Leaderboard


Popular Content
Showing content with the highest reputation on 01/08/2024 in all areas
-
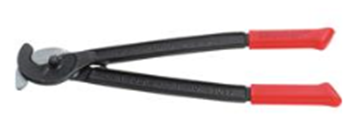
Propane is odorless. But, the odorant that is added to propane, mercaptan, settles in the bottom of propane tanks. When you get down to the last bit of fuel in a tank, the odorant is more concentrated, so you smell it much more readily when using a propane appliance. That could explain the strong odor you "washed" out. Like you, we have had similarly confusing readings from the gauge on our stock two-tank regulator. That is why we now have a Mopeka tank sensor installed on the bottom of each tank. They have proven reliable for us. $66.29 for the pair from Amazon. Tanks levels are reported to a smart phone via bluetooth. I also carry a handheld combustible gas detector in our Hull #1291. The one pictured below, $27 right now from Amazon, has worked well for me. It is very sensitive. The siren sound it emits grows louder the closer you place it to a combustible gas leak. Should one of our noses detect the odor of mercaptan, I can quickly isolate the leak and address it. The great majority of leaks in RV propane lines occur at fittings, which loosen over time as you drive down the road. Often, all that is needed is to tighten a fitting. Not only is it worth the peace of mind, but even if only used once, it is less expensive than a motel stay!
 6 points
 -
Be careful - "payback" could be tough.😇4 points
-
Oh, what a wondrous noise that Beech 18 makes! When I was a kid, Grimes Manufacturing in Urbana, Ohio, manufactured lighting for commercial and military aircraft. They had a 1953 Beech C-45H transport (the military version of the Beech 18) that they purchased in 1963 for aerial testing of their lighting systems as the Grimes Flying Lab. It would have strobes and lights all over it, looking like a UFO. According to their web page, it currently uses 75 lights. We'd see and hear it flying at county fairs, holiday events, etc. It still flies around Ohio's Indian Lake every Labor Day during the lake's "Ring of Lights" flare lighting event, with thousands of road flares around it. I love hearing it fly! https://n8640e.wixsite.com/grimesflyinglab
4 points
-
Took this photo south of Augusta Georgia of a Beechcraft 18. Camped at Hardridge Creek COE Campground on the Walter F George Lake in SE Alabama, we played golf on the Georgia side the lake.4 points
-
There are some learning curves with fabricating your own 4/0 cables. The below is the process that I have used successfully. Specialty Tools Used: If I needed to purchase tools for a 4/0 AWG cable efforts, I would spend the bucks for that Klein Standard Cable Cuter and a Hydraulic Crimper (shown above), or the one like John Davies suggested some time ago Amazon: TEMCO TH1818 Hydraulic Crimper Summit Performance: Klein Tools Standard Cable Cutter 63035 (16.25” long) 4/0 Cable Fabrication Procedure: I have found it very useful NOT to cut the copper bulk cable to length until AFTER you have completed the full lug insulation on one end. Failure to not do so will result in more cable wastage, and utterance of “Bad Words” as JD has mentioned occasionally. That said, one "trick" I stumbled on to help with getting all the copper stranded cable strands into the lugs is related to how I strip, cut and insert the cable to the lug. The amount of insulation to be removed varies by lug size and the length of the hole that your wire is inserted into. But for this description, let's say you want to have 3/4" of bare cable to insert into the copper lug. In this example I would: If the bulk cable does not have a perfect “clean cut”, then carefully cut it square with the cable cutter. Now mark the bulk cable with a paint marker ¼” from the end, and again at ¾” from the end. Use a tubing cutter (or a fancier insulation removing tool) circle cut the cable insulation (only) at the two marks. Only remove the ½” of insulation as you will be leaving that ¼” of insulation intact on the bulk cable. With the ½” section of insulation removed, now you want to loosen the ¼”" band of insulation by twisting the ¼” band of insulation on the bulk cable. Leave it in place to manage the strands of copper. Carefully done and you will have all the copper strands well managed by the ¼” band insulation on the end of the cut to length cable. Use a bench vice to hold your 4/0 lug. Since you have broken the bond of the ¼” band section of insulation, you can more easily insert the cable into the lug by pushing it into the lug as the ¼” of insulation retreats in front of the lug. As the ¼” band approaches the end of travel, remove it and you can finish insertion by twisting the cable into the lug as you push it. Only twist in one direction. Crimp the lug onto the cable. Now cut the cable to length and repeat the process on the other end. NOTE: Always purchase extra cable and lugs. There is a learning curve involved. GJ
4 points
-
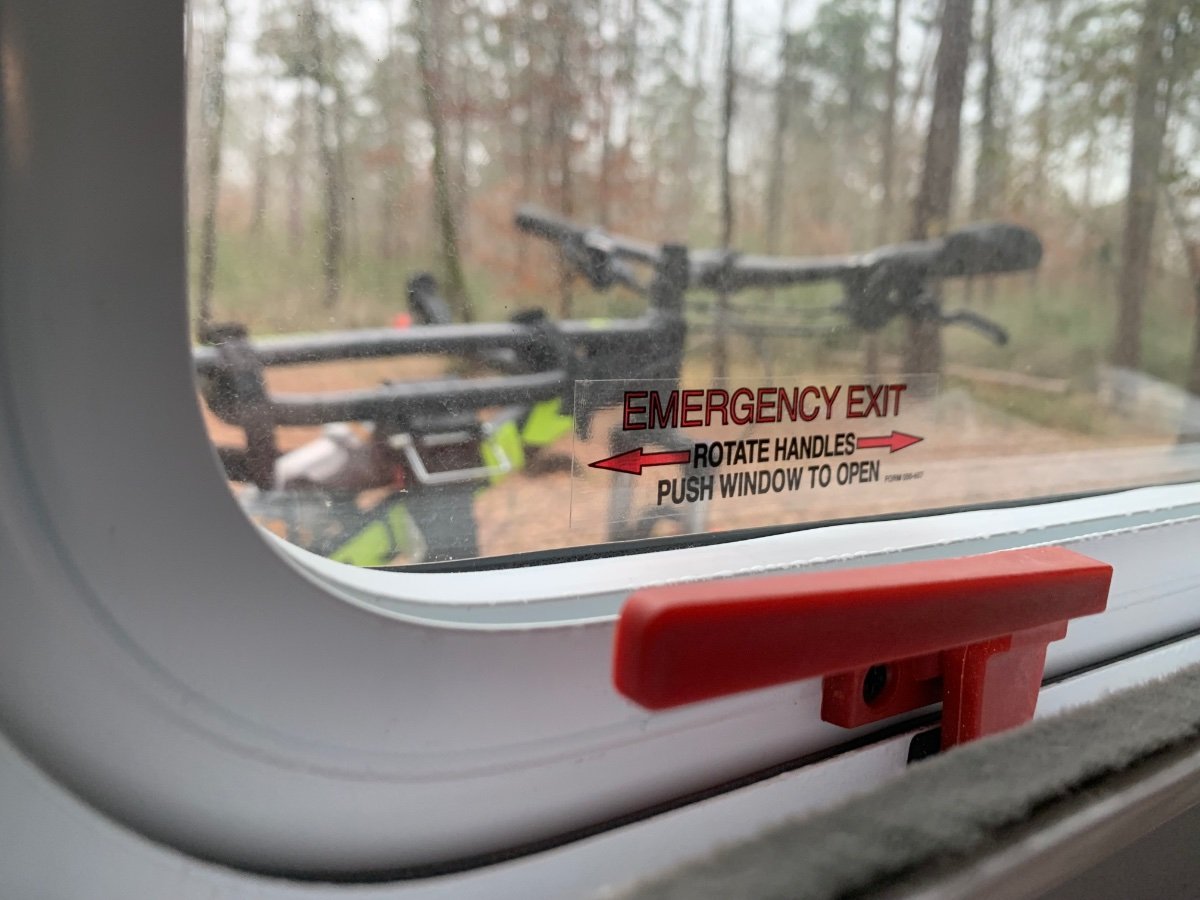
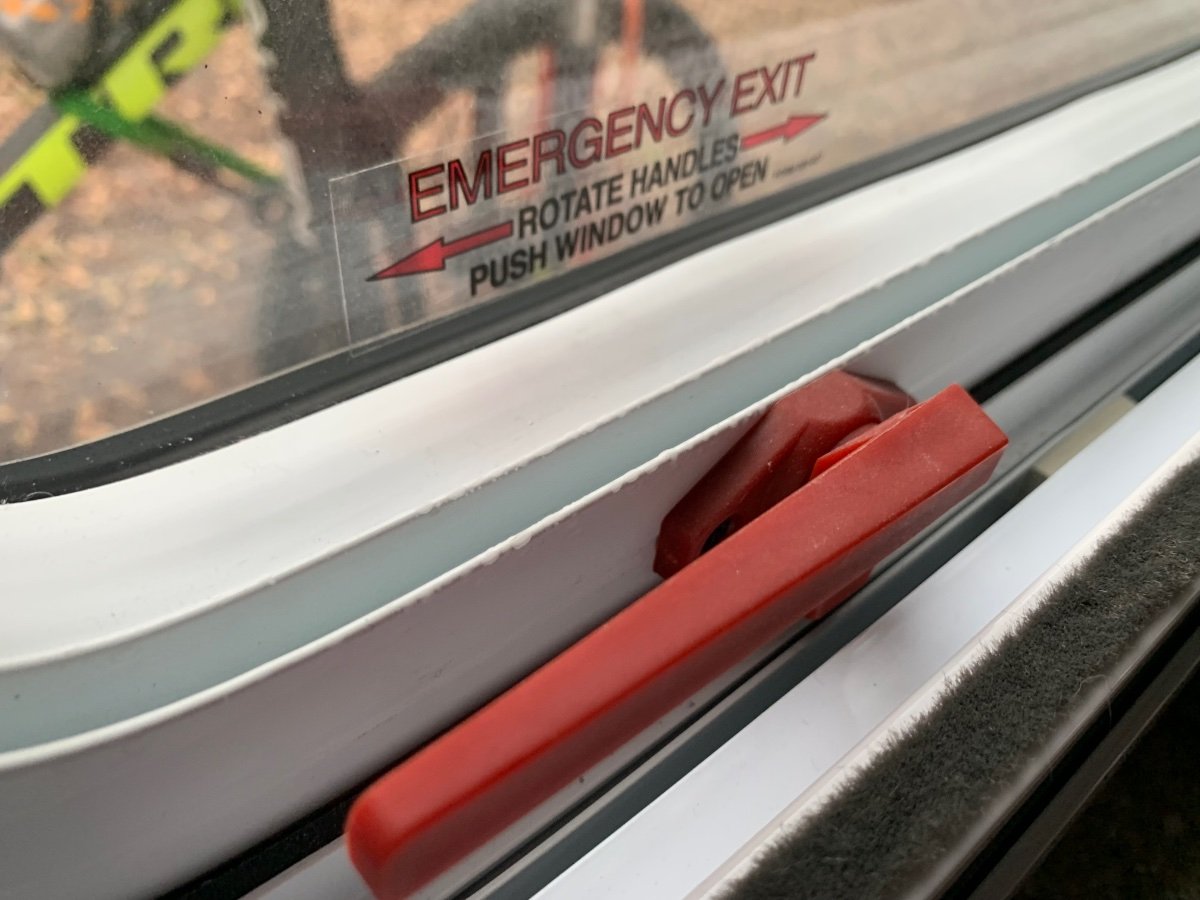
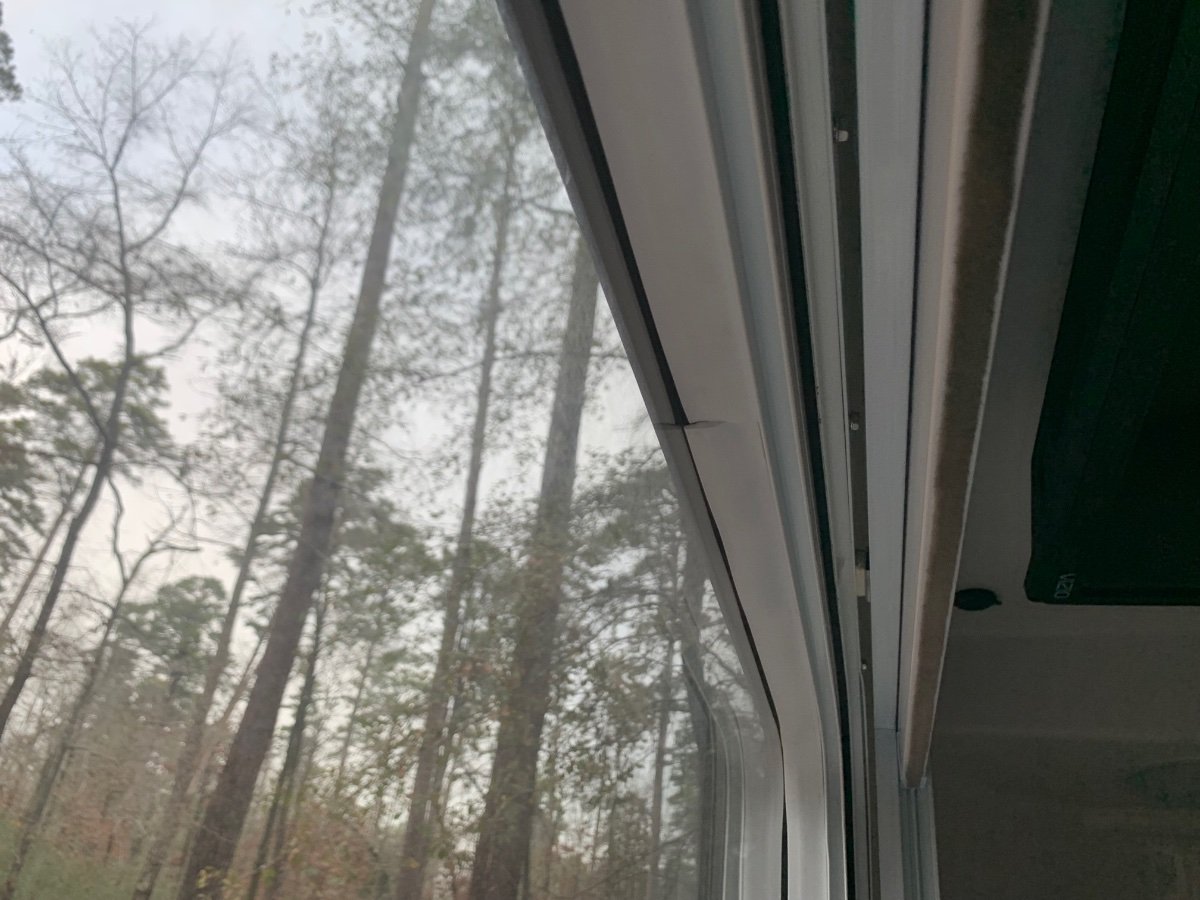
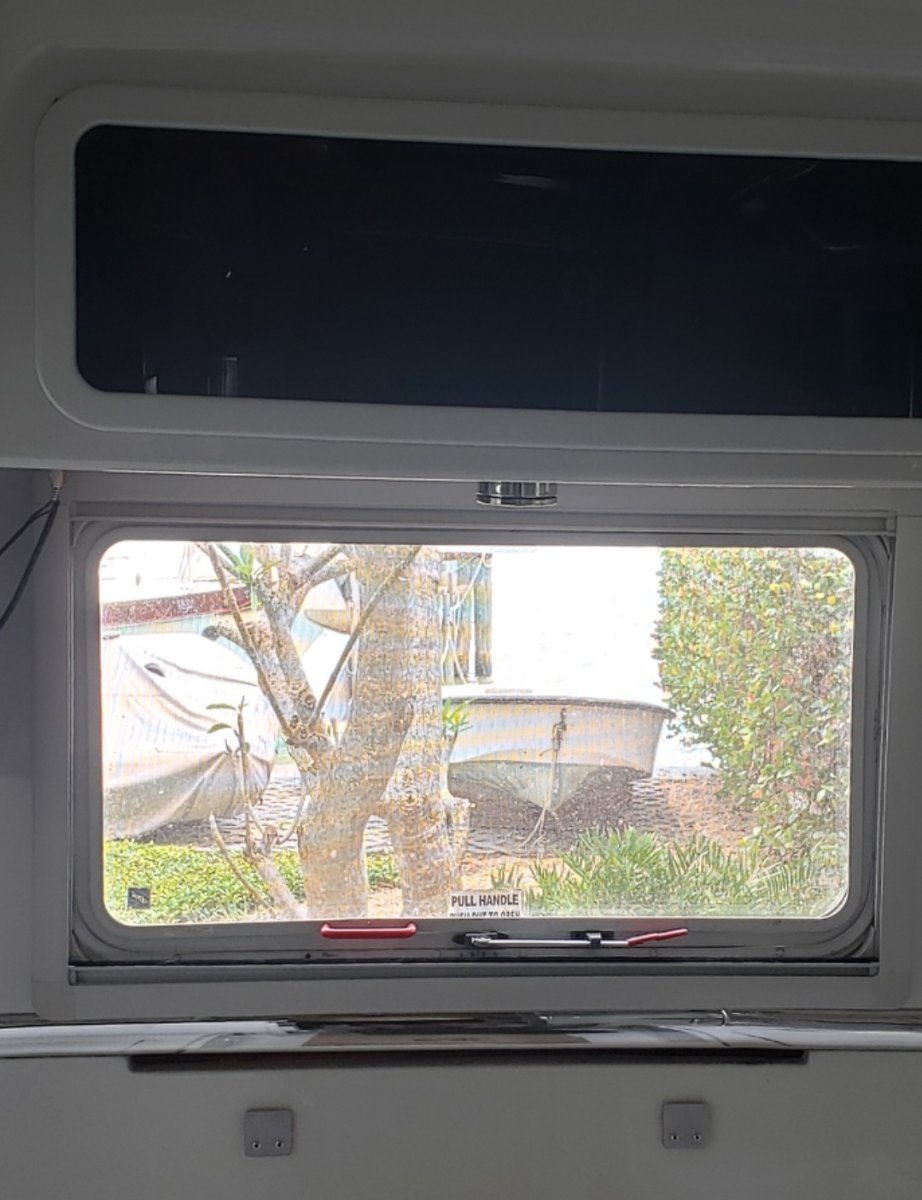
There was at least one owner that had a "problem" with the door lock which prevented them from being able to operate it. I believe that that was a problem with the "electronic lock" and not the door itself - but - that is at least one situation where this rear "emergency" window came in handy. Bill3 points
-
Cups must have been larger, we had good rounds of golf and it was not because of our golf skills. 🙂 We were looking for something a little warmer than temps at home during January. On our last day temps were 65F. Had a little rain, but mostly pleasant weather. Campsites 43, 44, and 45 were nice, we were on #45. Folks were fishing, bicycling, and boating there.3 points
-
Thought I would take my own advice and lube the vise. I found this crazy long bolt on the edge of our property a few years ago, must be a 15" long, likely from the telephone co. If this is hard enough it will become my new vise crank handle. I love when I can repurpose parts saved along the way! 🙂 See what a "cheater bar" on a 4/0 lug can do! Thanks @Geronimo John! I'd have that new cable on the Oliver today, if the heat shrink tubing was here and it wasn't snowing today! Oh but, it will be sunny and nice soon again in the high country of Arizona.
3 points
-
I agree fully. Personally I made that exact decision as I started out 20 years ago with a TEMCO Hammer Crimper. Still find it quite useful here in Hawaii on smaller stuff. But for use on our Trailer without a vice handy it was a no go for me. Especially I would have to borrow a vice. But I would never put a cheater bar on another's vice. So I went hydraulic. DYI Pro': I am very open to loaning out my hydraulic lug crimper during the summer. I know it was really handy this summer while visiting MaxBurner and beyond. If interested PM me. GJ3 points
-
For anyone this is or is anticipating making their own battery cables this is all VERY GOOD advice. Learn from John's previous experiences (I had to learn from my own mistakes thru the years). If you already have a $150 utility cable cutter, you're in good shape. If not, I have successfully used a band saw to make a nice, square cut in 4/0 cables. No band saw either, put on your thinking cap or get out your charge card. Remember, the goal is to get as smooth and square a cut as possible on the end of the cable. I use a small tubing cutter to remove the insulation also, but his method of leaving 1/4' on the cut end is brilliant and I guarantee you'll be hard pressed to come up with a better solution for getting all the strands into the lug prior to crimping. I bought a hydraulic crimper off eBay years ago. I paid about $35 for it. This is a tool I thought I would use a few times and then it would sit on a shelf in the shop for the rest of my life. Not so, I have used it dozens of times for various things. Need to make a pinched locking nut? A 10 ton press will flatten a nut if you're not careful. The fact that I have it makes it useful for many tasks that require a lot of pressure that are difficult to do other wise. I would not be willing to pay over $50. You won't find $150 worth of usage out of it, or will you? If you do, the $50 model will do it just as well. A bench vise is a very useful adjunct to this project. If you don't have one already, you now have an excuse to build a shop...so you'll have a place to mount that new bench vice.3 points
-
I have the EGO 2405 24" 2-stage snowblower with four 7.5Ah batteries (a pair to run and a pair on the charger). We have an odd-shaped gravel drive (lots of little notches and spurs) that I'd estimate at about 1700 square feet with a slight incline. I added ARMORskids to the EGO because of the gravel, so it leaves about a 1/2" of snow behind. First snowfall was 5" of heavy wet snow with temps right around freezing. I cleared the entire drive in about 1 hour on the first pair of batteries. The 10% charge light was flashing when I finished. I did not suck up any gravel or break any windows 😅. The only thing I didn't do was the plow pile at the end of the driveway. I'm sure the EGO could have done it, but a neighbor with a plow truck got that for me. The snow blower is quiet and there's no gas engine to dither with, which I like. It's pretty light, which is both a plus and minus. Makes it easy enough to maneuver around, but it did have trouble biting into hard pack snow because it wants to ride up on top of it. It throws snow really well. I kept the auger speed low to save battery and it still threw as far as I needed. You can run it one-handed (left) and use your right hand to adjust the chute on the fly. They make a fancier one with heated handles and power turning, which I'm envious of, but it was $350 more and I figured the heaters would eat more battery. So far, one storm in, I'm pleased with it. UPDATE: 2ND PASS: Another 2" of snow fell. This time I used a more efficient pattern and moved a little faster. Finished the whole drive in 30 minutes, using 3/5 of the battery power. Nice machine.
3 points
-
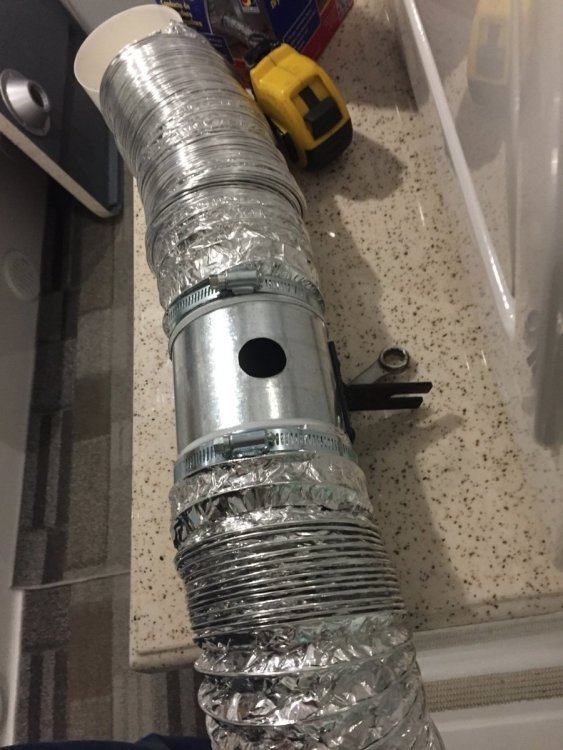
Recently purchased a Victron SmartShunt and I did not want to do a fancy install, perhaps later once upon a Lithium upgrade, but for now the shunt will be physically close as possible to the negative battery terminal. They don't sell shorty 4/0 AWG cables, as far as I can tell, and if you need a bunch of different sized cables, you can cut lengths to your needs and save money buying bulk cable and battery terminals (lugs). I installed the shunt last week to check it out, grounding it with two shorty 4AWG cables in parallel, because I had them on hand. Twas fine for the testing, but the cross-sectional area of the two 4AWG cables s is about 60% of one 4/0. Amperage capacity is directly related to the quality of the conductor (less resistance) and its cross-sectional area (more capacity). Cutting 4/0 cable is not easy. When I install an 1800W inverter 3 years ago, I used 2/0 and was able to cut that with the cutters shown. This tool is a bit dull and beat up because of that, and no way it was going through the 4/0. I put the cable on the vise and used the metal hand saw. Saw just touching the vise so that the cable stays put. A new fine steel blade would be best, fine since this is only copper. Today I crimped the shortest cable that I've ever made, only 5" long, hole to hole. The other thing is I customized it by turning the lug on one side 180 to the other side. This allows for a 1" height gain necessary to mount on the taller shunt (picture mounted later). I used Selterm brand tinned copper lugs, that are so big that the insulated wire between the lugs is only 1 1/4" long. It is extremely difficult to get all the copper strands into the lug, due to the sawed edges. Hammer the ends as round as you can before you strip the insulation, and then just strip a little at a time. I purchased TEMCo pure copper 4/0 welding lead "Made in the USA." The crimper tool is their brand too, that I had from last time. Some guys hammer this kind on crimper. But I prefer again using the vise. This is a tug! You'll need a strong extension bar to get the full crimp. The TEMCo HD crimp tool works great btw. I ordered heat shrink tubing which came in the wrong size, so later on that. Cool thing is 3" of heat shrink will go lug to lug on a cable this short, will show that later.
2 points
-
You are correct. I went back and found the post. It was a cheap gauge to measure propane in the tank, "Not the GasStop.". As soon as he removed it and reconnected the line, the furnace fired right up2 points
-
YES, we're thinkin' along the same lines! Since ours is a slider, the view is not as nice as yours. I removed our half screen for a better view, and it will sit in the back of the Oliver trunk, just in case my wife asks one day to open that window!2 points
-
The Partner is a great unit. Expensive though. With your aluminum table you'll likely not scorch it's surface. Growing up, my family tent camped A LOT. When I got some cash for my 11th and 12th birthdays I bought a Coleman stove and lantern. They are now pushing 60 years old and still work very well. Now just finding white gas is a problem and the Coleman fuel is insanely expensive. Sadly the LED lanterns made the ole style lanterns a safety hazard from many perspectives. GJ
2 points
-
2 points
-
I just looked at the Brightway website and it's not easy to navigate. I would call their customer service and ask them to send you the spec sheet for your specific battery model. All battery manufacturers have specs sheets with suggested charger configuration. On a side note, why two (2) DC-to-DC chargers? Wanting a higher charge rate? Make sure your TV alternator can handle the load of two chargers, let alone one. That's a lot of money @taylor.coyote! I see parts & labor come to $2000, so $4000 - Yikes! The parts add up to less than $600 total (100 FT 2 AWG cable, one charger, battery terminals (lugs) and misc.). Add another $260 if you really need two chargers. The cable is $215 plus tax: TEMCo INDUSTRIAL WC0180-50' (25' Blk, 25' Red) 2 Gauge AWG Welding Lead & Car Battery Cable Copper Wire Black + RED | Made in USA - Amazon.com This link comes up as 25 FT of red and black each, but you need at least 40 FT each, I'd buy 50 FT red, 50 FT black 2AWG to be safe. With one charger perhaps 4AWG is good, but I would need to see more specs to make a proper cable gauge decision. When purchasing, make sure you get pure copper welding lead. TEMCo is good and if you find cheaper, it is likely not the right cable. You allow the RV Co to make purchasing decisions and you will get the cheapest product they can source. The chargers are $240 plus tax: Amazon.com: Victron Energy Orion-Tr Smart 12/12-Volt 30 amp 360-Watt DC-DC Charger Isolated (Bluetooth) : Automotive "RV shops" are supposed to be experts, but not always true. The wait is often long and they always overcharge. I would figure out your design (good examples to follow on this forum), purchase the components yourself. Then given you will not do the labor yourself, all you really need is a local mechanic. Lots of local "mobile mechanics" that would love to come on your property for this job at a reasonable price! Priced at $4000, with $1000 in parts and say a shop rate of $110/hour, leaves 27 hours in labor. This job is nowhere near 27 hours and keep in mind, they have profit in the parts and labor. If RV shop had standard flat-rate hours as in the automotive industry, this would be somewhere between 8-12 hours, less than half of the quoted $$$. @taylor.coyote, it's good the "cost slowed me down." I'd say, leave that RV shop and drive away as fast as you can! They're wanting $2000 off the top and another $2000 in parts and labor (with considerable profit already in parts & labor).2 points
-
Welcome and congrats from Hull #1045, Jolli Olli2 points
-
I believe we referred to the D-18 as a “Bug Smasher”. Aircraft from the days of real planes.2 points
-
We were fortunate to see a great pilot do an airshow with a Beech 18 a few years ago, with a serious smoke system. 🙂 A Lady that flew Beech 18 aircraft for years taught me how make taildragger landings in a Luscombe, still using her method today. 🙂2 points
-
So that’s what a snowblower looks like! (Native Texan)2 points
-
Bingo! With early detection of a fire the Element will likely suffice, but if a fire is more involved then another type of extinguisher would be required. I like the fact that the Element will not necessitate a HazMat cleanup following its’ use. I have firsthand knowledge of an incident wherein a fire extinguisher somehow accidentally discharged inside a vehicle and it had to salvaged due to the high expense of a cleanup.2 points
-
I'd question that remark due to the fact that the previous "slider" window had a screen that could be considered a hindrance to getting to the "red handles" that are also used to open that window for "emergency purposes". By the looks of it I'd be willing to bet that the manufacturer of that window makes a screen for it. And, with regards to any of these windows being "blocked" by a screen - I know what I'm doing if I really have to get out of that window! Bill2 points
-
It’s because of the greater distance from the rear axle of the RV or trailer to the rear bumper, compared to that same measurement on a car or pickup truck. That greater distance means the loaded bike rack experiences much larger movement up & down and side to side from bumps & potholes in the road, from going around corners, etc. That larger movement means much higher accelerations/forces acting on the hitch and rack. Some motorhomes have ridiculously long rear overhang distance.
2 points
-
It should be good once the ‘memory’ from being rolled up is lost as it warms up and flattens when completely relaxed. Could hasten the process by running the heater, but gonna let it sit a couple weeks first. I carried the dinette table out to the trailer and it stayed in place, even when mounting the table.2 points
-
Or a hospital visit.2 points
-
When we first got our OE2, I too ran out of propane, more than once honestly. Stupid mistake on my part. My problem was the auto change over valve and my inattention. Certainly there are not some nice monitoring systems, but they are not infallible for sure. My solution, which would not work well for a trailer not attended in extreme weather, but works for us, is to not use the auto change over valve (as suggested above). And to pull the tank out and leave it in the TV for ASAP refill. Although we are warm weather campers, I have insured that should we find ourselves in a situation where heating of our Ollie is essential, I have options that independently can do so: Use the furnace. Use shore power or generator to run our Houghton Heat Pump 3000W Inverter and lithium's to run the Heat Pump or other options. Use shore power or generator to fire off an old fashioned 1500 watt electrical induction heater Get into the TV and fire off it's heater Go to a hotel! And if dire, crack a window and MaxFan and heat with the stove top. (Dire emergency Only due to dangers of CO) I strongly encourage all owners to access their heat options. The more options, the better. GJ2 points
-
Here's a really good video, made by a firefighter, that tests and goes over proper use of multiple fire extinguisher types - including the Element: I don't think the Element is a replacement for a regular fire extinguisher, but it's another tool in your arsenal - like the First Alert spray we have under our bed rails - that might be helpful because of its proximity when you need it.2 points
-
We now carry both traditional and Element fire extinguishers. What I like about the Element is the long burn time, and the small size that makes it handy to store (and grab) in the cab of the TV. Prior to buying, I spoke with my daughter who recently retired as a Fire Marshal from a large Oregon fire district. She keeps them in her vehicles.2 points
-
Using a hand saw to cut the cable worked for building one, got me through the day. Just put this one on my wishlist! Klein Tools 63041 Standard Cable Cutter, 25-Inch - Wire Cutters - Amazon.com More pics --
2 points
-
It may also be time to replace your lp monitor. You have a 2019. Logic tells us if you smell the rotten egg smell of propane, even if the sensor doesn't go on, turn off propane, and find the cause.2 points
-
That's because you paid the "big bucks"😁. To add a bit of fuel to the fire - I'm also aware of a Ford recall on the late model F-150's for problems with the emergency brakes! Apparently this recall is to fix emergency brakes that will "automatically" come on while simply driving down the road! Imagine the looks we Ford owners are going to get when we start simply chocking our truck wheels even without the Ollie in tow? OK all you GM, Chevy and Dodge owners out there - here is your chance to pile it on. But, be forewarned - payback is tough! Bill p.s. I specifically excluded the Tundra owners from the above because it is "common knowledge" that Toyota's never have any "issues" 😇2 points
-
like you actually had/have a propane leak somewhere between the tank and the furnace? Tomorrow when the system is pressure tested you should know the answer to this question. How cold was it when the problem first came to light? yes as long as you had the regulator on either "automatic" or pointed towards the tank that was 1/3 full. There are circumstance's when this statement is not true but for the most part, those circumstances are rare. probably, but unless there is a reason to suspect that your current regulator and/or gauges are faulty - why change them? It would be helpful if you filled out your "signature" line such that members of the Forum had a better idea about the age of your Ollie and, therefore, be in a position to give you better advice. You also might want to review the "proper" way to "open" your propane tanks. Also, yes, there are gauges that will reasonably show you the level of propane left in a tank (look up Mopeka). Bill2 points
-
I got some photos of the rear window. It is double paned. Looks like the track where a screen could go here: But it is blocked by the handles. The removal of the screen is obviously a safety feature providing access to the big red handles.
2 points
-
Replacing xantrax on my Oliver Elite II 2021. Can't beat power assist on Victron components (Uses battery to meet power requirements when specificed amount of current is set) I have had Victron Multiplus in my old camper and I am crying for the first time , I hate drilling into this beautiful Elite but can't get wires from upper cabinet to lower components without drilling. Going to install Victron MPPT - 100 /30 for outside solar panels 400 watts of ground deployed solar panels Victron Orion 12 volt to 12 Volt charger for vehicle charging and for a Pecron 500 amp hour battery I have under the bed. Victron Smartshunt for monitoring batteries Victron Cerbo GX for the brains of the operation all components plug into and are monitored by this device. Victron small touch screen Built wood support for Multiplus much heavier than xantrax probably double. (I did not lift or look at weights but had a friend put in place) (6 back surgeries lifting days are over) Here are some pictures Had one heck of time getting hole centered perfect to drill. Went as far as I could in corner of cabinet . . . . . .Little scary but turned out ok. Going to work on Battery box holes at same time and maybe add ventilation for batteries at same time. Thanks to everyone for posting information on ventilation Take care Montana Oliver
1 point
-
Fwiw,,we use a soft car wash brush with a telescoping handle. And, the trusty two step Rubbermaid ladder. i don't know if it will reach your awning, or not.1 point
-
In @Jason Foster's photos above, what appears to be a screen track means the screen would have to be removed to operate the handles, and reinstalled after opening window. I'd sure like to know what type of window this is. The opening handle is very different from our older first gen elite windows, and appears to be in a different position.
1 point
-
How so? What was the difference between your previous awnings and the one you have now that makes the previous ones so much easier to clean? Bill1 point
-
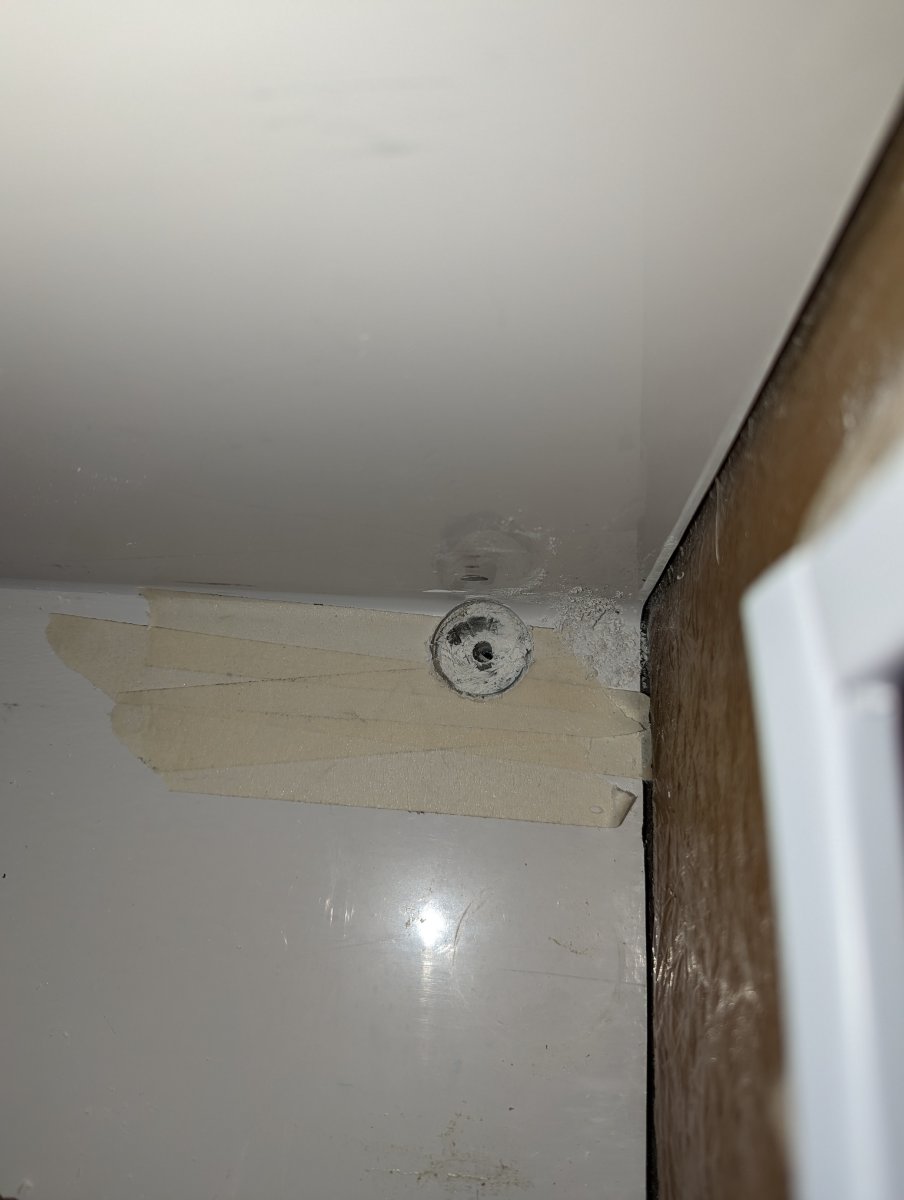
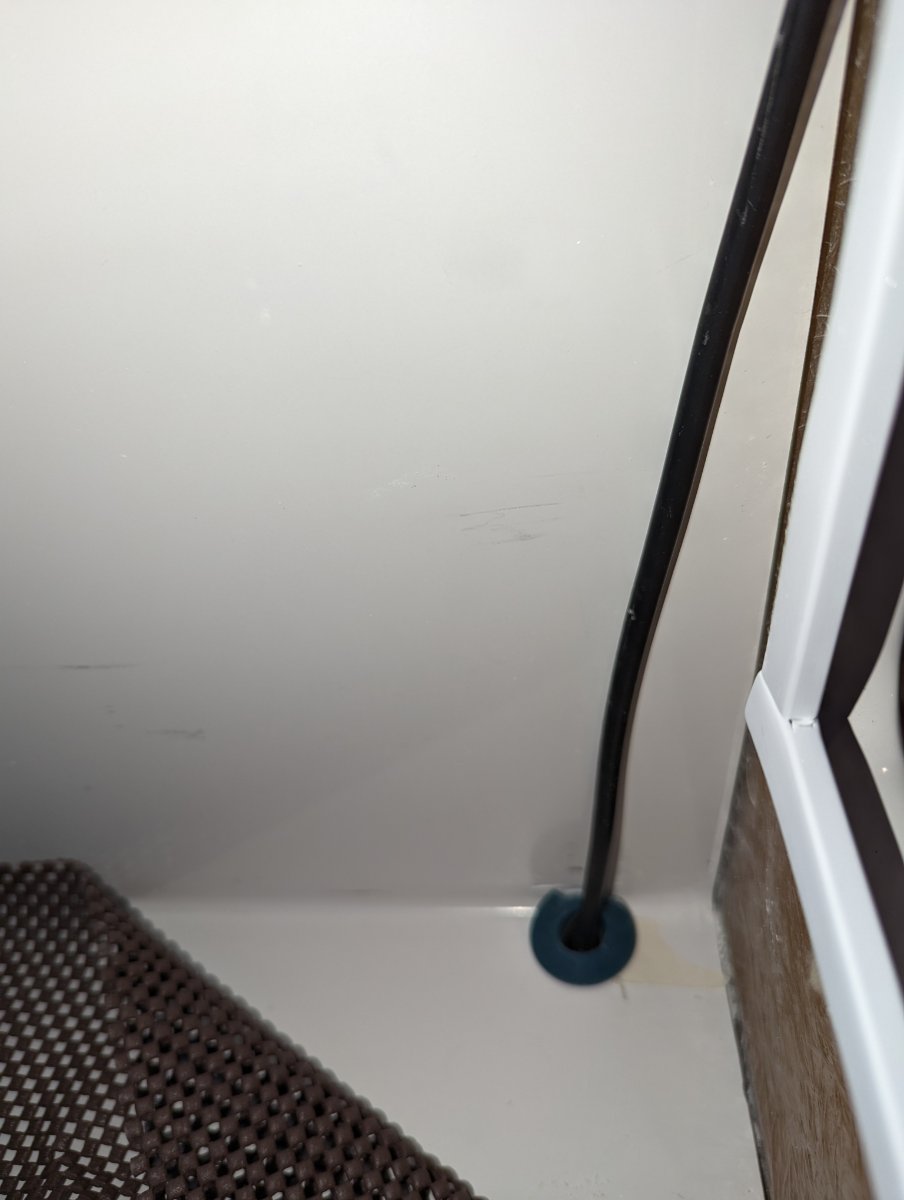
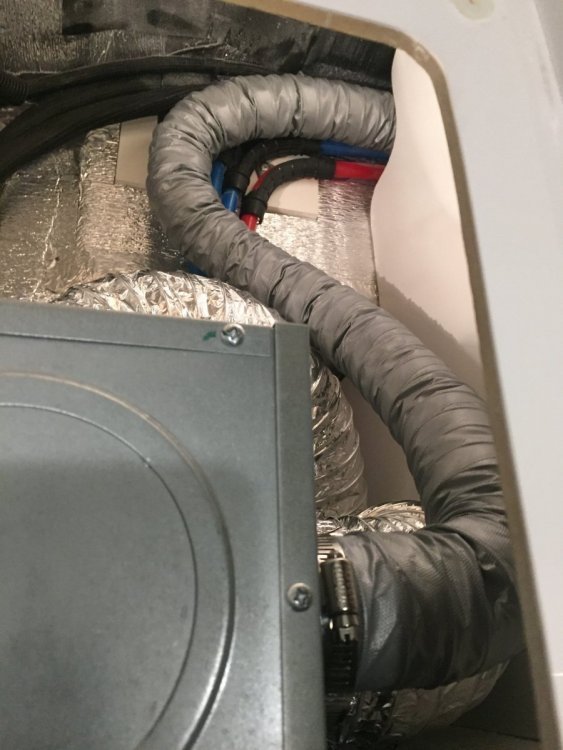
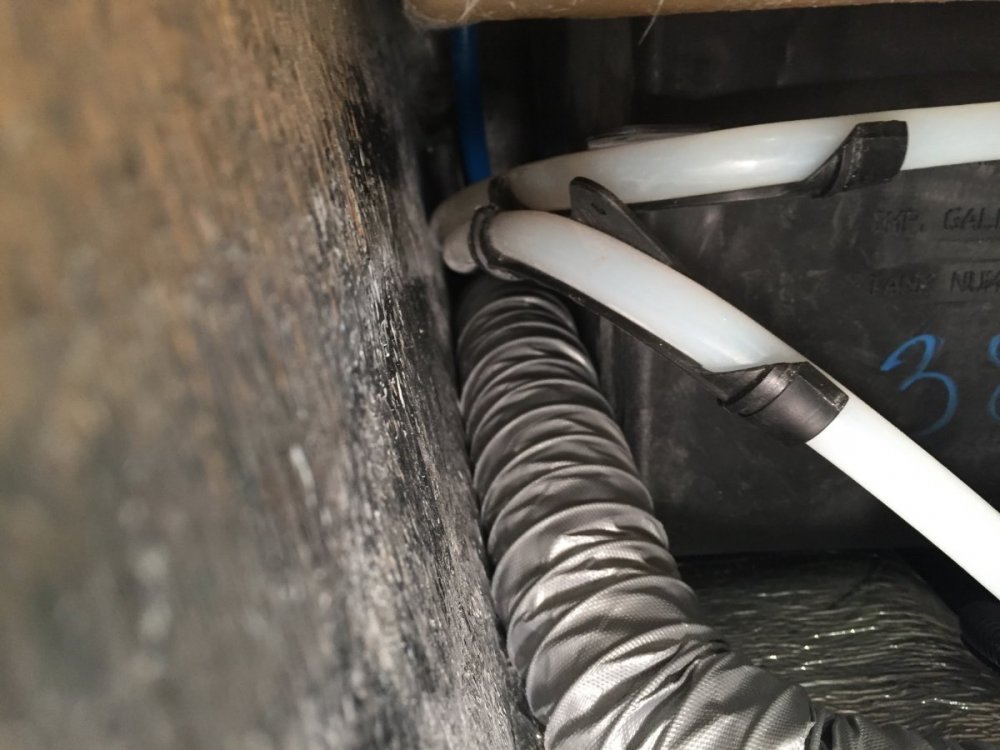
Being that Olivers are ‘four season’ RVs, guess the thought was that tank heaters weren’t really necessary! However, some owners ‘beg to differ’ and addressed their concerns to enhance heat in the hatch areas by various means; more-so to protect waterlines, but the tanks would benefit, as well. The most innovative approach I’ve seen was modification of the existing ducting, whereby holes and/or duct diversions are strategically placed to direct furnace heat, as necessary, to more vulnerable areas. Here are a few pics ‘borrowed’ from a forum post, full credit to that individual. Do a forum ‘Search’ on the matter.
1 point
-
As GJ points out above - there are a number of things that can cause "issues" with propane - and - these issues tend to be more prevalent when the temperatures are low - and - the lower the temps go the even more prevalent things become. This is at least one of the reasons that it is a good thing to teach yourself about EXACTLY how your propane system works. Not only follow GJ's advice above but also learn the proper procedure for exactly how to open the valves on your tank(s). "Sniff" a small bit of propane at least once a year or so such that the distinctive smell gets burned into your brain - I would say refreshed but somehow that just doesn't seem right. Propane, methane, some smells from your grey and/or black tank can all smell similar, but, they are certainly different. And, by all means, don't take any of this lightly (no pun intended). If you even think that you smell propane DO NOT even turn a light on or off. I don't mean to scare anyone but knowledge is a good thing in most cases. Bill p.s. Please let us know what the results of your pressure test are come Monday.1 point
-
Yes - look at the bottom of my post above and you will see information about my tow vehicle and my Oliver listed. You can put this same information in all your posts by left clicking your mouse on your Avatar. Then left click on "Account Settings". Then scroll down a little bit until you see "Signature" on the left side of your screen. Then left click on Signature. When the new window pops up you can fill out any detail (such as you see at the bottom of my posts) regarding your tow vehicle and Ollie. If you have problems - just PM me. Bill1 point
-
Thanks - it was in the 40's at night. The question about the regulator is that it showed that the tank was empty when it wasn't. Right now the regulator shows that full tank is only partially full and it looks about as full as the partially full tank even though that tank is a lot lighter. Thanks for the Mopeka idea. I put the information (year of trailer, type) in my profile...Is there another place it should be?1 point
-
Yep - that 'splains" it.😇1 point
-
1 point
-
On point Mike! Our Q1200 weber will hickory smoke and grill up baby back ribs, tenderloin steaks, chicken wings, lamb chops, trout, blackened shrimp. Just not a griddle guy here, except if we stop at a Waffle House. 😄1 point
-
So far I've made it my practice to test the plug prior to connecting the camper and rely on the onboard progressive unit to do it's job. I can see the interest some have in protecting the hard wired device, and have purchased a portable device but just haven't put it to use. I purchased a Progressive Industries circuit tester before getting the Oliver. I leave it in the same tote that I store the shore power cord in. Step one - Test the power supply. Step two - If good, drag out the cord and connect. Circuit Tester
1 point
-
Contact Service and I'm guessing that they will ship you some new caps. Then, when you install these simply put something like E6000 or any similar product on the backs of the caps and that will keep them from "falling off". Bill1 point
-
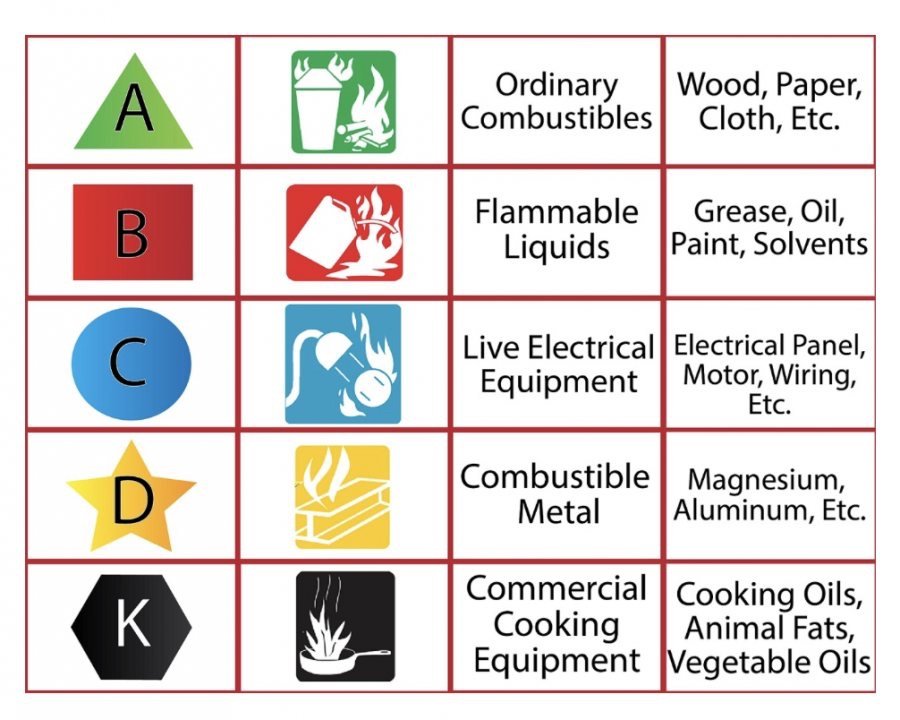
They are also certified for A, B, C, and K class fires.
1 point
-
Thanks for the Map, site info, and pics you were willing to share on this adventure. It sure looks like you had a wonderful trip. I am counting the days until we get to take a trip north.1 point
-
So... here we are in Wilcox, AZ wine country attempting to avoid sub-freezing temps in Northern NM. It's 75F here without a hint of wind. Harvest Hosting for a couple nights at Pillsbury Winery near the Chiricahua Mountains and Dos Cabezas Peak. OBTW: the new install of the Victron DC-DC charger is pretty awesome... Above pic shows the proximity to the Vinyard at Sam Pillsbury's ranch. Tough duty, but someone has to do it. Cheers to all... stay safe!
1 point


-
Recent Achievements
-


")


