Leaderboard


Popular Content
Showing content with the highest reputation on 02/15/2024 in all areas
-
I built this gadget to lift the 75 pound wheel and tire on and off the trailer. I couldn’t come close to putting a mounted tire onto the hub. With this thing, even Tali can take them off and remount them. I built it for under $50.
 6 points
 -
The Truma has a small plastic water tank that circulates the heated water. When winterizing, you have to shut the water supply valve to the water heater off. This is located under the street side bed. On the outside, there is a big yellow lever you have to pull down on the Truma after releasing the pressure. You drop it down as far as it will go and then remove the filter. There is a convenient sized hole to the right of the water heater to put that in. The water will then drain out completely. If, however, you don't do that and it freezes, the tank will crack. That is what you are seeing in the video. As far as I know, only a Truma authorized dealer can fix that for you.3 points
-
We have been using the "second jug" method and it's worked out pretty well for us.3 points
-
Please report what is ultimately done to repair your Truma water heater, by whom, and what it cost. That will be good intel for others (like me) who own Truma water heaters. Good luck!2 points
-
OUCH! I know that we all learn from our mistakes - but - this could be a fairly expensive mistake. Sorry to hear it.😭 Bill2 points
-
If your trailer will be exposed to freezing temperatures while in storage it's very important to do the full winterization procedure. It's not just the Trauma that can freeze and crack. Water lines and plastic fittings throughout the trailer are susceptible to cracking or splitting because of water expansion when it freezes. After bypassing the Truma (or getting it repaired) reconnect to city water (with a pressure regulator on your hose) and check for other water leaks. Look underneath the trailer and see if you have water coming out of any the scupper (drain) holes on the bottom of the trailer. Another way to check for leaks is to disconnect city water, fill your fresh water tank, and turn the water pump on. If the pump runs for more then a few seconds, with no faucets open, you are losing pressure somewhere. Good luck.2 points
-
Changing the sink connection to the black tank, if using the tank for just urine, makes a lot of sense. Many rv bath sinks drain to the black tank. The Swedish separett toilet has a line that can be dedicated to a tank or drain field. I'm kind of surprised that natures head, and airhead haven't already marketed a connection, as most rv toilets are mounted right above the black tank.2 points
-
If mounting heavier (I.E. Inverters, converters, DC-DC Charging) equipment to vertical surfaces several owners have found that just epoxy, JB Weld or other such products over time fail. For this reason, I use and suggest also adding SS Fender washers and small bolts thru the vertical Ollie surface, the mounting board and the mounting holes of the electrical gear. For our 3,000 watt Renogy Inverter, I used stainless steel four sets of 3/16" bolts, fender washers and nylock nuts. For my grins I also used JB Weld between the vertical hull surface and the cutting board mounts. No worries on our 15,000 mile Alaska trip and over many Rocky Mountain fire roads., Geronimo2 points
-
The Natures head sits right on the black tank so the mod should be pretty straight forward. I could see making this change down the road. At the same time, emptying the urine jug in the local toilet is about as easy as it gets. I have considered getting a second jug and cap for those occasions where emptying isn't immediately possible.2 points
-
Several have modified the toilet to drain the liquids into the black tank. The folks that showed us their trailer before we ordered ours had just completed the job that day. I remember that one member here had changed the bathroom sink to drain into the black tank, as well, to avoid urine crystallization problems. Plus, that saves some of the gray tank space. If/when we switch to an AirHead toilet, those are the modifications I plan to make.2 points
-
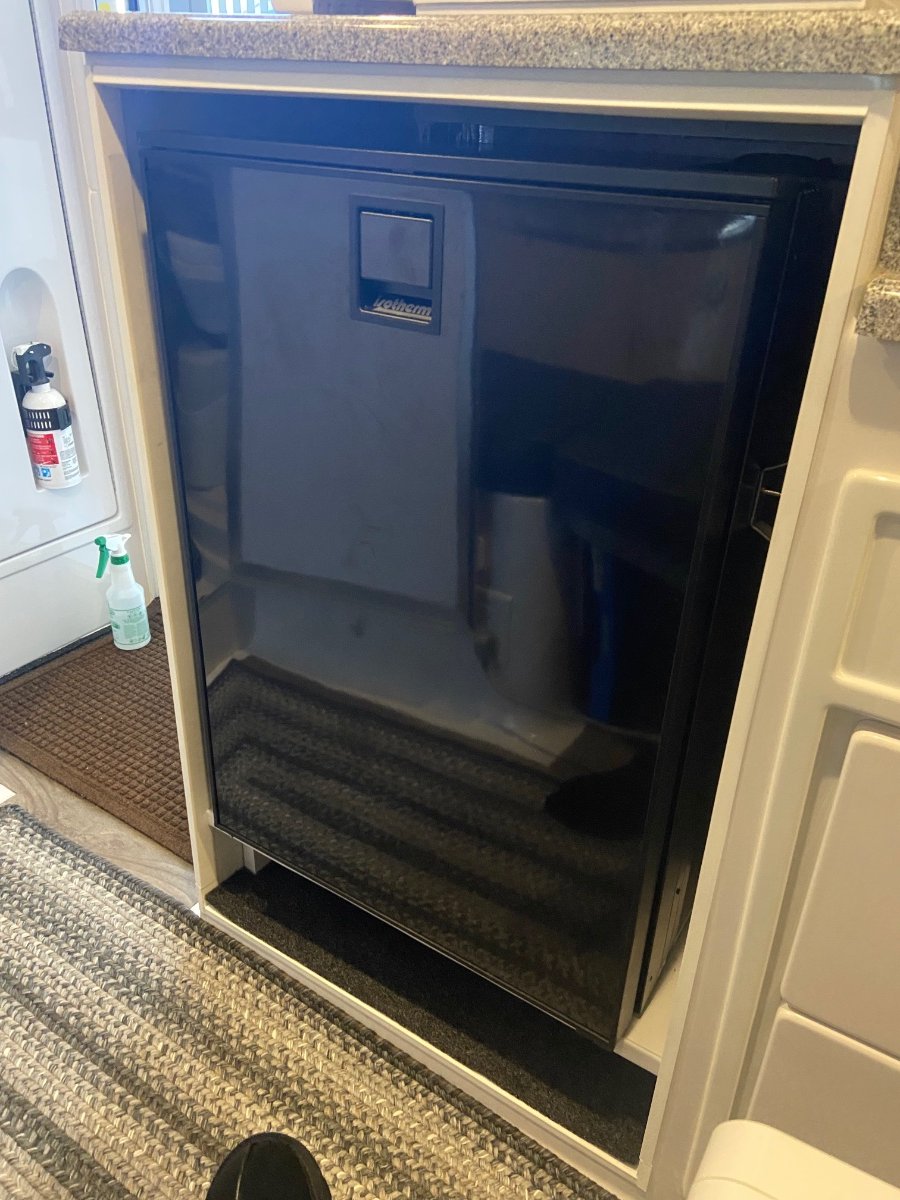
I have recently completed the conversion with the Isotherm that Oliver uses. Not too bad, hardest part was disassembling Norcold 4.1 and then reassembling it after removal from my smaller Oliver Elite. Had to remove refrigerator door and cooling unit in order to fit through the Oliver door. The Isotherm Cruise 130 fits through narrow passageway after removing its door. BTW, The Norcold works fine after reassembly and currently trying to sell.
2 points
-
Scott Oliver was at the Boston show, along with the locale dealer, Tim of Tim's RV. It was a great show and finding parking in Boston was not bad. Only had to park one short block away from the center. Tim will be at the Springfield RV show, but I do not know who else.
1 point
-
I'm not really sure that is a good thing. GJ1 point
-
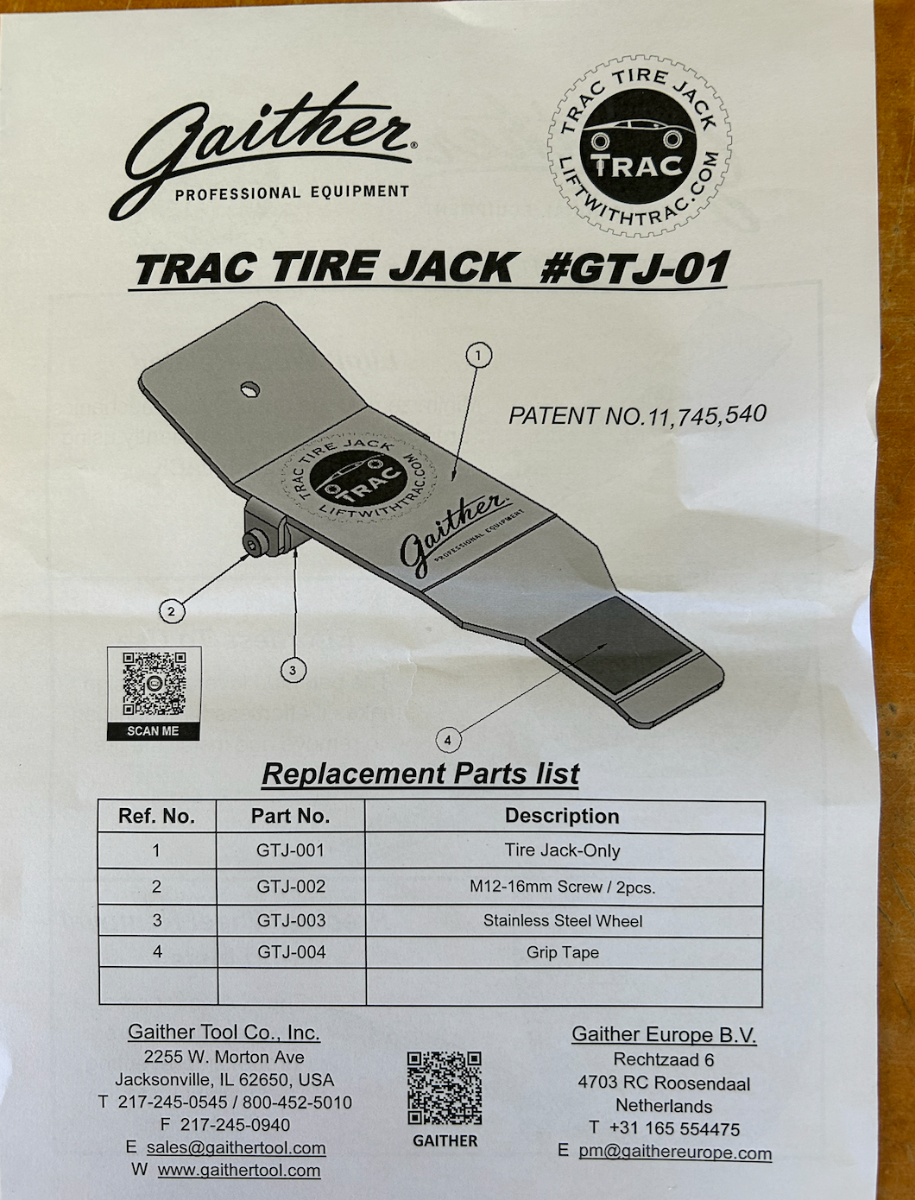
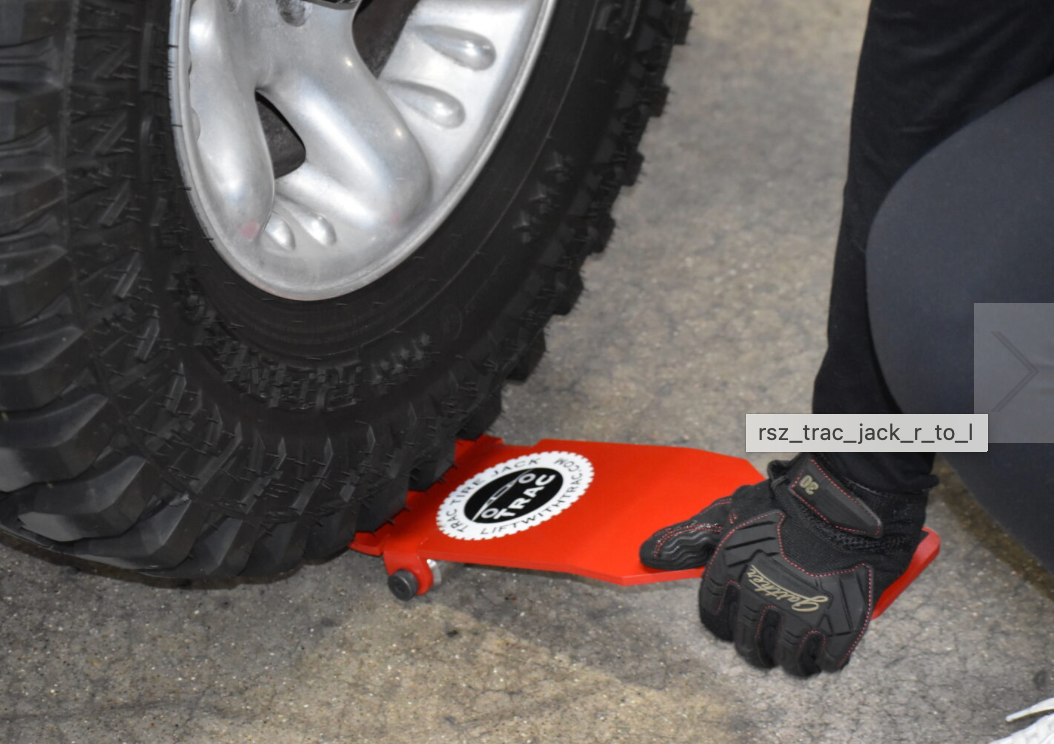
So, it's moving into wheel bearing examination season and my low back is already starting to scream at me. Those 16" wheel/tire assemblies are, by no stretch, an "easy lift" while trying to align the lugs with the wheel - haven't weighed them, but they feel like 50 - 60-something pounds. A real back strainer, for sure and for certain. Found this Gaither "Trac Tire Jack" somewhere on YouTube. The vid sold me on it immediately and ours arrived yesterday. Haven't tried it out yet, but by initial evaluation, it's going to make the wheel bearing drill a lot more fun than it already is. The unit is well made from solid steel, powder coated bright red, and the only moving part is the roller. This will certainly be a go-to tool in our shop... Check it out at: https://gaithertool.com/products/new-products/trac-tire-jack/ Cheers!
1 point
-
All really cool ideas! Love them all. Having such helpers when in the shop is wonderful for sure. But for on the road, or in the absence of a shop as in my case, weight is the enemy. As such, I must take a minimalist approach. And I am in the camp of using tools I already have. That said, at my vintage, I am well beyond tossing around our great E-Rated tires. But I always can find a helper capable of raising or lowering a rear jack from the trailer tongue. (NOTE: My 6,000 pound anchor rule is in play.) Taking Tires Off: Breaker Bar the lugs on one side of the trailer. Place safety jack stands under the frame ahead of and behind the two tires. Have helper raise that side jack until the first tire is not holding weight and adjust safety jack stand as needed. 20V Dewalt impact off the nuts. Repeat for second tire that side. Adjust jack stands and lower trailer onto them to take the weight. At this point the OEM rear jack becomes the safety jack stand for the two loaded one. Putting Tires On: Place tires near their axles. Raise rear jack and adjust safety jacks to allow lowering of the frame. Put tire onto the spindle and install lug nuts. Slightly tighten. Repeat with second tire. Have helper raise the trailer, remove Jack stands, lower wheel to allow for full tightening of lug nuts to 80 ft-pounds, lower axles to take full load and re-torque to 100 Ft-Pounds. done. Bottom line why are we even trying to lift the tire up onto the spindle when we can lower the spindle down to the tire using the electric jacks? Sort of an old biblical story in that one..... GJ1 point
-
I hope this new owner mistake is not a costly one for you. This is a good example of the my concern with the increasing complexity of our trailers over the years. The Suburban hot water heater has a shut off valve and an anode at the bottom of the tank. To winterize just turn the valve off and remove the anode when the water is not hot. Done. Can't say the same for the Truma system. As you now painfully know. As an ole brown shoe Mechanical Engineer, I prefer not to have combo systems due to complexity. Granted the integrated Inverter/Converters are super nice, cool and somewhat space efficient. They are also by far more energy efficient than the 2018 version we have. That said, they are also single point failure systems of great complexity. Should we lose one of the features (Inversion/Conversion/Solar/120 Shore Power/Battery Power/Solar Power, with independent systems we can survive just fine. But with a single point failure, you CAN HAVE no refrigeration, lighting, heat or AC. Then when there is a failure, trouble shooting the computer systems in the field can be a real PITA too. So there is something to be said for simplicity of systems. In the mean time, it is wise for all of us to occasionally revisit the Oliver University Videos. All of them. GJ1 point
-
In the immortal words of Artie Johnson, "Very interesting". Bill1 point
-
Wow! Ingenious design. Wish I could buy one to ease winter tire changes.1 point
-
UPDATE: Well, after about 8 months and 5,800+ miles of testing the Lippert hinges in various windy conditions - they all but make the outside "door hook/latch" obsolete. We no longer use it to prop the door open anymore, FYI. As @Patriot might opine... a "sano mod"! HA! Cheers, All!1 point
-
Now there’s a thought, I have a piece of plate metal begging to be put to good use! Last welding task was a roller skid plate for the front TV bumper mount to protect the QuikrStuff bike rack and secure our ebikes; pic of roller mockup during fabrication.
1 point
-
When we pickup up Oliver in 2023, they made a big deal about draining the hot water heater and leaving the water filter out while the trailer was winterized. They stressed that even if the water heater was drained, there could still be enough water in the system to freeze and crack the filter housing if the filter was left in place. May be time to turn bypass valve on the heater pending a more professional opinion than mine. Good luck and sorry about a tough start to your trip.1 point
-
Thanks for showing this mod and recently bringing up this old post. Just got a Amazon used "Like New" set for under $15 with tax! Awesome and thanks again.1 point
-
Amazon took a while to deliver these, and they came while we were away. These are the correct parts. I bought a set for spare parts. For only $12 for two pair, good to have on hand: Side to Side Adjustable Locking Device for 563/569 Series Blum Tandem Drawer Slide - 2 Pair (4 Pieces) with Installation Screws - Amazon.com1 point
-
Interesting other 'Former Airstream Owners' that found the Oliver Elites as excellent choices. Both are heavy travel trailers and ride firmly 'attached to the road' and very stable owing in all kinds of conditions. I was going to sell our 27/28 foot 2019 Airstream, after the first year testing out the 2019 Oliver Elite II. But just could not do it after making it a very reliable Off the Grid Airstream. 🙂 After 'tweaking' the 2019 Airstream with added hardware and improved the interior pop rivet issues with Lath Screws... it was solid. Interior cabinets had been attached to the walls with unreliable screws and few brackets. After improving the interior, I could not let it go after making the Airstream Off the Grid upgraded. Also upgraded to 16 inch wheels and Michelins. The Oliver... has much less to upgrade to be an 'Off the Grid' upgraded. Fewer screws to manage on hinges and hardware to secure cabinets. Less is best... Not much to go wrong as far as cabinets. Even the appliances have been cooperative. The Truma hot water system was not repairable after purchase and removed it. Probably going to find a simpler system and not concerned with 'instant hot water' when Boondocking. A folding table, a pot of hot water off the propane stove... and maybe jump into a river... makes you feel.... ahhhhh some. Yep. The plug to the electrical outlet of the Refrigerator had dropped out and found that once we put the Oliver on home power and did not work. Pulled the drawer out and saw the plug not plugged into the outlet. The Truma had three service receipts, two I have in my folder for repair and obviously was not replaced or repaired. My mistake not doing a 100% top to bottom inspection. You may want to remember this if you plan to buy a Travel Trailer out of Warranty. My only complaint. After owning three Airstreams, the third was easy to upgrade with better brackets and hardware from coming apart. On or Off the paved roads. Each Airstream was modified from the 2006 Airstream. The Oliver worked out so well for us, it is now our 'Special Purpose Boondocking Travel Trailer'. The manufacturing and marine hardware make the Oliver the #1 Choice for anyone who camps out and needs a reliable 'Home on Wheels'. The Airstream in comparison uses similar hardware that your home uses for hinges, and fabricated cabinets that are mounted inside with screws. The Oliver 'build' leaves little to vibrate loose, when being used, compared to the majority of other Travel Trailers. I would not hesitate to call the Oliver much easier to go from paved to unpaved camping locations. Fewer parts to come loose. I am a Geologist who is always 'looking for interesting' places to explore. Wife and Heelers enjoy the open spaces, mountains to wander among and come home satisfied with our choice of trailers and know which is best for the NEXT Adventure. 🙂 I also Tow on the Ball with the a 2016 F350 Diesel 4x4 without worry or sway. Same with the Airstream, towing on the ball without needing Weight Distribution or Sway Control. A smooth ride and never regret experimenting with towing options. The Airstream or Oliver Elite are easy to sell when the time arrives. We plan to keep both and am confident that the Oliver and Airstream will manage to provide everything we expected from a Travel Trailer while Boondocking.
1 point
-
Nice tool, though pricey (like everything else today)! I have a crowbar with a spade end I sometimes use this purpose. I also use a huge 6-ton floor jack and when it's time to remount, I lower the jack with the wheel in position and get it to the point the wheel only needs 1/4" lift to mount. Yes, save your back!1 point
-
Same here, it’s a slow recovery process, brother 😎👍🏼1 point
-
You'll want the graphics on before they do the ceramic coating, else it won't stick. Plus, the ceramic coating over the graphics helps protect them. If you let them know ahead of time what you're doing, I'd imagine they would polish the top front first to give you time to apply the graphics before coating.1 point
-
Full Disclosure: Actually noticed these "Antlers" as a nice mod on @Patriot's rig in a post where he described his new front storage box made by SeabiscuitMetalDesigns.com... After installing our DC/DC charger which requires a substantial 1/0 Anderson connection and cables, our front hitch area seemed to be getting "crowded." The Moose Antler addresses the mess of cables, chains, clips, hooks, etc... They actually look like antlers - and do a great job in getting your hitch kit off the ground and tucked neatly and tidy under the A-frame: Moose Antlers.mov The PITA was removing the 7-Pin plug and the DC/DC Anderson connection to route the cables through the holes in the lower area of the antlers. The rack is made of approx. 3/16" powder coated T6061 Aluminum - no moving parts. If interested, you'll need to head to Home Dumbo for a U-bolt to fit the rack onto the hitch strut, $4.65. Simple design and efficient - we're liking it! Cheers! Moose Antlers.mov
1 point
-
So after listening to all of his (guy in the video) points... and considering the "how" its done by thieves; it seems to me that the moment you take it out of that faraday pouch the signal can be picked up. If you are at the grocery store and they pick up your key fob RF signal as soon as you take it out and use it... then they already have you even if you then hide it back in the faraday pouch. Lock your truck up in the driveway at home and if they can do this from up to 300 feet away... then isn't this like closing the barn door AFTER the horse has already left? If this is really such a problem it seems that the manufacturers have some responsibility to resolve this? Insurance companies won't want to keep paying for some thing that as it turns out... wasn't really "locked" after all. Seems to me that the convenience of an always on key fob is the culprit.1 point
-
Those look like Altoid containers, I'm going to try using one of those first and if it doesn't work I'll go to one of the other suggested items. I looked up the pouch mentioned in the video and then looked up some of the other pouches Amazon has listed, After looking through the reviews on all the ones I checked there are multiple complaints that they either don't work or only block the RF for a few weeks or months then stop working which makes me a bit gun-shy to spring for the fancy pouch (I know the guy in the video said that after months his still worked, but even the one he recommended had the same complaints). The Altoid container on the other hand is simple enough and you get a free supply of Altoids and it's cheaper than the plain boxes offered on Amazon. I think I'll try a cinnamon container first, if that doesn't work then I'll try a peppermint one. a.1 point
-
Funny how we come full circle. Kids today can figure out (and, hack) anything electronic. Back in the day, it was just a few wires .. Thanks for the info. I have aluminum foil always in the trailer. Wrap it up. Simple Faraday cage, very cheap. Reusable.1 point
-
Yes, the 1" bulkhead fitting works fine for all 7 wires. You may need to stagger the connectors as you're pulling them through since they are wider than the cables but once they are through, they fit fine. (you can always practice with the fitting before you drill the hole! 🙂) The bulkhead fitting also has an advantage over just a pvc pipe as the flanges and nut, along with the included rubber gaskets, are easier to seal and actually helps anchor the junction box to the roof. I think getting the antenna base plane above the air conditioner is more important than horizontal separation. I fabricated my mount so the base of the antenna is just proud of the air conditioner and only adding a little bit to the overall height of the Oliver. Keeping the antenna wire lengths as short as possible also make a big difference on performance. Anyway, it sounds like you're on the right path with your installation. I hope all goes well!1 point
-
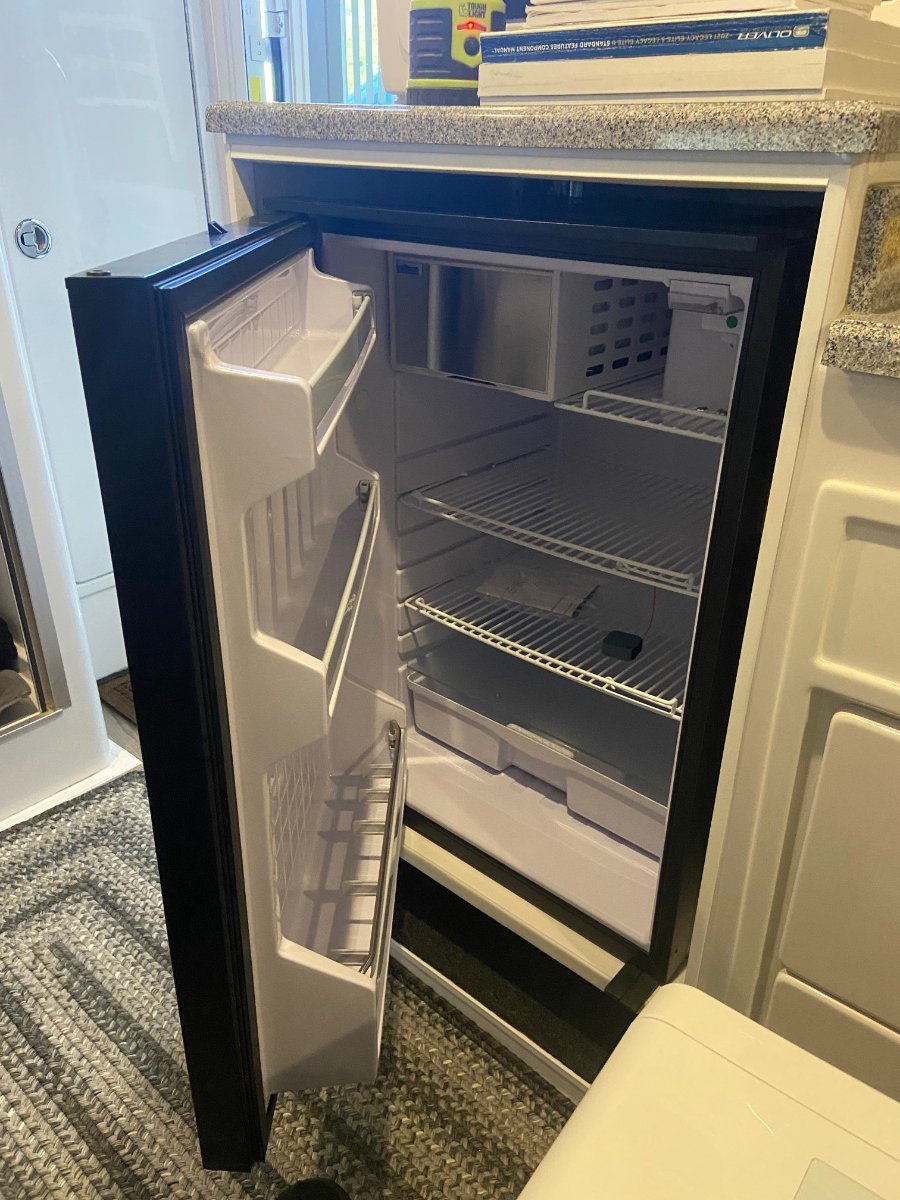
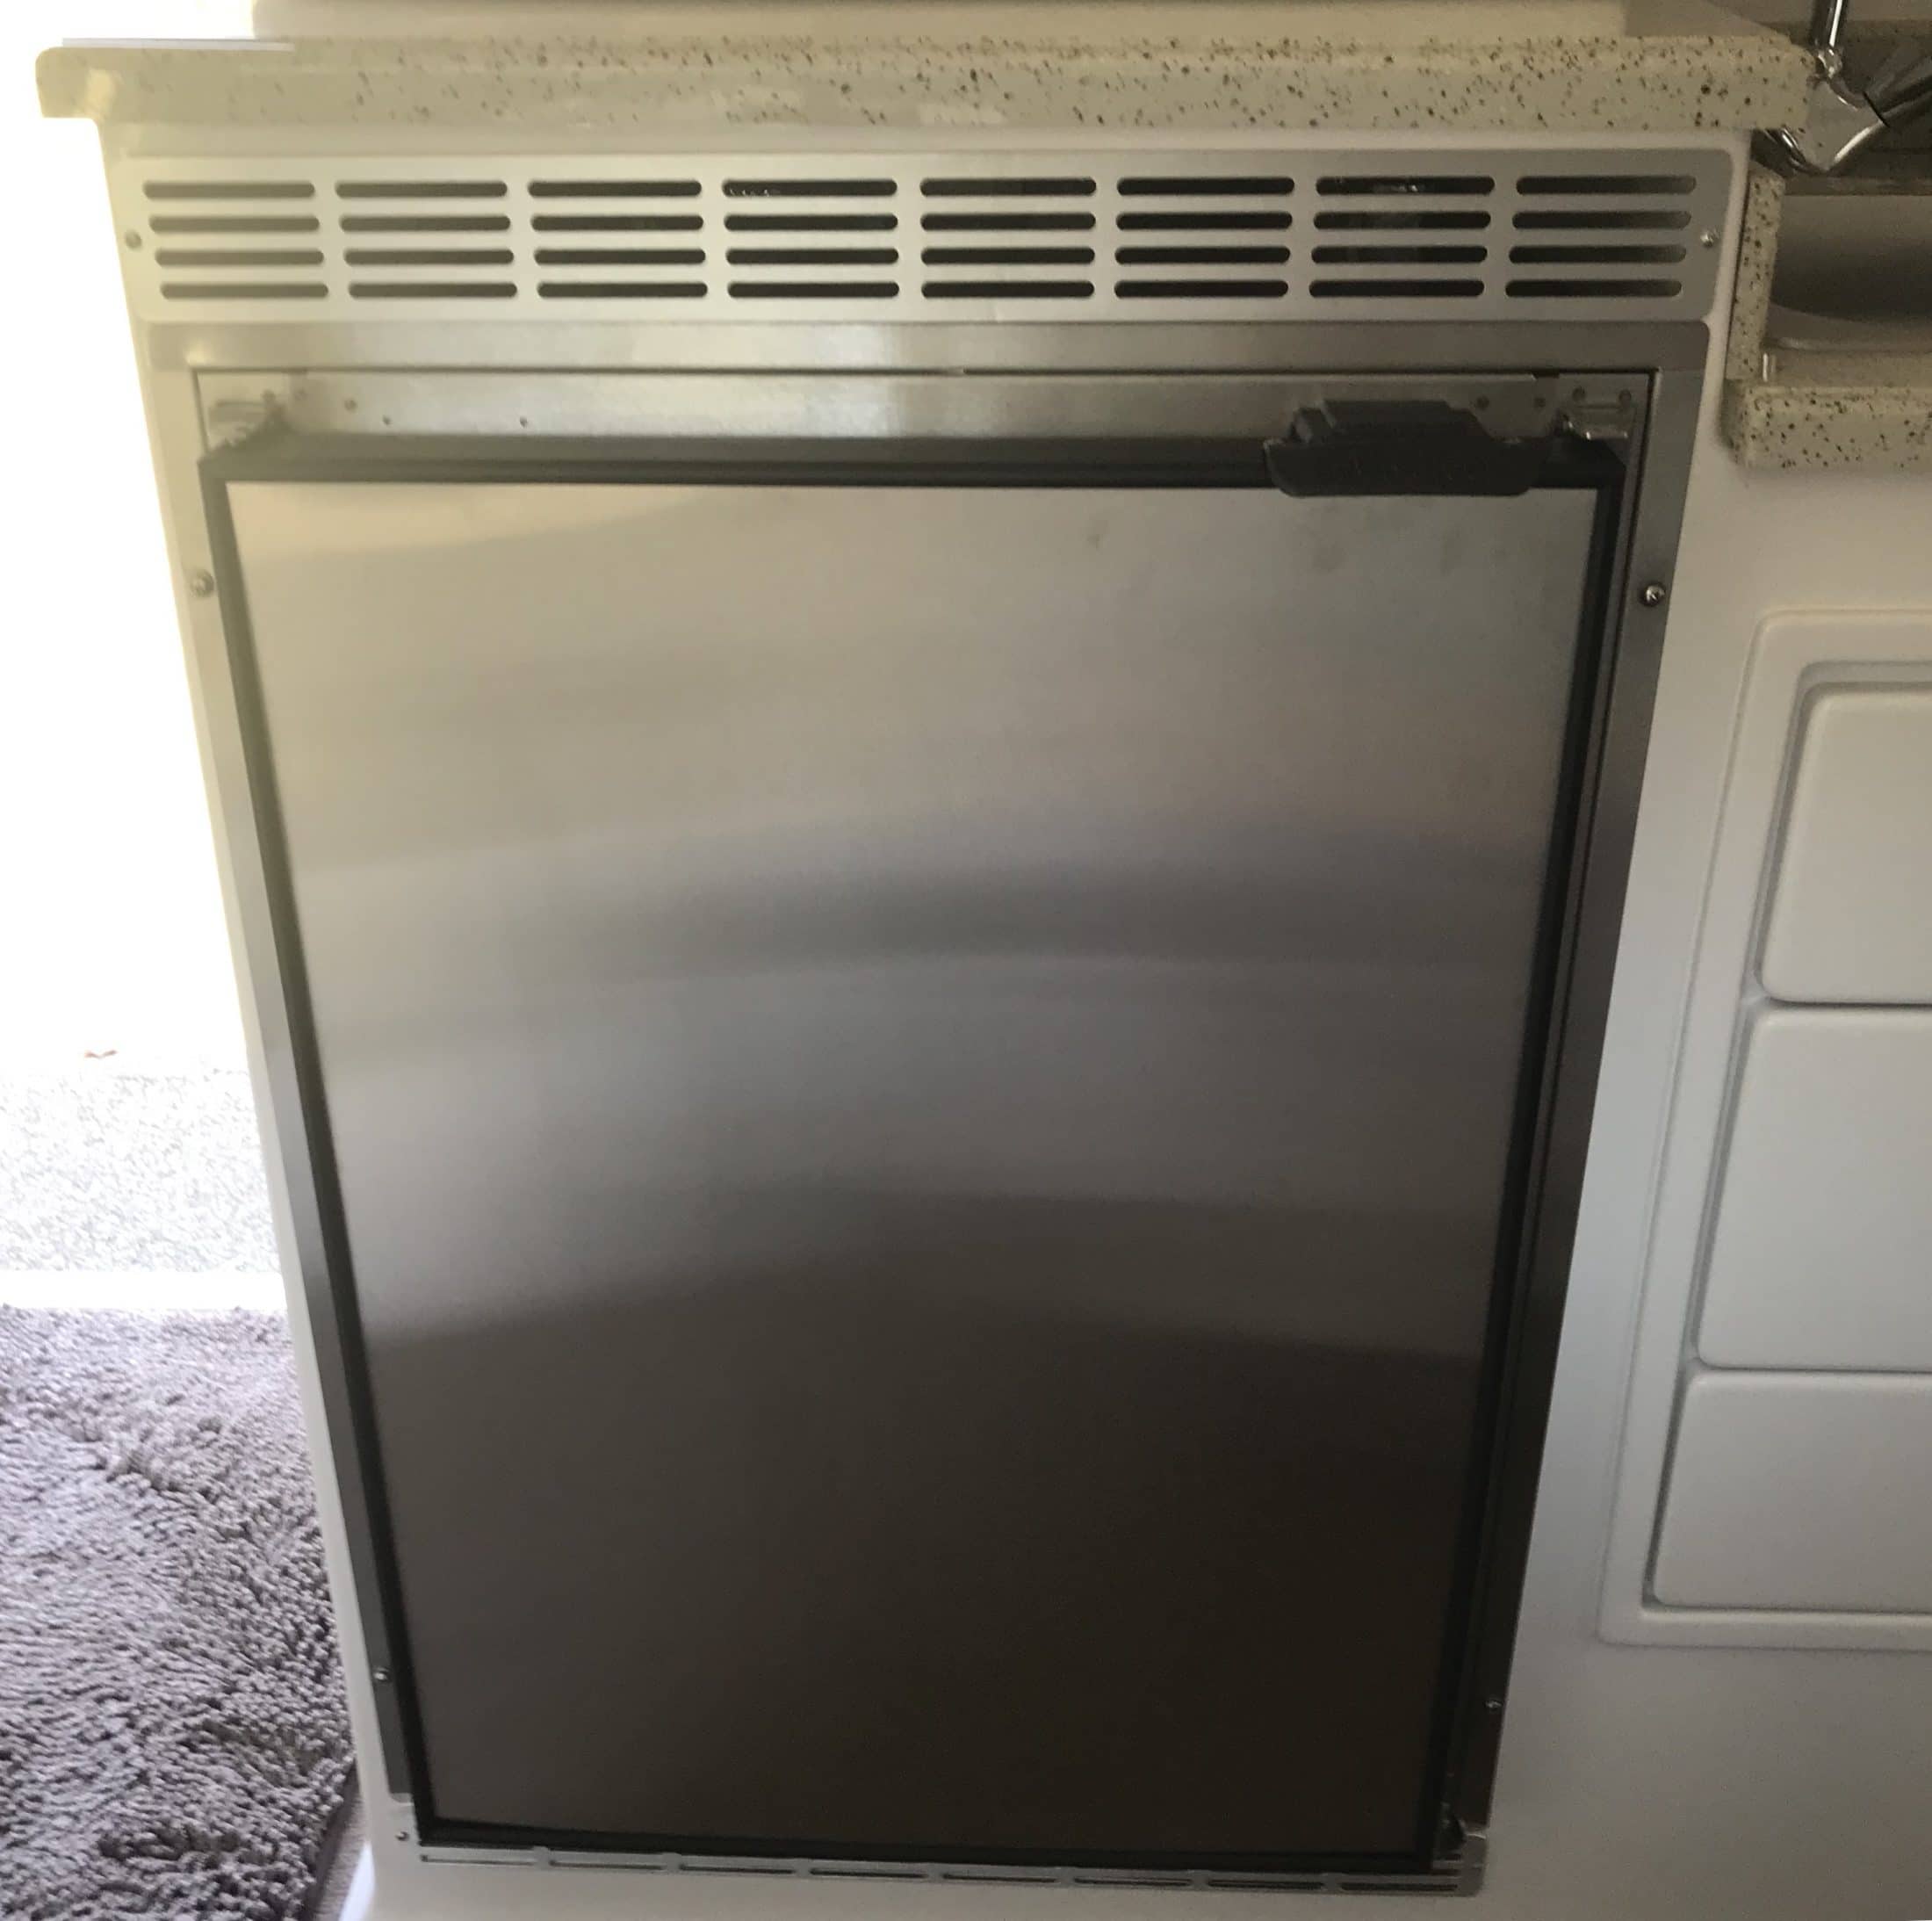
An incremental update. I finished the upper and lower grills so I’d call the installation complete. The fridge has been running continuously on either DC or AC since I received it coming up on a month now. We have been on a long weekend camping/test trip and we’re pleased with it’s performance. It maintains upper teens to low 20’s in the freezer and low to mid 30’s in the fridge regardless of the outside temperature. The compressor seems to run for about 5 minutes and then is off for about 5 minutes if it’s hot (95 or so) outside and is off a bit longer if it’s cool (mid to upper 60’s) outside. So far the 320 watts solar and four T105 batteries have been able to keep up. Testing will continue on upcoming trips.
1 point
-
I noticed that, as well. Their 2019 OLEll 505 and my 2020 OLEll 579. I have a feeling ‘we are not alone’!0 points
-
I use a Home Depot bucket. Easy to clean and cheap.0 points
-
A PS.. though I have the separett in my barn, I dislike almost everything about it, except the black tank line connection, and its clean lines and smooth cleanability. Don't even think about it for an rv, imo. Its nothing but a very expensive portapotty.0 points
-
What if... I find the perfect spot, set up camp, enjoy the sunset and find out at around 2am the land I am on belongs to the infamous Sawyer family.0 points


-
Recent Achievements
-


")


")


")


