Leaderboard


Popular Content
Showing content with the highest reputation on 02/27/2024 in all areas
-
Progressive Dynamics PD4045 LiCSV Upgrade.docxProgressive Dynamics PD4045 LiCSV Upgrade.docx Some of the 2018 OE2's PD Converters have a LI switch that allows use with Litho's. Below is a picture of the LI/LA switch and a hard copy of John Davies procedure to upgrade the PD if you don't have the switch as well.
 3 points
 -
If demand is greater than your supply, I have one too, free for anyone who wants it!3 points
-
Apparently that makes two of us!3 points
-
I never thought of the rubber plug as leak prevention, just keeping the fitting clean. But what do I know? Mossey3 points
-
The rubber cap was not inserted when doing the leak test - figuring if the QD was leaky, the cap might have plugged the leak. But the test can be redone with the cap inserted...3 points
-
I was initially thinking you should "safety wire" it shut. But your mention of zip tie got me to thinking - why not use a zip tie that is reusable like THESE or something similar? Bill3 points
-
Geronimo John: Thanks for Posting John Davies procedure.2 points
-
We have the ProSmart system that Oliver installed ( tank bottom sensor ) and we've had one of the devices fail and the other is difficult to connect to. I did purchase the Truma handheld device as a backup and it works pretty well with the minor limitations listed in previous posts; the device must be placed at a right angle to the tank and multiple readings are required to determine the level at which the propane is found. As I said it works pretty well but it's fairly expensive. The least expensive method, and pretty accurate, is to pour warm water down the side of the tank and then slide your hand down the tank to feel the point at which the tank goes from feeling warm to cold; that's your propane level. I use this method at times and it's works well. I used this method to verify the Truma device's accuracy.2 points
-
Just an FYI on the subject of replacing a converter/charger in a Progressive Dynamic's Power Control panel or upgrading an existing inverter: the wiring and components of any electrical system, whether AC of DC, has been engineered to the specification’s of the system components. If you choose to upgrade any single component, such as the PD converter/charger from 45 amp to 60 amp, you may overload the other components of the system. Please be careful and consider the bad things that can result from our desire to gain capacity from our upgrades and replacements! Mossey2 points
-
I bought the Truma before we took delivery of Hull #1291 in November, 2022. It worked o.k., but required me to remove the cover of the "doghouse" each time I wanted to check propane levels. So, I invested in a pair of Mopeka tank sensors in 2023. They have worked well. So, I haven't used the Truma since!2 points
-
You are correct. However fiberglass has the advantage of being cast in many ways. From many perspectives we would want the top mold to be very aero efficient. But the bottom could be squared off some with much less impact from an aero perspective. This is exactly what most vehicle shapes at the rear are. Squarish low for trunk space and aero above for efficiency. The auto mfg's figured out how to do this with sheet metal, and the boat mfg's are doing it in fiberglass. That said, I'm not suggesting Ollie bottom be a cube. Just moderate it a bit to square up a tad the sleeping corners. Just a that. GJ2 points
-
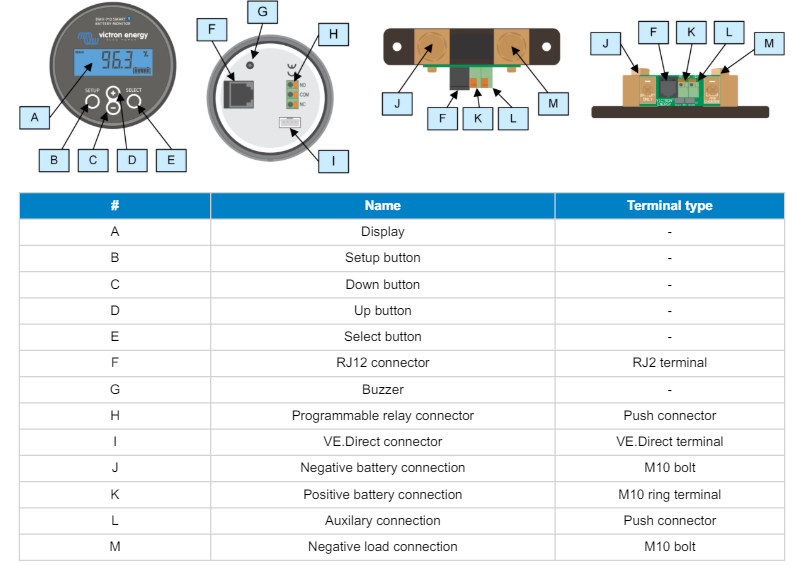
No, it works great, just not to the TV. Weak signal as we all know. My Ollie not in Hawaii, so I am at a disadvantage of not being able to run out and take a peek. But I do not recall seeing a 4-wire flat style connection on our Victron Orion 12/12 DC to DC unit. Hence, it appears the only way will be to connect the to the 712 Smart Display. I have as well, but from downloaded pictures from the web, our 712 Shunt does not have a connection for a 4 wire flat style Dongle plug. It has a RG45, and a NO, a NC, and a Common port. Hence the only option I can research find is to the 712 display. JPR2 points
-
I finally got around to purchasing some temperature sensors so I could experiment with different cold air return locations. The original 6x10 grille (45 cu. in. free air flow) was installed right next to the furnace in my front dinette seat (Elite 1). I never understood this decision and wonder if anyone knows why Oliver put it there. It is within inches of the furnace and two supply outlets. This is not desirable for even heating and does nothing to create air flow below between the hulls, which would help keep that area warmer in colder temps. My experiment showed much better results than I anticipated. First I sealed off the OEM return with tape. Then I cut two 6" holes in some cardboard and replaced those with the rear curb and street side fiberglass seat panels. I then placed sensors on the floor of the basement down with the plumbing on each side under those holes. I placed the third sensor under the sink. When I turned on the furnace, there was very positive intake through the 6" holes, which by the way, provide a bit more free air flow than the OEM grille (~56sq.in. for 2, 6" round versus 45 sq.in. for 6x10 OEM grille, which actually has 5x9" free air flow). I brought the interior temps up from 58* to 68* in about 10-15 minutes. You can see the temperature difference in the pic below; and this is with the return air holes cut in at seat level, not at floor level and as far to the rear as I would want them! I also noticed a big improvement in heat distribution throughout the trailer, although in our small elite1, heat was never a problem in the cabin. So, before I start cutting holes in my trailer, I ask if there is something I'm missing here, and why didn't Oliver do this to begin with. It seems like a very simple way to markedly improve the performance of an already stellar trailer. Any comments appreciated! Thanks. Dave
1 point
-
FYI: This is how we get our fridge back online after being turned off between trip - maybe a 3 to 5 second hold, then the default lights illuminate... Good luck, @Toby!1 point
-
I purchased a Dometic LPGC10 model in 2020 and it is fairly accurate to date. It can be a bit finicky at times, mostly due to the device not being held perpendicular to the tank, as required. That may seem like a simple task, but when reaching in and looking downward, there is a degree of difficulty involved. A green light indicates gas, but sometimes defining the tank level is difficult in that the indicator light will toggle red/green; however further adjustment(s) will ultimately determine the tank level. In a brief look at the current Amazon ratings between the two devices, the Truma may prove better; perhaps a user of that device will chime in. I like having such a device, and if/when my Dometic fails, I will research the Truma.1 point
-
Good to hear in that mine are scheduled to arrive tomorrow.👍1 point
-
You are correct @John Welte. Hull #1292 was the last 2022 model produced.1 point
-
I have been using the Mopeka sensors for the past six years. I’m able to see the levels on my phone without having to remove the propane cover. Rather than finding out when a tank is already empty, I can fill the lowest level tank when we are close to a tank filling station. We are many times in areas that may not be very convenient to a filling station, so the Mopeka sensors allow me to anticipate the need and fill the tanks where either the cost of propane is lower and/or convenient.1 point
-
Willie was a dumpster cat. Now has a great home and the coolest cat we ever had.
1 point
-
Mine had the rubber insert, edges a little chewed by pack rats. Like @MAX Burner wrote, it should not leak without the male connector inserted. Looked at mine again yesterday and the valve was at 45 degrees again, partially opened by our sewer hose, the end of the hose being right there. If I do not remove mine, I will use a zip tie to keep the shut-off valve at 90 degrees (closed).1 point
-
From the Victron 712 Smart manual, below are the connections. I assume that the VE.Direct (Terminal I) is where I could plug in the dongle which appears to also have a 4 wire flat "VE Direct" connector. Being higher in the trailer than below the dinette seat (Where my Victron Orion 12/12-30 resides, it would seem that the 712 monitor would be a more optimal location.... "Higher is better than closer" info from JD1923. Sadly the 712 monitor is installed in the fiberglass and rotation is not an option.
1 point
-
That's a good question @mossemi - As a safety feature, the ball valve on the QD can only be opened if the spring-loaded collar is in its extended (normal) position. If the collar is pushed "back", it allows the user to insert the male connection of the LPG hose. When the connection is correct, the collar springs to its normal position allowing the user to open the ball valve. When disconnecting, the valve must be closed in order to push the collar "back" and pull out the male end of the LPG hose, therefore, not allowing a disconnect with the valve open. But since you ask... I'm curious.... I'm going to go check right now. STANDBY 10 min. later: ....OK, I'm back. After opening the ball valve and squirting soapy water into the female QD there wasn't any bubbles observed from a leaky QD fitting. But, now that you've brought this up, we're going to add it to our periodic maintenance procedure! We've always checked the QD with the LPG hose connected and gas valve open, but never without a hose connected. Good Call! Cheers!1 point
-
@Geronimo John What's a BLuetooth Radio? My bad! Poor choice of words. I consider any device that can receive, transmit or both an RF signal, a radio. Let’s use a cellular phone as an example. Smart cellphone's have several "radio's" inside of them. First is the cellular radio which is actually a transceiver, meaning it can transmit and receive RF/radio frequency signals. Second is the GPS radio which can receive satellite signals and provide location service when you are out of cellular service. The phone also has an A-GPS which is Assisted GPS which receives GPS data from the cellular network and combines it with the satellite data. A-GPS works better indoors where satellite signal are weaker. The third is the WiFi radio which is also a transceiver. The fourth radio is the Bluetooth radio which is a transmitter. Were you using a dongle or just the 712 Smart (Shunt and Display Combo)? I am using a BMV-712. If not using a dongle, does the 712 Smart System broadcast the Bluetooth "signal" from the shunt or the display? From the display. I believe part of the inherent Bluetooth transmit problem with the Smart Shunt is the placement of the Bluetooth transmitter which is stuck onto the shunt itself. It will never transmit an omnidirectional signal so it is probably possible to increase its transmitter range by changing its orientation. The same thought would also apply to the Smart Dongle which I believe is also directional by design. Mossey1 point
-
Everything is good, no debate from me. We just want to make sure we get accurate information out here before it blows up into something that it isn't. Example hahaha:1 point
-
I would be happy to oblige, but I parked the trailer in storage this morning and then drove home about 600 miles away. I’ll try to remember to get pics when I go get it in a few months. I recall I cut one hole (used 2” holesaw) in the same spot on aft wall where a battery cable had been routed through but now unused, while doing my Battleborn battery install. The other 2” hole is on the forward wall, down lower I think. I also cut several other 2” holes in bulkheads throughout the basement on street side and rear compartments to facilitate convective flow. I’m still brainstorming future plans to introduce warm cabin air to basement in extreme cold, which might include small, quiet 12v blower fans. We camped several nights this winter out West in low teens with no freezing problems or battery issues. Last night in mountains it was 24. So I’m wondering if I need to worry much about additional mods, as I’m not really planning on camping any colder than that.1 point
-
The only settings I had to change in my 2000W inverter/charger was to change the charge setting from flooded batteries to a LFPO4 charging profile. Our early versions of the 2,000 watt model did not have a LFPO4 setting to switch to so I selected the "custom" battery option. I then set the custom absorption voltage to 14.6 volts (as recommended by the battery manufacturer) and I was done. The main reason you need to adjust the absorption voltage to a 14.4-14.6 volt level (consult your battery manufacturer for their preferred setting) is that the LFPO4 batteries require a higher voltage than flooded batteries to reach full charge, compared to the flooded or AGM batteries. To be confident how to do this with your model of converter/charger, you really need to consult the "Optional Equipment" manual that came with your Oliver. I just looked on the Oliver University and the factory manual they have posted is apparently a mid-2020 updated manual that appears to reflect a firmware upgrade to the units we have, since the manual on the Oliver site displays a LFPO4 setting in the menu, which my 2020 version does not show in the menu and definitely did not have. I would post a picture of my settings table from my manual, but it is across town in storage. PM me if you want me to retrieve my manual and post a copy of the settings menu here. I would be happy to do so.1 point
-
The remote display I have is part of Xantrex inverter/charger model that I have, not the PD Charger/Converter. When I elected the 2000 watt inverter/charger option, the factory kept the PD Converter/charger in place to serve as the breaker/fuse panel, but disabled the converter/charger function and instead wired the 2000 watt inverter/charger into the PD circuit/fuse panel. You would not need to change any settings to use a 1,000 watt generator to charge your AGM batteries since your converter/charger is has its own built in charging limit of 45 or 60 amps depending on the model. A 1,000 watt generator should be capable of charging the batteries at 60 amps since this will effectively limit the draw on the generator to about 840 watts (14 volts x 60 amps = 840 watts.) I you upgrade to lithium batteries, then you have two choices. You can replace your existing PD converter/charger with a more up to date version of the same model that has a lithium ion charging profile option built in. This is the lowest cost option, but you will be limited to a maximum charging current of 60 amps split among all your batteries . A superior solution but more expensive solution would be to keep your current PD converter/charger but upgrade your inverter to a 3,000 watt inverter/charger. The 3,000 watt inverter charger that Oliver installs can charge your batteries at a rate as high as 150 amps, thereby charging your batteries 2 1/2 times as fast as a 60 amp charger when you are connected to shore power. To charge with a generator at the 150 amp rate, you would likely need a generator that outputs a minimum of 2200 MW continuous, more if you want to simultaneously use any 120 volt appliances at the same time. I hope this is helpful.1 point
-
Toby I also have a 2018 Elite II. My procedure may not help you. But, after the Ollie wakes up from it winter's nap, I have trouble getting the Dometic refigerator started. I usually have to play with the on-off switch button, depressing the button multiple times and sometimes just holding the button in. So far, after a little time doing this the refrigerator finally starts and the lights on the control board come on. On another subject, in the future, you might want to add your year and hull # to the signature line, so people can see what Ollie you have and can help you better.1 point
-
Correct on location. I can pick it up just outside Ollie, but at 10' I lose the Victron Connect signal. Hence the need for an extender. From today's reading, I have learned that any Victron device that has the word "Smart" in it's name has Bluetooth connectivity. This would seem to imply that it should not be necessary to upgrade to the Cerbo or other computer based systems unless there are other features you want to have. Is this thinking logical? GJ1 point
-
Sorry that I may have added to the confusion. Apparently, the 2000 watt inverter installed in the 2018 Oliver was an inverter only without a battery charger built in. The 2000 watt inverter installed in my 2020 LE II is an inverter/charger. That is why I have a more sophisticated wall panel with led readout. In your 2018 Oliver, the batteries are charged by the Progressive Dynamics Converter/Charger under the dinette that also serves as the 12volt and 120 volt service panel (breakers and fuses). The PD Converter/Charger in your trailer has a fixed maximum charging rate of either 45 amps or 60 amps depending upon what model Oliver installed. The PD Converter/charger is perfectly adequate if you have lead/acid batteries or AGMs and charging at the maximum charging rate of 60 amps should not overtax a 1000 watt generator. If you ever upgraded to lithium ion batteries though, you would need to replace the PD converter/charger with a charger that offers a lithium ion charging profile built in. Progressive Dynamics makes one that is a drop in replacement for the one you have. Alternatively, you can install an updated combined converter/charger to charge your batteries and then bypass the charger in the PD Converter. That is what the factory did in my 2020 LE II. I do have a background in grid scale power and high voltage transmission, but the information above I learned the hard way when I switched out my lead acid batteries for LFP04 lithiums right after I picked up my 2020 LE II. Oliver started offering the lithium option in mid-model year about a month after I took delivery of mine so I had to figure it out myself. Information on this forum helped me out considerably.
1 point
-
I have the Xantrex PROwatt 2000 inverter in my 2020 LE II. It has Charge Current setting just like the 3000 watt version. The max charge current in the 2000 watt inverter is 80 amps (as opposed to 150 amps in the 3,000 watt inverter.) To set the charge current limit to less than the factory default of 80 amps, you just need to go into the inverter panel on the wall of the Oliver, enter into configuration mode, scroll to setting # 24 Charge Current, and change the setting. It only takes a minute or two. It is certainly not as easy as using a bluetooth app and I often have to refer to the manual again because the exact sequence of button pushing is easy to forget. But it works just the same as in the 2000 watt inverter.1 point
-
With no offense intended, I believe there is some questionable advice in this thread. In particular, it is counterintuitive to me that reducing the input amperage to the inverter is the best way to limit the level of charging current that the inverter is delivering into the batteries, especially when the inverter has a setting (#24) designed specifically for that function. Wandering Sage Brush is apprehensive about using the smaller Honda 1000 to charge his house batteries while boondocking. There is nothing to be nervous about as many of us do it all the time. The only issue you need to be aware of is ensuring that the combination of trailer loads (120 volt loads and 12 volt charging load) is less than the maximum output of the generator. If you try to run higher loads (i.e., greater watts) than the generator can produce, the generator will overload and shut down. The table above showing inverter settings are for a 3,000 watt inverter. Setting 28 is factory defaulted to 25 amps because 25 amps * 120 volts = 3,000 watts. If you lower the amperage limit in Setting 28 down to lets say 15 amps, you are turning your 3,000 watt inverter into an 1800 watt inverter because 15 amps * 120 volts = 1800 watts. There is no need to do that. If you want to charge your batteries with a 1000 watt generator, then you need to limit the draw on the generator to less than 1,000 watts. If you want all the available 1,000 watts to go into your batteries, then there are two steps you need to take when you decide to charge. First is to turn off your inverter and any 120 volt loads if you want to all the generator output to go into your batteries. You don't want any 120 volt trailer loads drawing on the generator at the same time you are charging the batteries. Second, you need to reduce the amperage limit in Setting #24: Charger Current. The charger typically charges at about 14 volts when the batteries are getting close to full. Since volts x amps = watts, 1000 watts into the batteries is going to require 71 amps of Charge Current (14 volts * 71 amps = 1,000 watts) . Adjusting for losses and generator derating at altitude and in higher temperatures, you should probably limit the watts from the generator at no more than 900 watts which equates to 64 amps (900 watts / 14 volts = 64 amps). So whatever inverter/charger you have, set the max charging current at 60 amps and your Honda EU1000 will probably charge just fine without overloading. If you are running the Honda 1000 and you are also getting 20 amps from your solar panels at the same time, then you will be putting 80 amps into the batteries (60 amps from the generator and 20 amps from the solar). This is equal to 1,120 watts (80 amps x 14 volts = 1,120 watts) You can leave the Charge Current setting at 60 amps all the time if you want unless you want your batteries to charge faster when you are on shore power. If so, just increase the max charging amps in setting # 24 before you go back on shore power.1 point
-
Conversing with a gif is a hobby of mine. Lol1 point
-
Oliver=Durability1 point
-
LOVE IT! He tooted.1 point
-
To remove the old fridge I removed the fridge door and the refrigeration unit from the back. As you get into it you’ll see what needs to be removed. Just keep the unit upright and be careful with the heat transfer putty and it can be reassembled with no issues. The NovaKool install, I removed the trailer screen door from the hinges and taped the lower hinge in the closed position. I also removed the NovaKool door and hinges and it went in sideways with 1/4 inch clearance. I also added a strip of painters tape on the entry door frame to prevent scratches. I would highly recommend that you make your own measurements before you even buy a new fridge as I think but don’t know for absolute certainty that Oliver has used slightly different door designs and maybe sizes as well. The NovaKool fit my trailer perfectly with two inch top and bottom openings. You’ll see the stages of the installation in the forums. I did however have to make two sets of upper and lower grills for the two openings. The first set I made at home out of aluminum but I didn’t like the difference in color between the aluminum grills and the stainless steel bezel around the fridge. I later had two more grills laser cut out of stainless steel.1 point


-
Recent Achievements
-


")


")


