Leaderboard


Popular Content
Showing content with the highest reputation on 07/10/2024 in all areas
-
For anyone considering adding a marine hatch to their bath vanity, I did this mod and I love it! But I think that you should take a look at @Frank C's version at THIS link. His bath vanity mod was a unique approach that I think is worth considering! Mossey4 points
-
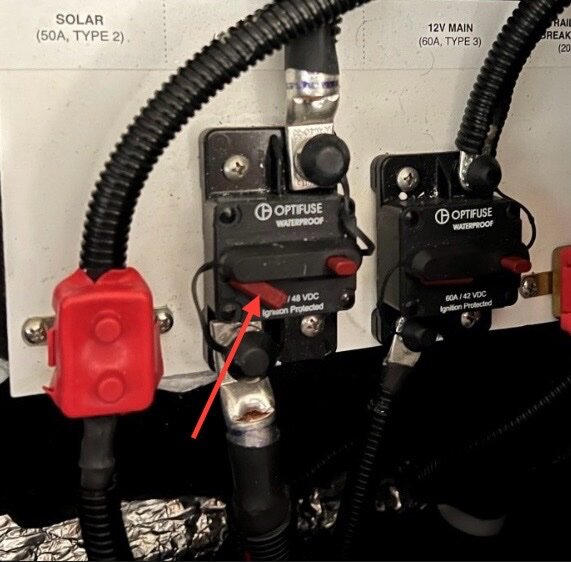
Make sure the red lever on the Optifuse resettable breaker is pushed inwards (see arrow on picture). The Optifuse breaker on the left shown in the photo is in the open state when the lever is popped out like that. The Optifuse on the right is closed. The red rubber covers on the outer two items are just contact covers on the other self resetting breakers. The Optifuse breakers can manually opened by pressing the little red button on them (which will make the red lever pop out), and then pushing the red lever back in to reset. And this is my first post in a long while since we sold our Ollie. A sad day when it was towed away, but it went to a good new owner. We’ve moved on to other travel plans now. But I still lurk here on the forums occasionally 🙂
 3 points
 -
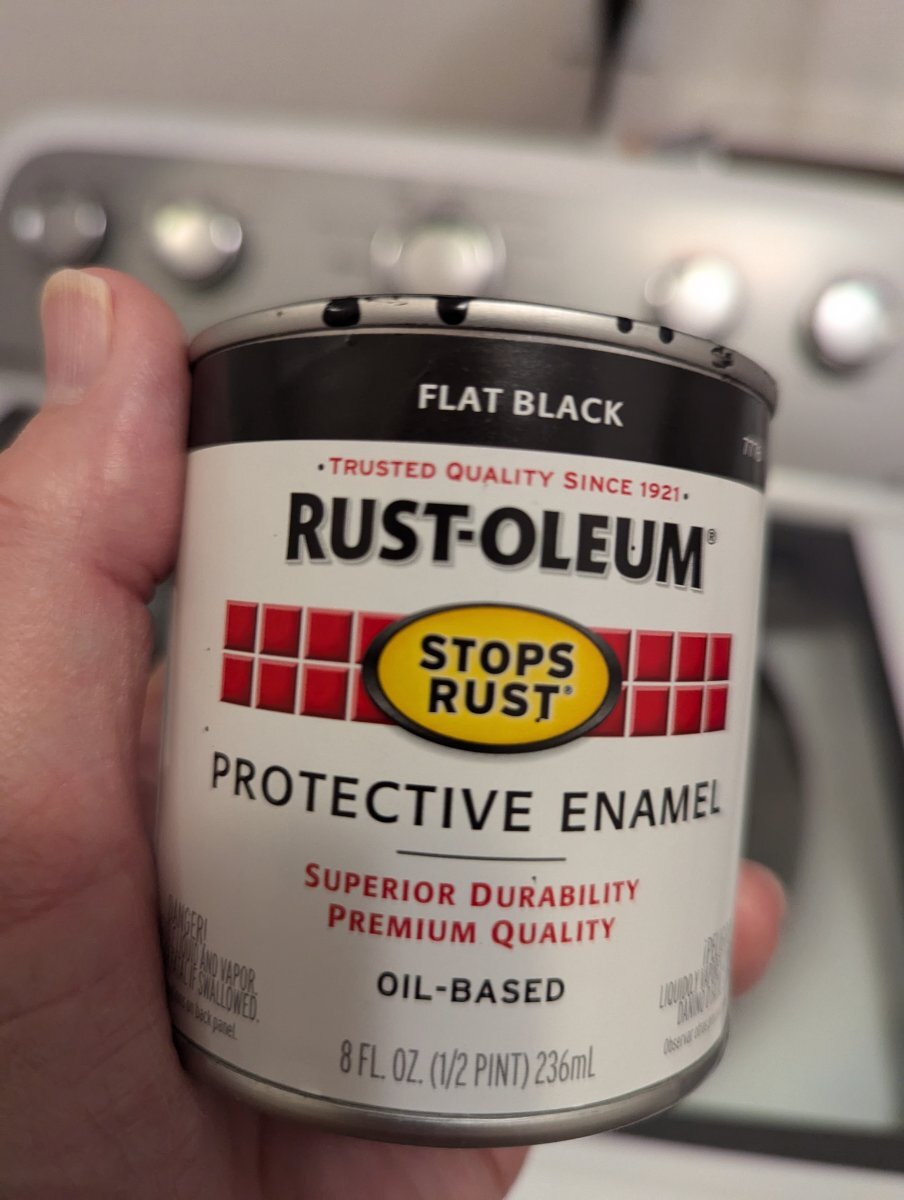
👍 Their Oil-Based is the best for rust prevention and adhesion, based on my experiences! Next up, Rust-Oleum Professional spray cans.3 points
-
I'm not entirely sure yet, but it was a measurement that was, I think Jason said, 3/16 inch off, or something like that. I'll get details when I pick it up. Hopefully no more issues were encountered by the team. I don't want to be... "that guy". LOL2 points
-
I'm interested in the AXLES question that @CRM asked too! Hull 113 got new window shades a couple years ago. They fit nice and do not fall off as some have mentioned. I dislike how the shades stick out so far when sleeping or leaning at the dinette. How do we know if we have "new large windows" or not? Measurements?2 points
-
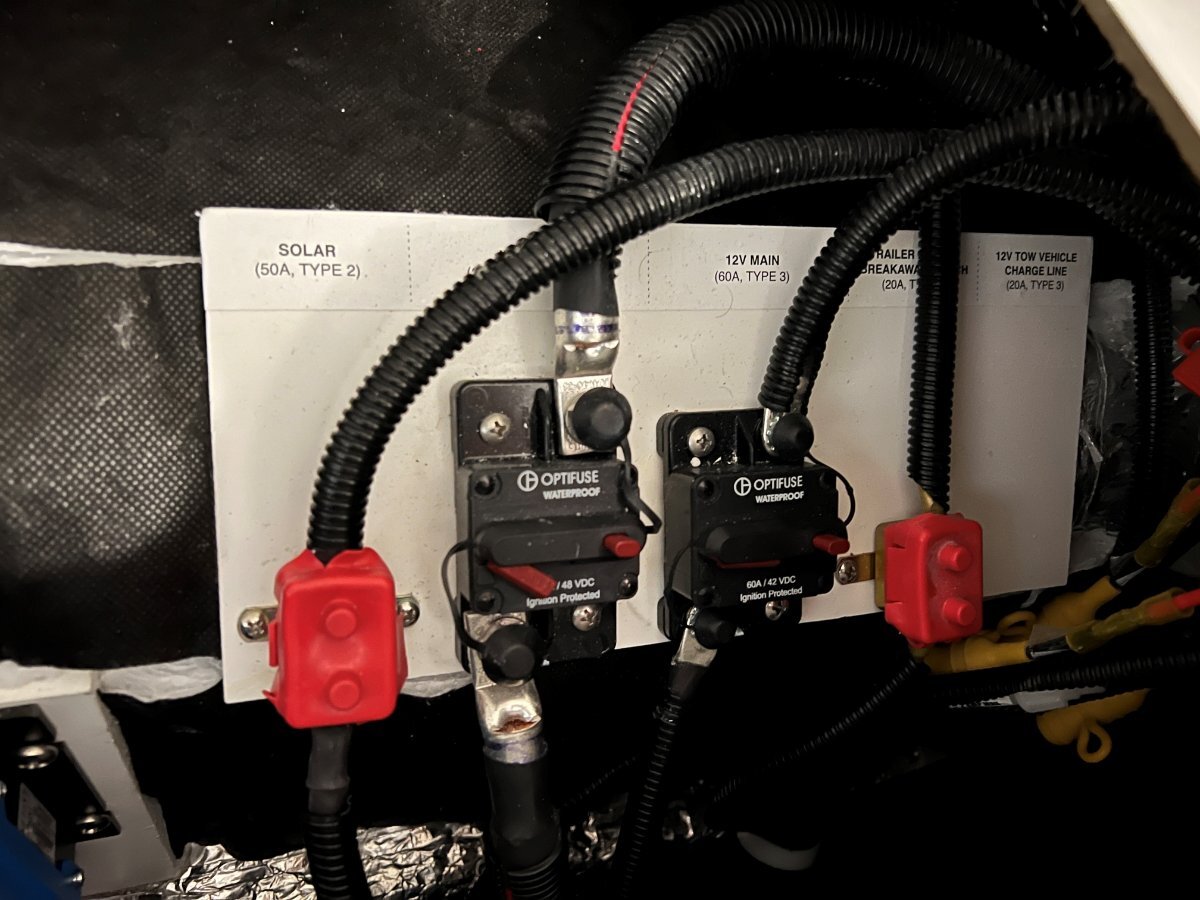
What is your hull#? We also have a 2023 (Hull# 1386) and unless the previous owner made changes there should be a breaker panel under the street side bed. Here's a pic of it, check the 2 breakers and the fuse under the red cap below "SOLAR (50A, TYPE 2"). As you can see our inverter breaker is in the off position.
2 points
-
Our coupler was black when new. I touch it up annually with Black Rustoleum. Mike2 points
-
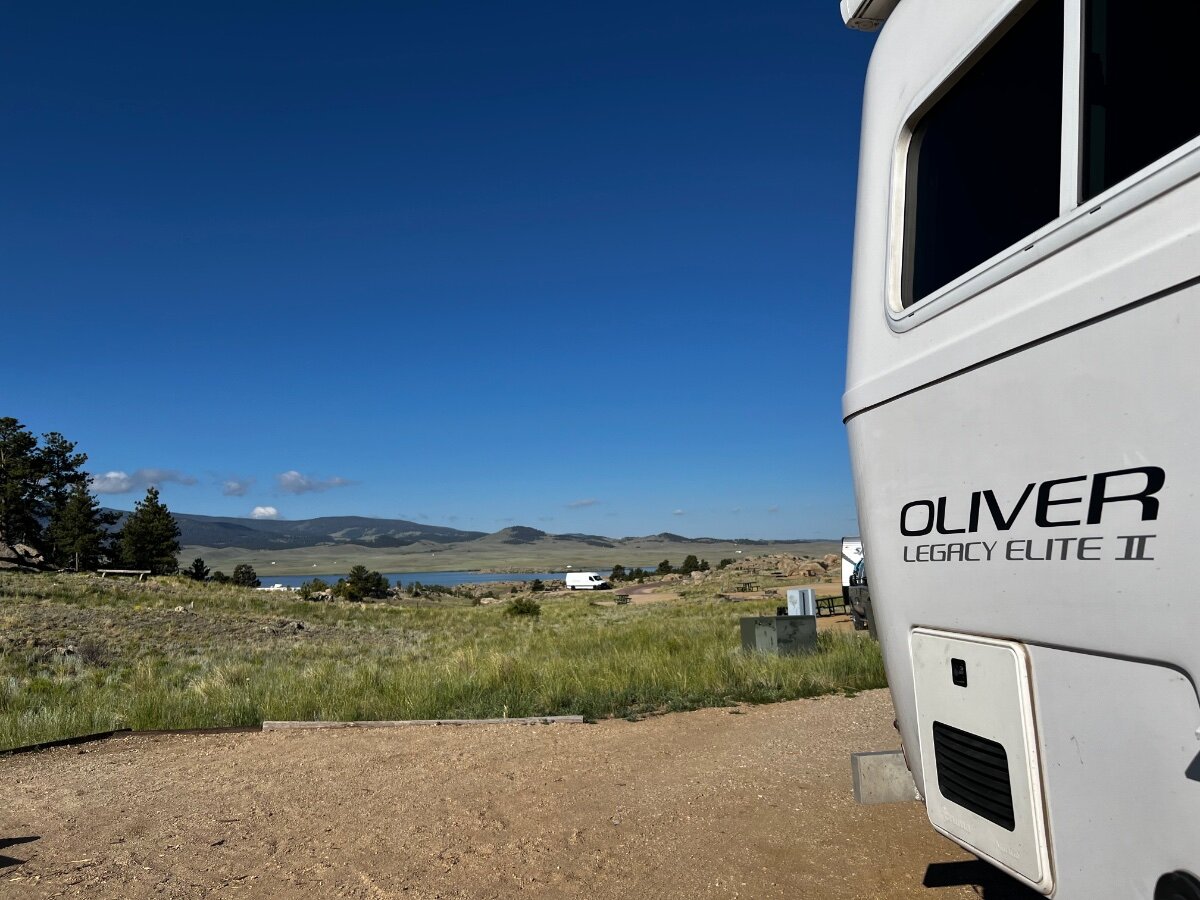
Loving these Colorado temps - Reset 2.0 #1364 at Eleven Mile Lake State Park Colorado. If you stay here do take time to do the Canyon. (What am I saying, most people with Olivers will be in the dispersed camping in the Canyon 🙂 )
2 points
-
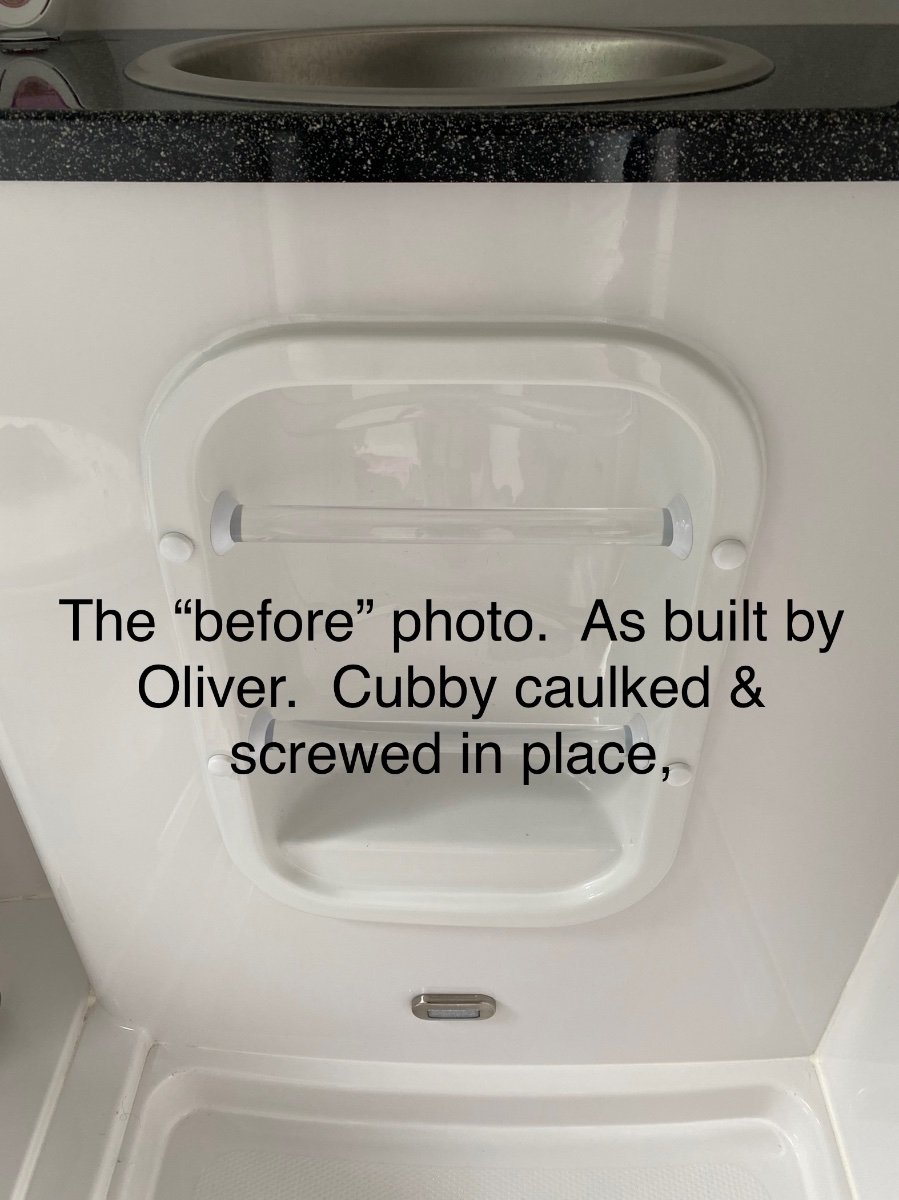
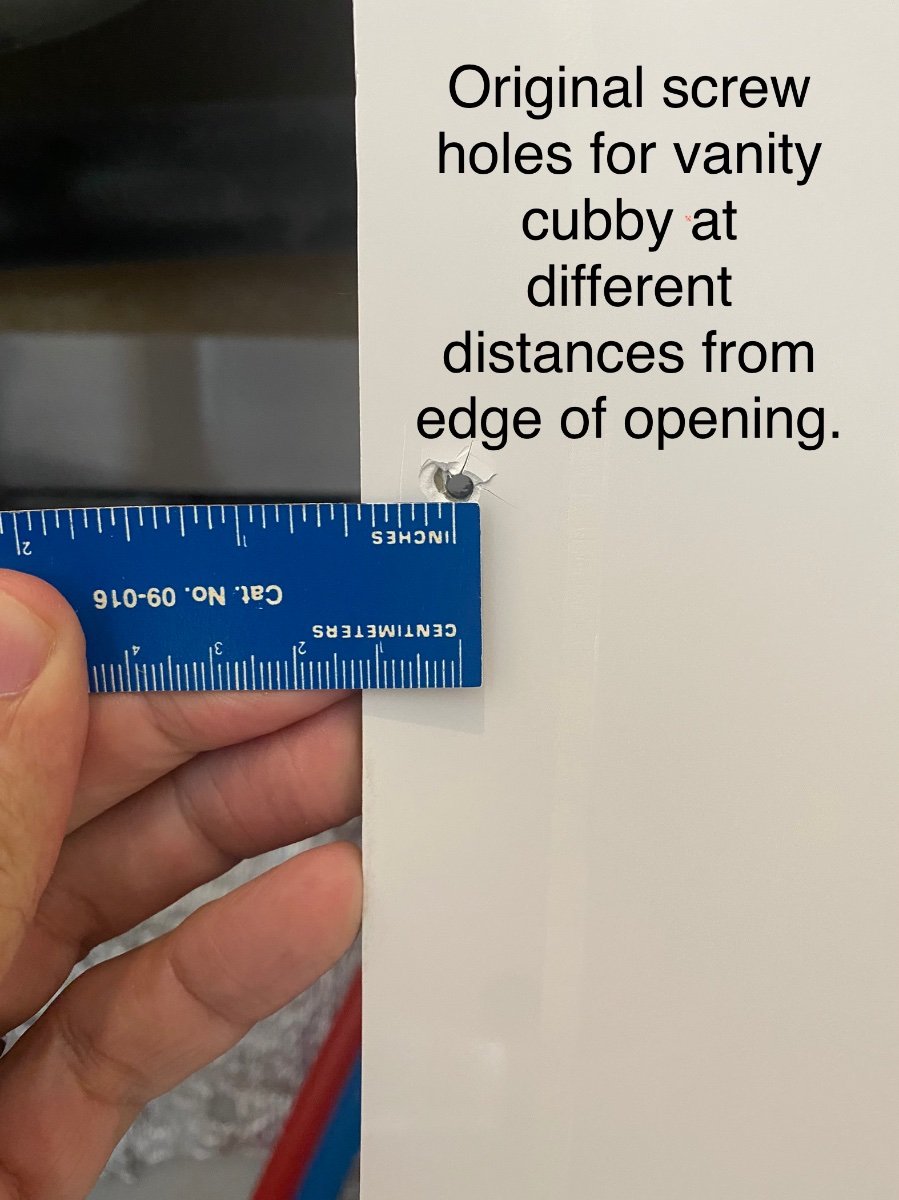
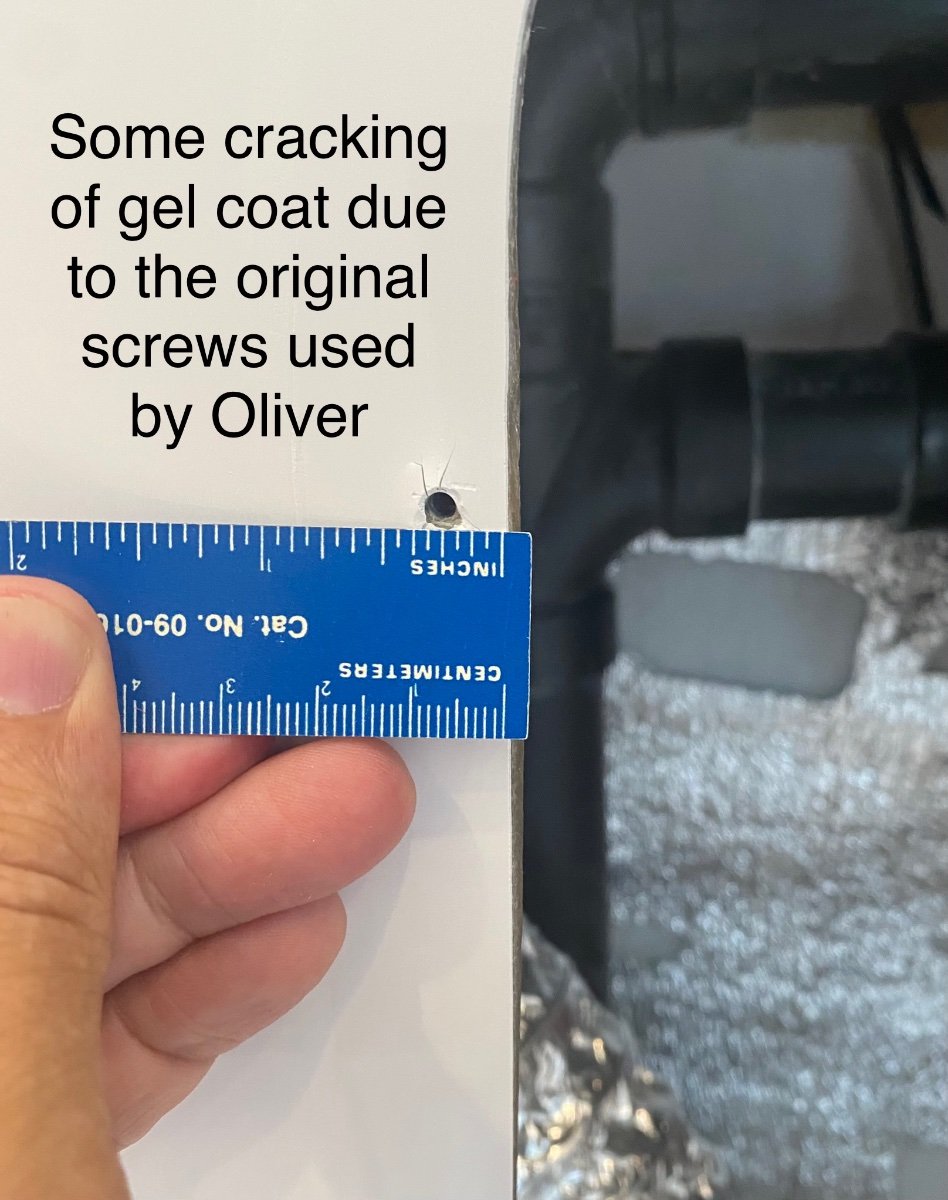
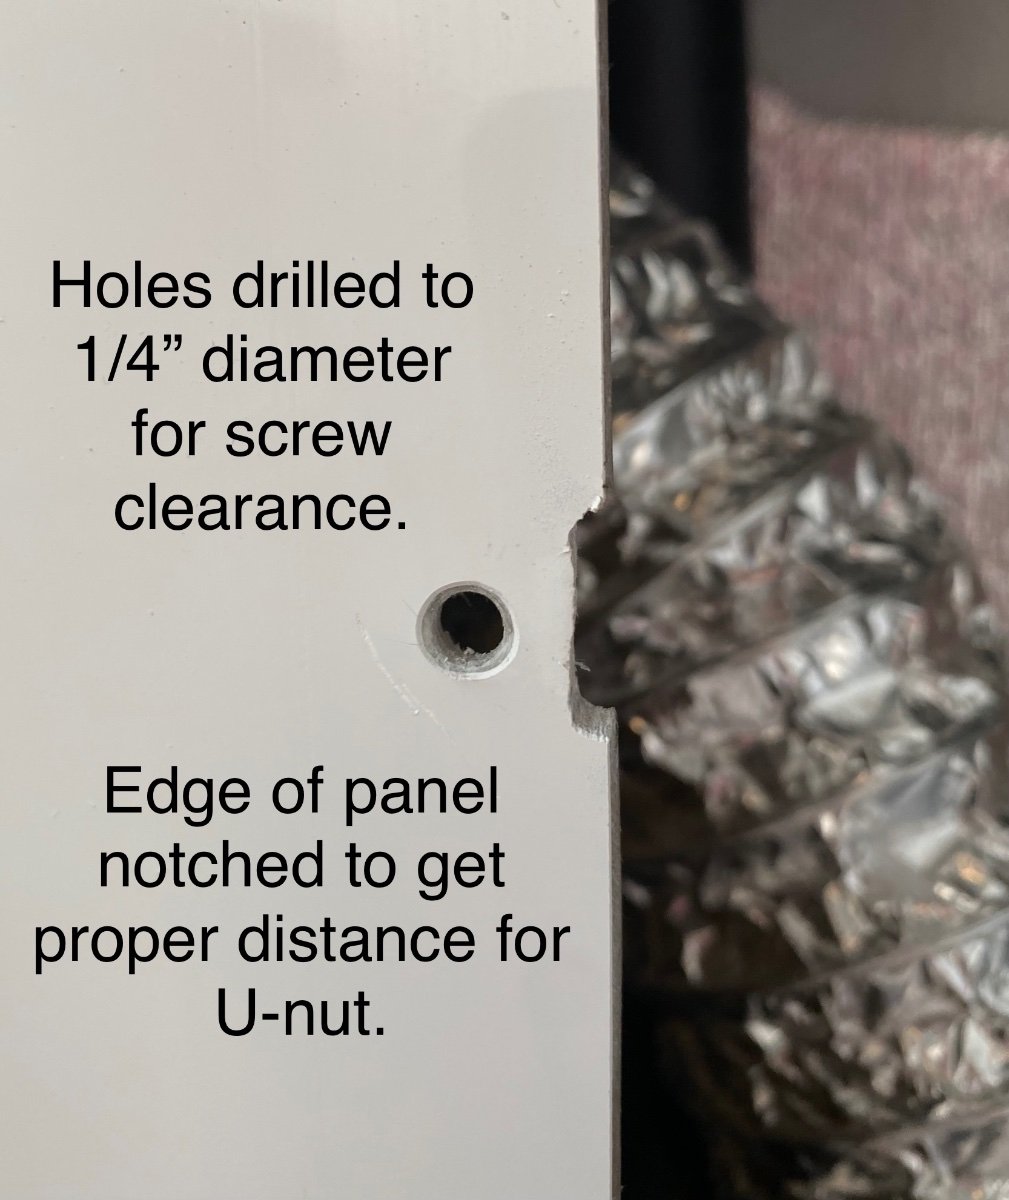
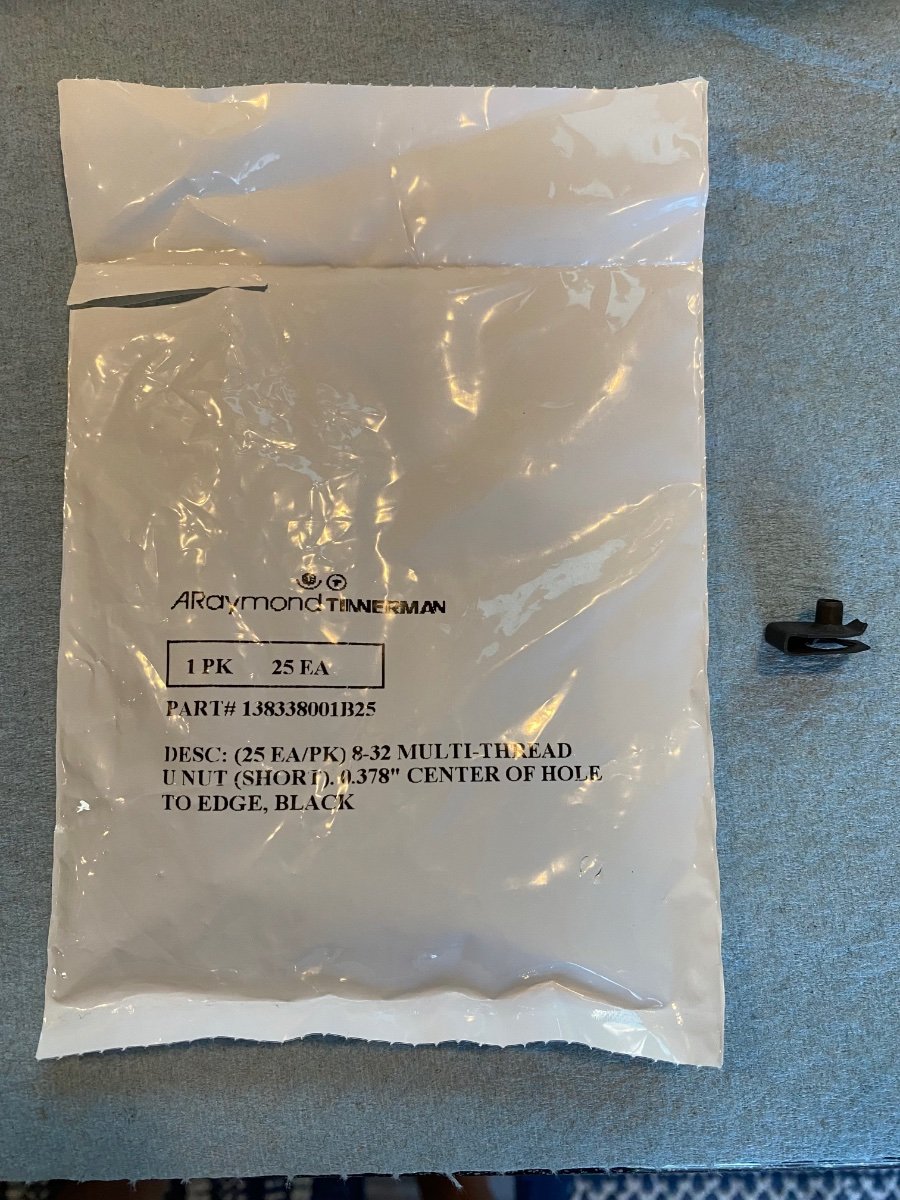
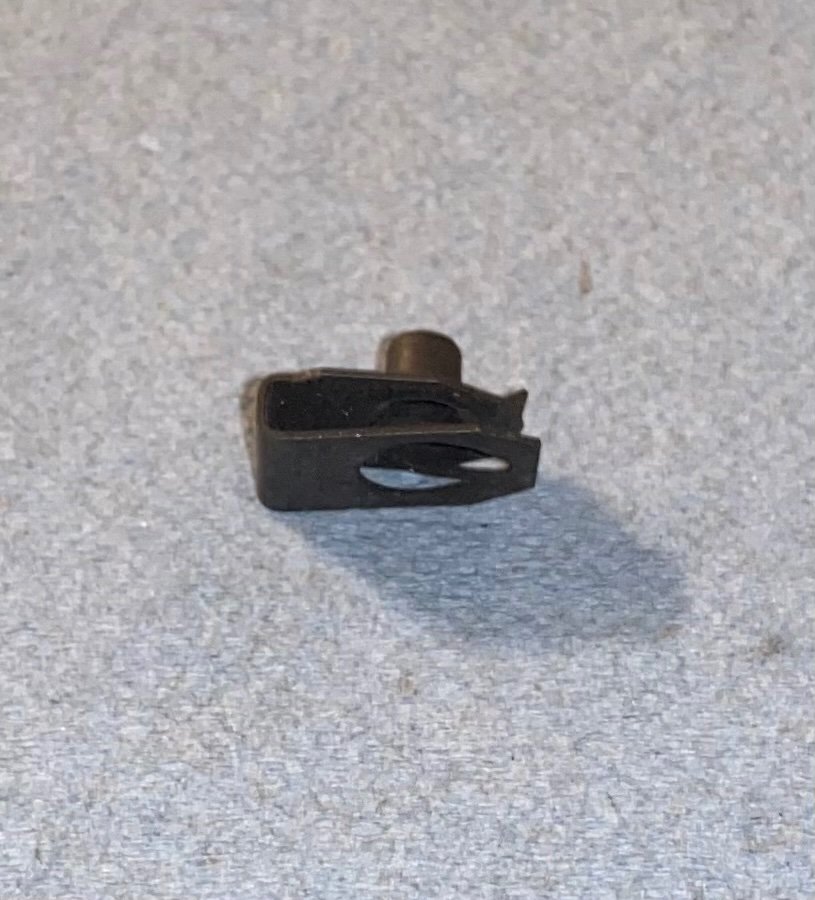
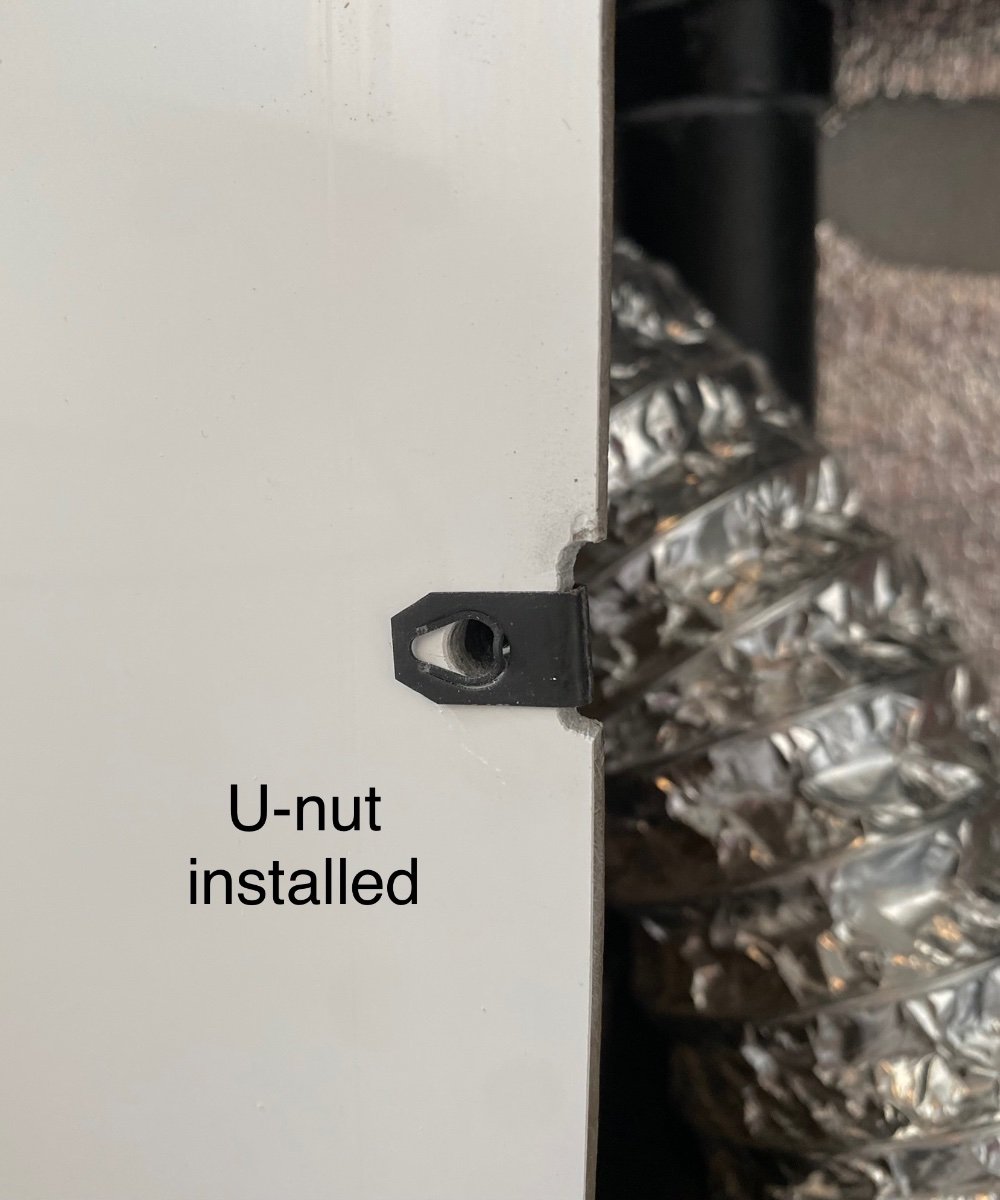
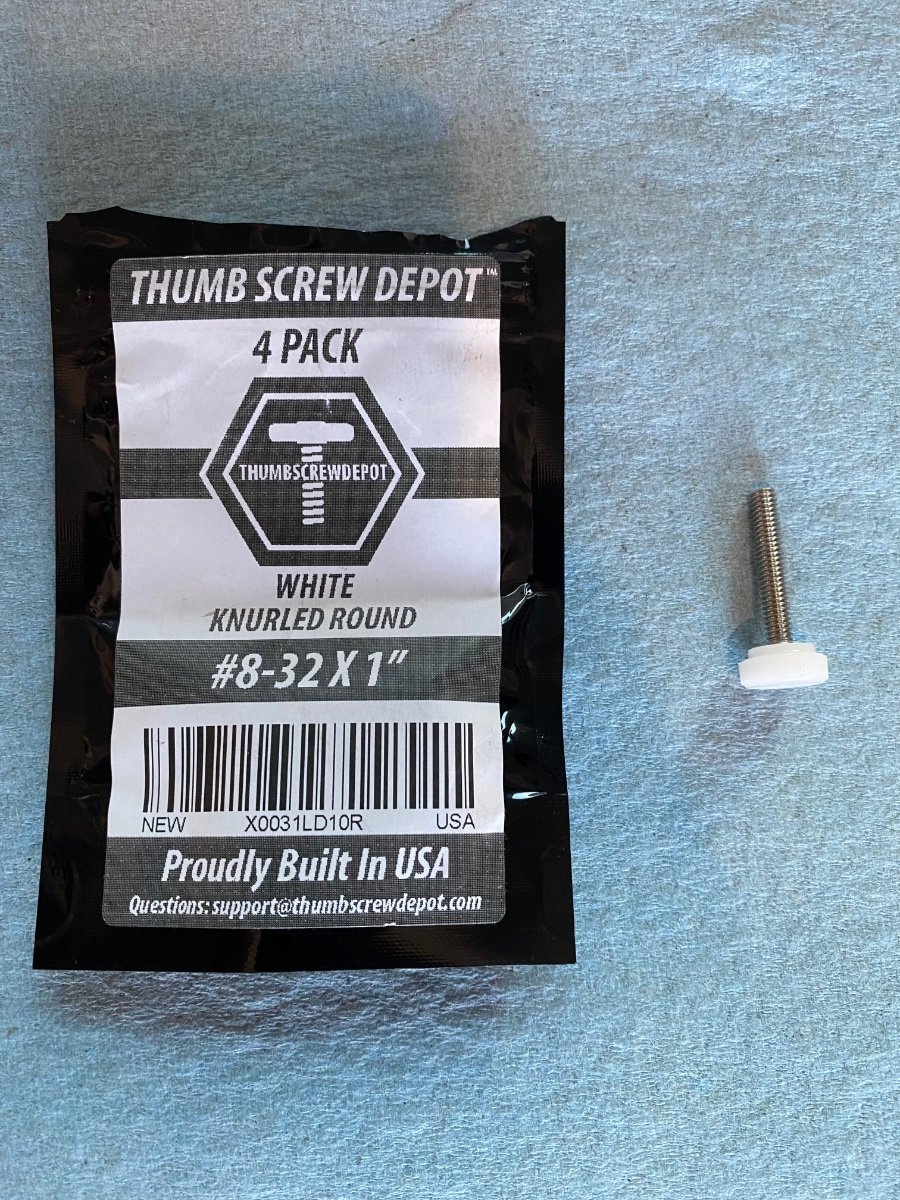
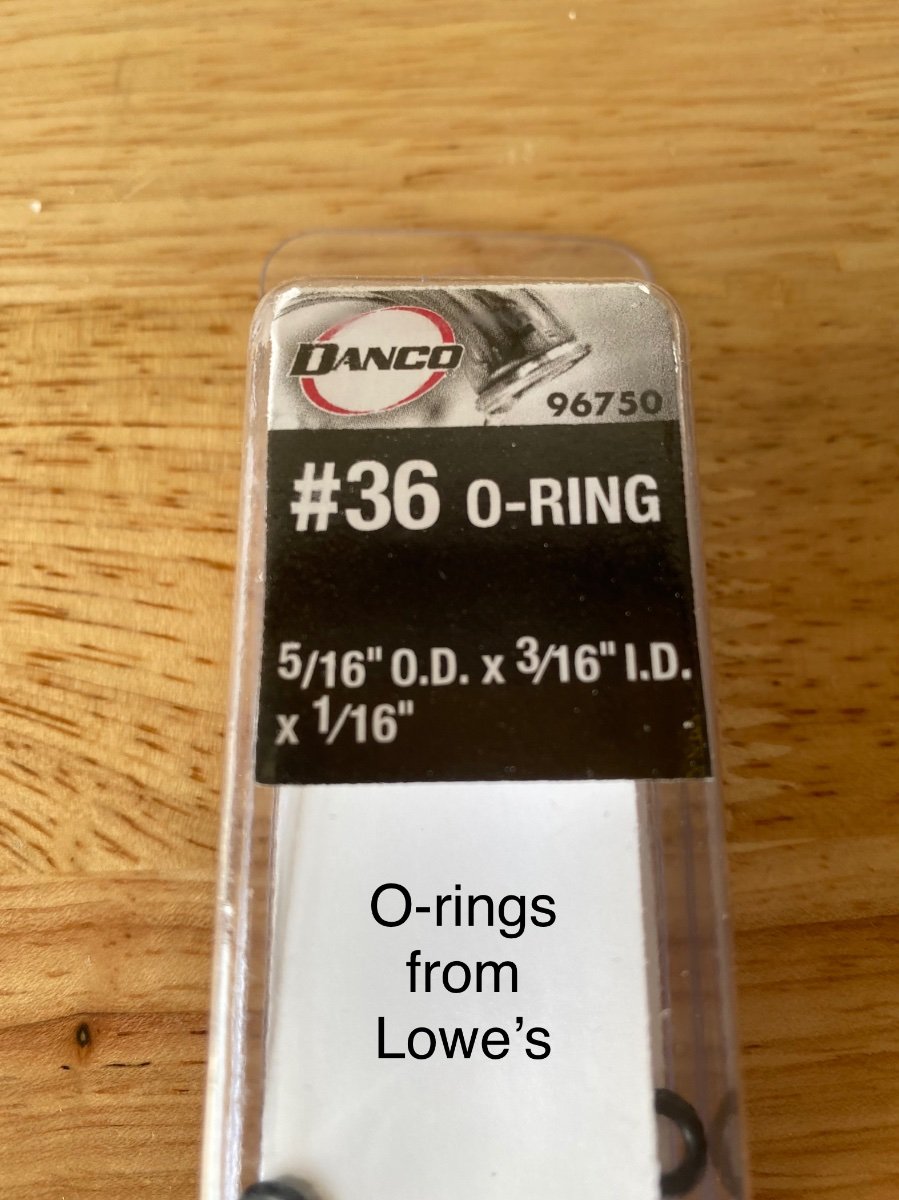
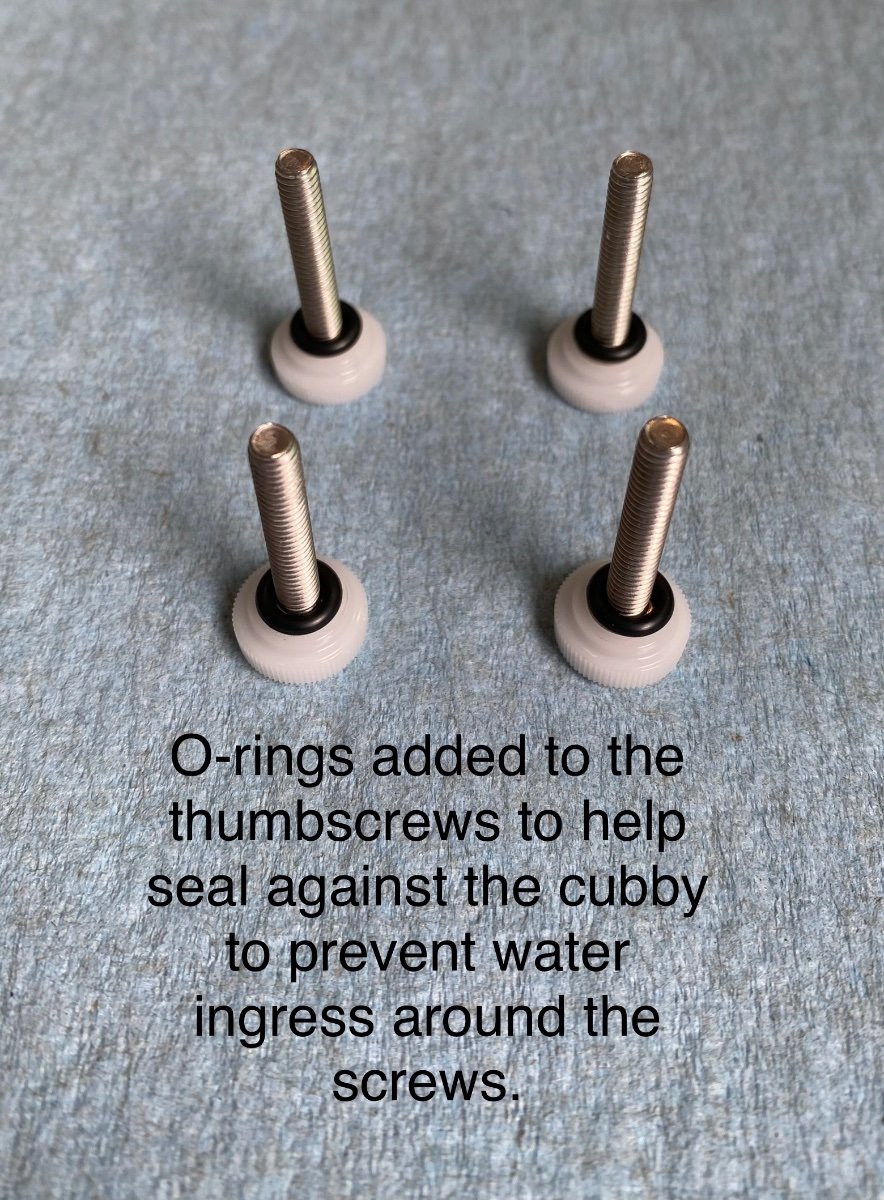
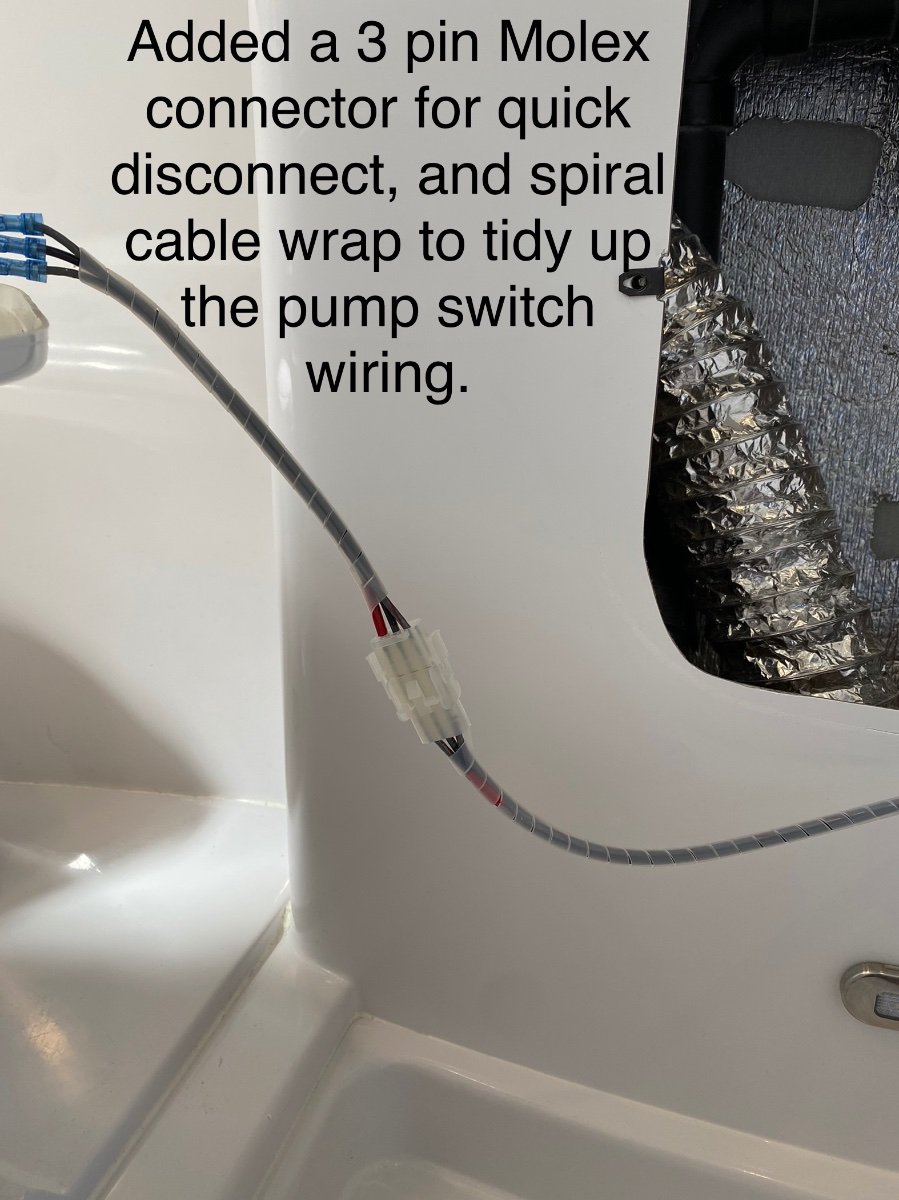
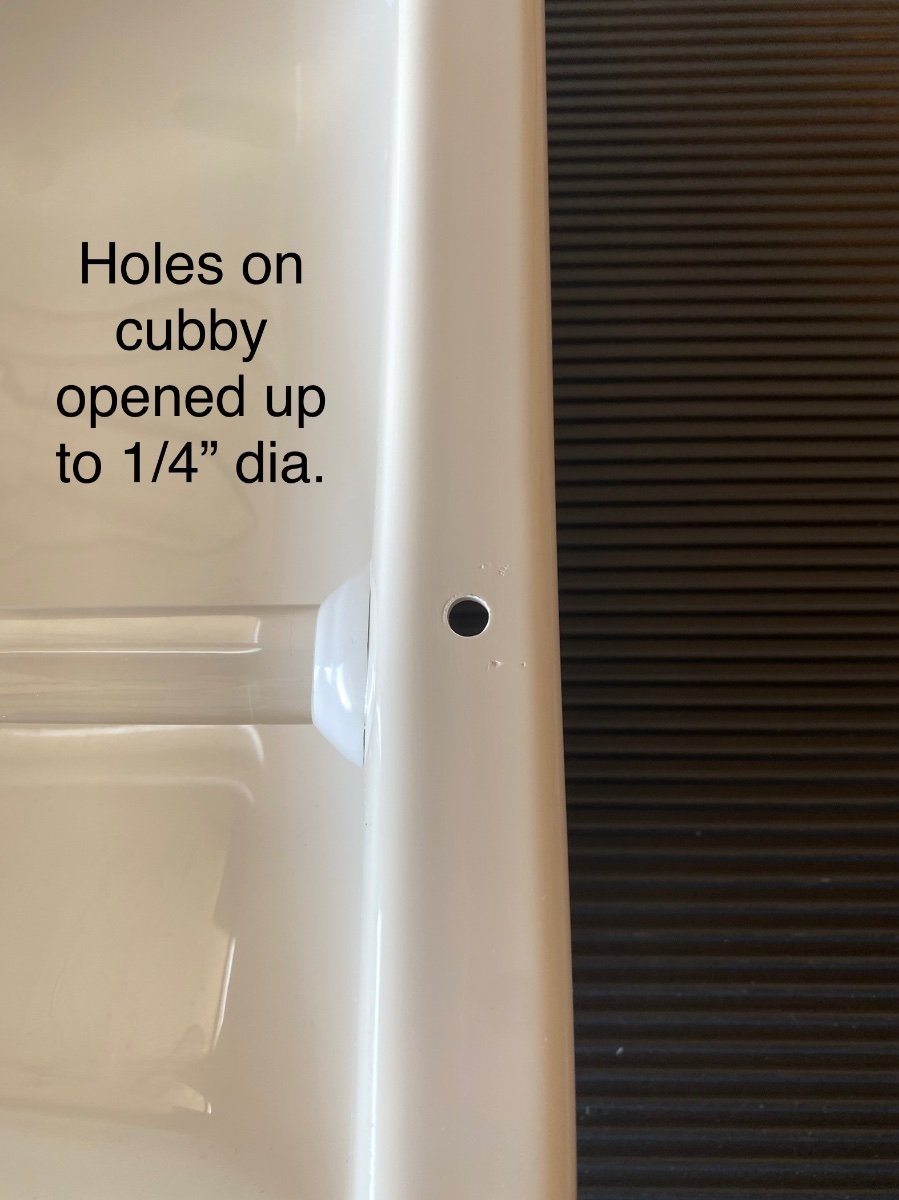
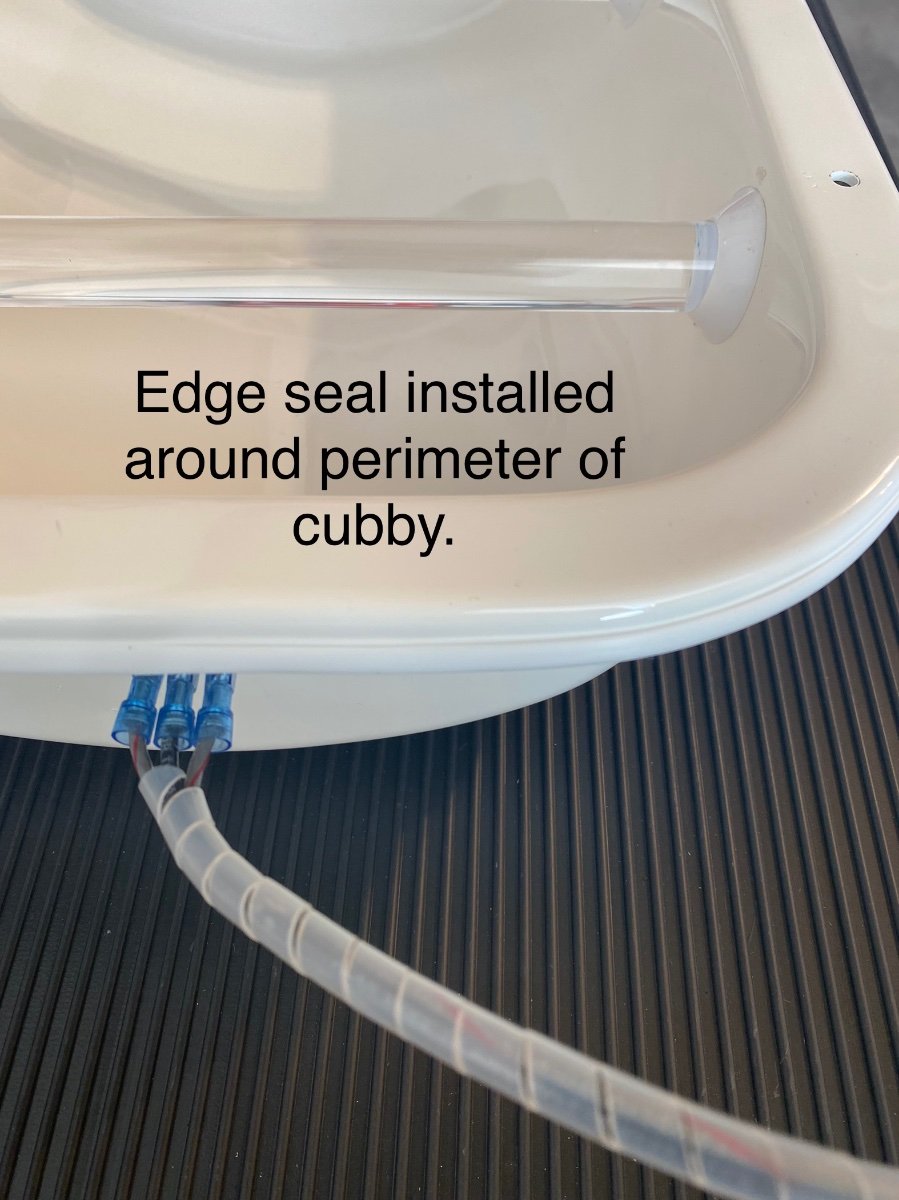
One of the great features of the Oliver trailer design is the fast and easy (no tools needed) access to ALMOST all of the plumbing, heating, and electrical systems through the hatches under the dinette seats and the beds, or by removing the kitchen cabinet drawers. One area that’s NOT readily accessible is the area under the bathroom vanity, even though there is plumbing, electrical, and furnace ductwork all tucked inside the vanity. The storage cubby in the front of the vanity is screwed AND CAULKED in place by Oliver at the factory, so access is a bit more complicated than the other areas. I recently needed to get into that vanity area for some inspection and maintenance, and after completing that I wanted to make future access easier (no tools needed and no caulking). I know some owners have replaced the storage cubby with a hinged marine access panel, but I didn’t want to lose the cubby storage. So here’s a detailed description of a simple modification I did, along with links to the parts used. Access is now fast and easy. No-Slip Clip-On Barrel Nut, for 0.025" to 0.15" Panel Thickness, 8-32 Thread Size https://www.mcmaster.com/94850A111 #8-32 x 1" Thumb Screw Stainless... https://www.amazon.com/dp/B09FZVLZKD?ref=ppx_pop_mob_ap_share uxcell Edge Trim U Seal Extrusion, Silicone White U Channel Edge Protector Sheet Fits 0.5-2.5mm Edge 3Meters/9.84Ft Length https://a.co/d/1uWUZB3 Molex -3 Match Set - (3-Pin) w/14-20 AWG, Wire Connector - 2.13mm D, Latch Lock, MLX https://a.co/d/gapvioi
2 points
-
Are the batteries on? On my 2022 each of 3 LiFePo batteries has a button on the top to turn it on.1 point
-
Correct, but based on the labels, the solar breaker is the red one in the left. @mthom: if there's no reset button on the red breaker on the left, try turning your solar panels off for a few seconds using the red switch above the bed, then turn them back on in an attempt to reset an auto-reset breaker.1 point
-
Well, as I just posted in the FB group. I can't get new axles on #110, they will not fit, but I did go ahead and get new AGMs for now! I just do not have time this year to fiddle with Lithium experimentation myself. They are installing my Dexter EZ-Flex system, which I had not yet gotten around to installing. A shame they spend so many man-hours trying to fit the axles onto the frame. I'm very pleased though with everything so far. Very impressed by the integrity of the Oliver service team. Jason did say the Progressive Industries converter I just upgraded to, which has a Lithium switch on it, part # PD4045CSV, is not "certified" with Lithionics, but is for Battleborns. The way I use the camper now, I really have no real "need" for Lithium, although I know I will love the future upgrade. Let's face it, guys can get each other "excited" over new shiny tech toys. I know I do. This might be the last set of lower-end batteries. Mine were not even able to maintain the hot water pot, which only needs 1050 watts of power. Since the "rube" who installed the batteries at the NC dealer connected the positive inverter cable to the wrong end of the batteries bank, the batteries did not degrade evenly, or together. So, screw it. Out with the old. At least Oliver will wire everything back up correctly. They have all the pre-cut connectors I'm sure. Jason said it takes less than an hour typically to install the batteries. Hopefully no more surprises. New large windows are in along with new shades.1 point
-
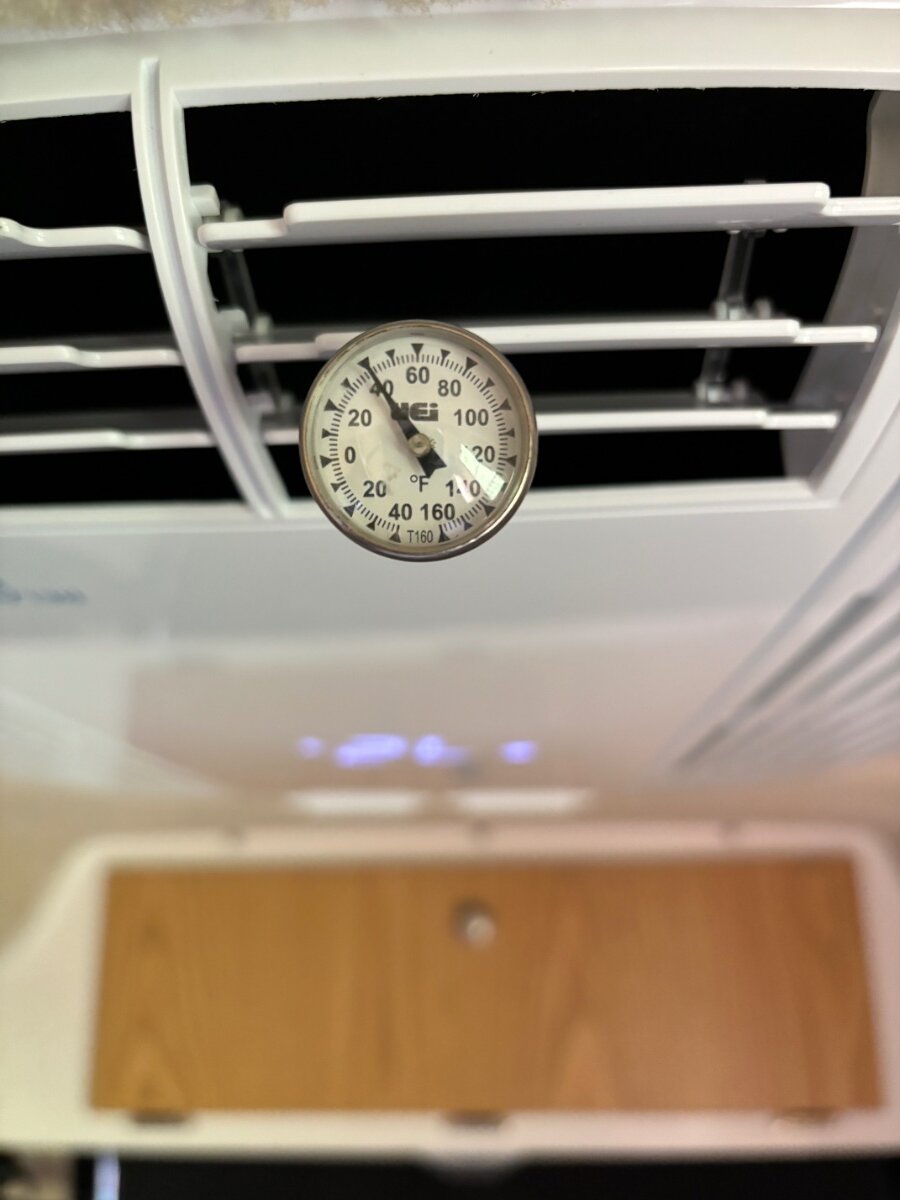
Correct. Compressor cycle depends on outside temperatures, as temps rise compressor cycles on more frequently. We have been in a heat wave here, in the 90s most days, these settings have worked good for now. We will be on a 10 day trip soon and the real world test will be if wife is happy lol. At end of compressor run cycle the supply air is at 40 degrees so I decided to adjust T1 up to 60 seconds to clear more of this cold air from unit and into cabin. This new setting doesn't seem to be causing humidity issues but it seems to help compressor cycle on more as outside temperatures rise and more consistent temps inside camper.
1 point
-
@jd1923: Very clean mod, brother! Nicely done - BRAVO ZULU!1 point
-
The MaxxFan Plus with the LED light really makes for a superior lighting configuration in the head with the factory OTT LED lighting package, FYI. Should be another standard module from the Mothership, IMO.1 point
-
It’s enough! 275A x 12 VDV = 3,300W. So you can run your A/C plus your microwave, at the same time across this beautiful piece of copper! Limiting factors will never be the copper bus, but instead your inverter or the cabling to it. Go with the proven design that @katanapilot has illustrated. Nice install! This copper 1/8x1x6” busbar on your B- terminal is likely a superior conductor than what your LifePo4 battery manufacturer has designed internal to the battery terminal, for sure! That’s all that counts at the final ground to the battery.1 point
-
Do your batteries charge on shore power? What brand solar charger? What does the SC panel read vs. the Victron app? Besides the SC ON/OFF switch, there should be a dedicated breaker. Did you check that?1 point
-
Just remember that if you disconnect the batteries from everything including the solar charge controller you need to disconnect the charge controller first from the solar panels. Or risk damaging the solar charge controller.1 point
-
My order arrived yesterday and it *did* have the LED light included. Was a little worried with so many receiving theirs without one when buying though Amazon and Ebay.1 point
-
It's hard to find a simple wire gauge chart. This one is not bad. 14 AWG can handle 10A on short runs <10 and 5A up to 20FT. I did buy the Beech Lane fan. It will get here before the weekend, so I hope to work this install then. The spec is 7.2W which translates to only 0.6A in 12 VDC. According to the chart, you could use as small as 18 AWG. Most DIY installers go with heavier than required when cost is less a concern. For me, I've had several spools of 14 AWG, one 12AWG, a spool of thermostat cable and some others from a commercial project back in the 90s. I've used this inventory on dozens of auto/home/RV installations ever since. Wonder what shelf life is on stranded copper? It still looks like new; copper is bright, insulation supple. What does copper cost today? Likely 5x what we spent 30 years ago.1 point
-
This is what we use, and a small can and a couple of small brushes.
1 point
-
+2 on touch up with Rust-Oleum.1 point
-
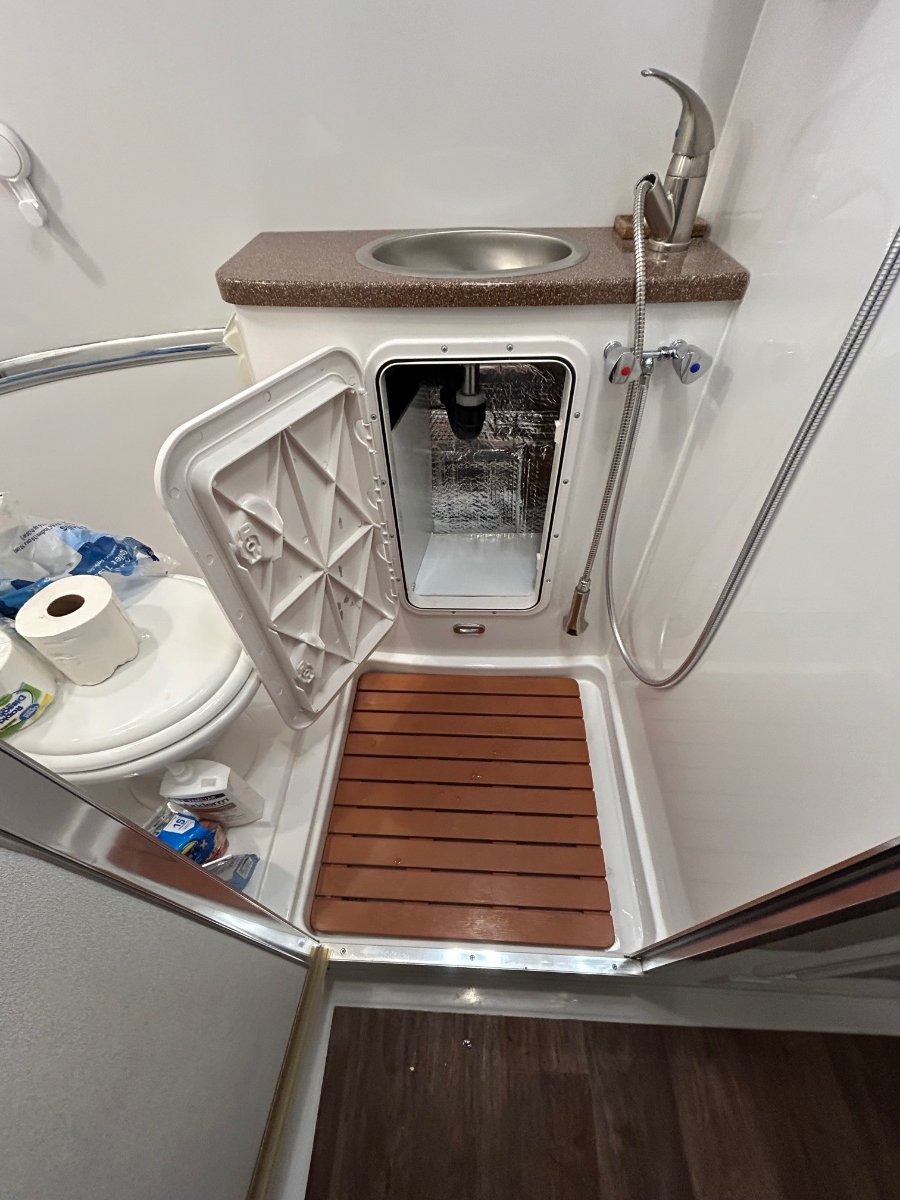
I had one more step to finalize this mod. Love it when I can cross something off the to-do list! Don't we all. 🤣 I deleted the duct under the bed and installed a return duct filter, so the deleted air duct needed the finishing touch. What is important is that no return air comes through this opening. The other consideration is the added return duct will throttle the return air, pull it a little more slowly, creating a stronger air pull through the basement. This is key to the basic design and will certainly help to protect the entry water plumbing (City Water and Fresh Tank inlets) in the rear of the Oliver (objective #2). Bought this item on Amazon: Amazon.com : NVAAV 4 Inch Boat Round Inspection Deck Plate Hatch with Detachable Cover and Pre-drilled Holes, Water Tight for Kayak Marine Boat Yacht Outdoor Installations : Sports & Outdoors Not the best quality, basically a cheap aftermarket part. I would not use it as an external deck plate, as the rubber seal was no good, so I went without it. The duct is a 4" opening and the deck plate for the water heater shut-off is 5", so my first thought to use the same part would not work. It was a snug fit, so I filed the opening just a little. Replaced the screws included in the package with a size smaller that I had on hand. Looks good in the end. I enjoy the look of our water valve switches, the return duct and deck plates, all now complete!
1 point
-
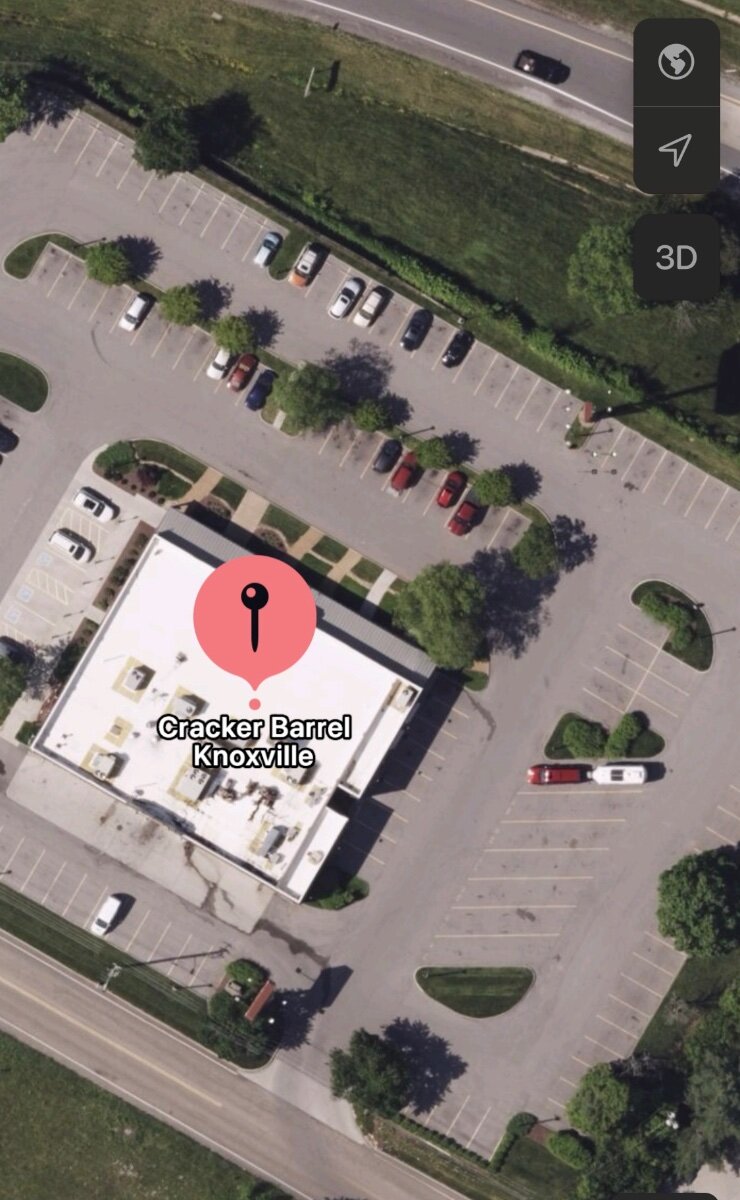
topgun2, this is what happens when you stay in Cracker Barrel parking lots too often! Google maps cameras catch you. This location happens to be on our way most anywhere west of Virginia so we stay here often. Maybe too often! 🤪
1 point
-
Mike, what black spray/paint did you use on your coupler?1 point
-
Your disconnect needs are different than mine, so I choose a location under the rear dinette seat. I was interested in a disconnect switch in order to allow battery removal for a future battery upgrade and I wanted less obstacles in the battery box. It will work for your needs wherever you place it. I have some small pieces of 4/0 cable and I can make a short jumper if you provide the connectors and cover the shipping cost. Mossey1 point
-
Epoch updated their site too, $100 less than before plus a 10% OFF code. 460AH for $1,169 after discount or 300AH for $899 (Victron Comms more). All authorized dealers should be offering this. Hope it doesn't end soon. Their prices keep getting better.1 point
-
I had this video pop up on my "suggested list". Very informative. I never did understand all the different sizes and names for wires. Americans! We're some stubborn folk, aren't we?! Looks like he's doing a good job with his new training series too.1 point
-
1 point
-
@Boudicca908: While you've got the cubby insert removed and have inspected that "great space" under the sink - try considering replacing the insert with one of these and adding a shelf to store toiletries and stuff: Gives you ready access to all that great space below the vanity sink... Just say'n... Cheers!
1 point
-
Update: Well, I've had the system on a few days of Solar and a few days of 20A shore power. The BlueSky and converter seem to be working totally as expected and as it was before my battery tray clean-up. A good long shutdown/reboot fixes almost everything. Even us. LOL I'll be at the factory for the first time in a few days. Not sure what to expect, but excited.1 point
-
Just so I understand your question. Do you mean the CO2 / propane detector under the dinette by the electrical panel? If so, then yes, I pulled the fuse during one of my tests to see where the draw was coming from. During one test ALL 12v fuses were pulled out, just to be sure. Good news this morning. After putting the trailer in "dark mode" last night, (with everything off and breakers popped open) the Blue Sky seems to have "fixed itself". After verifying the batteries had stabilized down to 12.94v and were holding this morning, I powered up the solar controller and reset the rear breakers. In short order I noticed a more "expected" behavior from the ProRemote, with only a draw of -1.1 amps, while it was rethinking it's life's decisions. LOL I verified all settings as Ryan from BlueSky had me set them to a few years ago (same batteries). All was well there. One test I did, out of curiosity, was to change, just for a few minutes, the "self discharge" setting. Ryan, and the user manual, suggested keeping it at 10% for FLA batteries. I put it to 0.00% to see what the ProRemote would say the draw would be. It immediately dropped down to 0.0amps. After re-reading the ProRemote user manual in the house, I went back out and set it back to 10% self discharge. The ProRemote leveled out to what I would consider a more "normal" behavior for my system, with a draw of -1.1amps consistently. As the sun is coming up now, the system is going from float to acceptance and back again as needed. Also, the charge level hashes (#####) appeared much, much sooner after turning the system back on, compared to yesterday or day before. Previously they would not show up for hours, which frankly I think was a normal behavior for my system if the power was taken away from the BlueSky for a while. Either way, it feels like it is "happier" now. I'll keep an eye on it throughout the day. I'll keep only solar on it for now and keep the shore power off until I confirm it's behavior. Thanks again! Great fun learning something new that does not involve a keyboard and a desk. LOL I still have not gotten around to checking the draw using my clamp multimeter. I will, hopefully today. Depends how busy I get at work.1 point
-
@topgun2 it's not the inverter. Good thought, but like you, I really don't use it too much. It's in an off state. I must say, I've had a good bit of fun touching all this stuff and getting more hands-on. I've been wanting to find something in retirement, whatever that will look like for me, to replace my current IT job/hobby. Something where I'm moving around more yet still staying technical. Thirty years of desk work on a keyboard in data centers has taken its toll on my back and neck. My interest has been solar and batteries for a long time, but have been nervous about doing things on my own. Usually I find when I do finally accomplish a new task or learn a new skill, I find it wasn't that hard after all. I'm a big scaredy-cat. LoL1 point
-
I've watched a number of YouTube vids on how to lessen the A/C noise of RV A/C units. Your approach looks similar to many - a combination of sound deadening materials plus smoothing the airflow inside the unit. Nice job with nice results. Thanks for posting this. Bil1 point
-
It had nothing to do with your failure but I’d seriously consider adding a WD hitch to your trailer. You have a lot of tongue weight with your front storage box loaded, well above what’s recommended for a 1/2 ton.1 point
-
Link is in the original post.1 point
-
@Frank C Brilliant!!!1 point
-
I have found it is fairly easy to back off the nuts on the trailer, get slack in the chain, remove whales tail. Do the reverse when hooking up. Count the threads on the bolt so they are even. Actualy really easy1 point


.thumb.jpg.e34bf01ef7f7d5e99ad31856d45afbeb.jpg)


-
Recent Achievements
-


")


")


")


