Leaderboard


Popular Content
Showing content with the highest reputation on 08/17/2024 in all areas
-
Same here. We roll at 45psi cold - pressures usually bump up to around 52-54psi after 20-30 minutes this time of year...FYI4 points
-
I am not an electrician or an engineer, so I sometimes struggle with all this electrical talk. But that does not stop me from trying to understand all that I read... If I understand this thread, we are discussing two different scenarios; #1) CLEAN POWER at the POST, vs. #2) Handling power significant spikes/drops or power cycles (brown-outs?) enough to do damage to our trailers. Both can occur after the initial 'CLEAN POWER' test. For #1, I too have a 30a to 15a adapter, with a W.A. Sperry tester (like @mountainoliver) plugged into the 15a side. I always plug that into the post before connecting my OTT shore line. Most of the time I get the 'circuit OK' and I continue. If not OK, I try to resolve with the CG staff. Like @Mike and Carol I also have a 4-prong 50A to 3-prong 30A adapter, and have used it when 30a was dirty & 50a was clean. For #2, I do not have anything as of yet... But have been giving it more & more thought. This is why; During our last camping season, we were at a CG that had a fueled 'CG' wide large generator that was, to put it in crude but understandable terms... undulating. Maggie & I were walking around and when I heard that, I hurried to our trailer heard clicks in the walls and saw lights on/off on Xantrex, I then disconnected our shore power. Later when I talked to the CG staff, they said the generator had governor (i.e. undulating) issues, another said the demand exceeded the output, so it would idle down for a moment. IDK enough to know what it was, however I do know enough that I did not like the clicking & lights show in or trailer.. So I am wondering if I need to look at getting something that handles #2 OR if #2 can be further split between (2a) power spikes/drops and (2b) power cycles (brown-out?). Still trying to understand all that I have read above... So keep the dialog coming, and I will re-read & watch video's. B~Out4 points
-
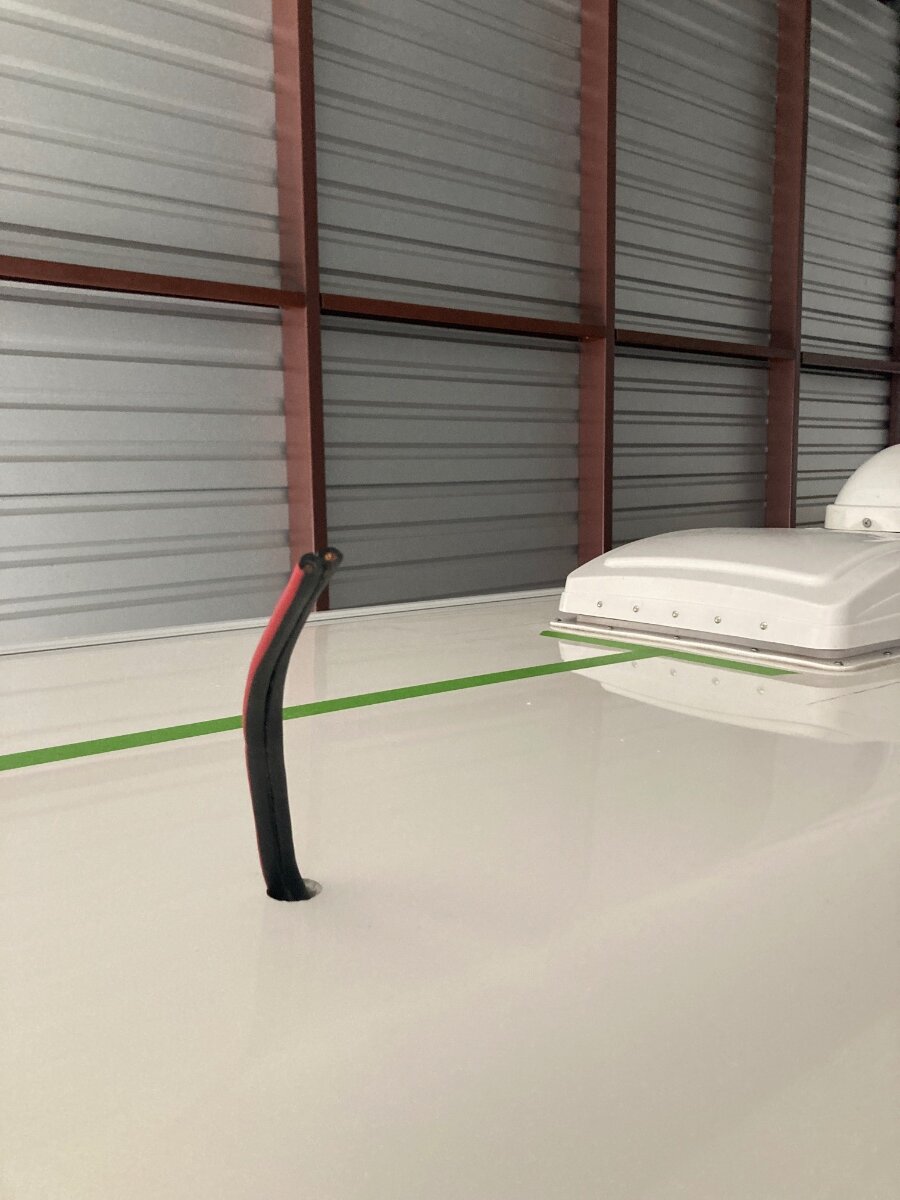
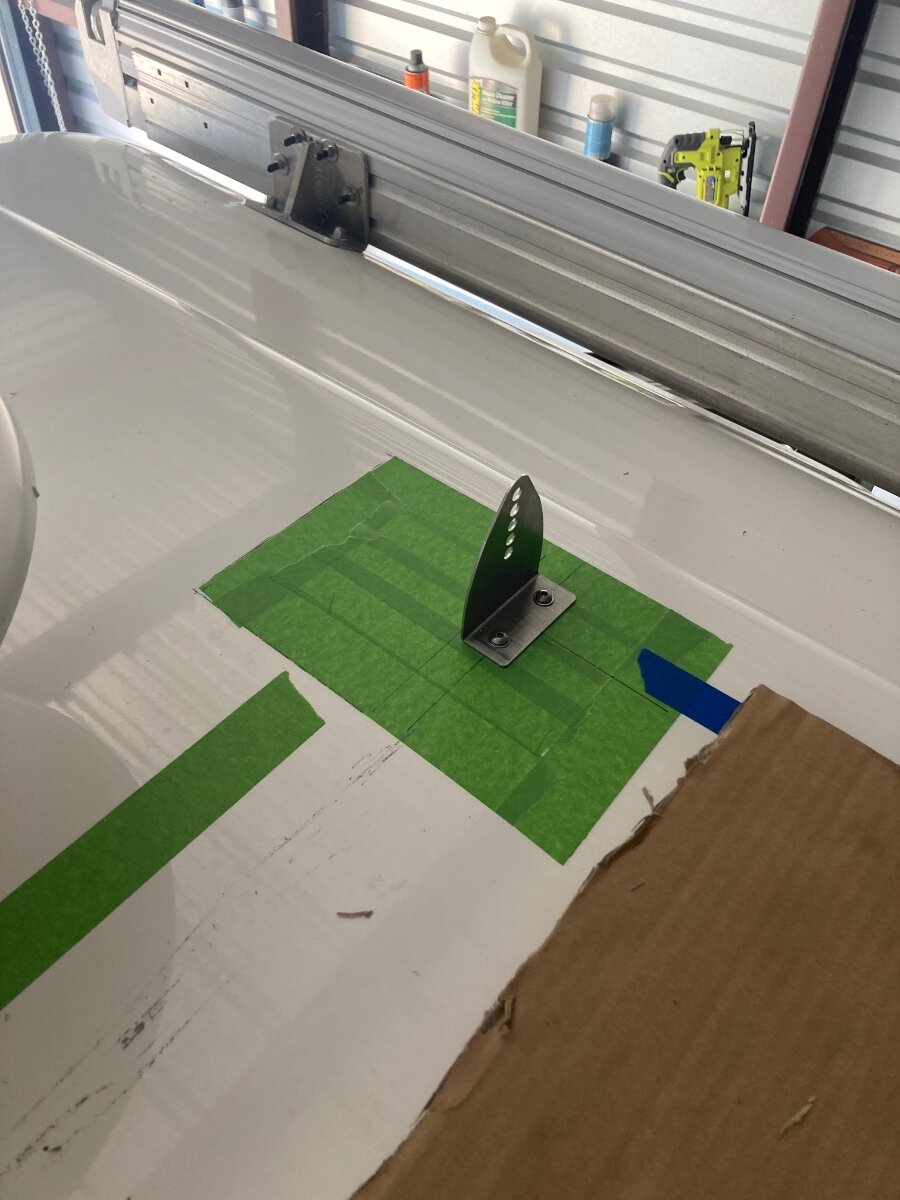
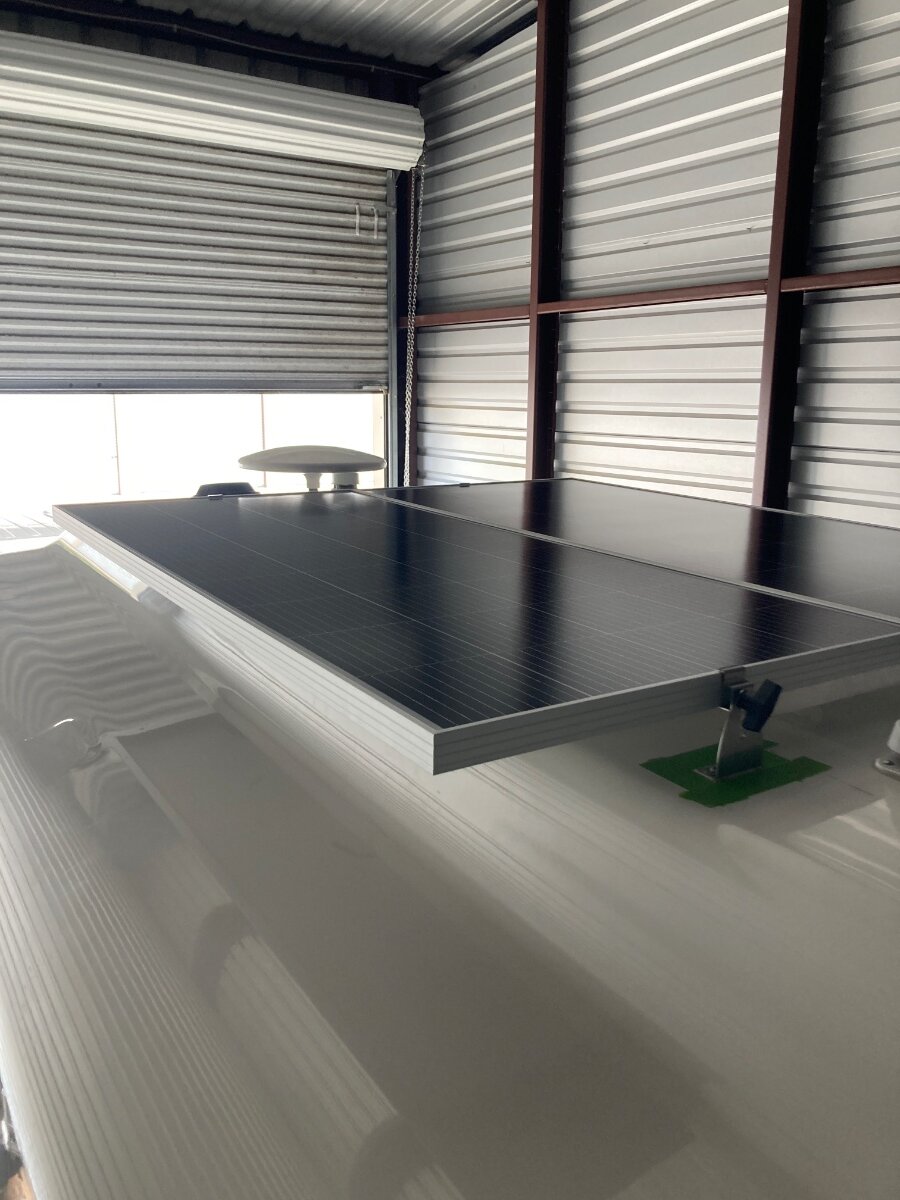
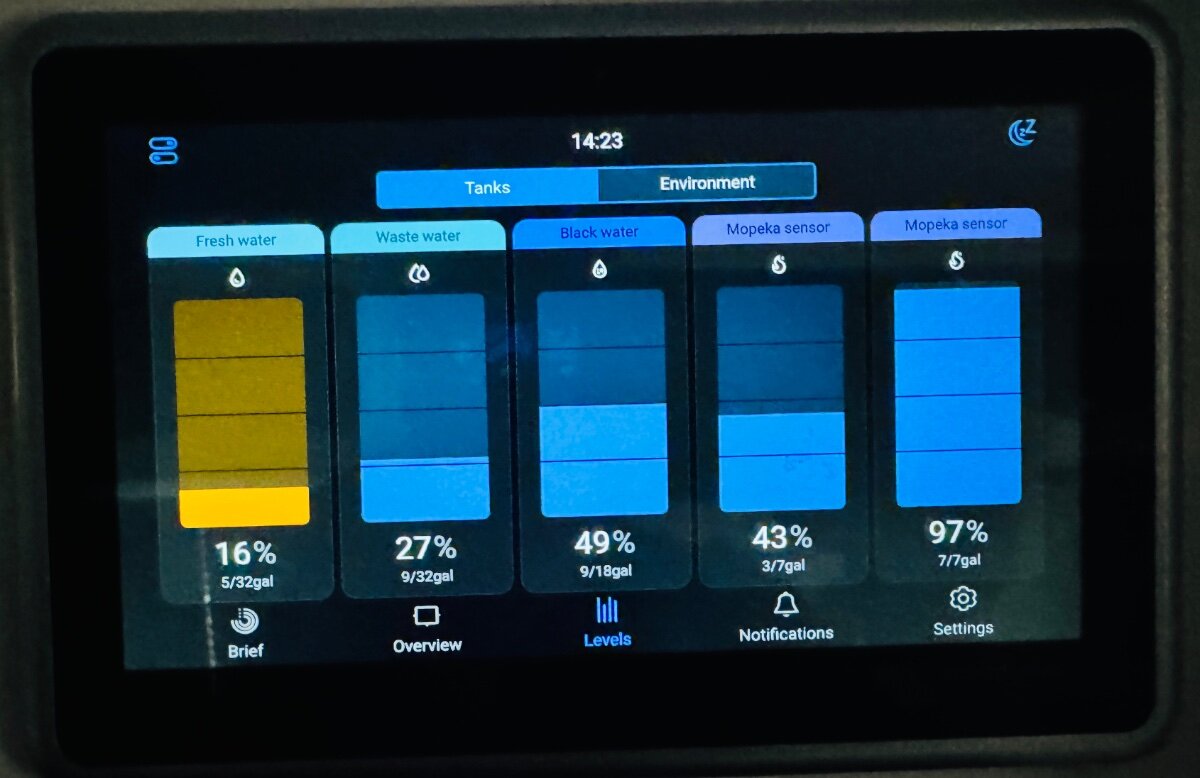
Started installation of solar on Hull 484. Little bit of background information. I purchased a 2019 LE II in April 2024. Although the trailer was not ordered with a solar package it was prewired for solar by OTT during the build and also had the aluminum mounting plates on the roof under the fiberglass. Thank you to owners @AndrewK and @carnivore that have completed this before and posted on this forum. @carnivore ran through his install over the phone with me and even provided me with spare mounts he purchased from AMSolar during his install. I would not have had the confidence to start drilling holes into my roof to locate the preinstalled wiring without these owners doing it before me. Panels are mounted, just need to complete the wiring on roof and seal around the mounts. Mounts were secured with VHB tape and screws by drilling and tapping into the aluminum plates. I went with 2 - 200 watt panels from Rich Solar for 400 watts total. Ordering a victron solar controller and smart shunt. Will post update when the electrical side is complete.
 3 points
 -
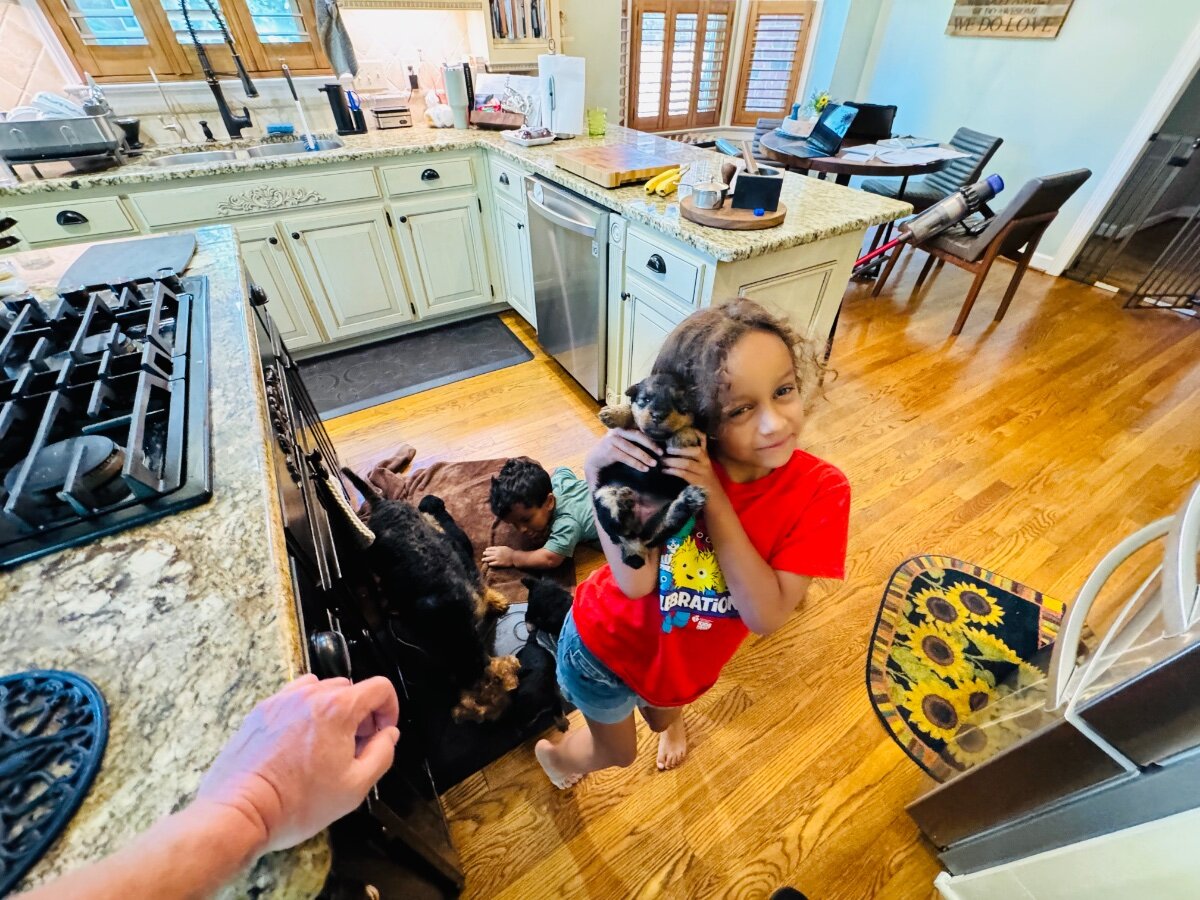
3 weeks old. 3 boys and a girl.
3 points
-
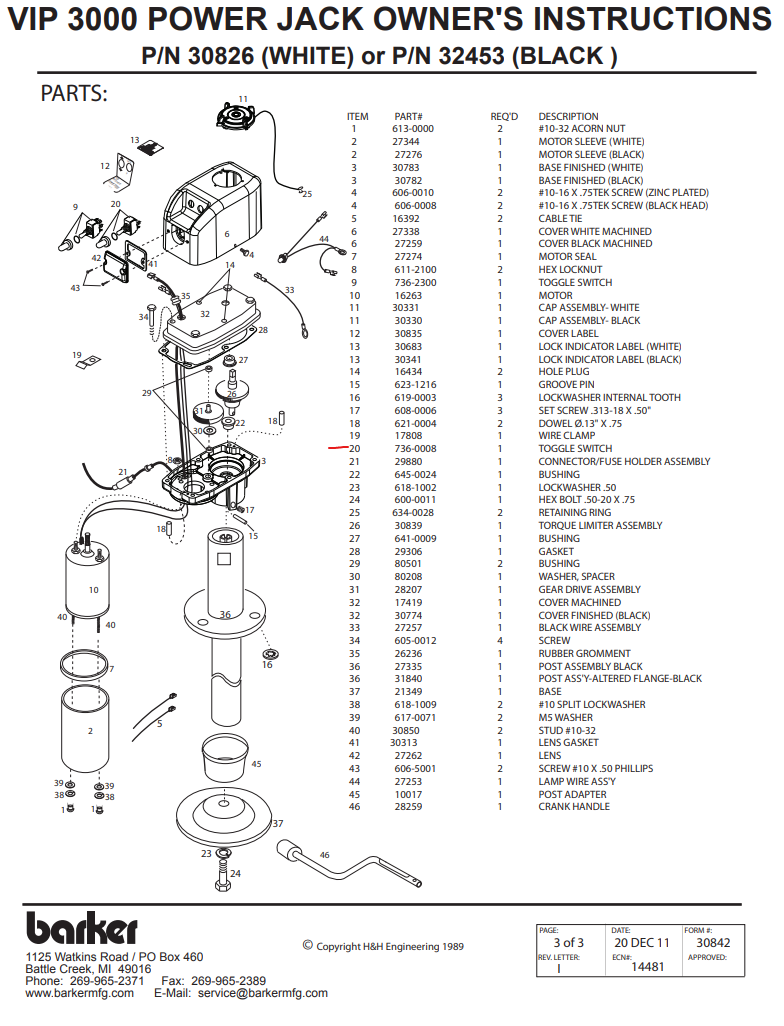
I was able to find the part with Mike Sharpe's help. I am attaching the Barker parts list he sent me as a reference. He marked part #20 but that is the light switch. Part #9 is the up/down switch. Here is a link to the place I bought it from: https://pdxrvwholesale.com/products/barker-jack-up-down-switch-736-2300
3 points
-
We have been running at 50 since the beginning of the year.👍3 points
-
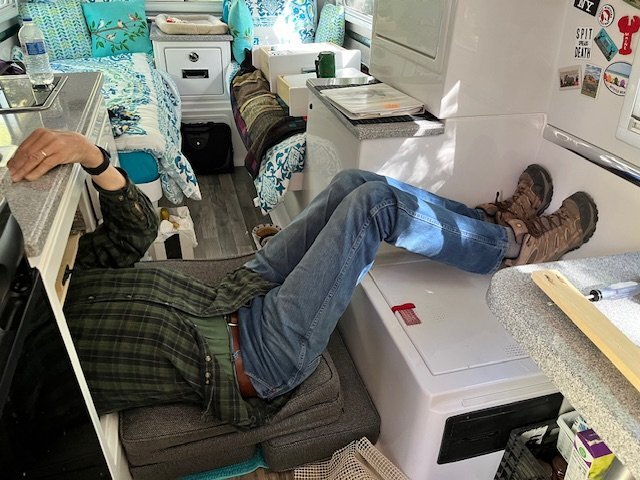
@routlaw you mean like this 'on the road repair' of drawer 'Rails & Slides' ??? A number of '(2) pre-drill holes' however 'with only (1) screw'... never did find the missing ones. The screws used should have been 1/4" longer. Not bad for a 76yo 6-5, I was further in before Maggie took the Pic, and of course Willis was right in there with me ‘Supervising’…
3 points
-
Good practice. I’ve had bad 30a connections but when I checked the 50a it was fine so I just used it. We had a 30a go bad after a few days at Table Rock Lake near Branson and I was able to use the 50a until they got it fixed (it was hot and we needed the AC). Mike3 points
-
As noted by JD, Sea Dog, and David Austin, tire pressure is a big deal. Prior to 2022 tire pressure out the door was 80 lbs. When we picked up our 2022 they were at 55 lbs. We run ours under 55 lbs. At 80 lbs. That would be the true definition of "Shake, Rattle, and Roll"😊3 points
-
If you're not using bolts, washers, and nuts, maybe try petmatex blue/medium strength. It's supposed to bond to plastics , ie frp, ie, fiberglass.3 points
-
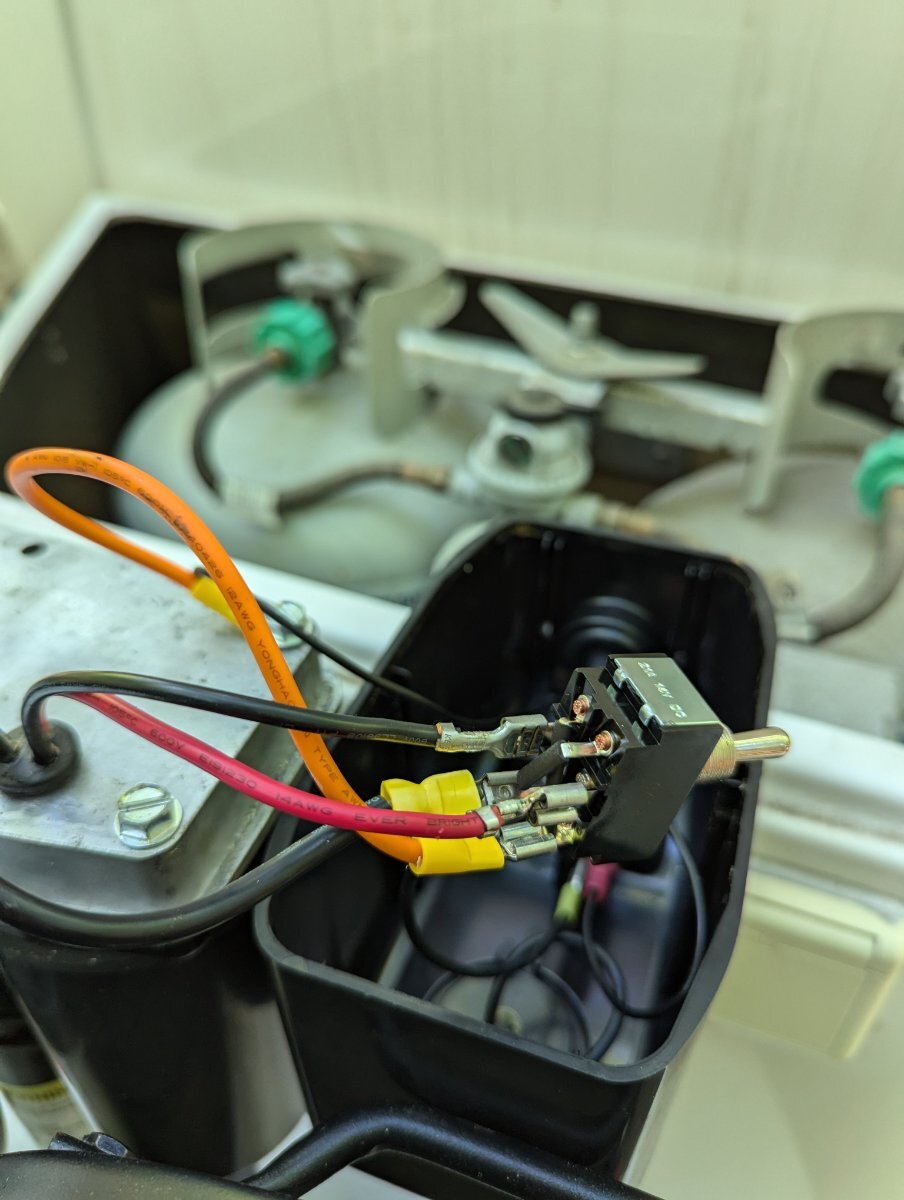
My tongue jack toggle switch stopped working in the up position this weekend. So I was not able to raise my camper. Luckily the bottom half of the switch stilled worked, so I could lower it. As an FYI: If you switch the red and black wires around it reverses the action of the switch so the down position becomes the upward movement. I was able to rewire it back and forth to get my camper hooked up using the motor. Having the inline fuse right there to cut the power off/on while switching back and forth was convenient. (obviously it could be done manually with the crank as well but then I would not have had anything to post). 🙂
2 points
-
As noted by @Patriot -- I frequently check the fasteners after travel. I have my tires at 55#. However, a couple of rough washboard roads have convinced me to lower my tire pressure more. Even though I go really slow, the vibration impacts everything. This last trip, I opened the Truma AquaGo WH (outside panel) to turn it on, and discovered a screw sitting against the panel door. It took me a while to figure out where it came from. That required me to go buy a TORX screwdriver (star-shaped), and Blue (medium) Locktite. I also purchased some other new tools this week, for dealing with Zerks. But that's another story. I wish we had a "recommended tools" list on the OTT Service Knowledge Base (a more robust list, I should say)... because sometimes you find a need and no hardware within distance.2 points
-
46 PSI here, and God Bless @John E Davies who swore by 42#!2 points
-
My Furrion/Cnlinko inlet is an older design. The socket itself is all metal the new ones are plastic. When I ordered mine, Furrion advertised the metal version but sold the plastic version both with the same model number. I called Furrion and the guy I talked to sent me another plastic version and a cable tv inlet. After further conversation, he found a metal version in someone’s desk in their office and sent that one to me. Apparently they no longer make the metal version. By the way, the Furrion/Cnlinko solar inlet has the same mounting hole pattern as the Furrion power inlet if interested.2 points
-
That surge protector will not protect you. You get what you pay for. If you want the proper protection,then you need a good EMS portable surge protector, such as the the Hughes Watchdog 30 amp EPO that will shut off power to the Oliver if there is an issue. South Wire Surge Guard 30 amp, or Progressive 30 amp, all EMS protectors, that cost $325+/-. I suggest you see what the guru of RV Electronics, Mike Sokol says about portable surge protectors. Link to a Mike Sokol article on surge protectors is in one of my earlier comments. He would tell you not to waste your money on the cheap ones You of course should do what you want Just saying.2 points
-
Tire Pressure and make sure your shocks are in good shape. I have found that most appliances in the OTT to be 'Metric threading', that is important when buying/replacing lost bolts/nuts. B~Out2 points
-
A good practice!✅2 points
-
Agreed, the red is a permanent seal that I do not use. I like the blue stick since, which is like a paste that you can rub on a screw vs. the liquid that will drip. BTW, Loctite is truly designed for metal automotive bolts. I wonder if the woodworkers out there know of a good thread sealant? This is what I have on my workbench for automotive maintenance: Amazon.com: LOCTITE 248 Blue Threadlocker Glue Stick: All-Purpose, Medium-Strength, Anaerobic, No Drip, General Purpose, Works on all Metals | Blue, 9 Gram Wax Stick (PN: 37643-506166) : Automotive2 points
-
Our interstates are like driving on the Ford test track. We have had hinge screws come loose on the upper cabinets. We put locktite on them and that solved that issue We are on our third microwave frame. 2 replaced under warranty and some shoring up by Oliver. Better, but cracking on the corners again. That's the roads. As owners, checking fasteners, electrical connections, fuse connections, etc. should be on everyone's preventative maintenance list.2 points
-
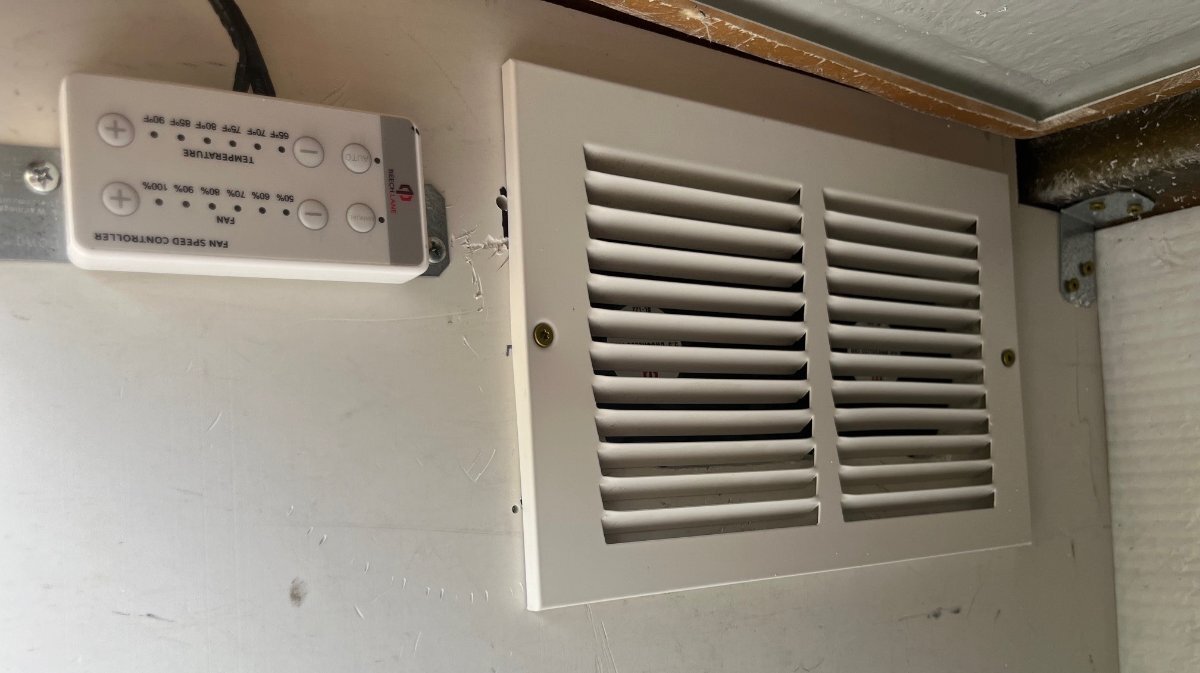
Pretty cool new UI in Beta. Orion XS 50 finally shows up.
1 point
-
Just DC and propane. From a boon-docking perspective… hopefully you don’t need AC.1 point
-
No display, just the VE.Bus device connected via ethernet which allows connection via the VictronConnect App (link and pictures shown above). Given this is true, if the Victron MP2 fails, there will be NO shore power. You'd have to pull the bed, pull the AC wiring from the MP2 and use wire nuts (have 3 in my Oliver parts box) to connect to shore power. I get soooo frustrated with design engineers that do not understand common let alone severe use cases! It would also be crazy to install a secondary ATS!1 point
-
@wolfdds a very helpful post and glad Mike Sharpe was able to get you the link and info. Thank you for posting. It might be super helpful if the mods or the site administrator would create a “sticky reference” page on the forum for links such as this. It would be super helpful when traveling and may require fewer phone calls to Oliver Service. It would be much easier to find links than using the forum search function. How about it mods can you discuss the idea of a sticky reference page for links like this to be created? Forum members thoughts? Thanks!1 point
-
Thanks Rich, I was getting the same 104 MAX after running the inverter over 3 hours, 94F outside with A/C thermostat set at 78F. The Blue Sky MPPT felt much hotter on a sunny day than the Victron MP2 inverter case, both under the streetside bed. 10-15 minutes with the fan on brought temp down to 95F. These temps are fine for electronics. The manual for the Victron MPPT 100/50 and 100/30 states "operating temperature -30°C to +60°C, full rated output up to 40°C." 40C = 104F for fully rated operation and MAX 60C = 140F. The fan did just what it needed, bringing temp under 100 vs. much over. Yes, fan position is hard to tell from my pictures. I call the rear basement "the trunk" since it is for rear storage. You can reach in that opening sitting outside with drill and jigsaw to cut that opening. The fan is mounted inside the basement under the streetside bed, and the fan control and grill are outside in the trunk.1 point
-
John, I just remembered I have Sensorpush wireless thermometers all over the Ollie, sorry did I say I’m still a spring chicken!😜 I checked and the temp under the street side bed got up to 40°C/104°F one day in July, while the inside was approx. 75-80°F!. I see the output is rated up to an ambient temperature of 104°F after which the current will be derated. So I will definitely have to look at ventilation in that area. I checked out your ventilation option, sorry if I missed it in the pictures but where did you mount the fan, is it the partition between the rear basement and below street side bed?1 point
-
Have you shopped EBay for a Victron CC? I am using a 150/45 that was cheaper than the 100/30 at that time. It's often all about inventory! Mossey1 point
-
"Spring Chicken" yeah you and me both! Stop by or let's meet up this winter! That is one cool fan install! Though not sure if I'd want to pull 100-degree air into the interior directly, which is the number I read yesterday. Check out the third post in my upgrade mod. It pushes hot air to the trunk area and should pull some cooler interior air in its place from the dinette and bath/closet areas from other installed vents. The Beech Lane is a decent product and the thermostat is working well at the 85 degree setting (90 is max). I have one behind the fridge too.1 point
-
If only my repairs were this simple, as difficult as your positioning is in the photo. Nice approach however given your height. What I am having to do is completely rebuild all drawers, replace all glides. Some of my glides, right side only are rusty, why I don't know as there are no leaks. Effectively the drawers built by Oliver were 1/4 to 5/16ths too narrow for the actual opening of the casings. I'm not making this up or exaggerating. This does not even include the spacers used to half a** make up for the difference which in this case were small washers glued with caulk to the back of the glides. Hoping to do a full report once I have everything built and reassembled which might be as early as today. Just started spraying on my first coat of varnish to the right side drawers a few minutes ago.1 point
-
We've not had issues with our drawers. They stay shut during travel without straps or locks. I did have a Blum Locking Device crack/fail and then that particular drawer did open during travel. Given newer hulls use the same, these were correct for ours, very reasonable and I have a backup part now. Side to Side Adjustable Locking Device for 563/569 Series Blum Tandem Drawer Slide - 2 Pair (4 Pieces) with Installation Screws - Amazon.com A couple months ago, I had to remove the drawers to fix a kitchen sink leak. I noted the drawer slides only had three tiny screws each! I added 3 more to each slide and used screws a size wider with larger heads. They are not going anywhere now.1 point
-
@rideadeuce Great upgrade Mike, and very helpful showing all the details! Chris wants fabric color vs. a brown leather look. We are thinking of going with these (two sets) but still waiting on our purchase. I also like the increase to a 5" cushion vs. the original 4". Not sure how the backs will fit but we could tailor them shorter if needed. Just another idea! Available in many colors with good reviews: Amazon.com: RSH DECOR: Sunbrella Deep Seating Cushion with Pillow Back | 24” x 24” Seat | Water and Fade-Resistant Performance Fabric | Outdoor Chair Cushion Set for Patio Furniture | Canvas Burgundy : Patio, Lawn & Garden1 point
-
Tood & Kat, this would be a simpler solution. Prior owner had this product under our cushions and an extra roll in the cabinet! Works great, cushions do not slide at all. You want the 20" roll, not the more common 12". Kittrich is the company name and "Con-Tact" is their brand. Con-Tact Brand Grip Premium 4 ft. L x 20 in. W Gray Non-Adhesive Shelf Liner - Total Qty: 1 - Walmart.com1 point
-
Like how Furrion ports are moisture resistant. When installing a 20A Zamp port in the 10A Furrion port, was able to retain the moisture resistance. Original before modification: After modification: Someone called it to my attention that my 10A Furrion port was now a 20A port, a new label fixed that.1 point
-
I actually bought these and returned them prior to buying the Furrion solar ports. Although these flush mount AP ports came with a rubber protective cap for a water tight seal when not in use, there was no moisture protection when in use. The Cnlinko connectors are said to be waterproof and the Furrion lid will further aid in shedding water.1 point
-
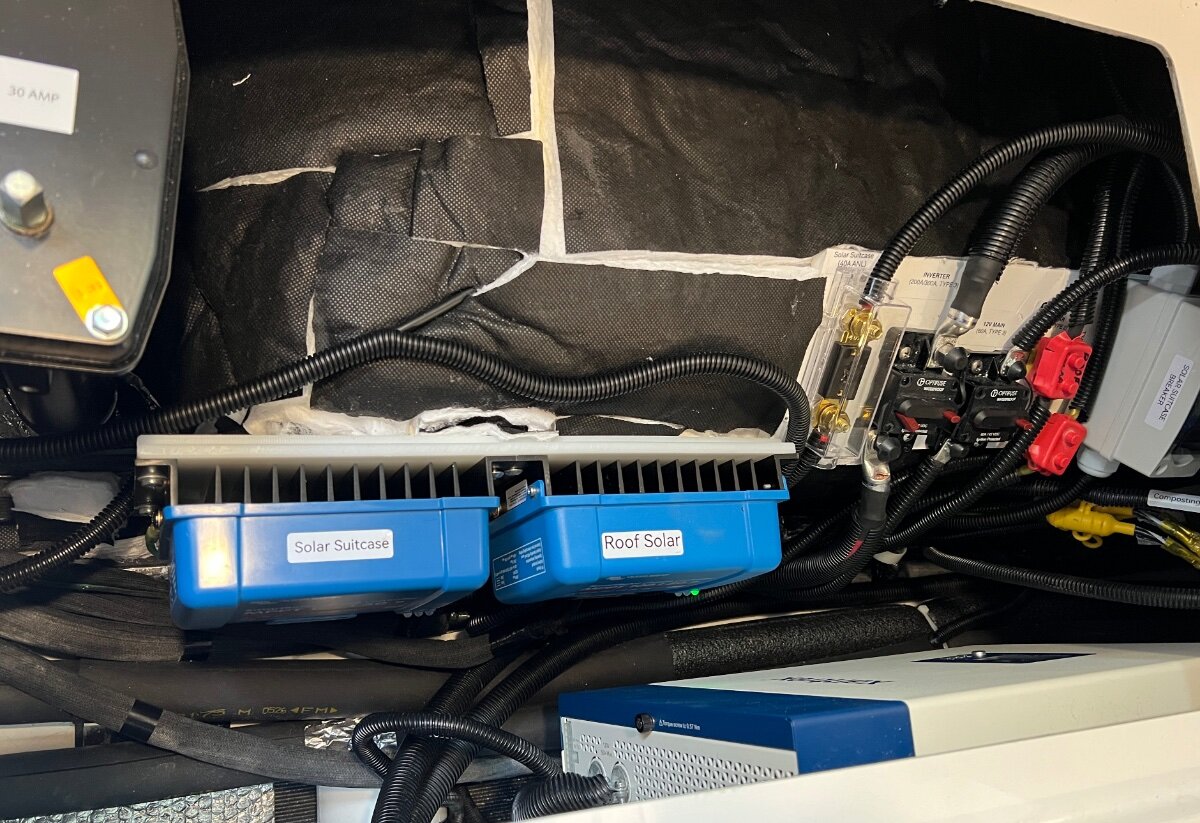
I added this 400W Renogy solar panel and Victron MPPT 100/30 CC, the CC was sized using this charge controller calculator from Explorist.Life/Nate. Pic of the stock 100/50 and 100/30 that I added for the 400W panel.
1 point
-
I like to test the power pole prior to spotting the Ollie and if I’m not blocking traffic I won’t even back in until I have verified the power pole is in working order. Mossey1 point
-
I think that it will take a very large solar panel array to be able to reliably recharge your batteries after any significant AC use thru your inverter. I’ve played around with our system running the AC at night for 8hrs with 400w solar and 640 amp-hrs of lithium from the factory. Even if we had double our solar wattage, I think it would take 8-10 hrs of full perfect angled sun exposure in the summer to replace what the AC consumed overnight. Although running a generator is less desirable, our EU2200 could likely bring the batteries back to near full in 2-3 hrs and solar could top of the last 10-20% throughout the course of the day. If it it hot and humid when we camp, we try to have shore power or go north, or to elevation out west.1 point
-
I use blue, ordinarily. Red is quite permanent. Blue generally does the job, but you can still remove the fastener, if necessary. But, Loctite is def your friend.1 point
-
This is the tester that I use before I plug in. It displays the voltage and checks several different potential power issues. Keep in mind that this type of meter only gives you a snapshot of power issues. Most of the power issues thus far discussed have been intermittent and random in nature. The power issue that I mentioned only occurred every once in a while but was bad enough to cause damage even with the factory installed surge protector. The actual surges were not the problem because the surge protector stopped them. The problem was that the power was switching on and off rapidly and several cycles in a row.
1 point
-
This is really what drove me to have double protection. Plus a way of verifying the post before plugging in (I did not think of just going the tester route).1 point
-
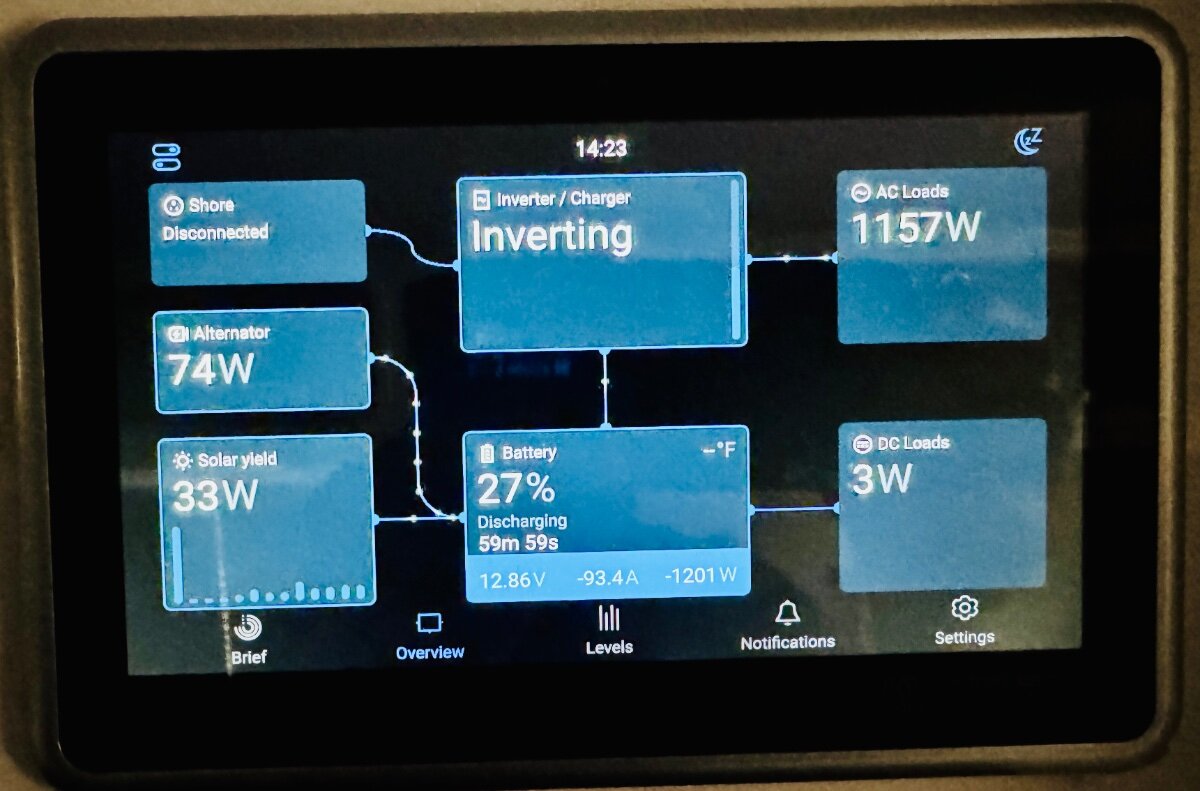
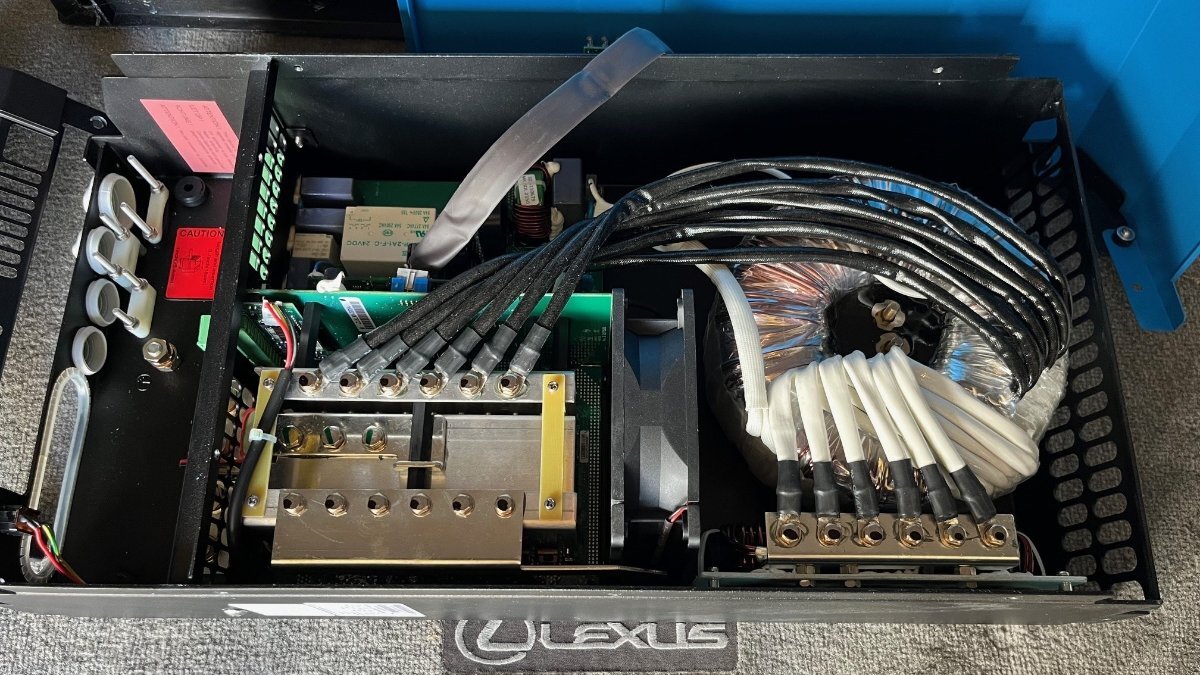
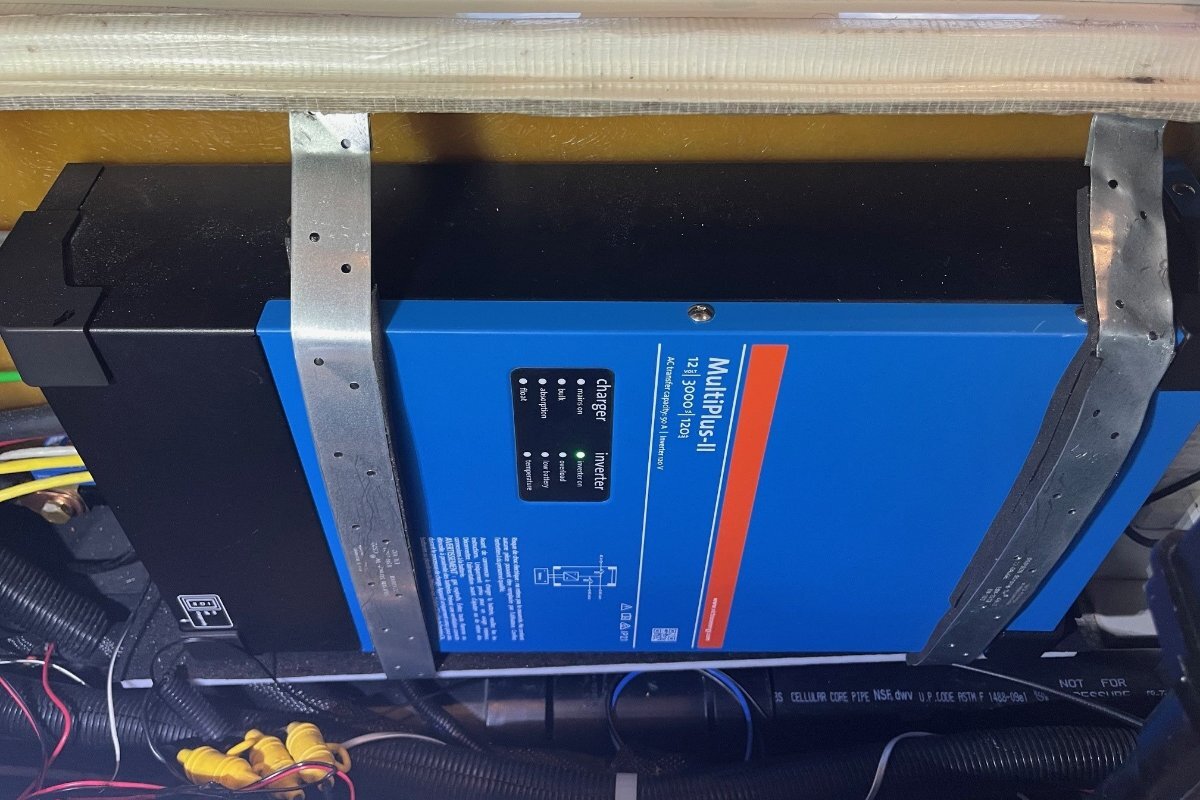
This inverter is a beast! When I first field tested it, I disconnected shore power and ran the A/C off of inverter only. It was reading over 3500W and I didn't understand. This is not a 3KW inverter, but a 3KVA rated at 2400W continuous. How was it able to run at 3500W+ for 1-2 minutes until I realized it and turned off the A/C? When I did the inverter was still pulling over 1500W. I thought that nothing else was on, so I started tripping the 120VAC breakers. The last one did it and I found out we had the HWH AC switch on! Whoa, won't do that again. Then it ran A/C for the next 4 hours. I turned it down to 72 degrees and the compressor was running about 2.5 of the four hours. This old Dometic PII takes +/- 1800W or 150A DC inverted. IT dropped down for 37% SOC. Given 63% of 600AH used is 378AH and if you divide that by 150A for the A/C it comes to 2 1/2 hours running the PII full on compressor running. As @rideadeuce has shown the Atmos A/C takes half this amperage, so with a future A/C upgrade, we should be able to run all the A/C we need for the hot day now and then. Here's the internals of the MP2 Beast!
1 point
-
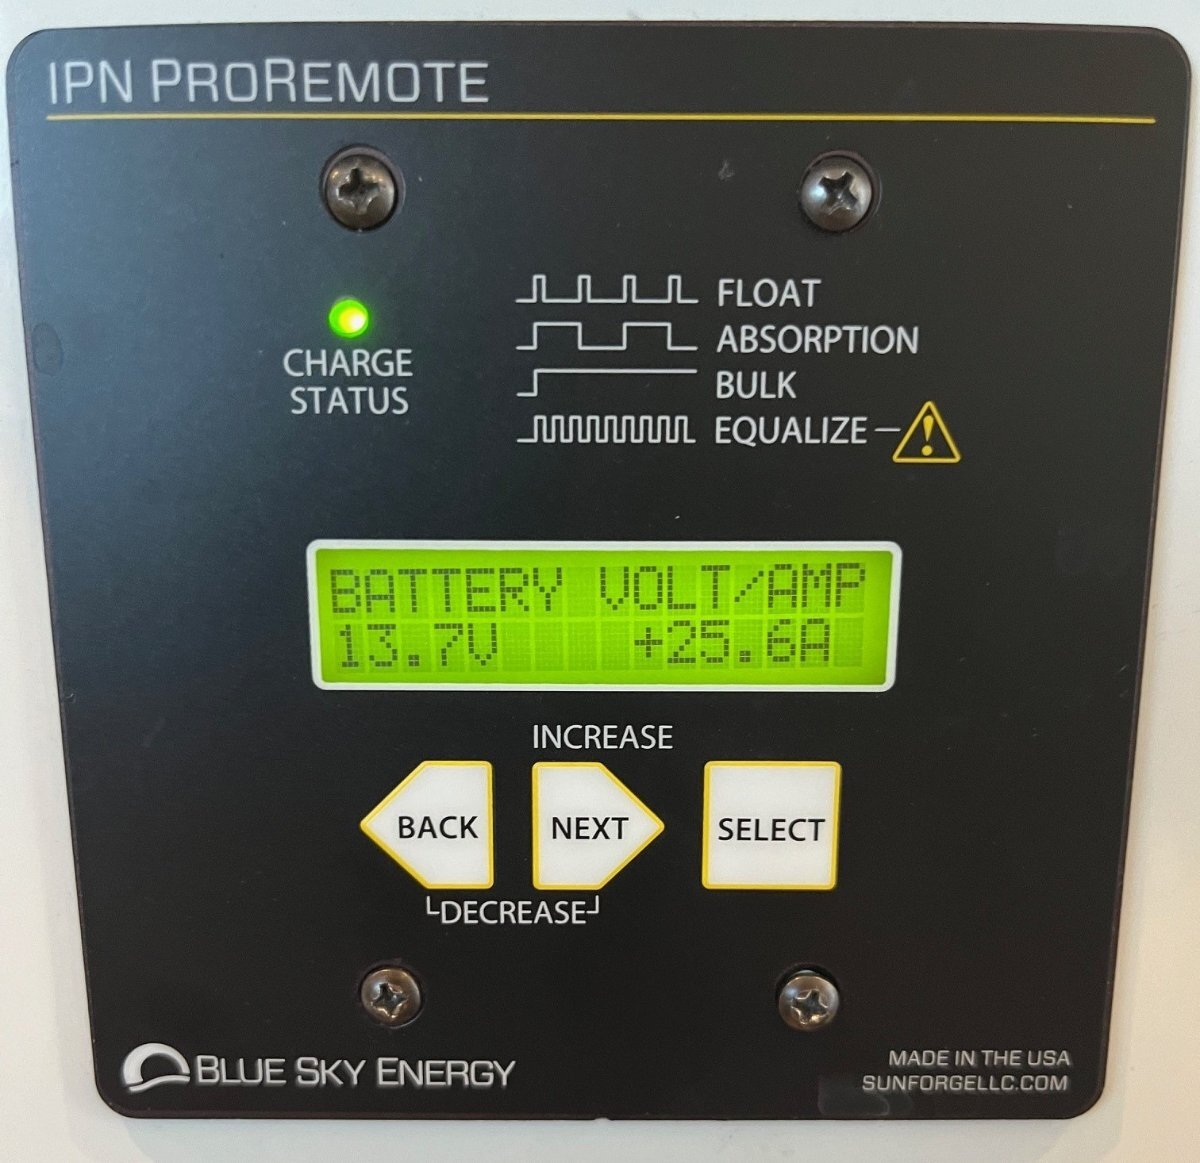
On the rare chance that you would be upgrading to LiFePO4 batteries and have the Blue Sky with IPN ProRemote, Ryan Gurin, Product Support Engineer at SUNFORGE LLC is amazing, responsive, friendly and helpful. All you need is this link he supplied and it's rather a straightforward configuration as soon as you get a handle on all the button clicks without missing! (Watch the video to learn this.) How to program BSE charge controllers for LiFePO4 batteries – Sunforge LLC
1 point
-
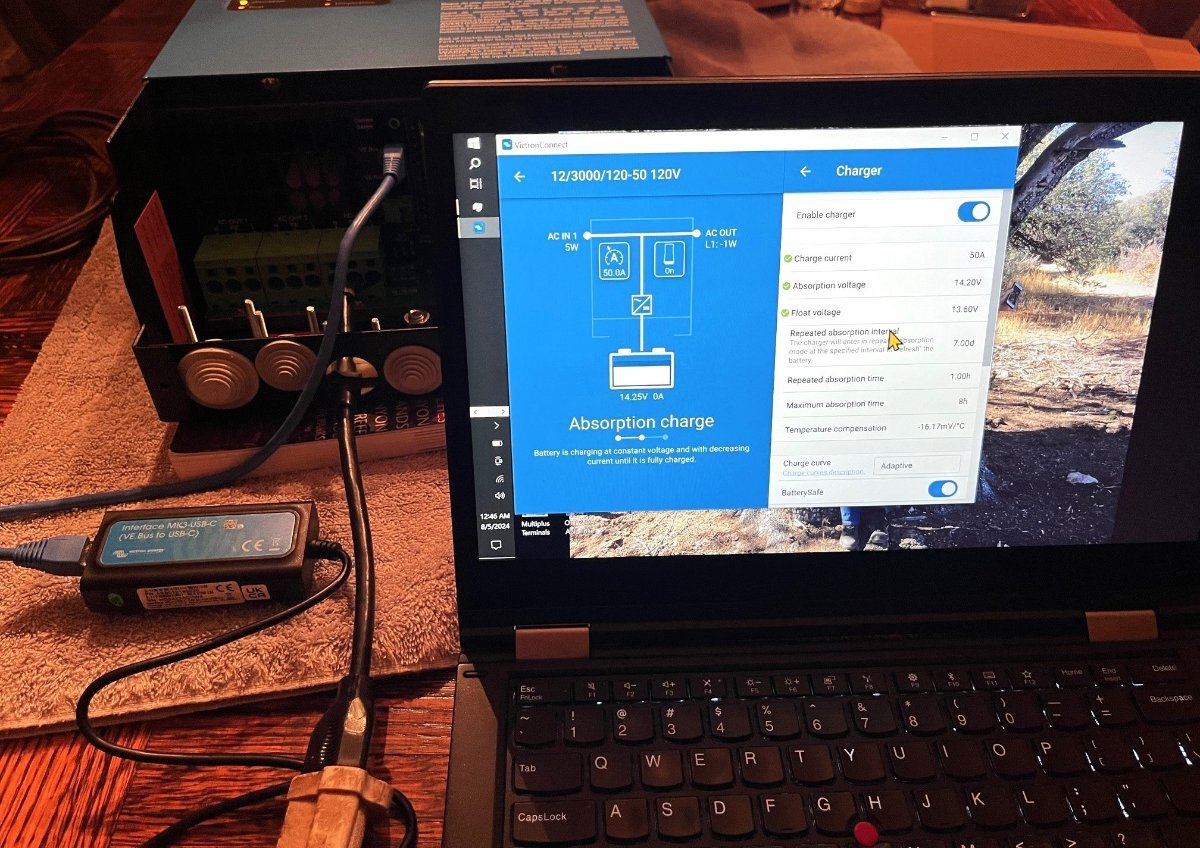
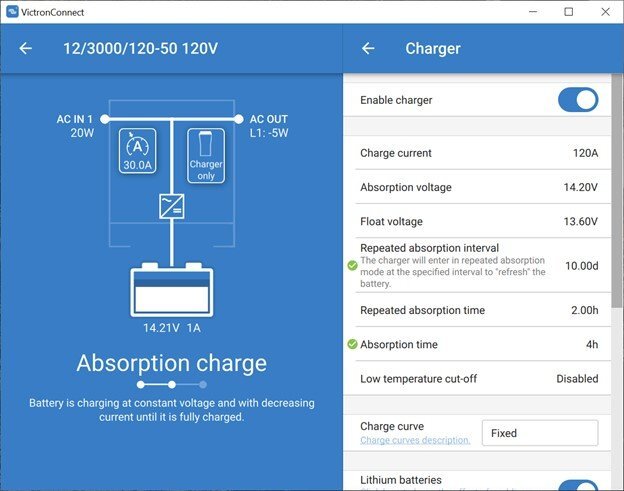
Besides the MP2 inverter, you need to purchase two devices. The VE.Bus Smart Dongle is used in place of a control screen. It's required to read MP2 status and for some basic functions like setting the shore power amperage and as an ON/OFF switch: VE.Bus Smart dongle - Victron Energy This device does not allow for configuration of the setup menus, so you will need the MK3-USB interface. I purchased the MK3-USB-C version since USB-C is faster and the newer style: Amazon.com: Victron Energy Interface MK3-USB-C (VE.Bus to USB-C) : Electronics (The picture shown is the USB but I purchased this item, and the title was correct as the MK3-USB-C and it was $8 less). The MP2 can be configured when attached to either 12VDC or 120VAC. I thought it would be smart to start the configuration and see the MP2 operate as a bench test prior to loading the 42 LB monster into the Oliver basement. I had a power cord I had saved from some device I had trashed. Pretty cool and everything working! Setup menus for
1 point
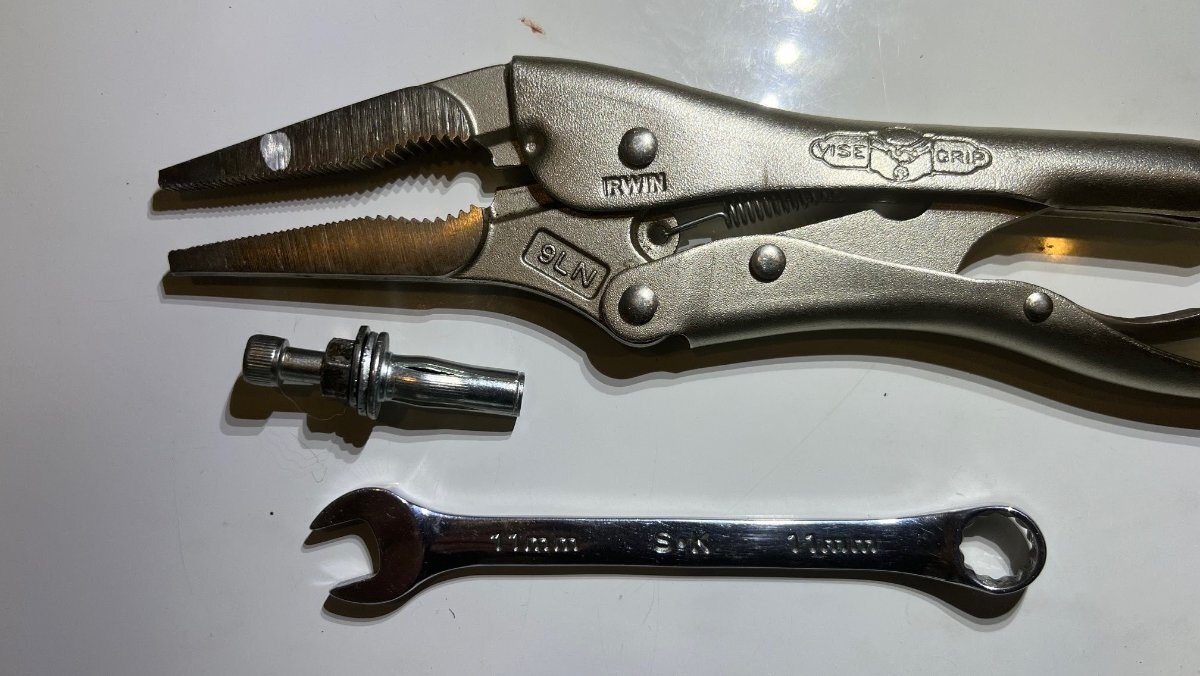
-
Time to strap down the MP2. I used ¼”x20 Plus-Nuts that I learned of on a thread that @Frank C wrote on replacing the bathroom vanity cover. There is a heavy-duty interior lip that allows for this without exposing screws to the interior. I knew of this HD lip from last year, when the curbside I mounted brackets for our motorized ball valves for the plumbing system. Not easy to get these started without the special tool but I was not going to spend that money for two bolts! A long-bolt-nut concoction and needle-nose Vise-Grip did the trick. Doubled some rubber tape for a tight fit. I got sloppy on the rear-side strap allowing the drill bit to catch and it pulled the strap in a spiral. Had to straighten it out the best I could because replacing it would be a pain. I’ll add to this post soon to explain programming, both configuring the MP2 and updating the Blue Sky SC for LiFePO4 batteries and more usage data. Ran our old LOUD-dog Dometic Penguin II for 4 hours today while strapping down and finishing up. The inverter was supplying ~1600W and the SC about 200 (cloudy day) for 1800W total. The batteries were close to full and read 37% when done, but 100% SOC is not yet set so these may be off. Finally, thanks to Mike @rideadeuce for leading the way on Epoch batteries and the MP2 installation.
1 point
-
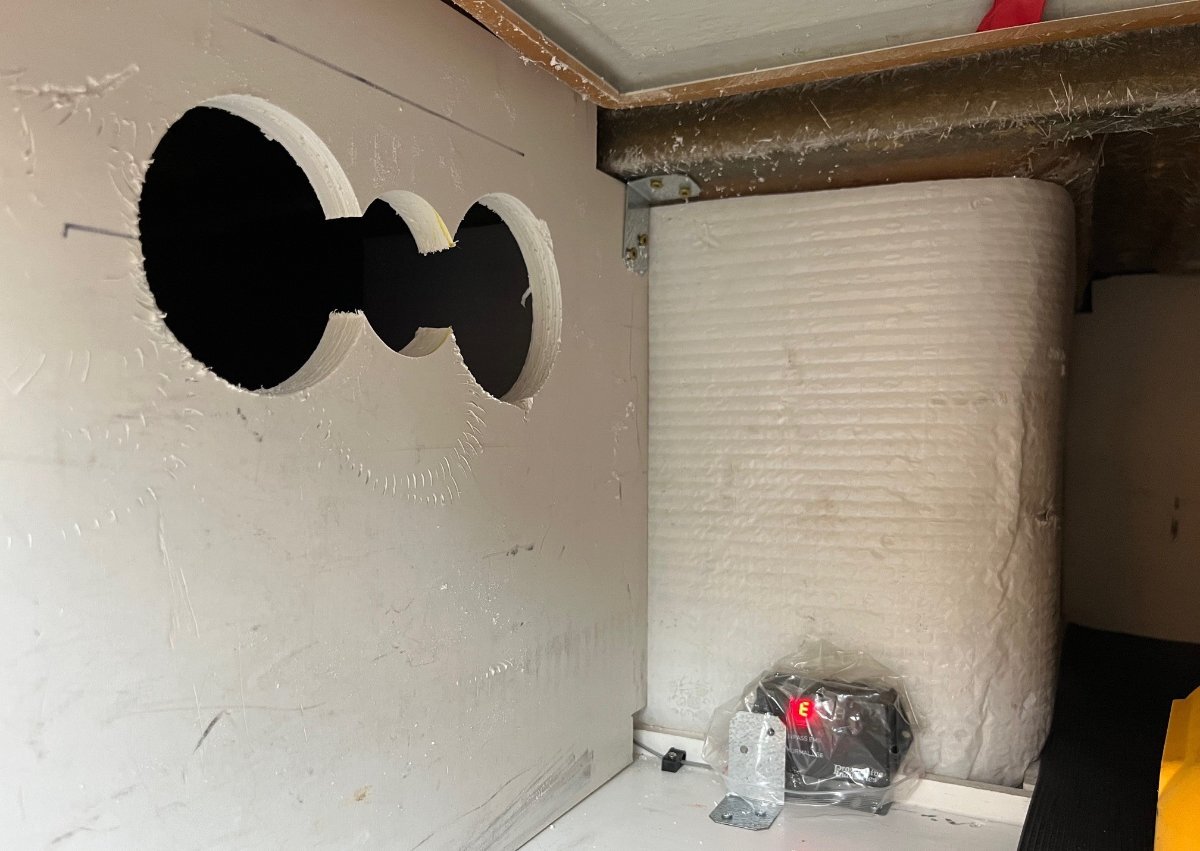
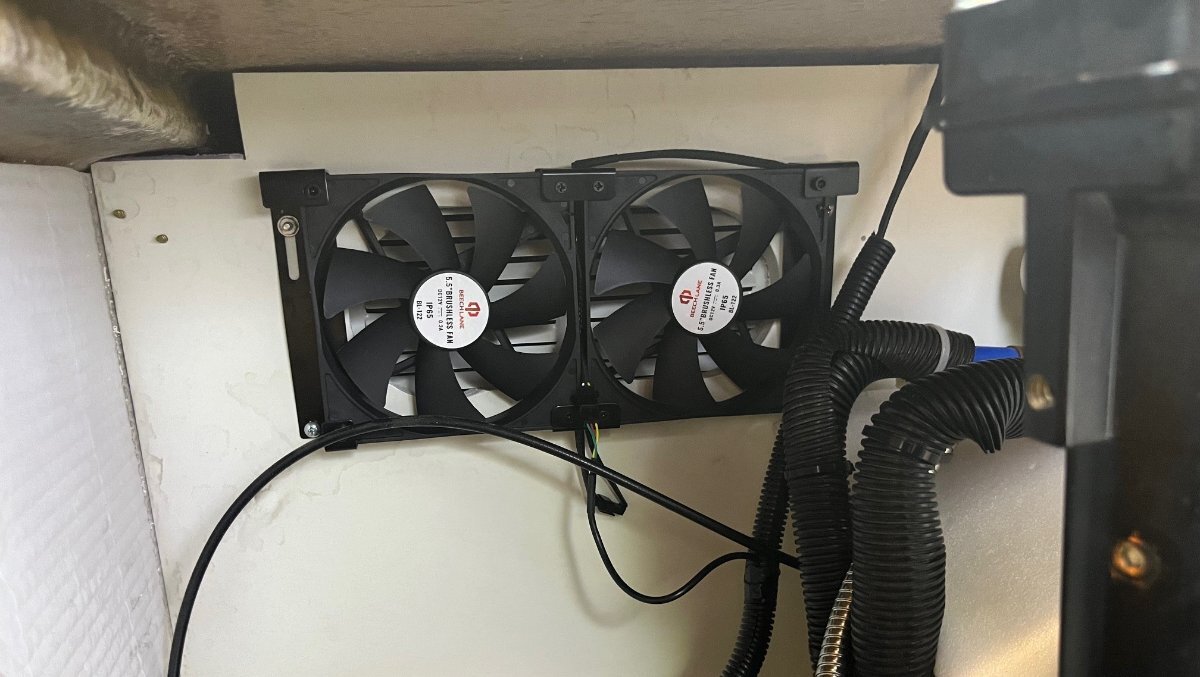
I had just installed a Beech Lane dual cooling fan for the fridge cavity and thought the same fan would be great to vent the basement area under the streetside bed. A 3KVA inverter produces a great amount of heat when inverting and charging large amperage. I was waiting on delivery of the Victron Multiplus II inverter anyway and it makes sense to install this before the large inverter is in the way. This fan is a dual 5” fan. I had a 4” hole saw available and thought that was enough of an opening to clear the hot air in this small basement space. I ended up using a jigsaw to cut a straight line opening above and below (not pictured). Notice the L-bracket top-right in pictures, necessary since this wallboard is only connected to the floor and outer wall. Then I hung the fan inside, added a wire loom. I used the grill that I removed from the furnace return when I added a filter there. Yes, the control and grill are hung upside down. I could have wired it the other way, but the wires would have to loop below. I keep a duffle bag there, so I pointed the vent up to blow over it.
1 point
-
Before doing too much, suggest verifying all the water valves in the curb side rear bunk area are fully turned in the proper direction. If one is partially shut WEIRD things happen. GJ1 point
-
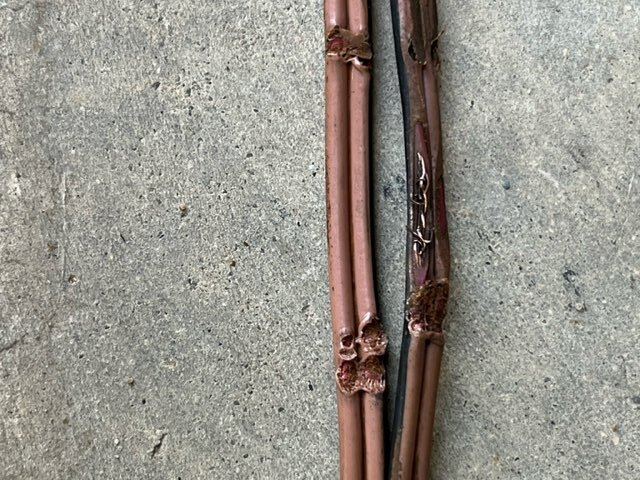
To All, Mine were abraded somewhere within the axle tube in the middle between the hubs. There was about 12' of wire stuffed in the axle between the hubs. Mike T. & I were in discussion, as we both had this issue at overlapping times. I believe I was just further in the process when we discussed. I will include pics (of both dbl. insulated wires) of where abrading exposed to the bare copper within the two insulations. I did not remember to label front & rear. It was explained to me that the during the forming of the axle tubes (and this may vary depending upon manufacturer) the inside of some may get a robotic welding, as well as the outside. the outside of course is smoothed off and painted. The inside, depending on the process may get a smoothing, however most of them are left with weld spatter inside so the axle tube on the inside resembles a concave wood rasp... just what we do NOT want to house our brake wires. Mine actually look like they were somehow pinched, or maybe during the shorting out process heated up enough to melt(?) the insulation near the abrasions. So I went straight to a previously read article by Prof. JED, Emeritus, which dealt with replacing the brake wiring. I ran my newly purchased (NAPA Shielded Brake Cable) wires outside the Axle Tubes, putting them thru a loom at about 9 o'clock (to the rear) to protect from rocks or other strikes. Using butt-splice connectors from the Shielded Brake Cable wires to the leads going into the brakes, then buttered the connectors up with adhesive-sealant to further protect connectors from moisture. I have some ZIP TIES (I've been told, like the ones 'LE' uses on your wrists...) which are 1/2" wide and abt 1/8" thick, and used those secure the loom to the axles. At least that was my approach at the time, as I wanted to get back to camping. The Brakes have worked as they should. B~Out
1 point
-
I don't know if you ordered directly from Dexter that it would be considered a custom order. They may or may not be cheaper directly from a Dexter distributor. You won’t get a straight answer from anyone until you have your as built information. Mossey1 point
-
Thank Gawd, this procedure was explained. I envisioned struggling holding the fridge on my shoulder, whilst walking up-down the runway, patting it on its back. B~Out1 point
-
I found the SN engraved on the rear side of the axle near the center. Take a damp rag and a flashlight with you and wipe the axle down, it should be visible. Mine was close to where the label used to be. Mossey1 point


-
Recent Achievements
-


")


")


")


