Leaderboard


Popular Content
Showing content with the highest reputation on 08/30/2024 in all areas
-
Now y’all have given me an excuse to buy another tool - Dead-blow hammer. Although, I don’t think it would be necessary in this situation. I used a regular hammer and a 3/4 in socket to cover the zerk fitting and it seated easily over strong base like a vise. Unfortunately, I am in the process of changing out the 2 1/4 in shackles for 2 1/2 in shackles that Lew sent me. So after 3 subsequent wet bolt installs I have gotten fairly proficient at it. Hopefully, this time it will give me the necessary clearance for the easy flex to work properly. M4 points
-
I have a narrow 90 degree turn getting into my driveway, then I have to make a 60 degree turn to the opposite direction right away. The RV port is only 25 ft from the road. I practiced probably 20-30 times backing up normally into the spot had chosen before we built Hummi's home. I had the location marked out with cones and paint. I got it into the area twice without going out of bounds. I decided that putting the trailer through a wall greater than 90% was not going to cut it. I was wanting a heavy duty bumper to stop deer ruining the front front end. That settled it, and I purchased a BuckStop front bumper with the hitch built in. It is the slickest way to park the trailer. I can park the trailer within a couple of inch of where I want it every time. The only thing I wish was the hitch was off set to the passengers side by about a foot. This would make it easier to look around the trailer from the drivers seat. I also use the hitch to carry bicycles on the front.4 points
-
Last Thursday we arrived at the campsite and, hoping to help Reset 2.0 (LE II Hull 1364) cool faster in the Texas sun extended the awnings. After completing setup, we decided to go explore. I grabbed the Awning Remote and hit the "In" button. "L" was what I got on the display. I assumed that the remote was not telling me that I was a total loser, and that this indicated a low battery condition. Lesson 1: There is no / zero / zilch reserve capacity on the awning remote - once it says L that stands for out of luck. I pulled the batteries out, shuffled them around, rubbed magic pixie dust into them and got two more pulses out of them to get the awning retracted. For those that don't have a full battery inventory of everything that uses a battery in your Oliver (that would include me) the awning remote uses three CR2430 Lithium batteries. This would be great if we camped in urban areas. However, as we were in the hill country of Texas ... Walmart Fredericksburg - no stock Home Depot - no stock Lowes - no stock Ace Hardware Fredericksburg - 2 Ace Hardware Wimberly - 2 Remember - I need 3.... So off on a delightful tour of Central Texas, kind of a preview of the Texas Rally coming up in October. Breakfast in Johnson City, battery pickup in Wimberly, shopping for flour and bourbon in Dripping Springs, lunch at Ab Astris in Hye, battery pickup in Fredericksburg, then back to the trailer in Stonewall. Lesson 2: Have a battery inventory and spares. I never thought about the fact that the awning remote had batteries... Lesson 3: Texas, especially the Hill Country, is a great place to drive around in. (Ok, so I already knew that 🤣.)
 3 points
 -
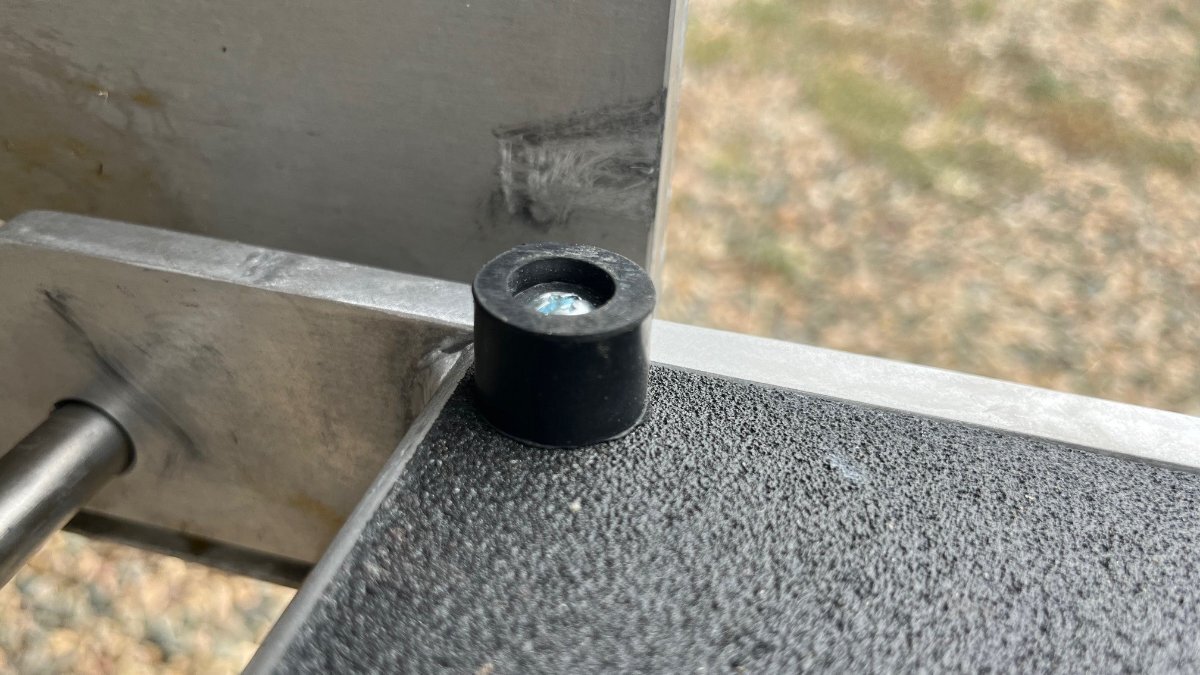
Just added the final touch. Prior to my clean-up project, prior owner had the steps wrapped with a rubber matting. They looked terrible and collected dirt, so I tossed them out. Noticed lately that when the steps are folded it's metal on metal, so I added these little bumpers in each corner (drilled 5/32" holes) under the door. They're out of the way and the folding step sits nicely. These where rubber feet off some appliance I tossed years ago (always save hardware)!
3 points
-
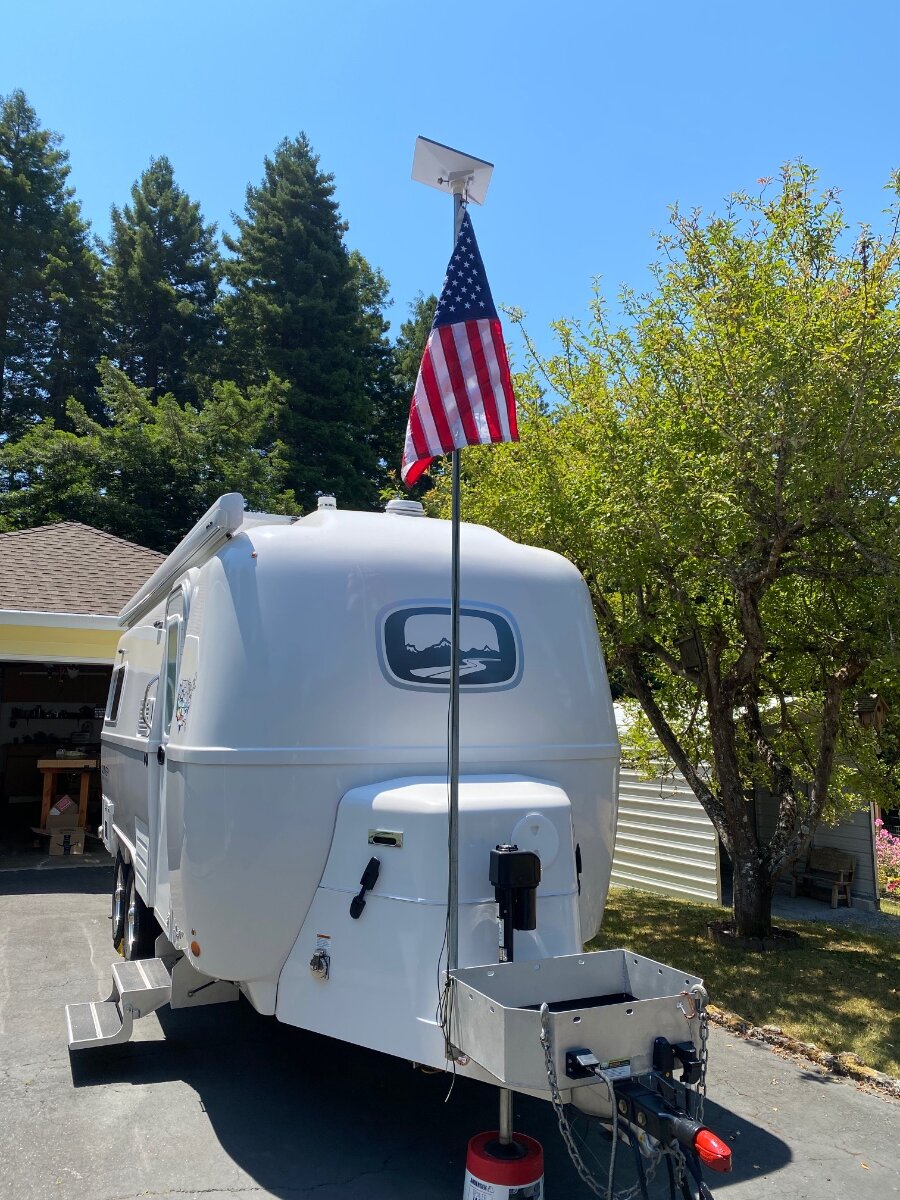
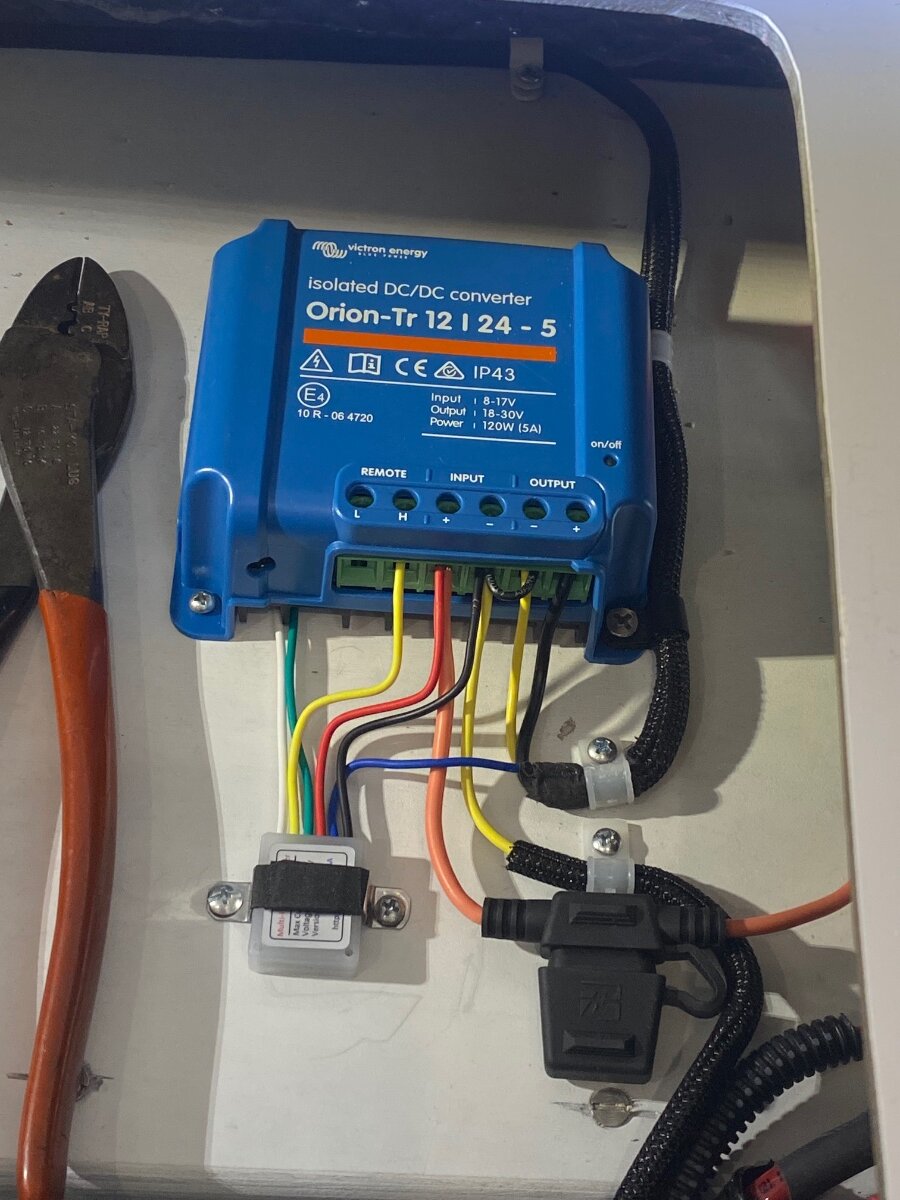
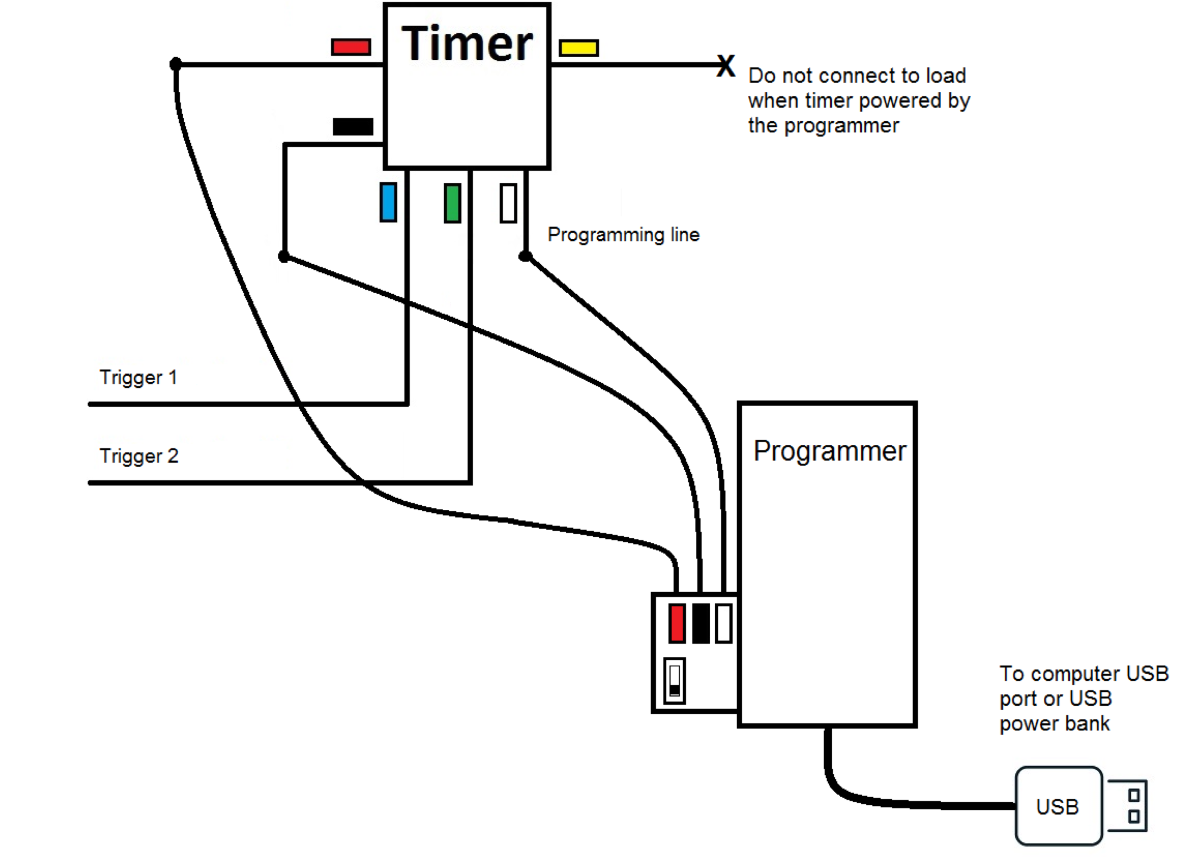
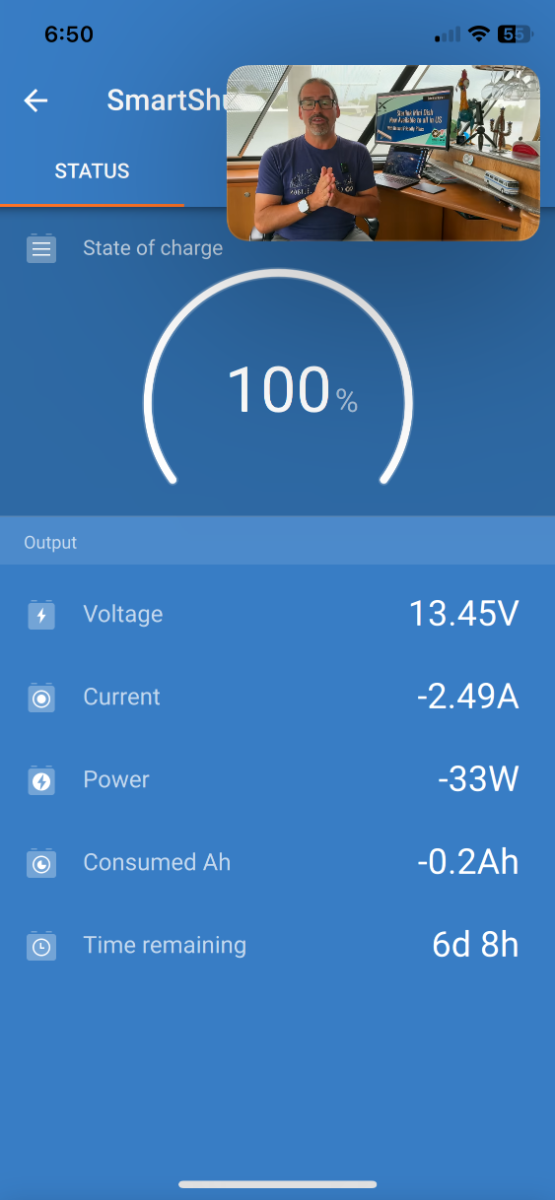
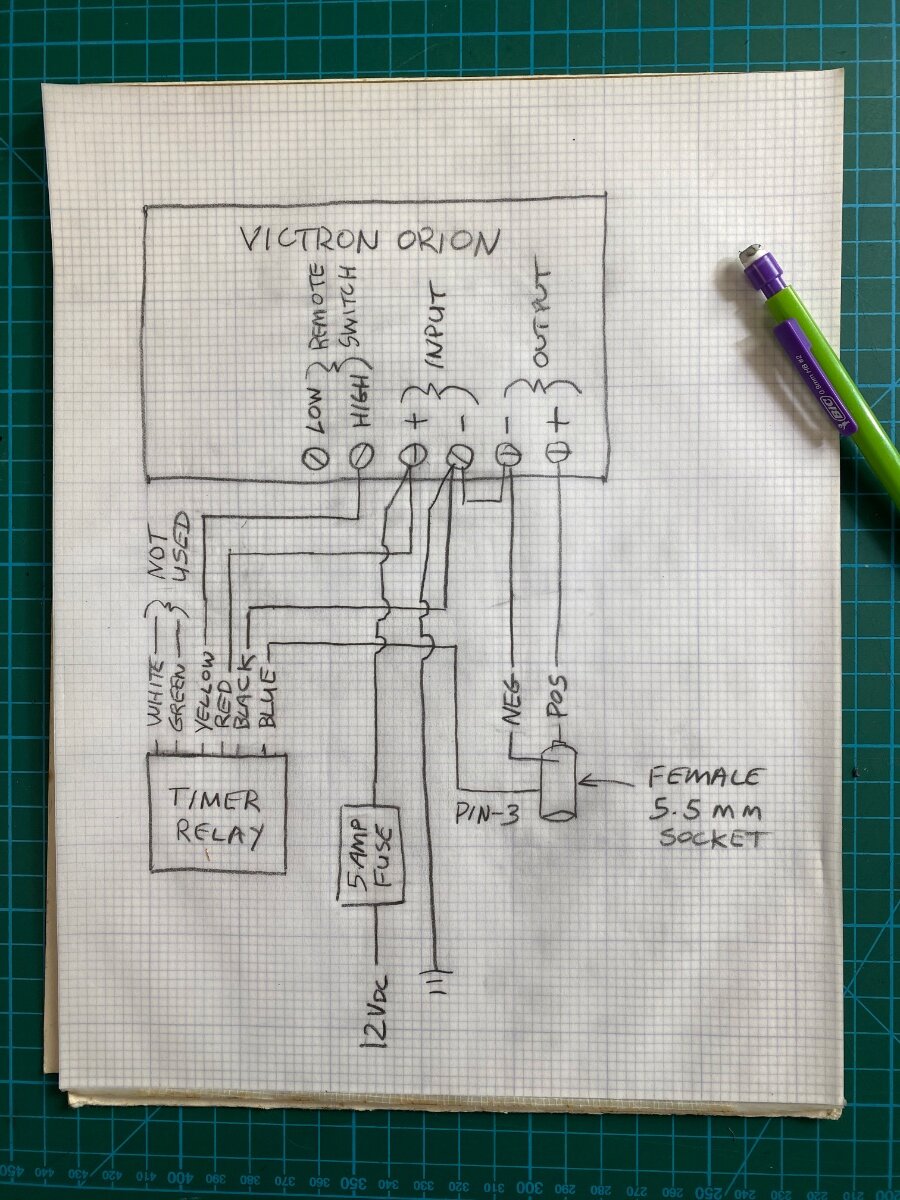
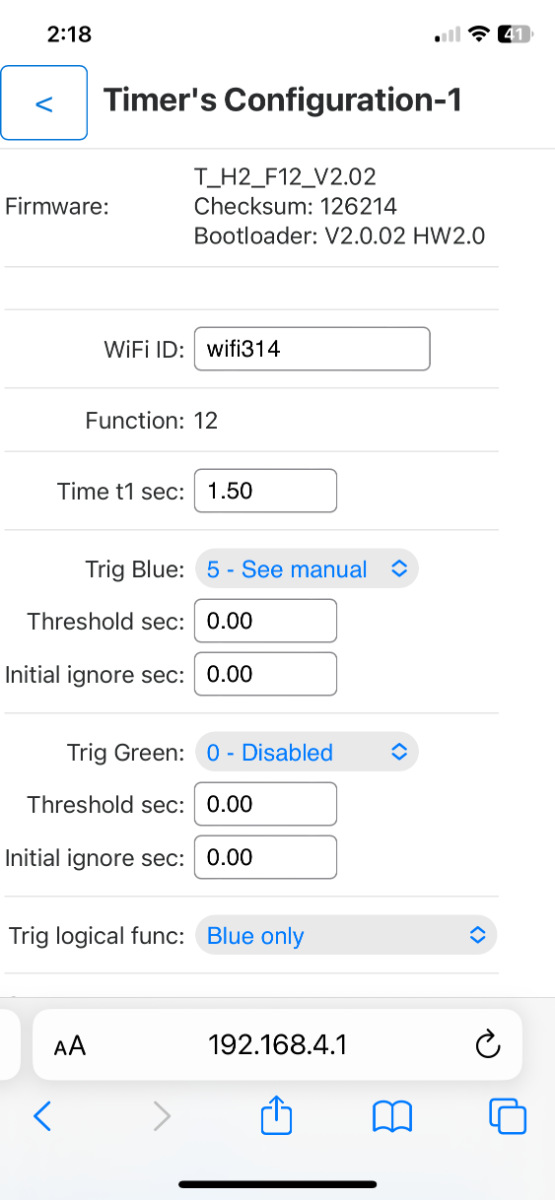
After lugging around my old heavy Gen-1 Starlink for a few years, I was thrilled to get the new Starlink Mini. It’s small and light, and the router is built into the dishy. It speed tested at 202 Mbps, a very respectable speed, although not as fast as the Gen-3 which typically runs over 300 Mbps. The Mini comes with a 50’ x ~1/8” diameter power cord that has 5.5 mm barrel connectors on each end. It also comes with a 120 volt AC wall transformer that puts out 30 volts dc (vdc.) The Mini is rated to run on 12 to 48 volts vdc, and 25 to 40 watts. It peaks at 60 watts with snow melt on. The 12 Vdc rating is an attractive feature, particularly for Boondockers who don’t have inverters. However, when I first hooked it up to the Oliver’s 12 Vdc battery… it would’t work?? After some investigation, it turns out that it’s not so simple and I’ll try to explain why: Given that the AC transformer puts out 30 volts, and the power is about 40 watts, then it would be drawing 1.3 amps per Ohms law (40w/30v = 1.3 amps.) With the same calculation at 12 volts, the amperage increases to 3.3 amps. The resistance of the long thin power cord can’t handle this higher amperage and the resulting voltage drop puts it below the minimum 12 volts operating range. In fact, I did some bench testing and found it would only work at voltages over 18 volts. There are solutions to this issue including cutting the cable shorter, using a larger gauge cable, or increasing the voltage. Without a better option, I chose to increase the voltage. I looked at cheapie power converters that would probably work, but I wanted something more robust and higher quality. I found a Victron Orion TR 12/24-5, isolated, DC to DC Converter, and it was perfect for the job. It has a 12 Vdc (+/-) input and an adjustable output of 20 to 30 Vdc at 5 amps. Standby power is under 80 mA, and it has remote on/off switching capability. It comes factory set at 24 Vdc, but I adjusted it to 30 Vdc output with the potentiometer on the front. To connect the Mini to the trailer’s 12 Vdc power system, I installed a 5.5 mm female panel mount socket into the Satellite TV inlet. I removed the Coax connector and the 5.5 mm socket and nut fits perfectly in it’s place. Oliver conveniently labeled it “Satellite.” If you need the satellite TV, then install a third “Furrion” inlet as I did for my old starlink RJ45 connector. I mounted the Victron under the rear seat on the street side. The socket wiring was sheathed and routed along the ceiling of the outside storage garage. There are a number of options to pick-up 12 volts in that area, I took power off one of the circuit breakers. I ran the negative wire to the ground bus under the rear dinette seat. The Mini comes with both a snap-in kick-stand and a 2” pole mount, and they’re both necessary for optimum RV use. I prefer having it on a pole, but we often have to move the dishy away from the trailer for a clear sky view. That’s why it’s a bad idea to shorten the cord. It also has an RJ45 port that I suppose is for hardwiring without WIFI, but I probably won’t ever use that feature. I built-up some PVC fittings on my 10’ Electrical Metallic Tubing (EMT) mast to fit the Mini’s pole adapter. (See the post for Tacky Starlink Dishy Mast). A little sanding was involved, and the starlink mount uses a thumb screw to hold it in place. It’s better to turn the Victron off when not in use, so I recommend using the remote switching feature with a switch installed in an easily accessible location. I’m too forgetful to switch the Victron off every time, so I came up with a way to turn it on & off when the Mini’s power cord is plugged in & out. Read on if your interested in that part of the installation: The “three pin” 5.5 mm female socket sold by Amazon has a built-in switch that’s designed for appliances that use either batteries or a 120v transformer supply. When the transformer is plugged in, the pin-3 switch opens to disconnect the batteries. This is opposite of what’s needed for the Victron remote switch, but it can be used to trigger a digital relay and it’s actually easier than it sounds. Amazon carries fun little programable 5 &10 amp timer/relays for under $20. I already had the 10 amp version in the Oliver for a hot water recirculation pump timer, and it works great! The 5 amp is adequate for this application, and you will also need the $20 dollar re-usable Bluetooth programer. They use 50 μA of idle current, which is nothing, and they can be programed for delay-on, delay-off, flashers, dimmers, duck decoys, and more. But for our application, we’re just interested in the trigger functions, specifically the “ground-open” trigger. Before installation, the relay has to be programed from a smart phone or computer. It’ links by WiFi to flash the program into the relays memory. Use wire nuts to connect the timer and programer together, and power them from a USB port. Follow the well written and simple programing instructions using the settings shown in the screenshot below. The relay requires a timing function, so I arbitrarily used function #12, which is “delay-on.” I set it randomly to 1.5 seconds. The trigger is programed to use the “Trig Blue” set at #5, which corresponds to the blue wire used as a “grounded trigger.” The green wire trigger is disabled. My wiring sketch shows that the timer is powered with 12 volts from the Victron’s positive and negative inputs. The relay’s yellow output wire feeds the positive side of the Victron’s remote switch (the negative side is not connected). The Victron’s output feeds the 5.5 mm power socket, and the blue trigger wire goes to the 5.5mm socket’s pin-3. Use a continuity tester to identify pin-3, it’s normally shorted to the negative lead of the socket and it “opens” when the male connecter is plugged in. The socket barrel is negative, or ground, and the center pin is positive 12 vdc. There is one other step to make this work. This Victron model is “Isolated,” meaning that the input and output “negative” terminals are isolated from each other. It needs to be “non-isolated” because the timer is grounded to the Victron input, and the socket is grounded to the output, and the trigger needs continuity between the two. So remove the jumper wire that comes on the Victron’s remote switch, and use it to jump across the two negative terminals. Victron support confirmed that shorting the grounds is not a problem, it just un-isolates it. This works satisfyingly well! I checked out the power draw with the solar turned off, and while streaming a video. It was 2 amps, 27 watts (after subtracting the parasite load). That’s a huge improvement over my previous Starlink, and I don’t have to worry about running the inverter and draining down the batteries anymore. I hope someone finds this useful Cheers! Geoff
2 points
-
Confirmed by Oliver, the Girard Awning wind sensor is hard wired, so at least from 2022 to present. Not sure when Oliver switched to Girard.2 points
-
The newer models are hard wired. I believe our 2022 Girard sensor is hardwired as wires go from the sensor to the Oliver. There are no screws or battery compartment.2 points
-
Lesson 4: There's also a battery inside the awning. It's for the wind sensor. It does have an audable warning when it's going low. The problem is if you don't know about it in advance I've heard one will actually become a total loser due to the incessant beeping that you can't locate..2 points
-
This "awning dam" appears to be a geographically necessary option. In the Great SW USA, we haven't missed ours in the least - however, if we lived east of the Mississippi, we'd probably have left it up there! Cheers, all!2 points
-
I’m on the ‘Happy Camper’ train, never an odor issue! Add as recommended following each dump cycle to both holding tanks, as well as a drain valve lubricant a couple times a year.2 points
-
Got some exterior and interior pics of Jim Oliver's Ollie today. But, I can't post them until I get home early next week. Bill2 points
-
Hi Randy, I’d be happy to help you, and the first thing that comes to mind is polarity. Some of the SAE solar connectors are intentionally wired backwards for specific solar chargers. In fact you can get polarity reversing connectors for them. Check that out first thing. However, I’m a little confused that your using an SAE to RJ45 adapter? We should first confirm that you're hooking up a “Starlink Mini,” which is completely different from other Starlink units. The Starlink Mini has an RJ45 connection, but it's not a power connection. You must use the 5.5mm barrel power cord. Other Starlink units are powered differently and this modification will not work for them. There are 5.5mm to SAE adapters that could be used in your application, if you are in fact powering a Starlink Mini. The picture shows one from Ebay with a polarity reverser included. I hope this helps and please feel free to contact me privately is you have more questions. Cheers, Geoff
2 points
-
I like the deadfall hammer I think I have a 2 pounder. I also have a few large brass punches that I could use with the sledge. I am starting to think it would be fun to borrow the Orielly's ball joint press. I have never used one.2 points
-
Yep. I get home and spray all along there. Then follow up with mop and soap. I would never consider removing it. To each his own🙃2 points
-
Spot on ScubaRX. Would add well greasing the spring and insert. Also using a deadfall hammer would work a bit better than the big ole hammer. May also cause less damage should we have eaten our Wheaties that morning. 🙂 GJ2 points
-
FWIW: We bought our front hitch from eTrailer about 6 years ago - used it on the RAM 3500 to get the AS into the cave. For us, it was an absolute game changer. Whereas backing the TT into the somewhat "narrow" 10-ft wide door it may have taken a few tries to get the perfect line-up. With the the front hitch it was "1 and done" - piece of cake. The 500# vertical weight limitation wasn't an issues for the 30-foot travel distance. We highly recommend the front hitch option for tight quarters.2 points
-
I should have listed that - all the lockers out there came back with a Tuesday delivery date - one day after we got back to Dallas. But that is a great option in most places!1 point
-
Nice, we will do some of that during the Texas Rally! Another thought is Amazon to a local pickup locker. If I ordered this today, it would be delivered here tomorrow: Amazon.com: PGSONIC CR2430 3V Lithium Battery (5pcs) : Cell Phones & Accessories1 point
-
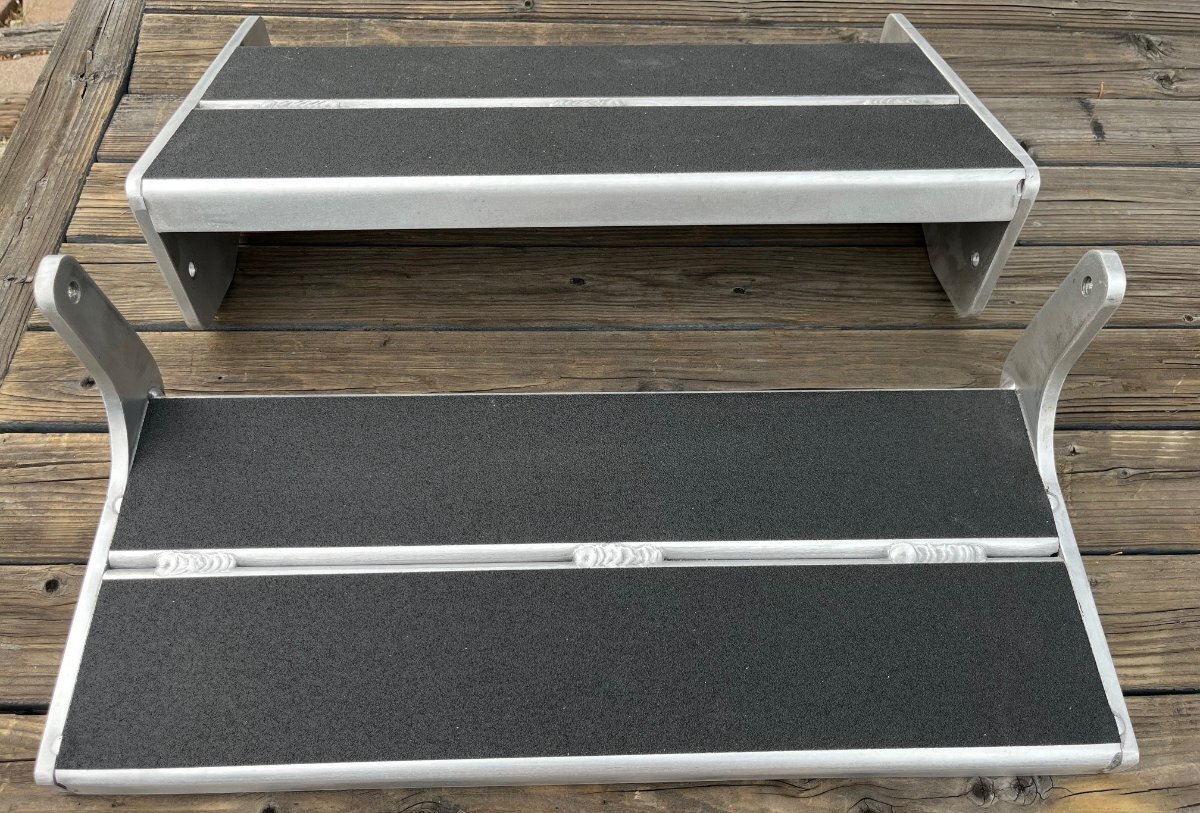
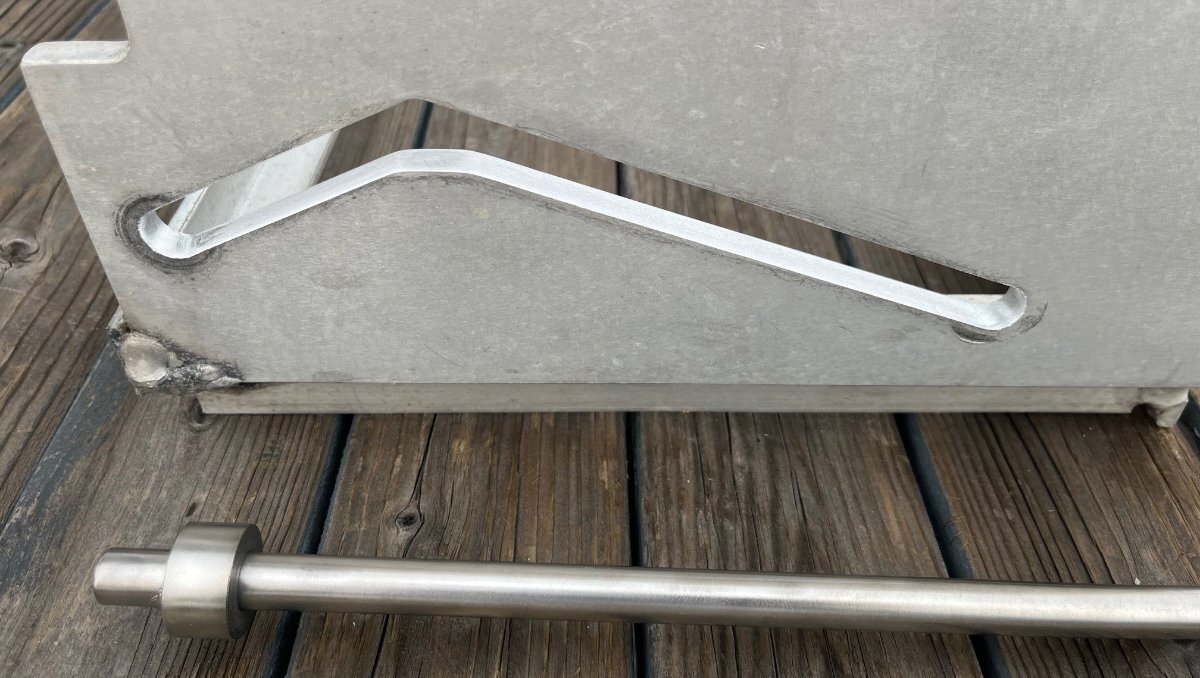
Hull #113 now being 8 years old has needed a lot of upgrades and M&R our first year of ownership. A point of contention as always been the manual stairs, the back-breaking effort it takes to pull them down, metal on metal, and more so to put them up. I had greased the moving parts, and it did not seem to help much. Pressure washing it last time, an edge of the slip-resistant tape came off. Prior owner had wrapped the steps with some kind of rubber cushion and that dirtied the steps where it laid. They looked awful. It was time for proper restoration! I disassembled all components of the stairs so they could be cleaned and reconditioned in my shop. If you do this, make sure you have everything you need out of the Oliver as it is very difficult to get inside afterwards! First, I used a heat gun to loosen the glue on the tape and scraped it off. The glue residue was intense. I used 3M General Purpose Adhesive Cleaner, and it barely budged it. The rest I sanded off using a cordless Dewalt orbital sander and near a dozen sanding discs. There are better sanding tools, but this is what I had. After more and more detail sanding the aluminum started to look pretty good. The key detail work to getting the stairs to operate easier was to file the groove the axle slides within (see pic 2). I used a small hand file and spent an hour working it in the direction of the movement. Most of the machining marks were 90 degrees the wrong direction. I only sanded this groove on the base as I did not want to detail that whole frame, just the steps. I used this product for the stair surfaces: Amazon.com: 3M Safety-Walk Slip Resistant Tape, 4 in x 15 ft, Anti Slip Tape, Adhere Without Wrinkling, Curling, Tearing, Shrinking or Lifting, Self-Adhesive Backing For Quick & Easy Application (610B-R4X180) : Industrial & Scientific After sanding and placement of the anti-slip tape, I applied an automotive ceramic coating to all the sanded aluminum to slow oxidation. Got to this point today. Friday I will have time to remount. The frame is held on with 4 standard carriage bolts and nylon locknuts. The two stairs are connected to each other with a short, geared press-fit specialty bolt with a Torx-55 head, that are not easy to remove. Pictures were taken before applying the ceramic coating. It should look great when mounted. Boy, I hate sanding and polishing work! 🤣
1 point
-
AMEN, Brother! 😜1 point
-
Never seen one. If ours had one, a prior owner removed it. We haven't camped a rainy day, yet! 🤣1 point
-
Haven't missed ours either, Mike. Took me 2 years to finally make up my mind and mine was a real bugger to remove the residue.1 point
-
Yep, I have a hammer and a mounted vice. I use to be a machinist, and sometimes my mind gets stuck in using proper tools. Big ole hammers and vices just remind me of blacksmithing and welding. I almost thought of spending a few hundred bucks on a Table top arbor press that I could get the 10" drums under for pressing the bearings, but then I figured I was starting to get carried away.1 point
-
I pulled ours off after 4 years, it came off cleanly with very little residue. Haven’t missed it…. Mike1 point
-
Winston and Brandi did a fabulous job of restoring Jelly Bean. If you ever see it don't be afraid to ask for a tour. Jim Oliver's Beast presently sits in the Oliver Service area. However, Scott Oliver has plans to move it to his home in the near future. Hopefully I can get some additional pics of it this afternoon. Bill1 point
-
Nicely said!1 point
-
Ditto on the first part. Be sure to wrap it in heavy aluminum foil for the RF raiders. In addition to the above, the following for us works well for the Lesson Learned. (Snipped from Partiot's post above) GJ
1 point
-
Thanks for all the suggestions. Was able to remove it with bug and tar remover but still a lot of messy work. Will do a final clean, polish/wax later today if it doesn’t rain. Not sure why Oliver ever made the decision to install these things in the first place. All mine ever did was create a damn for debris and organic detritus. Thanks again.1 point
-
We keep two exact sets of TV/OTT keys on respective caribiners. One set stays in the TV - one in the OTT. We use Casablanca's main hatch combo lock exclusively when boondocking - so if one of us gets back to the trailer before the other, no biggie getting inside. Full Disclosure of a Lesson Learned: Magnus (knucklehead #1) locked us out of our TV during a roadside stop enroute to Pagosa Springs several years ago with the truck still running. Had we stashed another set of keys in the TT, we wouldn't have had to break the rear window to get access to the TV.... That was not a cheap date!1 point
-
Me too. I try to keep rough track of consumption. All of our fresh water goes into the grey tank but the two indicators (fresh and grey) never add up. I was thinking of trying to correct it before my trailer goes out of warranty but decided it's really not worth it.1 point
-
Since you (or at least myself) would never try to press the wet bolts into the shackle straps while under the trailer, I can't see this being an issue or a useful tool. If you own a vise and a hammer, you have all the tools you need. If not, this job is probably beyond your capabilities.1 point
-
I did a brief preliminary test while at the Cow Barn yesterday, a 15 minute run at TV idle. No drop in TV battery voltage while running its’ a/c full blast, and the 40A DC-DC charger and DPll (High setting) simultaneously. The run duration was limited due to the fact that the OTT was inside rather than outside the storage shed, whereby exhaust fumes would not have been an issue. The TV’s alternator gauge indicated a steady +14V output throughout the test, a vast improvement over the aging stock alternator. Looking forward to a planned trip next month to see how it performs, but very encouraged by the results of this test. TV at idle DPll current draw offset by DC-DC DPll turned off, DC-DC output (minus misc. OTT draw) DC-DC off, OTT misc. draw
1 point
-
Just got this today and it looks great. Thanks to those who suggested it! amazon.com/dp/B00H7LPKKU?ref=fed_asin_title1 point
-
Ours works for both.1 point
-
Geoff, Thanks for this post and excellent write up. I used this for my Airstream and performed some additions like powering a WiFi and adding a RJ45 to the external connector. The power relays are awesome too and I know I will find uses for them on other projects.1 point
-
Here are the program settings for the relay:
1 point
-
It's for those of us who live in rainy climates, and don't want a waterfall running down the side of the trailer, and soaking everything within a couple of feet. It has rained every single trip except one since we bought our trailer! ⛈️😠⛈️0 points


-
Recent Achievements
-


