Leaderboard


Popular Content
Showing content with the highest reputation on 11/30/2024 in all areas
-
2024 was an amazing year for us. We sold our home in Loxahatchee, FL, moved to our condo in Jacksonville Beach, and recently completed our new mountain home in Dahlonega, GA. My new shop is up and making sawdust. We cannot be happier. My 2025 catalog has new products and many more pictures from Oliver Trailer owners who have had me craft upgrades. You can download the 2025 PDF catalog here: http://bit.ly/3v0qiqU Onward and Happy Camping, Foy Sperring
 7 points
 -
I just finished this great mod! Thanks Minnesota Oil! FYI, this modification can be done with hand tools, it just takes a lot of elbow grease with a hacksaw. I used a woodworking bandsaw with a fine blade and 2" hole-saw." The edges were draw-filed for a polished look. I didn't mill out a recess to fit the frame per Minnesota's plans, but I did drill and bottom tap blind holes (not all the way through) for the mud flaps. All the aluminum was available at Amazon: 12" x 8" x 1/2" plate 12" x 3" x 1/2" bar 12" x 3" x 1/8" bar I had some difficulty finding decent mud flaps. I ended up getting a set at O'Reilly's Auto Parts, they had a chevron patten on one side and vertical lines on the other. Cheers! Geoff
6 points
-
I have a couple of these knee savers. One in the Oliver, one in the shop and one for all other outside landscape jobs. On long trips I always have one handy in the bed of our TV. With pretty solid reviews, they have held up really well and my knees stay happy! 😊
3 points
-
THAT looks like a "Holiday Gift Stuff" to me! Bill3 points
-
Perhaps Black Friday is a good day to start a thread about 2024 potential gift items. I have used one pound bottles of propane for a long time but have always hated the thought of simply throwing them away when they were empty. Yes, I tried recycling them but found that difficult to do given the few places that will accept them. Yes, I tried connecting a hose to a larger tank but found that to be a bit cumbersome. Yes, I tried a five pound tank but didn't like it. Finally, a couple of years ago I saw a one pound tank (Flame King) that was (legally) designed to be refilled. But, there were a couple of design items of that tank that I didn't like. Finally, about a year ago the company that makes the Big Buddy/Mr. Heater propane heaters can out with a refillable one pound tank that seemed to be what I was looking for, so, I bought a couple - a Fuel Keg. To use this tank I also needed what they call the Refill Kit. I've now used these tanks and refilled each of them three times with no problems. It is a simple process that takes less than five minutes (from dead start to putting everything back where I got it). A full one pound goes into each tank during the refill and they work exactly like the old disposable tanks but you simply don't throw them away. Assuming that you can purchase the throw away tanks for $5.00 each and I refill each of the refillable tanks about ten times I will start to save money in addition to not adding to the landfill. There are a ton of review videos (like THIS one) or (THIS one for Flame King) on YouTube. Happy shopping! Bill2 points
-
I carry a pad in the Oliver for any kneeling or laying on my side or back; stows against the nightstand between the twin bed rails and floor perfectly. Mostly for inside use, but outside on occasion, as necessary.
2 points
-
And to all a good night…2 points
-
Happy Thanksgiving to all! Mike and Krunch2 points
-
Happy Thanksgiving!2 points
-
2 points
-
Happy Thanksgiving to everyone !!2 points
-
2 points
-
Happy Thanksgiving!
2 points
-
Happy Thanksgiving 🦃2 points
-
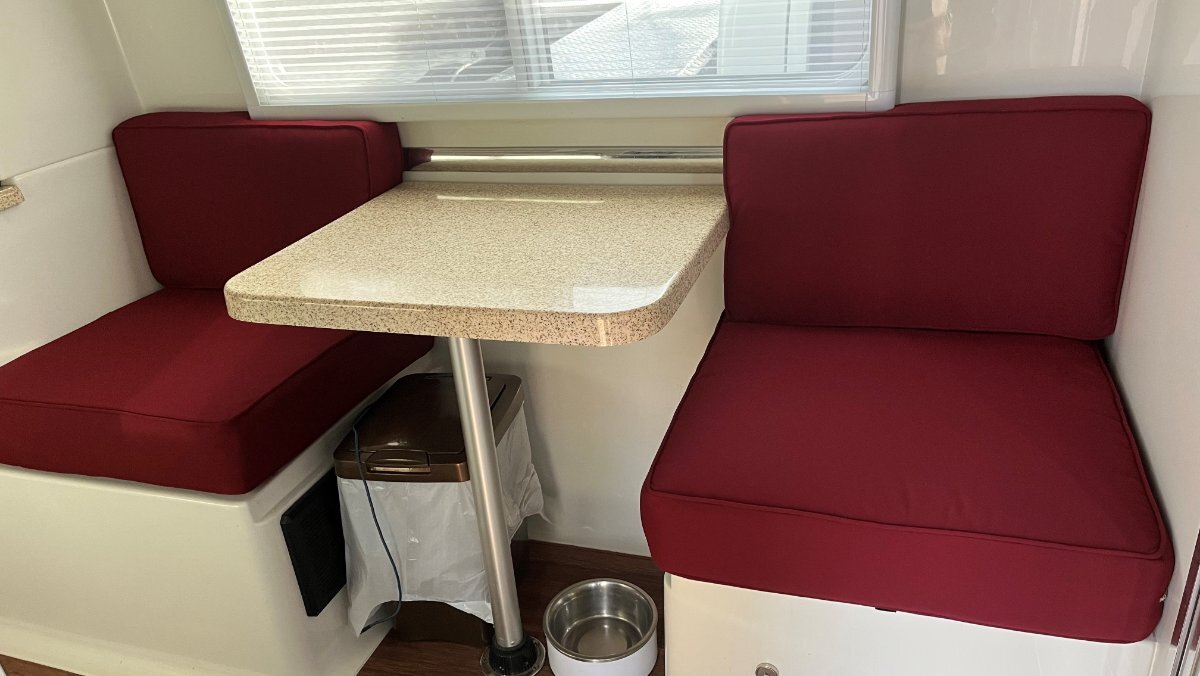
They put us on their November calendar. After running our trip, every time I sat on the old cushions, I thought it would be a shame to merely reupholster with new cloth yet keep the 9-year-old foam. When we dropped them off, I asked about new foam. He said the quality of foam for seating they carry is far superior to what we showed them in the old cushions. We went with 24x25" bottoms with 5" new foam (1" taller) and with the batting and fabric, the cushions are closer to 6" tall. We had 2" clearance under the window frames with the old cushions. The new ones just fill the opening and stay nicely. Went with the original sized 4" foam for the seat backs. All new foam, batting, fabric, zippers with newly corded edges. Chris loves the color given her Red, White and Blue Oliver theme! We spent just under $500 out the door. Which for me was better than the $350 for upholstery only. Soon, she will look as good as she tows or provides inverter power!
2 points
-
The first thing I did, as an upgrade our new-to-us Oliver, was to upgrade the A/V system. The prior owner recently replaced the original lame corner-mounted 24" TV (TV means television in this post, not tow vehicle) with an Insignia smart TV running the Amazon Fire TV OS. OK, it was an upgrade, since it was then capable to stream from Amazon, Netflix and other services. But come-on, the TV was ugly and BLACK, 4" deep, had a ginormous black 1 1/2" wire harness, etc. I could go on-and-on! (see pic) I have never watched TV on a 24" screen, and do not plan to do so going forward. We enjoy TV and watching movies and I not going to start squinting to watch a low-rez 24" TV. I'm thinking 32" hi-rez would be perfect in this space! 🙂 First thing I did was to realize and test all the accessories we have in the new Oliver. Like the Weingard Sat dish upgrade, nice! The Furrion radio audio system, can play CDs, DVDs, but not Blu-ray. OMG, I looked at Amazon and other providers to replace this head unit, and still today, now that Blu-ray has been around for 16 years, you cannot replace this system, with a wall mounted unit, that also plays Blu-ray. In our beautiful Oliver, view of the rear living space, let me ask you, what stands out as being out of place? It's of course the BLACK, UGLY TV!!!
1 point
-
Happy Thanksgiving, all! Got the turkey on the smoker early this morning. Expecting a house full by noon. Hope everyone has a wonderful day. Mike and Carol1 point
-
Fiberglass work by Oliver or a marine shop that does fiberglass repairs.1 point
-
Re-reading this post.... I have seen damage to lanai doors that seem to have a similar construction (materials) and we thought it was due to long bouts of strong sun exposure on one side of the door, with cooler shaded side reacting differently. That may be wrong, but I wonder. Foams and plastics are light weight, but sun and heat can really break them down.1 point
-
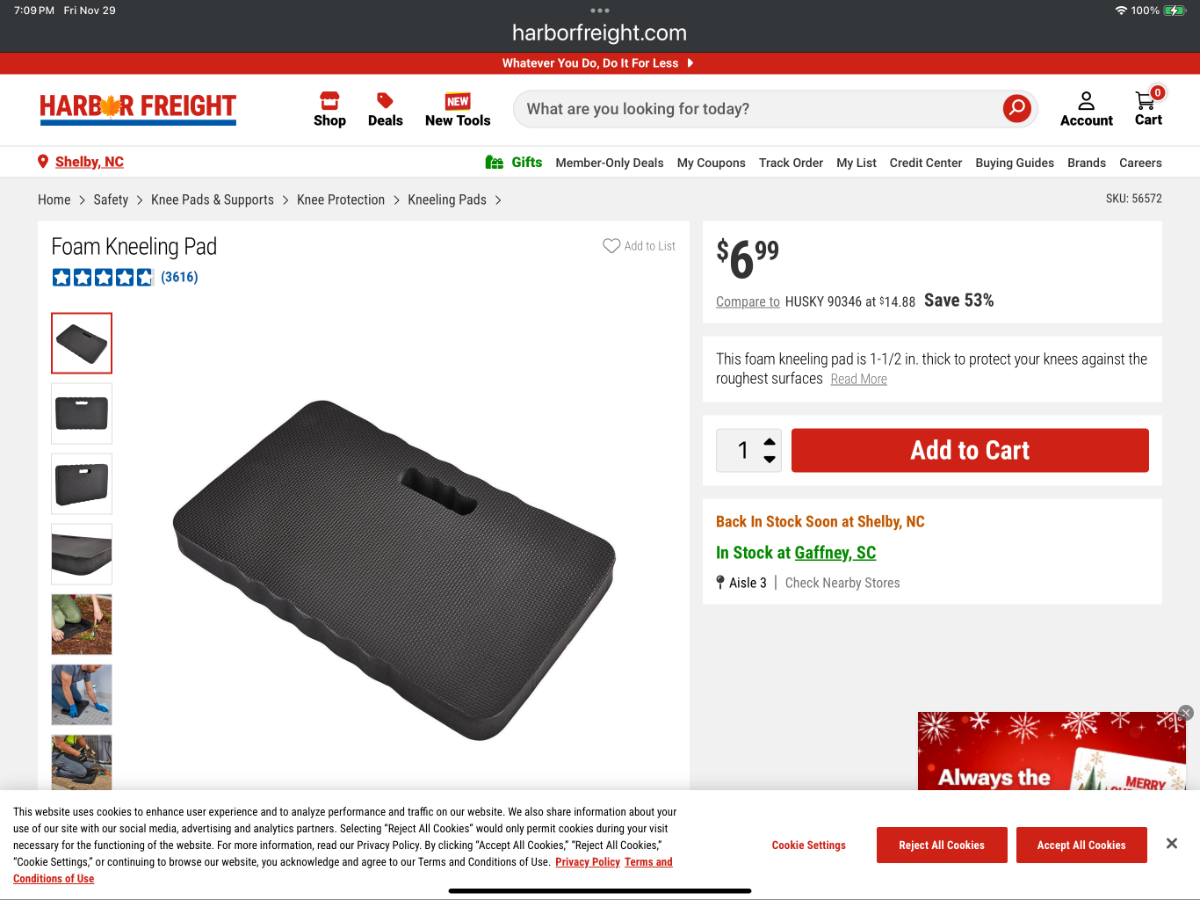
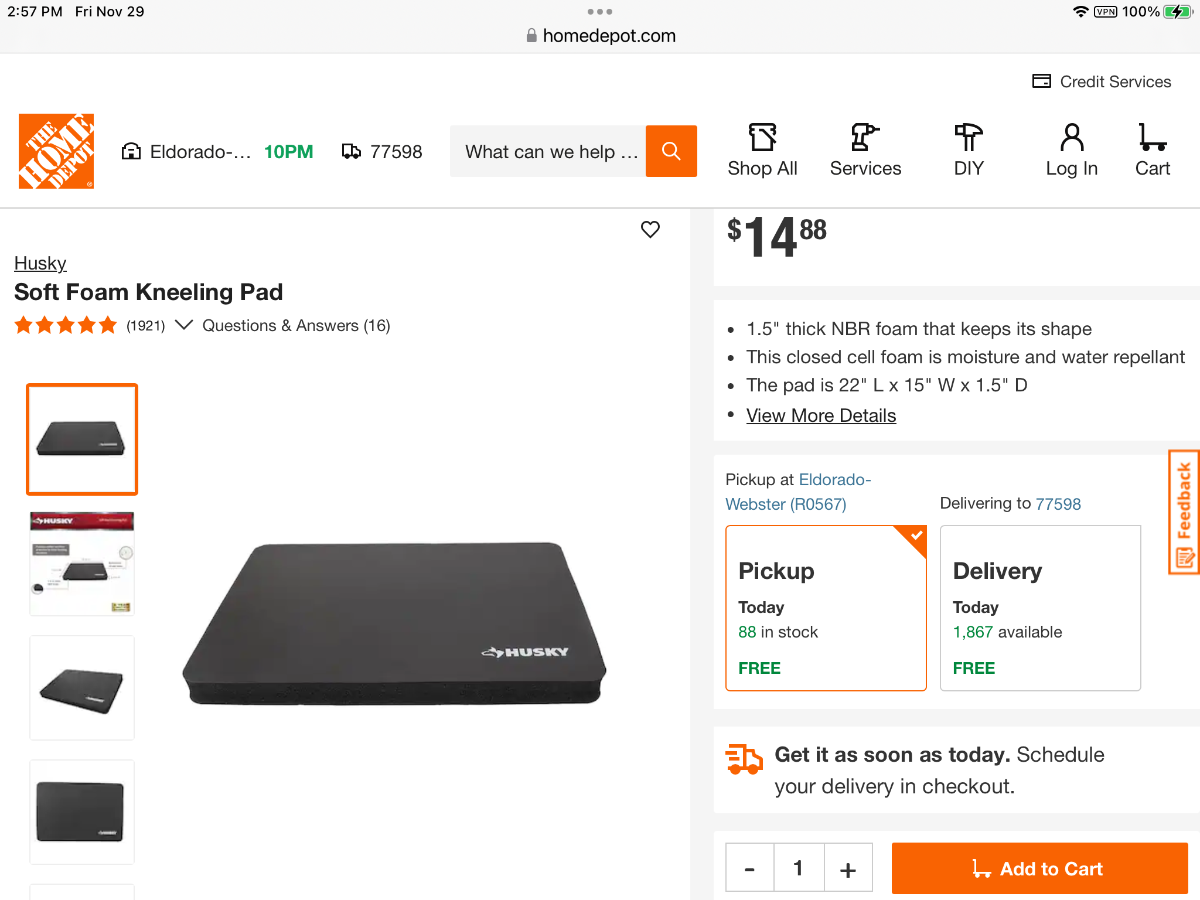
Wow, less than half the price of Home Depot for what looks like the same item less the Husky house brand name.1 point
-
Beautiful craftsmanship Foy!1 point
-
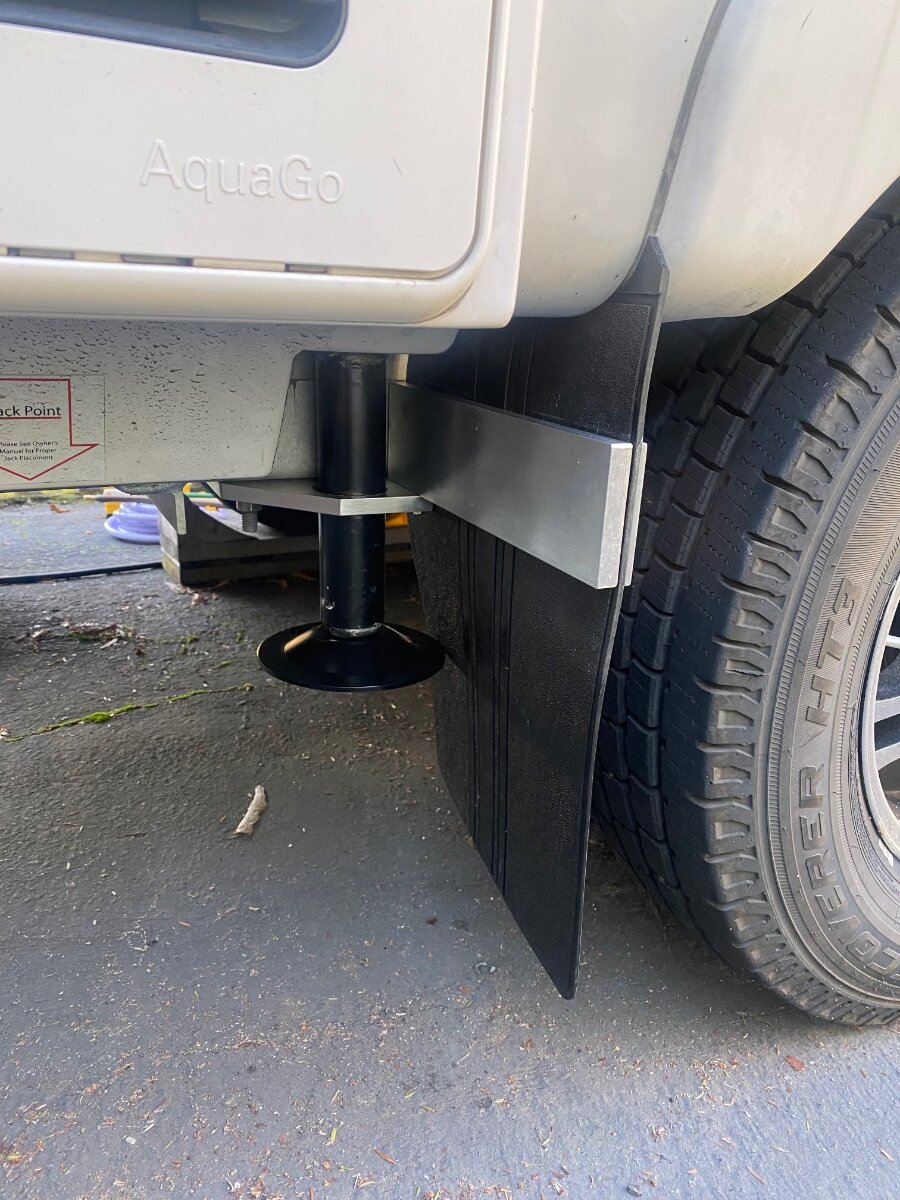
New pics... I purchased some basic construction scaffolding a few years ago when we painted the exterior of our home. Remembering about $260 on Craigs for a 2x8' setup (old crusty parts). I'm the tool and setup and prep guy. Chris is an amazing painter, interior or exterior, highly detail, never bleeds a line! The rig was wobbly! I had to tie the scaffolding to the building, or to a close tree or bush, really, anything to keep it stable! I should take a picture of my neighbor's custom home next door, tomorrow where the sub is working the stucco, OMG! the rickety frame with random wood planks. You're not getting me or any family member on this this rig!!! When I sold the old scaffolding, I kept 3 of these adjustable legs (while getting our money back). Glad the see the MetalTech stuff is industry standard in the 1 3/8" inside diameter. It is so much more secure than the wheels that come with these AMAZING Home Depot deal!
1 point
-
For $1600, Craigs tape job looks really good to me! Thought when I looked a year ago these doors were under $900. Like Mike, our few lights cracks will stay as is no tape required, but I would do the same it the laminate was coming out of the frame as pictured. To remove and replace the surface will not be easy, given you want it installed within the frame like the original. The only removeable section is the bottom cross-member (see door bottom pictured) and the window surround and door handle. You can buy 4x8' sheets of similar material at Depot and other stores. Cutting smoothly to size with top radius corners is not easy but doable. The trick would be after getting all the old material out would be slipping the new surface into place. You would likely have to chisel and file the core of the door to make extra room for material that would be a few mils thicker. Or you could just glue it over the frame. 🤣 I'll replace our door ONLY after we have trouble opening and closing it!!!
1 point
-
I have the same one in my truck toolbox but after brake jobs and such mine is strictly for outdoor use! 🤣1 point
-
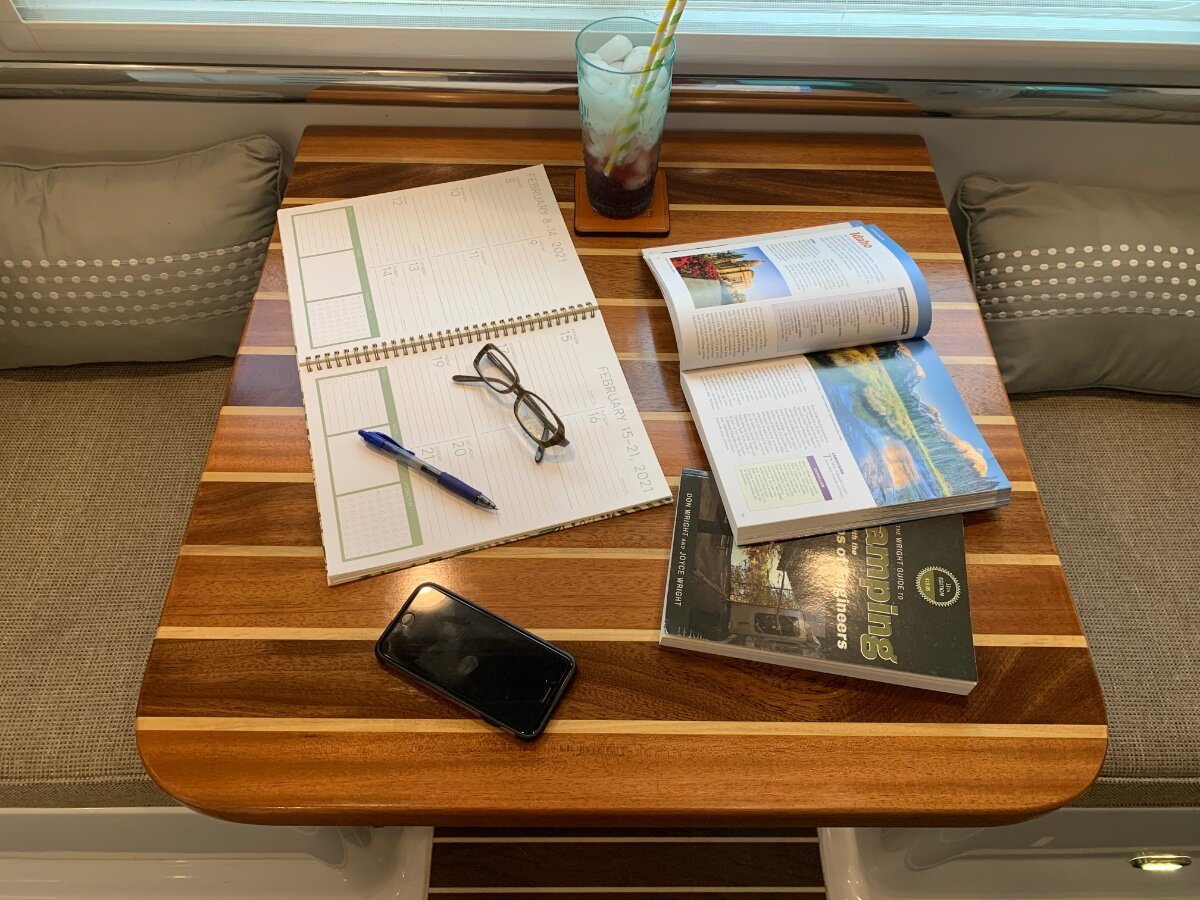
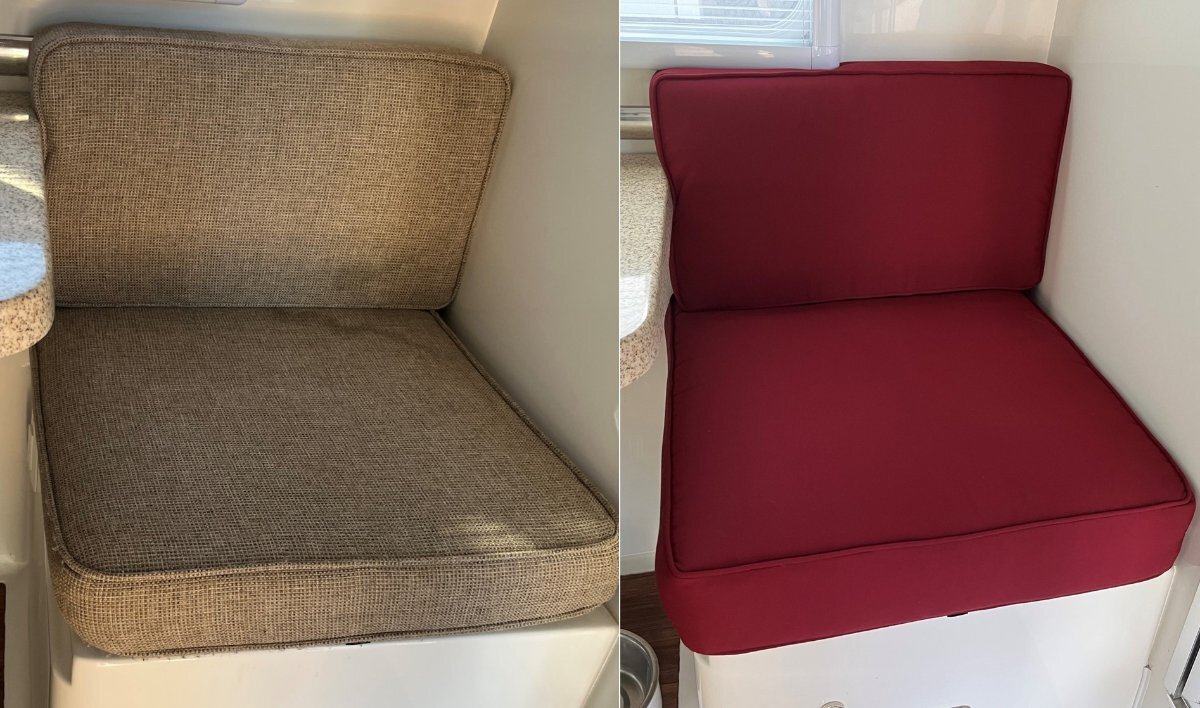
This would be nice at times but will take depth from the seating area. I like the pool noodle idea or a lumbar pillow since they can be removed when dining. I have one that I can use at the dinette and always when watching TV from bed. Sitting correctly when eating I prefer the full depth, but perhaps not needed for all given Ron's comment. Our dog Charley likes to sit at the dinette in the morning looking out the window and when we are away for the day. We're looking now for a throw-cover, so he doesn't dirty the new fabric! Checkout my before and after picture. Our old cushions were just gross! I tossed out the bottoms but kept the backs which are great for kneeling when working in the Oliver basement! One reason ours got so dirty is that all summer I used them for kneeling or laying on the floor working all our Oliver mods.
1 point
-
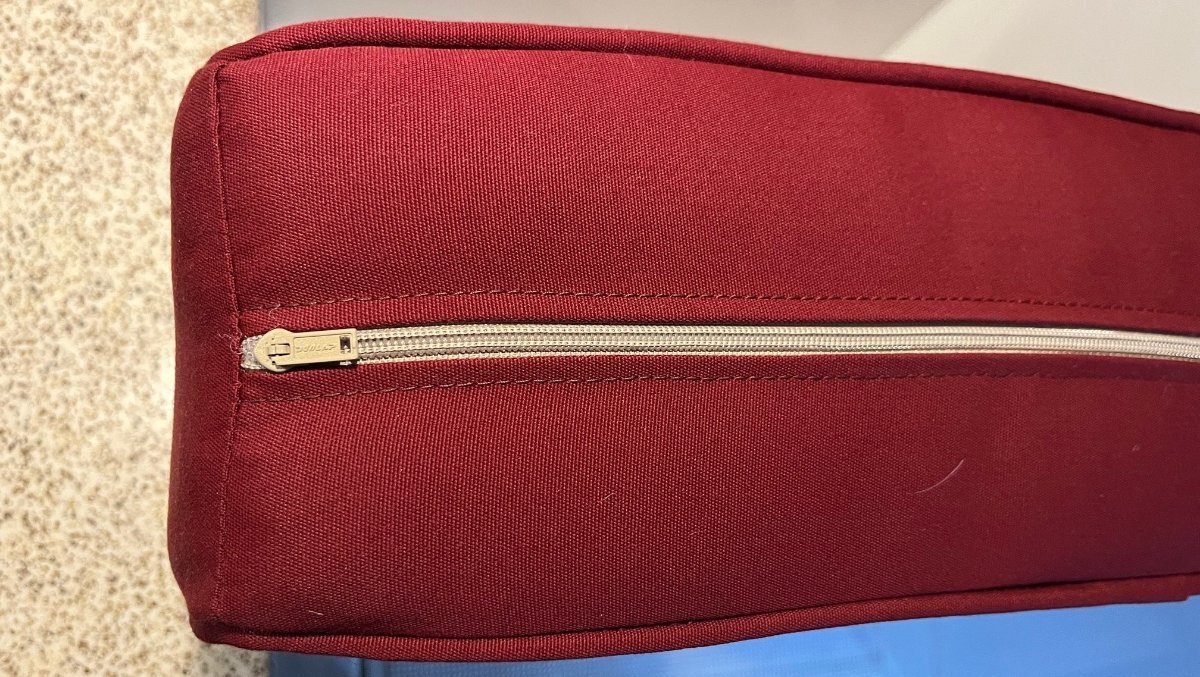
Chris and I had a Thanksgiving drink in the Oliver yesterday! I was testing a new TV tuner and antenna earlier in the day and had the football game on. These cushions so much more comfortable! The foam is better quality, denser so you do not feel the hard platform anymore. The seats are 22" tall and I measured our dining room chairs and LR couches which all measure 20" high. I have short inseams for my height. When Chris or I sit squarely our heels would be 1" off the floor but when leaning back or forward they feel fine. The bottoms with 5" foam and with Dacron batting are 6" finished. The backs are 5" total using 4" foam. I believe for Chris, or for you and Brooxie new 4" foam (5" total) in the bottom cushions would certainly be enough for your weight. My weight is in my upper body, so the deeper bottom is great! If you make the backs deeper, you will lose an inch of seating area which might work well for you. Either way, it made sense for the extra money to replace all materials after 9 years as the old cushions had several stains and the old foam was no longer square. We bought this fabric at $42/yard delivered, buying it through our upholsterer. Comes in many colors, you will need 4 yards: Sunbrella Upholstery Canvas Burgundy (5436-0000) I added a picture to show the quality of the work.
1 point
-
I didn’t think you went to bed that early! Mossey1 point
-
Hull # 117 looks like the day it left the factory - no cracks at all. Bill1 point
-
Happy Thanksgiving, everyone!1 point
-
Happy Thanksgiving1 point
-
That’s a good point, I wonder if a change in the door was made after 2010. We’ve got a number of horizontal cracks in our 2016. Mike1 point
-
We had a similar experience. What began as one, fine crack near the window eventually spread with a spider-like appearance throughout most of the door over a period of several years. Finally decided to have the door replaced earlier this year by Oliver. I had asked Mike Sharpe if repair, instead of replacement, was an option. Mike had gotten that question before, and had then checked with a tech who had attempted the repair. Mike was told by the tech that the repair wasn't feasible; too labor intensive with unsatisfactory results. Note: the shade of the door (manufactured by Lippert) was a slightly different shade of white than the rest of the trailer; noticeable if you look for it. Jason said that Lippert might consider a custom job to match the shade of the existing door. However, even if would Lippert did agree to it, Jason was unsure of the cost or time it would take for the job. We decided to go with the slightly off-shade version. I had asked both Oliver and Lippert what caused the cracks, but neither knew. Good luck!1 point
-
See this post (end of page 2) for probable cause -1 point
-
1 point
-
Notice how far back the TV screen is in relation to the rear window. To make it solid, I bolted the mount through the attic ceiling and used long brackets I had in my shop to distribute the weight across the width of the attic ceiling.
1 point
-
Being confident, the old has to go... Next day, I just pulled everything old! Request for those reading... How should I fill these holes? I'm an engineer/mechanic, not an artist or autobody/paint guy. I want to be able to later finish the fiberglass and polish the corner, without evidence of original installation (finish work TBD by a professional).
1 point
-
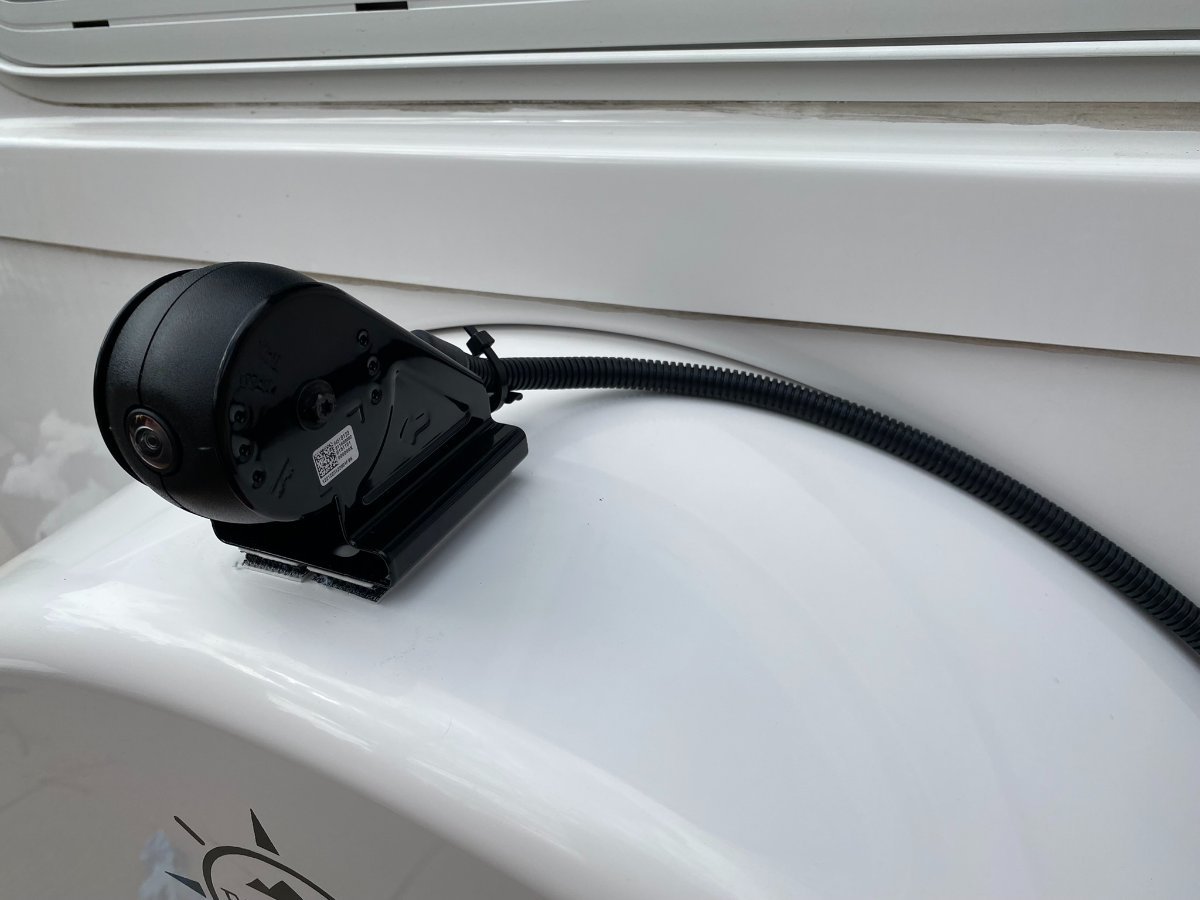
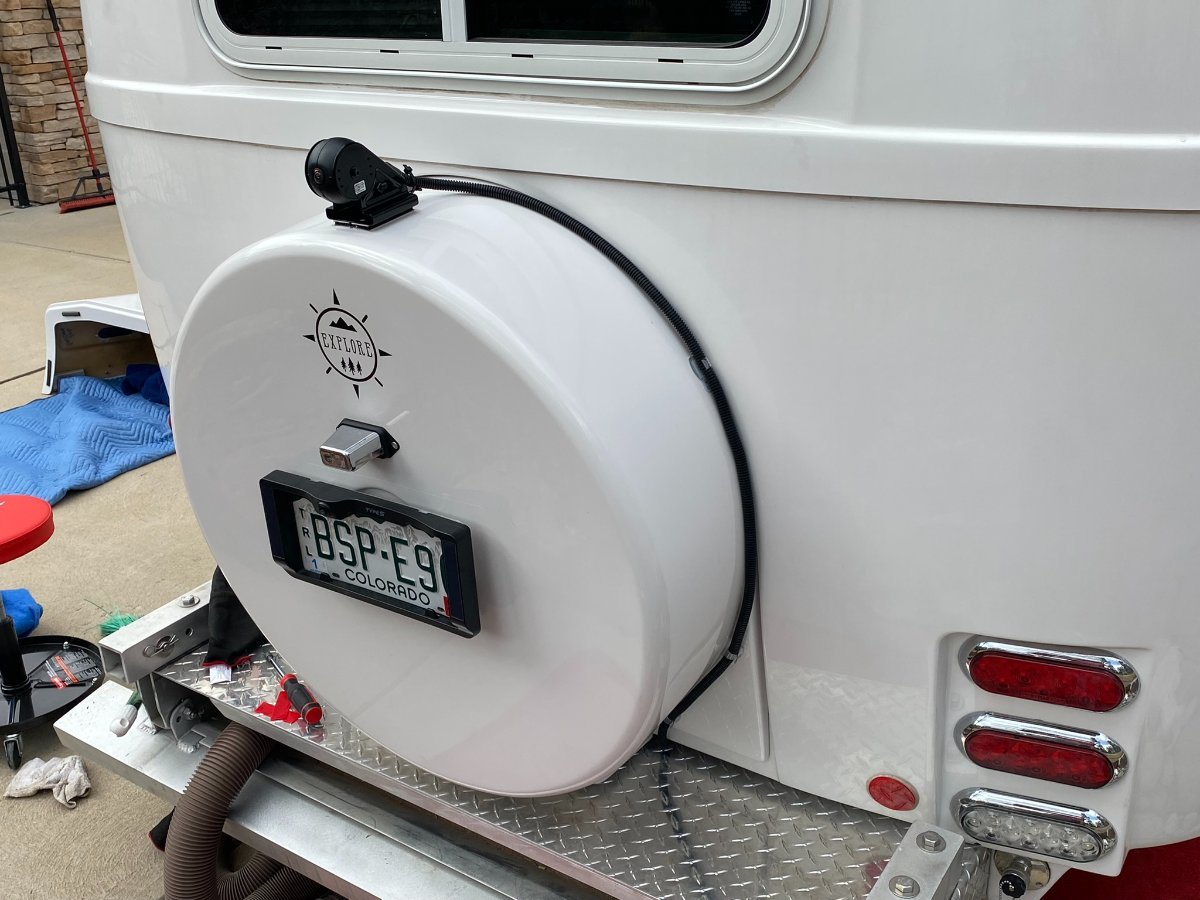
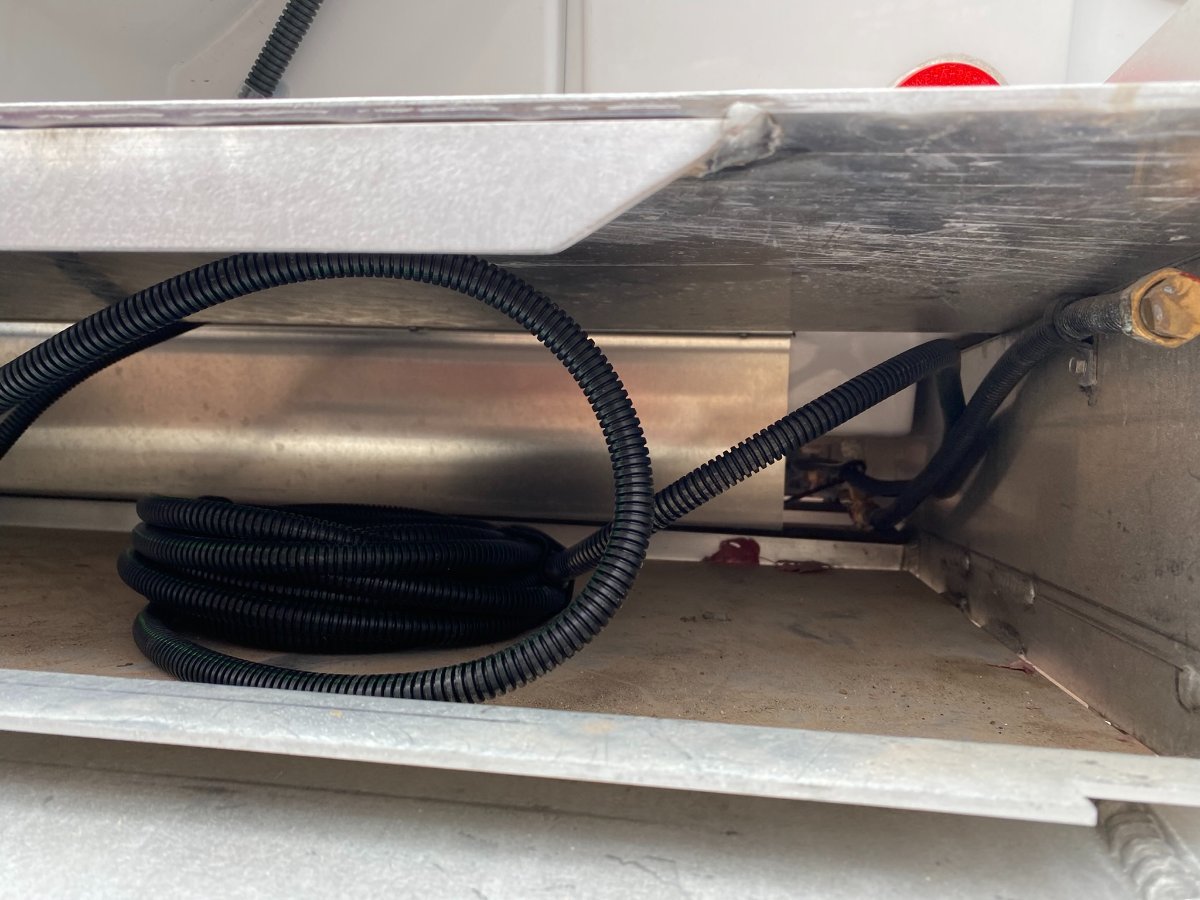
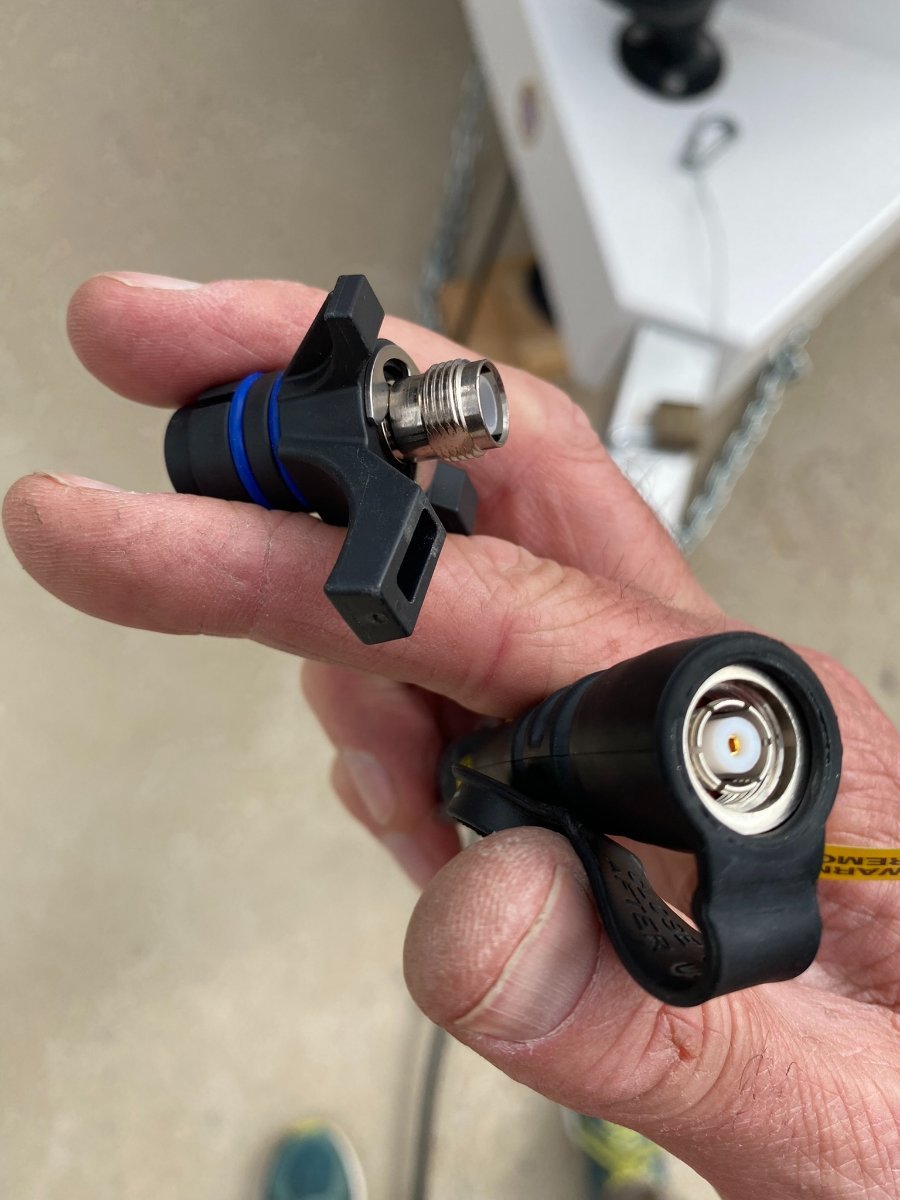
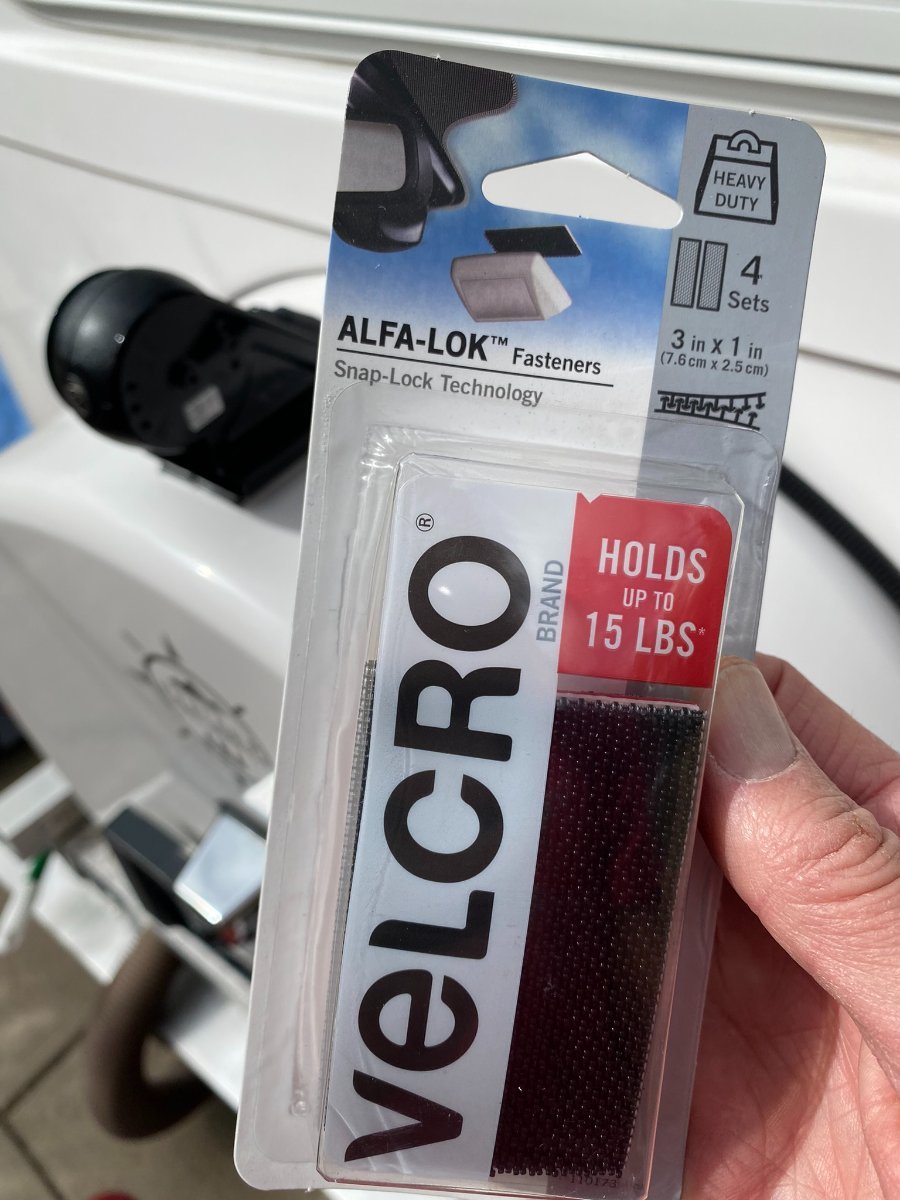
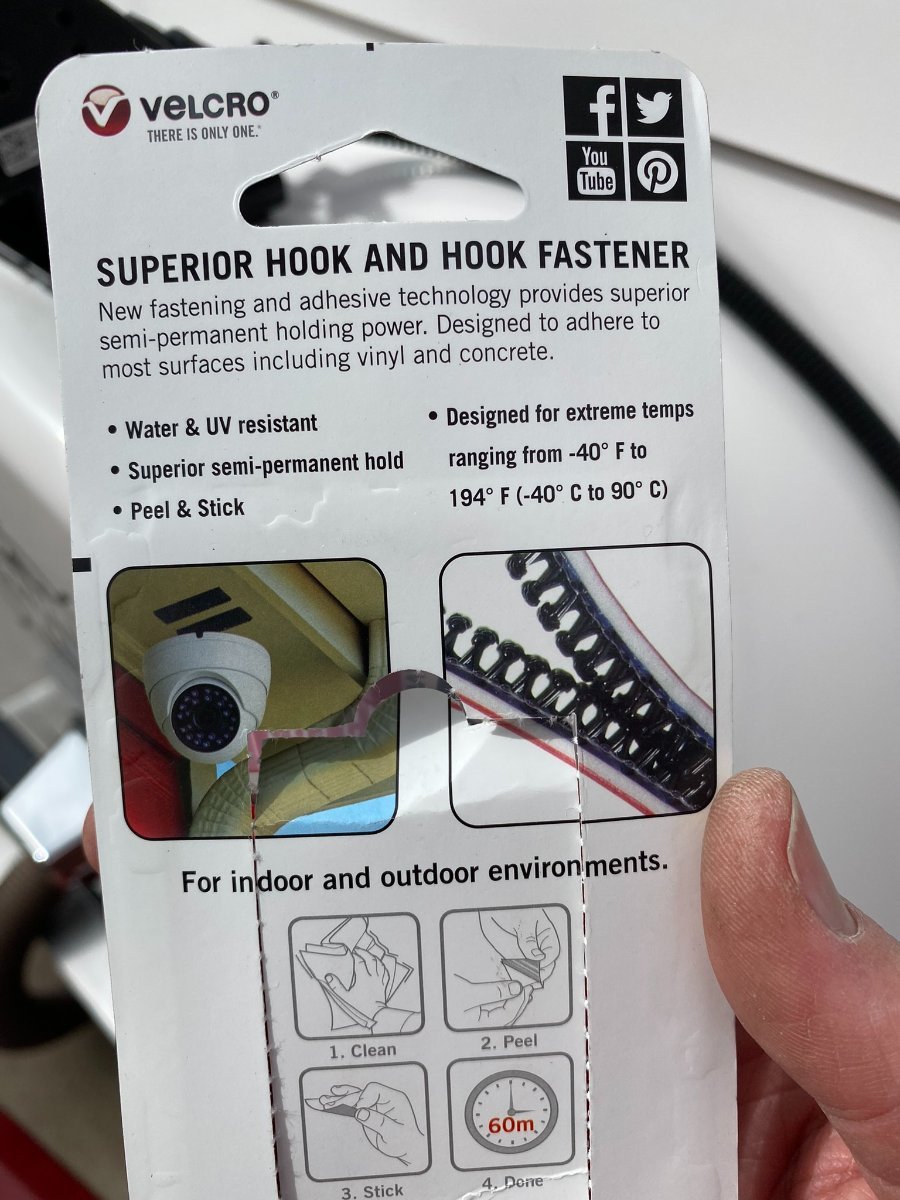
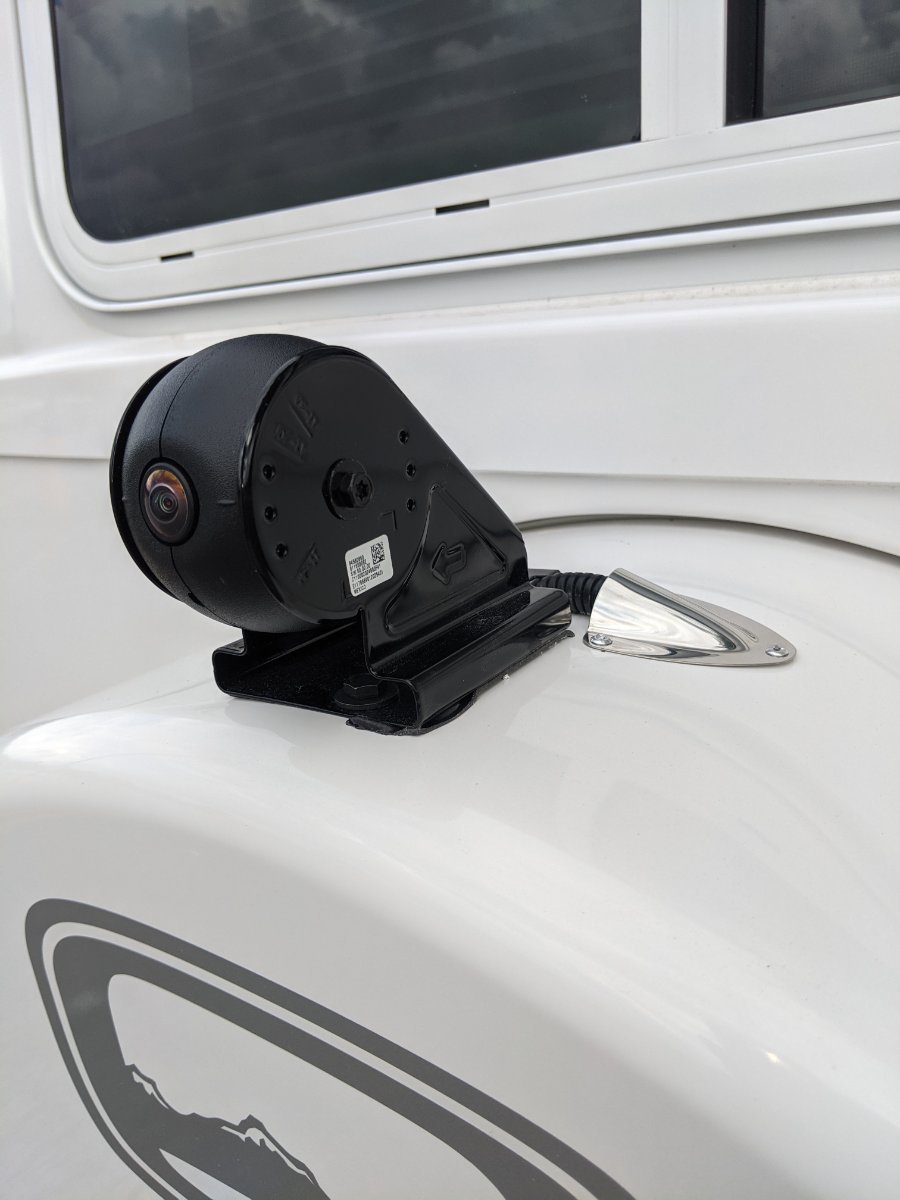
I thought I would follow-up on this after my install. Might be helpful if anyone else has a 2020-2022 GM vehicle with the advanced trailering feature and is considering this accessory... Everything went well and it was easier than expected. The "transparent trailer" view feature requires that the camera be placed within a certain zone at the back of the trailer and on the Oliver, the only plausible location is to mount on top of the spare tire cover. @Cameron shared a photo above of the camera installation that Oliver did for him, and it looks great. I decided I didn't want to drill holes in the spare tire cover as the camera is not compatable with non-GM trucks and I might move to another TV someday even though I love my Silverado 3.0L deisel. The other challenge is that you must still be able to remove the spare tire cover if needed, so I needed a plan for either easy removal of the camera or lots of slack cable inside. As it turns out, I have both. There is plenty of room to run the cable in the channel between the aluminum crossbars and the fiberglass under the trailer on the curb-side. This is where the propane line is located and runs all the way from front to back. The cable is well protected and tied in with several zipties along the way. The plug-end of the cable that plugs into the truck bumper port can be unscrewed to make it smaller and now it fits easily through the gap at the back of the diamondplate bumper and fiberglass to route the cable into the storage area in the bumper. Then it is easily routed into the chanel where the propane line is to run all the way to the front. To scure the camera, I elected to use this high-strength plastic Alfa-Lock Velcro product that utilizes 3M tape. This allows me to remove the camera if needed and replace it easily yet it has a very secure hold. I will only need to remove it if I need to access the spare or, alternatively, I can leave the camera secured and pull the excess cable up through from the bumper storage space. Since the camera is mounted on a horizontal surface, this seems plenty adequate. Finally, I used a few stick-on plastic retainer clips to hold the cable around the outside of the spare tire cover. The look is not as clean and good looking as Cameron's install from Oliver but I'm happy with it and it seems plenty secure. I will see how this it goes this travel season. If the Alfa-lock Velcro fails then I will try 3M automotive tape and rely on pulling through the extra cable from the storage space when I need to remove the cover. Hope this is helpful for anybody else considering this accessory install. Dan
1 point
-
Here is the GMC trailer camera installed by Oliver service prior to pickup. They did a great job.
1 point
-
After getting emails every other day from Epoch and Renewable Outdoors, I thought what the heck, what does the 460AH battery cost on this Black Friday. With 1060AH you could run an Atmos A/C ALL night long (or 2-3 hot afternoons in Arizona)! I was disappointed to see this vendor now charges sales tax. Whenever I spend $1000 +/- on a big-ticket item, I look for an out-of-state vendor that does not hit the minimums to charge out-of-state sales tax. 😒0 points


-
Recent Achievements
-


")


")


")


