Leaderboard


Popular Content
Showing content with the highest reputation on 01/09/2025 in Posts
-
@jd1923 There are a number of inaccurate statements in your post above. Specifically, please refer to any number of prior posts here on the Forum regarding the issues and whole story (to include Oliver's involvement ((or lack thereof))) relative to the fresh water tank issue. Hopefully a review of the entire situation will help with your (and/or anyone's) concerns in this regard. March 13, 2018 October 26, 2017 May 5, 2024 Note your participation in this May 5th, 2024 thread. With regards to the "cutouts". I believe that it was sometime in 2018 when Oliver "standardized" their wiring for all Oliver Travel Trailers. Prior to that - for both your Oliver and my Oliver a certified electrical tech was hired to do the wiring on each trailer. Since there were more than one tech (I've been told that there were as many as three at any given time) and since it is doubtful any of these tech had specific RV experience, the wiring and connected "cutouts" were dramatically different from one trailer to the next. Yes, perhaps Oliver should have had a QC person go back and check each tech's work. But, it is fairly obvious that Oliver didn't believe this was necessary given that the tech's were "certified". Once the "cutouts" were "hidden" by cover plates the only way they could be seen would be to take things apart - as you and many of us have done. Same thing (I believe) applies to the circuit breaker issue you mention. While not "perfect" my Oliver continues to serve me extremely well after ten years. If I had not purchased an Oliver I would be on my second or third RV by now and still dealing with trying to make those things into an Oliver. Yes, it is frustrating to deal with someone's carelessness and/or lack of proper technique/skill but it is a fact of life and Oliver through its own quality control system tends to limit most issues of this nature. Finally, From my experience, Oliver has always bent over backwards in helping many owners correct any issues with the trailer. And this extends well beyond what the stated warranty period may reflect. Bill4 points
-
We are all going down the road towing an earthquake through a hurricane. No screw ever gets tighter with vibration, it always loosens. I go completely through our Hull #50 at least once a year and check all bolts and screws for tightness, especially the electrical connections. I’ve preached this for several years on multiple platforms. You can’t blame a manufacturer for a loose screw on a a product that you’ve used successfully for years. The impetus is on us to maintain the product through regular inspections and maintenance.4 points
-
Ditto. Just make sure you have the head room under hood for them. GJ3 points
-
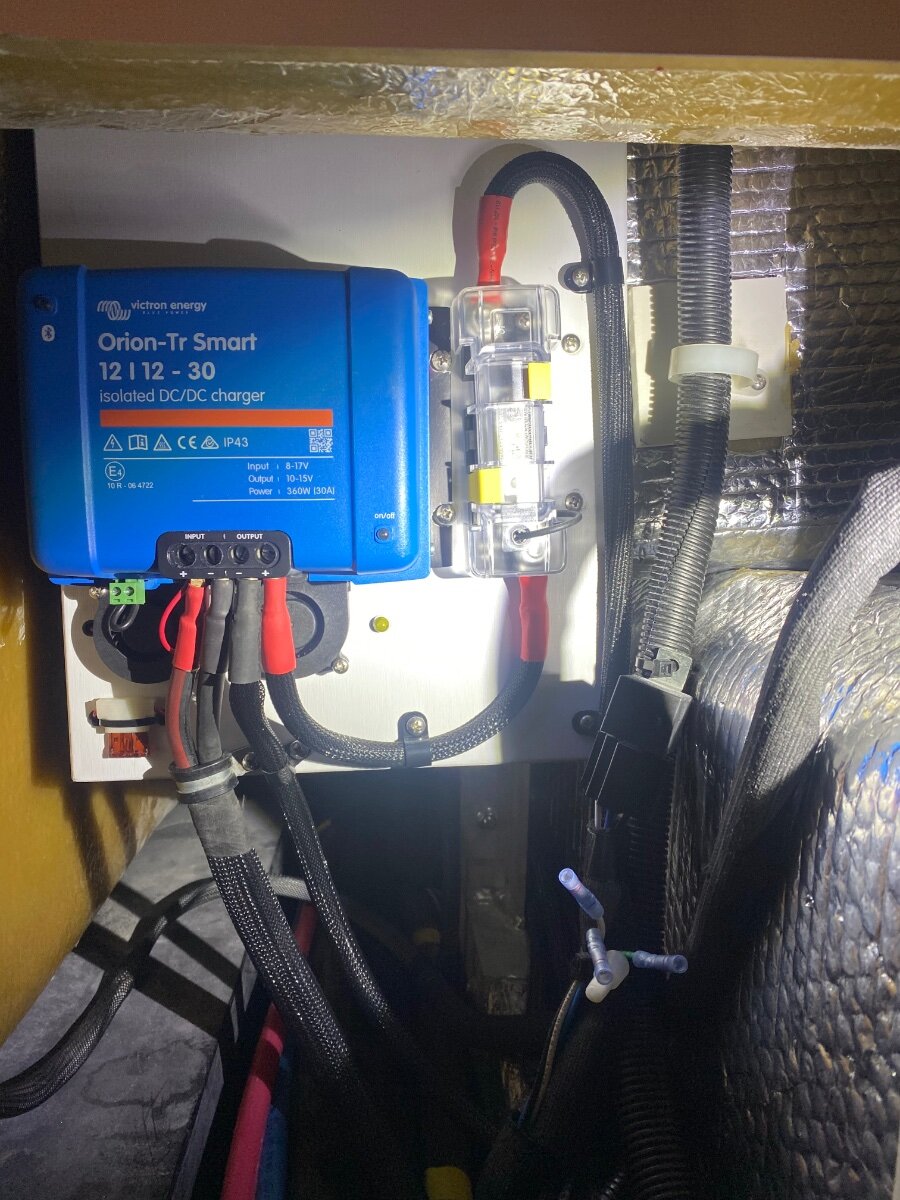
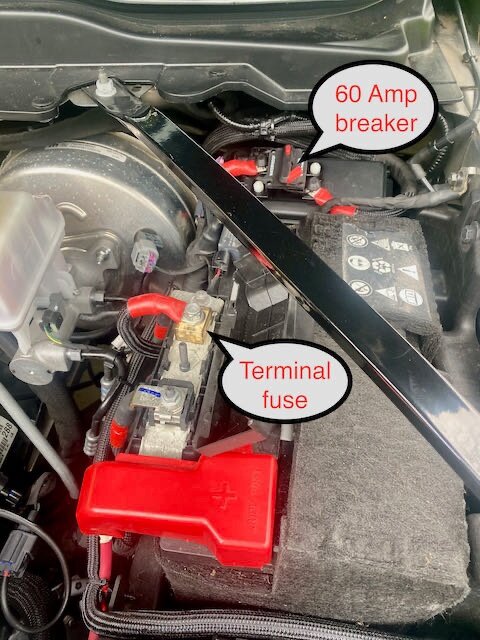
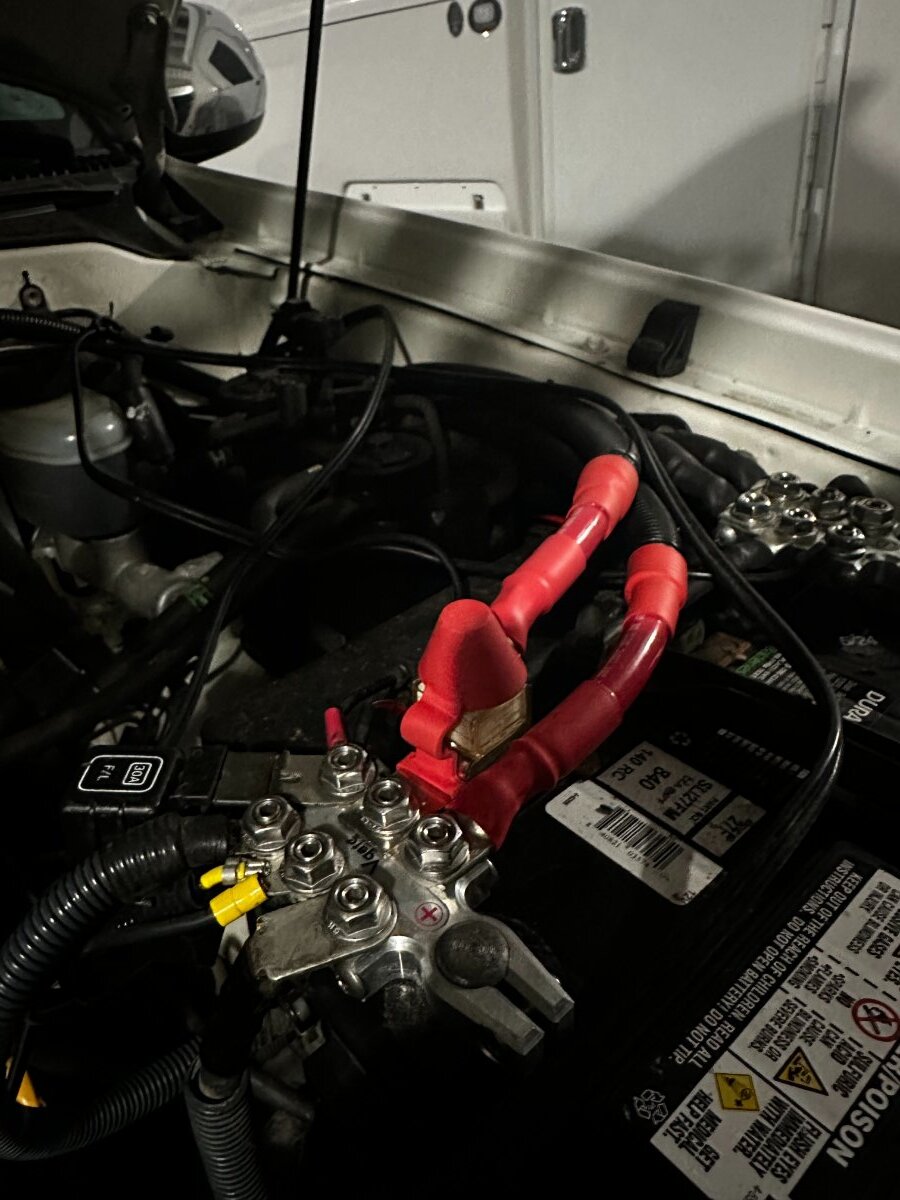
I also used a Blue Seas MRBF 60 amp fuse, and I added a redundant 60 amp breaker just as a disconnect switch. The Orion output has a #7720 Blue Seas 60 amp fuse block, rather than a breaker. Just as a FYI: A breaker has polarity so it only protects the wire on the load side. In this unique application, you would have to decide if the breaker will protect the wire from the massive Oliver battery current potential, or from the 50 amp Orion charger potential. Whereas a fuse has no polarity, it protects the wire from both potentials.
 3 points
 -
I used the following that were recommended by Artek. 1. Blue Seas MRBF Terminal Fuse Block and a MRBF 60 amp Fuse. 2. Blue Seas Series 187 Surface Mount Thermal Circuit Breaker 60 amp. I have attached photos.
3 points
-
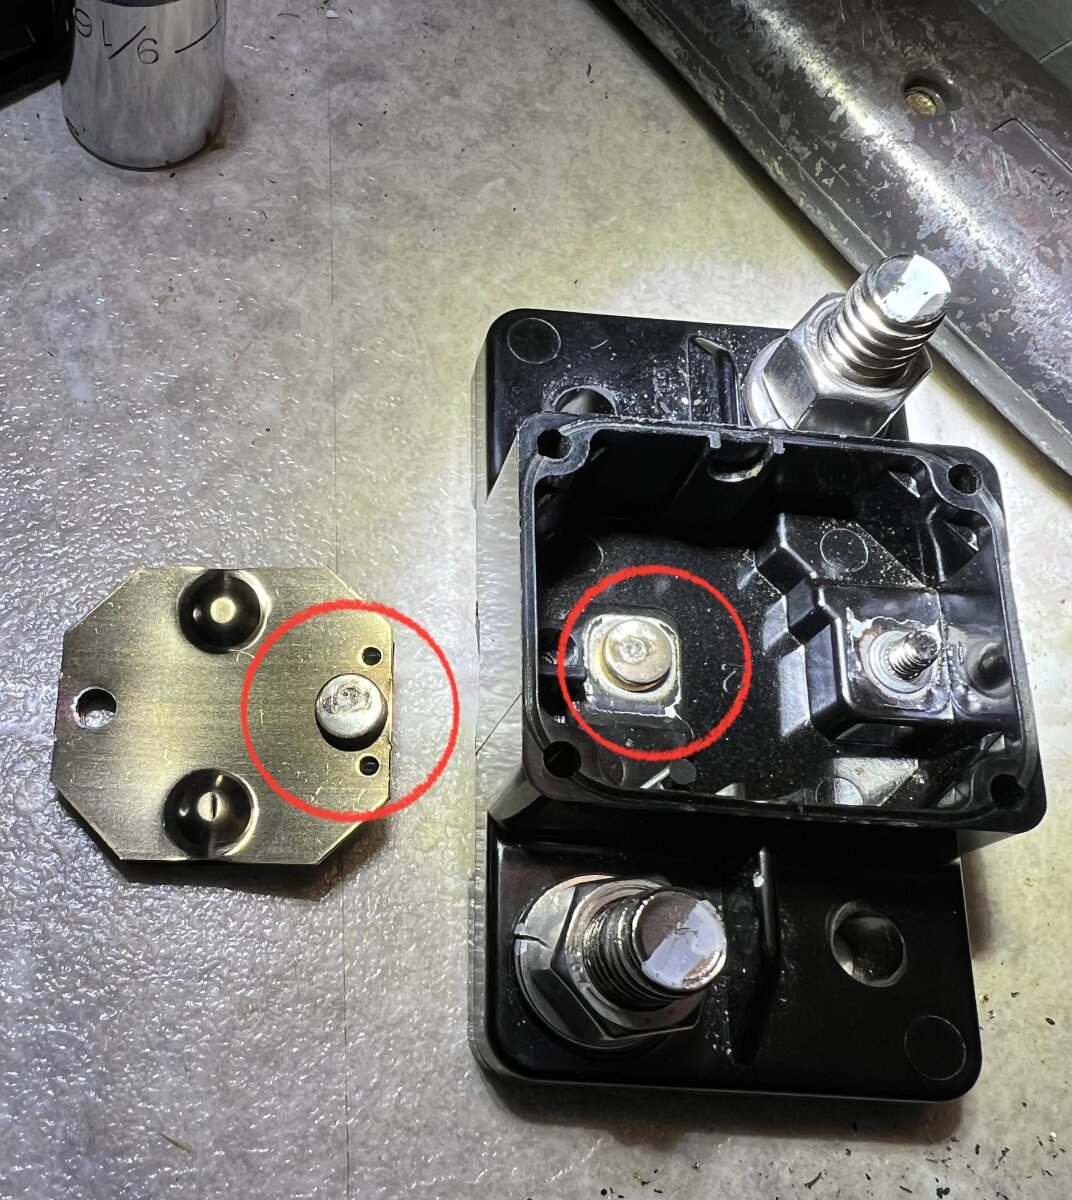
That's a really clean installation, great work! One word of caution though is that manual disconnecting / connecting with an active load applied can cause contact pitting and heating of the contacts in breakers of this type. A heavy duty marine spec. switch with larger contact areas would also fit the bill since the circuit breaker is redundant in this application.
2 points
-
Well Stated👍2 points
-
We have some friends nearby that we camp with a couple of times a year. They have a YouTube channel of Ohio's parks, and always end the video with "Keep it between the mustard and the mayo!" Being dense, he had to explain to me that it was between the yellow centerline (mustard) and the white edge line (mayo).2 points
-
We did this to our Casita and Oliver...quite an improvement but some of the tinyest,unidentified critters still manage to infiltrate. We are happy we did this modification and do recommend it! :) Best of luck, John1 point
-
Rich - Now that you have the screens removed for cleaning: If you live in or travel to any area of the country that has "no-see-ums" you might consider replacing the screen material with material that has a smaller/finer mesh such that these biting little critters can't get in. There is nothing "wrong" with the standard screen material except that the mesh (the small holes in the screen) is big enough for these (and other) small insects to crawl through. There are a number of YouTube videos on how to easily tackle this job - https://www.youtube.com/watch?v=t7emMleueHg Good luck. Bill1 point
-
Some historical perspective might be useful in the discussion of standardization of the early trailers. Those of us who ordered our trailers in 2015 recall that a small number of trailers were being made by a small group of workers. The production of trailers had just started back up after being shut down for a number of years. Most trailers were ordered by the future owner, with different features and options. It was common to call and request installation of a desired accessory or to change the installation of something else. You could call and ask that electrical outlets be moved or added here and there. Oliver was trying their best to accommodate buyer desires and requirements which resulted in some “one off” work and installs and prevented the standardization that is being discussed today. Mike1 point
-
Nice! Also, if you want you can flip the shades so you can open the night shade from top down as opposed to bottom up, see this post.1 point
-
Starlink monthly billing works as follows: Payment due date The first month's service fee is automatically charged on the payment due date, which is the earlier of the date you activate your Starlink Kit or 30 days after it ships. Recurring billing The service fee for each subsequent month is due on the monthly anniversary of the payment due date. Billing cycle The day you activate your Starlink becomes the recurring date for your statement. For example, if your billing cycle is June 28th–July 27th, you'll be billed on June 28th. Pricing Pricing may vary based on your location and selected equipment. Additional charges You may be charged additional automatic charges for Priority or Mobile Priority data if you opt-in to purchasing it after hitting your data limit. Payment methods Starlink accepts most credit cards, debit cards, and ApplePay. Alternative payment methods are supported in various regions. Pausing and reactivating If you pause your service, the month you pause is not pro-rated. If you restart your service, the month you restart is pro-rated.1 point
-
Asking @Snackchaser, @Geronimo John and @Coddiwomple what did you use for fuses in your DC-DC charging systems? The wiring diagram shows fuses on B+ at the both truck and trailer batteries. The user manual for the Victron 50A DC-DC charger states the fuse should be 60A or 70A. What do you suggest, or what did you install? 60A would be better protection but would not want to blow a fuse during a short surge. I want to go with ANL or other fuse type and not a circuit breaker.1 point
-
Anita and I will be at site 252 Jan 17th to 20th. Hull 2921 point
-
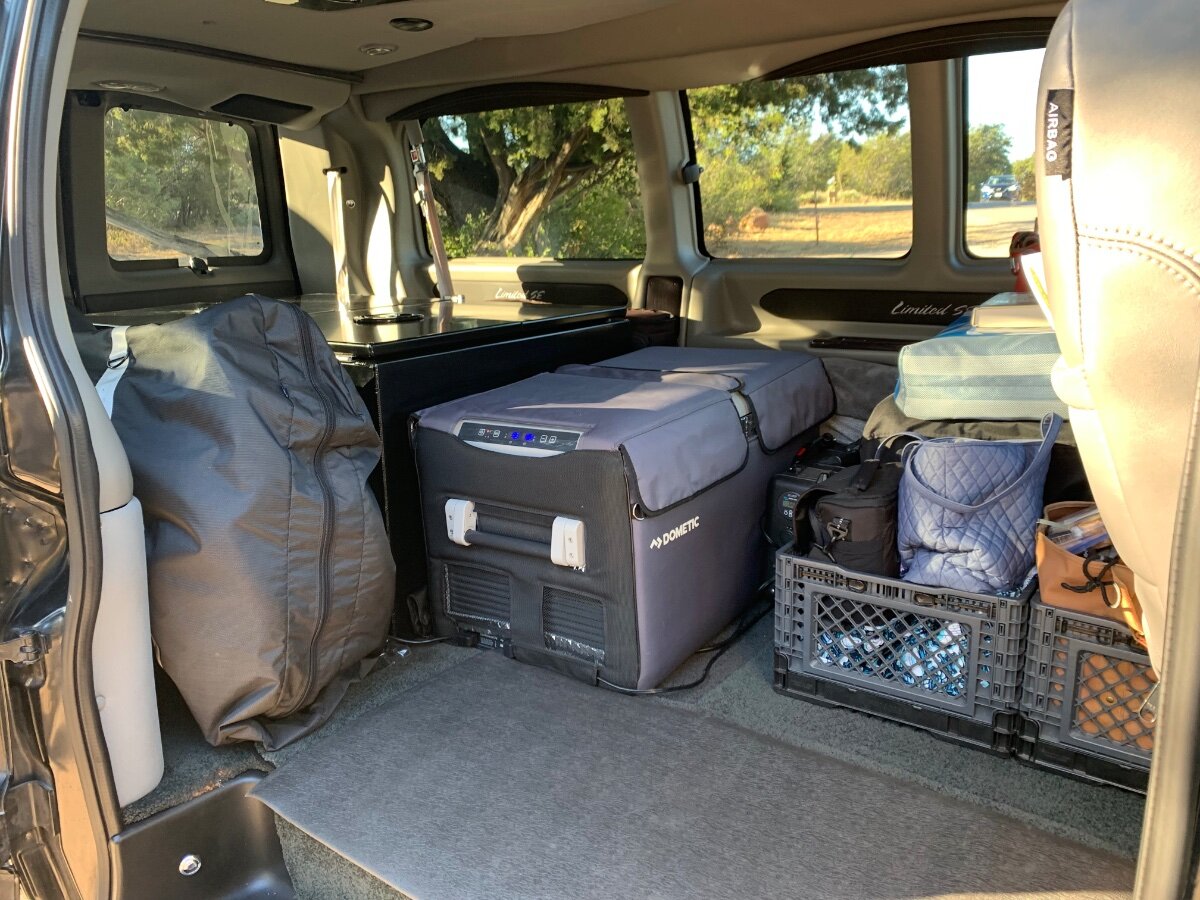
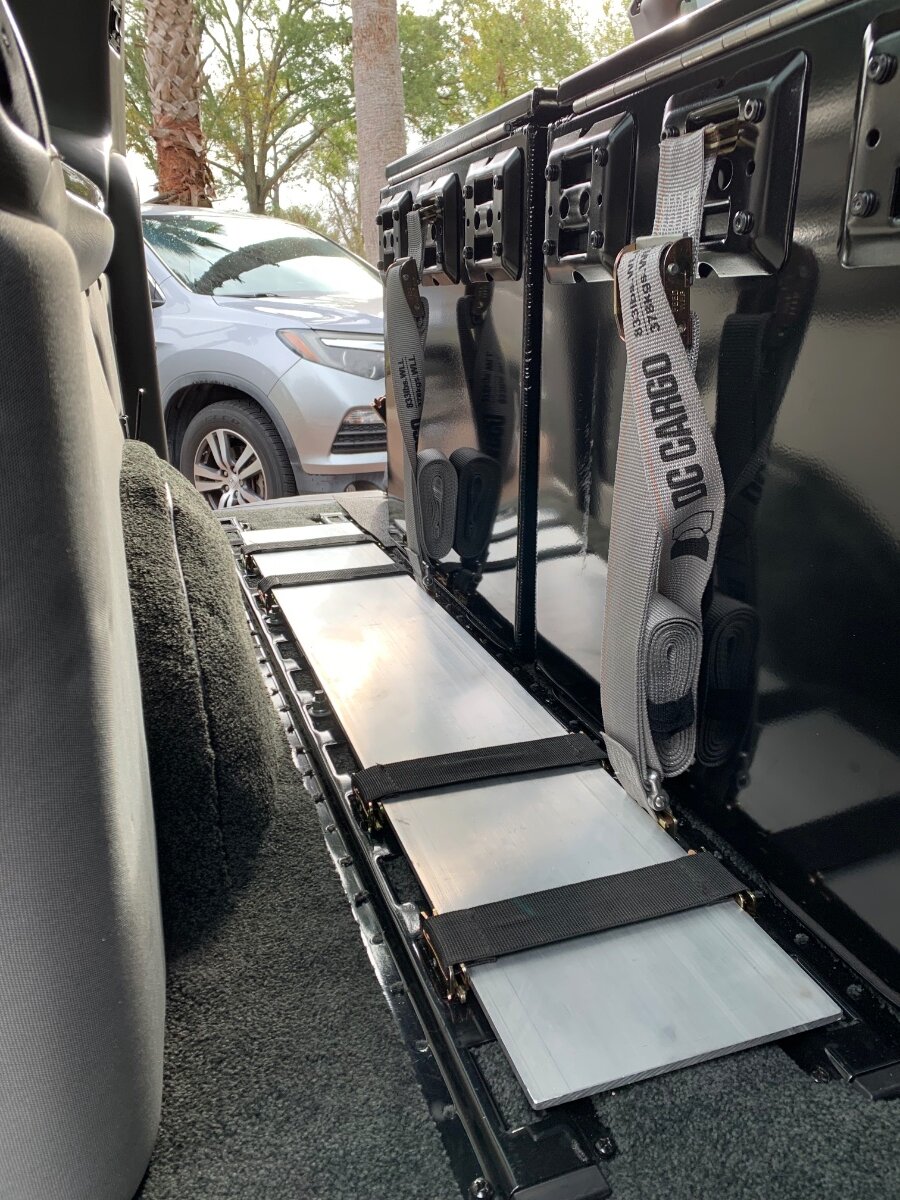
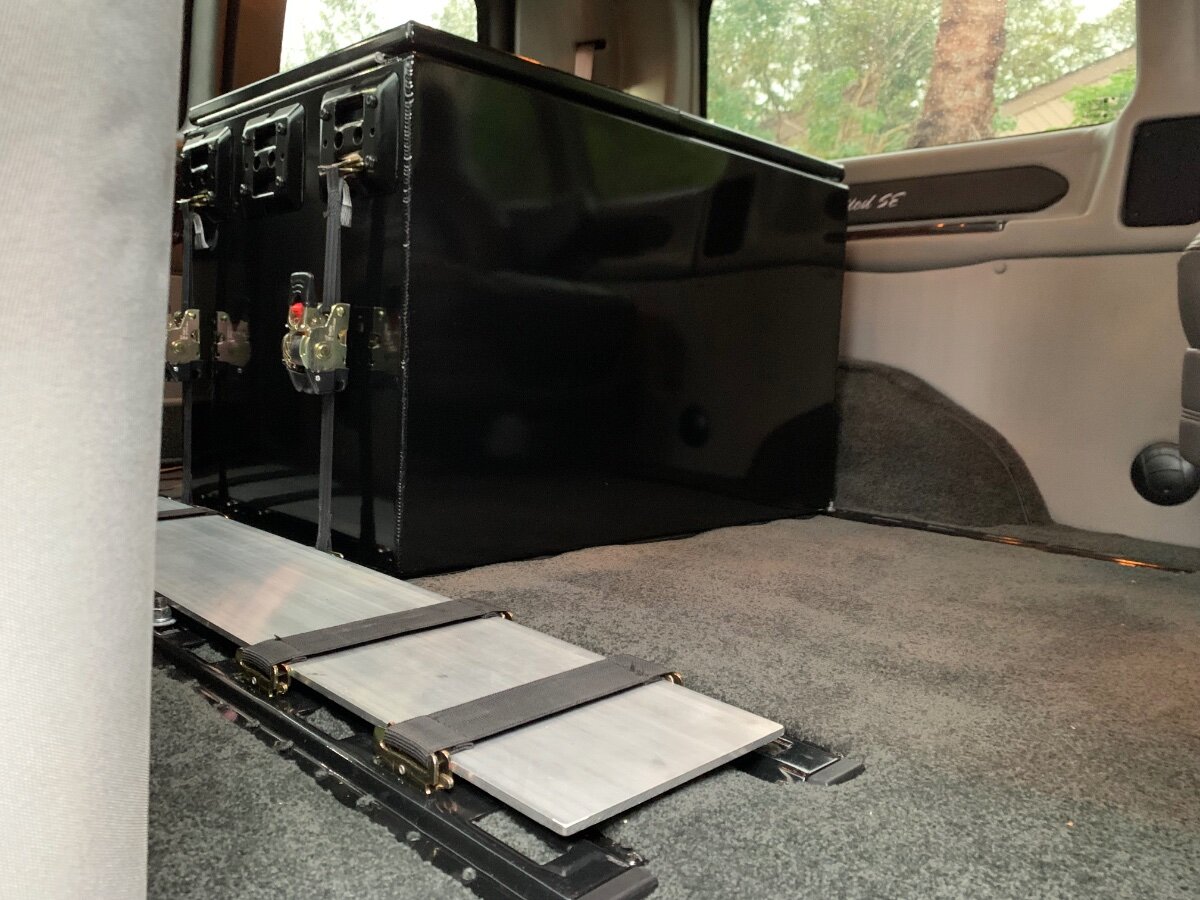
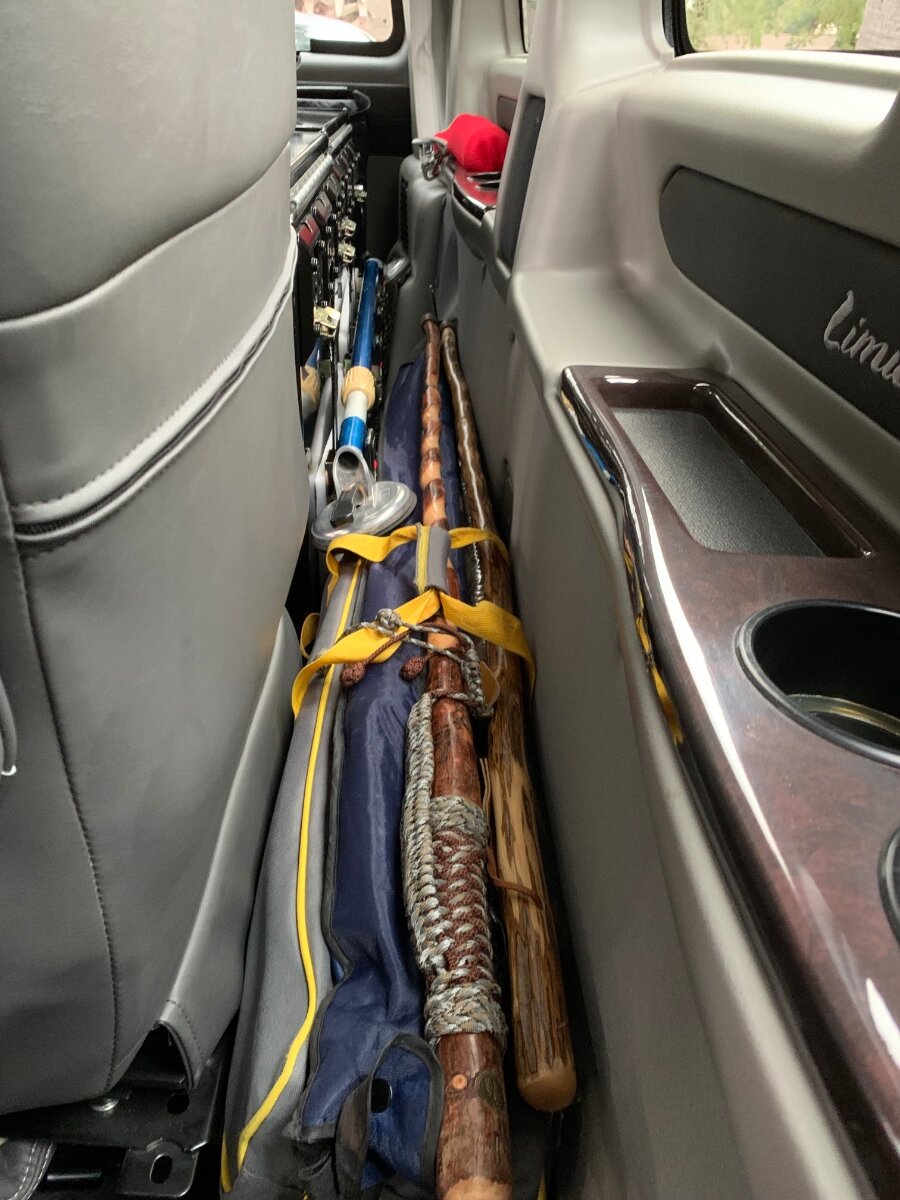
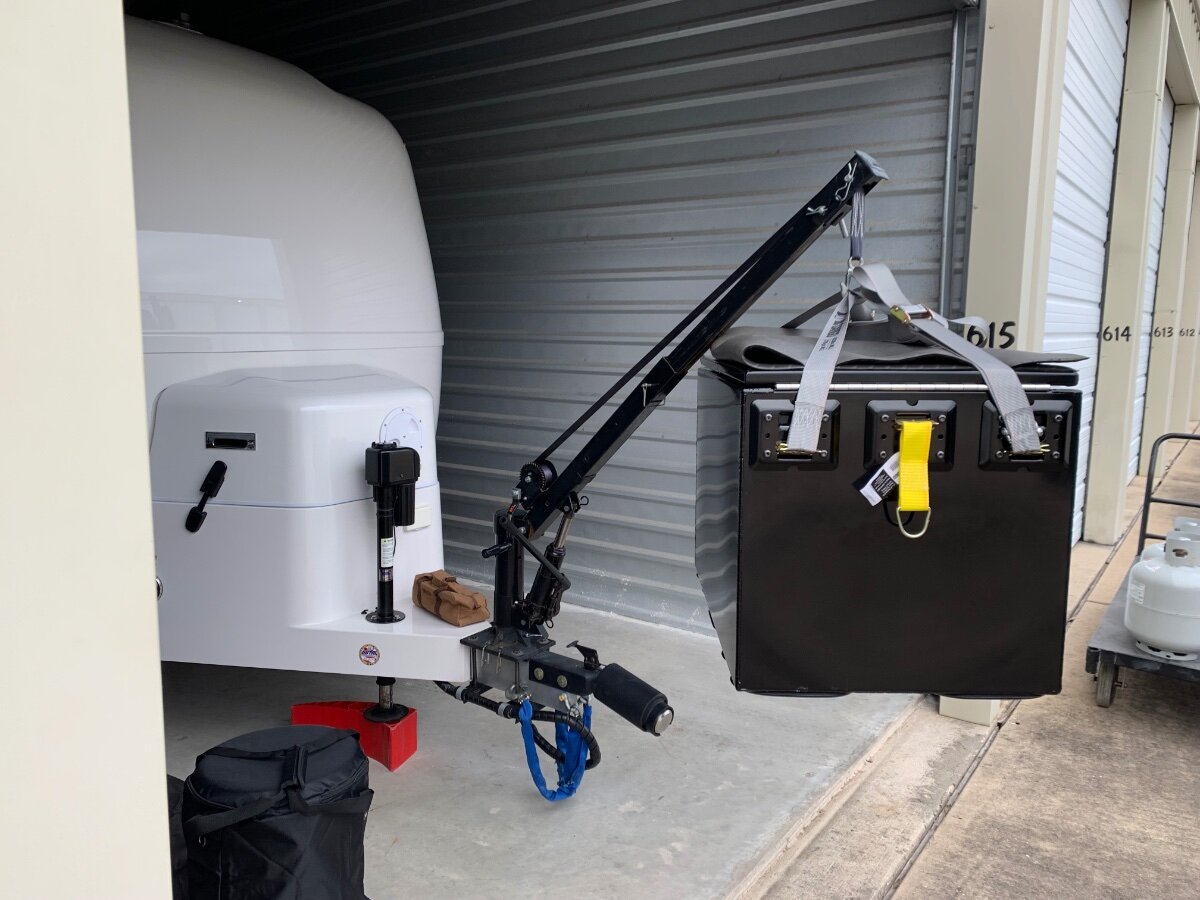
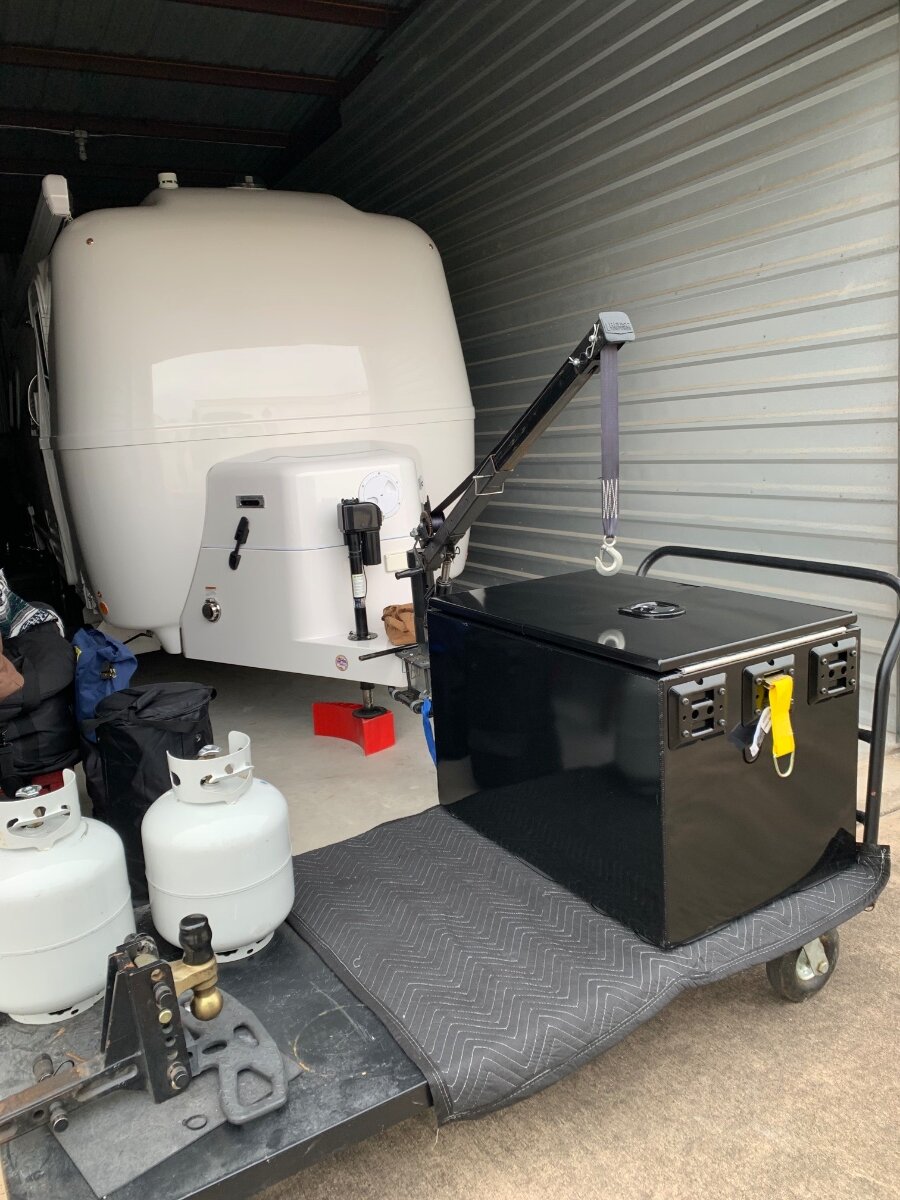
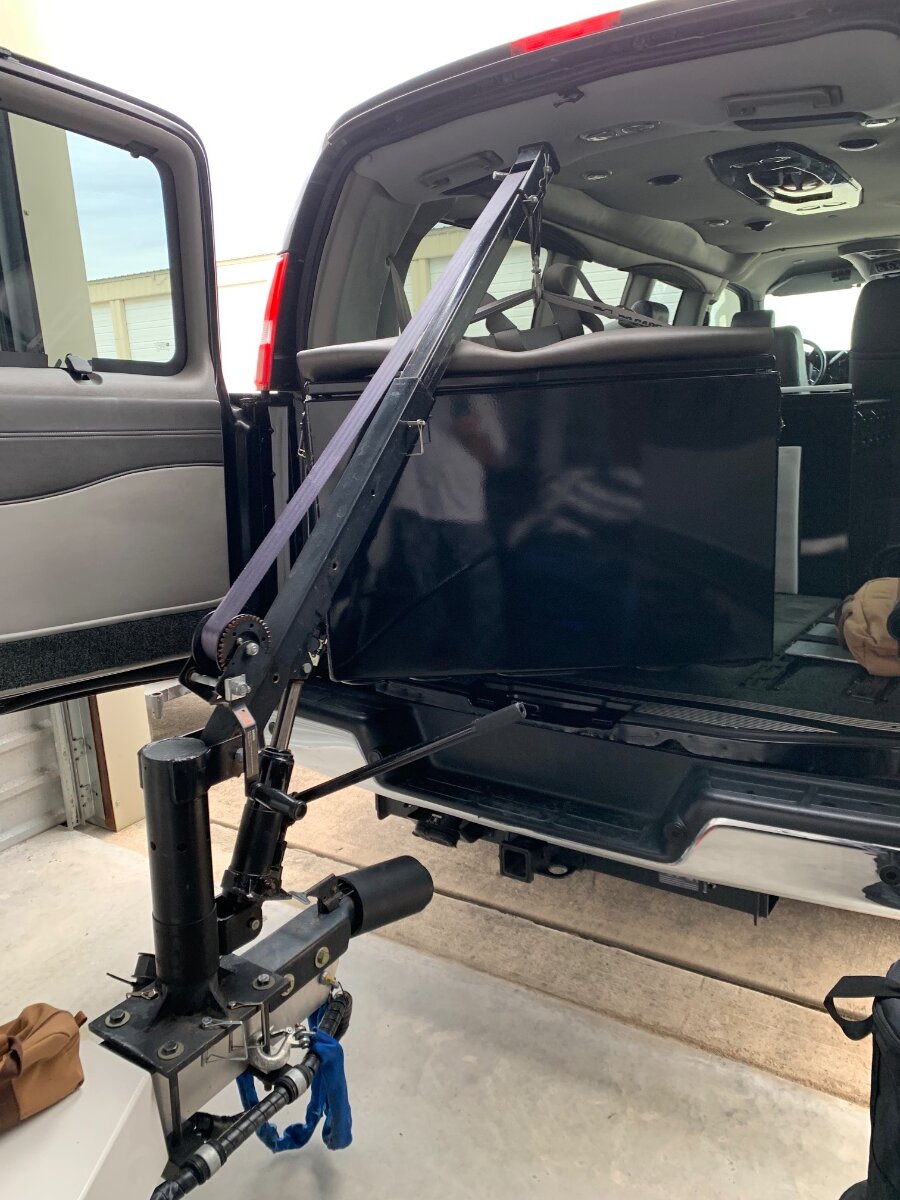
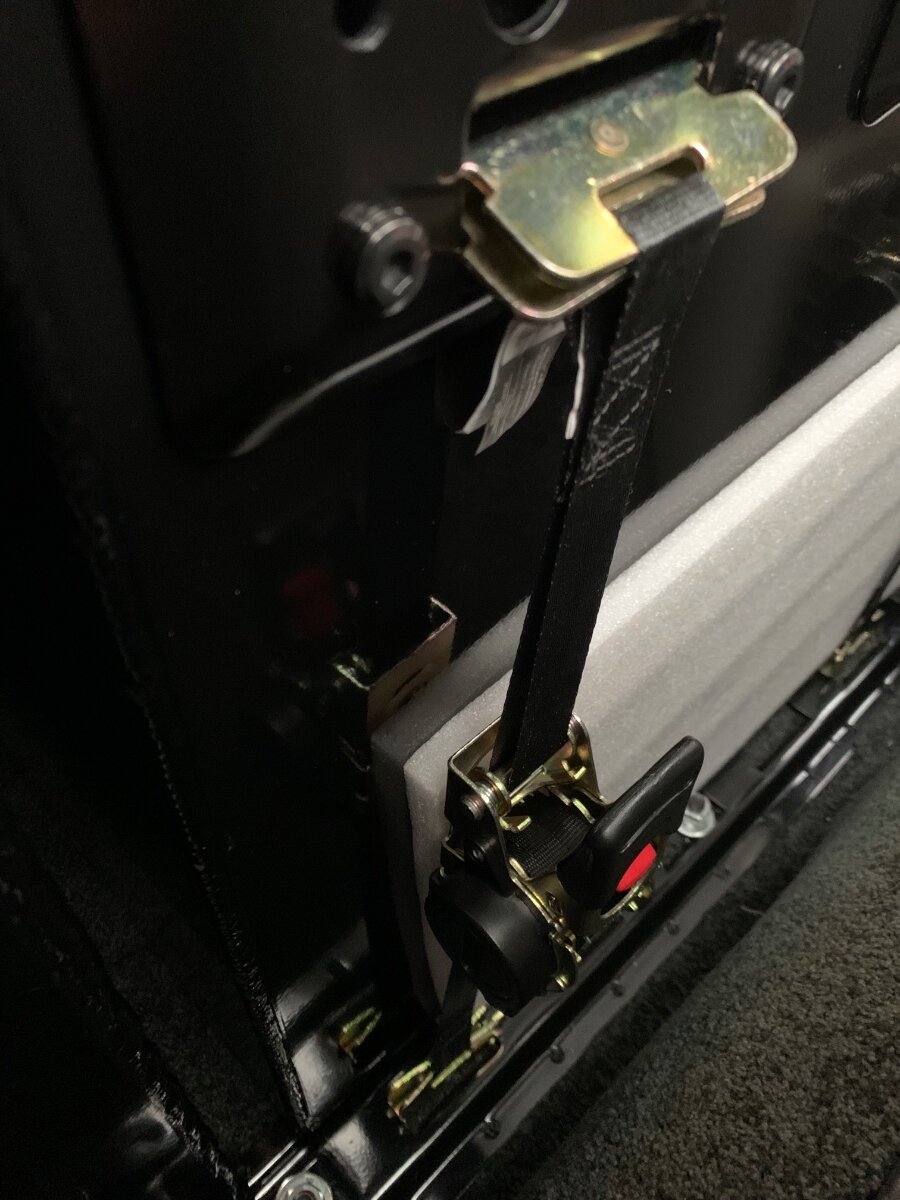
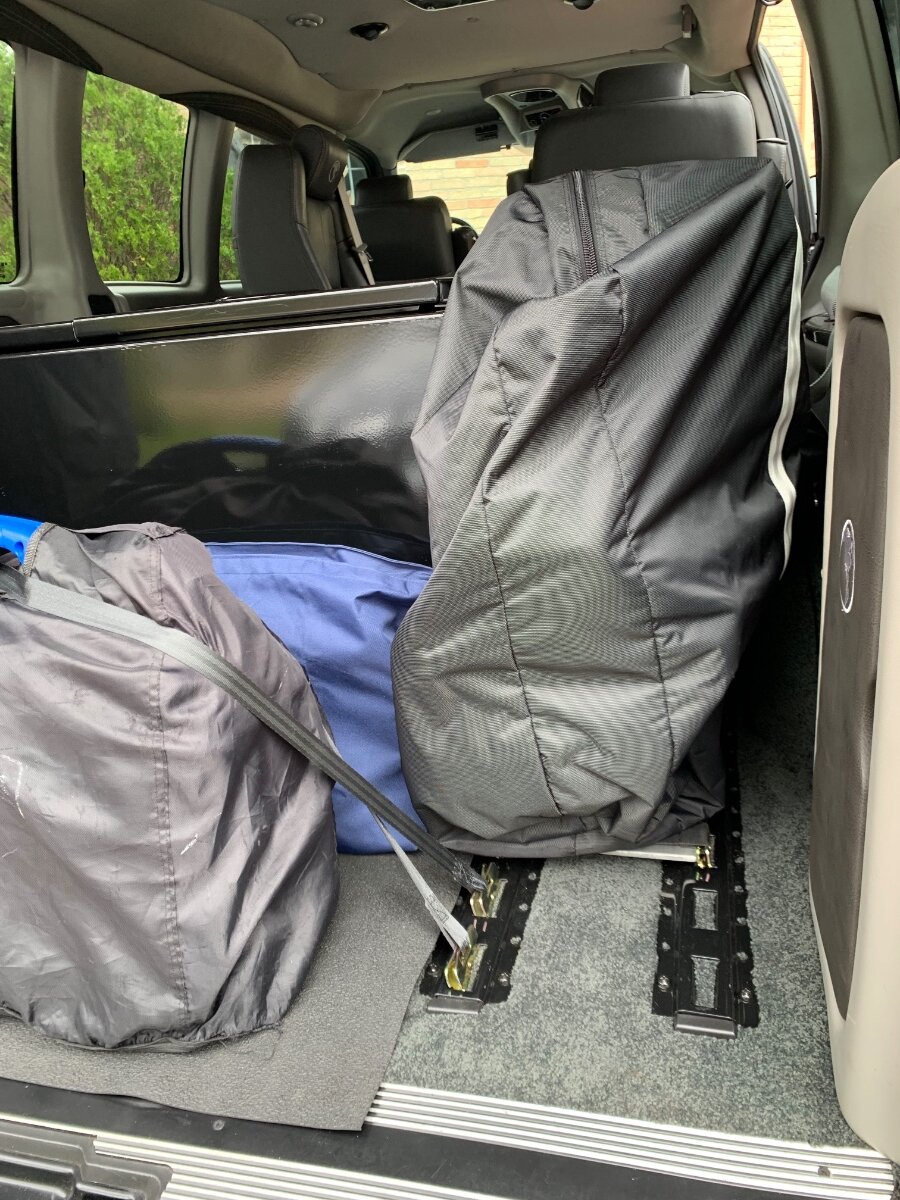
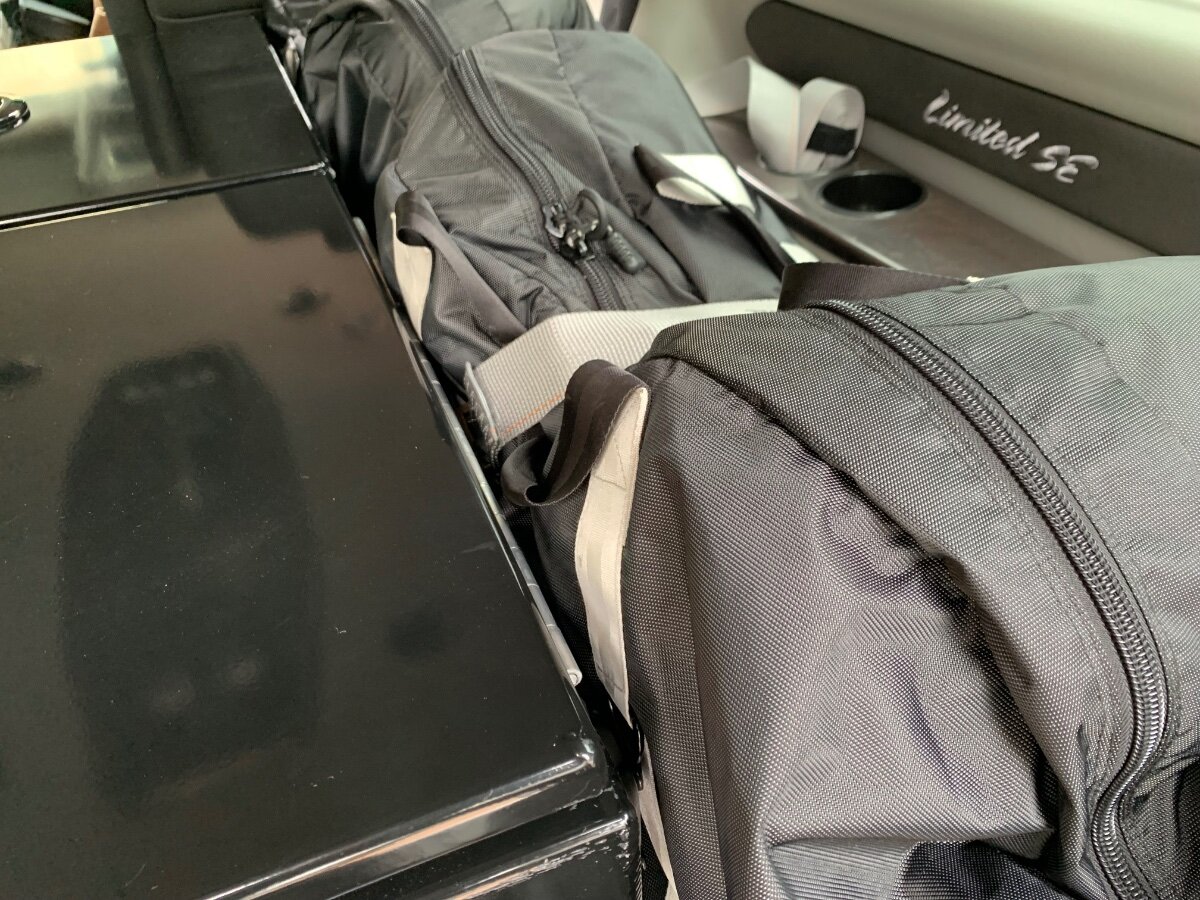
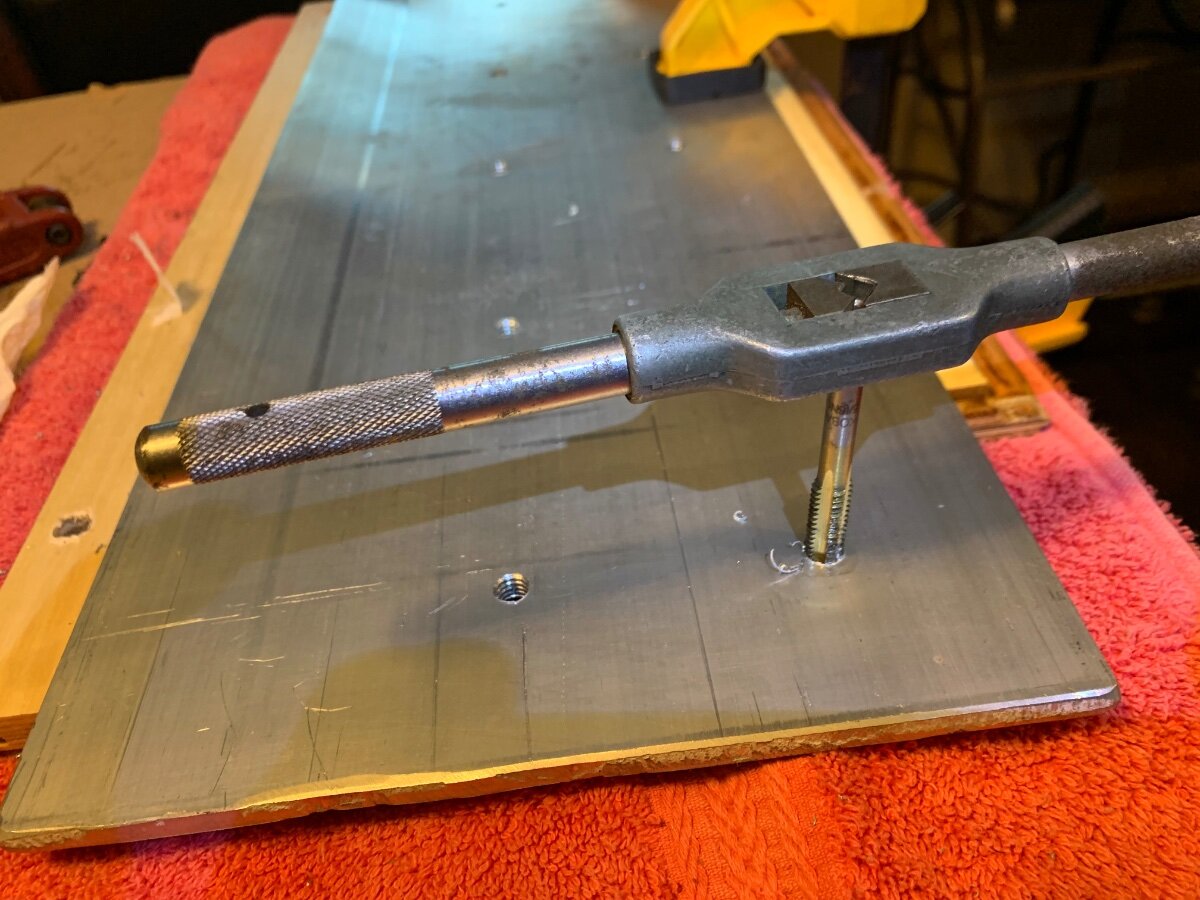
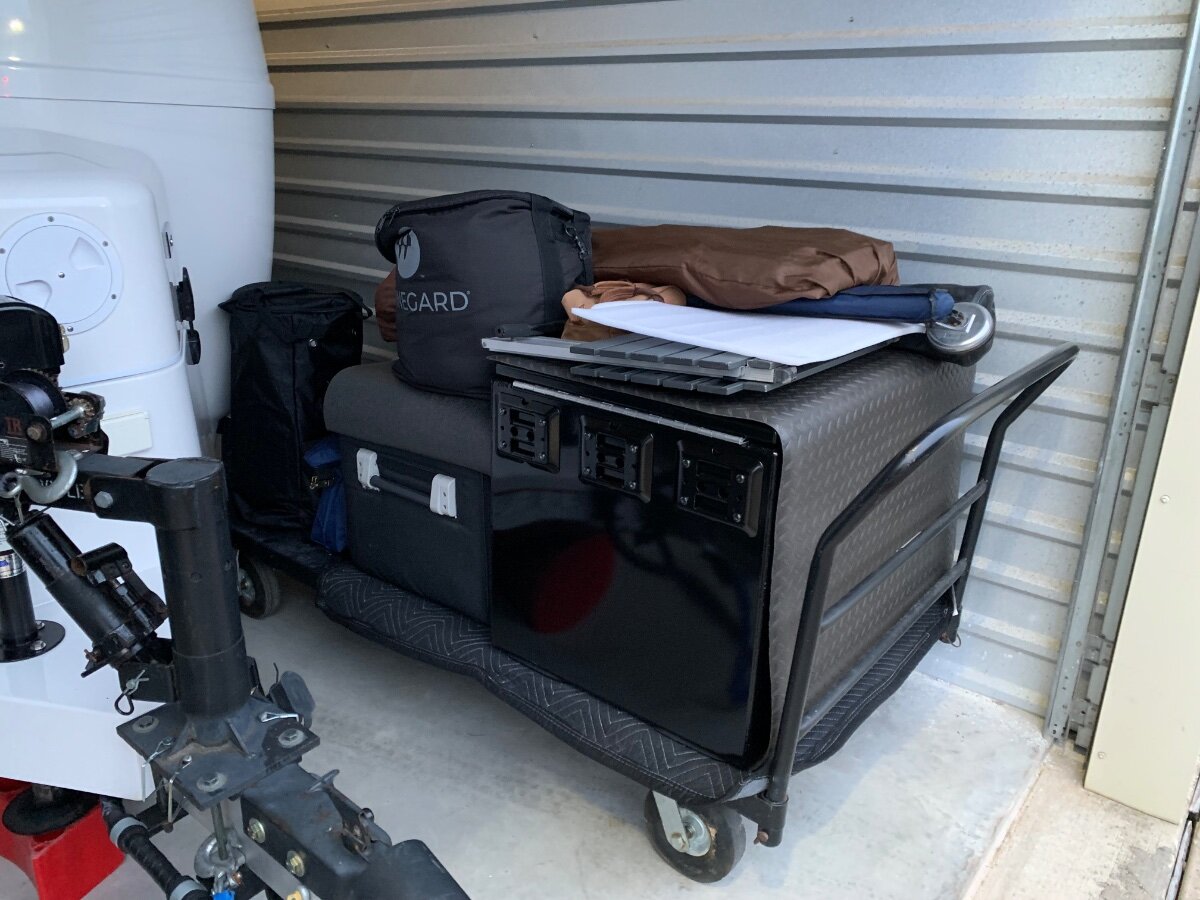
When towing with a truck, the majority of ‘stuff’ brought along on a camping trip or road adventure is conveniently stowed within the various holds of the Oliver and bed of the TV. However, even though my former crew cab Silverado 1500 had a storage box under the rear seat, it was mostly used to accommodate service tools and supplies for the truck and thus, found myself utilizing the rear floorboards and seat as additional cargo space when traveling. There’s peace of mind knowing cargo carried in the bed of a truck is adequately secured, not so much for that behind the front seats! All one needs is something going on from behind when something tragic is happening up front, no bueno! We’re required to wear seatbelts for good reason, proper securement of vehicle interior cargo should be of equal importance. I would be interested in learning how owners with trucks/SUVs safely carry their cargo within. My awareness of cargo securement was heightened recently with acquisition of a converted cargo work van as my TV; specifics are detailed in a forum post last October under ‘Towing an Oliver’ and titled ‘2019 GMC Savana 2500 Cargo Van’, if interested. Unlike service utility work vans that generally have a partition or cargo net, along with containment shelves and boxes, to secure cargo and ensure personal safety; conversion and passenger vans are more designed for ‘people’ cargo. In the aforementioned forum post, I addressed cargo containment, but cargo securement was still under consideration. Here is what I did to address the subject matter: Maiden voyage to Texas Oliver Rally, Inks Lake SP; cargo contained, but not secured! DC CARGO E-Track system components were obtained via online purchases from Tractor Supply. Each of the Buyers Products boxes were fitted with six of these brackets, three at the top of each end. A 1/4” x 8” aluminum backing plate was used to attach and strengthen these mounts. Backing plate cut to size, holes drilled and tapped for mounting bolts. Containment boxes prepped for backing plate and E-Track bracket installation. Super Sliders affixed to bottom of containment boxes for ease of handling on interior carpet. Three E-Tract rails fastened to deck to accommodate securement straps. Aluminum plate at floor level is runway for folded e-bikes. This box was slid rearward once back box was removed for storage at COW Barn. It primarily contains items typically kept in the TV with additional storage space, as needed, a trunk per se. Ratchet straps best used for non-towing vehicle use. Box securement once e-bikes are deployed. Wider Cam straps best used for e-bikes and subsequent box securement when traveling. Rear box is for camping ‘stuff’, forward as a truck and more ‘stuff’. Driver’s side box securement using ratchet straps. View of e-bikes ready for ‘takeoff’ on runway! Cam strap securing e-bike. Ratchet straps for spare propane tank, generator and other needs. Items too long for the containment boxes are stowed behind at side panel. Oliver-mounted hoist used to transfer box at storage facility. TV moved forward to enable box positioning. Cam straps used for the lift. Containment box lowered onto platform cart. Liking the modular containment storage.
1 point
-
Hope to see you at the Next Texas Rally. Gary Hull 2921 point
-
I had several electrical issues that were resolved under warranty at a local repair shop. In all cases, it "appeared" it was not the component but the OTT installation of the component. OTT honored the warranty and was very cooperative along with the component manufacturers (Truma AC and the inverter folks) in resolving the issues. But I learned just because electrical items work at trailer delivery does not mean they are right or will continue working. I hope my electrical issues are all resolved especially because I am now out of warranty, but I wouldn't be surprised if they are not. I too have noticed how crudely and unrefined the cutouts in the interior hull are for some of the components - glad it's not just my trailer, I guess and we can all share the aesthetic. Unlike JD, I don't have the time, skills or interest to do all of my own electrical work on this or a stripped-down trailer. As it is, I just wish I had more time to camp and cooperative weather to go with. Finally, although I managed to resolve these issues with Oliver's generous help locally (and the shop did a fine job), I feel it is critically important to have the Mother Ship as a backup and intend to have them do overall maintenance of the trailer every few years to supplement my own. No local shop (especially one that is not a dealer) is going to know the Oliver trailer and systems weak points as well as Oliver.1 point
-
Yes. After I could not get the Levelmate Pro app (which I already have installed on my Android phone) to work with the Levelmate Max device, I emailed Techno RV customer support (the manufacturer, from which I bought the Levelmate Max directly pursuant to an upgrade offer). I was advised that the manufacturer hopes to release the Levelmate Max app "any day now." That was last week. The app is still not available on the Google Play Store. I "bit" on the offer on December 18. I received the Levelmate Max on December 27. Techno RV obviously published the upgrade offer, and began shipping Levelmate Max units, long before the necessary Android app had been created and tested. That app remains unavailable today. Techno RV took my $160 on December 18 knowing that I could not use the Levelmate Max with an Android phone, yet did not (and still does not) disclose that critical fact on its website, or even today on Amazon, where Techno RV also sells the Levelmate Max. DO NOT BUY A LEVELMATE MAX IF YOU USE AN ANDROID PHONE, unless you need a $160 paperweight.1 point
-
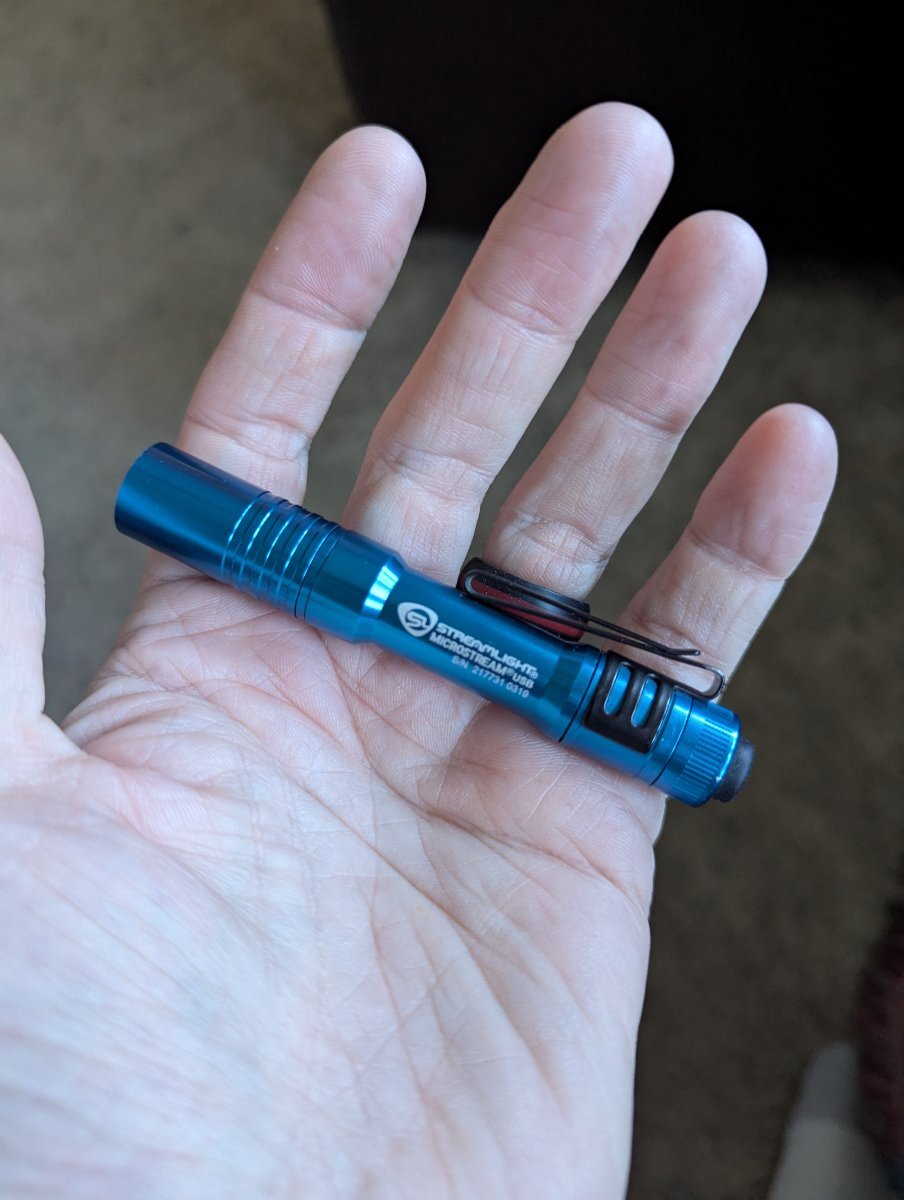
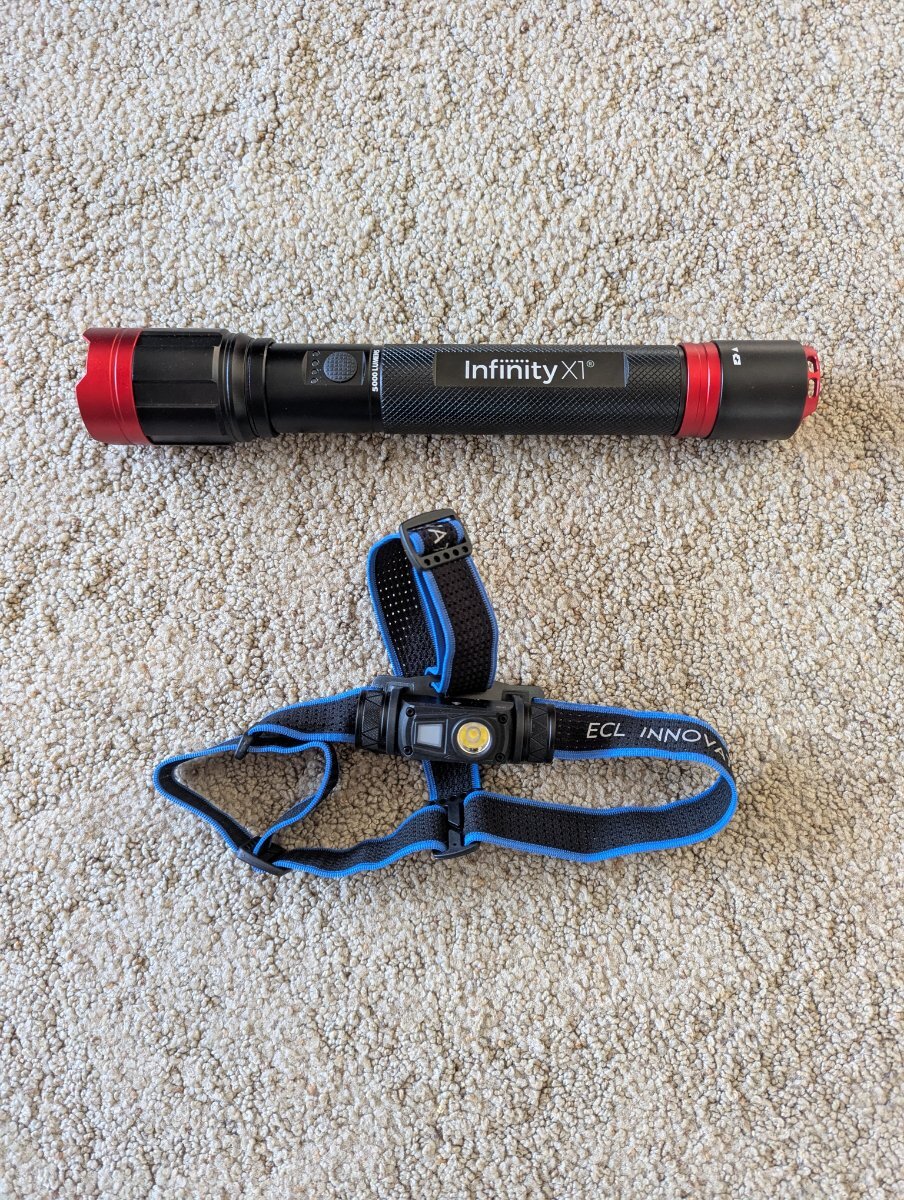
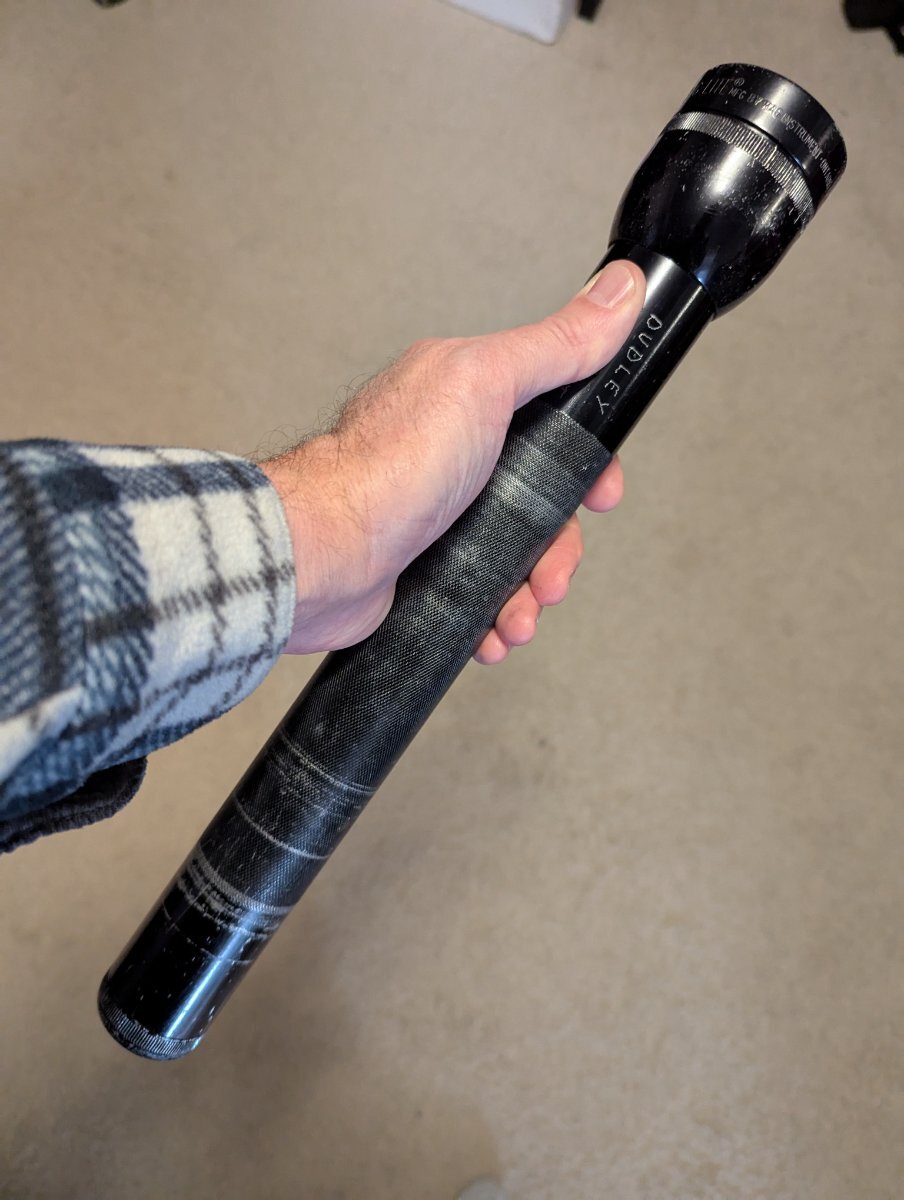
Ooooh, flashlights! Steph will tell you this is my impulse buy weak spot. Everything from no-name Amazon lights to some nice Streamlight and Olight units with my fire/SAR gear. When I was working, this little Streamlight Microstream was my EDC. The blue one was special because the default power-on setting was Low, while the other colors defaulted to High. Not sure if that's still true, but it was important because I used it to check pupils and didn't want to blind my patients. Don't have an EDC now but I added a Wuben H1 headlamp and a second Infinity X1 (Costco) to my assortment of lights over the holidays. And I still have my very first Maglite from the 1980s, with the LED upgrade kit from the original incandescent.
1 point
-
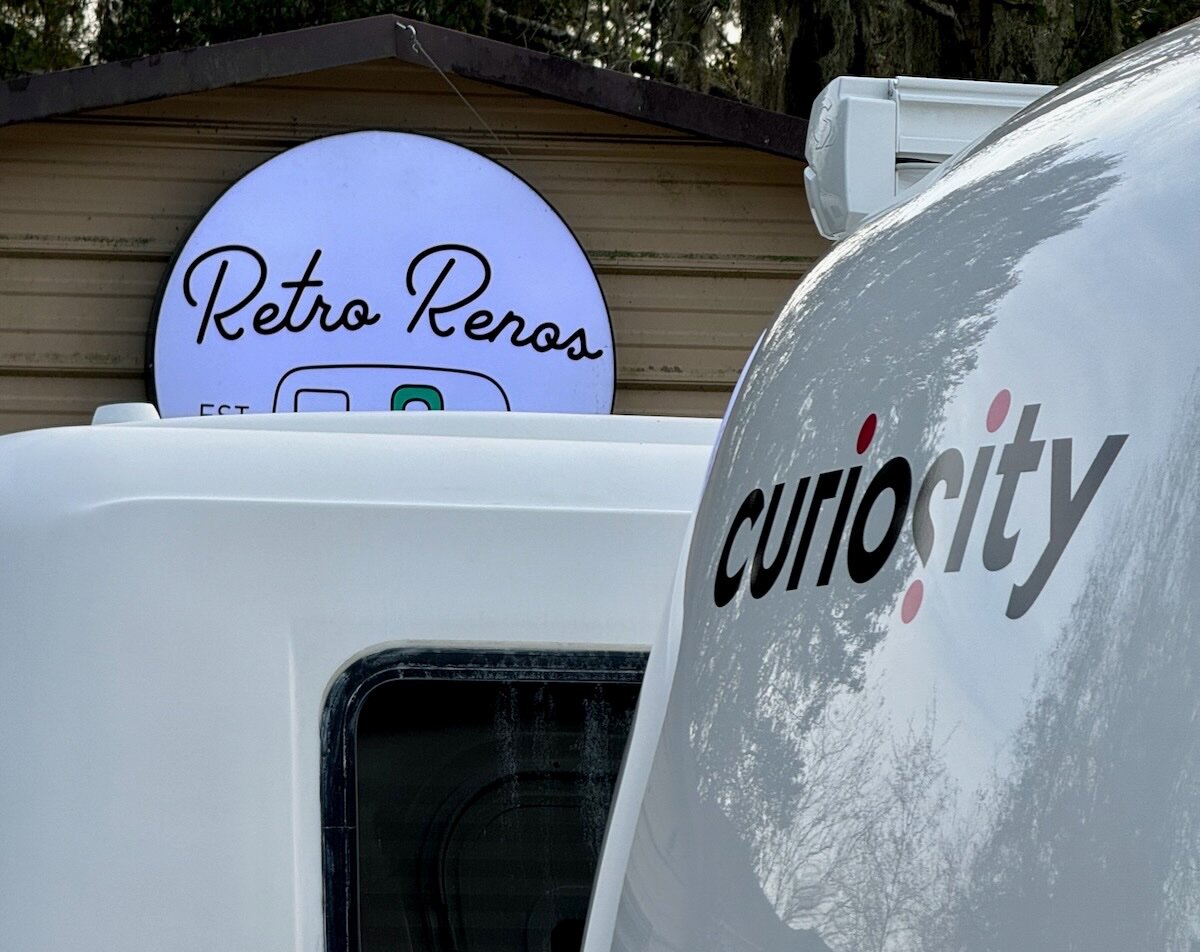
We are cruising out of Jacksonville. This past January, we made arrangements with Retro Reno there in Jacksonville to work with CGI as a spot to do our ceramic coating and they'd told us to stop in if we passed that way again. So we contacted them late this summer to see if we could rent a spot. Since we were last there, they've become Escape and Casita dealers, and built a new shop, so I was concerned that they might not have room. Daniel called me, looked at their schedule, and said they would have room for us. He also offered to have us camp there the night before departure, and he will drive us to and from the ship port to avoid parking at the dock. All at a price I was comfortable with, and only a bit more than the RV/oversized spots at the port. I was dreading leaving the trailer at the port with the e-bikes on the back and valuables inside! So this was a huge relief for us.
1 point
-
Your Oliver really enhanced our campsite view, take care!
1 point
-
You too Tom! Didn't we meet at the dump station upon leaving? Too bad it wasn't a few days sooner! I met Ron at the Rally and what a pleasure to meet this Southern Gentleman! Can I say @Ronbrink is a nut? 🤣 Or perhaps a pack rat?! Love the guy and I know we've learned a lot from each other on this forum, long before meeting in person. There is NOBODY more prepared than Ron, though I must say, I have not yet met Steve! 🤣 @ScubaRx Hoping we will run into each other soon. I have the first week of Feb open to get down to Quartzsite, or points between! I prefer to pack a bit lighter than Ron, and Steve, but their mods are the tops! EXCELLENT well-presented post here. Thank you Ron, for posting ALL your great work! I've copied more than a couple of your mods.1 point
-
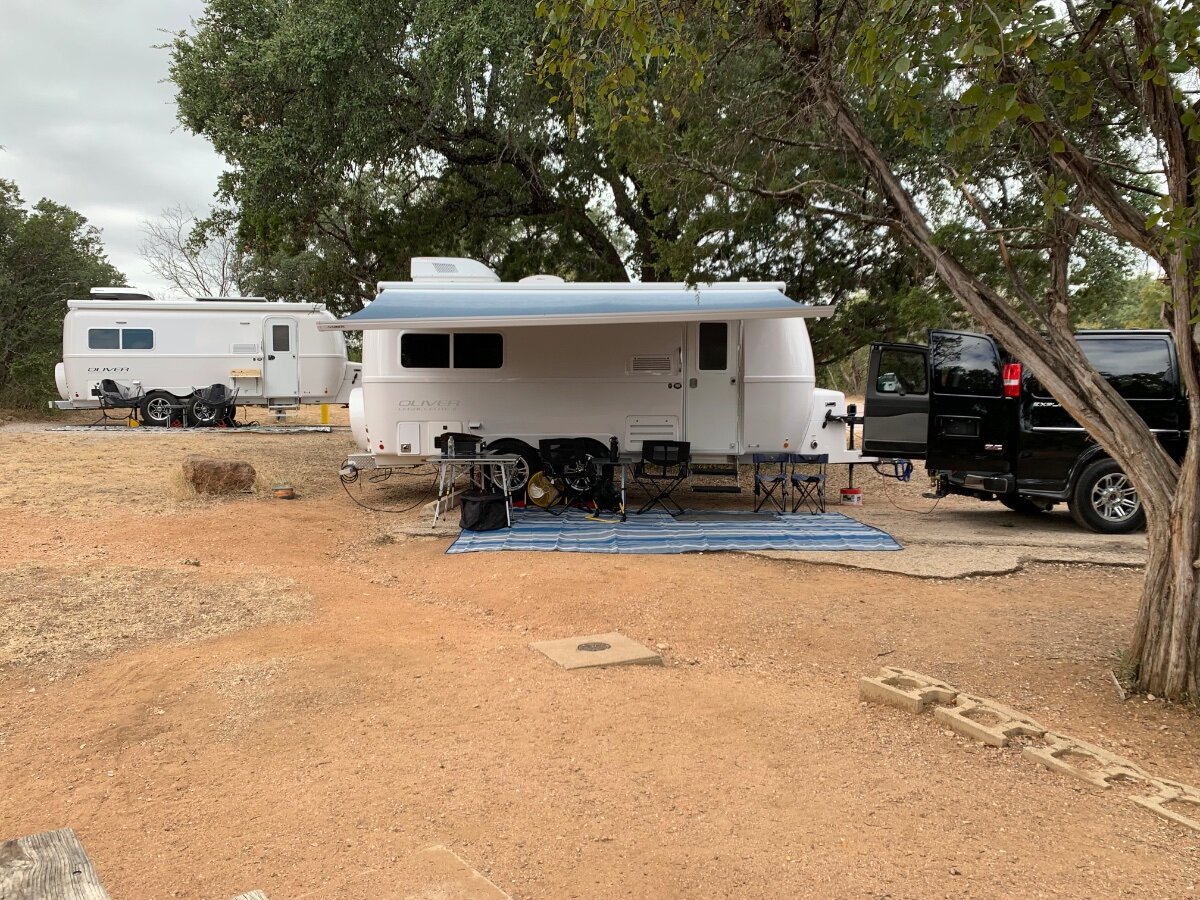
Just returned from our first camping trip using the Mini. Our campsite was covered with many trees, but managed to find a small opening in the following photo. Since it was a Rally, we spent a little more time in Ollie than normal. It was windy with tree limbs & leaves moving/falling, believe that affected the Mini's reception, too. Did not document obstructions like Zodd's previous post (I will next time). Used 11GB of data with three days of use streaming mostly with the ROKU device set at 720p resolution. Very pleased with the Mini's performance! 👍 View to NE (030)1 point
-
As you can see, this is an old case, but very rugged. Also use Pelican cases on motorcycles, broke a latch on one a few years ago, called Pelican, all they wanted was the name & address to ship a new latch to, no other info needed. When I purchased the Pelican case, it came with egg-crate foam in the lid and two sheets of foam in the bottom of the case. Now I only have one sheet of foam in the bottom of the case since my laptop was too thick for two sheets and I used the second foam sheet for another use. Use two soft foam blocks to secure the Mini in the case. Additional foam blocks should not be needed if the case still comes with two foam sheets in the bottom of the case in addition to the egg-crate foam in the lid.1 point
-
After our SL mini shake down trip out west I have decided to purchase a cord reel for the mini to keep the cord neatly buttoned up during travel. As well as a little quicker to deploy and roll up. I also decided to scoop up an extra SL power cord as well. If by some unlikely chance the cord gets cut by a grazing Bison well…you sorta flapping without a spare. This big guy was grazing on the nice green patch of grass next to XPLOR and he actually tugged on our SL cable and fortunately did not chew through it. Smart Bison! I will post up on how the cord reel works out. I highly recommend a back up spare power cord. As we all know things happen. https://www.amazon.com/dp/B07WYCR42L?ref_=ppx_hzod_title_dt_b_fed_asin_title_0_0 https://www.amazon.com/dp/B0DB21PPSC?ref=ppx_yo2ov_dt_b_fed_asin_title
1 point
-
@Geronimo John previously requested in one of our recent thread on "Relocating Bath Water Pump Switch and LED", for us to post a new thread discussing options for opening up storage under the bath/shower (HEAD) sink. In that earlier thread, G-John referred to an insulation modification engineered by @John E Davies which is actually an element of this suggested mod as well. D and I wish to thank both G-John and JD for their combined encouragement for this and other OTT modifications we've logged to date. FULL DISCLOSURE: We haven't completed the mod, but members should get a good idea of the direction its going - and we will continue to update progress. 1. Background: We mentioned in the WP Switch/LED thread, the PO installed a marine-grade deck hatch on the front side of the sink cabinet after removing the "cubby shelf" which housed the PW Switch/LED package. The deck hatch is available on Amazon: As shown above, the hatch is configured with 2 "dogs" that adequately seal the compartment within as we have yet to discover water intrusion after showering - believe me, we've checked! Higher quality deck hatches are available at a higher price point than this one, for sure. On the plus side, the rubber seal used in our hatch cover is totally replaceable. In fact, some are available that more closely match the latch hardware OTT uses for the upper storage cabinets in the main area. Here's how ours is configured: 2. New storage area: When relocating the WP Switch, we cleaned up the wire bundles and PEX lines in the void below the sink. JD noted in his "How To" thread about how to better insulate this void - especially since PEX lines are located there. We will do the same insulation upgrade in Phase-2 later this summer. D is calling this a "game-changer" for her because it opened up the space below the forward dinette seat for other items - now that the void serves as storage for dry paper goods previously under the seat, as shown below: 3. Path forward: We're planning to add shelving in this compartment for better organization after the insulation upgrade. I'm actually hearing rumblings from D of converting the forward seat storage area into a mini wine cellar - more on that in another update... So as @Patriot might say, "Mod on..." Cheers!
1 point
-
Travel season includes all 12 months around these parts!1 point
-
I get that. I love my 2005 Silverado, and I'll literally drive it til it won't "drive no more." Paid for decades ago, simple maintenance. We will, unfortunately, have to adapt. We already see the problems with hybrids, and "eco" gasser engines. My 7 year old tesla x jas had a maintenance bill of 4 tires, two wipers, and a 12v battery. I'd say 1500 to 2000, over 7 years. No oil changes,etc. You'd have had the same bills, for any gasser, plus plus. That said, I'd never likely try to tow with the x. The cyber truck, as cool as it is, is too big for me. Too big for spaces at the grocery store and costco, imo. Way too big for my allotted garage space. Maybe they'll make a cyber mini someday. Then I might be in the market. If it has a bigger battety, and can still tow my power boat, and the Ollie. We don't buy anything that can't tow 5000 pounds, at least. Also, need plenty of space in the back seat, for grandkids. 😄1 point
-
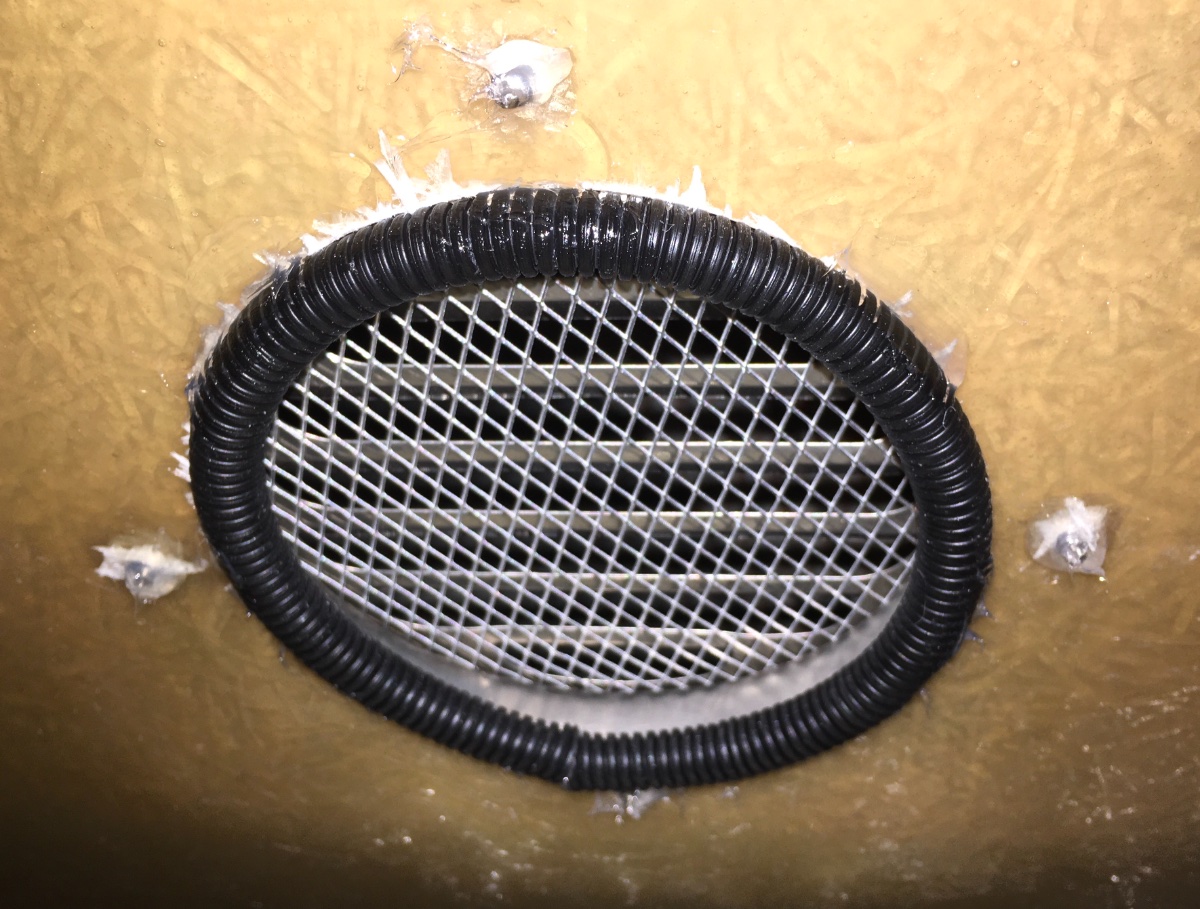
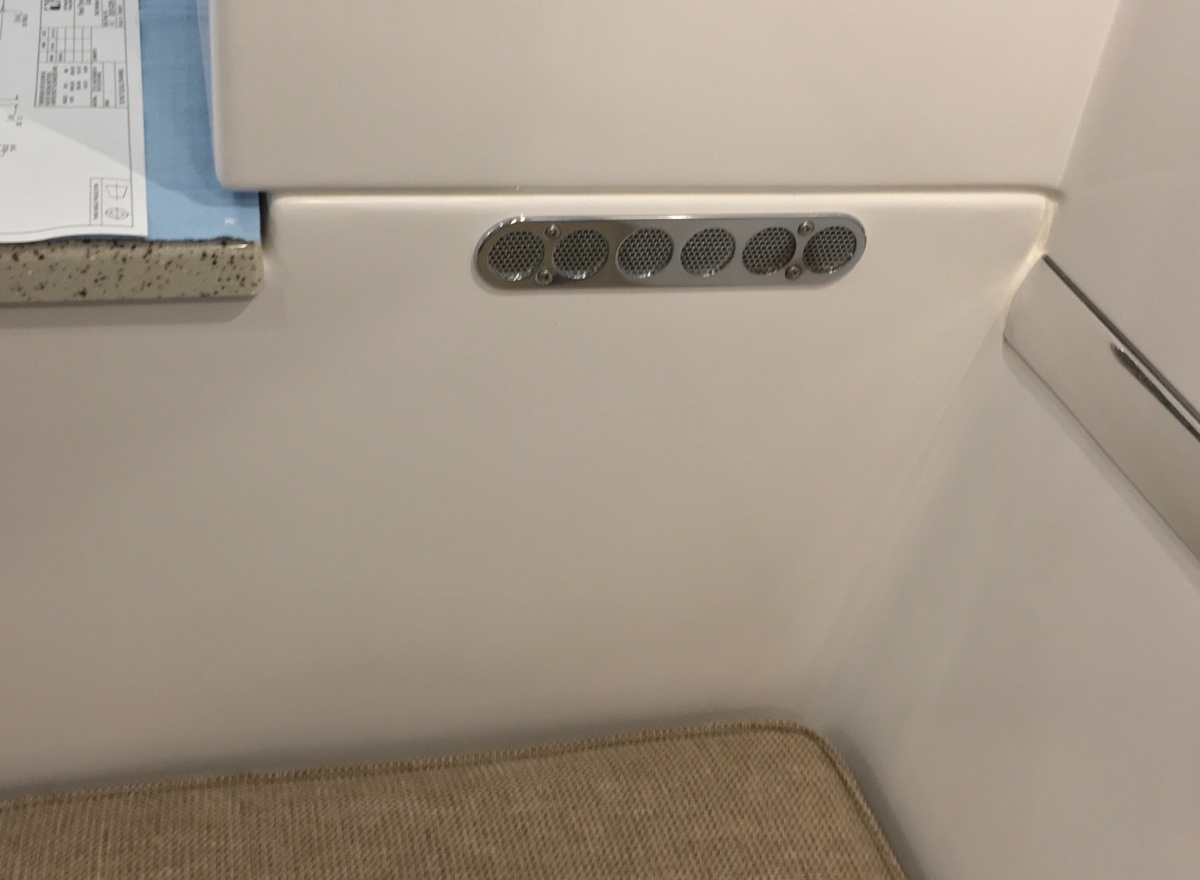
I worry about Oliver owners with the Suburban furnace that close any heat vents (supply vents) in the trailer. This is almost always detrimental to the functioning a an HVAC system but in the case of my generation of the LE II it can be dangerous. According to my furnace manual, the furnace requires 25 square inches of unobstructed hot air venting to work properly. Even a few feet of lightweight flex duct will restrict airflow and any bends in the flex duct will restrict airflow even more. The two 4" round supply ducts in the Oliver total exactly 25 sq. inches at the furnace so technically, when the runs of flex duct are considered, Oliver has not ensured sufficient airflow for the furnace to operate at its best as it is. (An analogy would be someone that exceeds the GVWR of their tow vehicle). Closing one of the two cabin vents inevitably causes a sharp increase in back pressure against the furnace fan with the result that the fan cannot move as much air across the heat exchanger and into the cabin. The result is hotter air coming out of the remaining open vent but less Btu's in total flowing into the cabin, and the likely overheating of the heat exchanger resulting in the furnace shutting down prematurely (short cycling). In milder weather, this might not be noticeable but it is dangerous in colder weather because if the high temperature limit switch in the furnace ever fails, there is a serious risk of a fire. The only safe way to increase the flow of hot air into the Oliver's cabin is to increase the number or size of return vents, which will reduce cabin pressurization when the furnace is running and thereby enable the furnace to move more air (and Btu's) through and out of the supply ducts. In my experience, the key to comfort and balanced heating in the Oliver along with a warm bathroom is to ensure that all the hot air from the cabin must flow through the entire basement on its way back to the furnace, thereby heating the entire basement as well as the cabin. This requires additional return vents in the middle and front (bathroom) of the cabin.1 point
-
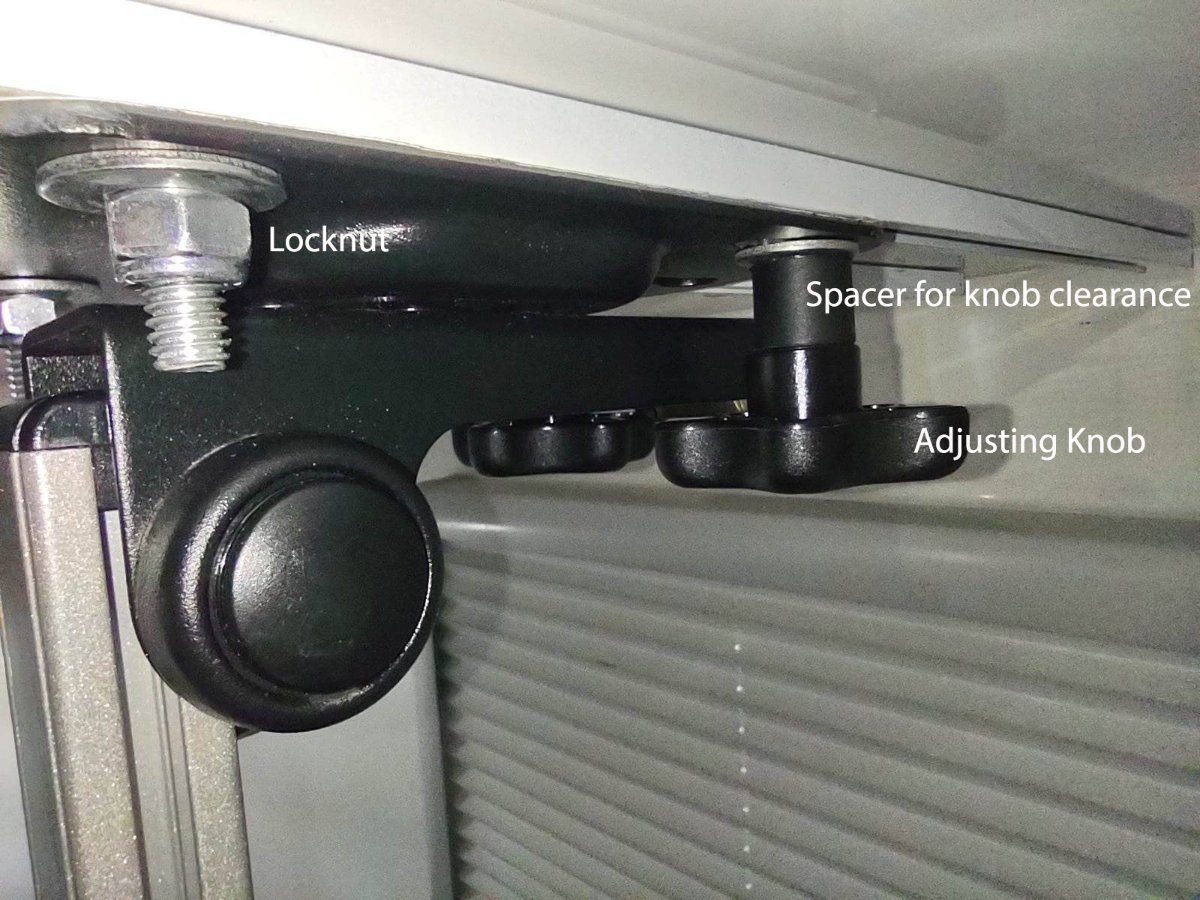
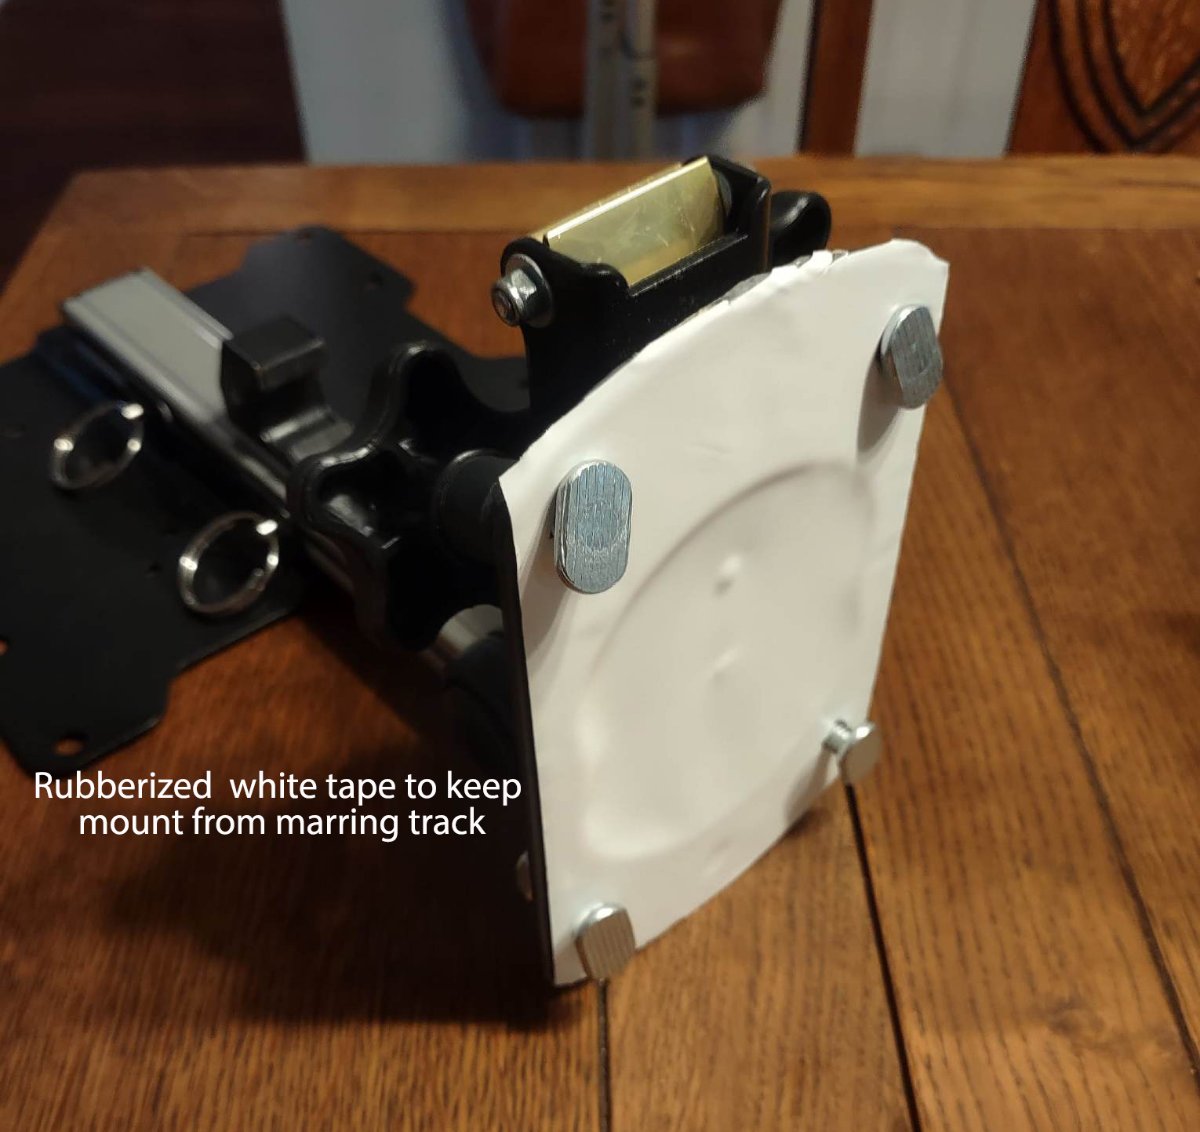
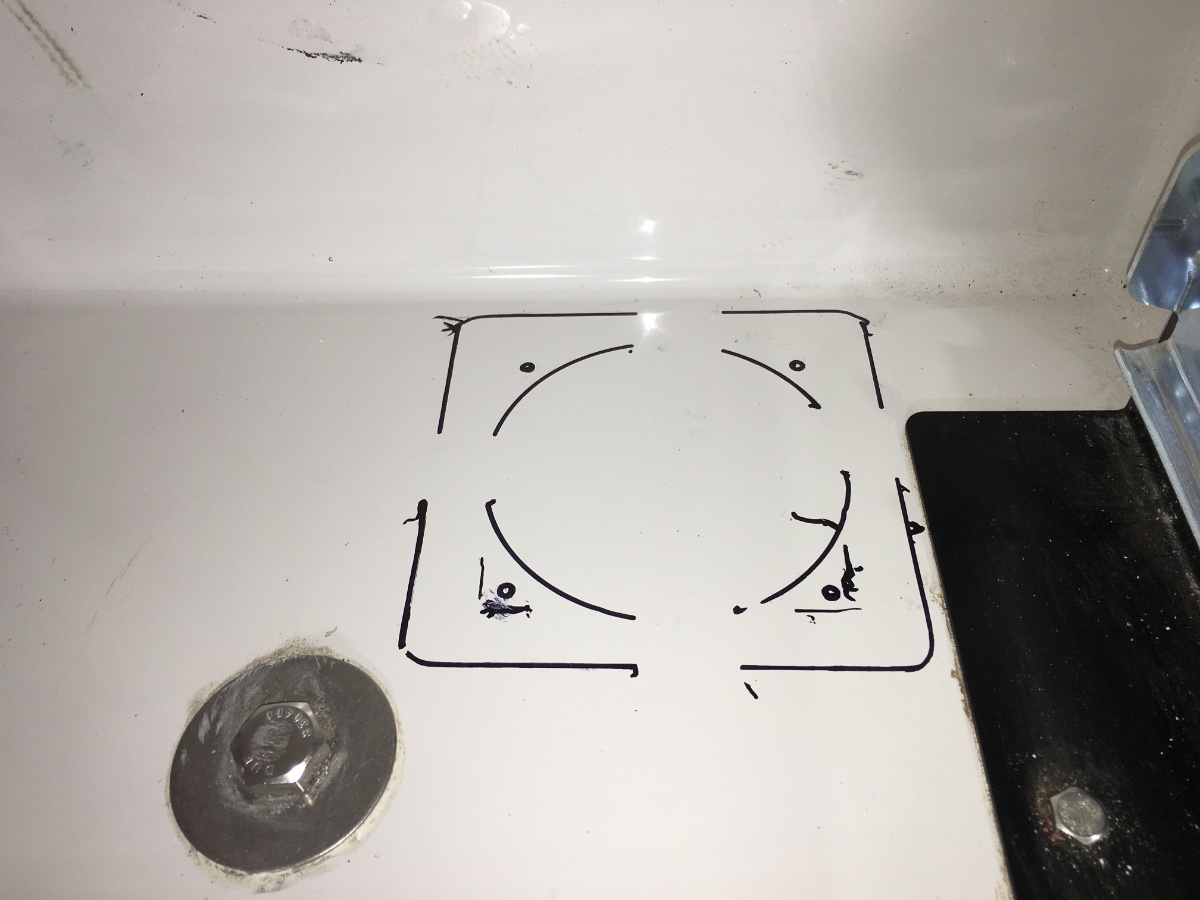
Some more pictures of the track mount that show a little more detail. Painted the track with white epoxy enamel since last pics and it now blends in much better. The locknuts in the front of the mount are only adjusted once when installing and the two knobs in the back are used to lock the mount in place while traveling and then left slightly loose while in use to allow the easy removal of the TV and access to emergency window. Used a 4" wide piece of white rubberized tape on the back of the mount to prevent marring of the track and add additional grip when traveling.
1 point
-
When cooking for a small herd, I make them my Geronimo John International Cowboy Special: Pan fry well several cans of diced low sodium Spam with just a bit of butter. Drain well. Dice many pounds of potatoes and pan fry a bit crisp with some olive oil. Salt and Pepper. Mix Spam and Spuds in skillet and get it hot. Whip raw eggs and mix into hot skillet with the above. Mix some while cooking. Add lots of cheese, Pace Picante Sauce, and some sour cream on top. Then sprinkle Tabasco (Depending on the crowd: If children, about two drops. If Texan, a lot. If Cajun all you have!) You don't know how many times I have been asked where I got the delicious ham I used. Seriously.1 point
-
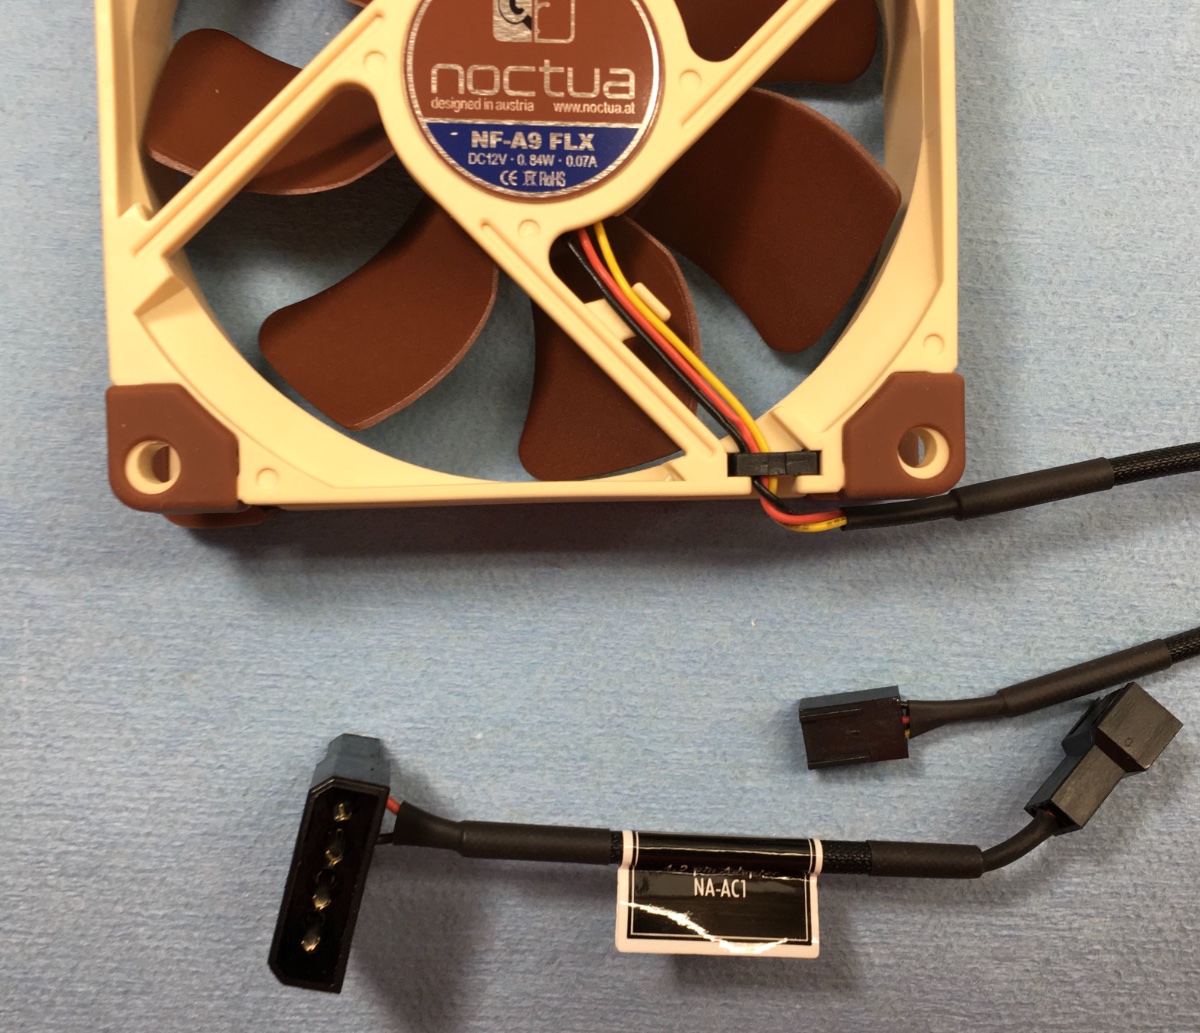
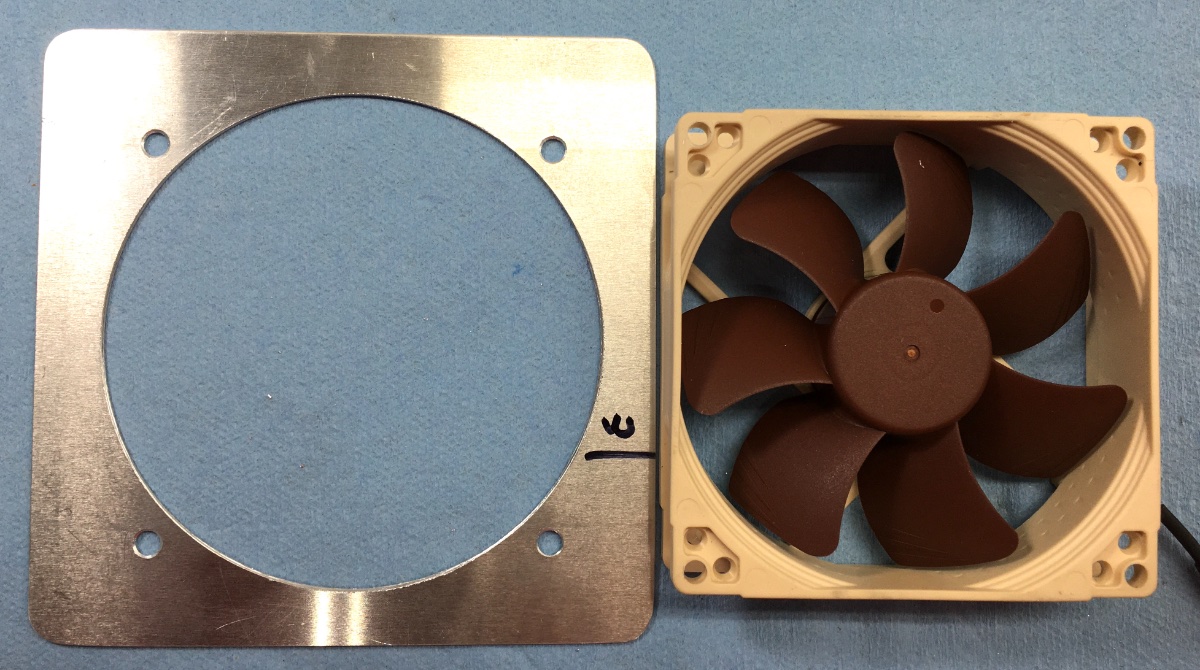
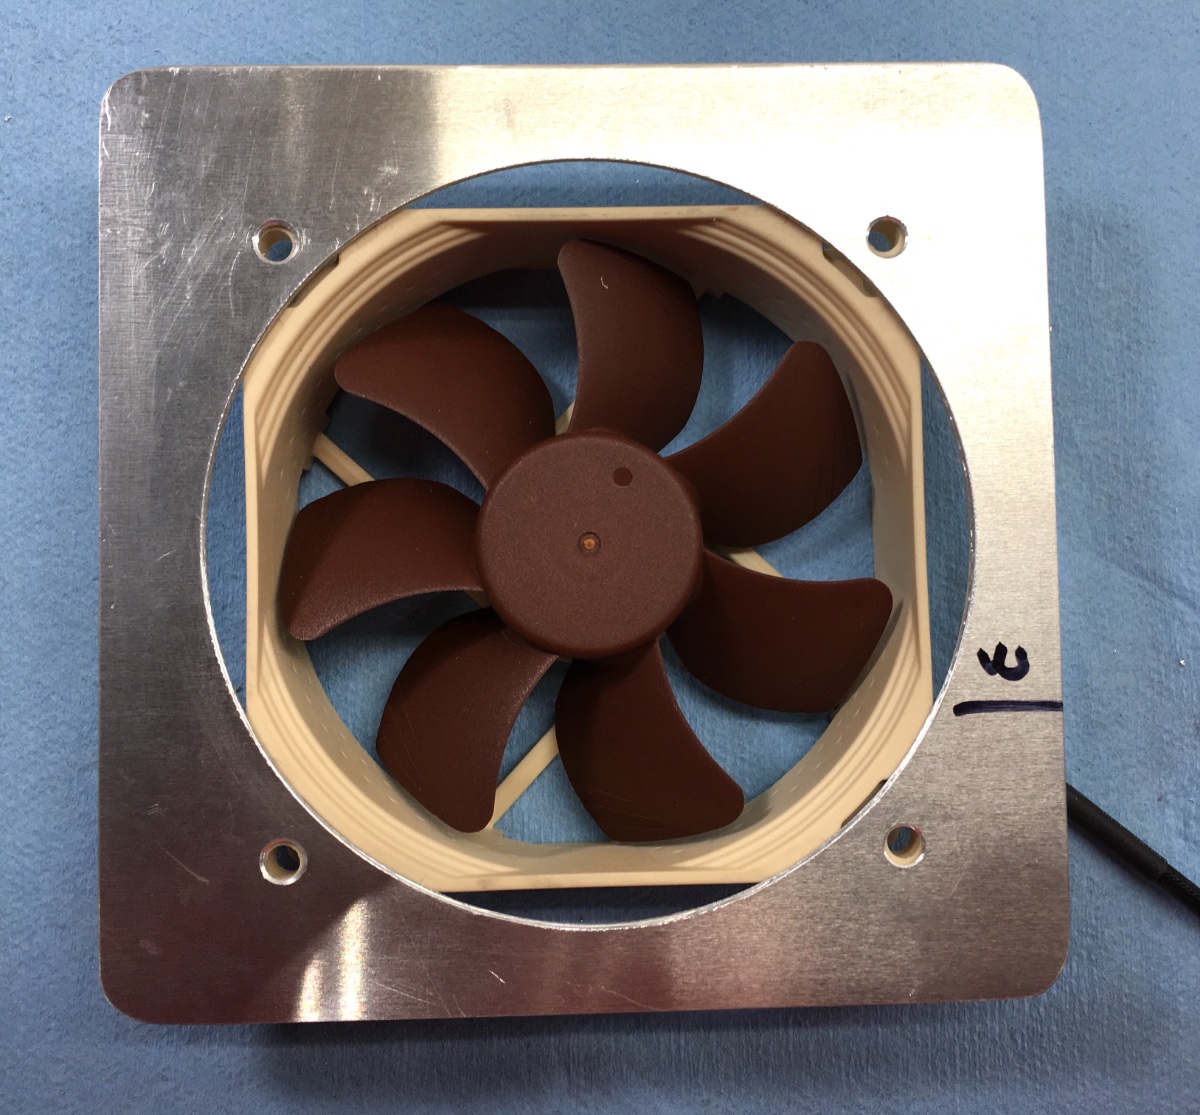
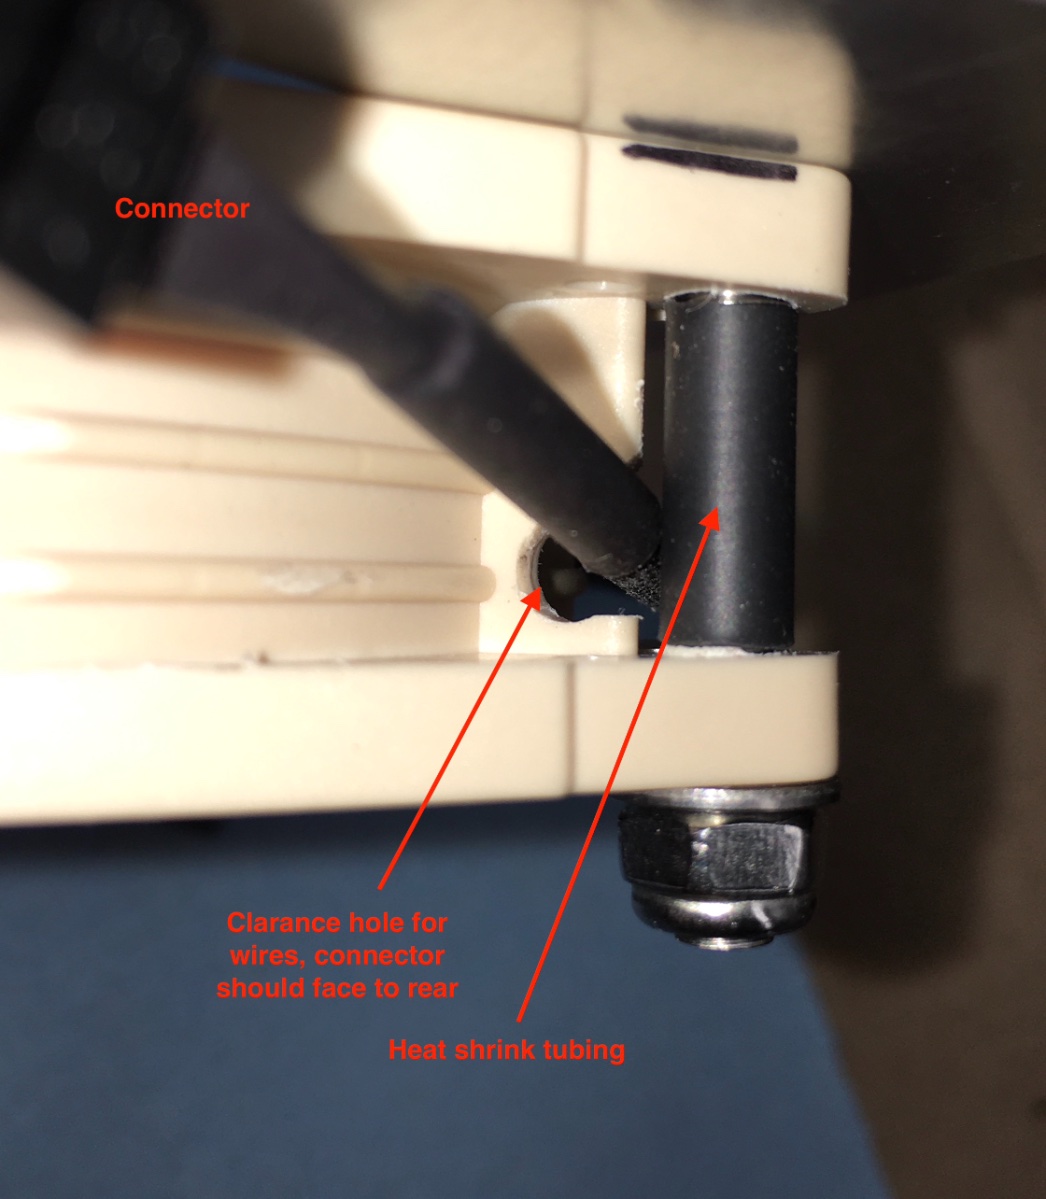
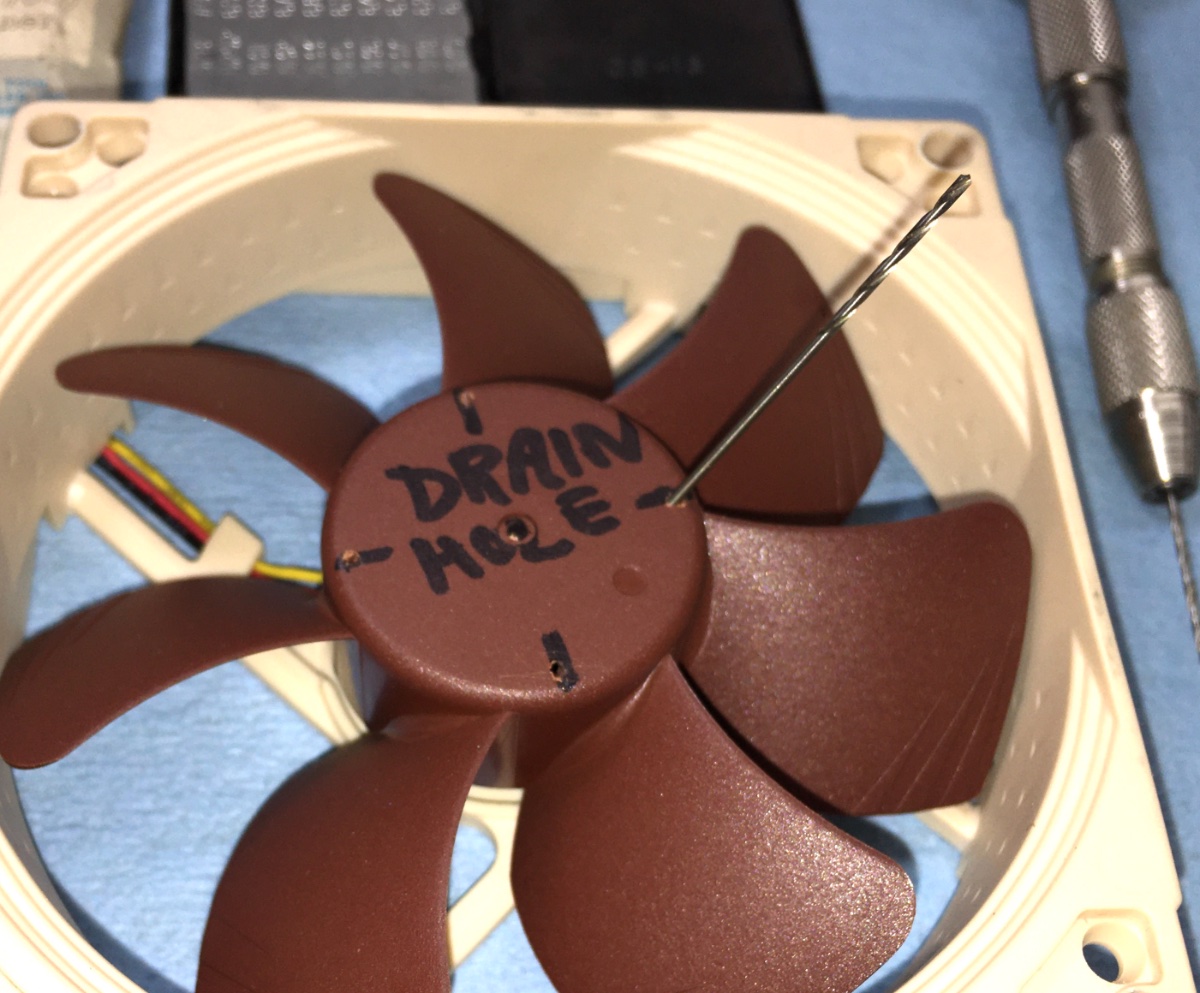
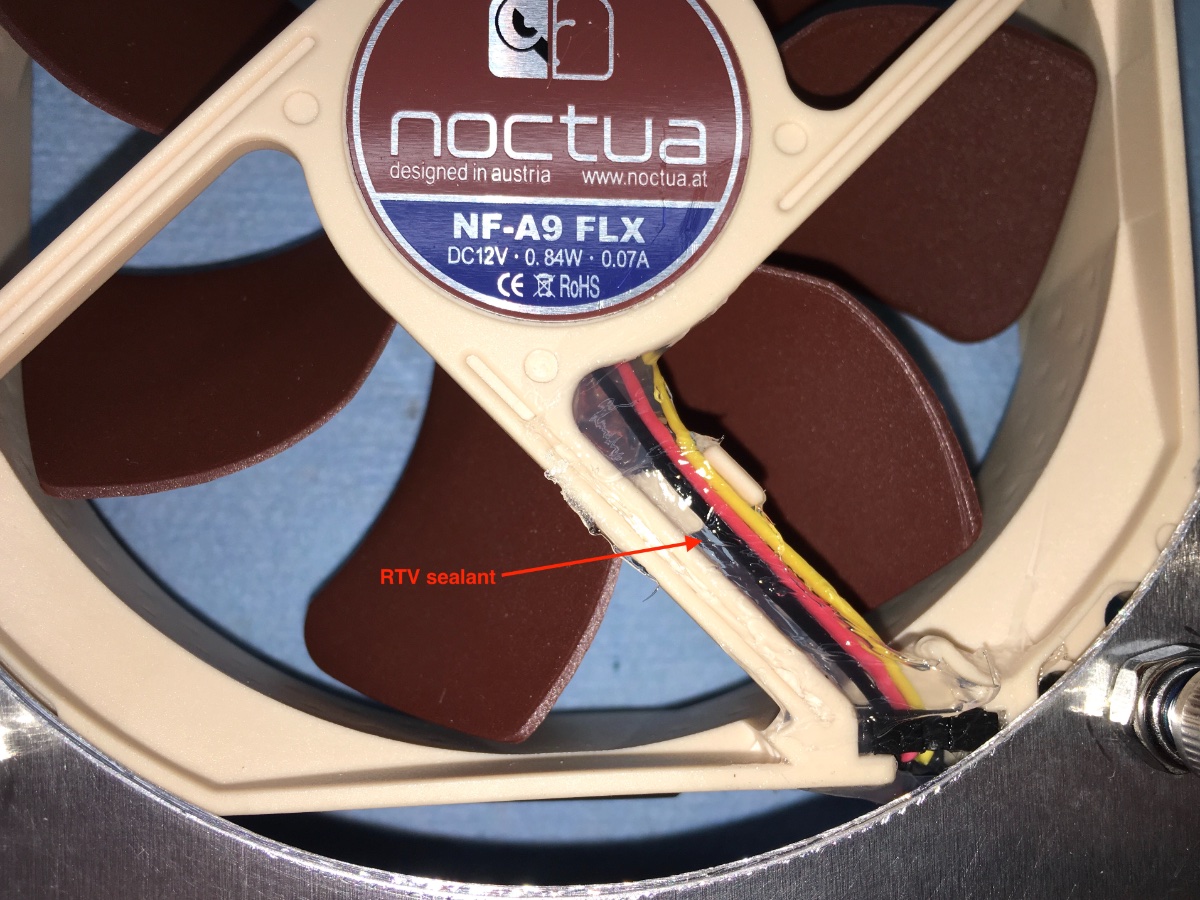
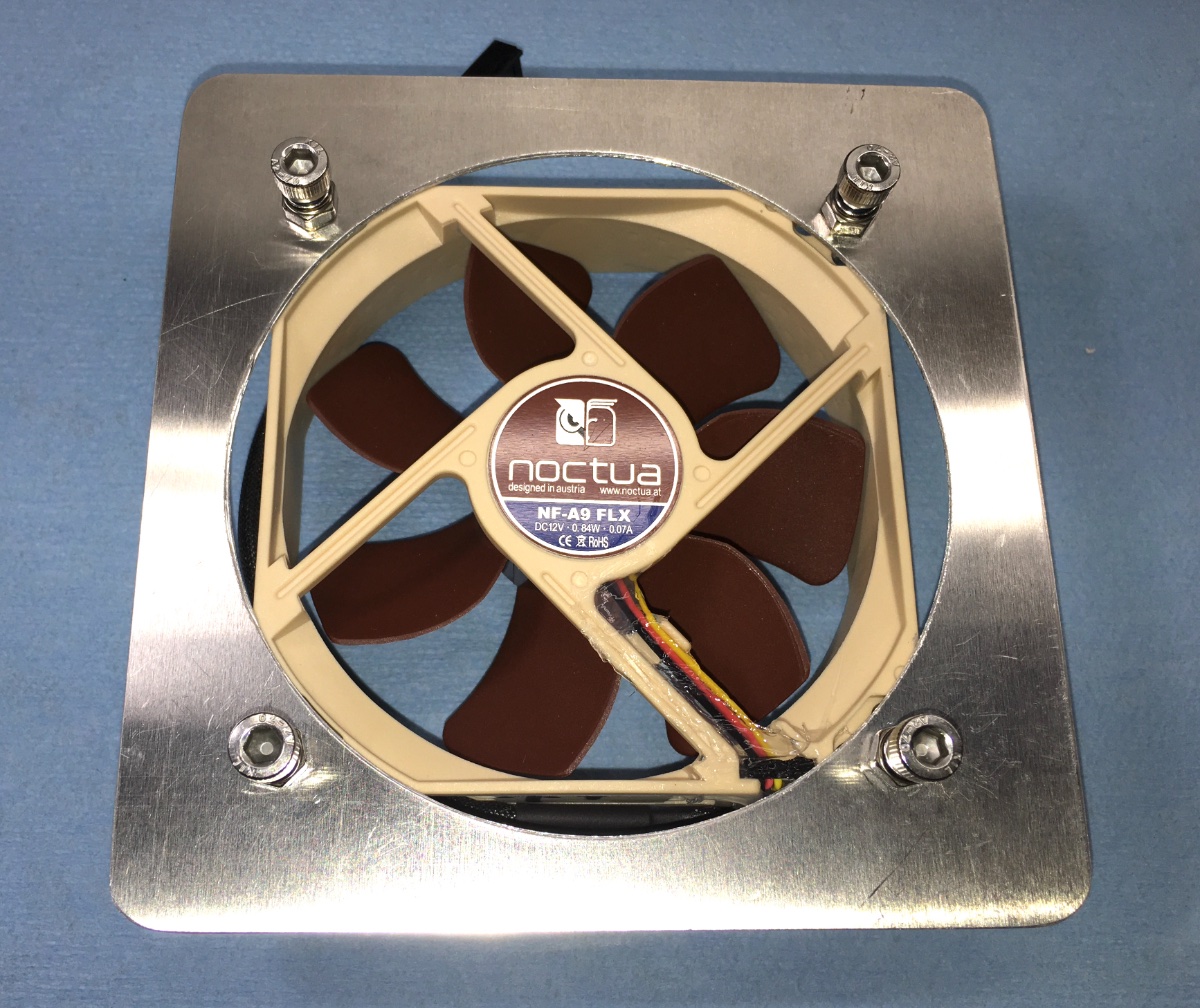
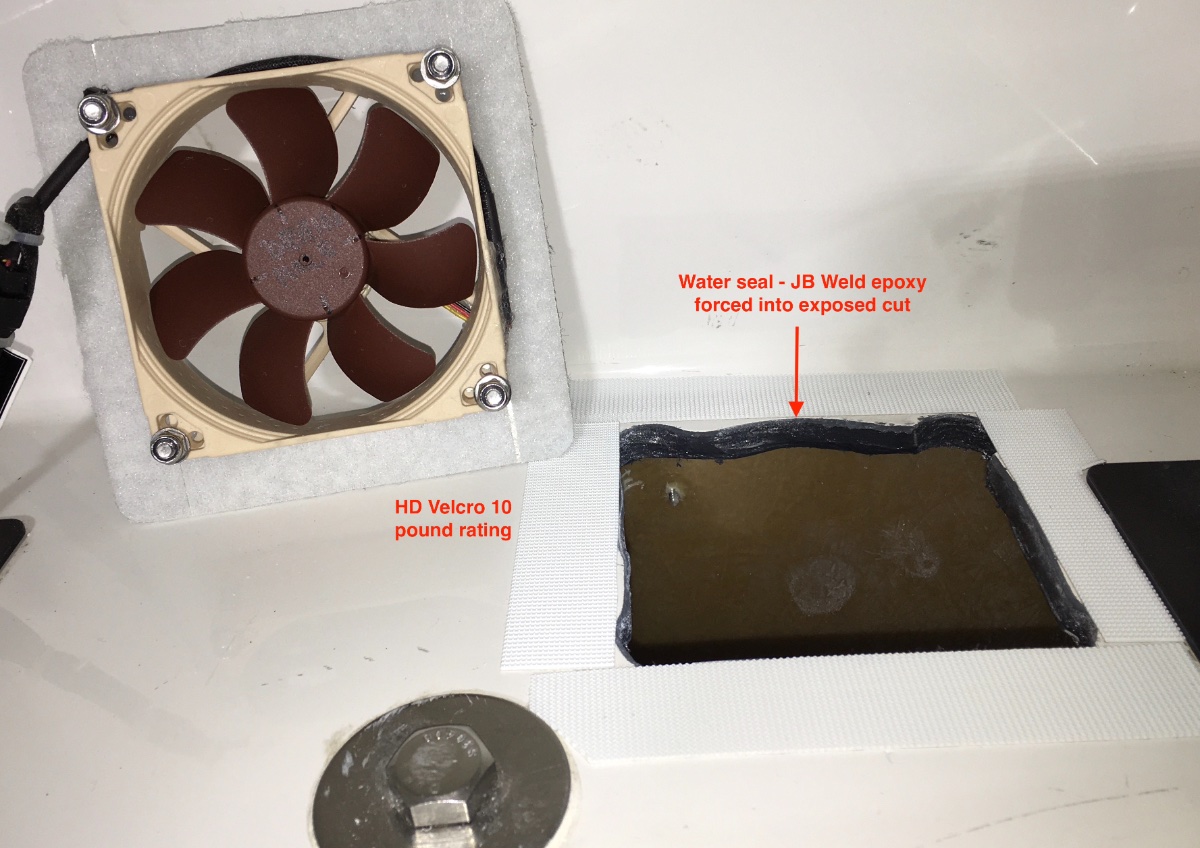
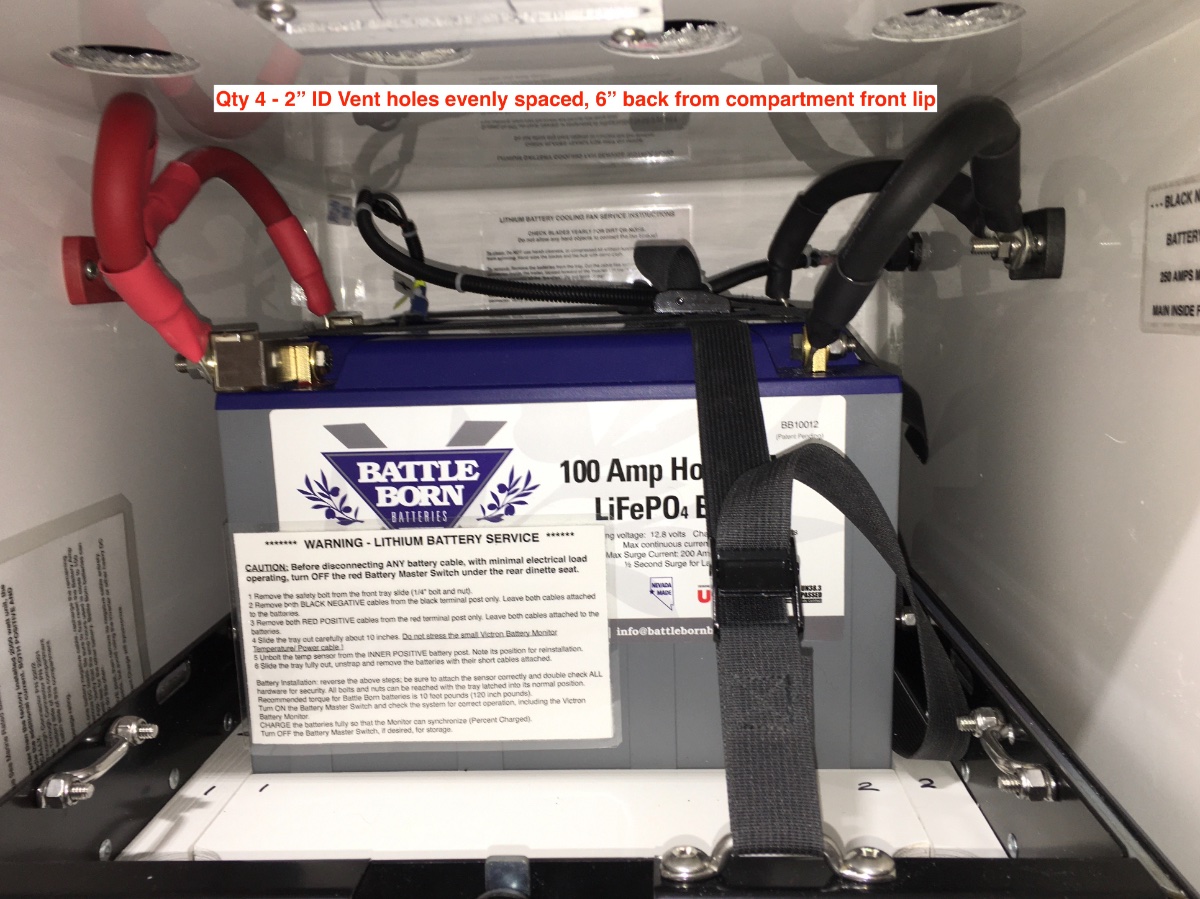
Battery box cooling fan. This one is high quality and well regarded. It has sealed ball bearings and uses just 70 milliamps (0.07 amps), so it can run as long as needed. Flow rate is 38 cfm on high, they supply two dropping resistor harnesses if you want to slow it down to reduce the sound level. It is pretty quiet, though a light sleeper on that side of the trailer might want to turn it off at night. But it is “white noise” which sometimes you do want..... Noctua Fan I really wanted the fan to go in the bottom at the rear wall, so it was centered between the two electronics compartments. The problem is that the floor of the box is not fiberglass honeycomb as I thought, rather it has a hard (6061?) 1/8" aluminum diamond plate bonded in the center! So cutting a large opening was a challenge. If you have access to a scroll saw (pivoting head) it is easy enough. Otherwise, choose to locate the fan at the bottom edge of the rear wall instead! That is thin (1/'8") fiberglass. Screws are 5mm, and are double nutted so that the heads will stick up enough to use as "grab handles", for servicing: John Davies Spokane WA
1 point
-
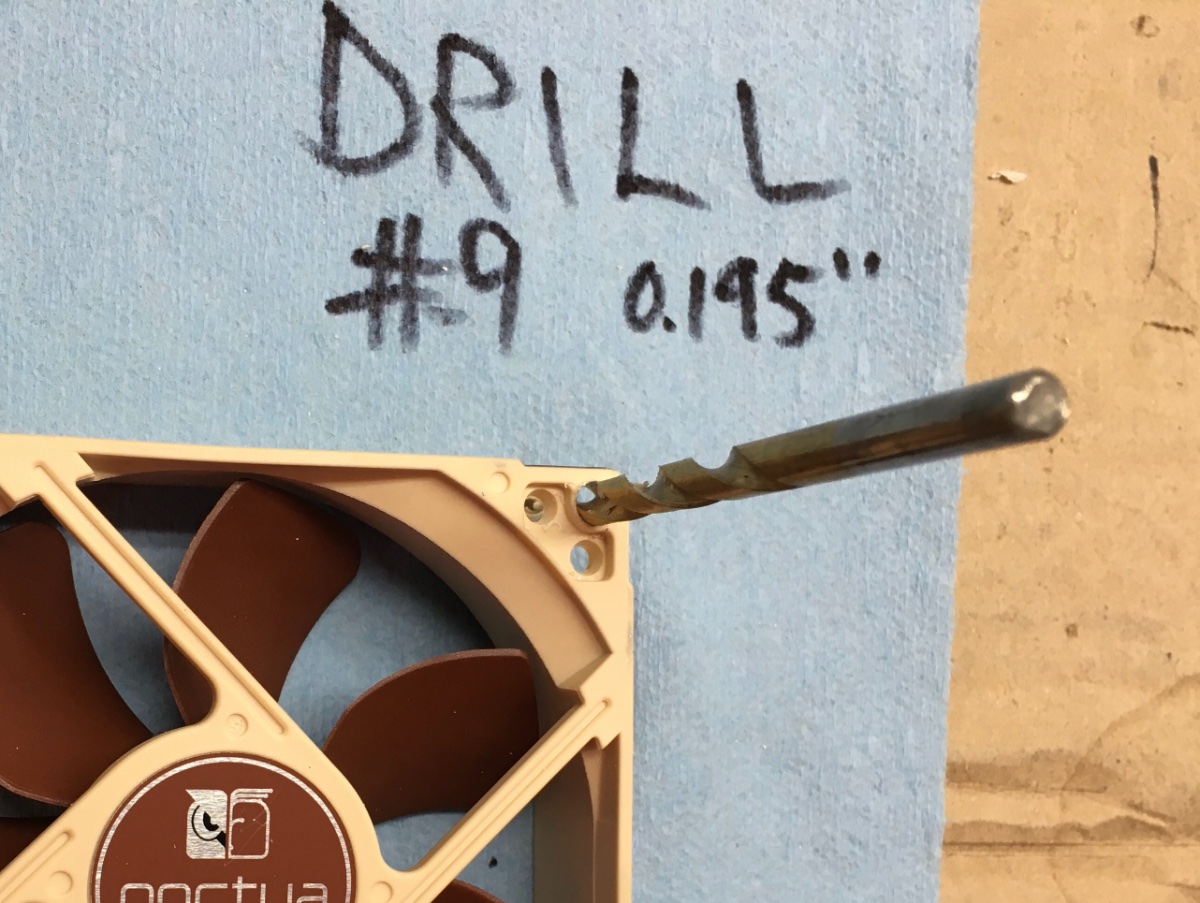
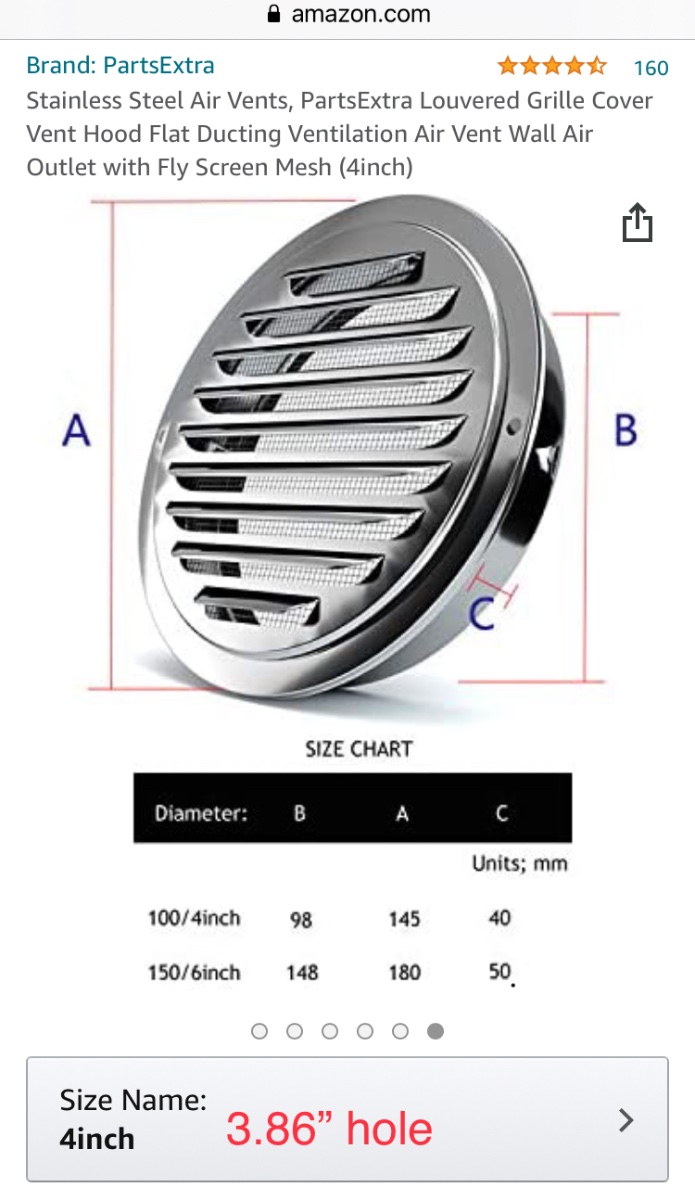
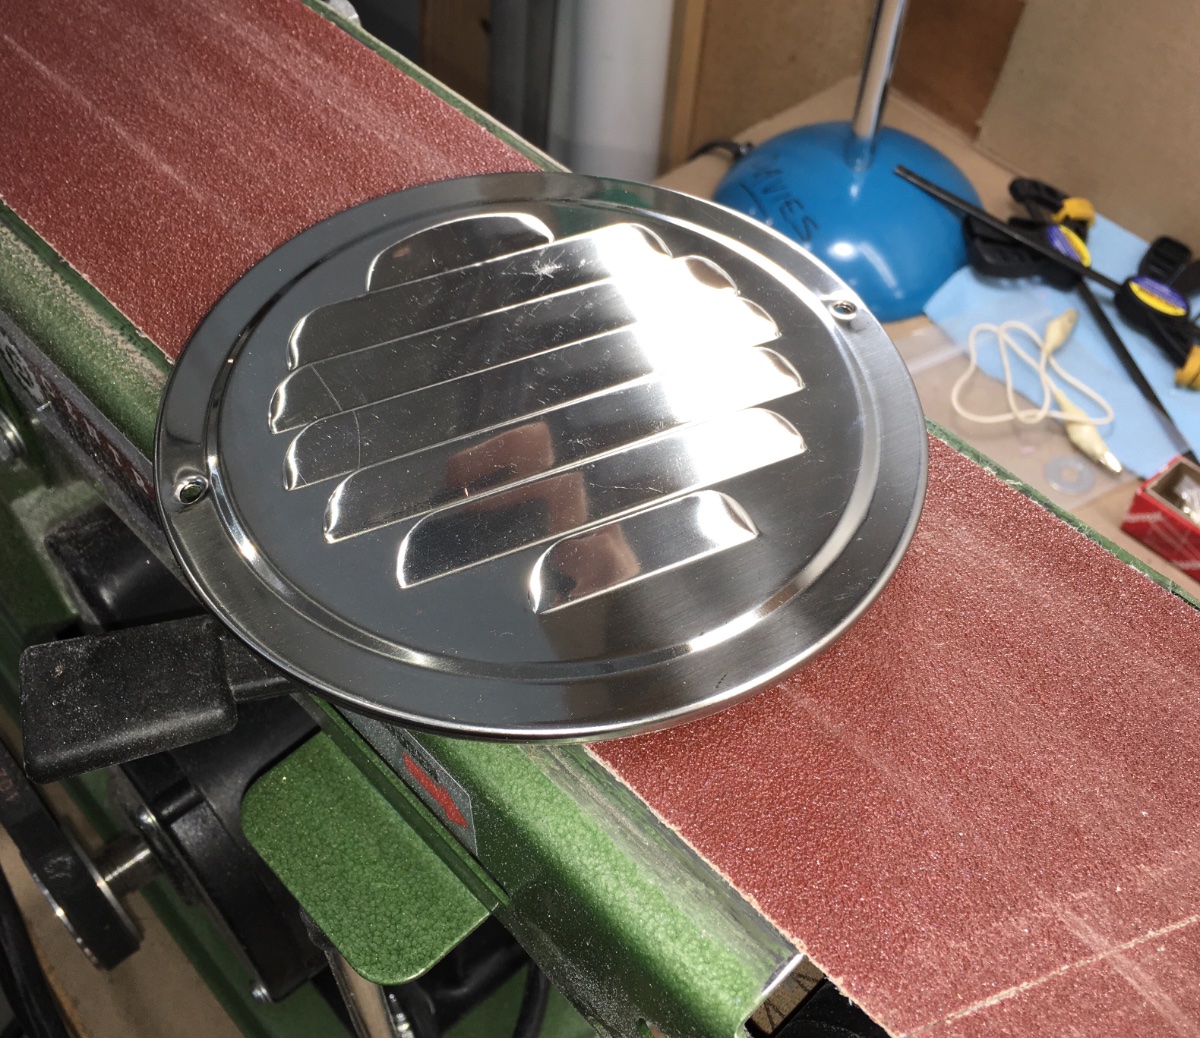
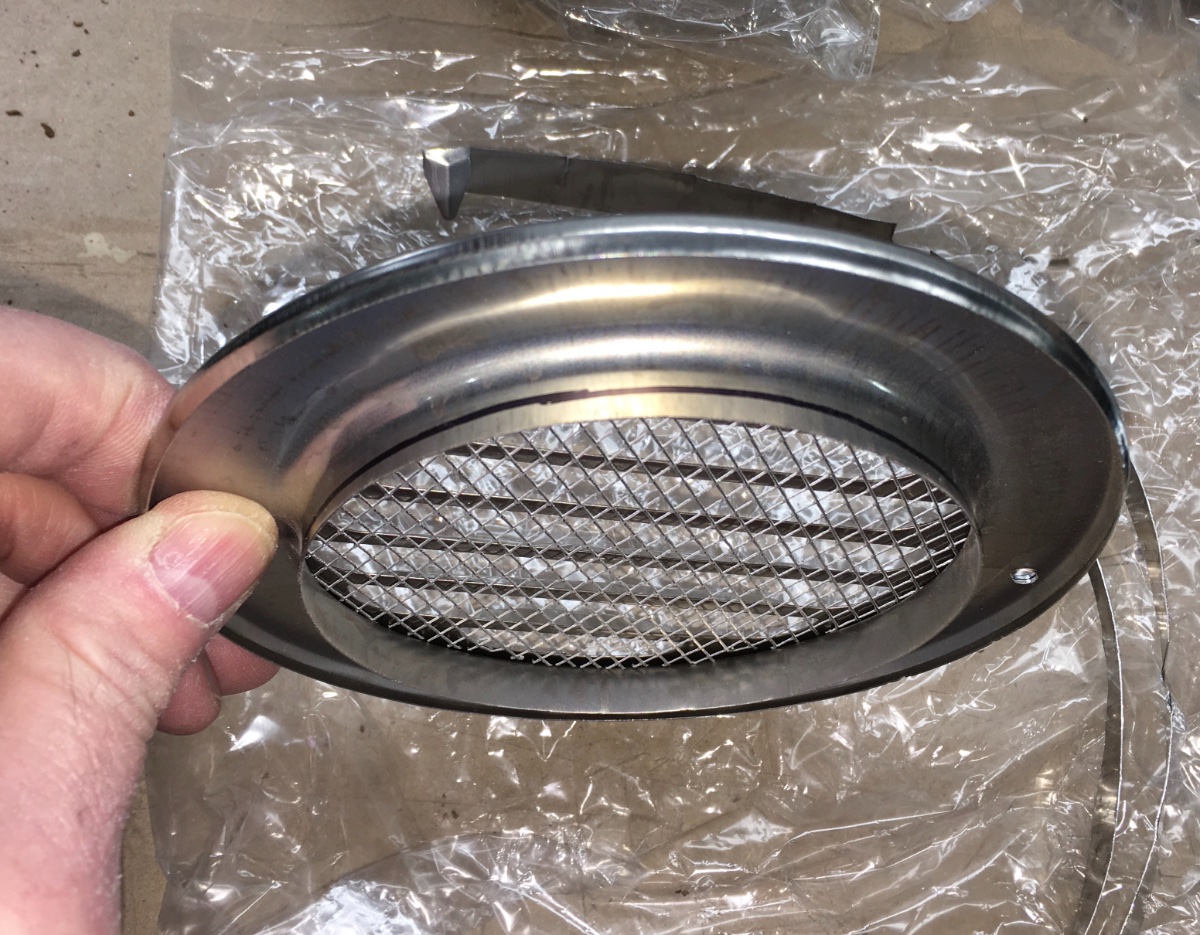
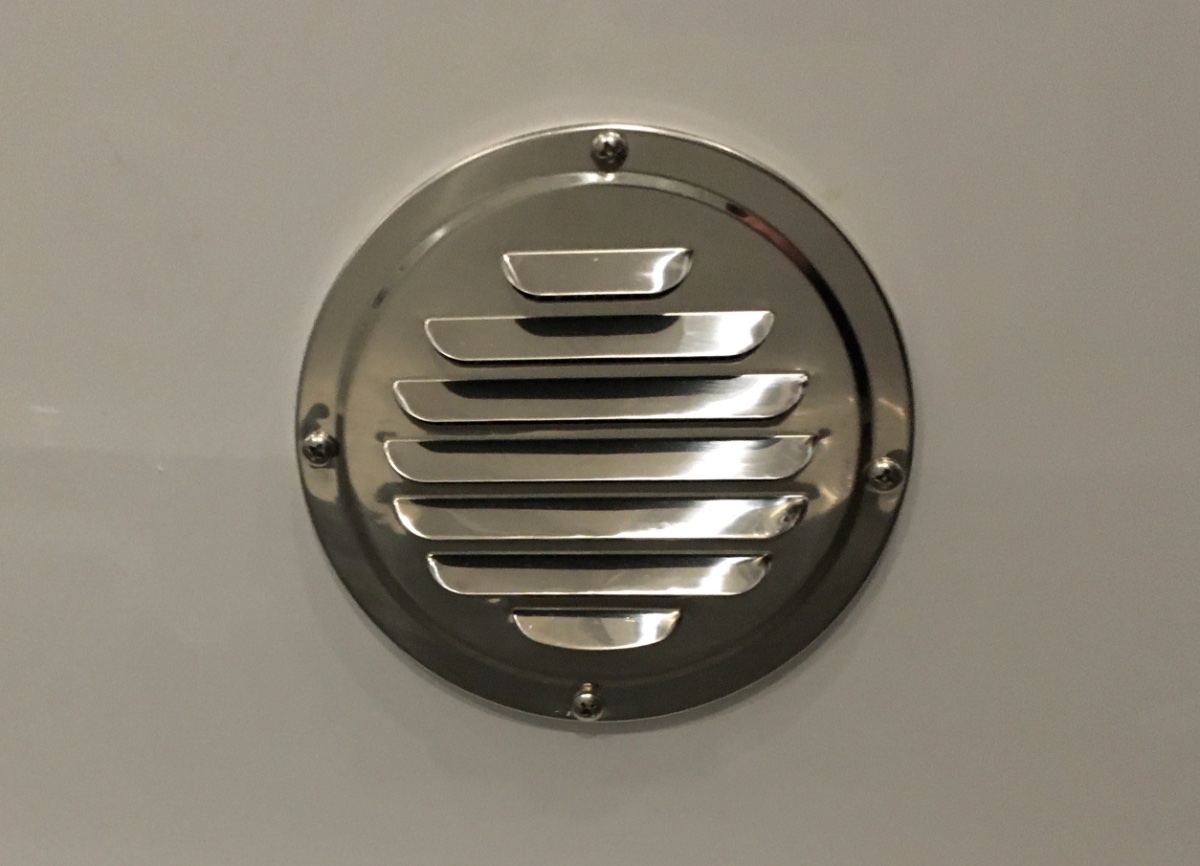
Battery box intake vents. Originally I wanted aluminum louvered vents, so I could paint them white to blend in, but the ones I bought turned out to be way too flimsy. They would have been destroyed by a wayward kick. I ended up with these and am fairly satisfied. They are sturdy and very pretty. Unfortunately they need trimming and the addition of two more mounting holes, so they would pull down tight and flat. Drilling stainless is possible, a drill press makes it less frustrating. It requires a lot of pressure on the bit. Use a 4" hole saw or a jigsaw to cut the holes in the fiberglass. I placed one under the rear bed and one under the rear dinette seat, centered front to back and up/ down. The center is approximately 9 " off the floor. Even though sanded smooth, the edge was pretty dangerous, so I used 1/4" split loom to protect fingers. I added a blob of silicone on each protruding screw tip. In the future I plan to add third vent at the bottom of the closet door opening. John Davies Spokane WA
1 point
-
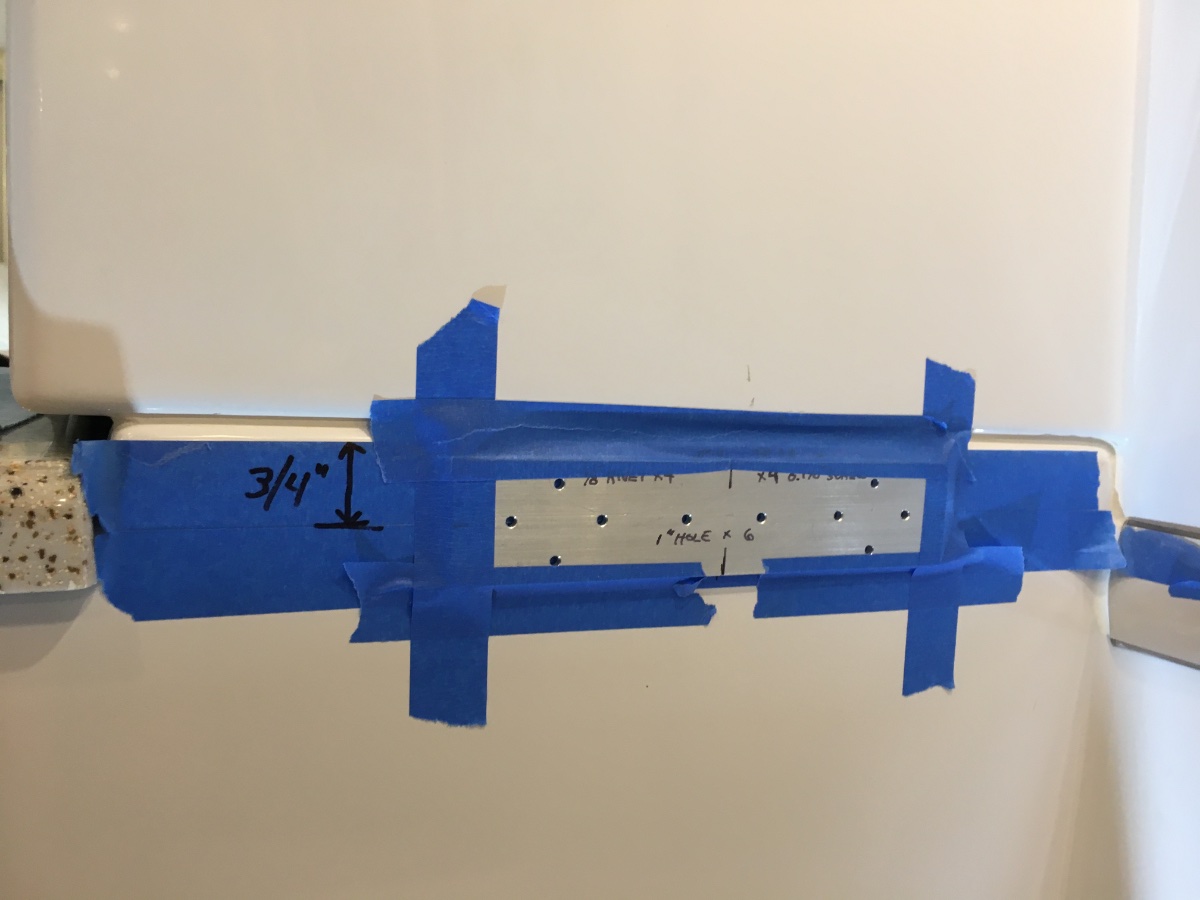
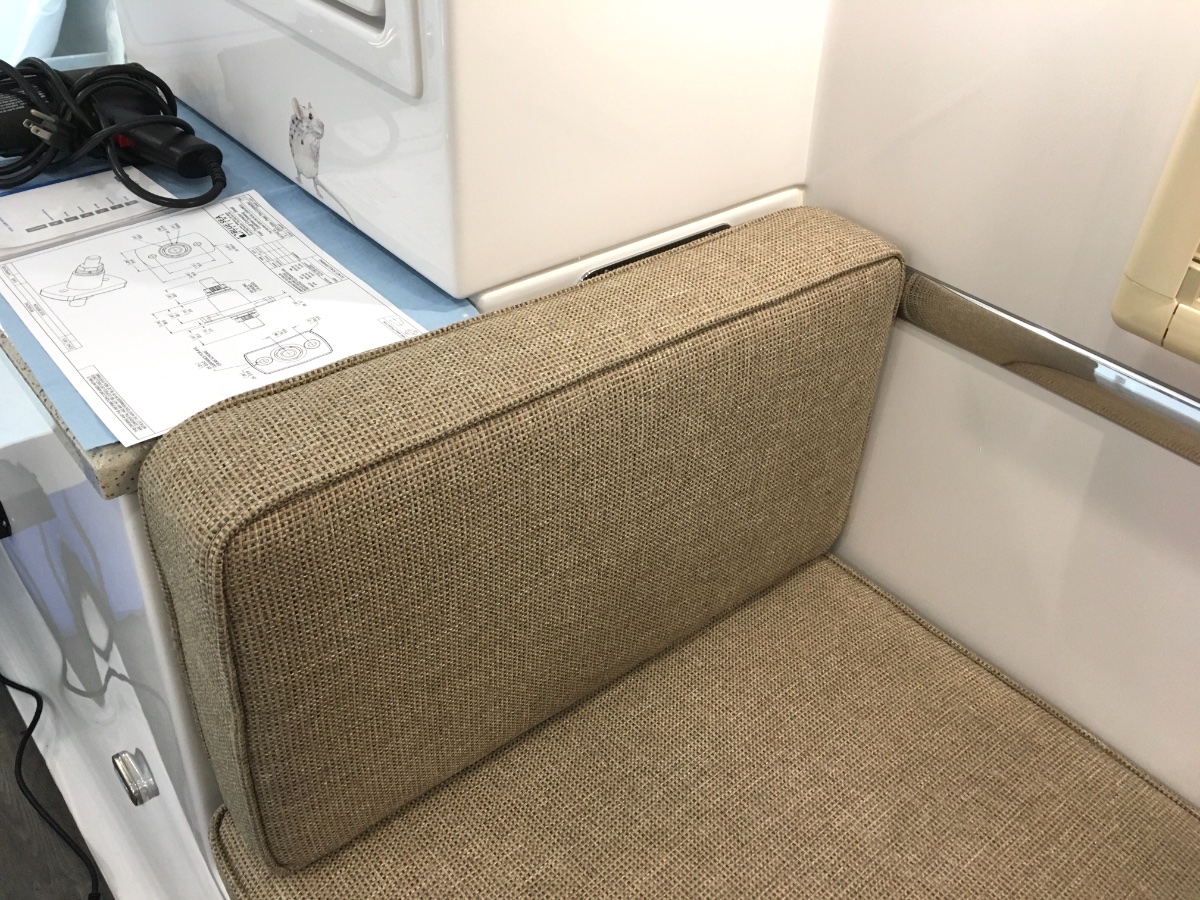
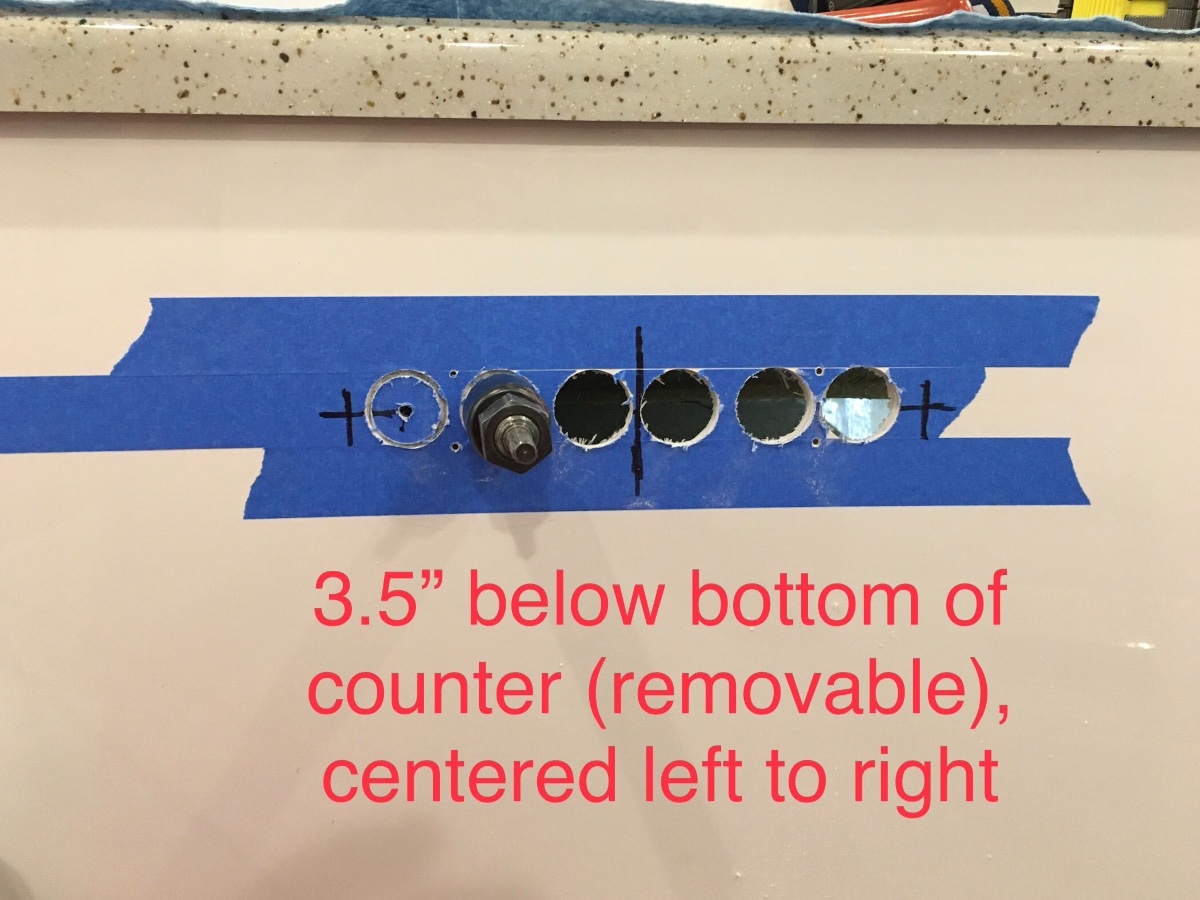
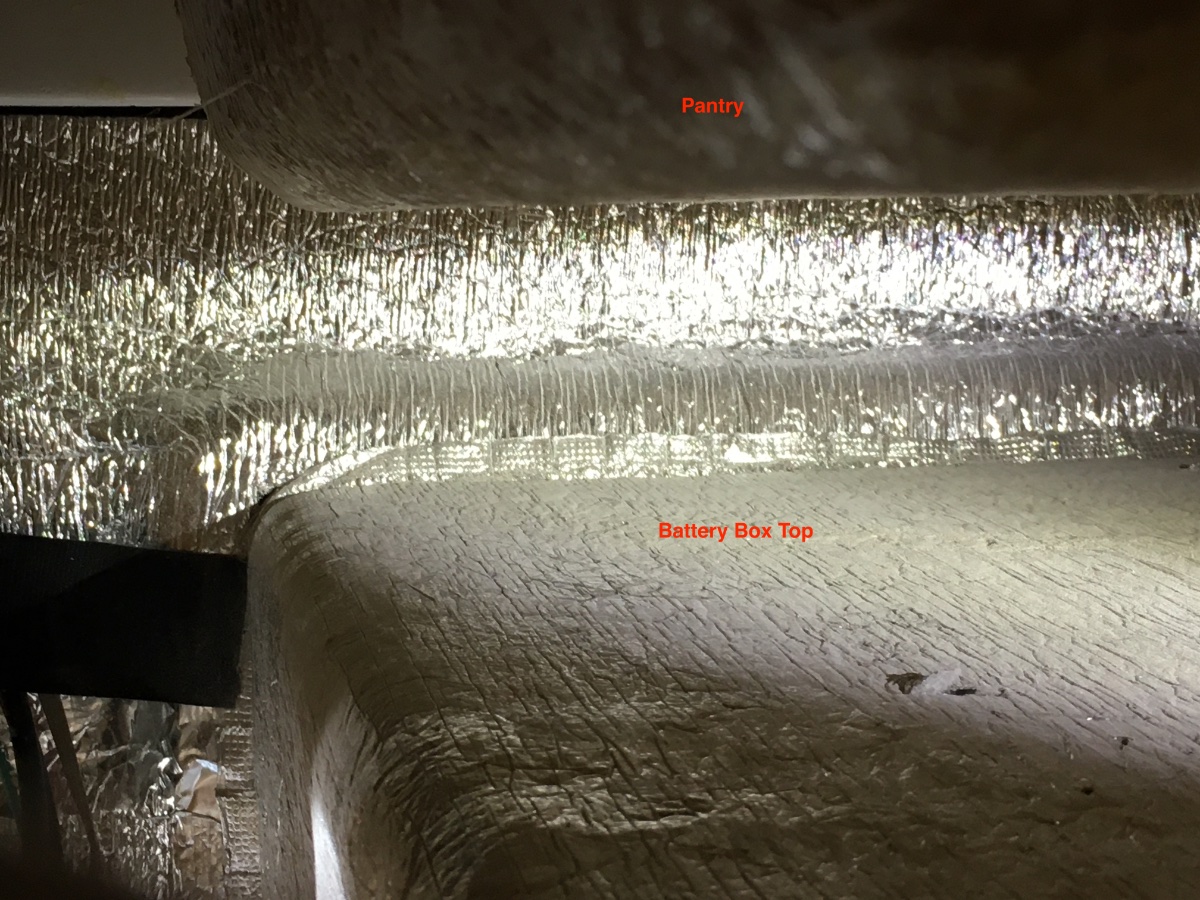
Battery box exhaust vents. Qty 3 - Perko 51840 Chrome plated brass (same part used on the battery door factory vents) ... https://www.go2marine.com/perko-ventilator-vent Make a template - there are a lot of holes to drill: The 4 mounting holes can be sized for 1/8" rivets (not recommended) or number 6 sheet metal screws. Choose the correct size for your fasteners! I chose screws. The front and back vents go here: You will be staring at these for a long time, so be very sure the holes are perfectly straight, measure thrice, cut once. Don't use a bubble level, measure up to the joining line. Here is the reason you can't position it higher: Deburr the holes CAREFULLY with 80 grit sandpaper (wear gloves or you will drive glass shards into your fingers), do not scratch the surrounding gelcoat!!!! Install the Perko cover. Repeat these steps for the rear wall. The optional factory granite countertop keeps the seat cushion slightly away from the wall in this position. If yours does not have the optional ones, the front vent will be blocked with the cushion as shown here.. Here is a view inside the compartment, looking back at the INSIDE of the rear vent. Notice you cannot position it higher or the screws will not clear the top: The third vent goes in the center of the inside wall, directly below the pantry shelf. Having three vents means that one blocked vent (a pillow for example) will not significantly affect the airflow. Finally, there need to be holes in the TOP of the battery box, to let air out from that space. Since I mounted a fan in the bottom, at the very back, I chose to place them in front, so air would move below and across the batteries, leaving no "still air" pockets. All other openings in the box should be sealed with heavy aluminum tape or a similar product. There is plenty of space on top of the box for air movement: John Davies Spokane WA
1 point
-
Smart. Nothing heavy in our back seats except the impact wrench and torque limiting extensions, which are under the front seats to contain them in an impact. I once saw a guy killed by the small red steel toolbox in the bed of his pickup. He went head on with a tri-axle dump truck at about 50 MPH and his toolbox flew through the truck cap window and rear truck window, hit him in the head, then kept going through his windshield and dented the hood of the dump truck just below its windshield. The pickup driver was killed instantly. The truck driver was lucky it didn't get him, too. (The cause of the accident was an impatient small car that passed the dump truck in the fog, then cut in front of him and braked hard when she saw the oncoming pickup. This caused the rear tires of the empty dump truck to skid out and the dump truck crossed the center line into the pickup. The car driver kept going but called 911 to say she had witnessed an accident. She was charged with vehicular homicide.)0 points


.thumb.jpg.e34bf01ef7f7d5e99ad31856d45afbeb.jpg)


-
Recent Achievements
-


")


")


")

