Leaderboard


Popular Content
Showing content with the highest reputation on 04/19/2025 in all areas
-
When I was addressing this issue of connections for griddle and grilles, the forum offered me the link to this wonderful company called PROPANE GEAR, and so I pass it on to you. With this company, I was able to obtain the correct hardware to use a grille, as well as my Blackstone 17 inch griddle, connecting to propane tanks. They provide great service, and my orders were received in a timely fashion. https://propanegear.com/3 points
-
Woke up to several inches of snow on our last morning in GC. Then I learned that it is unwise to use my bare hands to wrestle the Anderson chains when they have been buried in snow. 🤣 Later, we spotted our third Ollie on this trip. Whoever was headed south on 89 near Camden, Howdie! 76667912346__E5263CEE-8B76-4C5E-9E91-6C46970D4CE0.heic3 points
-
Currently at 57 trailers on the list. Here's what I have so far. The final list will be posted as a PDF next Sunday, and I will bring a stack of printed copies with me. Stop at G23 and grab one! 2025 Oliver Rally Attendees.as of 4-19-25.pdf2 points
-
E31. John and Kim. #867. Peachtree City, GA2 points
-
I had a similar potential major issue several years ago in a campground with multiple extreme voltage spikes. The voltage was spiking to almost 200 volts and the EMS saved the camper from damage. I called the Progressive Industries folks and told them of the issue and that the EMS was seven years old. They still sent me two new circuit boards at no cost. I’d give them a call and get new replacement boards. After an event like you experienced, I wouldn’t take any chances using the old boards even if the system seems to be working properly. I had to end up requesting several new boards because the Progressive Industries folks kept sending the boards in just a little bubble wrap and in an envelope. Several arrived crushed or otherwise broken. I explained to the contact person that they really should be sending the boards out in boxes but they didn’t seem to care. Anyway, I ended up with two new working boards.2 points
-
Be sure to check this very carefully - depending on exactly what happened (electrically speaking) many of these units actually sacrifice themselves (even partially) in order to do their jobs. You might want to check with the manufacturer of your EMS to see what they have to say on the subject. Good luck! Bill2 points
-
I hear you brother, we also searched in vain for a decent stove that would work off the low 2-3 LB pressure trailer gas connections. No luck, so we decided to stick with our favorite Everest stove from Camp Chef that uses the more common 10 LBs pressure. It's a really popular stove that can blast BTU's or be turned way down to a slow simmer. We converted our stove to use a 5 LB propane tank instead of the annoying 1 LB green gas bottles. You can probably do the same modification to other stoves that use the common 10 LB regulator/green bottle system. To be able to use a larger propane tank, you need an adaptor to fit a long hose to the 10 lb pressure regulator/green bottle support. . . but that’s kind of janky. There is a YouTube video that shows how to easily eliminate the awkward green bottle regulator, and convert the stove to a quick connect hose that’s way more convenient and better looking. We bought a quality padded case for our 5 LB propane tank that it makes it easy to carry and stow. We also got a 5’ hose with adjustable regulator and parts for a quick disconnect. We saved the stoves original regulator/green gas bottle holder as a backup, and bought a second one that can be taken apart to get the propitiatory stove connector piece that's needed for the quick disconnect as shown in the video. In all honestly, we now prefer having a portable stove instead of being tethered to the trailers low pressure gas connections as we originally wanted. We often put the stove on a picnic table or bring it to group cookouts. Since the Oliver's awning can't be used in the rain, we carry a canopy that can go over picnic tables so we can now cook and eat outside when its raining, which is does an awful lot around these parts. If anyone wants to go this route, Iv’e linked the stove and padded tank, with all the parts needed to convert it to quick disconnect. Cheers, Geoff https://a.co/d/4wh0e5k https://a.co/d/66t3la0 https://a.co/d/0U67u5X https://a.co/d/6zcM88m https://a.co/d/7VNUJ9d https://a.co/d/7VNUJ9d https://a.co/d/fSQMj0G https://youtu.be/QI3TZYfKDEU?si=pH_B9Z9l3SnksOdR2 points
-
This is what I used. Used it around the spare tire cover and to cover the rough edge on bed rails, too. Rubber Edge Trim, U Channel Edge Trim with Metal Clips Edge Guard Protector1 point
-
We keep our trailer in a detached garage we built about 18 months ago. Prepping for summer, I had the Ollie plugged into a 20A outlet in the garage (with the Xantrex dialed down so it didn't overload the circuit). Last night I looked outside and the garage was dark, even though I had left a few lights on. I went over to investigate, smelled hot electronics and found a slew of weird electrical problems inside. Lights were flashing or going dim, something was humming, and the garage door motors were making bad noises. Realizing there was a major problem, I killed the master breakers in the garage sub panel and then the breakers covering the feed from the house distribution panel. Based on my smart home logs, the incident may have been going on for 2 hours before I noticed it. The electricians who originally wired the garage were here this morning. They discovered that the neutral line going to the garage was not clamped to its bus bar in the house. It was just sitting loose in the hole. This is called a loose or floating neutral and it can cause severe damage to electrical devices and potentially shocks or a building fire. Once that was fixed we started assessing the damage. Both garage door openers were damaged, as were 2 smart light fixtures and a Makita battery charger. I'm thinking, "the Oliver!" During the event I had noticed that there was no 120VAC inside the Oliver, even though it was connected to a live outlet. As far as I can tell now, the Oliver sustained no damage. All the 120VAC and 12VDC devices appear to be working as designed. It seems the EMS did what it was designed to do and isolated our trailer from the faulty shoreline power throughout the incident. We'll know for sure as soon as we get out camping. Amazingly, the wiring had been that way for over a year with no symptoms at all until last night. The electricians have accepted responsibility and are paying for all replacements and repairs to damaged equipment.1 point
-
E28, Erv & Sherry #650, Chattahoochee Hills, GA1 point
-
The Oliver is still a great camper BUT - you ain't no "newbie" no more! Bill1 point
-
This is why I do my own electrical work. and construction and vehicle maintenance and plumbing and medically necessary surgeries.
 1 point
 -
Agreed, the Blackstone is a popular flat grill and not what you want. Heed Steve's advice @ScubaRx in the post above. They do not regularly sell low pressure. They all or almost all come with regulators to reduce the high pressure. It is easy to remove them, add a HW fitting or change the hose and add a quick disconnect that mates with the Oliver fitting. I modified our Weber grill and our LP fire ring. Added a 12' extension with a 'Y' so we can connect them simultaneously. There are hundreds of choices. Here are a few... https://www.amazon.com/ONLYFIRE-Adjustable-Removable-Tailgating-GS301/dp/B0DF71PPC7/ https://www.amazon.com/Concord-Stainless-Roadster-Propane-Burner/dp/B0BGMGLGTM/ https://www.amazon.com/ARC-Adjustable-Pressure-Portable-Regulator/dp/B07TWZ1H2T/1 point
-
You took an Airstream into Chaco? You’re a braver man than I.1 point
-
I can personally attest that driving the 40 mile washboard gravel road into Chico Culture with 80psi in the Oliver tires is both stupid and detrimental to the Oliver. I'm not completely convinced that it didn't slightly alter the earth's orbit around the sun as well.1 point
-
Just wanted to share with everyone that Oliver’s labeling has improved over the years. This is a picture of the circuit breakers for the inverter in our trailer. Clear labeling really helps.
1 point
-
Fridge or freezer? I periodically use Aquaseal (which is urethane) to attach drysuit gaskets. I store it in our freezer between uses, which keeps it usable for years.1 point
-
My inverter is still attached in it original position. That being said and I was going to re-attach the mounting board or just being proactive trying to prevent the mounting board from breaking loose, I think replacing the just top 2 screws holding the inverter to the mounting board with the through bolts of your choice, would prevent the inverter and board from falling. But the other choice is to hide the bolt heads. This is where Krunch keeps 4 or 5 pairs of sandals, slippers or 🩴’s under her port bed overhang. I’m sure no one would be able to see the bolt heads unless they wanted to borrow a pair of her shoes. We won’t even discuss where the other 15 pairs of her shoes go! Mossey
1 point
-
This may be a consideration if you choose to go that route. The integrated washer is a clean look with more surface for support. Box of 10pcs McMaster Carr https://www.mcmaster.com/97654A265/1 point
-
NObody is making you put ugly hardware store hex head bolts there, you can buy expensive chrome ones at Ace Hardware (they keep them locked up or else kids would steal them) or use a nice looking satin stainless button head screw like this. I do not recall the size I used for my inverter repair, but they are scattered all around the interior of “Mouse”. They look perfectly fine. I think they look custom and classy. Do remember to countersink any holes that go through gelcoat to prevent chipping and cracks. I used six of these to through bolt the new wood fridge frame I built, you can see them here. Yes they are visible, no they don’t look at all bad. Make very sure they are lined up and parallel to any nearby edges, if at all possible. Measure thrice, drill once…. John Davies Spokane WA
1 point
-
I realize this is very contrary to what most people think of or recommend when attaching something to a surface in the Oliver. The first hole you drill is always the hardest. After that first one, you'll feel more at ease drilling the next. I've drilled so many in mine through the years, I've probably lightened it a couple of pounds. You really will be pleased with the stability as a result.1 point
-
Thanks JD. Early this summer as part of our LiFePo4 upgrade, I replaced our OEM 2K inverter with a 3K Renogy. As you know it is a LOT larger and heavier than the OEM 2K unit. I drilled out the four mounting holes, and added supplemental wood supports to accommodate the longer Inverter and to bring the four 3K mount holes in line. I too was concerned about the weight and poor support. Some JB weld and through the bunk vertical wall went four SS bolts, SS Fender Washers and 1/4 X 20 bolts with nylock nuts. Yep I trust JB Weld, but I trust it more with thru-bolting with SS bolts and fasteners. So yes, if anybody wants to look, you can see under the street side bunk rail two of the four attachments. PS: Used he same approach on the mounting of the Victron 12/12-30 charger under the street side front dinette seat facing aft. GJ1 point
-
Thanks John. I was thinking about a few more crazy options today. One thing I've got in the back of my mind is that a loss of the fan and having the battery box heat up isn't a show stopper like not having backup heat would be (and having pipes freeze / break). So, I still have a few months (at least) to think about it before we start seriously warming up here. I'm not planning on super hot camping, but all I have is a big steel shed for the Ollie and it could get blistering hot in there over the summer. My batteries are always on to run lights, toilet fan, etc. If you get any data from your design, please let us know - like if you get the bug to head straight south soon. 🙂 Thanks again for reviewing my design and sharing your thoughts. Very helpful.1 point
-
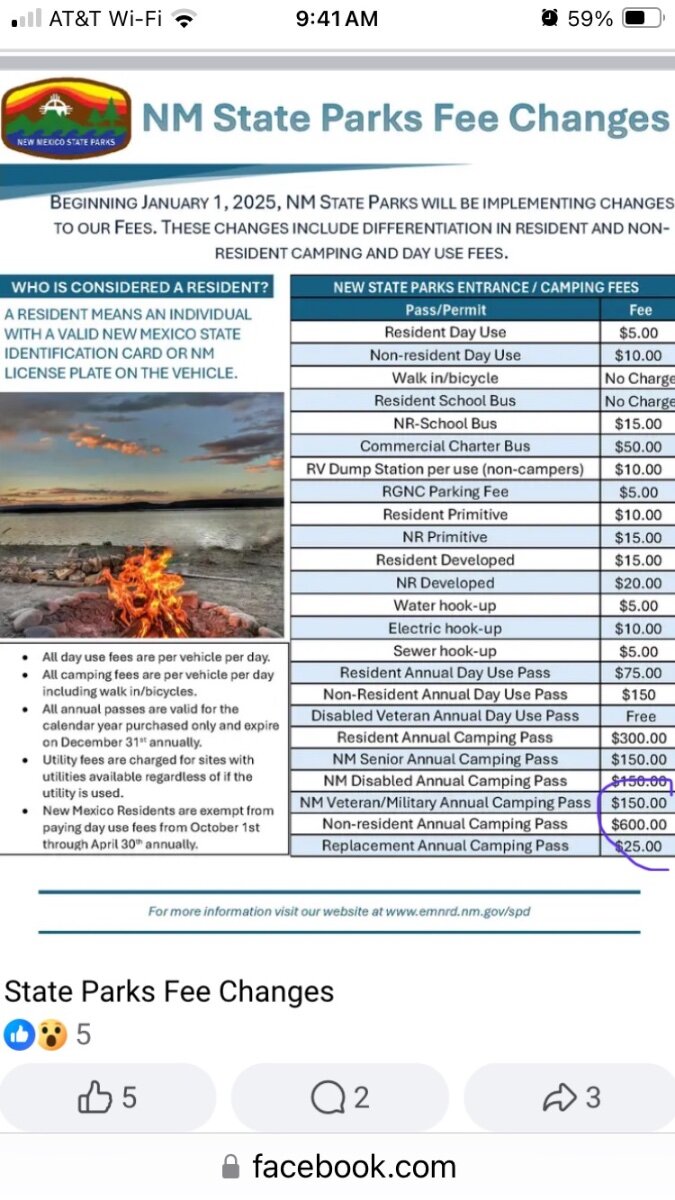
New Mexico State Parks will be implementing a new fee structure beginning January 1, 2025. For those who have been following this topic this is not news. If you have not been following, the rate increases can be substantial, particularly for non-NM Residents and may come as a surprise. Most notable is the increase in fees for the non-Resident Annual Camping pass from $225 to $600. Passes purchased in 2024 will be honored til expiration in 2025. If you are a non-Resident and plan to purchase the Annual Camping Pass for 2025 you may wish to do so yet this month so you will not feel the impact from the increased rate until 2026.
0 points


.thumb.jpg.e34bf01ef7f7d5e99ad31856d45afbeb.jpg)


-
Recent Achievements
-


")


")


")


