Leaderboard


Popular Content
Showing content with the highest reputation on 04/27/2025 in all areas
-
Landed at Rivers Edge CG in Cherokee County, Murphy, NC. Concrete pad, F/H and a nice place to overnight on our way to LGSP. It’s good to be back on the road and traveling again. Tomorrow onward to Lake Guntersville SP. See ya at the Rally! Nothing like the beauty of Western North Carolina! 🤩 Safe Travels!
 5 points
 -
We just had the same experience at our cabin. Kwikset is sending a new battery pack. Three to four years is our experience with keypads exposed to the elements. It's a love/hate relationship.4 points
-
First highway test today. Left home today and drove 175 miles to Holbrook AZ. We went mainly state highways, drive-time of 3:10 hours, an average of 55 MPH. We started at 59% SOC (600 Ah total) since we had started the fridge on DC about 40 hours before departure. Just after we arrived we had 81% SOC. That's +132Ah in charge or 41.7Ah per hour charge rate. However, the Orion on the Victron app never got above 38A and was more often running at 35A. This means the Blue Sky SC and 320W solar was supplying the DC power to run the fridge and net close to +7Ah. This is so cool! Tomorrow we will arrive in Albuquerque and since it is about 240 miles I'm thinking will be pretty close to 100% SOC. I'm never going to worry about our batteries when we have a half day or more on the road again!
4 points
-
4 points
-
We've been working hard on Helene deadfall cleanup. Time to relax, grill some steaks, and chill a bit.
3 points
-
JD, running your fridge on dc and only 175 miles worth of charging... I'd say you're doing quite well! We've only used our charger twice since seeing you in Quartzsite. And we boondock more and more often. I do take advantage of solar with my portable and I'm happy to have the dc to dc charger as a backup for extended cloudy days...thankful I installed it for that reason :) Congrats on your successful project! It's sooooo nice to not worry about battery usage with the lithiums and having another backup plan through the charger! Happy Trails, John3 points
-
@Steph and Dud B I found RVLock's people to be very helpful when I was having a different problem with my lock. Let us know what you found necessary to correct the problem.2 points
-
We are in the process of locating qualified and reputable RV maintenance facilities across the country. The goal is to provide our owner's with outstanding service within reasonable distance. If you have had a good experience with a third-party maintenance shop, please let us know here so we can do additional research and add them to our database. Thanks!1 point
-
Greetings to the Forum! I am planning a foray into Idaho this summer and love to hear any thoughts, tips and feedback. I’m not really set on any specific destination, but would love to see the Sawtooth range and find some good hiking and fishing spots. To begin looking at routes, I used scenic routes suggested by friends who were not towing or camping – so I am not feeling confident in my routes. Any and all feedback is greatly appreciated. I will be approaching from Jackson WY. o I am assuming that I should detour south on 191 through Hoback WY, to avoid towing over the steep pass on Rte 22; o I drive a 2500 diesel; o My description is broken into segments, since I haven’t located camping spots yet. I might discard segments if the roads aren’t conducive to towing. o I’ve included google map links to the loops, but I know sometimes google doesn’t behave and changes the route I've created. o Initially I was looking at driving all the way to Missoula along the Scenic Rte 93, through Hamilton (the first route describe, with 3A below), but there seems to be a lot of switchback mountain driving. And a lot of it is fairly remote. Anyone use this route? Or alternate route? o Alternate B cuts this short by taking Rte 21, the Scenic Ponderosa Pine Byway, but it still has a fair amount of remote and mountainous terrain. Anyone tow this route? o I may make two separate forays. First, I will take a friend along; we have 9 days total (leaving Tetons NP Day 1, returning to Tetons NP on Day 9). I may return for a more leisurely route, focused on fishing and hiking, and a return depends on wildfire conditions and heatwaves. Sawtooth & Salmon Bitterroot Scenic Route 1 – head southwest on 26/89 through Alpine, stay W on 26 to Idaho Falls (fuel & food stop) then 20/26 west to Craters of the Moon National Monument (camp if possible, limited FCFS spots); 2 – from 26W, go north on Rte 75 / Gannett Rd through Bellevue then to Ketchum (stop, see historic Earnest Hemmingway haunts and markers, picnic lunch); drive through Sawtooth NRA and then over Galena Pass Summit (8701ft, a 5 mile descent on the way down, anyone do this towing?) – stop at Galena Pass overlook (camp possibly at Alturas Lake or farther along at Redfish Lake, or other suggested camp sites along 75); ALTERNATE 3A – from Stanley 3A – stay on 75 north/east following the canyons of the Salmon River all the way to a junction with 93 – turn N on 93 and through Challis, Cronks Canyon, Salmon, Lost Trail Pass and Darby – entering Montana. 4 – on through Hamilton, Lolo (possible camp at Lolo Traveler’s Rest) and to Missoula MT. 5 – from Missoula, head back to Jackson WY via I-90 S to I-15 S back to 26 E to Jackson. https://maps.app.goo.gl/zxxMXZXUwpuSN1GZ7 Google calculates the route from Jackson WY to Missoula MT approx. 1,020 miles (too far imo for 9 days) ALTERNATE 3B – from Stanley 3B -- take Rte 21, the Ponderosa Pine Scenic Byway. There is another vista on Stanley Road, about 5 miles away called Elk Mountain Overlook, need to investigate road conditions and towing. Past Cape Horn near Boise NF, Rte loops SW toward Banner Summit then descends through a narrow steep-walled canyon and then a stop at Sawtooth Overlook (if room to pull in). 4 – Possible stop at Kirkham Hot Springs (if I can find a place to park) and/or South Fork Payette River (fishing, swimming, possible elk). Through Lowman (stop for historic markers in the area about the 1989 massive 46,000 acre fire) and Idaho City (gold boom town of 1860s)…. 5A – Then return from Boise via I-84 / I-15 and then Rte 26. through Shoshone ID (camping somewhere along the Big Lost River or the Snake with fishing) https://maps.app.goo.gl/Zrc7jKKa2W4xY5m37 Google calculates the route from Jackson through Boise approx. 875mi Alternate 5B – from Idaho City 5B – detour to Idaho City Falls & Twin Falls parks for hiking (camp nearby if possible). https://maps.app.goo.gl/fMjQZfv5r4kHnYi79 Google calculates the route from Jackson through Twin Falls approx. 870mi1 point
-
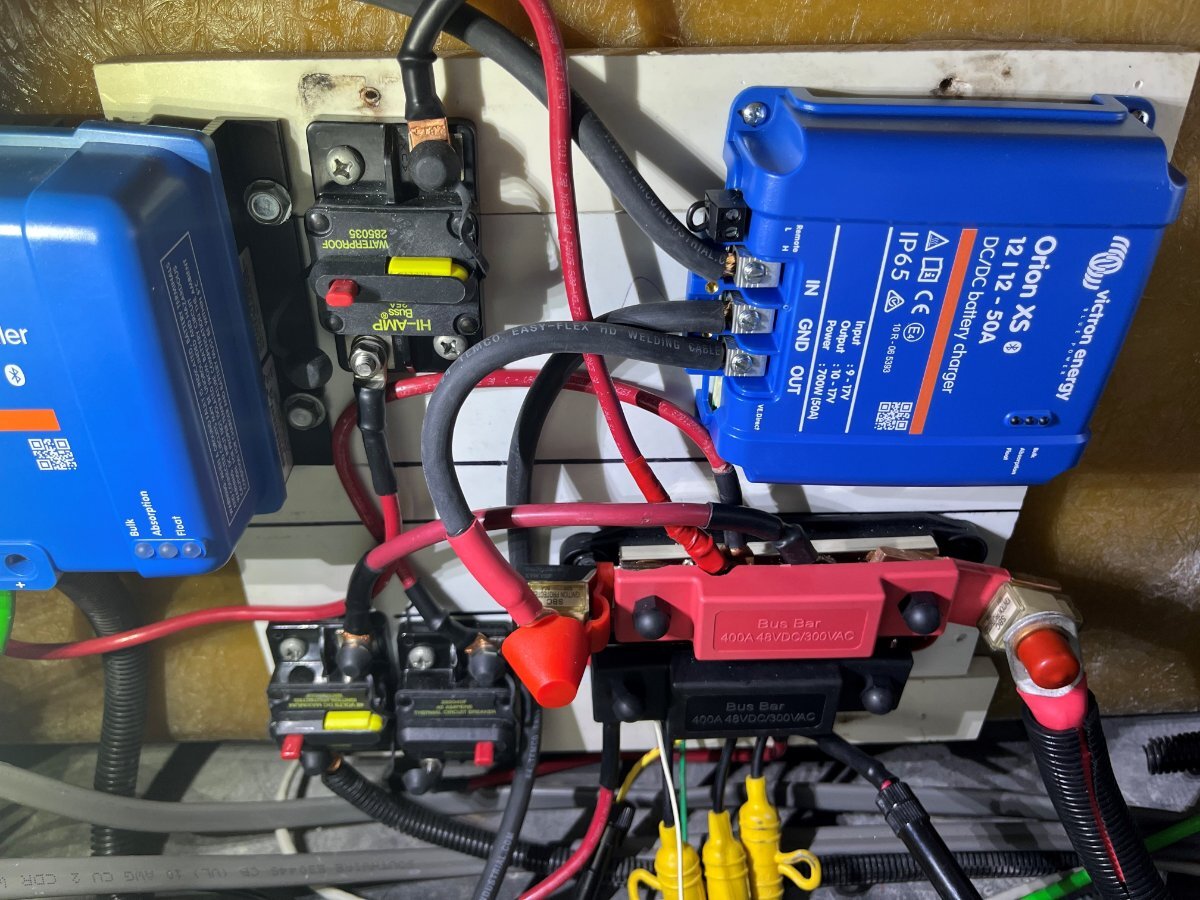
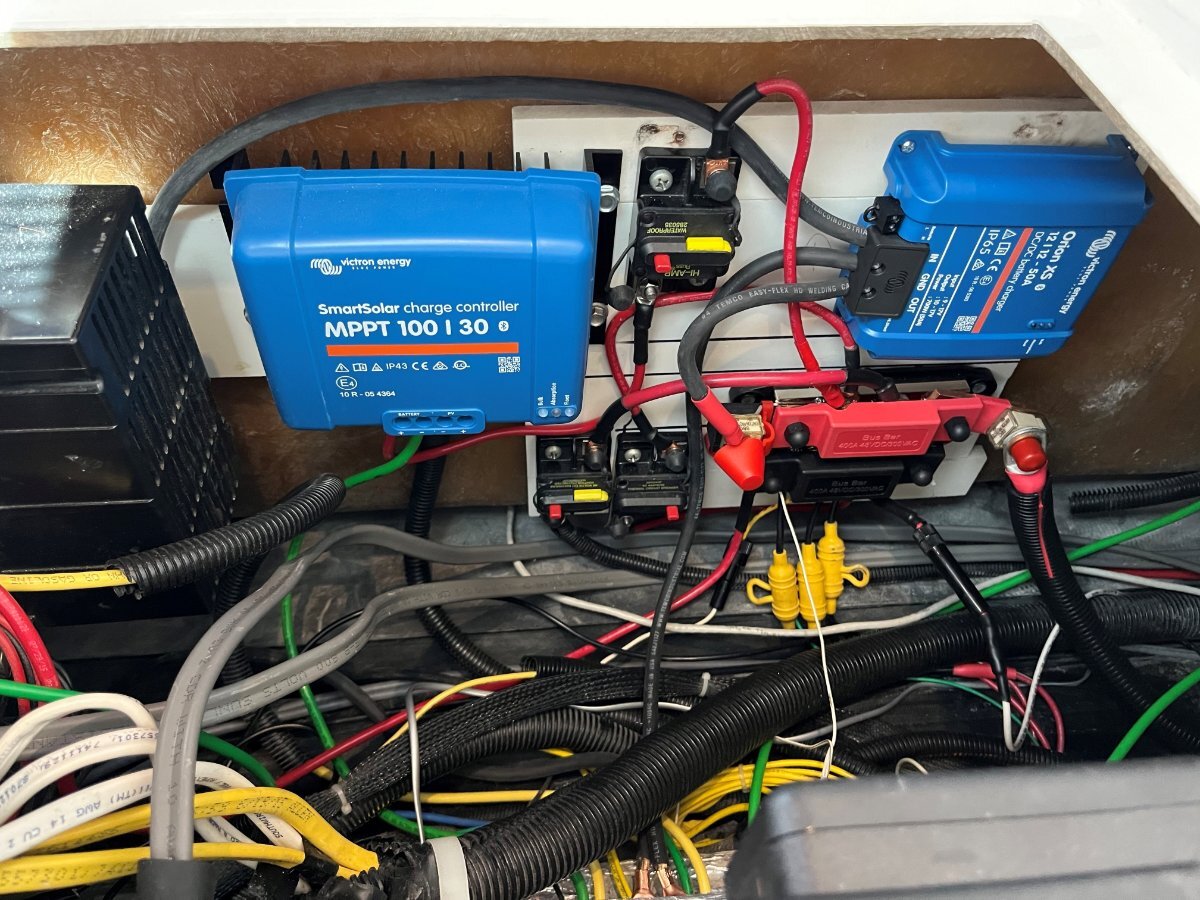
I’ve had the parts forever and between work and some travel, a list of injuries (that made it extremely difficult to kneel in the basement or crawl under the truck) I finally have this done, fully installed and performance tested! The bottom line is, “this charger is awesome!” A month ago, I was working on waste valves under the front dinette seat when it occurred to me to run the charger cabling in the Oliver since I had everything opened. I always drill the smallest hole possible, no fancy cable glands for me. Two 3/8” holes would been enough, but I had grommets in a parts box 1/2" OD and 3/8” ID which were the perfect size. I glued them in place and afterwards caulked all of the cable openings front of hull (no pics taken). It makes sense to wire the charger before mounting the board (pic1). The wiring is rather simple but the 4 AWG wire barely fits into the terminals. The 4 AWG wire will not fit into the Oliver ground/neutral bus, so I crimped on a lug and cut it to fit the opening. I installed the two grounds side-by-side (the other coming from the tow vehicle) (pic2). When I worked my earlier inverter upgrade and rewiring projects, I had saved room for the new Orion DC-to-DC charger (pic3 close-up and pic4). The main + bus (in red) is protected by a 90A Marine Rated Battery Fuse (MRBF) that connects by 4/0 cable directly to the Victron Inverter-Charger bus and then through a 400A ANL fuse connected to the batteries (400A Victron Mulitplus spec). All major circuits are connected to the main bus; the 40A breaker OTT installed for all the Oliver 12VDC circuits, two solar chargers (OEM Blue Sky for rooftop panels and a Victron 30A MPPT charger for a Renogy 400W suitcase) and the new DC-DC charger circuit which is connected through a 60A MRBF (see center of pic3). The secondary +bus (in black because I purchased a set) is protected by the OEM 40A breaker which connects to the 12VDC panel, the 3 jack fuses, etc. These are 8mm thick solid copper buses for minimal resistance. A considerable upgrade compared to the original OEM installation. I attached the Anderson connection, front of trailer, and then got under it to see all the many zip ties that OTT installed. OMG, they should have better cable management! I replaced a lot of these because of age, but I did not want to merely zip tie this new heavy dual cable harness! Instead, I used the u-bolts that hold the front basket and cut brackets to support the cables including the trailer harness in two places, in front and rear of the basket. The picture shows the front bracket (pic5). And after taking this picture I hammered both ends of the bracket to curve them up almost touching the upper bracket to create a D-shape. I could have purchased pretty brackets, but these were on hand, fully functional and can only be seen while lying on the ground! The trailer side installation was then done! When I finished and reconnected the house batteries, the blue light on the Orion started blinking and it was listed as a device on the Victron Connect app. So before even working on the tow vehicle installation, I was able to update the firmware and configure the Orion charger. I reduced the output charge to 30A for safety concerns and initial testing. The battery settings were close enough, within 0.1V of the specs for Epoch LiFePO4 batteries.
1 point
-
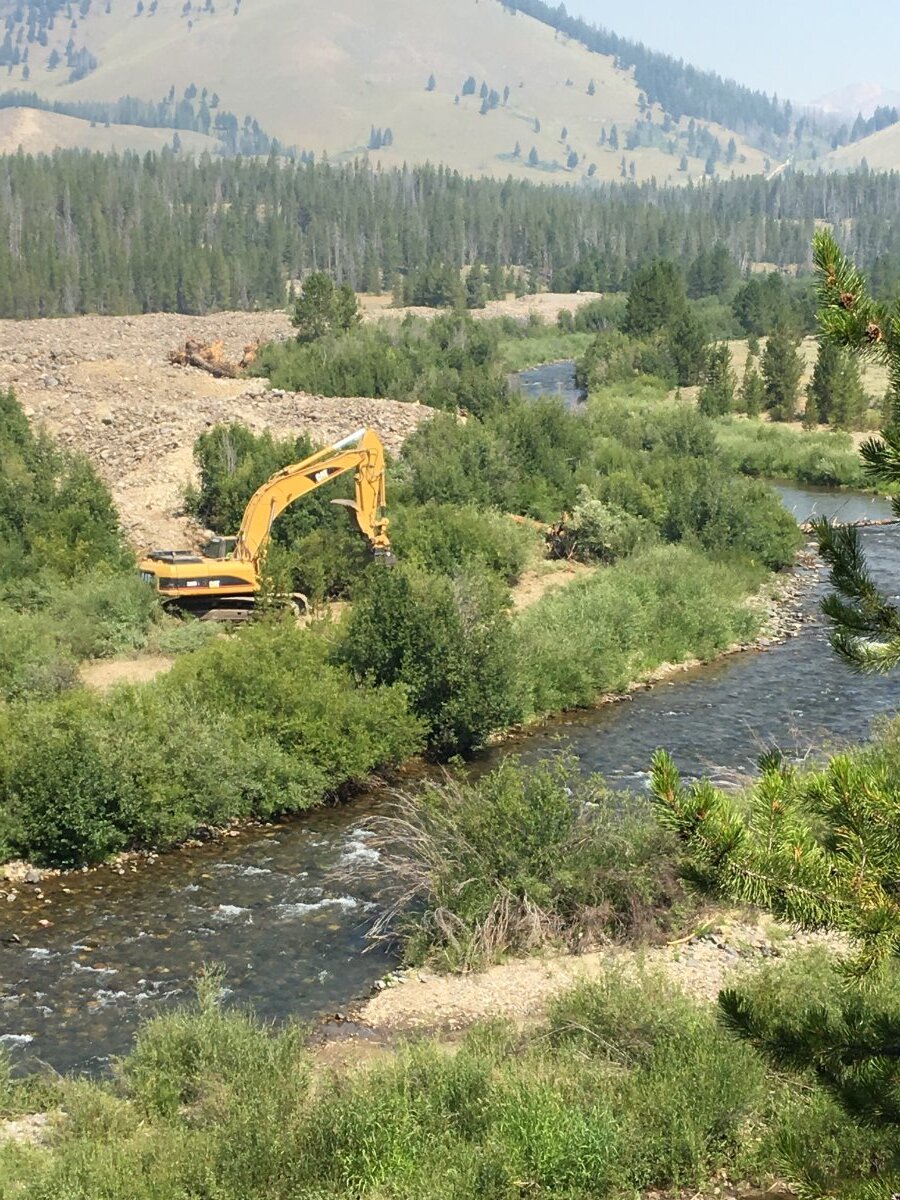
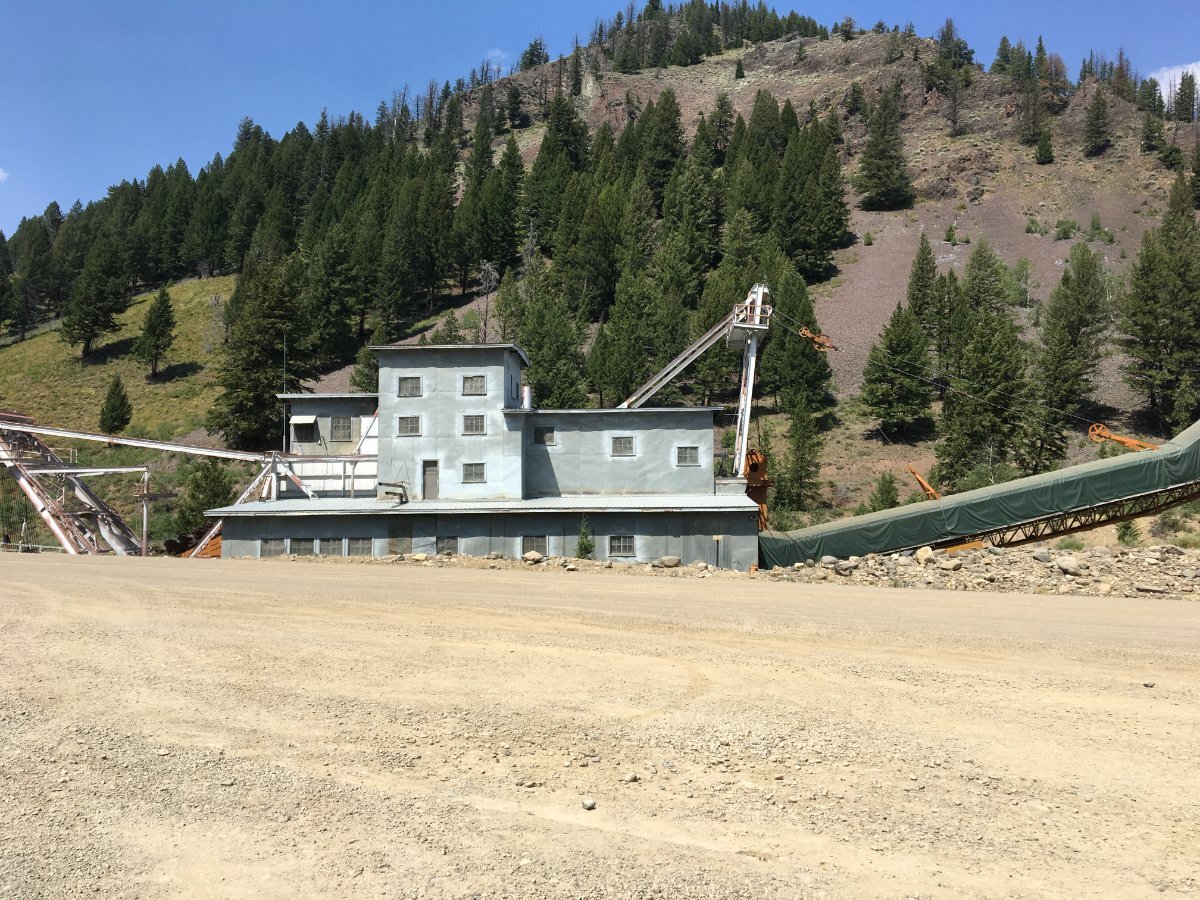
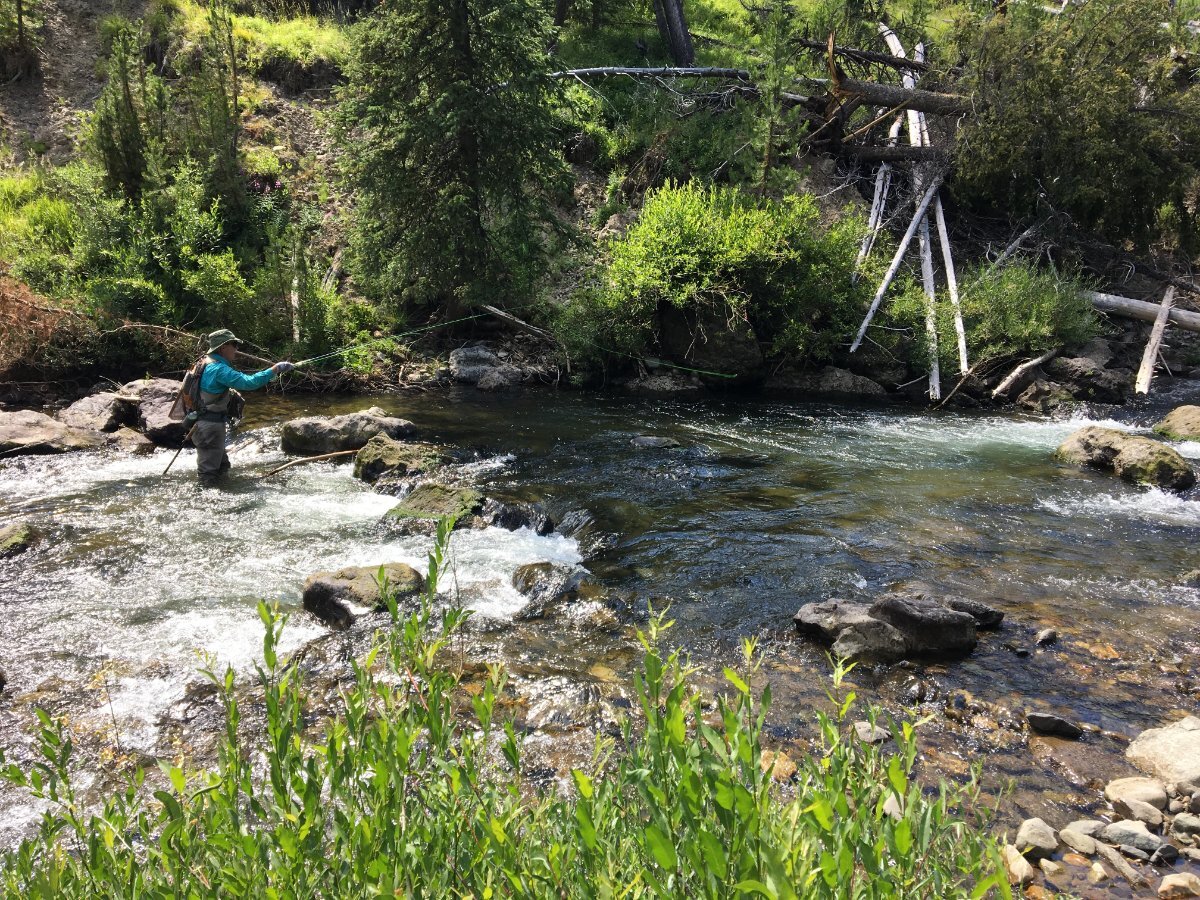
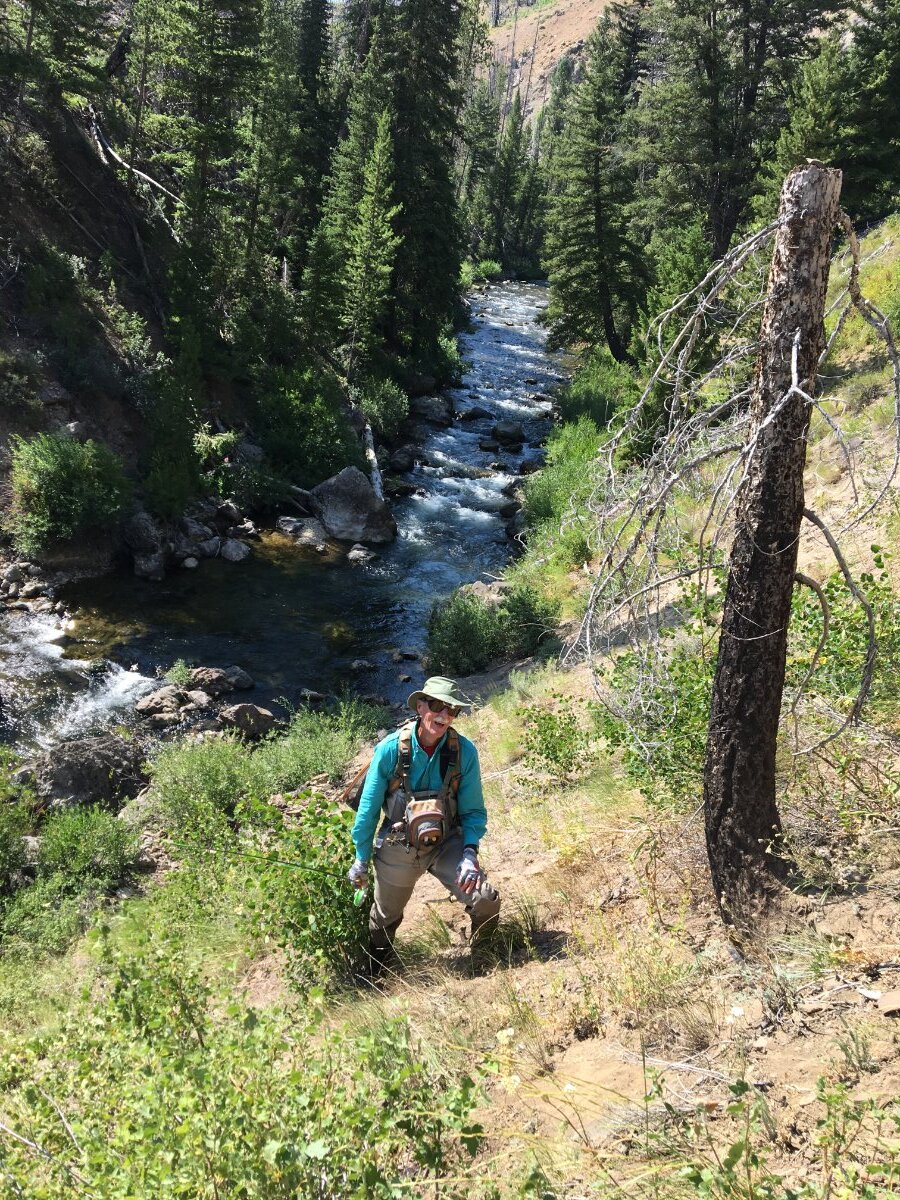
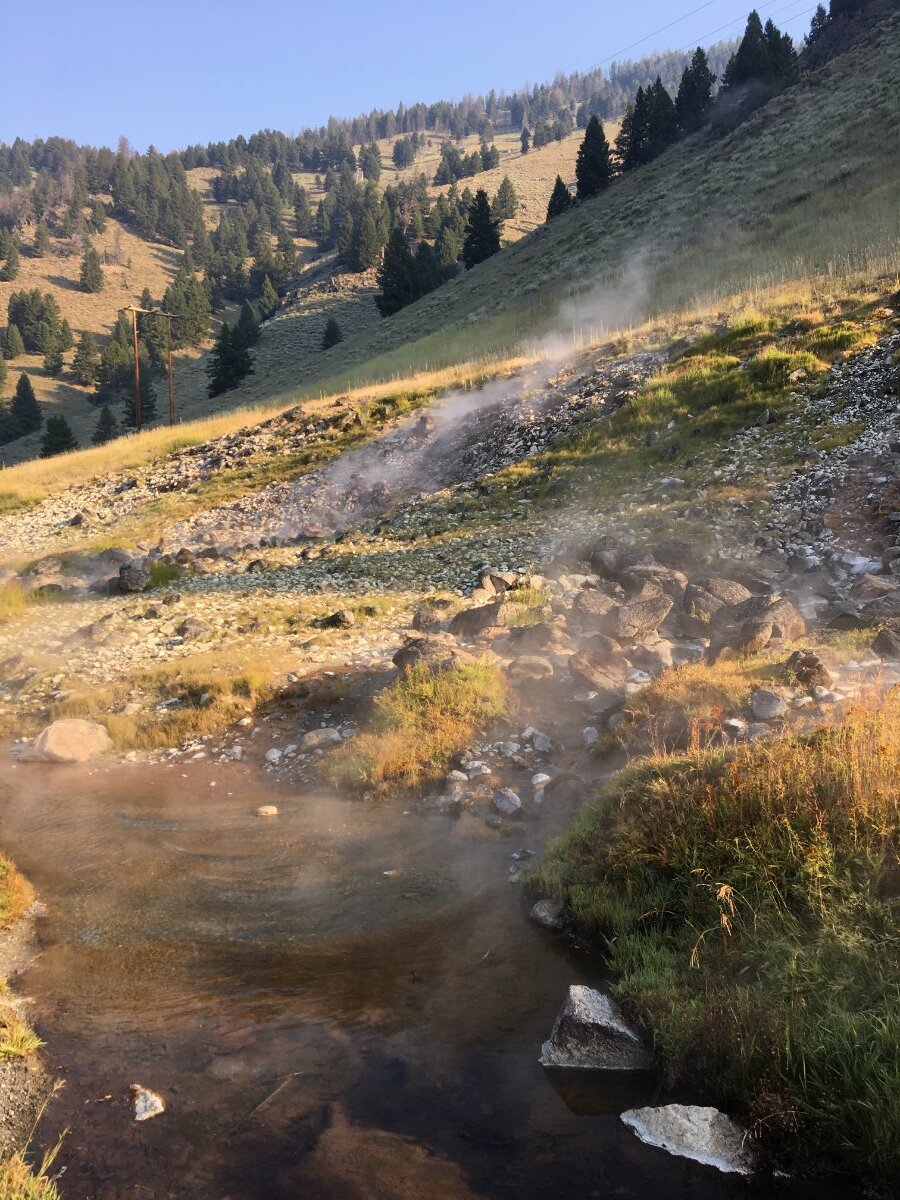
Don't miss the Yankee Fork which feeds into the Salmon River. Trout Unlimited and others have done a good job on restoring the Yankee Fork. A tour of the Dredge (GPS: 44.377737, -114.72268) is in order while here and so is the ghost town of Custer (GPS: 44.38767, -114.69656). Pole Flat Campground (GPS: 44.30335, -114.72012) is fine with water and pit toilets - the best sites at at the northeast (top) corner of the looped campground road (Forest Service Road 40369). The last pic below is the hot springs just west of Yankee Fork Road right on the Salmon River (free).
1 point
-
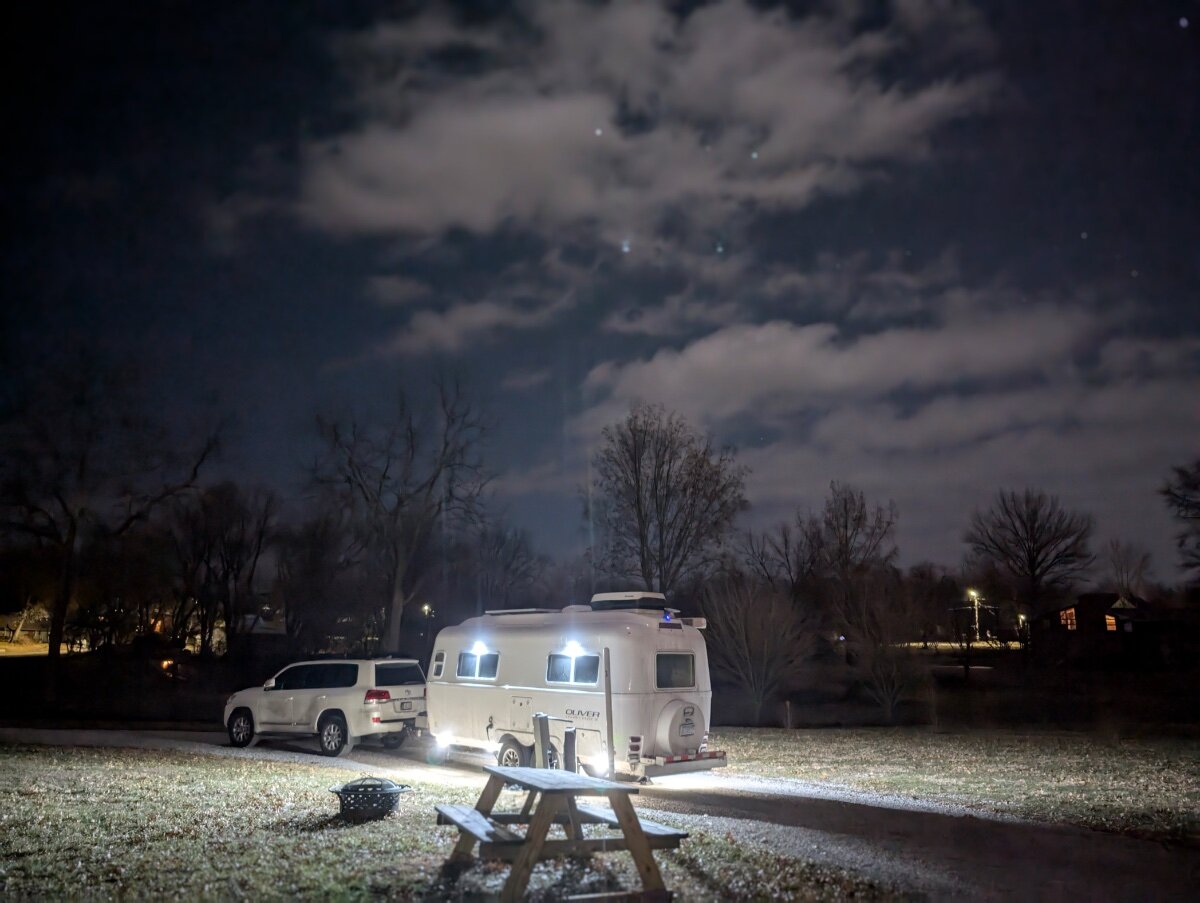
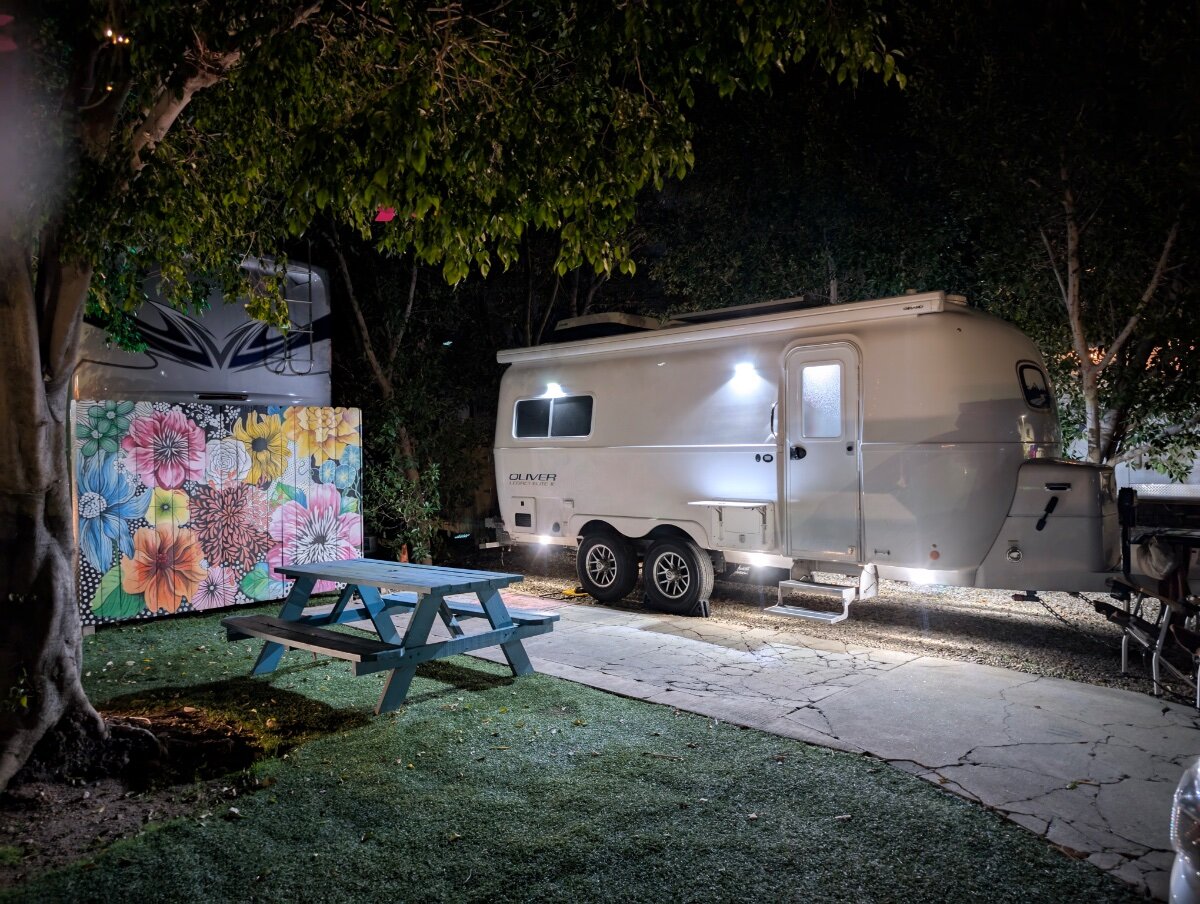
Thanks to Neil’s RV in Orem Utah! Our ‘shakedown’ trip completed (5000 miles over 18 days!) with 50-70 mph crosswind gusts… Very happy!
1 point
-
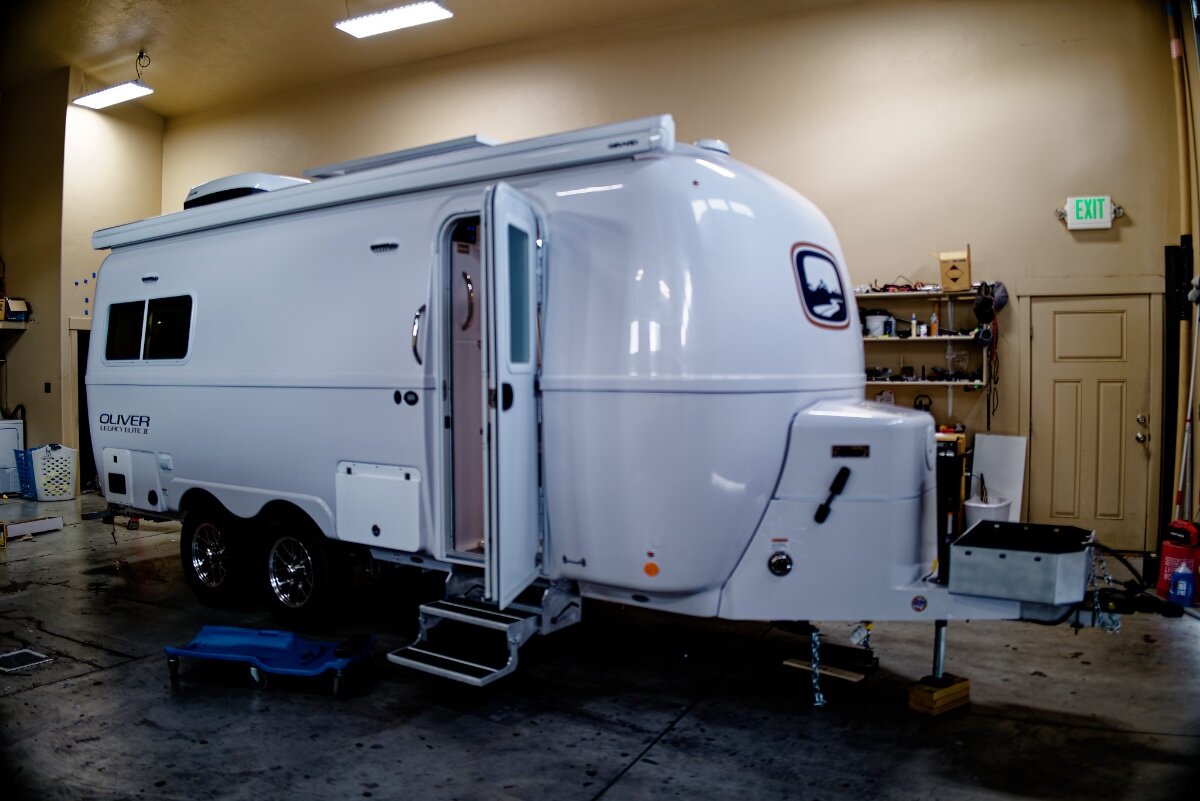
Welcome and Congrats. Nice bright campsite & rig. Did you get instruction the requirement to burnish in the brakes on your trailer? Since you picked it up at a dealer curious if it was towed there and the brakes were already burnished in. When we picked ours up at the factory, we had to burnish them in as part of our break in drive. Burnishing Brakes: Any time you have a new trailer, or have new brakes on an existing trailer, the electric drum style brakes must be burnished. (Broken in.) One procedure: On a lonely back road... Set the gain on your brake controller to 10 (or High) . Then drive up to 40 mph then using only the trailer brakes slow to 20. Drive a bit an repeat ....about 20 stops. Another way: On a 65mph highway, but in right lane...to drive at 60MPH. With control set on high or 10. Depress the controller for trailer only brakes for 1/2 Mile. Make sure you're not locking up brakes on trailer. After a 1/2 mile, pull over somewhere safe and smell/feel or measure with laser reader for hot brakes >350F on all 4 wheels. You may smell burning smells which are ok as you're trying to heat and seat the brakes. After burnishing (in either method) your brake controller can now be set to ~5 (or half) and should be setup for safe stopping. Here's our blog for future travel and outfitting inspiration: https://4-ever-hitched.com/trips-overview Welcome! Craig & Rose Hull 505 - aka Galway Girl1 point
-
I have driven, and towed a trailer many times, on all of the routes you are considering. I grew up in Idaho and regularly do the rivers accessible from those highways. You will have absolutely no trouble towing your Elite II with your 2500 on any of those roads. Just be sure to: (1) top off your fuel tank(s) just about every chance you get, as there are long, mountainous stretches with no services along those routes and (2) use engine braking (downshift to lower gears) going down steep, long hills. Relying exclusively on your brakes on these roads can burn them out quickly. You have correctly prioritized seeing the Sawtooths in Stanley. I recommend securing a reservation at Redfish Lake, if you can. Those sites fill up long before summer. Mid-week, there are often non-reserveable Forest Service sites along the Salmon River on Highway 75 available for a night or two. Good luck if you get there on a weekend. If your next priority is great scenery, either your 3A or 3B will provide lots of scenic mountain driving. 3A is more consistently scenic, with fewer miles of sagebrush prairie getting back east to Jackson, through Montana. Once you get close to Boise on your 3B, it's all sagebrush prairie from there most of the way on I-84/I-15 back to Jackson. If you choose "3B" through Boise, I agree with Galway Girl that Three Island State Park has good RV camping, not too far off I-84. Regarding your "5B" alternative, a stop at Shoshone Falls on the Snake River may be worthwhile as you pass by my hometown, Twin Falls, on I-84. It is higher than (but not nearly as big as) Niagara Falls. That said, I recommend finding a place to park your Elite II in town (like at Walmart) before heading down to Shoshone Falls Park, as that paved access road is quite narrow and steep. That is the one place where I would not want to take our Elite II. Highway 12 along the Lochsa and the Clearwater (referenced above), although beautiful, is not along the path of either your 3A or 3B. It would be best seen on another trip through "Scenic Idaho." Feel free to PM me if you would like to brainstorm your proposed routes, and possible RV camp spots along those routes, on the phone. I know them all well.1 point
-
5 duplicate posts deleted.🥳 Bill1 point
-
G-15…Karla Bahr…”Ollie”…Alabama…Hull #2761 point
-
We drove in via Stanley, camping at a beautiful USFS campground on a canyon near the ranger station. Plenty of hot springs. On through Boise to Ponderosa SP in McCall, ID on a beautiful reservoir, and then North and connecting with Hwy. 12. This will get a return visit probably 2026 or 27. Don't miss Crater of the Moon National Monument Beautiful campground in the lava bed.1 point
-
We arrived at our site at Rainbow Plantation…an Escapee Park near Gulf Shores on Thursday. Friday morning I got up and took our dog Nick outside to take care of his business. I came back in and was finishing breakfast when I needed to go back out to get something out of the truck. The door was locked shut and we couldn’t get out. We tried several times, but we were locked in! I crawled through the egress window and thought if I keyed in our code it would unlock the door…no luck.. I tried 2 or 3 times and still nothing. This time I tried the key and moved it to the unlock position…still nothing, then I tried the FOB and still…NOTHING. So here we were, I was locked out and Gerri and our dog were locked in. I called Oliver and talked with Jason and tried his suggestions…nothing. I called RV Lock company from where the lock came from and talked with Dave, a tech there. He had me tell Gerri to take off the 4 screws on the inside and then pull the red and white wires connection off. She did that…nothing…we were still 1 locked in and 1 out. I talked with Jason again and tried a couple other suggestions…nothing. After 1 hour of trying, it was suggested I call a certified rv tech to come and unlock the keyless entry. The RV tech worked for 2 hours following everything that Jason and the tech from RV lock told him to do via. the phone. Again, NOTHING. The RV Lock company said they had never had this problem before and definitely nothing like this. The lock was somehow jammed and was not unlocking. After 3 hours of trying, it was decided to do all we could to break the lock off. Finally we did, but by doing that, part of the door by the lock was damaged. We were now UNLOCKED, but no lock or handle on the door. We once again called and talked with Jason and it was decided that we should come up to the plant and they would replace the door and lock. So about 2:15 pm we bungeed the door shut and headed north. After about 7 hours of driving, we found a safe campground that had a spot for us. We then bungeed the door shut from the inside and went to bed. We got to Hohenwald around noon Saturday and Dustin met us there since Oliver graciously allowed us to park in the showroom/PDI area since we had no way to lock our Ollie. Anita was there so she let us in. We were allowed to borrow a key to the building so we could come and go as needed. Monday morning we took our Ollie to the plant and met Jason there and talked about the solution and possible causes. Jason said they would put on a new door and whichever lock we wanted…no cost. He also checked the egress window framing as we crawled in and out of that window several times while we were trying to fix it ourselves. Before we left, Jason said they were going to do some R&D on this problem to see what could have caused this. It could have been a total fluke with the lock, we don’t know. He said he would get back with us about what they found. For now, we put the traditional lock back on until I regain my confidence in the keyless entry lock. Oliver did an incredible job attending to our needs and fixing our Ollie so we could get back on the road. I cannot say enough for the positive support we received from the Oliver Company…100% Kudos. I don’t know of any other rv manufacturer that would have been as open and supportive as the Oliver Company.1 point
-
Hwy. 12 is a beautiful drive with great wildlife views. The LoLo Hot Springs was a fun night stop and enjoyed the hot springs. We took this route from West Idaho back to Missoula Mt.1 point
-
F43, Mark and Cyndi, Texas, “The Shuttle”, Hull 2931 point
-
I believe one would also need to remove the jack foot plate from the unit to pull it out. Easy to remove the plate bolt from below the foot plate. True. OTT provides the bracket to Barker who welds it on to their standared jack. Point is that it may be a OOPS by either OTT or Barker. Or maybe both??? GJ GJ1 point
-
E11, Rhonda, Tennessee, "Olliphant", Hull #62 Thanks for this!1 point
-
Good point. We need to be 100 ft from my truck or carry the Starlink with us which we would not do on the short hikes we walk these days.1 point
-
Welded to the wrong height is a worse manufacturing defect than a weld failing after 5 years use. You’d think they would have a jig to hold the two parts at a consistent height. Probably do and the tech just got sloppy. Good find!1 point
-
I use the Garmin InReach Mini. When I'm out fishing or hiking I simply clip it to the top of my fishing vest or day pack. When combined with a cell phone (with or without cell service) I can see exactly where I am on a topo map. Garmin has come out with a never version of mine called the Mini2 - HERE. There are models that have maps and other features right in the unit but I wanted to be as small and light as possible. Bill P.s. While on the road I use the USB connection and place the Mini on my dash. Using the maps that Garmin provides plus Google maps my wife and a couple of close friends can not only see where I'm located but they can (using Google maps) see the stream I'm fishing or trail I'm hiking.1 point
-
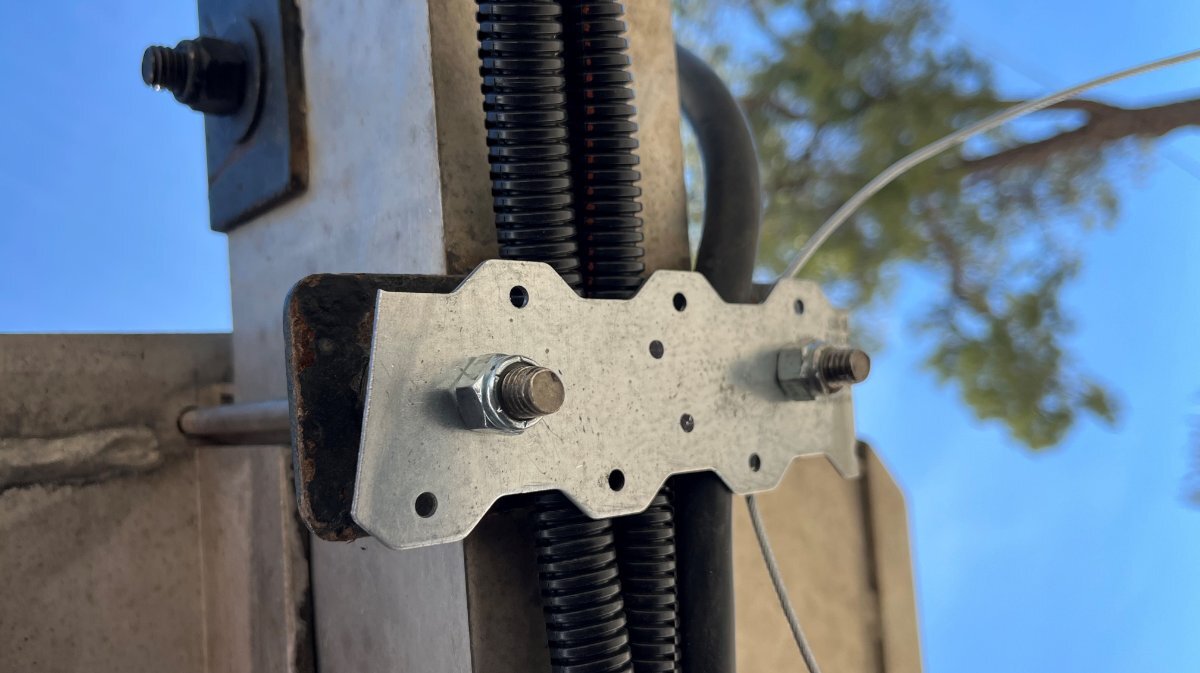
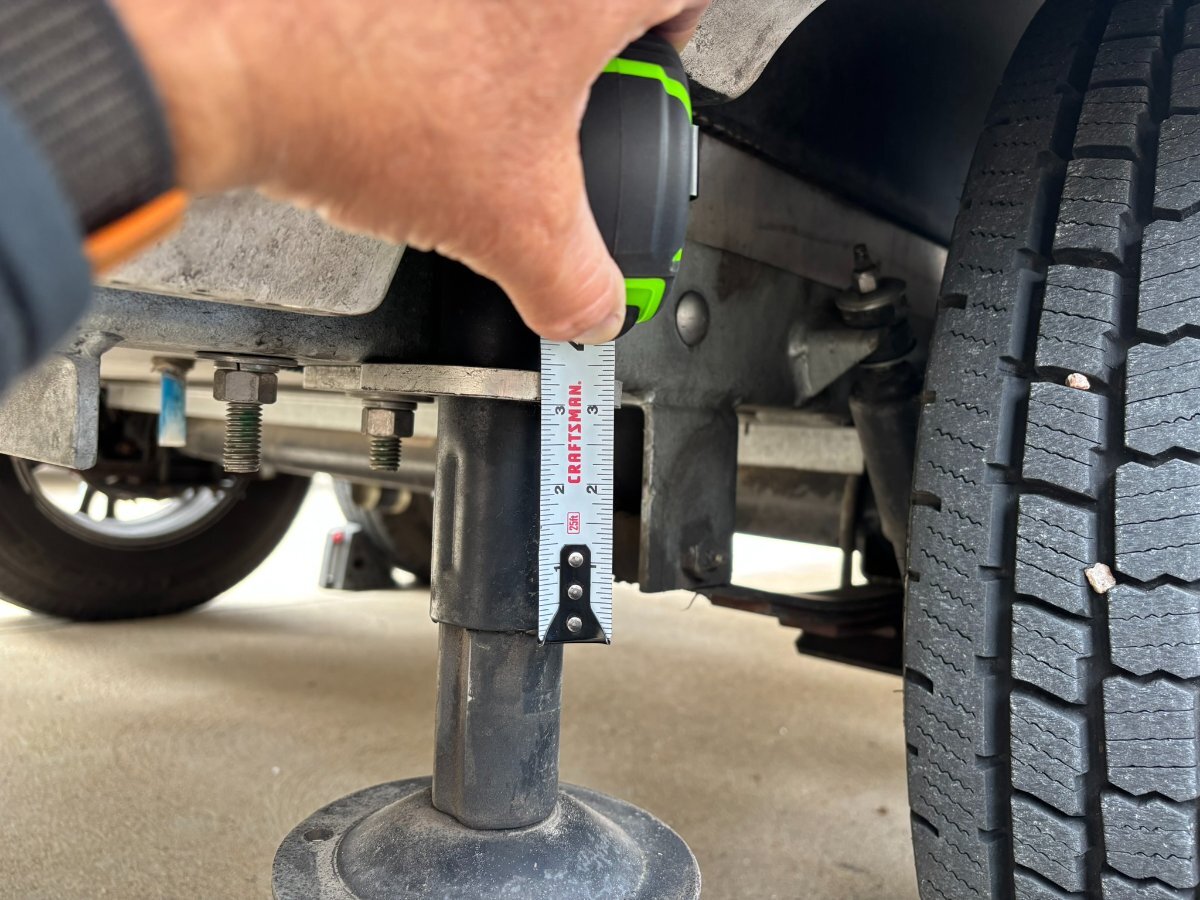
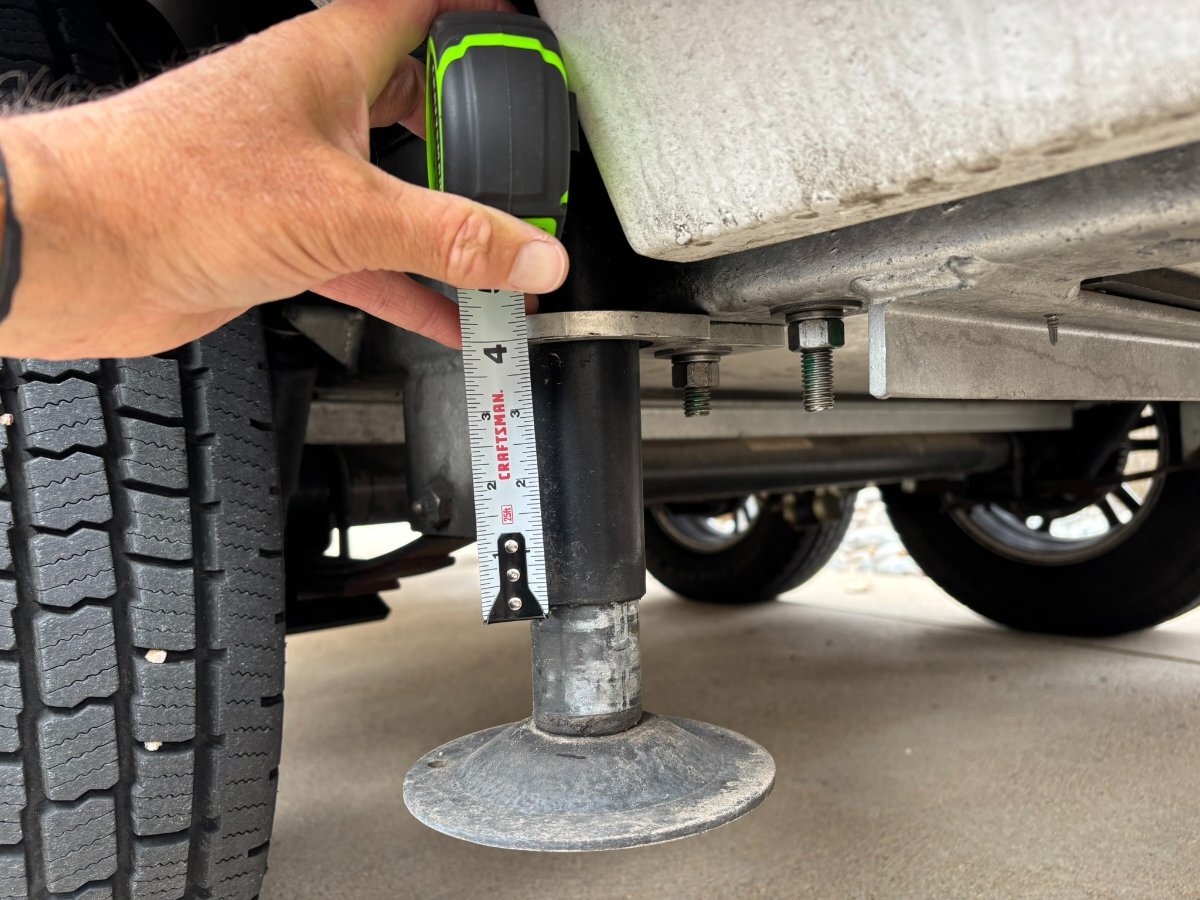
Thanks @jd1923 and @topgun2 JD, really appreciate you taking the time to measure your stabilizer jacks for a comparison! I had previously noticed that it sat high and just touched the fiberglass but didn't really think much of it as it worked just fine. I never had both of the under-bed compartments open at the same time to really see the difference until yesterday and then took measurments (should have done that a long time ago!! -- just busy with life and the trailer has only had occasional use until now) The bracket welds are intact, all bolts are tight and the unit is steadfast and operational. It appears that the mounting bracket was improperly welded to the jack assembly - both in height and in level/plumb. The jack shaft is plumb from front to back but not from right to left. Mike from Oliver service responded via email to my service ticket within hours --- impressed! I've emailed him more photos showing the welds and I've included photos showing the positioning out of plumb using a level. Hopefully, Oliver will take care of me....
1 point
-
Last Call! Currently at 73 listings. I'll and/remove up until sometime Sunday evening, and then print a bunch of copies to bring with us. I'll post the final PDF at that time, too. Thanks again to everyone who has contributed! It sure makes it easier for owners new and old find people they've only conversed with online. 2025 Oliver Rally Attendees as of 4-26.pdf1 point
-
OTT DOES fabricate these mounting plates "in-house". There were a couple of earlier models (in the low 100's hull numbers) where the welds did fail and Oliver both repaired these and changed the way these brackets were manufactured. Bill1 point
-
Thanks for your suggestions. As @jd1923 suggested, I checked the mounting bolts under the trailer and they looked tight visualy with lock-washers fully compressed. I put a wrench on them anyway and was able to tighten both bolts (on both sides) by about a quarter turn. This did not seem to change anything. Before pulling anyting apart, I started to measure differences between my curbside (too high) and my streetside (just fine) stabilizer jacks. I've attached the photos and I'm stumped. The curbside jack seems to be somehow mounted about an inch higher than the streetside jack. The inside photos are measuring to the mounting bracket. The outside photo shows that the cylinder for the shaft is an inch lower on one side. Is there some adjustment that I am not seeing? I believe that the curbside stabilizer jack was always touching the fiberglass lid but I never thought much of it. It seems to be doing damage to the lid now. Both jacks operate just fine as always. I am going to open a ticket with Oliver, but does anybody have a suggestion.....?
1 point
-
I'm currently listening to "Hell or High Water" by Peter Heller -- about the first-ever successful traversing of the Tsanpo Gorge in Tibet. It's a detailed account by Heller, himself an adventurist and expedition paddler. "In the winter of 2002 he joined, on the ground team, the most ambitious whitewater expedition in history as it made its way through the treacherous Tsangpo Gorge in Eastern Tibet. He chronicled what has been called The Last Great Adventure Prize for Outside [magazine], and in his book Hell or High Water: Surviving Tibet’s Tsangpo River."1 point
-
I believe they all are, except for the Aussie Houghton A/C (unless they off-shore their manufacturing like the rest). Atmos German designed, China built.1 point
-
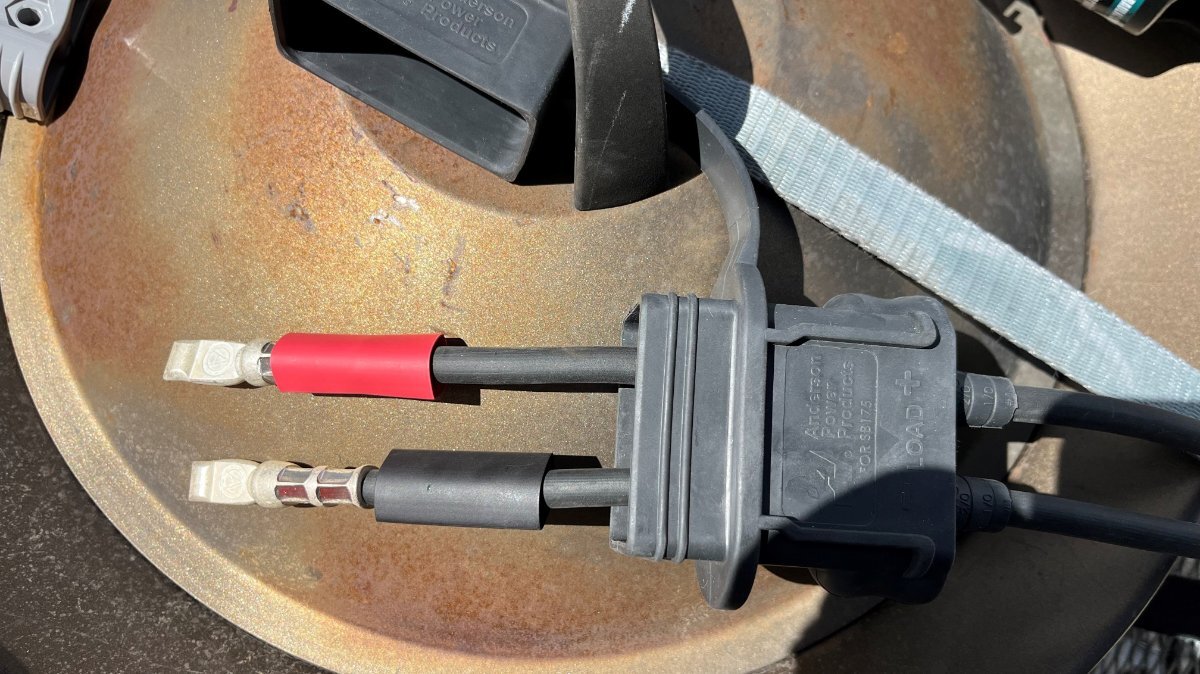
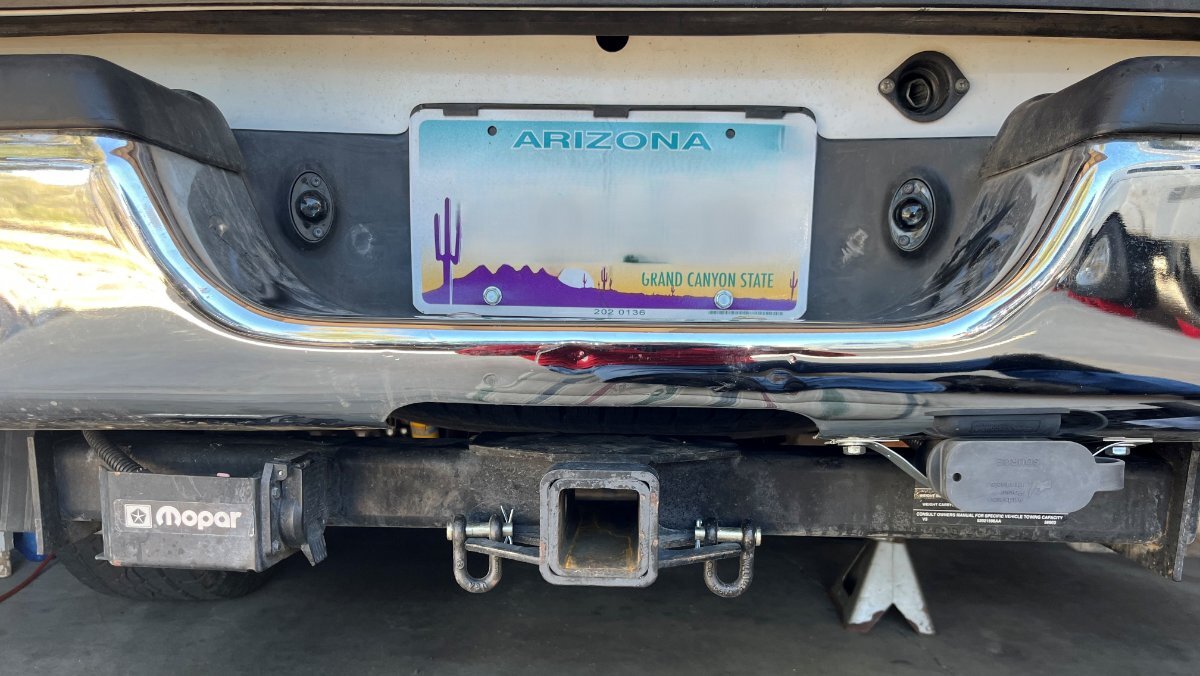
Next is the tow vehicle side installation. The Ram Cummins and most diesels have dual batteries. I chose to connect to the RHS battery since there are less connections, because its proximity to the alternator, and because I wanted a straight run down the frame to the RHS of the rear bumper. Looking ahead, last year I installed a custom Nations 180A HD alternator. OEM rating on our truck is 130A, thus gaining 50A for charging ampacity! Starting at the battery, I ran the B+ cable along the fender rail to keep it away from the heat of the exhaust manifold and entered the main frame member just behind the engine. Conveniently, there are two holes in the frame just behind the front wheel (pic1). The RH opening is where it comes from the engine and the LH is where it continues all the way to the rear wheel. I had 100’ of 1/2" automotive loom from a past project which made for a clean installation! I removed the RR wheel for ease of access in running the cable. It took a couple of wire ties to get up and over the rear wheel-well but mostly the 4 AWG cable just lies nicely inside the frame beam, very well protected. I decided it should come out below the rear bumper yet above the trailer hitch. The Anderson SB175 connectors are huge (pic2). A full inch or more of bare wire is required inside each pole connector, so I crimped each in two places. There are a series of holes across the bottom of the rear bumper. I used the two holes closest to the center, fabricated and simple bracket to hold the heavy environmental boot in place (pic3). This worked out great as you can push in and pull out the trailer side connection with one hand and it does not budge! So, I have the trailer harness connection on the left and the DC-DC cables on the right (pic4). It looks clean, nice and balanced. Many on this forum and elsewhere believe you need both B+ and B- 4 AWG (minimum) wire running all the way end-to-end! This is certainly true for the B+ cable. For the B- cable, I merely ran a 2 ft length from the Anderson coupler grounded to the rear frame. I believe an 8” section of steel frame will produce less electrical resistance than 4 AWG copper and testing showed this to be either true or “good enough!” I ran another short 4 AWG ground wire from the B- battery terminal to the front of the same frame member. Last step was to connect the B+ charger cable and reconnect the battery terminals. I used another 60A MRBF for the main run (pic5). I also ran short cable from the B+ terminal to the alternator (for redundancy, this connects the charger B+ to both the alternator and batteries with new 4 AWG copper). I’ve never seen anybody take these extra steps, but I believe it will provide better charging performance. You’re running 4 AWG everywhere else, but OEM cables from battery to alternator are usually only 6 or 8 AWG and solid grounds are often an automotive issue. BTW, OTT only installs one 6 AWG ground wire for everything running on DC! I added a second 6 AWG ground cable from the negative bus in line to the batteries in a previous upgrade. This should work great, I really liked how it turned out. I measured carefully and purchased only 65 ft of black 4 AWG wire (not bad for wiring an extended cab long bed pickup truck tow vehicle)! I used all of it, and every run has slack on both ends and the trailer side connector is 6” longer than the standard hitch coupler cable. I ran thorough testing today and I'm getting 40A charging output with the Cummins diesel running at idle! Yes, engine running at idle. I captured pictures of all the Victron Connect screens showing Orion and Smart Shunt data. I'm getting rather tired tonight, so to do this reporting justice I'll get all my data together and add another post tomorrow. As I opened my thread above, "this charger setup is awesome!"
1 point
-
When replacing my AGM batteries with Lithium’s I also put in a battery cut off switch. THen, in storage I shut off the batteries entirely. Even with everything off you will have some small power draws that add up over time. Also, I wouldn’t store at only 35%. The Battle Born tech told me to be at least at 50% before storing. I’m usually at 90% or higher when I park the trailer in our storage area. Then I shut off the batteries. If you don’t have a shut off switch, disconnect one of the ground cables on you batteries. Mike1 point


-
Recent Achievements
-


")


")


")

