Leaderboard


Popular Content
Showing content with the highest reputation on 08/18/2025 in all areas
-
Signed up for the Standby Mode Plan this morning. The Roam 50-GB plan that was on ‘pause’ can easily be reinstated when the time comes to resume that service. With SLM in Standby Mode, while parked in the home driveway and on the Savana’s dash, had cell phone Wi-Fi and when arriving at the COW Barn both my Victron Cerbo and Cielo Breez Max devices also connected. Liking this new service option!
 4 points
 -
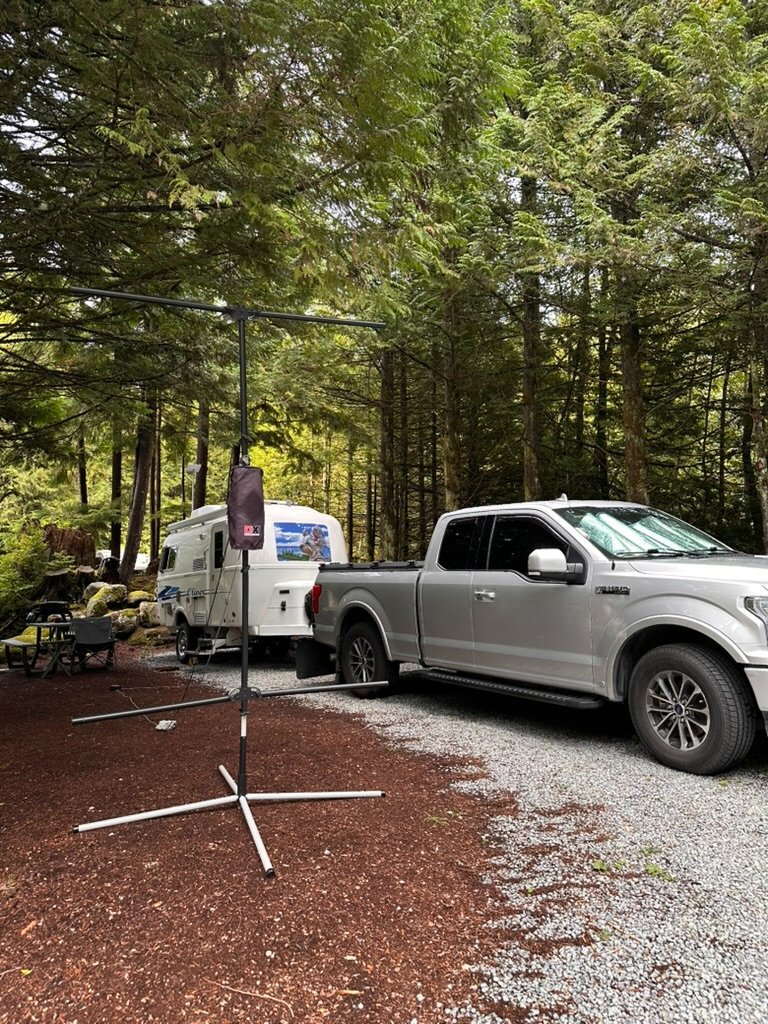
Nestled into woods, north of Vancouver, CA.
4 points
-
Badlands Motel and Campground is basically a reasonably clean parking lot with a convenience store. But you get full hookups 2 min from the entrance to the NP with this view 😀
4 points
-
Had this issue in Stand-By mode at home, that's when I ordered the router. Have not had issue camping, yet.3 points
-
If you sign into your account you can find the information. If you have more than one device, you choose the one that you want to start Standby Mode, etc. It's pretty easy.3 points
-
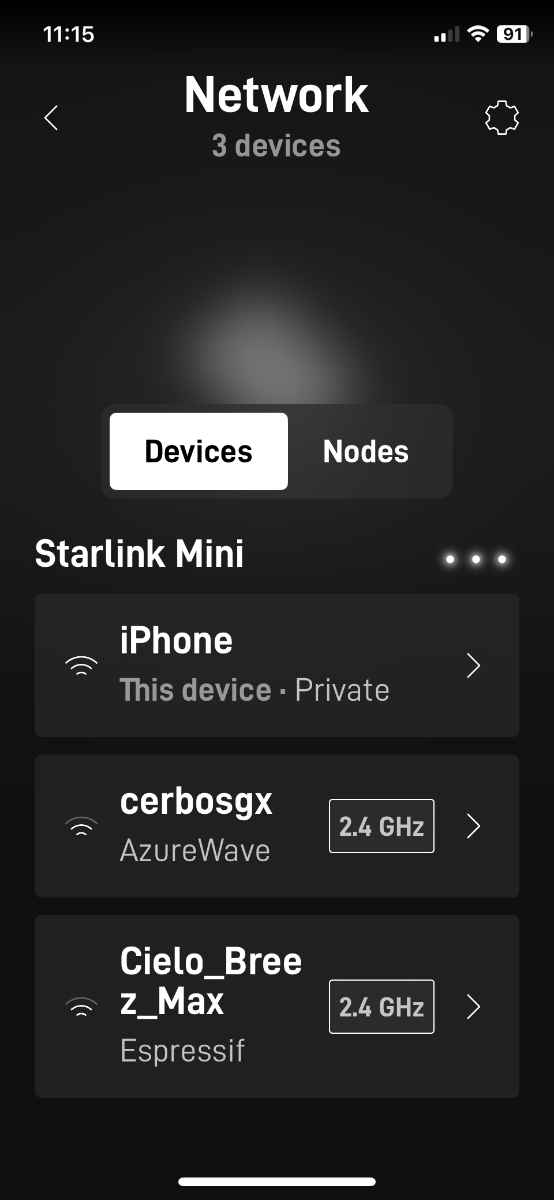
We had that experience at home while testing in the driveway. Once I got into the house the signal dropped, still had a bar but it was noticeable. I deployed the mini router and the situation was fixed. I guess it depends on the number of walls the signal has to go through. We’re now at Lassen National Park, the tree coverage is more dense but I found a small opening and the Starlink is doing its thing. Mike2 points
-
This means your truck alternator and starter batteries are fine. What is the SOC% of your LiFePO$ House Batteries when starting attached is an issue? You really need to test. It reads like this wire is hot, connected to your house batteries (shown RED in the picture, but it's the BLACK wire in the Oliver trailer harness). If it is, and until you can correct this, you need to disconnect the trailer harness whenever your truck engine is off for more than a short break. Anybody that does not have a multimeter and knows how to use it, should get a test light and learn to use it. This is all you need for this test (plus maybe a nail to use as a second pointer to touch inside the harness coupler): https://www.amazon.com/WINAMOO-Premium-Automotive-Extended-Circuits/dp/B08D9RY532/?th=12 points
-
And if this doesn't work, there's one more thing you can try before I would recommend calling in a mobile mechanic to diagnose it for you- disconnect your blue wire from the 7 pin connector and run a new temporary one to the load (brake) side of the emergency disconnect switch. You know the wiring from the disconnect switch is good since your brakes work when the pin is pulled. If the brakes then work you know the problem is between the 7pin and where the blue wire is spliced to the disconnect switch wire.1 point
-
Yes. All lights work. Brake lights operate. That is what fooled me several years ago... apply brakes... tail lights work.1 point
-
The ball and emergency chains are not suitable grounds for an electronic braking system. Might be enough to operate LED taillights but then fail to provide a good enough ground with the amperage required to operate the brakes. Could be the reason why your controller recognizes the trailer when you first plug it in and then doesn't anymore once you manually activate the brakes at the controller?1 point
-
Negative wire on the bus bar, and positive on an empty spot in the fuse box with a 10A fuse.1 point
-
If you ever need another surprise, look for the 120V outlet for the refrigerator and I’ll bet a cup of coffee it is a metal outlet box as well. The good news is that you won’t find a broken blue outlet box! Mossey1 point
-
That’s what I ended up doing. I made up a wiring harness with the switch and cable to run to the fuse box, and fed it through the switch hole. Then connected to the POE injector mounted just beside where the wires came through. It worked well for me.1 point
-
The braking system in our Olivers is inherently simple and designed as such for reliability. Like all things components can and do fail on occation but in most cases the failure is easily found. Olivers have electric drum brakes, a description of which can be found here. Olivers do not have an ABS unit but otherwise the diagram contained in the link is correct. I think you've established that by pulling the brake-away pin that the brakes do in fact work which eliminates most of the wiring, magnets, and the brakes themselves. That really just leaves connectors and your proportional controller ( truck side ). There are methods for trouble shooting the remaining components one of which is to use a DVM to assure that voltages and connections are correct. There is a method to simulate the brake controller but unless done properly can cause more damage than good so in that case I would enlist the help of a friend with another truck / controller and see if that works. Do you have another Oliver or trailer owner near you, most are willing to help.1 point
-
Do you have a trailer store (horse, farm, H-haul, etc) nearby that could do some checking? In the end it will probably be something simple, something someone with some automotive or trailer electrical experience could run down.1 point
-
We purchased a portable induction cook top and have hardly used the propane cook top however we're glad to have it as an alternative if need be. It's nice to have options especially when boondocking. The portable induction also gives us the option of cooking outdoors using the outside AC outlet, I like having both options. Luckily our pots / pans work with it. We use the Furrion system in ARC mode when watching YouTube and movies. It's not audiophile quality but it's pretty good for it's intended purpose. Its frequency response seems to favor applications like YouTube and movies and somewhat less for audio / music reproduction, not a lot of dynamic range.1 point
-
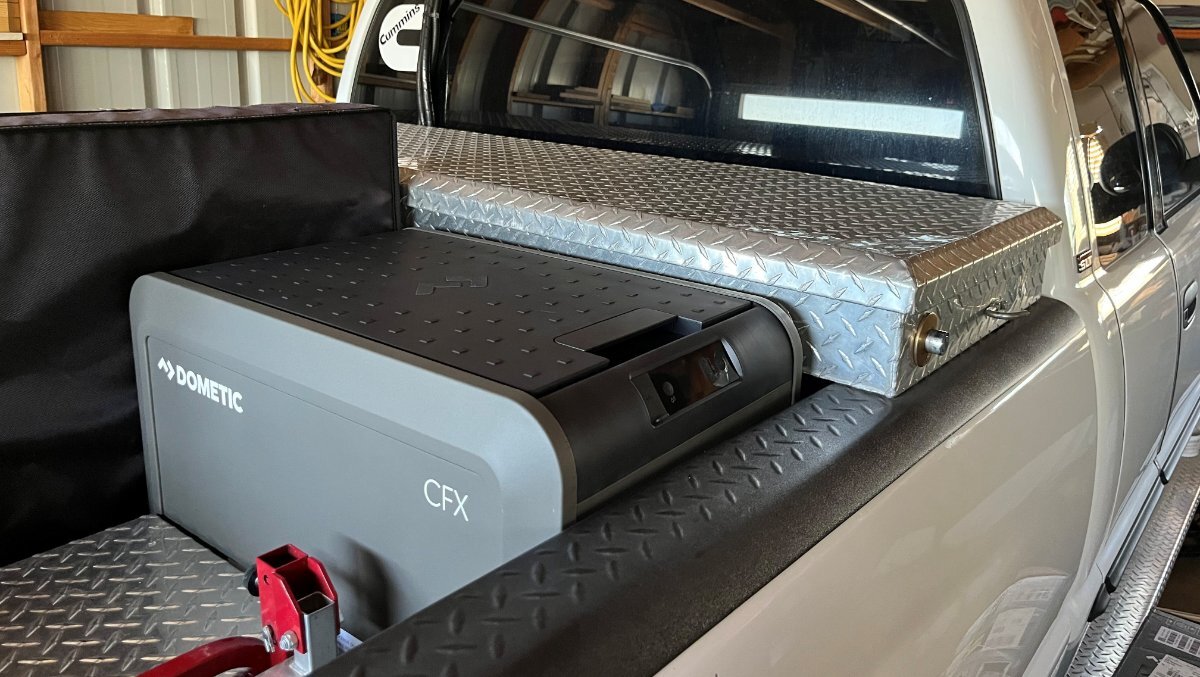
After deciding on which model to buy, what size would fit, and whether to go single or dual zone we went with the newest Dometic model CFX5. The single-zone 45L model fit perfectly in the front curbside area of the truck, behind the toolbox and in front of the wheel in arms reach from the passenger side truck door, so convenient holding cold water and food while towing! I built a stand to fit the cooler above the corner of the wheel well and bring the control panel to the proper height, just above the truck rail. Notice one stand support is cut short to clear the wheel well. There are four 6mm threaded sleeves built into the bottom of the fridge to hold it down. I let the refrigerator sit for 48 hours after having it sideways when mounting the platform. It looks very good installed, doesn’t it?
1 point
-
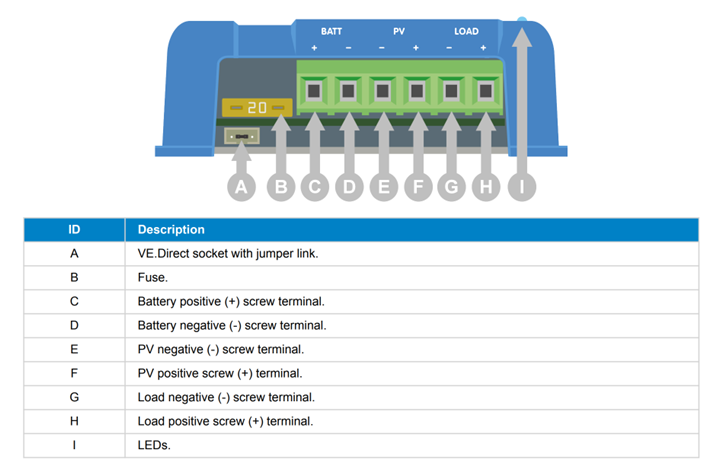
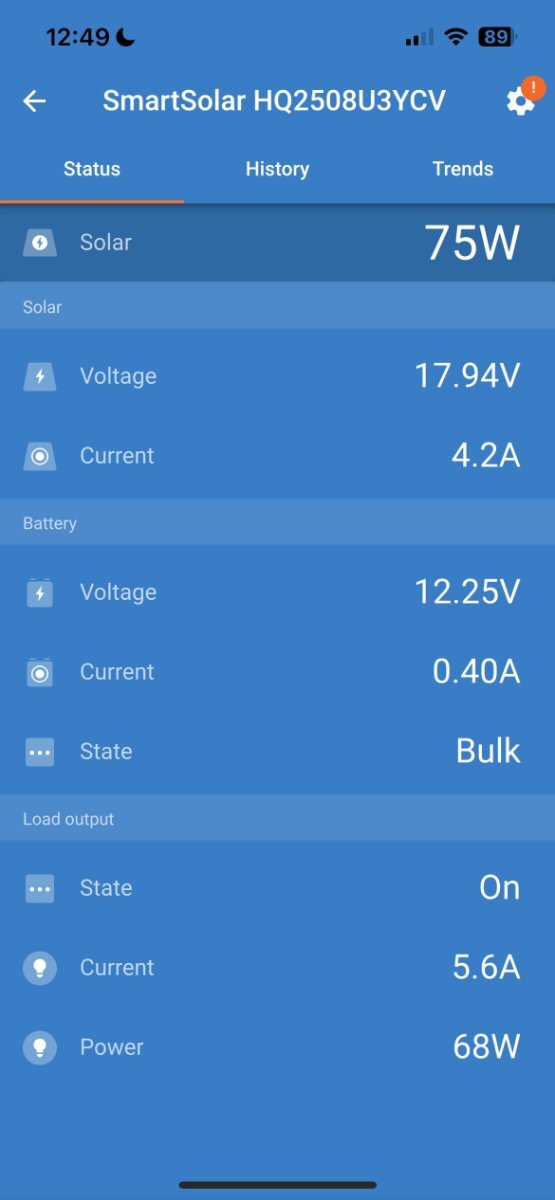
I’m really happy with the results! The 100W panel is regularly getting 70W, during the day, sitting flat, not angled to the sun. When getting high of 75W it handles the 5.6A required by the CFX5 with compressor running (observed 0A with compressor OFF, 3.7A lowest reading with compressor running and 5.6A highest reading), plus another +0.4A charging the TV starter batteries. This adds to 6A provided by solar. The Pepwave router was also running behind the scenes and it draws +/- 1A. This particular Victron SC has a terminal for 3 pairs of wires (see graphic). One pair for the battery (BATT), Solar Panel input (PV) and LOAD an output circuit. I thought this is a handy extra. I could have wired the CFX5 cooler to battery, but this LOAD circuit allows for special monitoring (the Pepwave is wired directly to the batteries).
1 point
-
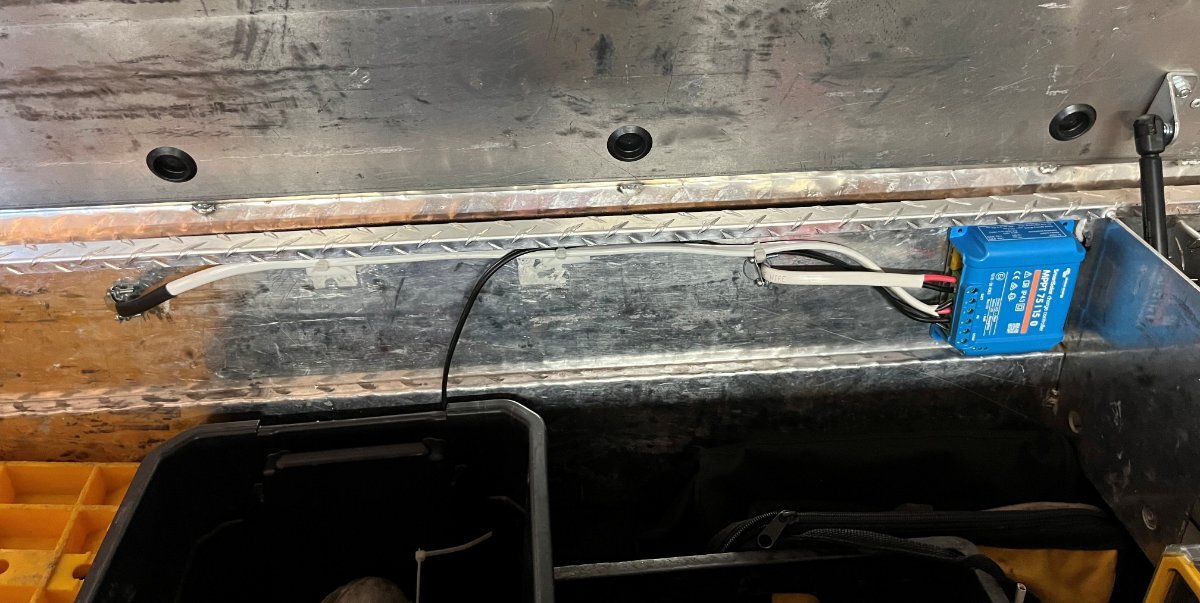
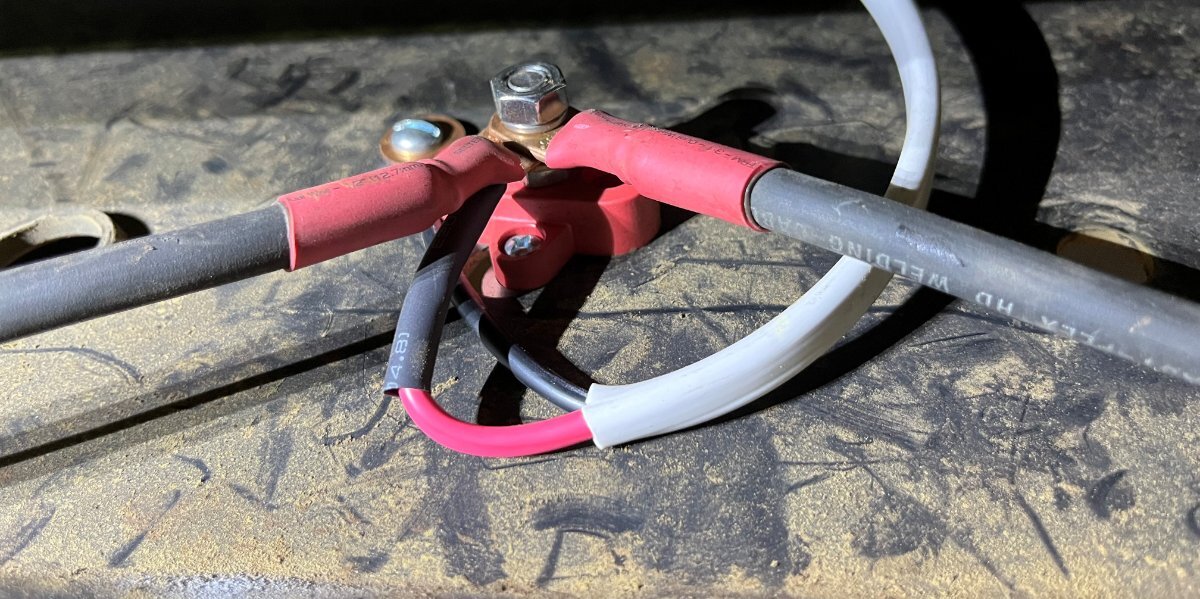
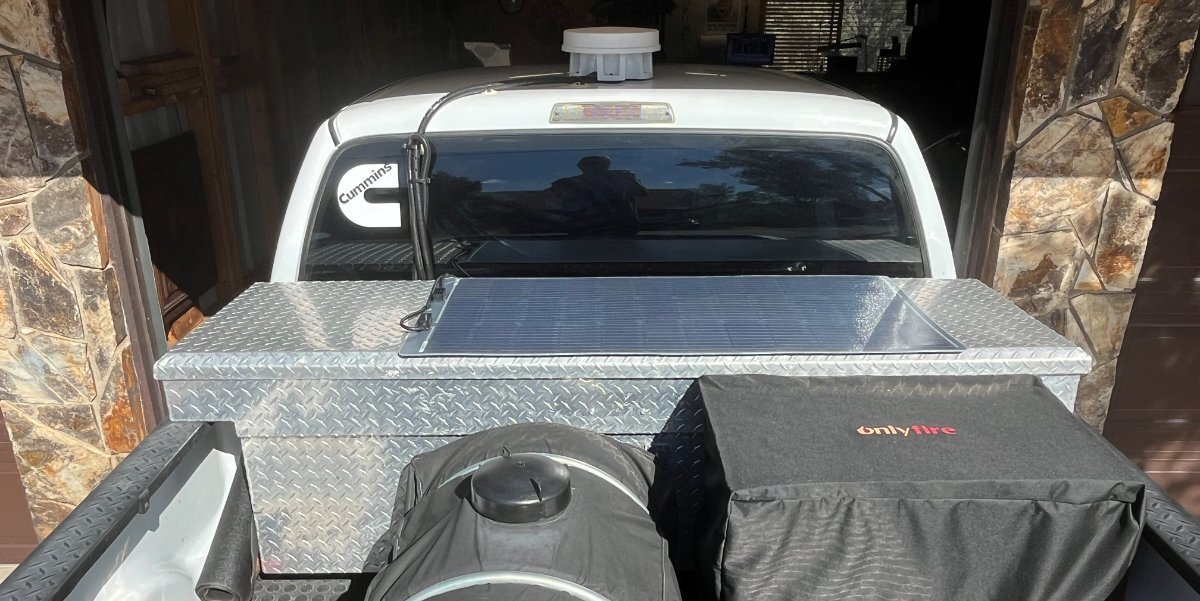
I came up with the idea to add a 100W Renogy flexible solar panel and a small Victron MPPT 75/15 SC. My goal was the solar energy should be enough to replenish the truck starter batteries while running the CFX5 refrigerator and our Pepwave router system. I had already upgraded the TV with a HO alternator and AGM batteries. The solar addition should keep my TV starter batteries fully charged, except in the mornings after running the router and fridge without sun overnight. After a few hours of late morning sun fully charged again. I have a spot in the bed where I could mount a second solar panel if needed. Those of you who have a truck cap should mount 2-3 of these 43x23” Renogy flexible panels in a heartbeat! I will share links for components used in a later post. I got the installation done Friday. I deleted the solar wire terminals and used butt crimp connecters and heat shrink adding a few feet of flexible 10/2 wire (left cable in the picture). The black wire pair is coming up through the bottom of the toolbox from the cooler. The short wire on the right exits the toolbox and goes stgright down to the frame where I intercepted the 4AWG wire from my DC2DC charger installation adding a simple single bolt buss for lowest possible resistance. Yesterday I thought I should trim the panel narrower. The Renogy panel is 23” wide and the standard truck toolbox is 21”. The job would have been easier if I had trimmed it before mounting it, but it came out very nice with a little extra effort. I used a boxcutter and a 1 1/4" bracket clamped to the edge of the panel and trimmed that amount off both sides, filing the edges smoothly afterwards. VHB tape was used to mount the solar panel to the toolbox lid and to mount the solar controller inside the box. I also purchased an inexpensive waterproof grill cover to protect the Dometic CFX5 cooler. They make an insulated cover for about $150 but I wanted more airflow than insulation and wanted a cover that would easily come off and on. I have a 1” piece of Styrofoam inside the cover to insulate the top from direct sun.
1 point
-
We took a 5-day trip and we absolutely loved having the extra cooled water and fridge space. On our way back home we stopped at a butcher, removed the drinking water from the fridge and set the thermostat down to freezer temps. It kept our steaks, chops and hamburger meats nicely frozen on the way home. On our first trip, I had 12VDC from the truck batteries wired to the fridge to run while driving. When camped we merely plugged in the fridge using a 110V extension cord plugged into the Oliver. The 110V connection will override the 12VDC, so you can have both wired to the CFX5 (not true in earlier models).1 point
-
That’s interesting Bill, we have not had that issue here at home or while on the road. 🤔1 point
-
In addition to the induction cooktop change, it was also noted that the cooktop orientation will be changed back to left/right instead of front/back. I don't know if induction cooktops have a cover like the propane version, but it was nice having the cover protect the bedding from any splatter. Also having the cooktop oriented front/back gave more prep space between it and the sink. I hope the induction cooktop is an option, and propane is still available. Especially for buyers not getting the big lithium packages. We don't have any pots or pans in the trailer or at home that would function on an induction cooktop other than a porcelain dutch oven and the few cast iron skillets I still use. I wouldn't want to have to buy all new cookware.1 point
-
Yeah, I was suprised to find a residential-type galvanized junction box for the 7-pin connection....but it was located close to where the 7-pin trailer wire comes into the hull behind the propane tanks. My 7-pin cable was damaged and I found it easy to replace it with a new one while I was in there. It seems to work just fine...1 point
-
This only occurs when you're connected/towing and should not be an issue, given engine runing, alternator charging. Ever test voltage after your truck has been sitting for 24-28 hours? This would be a first step. You need to get your truck diagnosed independent of the Oliver. Your truck being weak starting could be battery, starter motor, ground or an assortment of issues (again nothing to do with the Oliver). Best wishes, JD1 point
-
And, unless you are about the size of and have the agility of a spider monkey, forget about getting your head inside to see and your arm (forget both arms also) inside to work at the same time. But, taking out the vanity insert and replacing it with an access door is one of the handiest mods I've done. I literally use that access all the time.1 point
-
To put a bow on this one, the replacement of the circulation pump (Oliver service) resolved the issue. Hot water is flowing. Thanks all for the responses. In the end, probably not something I would tackle on my own. Took about 4 ish hours from diagnostic to covers back on. Spent most of the time reading and drinking coffee at the Rock House cafe in Hohenwald. Nice little coffee shop if you ever need somewhere to hang out. 🙂1 point
-
After trying to get our Norcold 3 way refrigerator repaired and having Oliver service center look at it twice. The service center quoted us a price of $4800.00 to replace the Norcold with a Dometic 12 volt compressor unit. I decided to try to repair it myself. The power board is easy to change it is the one accessible from the out side lower panel. That didn’t fix it. So I changed the optical display board next part number 628663. This board is located behind the front panel of the refrigerator. This board didn’t fix it either. Next I replaced the front button control panel part number 630619. The fridge is working properly now. I purchased these items on eBay. The removal of the front panel was the most difficult of this process. Message me if you would like an explanation of how to remove the front panel.1 point
-
We want to take a moment to address a recent change regarding our dealer network in Texas, and what it means for both new and existing Oliver owners in the area. No Current Dealers in Texas At this time, Oliver Travel Trailers no longer has any active dealer sales representation in the state of Texas. We understand this may come as a surprise—especially to those who purchased through our former Texas dealers. This was a business decision, and we sincerely apologize that a formal update was not sent to affected customers when this change occurred just a few weeks ago. Continued Service Support in Texas The good news is that warranty and service support remains strong in Texas. While there are no current Oliver dealers operating under our network in the state, both of our former dealer partners—Princess Craft and United RV—have confirmed they are continuing to service Oliver Travel Trailers, including warranty repairs, for owners in their respective areas. Additionally: Our factory-based Technical Support remains your go-to resource for any questions, approvals, or coordination related to warranty service. We also work with other reputable service centers where needed to ensure coverage in areas not directly served by Princess Craft or United RV. For those who prefer factory service, our Hohenwald-based Service Department is readily available to assist with scheduling and support.1 point
-
First, the Dexter suspension comes with Dexter springs. The suspension comes with a warranty. Dexter isn't going to approve or warranty their suspension with Alcan Springs or anybody else's spring. Maybe Oliver goes to Dexter 5-leaf. The moment Oliver switched out the Dexter Springs with Alcan's, everyone's warranty goes bye-bye. Bet would be pointless🤣1 point
-
FWIW, an update on this facility. I contacted the service manager, Adam, who said to bring it in. As chance would have it, I found myself in the area again this year, one year later, and dropped it off. Adam took care of everything and threw in a lube, all comped. Wow. I now again can fully recommend this RV service center.1 point
-
This subject is of great interest to me as I am located in in Western Washington State. Hohenwald is a l-o-n-g way from me, and I am having some issues with a recent swap of the Penguin to FreshJet3 A/C's. For those who have an interest, Bretz RV in Liberty Lake, Washington still does not have a functional service department. Their Missoula, MT location does have a service department, but it has NO ONE there who has been trained by Oliver (on site or back at Hohenwald). Due to distance, I decided not to call Bretz at Nampa/Boise, ID. The whole concept of "distributed Oliver sales and service" will eventually depend on Oliver owners having confidence in the ability of their local "Joe's RV" not only being able to sell them an Oliver, but also be qualified to maintain it. (For a $110K trailer, that confidence will make or break a sales decision.) At this point, those of us in Washington State are seeing little reason to be confident of any of that.1 point
-
This may be blasphemy to many of you, but I've been using a pneumatic impact wrench for decades when mounting rims, without manually checking torque. I have a quality impact wrench, very much like this one (wow mine was about $140, 35 years ago): Ingersoll Rand 2146Q1MAX 3/4-Inch Drive, Air Impact Wrench, Quiet, 2,000 ft-lbs Nut-busting torque, Maintenance Duty, Pistol Grip, Standard Anvil , Gray - Amazon.com First the "nut-busting torque" is for pulling nuts. The gun will not produce this torque when in righty-tighty position. Notice the 4 torque settings. I use the lowest setting when first mounting and get all lugs to this level (compressor set at 90 PSI). For automobiles or anything with 1/2" studs, I use the second setting as final torque. For 6-8 lug truck wheels the 3rd setting is good. I would not use the 4th setting for wheel lugs. Did that once by mistake when restoring our GX470 and broke a stud, and a round-trip to Napa to replace it. Torque settings are based on the strength of the steel (Grade 5, Grade 8, etc.), the bolt diameter and whether it's a coarse or fine thread bolt. There is recommended torque for every bolt. Problem is when for example rebuilding a truck suspension, you cannot fit a torque wrench on 2 out of 3 bolts. Maturing into the role of being a mechanic you get used to the feel of how tight is right. Love this Toyota guy! He taught me so much when restoring our GX, changing the CV axles, adding a 2" lift, etc. His catch phrase is "good-n-tight" which he says often, kidding in a German accent: Lexus GX470 Front Brake Upgrade - YouTube After mounting a rim, a few days or few miles later, I check the lugnuts again, this time by hand. Not using a torque wrench, but with a 24" long 3/4" breaker bar, 1/2" reducer with appropriate socket attached. I mount it about 90 degrees to the ground and push down with my foot. If it's a car, I just push down a little. On the 2500-series truck I put a bit of my weight on it. On occasion you find one or some that are somewhat looser and only those need a little more. If they all feel about the same, then you're good. Always recheck recent repair work at least visually. Another check I do on a regular basis is to rock the wheel. When parked flat, put your foot on the top of the wheel and push back and forth to rock the vehicle as hard as possible. Use your eyes and ears to notice anything. This is a simple check of lugs, bearings and other steering or suspension components.1 point
-
Excellent of you to do the follow-up and to notice something this detailed. Many would not have noticed. A good check to see if they are truly deformed is to take a good nut from the other side (better yet a brand-new nut). If it threads nicely by hand the threads are good, if it gets stuck you know the rest.1 point
-
Loveland/Fort Collins Colorado We have twice used Nathan RV Service and Repair. He moved from Fort Collins to Weldona. Oliver recommended him. He has twice done maintainence on our Oliver.The first time he replaced the flooring. This time he replace the Automatic Transfer Switch which had failed. He is thorough and price was quite reasonable. He took plenty of time when we picked it up to answer our questions. He loves working on Olivers.. he said they make the best campers! Hope this helps someone. Linda OEII #1111 point
-
Well, now I have to give an amendment. Just took off my tires yesterday to grease the zerks. The street side torque was good. The curb side wheels were way over-torqued and the threads were stretched on some studs. Boo. I gotta replace them now. It was the last rig they worked on that day at this shop and wasn't finished till 5:30. My guess is that the technician was in a rush, was using an airgun, and just jammed those lug nuts on while thinking of going home. Another reason to try to do more and more maintenance myself, with the help of these forums of course!0 points
-
Well - I don't know. Since this list was being compiled from recommendations submitted by Oliver Owners and primarily submission was via the Forum I really don't see that many recommendations when scanning the thread. It should be a fairly simple matter to simply copy these names down if you're interested. Good luck! Bill0 points
-
Starting in October 11, 2017 That is six years. How long should we wait?0 points


.thumb.jpg.e34bf01ef7f7d5e99ad31856d45afbeb.jpg)


-
Recent Achievements
-


")


")


")

