Leaderboard


Popular Content
Showing content with the highest reputation on 11/25/2025 in all areas
-
We wanted to wish everyone here a Safe and Great Thanksgiving! Best Regards, Bill and Debbie5 points
-
The Summit sourced lug nuts are chrome plated steel, not stainless steel. The OEM Lionshead Jaguar wheels on our 2022 LE2 have steel lug nut inserts. The contact between lug nut and wheel is steel against the lug nut, not lug nut directly against the aluminum. There are stainless steel lug nuts available, but none that are bulge acorn. Show me if you know otherwise. Bulge acorn vs. acorn is irrelevant due to the steel lug inserts on the Lionshead wheels. From what I can see, the contact between the insert and lug is the same whether the acorn nut is the bulge style or not. I don't know if the aluminum wheels on other year models had steel lug inserts. If not, then use the bulge acorn style. If you want to use stainless steel acorn (non -bulge) lug nuts, then keep in mind there's a risk of galling, which effectively welds the lug nut to the stud. Avoid use of impact tools to remove/replace the lug nuts to mitigate this risk. Steve5 points
-
This issue has been a long running one. Some time ago I copie Frank's post: OE2 LUG NUTS: Frank 😄 For anyone getting replacement lug nuts, make sure you get the proper type for aluminum wheels. The correct ones are the “bulge acorn” type which have a larger conical seating surface for use on aluminum wheels. Aluminum wheels are softer than steel wheels and require the larger seating surface. The ones installed by Oliver are the correct bulge acorn type so get the same style. “Acorn” type have a smaller conical face and are for steel rims. JPR: COMPARE SPECIFICATIONS! 24 required. I believe it was MaxBurner that turned me on th these chrome plated lug nuts from Summit Racing. My regular sockets work well with them and no interference with the wheel rims on our 2019.
 5 points
 -
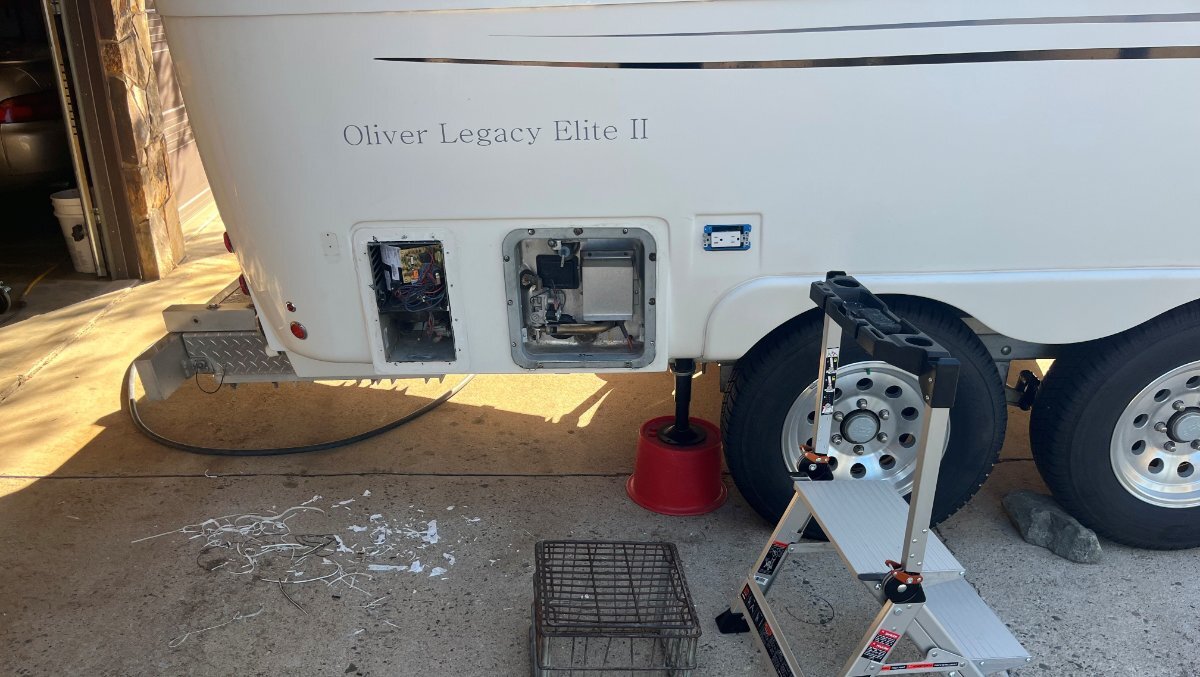
Your hull #124 was built before that buss modification was added. All of the early models were fused at the jacks, just like the front jack. You should find an inline fuse in the power wire near the rear jack heads.3 points
-
Happy Turkey Day. Happy Camping. Hull #1045, Jolli Olli2 points
-
Steve: Thanks for the correction. I updated my post accordingly to "Chrome Plated" steel. Our 2018 OTT rims came with the “bulge acorn” style. Replaced them with the same style as recommended by Frank and by MaxBurner sold by Summit. They have worked very well and my standard sockets work with them. I do use a Dewalt 20V impact to remove and snug up. But for the final three tightening stages by torque wrench. (Retorque in three stages (60, 80 and 95/100 ft-#). GJ2 points
-
@Kpaladin, welcome to the Oliver gang. I hope you enjoy yours as much as we have enjoyed our adventures in #12, since 2008. Nothing runs like a Deere. Nothing travels like an Ollie. @MAX Burner, we will miss you. Stop by the forum and say "hey" once in awhile. We hope you enjoy your new rig, too.2 points
-
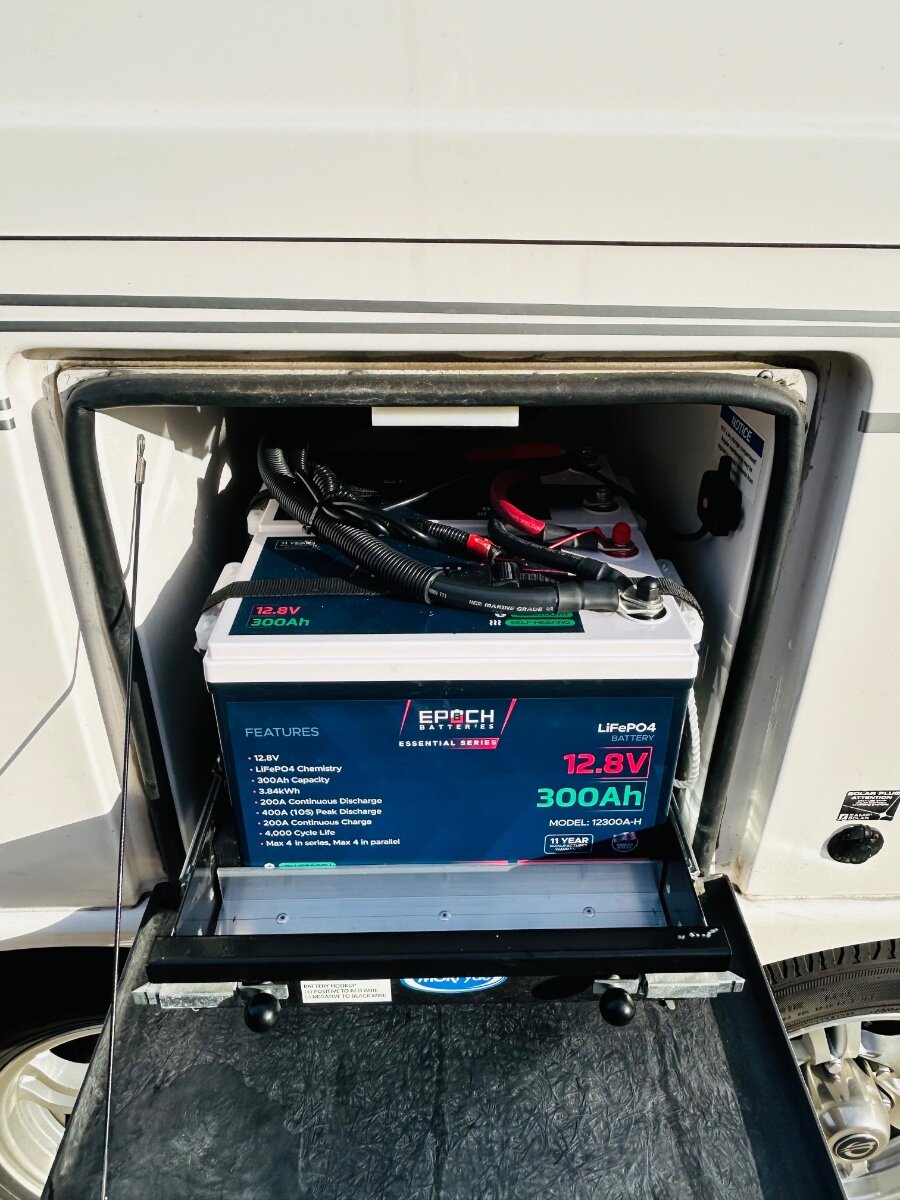
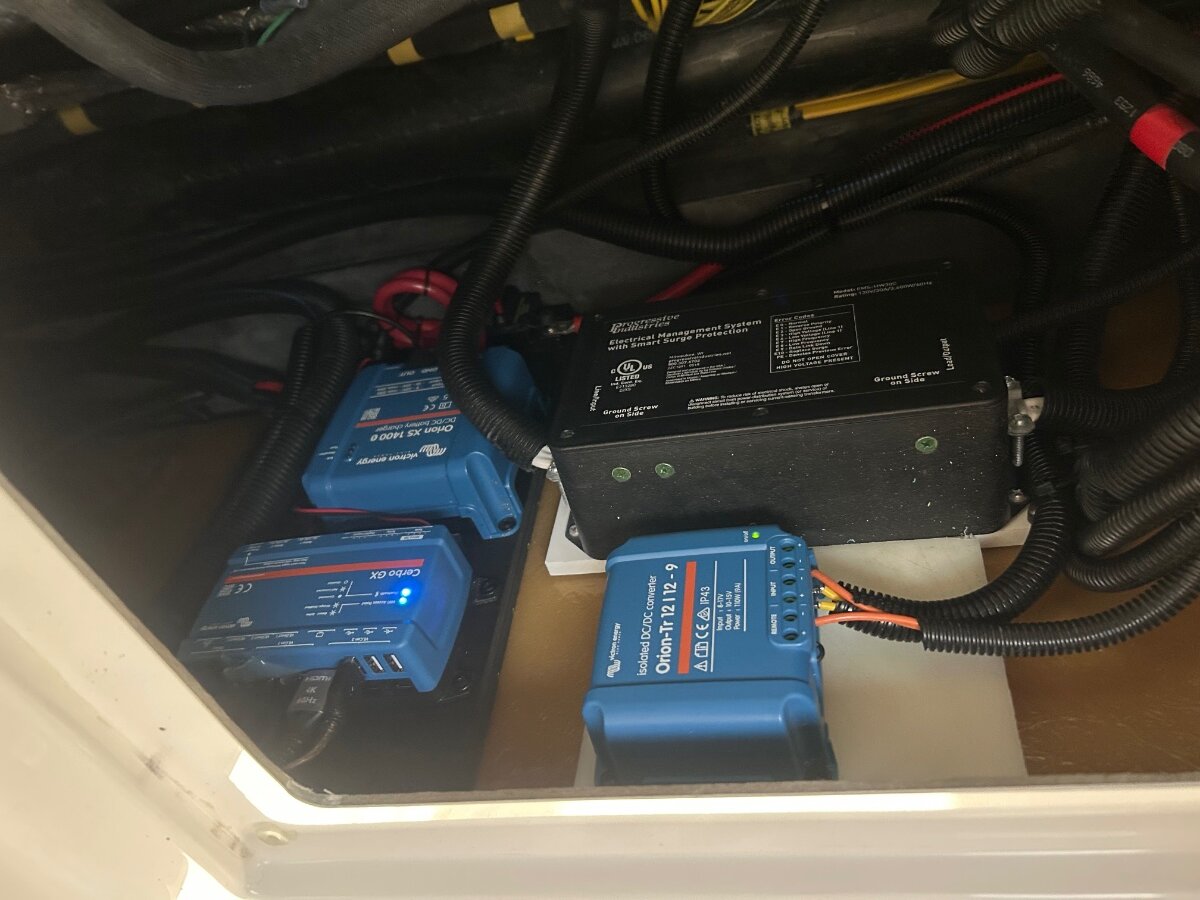
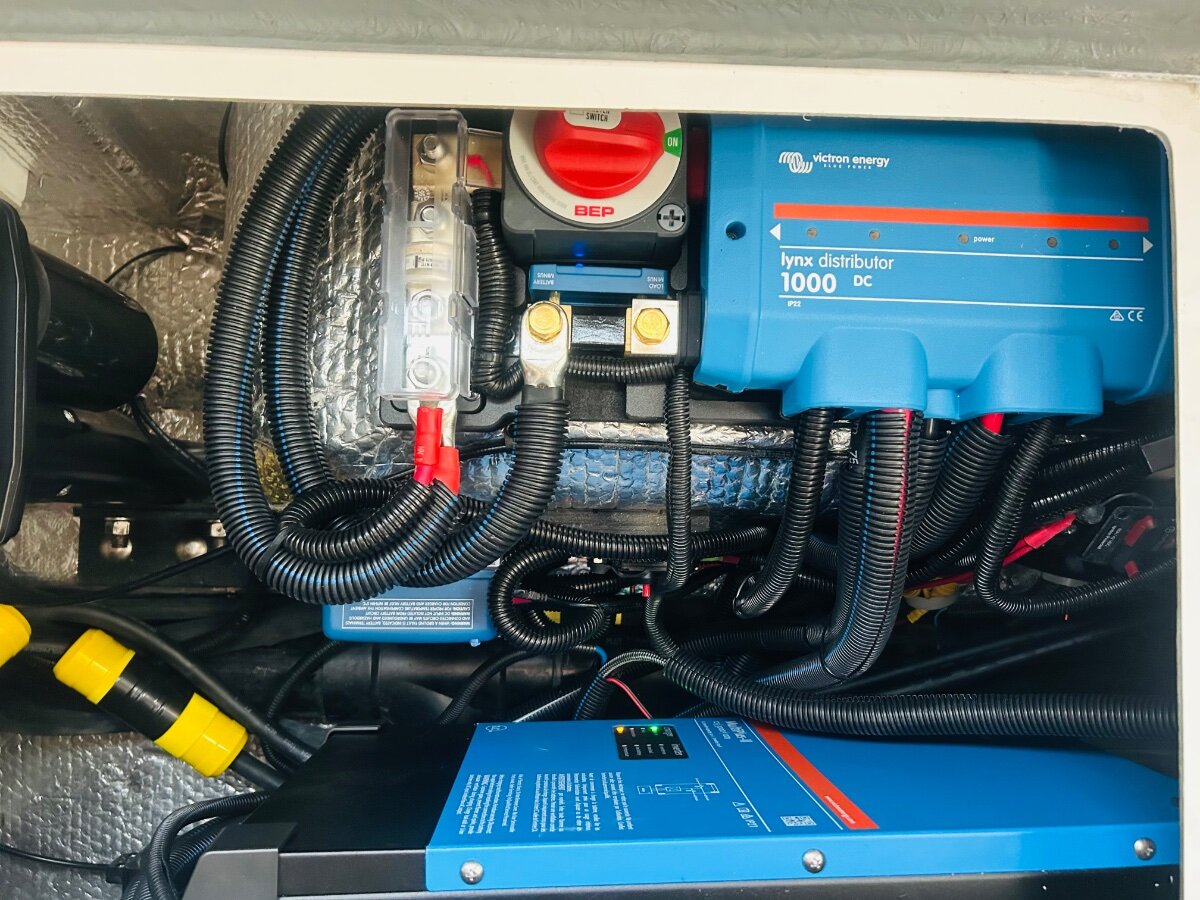
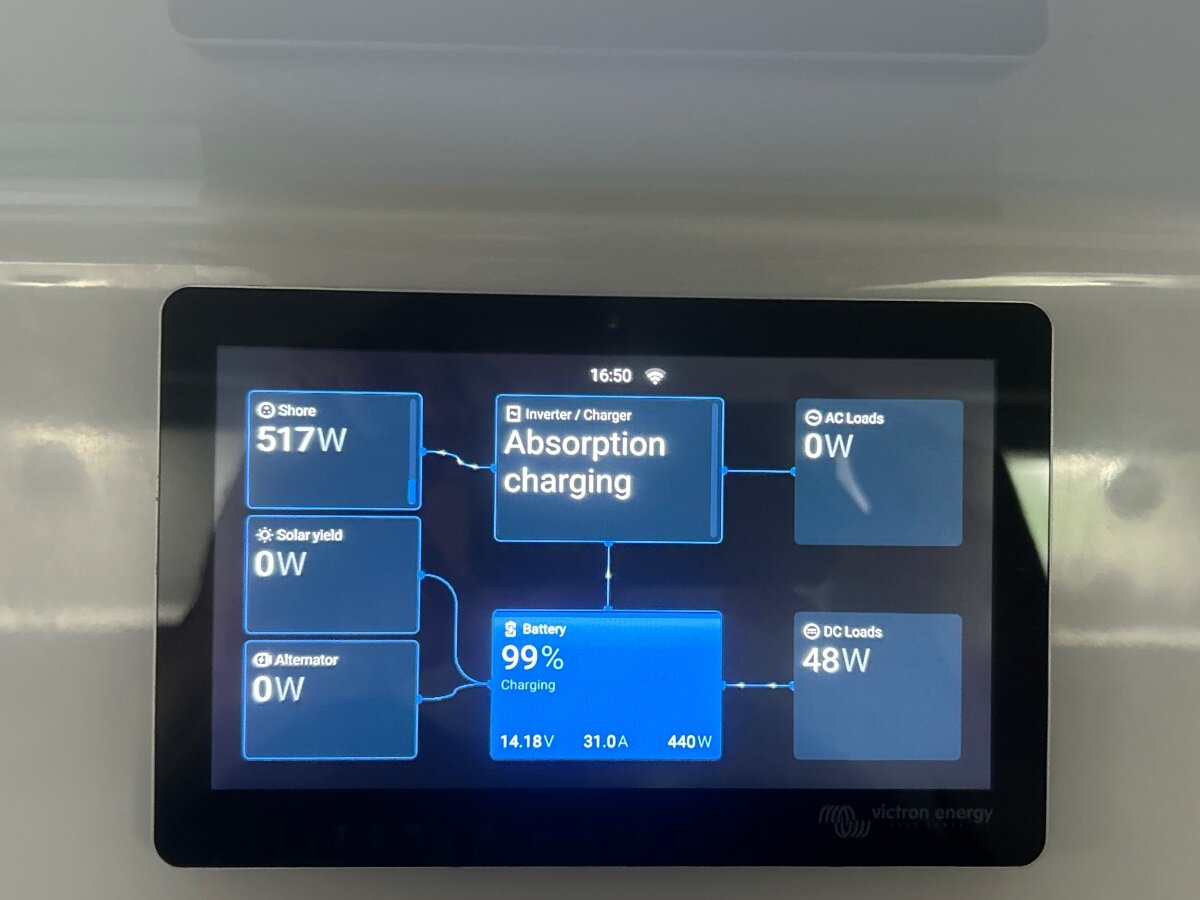
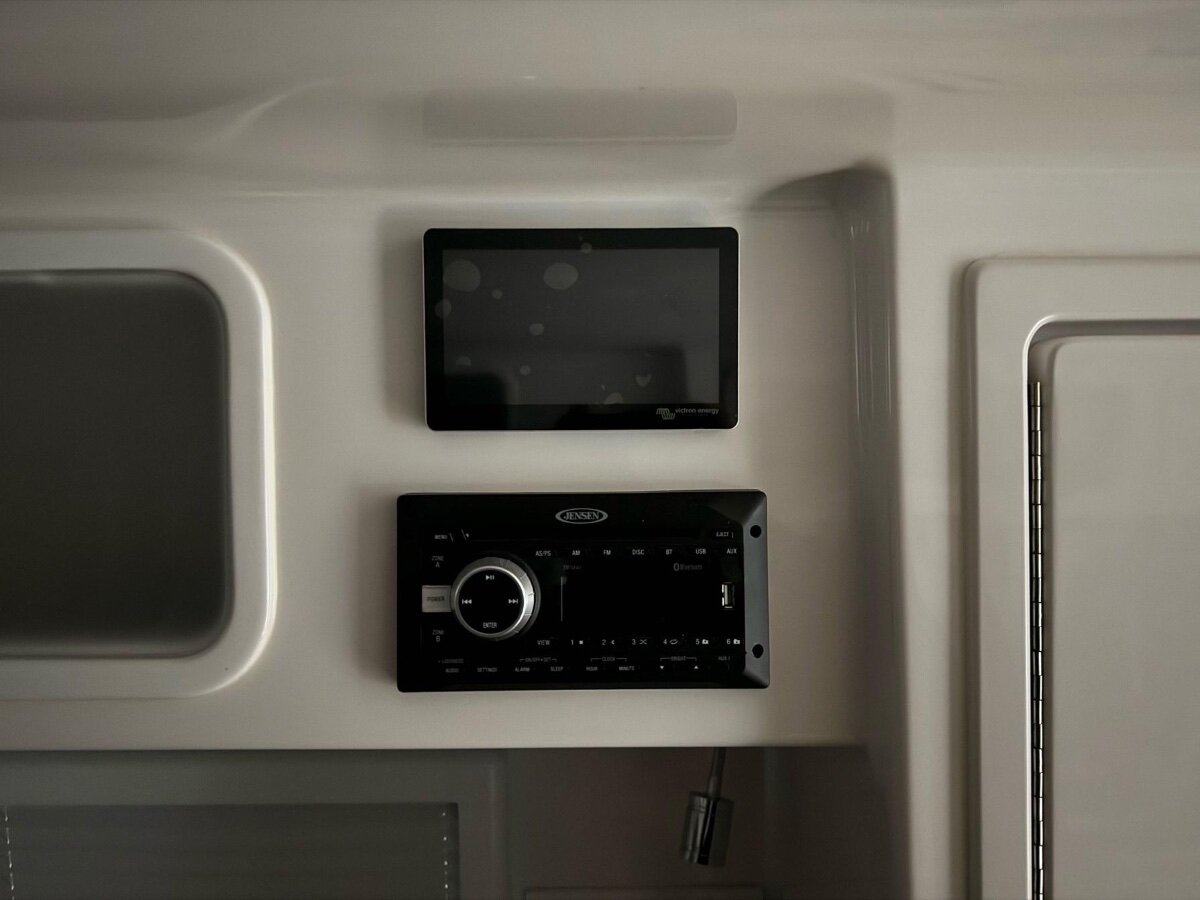
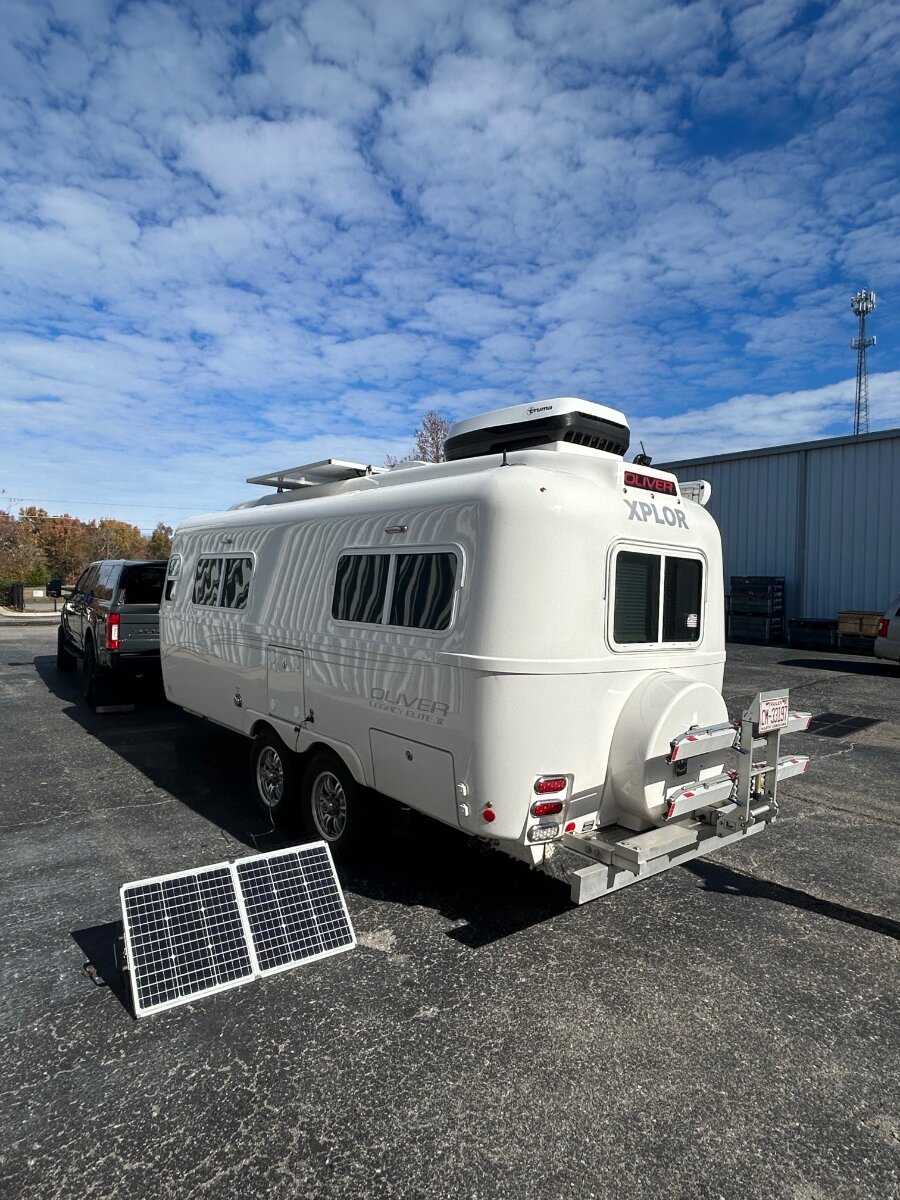
***Long Post*** XPLOR Hull #634 Victron 3000 watt inverter, Victron 12v DC to DC charger and Epoch lithium battery upgrade. Note: To discuss options and pricing, please contact Jordan Hall at Inverter Services, White House, Tenn. Our OEM AGM batteries were getting long in the tooth and it was time to upgrade our batteries to a complete lithium battery system on our 2020 Oliver LE2. Our good friend, and former Oliver owner Jim Posey, highly recommended we speak with Inverter Services in White House, Tennessee. I called and spoke with Service Manager Jordan Hall and discussed our needs and options. Jordan and his team at Inverter Services were excellent to work with and have a lot of experience working on Oliver travel trailers. Our tech/installer, Easton Ford, kept us updated on our install progress with photos and discussions as needed. We found Easton to be extremely detail-oriented and dialed in and focused on our project. We were originally scheduled to have this work done next March. After returning from our 54 day New England and Canada trip, I decided to call Inverter Services and ask if they had any cancellations. They did and we immediately took the cancellation. They are typically booked 6-7 months out. So we hitched op Oliver and headed to White House, Tenn to leave our Oliver with the team for 2 weeks. Important note: Inverter Services supports the RV and Marine industry in ALL things lithium battery and electronics. This is one of the most detailed and thorough, cutting-edge companies we have ever done business with. I chose Inverter Services to do this install because this is not my area of expertise and it absolutely is theirs. These guys are experts in their field and I admittedly am still in the learning process. Based on our excellent experience, we highly recommend Inverter Services in White House, Tenn if you are considering a lithium upgrade. We chose all Epoch & Victron following products for this install. (2) Epoch 300ah lithium batteries (internal heating elements) -https://www.epochbatteries.com/.../12v-300ah-heated... *Victron MultiPlus-II 3000w Inverter/charger *Victron GX 70 Touch Screen *Victron Smart Solar MPPT *Victron Orion XS DC-DC Battery Charger **We also had the RV Soft Start installed on our Truma Aventa AC. Inverter Services provides tech guidance/support/firmware updates as long as we own our Oliver. I cannot stress enough the pride this company takes in their work. As I think most would agree, Victron components are a class all their own and leaders in the Marine and RV industry. Post install, we have on board 600ah of lithium battery power, and with our extra 90W Zamp panel now configured to lithium, we have approx 410 watts of solar. This will certainly give us more options on the roads less traveled and boondocking. Still lots to learn on this new system. Now having the 12v DC -DC charger I don’t think we will see a need to carry a generator any longer. Thanks to all those on the forum who made the Lithium upgrade happen. ⚡️ The information gleaned here helped me decide the direction I wanted to take this install. ⚡️Happy Camping and Safe Travels! ⚡️ A few install pics- The Victron GX 70 touch screen fit the existing opening with no cutting or trimming of the fiberglass. Our system at a glance. The touch screen nice option if no cell service is available for the Victron app. Although with our SL mini that’s not an issue. Very happy with the touch screen and the Victron app. We can set the screen to time out at 5 or 10 min or longer and then go dark for sleep mode. Zamp 90W suitcase. 12v DC to DC Andersen connector. On our way home we camped at Cumberland Mountain SP in Tenn and gave our new system a shake down. It’s nice to not have to plug in. 😊
1 point
-
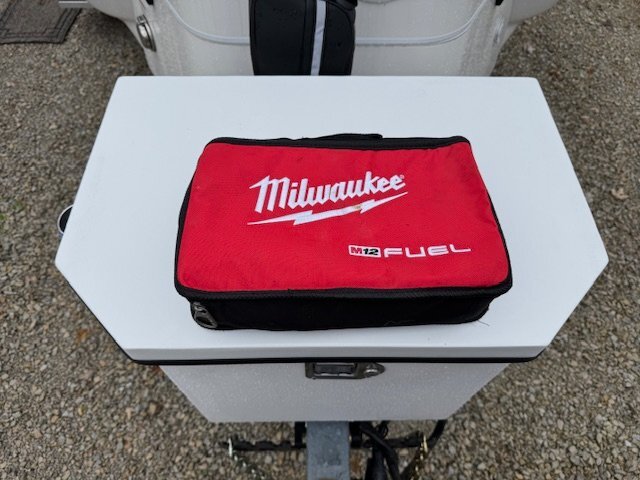
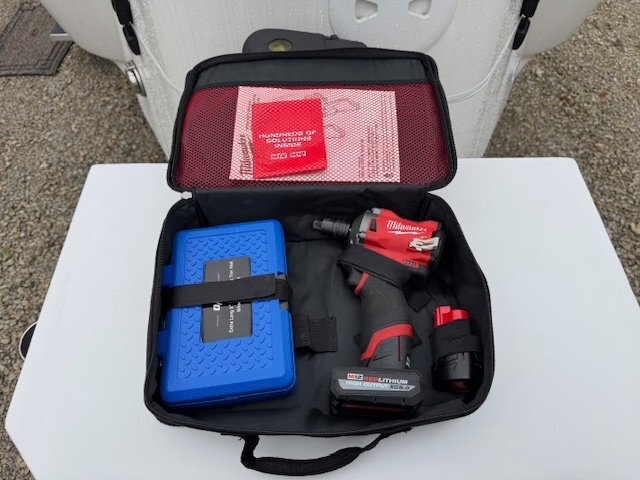
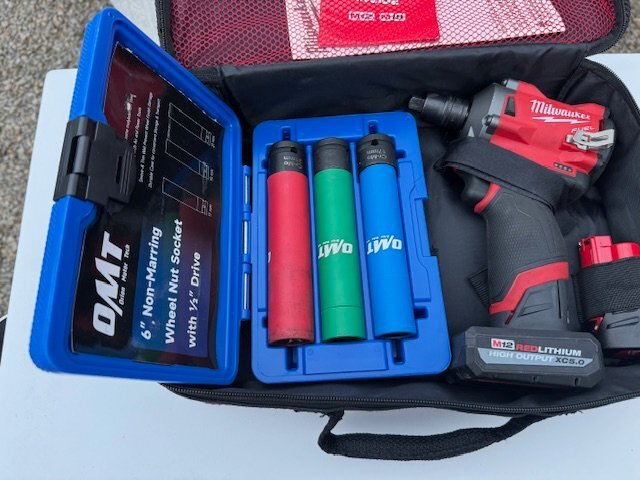
My emergency tire service kit includes the following. The reason I carry these items is they take up little space and stow in an easy access location like under the back seat of the truck or in the front tongue box on the Oliver. The Milwaukee charger is mounted on the side wall of our truck bed for anytime access. With that out of the soft case, the impact socket set fits nicely inside the soft case with the light and impact wrench so everything is together. I like having a tire plug kit along because a screw or nail in the tire is the most common cause and as mentioned earlier is the easiest fix and can be done with wheel still mounted to trailer. All these items fit neatly in a small space and are invaluable for getting you safely back on the road in a tire emergency. The most important thing is to try if possible to do an emergency repair away from traffic on a hard level surface. There are other tools you can have along to do a more thorough repair, but this set of tools will get you back on the road and safely to the closest tire shop if needed. This wrench fully charged has enough charge to remove all four wheels on your truck or trailer. The batteries will stay charged for many months in storage. https://www.homedepot.com/p/Milwaukee-M12-FUEL-12V-Li-Ion-Brushless-Cordless-Stubby-1-2-in-Impact-Wrench-Kit-w-2-5-0Ah-1-2-5-Ah-High-Output-Batteries-2563-22-48-11-2450/337134504 The sockets are extra deep so you won't need an extension even with a torque wrench. If needed you can remove the protective sleeve on the socket to fit the lug nut in the wheel. Three sizes to fit most automotive lug nut sizes. https://www.amazon.com/dp/B0C98ZHKQX?ref_=ppx_hzsearch_conn_dt_b_fed_asin_title_7&th=1 12V Milwaukee work light is indispensable in many ways and uses the same battery as the impact wrench. https://www.amazon.com/dp/B0BRZ31ZFS?ref=ppx_yo2ov_dt_b_fed_asin_title Tire plug kits come in many types and sizes. I personally like the mushroom style plugs. https://www.amazon.com/dp/B0FK4SNRBG?ref=ppx_yo2ov_dt_b_fed_asin_title&th=1
1 point
-
Greetings, All! Well D and I went over to the "dark side" and sold Casa Blanca to a great guy from near Kerrville, TX, David Knight. Please welcome aboard @Kpaladin David into the Oliver family. We're now into our next chapter of RV'ing and starting new adventures with our 2026 Brinkley I 235. It's totally "Victron'ed" out and includes 600A-Hrs of Epoch LiFePO4s and 800W of solar modules. We'll stay in touch! MAX Burner
1 point
-
I don't know if I'm in the minority or not - but - I happen to like the rear jack switches located on the front of my Ollie. Unlike Mike, I found the bubble level that is on the top of the front jack to be virtually useless. So, I installed three small bubble levels on or near the front of the Ollie. All three are right at the "belly" line where the top and bottom shells are joined. The first one is just above the front jack, the second is basically under the bath window and the third near the front door. These levels are much more accurate and sensitive than the one on the front jack and can be observed with a simple step in one direction or the other. I also didn't hurt that they were very inexpensive and are attached with exterior double sided tape. Finally, even though I very seldom use the rear jacks, when I do I use 6x6 blocks under those jacks. This makes positioning easy (in most cases) with one quick look to make sure that the jack and block are properly aliened. Perhaps, the "perfect solution would be to have three way switches so that these switches could be placed in BOTH the front and the rear which would allow for the use in either location depending on the situation. Having thought about this solution, I'm marginally surprised that ScubaRx has not done this type of mod (note that if you ever get a chance to see ALL of the switches that he and Tali have in their Ollie, you will see what I mean here). Bill1 point
-
MAX - please do not be a stranger (well, at least any "stranger" than you already are 😇). I'm sure that you didn't let the pups go with that fine Ollie of yours! DAVID - you've got a really nice Oliver there. We'd be happy to help in any way we can. Bill1 point
-
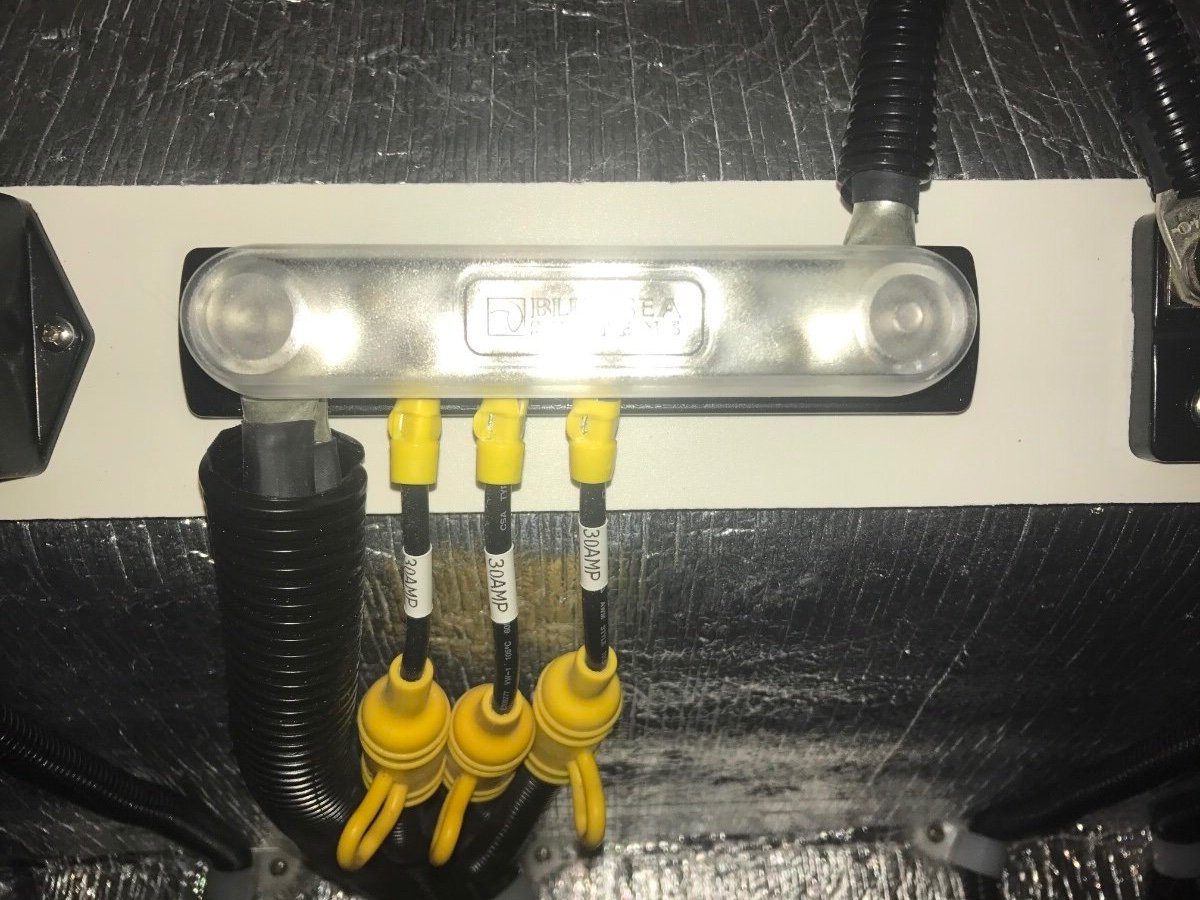
@taylor.coyote This picture is from below the front hatch under the street side bed of my 2017 LE2. The yellow fuse holders are for the 3 Barker jacks, 1 for each jack. There are 2 fuse holders for the front jack, 1 under the bed and 1 outside by the front jack. Good luck, Mossey
1 point
-
Our rear streetside jack stopped working during a trip a couple of years ago. First checked the fuse as Ron suggested above, but it was not blown. Next, checked the wires at the switch. It turned out one of the spade connectors had come apart. Reinserted the connector and checked the others. Haven't had a problem since.1 point
-
Did you check the fuse, there’s one for each stabilizer jack; for the two rear jacks, located under the street side bed area.1 point
-
This past April we went to MAC in Ft Worth. At the time the only coating they offered was marketed as "permanent". The shop declined to do our 2022 because it had some chalky patches. In their recent experience with another Oliver, their coating doesn't prevent the underlying chalky fiberglass to continue flaking off. Now the only "permanent" coating they sell is for nonporous surfaces like metal and paint. The website currently shows they have a 3-year coating for fiberglass.1 point
-
GJ thank you, my friend! Given I’m spending this kinda money… I’ll add 40 hours of my labor to make things right! A detailer can work around these, but with a little extra effort, the overall finish will be much better! 😎1 point
-
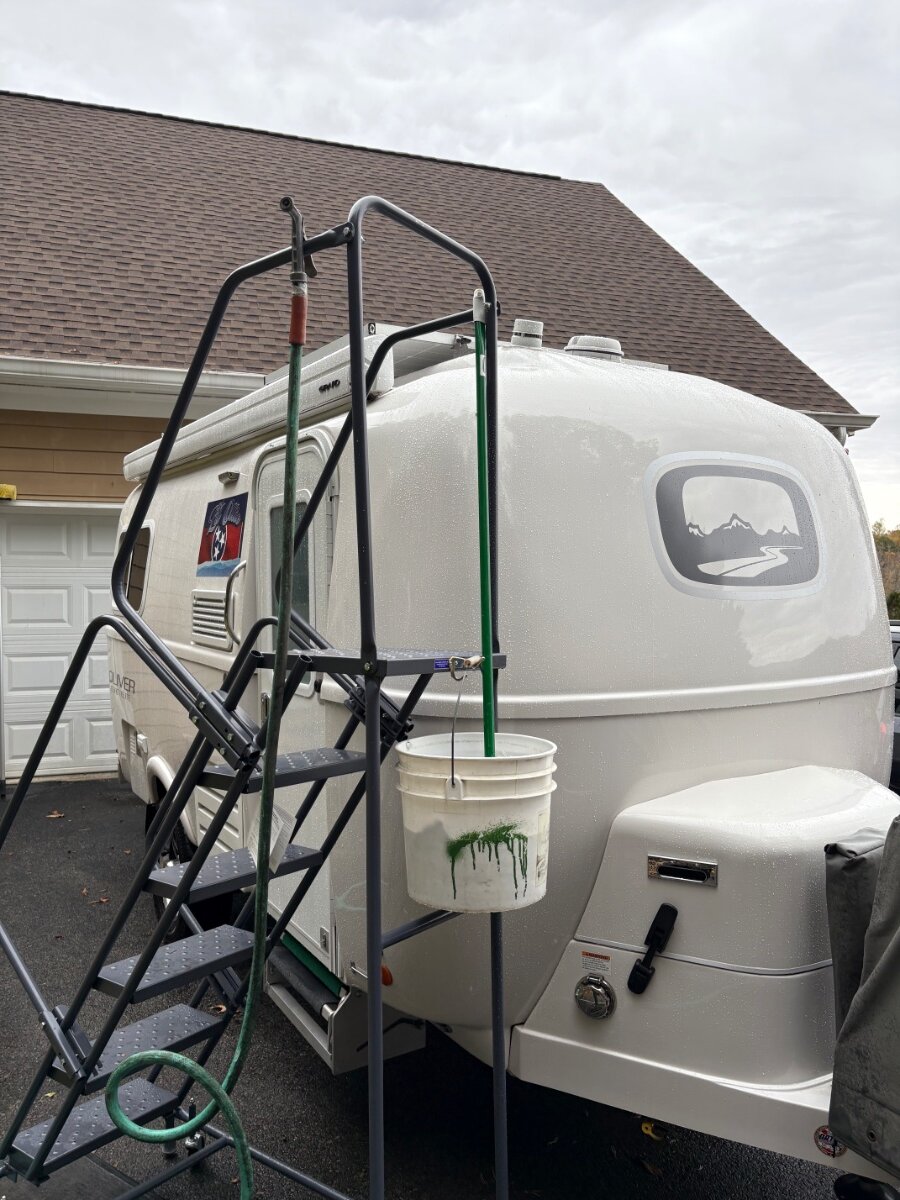
Funny that GJ revived this thread today. Coincidence given this morning I had an auto-body/detailing professional come to our home and quote finishing our Oliver. Old hull #113 will again have a shine on her! 🤣 Scheduled for the week after next, I’ve been busy removing items like all the covers, furnace, HWH, fridge vents, outlets, awning lower mounts, etc. Everything possible to make for a better detail job. Doghouse and spare tire covers completely stripped down. I’ll post a new thread with pictures in a couple weeks! Almost forgot, I’ve also removed about 2 LBS of silicone caulk!!! (see driveway in first pic)! First time I restored a vehicle, every nut-n-bolt removed, was an Alfa Romeo Spyder, Spring of ‘78. This is the way I work! Tear everything, clean and condition each and every part. 😎 For 2 1/2 years we’ve just gotten our Oliver sun-baked and dirty, now time for some love! Thanks for posting John! 🤗
1 point
-
I was lucky, we had a slow leak so we could fill and get home. We went to a truck tire place and they vacuumed out balance beads and installed metal valve stems.1 point
-
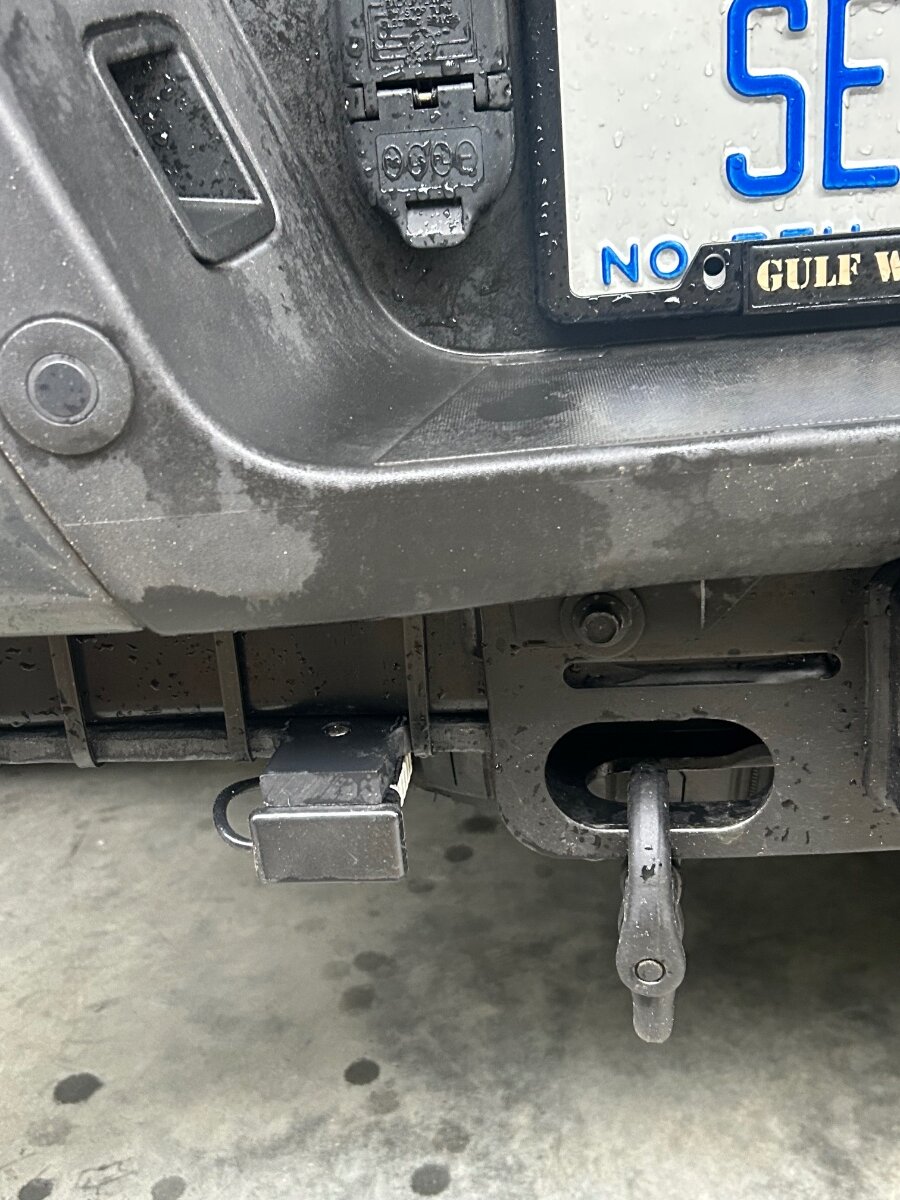
I've not acted on advice to switch to steel valve stems while using our TST tire pressure monitor. Yesterday, that procrastination bit me in the ass on my way home from the Hungry Mother Fiberglass Rally in Virginia. Rapid Pressure Loss" or similar wording was what the monitor said with a constant loud beeping. A quick look in my mirror showed the front left trailer tire was indeed low. Stopped to check, and with 28 PSI showing, I elected to slowly drive to the next exit, and found a flat spot in a gas station lot. The rubber valve stem was partially separated from the rubber base, and if flexed, dumped out pressurized air. No fixing that on the spot! Time to change tires. I have all the tools needed, and it was a cool sunny day, so that was a bit of luck. It had been raining a few hours earlier. I didn't have my impact driver with me, but I do have an 18" breaker bar, so I could loosen the lug nuts. Before jacking up and removing the tire, though, it was time to get the spare. Two heavy e-bikes made this a chore, but fortunately, that's when a large fellow stopped and offered to help. (Oddly enough, the local deputy sheriff who was using the facilities at the station never even checked to see if we needed anything on his way out of the parking lot.) With his help, we slid the rack and mount out far enough to get to the spare. His impact driver made for a faster swap than my breaker bar, and his torque wrench was easier to get to than mine buried in the trailer's basement. All in all, about an hour and a bit delay, and the kind gentleman who stopped to help refused any remuneration. - I usually only carry the impact driver with me on long trips. And while this was about an eight hour drive, I'd elected not to bring it with me. It will now be included in every trip. - I'll be removing the bike rack mount and cleaning those surfaces and applying a dry lube to make it easier to slide the rack in and out. After we were done, I was really re-thinking John Davies choice to not use the fiberglass tire cover while toting bicycles! - I will be changing to all steel valve stems before we leave on our next trip!1 point
-
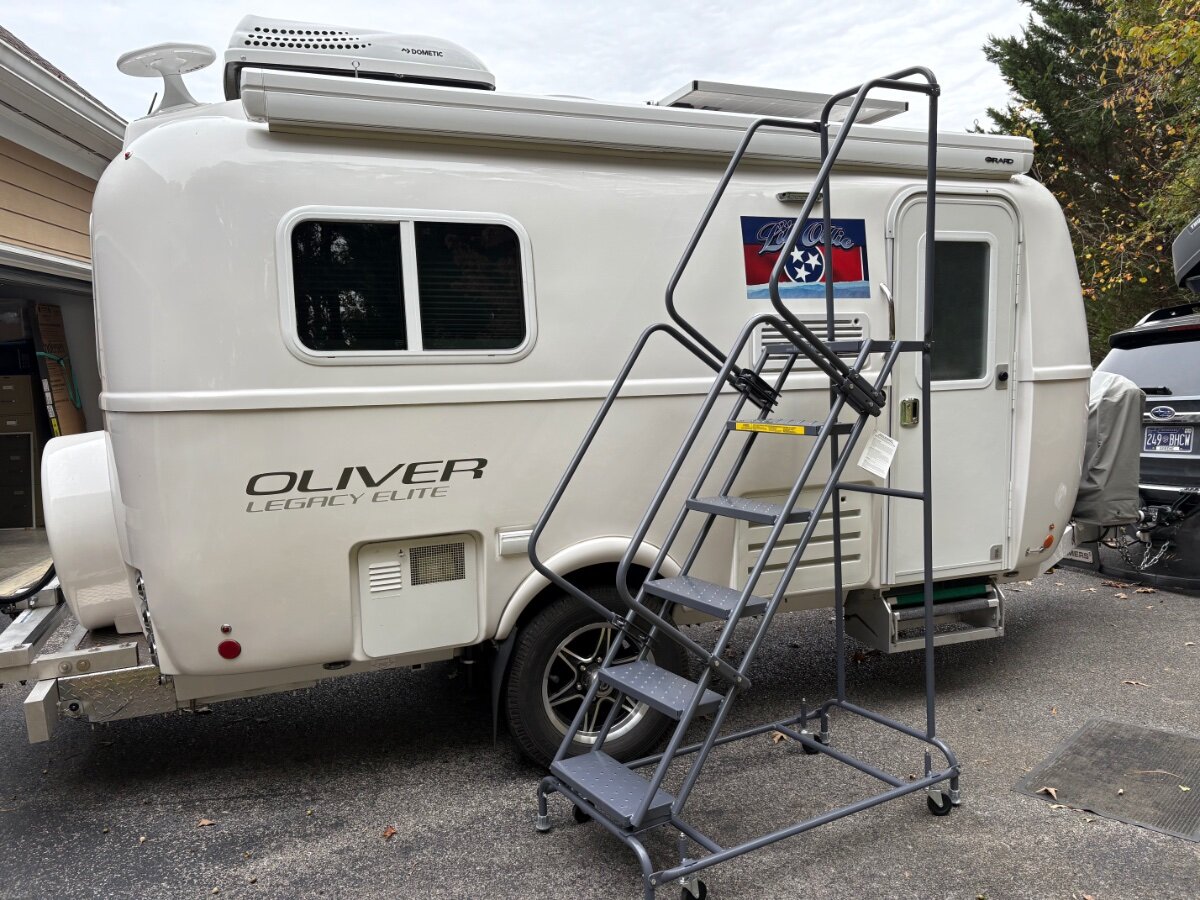
Am glad I invested in this Ballymore Ladder. Makes this job so much easier and safer. A little pricy but considering an ER visit or worse, definitely worth it to me. I can also use it for access to a lot of garage ceiling racks.
1 point
-
Apparently I am an idiot 😱 But a lucky idiot 😂 Yesterday was travel day. Moving from one FHU campground to another, with a boondocking night in between. Everything went exactly as planned. Beautiful in fact. It has been cold so I’ve been in the daily habit of using the electric space heater during the day and saving our propane for nights below 40. I’m super happy with the results we’ve had doing this with electric hookups. But last night was just battery. And I didn’t pay attention. 😳 i used so much battery before switching over to propane at 10 pm that the batteries hit 10% sometime around 5 am. When that happened EVERYTHING shut down. Including the propane furnace 🤪 I’m extremely lucky it wasn’t just a little colder, so nothing froze. Also lucky that the sun rose brightly (despite a weather prediction of rain), so the solar recharged the batteries to a usable level by 8 am. My takeaway: Never use the electric space heater on batteries below 50%1 point
-
There’s a wide range of “below freezing”. If it’s only down to the high 20s we still rely on our electric space heater (Vornado). I can turn it so that some of the heat is directed into the vent under the bed with the water pump, water tank, etc. We’ve never had anything freeze. I figure if the outer hull is in 27 degree weather and the inner hull is in 68 degree inside weather then between the hulls will be something in between. Below mid 20s we do use the furnace. That’s not been very often since we tend not to camp in very cold weather. Mike1 point
-
Hope they help! Mossey
1 point
-
This schematic and information is from Barker's website and may be of help! Mossey vip_3000_all_pages.pdf
1 point
-
@csevel Hope you're doing well. I'm not sure if you made it to the Guntersville rally or not. I was there, but way too many new names to keep track of. I replaced my lug nuts tonight and also discovered SIX cracked lug nut shields on the Oliver-provided lug nuts from 2016, only five pictured. I found this info out at the rally. I should have seen your posting first though. LOL
1 point


-
Recent Achievements
-


")


")


")

