Leaderboard


Popular Content
Showing content with the highest reputation on 07/17/2026 in all areas
-
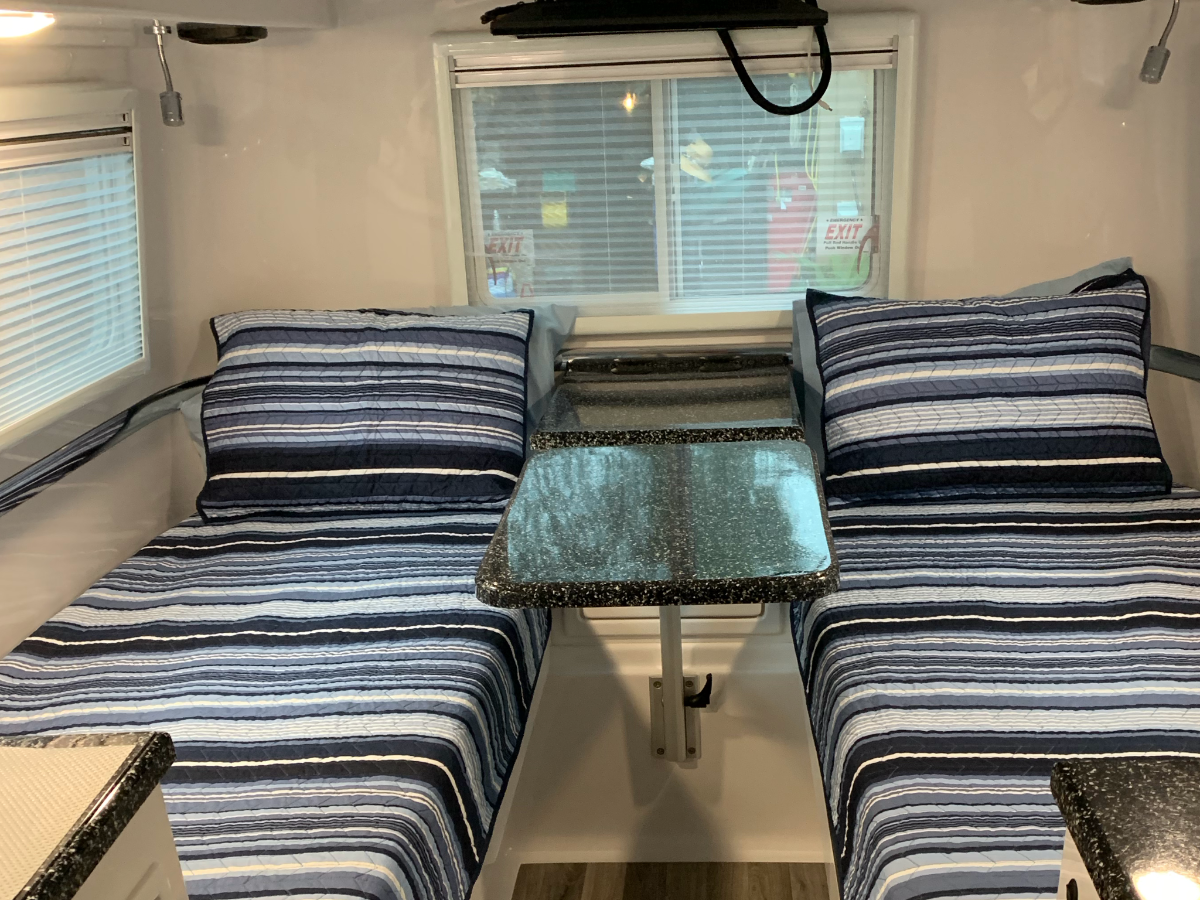
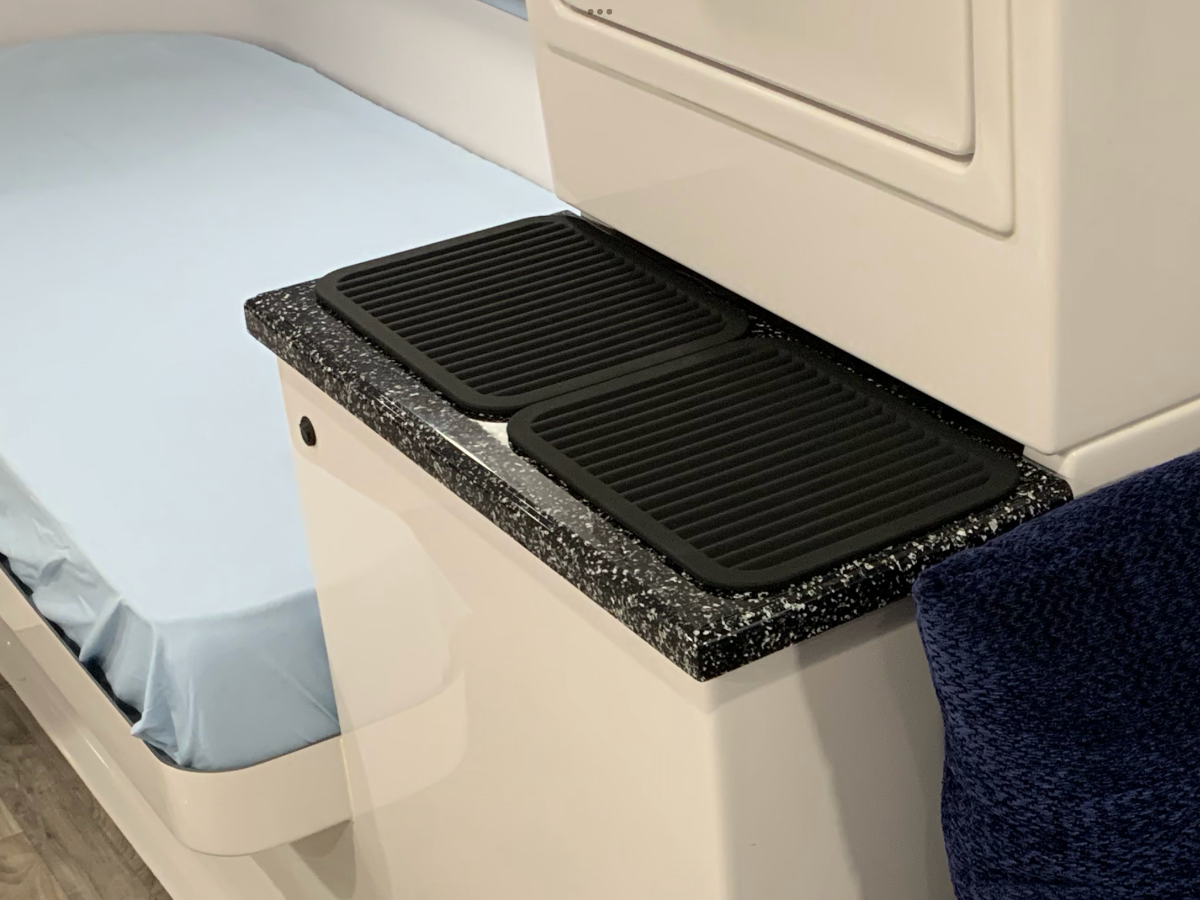
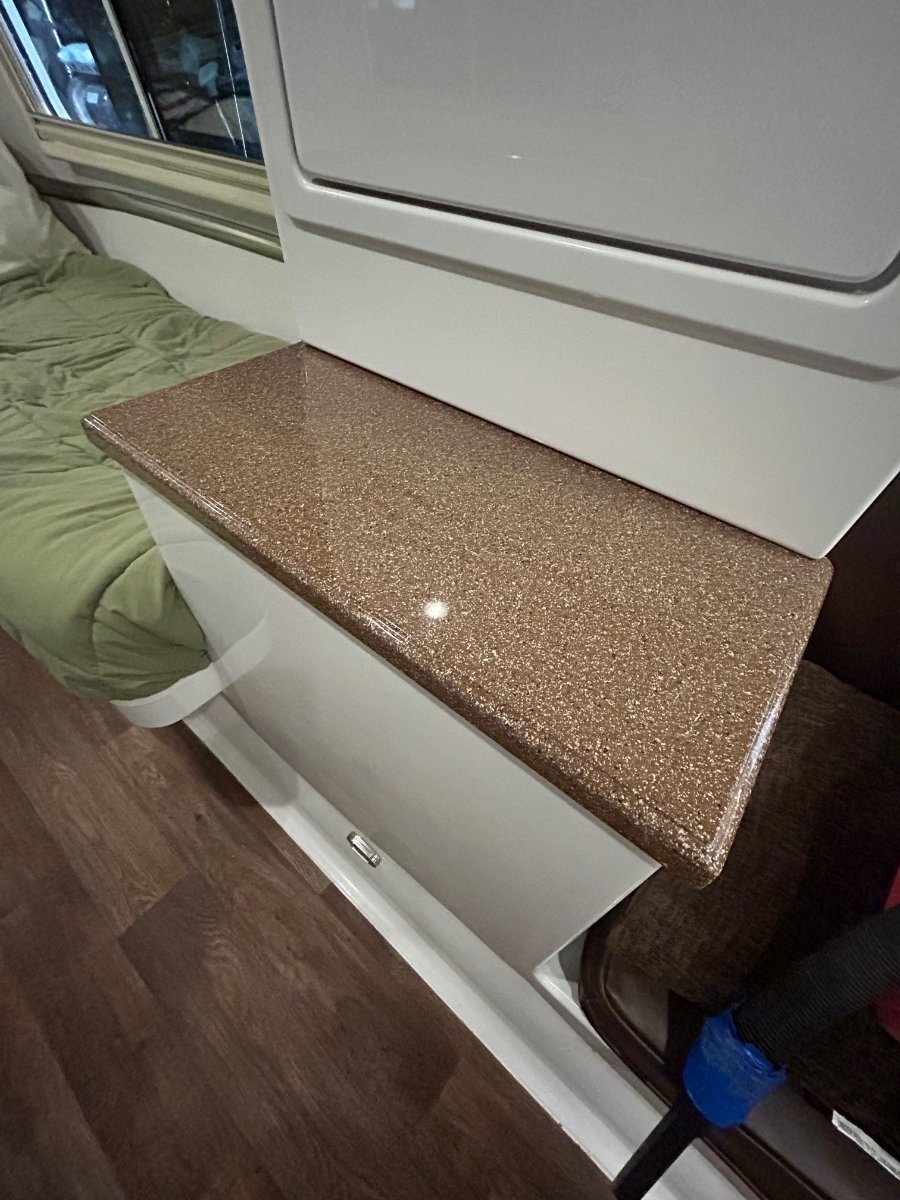
I originally ordered the ‘Black Samba’ fiber-granite for our 2020 OLEll and also opted for the Lagun table in matching color. The Lagun table was only offered with the twin bed floor plan and was factory-mounted on the front of the nightstand, which blocked the nightstand drawer when in place (see pic). I kept the Lagun table permanently mounted even though it hindered access to the nightstand drawer and overhead attic. After a few years I decided to reconfigure the Lagun mount and add a second bed table for independent use by each of us. However, upon contacting Oliver to purchase another ‘Black Samba’ Lagun tabletop I was told that color was discontinued. I ended up buying two in a contrasting gray color that closely matched the vinyl flooring, ‘Monte Blanc’ fiber-granite. After developing a sliding mount and installing the two new Lagun tables, I decided to make use of the original Lagun tabletop by replacing and extending the pantry countertop. The original pantry countertop was then used to extend the dinette table. I previously stated that heavy duty Velcro was used to secure the extended countertop, but 3M Dual Lock Reclosable Fastener was actually the product used, Velcro on steroids! Original pantry countertop used to extend the dinette table.
 3 points
 -
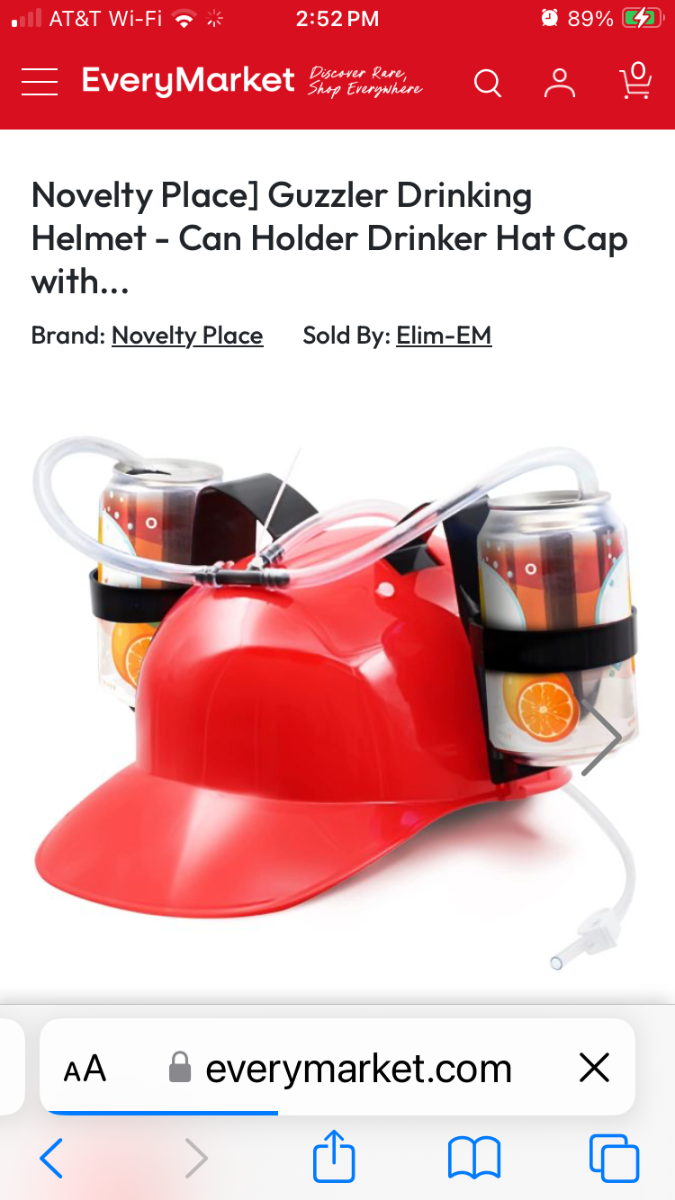
Perhaps you could place two treated, upside down blue solo cups into the holders on one of these drinking hats for when you go hiking? Think of the conversations you would have along the way 🤣 Keep having fun and sharing.
2 points
-
I have to think the lack of authorized or certified Oliver service outside of Hohenwald is a bit of a turnoff to some. Prospective buyers need to realize the vast majority of RV repairs have nothing to do with the trailer shell itself. My research says these guys operate similarly. There might be more. Casita Travel Trailers Escape Trailer Industries Scamp Trailers Bowlus Luxe Fifth Wheels Hallmark RV2 points
-
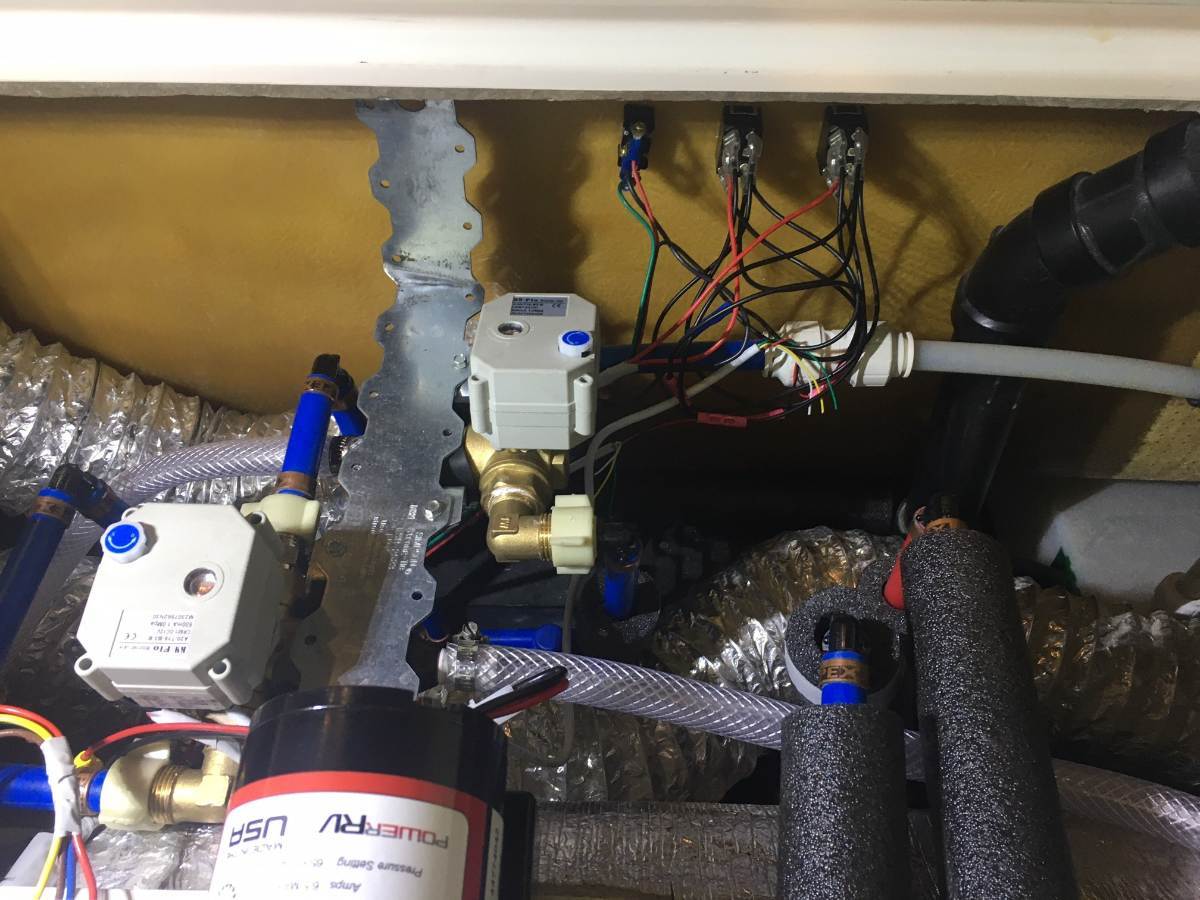
Yes, soft water lines must be installed in and out of the water pump. OTT used some kind of 'white' suction line from the fresh water tank. I'm not sure of the difference between this and PEX except the tubing is translucent and you can see the water within. You can see examples of both tubing in the picture I took after installing motorized ball valves.
2 points
-
I just noticed that with the exception of the dealer in Canada, all of them are now gone. All sales have officially moved back to Hohenwald. I think this will come as welcome news to many potential new owners. Many were opting to actually come to Tennessee for their pickup and delivery anyway. It has been reported that many dealers were taking payment, handing over the keys and sending people on their way without any kind of walk through. That's just not acceptable. Other dealers were selling the trailer, allowing the new owners to pick up their unit in Tennessee and still charging them $1.2-1.5K for "cleanup and delivery". That's just wrong. I believe this is a wise and good move for Oliver. They gave it a good run. Sometimes things just don't work out as well as predicted. Good job, Guys...1 point
-
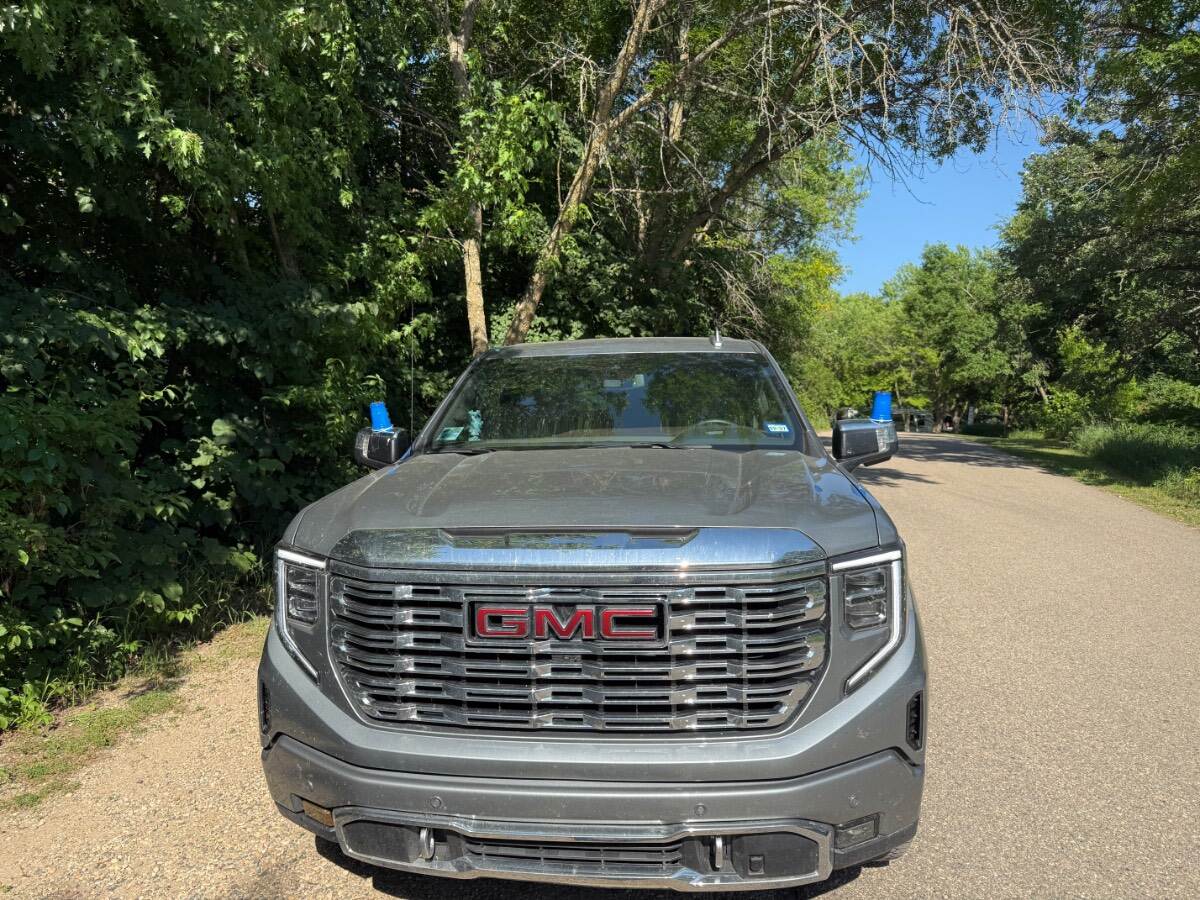
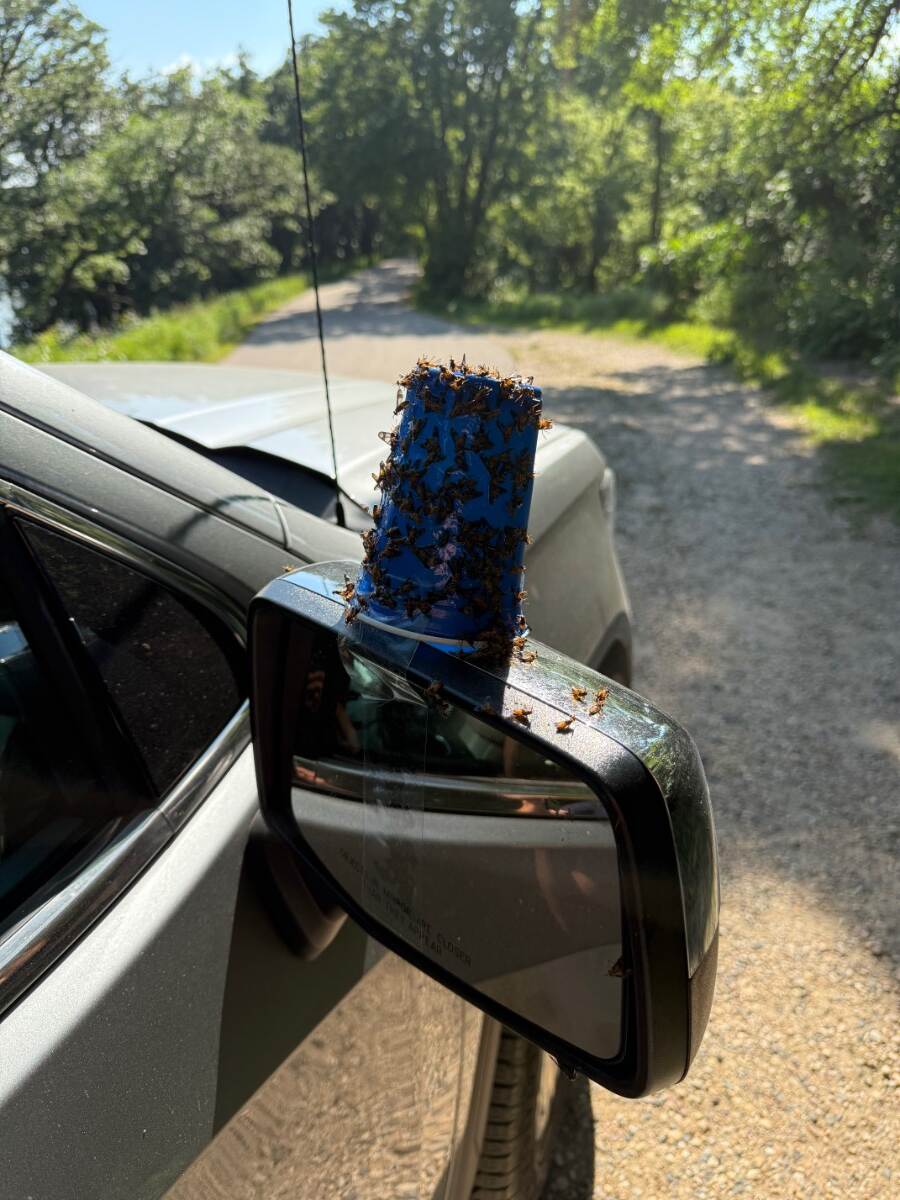
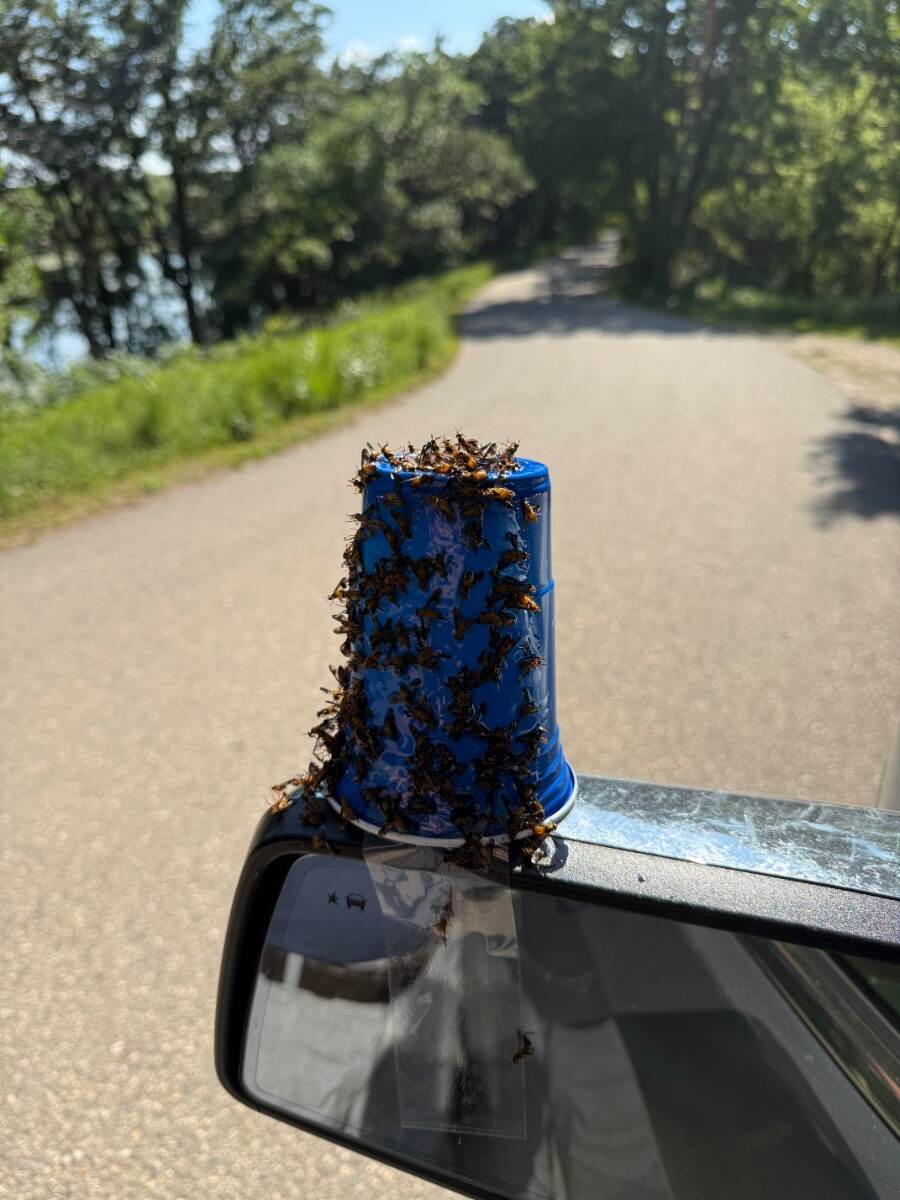
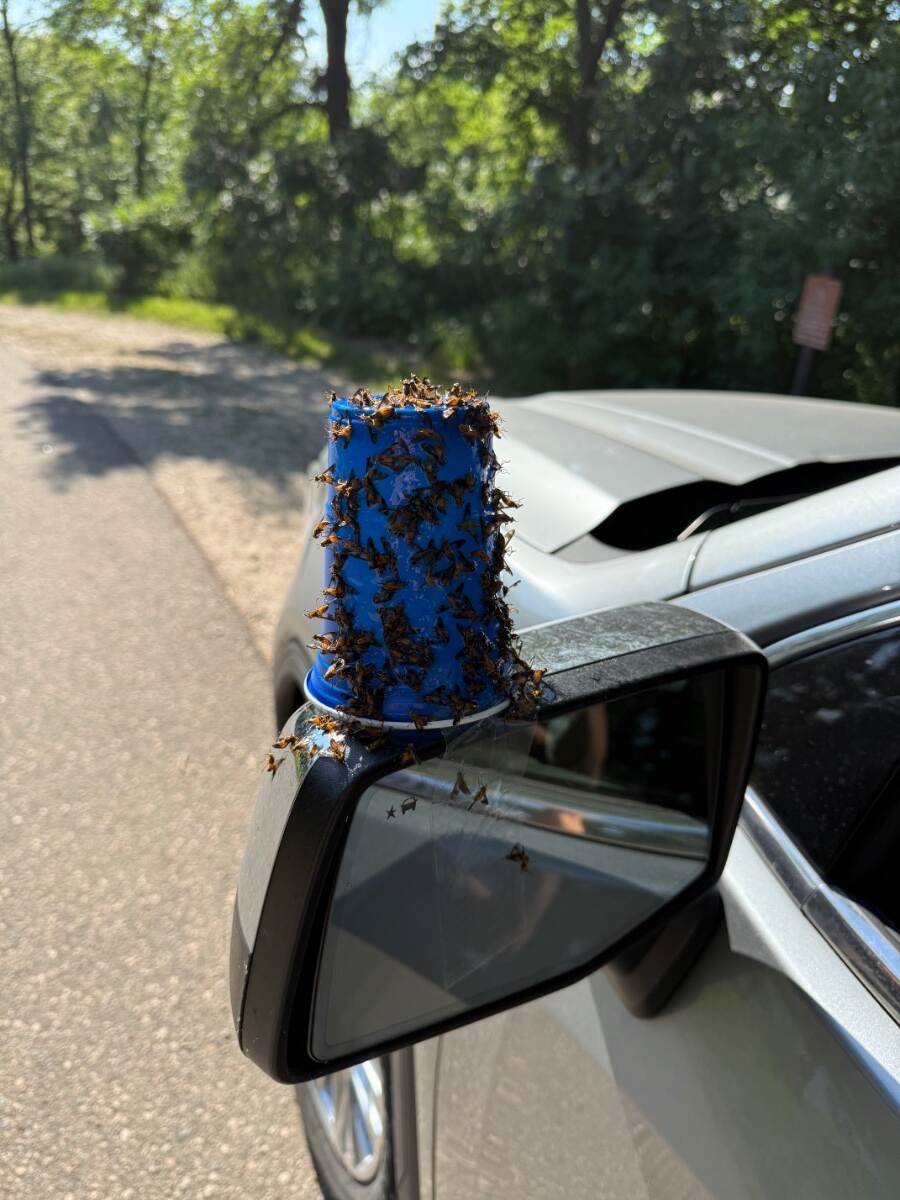
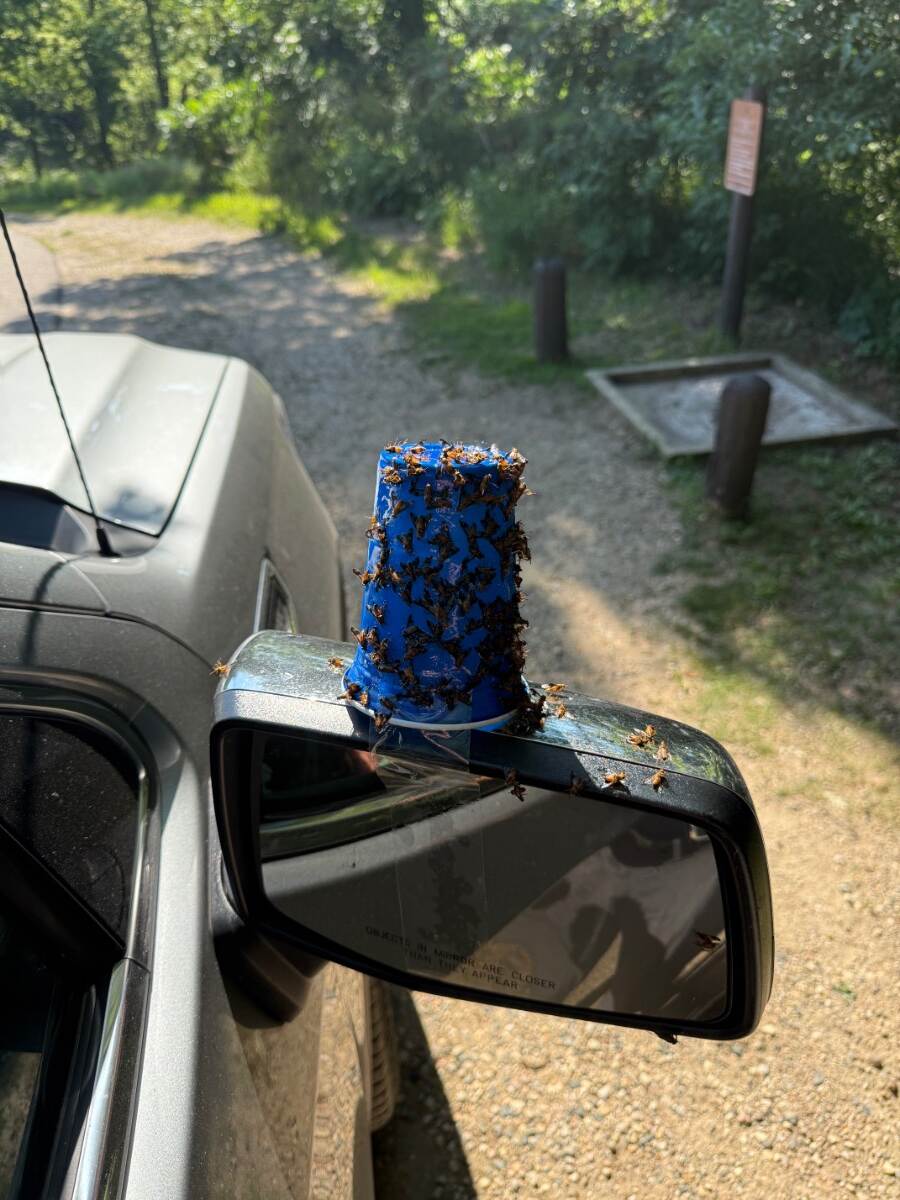
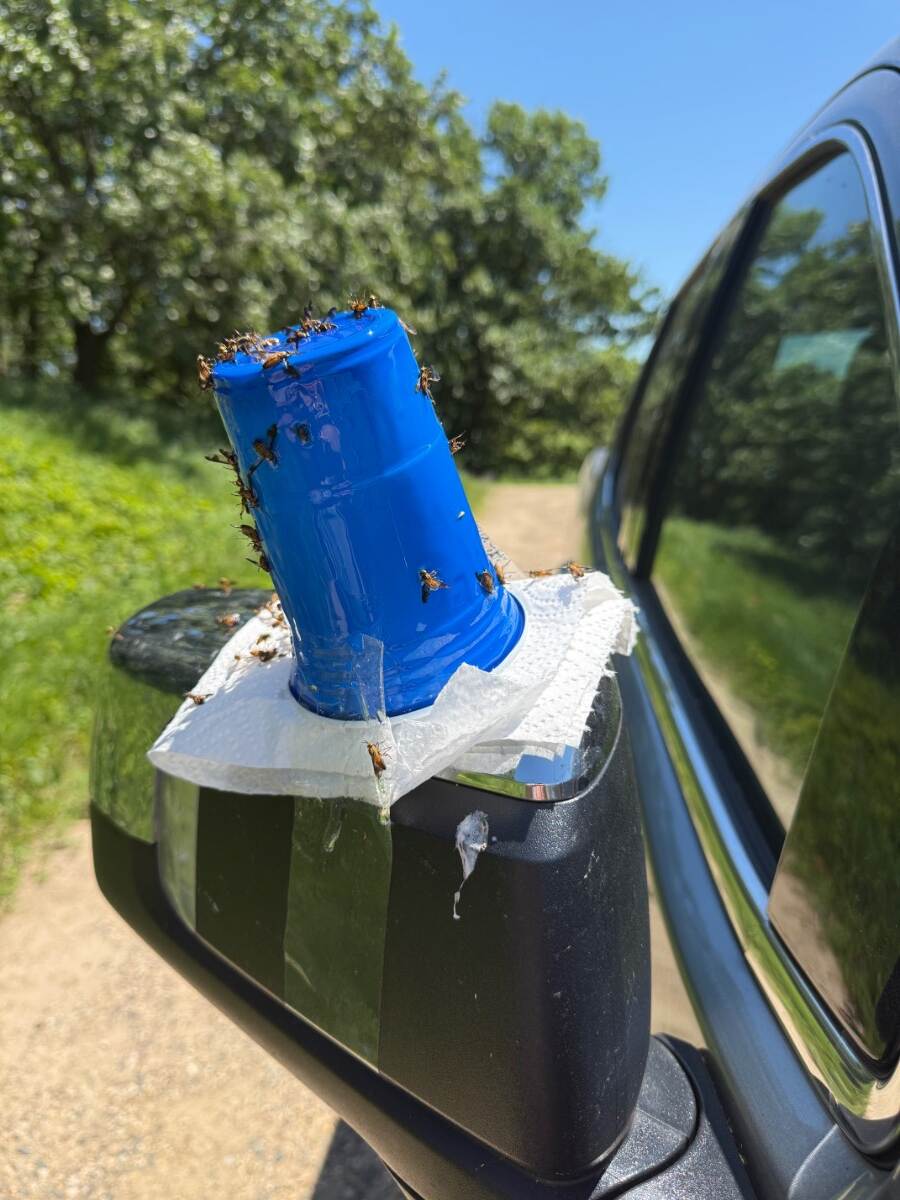
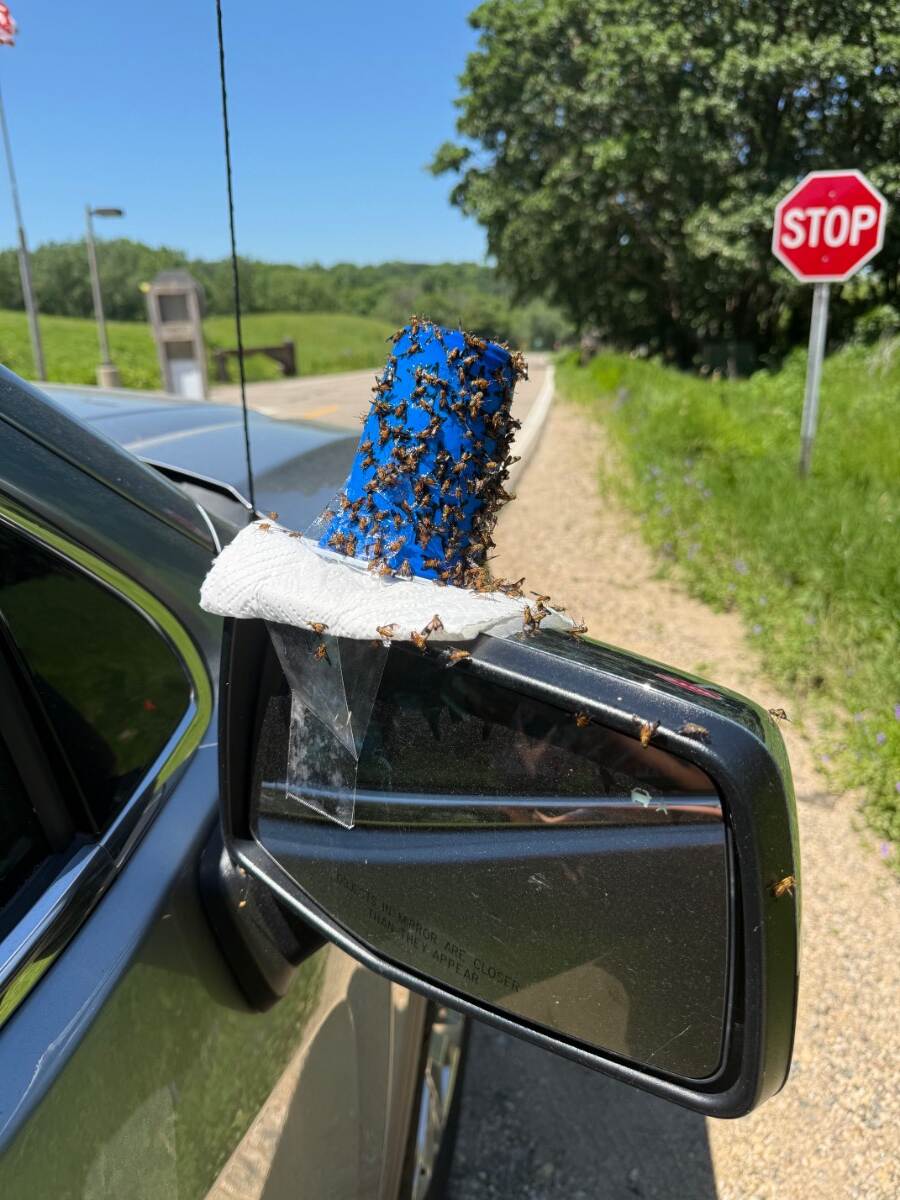
Staying here at Glacial Lakes State Park as campground hosts for the month of July has had me researching how to deal with all of the various annoying flying critters here. Minnesota is called “the land of 10,000 lakes” and humorously “and 10 million mosquitoes”. (I think that’s a low estimate between you and me…) Last year, the park manager told me that this time of year, flies are the bigger nuisance. She was right. We put if a cheapo screen house to sit in (when it’s not 95F of course) but when you’re walking, the deer flies have you at their mercy. The familiar stinky traps don’t attract deer flies, just “filth flies” (house flies). Have one up anyway and have harvested many thousands of those pests. A disposable trap fills up in about three days(!) A little research told me that deer flies go after moving targets, and go for your head or the highest point of whatever critter they’re annoying. I also read that they’re attracted to the color blue. I found a few articles - typically on equestrian sites - that told how to “troll” for deer flies using blue Solo cups and a sticky goo like “Tangle trap”. I used to use the stuff in my garden, so I was familiar with it. Amazon conveniently has a vendor selling a kit with the blue Solo cups and the sticky stuff. Since I couldn’t find any in the local hardware stores or Walmart, I bought the kit. I tried it out by painting the outside of one of the blue cups with the goo and taping the cup - upside-down - to my side view mirror. I took a slow drive through the campground and was shocked at how many deer flies I caught in just 5 or 10 minutes. I discovered that the flies attack - and stick to - the BACK surface of the cup. (Hitting their target from behind) So the next time I tried trolling, I put a cup on each mirror and only put the goo on the back side. Well, as I’ve rambled quite enough, so I’ll show you the pics of my 2-ton deer fly trap and the results. Now - if I could just find a way to ruin 10,000 mosquitoes’ day - I’ll be a very happy camper! (Here’s the kit if you want to make your own fly trap: https://a.co/d/00v6uY1Q ) ps - yes, I did get several quizzical looks as I drive through the campground with blue Solo cups taped to my mirrors….
1 point
-
I've used the personal Thermocells for several years without any issues but they are (probably) first generation models purchased when they first hit the market. Pre-quality fade? They still work after 12-13 years. I've also found Picaridin bug spray to work on repelling mosquitos. Perhaps not as effective as DEET but Picaridin doesn't dissolve your watch band, phone case or camera like DEET will. I also don't taste picaridin after application like I do DEET. Don't know how well it works on deer flies but it does OK with black flies.1 point
-
For us it's not a seasonal event. We use the boondocking valve configuration every week or two since we most often boondock in remote areas and pump extra fresh water from the 35-gal water tank in our truck bed. We also have 12" heavy foam mattresses and thankfully have not had to move a bed once while camping since we installed our motorized valves day-one! 😎 Got this idea from Steve @ScubaRx when I was a Forum Newbie and it has been an upgrade worth its weight for sure! At the same time, we did not want to live with the basic OEM water pump and installed a Made-in-USA Remco variable-speed pump which does not require an accumulator. They claim it's quieter, but I'd say it has a different sound as it increases speed to provide better flow. This pump can run dry for hours to and is generally self-priming given water is nearby in the plumbing.1 point
-
I'm feeling good about it.1 point
-
I sympathize, I had a deer fly take a chunk out of my forehead 50 years ago and I still remember the pain. Any place in the campground (away from your Ollie) you could set up a fan and a blue tarp covered with the sticky stuff? A deer fly version of the mosquito zappers!. For Mosquitos, I've had good luck with Thermocells. Good luck!1 point
-
So cool! Oh boy, I forgot one important thing in my dream Oliver order... No, switches, fuses, breakers or manual water valves installed under the beds! 🤣1 point
-
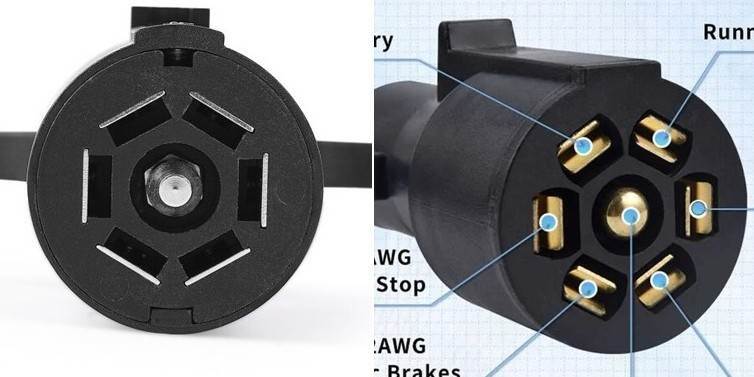
On our last day together, I checked the 7-pin female receiver on the truck side. It was a strange assembly! The female socket was merely pressed into the bumper opening (not bolted), with only plastic tabs keeping it in place! Then the 7 wires were terminated in a plastic terminal that snapped into the backside of the receiver. These two parts were very loose, not strongly connected. It gets me the GMC design does not have this connection hardwired. I gave it a good shake, moving it back and forth and rotating it the terminal. Maybe I cleaned up the connections (temporarily) since @Boudicca908 did not see the error message in the next 2 days towing. If it was my TT and TV, I would replace the 7-blade connections on both sides! replace this female receiver with a part that has a short wiring harness fused to the socket. Then replace the Oliver male plug and cable all the way back to the junction box in the bathroom vanity. Purchase both male/female sides from the same quality manufacturer for the best pairing. Anybody know of a good supplier for quality parts? It's hard to read through all the Amazon offerings and eTrailer wasn't much better. Who makes the best 7-blade connectors? It's not what OTT used on this 2022 hull. The other thing I learned is there are two types of 7-blade connectors (see pic). One has a single blade which I've used for decades, and another must be a newer style where there are two (IMO flimsy) blades. All of my trailers, including our hull #113 has the older single blade style.
1 point
-
Before the shutdown Oliver was planning something similar with the "Sport" package. Check out the price for the "Appliance Package" add on... 😲
1 point
-
Perhaps an understatement! OTT Sales would not want to see me coming. 🤣 if I was to purchase a new Oliver, my build would have NO factory options! No batteries or tray, no inverter, solar wiring to roof but no panels. No A/C or fan, just the two 14x14” cutouts. No rooftop cameras or old-tech Wi-Fi booster. No microwave, just the opening, and no tank gauges. No TV, no radio, no interior wall mounted displays (all we need are Bluetooth apps) not a thermostat, nothing at all. 🤠 No soft furnace ducting, must be fixed hard ducting. No silicone caulk on anything anywhere! Of course we would not be able to negotiate such a bare Oliver, but it would be a great canvas to paint my own design and build. Got to go back to 16” wheels, D52 axles and the full 5-leaf Alcan Spring package and LT vs ST tires. I wonder the price tag on such an Oliver? It’s actually what I’ve done the hard way in a used Oliver, using fiberglass fill patching 100 holes, literally. 🙃1 point
-
I got this idea from a social media posting, but here's a quick mod that makes the "secret compartment" below the Pantry easier to access: 1. Pulled off VELCRO from cabinet. 2. Installed a couple 8" drawer slides from Amazon: 3. Replaced the VELCRO onto the drawer slides: 4. One and done, can't even tell the difference; except for the convenience factor - time for a cold one. Cheers! A & D
1 point
-
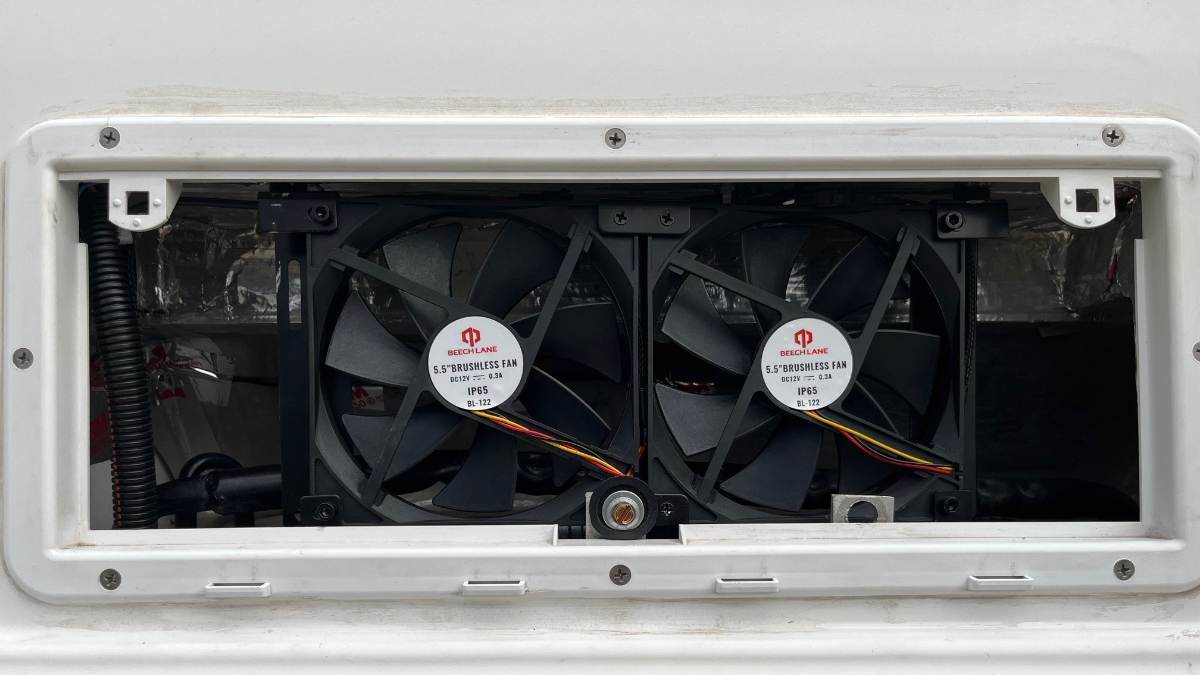
Given a Windows PC, turn it right-side up using the rotate button. Then click on Edit and crop your picture. I usually crop, flatten most to the 16:9 size, then Save or Save as Copy if you want to keep the original. It should stay right-side-up after working these steps. Agreed, they are kinda goofy, could be smaller with more simple functionality. I usually just push the one button setting fans at 50% and don't use/trust the temp set function. Great fans though! If you can fit the larger size, they pull a lot of air hence my using the 50% setting. I have one installed in the upper fridge vent and another installed in the basement to cool the Victron MP2, exhausting to the rear storage area. I only set them when needed, when I feel the upper fridge vent is hot or anytime the sun is on that side. The Victron has a temp reading on the app and rarely (when hot outside, battery SOC low, charging on full at 120A) I'll also turn it on at 50% where at this setting these fans are whisper quiet. 😎 I'm with John on this one, for utility besides safety reasons. I installed two Beech Lane fans both exhausting hot air, like we use our cabin MaxxFan in exhaust mode only. Neither style fan will function effectively (nor efficiently in CFM) when installed to push vs. exhaust air. The Beech Lane fan mounted nicely in the upper fridge vent in our hull with the older Dometic 3-way absorption fridge, no custom bracket required.
1 point
-
5k buys a lot of battery power and portable solar. An awning has to be brought in in windy conditions. Pretty prevalent in many parts of the west. I'd skip it. We use the original awning a lot. Sometimes only a foot or two over the door. Never been tempted to get a second awning, though. Congratulations on your upcoming adventures!1 point
-
I am NOT disappointed to see the dealer network go. But a separate issue is finding good service centers outside Hohenwald. I managed to find one in my Wisconsin area where i feel comfortable taking my Oliver. The key to this success is the willingness of Oliver tech support to work with them when necessary. OTT has been very good about this. After all, most of the components are not "Oliver" and appear in other trailers. At one time I suggested creating a directory of Oliver-friendly service centers across the US, but the logistics of doing so and the relatively small footprint of Olivers didnt make it practical.1 point
-
A little sad to see this, as I thought the intent was to have qualified service beyond Hohenwald . But, I get it. Oliver is a distinct elite niche product.1 point
-
We use a compressor and small nozzle at the end to blow out the track drains. Also have used pipe cleaners and wire in the past. The window design is pretty much window industry standard. My home windows also have weepholes. If drains/weephole are clear, you have other issues. Definitely eyebrows/gutters help, but is there another issue?1 point
-
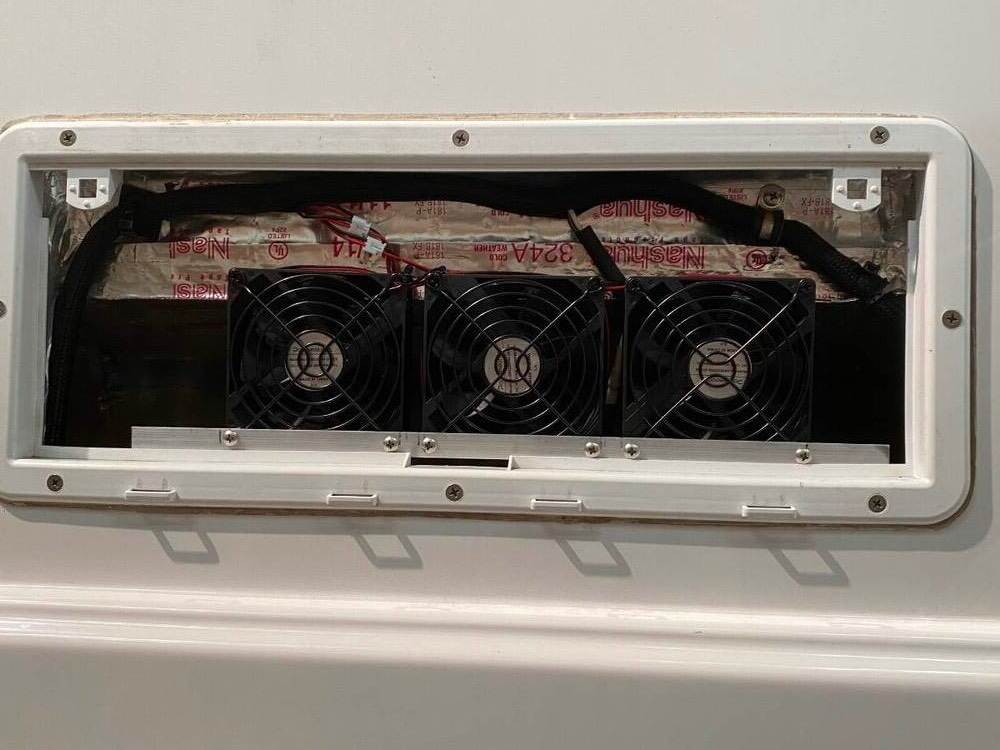
Geoff, Thanks for all the ground worked you did in testing and designing your fan system and such a great writeup. It really made this job a lot easier. I copied the bottom side of the installation pretty much what you had. The only change I made was the order of wires on the terminal Block. I started with the 12V+ on the bottom and then the 12V- on the top of the block, and did the flow up the terminal block just like your electric diagram: 12V+ ->Main switch -> Thermal Switch -> Fans -> 12V-. On the top side I had about 3.5 inches of opening clearance from the bottom of the opening to the fiberglass support for the microwave shelf. I did find a fan that was 92mm (3 5/8") with IP68 waterproof rating. I used a 1/2 aluminum angle stock and screwed downward into the middle of the outer shell and shimmed the aluminum angle up about 7/32" so the #8 Bolts heads would clear the plastic and I would have A little more contact of the fans against the upper section in the back. The top of the fans are not screwed in. They are setting against the upper fiber glass shelf with about 3-5 pounds of pressure. Nice tight fit. Sorry the picture is upside down I can't figure out get it correct. I tried rotating the original but that didn't help. Things I really like about this setup. 1. The terminal block Allows for quick diagnostic with a voltmeter. 2. Nothing is hardwired, All components have connectors so the thermal switch and fans are easily replaceable when there is a failure. 3. The thermal switch is very easily adjustable for height and location. 4. The wiring looks clean. I did a test on it yesterday. It was around 86 degrees outside. Took about 30 minutes for the thermal switch to kick on. Temp was between 120-125 degrees coming out of of the hottest side of the fans . I don't know why but I couldn't find a source for the original switches on the inside control panel without going through Oliver. I wanted to put in a dimmer for the outside porch lights and I was pressed for time to order an original switch from Oliver and to wait 2-4 weeks to get a part from them. So I bought a dimmer for the porch lights and received it in 2 days and moved the original porch light switch to the Street side awning position to use for the fans. Lastly, thanks for the info on removing the microwave, I never would have known about the jack screw. The inside of the microwave cabinet was slightly different. There was a step up in the back sort of like a backstop for the microwave the went clear across the back of the cabinet. So I removed 5 screws holding the bottom panel and backstop, This allowed full access to the back. After feeding the wires and loom through to the back of the fridge area, I resealed the hole with spray foam behind the microwave, and re-taped the Fridge area with aluminum duct tape around the loom and touched up some areas where the original tape was having some problems. It was a good thing I had to remove the microwave. The microwave was coated with fiberglass dust and there were piles of fiber glass dust in the cabinet. Now at least the back of the microwave and the cabinet is clean. I do not know what the air flow is inside and around the microwave, but I would hate to think that fiberglass dust got into the food/drinks.
1 point
-
Hopefully her brake issue is fixed for good!1 point
-
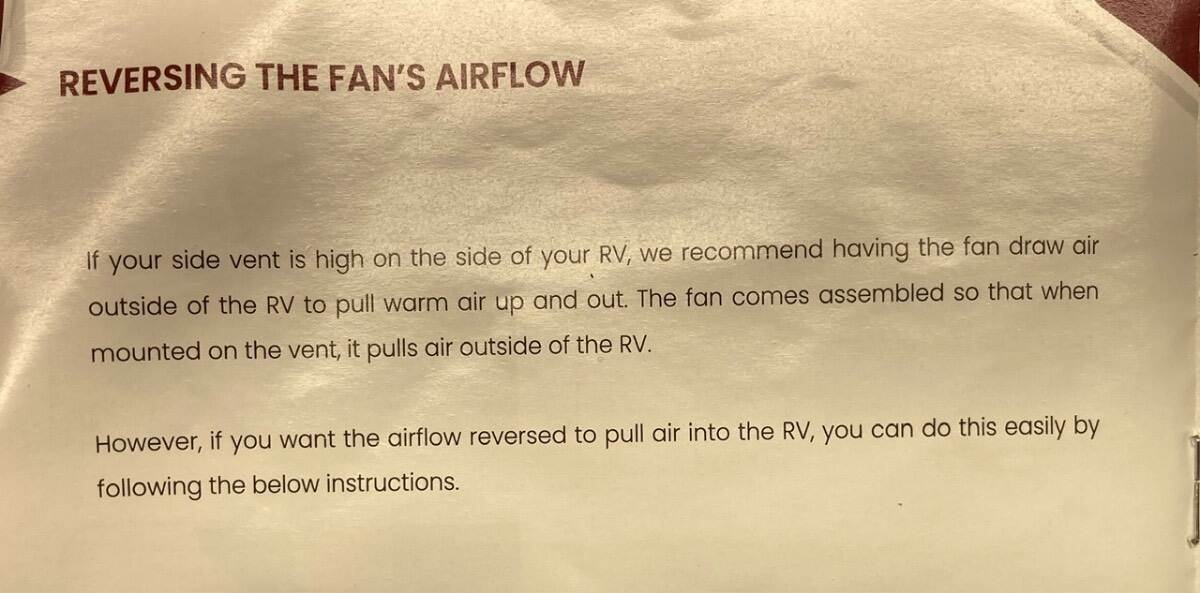
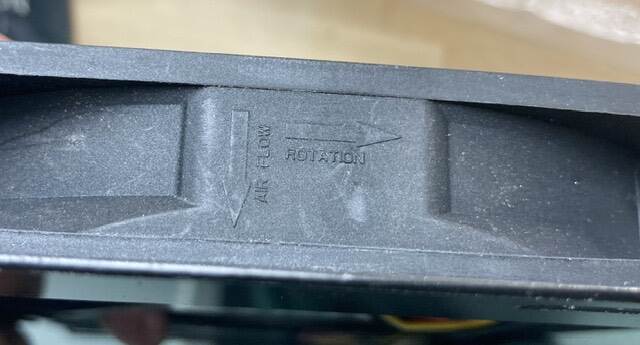
For those considering installing the Beech Lane fan, the instructions advise to mount it on the upper vent, blowing outwards. There is a small diagram on the side showing fan rotation and airflow direction.
1 point
-
Yes you are correct, and that is for the VAST majority of trailers/TV's that use the Anderson. But.... The vast majority of OEII's just don't sway, even under extreme circumstances. Properly loaded they just don't sway. For that reason, many of us have no need for that great feature of the Anderson "system". Starting with John Davies, we lube the ball to reduce the wear. I am not suggesting that all new owners assume the same is for their setup. Get some experience and then decide how your rig handles under extreme conditions. If after a few years you figure it out, then join the "Don't lube your balls" team. LOL GJ1 point
-
As JD pointed out natural convection will be low to high. Adding the fan above to move that hot air out is from an engineering perspective logical. Doing so puts the refer cabinet into a slight negative pressure condition. On the flip side, for those of us with the three-way there is another more important reason that I feel needs to be considered. The three-way units may be used on gas. Burning gas can, and does, omit some by-products that can harm. Like CO for example. If you set your fans up as a pusher (Moving air into the refer cabinet, and your seals on the cabin side are not perfect (And NONE of them are), you would be in effect giving the bad stuff a direct powered path into the cabin. You and your traveling partners may not wake up as a result........ This is why mechancal rooms are properly designed to be negative air pressure to occupied spaces. If yours is pushing air into the refer cabinet, I emplore you to change it. GJ1 point
-
again ???????1 point
-
Next time at your storage, take a good look at the jack post to see if it’s straight and can fully extend and retract. If you need a new post, I’ve got one, could ship to you. 😎1 point
-
Certainly that hole where your brake wire exit the axel SHOULD have a grommet. However, as a number of owners have found out - the brake wires that run through the axle can "short" due to the insulation wearing off INSIDE the axle where you simply can't see it. Mike Thompson (among others) experienced this. The good news is that the fix is fairly simply and inexpensive - run a new set of wires on the outside of the axel(s). I'm sure that Mike (or others) would be happy to give you the details. Bill1 point
-
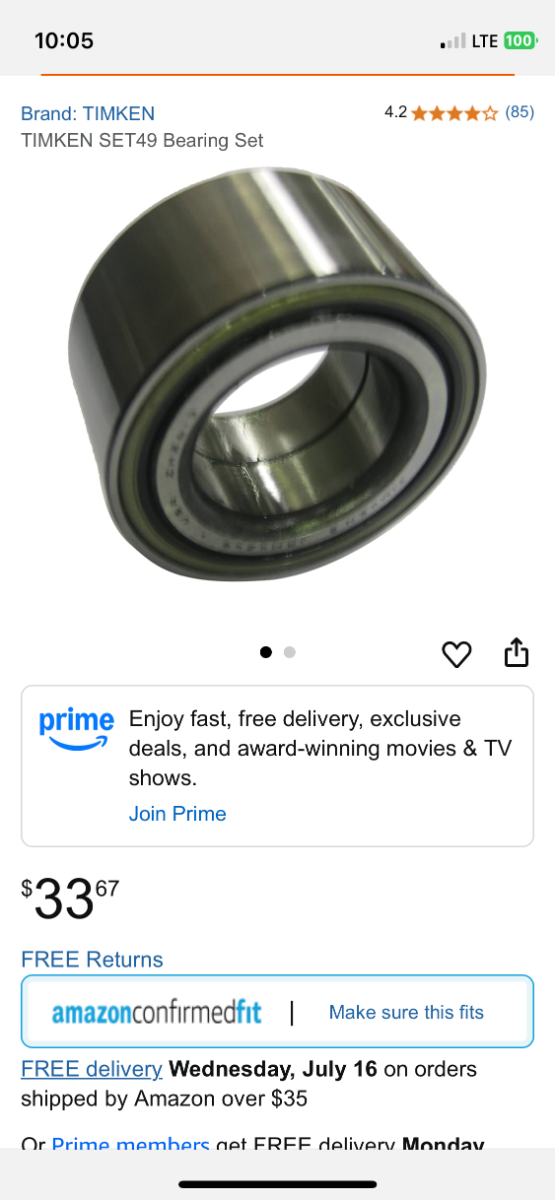
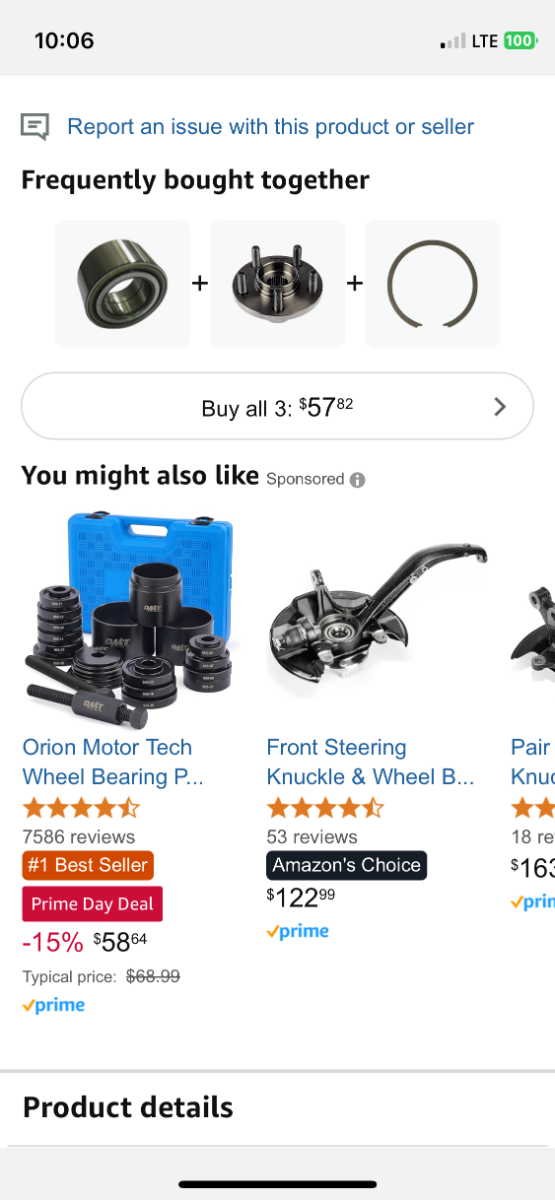
You will need a bearing kit: https://www.etrailer.com/Trailer-Bearings-Races-Seals-Caps/Dexter/31-73-3.html Or you can save some money purchasing parts separately. The Chrysler PT Cruiser, 2010 and earlier used the same bearing as their front-wheel drive wheel bearings. You can find them here and 100 other auto parts stores. https://www.rockauto.com/en/moreinfo.php?pk=1117862&cc=1441786&pt=1672&jsn=10543 https://www.summitracing.com/parts/tmk-set49?seid=srese2&utm_source=bing&utm_medium=cpc&utm_campaign=Brands+|+T&utm_term=4581596235429750&utm_content=GSAPI+5ba2a4366829c There's this company... Though I have no idea as to whether they are legit, but good prices as listed. Don't buy bearings here but it appears they have the correct snap-rings and perhaps other Nev-R Lube parts! https://www.easternmarine.com/catalogsearch/result/?q=Nev-r-lube And you need to get a bearing press. I suggest buying this even for those of you how would not entertain doing the work yourself. Most small shops will not have the correct size press fittings. https://www.harborfreight.com/front-wheel-drive-bearing-remover-and-installer-kit-21-piece-63728.html This kit is what I used it to remove and replace this this axle bearing! And you will NOT want to tote around this toolkit with you at 17x15x4" large and 25 LB heavy (though I could name a few Oliver Owners who would do so!). If you were to carry 6 LBS of numbered tools, as pictured... These are the tools i used.
1 point
-
After safely jacking up the Oliver, and removing the wheel, the brake drum/hub must be removed. First you'll need an extremely light snap-ring pliers for the spindle nut keeper which is required to get the hub/drum off. Then the spindle nut must be removed which requires an extremely large 1 7/16” socket. This nut is torqued to 150 lb-ft! You may need your spouse or travel partner to apply the TV brakes so that you can release this nut using a HD breaker bar. OR if you have a HIGH-Torque battery-powered 1/2" impact it makes this and several other tasks so much easier!🤣 Sockets of this size are generally 3/4” drive so you may also need a 3/4" to 1/2" socket adapter. The main bearing-keeper snap-ring is HD! You'll need quite a HD snap-ring pliers and good hand strength! If you intend to have an auto or trailer service shop work the bearing replacement, they can also remove the larger snap-ring, but it’s good to have all he necessary tools of which any small service station may or may not possess! These are the parts you would remove AND the same parts that may have to be replaced, besides the BEARING! I suggest having two complete bearing kits with you at all times.
1 point
-
Several years ago I was going to replace the bearings and brakes on my 3500 pound axles. I contacted a local Dexter dealer and the hub/drum assemblies were over $100 each and the loaded brake assemblies were close to that as well. Of course e trailer was even higher. I called the Dexter distributor that Oliver was using at the time, Textrail. The hub/drum with Chinese bearings were something like $46 each and the loaded brake assemblies were like $45 each with the manual adjust brake assembly even less. Anyway, e trailer is not necessarily the price leader so check around. And absolutely yes! I’d never buy Timken bearings from Amazon. I bought mine from a local industrial supply company that I dealt with for years. Bearings ordered directly from Timken. I think even the ones from Summit may have been knockoffs as well. I could be wrong on that but it seems like someone did a deep dive into this at one point. Anyway, buyer beware!1 point
-
The bearing installation tools that I have seen have a bunch of different diameter/different length tubes and a couple of thick discs one being threaded and a forcing screw. I believe the kit is all that’s needed to draw out the old bearing and to then press in the new one. Or so the YouTube videos that I’ve seen seem to show. Anyway, yes I’d carry a complete hub/drum assembly and two or three extra bearings. Also don’t forget to have several of the single use lock nuts on hand. The tru arc snap rings are reusable and pretty standard items.1 point
-
Okay, risking banishment from the planet and the inevitable public humiliation, my one and only update on my recent axle and spring upgrade. We are in the midst of a 3 1/2 month western trip. Granted a good deal of the trip was planned around a visit to Grand Junction Colorado we have made a complete trip out of that one appointment. I firmly believe that Oliver’s decision to change axles from the 3500 pound version to the 5200 pound version is one of the best decisions made. Nothing like extra capacity. Also the heavier springs are also a great benefit. I have noticed reduced rocking during travel. My original springs had relaxed quite a bit because I had only about an inch or less of clearance between the U bolts and the frame. There is now around an inch and a half to two inches of clearance which is probably a little more than what was originally there. I have done a little research on the Nev R Lube Dexter axles with very limited cell service so more research to come. The bearings used for the 5200 pound axles are also used for the 6000 pound axles. So there is a little bit of extra capacity there. I also found out (not totally confirmed yet) that the bearings are also used for front and/or rear axles in several smaller cars. I also found out (not totally confirmed yet) that the Timken bearing used is a standard Set 49 bearing sold at every auto parts store for a fraction of what Dexter charges. The bearings are fairly easy to replace using a standard automotive wheel bearing press kit. So can be done on the road if needed. The bearing press is available at Harbor Freight and Amazon and I’m sure dozens of other places as well. Of course all the above information is to be confirmed once we get home in August sometime. Others are more than welcome to join in the research.
1 point
-
We’re in Grand Junction this morning with the guys at Alcan installing new 5200 pound axles and new springs! I also noticed that heavier bronze bushings are used in the Alcan springs. The Dexter bushings are sintered bronze AKA Oilite bearings. These thin wall type bearings are the wrong application for use in a rough bore because they are so brittle. Typically they should be pressed into a finished bore then final reamed to correct final diameter. Anyway, the Alcan bushings are machined from bronze bar stock and are the correct application.1 point
-
We did this mod without knowing it was already posted! Our exception was utilizing 12lb double sided tape and black 10" locking drawer slides. The tape (from local ACE Hardware) was the thinnest we could find in the weight capacity I was looking for. It's installed on both the slide base and the bottom of the countertop. I was concerned about it floating too high above the base but it closes up nicely and is not noticeable. Not concerned about pulling them off as all the force is lateral and not expecting any weight bearing for the tabletop once slid out. https://www.amazon.com/dp/B08GJMLDPL?ref=ppx_yo2ov_dt_b_product_details&th=1
1 point





.thumb.jpg.e34bf01ef7f7d5e99ad31856d45afbeb.jpg)
_pdf.png.1032bd6270d521bb1a9f25f96cdcbdcf.png)













-
Recent Achievements
-