Leaderboard


Popular Content
Showing content with the highest reputation on 12/30/2020 in all areas
-
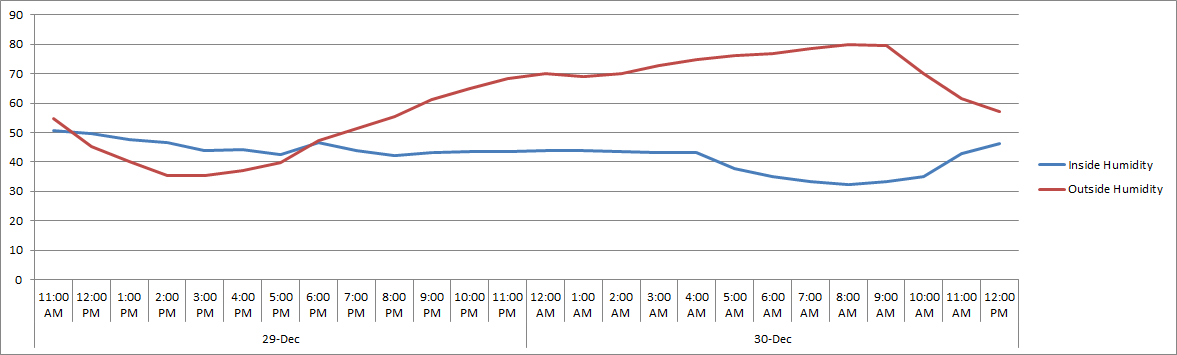
Ok, for the data geeks like me out there, here's the test results with no heat other than an electric space heater set to ~65: This was a "real" test since I actually showered and slept in the trailer last night. Some of the interesting things that impacted the data: - Showered at 5:30PM yesterday and again at 9:30AM this morning. You can see the associated spikes (about +5%) in the inside humidity from that. The humidity also stayed in the low 40's with me in there as compared to the low 30's without anyone. So each person may raise the humidity by 5-10% to JD's earlier point. It starts to go down again once I turned the heat up (see next point). - The temperature dropped to about 62 during the night and I woke up cold at 3:30 AM. I had the space heater on low and it couldn't keep up. I put it on high mode at the same temp and slept fairly warmly for another hour. You can see that the temp does spike during that time and it does not drag up the basement temps at all - as expected. - I added a sensor to the floor of the closet at 10:00 PM. It's just as cold in the closet as it is in the storage area and front street basement. I'm convinced I need to gain access to that area (somehow?) and poke a hole in the duct. 🙂 - At 7:30AM I pulled the plug on the test and started the furnace up. The temps in those 3 areas mentioned were around 38. The low overnight was 28, so maybe could have survived a few more degrees without the furnace but not much with the fresh water and city water valves probably at risk the most. I may have to address that risk as well. You can see everything shoots up pretty quickly once the furnace is started. Would have been nice to see how the temps rebounded on their own and how close it tracked to the outside temp, but I'll have to do that next time. I suspect they would not have rebounded fast at all given that when I cranked up the space heater at 3:30 AM it didn't stop the basement temps from plummeting at the same rate as the outside temp. - I ran the space heater on the inverter for a while to see what kind of drain they put on the batteries. I charged the batteries at 5:30PM before I started and again at 8:30 PM after I finished. You can see the heat goes up in the street side basement from the inverter fan during charging. The batteries drained 45% (180 amp hours) over that 3 hours and it wasn't even that cold out! I had the heater set on low and it was drawing about 80 amps consistently when on. That's incredibly high drain, so electric heaters aren't going to work well for boondocking. - All in all, it looks like all the basement temps came down about 10 degrees closer to the outside temps with the space heater as compared to where they were with the furnace. More importantly, the furnace is keeping the basement temps from falling as fast as the outside temp does. It's also a great way to get some heat into the basement areas pretty quickly if needed.
 7 points
 -
NC had a cold snap over the past few days / nights and I was able to get some pretty good data that validates what other owners already know - the Ollie does quite well in cold weather and will stand up to just about anything if you run the furnace. Disclaimer: I have done some minor cold weather modifications. In addition to adding some reflectix to the outside shower housing and the battery and basement storage doors, I added a furnace duct through the basement and down the street side. By putting 3 small holes in the duct to help heat that side of the basement, I have raised the average temp ~7F, so that gives you an idea if your Ollie is stock. During this testing, I had the hot water heater on occasionally (I've been testing my new shower head) and had the fresh water tank full at the start and used 20% or so during the two days. Here's the data: Some observations... 1. The higher risk areas are definitely the rear storage compartment and street side basement. They tend to get colder than the other parts of the trailer and do have a considerable amount of plumbing. 2. The front street side near the toilet / black tank are definitely the coldest. I'm not worried about that as I have a composting toilet and have drained the water from the line that's there for the standard toilet. 3. Both nights were similar in temperature, and an average of 7.2 lbs of propane was burned per night. At peak, the furnace ran 5 times per hour for 7 minutes each (so 35 minutes per hour). During this test, I burned about .75 pounds of propane for each 60 minutes of furnace run time. I'm going to run a separate test soon to pinpoint propane usage over furnace run time as that's going to be important for trip planning. 4. The batteries run the furnace and each night the batteries dropped an average of 22%, so 88 Ah of battery was also required per night. 5. As long as the Ollie has electricity and propane, nothing is going to freeze easily if at all. Even the Lithium battery compartment stays warmer than I expected. I need some colder temps to do more testing, but this looks very promising!
4 points
-
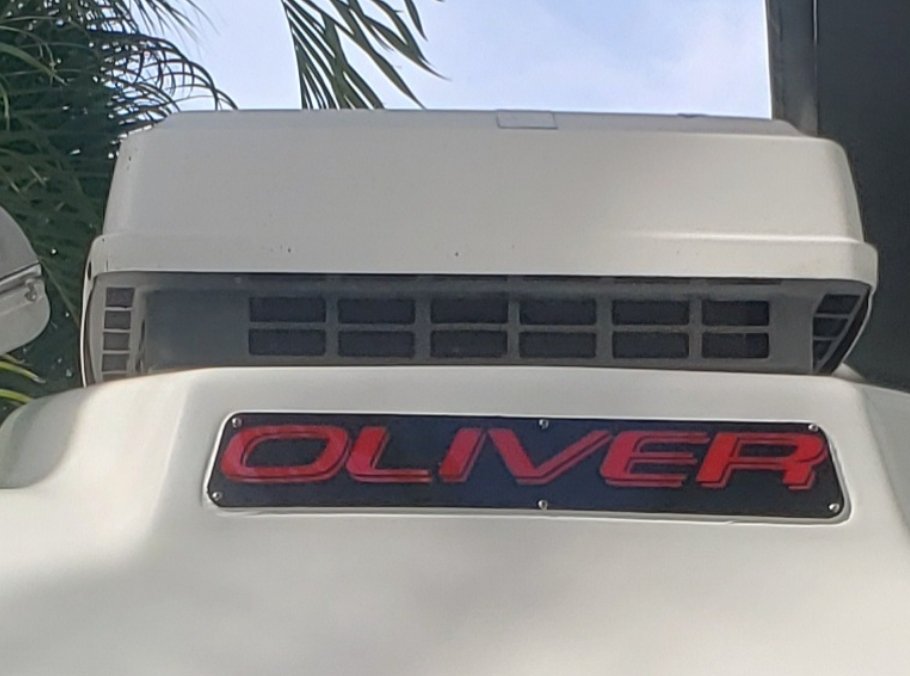
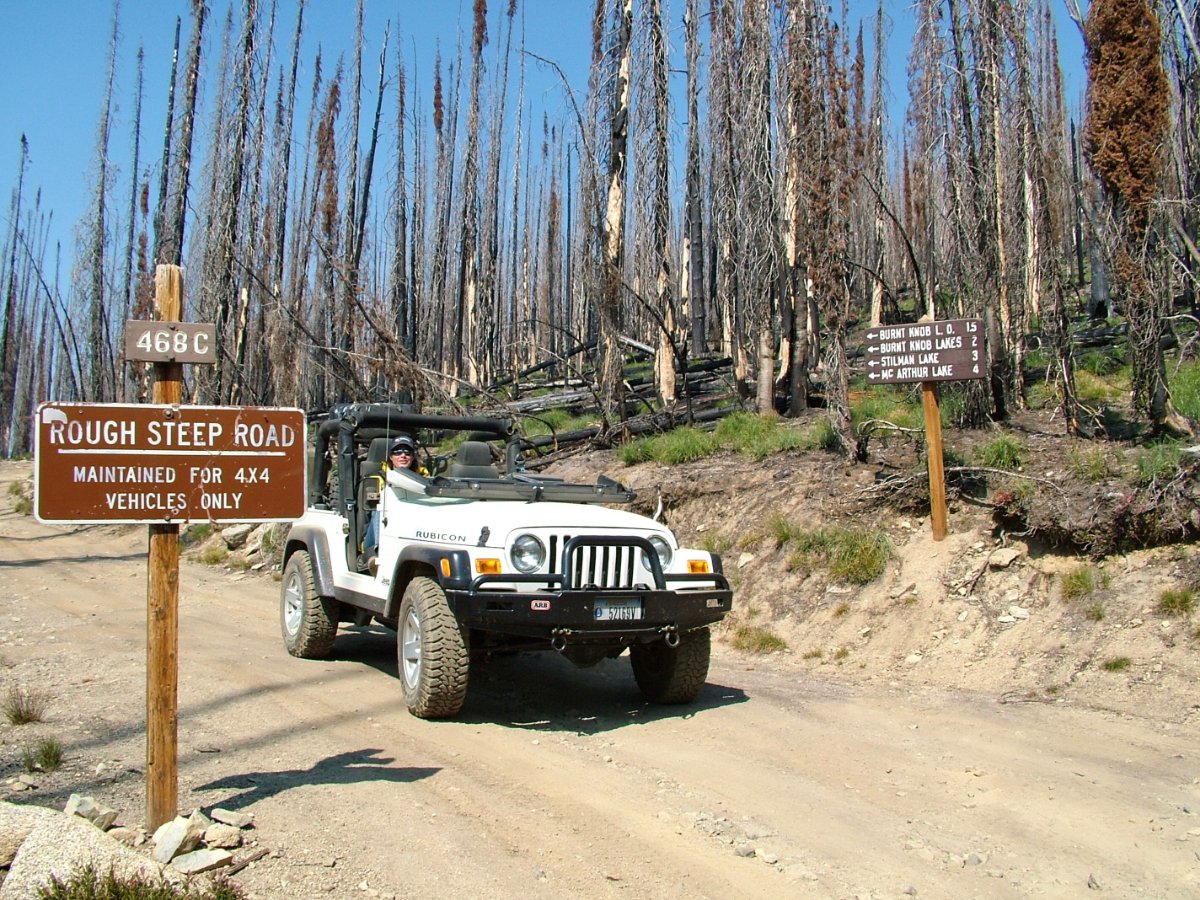
The Oliver is capable of being towed with just about any Tow vehicle. Well almost anything.😜 Happy new year to All 🍾 🥂🎉
4 points
-
Follow-up on delivery: In case any are wondering the cost of lodging, RV sites, and fuel associated with delivery, here are expenses of our 5,000 mile (plus a little bit) trip from the Southern Oregon coast to Howenwald and home again (rounded to the nearest dollar): Fuel - $927 (diesel) Average mpg 14.30; mpg affected by driving conditions - windy and cold conditions on I-80 all the way from Utah through Nebraska on the trip to Tennessee. Average mpg towing on the trip home was 12-15. Speed also played a part in mpg since it seems to make a big difference in the 1-ton diesel fuel usage when driving at freeway speeds. Diesel prices High 3.56 (CA) Low 2.08 (NM) Lodging and RV sites - $986 Hotels on the trip to Hohenwald - $734 (8 nights) RV parks on trip home - $252 (6 nights) We took our own food; only ate out three times. Didn't count this as delivery cost since we have to eat anyway. Picked up some supplies - hitch, small tools, etc but all were non-consumable and not included in cost. Total cost of delivery $1,913 Value of adventure, priceless4 points
-
I agree about the water heater. It has foam insulation on the inside, to keep the water warm between cycling on and off. But outside, under the ventilated cover, there is ZERO insulation. Which seems to me to be a pretty major design flaw. When you drain the tank, remember to turn off the electric heating element switch outside, and also flag the inside propane switch so nobody will try to turn it on when it is dry. I use a strip of blue masking tape across the rocker..... John Davies Spokane WA4 points
-
Kudos on collecting, compiling, and presenting these data. It appears that the space heater resulted in a 10°F temperature differential between outside ambient and basement temperatures, and the furnace (with the ducting mods you've made) made an approximate 20°F difference. Thank you also for recording propane use. Your nightly use of 7.2 lbs of propane, or about 1.7 gallons (at 4.24 lbs per gallon), would cost about $7 (at $4.00/gallon). Substantially less than the tax on a ski-area hotel room.3 points
-
I would drain the water heater and bypass it, for the winter. Small spaces freeze first. Easy enough to refill when you want to go camping .3 points
-
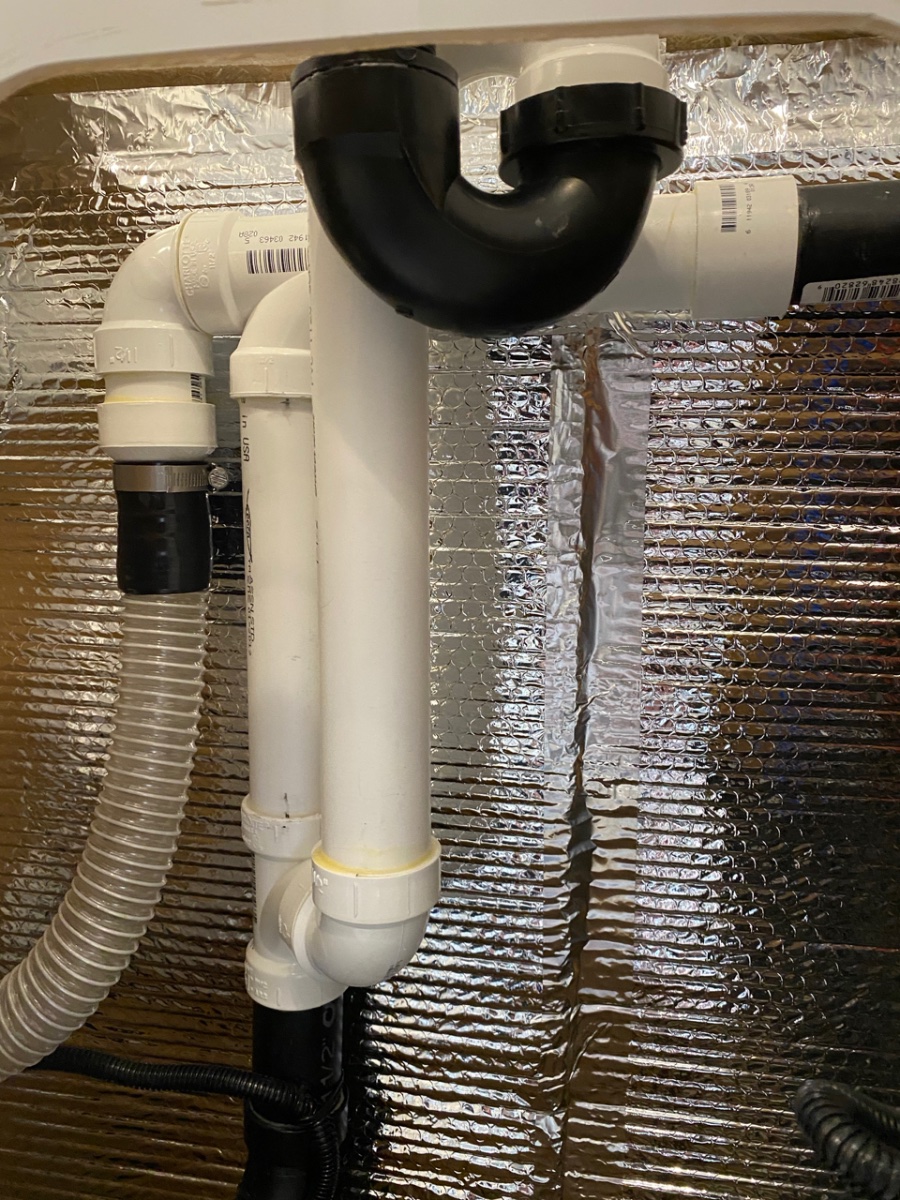
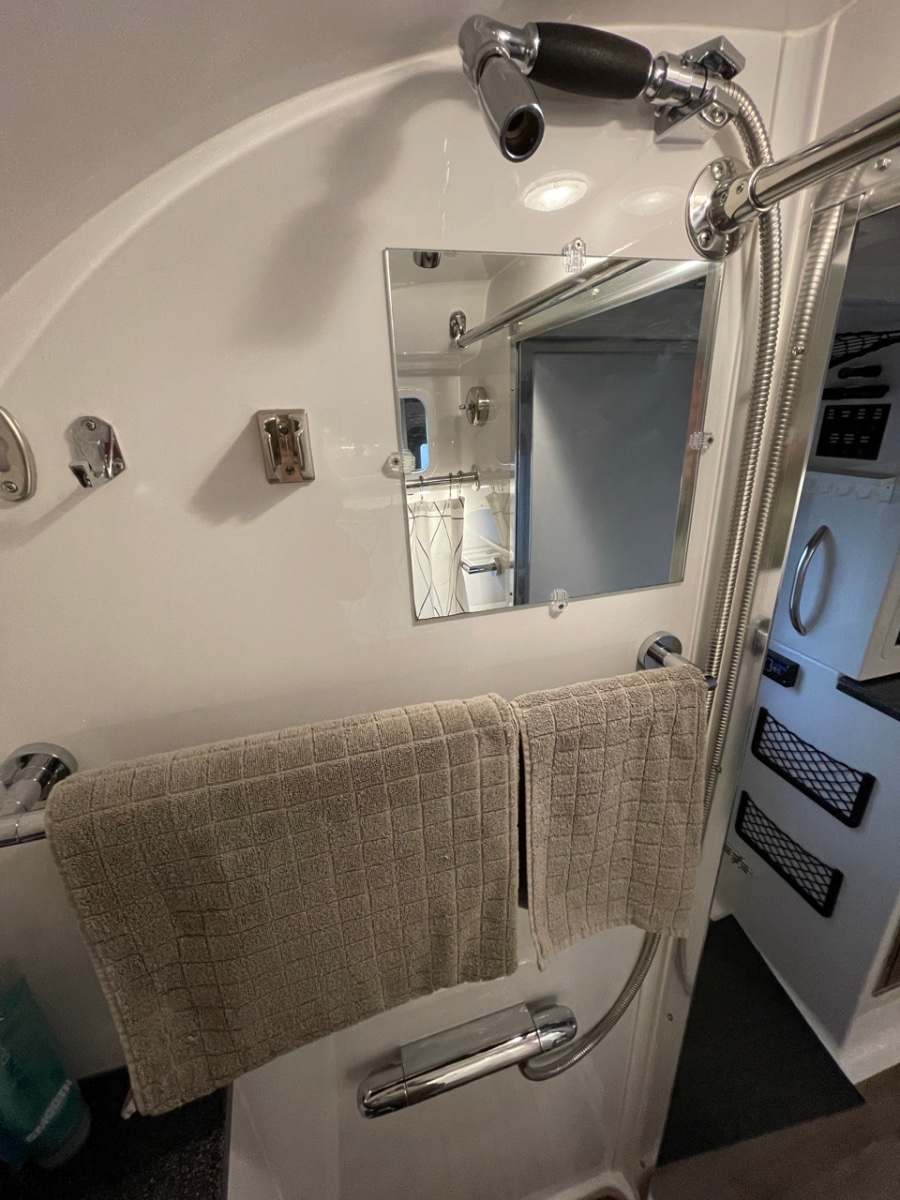
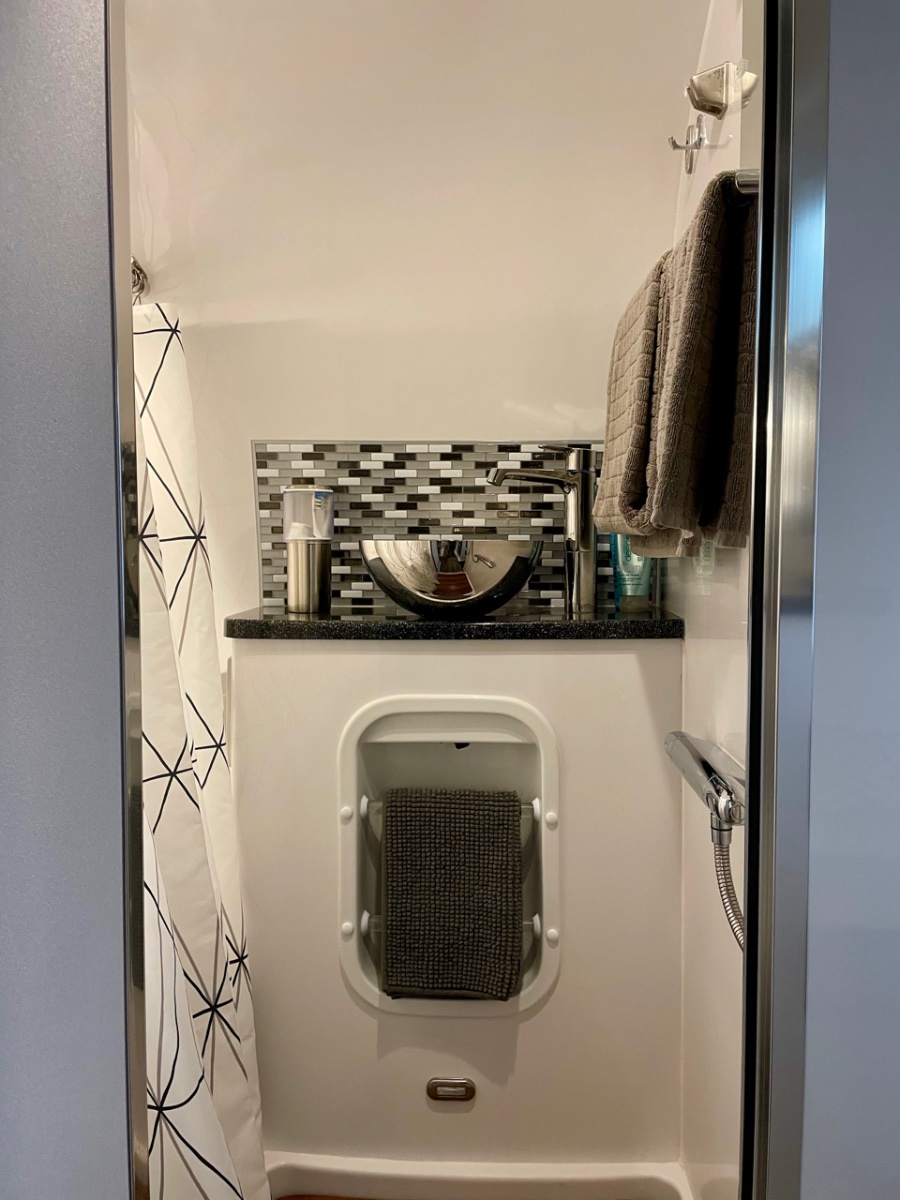
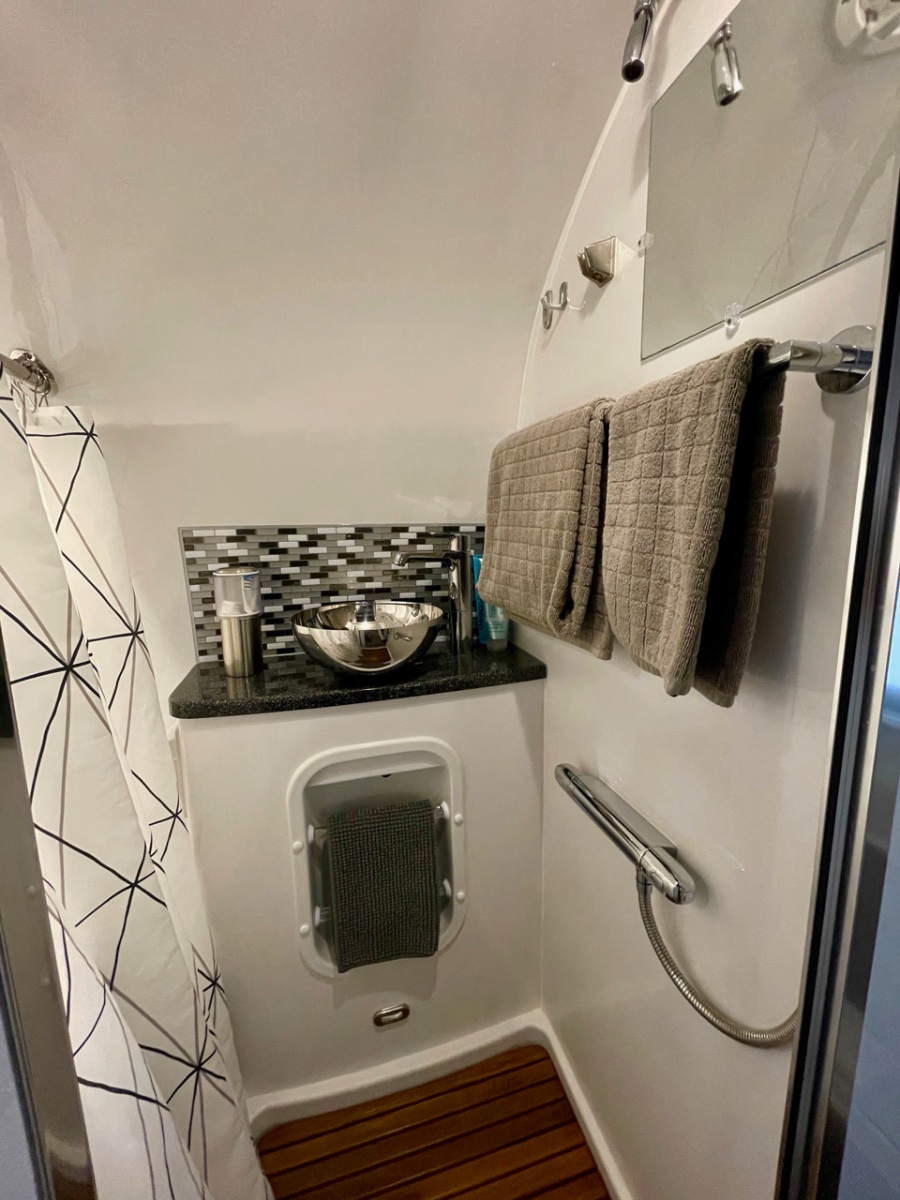
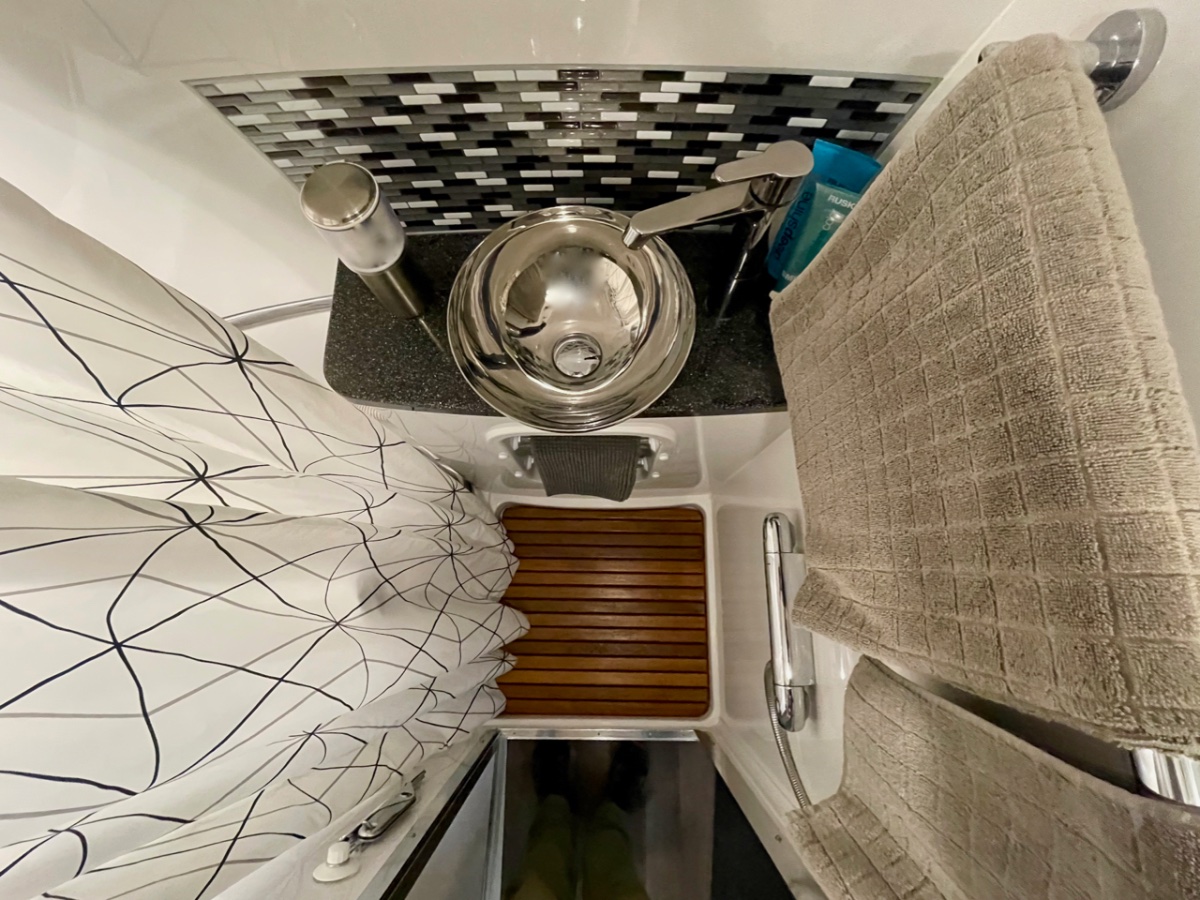
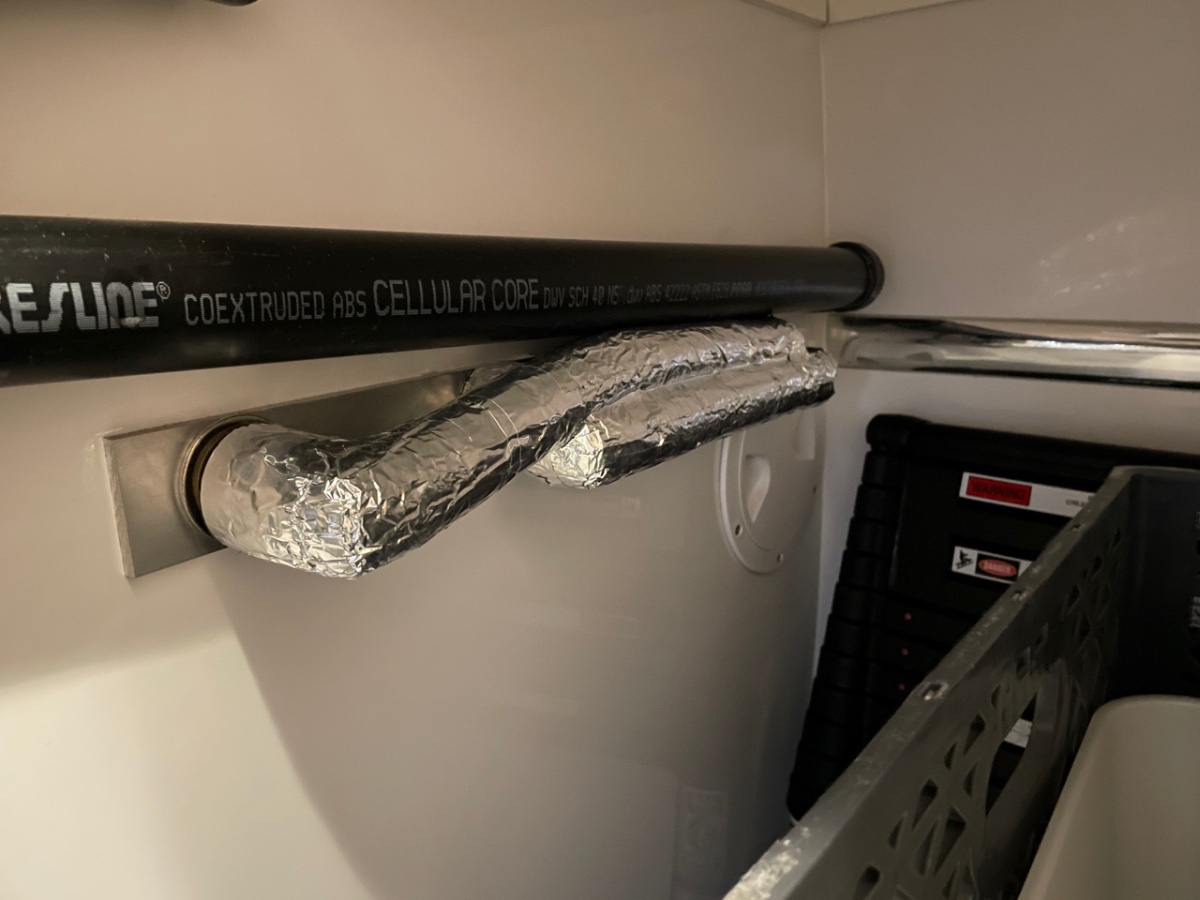
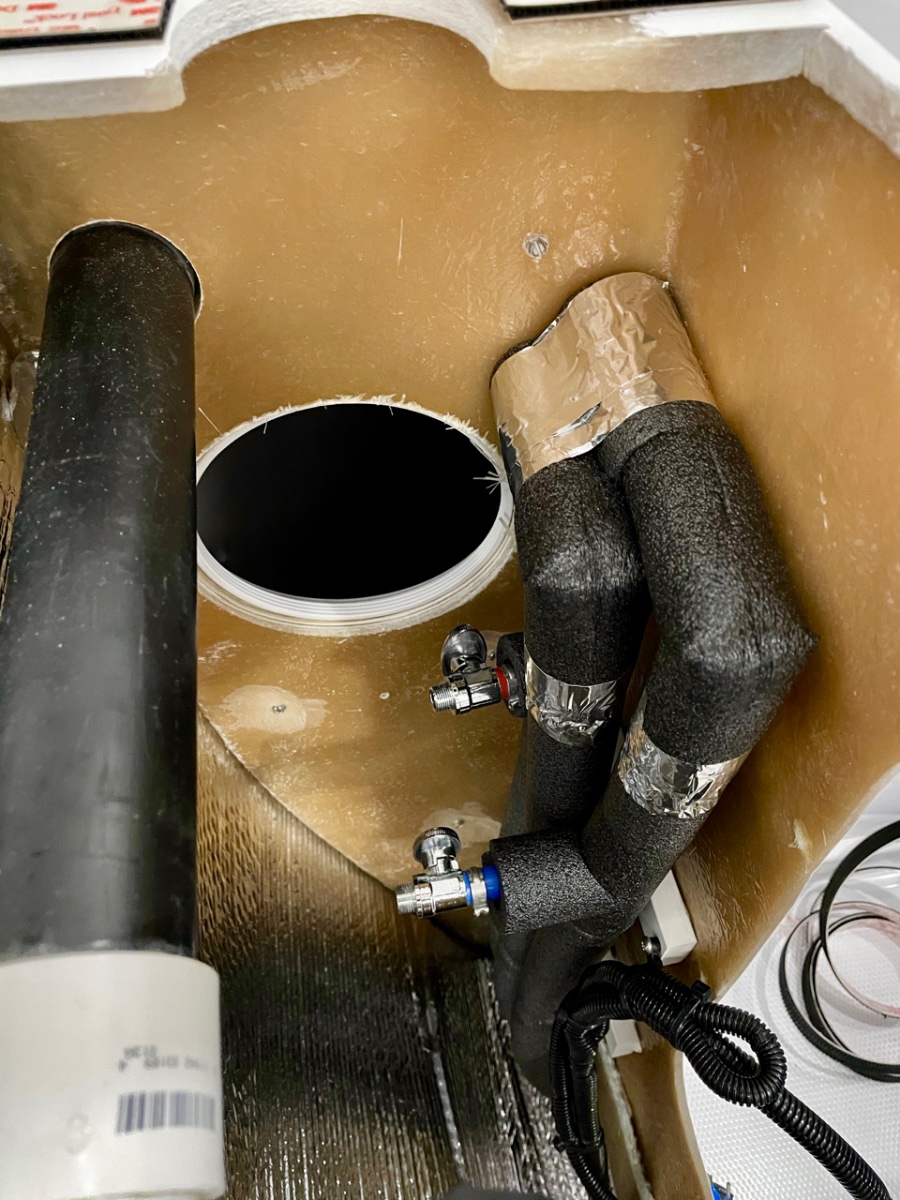
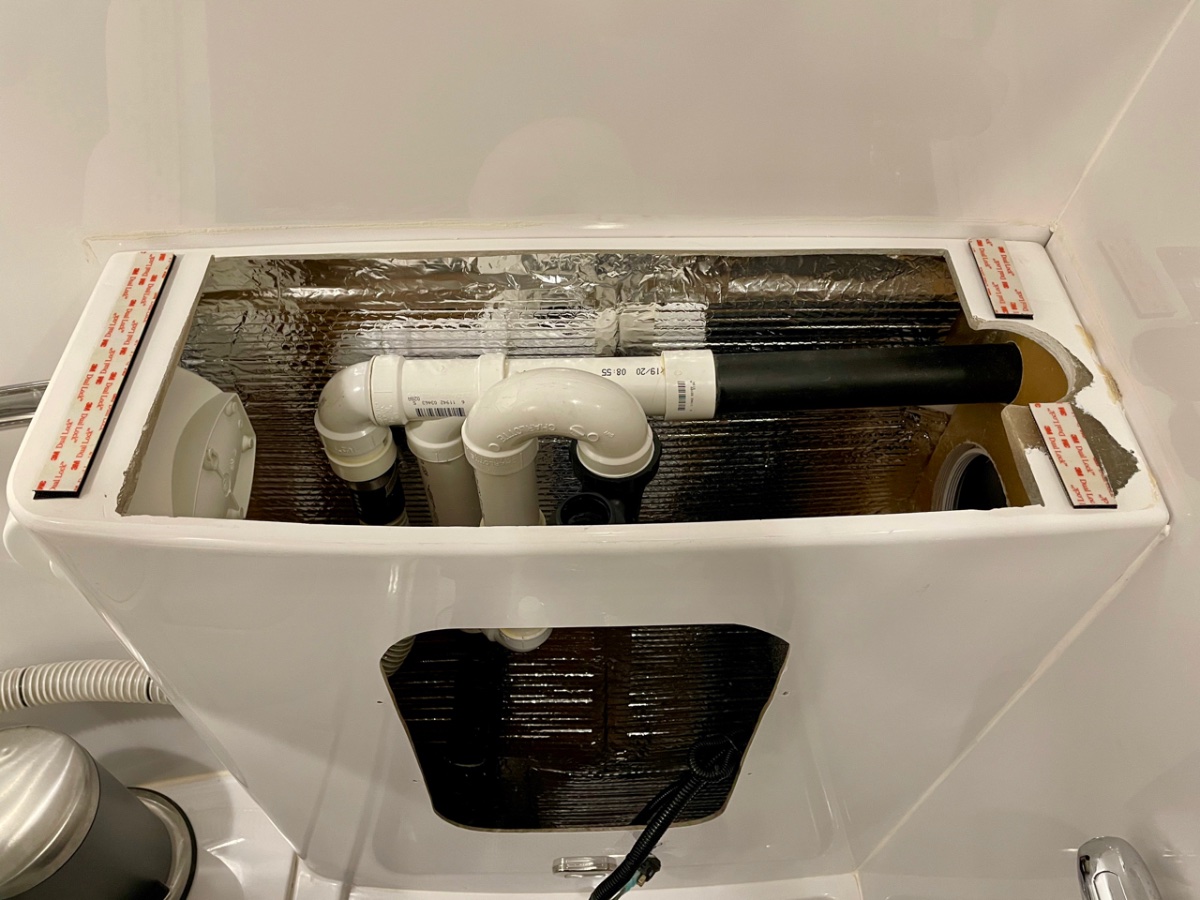
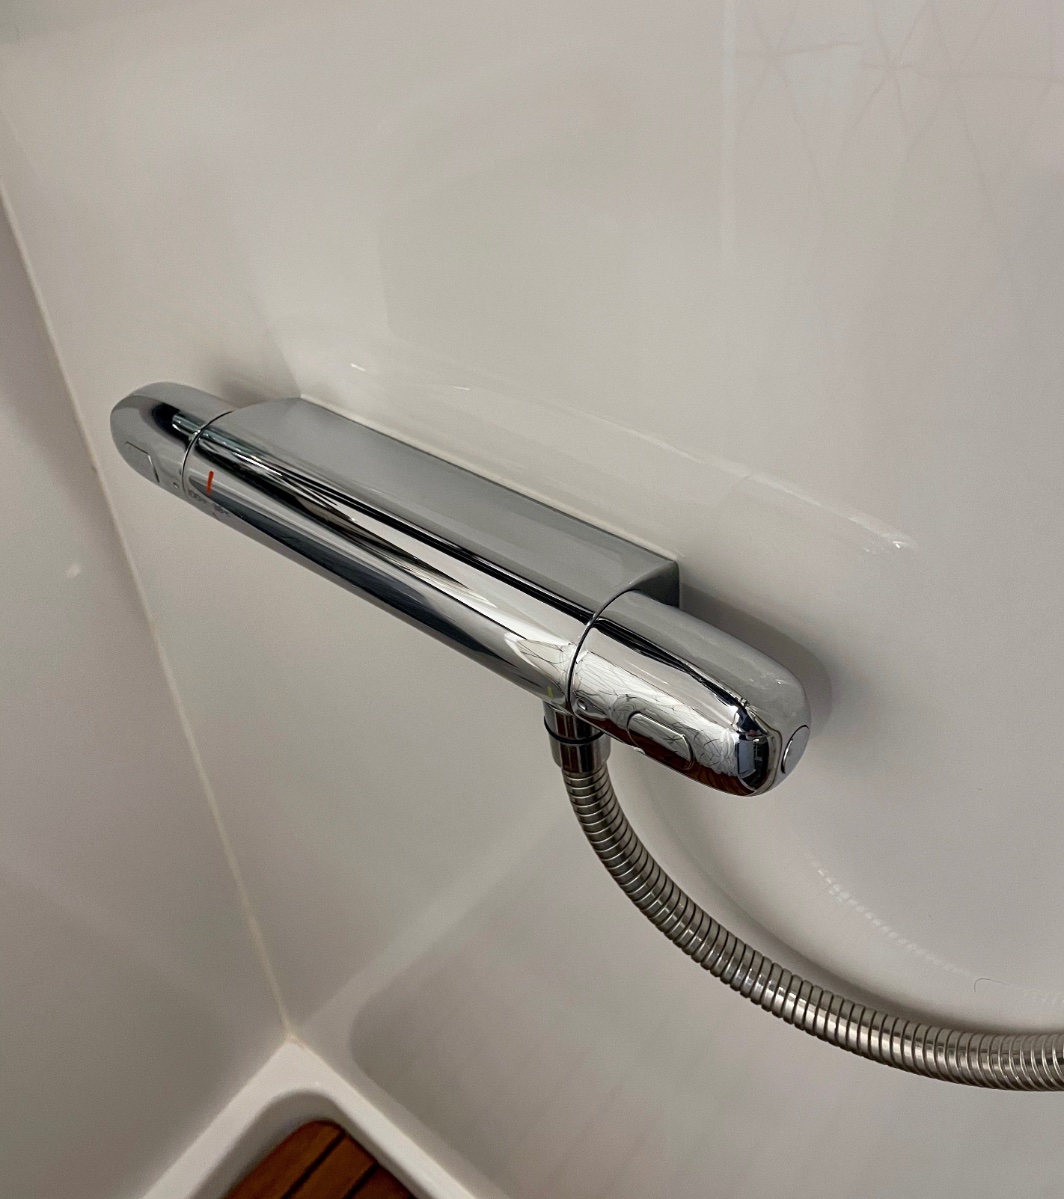
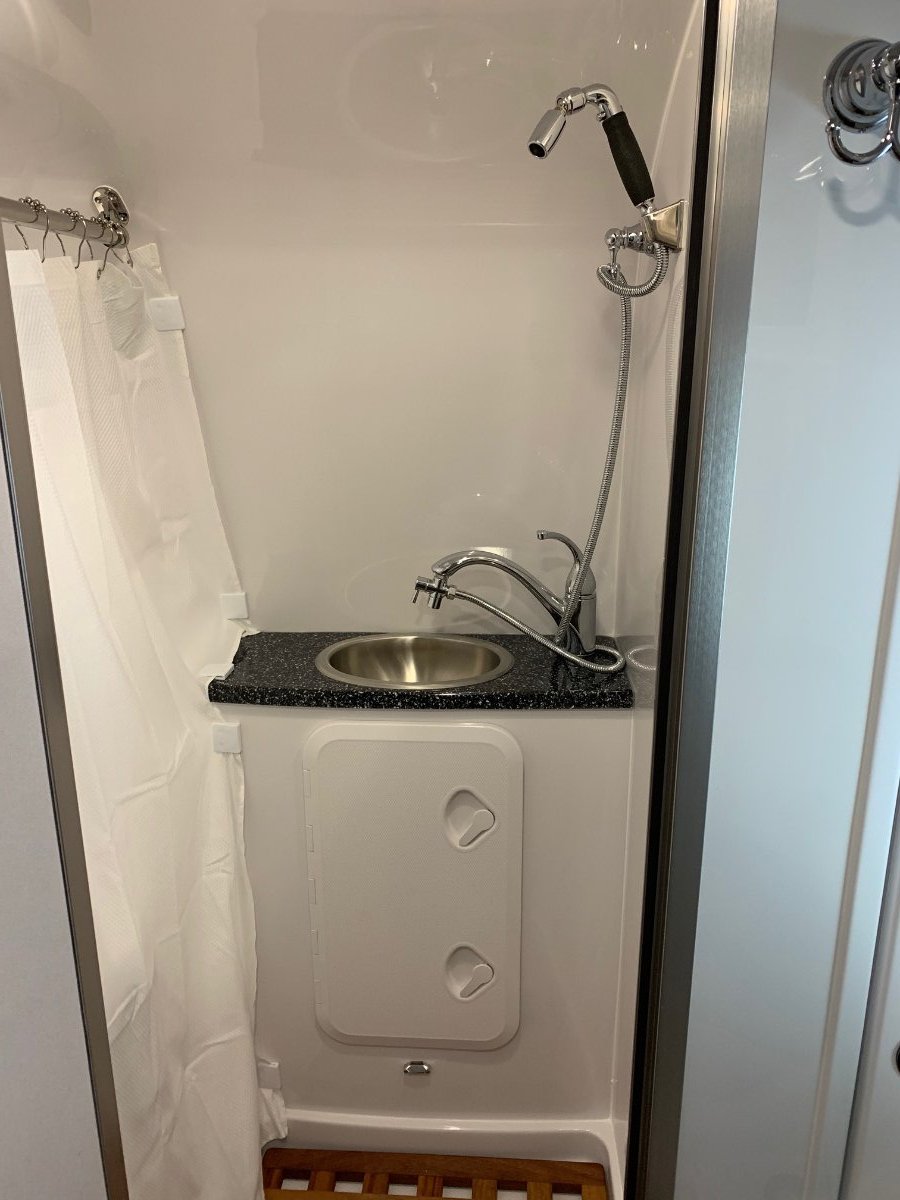
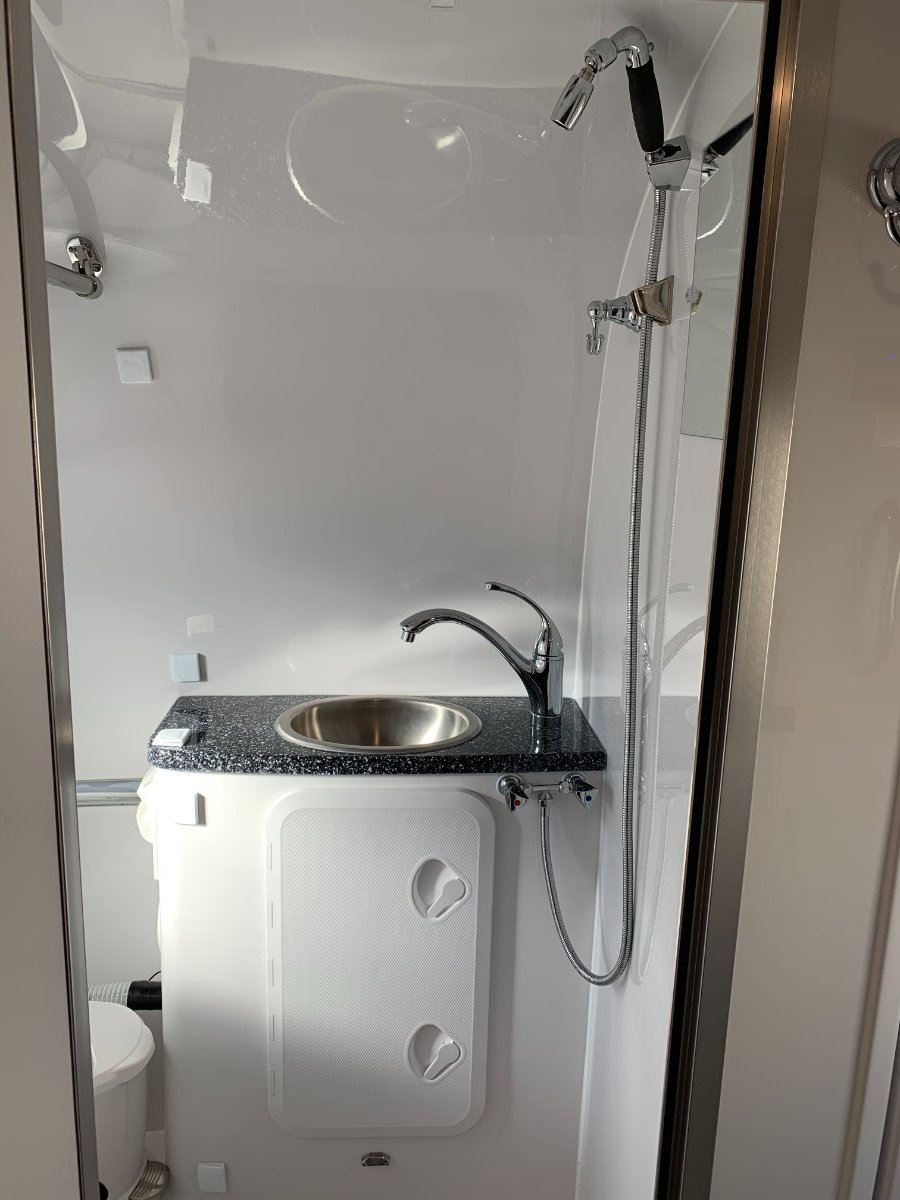
Many of you know that this has been a long, drawn out project. I think I started talking about it to a few people at the 2019 rally - so it's been well over a year in the making, almost two. Not that it was particularly difficult (though certainly a more major mod), but because of laziness and indecision on all the components it ended up being a start and stop project, with months sometimes between fits of activity. And then it snowballed into a complete plumbing overhaul, which was unnecessary - but then that's how the trailer got its name, after all. I'll post about all the plumbing stuff later, but since there have been a few recent posts about shower and bath mods, I figured I'd go ahead and toss this one into the mix. This project started for a few reasons. One, I've always found the bath sink to be mostly useless. It's fine for washing hands, but for most anything else, you've got to crane your neck around with the front wall curving in to hit your head. And trying to use a tiny little sink for washing your face just leaves water everywhere. So we found that were using the kitchen sink almost exclusively. That was fine - no big deal - but with the bigger sink, I was getting tired of wasting water cleaning toothpaste residue out of the sink, and it seemed silly to have a bath sink that got little to no use. The second reason for the upgrade is that after we redid the kitchen sink, the bath sink just looked sad. In addition to functionality, the bath needed some sexy. So the obvious solution was a vessel sink of some sort. Since a vessel sink sits on top of the counter, I'd have much more leeway in size and placement. I could pull it forward as much as I wanted, plus it had the added benefit of raising the sink to a more comfortable height for us. Some experimentation with kitchen bowls of different sized showed that I could get a fairly generous sink that didn't take up too much shower space. I settled on something in the 11" to 12" range; which proved to be a little difficult to source, especially after deciding on the material. I had bookmarks for dozens of sinks of different materials, but I couldn't find one that I really liked. I almost picked a glass one off Amazon, but in the end I thought that was going to be too heavy. What I really wanted - since I had already swapped out almost all of the brushed chrome fixtures in the bath for polished - was a simple polished stainless sink. There were a few out there, but nothing in the right size, nor at a reasonable price. So the project bogged down a bit at that point; but I was confident that I'd find something eventually, and so I went ahead and ordered a new vanity top from Oliver, without any cutouts for the sink or faucet. I’m glad I did, since Oliver has apparently now stopped offering our countertop color And sure enough, a few months later I came across a discontinued sink on Overstock.com that was exactly right. 11.25", polished inside and out. It's the Acquaio sink from WS Bath, if you can find one. I know that other sizes are still available. It was still pricy even on discount, but by that point I didn't care. To make up for the splurge, I got a faucet from Ikea, which is actually pretty nice. The colors from chrome to stainless don't exactly match, but they're close enough and it doesn't bother me. Since I was swapping out the faucet, I needed to find a separate shower valve, which was another lengthy quest. I thought at first that I'd put one to the right of the bath caddy, like @mountainoliver has in his trailer. But most everything I found was just a bit too big to fit (I didn't know about mountainoliver's mod and the mixer valve he used until later). Then I found the Grohe Grohtherm valve, which was interesting in a couple of respects - it didn't recess into the vanity at all (which eliminated a potential issue with the plumbing), it matched the Grohe faucet that I had already installed in the kitchen, and since it was linear, I thought that it might actually fit in the space above the caddy, between it and the vanity top. And it did fit, but looked squished in place, plus I didn't think until trying to place both it and the sink that the the sink drain and trap was going to be difficult to work the plumbing around. Plus putting it there meant that the shower hose was going to be strung across the vanity and generally look bad and be in the way. The problem with this realization was that I'd ordered the valve and the sink before one of my 3-month breaks in the project and now neither was returnable - so I had to make it work. This meant that the shower valve was going on the closet wall. I also realized during the test fitting that when I pulled the sink forward, the drain trap was going to hit the top of the bath caddy, meaning that I couldn't get it far enough forward to work. Small disaster. But I realized though that the bath caddy wasn't symmetrical, and if I turned it upside down, everything fit. I'd lose the flat shelf on the bottom, but we only use the caddy to hold the bath mat, so not a problem. Small problem with the water pump switch placement, though, since it would be on the bottom - but a quick email to Oliver had a new caddy that hadn’t been drilled for the switch on the way. At that point, all the pieces were here, all the logistics worked out, and I was ready to go. Time for another couple months off while I built up the courage to drill through the closet wall. Then finally... First step was to remove the existing vanity top, which is possibly one of the most firmly attached things in the trailer. It's glued in place, so the only way I could find to get it off without completely destroying the vanity was to cut through the joint with an oscillating saw. That's a slow, tiring, dusty endeavor; and it generates a great deal of heat, so you've got to work in spurts to keep the fiberglass resin from burning - which is fine really, since working through the caddy access, your shoulders will welcome the rest. I had to do a tiny bit of trimming on the new top to get it to fit as snuggly as the old one; and once in place, I sealed it with silicone like the original. Top off, new drain lines in place, and I decided to attach the new top with industrial velcro to make it easier to remove in the future (works well). Next, shower lines teed off the existing plumbing, line to the nonexistent toilet removed, and some insulation added to both the plumbing lines and the outside wall behind the vanity. (I have a circulating pump on the hot water, hence the extra line.) I also glued a small PVC block to the back side of the vanity wall to tie down the water lines and prevent them from vibrating too much. And as always, cleaned out as much fiberglass dust as possible, cleaned up and wrapped wiring, etc. The access port on the closet side is something that Oliver gave me in the original build. The sink valves and drain trap are accessible from that port, and since I used velcro for the top, I have the option now of cutting the silicone on the top and pulling that off for access, in addition to taking out the caddy. New plumbing in the closet for the shower. I drilled out a short piece of aluminum as a backing plate for the shower valve. The plumbing is protected somewhat in the closet by the ABS vent, and we really don't keep much in there that could bump around and damage the plumbing. But a few layers of aluminum tape should help protect the insulation from getting beat up and gives a bit of a spaceship vibe. The valve is supposed to stand out from the wall about an inch or so, but I decided to recess it so that it attaches flush and as out of the way as possible. I caulked around the valve and it ended up making a nice little shelf for a razor, and I placed it low enough that my wife can use it to prop a foot while shaving her legs. You can also hang a bar of soap on one of the handles to drip dry. The faucet has a neat feature with stops on both valves, which can be custom set to whatever temperature and flow you prefer. The little buttons on the handles allow you to go past the stops when you want. And that's really it. Installing the sink and faucet is just drilling two holes and following the directions. The only change I made is that the sink came with a short stainless ring to mount between the sink and counter, but I didn't like the look and so just used one of the black rubber gaskets that was inside the ring. That way the sink looks like it’s sitting right on the counter instead of a pedestal. We tested everything out on our last trip and functionally, it all works as expected. The sink isn't in the way at all while showering, and really is so much more usable. Plus I think it looks great. The shower functions just as nicely, with the valve not being obtrusive. I added a second holder for the shower head up high, which works better for me, though my wife prefers the original one. I still need to swap that one out, since I think it's the only bit of brushed chrome left in the trailer. I added the same backsplash material that a few other owners have recommended. I wanted to order a new, wider mirror; but the original one is glued on and so I didn’t want to go through the trouble of trying to get it off. I suppose I could just place one on top of the other, so maybe that’ll be a future project. Glamor shots -
2 points
-
Our third taillight has had its issues over the 13 years, requiring resealing every 3 years or so. This year, it developed some hairline cracks, as well. We decided to remove and replace the lens. Ours was held mostly by (probably 4200) adhesive, and a few dabs of epoxy. The adhesive loosened with a heatgun on low in the attic, and a plastic scraper. The epoxy was mostly mechanical, plus heat. And not fun. We broke the lens in several places removing it. We installed the new lens from Oliver with a bed of grey butyl tape. Since that's not truly an adhesive, Paul added 6 small stainless screws. We felt pretty comfortable with the addition of the screws, since butyl is pretty much self-healin, self-sealing. After a couple days for the butyl to rest, he applied loctite marine to the exposed edge of the trimmed butyl, to protect it from uv and dirt . Today, we added a lip of eze rv gutter on the eyebrow, for good measure, extending beyond the length of the bottom of the trapezoid lens. I can't tell you for another 5 or 6 years if this is a better solution, but I'll be able to tell sooner if it fails. We'll see. We're both very happy with tried and true old school butyl as window and hatch bedding.
2 points
-
John, Agreed, a Magruder road trip is not for the inexperienced, faint of heart or those afraid of dirt/dust and scratches/dings to the body work. I've travel this route (it is my backyard area sort of) so many times I can't keep track. Started back in the 60's with Grandpa/Grandma dragging us brats along to pick huckleberries or hunt bear...hated some of those forced outings. Of course, now days, I'm guilty of the same punishment on the youngsters. I've hauled horses in stock trucks and trailers over the Magruder for years. It's just a matter of what you know and are used to, I guess. These type of roads are not a big deal to me, but yes you had better know how to use your mirrors and be very comfortable backing up your rig, to include around switchbacks. Big cities and traffic...that's my Rubicon. Every time I hit Denver traffic headed south on I-25, I wonder why I'm here and if I'll make it across the US interstate parking lot mess to visit the kids. The posted photos are from this last summer. A buddy had never been across Magruder and wanted a guide. So off we go...spent two nights at the top of the world and as I'm totally done with the tent camping, the truck camper was my rig of choice: from the USFS brochure...#10 - Observation Point Observation Point Campground has nice camping spots and toilets. The elevation is 7620 feet and visitors can view the southern portion of the Bitterroot Mountain Range, especially El Capitan. The point also offers breathtaking vistas of subalpine/ alpine wilderness. As to long wheel bases and bigger sized TVs. It's all relative I guess. Your four door Yota would be considered big and cumbersome on many roads, but it appears you at least know how to get yourself out of a mess. Our two door Jeep (and really, do Jeeps need four doors...errr) is the right sized 4x4 for our needs. But compared to a Suzuki Samurai we are huge. Sorry for the slight thread hijack...back to tow vehicles and the endless discussion of what is the best rig. In my experience, you either use what you already own or can afford or move on to obtaining the correct vehicle matched to the task at hand. Me, I use what I already own which was purchased to tackle my taskings. Would I haul Ollie over the above discussed roads...yup, if it was all I owned. Spent, folded and/or mutilated be damned. Mark
2 points
-
And now with the same shower mixer as Mountainoliver... Mountainoliver, the check's in the mail! But... I don't know how to get anything delivered by the post office these days. 😉 So glad I didn't have to rip the caddy out again - sure made this addition easy!
2 points
-
For anyone interested, our trailer froze. We lost our faucet and our Truma On Demand has to be repaired (and hopefully not replaced). Here is the faucet we replaced and fit wise it seems perfect. Not as tall but I like that better. It has a pull down sprayer so taller isn’t really as issue anyway. https://www.lowes.com/pd/Moen-Adler-Spot-Resist-Stainless-1-Handle-Deck-Mount-Pull-Down-Handle-Lever-Commercial-Residential-Kitchen-Faucet/1001327070.2 points
-
This is a great idea! I’ve dumped grey tanks many times on RVs I have rented. Given it is dirty dish water or shower water it never bothered me. Never done a black tank as rentals had a cassette toilet and my rule with family was I’d take care of cassette unless someone went #2 and then you had to do it. With just pee it wasn’t bad. I’m not sure I want to deal with sewage so thinking hard about composting toilet. The pee jug doesn’t bother me but do wonder if composting part really does work. Does it really not smell. I’ve got a bit more time with to decide...2 points
-
Btw, since you are new to camping and rvs, as many people are when they buy their first rv, I'll offer this idea that I've used with several friends new to rv camping. Practice learning to dump with clean water. It's a bit of a waste of water, but so much easier on the nerves. Fill the grey tank to maybe half using a faucet, and the black with clean water by just depressing the foot pedal for a good long while, or run the shower wand into the toilet at the same time. Half full is enough when there are no solids or tp in the black tank, but do whatever you like. Hook up and dump. If you do make a mistake, the only thing you're spilling is clean water. No panic. This works really well if your first campsite is full hookups, but I'd fill the fresh tank, and work from there. It can flush some of the plastic taste and smell from new plumbing, at the same time. Sherry2 points
-
Hi Mike, I used SensorPush Wireless Thermometer/Hygrometer for iPhone/Android - Humidity & Temperature Smart Sensor with Alerts. Developed and Supported in The USA and then put the hourly averages into Excel. I put hourly averages into a spreadsheet manually, but there is a way to download that I just looked up - what a dummy I am - I could have saved a ton of time! The curb temp dropping - Overland nailed it - the temps in the basement curb stay really warm when the furnace is running. It's only a few degrees of difference when the furnace is running and the difference increases as the furnace runs less. I'm not really planning any further cold weather modifications unless something comes up in further testing. I'd love to have an all-electric backup plan, but that's a bunch of holes and computer fans so I'm not going there at this time. I'll run more tests with my current config if I get substantially colder weather this winter. I'm also planning on towing the trailer around in cold air with the furnace running to see how much I could push my luck traveling from ski resort to ski resort without winterizing. That could result in some additional changes. I think there will be a few modifications needed to keep that battery compartment cool in the summer - that's probably going to be tougher than keeping it warm in the winter.2 points
-
Hey John, great questions. Here's some answers... - I had the thermostat on 68 and that kept the inside at roughly 66 the entire time. I have been using 52 to keep it at 50 in my garage and that has kept all the temps well above freezing so far. - No vents or windows open. Closed up tight. With the furnace venting the moist air outside, I don't foresee humidity being a big concern in cold weather. - Bathroom door was open. If the door is closed the bathroom gets very much colder since it's pretty airtight and with the door closed the airflow through the vent is really non-existent. With the door open, quite a bit of warm air comes through the vent. Side note: Interestingly, I also opened the access door in my vanity, the hatch under the dinette seat nearest the shower, and the back basement access door on the nightstand to see if that made a difference. If anyone can see any blips in the graph where I did that let me know - it didn't seem to do anything at all. My guess is that the cold air settles in there and with no fan mixing it around it's the same open or closed up. - Yes, propane usage was done by weight the tank before and after the test. - I really don't think the battery compartment felt the effects of the furnace ducting - at least not to the extent other areas of the basement did. I say that because the sensors collect data every minute and I used hourly averages. I could see the up and down spikes on most of the sensors from the heat running and shutting off - but I couldn't see any of that on the battery compartment - it seems to be dependent on the outside temps. I used foam inserts in the battery door vents and 2 layers of reflectix on the inside of the door. I can easily remove all of that in the summer to let the batteries air/cool via the vents. If that doesn't work well enough, I'll put a hole or two through the inner hull and battery compartment under the pantry with a small DC fan to mix cool or warm air into the compartment from the cabin. I'm going to wait and see what you and Overland do to get conditioned air into your battery compartment and then copy the best one. 😉 John2 points
-
1 point
-
Thanks, I pretty much assume (at this point) that a lotta things are not exactly the same on Elite 1 as Elite 2, when I read through things most people seem to have the Elite 2. So I’m not taking any chances and going with easy things that don’t affect the “guts” of the Elite 1 (if that makes sense) as I read through stuff here. Your tips about the heater (non-tipping) I had already read about but def bears repeating! Thanks for the 2 wattage rec. I’ve been kinda looking at them but haven’t gotten anything yet. Nice blanket and big ole dawg, FTW! 🙂1 point
-
The Grohe valve is really beautiful. Their starlight chrome is some of the best chrome finish I've seen. I wish I'd used more of it in our house when we built it. Delta's chrome doesn't hold a candle to it, though it's pretty, too. I'm a chrome finish fan. Timeless.1 point
-
Yes, that will work. My black tank flush out hose is very similar. They collapse and don’t take a large space and are lightweight. They also don’t last as long as a regular hose!1 point
-
Terrific it looks awesome Your Ollie is nicely personalized. Great job!! Thanks for sharing.1 point
-
I have to smile at this. I always turn mine on when towing, even in sunlight. I think it adds extra visibility for other drivers - it might jar a texting one awake - and I think it looks very cool. The little diamond eye marker lights are so bright, they are like little suns. I have had people flash me, that just proves that it works. In heavy “nightmare” traffic I turn on the headlights and the fog lights. I once had a Mazda 6 Sport Wagon that was a beautiful beige/ green metallic color, with no daytime running lights. It got hit hard twice in parking lots, and there were ALWAYS people pulling out in front of me because the car was so hard to spot. I didn’t want to drive with the lights on so I added bright always-on LED strip lights above the front spolier. That stopped the “people pulling out” problem. It didn’t help with parking lots, so I just parked as far away as I could from the store front. But it taught me the benefits of driving with lights on in daylight..... Am I alone in doing this? John Davies Spokane WA1 point
-
20 or 30’ would be plenty. I have one of those collapsible hoses, they don’t take up much space but don’t last as long as a normal garden hose.1 point
-
There's tons of discussions on the forum about the Natures Head. Tons of stuff on the internet too - a lot good and some really scary. Most owners have had good success and so far we have for the first 6 weeks. We've used the trailer to camp 3 times now and I have not emptied the solids bin yet - and it does not smell at all - even in my garage where it is venting when at home (steel garage w/lots of natural air exchange though). Oliver also installs a screen on the top vent now as many owners of earlier models have suggested. It's also not as hard as we thought it would be to hit the appropriate targets in the toilet. 😄1 point
-
Very well done! May be steeling some ideas for Hull# 428. Curious about the panels on the overhead, I like the way they break up the look but wonder if there is a function I’m missing. Keep up the good work1 point
-
Hey connor77, I haven't put a hole in my ductwork in the basement yet and that is definitely something I'm considering as the data is showing it stays the coldest right now. It has plenty of plumbing that can freeze sitting right up against the back bumper. Bad design there - Overland solved this by rerouting that section under the beds / floor. I may do that instead as it looks pretty easy now that Overland has shown us the way. Bilge heaters or any heaters that use electricity are not going to work for boondocking (imho). They simply use too much energy (a 1500W space heater drains about 15% of my 400Ah per hour with only about a 20 - 25 degree differential). So propane is an absolute must to boondock in the winter and the batteries are used to push the air around only (fans, furnace fan, etc.). I'm running a test as we speak with an electric space heater (only) keeping the inside warm. Will see what the data says in that scenario. If shore power is available, strategically placed bilge heaters would certainly help/work. Skirting will help keep the basement a bit more stable since the weep holes are a good source of outside air. This would be especially true in wind I suspect. I haven't done any testing there. Mcb had an interesting idea to somehow catch the hot exhaust from the furnace and reroute it back under the skirted trailer. If that worked, it would certainly lower the resources required to keep the inside warm. I think with the design of the Oliver (already good for semi-cold temps), I'd prefer to carry extra propane instead of skirts. Bottom line so far - nothing can compete with propane for heat when boondocking.1 point
-
It would be interesting to see what happens to your experiment with the fantastic fan on, or open. We haven’t dealt with really cold temperatures yet, just a couple nights between 30-32, and the fantastic fan set on 10% with a window cracked kept the condensation away. We had the thermostat set at 66 or 68... something like that. I’ve noticed that the air being pulled into the cabin from the open bathroom vent by the fantastic fan set at 10 or 20% is significant... with the bathroom door open of course. Might be a good option to cracking a window.1 point
-
Bill - thanks. We will double check that tomorrow.1 point
-
Hey John, this is great info - thanks. Have all of your modifications eliminated the need to consider additional heating sources down below? Meaning do you now know that a bilge heater (or heaters) wouldn't be necessary or helpful? I have the same question about skirting - have you determined that you won't need to use anything like this for extended cold weather camping?1 point
-
I'd personally spend 15 or 20 bucks on a green or grey garden hose, and keep the supplied white hose for fresh water. You'll want the white one in the spring. Maybe you already have an old colored hose to use for now?1 point
-
Oliver only supplies one water hose and (from all that I've seen) it is white and (I believe) 20 or 25 feet in length. Given that you already have a heated water hose, you could simply use the one Oliver gives you for the black tank and your heated hose for your regular drinking/fresh water. However - be warned - unless you specifically mark this Oliver hose in some manner you risk the possibility that you might mistakenly use it for regular drinking water at some point. I'd recommend that you paint or in some manner mark the hose you chose to use as your black tank hose so that you really don't have to even think about it. Another way to tackle this problem is to simply use hoses of different colors - normally hoses that are certified drinking water safe are white (but not always). I use a grey colored hose for the black tank duties and a regular white hose for drinking/fresh water duties. I also carry a Zero G hose because it is easier to store than either a heated hose or a regular drinking hose and is drinking water safe. Bill1 point
-
So . . . . we too were down to 26 degrees last night; our Oliver parked outside the house, connected to power. We ran an electric heater; the lowest temp I saw was right at daybreak, when the cabin temp reached 55. It was 26 outside (national weather service got that right on the money!). We did not drain our water heater, but the compartment was 36 degrees; same for the basement. We did leave the nightstand basement access door open. We hand pumped antifreeze into the fresh/city water inlets, also running it into the outside faucet. This is such an easy thing to do and good insurance for the water connections. Regarding the water heater (ours is Suburban), does anyone have an idea of the temperature where it becomes vulnerable to freezing when the cabin is heated? We did not drain ours or turn it on; maybe we should have.1 point
-
Or until you get someone else to test it to failure for you. 😄1 point
-
Yes, ditto on the thanks, and I second what John says about source of indoor moisture once you are spending the evening/night/morning in there (along with possibly moist ski clothes etc.). In our camper van I've found that in colder weather we need to crack a window and our Fantastic roof vent lid a bit - the amount required depends on outdoor humidity and temperature. Otherwise the condensation on the windows (and presumably hidden surfaces w/in the walls) gets pretty out of hand. A compact dehumidifier would of course change that picture (and use more amp hours) somewhat. Our van has a Suburban propane furnace with the intake/vent holes on the exterior so as here the furnace propane burning is not a contributor of moisture.1 point
-
Thanks for the info. I have to comment on your furnace venting...... the combustion air comes in from outside and goes back outside. The cabin air recirculates all the time, the two parts of the furnace are completely separated, unless you have a failure.... So you may need to crack a vent and or window to reduce condensation. Humans respire about 300 ml of water daily, and that doesn’t include moisture from washing and cooking. Or alternatively run an electric dehumidifer. John Davies Spokane WA1 point
-
Nah, we need data on freeze damage, too. 😛1 point
-
Ah ok, those are easy tests. It's going to be 26 tonight here, so that's a reasonable temp for the space heater test. I'll turn on just an electric space heater (1500 watt) to keep the cabin in the low 60s or so. If any of my sensors send me a text that it's approaching 32 somewhere in the basement during the night, I'll call off the test and turn on the furnace. 🙂1 point
-
I'm just curious how quickly the hull temps would fall. We do sleep without heat most nights, but in freezing temps, we'll typically keep the heat on, but at a very low temp - 50° or so - perhaps that's a more useful test. I know some other owners that do the same. A test with an electric space heater would also be interesting to see, since there'd be no air circulation in the hull. Quite a few owners carry a space heater to use when plugged in.1 point
-
Great info, John - thanks for sharing. I think the only thing that surprises me is the outdoor shower, since I'd have thought that area would be colder than the basement if anything. I think the one important area that you're missing is the space underneath the closet. If you could get a sensor in there somehow, it would tell you how well the furnace ducting is working to protect the plumbing that feeds the bath. I'd be curious to see what the temps do without the heat going at night. It seems unintuitive that it would cool off while the other areas are warming, but the rear curb temps are going to be largely dependent on whether the furnace is running or not, so it does make sense. I'm actually surprised that the temps there aren't higher than the cabin, but I guess that depends on exactly where the sensor was placed. To a lesser extent, the bath vanity would be the same.1 point
-
Take a look at the Bioenno LiFePO, bioennopower.com, 1500 watt power pack for $1,200, plus a 100 watt foldable solar panel and controller for $200, if you need 1500 watt. I use the 500 watt power pack that was on sale for $250, built-in inverter, usb and 12 volt ports. I use it at work sites and for portable ham radio operation. Be careful of titles - it really isn't a solar "generator". It does not really effectively replace a propane or gasoline generator. It would be a fine backup or portable power supply, but very pricey. It will not likley power an a/c, microwave or similar appliance for long, if at all. That is what a traditional generator would do, maybe.1 point
-
This unit is one of the better ones in my opinion (note: I do not own this one). Will Prowse does an excellent job of identifying strengths and weaknesses of each unit he reviews. Some units can take a full day or longer to charge after being fully discharged. Would you buy one if your trailer already has Li batteries and an inverter? Would you buy one instead of upgrading your trailer to Li batteries? How would you expect to use the solar generator? Mike1 point
-
I think I agree with Mike - this is an Oliver issue, either design, or choice of battery (battery size). A battery slide out compartment is standard in tens of thousands of vehicles. Commercial trucks use them. I checked the batteries weekly on my fire apparatus - all had batteries mounted in a slide out, without ever having a chafing problem. The batteries are not mounted on a solid platform. It is foolish to have a protruding bolt that would contact the battery exterior surface. I currently do expert witness/investigations that involve factory and design defect evaluations. Without seeing the issue in person and doing a proper evaluation, it is difficult to assess, but it sure sounds as though this is a manufacturing and/or design problem. Or use of an improper battery that does not fit the slides, when looking at the damage on the exterior surface. The proper battery sized battery, dimensionally, should be used rather than attempting to provide a patch fix. The damage on the bottom of the battery seems to be caused by protrusions that should not be there, that need to be removed. Don't patch it, or treat the symptoms. Fix the cause. Of course this is based upon photos and discussion, as I won't get my Oliver until March. There are many issues to evaluate, I am finding out, that seem to be design and possible manufacturing miscues.1 point
-
Hi! We are Benjamin & Alexandra from Chicago Illinois, and we just picked up our Legacy Elite about a month ago. So far we've enjoyed just all the nights in our Ollie before we put it to bed for the cold & snowy winter! We've both been hiking, canoeing, cycling and camping since forever under tarps, in tents and in a pop-up trailer. This is our first foray into a hard-sided camper with creature comforts so that's something of a new experience. Most of our camping has been in the Sunset Lakes Resort, Chillicothe and several other places in southern Illinois. We are expecting to revisit some old favorites and also to begin ranging further afield once spring arrives.1 point
-
Retired again, for last time, for real, I hope. Not going to be full-time trailer traveling, we will be taking long trips. Have stayed in Fort Wilderness twice - with a pop-up Coleman and one daughter, and a 24' 5th wheel and 3 daughters, so have towed before. And living in a 24' 5th wheel with 3 daughters, 18, 10 and 8, makes for an interesting trip. Placed an order for an Elite I that should be ready in March. Decided to splurge, and make it reasonably comfortable. Compromised between a larger trailer and a teardrop that will be towed with my 2014 Tacoma, for now anyway. Will see how the tow home to Camarillo, about 50 miles west and slightly north of Los Angeles, will be. Hope to make it a 2 week trip, making a few notes of what needs to be done. Have enjoyed the forum, learning about the Oliver.1 point
-
In the photo, you can see edge of one of our new panels. We have upgraded from 2 x 100 watt panels, side mount, to 2x 200 watt panels. That writeup to follow soon.1 point
-
Capacitors can store and discharge energy very quickly, so they can make-up for very brief, high energy demands that a battery can not keep up with.1 point
-
Mike, Can you describe your system? 4AGMs - Y Solar? Inverter? Number of cables into battery compartment? Inside my battery compartment there are seven cables. 1 big red (main line) and 2 small red (solar pos. and 12V appliance pos.) plus 1 big black (main line) and 3 small black (solar neg., appliance neg. and ZAMP the temperature sensor). You can also just count the number of connections to your AGM batteries and subtract the battery to battery connectors rather than tracing the cables. The inverter has a large capacitor that charges and discharges each time a battery connection is made (note: expect sparking unless you have a cut-off switch). More details will follow based on your system components.1 point
-
My 2016 Ram 1500 had a couple hundred pounds more payload than the 2020 Rebel did. They both had the same engine (5.7 Hemi), rear end (3.92) and 8 speed transmission but the 2016 towed better and had better gas mileage. I really wanted the Rebel and I’m glad I got it, but the towing experience was not as good. When this 2500 showed up at a local dealer with all the towing options, large payload capacity and Cummins it seemed like the time to move up. It looks very similar in color and styling as my Rebel and I got it at the end of the month so they were willing to deal. Mike1 point
-
I'd say that if you're choosing a trailer based on your tow vehicle, then you're letting the tail wag the dog. Pick the trailer you want, the one that fits your camping lifestyle, and if that means you need a different tow vehicle, then so be it. Olivers aren't disposable. If you choose wisely, your trailer will last a lifetime - your truck will not.1 point
-
Also for Forum authors... we were unable to migrate the subscription of replies to your forum topics. To enable subscription to your topics, go to your profile a click the "Forums" tab. Here you can see a list of all topics you have written. You will have to open each and click the "Subscribe" link on each that you would like to be notified on if anyone replies to the topic. Sorry for this inconvenience.1 point


.jpg.52d3008873852d76276232b024d779cc.jpg)


.thumb.JPG.dd838cdb3df463dab6a16861fa23a319.JPG)


-
Recent Achievements
-
")


")


")


