Leaderboard


.thumb.JPG.dd838cdb3df463dab6a16861fa23a319.JPG)

Popular Content
Showing content with the highest reputation on 01/30/2021 in all areas
-
I have died and gone to heaven. Family requests no flowers. Just laughs. Bought a Jetpack today. No time to set up yet of course. Will write my goofy crap at https://whendogsdrive.com when I get more settled — and learn how to hitch and a few thousand other little details. FYI, folks. Thank you ALL.
 6 points
 -
Yes I’m still up. Outside in cold. Full moon. Gorgeous. I love my Ollie so much I married it and had its babies. Thank you ALL. Again. Second pic is my OCD-thang (ref: John Davies reply re: “yellow thing” as I call it.) I’m verruh techy about all these parts, as you can see. Hee.
5 points
-
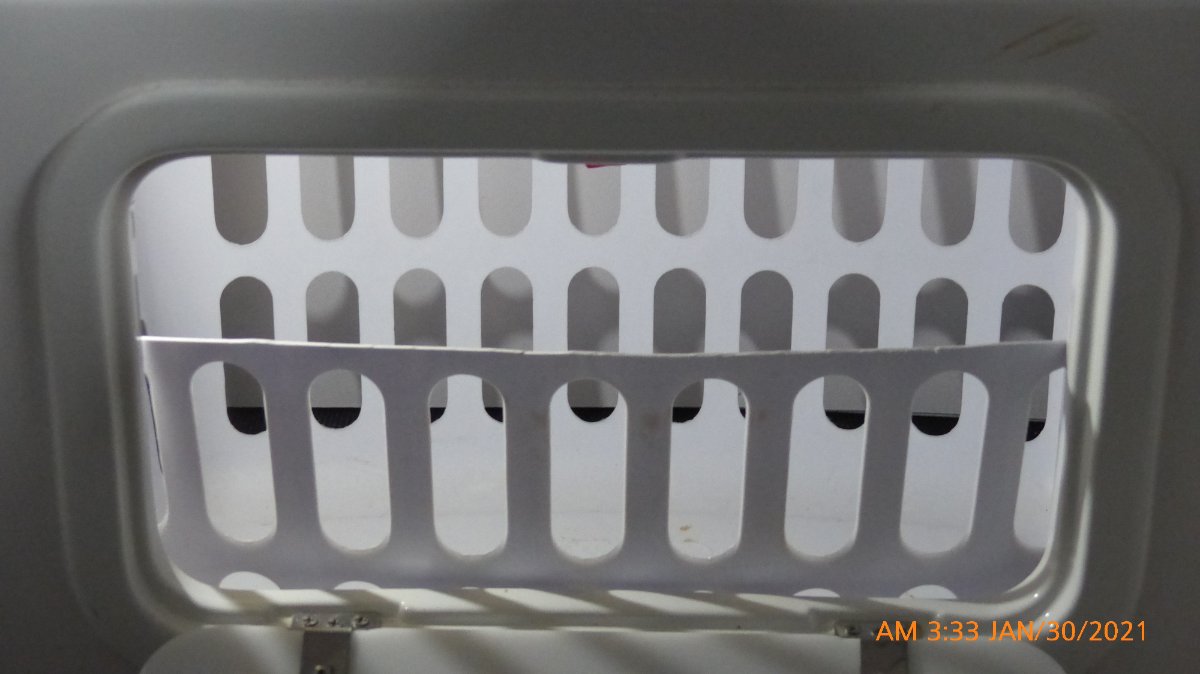
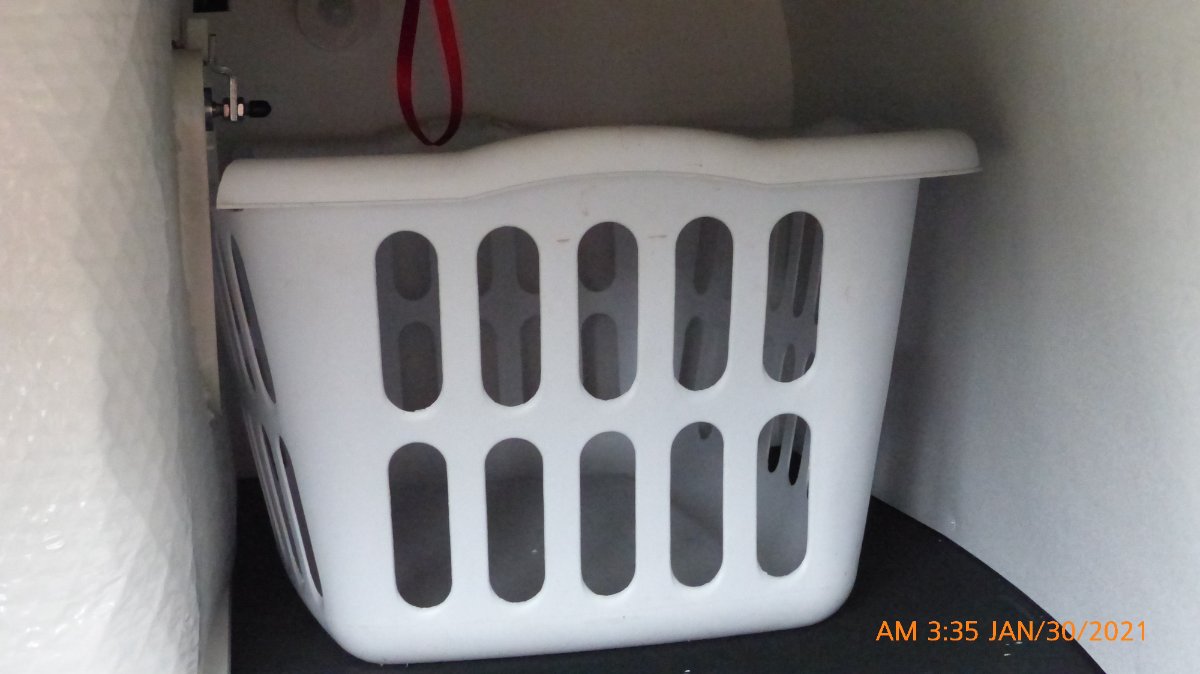
The basement floor is lower than the bottom of the door. I used an old plastic hamper that came with our 5th-wheel (which had a trap door in the floor for a laundry chute!). The one side of the hamper was cracked, so I cut it down to give room to put clothes in. Not full door access, but it works. I could have cut the side down further, but didn't want to give up capacity of the laundry basket. Before doing this, we tried using a canvas laundry bag, but it was too hard getting things into; I think the rigid basket will work much better.
4 points
-
Yes, fwiw I recently rehabbed the long neglected white fiberglass top of a sixteen year old camper van with a buffer and two steps of buffing compound and then some paste wax, per pointers SeaDawg had given somewhere on the forum to Practical Sailor magazine, which has a fantastic set of articles on the topic including well done tests/reviews of various products for each step. I used it as an excuse to get another power tool 🙂 - I went with a pretty decent Shurhold dual action buffer rather than the awesomely powerful but perhaps hard for newbies to handle DeWalt - forsaking a little efficiency in favor of not burning my fiberglass. It will come in handy for the regular wax jobs required for the trailer too (presuming I stick with the paste wax which does seem to do a pretty great job). Here's one of the multiple PS articles I read to help guide me through this rewarding if time consuming task. There are businesses that do fiberglass work that will probably be up for doing this for you as well - often clustered around businesses catering to boaters but not always. The van top now looks great and more importantly is not a dirt magnet as it had become, and water beads up and runs off instead of just spreading out in a film on the formerly very chalky surface.3 points
-
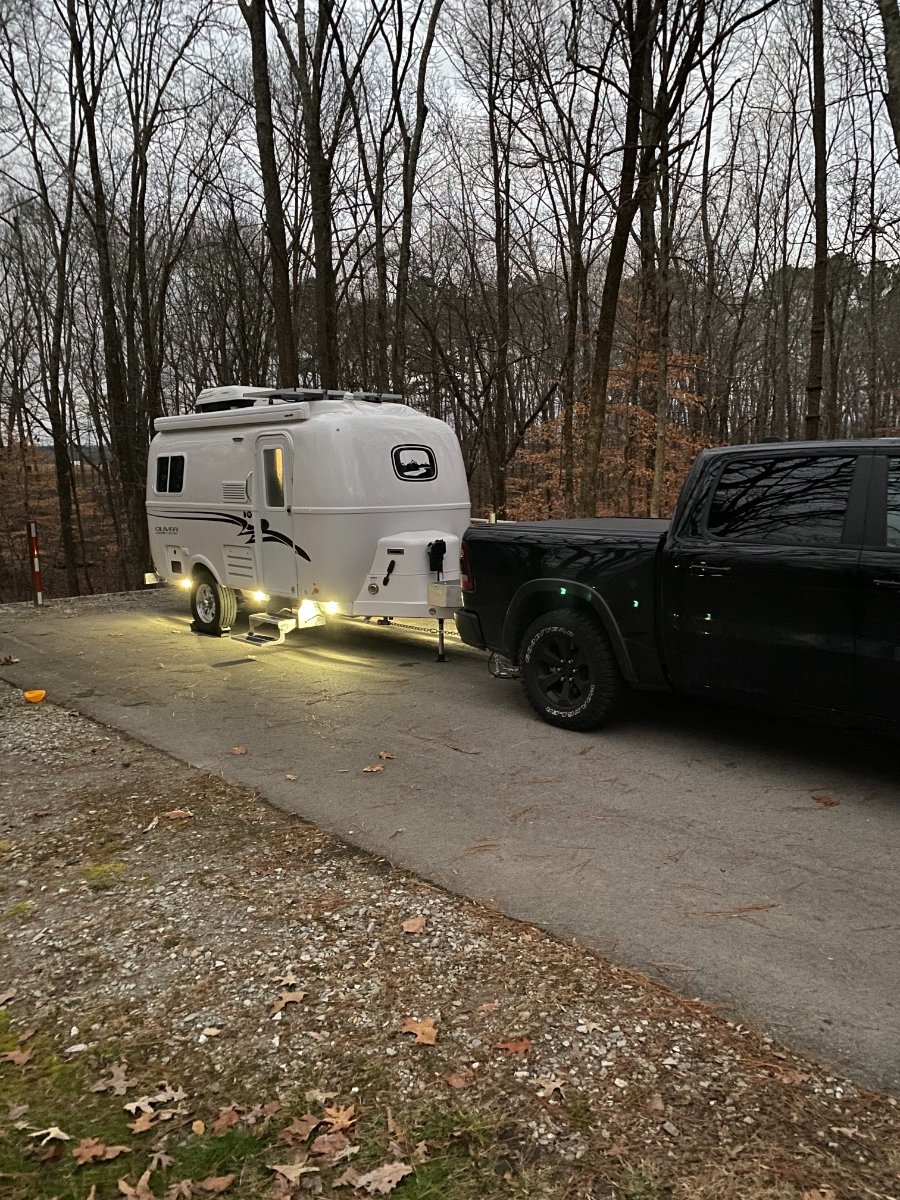
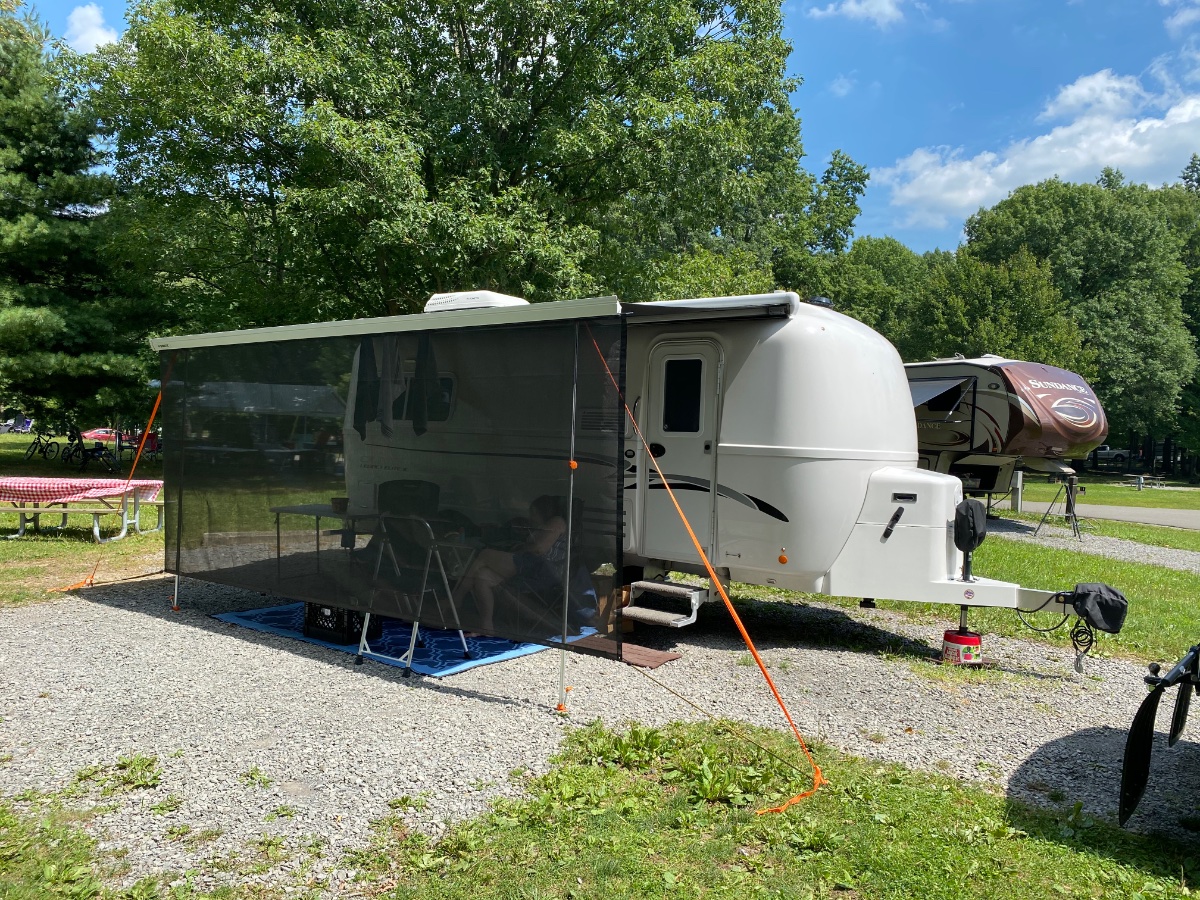
All: well I got it! So much to do today - LEARN. Newbie, 2000%. Hellva time backing in and park empty but a couple finally came along and he helped me back in. HE said it was not the easiest place to back in. I need to learn everything. Only hooked to elec so far. But restroom right across from me with SHOWER, which is now the most beautiful word in the English language, in my book. I am so glad I booked a week here to figure basic things out! Here is the Ollie (it’s 6:30 AM CST).
2 points
-
We are just to simple - our "needs wash" clothes go to a cloth bag, thrown into the front closet - besides - the basement is full of rv stuff - you know- important stuff- real important stuff, well ok; its my (RV) stuff - so CB says......2 points
-
Thank you for your posts. They make me giggle. We have a Ram that slammed its brakes on while we were backing up at David Crockett SP too. We were fairly new to the truck and completely new to the Ollie, WTH?? Jumped out to see what we had hit or were about to hit, nothing there. It took us a bit of testing but we finally figured out it was the ball and hitch thingy! Scared the crap out of me. Honestly, I have so much admiration for anyone who does this alone. Even doing it with a partner can be nerve-wracking but at least you have someone to bounce ideas off! Our dog, Fiona, thinks she can drive too although she wants to drive our Prius more than the Ram. Happy travels and hope to meet you some day. Paula2 points
-
I use a old thermal stainless pot from a defunct krups machine. And a big drip cone from Amazon. If you really want steaming coffee to last, preheat the big pot (clean), with boiling water. Let it sit for a minute or two. Return water to the tea kettle. (Same procedure for thermal mugs) Reheat water. Make coffee. The preheated jug or cup keeps coffee hot much longer .2 points
-
Another good pour over coffee maker. Makes enough to take on the drive with you and keeps it hot! https://www.amazon.com/dp/B0080J2N8A?ref=exp_keepyourdaydream_dp_vv_d
2 points
-
Since this is resurfacing... If you like *good* coffee, and are willing to do just a little work to get it, I strongly recommend the Clever Coffee Dripper. As explained at that link, "The Clever Coffee Dripper combines the best features of French press and filter drip brewing. It combines control over steeping time with a sediment-free cup." It really does work quite well if you follow the prescribed process (and there are of course some Youtube videos with coffee geeks suggesting variants of the process). We actually have two of them so we can each be making our morning cups simultaneously. Boondocking bonus - you can heat your water on a stove rather than using an amp-hours greedy electrical appliance (but if you're adamant about drawing battery down for your coffee you can use the microwave for the water 🙂 ). Buy the best fresh roasted beans you can find (one fun little hobby I have while out and about in new-to-me areas is finding the little coffee roaster operations that have sprung up in many areas) and grind them in the morning as you prep your water etc. using something like this little Hario coffee mill. It takes a bit more time than putting that pre-wrapped puck of coffee into the Keurig but it makes SUCH a better cup!! BTW I should warn any coffee geeks/snobs out there that the Sweet Marias web site that I linked for these two items is a deep rabbit hole of home roasting and brewing information, equipment, and green beans. Turns out that coffee is among the three food items (along with wine and chocolate) that stimulate the widest range of our taste and smell receptors, and there's a stunning variety of bean types and processing methods that create a rainbow of coffee flavors to be discovered, and the folks at Sweet Marias are clearly on a mission to help folks explore that rainbow. Don't say I didn't warn you if you lose hours there and end up exceeding your decadal appliance budget on roasting and brewing gear for home and trailer...2 points
-
Here's another of the very helpful PS articles1 point
-
Re-gelcoating is not even remotely practical. It can be done but the cost would be well north of 10 - 15K and there is really no point in it. If your gelcoat has gone beyond buffing and waxes, than painting is the next step. This is done all the time with fibreglass boats. In fact, I don't think I have ever heard of anyone re-gelcoating an entire boat ... small, damaged areas yes but not large surfaces. You can do an amazingly good job by rolling and tipping some of the high tech paints commonly used in the marine trades and professionally done sprayed two part urethane paints will out-shine new gel coat. When your Oliver reaches, say 40-50 it may need paint but not before.1 point
-
You can usually bring gelcoat back with fine rubbing compound, and buffing, waxing etc. Gelcoat isn't a paint, or a coating. It's fiberglass, without the "fiber", and sprayed onto the mold before the rest of the fiberglass is built up. The gelcoat on our trailer is marine grade, fairly thick, and you'd be surprised at what some buffing and waxing can do. Even when it looks chalky and tired.1 point
-
John, I ended up buying the 6" smart fan that has 10 settings from 35 cfm to 350 cfm, so I was able to do some additional testing of the "bilge" fan idea. I also got the programmable thermostat with it (more on how I'm using that below). After lots of testing on lots of different fan speeds, you were right about running the fan longer (thanks again for the ideas). For the first 20 minutes or so, the temperatures in some of the basement areas would go up quickly and others would go down quickly, but if I kept the fan running, eventually things stabilized and all of the temperatures ended up pretty close together. The faster the fan ran, the faster the temps stabilize. The important thing was the temps stayed well above freezing in all areas of the basement that I had the sensors with outside temps in the mid 20's and the interior held at 55 with a portable electric heater. Since this works well, I feel like I have the "all electric" solution to keep everything from freezing - and it's independent of the furnace. I installed the fan under the front dinette seat with a 6" vent and the thermostat in the back up against the inlet check valves. As a reminder, my primary goal was to not have to winterize while in storage, but to use electric as a primary source of heat rather than (relatively expensive propane). So I have my Oliver set up in storage now as follows: 1. Electric space heater set to 55 degrees 2. Furnace set to 50 degrees 3. Smart fan set to come on when the check valve temp falls to 38 degrees What happens with this setup is the space heater will try to keep the interior at 55. Once the check valves get cold (38), the fan comes on and runs as fast as it needs to in order to keep the check valves at or above 38. The valves don't come up in temp very fast, so the fan runs quite a bit once they hit the 38 degree mark. This eventually heats up everything in the basement and of course cools the interior a bit faster. When it's cold enough outside (25 degrees or colder), the space heater can't keep the cabin temp at 55 and eventually the cabin falls to 50 - where the gas furnace kicks on to help out (and it heats everything up in the cabin and basement). Being in NC where we don't get super cold nights a lot, the furnace isn't running much at all in this scenario. It ran last night for the first time when we had 22 degrees - and it only ran a few times and used a negligible amount of propane! I think this bilge pump will work great in the summer too to get the hot air out of the basement. Not sure how I'll use it yet in summer, but at least I'll be able to keep the basement "fresh". 🙂1 point
-
One possibility are the panels clean? You could try shore power to see if the battery is capable of hitting full that would eliminate the battery as the problem.
1 point
-
I don't know about the Ram, but, when I bought my F150 my salesman basically talked me into buying the tailgate step. I reasoned that with the number of retired persons in my area this feature just might help with resale on down the road. However, this step has become another one of those things that I thought was "fluff" - like heated seats and heated steering wheel. It really is helpful. Bill1 point
-
This is exactly my situation! Very new to truck, have had NO TIME (I must say this ten thousand times a day, "I have had NO TIME TO READ OR LEARN ______") to read manual for truck, much less Ollie stuff. A major move across states, during tax time, and changing from "sticks and bricks" to "nomad" and issues with mail service, change of address, every e-service thing you can thing of, accounts, internet/wifi-stuff, what to pack, not pack, driving, not sleeping, OTT Orientation overwhelm WITH SICK DOG, then throw in just "general" non-sick-DOG to deal with 24/7 and general stress and never having towed much less operated any RV or even set FOOT in an RV. Yes, you can say it is nerve-wracking PLUS! :-) Oh, and all during an annoying-so-over-this-crap "lockdown." Thanks Paula, for the kind words! I disabled the rear park assist on Ram but some other "helpful" feature is still telling me I can't back up when I want to. It really does feel like the HAL9000 from 2001: A Space Odyssey" is running my truck. HAL won't let me drive like I need to. He will NOT open the pod bay doors. He slams on the brakes suddenly for no reason. He engages my parking brake when I say the word "taco." Kidding, but it feels about that random and weird!1 point
-
We’ve gone ahead and ordered this year’s HD, but there are 2 things I wish it had: a telescoping steering wheel and the multi-function tailgate. I think this tailgate would make it so much easier to climb in and out of the back. I would have gone for it in a heartbeat if it were available.1 point
-
Yes, awning power is switched off when using the screen and the Carefree support poles.1 point
-
ShirMica, What Site # @ DCSP are you in? We were in #62 for our initial stay for factory pickup & "Read the Manual" time. Just trying to get my bearings based upon your pic's. Bryan1 point
-
That looks great Frank. 👍🏻1 point
-
We added a screen to the awning along with the Carefree support poles. It’s been great as extra living space with a bit of privacy, but it’s still quick to stow away in case of high winds.
1 point
-
We have the 5 sided model Clam. Gives a little more room. We love it. Keeps bugs out . Agree easy up and easy down. Stable in wind. Added side panels makes it usable in rain storms.1 point
-
When the Clam is staked out at the corners plus at the "mid-line pull loops" it is VERY stable in very high winds. The only "issue" that I've heard is in a heavy thunder storm with a bunch of rain, the larger model's roof can "collapse" due to the weight of the rain. I've never had that problem with my four sided model though. And, since you are talking about Maine, I should note that due to the very fine mesh screening on this shelter it can become warm inside on a sunny non-breezy day. But that fine mesh does keep out even the smallest of critters and the average temps in your neck of the woods are generally lower which reduces this potential heat issue. Bill1 point
-
John, yep, using 11 Pro. It makes anything at night look awesome. Another good example of tech-wonderful and not problematically “predictive” (i.e., newer Ram trucks slamming on brakes because it thinks you’re about to roll back over a baby carriage but really it’s just the ball on your hitch thingy). Disabled that. Today it decided I should not back up because a FedEx truck was parked, empty, blocking me. I will figure out what “it” thought was “wrong” with my Evil Plan tomorrow (or when I get “time”) and disable THAT annoying safety over-do feature as well. 37 computers in a truck? I sit there going, “OPEN THE POD BAY DOORS, HAL.” Aheh.1 point
-
Very nice night shot, are you using an iPhone? If so, which one? My wife bought an 11 Pro with the new triple lens camera. Night Mode takes some jaw dropping images. I am glad you are happy. John Davies Spokane WA1 point
-
We drip into a thermal container, whether we’re sitting around the trailer or getting on the road. We also carry a Nespresso Pixie for those times only an espresso will do. Mike1 point
-
They do sell online. In Bandon, at McKays Market. However, most of their business is with local restaurants and the Dunes golf course. I like their Beachcomber Blend; if you like a lighter roast, our "coffee snob" son likes this Ethiopian. I buy directly from the warehouse. At the beginning of the pandemic lockdown, I purchased online; if you order 10# the shipping is less expensive. I didn't think about dripping into a thermal container. We have a good thermal carafe that should work great! Thanks for the info. Edit: I checked and our thermal carafe mouth is too wide and our travel thermoses too narrow. I guess I'll just keep doing what we've been doing.1 point
-
That's true of some of the sites but not all of them. We've had a very open site with territorial views in the main campground, and a lovely water view site at the Bowman Bay CG. Yes it is generally busy though not as bad on weekdays out of COVID times. It has some really amazing shorefront hiking both north and south of the bridge. I like Fort Casey well enough as a historical site but Deception Pass gives a great feeling of the semi-wild PNW inland salt water shoreline with the rocky headlands and little beach coves and a great mix of trees big and small. I've hiked at both and will be returning much more often to DP for more hiking.1 point
-
Perfect!!!! You've got it 👏1 point
-
The Walmart at Lawrenceburg is nicer than the one in Hohenwald, assuming you are staying at David Crockett SP after delivery. We settled into our campsite before going shopping. It's about a 15 minute drive; maybe less. Seen in the Walmart parking lot:
1 point
-
Woohoo! How many tries was that? That is pretty much perfect. Obviously further back whacks the parts together. That is why the wheel chocks are there, but go super slow to minimize any impact. Add this to your Honey Do list. A Magnetic bubble level, stick it on the side of your Bulldog coupler. When you DISCONNECT the hitch (it is raised up enough to clear your ball) move the level until it is horizontal ... the next time you get ready to hitch up, like in those pictures, you raise the tongue with the jack until you see the bubble where it is level. Then you know you have enough room for the ball to clear, with no bangs. Without the bubble it is a matter of trial and error. Once the BD is aligned pretty close to the ball, you can use a little brute force with your foot to kick the Andersen left to right, since there is play where it connects, or even kick the trailer tongue. It will wobble a bit too (sways as the tires shift against the pavement ). Sometimes if the coupler seems reluctant to drop in place, a little kick is the best option. Keep hands clear!!! Having the small trailer makes this part of hitching up a lot easier. The tandem is more difficult to shift sideways. John Davies Spokane WA1 point
-
Dang! That's good. I know that you were just practicing, but, in "real life" it is a good idea to make sure that your trailer "bulldog" hitch is higher than your truck's hitch ball before you start the process. It is also a bit easier to see that bulldog hitch in your camera screen if it is a lighter color than black - I spray painted mine silver. All you need is a can of spray paint, a bit of masking tape and a few minutes for drying time. Bill1 point
-
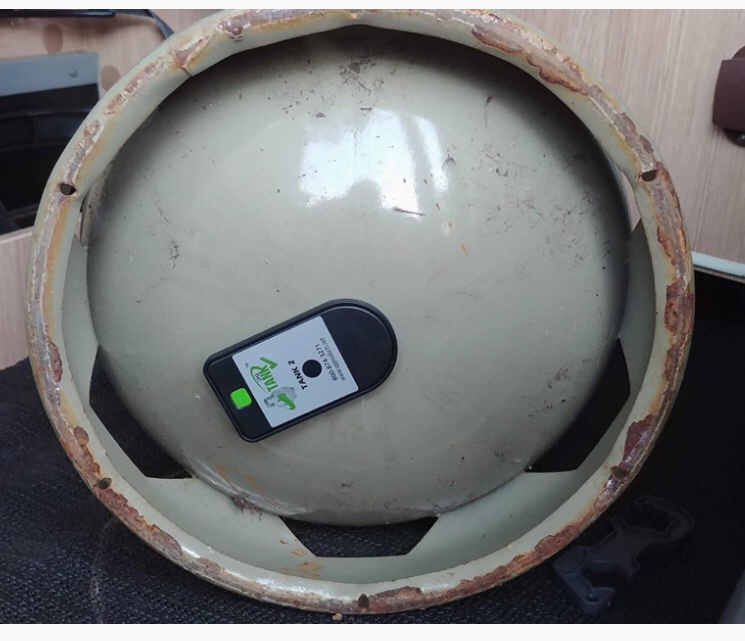
Propane goes fast in below freezing temps if you are not using electric heat as a secondary method. You should definitely take advantage of shore power when it is there! I rarely camp in cold weather so my supply is not usually a worry, you are full timer, so you should get some sort of monitor. This is well regarded ... https://www.amazon.com/AP-Products-024-1001-Propane-Indicator/dp/B01C5RQJHS/ref=mp_s_a_1_3?dchild=1&keywords=AP+Products+024-1001+Propane+Tank+Gas+Level+Indicator&qid=1611919630&sr=8-3 You might maybe have to raise the tanks up a little to make room to install the transmitter(s) under the bottle(s)... https://www.amazon.com/Mopeka-Tank-Check-024-5002-Halo/dp/B07HQZRR9F/ref=mp_s_a_1_1?dchild=1&keywords=Mopeka+024-5002+LP+Check+Tank+Halo&qid=1611919707&sr=8-1 Some people complain of poor battery life. That is probably from using crap counterfeit cells which infect the Internet. If the price is just way too good to be true, it is FAKE. Buy a name brand multi-pack of CR2032 cells at a local hardware store so you know it is genuine! I have no personal comments about how well the sensor actually works. I would definitely not install the butt ugly display unit they have available. Instead I would install just ONE sensor underneath ONE tank; call that your Secondary tank and write that on the tank near the shutoff valve. Label the other tank Main. Set the little movable arrow to point at Main. When your gas supply has been used up in Main, the regulator will automatically switch to Secondary. (The green indicator window for Main turns red.) At this point you can monitor the gas level in Secondary using the electronic sensor and your phone app. When that drops to say 1/2, take out both bottles and get them both refilled. There is no need to have two sensors, just check the app daily to get an idea of your gas usage. Once the valve switches itself, you will start to see the level go down. Make a habit of checking it daily first thing in the morning, so if you need to buy more gas, you will have a full day to deal with that.... That would be my setup.... right now I leave Secondary turned off; when Main runs out, my fridge, furnace and hot water quit working and I freak out and go outside to open the other valve. Then I have to reset the fridge and water heater; sometimes it is the middle of the night. But at least I do not completely run out and then start to freeze my butt off or lose food..... Maybe I should install one of those gauge doohickeys! When you remove the tanks for servicing, you should remove the sensor so it is not damaged in transit (setting it down on a rock!). Some owners carry a third propane tank in the bed of the truck as a backup, that sounds awkward and just a little dangerous to me. I would strap one to a rack on the Ollie if I were to do this. When transporting for service do NOT lay them on their sides, upright only! Hang in there. Some days of worry will get better, to be replaced by many days of pleasure and new experiences. John Davies Spokane WA
1 point
-
Do you know which way your tanks are set up? It's been pretty cold today in Lewisburg, according to weather.com, but I doubt your furnace ran much your first night. It was much warmer. My guess, not being there, is you are good for tonight, even if you are on the one tank setting. At the very least, if you're actually set in the 55 to 60, and the heat didn't kick on a lot during the day, you should be good for tonight. Maybe tomorrow. The only way to really tell is to remove the hood, and slide your fingertips down to feel the temperature difference, which is actually really hard to do when it's cold out. It's easier to feel the difference in warm air. Or, loosen both tanks, lift and feel weight difference. Assuming you don't have a propane guage, which we don't, either. You can extend the life of your propane by using a small electric heater, when you have hookups. Make sure it has tipover and overheat protection. We put ours under the small dinette, facing out. The furnace rarely kicks in, and we can use free electricity for auxiliary heat. Sidenote, we never leave the electric heater on when we're not physically in the trailer.1 point
-
Try THIS ONE. It is the 4 sided model. Bill1 point
-
Which version do you have? I'm not finding the collapsed lengths listed on their site. Thanks!1 point
-
Quite a few owners have a clam tent, though, and seem to get a good deal of use out of them. They're very easy to deploy, though I don't know how difficult they are to take down, and they do take up a good deal of space in the truck bed. But for buggy conditions especially, they seem like a good buy. Personally, I think I'd prefer one of those over an attached room.1 point
-
John, I did basically the same thing you’re thinking a couple of years ago. I took two low amperage 12 volt computer fans and mounted them to the inside of the furnace return grill. Now that I have removed the problematic propane fridge, I use the fridge fan switch by the entry door to operate these fans. I don’t use a thermostat but just turn them on and let them run. They are able to take the conditioned cabin air and force it into the basement. Not a lot of flow but I can feel a slight bit leaking thru the converter grill under the dinette. A higher capacity fan(s) would be great but I would be careful not to have so much that you run the risk of activating the furnace sail switch.1 point
-
We went with the "standard" one bed model. We don't want to sleep separate. Another reason is the standard bed is longer (sleeping across the trailer) and I need the room to stretch out. We use a "full" size topper so I am trying to figure out some creative ways to either allow about 24" of the aisle to be reclaimed or something else. For now the last 24" of the oliver is where our air filter and dehumidifier live. The area under the bed is where we store some extra stuff, but it's not like we are out of room in any of the other storage compartments either. One thought I've had is to put the truck freezer we are looking at buying under the bed to avoid the "how to power it?" when we reach camp. It is nice to be able to convert the space to a dining table when there are amazing views to the rear of the trailer - we seated 3 kids +3 adults there which might be more difficult in the twin.1 point
-
As local hosts who are showing our Oliver 2-3 times a month, I finally built this list of some of the top items people buy for their new Oliver. Maybe this is useful to pending/new owners: Click the link to go to the Amazon list...which includes comments for each item with regards to how it works or fits for Oliver trailers: Oliver Trailer Outfitters list on Amazon Craig & Rose Hull 505 -Galway Girl1 point
-
Plug converters: We've yet to run into a campsite that didn't have 30a service, though I guess there's one out there. External Surge Protection: If you have the built in then I wouldn't Wheel chock or “X” blocks: We tried the X-chocks and found them to be unreliable and a PITA to use. I prefer the cheapy hard rubber chocks, four of them. Extra 25′ potable water hose: Not necessary to spend extra on these, but they're nice. Jack stand blocks: I use the Camco legos. I should probably find something lighter and less bulky though. External water filters. We have this one but have yet to use it - I wouldn't call it essential, but their 'essential system' would be the one to get. Extra grey water discharge hose: We have a cheap 100' garden hose from Home Depot that I got because it was...grey. For composting toilet: We use regular TP - nothing you get will have time to degrade much all before you dump, so it's really just a question of bulk. We prefer peat over the coco, and just carry three or four gallon ziplocks of it in case we need to dump the toilet while travelling. Tool Kit: I think there are a few lists/threads on it if you search. I carry way too many, and then bring more just in case, so I'll limit my advice to just a decent screwdriver and wrench/socket sets, hex set, some vice grips/pliers, utility knife, etc. A rubber mallet is indispensable for knocking chocks out. A multimeter can be handy. Tire gauge. Gloves. A few repair items are good to have: gorilla tape, assorted zip ties, self fusing silicone tape, butyl tape, screen repair kit, fuses. Cookware: The Magma set is pricey but you won't regret it. Also, also, and also. Utensils: Most of the RV specific things we bought ended up getting quickly replaced by duplicates from our kitchen. For us, there's enough room in the drawers not to worry about space saving products. Here are a few things that we really do like though: tumble trivets, drying mat, wine crate, Dishware: We have these. Cute, but that's about all I can say for them. On my to do list is to find a way to safely carry real dishes. We also end up using paper plates more than we should. I spent a small fortune on Strahl glassware since I figured they're used in restaurants so they'd hold up, but after one trip they were cloudy and covered in scratches. You could probably run over them with a truck though and they'd survive. But we just bought a few of these to try and have high hopes. Utensil and plate organizers: These and these fit the drawers really well. Dish soap and hand soap: We just keep a small bottle of Dawn in the pantry. I'm used to one of these at home for hand soap, so I got one for the trailer. Paper towel dispenser: We love this one. Above the sink with screws and caulk. Inside entrance matt: This fits the space almost perfectly Ground matt at exterior entrance to trailer: This one does the job Extra matt for outside of bath area: Definitely needed - we have this one. Trash receptacle: We bought this but it's too big and we don't do a good job of separating the recyclables. But it does fit well under the dinette and travels well in the shower. We have a tiny little pedal bin from Ikea in the bath but they don't seem to make it anymore. Toiletry organization suggestions: We use these in the bath cabinet. Also these with the clear tops. Any kind of cabinet or closet organizers that are essential: We use these for clothes. If you can find the Rubbermaid bento boxes, the medium size works great in the upper cabinets. Unfortunately it doesn't look like they make them anymore. Toasters: The Breville Mini is one of the few (perhaps the only one?) that fits in the microwave cabinet Coffee maker: Join the dark side. I'm still shocked how good these are. It travels in the sink. Other stuff that we MUST HAVE at pickup??????? Patience.1 point


-
Recent Achievements
-
")


")


")


