Leaderboard


.thumb.JPG.dd838cdb3df463dab6a16861fa23a319.JPG)

Popular Content
Showing content with the highest reputation on 11/29/2021 in all areas
-
I once raced an airstream to get the last spot at a campground. It was a good spot, too.2 points
-
Congrats and great to hear you seem to be having the same experience we have had with # 927. We too got the 2-5/16 coupler as an option - but with one problem - it pulls so great, I forget it's there 🤪 Keep on enjoying!!2 points
-
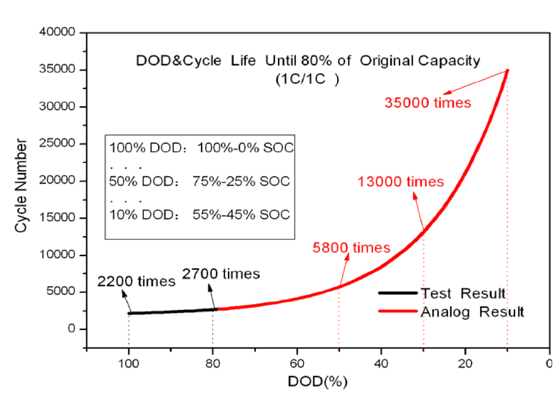
There have been numerous posts in this forum about Oliver’s lithium battery systems—about their usefulness, limitations, and value with respect to cost. Despite reasonable arguments against it, a number of us have purchased the lithium package. Reasons for purchasing the option have included the ability to run the air conditioner (A/C) for short durations (like at highway rest stops), greater usable energy (more boondocking in cloudy weather without needing a generator), faster charging, and longer battery life. This post summarizes things I’ve learned over the last 6 months about the Xantrex/Lithium/Zamp system. This post might also be titled “Things I Wish I’d Known from the Start.” This summary is a work in progress. Hopefully, with your corrections and additions, this thread will be of use to others that have purchased the Lithionics option or are considering doing so. At the time of this writing, manuals and other information for the Lithionics batteries are in the Service Center Knowledge Base — see links at the end of this post. I assume at some point Lithionics information will be compiled with all of the other trailer manuals in Oliver University. Battery State of Charge A key component of the Lithionics system is the app that lets users monitor State of Charge (SOC) and voltage (see links below). The reliability of the SOC values (which describes the amount of energy remaining in the battery) depends on (1) maintaining SOC calibration and having (2) up-to-date Lithionics firmware. The SOC should be near 100% at 13.6 volts, and about 50% (+/- about 10%) at 13.2 volts. If this is not what you’re seeing on the Zamp controller, Xantrex remote, or Lithionics battery app, then something’s wrong. By way of example, a couple times we’ve experienced the SOC readings of 60% when the batteries were dead -- not good. Note that the voltage reading on the app while there is a load on the system (e.g., electric heater) is different than when there is no load; the “resting” voltage may be higher. SOC Calibration The SOC requires periodic calibration. According to the manual for the 130 Ah batteries, the SOC can be calibrated simply by charging the batteries to 14.4 volts. The manual also states that fully charging the batteries to 14.4 volts should be done at least once every two weeks for battery life. Get the 130-Ah battery manual from Lithionics using the links below; at the time of this writing, Oliver has the incorrect manual posted in the Knowledge Base). When charging with shore power, it is not always apparent that the batteries have reached 14.4 volts, because when charging, the batteries only stay at ~14.4 volts for a short while before dropping back to about 13.6 volts. You can verify that batteries have reached 14.4 volts by monitoring battery voltage using the Lithionics app during a charging event. If you are unsure that the batteries are reaching 14.4 volts, you can at least confirm that the Xantrex charger/inverter is set to charge to at least 14.4 volts in the Xantrex app (https://support.olivertraveltrailers.com/portal/en/kb/articles/xantrex-remote-bluetooth-pair-operation) and, under Settings, check the custom absorption voltage. Ours came from the factory set at 14.6 volts, which is sufficiently high to get the batteries to 14.4 volts. Lithionics Firmware At least some of us that picked up our trailers in spring or early summer have batteries with outdated firmware. As I understand from Lithionics, more recent firmware versions have an improved SOC algorithm (our initial SOC readings were unreliable). You can check firmware version with the Lithionics app by clicking on a battery, then clicking on the settings “sprocket” in the upper right side, and then clicking on firmware. Our battery came with firmware version 1.0.05; I’ve recently updated to 1.0.07 by clicking on flash firmware. This has to be done with your phone in close proximity to the battery, and has to be done separately for each battery. Updating firmware comes with a “…this is a critical operation…” warning; you might want to check with Oliver or Lithionics if you have any questions about doing this. Has updating firmware improved our SOC readings? I’m not sure yet, but I think so. So far, the readings seem more reliable, but I’m still testing. SOC Calibration by Cycling A Lithionics rep told me that the SOC can be calibrated by “cycling” the batteries, and that this should be done every two months. Cycling consists of discharging the batteries to reserve voltage (e.g., ~12.1 volts) and then charging to 14.4 volts. However, the rep could not point to written documentation supporting this form of calibration. As the batteries support more partial cycles than full cycles (see graph below), calibrating by simply charging to 14.4 volts (assuming this effectively calibrates the SOC) seems better for battery life. Lithionics batteries will not charge from tow vehicle The standard 7-pin connection from tow vehicle to trailer cannot be used for charging the Lithionics batteries. Charging the batteries from the TV requires a DC to DC charger, which is an aftermarket installation. For more discussion on this, search for John Davies’ Redarc DC-to-DC charger installation description. Batteries Turn Off Twice now one or two of the three 130-Ah batteries have turned off when reaching low voltage (which happened because we were relying on incorrect SOC values). The SOC readings themselves looked OK, but the voltage did not correspond with SOC. The battery State in the Lithionics app reads “Off” for each battery when it is off. There is no flag on the Zamp or Xantrex control panel that alert the user to one or two batteries being off. The lesson (at least for me): monitor all three batteries, not just one, and note the Current, Power, State, and Status Code settings. If one or more batteries are off, turn the battery(ies) back on, and fully charge to 14.4 volts. Inverter Noise The Xantrex charger/inverter can be noisy charging the batteries with shore power (I’ve measured 60-64 decibels in the cabin when batteries are charging, and about 72 decibels adjacent to the inverter). The noise comes from (1) the charger/inverter fan and (2) the way in which the inverter is mounted (the fiberglass wall to which the inverter is mounted propagates noise into the cabin). The noise can be masked by turning on the A/C. Alternatively, the noise level can be reduced somewhat by lowering the charger current. In the Xantrex app, go to settings, and change the Charger Current from, for example, 100 amps to 30 amps. This will reduce fan noise. It will obviously take longer to charge the batteries with lower current. If you would like to be connected to shore power (to run an electric heater or the A/C, for example), but not charge the batteries (to avoid keeping them fully charged for long periods of time, or to reduce inverter noise) you can set the charger ignition control in the Xantrex app settings to “auto-on” (thanks to NCEagle for figuring this one out). In this mode shore power energizes the 110 outlets, the A/C, and the fridge, but does not charge the batteries. Turn the charger ignition control “off” to resume charging batteries with shore power. There are likely ways of re-mounting the inverter so that noise does not propagate into the cabin, with either a different mounting location or perhaps mounts using rubber bushings. Has anyone tried this yet? Xantrex Communication Errors Too often, I’ve gotten “Code 20” communication errors on the Xantrex remote panel. This can be resolved by pushing the red button on the 300A breaker under the streetside bed, waiting for at least 30 minutes, and then pressing in the little red flag on the breaker. Yes, this is a pain (I wish this breaker were more accessible), but it usually resolves the issue. Leaving the Xantrex inverter on battery mode for 25 hours or more will result in the Code 20 communication error. The time limit can be changed in the Xantrex app, but cannot be lengthened to more than 25 hours. As long as the inverter has not timed out, turning the inverter off and then on again at the remote panel resets the 25-hour time-limit clock. Battery Storage Lithionics provides guidance for storing the lithium batteries (see link below). Long term storage can include lowering the SOC to about 50%. Discharging to the appropriate SOC can be accomplished by turning on an electrical load (e.g., A/C or space heater) while in battery mode and monitoring frequently. Theoretically one could set the inverter cutoff voltage (in the inverter app, under settings), to something like 13.2 volts, but the highest cutoff-voltage option is 12.8 volts. Lithionics recommends keeping a log of SOC and voltage readings prior to and after storage for warranty purposes. ------------------------ Hope this helps. Again, please correct any errors that you see, and please add your observations and tips. Fritz ------------------------------------------ Relevant Links Lithionics battery app: https://support.olivertraveltrailers.com/portal/api/kbArticles/386680000012415191/locale/en/attachments/lpqvx861bbc9c842d48f7995281b07d0a193d/content?portalId=edbsnfe5dceb1ade7571879ff200cb63e14a94b62f48e3338c31a6401acd00130b0bc&inline=true). Lithionics battery manual: At the time of this writing, the Oliver Knowledge Base has links to Lithionics manuals for 125 Ah and 320 Ah batteries. However, our LE2 has three 130 Ah batteries as part of the 390-Ah package, and the manuals for the 125-AH batteries and the 130-Ah batteries are not the same. A manual for the 130 Ah battery can be found on the Lithionics website: https://lithionicsbattery.com/wp-content/uploads/2018/12/12V130-G31LRBM8-Battery-User-Guide-R1.pdf. Lithionics Storage Procedure https://support.olivertraveltrailers.com/portal/api/kbArticles/386680000012415191/locale/en/attachments/lrotz3ebee5a7020f42a58eb0d4db18a41356/content?portalId=edbsnfe5dceb1ade7571879ff200cb63e14a94b62f48e3338c31a6401acd00130b0bc&inline=true Lithionics FAQs https://support.olivertraveltrailers.com/portal/api/kbArticles/386680000012415191/locale/en/attachments/lrotz0edc34bc92ef4dce941bbb7f3f2d89db/content?portalId=edbsnfe5dceb1ade7571879ff200cb63e14a94b62f48e3338c31a6401acd00130b0bc&inline=true Xantrex Remote Bluetooth Pairing and Operation https://support.olivertraveltrailers.com/portal/en/kb/articles/xantrex-remote-bluetooth-pair-operation
 1 point
 -
Was literally typing an explanation of how surge brakes work but John did a better job than I would have. I’ll have to look up the trailer valet…looking for ideas to weld onto my aircraft tow to move trailers around.1 point
-
Mine does. I got my Champion 2K at Tractor Supply on sale for $349. Mike1 point
-
My Champion 2K generator is 37 lbs. It’s quiet, too. Mike1 point
-
A bit of trivia... I just weighed my like new, over 15 year old, 1000cc Yamaha generator and it was 50+ lbs. Guess I can buy a new Honda 2200 and not feel bad about the weight at 47 lbs. 😉 They really cut the weight in the last 20 years, with 1000cc units now weighing in at 30 lbs. Guessing steel vs aluminum castings.1 point
-
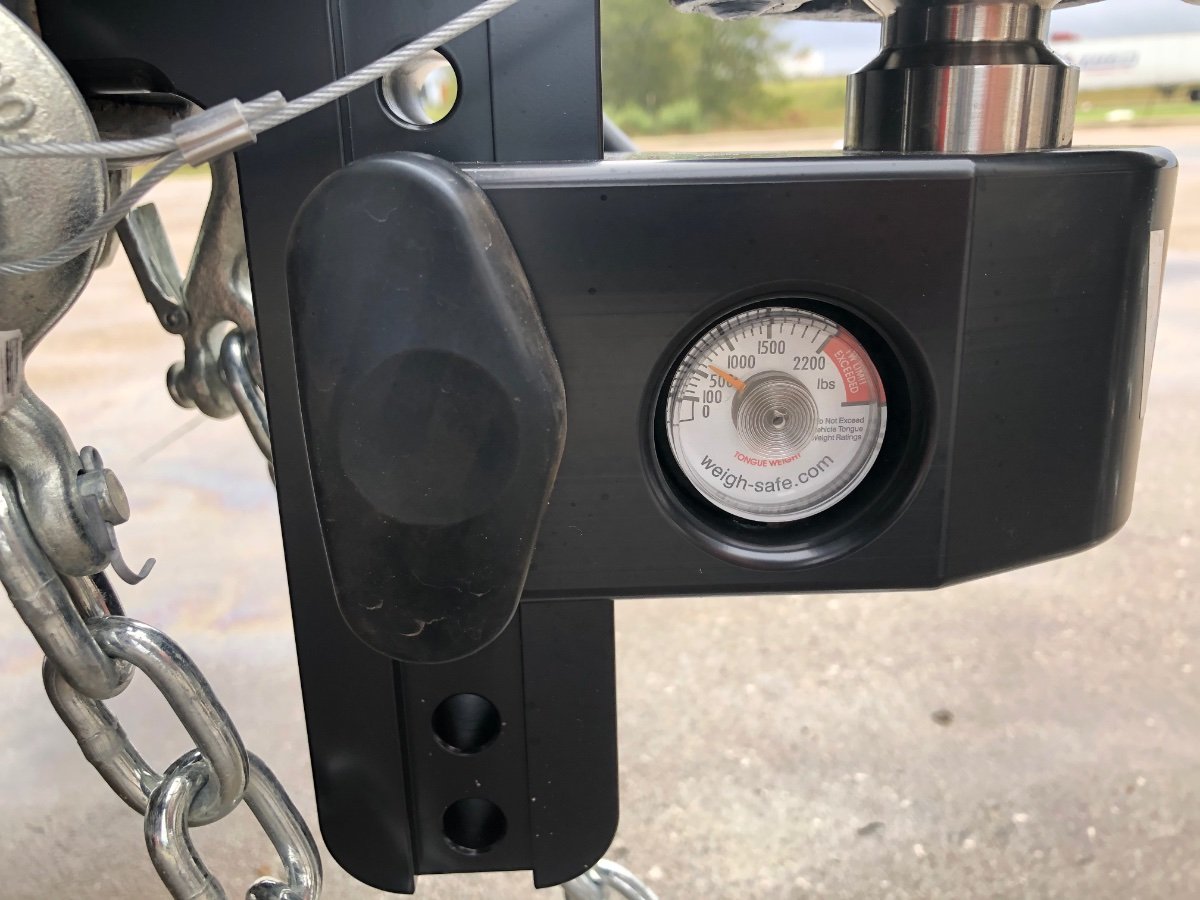
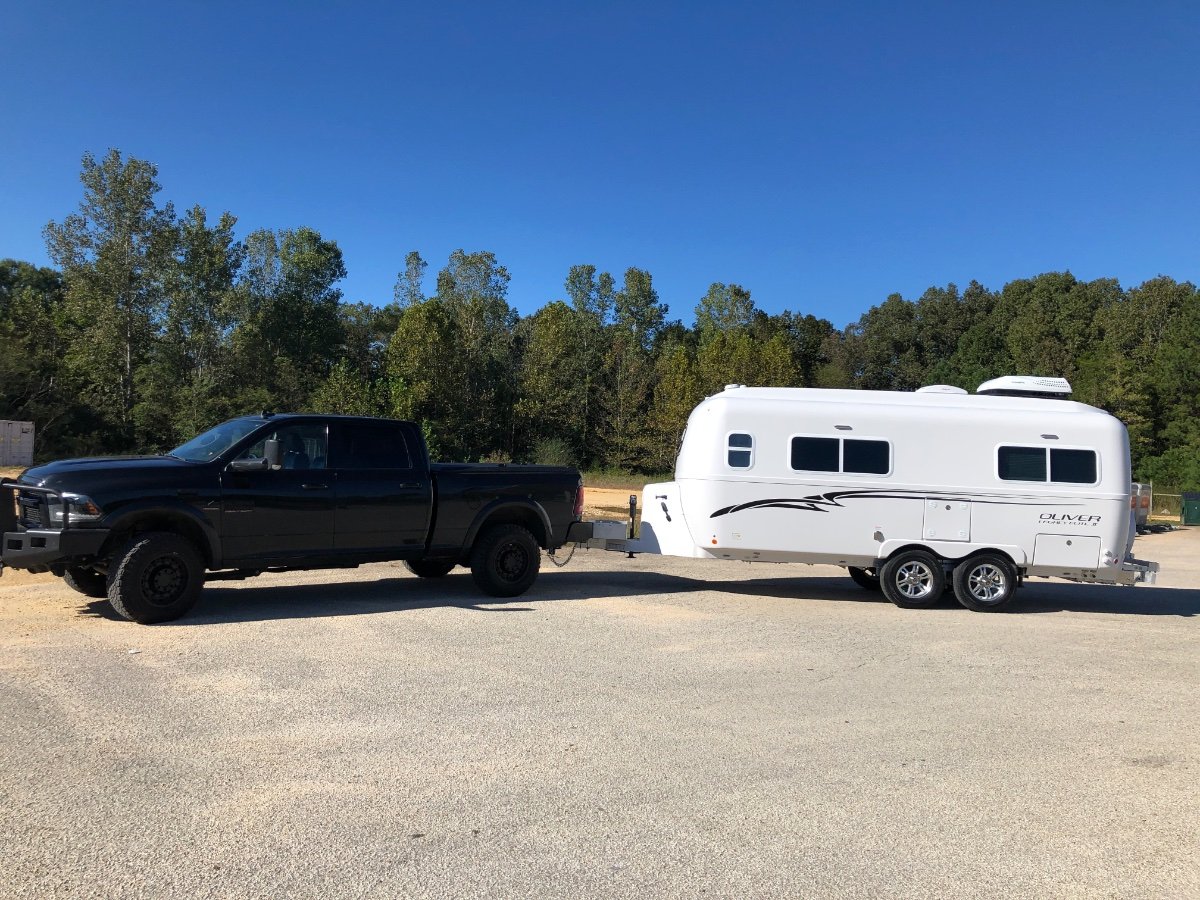
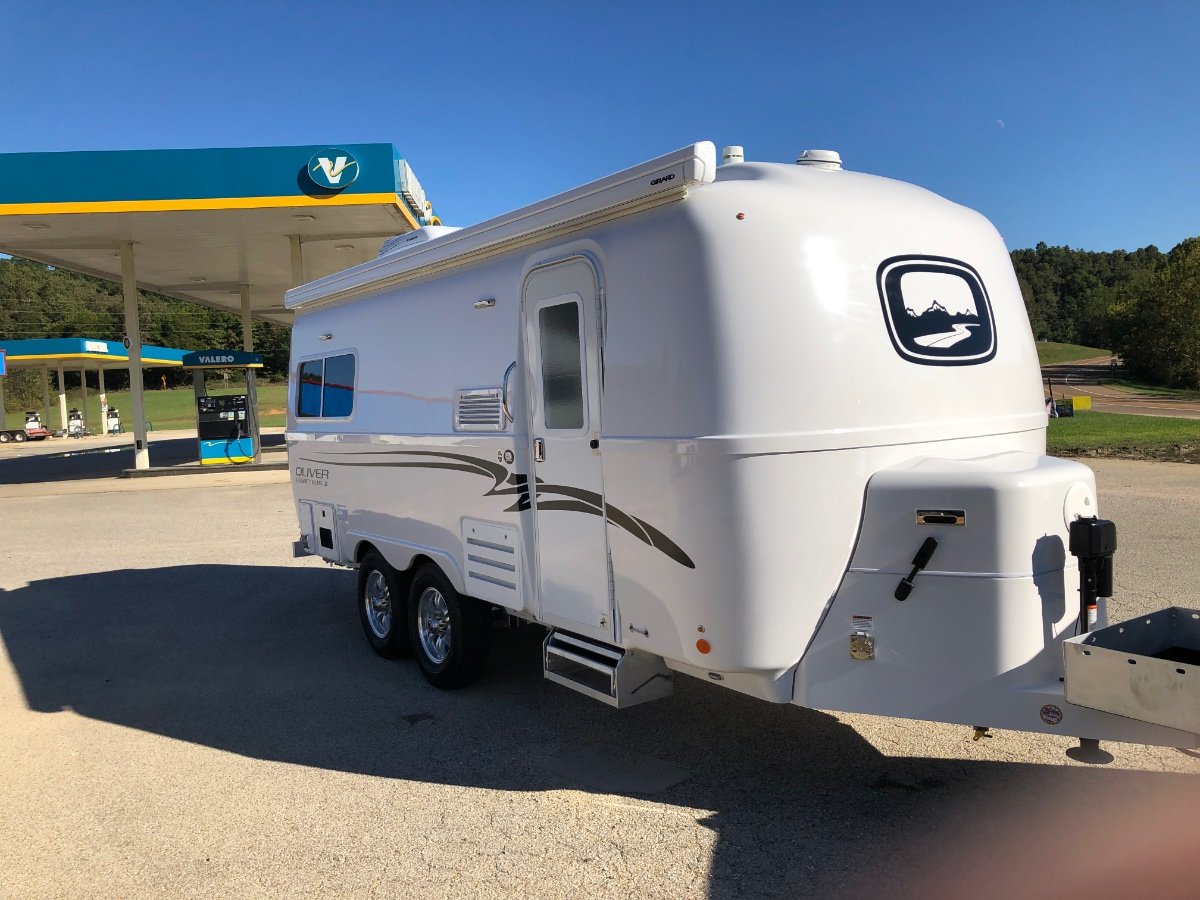
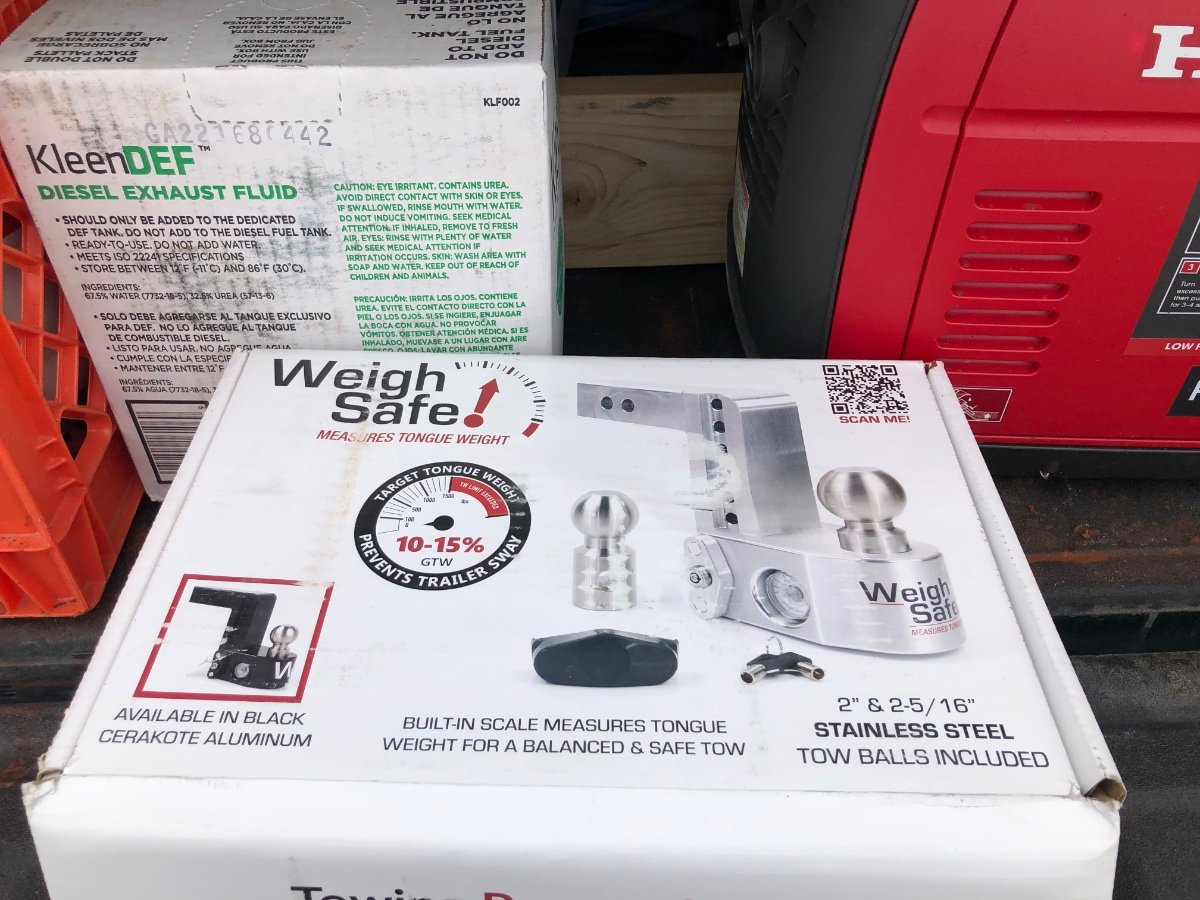
Not one single thing to complain about, Thus far its everything I expected and more. Tows like a dream behind the One-Ton (no anderson hitch just a 2-5/16 Ball.) My tongue weight is 610 Lbs. Fresh Water Tank is Full rest empty. My Hitch provides the actual weight on the spot. I can imagine others have a much higher tongue weight as I am single and pack very light in comparison to most. I do have two 15 gallon water jugs in the front box that I bought filled and strapped there to increase the tongue weight because at 490 Lbs. (This was the exact weight when I pulled it out of the factory and for the first 500 miles before I put any of my stuff inside of it) I was feeling a bit more feedback from the trailer than I appreciate and I figured the additional weight would change its attitude. It did and having the extra water along is a plus until I hit cold country next week then I may change them out for a couple sand bags. Before JD tells me the front box is only rated for 150 Lbs... I know... Its fine and I will beef it up before my next trip. I will post a couple pics when I get better service or home I think this Weigh Safe hitch may be something others find helpful especially if your in a situation where tongue weight is critical due to your tow vehicle. A quick google of "weighsafehitch" and you will be looking at it. I can attest to the fact that it works well and is much faster then finding and weighing on a CAT scale at a truck stop especially if your experimenting with different weights to find your comfort zone. At any rate Props to Oliver for building a quality product in a time when that is not so common anymore and I was very impressed with their staff and how I was treated by them on my pick up day. They are all working hard to push these units out the door but they are doing it with Grace and I appreciate that a lot and they deserve the credit for it. I have attended three Nascar races in a row now (I did not have the Oliver yet for the first two) and will be dry camping in the infield of Kansas City Speedway this weekend, this will be my first time dry camping and I am sure I will exceed the tanks capacity but they do have service running there to pump and fill so I am REALLY not dry camping but I will give it a go and see how long I can get by.... Trouble is that insta hot water heater works very well and it only takes a handful of showers to top off the grey when the water does not get cold. Oh, and the towel hooks somebody was hating on in their blog? they work perfectly, my towels have not fallen off in over a thousand miles and I doubt they ever will but you DO have to know how to hang the towel properly on this style hook..... thanks Grandma for that lesson years ago! Happy Trails Everyone, From Guthrie Oklahoma... For Now...
1 point
-
It's all relative to wants and needs. My company pays $425 a month for internet for one of our employees to work from his home - and that's for just 20 down and 20 up. It was the only thing available several years ago and we had to beg for it since it was for business from a residence. Obviously, we're interested in trying out Starlink's service.1 point
-
I actually had to sign on to my log in to find the new date. It wasn't in the email. Once you log in to your account page from the link in the email, scroll down about half way the new date is listed there.1 point
-
We do not have a composting toilet and never will. The tried and true gray and black tank system in the Oliver we find is so simple to use and maintain. We have no desire to maintain and clean a composting toilet for a multitude of reasons due in part human excrement is 100% hazmat. The name composting toilet seems a bit of a stretch or misleading as it takes 4-6 months on the conservative side for human waste aka HAZMAT loaded with harmful infectious bacteria to break down before it actually becomes a “compost”. This link with videos has pretty interesting owner feed back with regards to “composting toilets”. https://drivinvibin.com/2020/08/17/rv-composting-toilets/ Another link worthy of reading and knowing the laws before disposing of or burying or dumping human waste. There are many restrictions to be aware of. https://www.boondockersbible.com/knowledgebase/is-it-legal-to-dump-composting-toilet-waste-on-the-ground/1 point
-
I have to agree with @hobo. I also do the cleaning and my wife and I both seem to have no problem "aiming". The only learning curve is figuring out where to sit - and that's different for everyone. Once you figure that out it's easy peasy. 😁1 point
-
No matter which toilet option you choose, you will still have the gray water tank to empty (the tank that collects water from the sinks/shower) and most states/campgrounds prohibit dumping gray water on the ground, so you’re still dealing with the campground sewer connection. And with the composting toilet you still have to dump the small pee tank somewhere.1 point
-
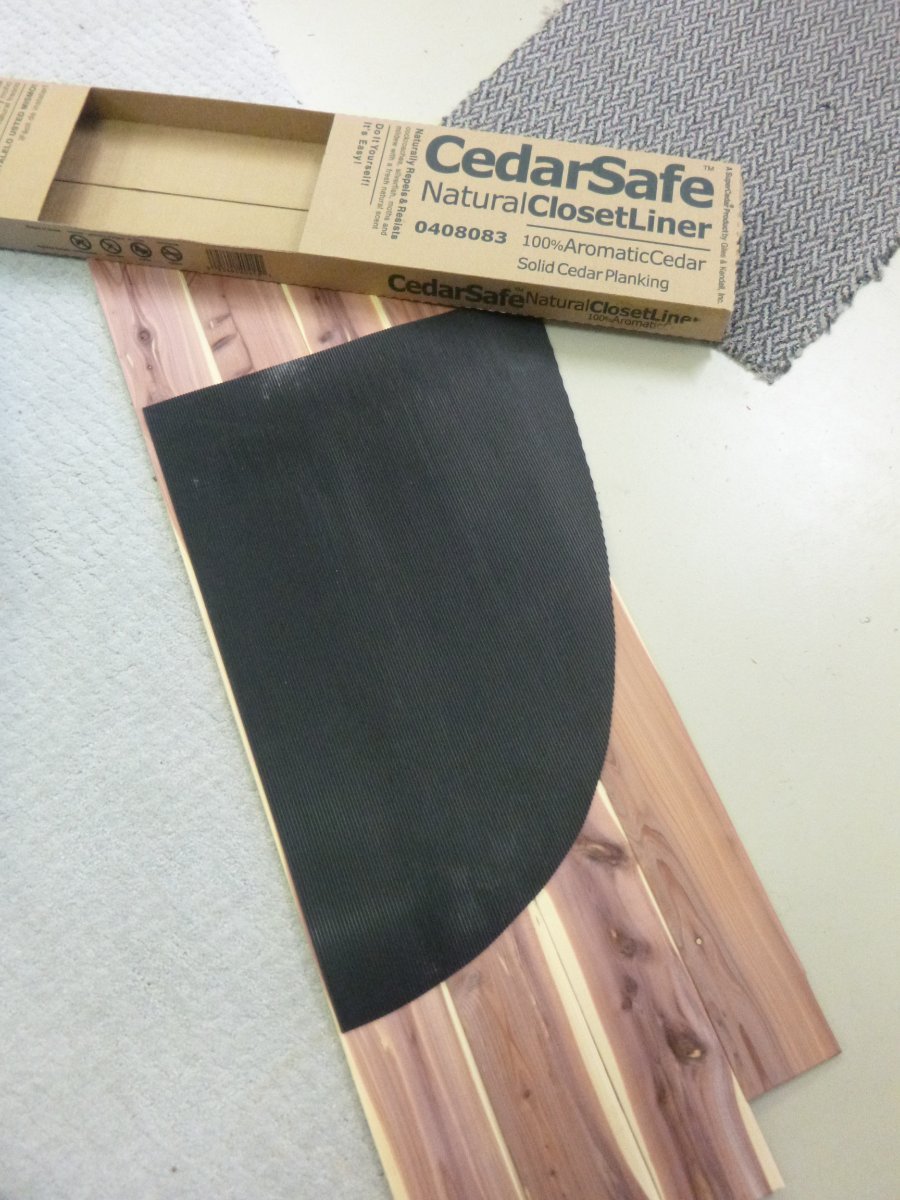
Instead of replacing with "rubber" material, I purchased cedar closet lining at Lowes, used the black mats as a pattern. Bill
1 point
-
In regards to lithium life span, those numbers are based on full discharge cycles. A set of batteries in a home solar installation, where they are deeply discharged every single day, will work orders of magnitude harder than on RV trips with partial discharges. My Battle Borns have been used for one season, and rarely did they ever drop very far below 50% state of charge. In about 45 days of use, the Victron Connect app shows just 12 cycles. Obviously if you are full timing off grid, you will stress them more, but at the rate I am going they will probably last for the rest of my lifetime….. and be healthy for the next owner. The expected life is 3000 to 5000 cycles. John Davies Spokane WA1 point
-
My wife and I are taking delivery of an Elite II next summer as well. We haven't yet been required to make a final commitment on upgrades, but we are leaning toward the Lithium Pro Package over the Solar Pro package. In response to an earlier, similar post inquiring whether to go with wet cell or AGM, I stated the reasons we have tentatively chosen the Lithium Pro Package. I have edited it to more specifically address your LIFePO4 vs. AGM query: "We are presently planning to spend the extra $$$$ on the Lithium Pro Package [over the Solar Pro Package], for many reasons: (1) we view it as "future proofing" (it's a lot easier to have the more robust 3kw inverter and wiring infrastructure installed during construction); (2) we hope to be able to run the AC with just our 2kw generator, which requires the Micro Air Easy Start [included in the Lithium Pro Package] (which is also much easier to install in the factory before the AC goes on the roof); (3) we want to be able to run the AC, albeit for only a short time, on the batteries; (4) LiFePO4 accepts a full charge much faster than lead/acid, and so is more efficiently recharged with solar; (5) 390Ah of LiFePO4 provides much more usable battery capacity than 400 Ah of [lead/acid/AGM batteries], because only about 50% of lead/acid capacity is usable before recharge compared to 85% with LiFePO4; (6) payload,and therefore trailer weight, is an issue with our 2019 Tundra 5.7L Double Cab tow vehicle, and LiFePO4 saves a couple hundred pounds vs. [AGM] and (7) the increased cost is offset to some extent by the 10-year probable life of LiFePO4 batteries." I will add with regard to the first point, future proofing, that we plan to own our Ollie for a couple of decades, and we believe that the price of LiFePO4 batteries vs. AGM will continue to drop over that time as lithium R&D costs are recovered. We do not plan to spend the additional $4400 for the 630 Ah Lithium Platinum Package because we believe 390 Ah will be enough. But, if, over time, we decide we really want more battery capacity, it will likely be less expensive later, and we can add it without having to also upgrade the inverter or any internal wiring. I expect you know you will likely get between 3 and 5 years of service from AGMs. So, over the probable 10-year life of the LiFePO4 batteries, you will be required to replace the AGMs at least once, maybe twice. Today, you must pay at least $800 for 400Ah of AGM capacity. And, I note you have purchased a Honda 2200i generator. If you plan to run the AC using that generator, you will still need to spend the extra $400 for the MicroAir Easy start if you don't opt for the Lithium Pro Package. So, over time and considering the cost of the MicroAir Easy Start, the "net" cost differential between the Solar Pro and Lithium Pro packages falls more in the $2400-$3100 range, not $4300. For these reasons, we are still planning to spend the extra on the Lithium Pro Package. Hope this helps with your decision.1 point
-
SW Florida til the end of February, then out to AZ/NM for March.. back to Maine for Alewives early April…. Have a good Thanksgiving and Safe Travels!1 point
-
Fritz, thanks for taking the time to compile all this information! It will be very helpful to many people, I'm sure. Certainly helpful to me.1 point
-
Wanted to find out if the 2022 Tundra will fit in my garage, it will : https://www.tundras.com/threads/2022-tundra-dimensions.95799/#post-2428472
1 point
-
I'm at just under 3,500 miles. I would imagine mine won't need any additional tightening - just that periodic checking, at which point I'll likely leave the torque wrench at home too. I'm guessing there's a bit of imperfection to the holes in the aluminum wheels and that by now any flattening out that was happening is probably done with.1 point
-
I am a little surprised that wheel nuts need regular tightening, I haven’t found them to loosen at all, once they are checked once or twice after installing the wheels. They do however loosen noticeably if you paint (or install new) drums, the paint underneath the wheel hubs compresses and makes things looser. I am not trying to downplay the need to check them, but before every trip is not necessary if they have already “settled down”. OTH, checking too often never hurt anything, if it makes you feel better. And it might catch something weird before it gets dangerous. I do not carry a torque wrench on trips, even long ones. One thing I do is to raise the tires off the ground every two thousand miles or so, and check for any signs of loose or rough bearings. That, plus a TPMS, plus quality bearings and grease, should eliminate any chances of catastrophe. Tripmushrv, be sure to set the wrench back to the minimum value before storage, and be gentle with it, no drops to concrete please. It is a fairly delicate tool. And it should only be used for tightening, not for removing nuts. It can be used for other stuff too, like your suspension or coupler hardware.Even if you are not comfortable checking those, a kindly campground neighbor might be, if you have the tool and sockets to do the job. John Davies Spokane WA1 point
-
TL/DR so I don't have feedback on the details of your long lists, but I'm wondering if you've seen the checklists for getting ready for towing and for setting up camp that are in the Oliver user manual (available on this site at the Oliver University section)? They strike me as a great starting point and a nice balance between being thorough while avoiding numbing the mind with detail. They also have good steps for sanitizing as well as winterizing the water system. I've added a few things on top of their list for my pre-flight process but only a few.1 point
-
When draining your grey tank, I noted you elevated the front of trailer that is good. Also you should open the drain valve inside the trailer when at dump station. Probably already open when connected to full hookups at campsite. Opening the shower drain valve lets the gray tank drain faster because it allows air to enter the tank. Make sure to close it prior to heading off down the road. Like Mike said I am not aware of any stove vents that need opening or closing. Not sure I would drive with and a/c cover on. Overall I think your lists are pretty thorough. You may adjust things as you get more familiar with it. Like Mike said, just go out and enjoy it!1 point
-
Pretty thorough. Made my head hurt a little reading through everything. I think you’ll be able to whittle these steps down after a while. We don’t use checklists when setting up, tearing down or dumping, it’s pretty much second nature. We both do specific things and then we double check what each has done. We do use checklists for packing, too easy to forget to bring something. A few comments on your list: - I am not aware of any stove vent that needs opening. - We travel with propane on. The fridge switches to 110v automatically if we’re hooked up. - We generally turn the water pump on when we need to use water, we don‘t leave it on 24/7 when boondocking. - If you have the suburban hot water tank and the outside switch is on it will automatically use 110v. If dry camping we turn the hot water gas on before we need hot water. Once hot, it will stay pretty hot for a while without the gas cycling on and off. - When we arrive at a site the first thing we do before backing or pulling in is to walk the site and verify where utilities are (if any) so we know where best to park. - Not sure why you need to hook your electrical cable to the trailer first. Just ensure the breaker in the box is off before hooking up electrical. We don’t have the on board surge protector, so we plug one into the pole that checks the electricity. It usually has about a 45 second delay before it passes electricity. I think the newer trailers have built in surge protection. You’ll use 30a most of the time, only twice have I had to use 50a, once because that’s all there was and once because the 30a was bad. - Your “gray water sewage” is really black water sewage. Black and gray go down the same hole. I flush the black tank a couple of times before pulling the gray handle. - Trip prep: I always check trailer lug nuts before a trip. - We travel with a full fresh tank. There are times you may not be able to fill once you arrive. - “white water” is normally referred to as fresh water. Gray and black have the colors! - if you are at a dump station, you’ll learn to be pretty efficient especially if folks are waiting. We’ve never had anyone get impatient but we try to be ready so we don’t have to do a lot of unloading to get what we need to dump. Like I said, some of this will get to be second nature, just enjoy the process! Mike1 point