Leaderboard


Popular Content
Showing content with the highest reputation on 05/30/2022 in all areas
-
Hello, We are Kathy & John from Michigan. After searching for several months we found a 2021 Oliver Elite ll just 10 minutes from our home! It was exactly what we’ve been looking for and we purchased it on 5/30/22. We previously owned an Airstream Nest that we loved for short trips but quickly found it too small for anything more then a few days. The amazing coincidence is the couple we bought our Nest from and the couple we bought the Oliver from are from the same city and just minutes from our home! What are the odds of that?! We are super excited to be a part of the Oliver family and look forward to many adventures!
 6 points
 -
Have you plugged in at home and tried it out? You’ve got the thermostat set right? I’ve never run the AC on batteries, but on shore power it gets cool in 10 or 15 minutes. On our way back from the rally we had a couple of hot stops in Texas and the AC cooled us down pretty quickly. Mike5 points
-
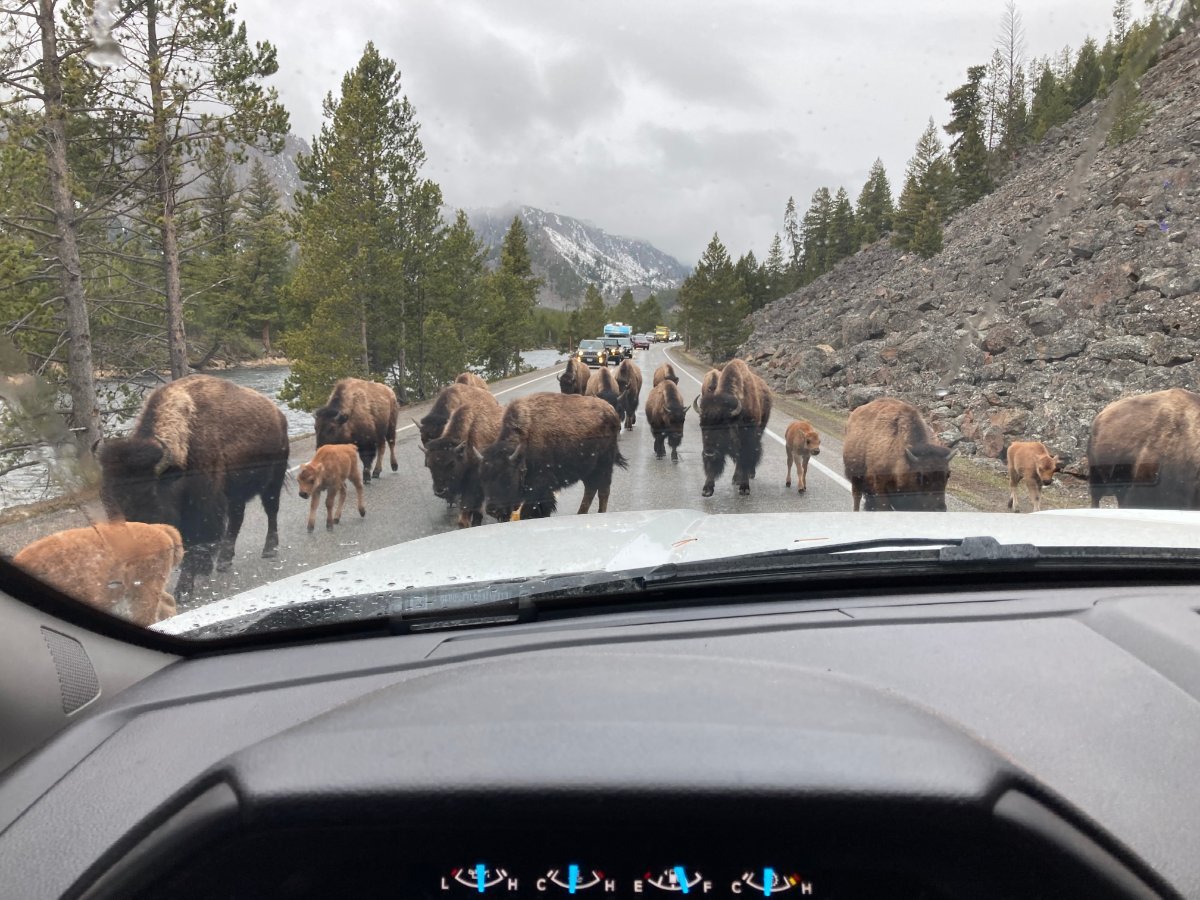
Great western Bison ranch....sometimes referred to as Yellowstone. Guess they wanted a close up look at the Ollie! May 2022.
5 points
-
When I have someone who’s interested in seeing my Oliver, I will turn the Ac on about 45 mins before showing. I open all the cabinets to let the Ac circulate throughout the entire hull. The temp will be at 74dgs the automatic fan goes to low. It is quite cool and the noise level is minimal. This is in Florida temps in the 90s. In short 45mins🥶4 points
-
We just completed a five week trip from NC to Grand Canyon, Grand Teton and Yellowstone....mostly boondocking. Running the fan or furnace at night we would use about 10% SOC which would easily recharge with clear weather. When we got to Yellowstone, I had to use the generator on the forth or fifth day because it was overcast & snowing every day (lost a little SOC every day until SOC got to 50%...and with 19 degree temps we did not want to chance the furnace fan operation). Another setting to consider is the inverter battery low voltage cut off. From the factory, mine would not let me deplete batteries below 70%....then I learned how to change that setting. You can use the battery app and inverter app to help gain an understanding of amps used by each appliance. We try not to use more than one "amp hungry" electric appliance at a time (Kerig, fry pan, microwave, hair dryer...etc). And I monitor where we're at on our daily "amp budget" and make consumption decisions accordingly. It gets easier with experience and practice.4 points
-
Tina and I find ourselves back here on this lake like it’s a magnet. Osprey Campground on Priest Lake in Idaho. We are out on an excursion needing to be back home around the 24th of June. We will see where the gas prices take us. Payed 5.15 in Tonasket WA. Just letting all the great folks on the forum know you and your info are appreciated. It is very interesting to find that a lot of crickets can create a slick spot in your travels. Mike
3 points
-
Thank you! The Platinum Package is much more descriptive and useful for troubleshooting than "battery package our $$$ could buy". I know you all are newbie’s, but when speaking about your Ollie, please remember that there is no such thing as TMI. To much information equals more accurate support from the forum members. Mossey3 points
-
I am happy with our choice of the convection/microwave oven, although I have not used the convection feature all that much. Upon heading home to Oregon after picking up the trailer, we stopped in Utah after a 700 plus mile day of towing and I was too tired to even hook up to power. I only had the basic 4 flooded batteries at the time, but I proceeded to bake a couple of pork chops for a little over a half hour at something like 350 degrees. Worked well and they were nicely browned and delicious. With the lithium pro package, you should be able to use the convection oven while boondocking without giving it a second thought. Just don't use any other power hungry appliances at the same time. Makes great nachos.3 points
-
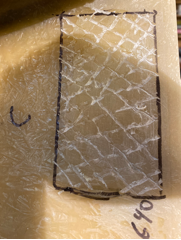
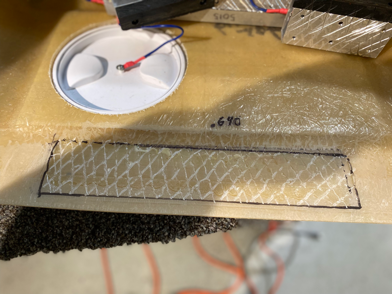
Seems to be a random problem over the years. Our 2019 still has all blocks intact. Since Oliver chooses to use adhesive to mount those blocks, surface prep is critical, making sure both surfaces are clean and free of wax, dirt, grease, oil, mold release, etc. before applying the adhesive, so it’s very human-dependent. And Oliver may occasionally have an employee that isn’t as careful with the preparation step.3 points
-
A Memorial Day Salute to those service members that served and sacrificed everything. Let us never forget, Freedom is not Free.3 points
-
Wish I could erase 60. Years that is.3 points
-
Open the Lithionics App....here is the initial screen showing three batteries in my case. If you don't have all batteries showing....make sure they are on and then tap the discover button shown below. Tap on each battery to see the specifics as you show in your attachment. By the way your screen shot is showing 95 amp load....which seems alot if you have more that one battery. Boondocking....my AC will pull 28 amps each battery.
3 points
-
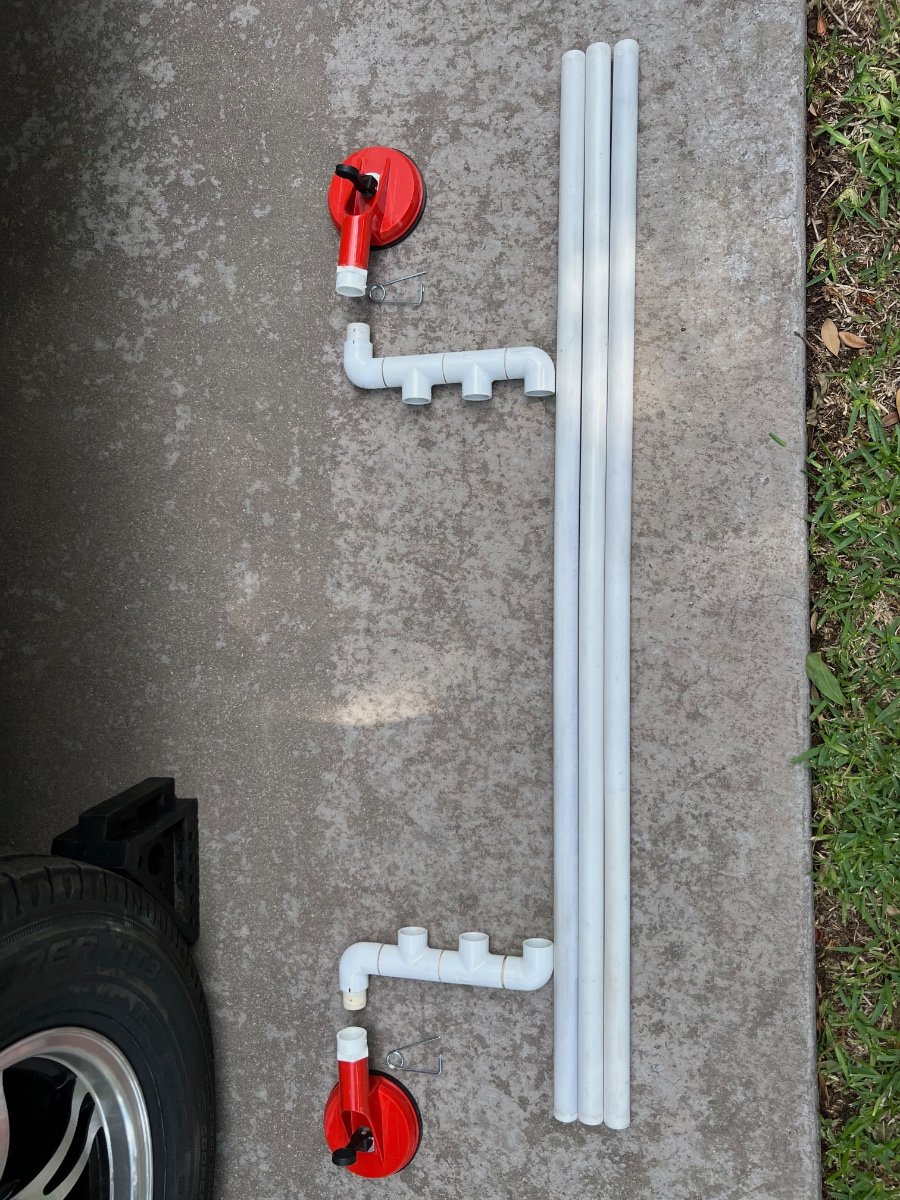
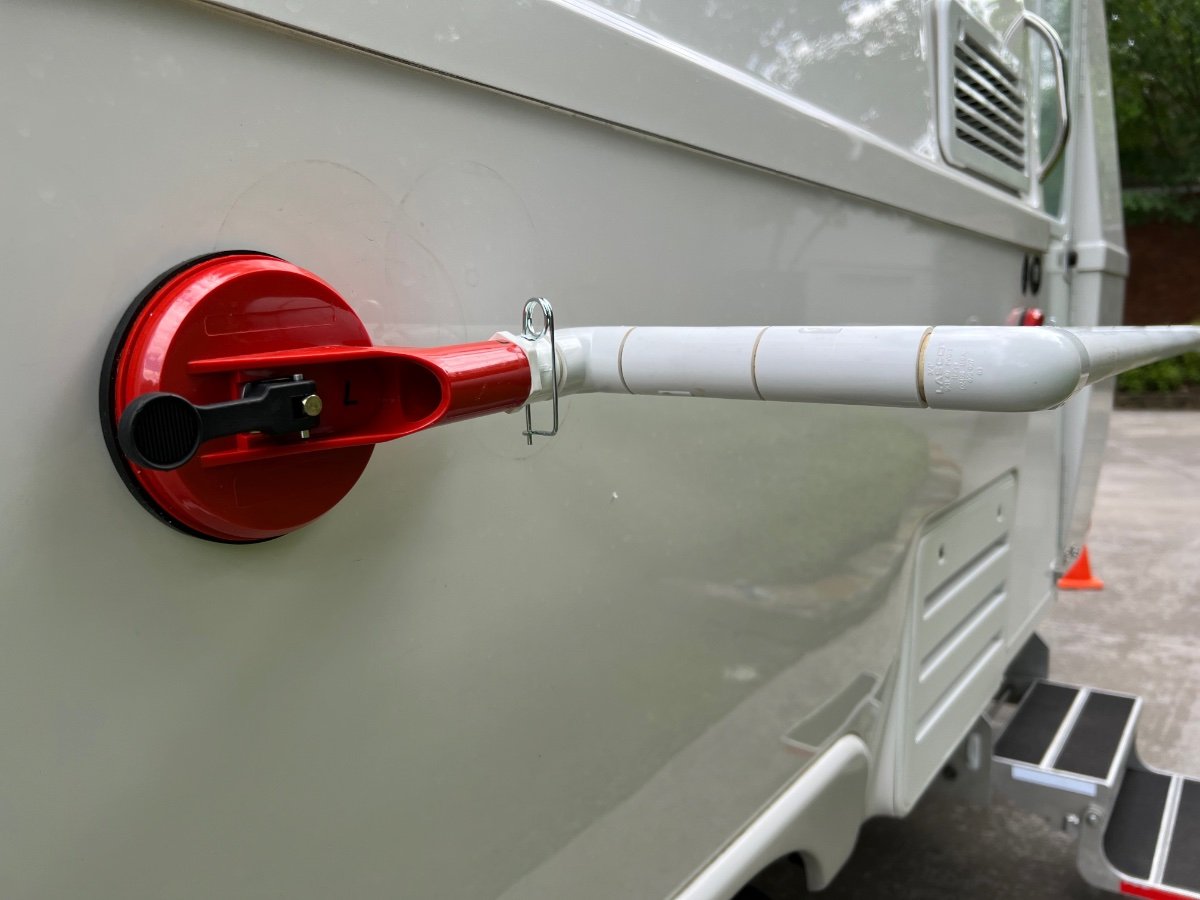
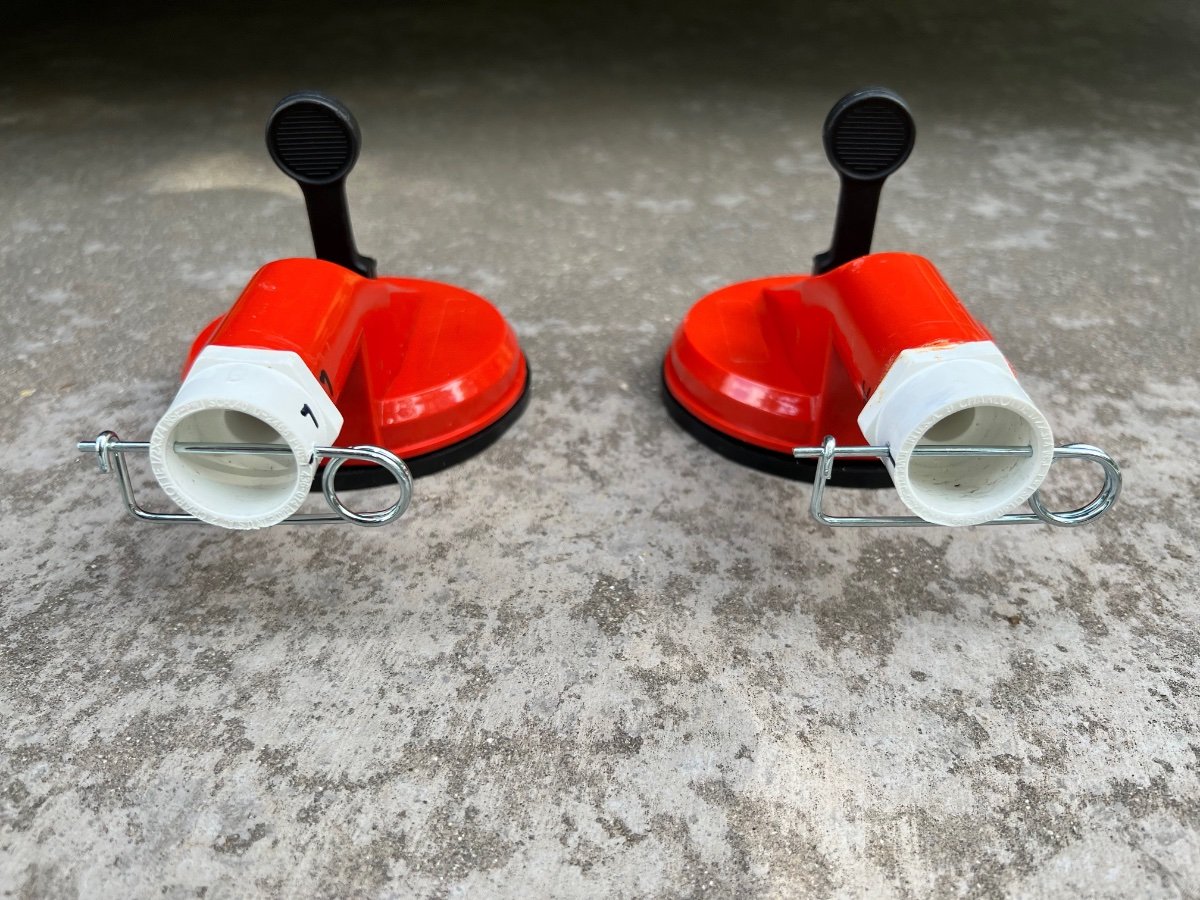
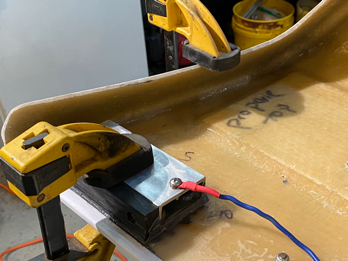
I had seen the posting on 4/22/21 by @Calypso showing an externally mounted towel bar on the side of Hull #520. The towel bar was made from a suction cup lifter and a piece of ¾" PVC tubing. I thought this a great idea and made one for our LEII picked up on 2/17/22. Due to nearly constant downpours in central TN the week we picked up Hull #990, we had immediate need for an external towel bar. We recently returned from a two week trip during which we also encountered several downpours. We used the towel bar nearly every day, often not having enough space to hang damp items. Upon our return I was about to make a second towel bar. I was thinking of adding an improvement to offset the bar/tube further from the hull of our LEII, to avoid having towels in contact with dirt on the hull. After mulling over a design for several days, I had an Aha! moment. I could modify my existing PVC towel bar assembly and add additional tubes for greater capacity, while also moving the tubes further away from the hull. Below are photos and a description of the result. Materials (Quantity, Description, Source, Cost, URL) 1- 4-2/3 In., 125 Lb. Dual Suction Cup Lifter (Harbor Freight, $8.99, https://www.harborfreight.com/4-23-in-125-lb-dual-suction-cup-lifter-57501.html?_br_psugg_q=suction+cup+lifters) 2- 3/4 in. PVC Schedule 40 MPT x S Male Adapter (Home Depot,$0.71/each, https://www.homedepot.com/p/Charlotte-Pipe-3-4-in-PVC-Schedule-40-MPT-x-S-Male-Adapter-PVC021090800HD/203811638 4- 3/4 in. PVC Schedule. 40 90° S x S Elbow Fitting (Home Depot, $0.75/each, https://www.homedepot.com/p/Charlotte-Pipe-3-4-in-PVC-Schedule-40-90-S-x-S-Elbow-Fitting-PVC023000800HD/203812123) 4- 3/4 in. Schedule 40 S x S x S Tee (Home Depot. $0.85, https://www.homedepot.com/p/Charlotte-Pipe-3-4-in-Schedule-40-S-x-S-x-S-Tee-PVC024000800HD/203812197) 2- 3/4 in. x 10 ft. PVC Schedule 40 Plain-End Pipe (Home Depot, $6.98/each, https://www.homedepot.com/p/Charlotte-Pipe-3-4-in-x-10-ft-PVC-Schedule-40-Plain-End-Pipe-PVC-04007-0600/100348472) 1- 0.091 in. x 2-3/4 in. Zinc-Plated Safety Pin (2-Piece) (Home Depot, $2.31, https://www.homedepot.com/p/Everbilt-0-091-in-x-2-3-4-in-Zinc-Plated-Safety-Pin-2-Piece-815408/204276312#overlay) The finished towel bar/drying rack shown in place below. The disassembled parts are shown below: I chose NOT to cement the entire assembly, since it would be much harder to store when in transit. Construction Cut the handle of the HF Dual Suction Cup Lifter in half transversely. A hack saw or bandsaw is recommended. File/sand the cut edges to remove burrs. Use PVC primer and cement to fasten the threaded end of each 3/4 in. PVC Schedule 40 MPT x S Male Adapters to each of the cut ends of the handles of the Dual Suction Cup Lifter. Cut the ¾" PVC tubing for the hanging tubes I chose to make 3 hanging tubes, each 45" long. This length easily fits in our rear cargo carrier and sags very little Adjust length to suit yourself. Cut 8 pieces of ¾" PVC tube to 1-½" in length. These short pieces serve to couple the elbows, tees and adapter together. Using a belt sander I slightly beveled the cut ends of the hanging tubes and the connector tubes so they would more easily slide into the tee and elbow sockets. Assemble the two "manifolds" as shown above, each having: 2 elbows, 2 tees and 4 of the 1-½" connector tubes. Use PVC primer and regular PVC cement to assemble one joint at a time. Be sure to align the open sockets of the tees and elbows. Hold each joint until cement prevents movement of components. The manifolds should be identical. NOTE: do not put PVC primer or cement on the short connector tubes which will be inserted into the adapters cemented onto each handle of the Dual Suction Cup Lifter. When the manifolds are assembled insert the hanging tubes into the three open sockets on each manifold. Again, I chose not to glue the hanging tubes to the manifolds for ease of storage. Insert the connector tube on each manifold into the adapters cemented to each half of the Dual Suction Cup handle. Again, do not use PVC primer or glue. With all components assembled, do a test fitting on the hull of your Oliver. Slightly dampening the suction cups significantly improves their grip on the hull. The hanging tubes and manifolds assembled should largely support themselves horizontally. I had leveled my trailer and used a level to also level the towel bar/rack. When the towel bar/rack is level drill a 7/64" hole vertically through the adapter coupling joining each half of the Dual Suction Cup Lifter to the short connector tube of each manifold. The purpose of the hole is to permit insertion of the zinc plated safety pin which will prevent the towel bar/rack from sagging, while still permitting the rack to be disassembled. Insert the zinc plated safety pins through the holes drilled into the adapter couplings to maintain the towel bar/rack in a horizontal position extending from the hull. I marked the suction cups and manifolds Left and Right to avoid difficulty later inserting the pins through the connectors. I also put an index mark on the adapters and manifold connectors for easier alignment. I have not yet tested this assembly in the field, but am confident it is strong enough to hold as many towels and clothes as will fit. I expect it could also support wet shoes or hiking boots. I hope this is useful to other owners. I welcome suggestions for improvements. As a final note, update your departure checklists to include removing and stowing the towel bar/rack.
2 points
-
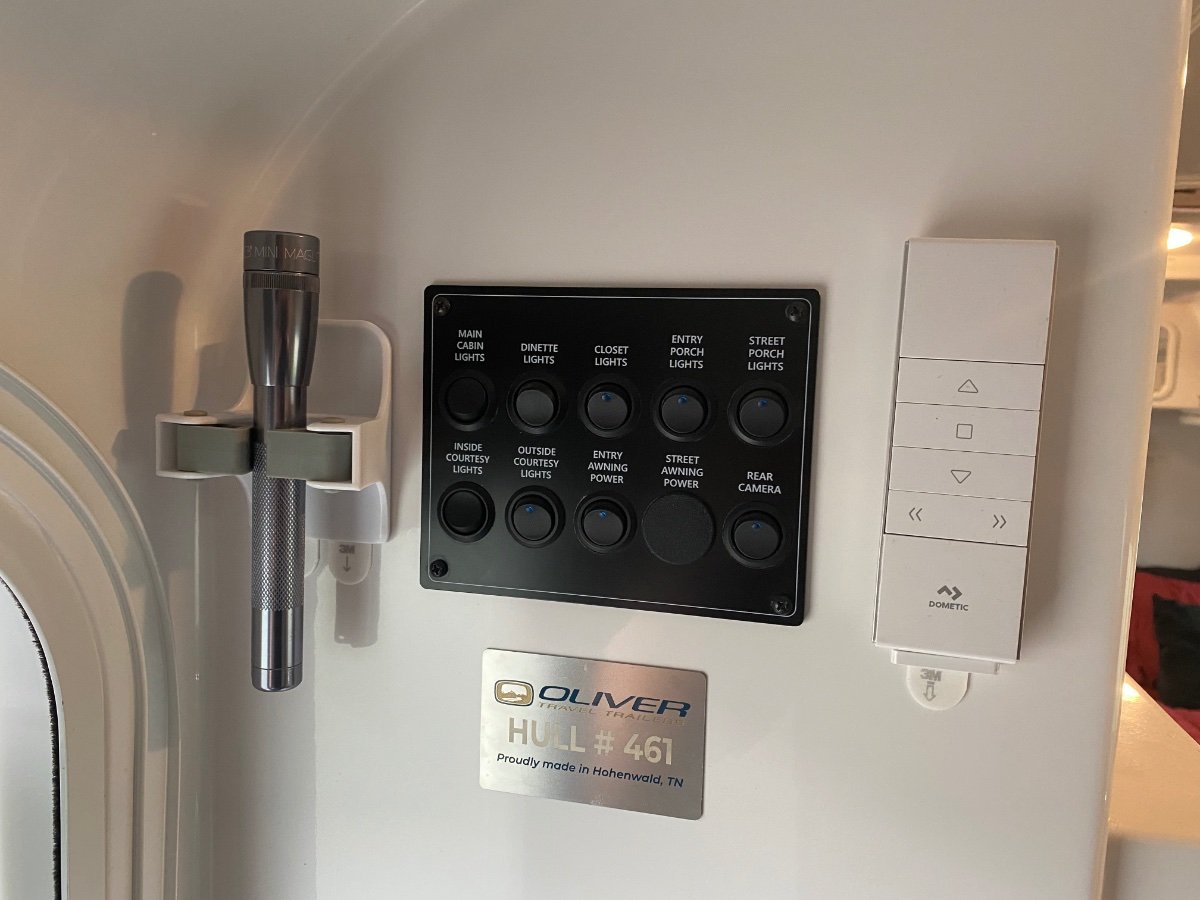
The 3M Command products are perfect for the smooth interior surface of the Ollie. Just added one of the Command broom holders by the door to keep a flashlight handy. The broom holder is the perfect size for a 2 AA cell MagLite. Also used Command strips to mount the magnetic holder for the awning remote so the remote is close by when set up at a campground (but the remote does get put in the nightstand drawer when traveling since the magnetic mount isn’t very strong). And the Command products all remove cleanly from the fiberglass so I (or a future owner) can easily change things in the future.
2 points
-
Your question sounds straightforward but the answer is complicated and multi-dimensional. Cooling a hot trailer to the preferred set temperature is a function of the capacity of the AC expressed as the hourly maximum Btu's of heat that the AC can extract from the inside of the trailer versus the heat gain into the trailer from the outside. My AC is rated at a maximum of about 13,500 Btu/hour so I will use that as an example. If the trailer is absorbing heat from the outside (heat gain) at a rate greater than 13,500 Btu/hour, than the air conditioner will not be able to cool the inside of the trailer at all. It will be doing well just to keep the inside from heating to warmer than the outside. If the outside temperature is 95 degrees and the heat gain is 7,000 Btu/hour, then 7,000 Btu/hour of AC cooling capacity will offset the heat gain and the remaining 6,500 Btu of cooling capacity is available to actually cool down the inside to the preferred temperature setting. If the outside temperature is 105 degrees and the heat gain is now increased to 10,000 Btu/hour, then there is only 3,500 Btu/hour of cooling available to actually lower the inside temperature and it will take longer to cool the inside. As the inside temperature falls relative to the outside temperature, heat gain will continue to increase. Heat gain is a function of the several factors, the most important being the difference between the outside temperature and the inside temperature. The good news is that compared to most trailers, the heat gain in the Oliver is on the low side if the user cooperates. This lower heat gain is a function of many design attributes including the insulation between the hulls, the white outside color, the tinted windows and the "tightness" (very few penetrations of the hull) that minimizes the number of outside air exchanges per hour. To get the most out of your air conditioner, you must park your trailer in the shade, make sure all windows and vents are closed tightly, and don't open the door unnecessarily. If shade is not possible, extending the outside awning can help reduce heat gain in the trailer somewhat as can closing window shades. The speed with which one can actually cool down a hot trailer is a function of how warm the inside is to start with (stored heat in the thermal mass of the trailer itself) and the excess cooling capacity of the AC remaining after offsetting the ongoing heat gain from the outside. There are things you can do to achieve the best performance upon arrival on a hot afternoon. After minimizing heat gain to the extent possible by parking in the shade, etc. , make sure that the trailer is closed up as tight as possible by closing all windows, hatches, doors and vents to the outside. Then turn on the AC and set the thermostat down as low as it goes, and open all the inside vents on the AC itself to maximize airflow through the heat exchanger. You will want to turn the thermostat down way low because you want the compressor in the AC to run continuously until the trailer cools to the desired temperature after which you can reset the thermostat higher to hold the desired temperature. I have concluded the Dometic thermostat in my Oliver does not work very well. It will cycle the compressor off and on unnecessarily, even when the inside of the trailer is still well above the set temp. By setting the set temperature down to say 60 degrees initially, the hope is that the compressor will run continuously until the trailer is cooled . Any cycling will greatly increase the time it takes to cool the trailer. While the trailer is cooling down , stay outside if possible and try not to open the trailer door unnecessarily until it has cooled down inside. A human body adds several 100 Btu's an hour and two persons inside can easily add 500 Btu's an hour to the cooling load. Opening the door several times can do the same. Once the trailer has cooled inside to your desired set temperature or below, you can move inside, raise the thermostat setting to your preferred set temperature and the AC should cycle normally to maintain the inside temp you want.2 points
-
JB Weld is still holding up for me. 4 months since I put it on 🙂 4800 miles ago. As FrankC said, surface prep is critical. John2 points
-
I’ve still got my blocks. It hasn’t appeared on the forum from many folks so it is probably a random problem. Maybe bad batch of glue or incorrect glueing technique or something else. It’s important that it’s reported so they can refine their procedures.2 points
-
It has happed from time to time in the past but I would not call it very often. Since you have already received a replacement from Oliver Service, they are now aware of your issue and a few others that have had the same problem in the recent past. They will process this information and take steps to either correct installation procedures and/or material components if it is found to be a often recurring issue. Bill2 points
-
I agree, vents and thermostat setting are critical for setting the temputures to your liking. The thermostat is a little harder to figure out at first and paying attention to the symbols does take a little to get the hang of it. I think it cools ok, but the noise of the unit is my biggest gripe. trainman2 points
-
Have you tried adjusting the vents? Open the ones on the sides and back if they aren’t already. What temperature do you have the thermostat set at?After an hour it should be plenty cool inside the trailer.2 points
-
I'm not the best person to respond, as we rarely use ac, but, I'd definitely test it out, take notes, and open a service ticket while you are still under warranty, just in case.2 points
-
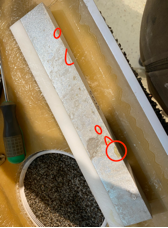
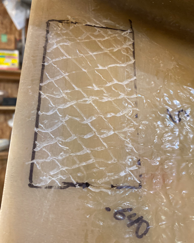
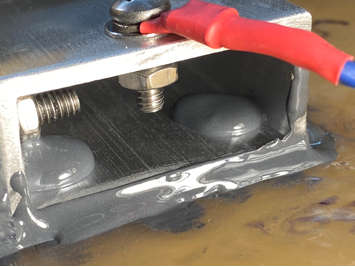
I bought my Oli used at 10 months old (2020 hull# 648). When I got my Oli one of the small Aluminum support bars was missing in the dog house lid. One my first voyage, We lost the other one within the first 40 miles. I noticed I had a bad habit of lying down the access port cover, so I fixed up a 18g wire and hooked to the large support bar and to the back of the access port cover. Just one year as the owner on one of our 5 day outings, I got to the camp site and went to open the access port to turn on the propane; The large bar had fallen off, and was hanging by the wire. I was going to call Oliver to order 2 more small bars, but since I am out in the cold when it comes to Olivers Warranty I decided to make Aluminum Support bars. I had left over 1”x2” Aluminum rectangle left over from mud flap installation (Original rectangle material was 1”x1.5”), and I had a few small pieces of Black 5/8” thick Ultra High Molecular Weight Polyethylene (UHMW) lying around. The large bar that I still had only a few very small areas that had the resin attach to it (marked in Red), and the area where the bars came off where real smooth. The surface of the aluminum had a fair amount of oxidation. I cut a couple pieces of aluminum with a Angle grinder cut-off wheel, and the UHMW was cut to size on a table saw. I counter sinked the UHMW with a 3/8 spade drill and drilled out for a 10-24 SS screw. I also tapped the aluminum with a 10-24 tap for attaching the UHMW. I got a little carried away when I attached the UHMW to the aluminum, I used blue lock tight and lock wash and nut on the back side. I was paranoid of the aluminum support bars falling off again, so I go a little carried away with the mating surfaces to be attached. I used a 1/16 angle grinder cut-off wheel and cross hatched the aluminum, I then drilled and tapped 1/4-20 threads into the aluminum. The 1/4-20 holes are NOT for bolts but something extra for what ever I used to adhere to the Aluminum. I also sanded the aluminum by hand with 40 grit sandpaper for metal. For the Fiberglass I sanded down the original area with the 60grit sanding pad on a angle grinder. I left one small portion of an edge for locating the bars side to side. I used a Dremel tool with a carbide bit to cross hatch the fiberglass. Finally I did a final hand sanding with 40grit sandpaper. I made a tool for locating the aluminum support bars from the edge of the of the fiberglass. I took measurement from the impressions in the fiberglass from the resin, and the one Aluminum bar that I had. I calculated the offset of the bar .640” from the edge. This measurement was including the white trim piece. I didn’t realize that the trim would just come right off. If I had to do it over again, I think I would done the measurement without the trim piece. Note the picture shows me holding it without the trim on the shell, but I did not use it that way. Note the wires in the second picture. Before I mounted the bars I made a couple of security straps. I figured that by some chance one of the bars would come off I Attached 16g wire with heavy duty eyelets to each bar. That way I will not loose any more support bar if they cam unglued. The next question was how to adhere the support bars to the fiberglass. I felt that my 2 low tech options were JB weld or Gorilla glue. I research both, and both seemed to be a reasonable option for adhering aluminum to fiberglass. I have used Gorilla glue a few times and never had any problems with it besides the bottle has a short life span in Oregons high humidity after it is opened. The JB Weld had a fractionally higher shear factor than the Gorilla glue did, and I have use JB weld in so many applications and it has never failed. I flipped a coin and JB Weld won, although it might have been a 2 headed coin. I ended up using 1 package of the Professional size JB Weld, and one of the regular size. to do the job. I used a Bondo plastic putty tool to spread the JB weld. I put a small amount on the fiberglass just enough to fill the cross hatching squeegeed across the fiberglass. Then I put a large amount on the Aluminum cross hatching. Put the Aluminum bar in placed and then clamped. Note the trim piece in place. Below is of one of the bar ends. The puddle of JB Weld on the inside of the bar is what pushed up through the 1/4-20 holes. Here are the tools I used for the JB weld. The 3M adhesive remover worked great for cleaning up the JB Weld (sometimes I can make a mess). The final Product. I secured the wires with GB 1” square adhesive back wire tie downs to keep the wires out of the way.
1 point
-
@Jps190 I’m not sure I follow your reasoning. It seems basackerds to me. My Elite II is the oldest one on the road. Hull #050. We had never waxed it, washed it a couple of times in the past 10 years. Always stored under cover. Had it ceramic coated and it looks better than the new ones being delivered today.1 point
-
I’m betting that none of your previous rigs were Oliver’s. Two Oliver’s, almost 15 years and >150K miles traveling, never a roof leak.1 point
-
This highly depends on where you will be storing your trailer. I have 2 vehicles with Opticoat pro ceramic on them. My truck lives outside and my wires car lives in the garage. If you are storing inside then I would say yes to ceramic on the trailer. If storing outside then I would probably advise against it. The coating I have is supposed to last "5 years". Wife's car still looks immaculate, but the horizontal surfaces on my truck (hood and roof) appear to losing there hydrophobic properties after about 1.5 years. If storing outside I would probably just wax it every 6 months or pay to have it done. With ceramic if it starts to break down you have to remove it with mechanical means to start over which will add to the expense of maintaining your trailers appearance. Wax is just wash/polish/wax again to be good as new. John1 point
-
It sure does! Thank you 🙂1 point
-
Persistence pays off! Congratulations and happy camping!1 point
-
Congratulations on your “new” trailer. Hope to see you out on the road! Mike1 point
-
Congratulations! Wishing you many safe miles and adventures!1 point
-
Kathy & John - What are the odds - but - good for you two! Welcome to the Family and enjoy the heck out of that wonderful camper. Bill1 point
-
Yes - assuming that you have the "standard" air conditioner, the condensate will flow from the overhead a/c unit down a tube that is located between the shells and exits at the bottom of the Oliver via a short tube at the rear street side. While operating in humid conditions you should see water dripping from this tube. While at the recent Owner's Rally I observed this very thing happening on my Elite II. Bill1 point
-
@Galway Girl, @SteveCr Thank you for the answers to my questions! As I said, I do not have Lithionics batteries or the Xantrex Inverter/Charger so my question’s are simply for my education and the hope that I do not provide incorrect information in the future. And the picture I posted above is a screenshot from the Lithionics website of one of their guides and not from my equipment. Mossey1 point
-
Mossemi: In the Lithionics app you see each battery as it's own entity. They have a specific SN and you can rename them ...like Battery 1, Battery 2 or Front/Rear etc. In the Lithionics app then you see each battery on or off and it's specific details. Folks with 3 Lithionics battery configurations have 3 different battery screens available to look at the details. For the Platinum Package with 2 of the 315AH batteries you see 2 screens. In our case we also installed a Victron Smart Shunt on the negative side of the bank of 2 batteries. This way we monitor the total of both batteries. (To do that we're using 2 bluetooth based apps, one from Lithionics and one from Victron.) CS1 point
-
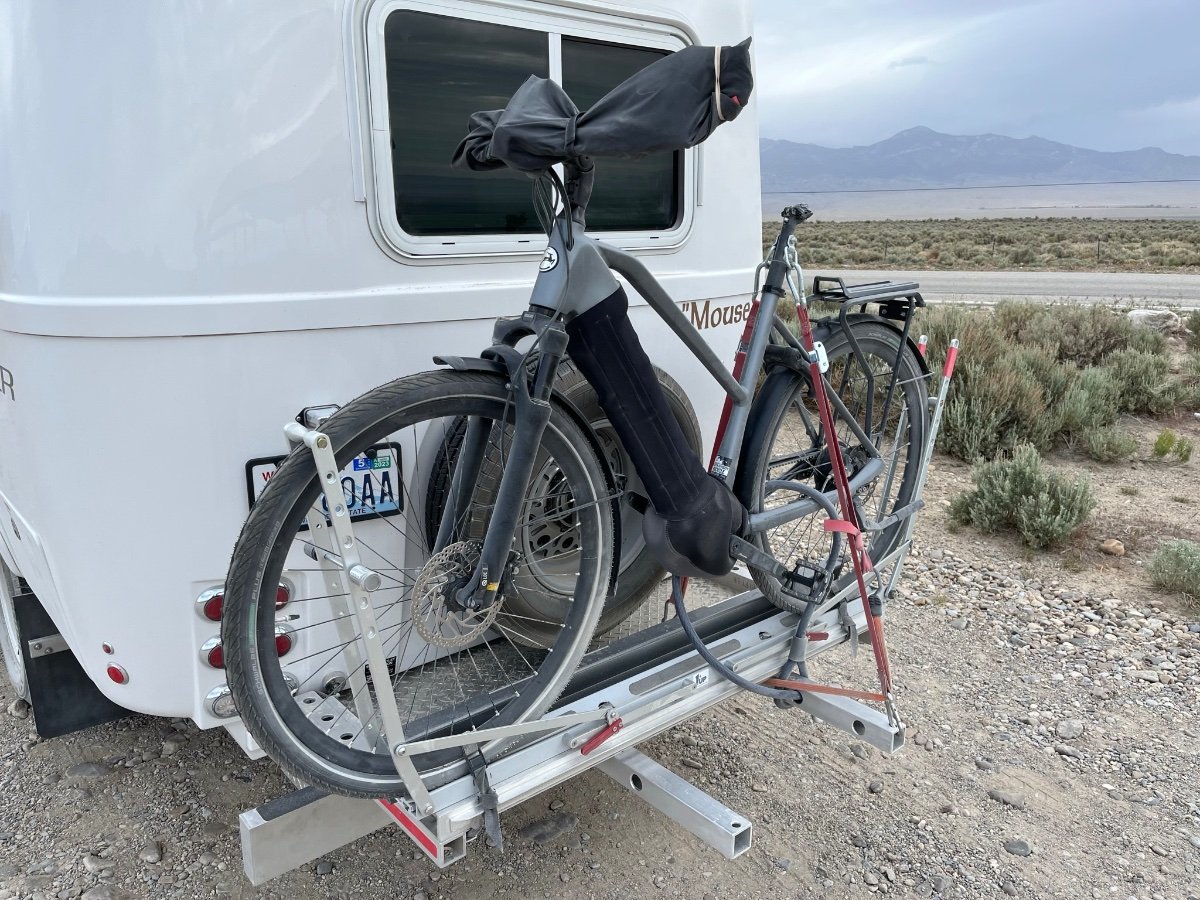
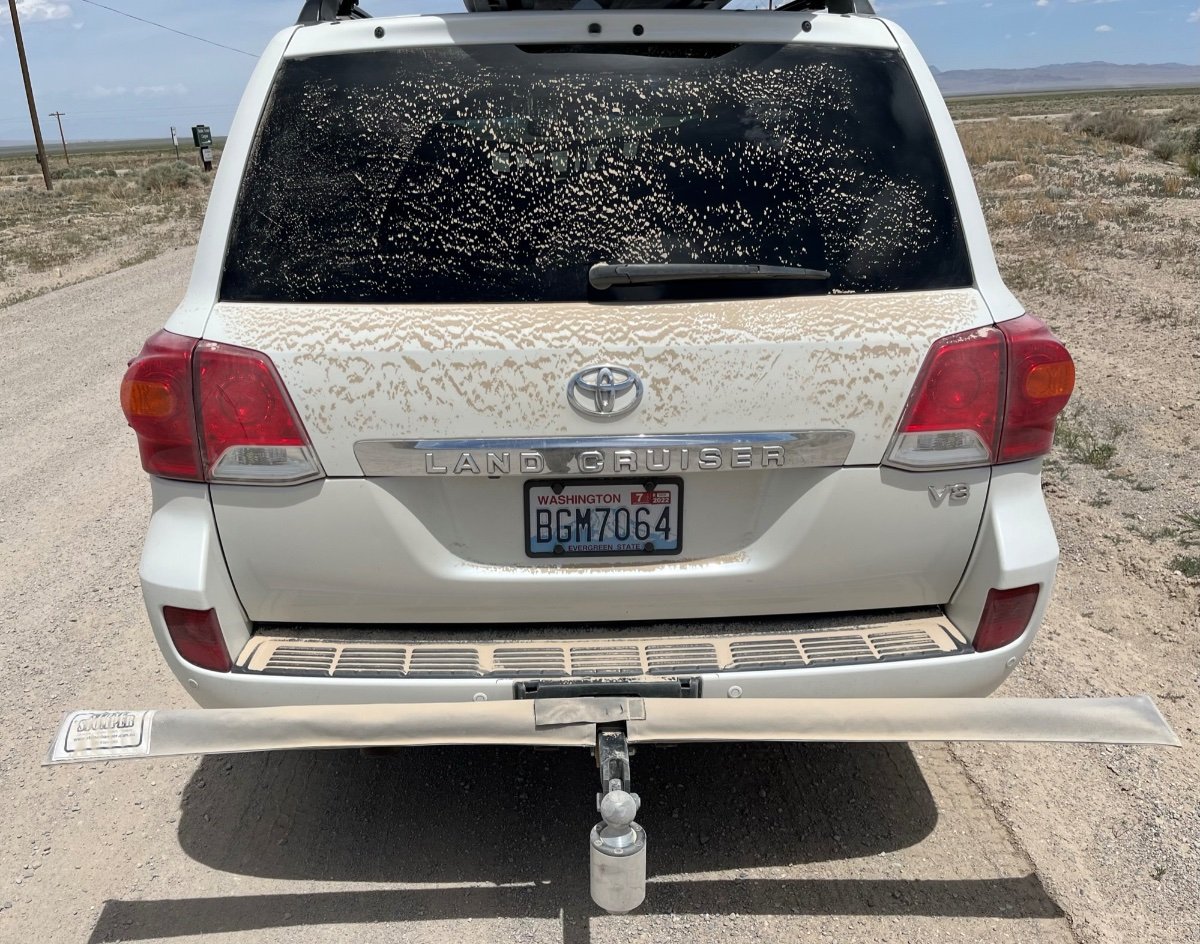
Three miles of dusty washboard 8% gravel road to get to Great Basin NP Baker Creek Campground….. No grease leaks! I seal the mating surface between the cap and the hub with a skim of clear RTV silicone sealant. The new bike rack works great: Obligatory Land Cruiser covered in dust pic, following almost 50 miles of dust up Snake Creek Canyon (south GBNP). I didn’t try to take the trailer on that one, John Davies Spokane WA
1 point
-
On our trip across the Top of the World Highway, as we headed towards Chicken, AK for a chicken pot pie, we only saw one set of tire tracks heading over the edge. !#?*!! (No vehicle was visible in the bottom of the valley) My Vortex coating added about 40 pounds to the trailer and is still holding up very well. Tiny flecks of paint can get knocked off by debris, but can be easily fixed with a bit of matching touch up paint. The fiberglass is well protected.1 point
-
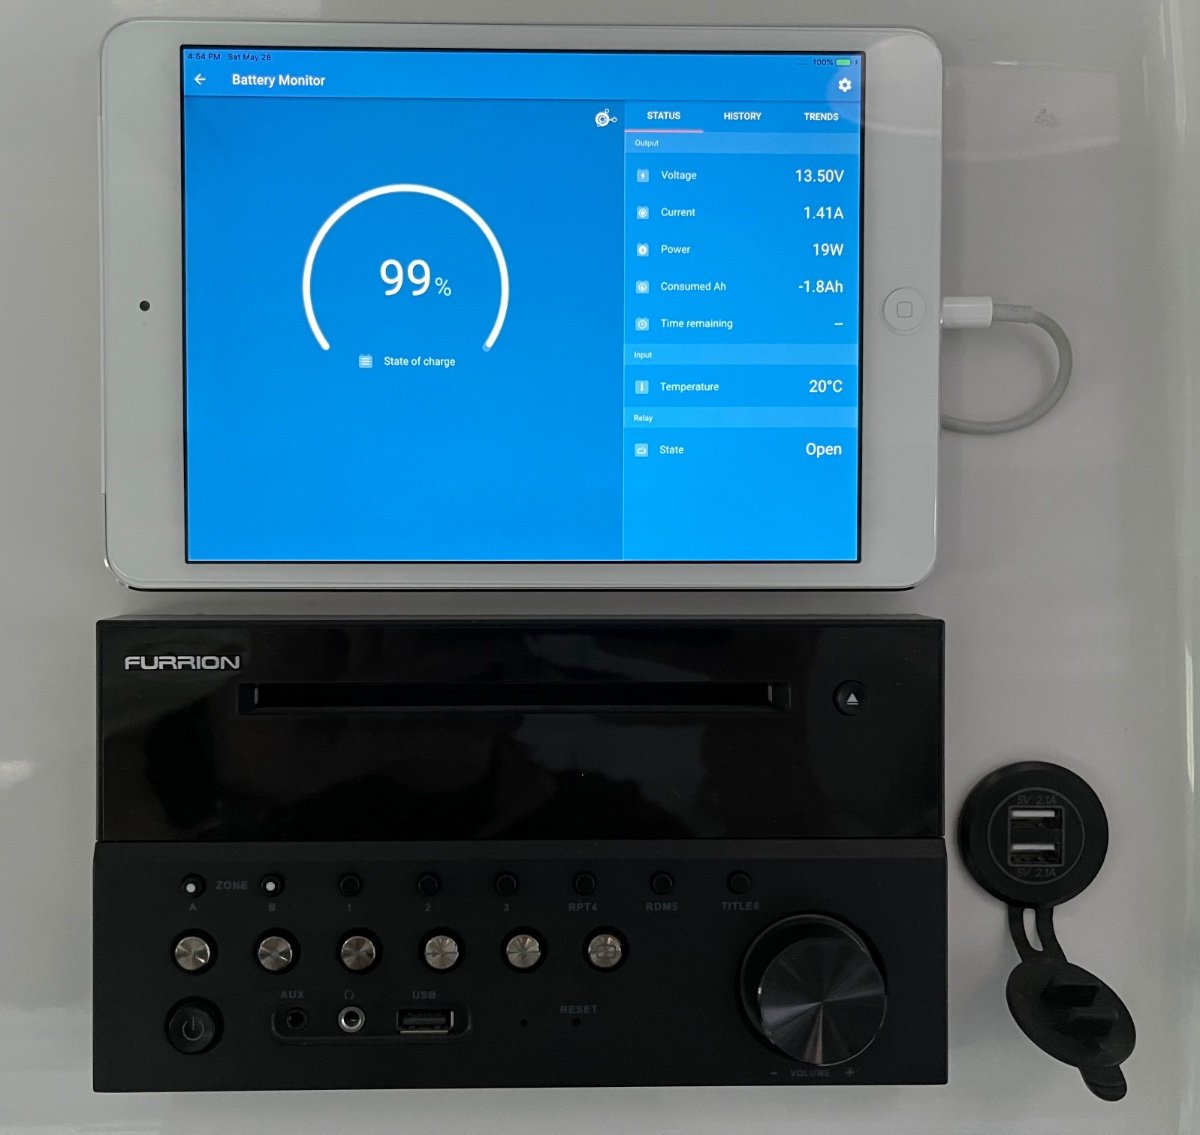
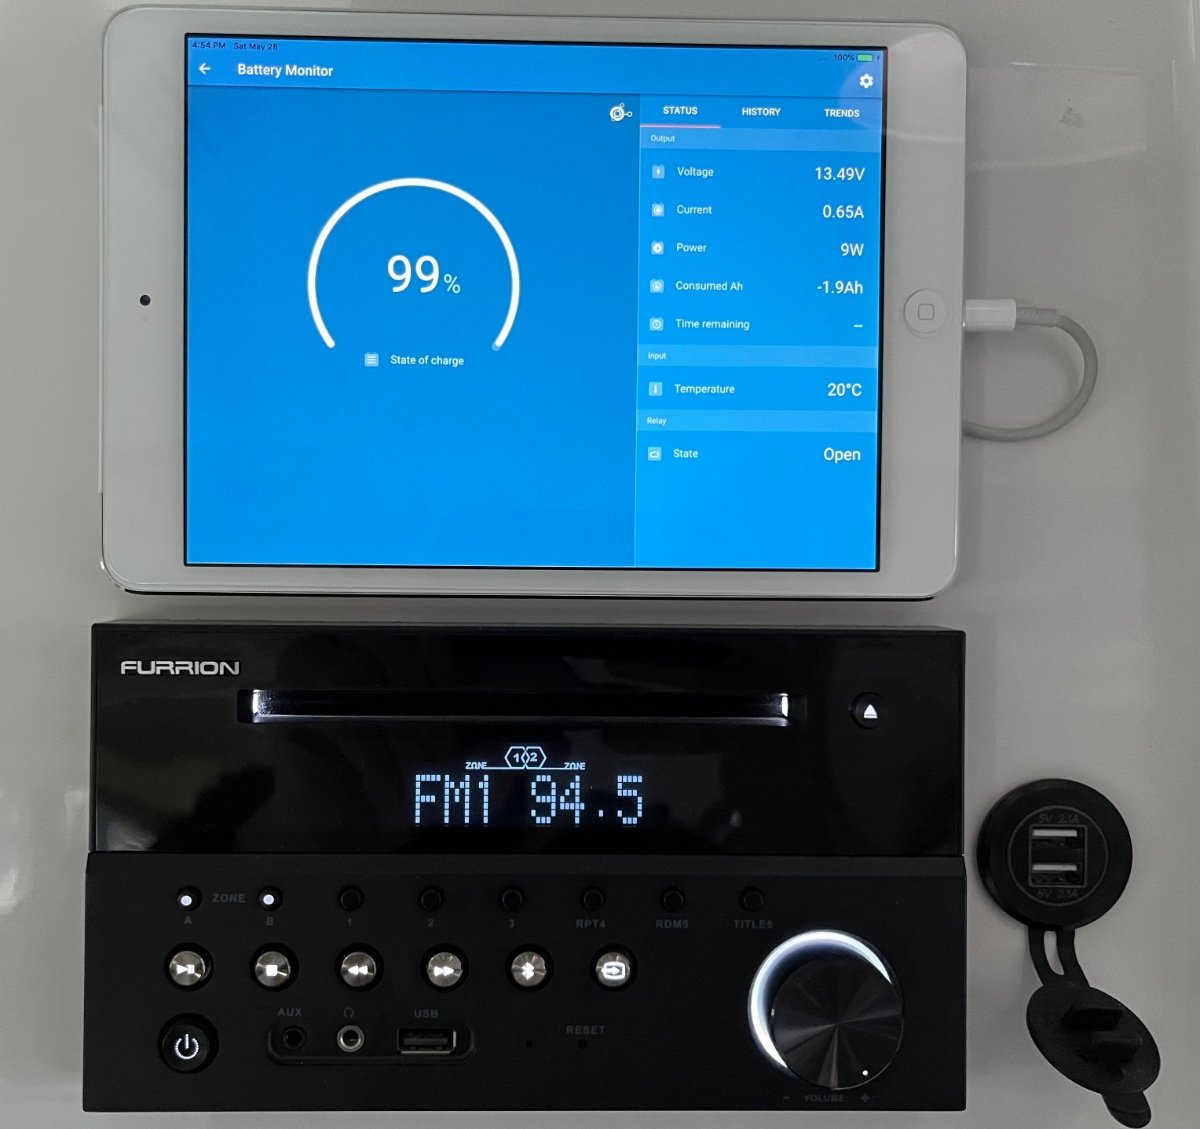
I posted this in another thread and from the positive reaction I decided to make it a stand alone one. For five camping seasons I have been hating the back lighting on my Furrion radio head. The normal mode is very bright, when I switched it OFF by pressing the POWER button It dimmed a little and showed the time. I have been pulling the circuit breaker for it sometimes….. until I finally read the @#$&* operating manual, a week ago. Normal ON: Short push STANDBY: Long push completely OFF: John Davies Spokane WA
1 point
-
I just took my LEII to Discount Tire to have them take off the wheels and install the GM TPMS sensors. I pointed out the jack points on the trailer. The trolly jacks they wheeled out did not lift the trailer high enough to fully get the wheels off the ground. The guys wanted to lift it by putting the trolly jacks under the axles. I was uncomfortable with this and they went and brought the tech mananger out and he told me they would not put anything under the trolly jacks or use anything else due to their safety protocol. He assured me they would use 4 trolly jacks and lift the entire trailer evenly from both axles and there would be no problem. I finally agreed and everything went just fine. No problems. TMPS works great. Just sharing this if anyone else goes to a tire shop. Discount Tire was was great to work with by the way. Very professional and they had 5 guys all working on my trailer at one time to do it right. They only charged me $10 per wheel to remove, install TPMS sensors and then reinstall. Highly recommend Discount Tire as I've always had good service there.1 point
-
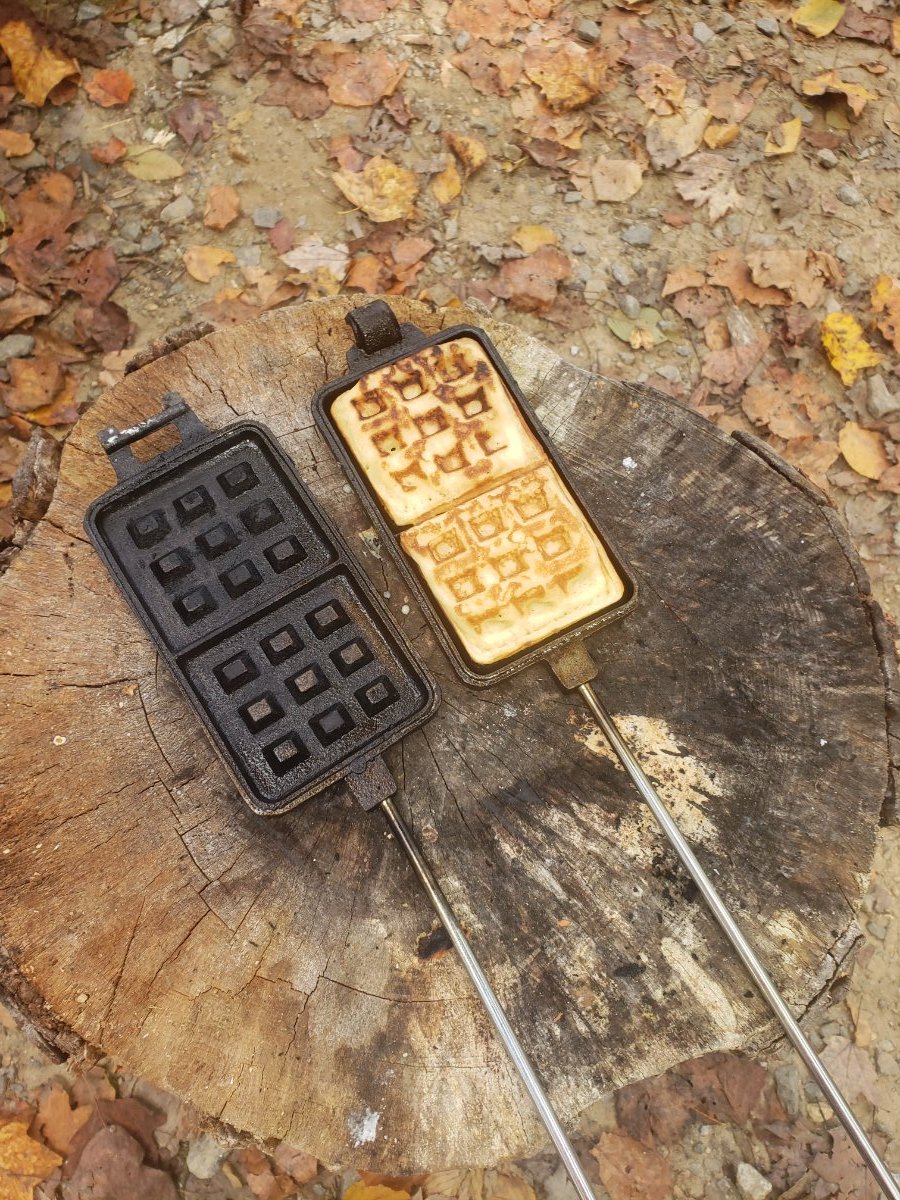
Brunch waffles on the fire, today. 30 to 45 seconds each side, in a hot waffle iron, on the coals.
1 point
-
Year before last I was camped at Pebble Creek in Yellowstone and the two ladies next to me showed me their white Tundra with a big dent in the driver's side door. That dent was caused by a bull bison as he walked past and just slowly moved his head to one side - ouch! Bill0 points


-
Recent Achievements
-


")


