Leaderboard


Popular Content
Showing content with the highest reputation on 06/08/2022 in all areas
-
Alberta and Randy, I would like to thank you for your excellent post. You described your issue and explained the things that you had tried while troubleshooting. You also provided information about your Oliver in your signature such as model and the year it was built. It is difficult to provide accurate answers to those requesting help with limited information. This is especially true in a non verbal conversation such as an email or a post online. You have provided an excellent example for others to follow when requesting help on this forum. Mossey6 points
-
Hull 244, LE II. 2017 Approx 30,000 miles on the trailer. Bearings first repacked at 9,100 miles. Repacked a second time at 22,000 miles. After another ~8,000 miles I decided to inspect and repack them again. The pics below are the outer bearing from the L (streetside) forward wheel. I carry an infra red temperature ‘gun’ and regularly monitor the wheel temps near the hub when on extended trips. There was no indication of that wheel having elevated temps. I also carry spare bearing sets and tools to change them on the road. I changed out all 8 sets of roller bearings and races yesterday and today. This outer bearing and race was the only pair that was damaged. Carry spare bearings.5 points
-
The link that John posted above has this Plug Adapter referenced. It basically uses one of the 120v legs to power your camper through your normal cord RV power cord. The two legs of 120 power (in your truck) are 180 degrees out of phase with each other. They cannot be combined (spliced) and I doubt many/any RV’s utilize appliances that require 240v. The 50 amp RV plug used in larger trailers just distributes each leg separately to different appliances/outlets in the trailer. Ideally generators would like the two 120v legs used evenly as far amp draw is concerned. I’m not sure if this is an issue with the ford truck outlet.4 points
-
Thanks Everyone! I called Jason at Oliver. He returned the call quite promptly, and talked me through various things to check. Turned out I had to go to the water pump itself under the curb side bed to check the wires. There are two little red wires that attach to the underside of the pump, near you as you look. One of them was not connected at all! Three screws had to be removed to be able to reattach the wire once attached…Everything worked. Surprise! Thanks for all the feedback. Citrusbreeze Charlie4 points
-
As previous Airstream owners, we too felt the E2 ticked all our boxes - and eliminated so many problems with other designs. The idea of the cabinets molded into the unit meant never having to reinforce screw holes. When you analyze the many things - so many things - that Oliver has built into their design, it makes one smile. And, as production continues, they seem to listen to those of us commenting on their product. Good choice! Charlie3 points
-
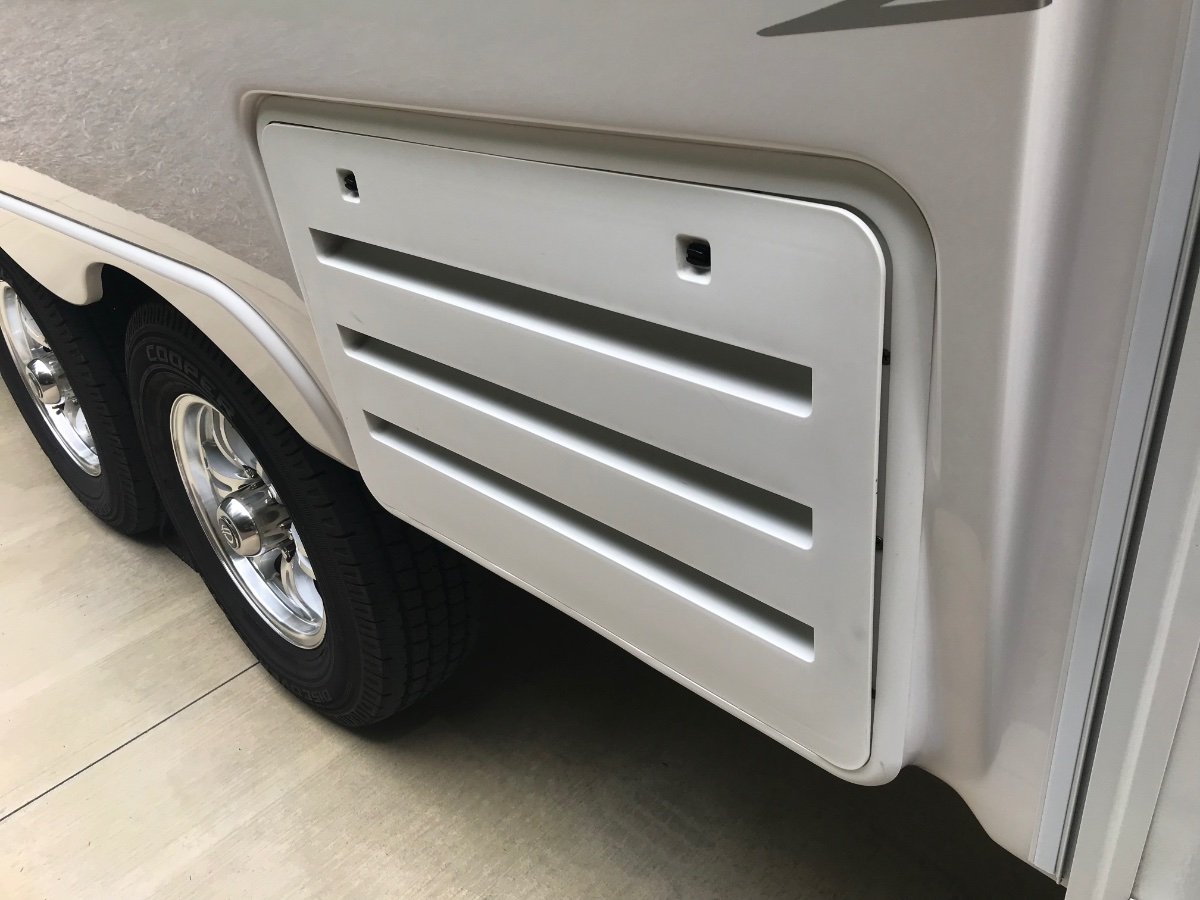
I just submitted a work ticket on this same issue. We are still under warranty. I have requested service send me a new frame and refrigerator vent panel which I will install. I sent a video and these pictures to Mike Sharpe along with the work ticket. Add/edit - here is the left side of the vent which sits flush -
 3 points
 -
I'd put in a Service ticket and see what they have to say about this. Obviously, if you are still under warranty then it will be a "no brainer". Bill3 points
-
Of the 16 sets of bearings/races for the 4 wheels, only the one outer bearing and its race were damaged. There was no excessive play, nor was any bearing torqued too tightly. I used the same procedure on all wheels. The grease is Mobil 1 Synthetic. Mobil 1™ Synthetic Grease, the official automotive grease of NASCAR, is an advanced full synthetic grease formulated with a proprietary blend of high-performance synthetic base stocks and a lithium complex soap thickener. The thickener system provides a high dropping point, while additives impart excellent extreme-pressure properties and resistance to water wash, rust and corrosion. The proprietary blend of high-performance synthetic base stocks used in Mobil 1 Synthetic Grease gives reliable lubrication over wide temperature ranges -50 C (-58 F) to 246 C (475 F). Outstanding structural stability coupled with high performance synthetic base stocks make Mobil 1 Synthetic Grease an outstanding all-purpose automotive grease.” Excellent Resistance to Rust and Corrosion • Longer life of bearings and chassis lube points when exposed to corrosive environments Outstanding Structural Stability • Provides effective lubrication over extended periods of time Exceptional wear protection under heavy loads • 20 % Improved wear protection 2. • Provides bearing protection while cornering and other conditions where bearings temporarily experience heavy loads. Excellent resistance to water wash • 40% better resistance to water wash out3 from heavy rain storms or exposure to high amounts of water. Improved grease bearing life • 3X improvement in grease bearing life4. (From the Mobil 1 website)3 points
-
Depending on the size of the humans and the pups you might find the smaller Ollie to be a bit cramped. It would be best to actually take a look at each model or even better take the factory tour. Welcome! Bill3 points
-
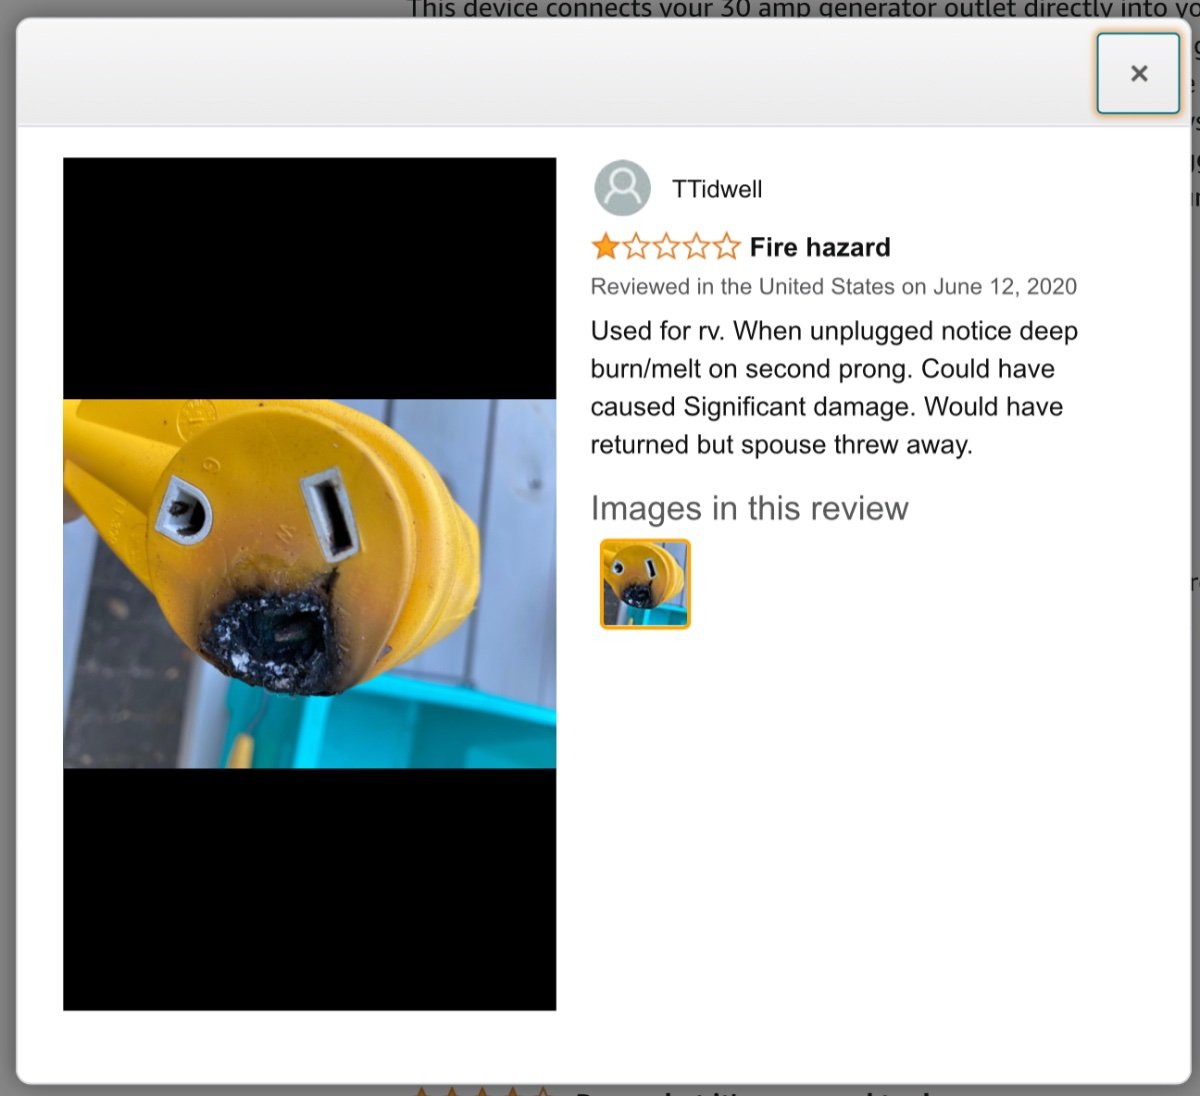
Related/Unrelated: I would STRONGLY encourage anyone with a transfer switch (box under rear dinette seat) to occasionally (maybe annually) open it up and check the tightness of all the connections. (BTW: ONLY APPLICABLE TO TRAILERS THAT HAVE THE OPTIONAL 30 AMP RV RECEPTACLE ON THE FRONT). These connections within the plastic box, if loose, can and will cause extreme heat and potential fire hazard. I speak from experience. BEFORE DOING THIS; DISCONNECT ALL SHORE POWER!3 points
-
Update - Mike Sharpe let me know he is having the parts department ship me a replacement vent frame tomorrow. Yet again, awesome Customer Service by Oliver Service Center Staff. I will post up a few pics after I install the new vent. -David2 points
-
I had the same concerns as you. So when I did my recent annual maintenance I swapped out the original Dexter supplied bearings with new genuine Timken bearings from an authorized Timken distributor near me here in Pennsylvania, and verified as genuine Timken using the WBA bearing app. There are a lot of counterfeit “Timken” bearings on Amazon so be careful what you buy. Some of the original Dexter installed China bearings showed some odd discoloration on the races that appeared thermal/heat related (see photo) even though they had always been well maintained/greased, so I didn’t want to take any chances so I replaced them. Thankfully the axle spindles were still in perfect condition.
2 points
-
Hi EJ, FWIW, I agree with Bill. You essentially have a family of 4 and from a couple that lived in a Casita Deluxe for 2 years, which is roughly the size of an Elite, we so much appreciate the the extra room an Elite 2 provides. The floor plan is something I can't help with but for the 2 of us we are very happy with the twin beds. BTA we are full timers and want the space. We wish you the best with your decision, Wendy & John2 points
-
If you are out of warranty then maybe look at a piece of aluminum angle or tubing attached on the inside of the vent. Maybe a piece on each side or just one in the middle would suffice. You could experiment with different stiffeners and temporarily attach it with zip ties. Mossey2 points
-
Indeed they do. Bill2 points
-
The red wires do fall off.2 points
-
Welcome to the forum! As Bill said really try and take the factory tour. You will see Ollies being assembled from start to finish and it is truly amazing. All the best with your choice! David2 points
-
Have you checked to see if the microwave is still plugged in? How about that microwave circuit breaker? When you have time - please add your year, model of Oliver to your profile. Bill2 points
-
This is beyond my skill set, but I know you will only be able to use half that rated current per “leg” if you spilt it into two 120 volt legs. You can’t pull 30 amps like from a proper RV socket. But you could plug a second cord into that second leg for some other load like a chainsaw while the trailer was getting power. https://www.f150gen14.com/forum/threads/anyone-figure-out-how-to-convert-240v-outlet-to-120v-and-still-use-all-7-2kw.3148/ Doesn’t Ford offer the necessary 240 to 120 adapters? I would definitely go with OEM parts in this situation. If you use a no name China made cord and damage the inverter, Ford won’t be happy. I bet that unit is a couple of thousand $ at least. I am guessing that this is appropriate. https://www.homedepot.com/p/Champion-Power-Equipment-3-ft-240-Volt-Y-Adapter-48035/203501783 John Davies Spokane WA2 points
-
You haven’t provided enough info for anyone to help. How long did you run the microwave? How long and what quality sun exposure? “Nearly 13 volts” reading on what device? Under load? Charging? Resting? What batteries do you have? John Davies Spokane WA2 points
-
What grease have you been using? Was there any excess play in the hub? Any unusual sounds when you spun the tire? You lucked out by catching that early enough. Nobody likes to deal with a smoking hot seized hub in the middle of nowhere. Thanks for posting the pics. John Davies Spokane WA2 points
-
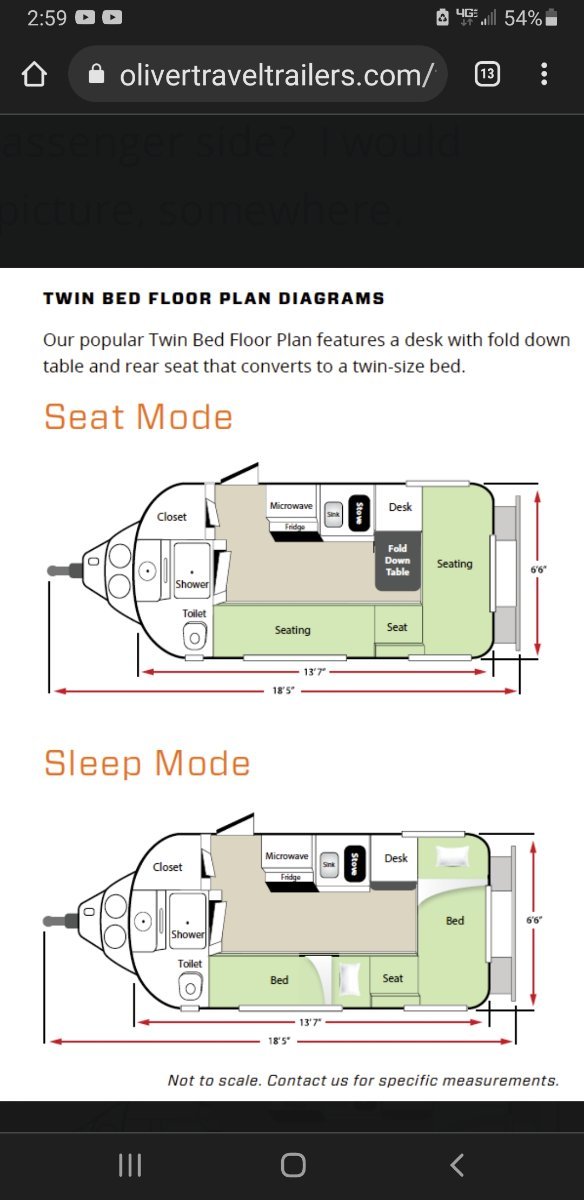
Welcome to the forum! The le is being redesigned this year. The original, like mine, had a twin floor plan available, with one bed across the back, the other slim bed down the side, utilizing the small dinette. Stay tuned for the redesign. We'll see. Attached is a very old floorplan, for the elite.
2 points
-
@Minnesota Oli, that's an awesome testament. For others, he did do a significant upgrade to the heating/ducting system. I personally would not choose to camp in subzero temps, but other folks here might want to. Not for me, if I can avoid it! I left Minnesota 40 years ago. I go back, usually in summer, to visit my family up there. Hardy vikings that they are.... Minnesota oli's upgrade link, for those who are interested in camping sub zero2 points
-
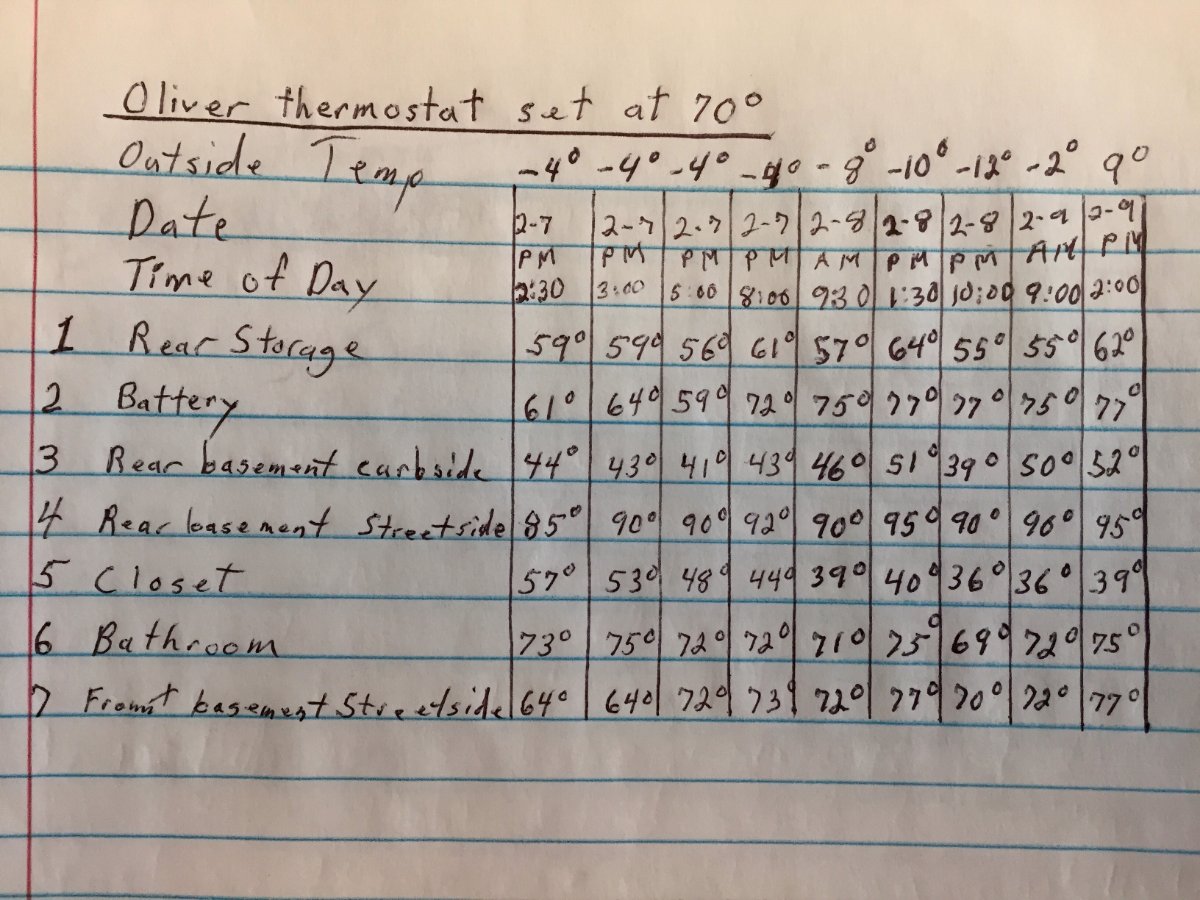
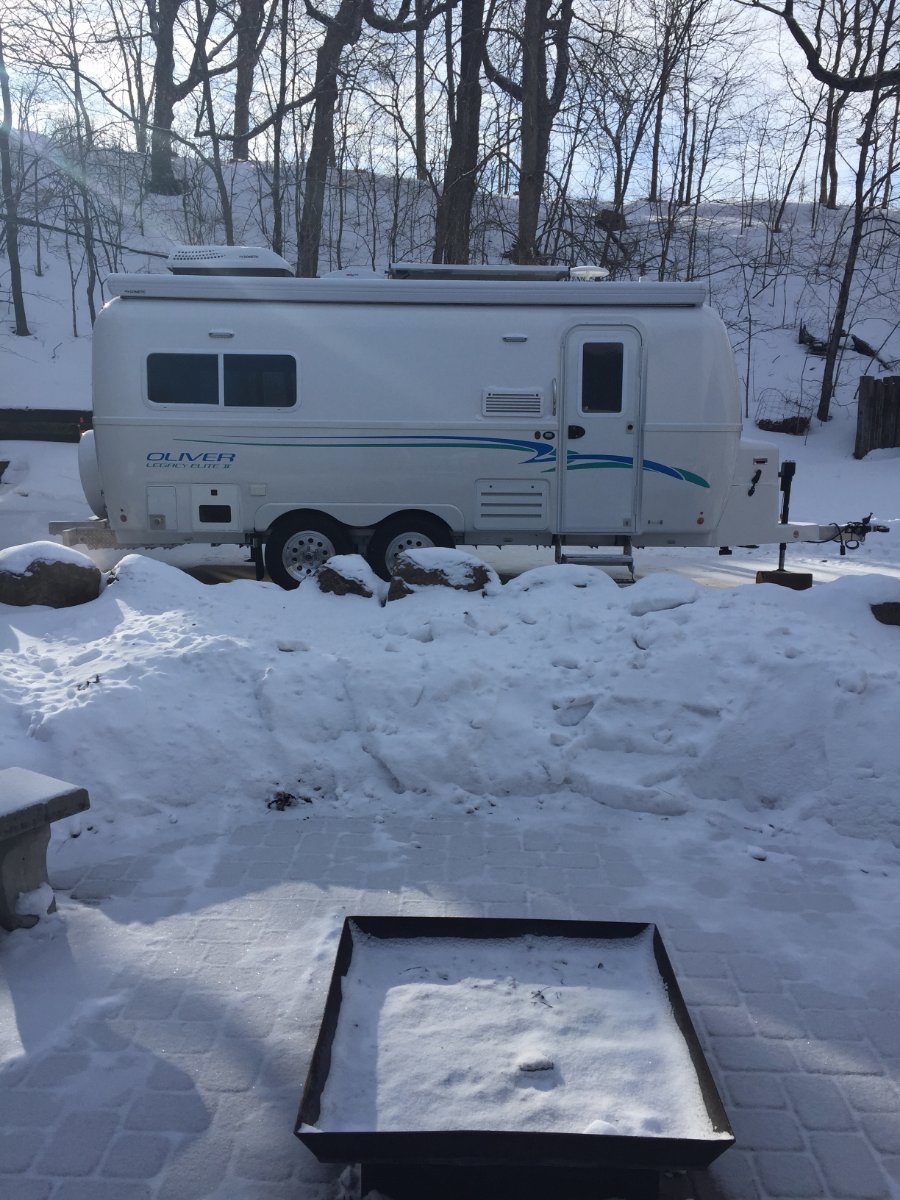
I was impressed with the Olivers ability to hold heat. I did a modification to the heating system by simply adding ducting to the street side. With full fresh water tank and pump turned on I spent two days in sub zero weather, negative four down to negative twelve. I had the thermostat set at seventy degrees and was burning .274 gallons per hour but was toasty warm inside including the bathroom.2 points
-
I’m home, in hot, humid Myrtle Beach SC area. I have the 630ah/340w on my 2022 Elite 2…soft start on the AC. I ran a quick & dirty test last week, ambient temp in low 90’s, camper fully closed & in full sunlight. I started at 100% SOC, and set the thermostat to 80 degrees/automatic…kept the blackout shades closed. Ran the AC as stated above for 5 hours, 3-8pm, charge dropped to appx. 40%. I replaced about 10% charge per day, so I was just over 50% on Friday, 60% Saturday, with no power consumption….I did the same full-sun run in the AC on Sunday, started at 60% SOC, ambient temps were about the same. 4 hours of use saw the SOC drop to 18% & 20%. I plugged into shore power and the batteries were at 100% SOC in 3 hours. Far from a scientific test, but I was surprised how well the batteries handled the challenge and how quickly they recovered.1 point
-
1 point
-
Nothing "wrong" with that grease. I find your picture and the wheel bearing location interesting. If there is a wheel that would have this kind of issue I'd first guess that it would be on the curbside wheels. My thinking is that with the "crown" of most roads the curbside wheels get more of the weight (of course assuming that the trailer was "balanced in the first place) and that more often than not the curbside roadway surface tends to be a bit rougher than anything more towards the center of the roadway. In this case with the information given it would appear that this is a case of a "bad" bearing. Indeed, they all will wear out at some point but this would appear to be somewhat early. Glad you caught the problem BEFORE it became a "problem". Bill1 point
-
Another big caution about cheap power adapters and high amp circuits. They are cheap for a couple of reasons, they use smaller gauge poor quality wire (sometimes copper plated aluminum) and the pins in the socket and plug are substandard - they are undersized and weak, so they bend and you get a poor contact. Poof! Camco makes decent RV accessories and I have bought a lot of them, but I won't buy anything electrical. Look for a good marine part like Marinco, and expect to pay double or more. Kristie, you probably don’t want that to happen to your Ford inverter connection… John Davies Spokane WA
1 point
-
The CO/LP Detector issue is something that most of us seem to have from time to time, or I do. It can just go off for no reason that I can find, but I'm sure there was something there to set it off, all being said I reset it and till the next time, which could be the next day, or months down the road. I did have to have Oliver Service send me a new Power Controller (the surge protector module, not the unit with the breakers and fuses module) under warranty as mine just would not stay set, or would work for a short time 10-15 minuets and then kickoff and reset. A new one took care of the problem and so far, so good. trainman1 point
-
I have found it is fairly easy to back off the nuts on the trailer, get slack in the chain, remove whales tail. Do the reverse when hooking up. Count the threads on the bolt so they are even. Actualy really easy1 point
-
Thank you so much for replying!1 point
-
There have been other threads concerning this issue. I don’t think there’s any way to get the full 7200 watts as 120 volts.1 point
-
Does lactaid work? A lot of people can't tolerate dairy. Northern European ancestry can for the most part. We're from Swedish ancestry so we have no problem.1 point
-
Glad Jason got you squared away. Happy Camping!1 point
-
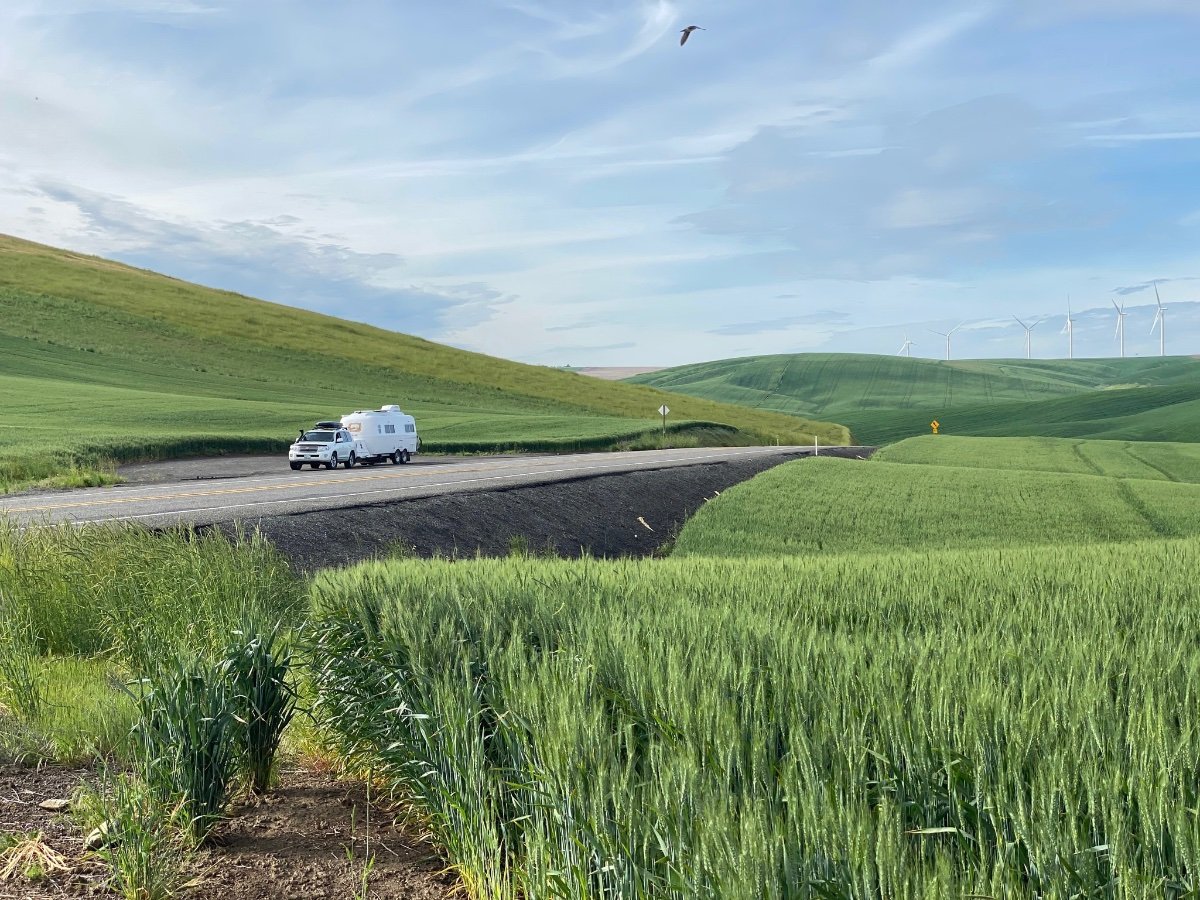
My wife took this with her iPhone 11, no retouching at all except a very slight adjustment of the Brilliance. South central Washington Palouse wheat fields on a WA 127 pass between Dayton and Dusty, the day after a bunch of rain. We had a delayed cold and dry Spring, then it got warm and very wet and the fields just exploded. I have lived here for nearly two decades, have driven through this area many times, and have never seen it so lush and vibrant. The stems are about four feet high and no irrigation is used. Look closely for a couple of cool “Easter eggs”. John Davies Spokane WA
1 point
-
Have you tried just turning on a faucet? Even with the pump on, the water will not run if it doesn’t sense a change in water pressure.1 point
-
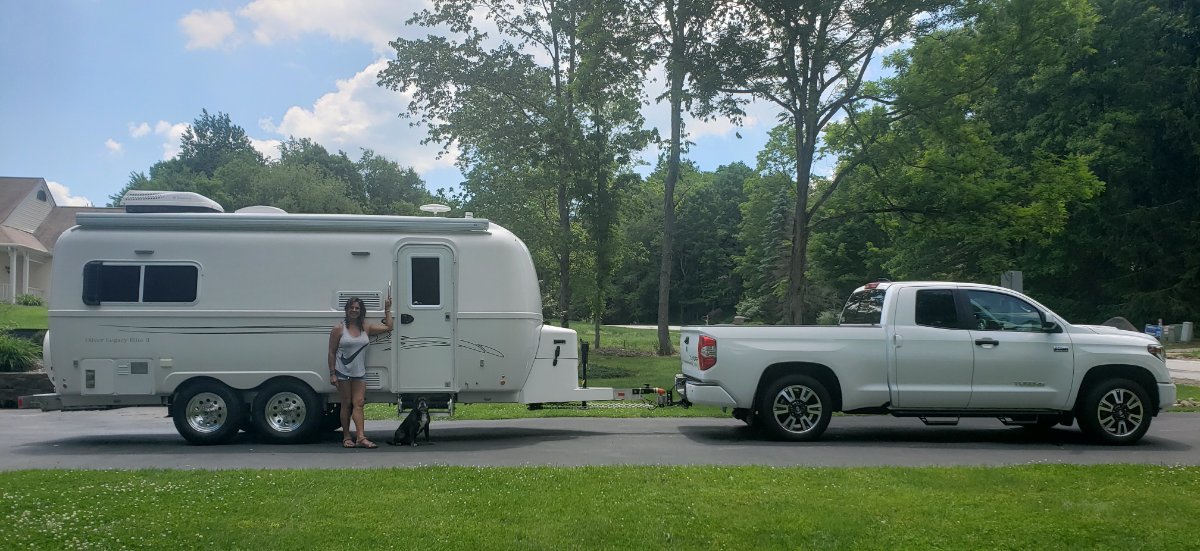
I have a '20 Tundra TRD Sport which was purchased before I knew I'd own an Oliver and right after Covid began and dealers were desperate. I have done no suspension modifications but added taller Michelin Defender tires. I do have the TRD sway bars and Bilstein shocks which I think are helpful features. I have no squat at all with the WDH. Outside of payload, which is low..around 1300# .. I find it to be a perfectly acceptable tow vehicle for the ILOVHER. It has plenty of power with the V8 and when using the Tow/Haul mode, the transmission comes to life. RPMs at times can tip up to 3k+ if you're a lead foot but doesn't stay there. I like the integrated brake controller and the plug and play seven pin. I am certain when its time to do brakes, I'm going big ProComp slotted. I would just feel safer with bigger braking power. The other thing I will add at a later date is an external transmission cooler. Somehow Toyota slipped that out of the builds starting in 2019 and uses some kind of heat exchanger. All three of my pre 2009 V8 4Runners had external coolers. There is a big stink on the Tundra forums about this as people are scan gauging pretty high ATF temps while towing. I pack light and distribute weight inside the camper if necessary (like the cooler of ice and beer) I don't do much mountain driving and if I did, the Tundra would do the job but certainly not as safely as a 3/4 ton or 1 ton diesel. I also think it's crucial with a half ton truck to have the Andersen WDH; no doubt there! With all of the above said, if money were no object, I certainly would love a larger truck but it's not in the cards as of now. The Beast is my daily driver and gas just shot to 5.29 here so I'm going to stick with her for now. With my travel primarily on the east coast, and not full time as of yet, I think its a good dependable truck for towing my baby ILOVHER.
1 point
-
Our water pump quit working once. When I checked it I noticed that there was a wire lose that goes to the pump. On mine, there are two red wires that connect to the pump. Make sure they are both still connected. They can work lose if you are on bumpy roads. Mike1 point
-
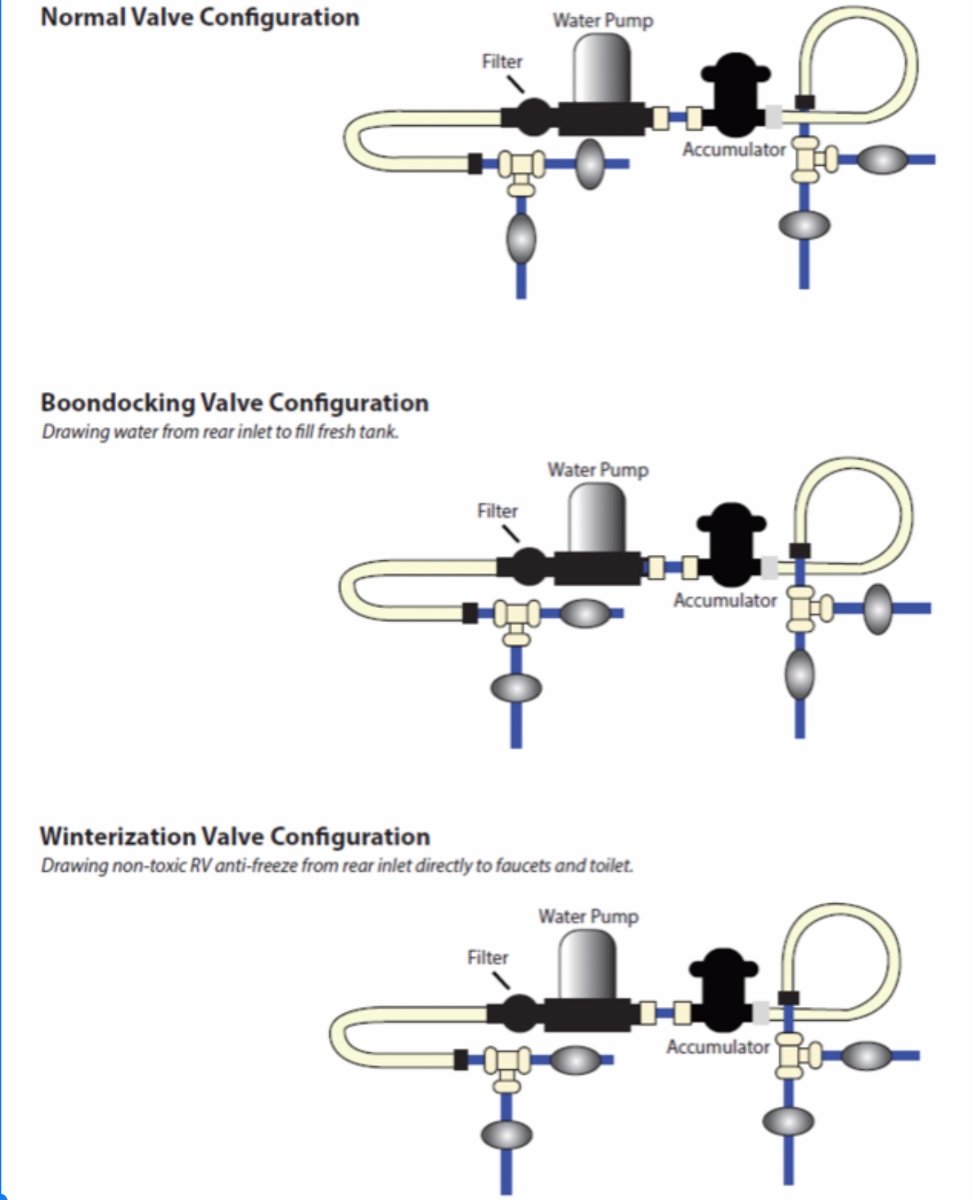
https://support.olivertraveltrailers.com/portal/en/kb/articles/2021-model-water-pump-valves The link above will take you to a water pump guide for 2021 and 2022 LE2’s. The picture below is for earlier LE2’s. Mossey
1 point
-
There is so little external access storage in the Ollie it would be a shame to lose the bumper storage just so you don't have to carry a bottle to the bathroom to empty it. Once you dump the black tank the whole bumper storage should be treated as contaminated and therefore storage of items becomes limited. I would rethink this and either buy a second bottle or carry a larger tote in the back of the truck into which you can empty your pee bottles and then visit the toilet or dump station to dispose of the larger amount all at once1 point
-
I have been a owner of a Nature's Head toilet in my Ollie for the past 2 years, For 20 years before that, I had a portable toilet in past popup campers. Emptying a portable toilet is gross in itself. I have never had a odor problem from the urine tank or the Nature's Head toilet smelling. I do empty the urine tank when 3/4 full and rinse it out. We do have a vinegar and water spray bottle in the bathroom and do a small spray on the inside of the toilet after each use. I do believe that Hature's Head recommends a vinegar spray bottle. With myself and my wife using the toilet, I usually have to empty the urine tank after 5 days of use (longer if a toilet is present at a campground). At the end of the camping season, I thoughly clean the tank and toilet and scrub everything clean. Emptying a black tank or a portable toilet tank at a dump station is a lot less desirable then a couple of spirts of a vinegar bottle. Just my opinion.1 point
-
I thought the concept of the natures head toilet was to do away with the standard toilet and not utilize the black tank. More user friendly. I have to agree with JD and SeaDawg you’ll still get the urine smell which would most likely will come from your outside vent unless you constantly pour in vinegar or black tank chemicals. Then your in the same situation as a regular toilet. Find a dump station, hose hookup dump and black tank rinse. As suggested get a second or even a third pee tank. In my opinion that mod may get old quickly and not worth the hassle.1 point
-
As long as you pour a gallon of fresh water into the tank after emptying it, that will be fine. But urine does in fact do gross things as it dries, it turns to hard yellow crusty deposits which are not super easy to remove. I use hot water with a strong dose of laundry detergent, and let the tank sit. Cleaning out that yellow gunk from a small PEX line will be a lot harder. Rinsing each time with a couple of squirts of vinegar will help. I was an A & P tech for many years, if I encountered a mess in a pilot relief tube or the outside venturi, where it dumps urine (hopefully) into the air, I told the owner/ pilot to deal with it, or an unfortunate minimum wage line boy. Urine deposits can mess up an airplane skin. This has been discussed several times, go over those older threads and then go ahead if you still want to. Just don’t do anything that can’t easily be reversed in case you or a future owner doesn’t like the results. John Davies Spokane WA1 point
-
There are a bunch of cons to this mod. I personally would rather visit a toilet or outhouse every three days with that little tank, dump it and return, than deal with dumping and rinsing the big black tank, which requires a sewer connection. I routinely dump my grey water at home into the gravel, or when boondocking in the desert, into a sage brush. With the Natures Head you do NOT need to stop at dump stations for your human waste, why make that more complicated? You will still need to use a station for your grey tank sometimes, but that is so much less nasty when it is just fresh water with a small amount of soap in it.I suggest a second tank and cap, and call it good. https://store.natureshead.net/p/28-Nature-s-Head-Extra-Liquids-Bottle.aspx John Davies Spokane WA1 point
-
This has been discussed a number of times, but I've yet to hear of anyone who has done it. Separret waterless toilet offers a drain line conversion, unlike nature's head. I don't "think" it would be terribly difficult to adapt, but I'm not very familiar with the nature's head.1 point
-
Poorly, but the 2023 models have all Victron equipment. This is a game changer.1 point
-
We use a Victron shunt and Victron battery monitor that displays on an app all DC power coming into and out of the batteries. That way you can watch as you turn on or turn off separate things and their usage. Charlie1 point
-
We have dry camped most of the time with our Oliver Elite. But, we camp (like you) as if we're in a hard sided tent. Experience will help. We carry a little Honda 1000 just for charging batteries. We also have portable solar, but only use it if we're at a site for many days. Unless you drive an suv, and don't want to carry a generator in the cabin, I'd opt for the small generator "insurance policy. " easy to carry and deploy. I'll add this. I have a good friend with a Casita, single group 27 battery, can camp 2 to 3 days or so without power, in decent weather - in the fall, in treed north carolina, and upstate new york. She is also a veteran tent camper. We camp the same way, but we have an electric dc compressor fridge. Fall is much more problematic than spring, because just the fridge uses 60 to 70 ah a day. So, we can't go 5 days in full shade, in the fall, even with 400 watts fixed solar. That's not your situation, since you can run your fridge on gas. Your fridge takes gas and minimal power. You do need to monitor amp hour consumption. And replenishment. Everyone is different in their style and needs.1 point
-
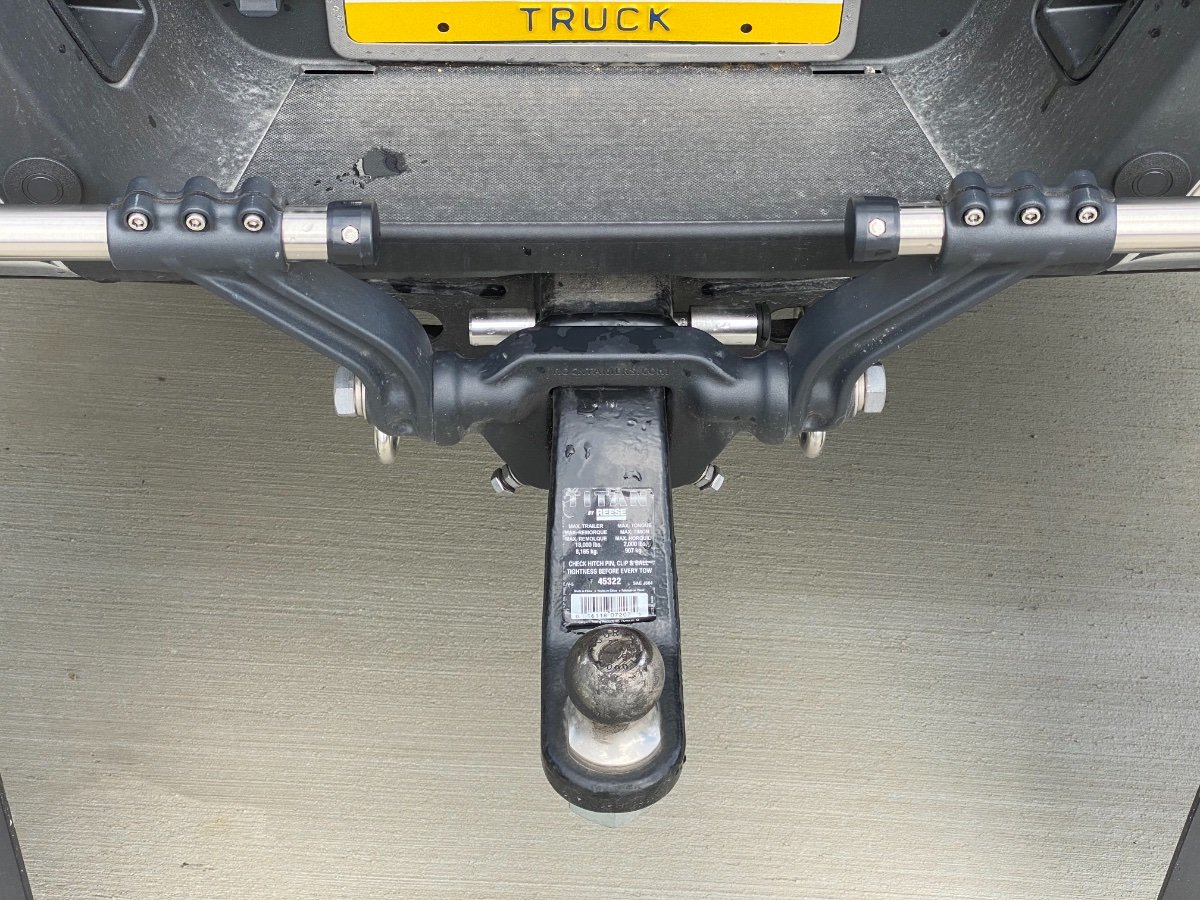
Here’s the ball mount hitch and ball I’m using on my F-250. My F-250 has a 2-1/2” receiver. Truck, receiver, ball mount and ball all rated well in excess of the Ollie weight for a big safety margin. The ball mount is a 3” drop and that put the ball at the proper height for my truck. Reese Towpower 45322 2 1/2" Titan... https://www.amazon.com/dp/B003JID6U6?ref=ppx_pop_mob_ap_share CURT 40056 Stainless Steel... https://www.amazon.com/dp/B08557RHP1?ref=ppx_pop_mob_ap_share
1 point
-
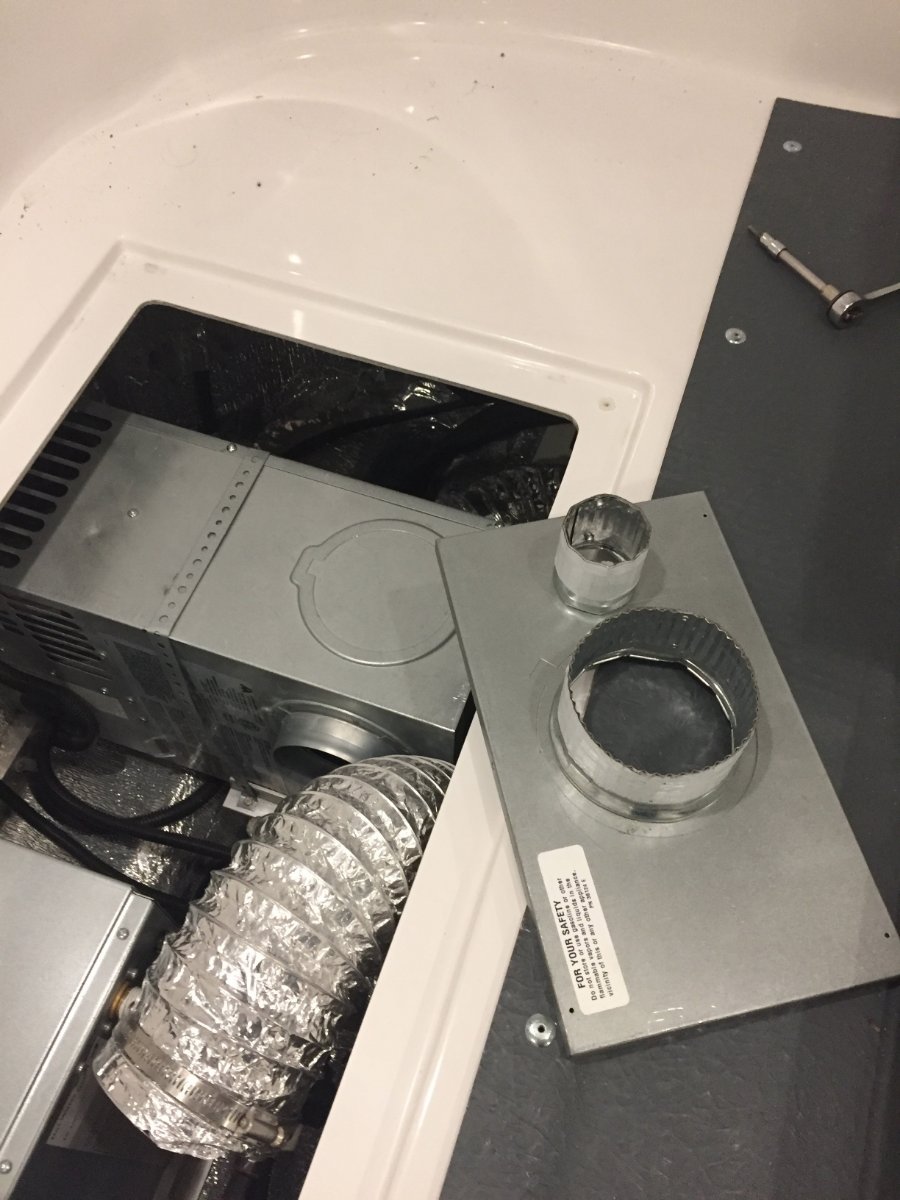
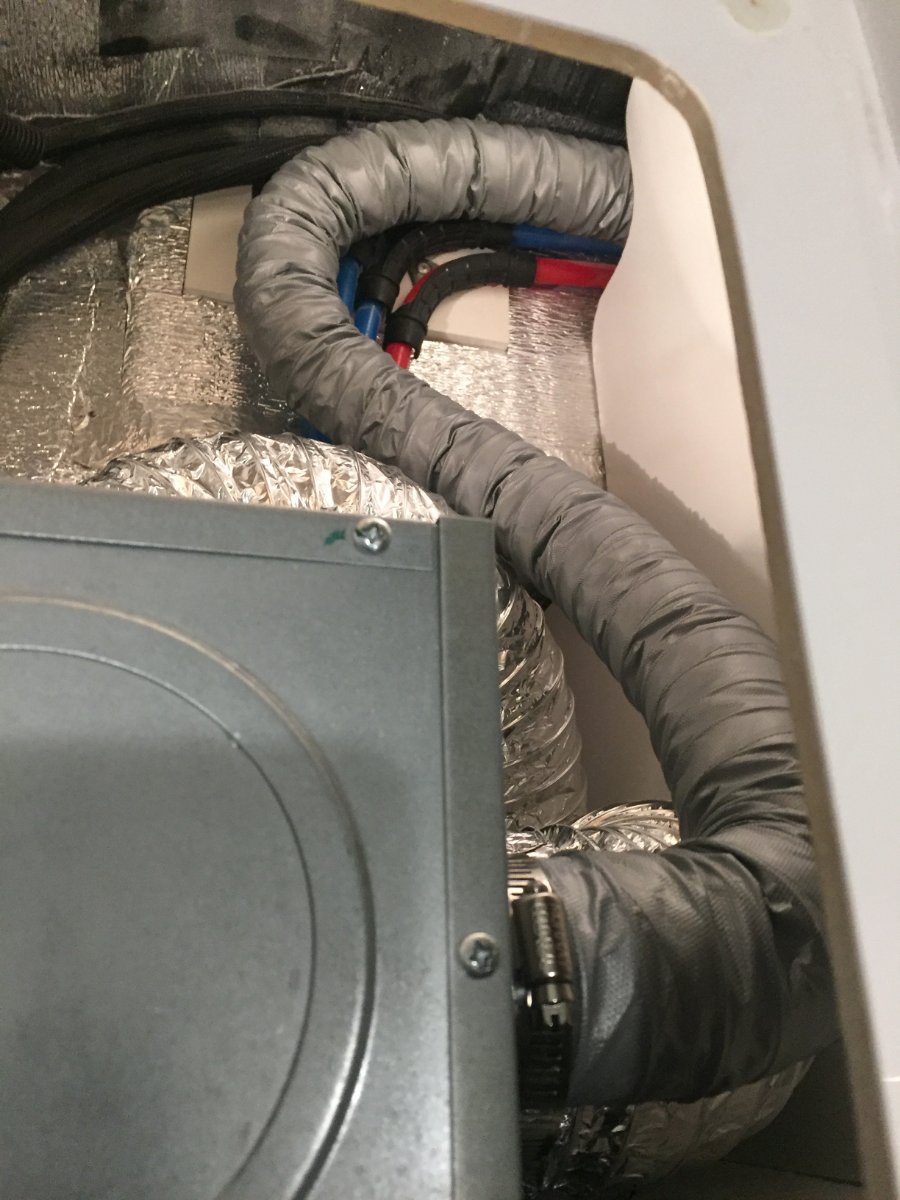
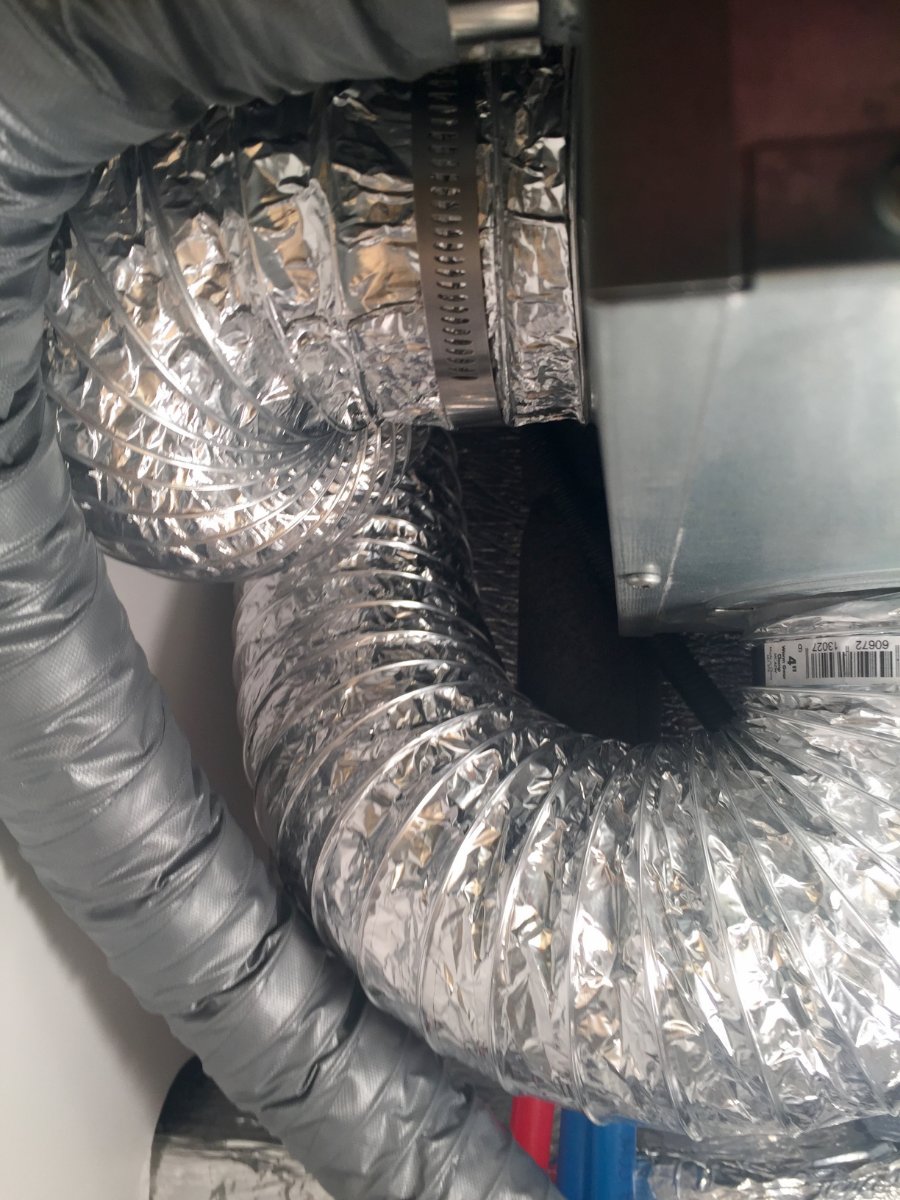
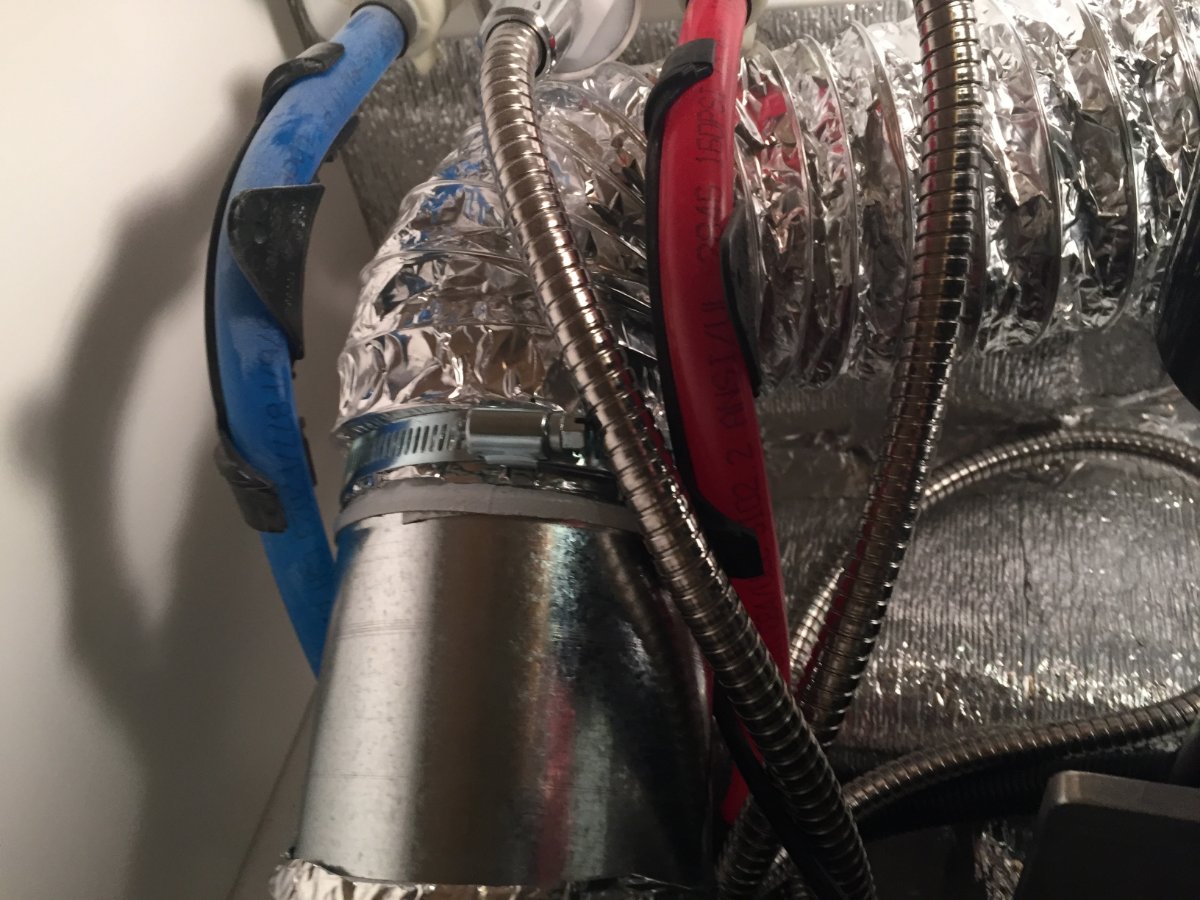
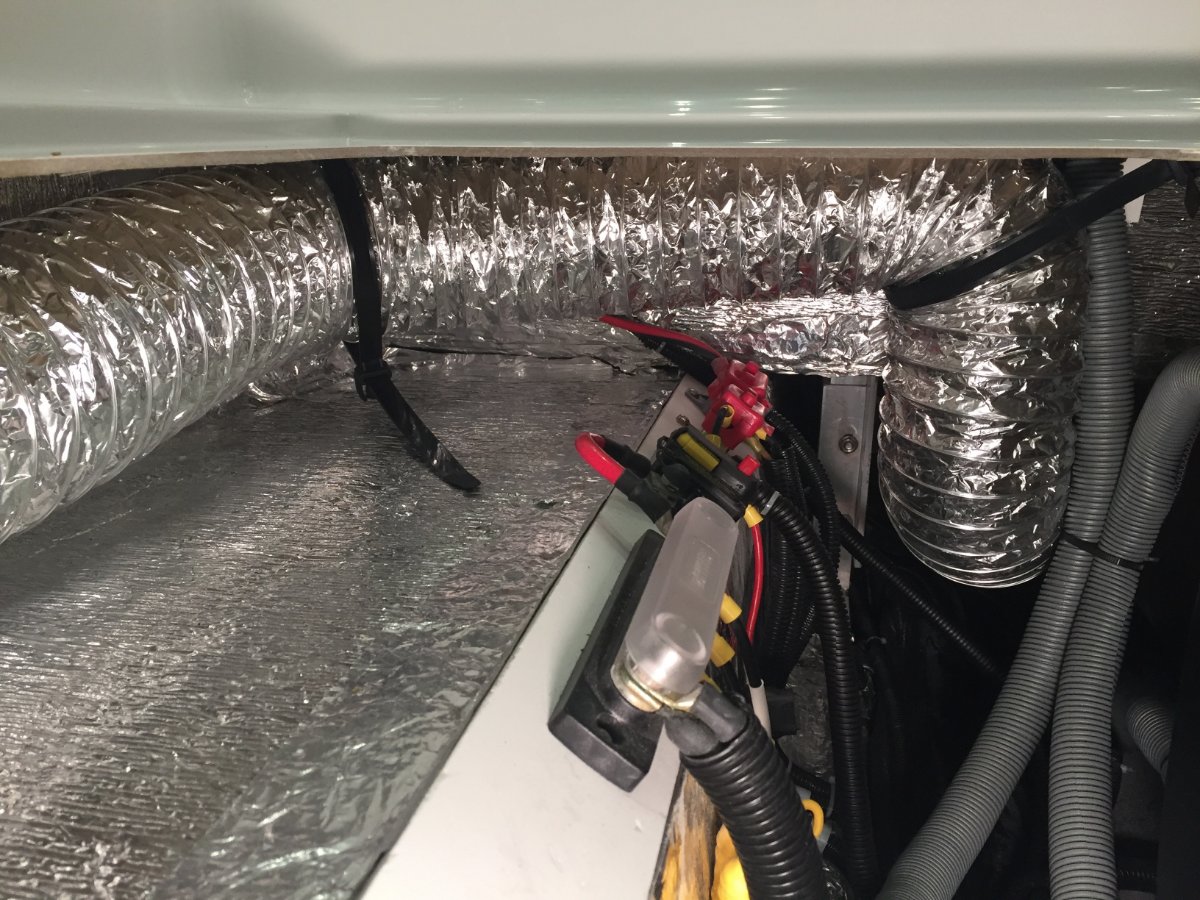
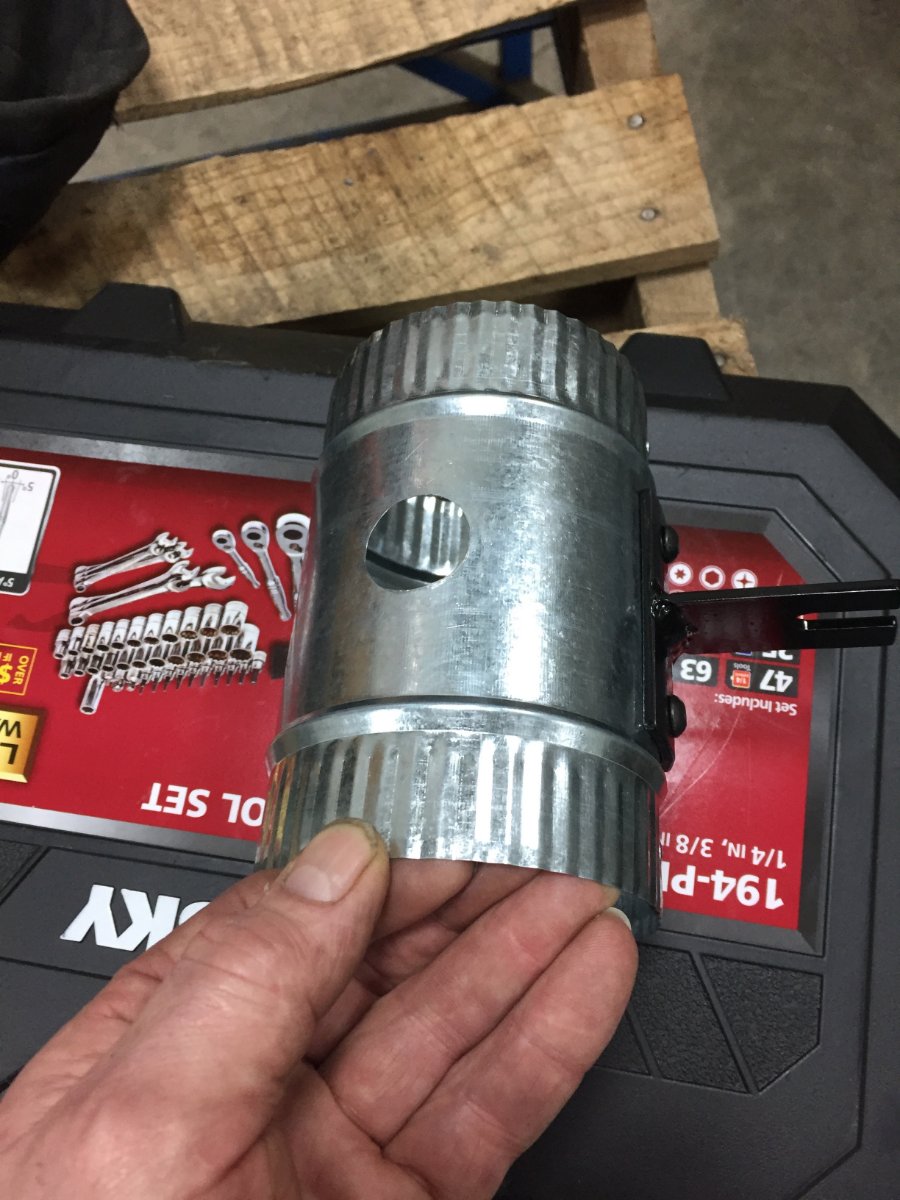
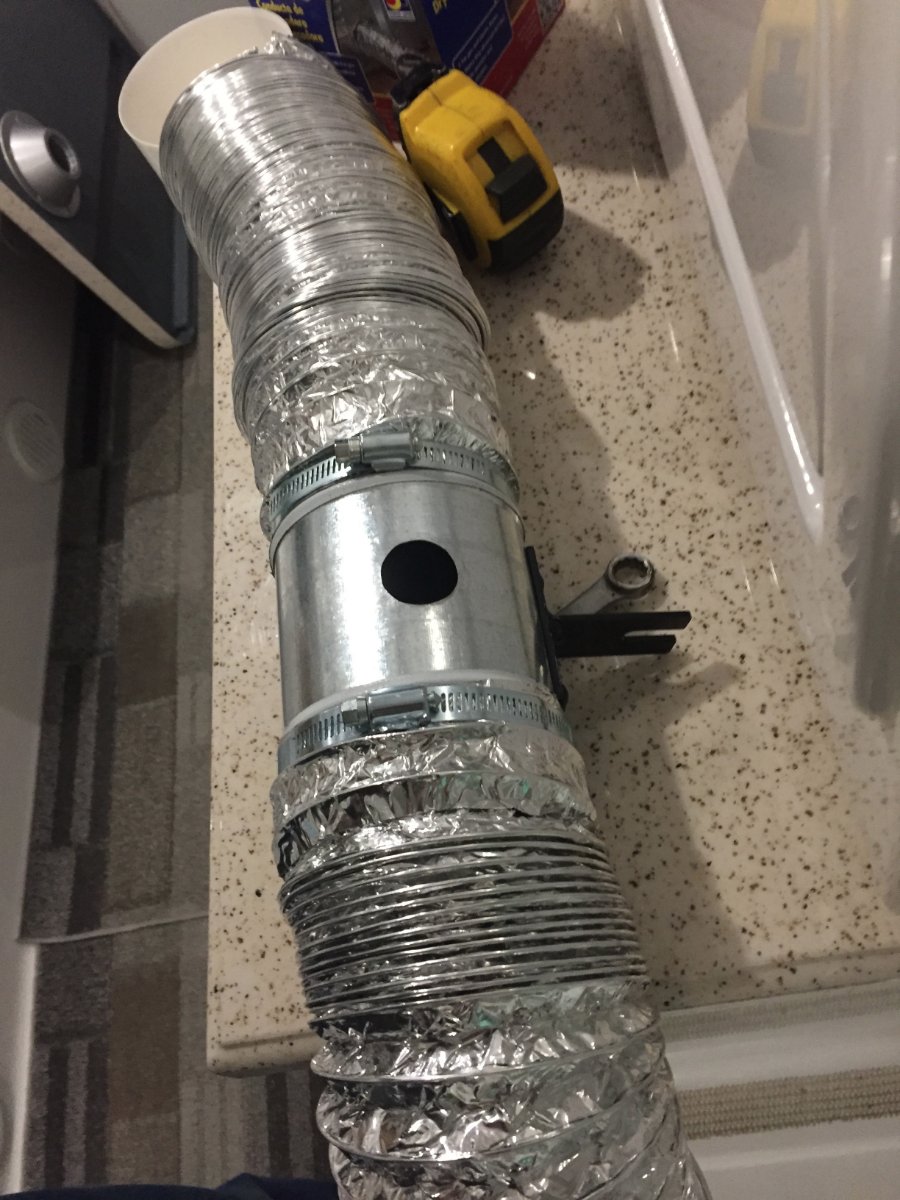
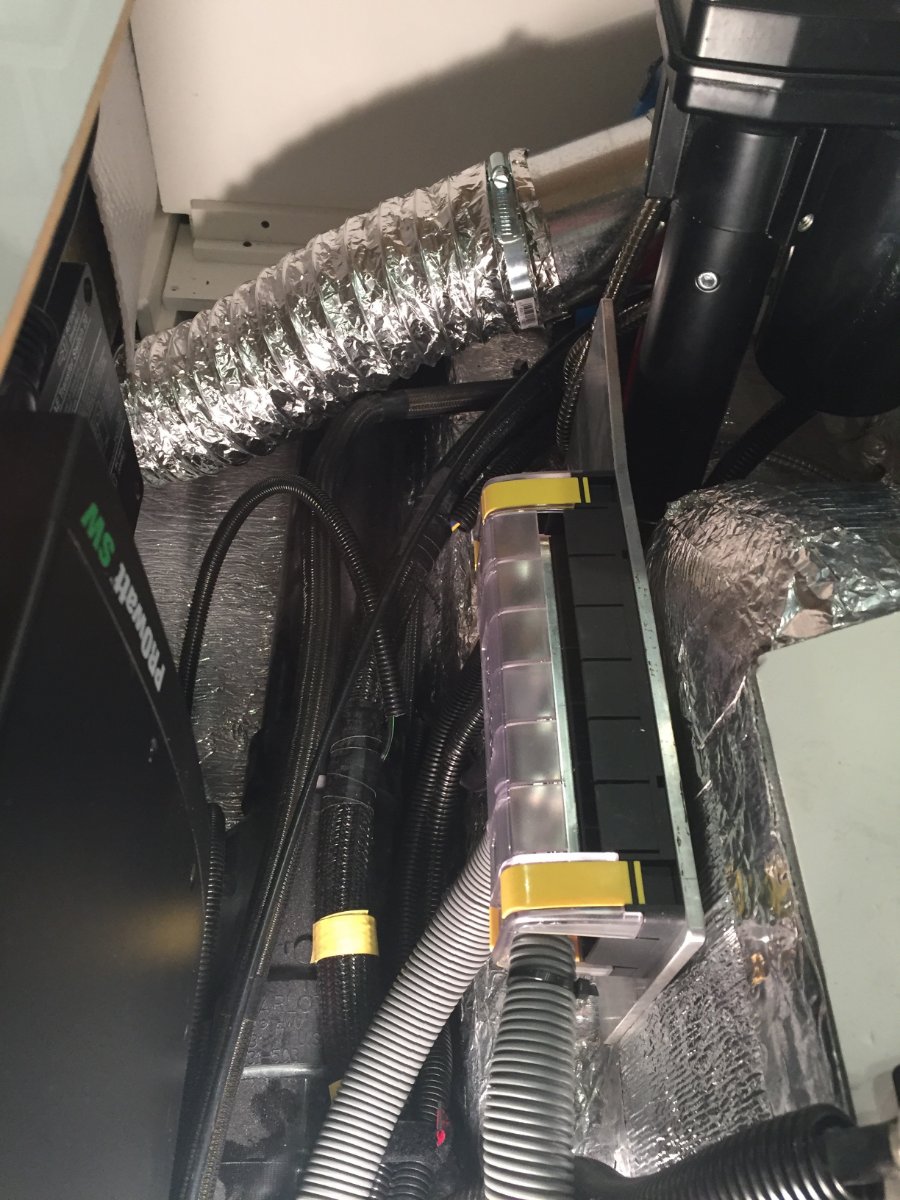
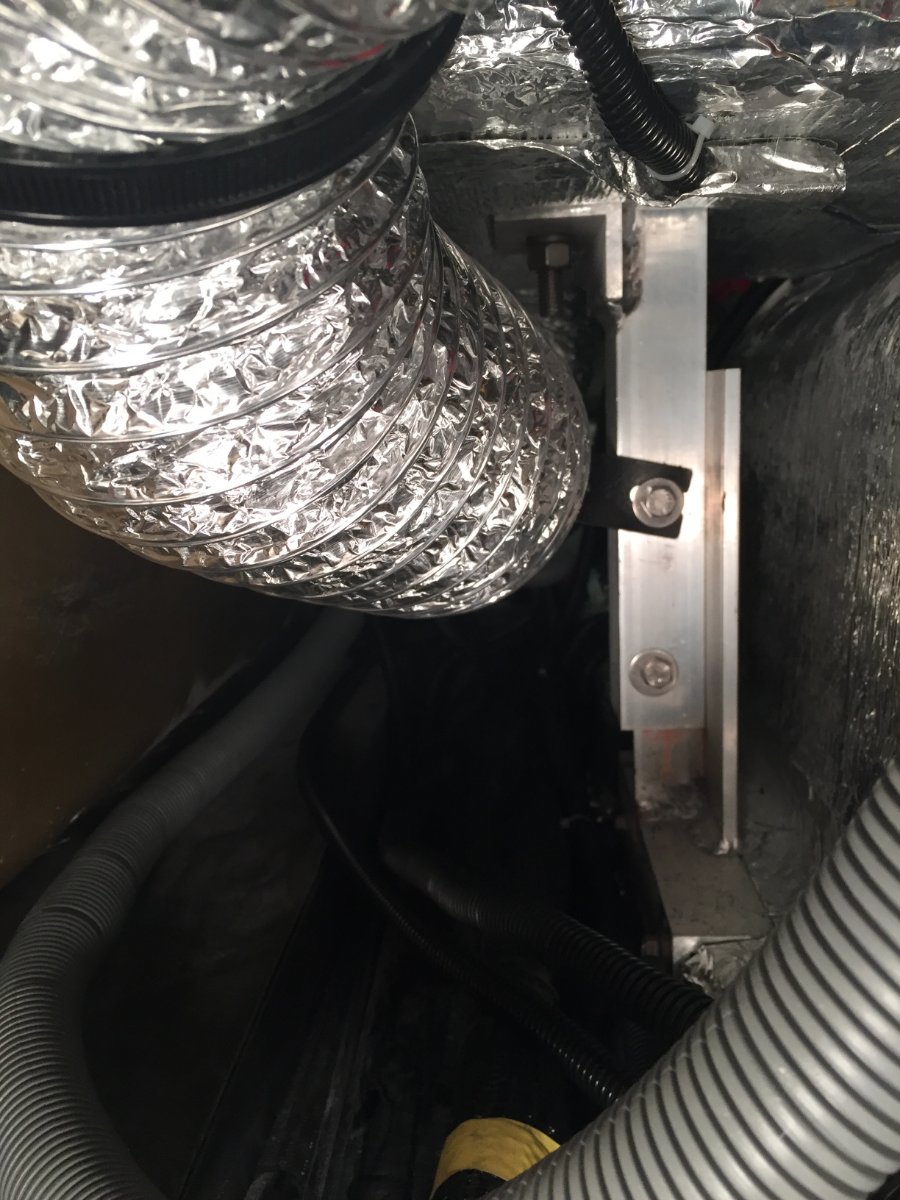
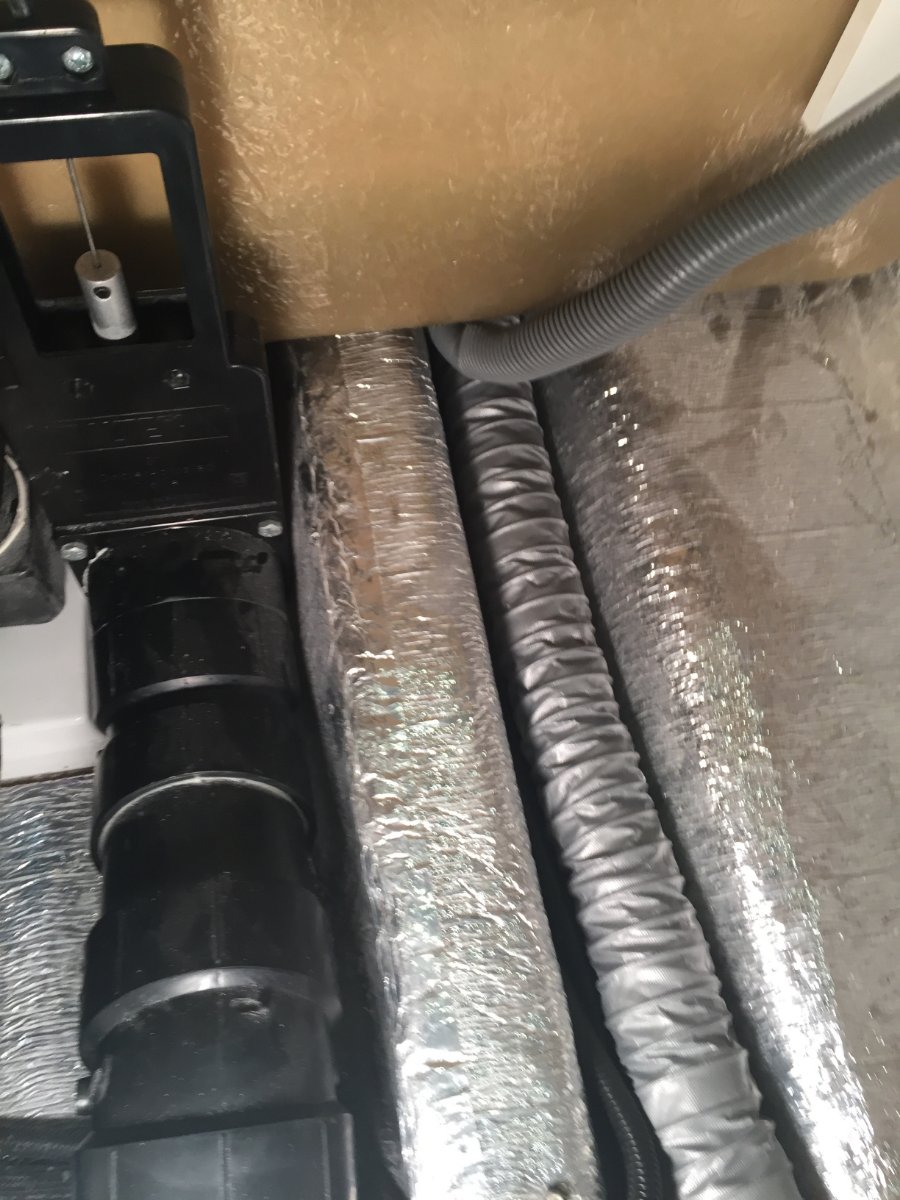
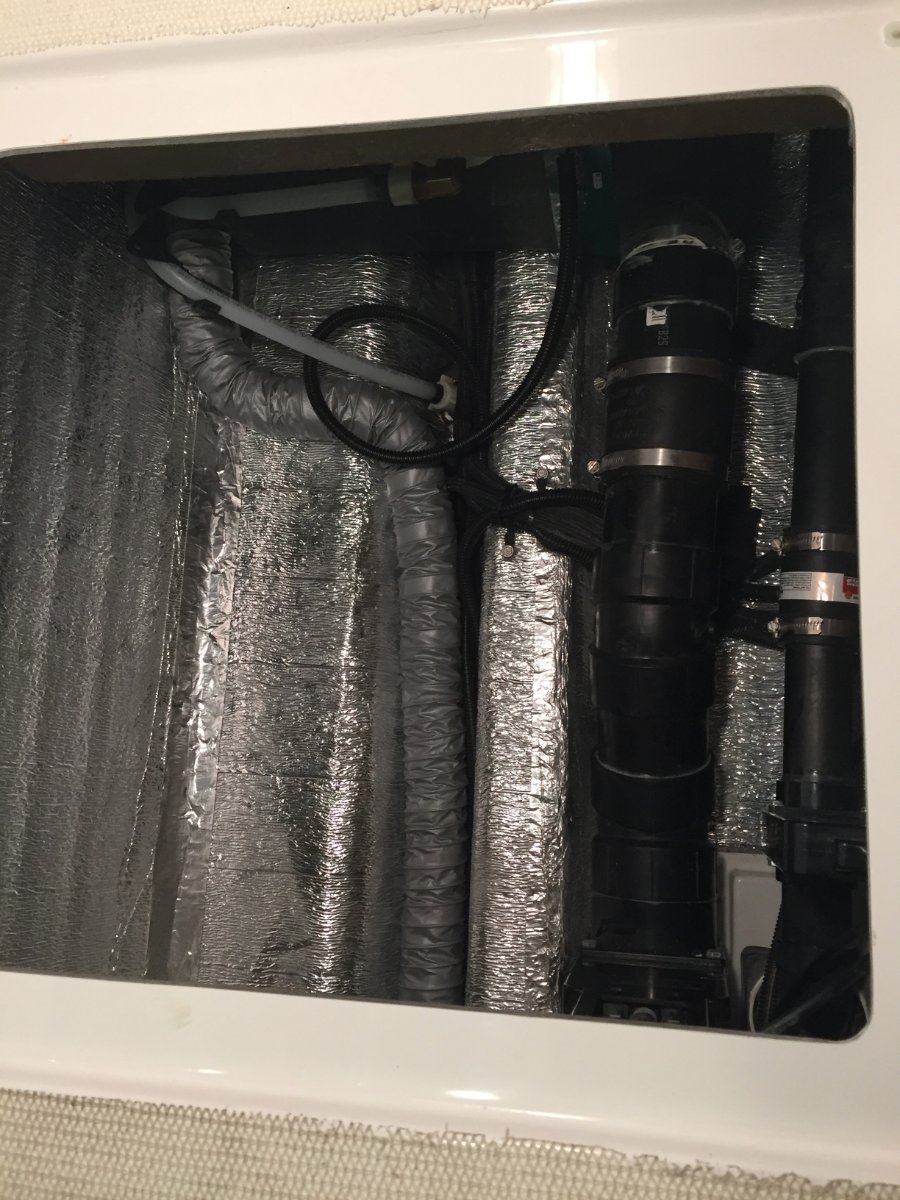
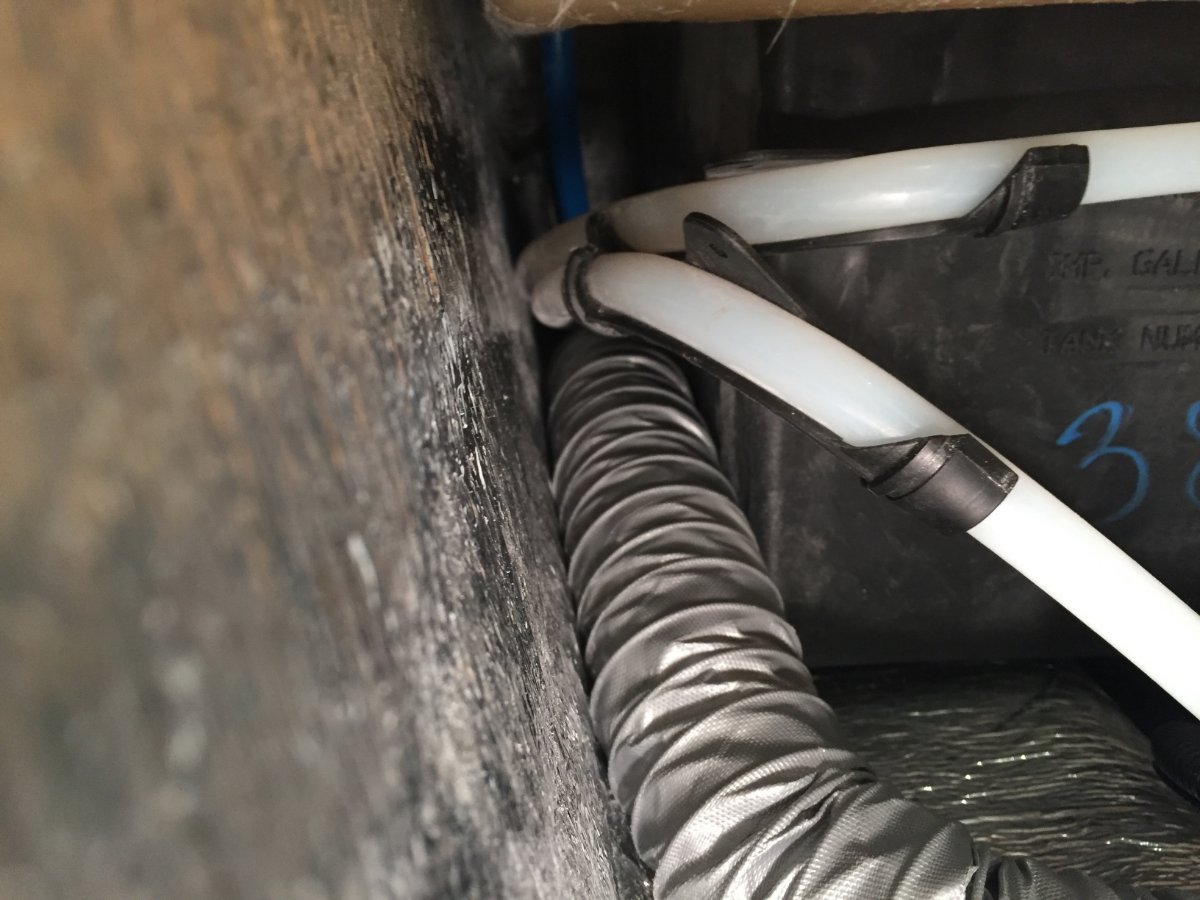
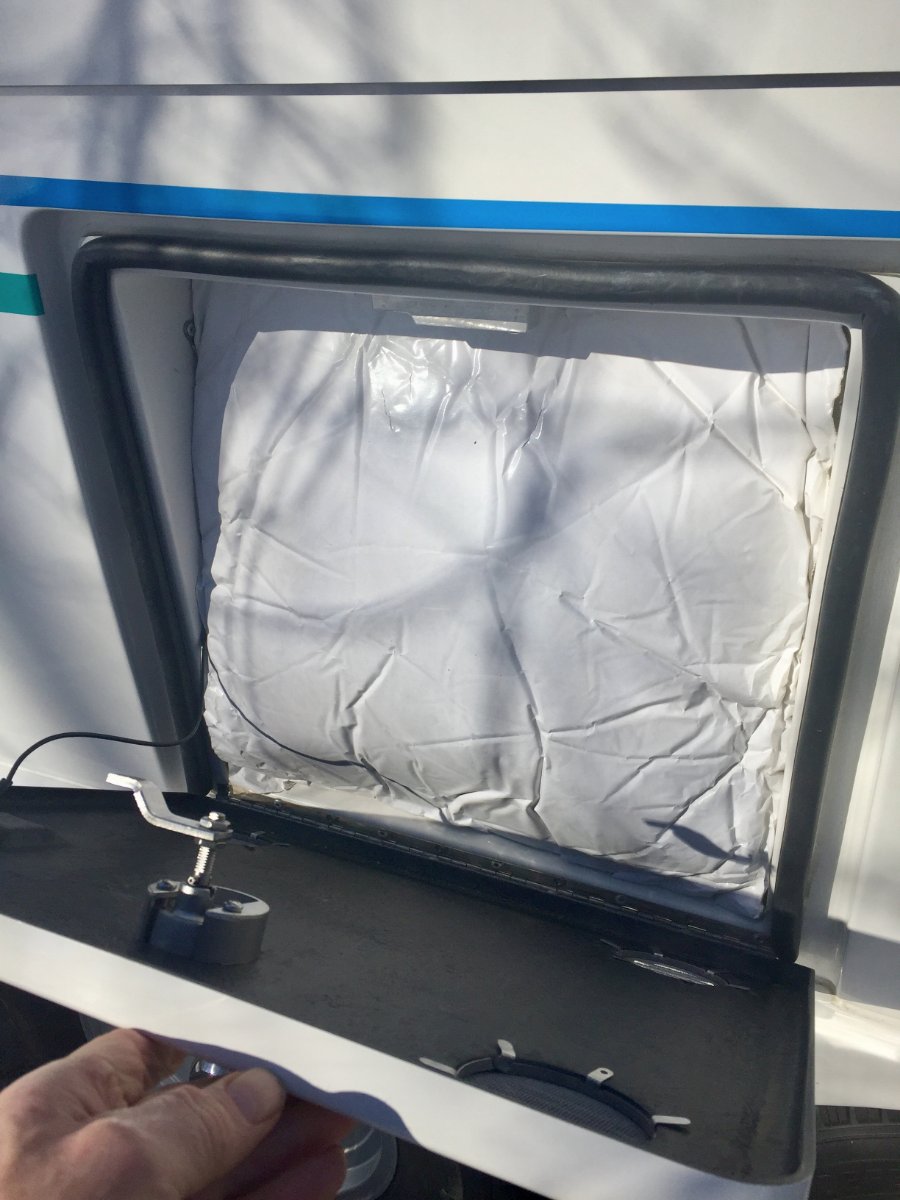
The seed was planted for this furnace mod when we grabbed a canceled reservation three weeks out at a Minnesota State Park. This reservation was mid October and when the date arrived the weather forecast had changed for the worse. We stayed for only two of the three days and we received our first snow of the season, 6 inches of wet snow. We had a non electric site and my batteries were having trouble making it through the night and I was concerned about the water freezing in the Oliver. I have already addressed switching to lithium batteries and posted about it on Oliver Forum. Now I want to share with you what I have done to relieve my worries about water freeze ups in the Oliver, provided that I have a functioning furnace. I first tried to identify the weak spots and came up with the following. Boondocking Inlet Outside Wash Station Fresh Tank Fill Inlet City Water Inlet Black Tank Flush Port Toilet Water Supply Line Hot & Cold Lines Crossing Back Of Oliver The Oliver has all of it's heat ducts run on the curbside which protect the kitchen and the bathroom faucets from freezing. My plan is to run a 2" ducting along the back to the street side and terminating in to the trough that the water lines run in for the city water inlet, fresh tank fill inlet and outside faucet. This trough also has the check valves for those two inlets and has the floor of the exterior storage compartment covering over the top of it. To get at the trough you will have to remove the back wall of the storage compartment and flip the mat back that covers the floor. This exposes the water lines that come across the back of the trailer and drop into that trough. There is a wall that separates the furnace compartment from storage and extends past the wall you just removed. It has a opening for the water lines and it is large enough to run the 2" duct through it and on top of the water lines across the back and into the trough. Now you can flip the mat back down and they are long enough to cover the water lines and the newly installed 2" duct, then the wall is put back in place. On the connection to the furnace I removed the back of the heat exchanger. There is one hard to get at screw on the bottom but the rest are easily accessible. I made two holes, a 2" and a 4" in that back plate. I could not find a 2" starter collar locally so I bought two 4" and removed the rivets on one of them and formed a two inch collar, cut to length and re-rivet. I then installed the 2" and 4" starter collars to the heat exchanger back panel and then the panel to the furnace. I then hooked up the 2" duct to the furnace. Looking in to the access hole under the street side bed you are able to see where the water lines come up and out of the trough and to the valve of the out side wash station. When the furnace fan is running it will blow out a lit Bic Lighter held in that area. So we're protecting water lines, the check valves and dumping warm air underneath the outside wash station valve. Now back at the furnace I attach a 4" heavy duty aluminum foil duct to the newly installed starter collar. It is routed forward a short distance until it can be routed across the basement to the street side and then fed between the hot and cold water lines that go to the outside wash station valve. At this point I need to use a 4" coupler that is 6" long to attach the next 8' piece of 4" duct. I use the 6" long coupler so I can add holes if I need to flood a area with heat, this particular coupler did not need to. I then routed the duct from the wash station valve along the outer wall and over the wheel well, make the corner by the battery compartment and then once getting past the wheel well go down and under battery compartment. Up in that corner I attach a adhesive base 3/4" cable anchor so I can loop a 20" releasable tie strap through it and around the 4" duct holding it up and out of the way. A second 20" tie strap is used were the duct heads down under the battery compartment, it utilizes the loop that anchors the 4/0 cable coming out of the battery compartment. Next I prep another 6" long 4" coupler by adding a metal mounting bracket. It is bolted to the coupler using two 10-24 machine screws that go through the bracket the coupler wall and then a backing plate that has tapped holes. This coupler I will add a1" hole that will be pointed up to flood heat at the battery compartment. The mounting bracket will be utilizing the upper bolt of the support leg for the battery compartment. This keeps the duct up and away from the inverter and electrical components and positions it to flood heat up against the bottom of the battery compartment. The next length of 4" duct is clamped to that coupler and routed up from under the battery compartment over to and along the wheel well. It is held by two 20" tie straps similar to the other side. Because I want to run the heat duct under the foot space of the dinette I need to transition to 2" duct. There is access via the same trough that I utilized in the back of the trailer, but at the front there is more room and I am able to pull the 2" ducting through. From there it continues toward the front until it reaches the black tank flush inlet where it then follows that pipe back along the black tank and terminates by the water supply line for the toilet. At the transition point I add two more short pieces of 2" duct and route them down to where the main black tank drain pipe goes under the dinette foot space, they are terminated on either side of that pipe. There was not enough room to run the 2" duct but enough to force air along either side. At the transition from 4" to the three 2" ducts I simply inserted the three 2" into the end of the 4" and used aluminum foil duct tape to seal the transition. I also want to mention that I used the aluminum foil duct tape to reinforce the ends of every 4" duct by wrapping outside and inside before clamping. That should cover the install, now lets talk about the results of the test in subzero weather. I rounded up seven digital thermometers and put them in the areas I was concerned about. Was placed just inside the empty rear storage compartment. Was placed on top of the batteries and a piece of acoustical insulation that was for large generator enclosure, it was 1-1/2" thick and 19" square. This was squeezed in the opening before the door was closed. Was placed in the rear basement curbside next to boondocking inlet. Was placed in the rear basement street side below the outside wash station valve. Was placed on the floor of the closet with the door left closed. Was placed on the lower shelf in the vanity in the bathroom with the door left closed. Was placed in front basement street side next to the black tank flush port line. I moved it out of the heated shed at 1:00 pm on Sunday 2-7-21. I moved it back in at 3:00 pm on Tuesday 2-9-21. The furnace was cycling off and on at -4 ' but I noticed at -8' and colder it ran continuous. I have the Truma water heater and that was also turned on. I checked propane consumption by putting on two 20 pound tanks that I had weighed and left them in place for 12 hours. It was -12' when I put them on and -2' when I took them off. Because of the subzero temperature the propane was not gasifying very well and the regulator automatically changed from the primary to the reserve after only consuming 2.353 gallons. The total consumed out of both tanks in 12 hours was 3.294 gallons, so that would be .274 gallons in one hour. My Victron BMV-712 was telling me that I had depleted my 400 Ah Battle Born batteries to 47% and at rate of use I had two days and nine hours left. I thought I would comment on a couple of things I like about the outcome of the project. The bathroom was comfy warm and the wall next to the bed was not icy cold. I am not planing to take up subzero camping but it does gives me a benchmark to go off of for any situation that I might run in to. If you have any suggestions or see something that is of concern please let me know. Paul
1 point


.jpg.b4fb182c2dd38b005d42f99a3317e409.jpg)


-
Recent Achievements
-


")


