Leaderboard


Popular Content
Showing content with the highest reputation on 08/20/2022 in all areas
-
Reminder that replying to the OP is useful, however it is not responding to the poll. Please participate in the poll by checking the box and submitting your vote. It will be useful to all if we can see where we are, and the results might be beneficial to Oliver, if we can get enough data points. The placard decal on 2021 Hull 797 is exactly the same as JD’s 2017. I’ve already voted above, but I run 45psi, check frequently with digital temp gun. I have a TPMS. I have tested the tire pressure several times by running them up to 60 psi for awhile on the highway, measuring temps, then airing down to 45, and checking temps again at next rest stop. No noticeable temp increases. If you are reluctant to reduce psi this low, you could try this test yourself. If your tires do not increase in temperature, your data confirms you have made the right choice. And more importantly (as JD pointed out), it is in accordance with the tire OEM. Based on JD’s reported good performance, I’m going to try lowering to 42 psi. Running this low may not be for everyone, as we all run at different weights, speeds, and road conditions.5 points
-
I keep the tires on the Outlaw Oliver, Hull #050 set between 60-65 psi. I formerly ran them all at 80 psi. I think that is too high. As for running them at 55 psi, I think that is fine for most owners. The reason I run more is our trailer is heavier than most all the others (raised bed option, twin 5200 pound axles, 10 ply all steel tires, disc brakes). As has been said MANY times in the past, everyone should buy and install a tire pressure monitoring system (TPMS). There are many brands available, Do your own research and select one based on your personal needs and wants.5 points
-
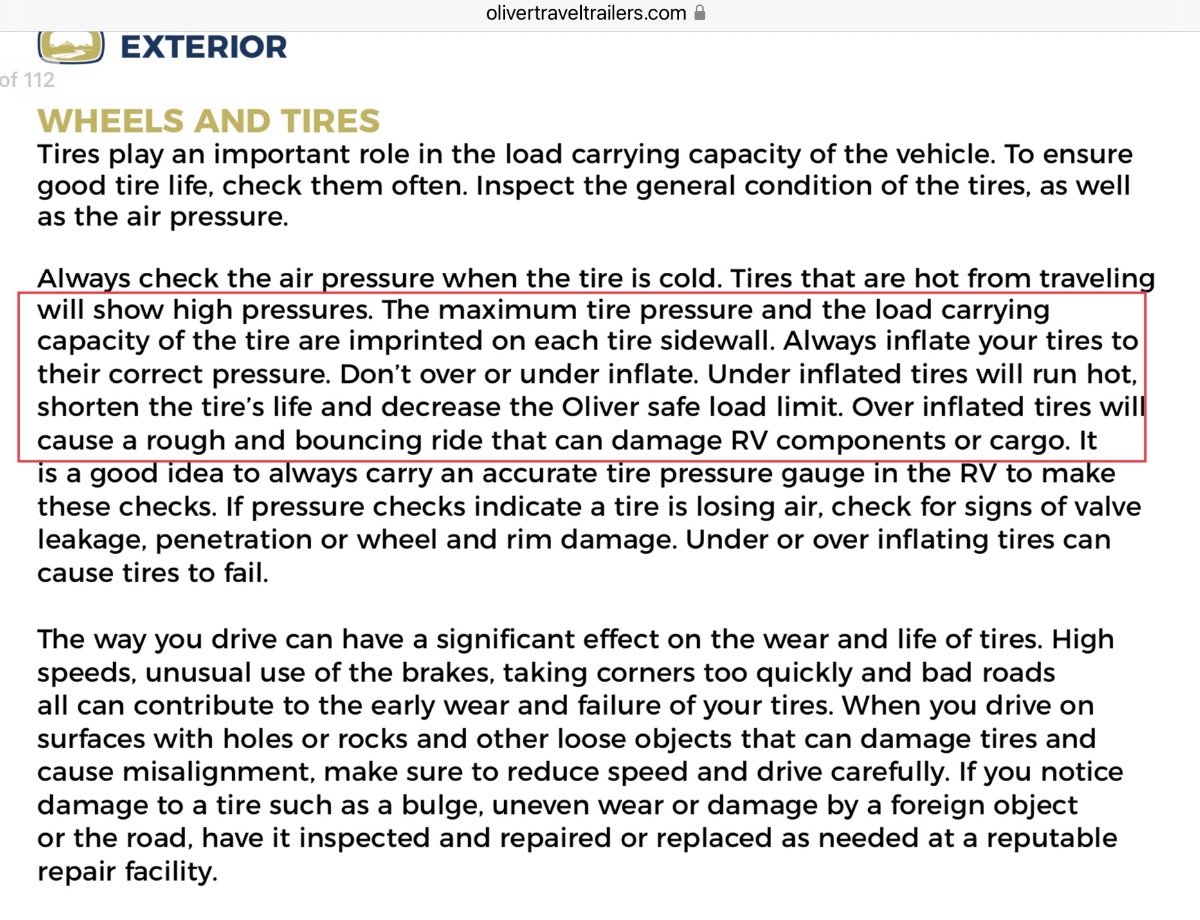
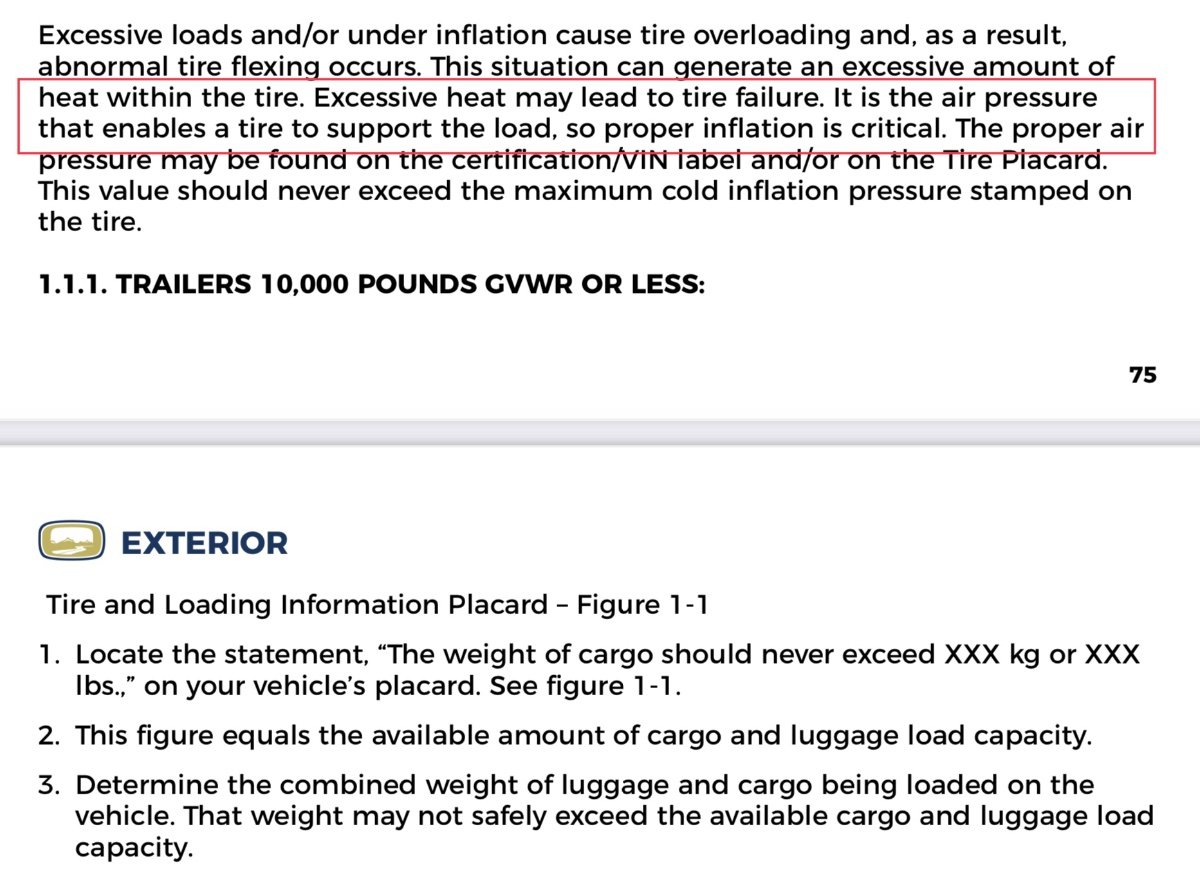
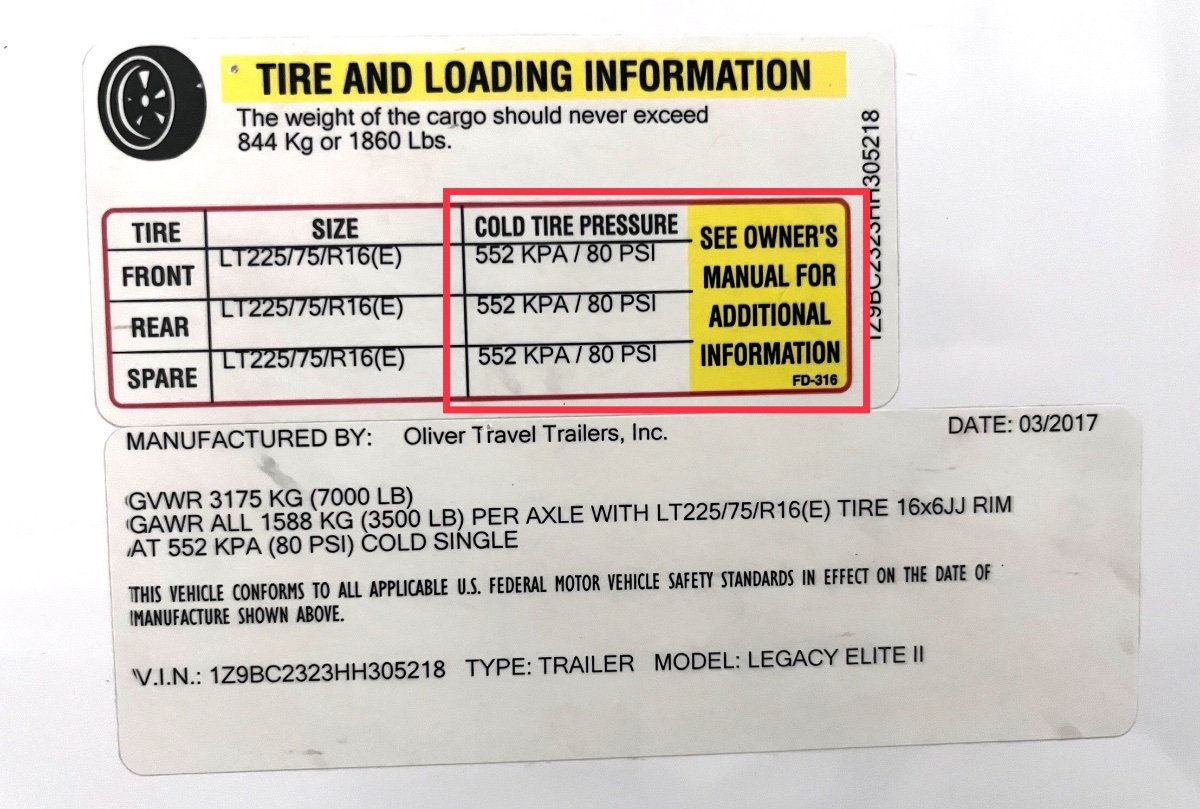
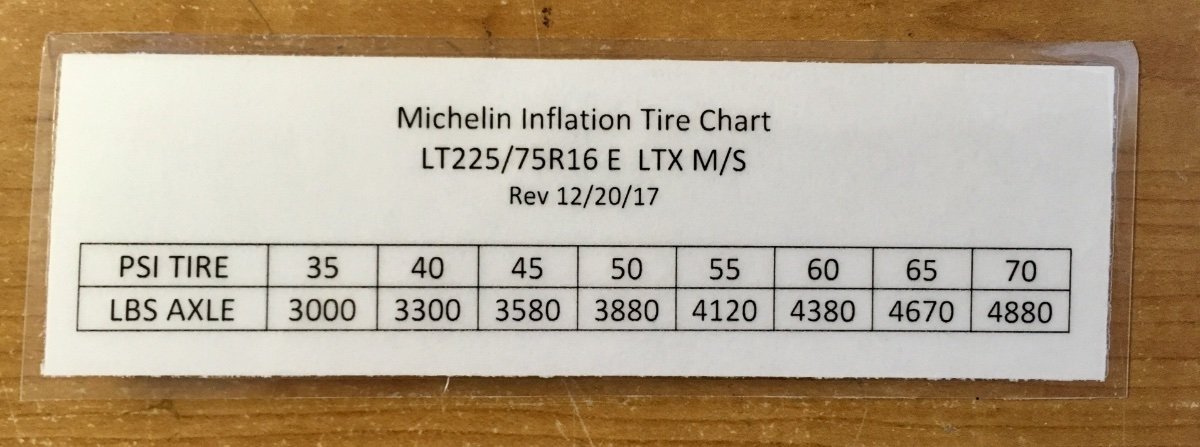
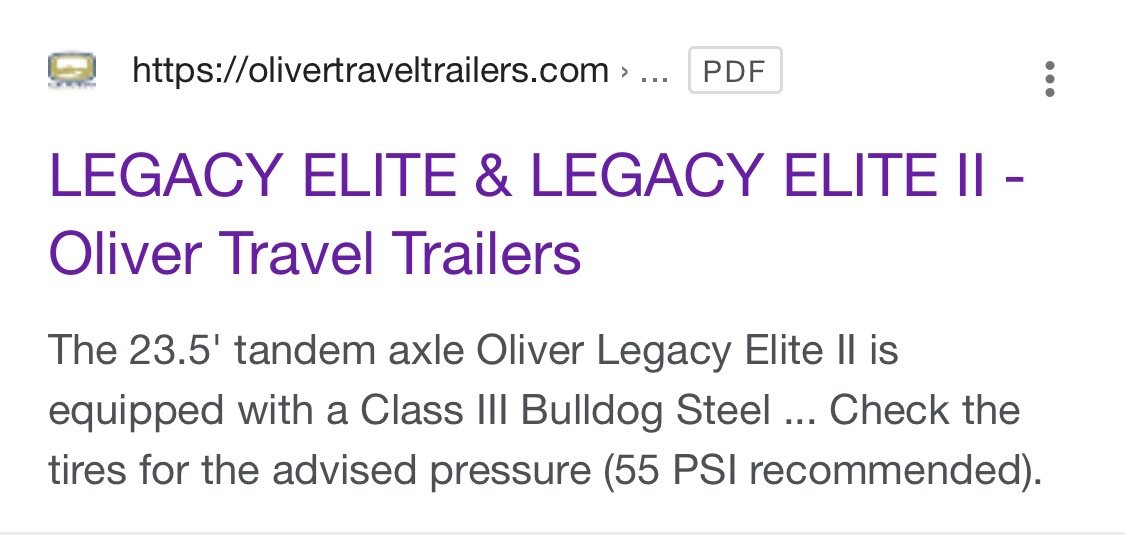
EDIT 10/02/22 This thread is for LE2 tandem axle only! Here is a related poll and thread for the smaller single axle trailer …. https://olivertraveltrailers.com/forums/topic/7376-elite-1-tire-pressures-poll-for-current-model-elite-1-only-with-lt-tires/ Everybody seems to be VERY confused about proper tire pressures. This has been an ongoing issue for as long as I have been on the forum, 7 YEARS. and with the proliferation of new hulls, it appears to be getting even worse. I actually started a service ticket long ago asking Oliver to include a Tire Pressure Load Chart, so we can accurately determine what is the right amount of air to carry the load. The sidewall pressure is the maximum the tire can take, not the correct pressure for the Oliver load! This has not yet happened, here is the one I made for the older tires (I run mine at 42 psi, with an approximate 6000 pound trailer weight.): From the 2022 Owners Manual Here is the Tire Placard from Hull 218 IF YOUR PLACARD IS DIFFERENT FROM THIS PLEASE POST A PICTURE. Please consider contacting Oliver with a new service ticket complaining about the continued lack of guidance. VERBAL recommendations given at DELIVERY vary wildly, are unreliable and should be received with a heavy dose of skepticism. 😳 Thanks. John Davies Spokane WA
 4 points
 -
This blog article has some great suggestions for making a wet bath more enjoyable to use. I especially like the tip on creating towel shelving using tension rods. Can anyone else suggest items or ideas that enhance the wet bath experience? 6 tips for loving your RV wet bath | Outdoorsy.com4 points
-
It really is confusing because everyone seems to have a different answer! When we asked the service dept at Oliver we were told recommended psi is 55.
4 points
-
We took delivery of out Elite 2 in last may and towed it back to eastern Canada with a Ford f150 2020 with v8 engine 4wd. When we got back home, we replaced the truck by a RAM 3500 Laramie 2022 diesel srw, crew cab because of the payload issue and we felt uncomfortable in the mountains of Virginia and Pensilvania with the half ton pick up. We are snowbirds and we travel 6 months in USA in winter time and feel more secure with a bigger diesel truck. The liability in case of an accident was another major factor for us. The mileage on the v8 was good, around 12 m/ g while towing. Sorry for typo, i’m french!4 points
-
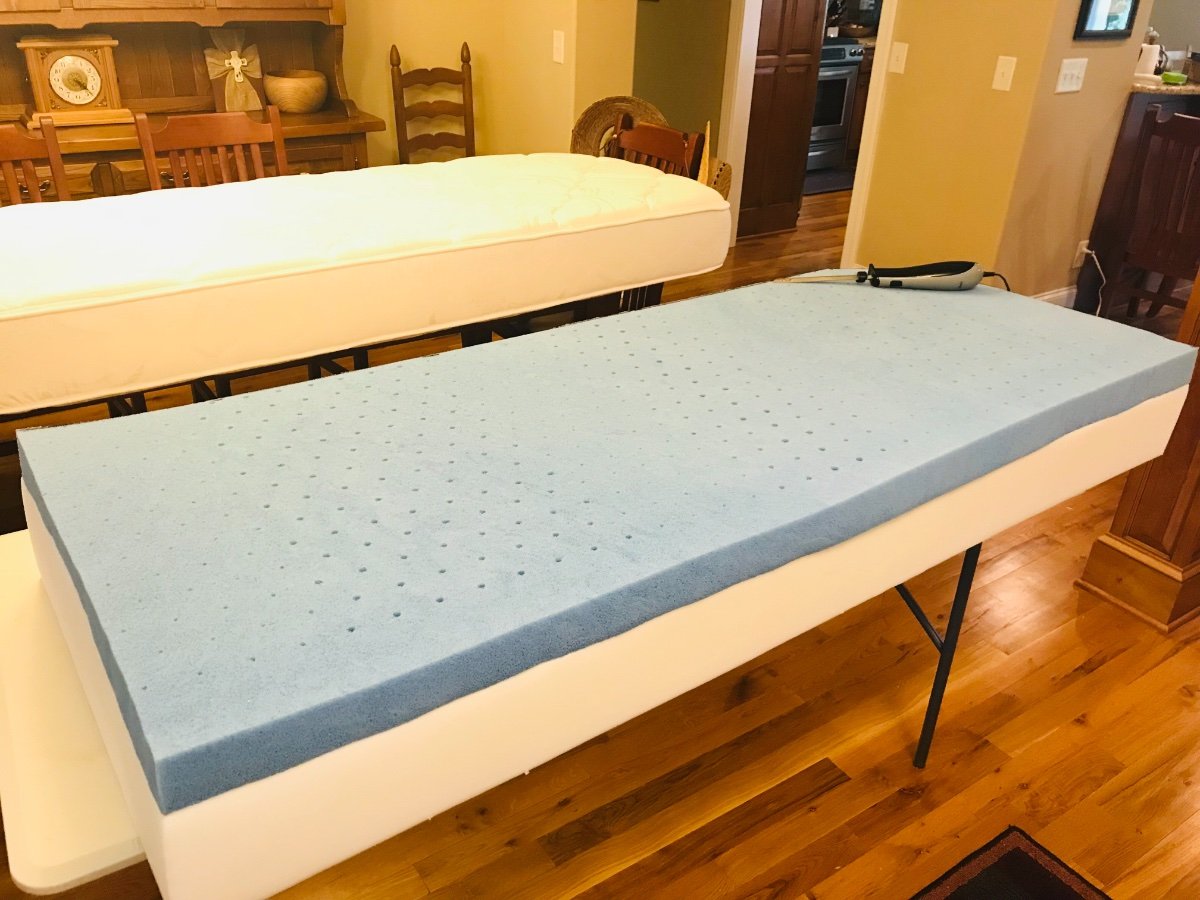
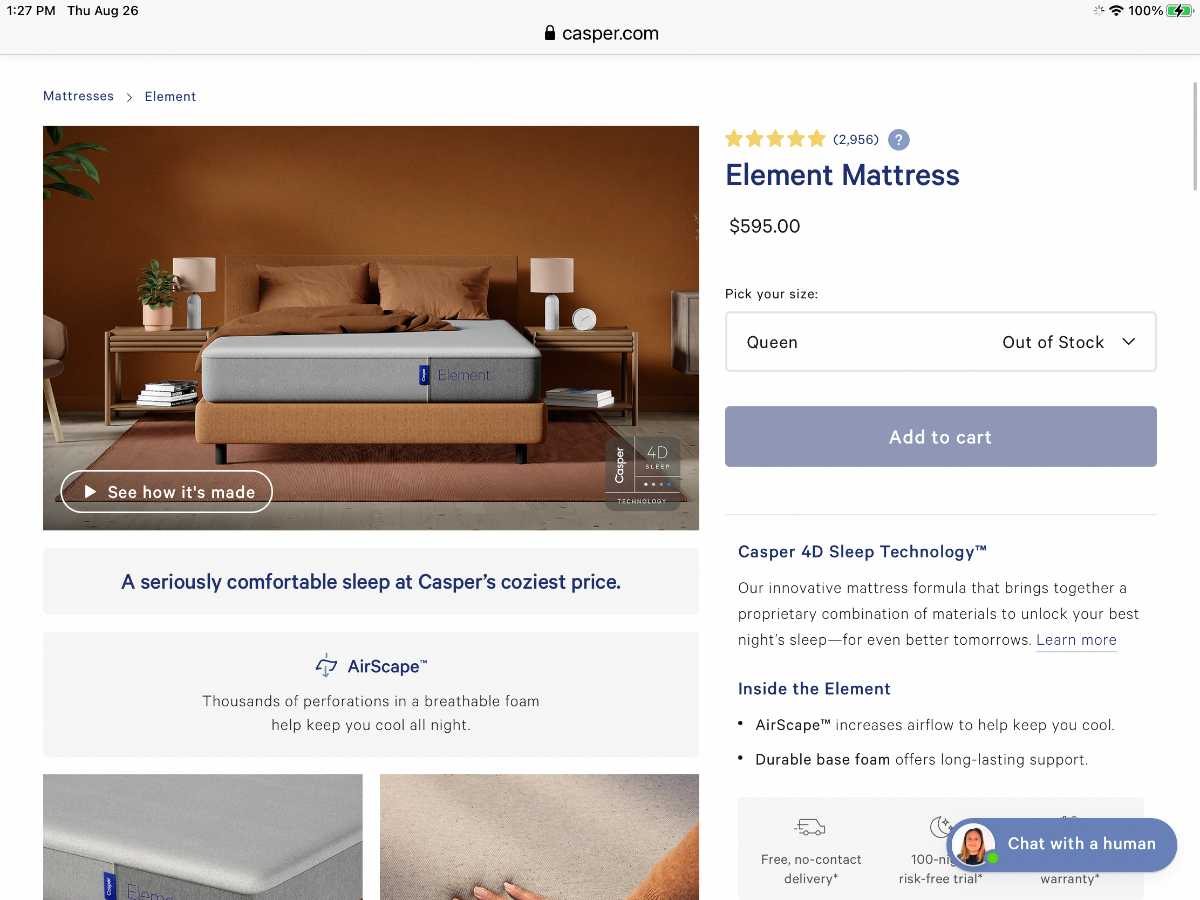
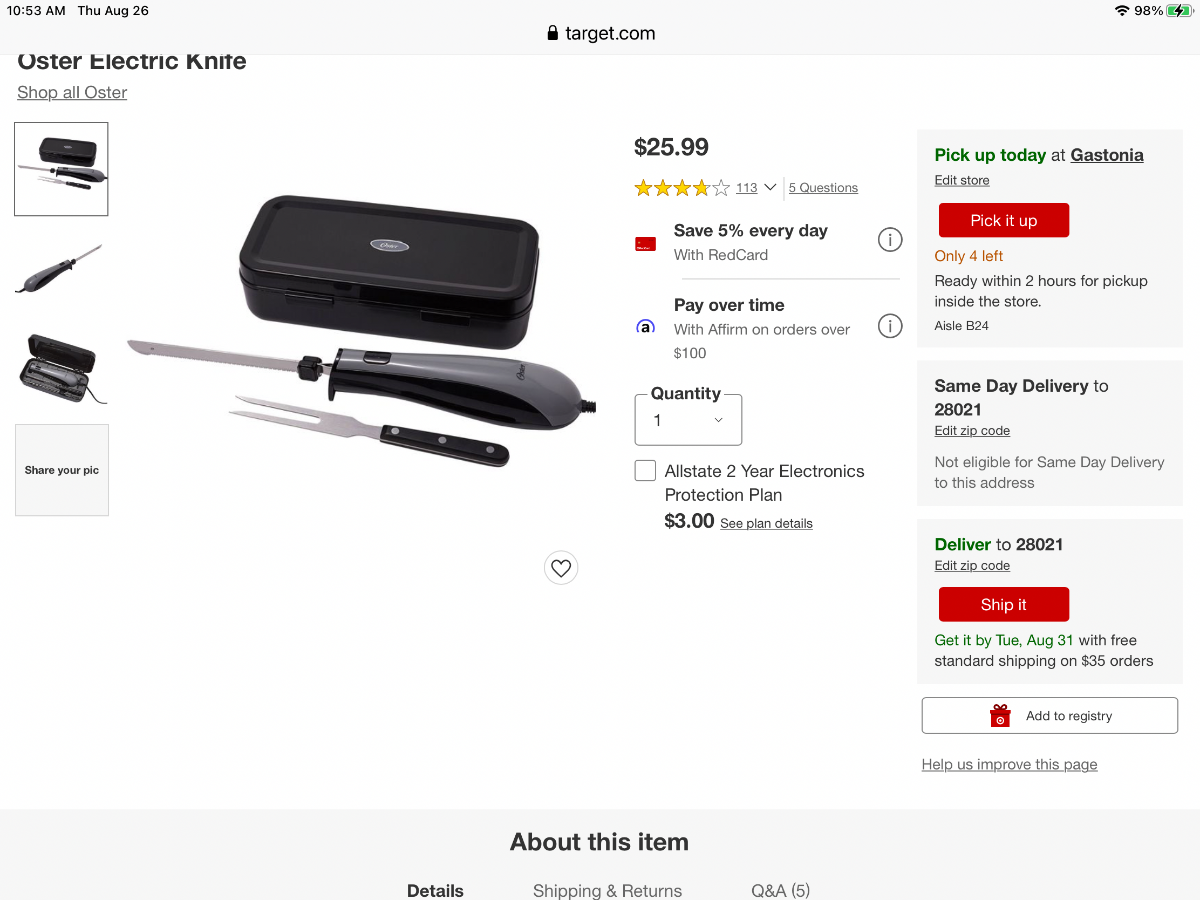
After sleeping on our twin Southern Mattresses in our Ollie, my wife and I both decided that the comfort level was not what we hoped for. We were experiencing pressure point pain in our shoulders and hip joints. We don’t experience this pain on our memory foam mattress at home. After some research, we decided to purchase the Casper “Element” memory foam mattress in a standard Queen size. We learned that Target is a retailer for the Element. We called our local Target store and found one in stock, asked them to hold it and we bought it. The element has many strong 5⭐️ reviews so we thought we would give it a try. After the purchase we brought it home and actually slept on it for a few hours on the floor of our home and are very happy with the comfort level, especially no pressure point shoulder and hip pain. Truly a night and day difference in comfort level from the Southern Mattress which uses coil springs. Naturally we wanted to be sure that this mattress was going to meet our comfort level before the cutting began. (Casper has a return policy if you don’t like the memory foam you can return it). After we were satisfied with the comfort level of the Element the surgery plan began. We used our Southern Mattress twin as a template for the radius and marked the foam. Then used an electric meat carving knife to carefully cut the 10” foam in to two halves for what Oliver calls a twin sized mattress. Essentially we made two 30” X 75” mattresses naturally with the radius to fit our Ollie. Choosing the 10” thick Casper Element allowed us to use our existing AB lifestyle fitted water proof mattress cover and fitted sheet and blankets. (We sold both the Southern Mattresses to a nice couple from Georgia who are taking delivery of their OLEll in Dec). Happy Camping! A few pics - note- Naturally mattress comfort is very subjective. So what feels comfortable to some may not be to others. 10” thick Memory foam with mattress cover after radius cut- Memory foam before cutting the radius-
3 points
-
I’ve always been unclear as to what is so objectionable about a wet bath.3 points
-
We keep several microfiber cloths, about 12"x12" from Costco in the camper-after using squeegee I use one to finish drying toilet, walls and floor, takes very little time and bath is all clean3 points
-
When we took delivery in may 2022, Oliver told us 55 psi.3 points
-
42 to 45 psi. 50 at the very most. 80 psi is the maximum that the tire can take, it is not at all appropriate for a little trailer; running double the ideal inflation pressure will beat up the frame, hull and your personal belongings😳 Have you been finding stuff shaken up, rearranged, and or lying on the floor? Does your television fall down? BTW, Did you ever get a tire inflator? You started a thread asking about it and sort of dropped out. John Davies Spokane WA3 points
-
I thought it be fun to start a topic on favorite camp recipes.😋 Share your favorite camp recipes for drinks, breakfast, lunch, dinner and snacks! Dinner: Lemon Chicken & Artichokes I love using my crockpot (with crockpot liners for easy cleanup) when camping and I always make this recipe Lemon Chicken and artichokes. I tweak it a bit and add a bag of petite Blushing Bell potatoes (or red skin potatoes) and I quarter corn on the cob and throw that in. You can add carrots, green beans or whatever sounds good! https://fitslowcookerqueen.com/slow-cooker-chicken-artichokes-whole30-paleo/2 points
-
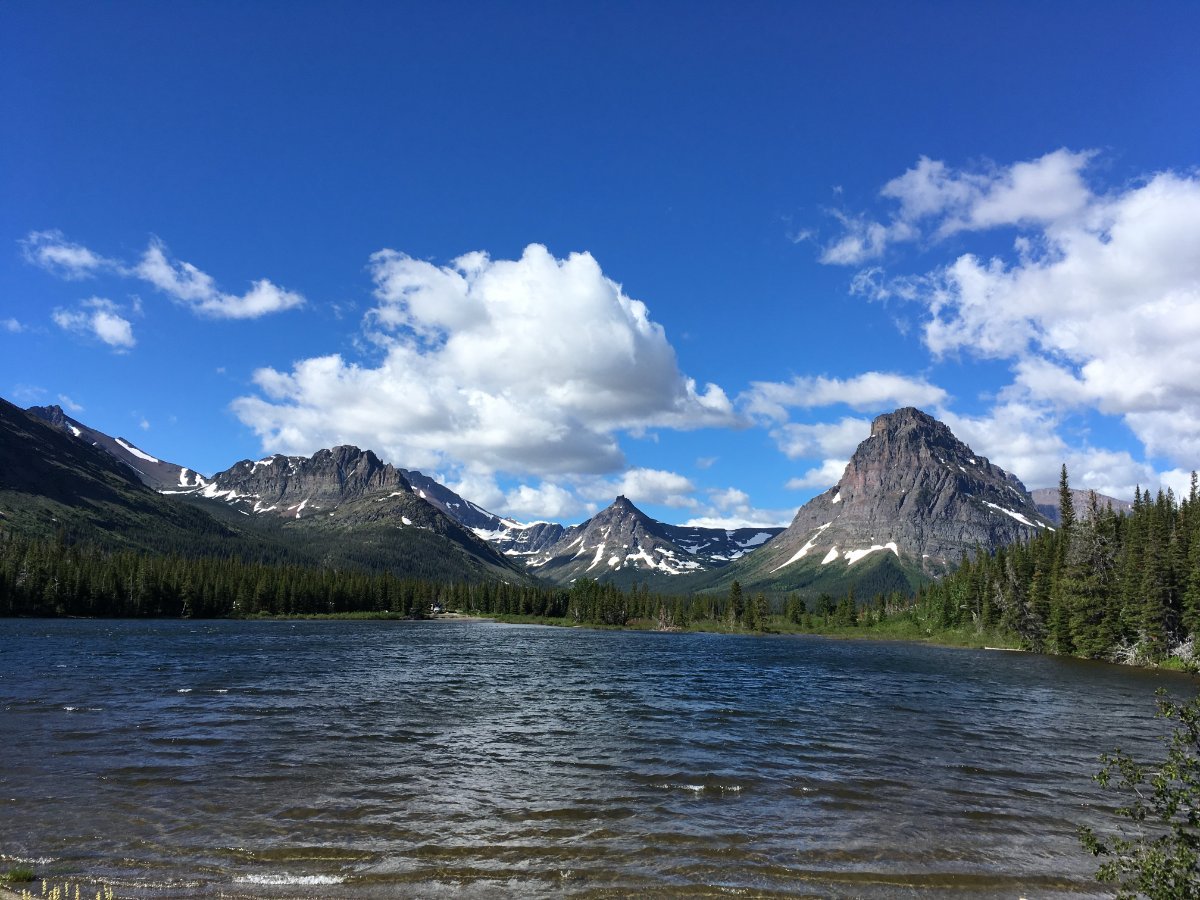
We camped at Two Medicine Campground. Loved it. It’s a bit of a drive up to the main entrance to Glacier, but not bad.
2 points
-
John & Dave, appreciate the inflation charts. Sent a request to Cooper for a inflation chart for the Cooper Discoverer HT3 Commercial Light Truck 225/75R/16 tires we installed last year, but no reply yet. Believe this is the current tire Oliver installs, too. We keep our LE2 Ollie's ready to camp weigh around 4950 pounds with empty tanks except for full 6 gallon hot water heater that is full except for winter camping when Ollie's ready to camp weight is around 4900 pounds. Like ScubaRX, we also have 5200 pound axles that were installed when Ollie was built, Oliver ran short on Dexter 3500 pound axles, so Legacy Elite Dexter 5200 pound axles were installed that have larger bearings and brakes. We ran Ollie's trailer tire pressure at 50PSI cold for the last six years. The BF Goodrich Commercial LT tires that were original equipment & Cooper Discovery HT3 LT tires we mounted have maximum capacity of 2680 pounds each @ 80PSI. The maximum weight we have on each tire (in our situation) is only 1238 pounds each without subtracting tongue weight on TV while towing. Also thinking about reducing pressure on the next camping trip, probably 45PSI cold after discussion in another thread. I also keep a digital thermometer for checking various temps from bearings, tires, battery compartment, and anything that looks like it needs to be checked 🙂 on camping trips.2 points
-
Our older elites have no cupboard. I keep supplies (washcloths, extra microfiber bath towels, etc.) in a plastic file case beside the toilet. Easily removed. Fairly waterproof if I forget.2 points
-
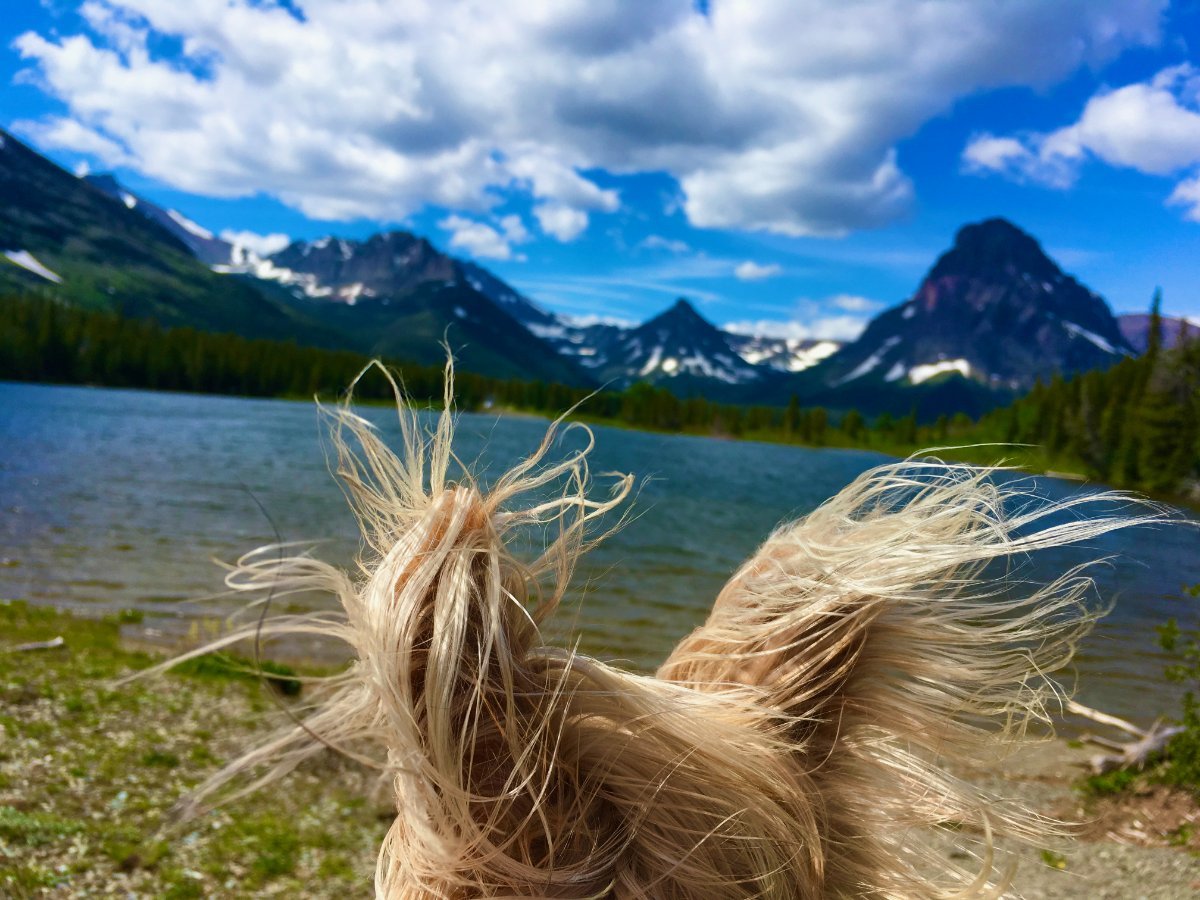
We enjoyed Two Medicine Campground in 2018.. It is first come, first serve. The view of the lake was nice and medicinal to the soul. (Please forgive the photo bombing that Bosker managed as he soaked up the healing view)
2 points
-
Easy and delicious. The best combination!2 points
-
I had some on my previous 36 foot fidth wheel Grand Design and it didn’t worked well because they work only on compression and not on decompression mode. The first 50% of the Sumo, when starting compressing there is no compression resistance and after that its getting too hard. After a few months, i get rid of them and went in Elkard Indiana to get a MoRyde indépendant suspension installed and that’s made a great difference. Sorry about my written english, i’m french Canadians! You don’t need that on an Oli because you already have shocks that work on both mode.2 points
-
Thank you All for your insight. The chain was twisted -- flipped it twice. It lengthened to meet the under side of the hitch. Thanks again.2 points
-
I was glad to find this post as we want a foam mattress but having trouble finding one we can cut without it containing loose fiberglass which will fly everywhere! I began searching online and found that Sam's Club sells these for $449 Queen. Can't wait to try this! Thank you!2 points
-
We just spent 8 days dry camping in a state park with bathhouses. We only used the (standard) toilet overnight/early morning and for "emergencies." We used the bathhouse the rest of the time. Our black tank read 69% full when we dumped on the way out.2 points
-
Hi, my name is Steve and I'm new here. As I scrolled through the classified I realized I best start off slow. My wife, Claudia, and I camped for years with our two boys. Now that we have 5 grandkids we're looking into getting out there again. We've always liked the smaller travel trailers and wanted to get something well made. The Airstreams are great but a bit heavy. All roads seem to lead to Oliverville but after I saw the cost of used trailers I decided to check out Casita to start small (just in case). I went on RV Trader and found one about an hour after I joined this forum. Go figure I'd been looking on and off for awhile. We found a used 17foot Liberty for about 14K. Might want to trade up to an Oliver if all goes well. (mostly with the bed). Happy Trails, Steve and Claudia1 point
-
Who has camped in glacier and which campground? Thanks!1 point
-
@AZ Wonderer I always feel like the more space you have the more stuff you bring..lol..so the wet bath keeps me in check!😜1 point
-
I don’t mind a wet bath, I’d rather have the extra space where we spend the most time. I find the wet bath so easy especially to clean! We’ve never had a camper that’s big enough to have a dry bath so I have no experience to compare it to. We mostly use the campground bathhouse to shower anyway.1 point
-
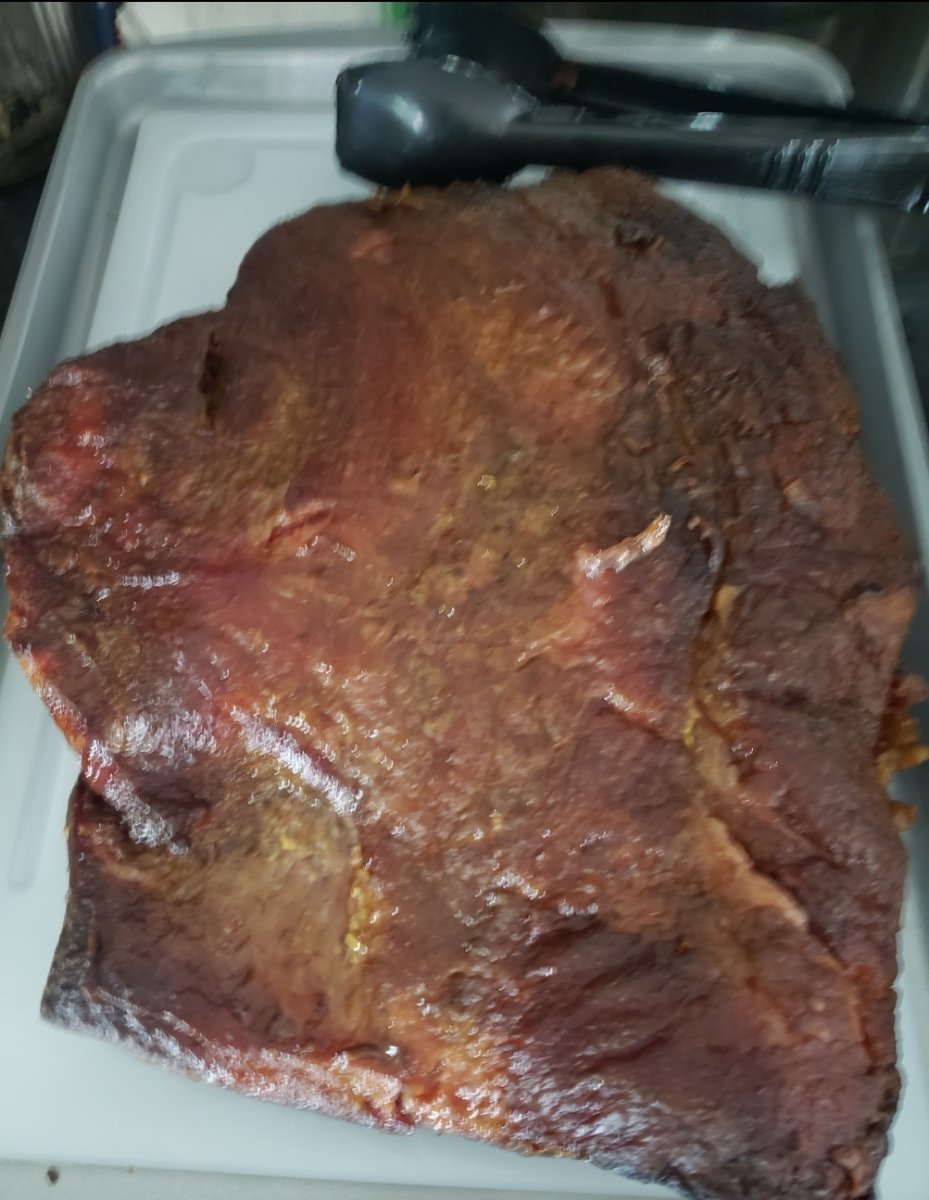
I know I've posted this in previous threads about campfire cooking, but I'll add it again, with photos. My husband's favorite campfire meal is teriyaki flank steak. I remove any chine and tendons, then stab the flank steak both sides with a fork, probably about 100 times each. Place it in a ziplock or vac bag, and add low sodium marinade. (Mrs dash is really good, but not always available. My own recipe is pineapple juice, low sodium soy, a bit of rice vinegar, garlic, ginger, honey or cane sugar, and a bit of water. ) Place the steak in the bag, add some marinade to cover (needs less than you think, as the holes allow the marinade to sink in), and marinate at least one day. I usually marinate one day, flat, in the fridge, then freeze flat between two cookie sheets in my chest freezer. Easier to carry and store flat pack items. (I do the same with chicken, pork chops, etc.) Flank steak cooks quickly to medium rare, about 5 minutes per side, on a really hot fire. sliced thin against the grain, on the diagonal, the little ribbons of meat require no knife. I sometimes just make veggies with it (seasonal), sometimes rosemary baby potatoes.
1 point
-
Care to share the KTT factory price? Hopefully much less than Oliver charges? Nothing beats a great nights sleep! 👍🏻1 point
-
We looked into the Southern mattress as well as the KTT mattresses. I decided on the KTT mattresses and bought them straight from the factory in CT in the spring of 2021. I picked them up in CT (closer and less expensive then gonig to Oliver in TN). They do not have any springs in them. I had KTT make the foam a little firmer than what OTT buys. They are very very comfortable and we love them.1 point
-
I installed Sumo Springs on a half ton Chevrolet pickup and pulled an Elite 2 to Maine and back. I was a lot happier when got home and traded that truck in on an HD2500 Duramax. Sumo Springs are a polyurethane bumper. Not the same as steel leaf springs. edit: @AZ WondererI had had a beer or 6 when I read your first post. I have reread your post and now see that you were asking about Sumos under the trailer, not the TV. After watching the video I want to investigate these further since there are no bumpers on the current setup.1 point
-
Share and Enjoy !Shares Packing up the trailer to leave on a camping trip is arguably one of the most stressful parts of the entire process, especially if your trailer is brand new. You're taking it out for the first or second time. You walk into your nearest camping store, your local Wal-Mart, or even Target, and you're faced with a million different options. Even worse, they make you feel like you need all of it. Online RV packing lists can seem overwhelming, too – there are essential items on those lists. Still, it can be hard to decipher what you need and what the best RV accessories are. What to Know Before you spend your life savings on travel trailer accessories and outdoor gear, take a step back and think about the essential items. Of course, there are a few staple items you should always keep in your camper to be safe. Still, in reality, you probably won't need extra throw pillows on the couch or a sleeping bag onesie. When you go back to the basics and get only the right gear, you'll have a much better camping experience with less clutter and more room to have a great time. You have limited space, so make the most of it and don't pack too much stuff. We have you covered if you're a new RV owner and are unsure what you'll need. Start with this checklist to get your travel trailer ready to hit the road! And don't worry, if you forget something, you can always make a stop or two on the way to your destination. Here are 20 RV essentials to bring on your next trip! 1. First Aid Kit Having a fully stocked first aid kit in your travel trailer is always a good idea. You never know when an accident could happen, and being prepared will make your life easier when someone gets hurt. So keep it in a place with easy access, just in case! 2. Surge Protector If you're going to a campground with hookups, you'll want to use a surge protector no matter what. It will protect your travel trailer in case of faulty outlets and lighting, saving you money on repairs down the road. Nothing can ruin an RV trip faster than an electrical system malfunction! 3. Water Tank Essentials If your travel trailer has running water, pack all the essentials you'll need for cleaning out your gray and black tank properly. The dealership you purchase your trailer from should give you the rundown on exactly what you'll need. If you're unsure, do some additional research or call us. Ensuring it's done correctly is vital to your trailer's long-term survival! In addition, you'll likely need a freshwater hose, a water pressure regulator, and chemicals for your black water tank. 4. Toilet Paper You can buy RV-friendly toilet paper from any camping store or travel trailer dealership. However, using regular toilet paper in your camper can cause damage to your septic system, so make sure to have this specific type on hand. 5. Electrical and Duct Tape You'll most likely need electrical or duct tape during your camping adventures. So keeping them stocked in your camper trailer will come in handy when you need them for an emergency! 6. Basic Tool Kit You never know when something will break, a screw will come loose, or you'll need to make a minor repair. An essential tool kit on hand will save you headaches and trips to the store while camping. You'll also want to bring a cordless drill, just in case. Having an emergency roadside kit on hand is also a good idea. 7. Flashlights Lighting is self-explanatory, and having flashlights in your trailer is a great idea. Especially if you're boondocking and you don't have the luxury of a campground with lights. Keeping a few headlamps in your trailer is also a good idea! 8. Extra Blankets There's a good chance you'll have some cold weather while camping – even in the warmest summer months. So keep a few extra blankets in your trailer to ensure everyone stays warm on those chilly nights and mornings. If you don't have much room, store your blankets in the lower storage spaces. 9. Dish & Hand Soap It's frustrating when you want to start washing dishes after a meal and realize you forgot the soap. Keeping a few bottles stocked in your travel trailer will prevent you from running into this problem and keep you from having to make a trip to the closest grocery store. 10. Extra Towels Make sure to keep extra shower towels and beach towels in your trailer. It's one less thing you must remember when packing for each trip, and it never hurts to have a few extras. Just wash them when you get home and immediately take them back into the trailer. You'll never have to think about it and always have clean towels while camping! 11. Paper Products Before your first camping trip, stock up on paper plates, bowls, plastic utensils, napkins, straws, and anything else you think you'll need during mealtimes. Remembering to bring these every time is a pain, so having them stocked in your RV kitchen will save you headaches and time. If you want to make things even easier, keep a crock pot and instant pot in your trailer. 12. Non-Perishable Food You can keep non-perishable food items in your trailer, like pancake mixes, cake mixes, cereal, pasta, drink mix packets, s'more ingredients, baking items, and freeze-dried meals. These are perfect RV food items in your new camper that will last a long time. 13. Spices For non-perishable food items, get some salt, pepper, and staple spices like garlic powder and onion powder to keep in the trailer. There's nothing worse than packing all your food and realizing you forgot the herbs and spices when you go to make your first meal! 14. Rain Gear You never really know when a storm could strike while camping, so having some extra rain gear is always a good idea. 15. Bedding Pillows, blankets, and sheets would be a must when camping, especially if your travel trailer didn't come with them. Get comfortable bedding you'll enjoy sleeping in for a more enjoyable camping experience! 16. Phone Chargers Phone and smartwatch chargers are another excellent staple to keep in the trailer if you don't want to worry about packing them. Even if you don't have service where you're going, you'll still want your cell phone to capture all the fun memories. 17. Toiletries These products are essential no matter where you are: toothbrushes, toothpaste, face wash, body wash, shampoo, conditioner, bug spray, sunscreen, and any other toiletries you'll need in your travel trailer. In addition, Target and Wal-Mart have great travel-sized options. 18. Hammocks & Chairs You'll need somewhere to sit while relaxing outside, and hammocks and camp chairs are great options. Store them in the compartments under the trailer to save space! 19. Games Indoor and outdoor games are always fun to have on hand, so get a few of your favorites and keep them in your trailer. It's a great way to pass the time while having fun with friends and family. 20. Fire Extinguisher Lastly, ensure quick access to a fire extinguisher in an emergency. Hopefully, you'll never need it, but it doesn't hurt to have one on hand. Stocking the essentials in your trailer will make packing and leaving easier for everyone. If you're looking for camper trailers for sale, reach out to Oliver Travel Trailers. We have everything from small to luxury travel trailers, so you can find something to meet your specific needs. Reach out to our team today to see what we have available! Share and Enjoy !Shares The post 20 Essentials to Keep in Your Travel Trailer appeared first on Oliver Travel Trailers. Read the Full Article1 point
-
Thank you for the wonderful list!👍🏼😃1 point
-
Has anyone used a Wrappon toilet? It’s sorta like the Cleanwaste folding toilet we use now in our squaredrop, but it “flushes” at the touch of a button, sealing the bag and loading the next one. Not pretty, but definitely functional. https://www.setechnologiesltdusa.com/wrappon It is similar to the Laveo, but 50 flushes for the same price as Laveo’s 17, and much more compact refills.1 point
-
We keep our Coopers at 50. We have the AT3 not the HT3. Mike1 point
-
We normally keep ours around between 55-65, 60 seems to be our sweet spot so far.1 point
-
To be clear, since I weighed in on this, the video states the same things as the Nature's Head user manual I linked - that cleaning the interior of the bin is unnecessary and in fact may inhibit composting a bit since that matter that's left behind will give the composting a good start with the fresh material when refilling. However, the video and manual note that *if you want to periodically clean dried on solids from the inside of the bin* that you should only use water or a combo of water and vinegar - no "sanitizing" type chemicals which might inhibit composting bacteria from doing its thing. So yes, some periodic cleaning may be desired or possibly needed (we have yet to see a need but we're only a bit over a year and a half in). And for sure there's some work either way. It takes maybe 5-10 minutes ish after 3+ weeks of use for two adults to do a swap out of the full bin contents for some new moistened peat or coir. I agree that folks should pick the tech that they think will work best for them. I'm not here to pitch the compost toilet - I am simply sharing what I've learned about the regular maintenance (and I'll also note that as someone who tends to camp w/o water hookups, I really appreciate not having to use water to flush a toilet - for me this is the big selling point for going w/composting, as I think the maintenance is kind of a wash between the two types of toilets/tanks, so long as you keep your black tank blade valve lubed or you avoid getting the wrong things into your compost bin).1 point
-
If you are germ-phobic, don't get it. (although it's actually very hygenic.) If you have delicate sensibilities, don't get it. If the thought of wiping down the bowl if your aim isn't perfect makes you faint, don't get it. If the thought of putting your TP in a bag after wiping freaks you out, don't get it. If you plan on mostly camping in sites with water hookups and dump tanks, don't get it. However, If you consider yourself sort of rough and tumble, get it. If you plan to boondock, get it. If you're comfortable talking about (joking about) BMs, get it.1 point
-
From the Nature's Head online User's Guide:1 point
-
This is not correct btw. Per the instructions for the Nature's Head toilet, you just empty the bin out into either a compost bin where it can go on to fully compost (and then be used on ornamental, NOT food plants) or into a trash bag that goes into the usual trash waste stream, and then you refill the bin with more compost medium (moist peat moss or coconut coir), and the residue left behind from the prior load will serve to help the population of beneficial bacteria build back up. And they are quite strident in their documentation to stress that it is vital NOT to sanitize the bin with bleach or similar cleaners. But for sure, as you note, it takes a while for the material to fully compost, so if you're on the road for a while you'll be disposing of the partially composted material in the trash. The nice thing is that for two people, we've found that we can go *at least* 3 weeks before needing to empty the bin, and if there are gaps of time between weeks of camping, we can go longer as the volume shrinks over time. The benefits of that partial composting include no poo smell even if you are working with an opened bin as long as you let the last "deposit" sit for half a day or so before doing the work, and it really isn't disagreeable to do the emptying at least from a smell perspective. Since it's not fully composted, though, you should assume there is still some fecal bacteria, and just as you should do if you have a full black tank to empty, you should probably be wearing gloves and you should be thoughtful about cleaning your hands and avoiding spillage (which is not hard). If you let it continue composting in the toilet (or a separate compost bin) at home after camping, you can eventually consider it fully composted, i.e. free of that nasty fecal bacteria. I would refer to manufacturer documentation of how long that takes versus social media or web forum claims in that regard. We, btw, put toilet paper in the bin along with the poo deposits, and it's been no problem other than that it can make the crank a little hard, but not impossible, to turn until it's decomposed a bit which it does relatively quickly. Given how rarely we camp with full hookups, the composting toilet has been great for us and I would absolutely choose it again if I were buying another trailer.1 point
-
There is another option that a few of us use (I learned this option from another Oliver owner on our delivery day). We have the standard flush toilet in the camper but since we took delivery of our Ollie brand new, it has absolutely only been used for #1. No solids, no toilet paper ever go into the black tank. #2 is done either at the campground restrooms, or roadside rest stop restrooms while traveling, or if absolutely necessary, using the bathroom in the camper, but then #2 and toilet paper go into disposable camp toilet bags (bag is placed in the toilet while doing your business) and then disposed of into a suitable trash receptacle. Makes life with the black tank very easy. Keeps water usage to a minimum. Takes a very long time to fill up the black tank before it needs emptying. No toilet cleanup/no scrub brush needed. No stuck/clogged drain valves, easy black tank emptying, easy black tank rinse. Trail Essentials Toilet Bags, Certified Biodegradable and Compostable; Use and Bury in Ground –Includes Convenient Water Resistant Carry Case https://a.co/d/ab7IGyb1 point
-
https://olivertraveltrailers.com/forums/topic/1978-nature039s-head-composting-toilet-installation-in-an-oliver-big-thread/ John Davies Spokane WA1 point
-
@Lois We love having a compost toilet. It saves so much water! We don’t find it difficult to clean at all and emptying the urine container is no big deal. I was uncertain when we got the compost toilet but now I’d never go back to a traditional toilet in an RV.1 point
-
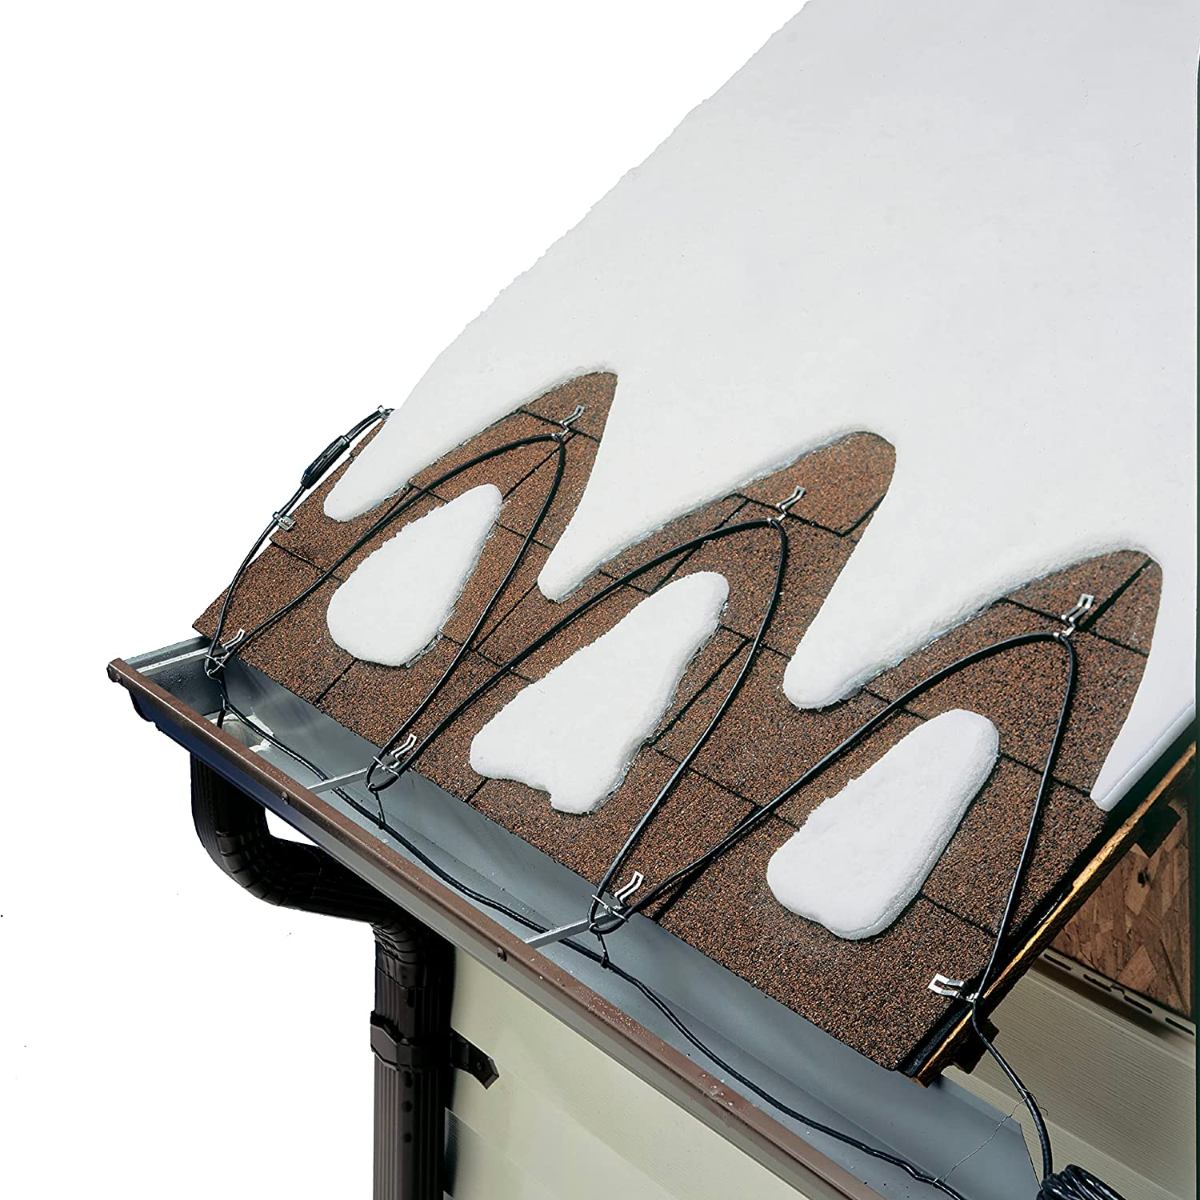
I don't get a lot of snow in eastern Washington and it usually melts away during the day but I wonder if it helps if putting one those heating cable on the roof beneath the cover. Of course you would need access to shore power.
1 point
-
I used to hang around a seasonal campground. I have seen covers, that had flapped around all winter, 'buff' the paint off SOBs (Some Other Brands). If they used a tarp, even worse. Let alone a good snow fall could end up freezing the cover to the ground. Cover frozen to the ground means no entrance to the unit to check nside, unless you destroy the cover. Also you still want to remove too much of a load off the AC and solar panels. Hard to remove the load without damaging a cover? I have had an inch of ice and maybe 9 to 12" of snow on top of that and according to the solar controller inside it was still charging. Haven't plugged it in since bringing it home in 2017, where it rest between trips. Wish I was as ambitious as these others when it comes to waxing. A quick Maquires Wash and Wax twice a year is all I have done. However this Fall I fully intend to wax and buff...1 point
-
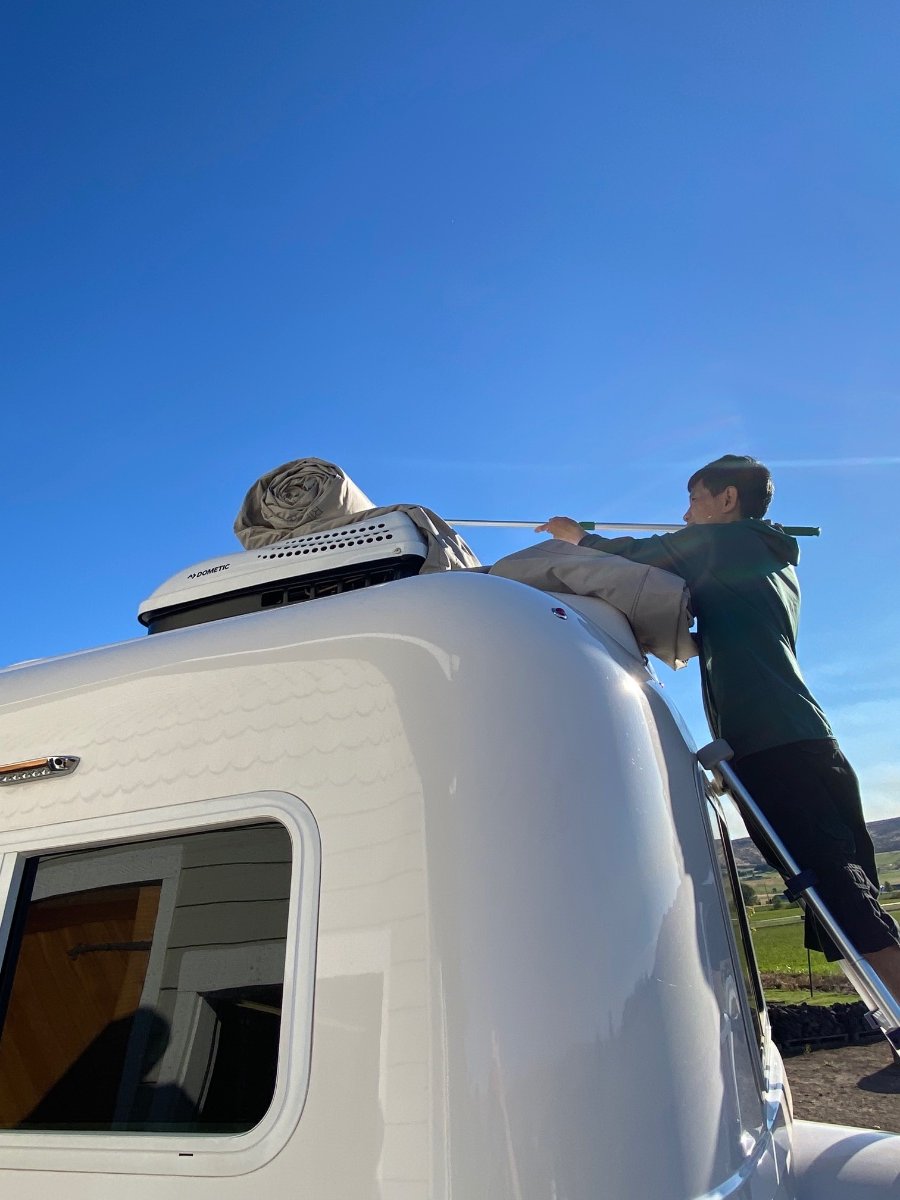
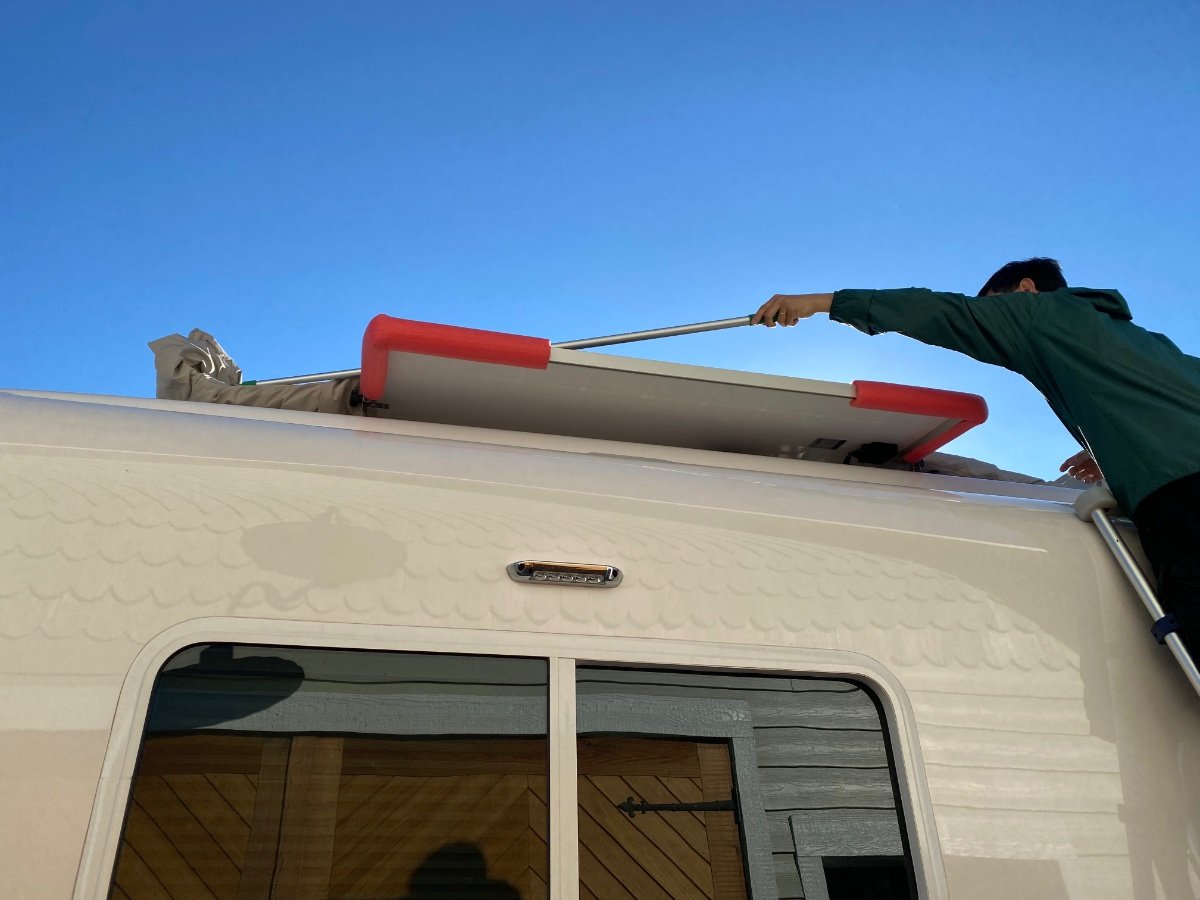
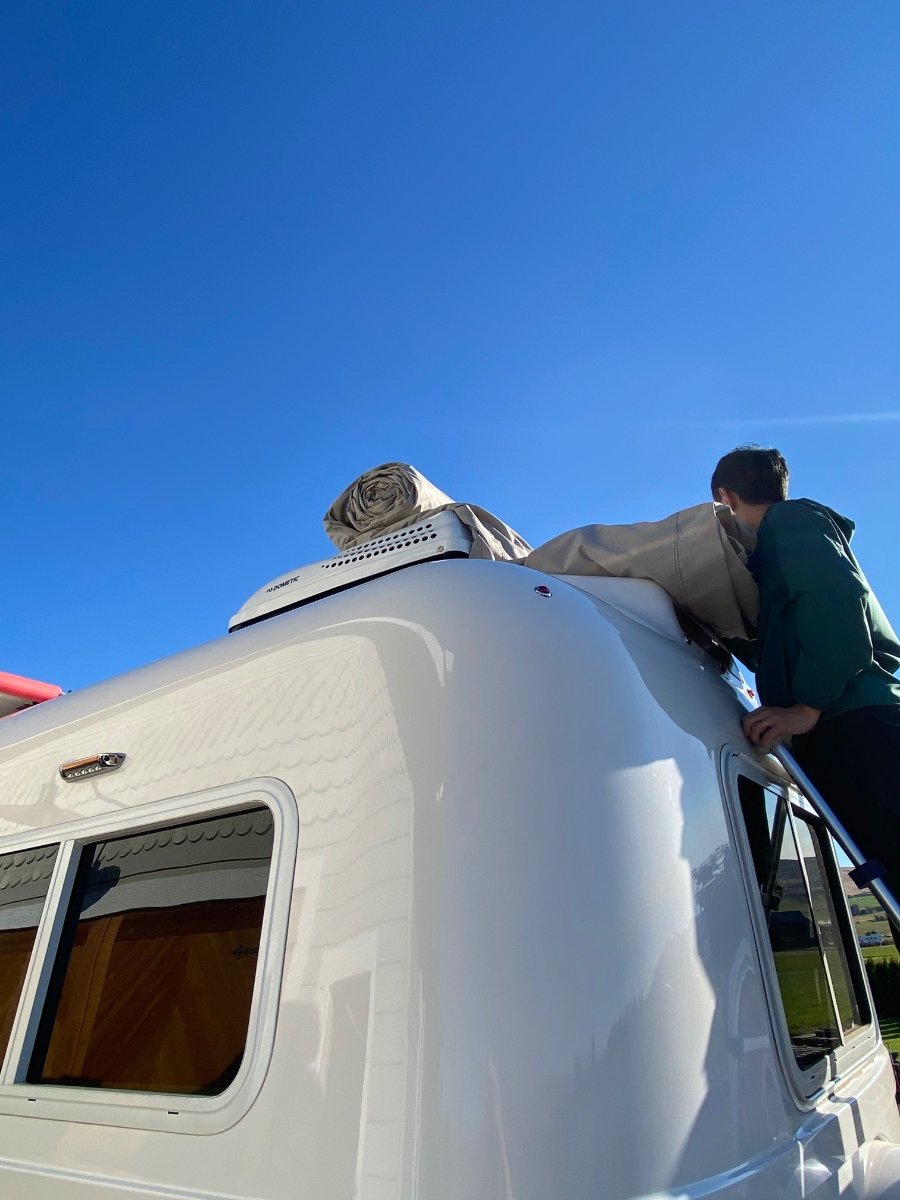
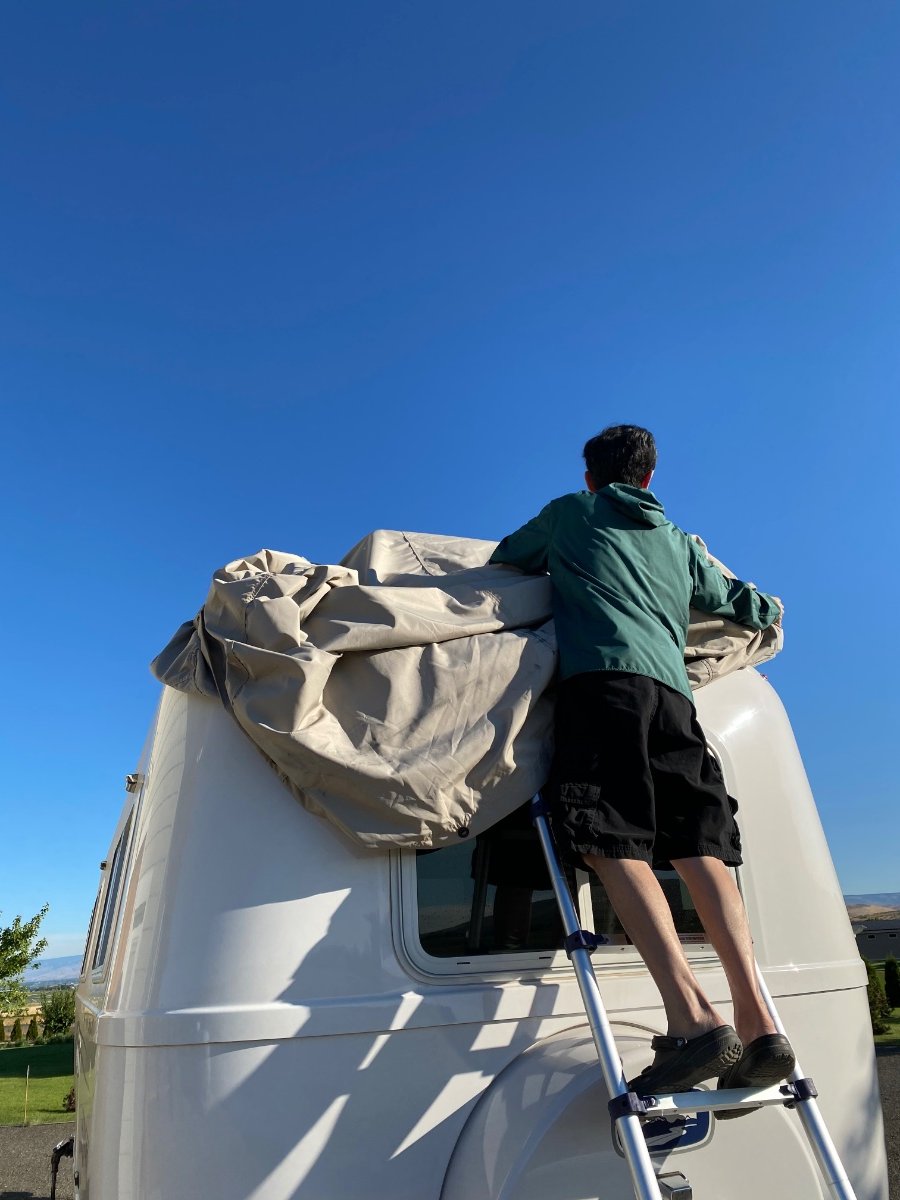
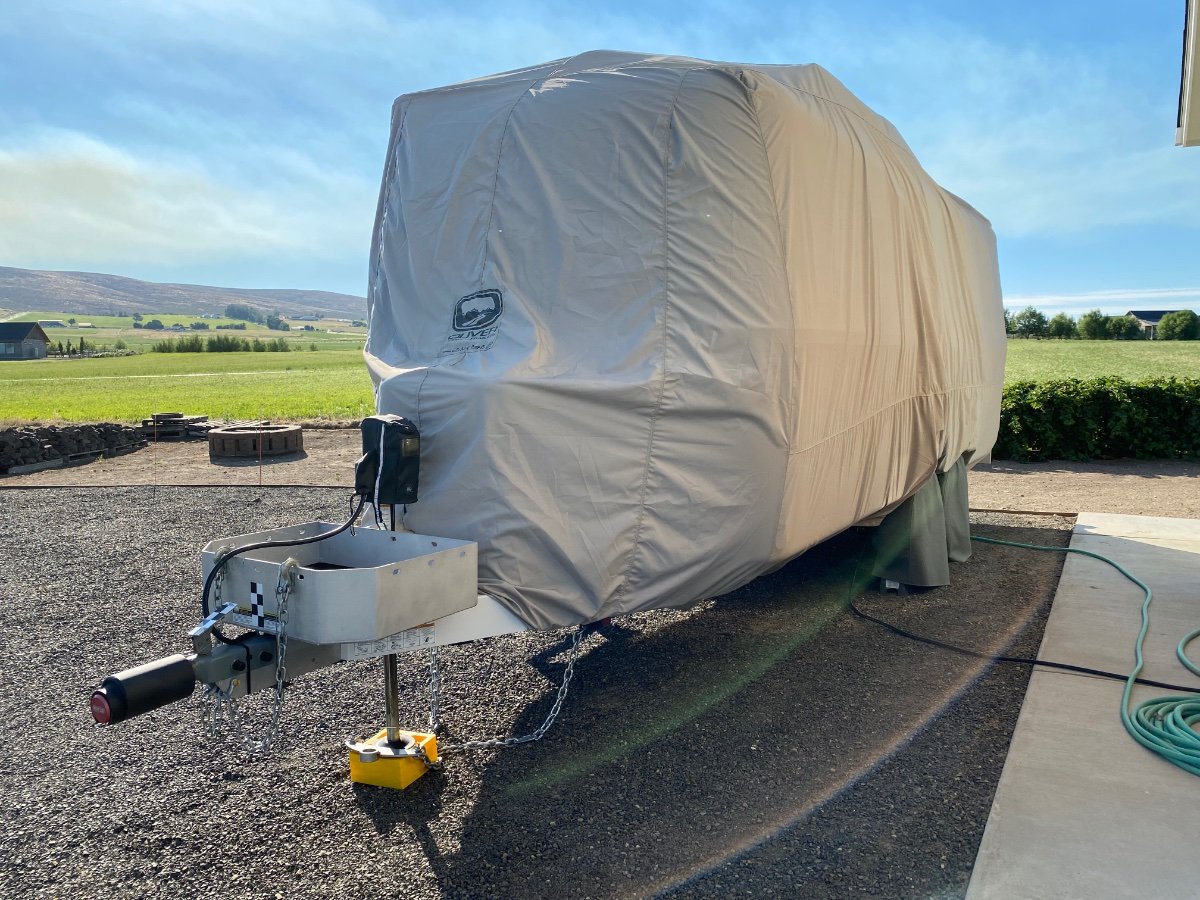
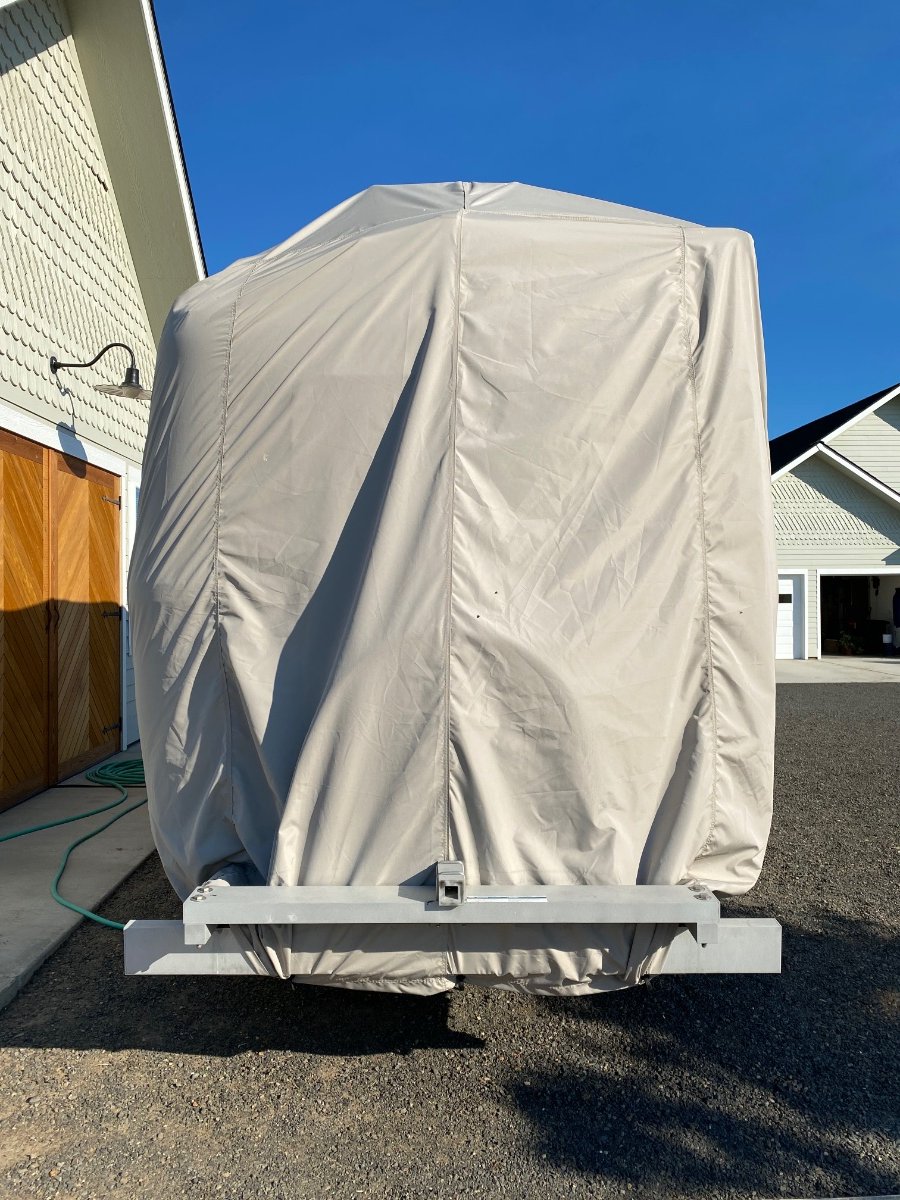
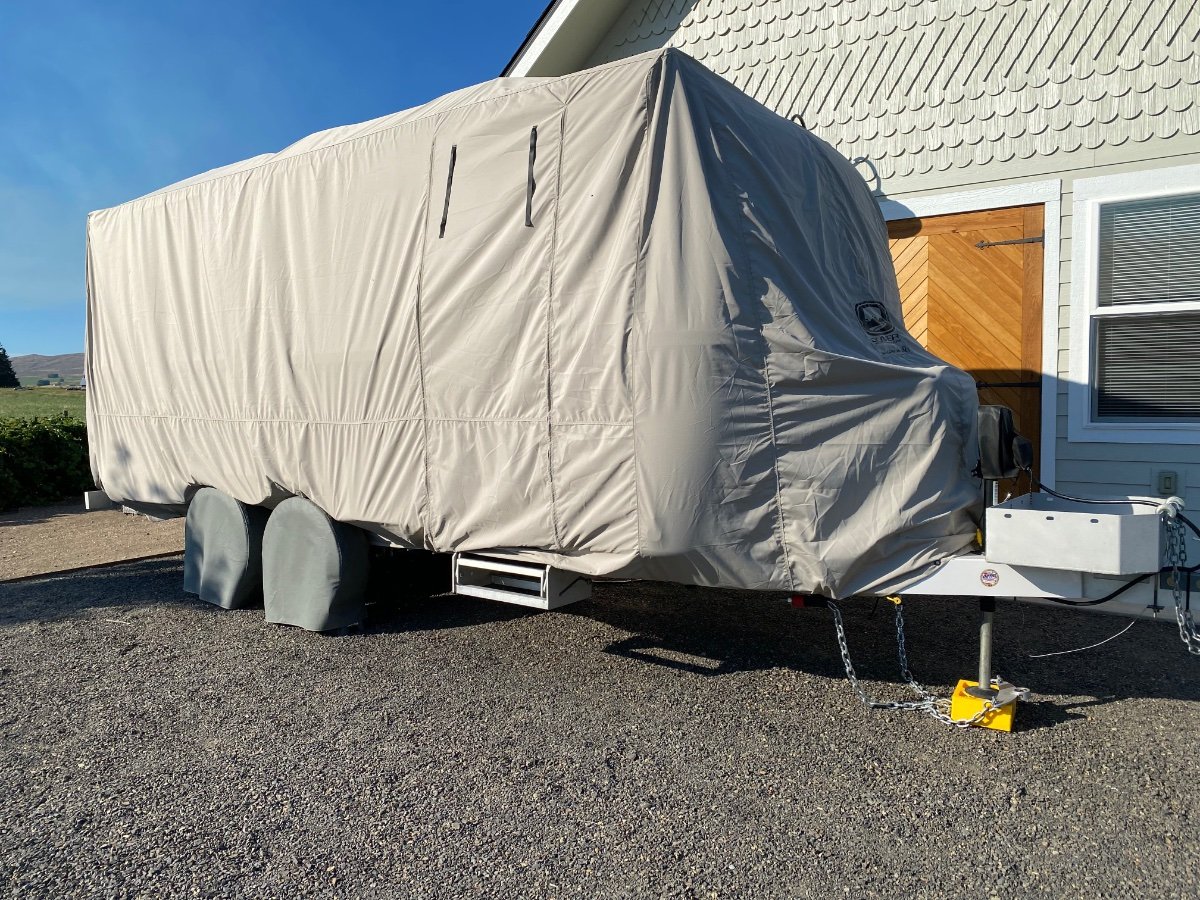
I'm using Calmark cover. It's very easy for me to put the cover on by myself. I usually start from the back to front. The key is to fold the cover into a very small roll so I can unroll easily from the back and spread to the sides. Here, starting from the back using a ladder, climb one hand and the roll of cover on the shoulder. Put the cover behind the AC, unroll it over to the front of the AC using a pole. I also use pool noodle to cover sharp edges of the solar panels. Once the cover is unrolled entirely, spread it on both sides starting from the back. Now the final product after using bungee cords to tie it snug. I don't used the ropes from Calmark. They only provide 4 ropes. I use 12-15 bungee cords and find that much easier to work with. I also don't cover the rear bumper. I can do this alone within 30 minutes if I really want to but I usually take my time and take special care around a ladder and end up being 45-60 minutes. Taking the cover down is much easier and much quicker. You just climb a ladder on one side and lift the cover to the roof then carefully pull on the opposite side. The key here is the roll the cover into a really small roll. I'd recommend taking pictures how it was rolled when you get the cover from Oliver. Hope this helps.
1 point
-
Thank you so much for the info. I have such trepidation about covering it being Airstream was so adamant about not covering my fiberglass Nest. We never had any issues leaving it uncovered and did exactly the same as you, waxed it Spring, Summer and before Winter with a good marine wax. We’ve never had solar though so the panels are another concern I have but I’m happy to hear you had no issues with yours uncovered and have similar Winter snowfall amounts as I do here in Mi. Thank you again, I really appreciate the info.1 point
-
I'm torn on that. I suspect a cover "might " make it harder to clear snow, in a dump snowfall like my younger days in Minnesota. A hard sided cover, like @Patriot's, rated for snow load, would obviously be ideal. But wind driven snow could still be an issue.1 point
-
John Davis: FYI, Looking at the 2023 Build (rate) sheet under "Water Heater & AC Packages" it states the following options: Ssuburban Water Heater & Dometic AC - $0.00 increase or Suburban Water Heater & Dometic AC with Micro-Air Easy Start - $450.00 or Truma AquaGo On-Demand Water Heater & Truma Aventa AC - $3500.00 or Truma AquaGo On-Demand Water Heater & Truma Aventa AC & Electric Antifreeeze Kit - $3800.00 No Furnace combo model is listed. In the catalogue, it only lists LP Ducted Furnace, no brand is given. Maybe the web site gives more information1 point
-
Are you positive that it is the water heater/ furnace combo model? Have you spoken to Oliver Sales about that? I sure hope so, I would be interested in a factory installed retrofit, because the old furnace is a true PITA to service, especially if there is a board failure. I am sure propane consumption will be stellar with the combo unit. And hopefully stellar maintenance access too, depending on where they choose to position it. And way way quieter. Any details will be very welcome! I agree with your decision to wait! Your drive home may be challenging, don’t rush if the weather turns bad. John Davies Spokane WA1 point
-
Hi Bill, I already cut the corner aka radius, it was easy with the electric knife. The mattress is 10” thick and the blue cooling foam is on the top side of the mattress that you lay on. It took about 2 hrs to complete the cutting. We already installed the new memory foam mattresses in the Ollie, it’s like sleeping on a cloud ☁️. Very pleased with the outcome. (Note the Southern Mattresses were 8.5” in thickness.) -David1 point
-
I've successfully replaced a broken Bathroom Door Mirror. It was pretty darn easy, however I'm going to provide step-by-step instructions below for anyone who has any concerns about how to do it one's self. Note: Be very careful handling glass! It's possible to get severe lacerations, if you're not reasonably careful. You may want to wear some light work gloves with silicone grippers on the fingers. Mirror has Safety Backing which is intended to keep broken mirror from having exposed sharp edges, but it's not perfect. 1) Order a new Safety Mirror w/Safety Backing in these dimensions 18.5" X 61" X 1/8" from your local glass store. I don't recommend picking it up until you have the broken one removed and can bring the Plastic Backing Board to provide added support for the new mirror when transporting it home. 2) Remove door from Ollie by unscrewing the 4 screws on the hinge side of the door inside the bathroom. When the last screw comes loose, be ready to carefully lift the entire door and hinge assembly from the fiberglass door opening. 3) Place the door on a open, flat surface. Begin by removing the 2 screws that hold the door handles to the frame, and set those aside. Next, remove the plastic door latch by removing it's screw, and set aside. Next, there are 4 screws, one per corner, that hold the aluminum frame together. It probably doesn't matter where you begin, but I started by removing the two screws on the long side opposite the hinge. Set screws aside, and begin to gently work the aluminum frame from the mirror, the 1/8" plastic backing, and the silicone seal that holds the mirror in the frame. Once off, set aside. Move to either the top or bottom frame piece, Loosen until free, the screws that stay connected to the hinged frame piece. Carefully remove top and bottom frame pieces. Finally, remove hinged side from mirror. Note: Be sure to notice how the one piece silicone seal is placed on the mirror edges. Notice how it fits on the corners. You'll want to duplicate that exactly with the new mirror, if you want it to go back together easily. 3) Remove Silicone Seal and set aside. Carefully remove Plastic Backing Board from 1/8" mirror. It was glued to the mirror, so it may take some gentle prying. Mine came off easily because the glue was no longer holding them together. 4) Take Plastic Backing Board to glass shop to glue or tape to new mirror before transporting. Make sure your vehicle has a flat space long enough to support entire mirror. It would be a bummer if you hit a bump and it broke before you got home. New mirror cost me $130 5) Begin reassembly by removing tape if it was used to keep backing board on mirror. Place Silicone Seal on new mirror exactly the way it was on the broken mirror. I recommend starting with the hinged side first. Very gently work the mirror, backing board and silicone seal into the hinged frame piece such that the top and bottom frame pieces will fit perfectly to the 45 degree angle cuts. This allows for perfect screw and threaded holes to align perfectly. 6) Gently press top/bottom frame pieces onto mirror/backing board/silicone seal such that they match perfectly with hinged piece. Screw the top and bottom screws from the hinged side into the top and bottom pieces. 7) Now install the other long frame piece until it matches perfectly with the top/bottom pieces. Once together, install the two screws you set aside. 8) Now you can reinstall it into the trailer. Simply lift into place such that frame holes align holes in fiberglass opening. Replace screws till tight. 9) Lastly, reinstall Aluminum handles and Plastic Latch. Voile! You have a new mirror which you will never allow to break again because you learned your lesson the first time, as I did LOL.1 point


.thumb.JPG.dd838cdb3df463dab6a16861fa23a319.JPG)


-
Recent Achievements
-


")


")


")


