Leaderboard


Popular Content
Showing content with the highest reputation on 03/29/2023 in all areas
-
Just discovered a couple that are new Oliver owners that just switched from Airstream. And they have a Youtube channel they will documenting/sharing their Olliey adventures through. Of course this just adds to our anticipation after watching. Don't know if they are on the forum but felt it would be nice to share their story here.8 points
-
Not an aircraft tech, but a machinist and all around DIYer by necessity that has a proclivity for detail. This is the upgrade panel for our retirement remodel we're preparing to move into. My wife giggled when she saw this. The county inspector just grinned real big and asked, "Your work?". My electrician buddy from work just said, "Nice!". The panel it replaced was full of mud dobber nests and looked like a bird nest. I feel better now. 😉
 7 points
 -
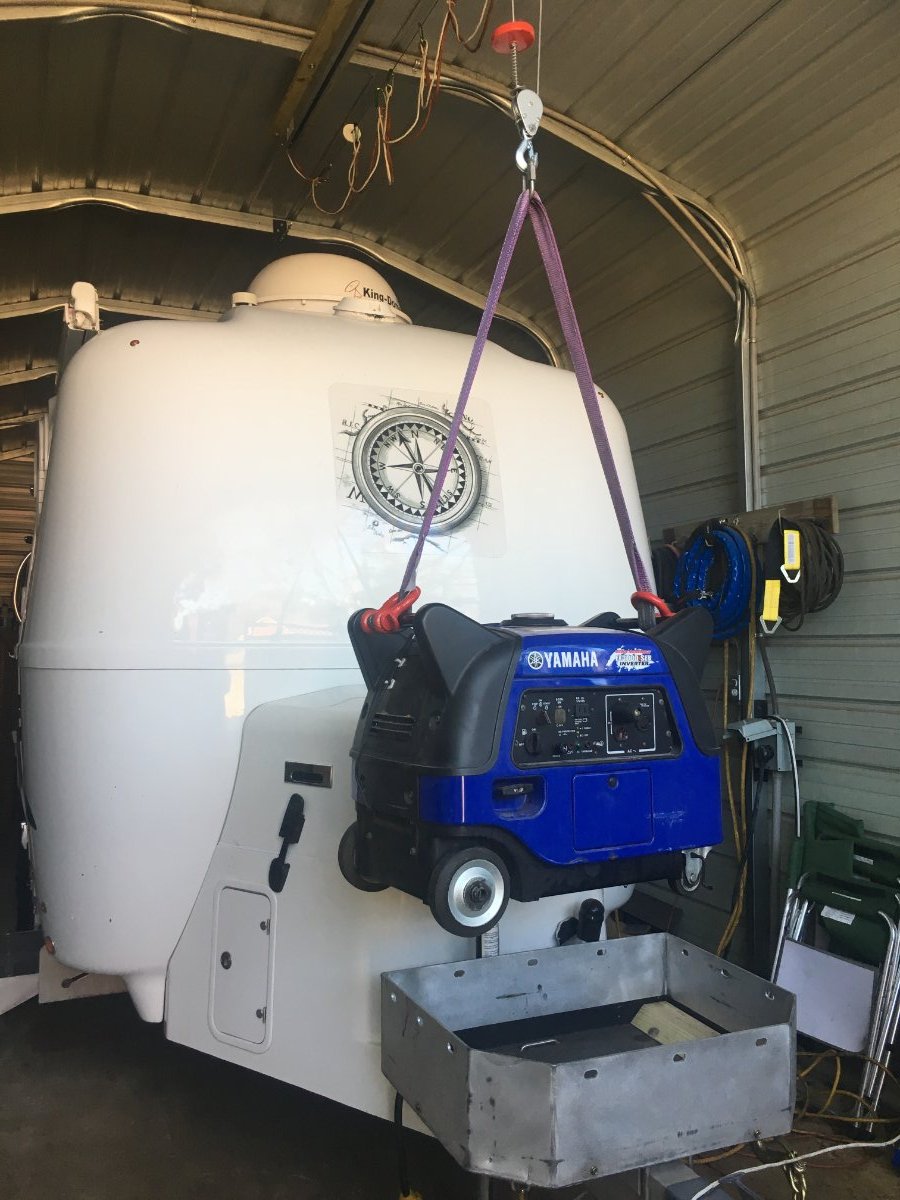
We have carried our Yamaha EF3000iSEB 3000 Watt Generator in the front basket for the past 15 years. It weighs well over 150 pounds when fueled. I can easily lift it by myself and place it into the basket! 😊
5 points
-
You will be fine! I'm excited for you. Bill4 points
-
Under three weeks now. Counting down and doing everything I can to be prepared.4 points
-
We watched this a few nights ago and could relate to their transition although our Airstream sold last July and we had to wait until March to pick up our Oliver. They went from an Airstream Classic (huge amount of room and storage) but a very long trailer. We noticed they had the Hensley hitch - people swear by that hitch for anti-sway but it is so heavy and so expensive. We went with the Blue Ox setup and, honestly, I don’t think we even needed that. It worked good for weight distribution but I never had any sway issues with the F-250. I like the simple setup I have now. Drop it on the ball and go! Thanks for the share — shouldn’t you be heading to TN soon?? 😉 BL4 points
-
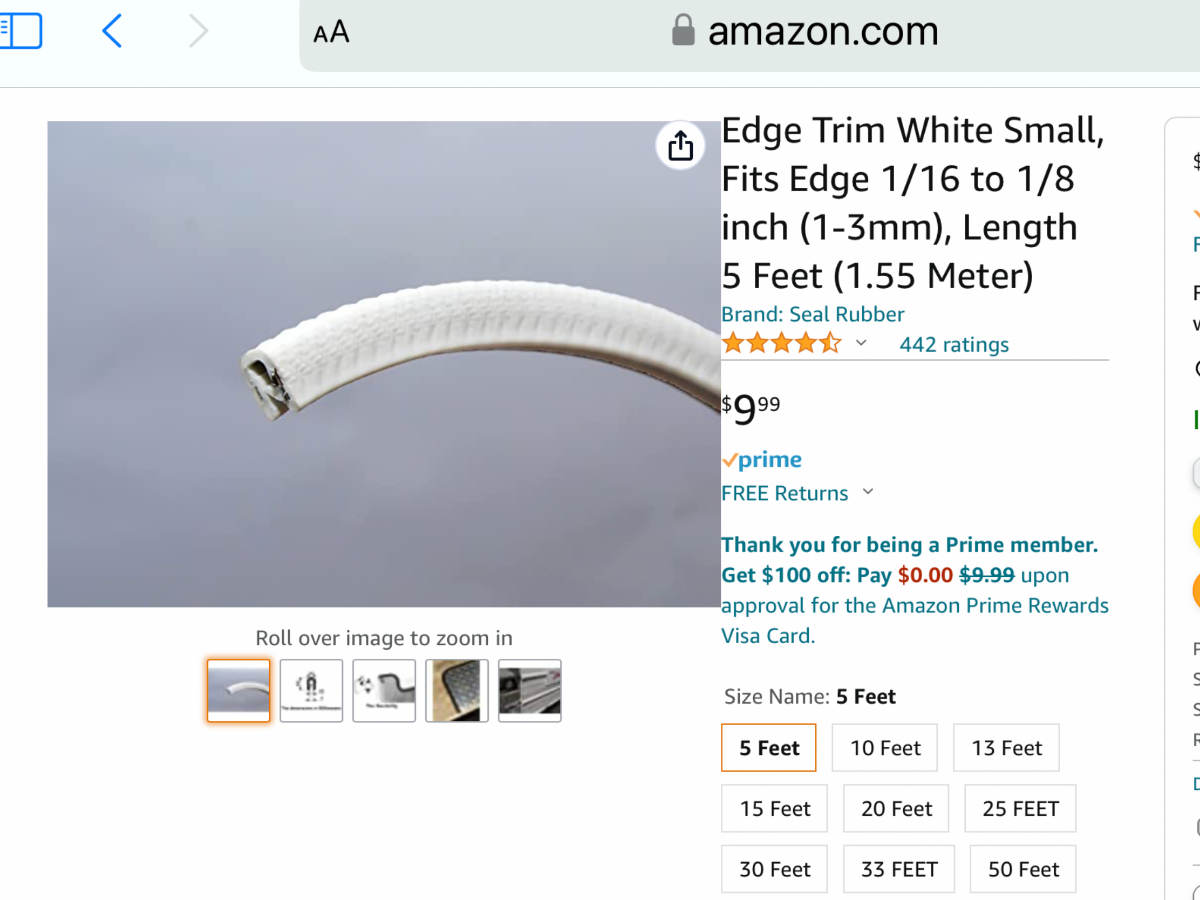
I’ve been looking for something similar to this to put around the upper interior cabinets, I’ve gouged my fingers so many times on the fiberglass edge taking things in and out of the cabinets. I think this would be too thick for the doors to close??….. but I’m going to definitely grab some for around the bed rails, dog house and spare tire cover.4 points
-
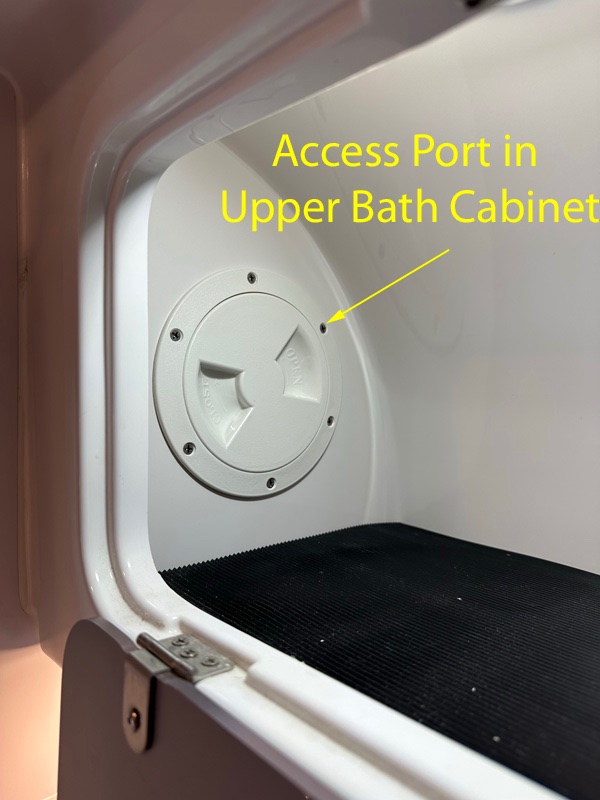
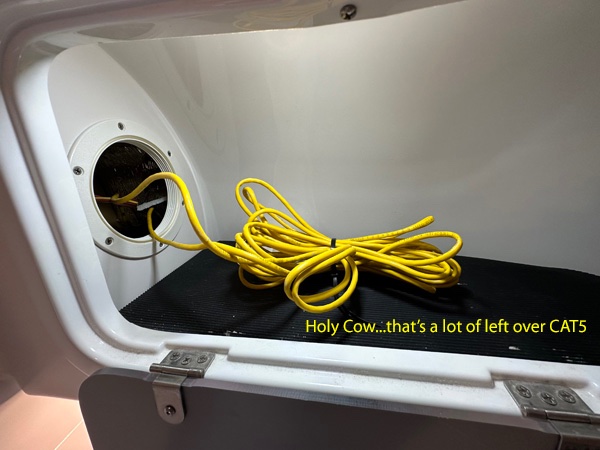
If this helps: In 2019 - Hull 505 - The Cell Booster and WIFI power switches are mounted to the right of the upper storage bin above the front dinette seat. There's an access port in the left side of the upper bathroom storage cabinet (above toilet with the mirrored front.) Inside that access port is where the cables run down from the WIFI Booster on the Drivers Side FRONT of the trailer. The WIFI Router is mounted on the wall inside the upper cabinet on the right end (against that cabinet wall). The actual external WIFI Booster/Antenna's are mounted outside on the top of trailer just above bathroom cabinet. The Cell booster is at the far end in the upper cabinet mounted against the pantry wall. There's an access port inside the pantry wall. The outside cell antenna is a magnetic mount on a plate on the roof. The cable runs through that plate with lot's of sealant around it. The cable snakes it's way between the two hulls and eventually ends up in the pantry access area. What I've learned is new "wifi boosters" use a different kind of cable than the ones put in older vintage trailers. (Sigh) So even if the cable is inside the trailer it might not be the correct cable for todays boosters. Hope this helps a bit. Craig
4 points
-
I don't know the exact type of tape that they use, but on fiberglass boats I've seen a cloth tape applied to the raw edges of fiberglass openings. It would need to have a substantial adhesive backing. I'm thinking possibly a fiberglass cloth tape. To find the right thing may be a trial and error process. Quick search found this. It's not cloth but is designed to hold up to moisture exposure and permanent use. https://www.amazon.com/Adhesive-Decorative-Sealant-Bathroom-Protection/dp/B0BC4NL2XJ/ref=sr_1_70_sspa?crid=3QUZHKFMEOTNV&keywords=edge%2Btape&qid=1680097392&s=industrial&sprefix=edge%2Btape%2Cindustrial%2C96&sr=1-70-spons&spLa=ZW5jcnlwdGVkUXVhbGlmaWVyPUExQUEwQzNZWDdBVkFQJmVuY3J5cHRlZElkPUEwNTU4NTIyM04xMjFYVFI4Qkw5TiZlbmNyeXB0ZWRBZElkPUEwODgyMTg5MlkzV0lZS0UzNEpXOCZ3aWRnZXROYW1lPXNwX2J0ZiZhY3Rpb249Y2xpY2tSZWRpcmVjdCZkb05vdExvZ0NsaWNrPXRydWU&th=13 points
-
Probably more pilots than A/C Techs in the forum - so, as we break 'em - you fix 'em, eh? Ha!3 points
-
7:16 am, Wednesday March 29, 2023 Dear diary - So many butterflies!!3 points
-
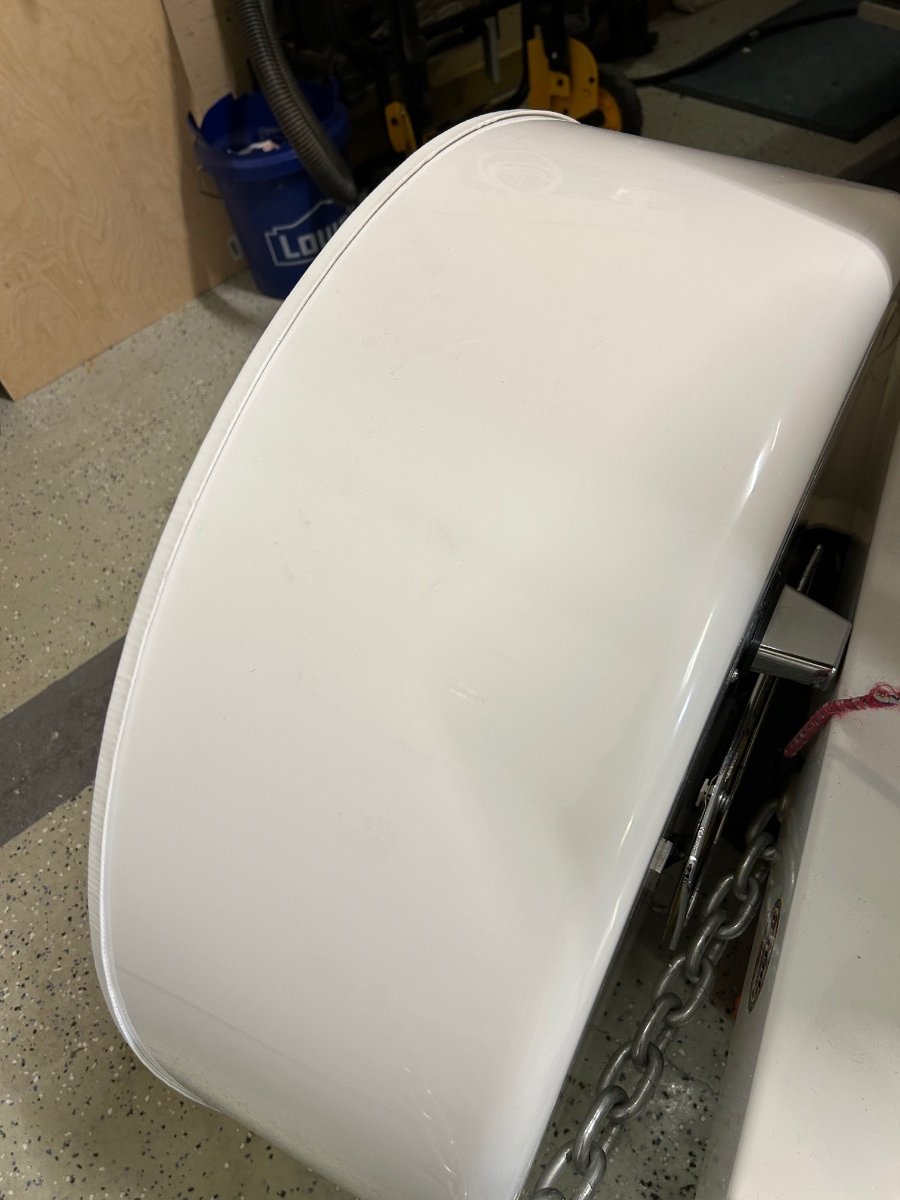
I ordered an initial 20 feet for the spare tire cover and only needed 13 feet for the job. The "dog house" LPG cover edging was in good repair, so I actually had enough for that if it was necessary. The bed edges (which is a brilliant idea on Patriot's part, IMHO) will take 12 feet to cover - I've ordered 10 more feet from Amazon. Hope that helps...
3 points
-
I really like this mod! Thank you for sharing.3 points
-
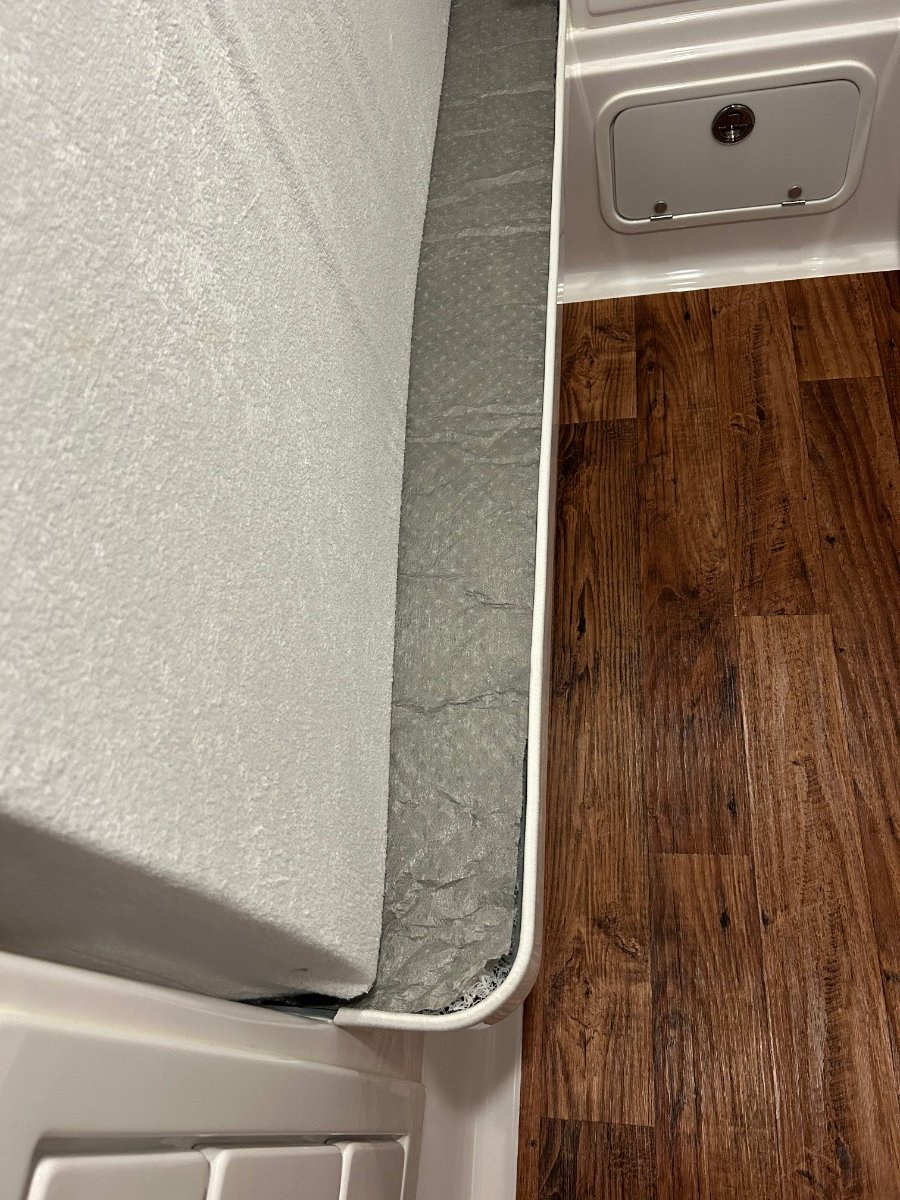
The product Oliver sells as an option is called Hypervent. We've had it for 3 years and it's keep our mattresses dry from any condensation. It's sold directly from HyperVent but you might be able to get it through Oliver Service. Not cheap - you'll need 14' to do 2 twin beds... ($189.00) https://www.hyperventonline.com Hypervent is only sold by phone. Call 206-783-1696 to Order. Genuine Hypervent is $13.50 per linear foot.
3 points
-
After replacing the protective strip around the “dog house” LPG tank cover, I realized I ordered enough for the spare tire cover. So after removing the cover when accessing the tire, I can place it flat on any surface without dinging the edge on sharp rocks or debris. It may seal the compartment a bit better now also.
2 points
-
We had a Hensley on our first trailer. Fantastic hitch. Solid as a rock in any towing situation, including emergency maneuvers. Hitching up took some practice, though. Got rid of it when we bought a fifth wheel.2 points
-
For those of us who do not have street side awnings, this is a possible alternative. I’ve put my commitment in on Kickstarter yesterday, for a MoonShade XL, pre-order sale price of $445. As of yesterday, it was 50% funded in one day, so this indicates to me this is a popular item that is going to go into production soon. It’s 12’ x 9’ so should fit nicely along the street side, provide shade over the two large side windows next to the dinette and the rear bunk. It attaches with suction cups, 3m VHB, or you can screw or bolt anchors into your trailer. Personally I’m going to try the first 2 options. It’s a test of course, I won’t know how well it works until I try it. The price might seem high but I’ve seen and assembled the smaller version (MoonShade Original) and it is a quality piece of gear. I had to try something as my wife is still unhappy that I talked her out of the street side awning option on our trailer order. If you think you want one, I suggest you jump in now if you want the significant discount. If you’d rather wait and see, I’ll post a follow-up review with pics in the future and let you know how it worked out. MoonShade XL2 points
-
One of the "nice" things about retirement is having the time to do things the way that they actually should be done. I've found that taking "short-cuts" actually tends to cost more in the long run. Bill2 points
-
Gotta love a mini hoist along with the TV where tongue weight is not a concern with the gen basket loaded. Nice work!2 points
-
Good idea, Katjo! I'm on travel now, when I get home this weekend, I'll check the cabinets to see if it might work there and let you know...2 points
-
Depends who's flying it...2 points
-
7 years ago I attached a plastic paper towel holder above the sink with command tape. I think it’s a Camco, got it on Amazon for less than $10. It’s still there today after a lot of miles and years. Mike2 points
-
YES! - Townesw You might want to send him a private message to see if he will share his design/measurements with you. Good luck! Bill2 points
-
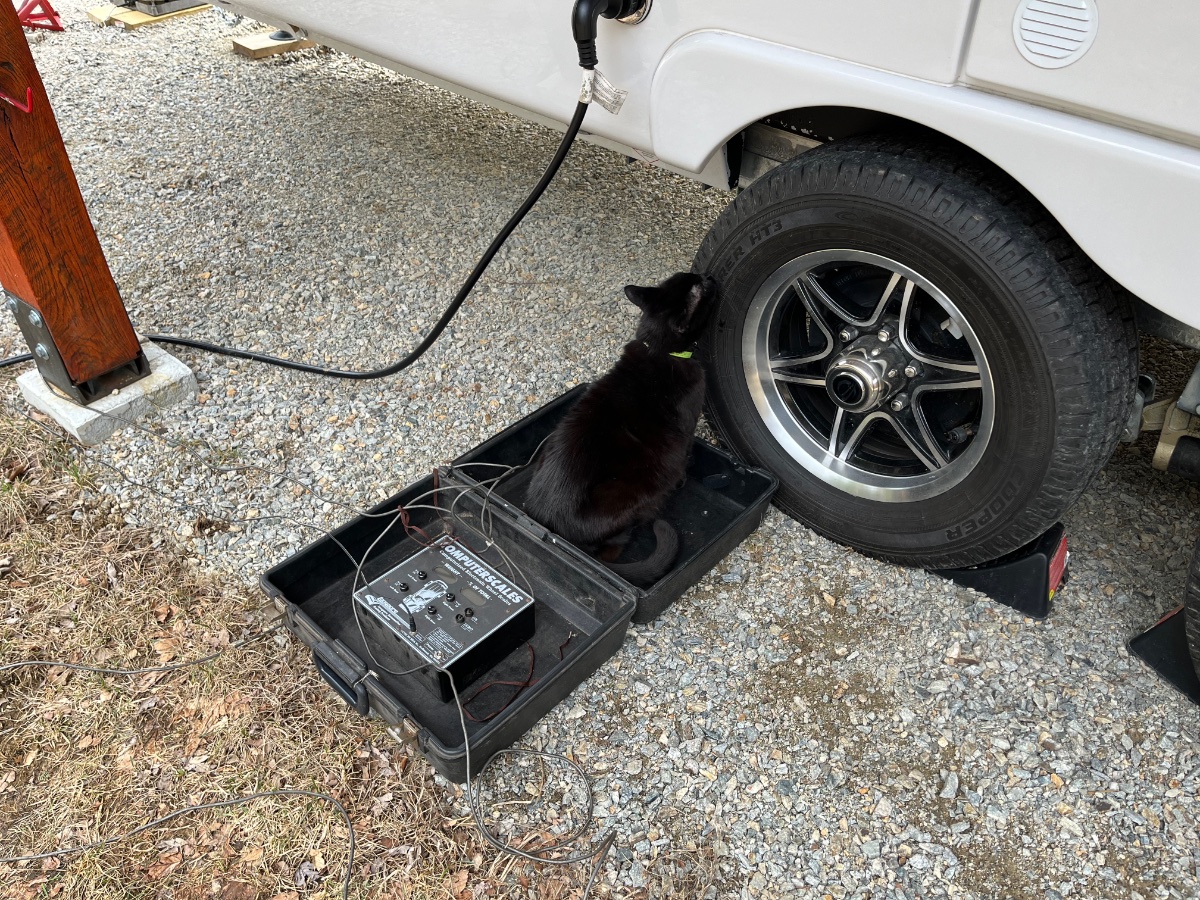
I thought some people might find this interesting for what is worth. With gray and black water empty I filled my fresh water tank to capacity and it added 43 pounds to the tongue. It went from 509 lbs to 552 ponds. I then put my bike receiver and mountain bikes on the rear bumper a total weight of 88 pounds and the tongue weight went down to 508 lbs a 44 pound difference. I was surprised the bikes made that much difference. It goes to show where you put the weight can make a big difference in the CG.2 points
-
Yeah, this plastic edging treatment is very useful. Now that I've read Patriot's post, I wish I got more - I will anyway this stuff is cheap from Amazon. Totally a friction fit, FYI. Ollie On!2 points
-
Here are a few pics of the mod mentioned above - Dog house Edge of bed rails.
2 points
-
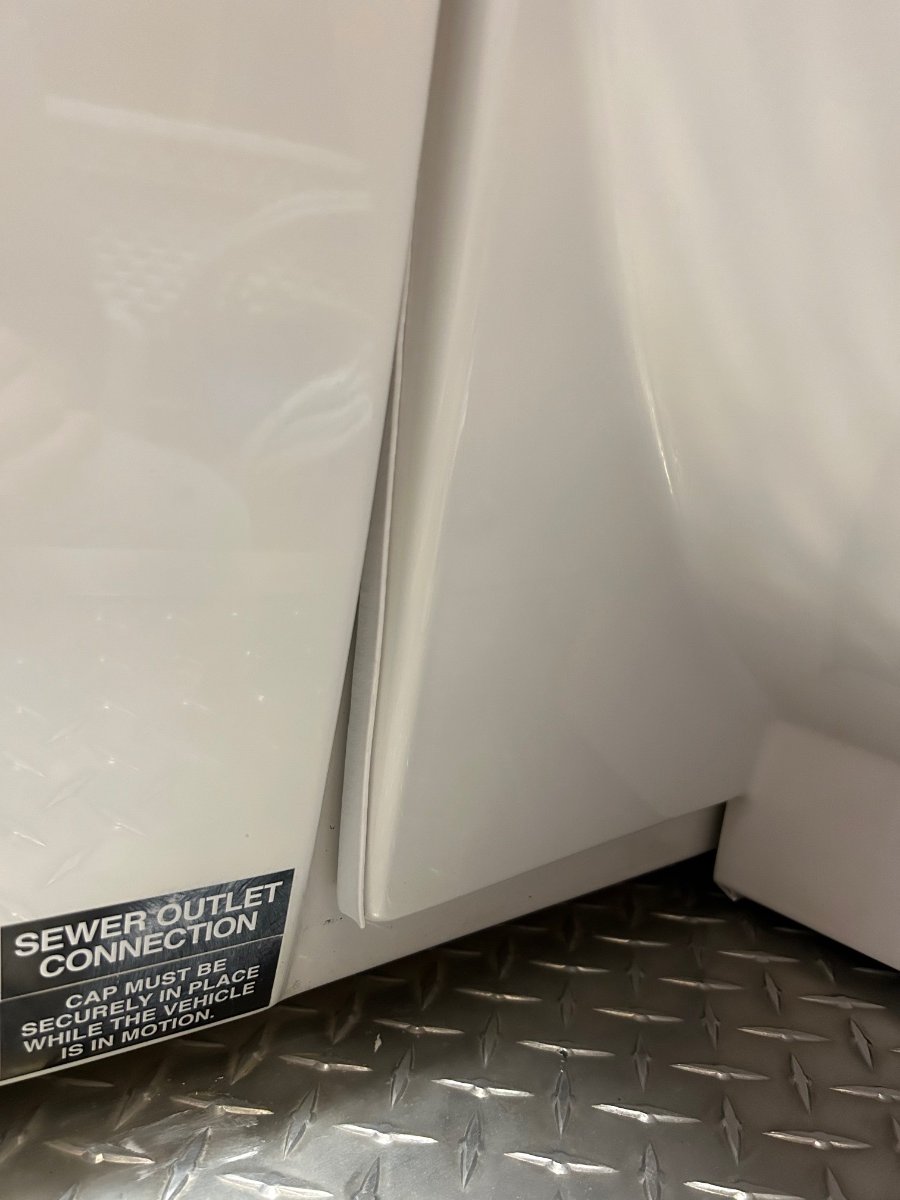
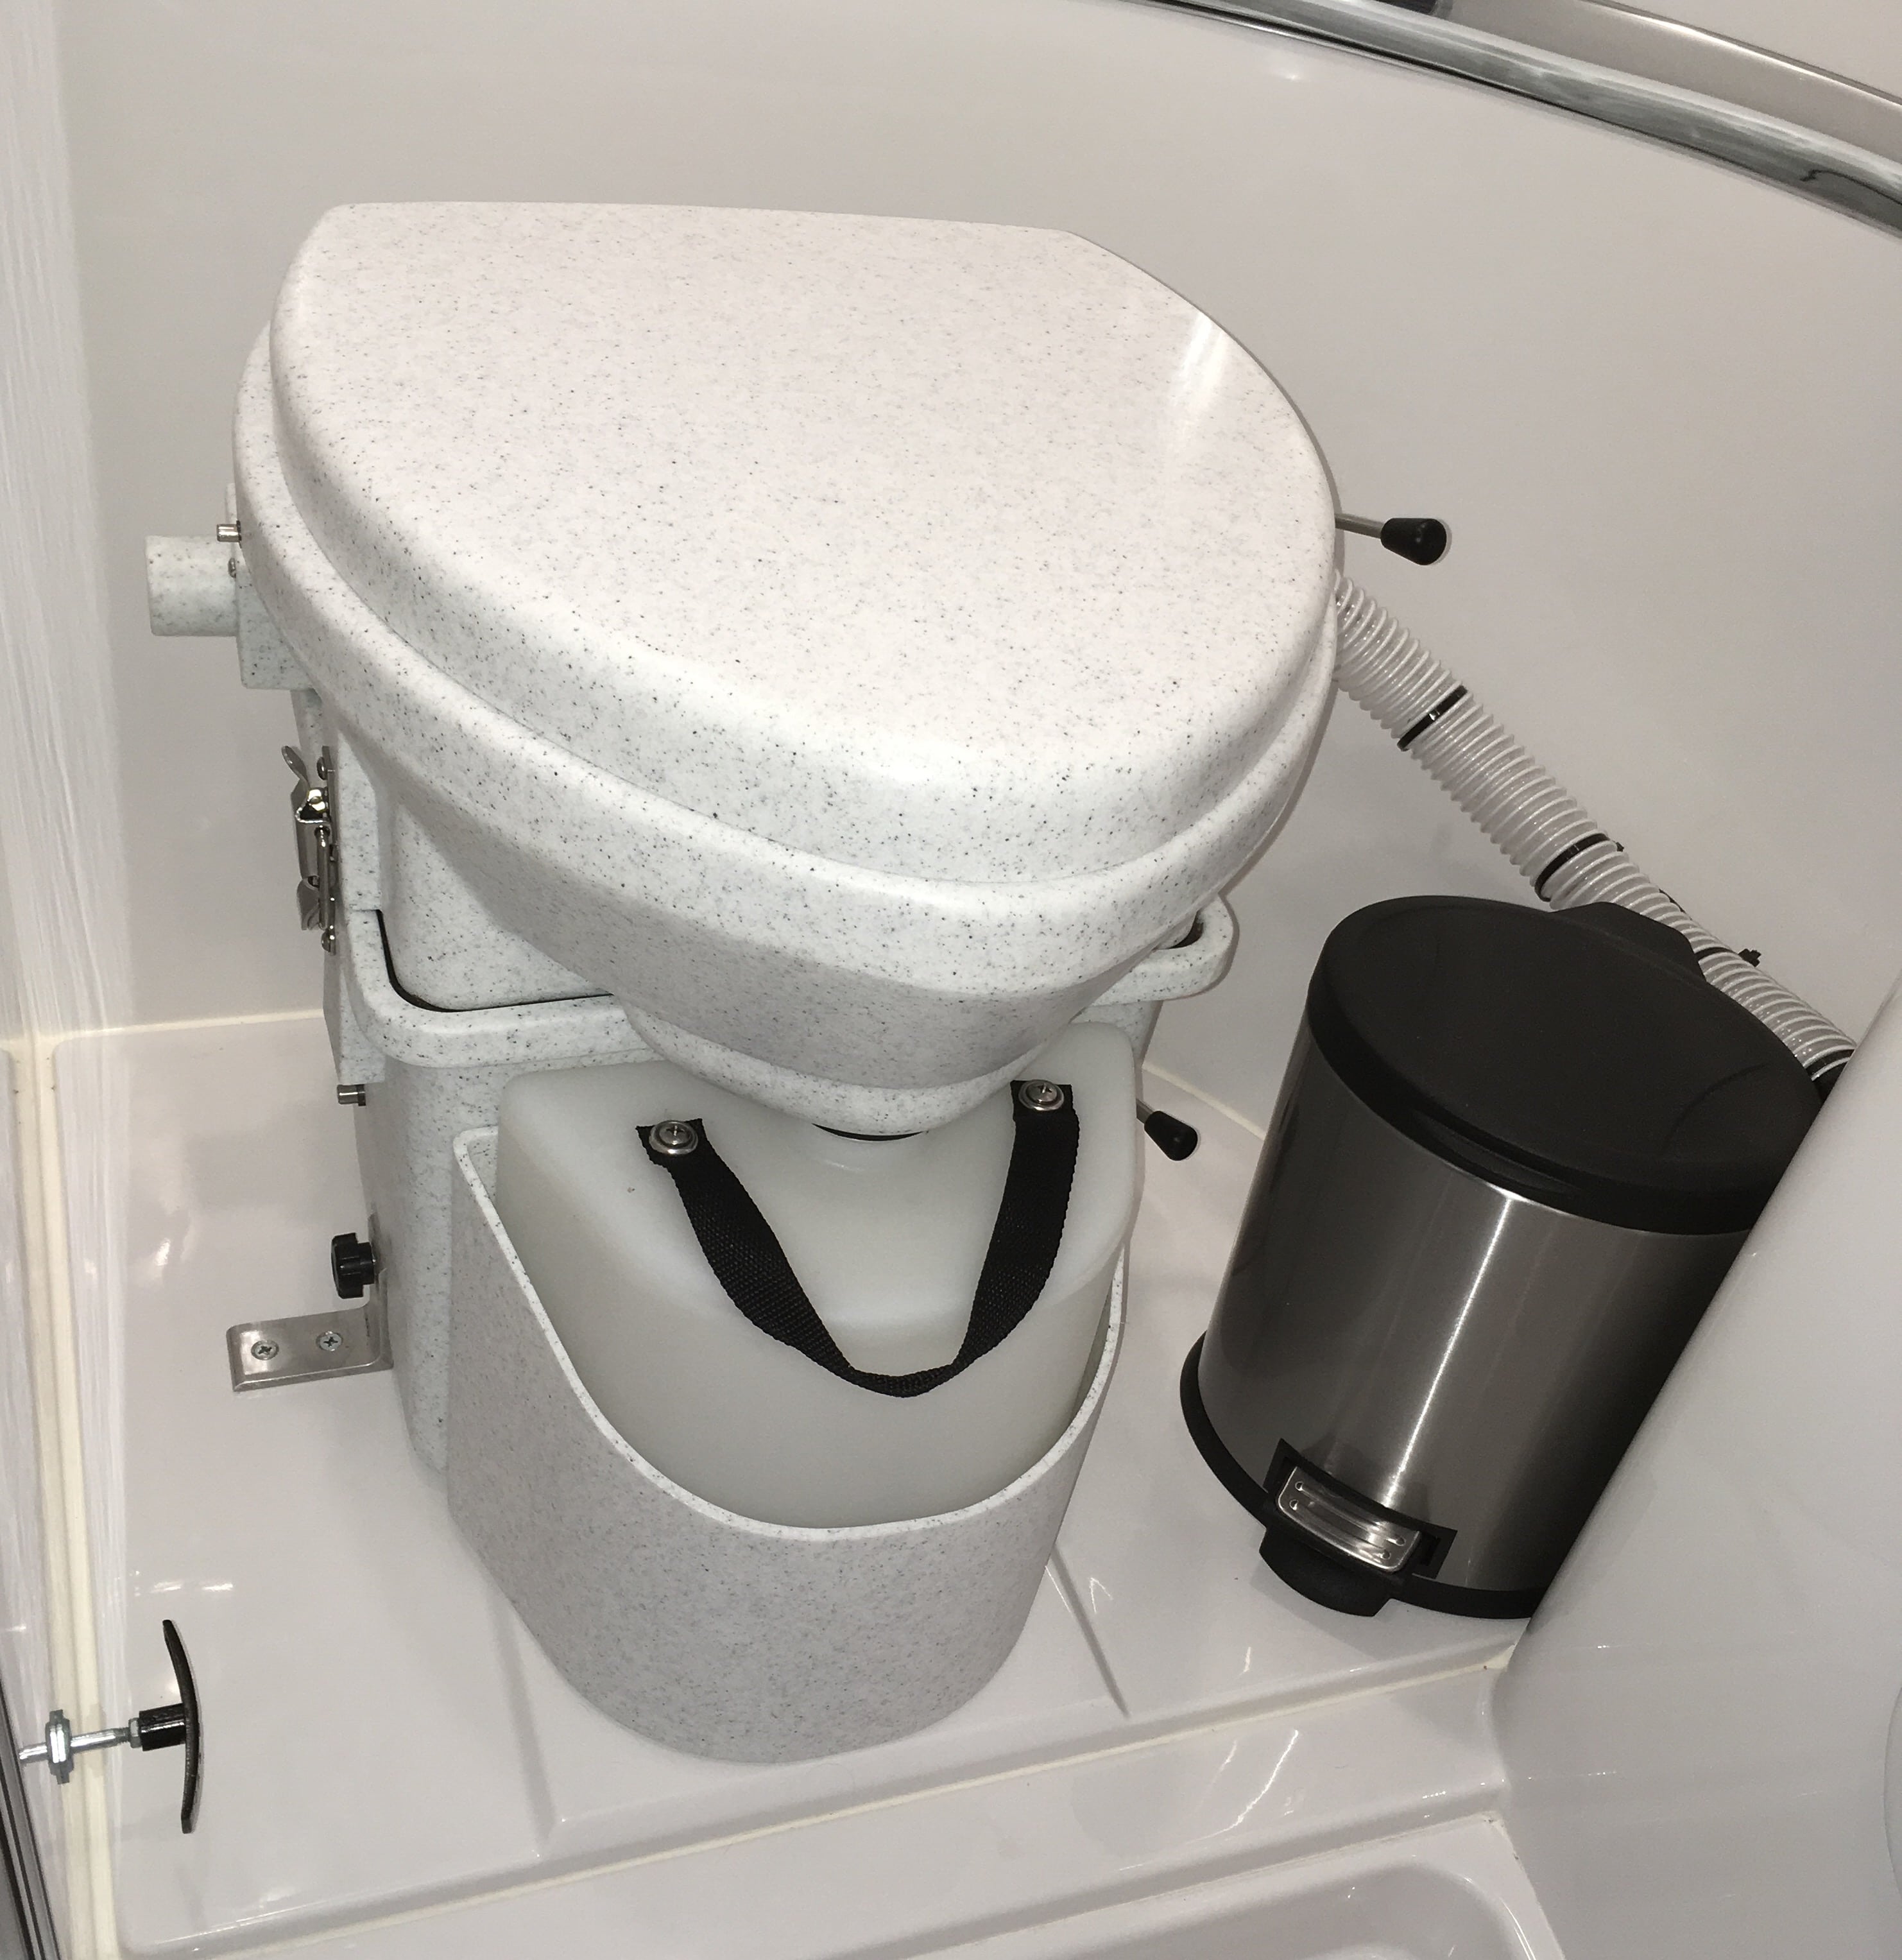
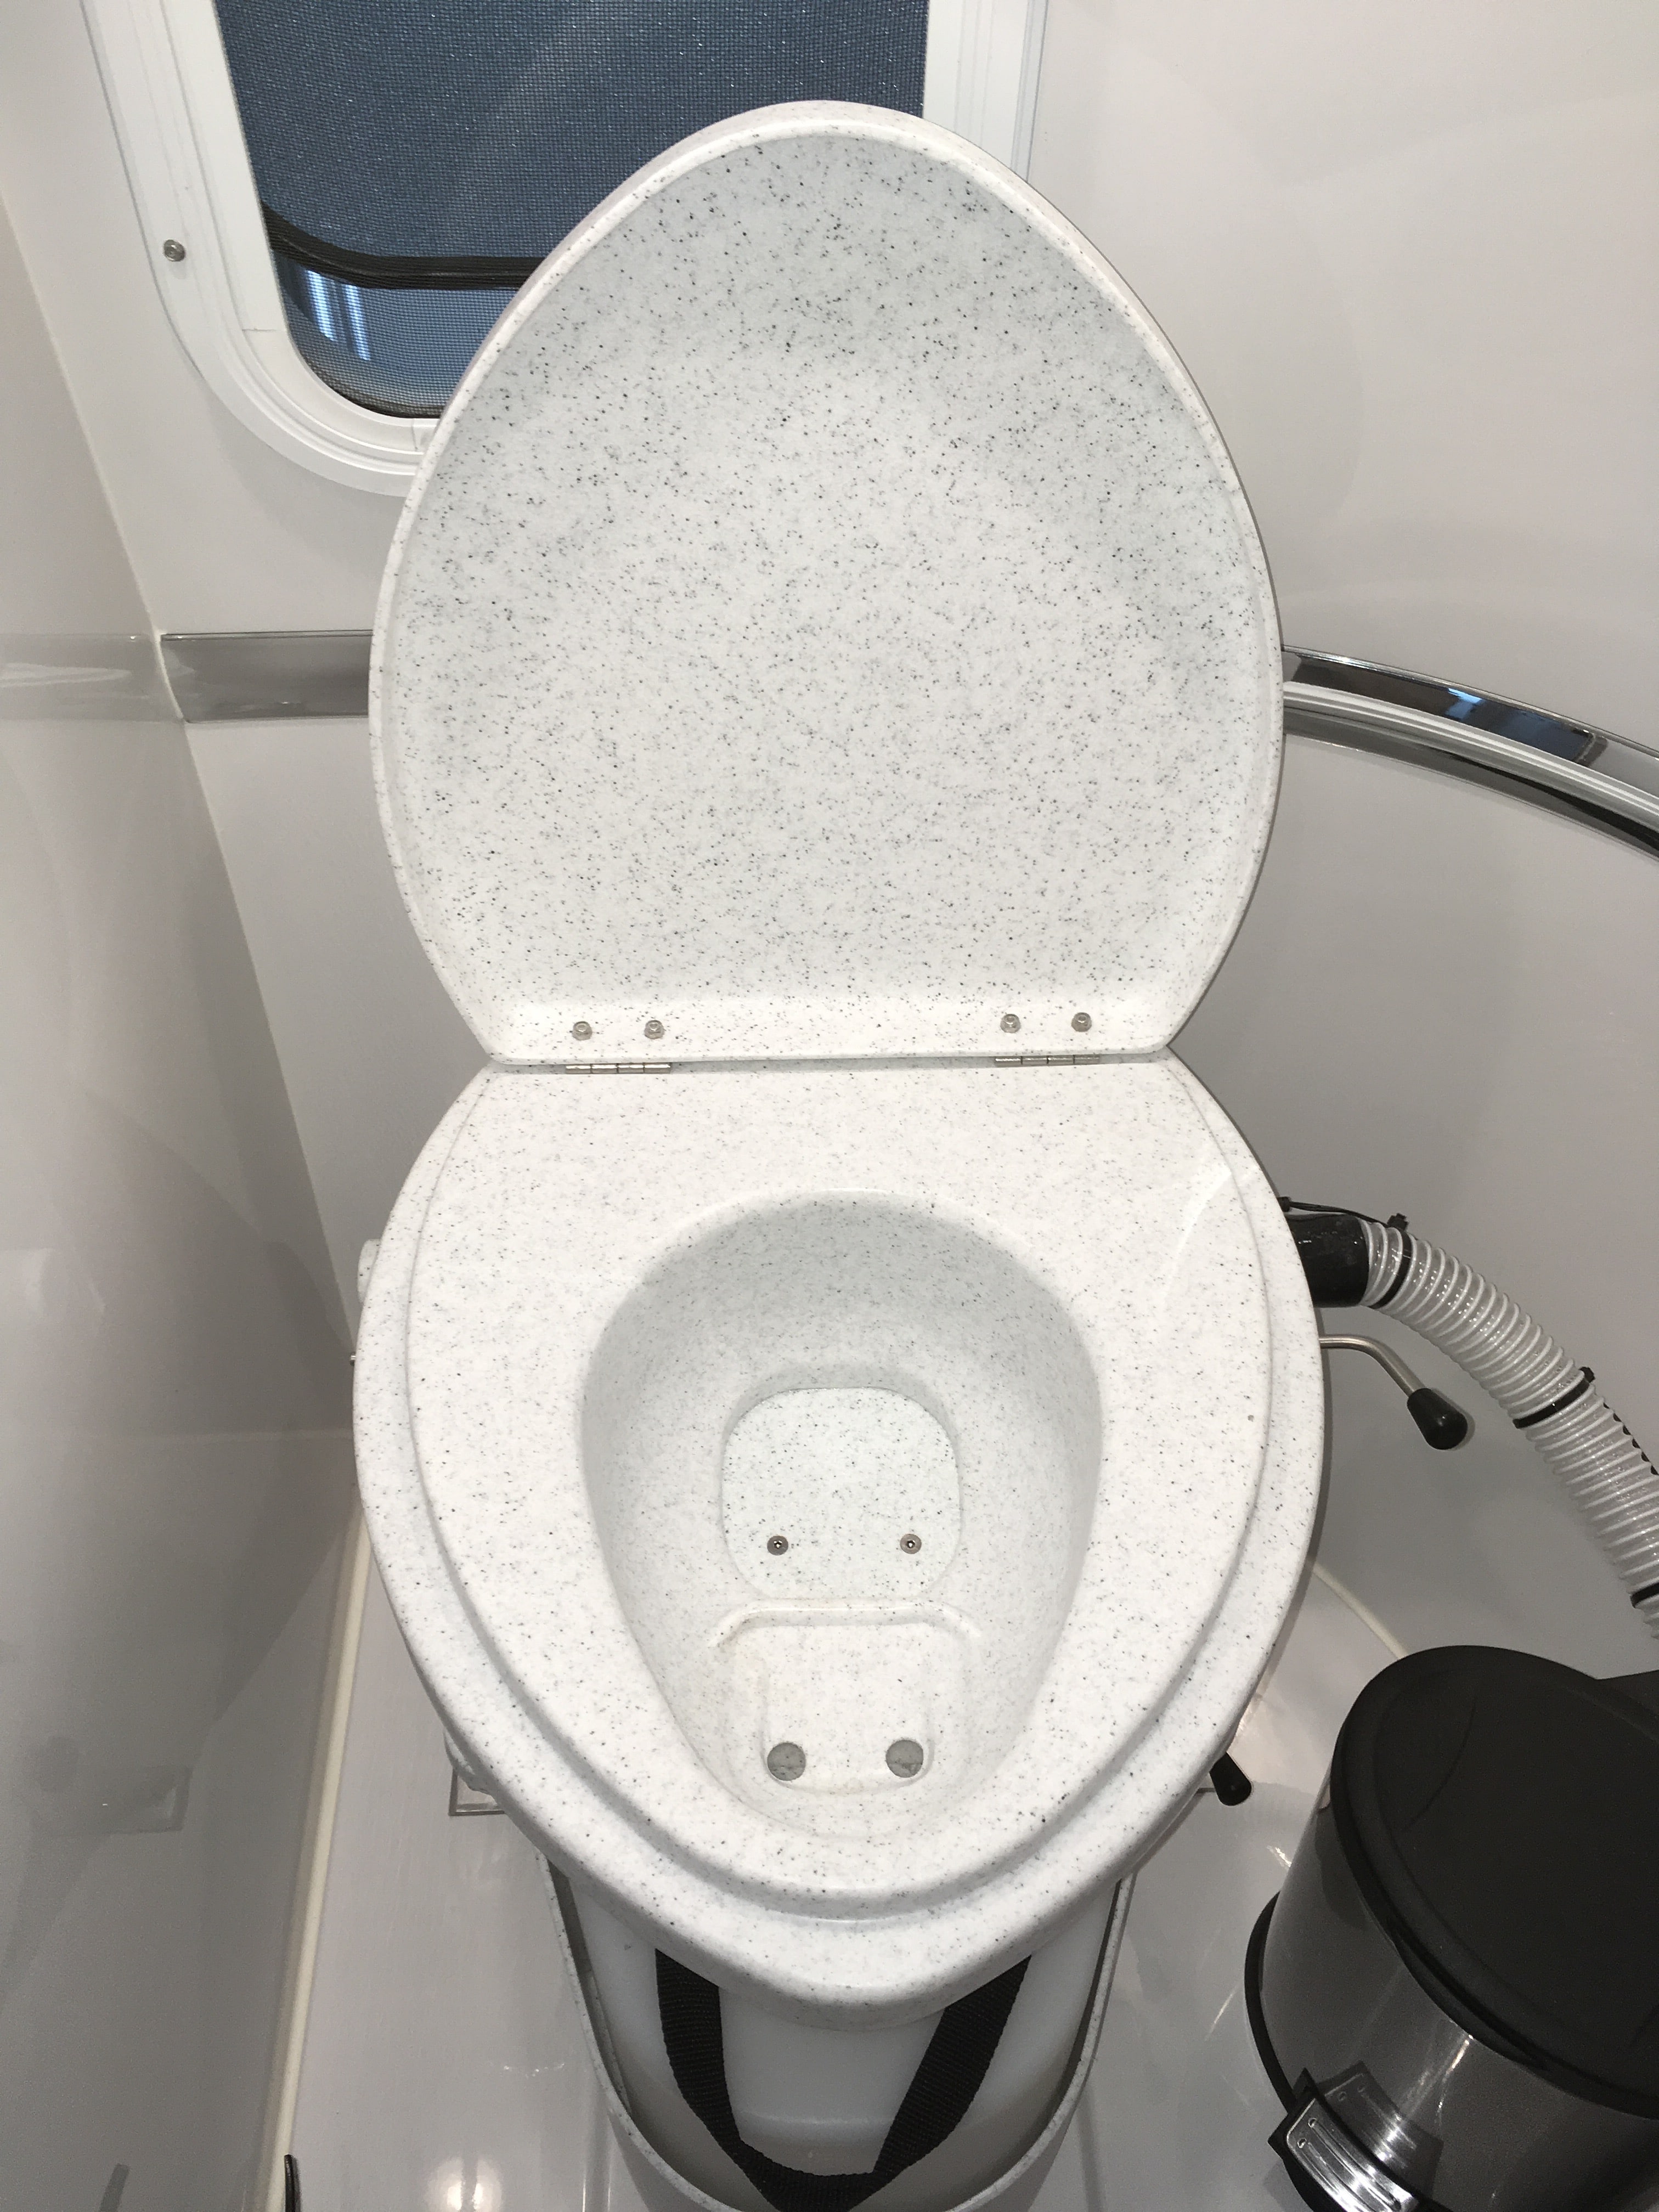
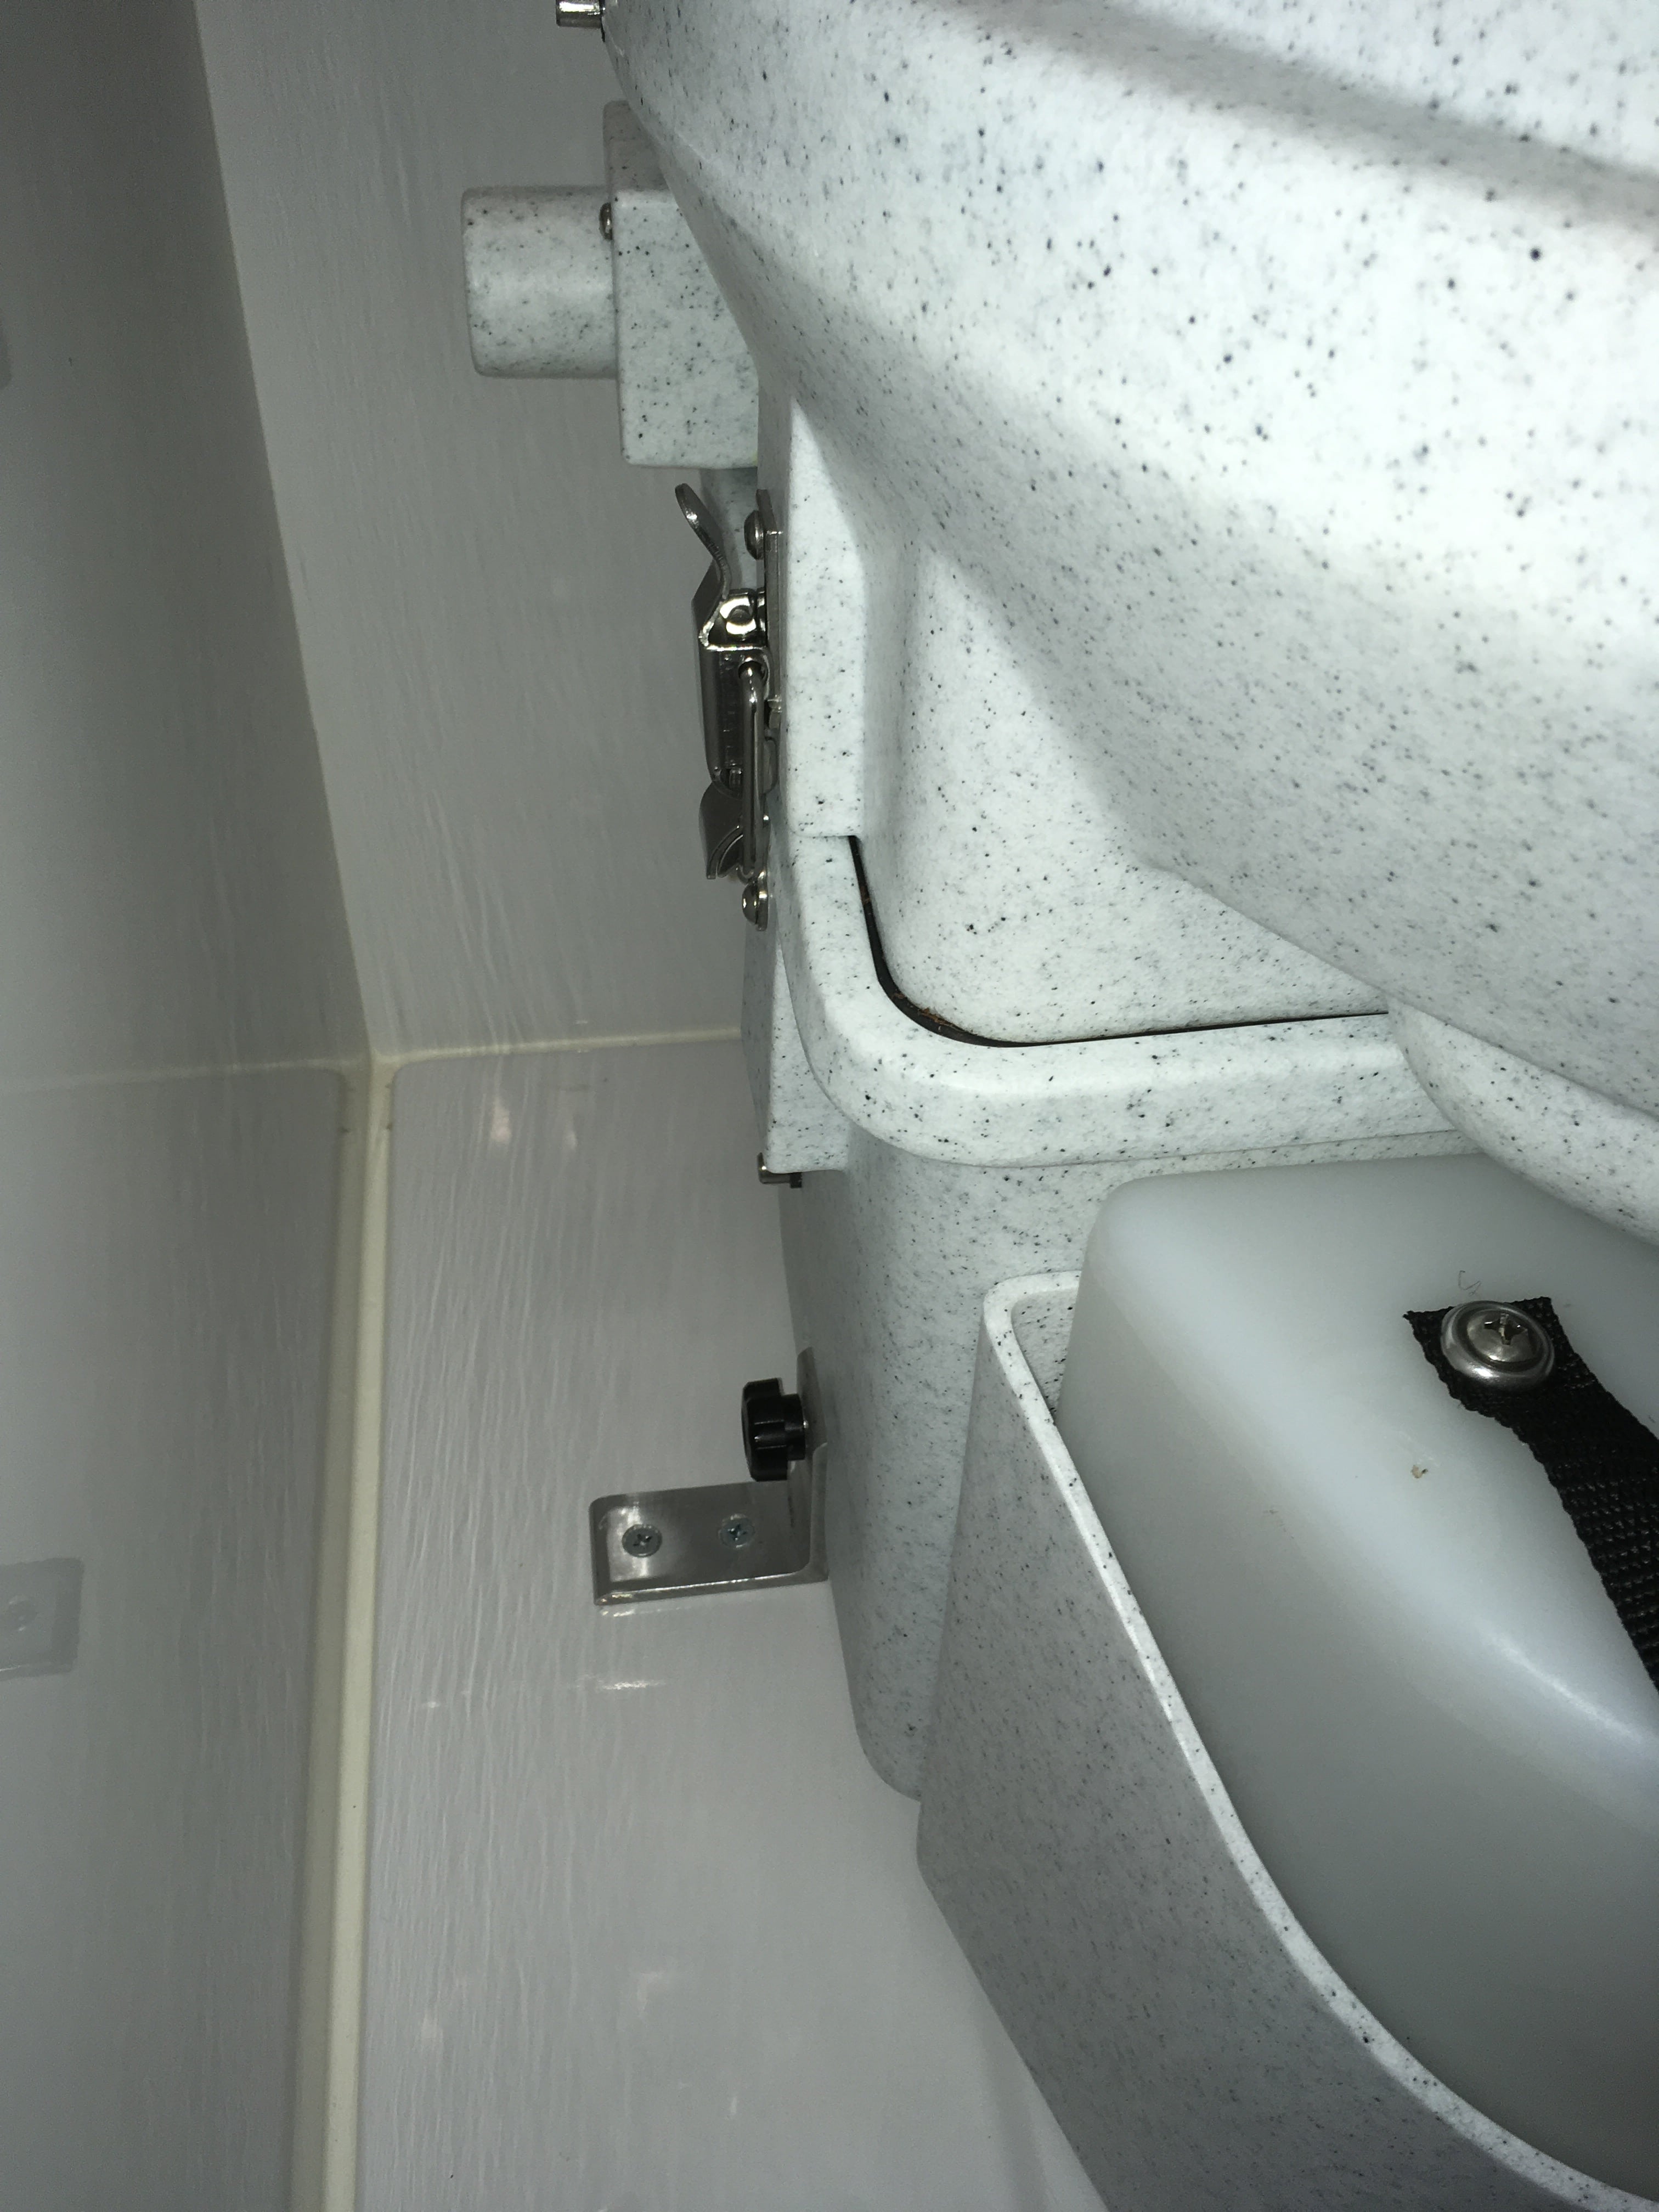
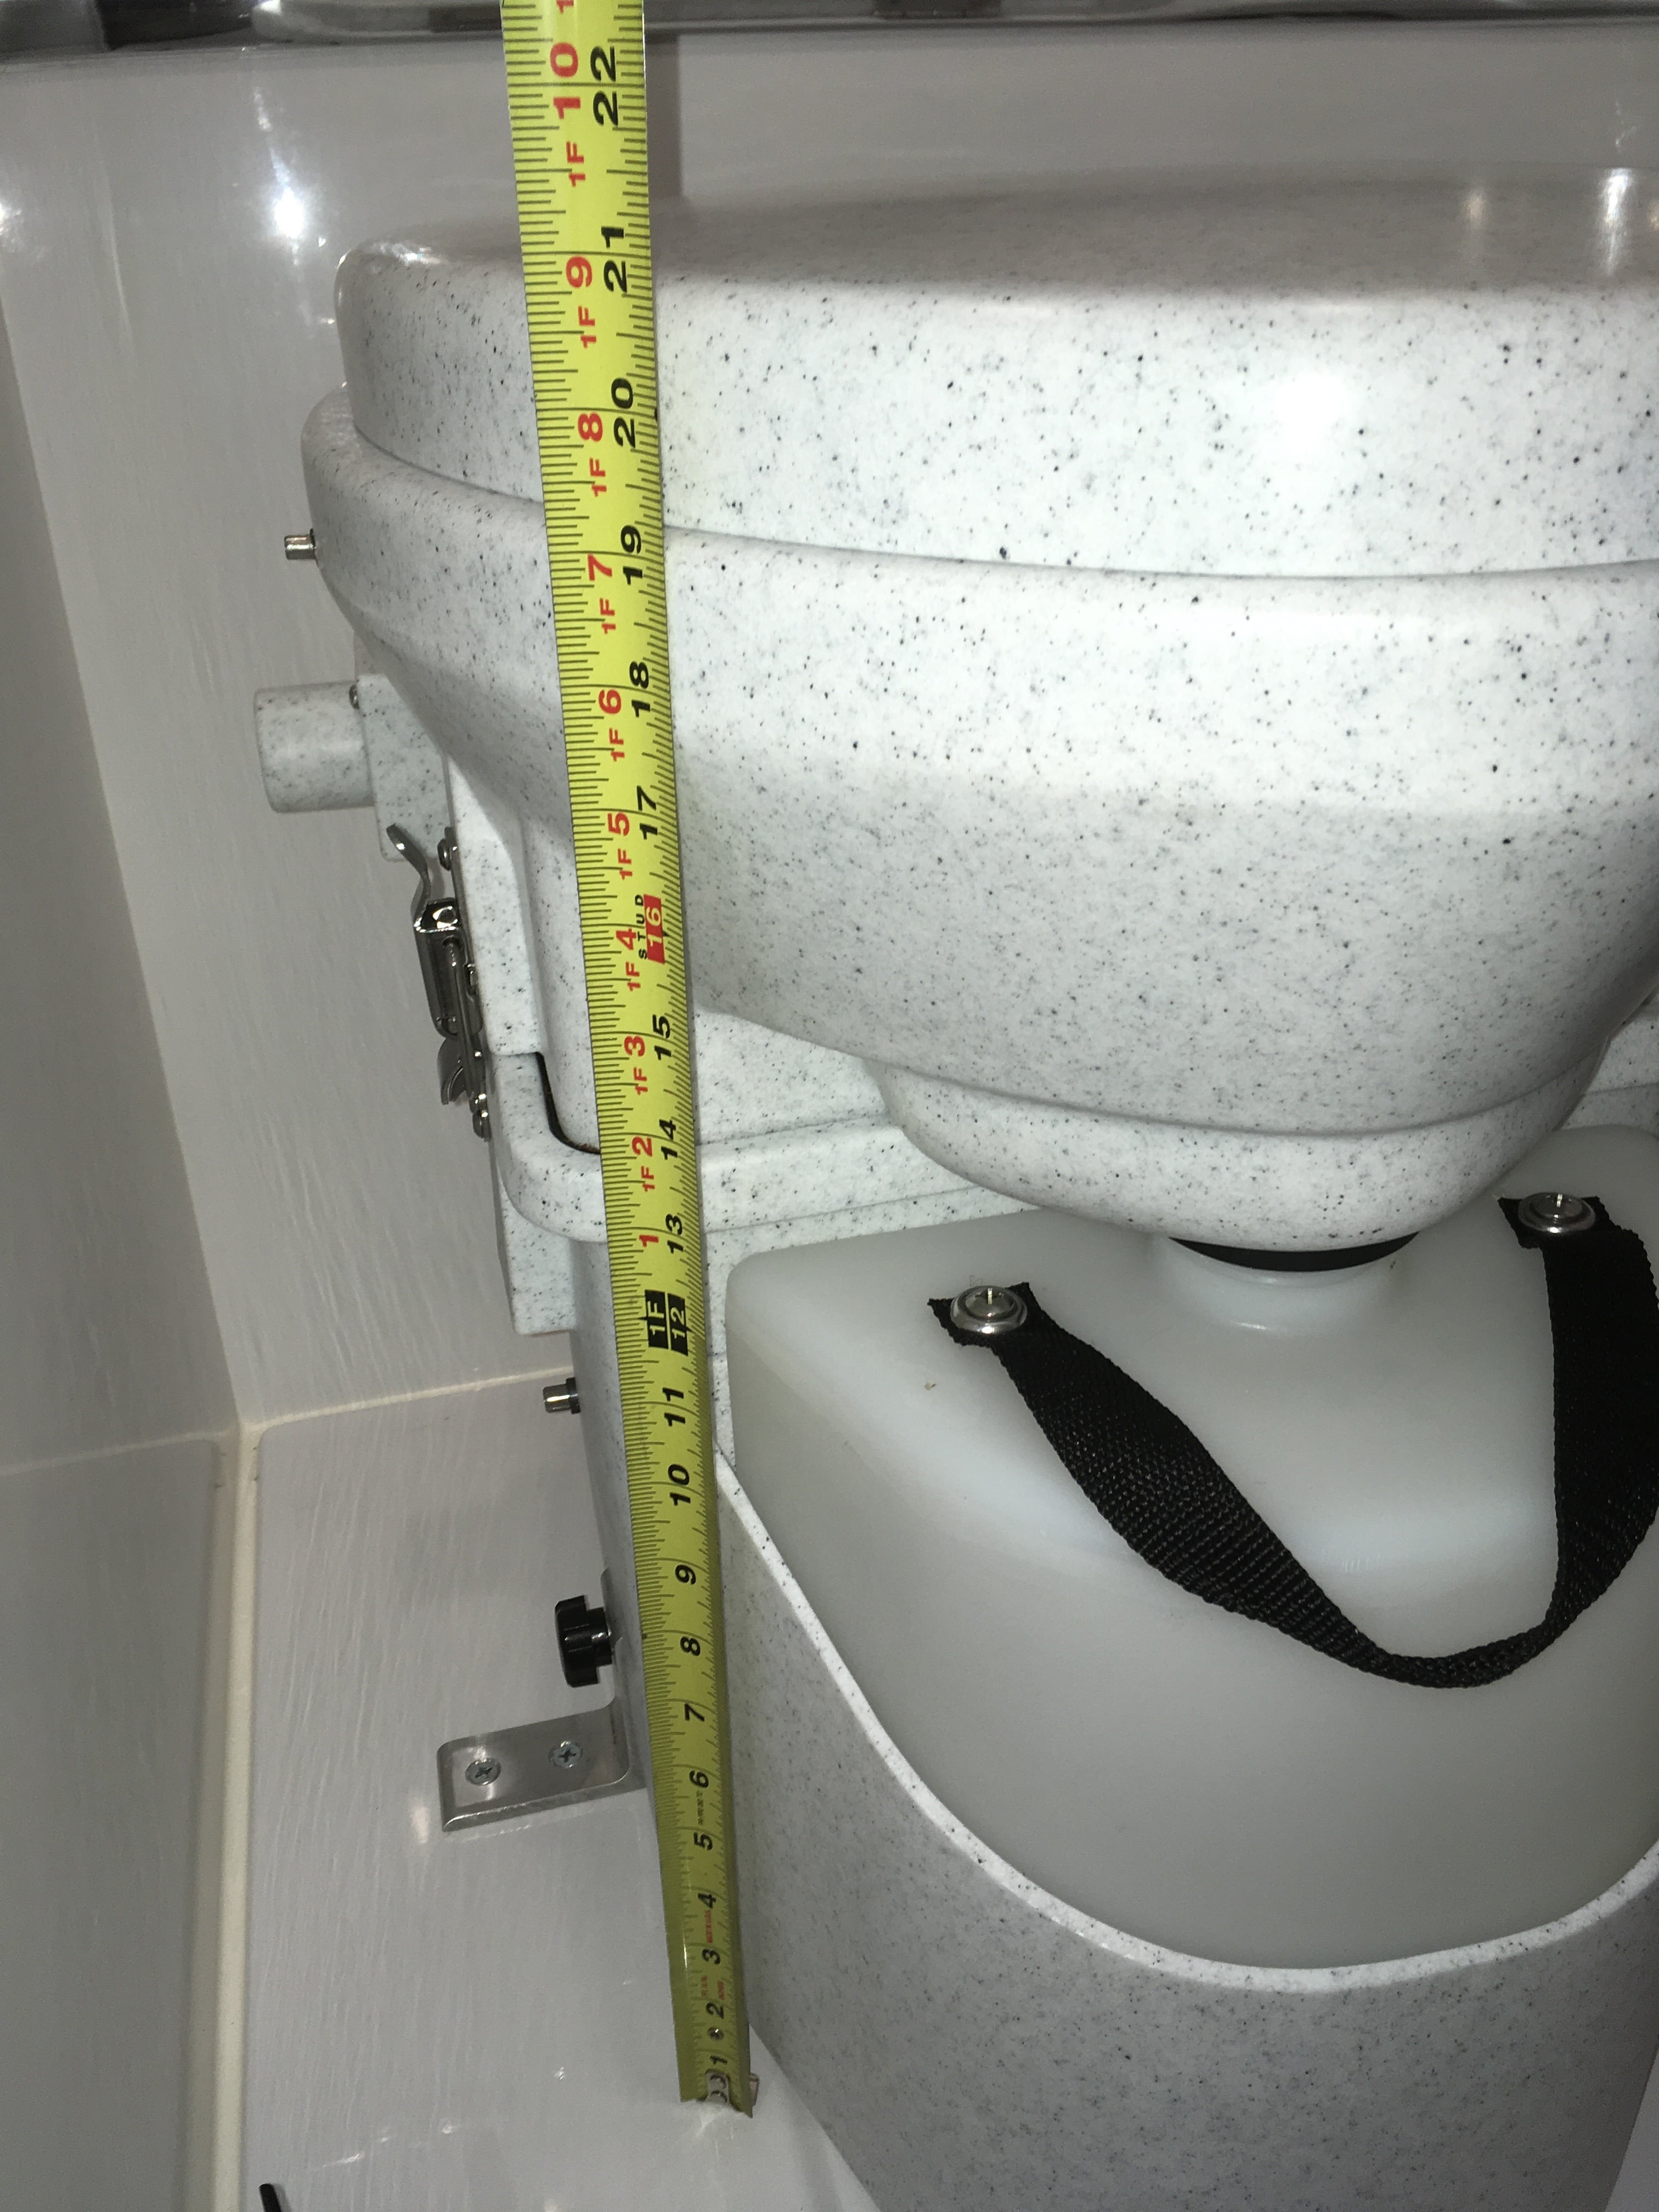
EDIT 12/10/23. Useful link: https://olivertraveltrailers.com/forums/topic/6720-natures-head-compost-toilet-troubleshooting-user-guide/ EDIT 06/06/23. This is an Oliver factory installation, not mine. One member has assumed that I did this. There are a number of threads asking about this toilet. I hope we can gather up a lot of the talk here in one place. I think there has been one other installation in an Ollie but there have been NO published pictures of any kind, that I have been able to find, even from the factory. This is baffling to me. I really wanted to cut the dump station umbilical. We routinely dry camp and finding an open station during a busy holiday weekend or off season is not something I want to face. With the NH toilet we can get rid of our grey water with a 3/4 inch garden hose. In many western states it is legal and encouraged to run a hose out to a nearby shrub and let your water trickle into the ground. The black tank, drain plumbing and vent system are all completely retained. The factory folks are extremely reluctant to delete these parts, since they are part of their certification. If you wanted to reinstall a regular toilet, it would be a very minor job. The fresh water line is even in place, next to the wall. You could sell the used NH for $400 and that would pay for the replacement conventional RV toilet, with a lot left over. An RV toilet is less than $200.... I chose to charge the base with coconut coir rather than peat moss, since it is a renewable resource and doesn't damage the environment. https://smile.amazon.com/s/ref=nb_sb_noss_1?url=search-alias%3Daps&field-keywords=coconut+coir I made the mistake of just dropping a dry 2 pound brick into the bottom, adding water and then letting it hydrate. I ended up with WAY too much material. You need to do this in a bucket, outside, and then transfer the expanded stuff into the base, and the leftovers into gallon zip bags. The correct height is even with the internal agitator centerline. Any higher and it becomes difficult to turn with the handle. It takes about two gallons, I did not measure. There are many online sources with info. To summarize: Sit to pee, everybody, so there is no splashing. The trapdoor stays closed and your pee goes forward, and then down into the reservoir. Which you pre-treated with a half cup of vinegar, to kill the odor. That part is easy. To poop, open the trapdoor, finish the job, wipe and close the door. Give the agitator handle two or three turns. The poop and paper will decompose rapidly once the natural process gets going, which may take a few days. The fan keeps a steady flow of fresh air into the reservoir and out of the trailer through the existing roof vent. I never noticed any bad odors except the first days, before I figured out that Oliver had installed the wrong fuse, a 1 amp, which had blown. Once I installed the correct fuse (2 to 5 specified, I used 3 amp), the fan worked as designed. The fuse is located in the main distribution panel under the dinette table, right row, bottom position (UN-labeled!). It is best to put only the absolute minimum amount of RV toilet paper into the base. If you put a lot in, it wraps around the agitator and makes it harder to turn. Only stinky paper goes down - the rest (damp with pee) goes into the small covered waste can to be disposed of weekly. The can came from Walmart, $10 I think. Cleaning is simple: spritz the area lightly with a dilute vinegar spray and wipe down with a disposable baby wipe, toss in can. Done. The residual vinegar and wipes control any odor from the can. The pee tank is big but it will fill up faster than you can believe if you have four people using it! Empty when it gets to within an inch or two from the top: Flip the two side latches, carefully rotate the top off the base, remove the pee bottle and cap it. Dump it in any approved location - a pit toilet or a rest stop restroom. Rinse with fresh water a couple of times and recharge with half a cup of vinegar. Reinstall into the toilet and close and latch the top. The pee will eventually form crusty yellow deposits. The fix, I have read, is to add gravel and water and shake it hard, then rinse several times. In two weeks of use I never noticed any significant deposits. The longer you let the poop decompose the better. If you can leave it over the winter, dump it out in the spring and it will be totally benign. If you need to empty it mid-season, remove the pee bottle and vent hose, unscrew the two hold down knobs and lift out the entire unit. Carry it outside and put a 13 gallon or larger trash bag on top, flip it over and empty the compost. Refill with clean coir to the centerline. There is NO need to clean it out. Any residual material will just help the next batch get started. The organic waste you can double bag and put in the trash, or if fully decomposed, it can be spread out in the woods, but not near a potable water supply or garden. The way to keep the smell in control is to keep the pee out of the main reservoir. It's the urine that makes a pit toilet smell so bad.... If you throw up or have a messy poop, you can add a little more fresh coir to help absorb the extra fluids. I keep a gallon bag of the hydrated stuff in the overheard cabinet (along with a quart of vinegar) and haven't had to add any extra. The fan has a dust filter that is supposed to be checked every few weeks, by removing two Philips screws. I think that is way too often in the clean environment of a fiberglass trailer, unless you have a dog that sheds. You can put your hand over the left (inlet) opening and feel a light suction. If that isn't present, you need to clean the filter. The pee bottle sits in a sealed cavity to catch overflows, This is a problem since when you take a shower, a bunch of fresh water gets trapped there. I intend to drill a couple of small drain holes in the bottom. I don't care if the pee bottle overflows onto the floor of the head, at least that way I will notice it! unless it is dark, and I am barefooted.... that would be bad 😉 This is why you want to empty the tank before it gets too close to the top. Agitator handle: ours fell off right away, the shaft has a set screw with lock nut. It is very easy to tighten correctly. I am not sure why the factory guy couldn't do it successfully. Spares: I intend to purchase a spare pee tank ($40), spare lids, and a fan.I already have extra 3 amp fuses. ... http://store.natureshead.net I intend to wire in a small LED in the wire harness to show that the fan has power. You can probably hear it running, faintly, if you are in a very quiet area and don't have bad tinnitus, as I do. The Nature's Head is a cool device, but it is really just a fancy bucket. A solidly built, very expensive bucket. I wish the price were about $250 instead of $800. That seems about right for what you get. OTH it is very rugged, and long time users seem to love it. My wife still has some reservations about using it, and we need to get a short step stool since it sits so much higher than even a tall toilet. This one might work well, and it might fit in close to the base with a bungee cord around it for travel: .... https://www.squattypotty.com/shop/poop-better/classic-ecco I am still learning, but I have no regrets at this time. Questions? John Davies Spokane WA
1 point
-
Save BIG on Battle Born Batteries, Apparel and Gear for 48 HOURS ONLY! Get up to $250 off all Battle Born Battery models, including Heated LiFePO4 options, and 25% off Apparel and Gear. Don’t miss these Spring Savings, purchase now! Sale Ends at 11:59 PM PST on Friday, March 24. BB Spring Sale 48 hour only John Davies Spokane WA1 point
-
I decided to weigh my trailer because there is a lot of discussion. I have a set of scales I use to do weight and Ballance on Aircraft and they are very accurate. I did a quick and dirty weight but will re do it on the hanger floor in another week fully loaded. The trailer is a 2022 LEII with solar, lithium a convection microwave and two full 30 Gallon propane tanks. At the moment it is still winterized so it has no water. We have a Lavio toilet so there is no black tank water. It is loaded and ready to go with everything we travel with less the 240pounds of fresh water. The trailer weighs in at 5,220 pound add the fresh water and we are at 5,460 pounds. The weight on the tongue is 509 lbs. I plan to re weigh it with the fresh water full to see if it changes the tongue weight. So that’s it in a nut shell. Before someone comments I put the trailer back down level on the tires and moved the load cell under the trailer ball to get the tongue weight, I did not take a picture of it. Bill
1 point
-
We're heading up to Alaska this summer - 2023. Here's the map of our route. I see Costco's in Fairbanks, Anchorage, Prince George BC. Any tips on Diesel along the routes we show below? Craig - Hull 505
1 point
-
Please do confirm the number of feet to do them all. Thanks GJ1 point
-
Thanks Craig for filling in the gaps! And now we know the rest of the story! Mossey1 point
-
In the comments on tongue weight, nobody has mentioned cargo or generators mounted in the tongue storage basket. Are any of the mentioned tongue weights including significant weight in the basket?1 point
-
Patriot - just curious, what material are you using for the mattress vapor barrier? We are looking for something that really works well, haven't been successful yet.1 point
-
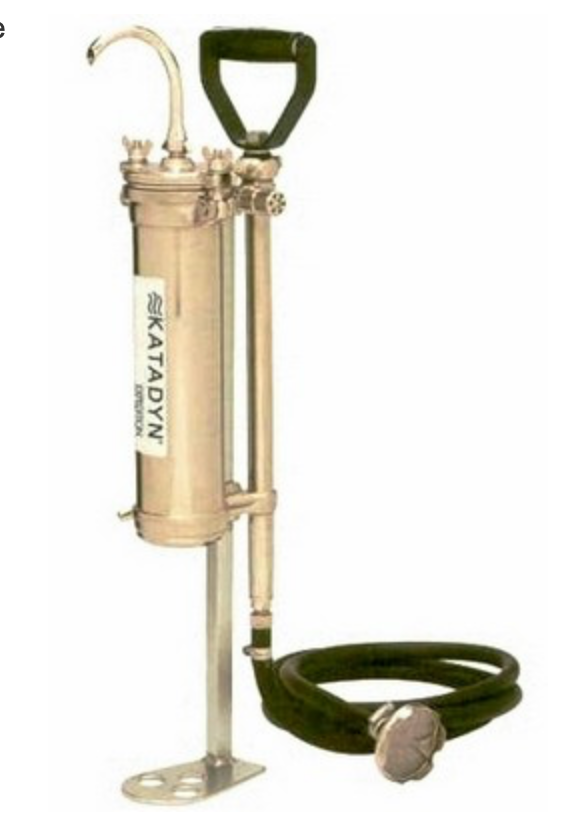
We've got the Katadyn Expedition base camp filter. Super heavy duty and not light weight (about 12lbs); fairly compact.
1 point
-
I do not have any switches installed, just the power wires. I think the cellular booster/WiFi antennas are located on the front port corner and the active components are mounted in upper cabinet above the front dinette seat and the switches are then mounted on the outside of the cabinet between the bathroom wall and the cabinet door. You would get the switches when the active components and antennas are installed. So you should wait until April 9th to continue your Easter 🥚Hunt. Mossey1 point
-
A "fulcrum " is a wonderful thing. Bill1 point
-
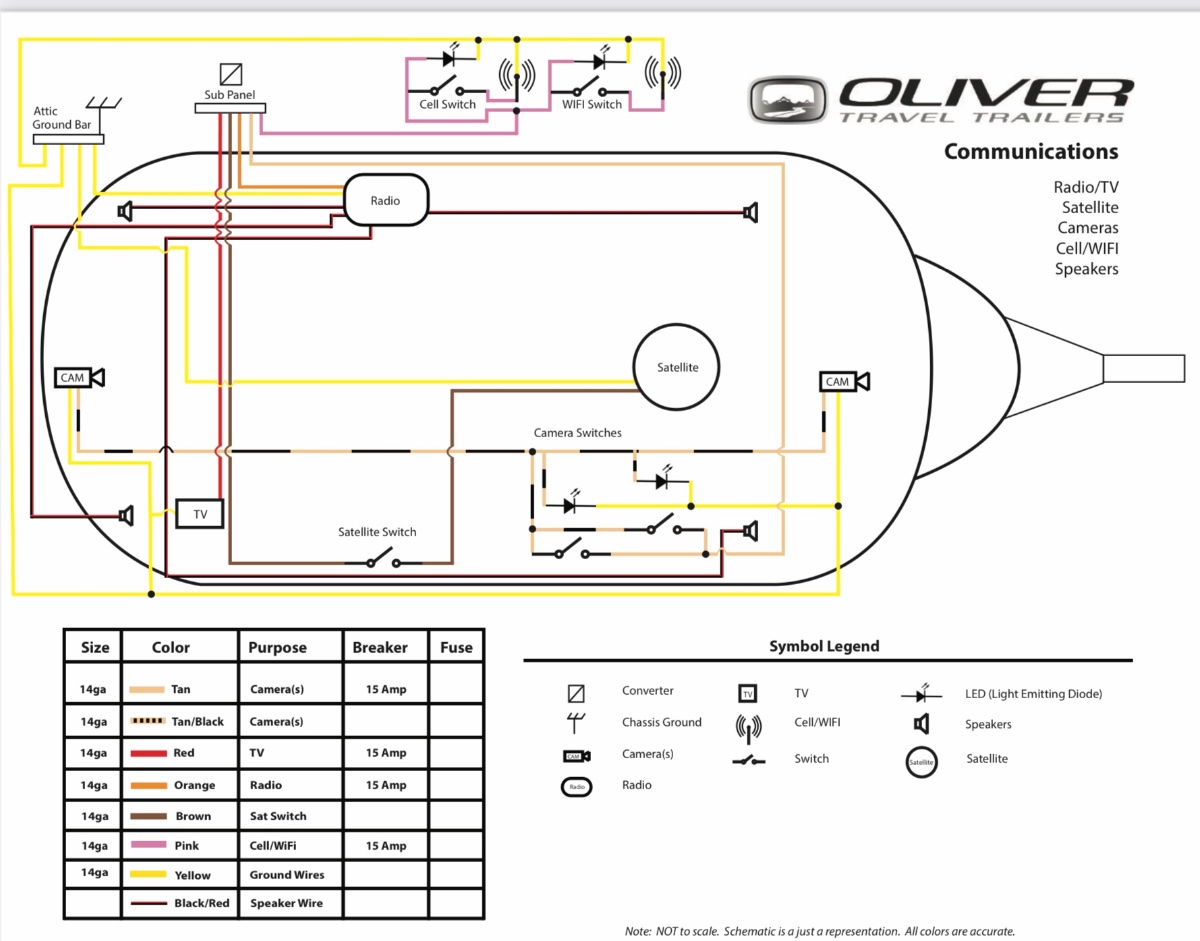
Our older hull 342 Owners Manual does show a cell Switch and a WiFi switch wiring. But it's location is not "to scale" shown. Where are your switches located? Knowing that would greatly reduce my "Easter Egg Hunt". thanks, GJ GJ
1 point
-
Hull 193 is pre wired for power. The pink B+ and yellow B- are accessed from the left end of the bath overhead cabinet. Mossey
1 point
-
That water source at Meriwether is located at 35.52419, -87.45465. Note that there is no sewer dump nor electric but Hohenwald is only about 6 miles from this camp. Bill1 point
-
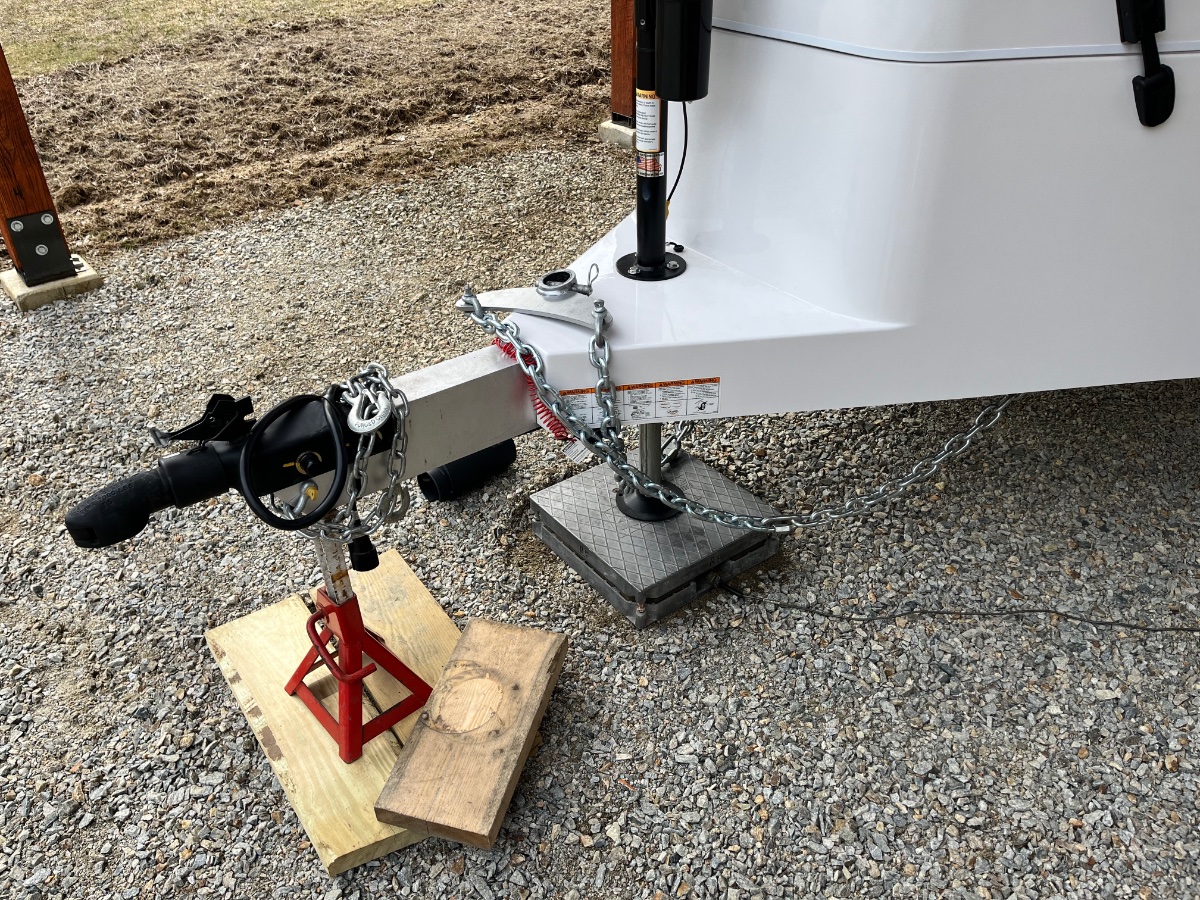
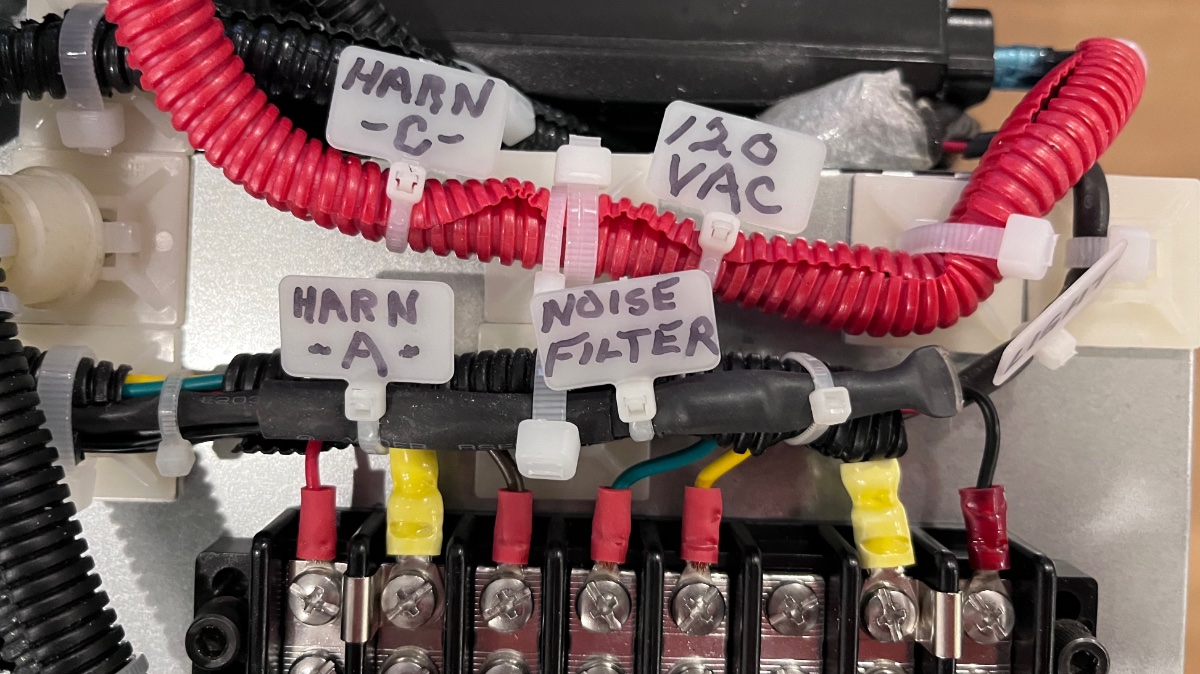
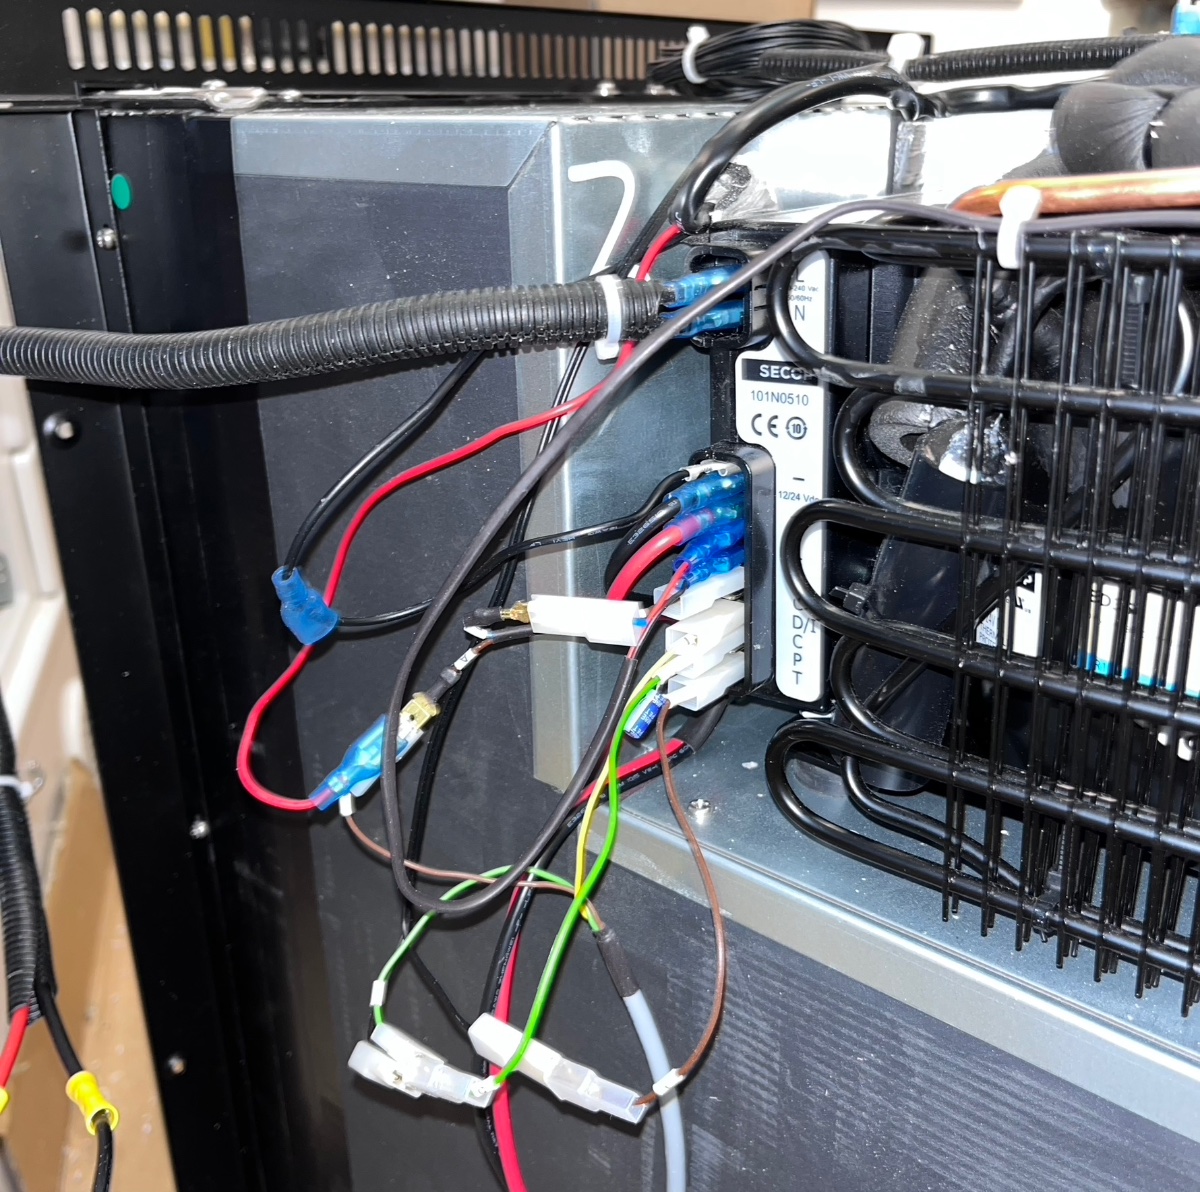
Thanks for posting, this is very cool! But %^*+! 😉 Please put a soft cotton towel under your whale tail. Or suspend it with a bungee cord under the coupler hole. Half of that Andersen weight is carried by the truck, after all.…. I used to weigh light aircraft, it was a task I greatly enjoyed. More than greasing the gear and wheel bearings. If you don’t mind, please post a pic of your hanger and what’s inside. As far as redoing it all on your hanger floor goes, why bother? It’s a trailer, not a piano. As I was told more than once by my supervisors, perfect isn’t needed, just good enough. As an anal compulsive that is hard to hear, and much harder to do. I can’t wait until I see your rearranged trailer wiring. LOL, here is my new compressor fridge digital control harness….. Isotherm’s “solution” during my initial smoke test: And my solution to their solution: We need more aircraft techs participating in this forum. I was lamenting to myself that I no longer have access to an avionics wire marking tool. John Davies Spokane WA
1 point
-
Immediately got on Amazon and ordered it. I love this forum. In addition to helping me fix problems I have, it teaches me about problems I didn't even know I have. Yea!1 point
-
I was thinking the same thing but I have not had any funny feelings towing it all seems pretty stable to me. With that said I’ve only towed about 1,500 miles to date. I also have two full 30 gallon propane tanks so that adds weight up front. like I said I’m going to fill my fresh water tank and re weigh it, maybe it will put weight up front. I also usually have two bicycles on the back which will move weight back. With in a week or so I will weigh it again with bikes, water and make sure my propane is topped off and see how much things change. Bill1 point
-
That's the same price I paid (out the door, no tax) at the Big Tent in Quartzsite last month. I bought an extra 100 amp hour battery to put into the truck to run the Dometic fridge/freezer.1 point
-
You won’t need adhesive, this trim grips extremely well. No issues with it coming loose at all.1 point
-
Nice job! Here is a where you can ordered the edging off Amazon. 😊I used this on the edge of the dog house aka propane tank hood as well. And decided to use it on the fiberglass edges of the twin beds.
1 point
-
I was using this tool ordered from Amazon. The order of wires is actually on the tool itself, easy to identify. I'd recommend buying extra Cat 5 and RJ45 connectors and practicing on those first before cutting the actual Starlink cable. That what I did and I had no experience with this before. There are lots of videos on YouTube. The difficulty for me was fishing the cable through the attic space due to tight space but it wasn't that bad. Good luck!
1 point
-
Usually when we've camped, I work from camp for at least a couple days so need my starlink working --- flagpole buddy has been great. https://flagpolebuddy.com/1 point
-
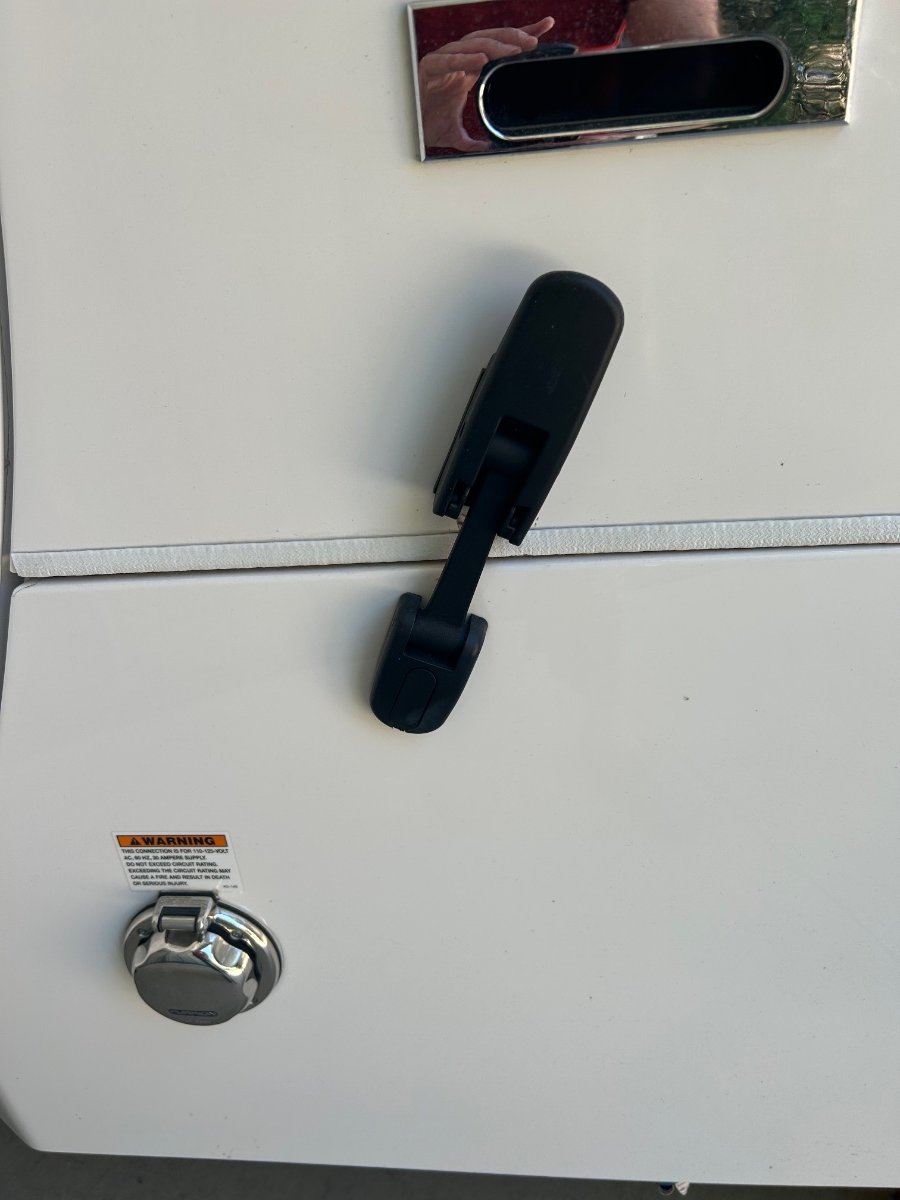
This mod of Bill's no drill door handle made the Oliver Newsletter. We love ours and it looks and works great. I guess Oliver liked it too! Way to go Bill!! :-)1 point
-
At the Oliver Rally several people commented on my low tech solution to the door handle problem. The handle was $2.50 at Ace Hardware, and I used two sheet metal screws. I decided on this solution after reading Topgun2's post about the screen door handle, and that the bar did not have the strength to support someone when getting in or out of the camper.
1 point


-
Recent Achievements
-


")


")


