Leaderboard


Popular Content
Showing content with the highest reputation on 05/06/2023 in all areas
-
Yes. Before installation I tried to run it on the Honda 2200i but it would not start up.....as expected. I installed the Easy Start (from the Dometic) on the Truma Aventa. I wired the ES, without any splices, into the Truma wires so that in the future I could remove the ES and easily restore the OEM wiring. You would not be able visually tell the ES had been installed. ((This was a little extra work .....when Oliver originally installed the ES into the Dometic they removed and spliced Dometic wiring. So, when I removed the ES, I had to rewire the Dometic with non-OEM wire. The Dometic works fine...just does not look OEM to the trained eye. I explained this to the person who bought the Dometic and they were fine.)) Once installed, I had to relearn the ES. On my ES model this required removal of the cover and physically moving a connection jumper, once to reset the ES and again to relearn the Truma. New ES models have a bluetooth relearn feature. This was an easy procedure. I previously installed a 30amp RV receptacle under my home's entrance panel. I used this power source to start up and relearn the ES/Truma. Once I was satisfied everything was nominal, I switched the power source to the Honda 2200i. The Truma started up and ran with no problem. A big decision was where to locate the ES. The Aventa structure is a two piece tightly fitting molded foam. There are a couple of options without modifying the structure. I chose a forward location near the thermistor. The wiring diagram was provided by Micro-Air. If you buy a new ES, they will warranty the compressor for two years. I chose not to go this route since I had the older ES on hand and would install it myself. Material used: -2.5 feet of 14 awg wire (two insulation colors...5 feet total) - two wago type connectors (ideal brand from Home Depot actually) - two 1/4" spade male connectors - one 1/4" female/double male spade "piggy back" connector - four tie wraps to strain relief the wires & cable - Three cups black coffee Steve6 points
-
If you are the original owner, then I think you should make a warranty claim with the Oliver Service Department. If you are the 2nd owner or just like to fix stuff, PM me and we can discuss how I would fix this issue. If there is glue residue on the end of the pipe, it would indicate that it was glued and connected but the pipe was not inserted far enough into the valve body which probably led to the failure. Mossey5 points
-
Although I would like the ES or soft start, I was informed by Oliver Service that installing an easy start or soft start would void the Truma factory warranty and they won’t install it. We are having the Truma installed on May 8th. If I learn anything different I will post up. Patriot🇺🇸5 points
-
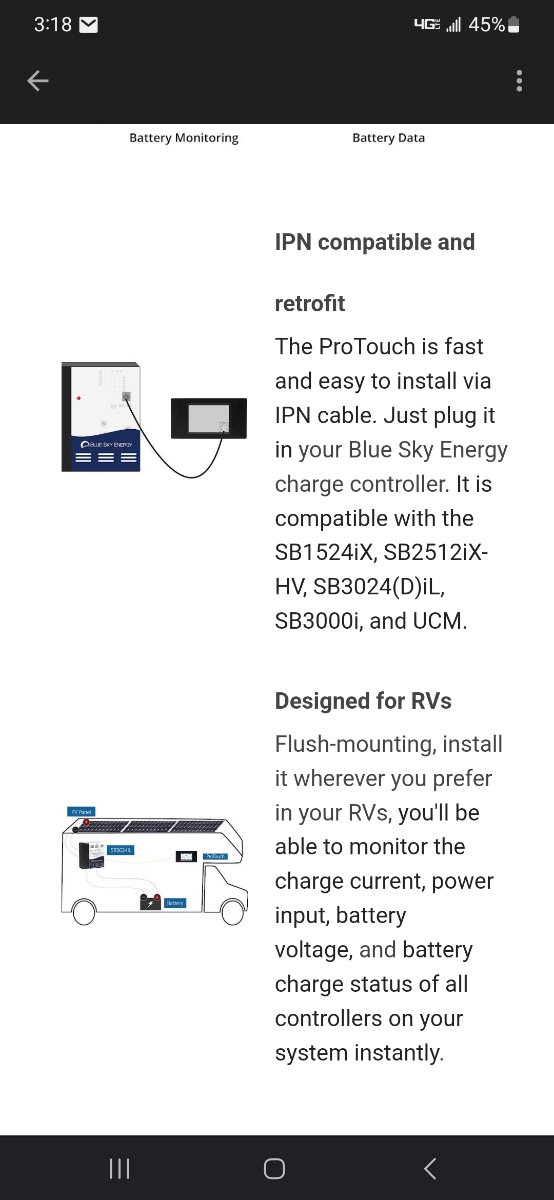
For us "old timers" with the mostly indestructible Blue Sky solar gear, there's a new, easier GUI available for our old school systems. More info available if you buy the unit with the shunt. I haven't read any reviews yet, as I just got the email from Sunforge yesterday. I don't think there's any bluetooth remote capability, but it looks like a relatively easy install. https://sunforgellc.com/product/protouch/ Ten per cent off coupon code in the first photo. ProTouch_Manual-Rev-1.0_AP.pdf
 4 points
 -
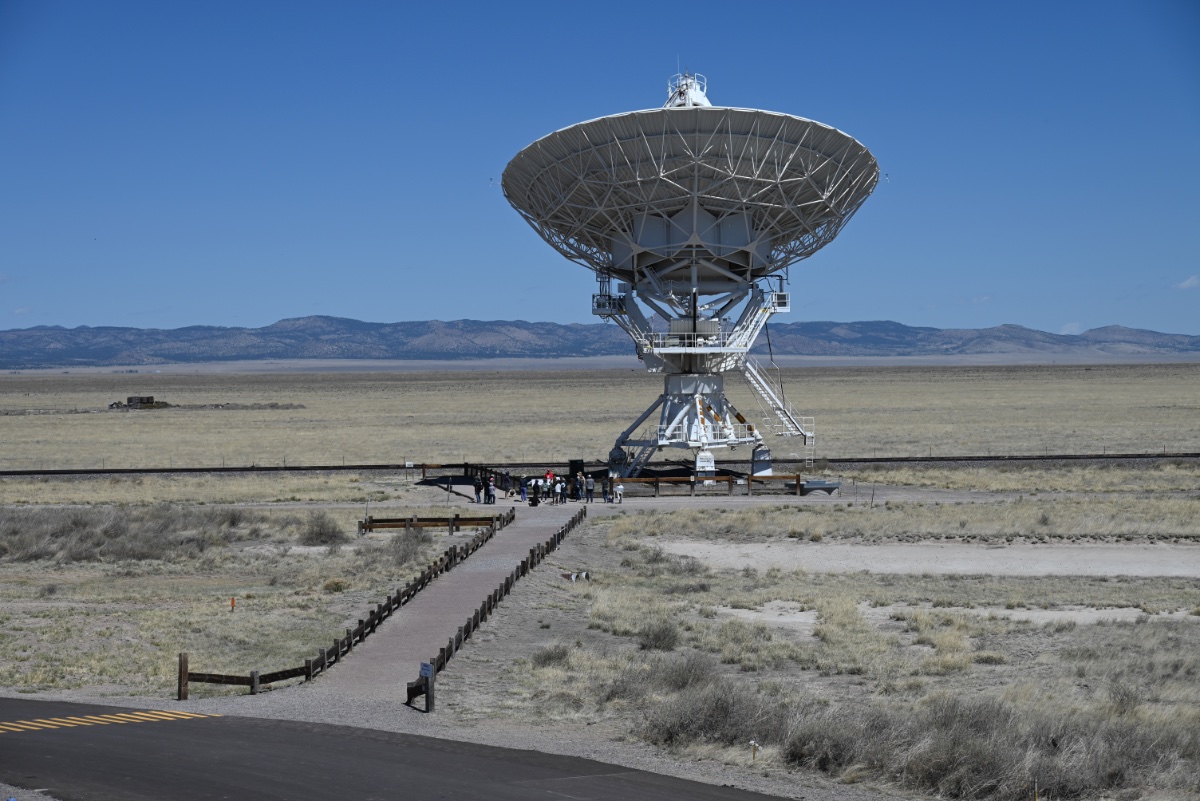
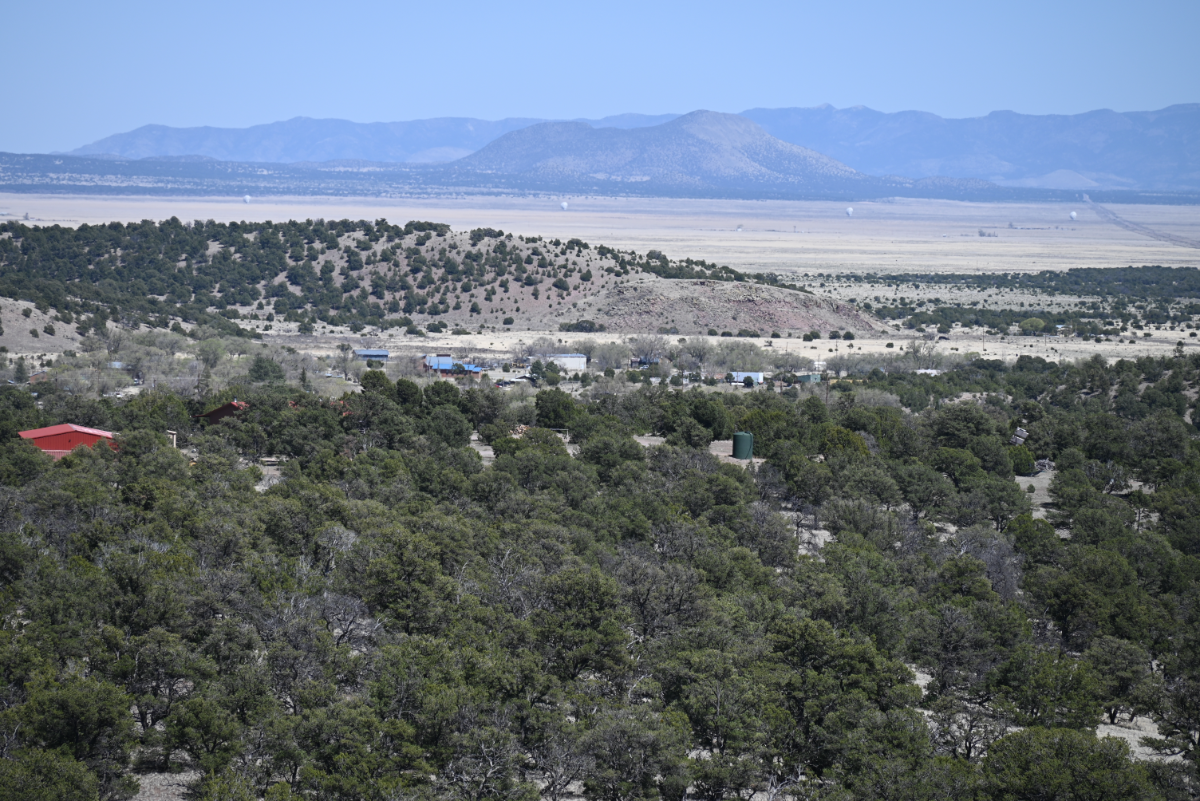
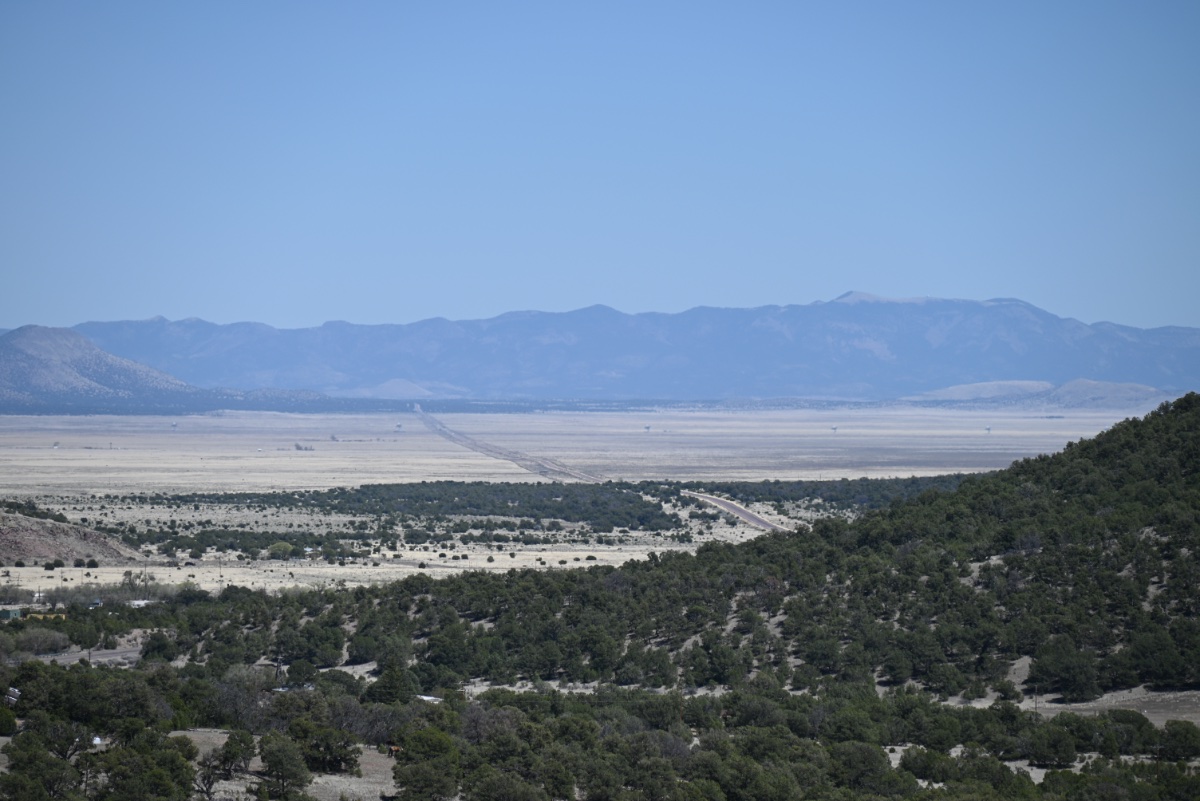
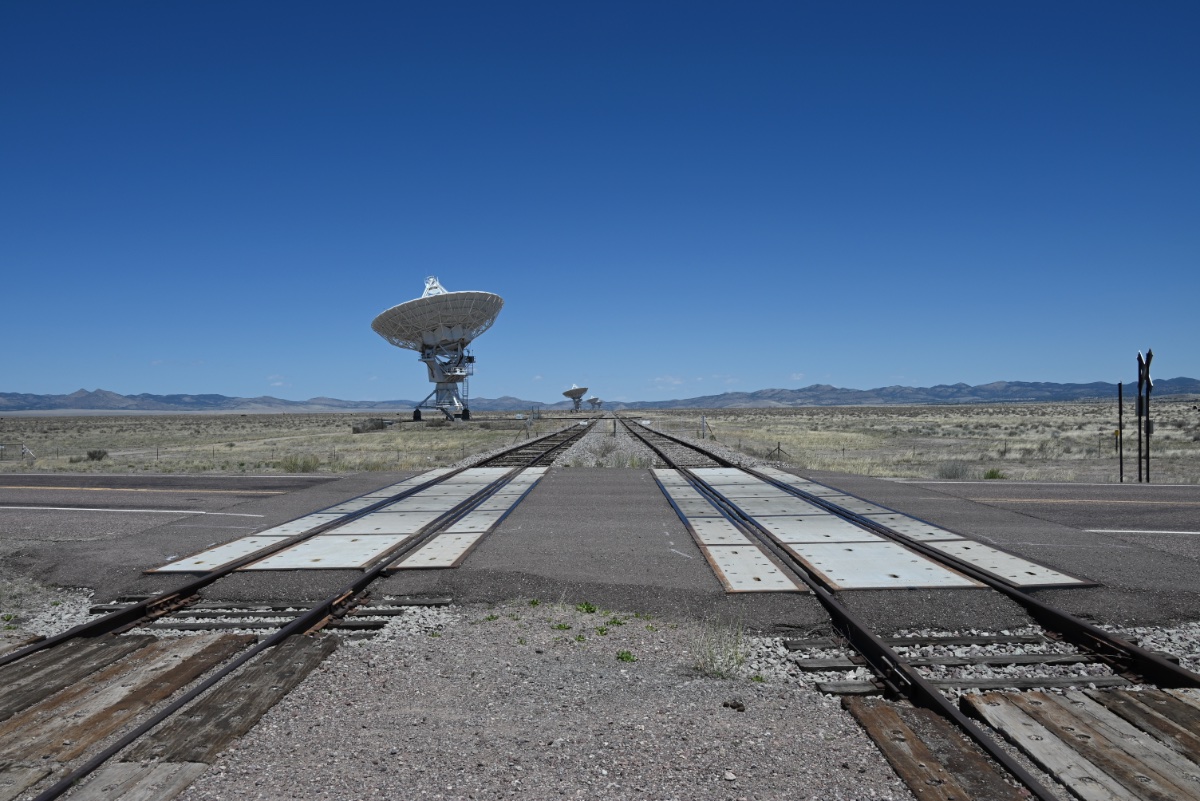
Here's a photo of one of the radio telescopes from a distance, with people standing at the base for scale: ...and here's a view from one of the trails in the campground: The road you see is route 60. If you look closely you can see a railroad track crossing the highway and some of the dishes of the array. The dishes are moved between permanent positions using a special rail car. Here's a photo when standing at that junction:
4 points
-
Agreed. It makes no sense, particularly since green glue costs more than either PVC or ABS glue. But, our Hull #1291 has that same strange mixture of PVC fittings and ABS pipe. No plumbing inspector of my acquaintance would pass it. In Idaho, for example, only one transition from PVC to ABS is permitted per drain line. PVC is commonly used for Drain Waste Vent (DWV) pipe assemblies in the Eastern USA. ABS is commonly used for DWV pipe assemblies in the Western USA. I don't know why, but that is what I see. But no state I am aware of allows the two types to be mixed throughout a drain line. I wonder if the rules don't apply to RV manufacturing? That said, as long as the correct green transition glue was used, a drain line with PVC fittings and ABS pipe should hold up fine. That is why I did not raise it as an issue when we took delivery of Hull #1291. I did note one place where insufficient glue was used on the top of a DWV joint, but I chose to address it myself when I got home. Properly adding glue to a partially-filled DWV joint requires preheating the joint with a heat gun. Much like "sweating" or soldering copper pipe, if the joint is preheated, then the glue is applied, the glue gets sucked into the void to create a proper seal. Unsure if Oliver would use this method, and since the void was on top of the pipe, I just chose to do it when I got home.3 points
-
They are colloquially called "Ferncos". They should be available at any hardware store that carries plumbing parts. They are code approved for Drain Waste Vent (DWV) connections, like the one in your photo. IF you can move the pipe enough to achieve full insertion into the female flange part of the fitting shown in your photo, you can glue it with ABS glue. ABS glue is available at any hardware store. Buy the smallest can you can find, because it has a short shelf life once opened. Place a shop towel or 2 layers of paper towels under the joint to catch any drips, then daub glue on both the inside of the female flange and the closest 1" of the pipe, then immediately insert the pipe into the female flange and hold it in place for 30 seconds. The glue will take hold by then, and you can let go. IF the pipe won't move enough to allow full insertion into the female flange part of the fitting, using a Fernco is better than trying to glue the joint. Just be sure to measure the outside diameter of the pipe, and buy the right size to fit that. It looks like you can pull the pipe far enough away from the fitting to enable you to slip the Fernco coupler completely onto the pipe. Once the Fernco is on the pipe, then slip the end of the pipe as far into the female flange part as you can. Then slide the Fernco coupler back toward and over the flange so the coupler is centered over the joint (as best you can). Then tighten the hose clamps until they are snug. If you tighten with a slothead screwdriver about as tight as you can, that should be about right. If you use a nut driver, be careful not to over tighten, or you can strip out the screw in the hose clamp. Good luck!3 points
-
Love that pic. Says a lot.3 points
-
...so here's a "2-fer". Top pic is a "chirpie" aerator nibbling on a full moon in Durango. Next one is Magnus after a long day on the road.
3 points
-
Kansa, get a warranty claim started, if you can wait for an Rv tech. That is obviously “user error” on the part of the installer, plus somebody did not inspect it later… regular ABS primer and black glue should fix it, but there may be other spots that are not right, so every glued joint in the trailer should be inspected IMHO. Of more concern to me is they mixed abs pipe (black) and pvc connectors (white). While it CAN technically be done with the correct special green glue, it is in no way standard practice on a production line! It could be OK for a repair, but in many areas it would not pass an inspection! I would like to know why they did it!!! Read this. https://www.mortonsonthemove.com/abs-to-pvc/#:~:text=Absolutely.,to chemically bond the plastics. Good luck. John Davies Spokane WA3 points
-
Here is a black pipe coupling you can purchase at Lowes. This is routinely used for ABS connection repair...beats re-gluing. I believe Oliver uses these or something similar now anyway. I eb
3 points
-
In the apple orchard at Red apple farm on Rt 2. Our first Harvest Host night. Fantastic
3 points
-
@John E Davies, I haven't found the easter eggs. 😐 But here's my "smile photo." I call this tree on our property in NC my t-rex tulip tree. If you squint, you can see the open jaws, and neck outline. This time of the year, the tulip poplars are in bloom, near the top, where the little blooms kind of look like tulips. In the lower branch/bottom jaw, you can see the blossoms. They look like teeth from a distance. These trees are usually kind of cone shaped. T rex is reaching for the sun, obviously.
3 points
-
One of the first things I had to replace when getting Hull 110 was the cell booster. I picked up a WeeBoost and left the interior antenna cable extended over the dinette table. I've not yet made it super "pretty", but the long cable allows me to sit outside with my phone right next to the antenna. Basically, if you've used a booster before, the phone pretty much needs to literally be on top of the antenna to get any significant boost. At least with this POS WeeBoost. I want to shop for another extended cable to make it even longer. As it is now I can barely get then antenna outside the door. It's a stretch.
2 points
-
Our factory-installed cell booster provides a moderate signal gain - 1 or 2 bars - in marginal coverage areas. Sometimes enough to eliminate buffering when streaming.2 points
-
Progressive Dynamics PD5110010V Automatic Transfer Switch With Pig Tail AC Wire Connections2 points
-
Use that TPMS on your trip to the Rally. Keep a very close eye on the tire temps and pressure. If you have anything approaching or over a 10 psi increase in tire pressure it could mean that your tires are underinflated. Remember - it is high tire temp that kills most tires and generally degrades a tire from the inside to the outside. Obviously, you must also keep in mind other conditions such as the road surface (a concrete surface will generally be cooler than a black top surface), the "crown" of the road (the tires on the lower side of the crown will generally run a bit warmer than the tires on the high side), the sun ( the tires on the side of the camper that are in the sun will run hotter than those in the shade), etc. Also keep in mind that the tire temps you should be most concerned with are the "cold" tire temps. That is your base line. Tire manufacturers allow for the natural increase in tire pressure in the construction of the tire. Even when a tire that has a maximum pressure rating of 80psi (cold) goes over that pressure during "normal" operation it is (most likely) within design specifications. Bill p.s. Have a safe trip over to the Rally! Can't wait to say hello!2 points
-
@SteveCr Interesting. Where I came to a full stop in your post is where you stated “hopefully the Truma will not give any trouble”. As the end user I wonder why Truma does not recommend an ES? There must be a reason. Moving forward, I am choosing to trust the engineers at Truma and Oliver Service recommendations. Given the out lay of cash to have the Truma retro fit done by Oliver, I choose to yield to Oliver Service and the Truma’s engineers caution flag and not install the ES and completely void the Truma warranty. I am thinking in the next 2 years Truma may approve an ES, I am willing to be patient. Did you install the ES on your Truma? Would like to hear your results. Patriot🇺🇸2 points
-
@Katjo: We've got the cell booster in Casablanca, too. We see no signal difference sitting at the dinette with the boost on either! We've tried and like the Star Link system (loaned to us from RV friends) and it's great in providing internet access. The RV-subscription of Star Link allows you to pay by the drink - on a monthly basis. Not a bad deal, we're getting one before our next trip, FYI.2 points
-
Cathy, I am in 100% agreement with you on keeping the trailer warm. I keep it connected to shore power and leave a small space heater on continually during the winter. I like to keep it about 60 degrees inside. Just because your pipes are winterized and won't freeze doesn't mean that other things won't suffer from being frigidly cold. If you have Lithium batteries you don't want them trying to charge themselves when the temp in the battery box is below freezing.2 points
-
Yes, Oliver and Truma both have said Truma will void the warranty if ES is installed. The Truma warranty is only two years and the ES can easily be installed yourself ..... almost plug and play. Hopefully the Truma AC will not give any trouble...I know the ES will not cause any. I worked for Emerson Electric and Schneider Electric for 34 years. We routinely modified OEM devices to suit our design intent. For my estimation, the ES/Truma installation is low risk. Modifying my F150's software....now that caused me to sweat. Voiding that warranty would have been painful....Truma, not so much. Steve2 points
-
We pre-sold our Dometic to a guy locally here in NC. I had it on FB market place for maybe a few hours. Patriot🇺🇸2 points
-
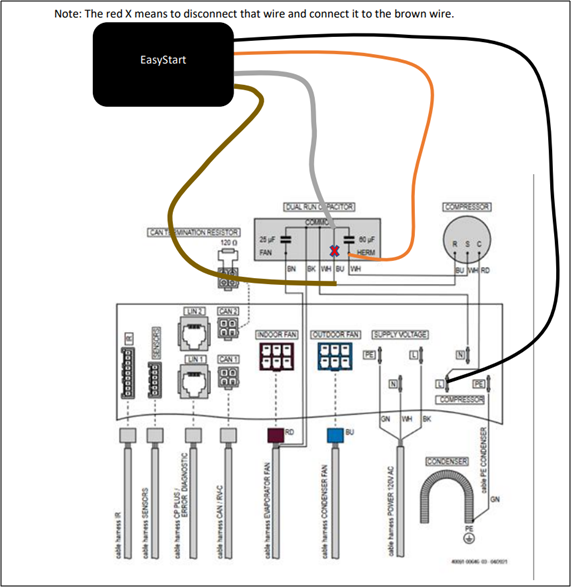
Here is the ES to Truma wiring diagram for those interested. If taken off the old Dometic AC the ES will need to be relearned....very easy with online instructions.
2 points
-
Ours was over a decade old. I offered it up for parts, and eventually recycled it. Newer unit owners have sold theirs on ebay or Craigslist.2 points
-
I was at the factory recently and I saw at least 8-10 Dometic units stacked against the back wall in service. So, as far as the swaps being done there, it appears that many owners are just leaving them behind.2 points
-
This campground (Datil Well Recreation Area) is highly recommended. Price is excellent at $5 per night or $2.50 per night if you have a National Parks Senior Pass. It has at least three clean pit toilets, a central water supply, back-in and pull-through sites, roof-over picnic tables at each site with a concrete platform, fire pit, decent privacy, beautiful surroundings, and (believe it or not) wifi access. They don't take reservations and there are over twenty sites. There were several sites available when we got here yesterday. A couple of sites have electricity but these are usually occupied according to the campground host. Sites are not all level and are gravel driveways. Handicapped site is level and poured concrete. This is what I would call luxurious boondocking!2 points
-
Hello routlaw, 2021 LE 2 #806 definitely requires a 1 1/2" socket. Your vintage axle hub nut may be different...why you may see different answers. The good news is that to verify you just need to remove the wheel and pop off the hub dust cap....10 mins or less.1 point
-
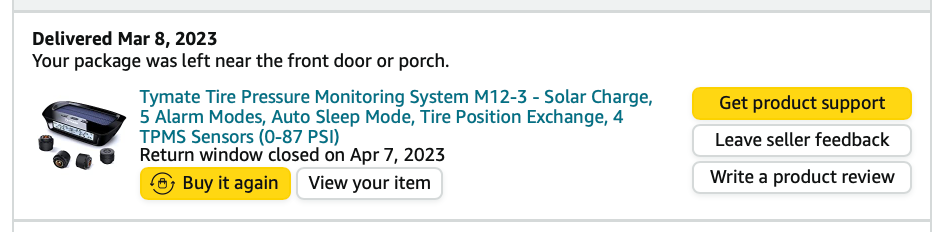
@routlaw: We found this unit on Amazon for what we consider a fair price point, much less than what we invested in the first TPMS go around: We've got roughly 500 miles of usage so far without issue. The readout is smaller than my old eyes would like, but it's solar powered and doesn't need 12vDC unless it's not been used for several weeks. It charges through a USB cable in about 25-30 minutes time. But as mentioned above, sensor batteries are a piece of cake to replace. Just my $0.02 worth... Stay safe, brother...
1 point
-
Air Command has a built in thermostat/ control panel plus a small remote for changing modes and temp. It can’t easily be set up with a remote thermostat, to the best of my knowledge, but I never pursued that idea. John Davies Spokane WA1 point
-
This image below is from the Xantrex 3000. The "grid" is powered from a Honda 2200i while running the Truma Aventa AC. Amazing numbers. Prior to ES installation the Aventa would not start up....afterwards no problem. I'm just sharing that folks that already have a generator that powered their Dometic absolutely do not have to shell out $2,400 for a 3000w Honda generator (or $900 for HF Predator).
1 point
-
We have a cell booster on our camper but when I turn it on I have no idea what it’s boosting, it’s definitely not my cell service! I have a Verizon hot spot that works great when I have cell service but there are times I get nothing but dead zone at certain places we camp. I’ve been contemplating getting a WeeBoost but have no idea how to set one up or how well it works. Star Link seems to be a good choice but I can’t justify the cost since we aren’t full time. How is the WeeBoost working for you? How did you hook it up?1 point
-
2021 LE2 Sold my Dometic minus the Easy Start for $400 on Facebook Marketplace....took a couple of months. BTW.....a Honda 2200i will most definitely run the Truma with an installed Easy Start.
1 point
-
HA, didn't see the reply until now. Winning!1 point
-
There are six more scattered around the interior… all different, of course. John Davies Spokane WA
1 point
-
Update! Wayfinder and connor77 have volunteered to have everyone in their Ollie's for the dump valve discussion! 😮 Just kidding! 😎 We will try to do most of the discussion in a common place and then do a practical demonstration in and around the volunteer's Ollie's. Mossey1 point
-
Reading through this thread this morning I like the many perspectives being shared. But the best part is for a new person with minimal or no travel trailer towing experience, it quickly becomes obvious that loading and balancing for proper tongue weight is a concern and focus for the experienced and for good reasons. We are fortunate in that Oliver has engineered our trailers to be easy if not forgiving in this respect. We do have a considerable amount of cargo capacity, so it is important to be mindful of the placement of cargo in relation to balance and especially tongue weight. This also emphasizes the importance of understanding the capacities of your tow vehicle. Everything you put in the trailer effects the TV loading. If you are operating on a thin margin with the TV it is critical to be mindful of all these considerations. A good emphasis on tongue weight is the focal point because that is the one factor that will most effect stability and safe handling of the trailer while driving. It also effects the steering characteristics of TV. The last thing you want to do is add weight to the rear in a way that reduces tongue weight, especially weight at the bumper hitch. It's fine if it offsets weight added to the front but should never cause a reduction in tongue weight below the 10-12% that's required for stability. Like @Katjoeluded to, weight added to the rear hitch has a way of magnifying the "whip effect". Point being it's wise to be mindful of loading cargo, especially heavy cargo. For a new person my advice would be to stay mindful of all these factors, and if you load a certain way and notice a change in stability, consider alternatives to the load to improve. Each of us kind of seek out the sweet spot for a TV/trailer combination. Great discussion folks.1 point
-
Correct. Oliver installs an automatic transfer switch when the extra 30 amp port is ordered as an option. For any DIYers thinking of adding the extra 30 amp inlet port themselves, there absolutely must be a transfer switch installed to prevent multiple simultaneous external AC power connections.1 point
-
All of our tap lights come on when we turn the master light switch on. Every time.1 point
-
What’s “overkill”?1 point
-
Welcome @Nightfog. True about YouTube watching. It took me 8 to 10 years to pull the trigger. LOTs of "research" for sure. This group is fantastic and TONS of experience. I learn from them every time I log in. CORRECTION: Oliver is my first camper, and maybe my last. LOL Cheers,1 point
-
I suppose any of the above will make do. Oliver Service highly recommends a minimum of a 3000 watt inverter gen. And now with those that choose the optional quieter new Truma Aventa a 3000 watt generator is required if you want to run the AC. I am partial to Honda gens as they have always served me very well. My 02 cents worth. 😊 Patriot🇺🇸1 point
-
Will do!1 point
-
Almost done, this is the same Isotherm Cruise 130 that Oliver is now using. I have some paint touchup to do, and some sealing after the paint is fully cured. I will do a new thread when it is finished. It is remarkable how silent it is…. John Davies Spokane WA
1 point
-
If it's not the cable, it could be the valve itself. Our last trailer had a tank valve where the seals were very tight against the gate, making it hard to operate. Adding some RV tank valve lubricant every spring solved the issue. You just pour some into the tank before a trip.Thetford RV Drain Valve Lubricant... https://www.amazon.com/dp/B000BGK2L0?ref=ppx_pop_mob_ap_share1 point
-
If gray water is leaking into the hose when the valve is closed, raise the street side bed access hatch nearest the pantry and you will see the gray water valve. Push the silver cylinder at the end of the cable as far down as you can. That should solve the leaking. It is probably time to remove the cable from the outside and clean and lubricate it. It’s not difficult, loosen the screw on top of the gray water gate (under the street side bed), then pull it out from the outside. Clean and lubricate the cable then stick it back in and push it until it reaches the gate inside. While the outside handle is in the closed position, re-tighten the screw on the cable inside. That’s really all there is to it. I’ve done mine (and the black tank gate cable) twice in 7 years and it works fine. Mike1 point
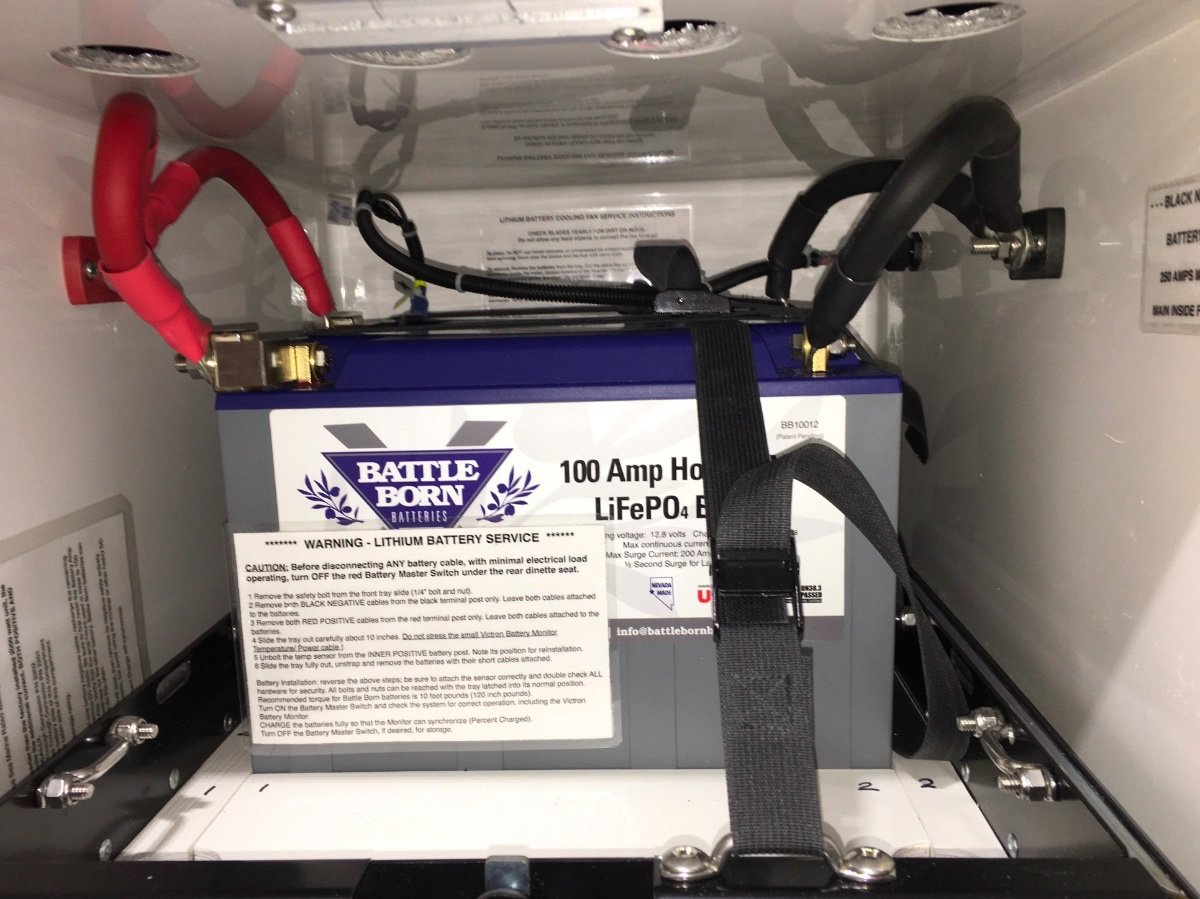
-
Four 6 volt AGMs are certainly the most painless and cost effective option. But they are not especially long lived, anything longer than three years is uncommon. Mine were fried at the beginning of season four. The advantage is that they are completely plug and play, you don’t have to mess around with different charger settings or making new cables. Lithiums are the way to go if you are at all handy and willing to learn how they work. They require a clear understanding of their differences and care. The weight savings is stunning! They do require a new charging board for your converter, with a “lithium switch”, and a simple change of settings in your solar controller. Your truck will no longer charge them properly, you should either disconnect that charge wire or install a smart DC to DC charger that will properly manage that current. If the brand has its own Bluetooth app, you do not need to do anything else special, but Battle Borns require a separate battery monitor, to keep track of the state of charge. (You can no longer use the system voltage since it doesn’t steadily decline like a lead acid battery.) I suggest that you educate yourself about RV lithium batteries, and then make an informed decision. I switched to two Battle Born 100 amp hour ones and I find that amount to be plenty, except when I am running a compressor fridge in the truck, that uses up to 50 AH per day and then I start to worry. I do have room for a third battery, but so far I do not think I will need to add it… These ship free and have a super warranty and reputation: https://battlebornbatteries.com/product/12v-lifepo4-deep-cycle-battery/ This is excellent: https://olivertraveltrailers.com/forums/topic/6629-how-to-find-happiness-with-lifepo4-lithium-ion-batteries-solacity-article/ Other FYI: https://olivertraveltrailers.com/forums/topic/4812-how-to-progressive-dynamics-pd4045-lithium-upgrade/ https://olivertraveltrailers.com/forums/topic/5270-how-to-redarc-dc-to-dc-11-amp-output-trailer-charger-installation/ If you must get running again ASAP, buy a $100 12 volt Walmart Deep Cycle battery (not AGM) and use that until you get the situation under control. Later you can sell it on Craigslist and recoup some of its cost. John Davies Spokane WA
1 point
-
Agree with John on this. Knowing my limitations causes much research, questioning and learning. Some of what I’ve done amazes me on the one hand and is very satisfying on the other. I’m a bit apprehensive about my upcoming battery and charger project resulting in more digging and learning. The input on this forum is quite a resource and the experiences and lessons learned from fellow owners is invaluable. Add to that some private tutoring from knowledgeable owners and impossible sounding projects become possible. Mike1 point
-
Thanks JD - great material.1 point
-
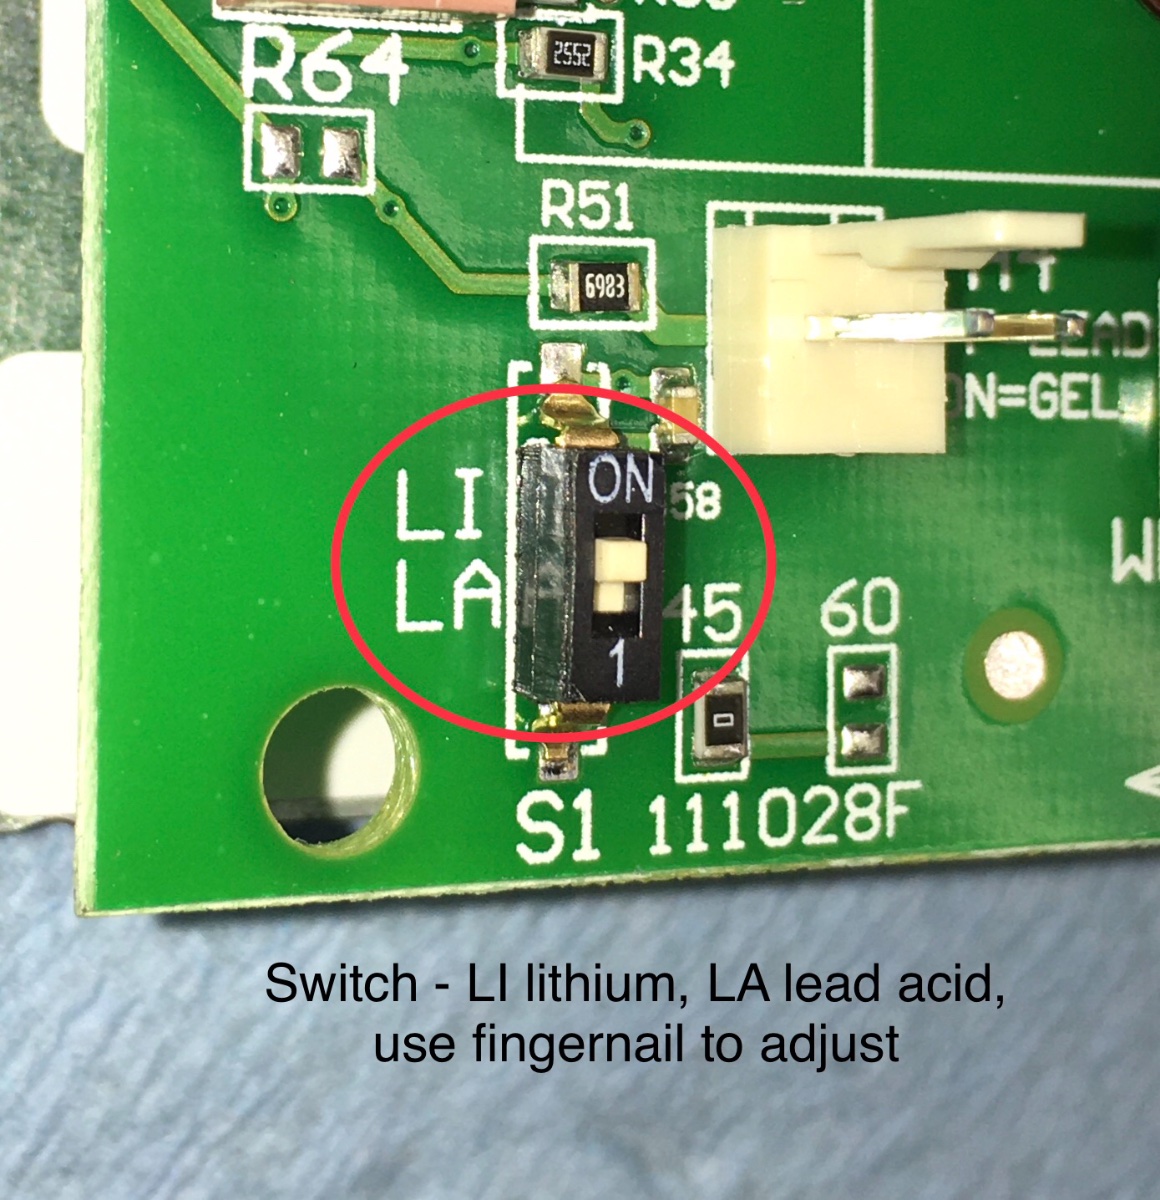
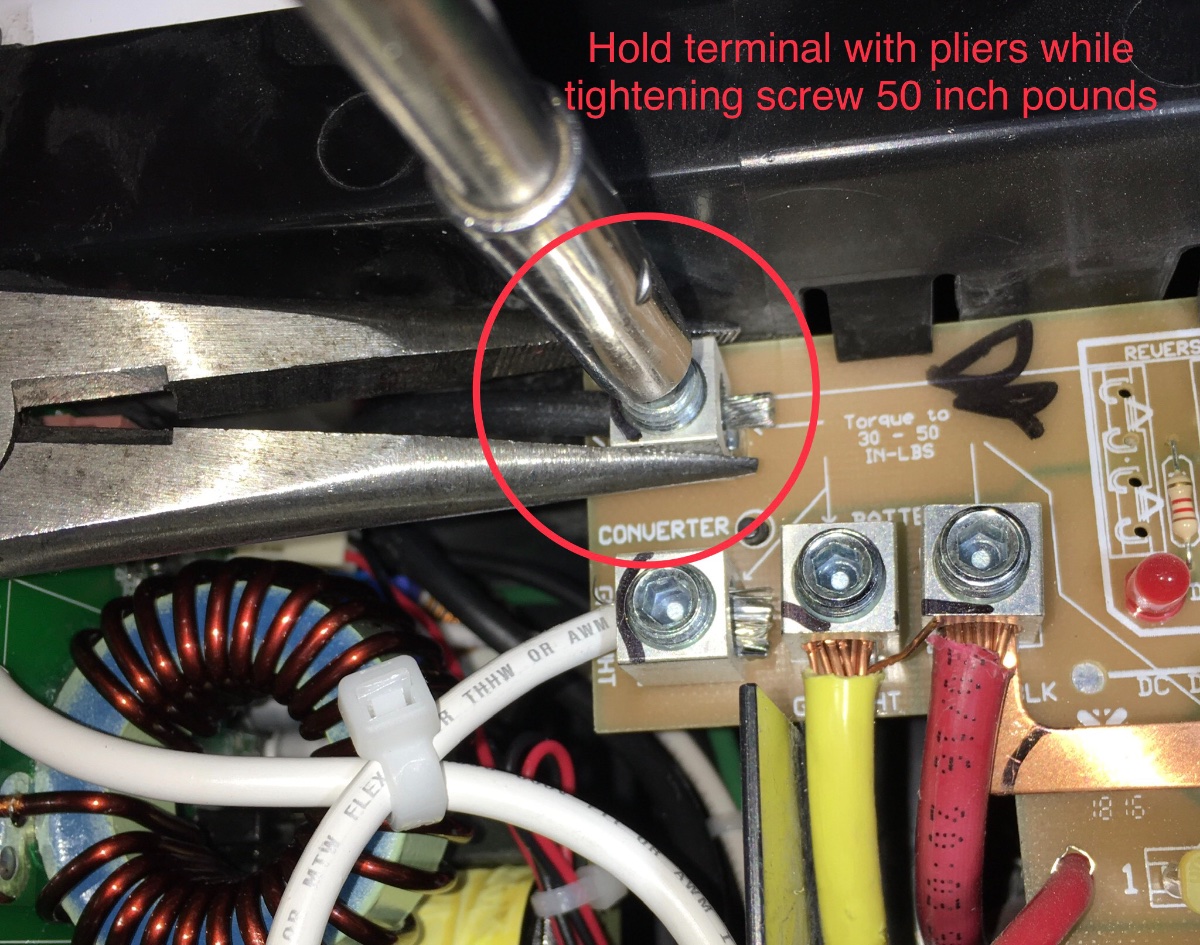
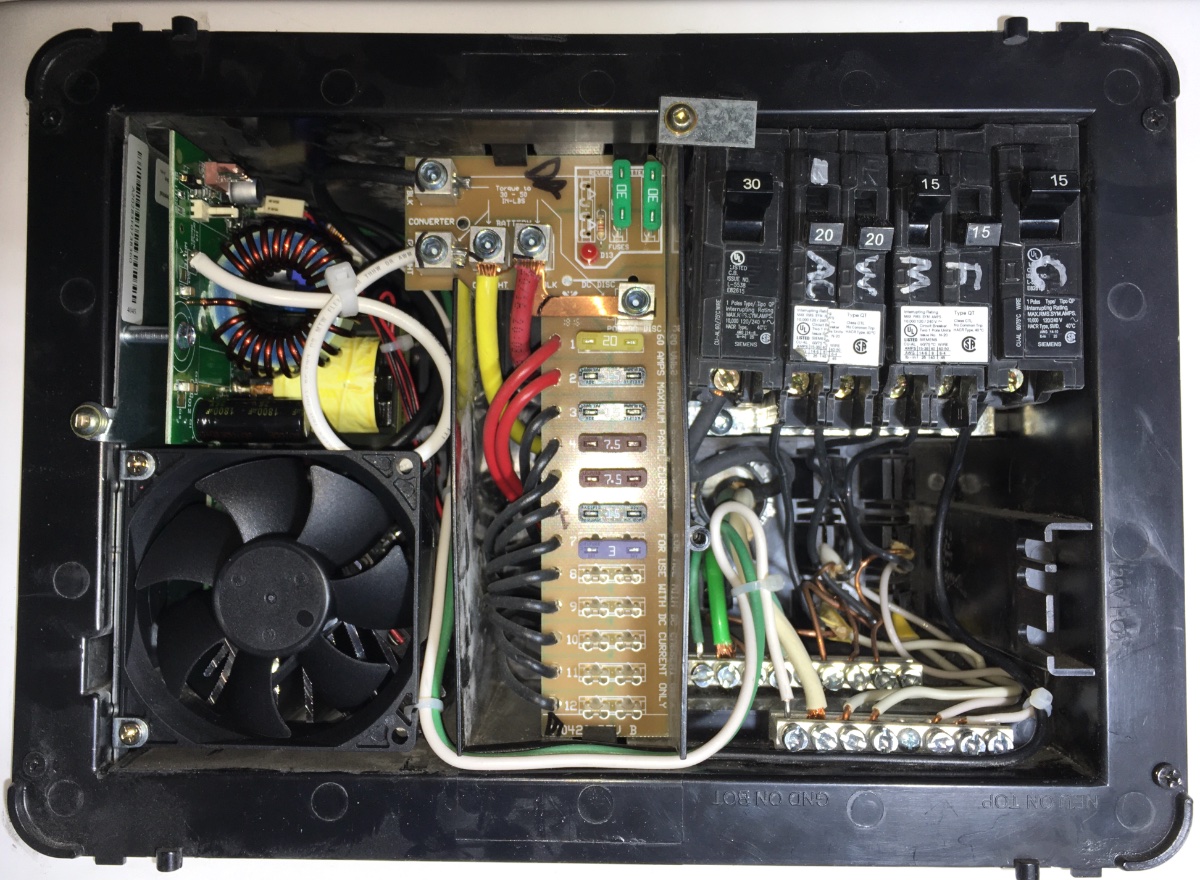
Prep the new unit. Secure the three small 120 volt AC wires with nylon ties. Also secure the black and red fan wires if necessary. This provides "strain relief" for the soldered joints and reduces the chance of damage from rough roads. Plus it looks a lot better. Here is the Lithium/ Lead Acid selector switch which alters the charging parameters to allow a 100% charge. It is an actual microswitch, you slide it back and forth with a fingernail or tiny screwdriver. Make sure it is in the upper ON "LI" position. Slide the new unit into place and install the retaining screw and washer. Connect the wires. The two big wires need to be tight. Mine were actually a little loose. Hold the terminal block with a pair of pliers to reduce strain on the circuit board. You don't need a torque wrench, hand tight is fine. Secure the white wire in a loop as shown. You can't get access to the black one. Add some ties to secure the AC wires. Done: BTW, the circuit breakers just snap into place, I tried to align mine so that they were close to even, but had no luck. The silver letters are lables I added with a Sharpie: C converter (charger), F fridge (or use R for refrigerator), M microwave/ outlets, W water heater, AC air conditioner. The big 30A one on the left is the MAIN breaker that shuts off power to all of the others. BTW also, each 12 volt fuse in the center is held held in place by little brass clips. The "ears" are very soft and can be distorted easily, causing an intermittent connection. (My fridge kept shutting down due to this.) Always be careful removing or installing a fuse, do not rock it sideways or the connection will be loose! You can very CAREFULY squeeze the ears together with mini pliers to make a tighter fit. This is a poor design. Reinstall the cover. Reconnect your NEW lithium batteries and shore power, and make sure the system is charging. I plan blow the dust off my used unit so I can sell it on here or on eBay. I hope this thread is helpful. John Davies Spokane WA
1 point


-
Recent Achievements
-
")


")


")


