Leaderboard


Popular Content
Showing content with the highest reputation on 01/14/2024 in all areas
-
@AlbertNTerri a very solid report and glad you have your issue fixed. Thank you for letting us all know. What I find really disturbing is that Truma knowingly admitted to you that they were aware of the collar nut not being properly torqued which resulted in a gas leak and a fire. Wow, very disconcerting. At a minimum one would think that Truma would have initiated a safety recall via serial number and address this serious fire hazzard. This could have really turned out to be a fire that might have completely destroyed your Oliver. I am so glad it did not, and you took all the appropriate steps to prevent further damage. Again, so glad you are both safe and your Oliver did not suffer and damage as far as you can tell. Hopefully Truma will do the right thing and immediately initiate a safety recall to address the torque issues on ALL serial number units with improper torque specs. Patriot🇺🇸4 points
-
😁 Hi, I’m Steve, and I am a Snow Peak Addict. 🤪3 points
-
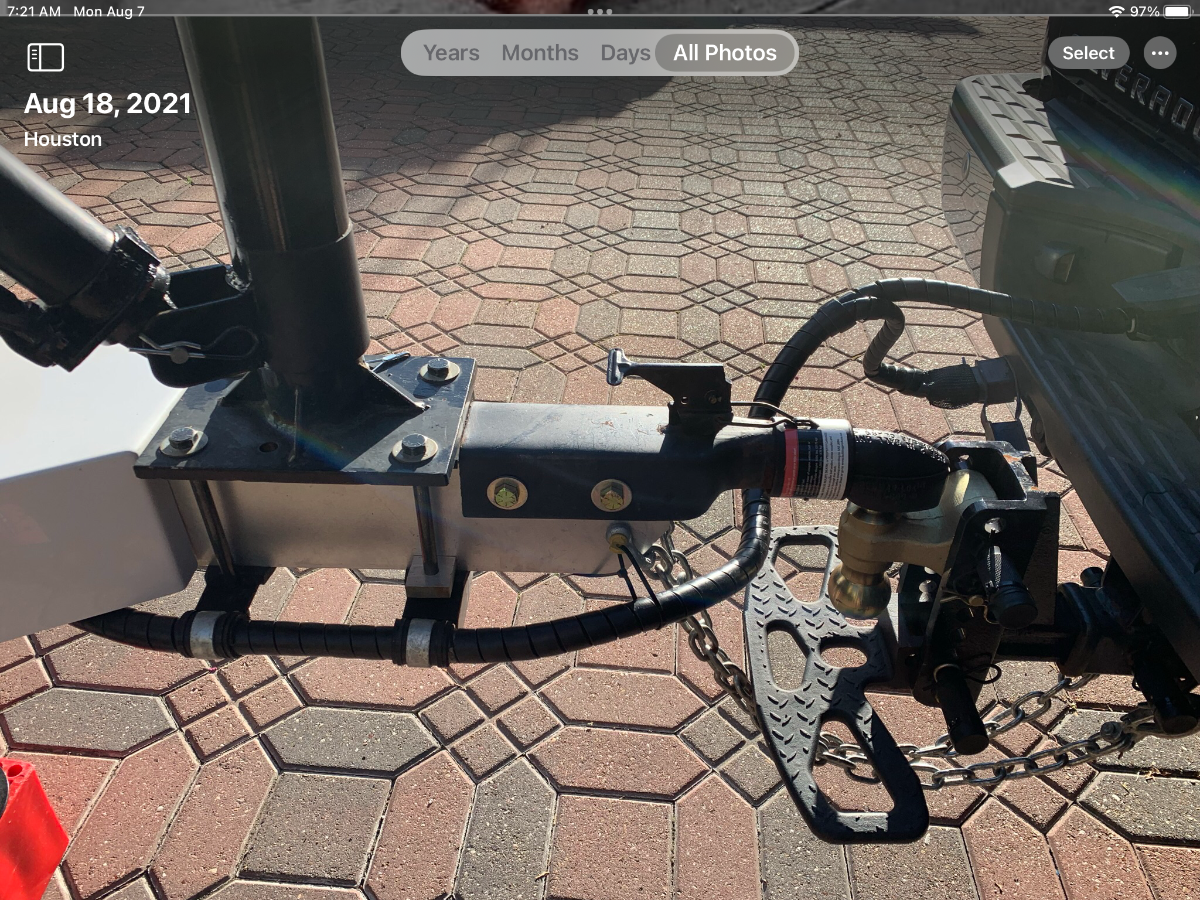
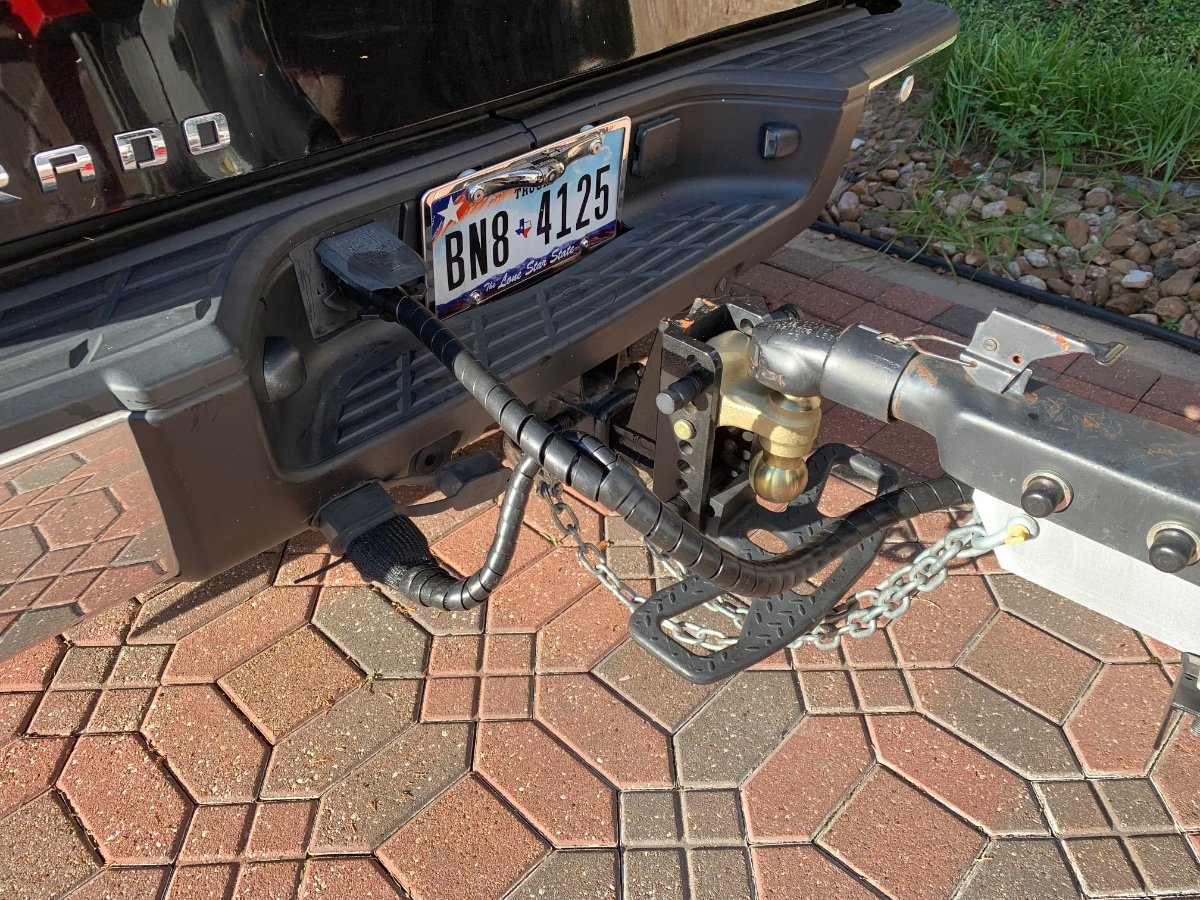
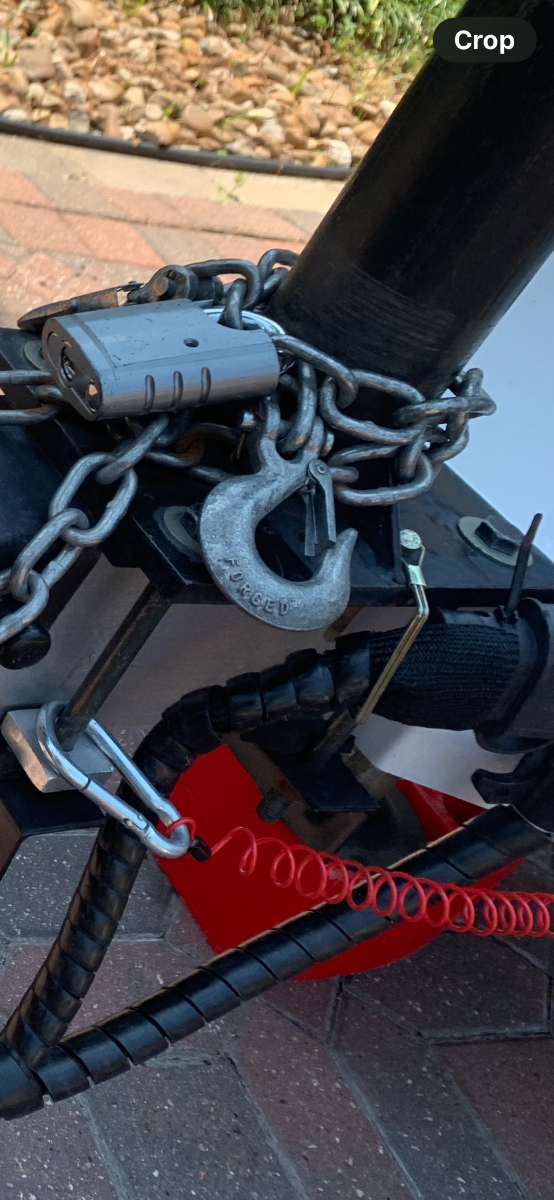
Spiral wrap hose protector, 3/4” ID for use on dual cable, .67” OD on single cable. Also used remnant sections to wrap propane hoses as routed along and over the frame up to the tank hoses. Unfortunately, the larger size in ‘black’ is currently unavailable on Amazon. I’ve used this type protector for decades on other trailers, as well as boats and Jeeps, and find this particular brand to be high quality and heavy duty.
 3 points
 -
Some Sun setting pix from this evening at The Q... ...and if you look closely, you'll see where the locals placed their "Q" in Dome Rock: Cheers, All!
3 points
-
I'm surprised that you could pull your trailer up the shear side of those mountains. Carol must have been behind pushing.3 points
-
It may be prudent for Oliver to address the issue in the forum’s News & Announcements for good measure, as well!3 points
-
I'm posting this in case anyone else encounters this problem: We were traveling back east from Hohenwald in a driving rain storm through GA and upon setting up at the campsite could not get the Truma furnace to heat; the error E 5 H was displayed on the digital display panel. The Truma documentation that I have did not list this particular error code. The furnace had been operating flawlessly prior to the rain storm so I suspected that the problem had to do with moisture preventing the furnace from igniting. I took a hair dryer and blew warm air up into the Truma exhaust vent to dry out any accumulated moisture and that fixed the problem. If anyone has a detailed description of the E 5 H error please post it here as I could not find a description online or in my documentation.2 points
-
@Mike and Carol today I thought of a 4th item to check. However, probability on this item being the cause is also lower than bearings and spindle. This would be the RR shock. If the shock absorber at that position failed drastically it could affect tire wear. To test, remove the shock and push it down to full compression on a workbench. Release it and look closely to see that it gradually returns to full length without hiccups or hesitation. Run it up and down 2-3 times in this manner.2 points
-
Frankly, we enjoy having the extra 6 gallons of available water in our standard Atwood water heater. Been using either an Atwood or Suburban in our RV's since the early '90's - we know them and how to keep them working. With the fresh tank syphon tube mod and the Atwood we're toting north of 38 gallons usable... plus a 6 gallon tote in the TV.2 points
-
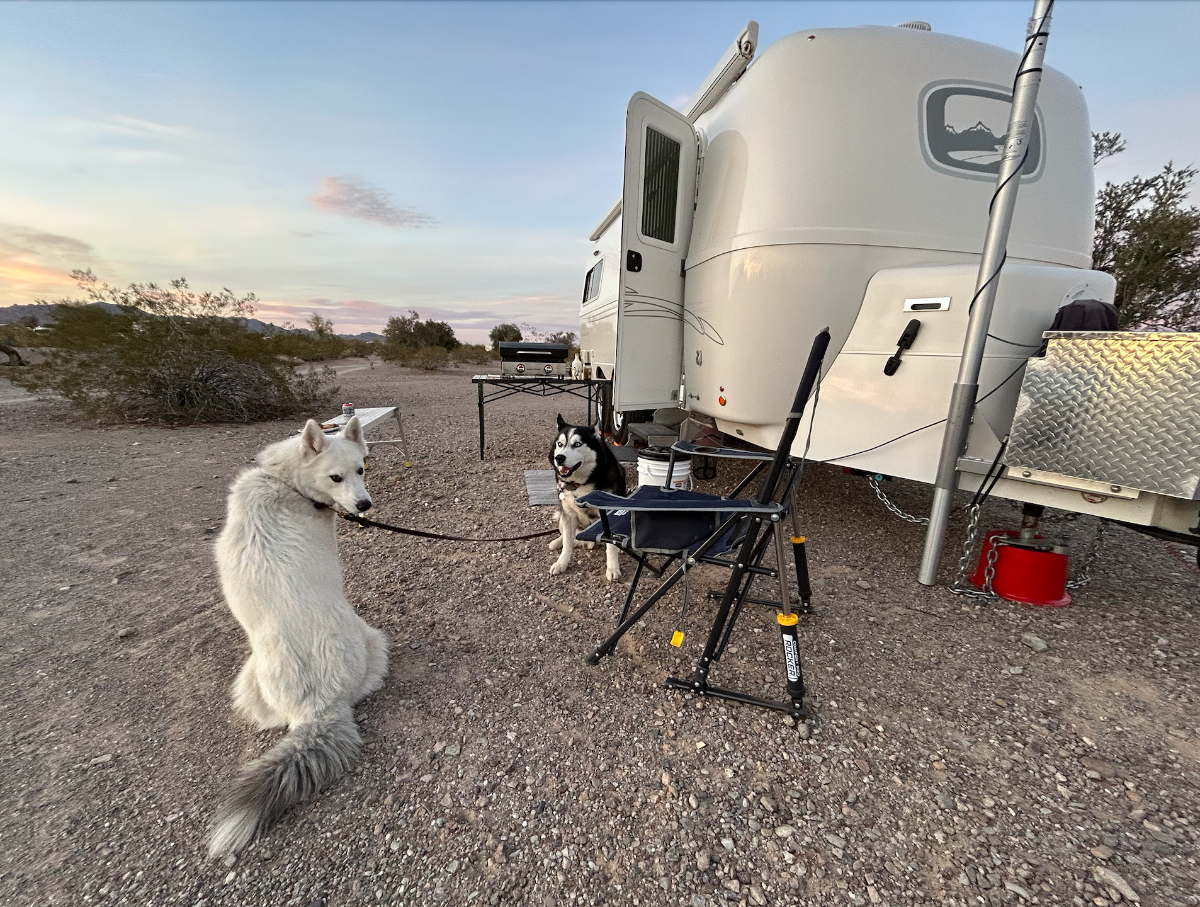
@Jps190: Here's an idea for you, brother... We made a Lagun table with Red Oak and fitted it with slots to fit onto the overhanging bed "wings" - its purpose was to be used as both a table and dog log rack. More space for the humans and the canines during slumber operations. I'm pointing to the slots here: The table top can be lowered onto the bed wings and pillows fill in the height gap between the table top and the mattresses. One or both of the Huskies fight for the cushy pillow addition... (Pls. ignore the dog logs in the pix below): Magnus won the fight: You wouldn't need to remove the night stand as the dimensions of the extended (port/stbd) sleeping area is approximately 52.5"W x 80"L. A standard queen is 60"W x 80", FYI. To make this design into a larger sleeping area work for you and save some $'s... All you'd need to do is 1. Make the table top 14" longer or 2. Use the existing Lagun table top dimensions and make a separate 14" section to fill the gap from the table top to the head of the bed. Then it's just a matter of getting a memory foam insert to match the height of your mattresses. The advantage to this system is its versatility - you can have the extra table space of the Lagun-style table plus the larger sleeping area with just a single additional component to your load-out. FYI: We store/strap our Lagun table top onto the inboard bulkhead in the closet - out of the way completely until we need it. Easy peasy. PM me if you need additional details - happy to help out. Cheers!
2 points
-
When your position is at the west-end of a given time zone, in this case only 25 miles east of PST, the sun comes up quite late in the AM. 0753, in fact: Nice having a room with a view (the not-so-Tactical OTT Operation Center): Cheers...
2 points
-
Well, let's see... The ultimate answer should be - "It depends". Why? The situation for us is fluid. Currently, the boys and I are solo in Quartzsite... Therefore, I get which ever "side" I want - port or starboard. Last night I chose the port side, head fore because we were watching a Netflix movie - Magnus did too. Oscar was banished to the starboard rack. When D is aboard - she opts for the port side and usually takes Oscar with her, he's smaller and gives her more room. Magnus and my 6'1" old bones get the STBD side and make due. What about morning coffee/shower time? Similar to @ScubaRx's comment, interestingly, after the coffee is made we switch from heads fore to aft... Why? Better view - especially when D climbs out of the shower... Cheers!2 points
-
It is some nice, well made gear.2 points
-
An unbalanced tire causes vibration. It would have to be extreme to create this kind of cupping, and less likely than other causes. Checking the balance doesn't matter anymore, since after this cupping it is certainly out of balance. You must determine cause, though bottom-line Mike, before a major trip you need to but a pair of new tires for that axle. Save the good one in case you do not find cause and have another single tire worn upon your return. I read some comments here suggesting alignment, but there are no alignment mechanisms in trailers like in an automobile or truck. You cannot adjust camber, caster or toe-in on trailer wheels. Looking at the picture, you can see that the axles are attached and float on the leaf springs, which bolted to the frame at 3 fixed points. The leaf springs generally have a centering hole that would not shift and again, not adjustable. Also, it is highly unlikely that a damaged axle would affect one side and NOT the other! Likely possibilities: a 1) damaged rim, 2) the bearings or spindle, or perhaps 3) the leaf spring for that wheel. When your trailer is sitting level, before you jack it up, inspect the leaf spring thoroughly and compare its height and shape to the good side. When you get the affected wheel up in the air, check for free play by pushing it in the 3 to 9 o'clock and 6 to 12 positions. Remove the wheel and check the backside of the rim for any cracks or bends. Now look again at the leaf spring thoroughly and check for bangs, bends or cracks. Lastly, it is most likely the bearings or a worn spindle on which they sit. It appears the cupping is more so on the outer edges of the tire, which again looks like bearings. See what the grease looks like. Clean inner and outer bearings with old fuel or kerosene, blow dry and see if they spin freely and quickly when sitting on a workbench. Check the axle to see if it is out-of-round, has any discoloration, bad spots or anything that does not look like clean hardened factory steel. Of course, correct anything found to be damaged. If you cannot find anything, just repack your bearings, mount those new tires and try to enjoy your trip! Once you get underway check the temp of each hub each time you stop. I just read this in another thread here. You can get the fancy infrared digital thermometer, or just use the palm of your hand to feel the heat. Feel if one hub seems hotter than the rest. And of course, keep a closer eye on this RR position that had the issue. Good news is you found this prior to leaving, tire cupping is not life threatening immediately, as it likely took tens of 1000s of highway miles for this tire to get this amount of cupping. I understand you put a lot of miles on your Oliver annually. Best wishes
2 points
-
For those that have a bit of time on their hands AND want to save a couple of bucks too: Take those "yellowed" outlet covers off, clean then really well, wipe with alcohol and then given them a couple of coats of Krylon white spray paint. Let dry overnight and put them back on. I did mine this way about two years ago and there have been no signs of the yellow reappearing. Bill2 points
-
Our trailer is 8 years old. We had it ceramic coated by the CGI team last year and the fiberglass looks as good as or better than new. Unfortunately, the outlet covers on the 110 outlet and back jack switches had turned yellow. The plastic chrome bezels around the tail lights had lost their shine. So, while this isn’t an easy “mod” it is an easy and inexpensive maintenance project. I ordered new Furrion outlet covers and six new chrome light bezels and had them all replaced in about 15 minutes. All are available on Amazon. Furrion Outlet Cover Light Bezel Old and new. This looks much better than the yellow version. Old and new. New bezel on top, old bezels in the middle and bottom.
2 points
-
Another vote for heads to galley, and others have hit on our reasons, as well. Another plus for heads to galley is the ability to use the Froli adjustable headrest under the mattress; this headrest, coupled with their mattress support, have reinforced the heads to galley position best for us.
2 points
-
Nice install! For general information to those that may not be aware, Anderson has an Environmental Boot that can be used at the bumper mount, as well as the DC-DC cable connect on the OTT; this ensures a waterproof connection when in use, and protection from dirt and moisture when disconnected.
2 points
-
Many of the COE campgrounds at Land between the Lakes are closed for the winter. Our favorite is Canal COE and it is closed in March. You will need to check the others. Smoky Mountain National Park is one of our favorites. You will still have cold temps and snow in the mountains in March. I would suggest taking the Natchez Trace Parkway from Hohenwald to Natchez, MS. Plenty of campgrounds and State Parks along the way. That heads you South to warmer temps. Head into Texas with unlimited State Parks and Big Bend National Park.2 points
-
Additional Update: I received a call from another person at Truma to follow up on the problem and repair (this individual called from the office in Indiana, the one I'd been dealing with previously was based out of Tampa/Lakeland area). He had viewed the video, I described the course and outcome. He informed me that they were aware of the collar nut which fastens the propane source to the burner assembly not being torqued to the appropriate level on some of the units that left the Truma factory and that they thought they had addressed this issue. He informed me that, "Out of the multiple thousands of water heaters they have produced, only a handful, less than a dozen, have had this problem, and they thought they had fully addressed it." He also informed me that they have been in touch with Oliver since it seemed to happen more often with units that were installed in Oliver's trailers. He told me (Truma) would like to see the unit and evaluate the repair themselves and suggested I bring it to the Lakeland FL location when we head north at the end of April. I told him that when this was initially discovered and I started talking to them last week about it, I was about 2-3 hours away from that facility and was happy to head over there (albeit in the opposite direction from our destination at the time). I actually started heading that way when they called me back and said they could not see me until the end of March due to their current schedule and work load. the gentleman from Indiana scoffed at that and told me that they will make the time to see me whenever I can get to them and to just call him when I'm heading that way so he can arrange me getting to the front of the line. (Currently we're settled in in Key West which is 5-7 hours away from Lakeland, traffic depending). For now, the unit is working well, no evidence of gas leaking. When we start heading north in April we may make the effort to swing by Lakeland since that will add less time to our journey north then stopping by The Mother Ship in TN. I'll update as needed. TAKE-HOME SUGGESTION: If you're so DIY inclined, I recommend removing the 2 star-head screws holding the bottom of the burner assembly in place, slide the burner assembly out enough to get a wrench on the collar nut (where the gas line turns upward 90-degrees and attaches to the burner assembly with a compression fitting) and make sure it is good and snug. I've reached out to Truma again and asked for their recommended torque for this nut, I'll update when they reply.2 points
-
Snow Peak Addiction is hard to cure…😇2 points
-
That's one way to say it. Another way is to say, "to winterize, expel all water from the plumbing system using compressed air." I do understand OTT does not advise this procedure, I've heard and read this several times, but I've never been very good at reading directions or listening to advice (some say an attribute of the good engineer). I have used this method for years in other RVs and just worked this yesterday on our Oliver. This is more complex in the little Oliver than say on our past Bigfoot Class-C RV, because of having four (4) hose water inlets. Please allow me to list my procedure and please comment if you believe I missed something, where there may still be some water in the system. I learned this from a Bigfoot owner, on the BOCI forum, who lives in Calgary BC Canada. He uses no antifreeze where of course lows are sub-zero for several months of winter. 1) Park your OTT nose uphill and start draining the Fresh Water tank. 2) Drain Hot Water Heater (HWH) and set HWH bypass valve 3) Reduce air compressor pressure to 50 PSI and use an air to hose fitting (see pic of one I built with spare parts). The fitting must be connect to the hose first, unless yours has a shut-off valve. 4) Turn your water system draw valve to the Winterize/Sanitize position. 5) Open the kitchen faucet both hot and cold sides 6) Connect the compressor airline to the rear Sanitation inlet (a few seconds is all required). 7) Change water valve back to Normal Camping Position. 8) Connect the compressor airline to the Fresh Water inlet (a few seconds is all required). 9) Connect the compressor airline to the City Water inlet (leave it connected). 10) Go inside and close the kitchen faucet. Then open each faucet separately. The toilet, then hot and cold, one at a time, for the bathroom sink, and kitchen again. Run the water pump at some point to expel internal water. Go outside and do the same for the outside shower. Go back inside and check each faucet again. They should all blow water mist when the lines are mostly empty (empty enough). 11) Close Fresh Tank drain when empty. Finish up with the HWH and reset the bypass valve. Get everything back to Normal Camping Position. 12) Empty Black and Gray tanks. Connect airline to Black Tank rinse, or at least remove cap to release water in this line.
1 point
-
Love the Flag mod on your Ollie Max!! Great photos and thanks for sharing! Have fun with the pups! ruff!! Patriot🇺🇸🇺🇸1 point
-
Personally, I would not run the water heater on eco or comfort while driving….that mode requires propane and a flame! For driving, with the antifreeze kit on, turn off the propane and set the truma to antifreeze mode, that will keep it from freezing while on the road without having to leave the propane on.1 point
-
Just another sun rise at The Q... The 'yotes were singing all night! 41F here now and expecting "Wall-to-Wall" sunshine today... Cheers!
1 point
-
You’ve got it! The woman who owned Nora’s (her daughter), sold it to a couple of local fellows who have put a lot of effort into improving it. The food, coffee, and pizza are now very good. It still has the same small local mountain town vibe - people who live here tend to thrive on that. Hungry Jack’s, the local general store was bought out by 250 of us, and is becoming exceptional!1 point
-
Hull 505 - Reports back Our SN for the failed unit was Hull 505 - SN DLE 60C - 29289053.. Another SN reported is.... Hill 1125 - S/N DLE 60C - 32153014 There were other reports before and after hull 505. Maybe Truma needs to reveal and report all suspect unit S/N to NHTSA?1 point
-
Heads to the front. We like being able to see the tv. The back just seemed too cramped I sleep on the curb side, CPAP sits on the stove glass with 12v plug right above. CPAP put away in the closet during the day.1 point
-
I will preface the following by thanking Mike and Carol for a segue into the issue of bedding variables. Hopefully it will be helpful to some or at least entertaining to others. We make our twin beds in such a way that eases this somewhat difficult task and doubles the layers of cover to better dial in personal comfort; works great for our ‘he’s hot’-‘she’s cold’ dilemma! It all starts with proper planning and prep, mostly done in the convenience of home when the bedding laundry from a trip is being done; sheets, pillowcases/shams, blankets and throws. I’ve grown accustomed to that ‘fresh’ scent opposed to the ‘seasoned’ smell of my old camping/hunting bedroll, but I’ve digressed! Once laundered, the fitted bottom sheets are folded in the usual awkward manner; however the flat sheets are each folded in half lengthwise, laid out (as if on the Oliver twin) to initially fold the bottom up and over to the desired bed length (foot of bed where tucked in to wherever you like the sheet top to be when made), then subsequent folds of the remaining in smaller lengths to complete the process for stowage; the blankets are folded in much the same manner, but rather than a half fold allow the top portion a bit more width for aisle overhang (more on this later). Along with folded pillowcases/shams, throws and pillows, all is zippered up in a clear bag and placed in the Oliver for future use. If a second set of sheets were used on a trip, they are folded in the same manner, but stowed at the closet upper shelf until next needed. We rarely completely make the beds prior to departure, but at minimum the fitted sheets are installed to protect the mattresses in transit. ‘Bed Scrunchies’ are your friend, especially if one uses standard twin sheets rather than the custom ones that better fit the curved mattress corner. ‘Why all the hoopla?’ you may be thinking, well let me explain! When it comes time to make the beds, your uniquely folded flat sheets are laid out ‘head to toe’ with the ‘lengthwise’ fold against the fiberglass wall, and if done properly that ‘initial’ fold you made will be at the foot of the bed. Now simply take that generous length of folded sheet and lift the mattress enough to tuck it into place; do the same with the blanket. Voila, the sheet and blanket ends are firmly anchored and the bed is almost made, less the pillows and optional throw, if desired. ‘Now wait a minute, what’s the big deal?’ you may be thinking, well let me explain! Traditionally, RV bed covers are tucked in at the bottom (easy), as well as along the wall (not so easy). A standard twin sheet/blanket is way too wide for the Oliver’s bed size, thus resulting in unruly bulk, and a lot of reaching, bending and tugging to tuck the excess away in good order. Many resort to altering bedding or making do with non-standard sizes, and I get it. However, I’m a simple man (my wife is laughing), but innovative! I now have two layers of sheets and two layers of blanket to crawl under, allowing me to peel off consecutive layers, as necessary. But there’s more! The crux of the matter is the simplicity and ease of effort in straightening the bed covers, whether during the night after getting up or just in and out of bed in the morning, and of course making it up for the day. ‘How is that?’ you may be thinking, well let me explain! If laying or sitting in bed, by grabbing and aligning the top corners of the sheet while slightly lifting and pulling, they will self-make; the blanket can then be done is like fashion. Because each are snuggly tucked and anchored, you can pull as taut as you like for the desired result. Making up the bed is just as easy, only from a standing position and in a jiffy! The proof is in the pudding!
1 point
-
Thanks for the info! And quick thinking on your part to resolve it.1 point
-
Nice creative and thoughtful approach - good work. But, THIS kind of thing probably shouldn't happen in the first place. I'd make sure that both Truma and Oliver Service know about it. Bill1 point
-
I just did a quick search on 5L stackable bins and I believe this is the link as the price, material, description and dimensions match. https://www.target.com/p/5l-stacking-bin-with-lid-white-brightroom-8482/-/A-86300286#lnk=sametab1 point
-
Bill, we have 20 year old sleeping bags. They don't look elegant like some pictures I have seen here. We talk about getting more into this century, but it's already nearly 1/4 way done, so why rush things. John1 point
-
We both sleep with our heads towards the galley. 😴 We really sleep great on our 10” memory foam mattresses.1 point
-
Jason - Sorry about that - If I had thought for just a minute and/or looked at your signature I would have realized what the "problem" is. Those fancy new awnings sure are nice given how easy they are to deploy, but, that ease of use has a cost. For what its worth - I bet that I've only used my old style awnings a dozen times in the past eight years. Bill1 point
-
@Ronbrink Any display that is on may be running on 12v, such as the smart shunt's Bluetooth radio you are communicating with while viewing the Victron Connect app. The propane/CO Detector is always on for safety reasons. The only way that comes to mind is a DC clamp on meter and start testing circuits. Mossey1 point
-
Here is a rivet specifically designed for plastic. Grip range is .02" to .32", but you'd have to step up to a #10 fastener. I don't know if the vanity wall fits into that range. I have no idea if/how these would work for fiberglass, but since they are designed for plastic, I'm assuming that it would put a lot less radial load on the material. https://www.mcmaster.com/products/rivet-nuts/for-use-in~plastic-2/1 point
-
Glad everything is back in working order and you were able to move out of the hotel! I do have at least one question, how was it determined that only one battery was bad to begin with? I don’t think you mentioned that in your initial post. Mossey1 point
-
White van, white Oliver, looks like a nicely matched set! 😊1 point
-
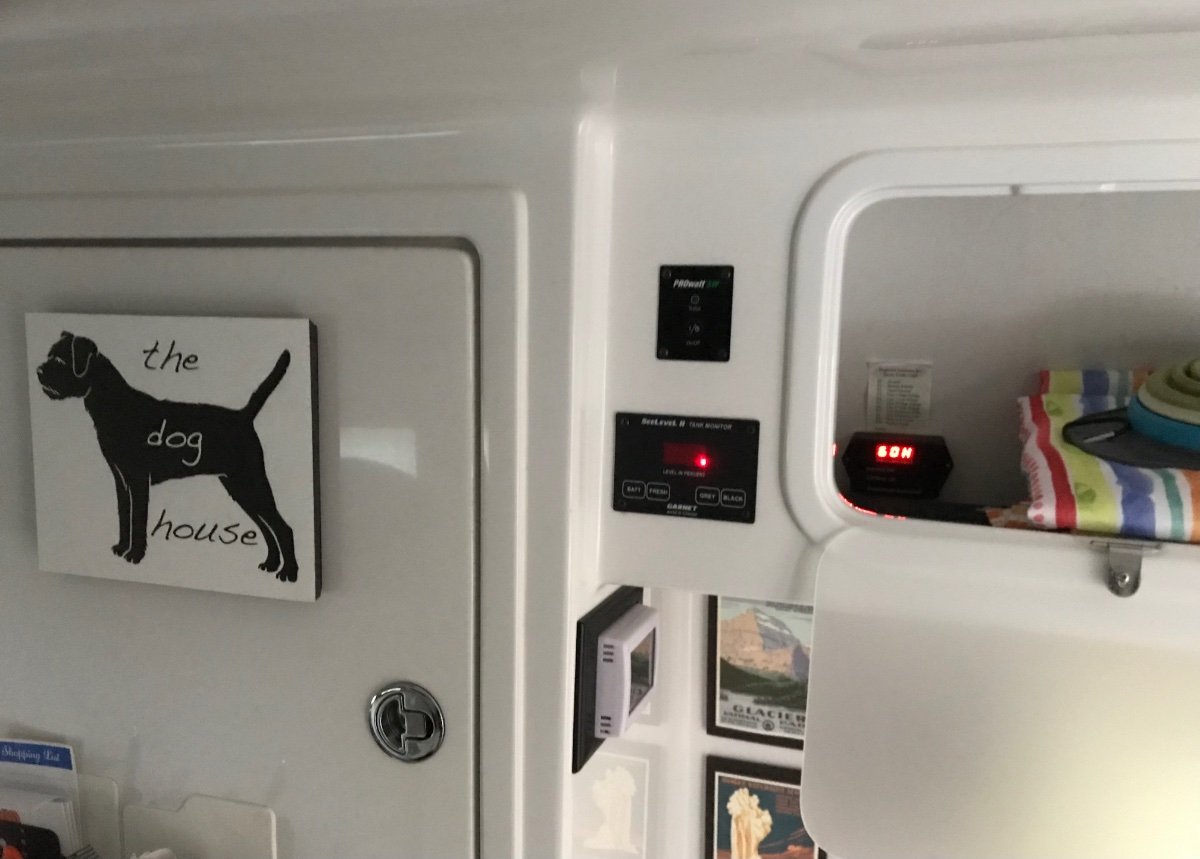
My factory installed our EMS remote display was installed under the street side bed. This was a great location for me because I then got the choice of where to move it to. I found out while researching a new location that I could purchase another remote display and link both the displays together in a mast/slave configuration. Ultimately I just decided to move the original display to a more convenient location, as shown below. My normal new site setup entails testing all outlets available at the pedestal. When I have determined the outlet I will connect to, I’m pretty confident it will work at that time, so the inside upper cabinet location is fine for me. If at a later time a condominium moves in next door and interrupts our power supply, resulting in reduced voltage, all I have to do is move the picnic tablecloth and the display with an error chart taped to the wall above it, allows for pretty quick troubleshooting. And if it’s raining or snowing, I don’t have to go outside to verify the pedestal is providing the correct voltage Mossey
1 point
-
First, I would buy spare fuses for all the sizes and types your trailer has. The trouble shooting process that likely will follow WILL likely result in your needing them. 😞 GJ1 point
-
No. Emergency situations while in the bush are addressed under Forum Rule 12.34B and you are allowed to communicated in any way such events. Also, they are not considered as hijackering. Something that this owner never does and can't even spell the work correctly. GJ1 point
-
@Ronbrink I think we all recognize the each Oliver is somewhat unique, whether from the factory or because an owner has made changes to suit their particular needs. So I try very hard to avoid making definitive statements and I try to avoid talking in absolutes. So I will not talk about your Oliver specifically, but I will talk about mine. Whenever I am working on the 12v system in my LE2 hull 193, the first step for me is to turn off the Blue Sea battery cutoff switch. I installed this switch, not Oliver and I do have solar. If I am plugged into an AC power source and I want to work on the batteries, I will also turn off the 12v charging breaker in the Progressive Dynamic power center. And I will also turn off the breakers I installed before and after the solar charger if needed. The last breaker I may need to turn off is the flag breaker Oliver installed which is I believe is the first device connected to the Progressive Dynamic's 12v charging circuit. And then I would use a 12v tester of some sort to verify the device I was going to work on was in fact isolated. All that being said, I would guess your 120v input to the charging section of the Progressive Dynamic was the source of the 12v output to the Oliver. Mossey1 point
-
I still think it looks wrong too. Yes, the lower left battery has the red cap wrong, but on that battery you can see the +/- signs. The new battery is top left and there are no +/- signs showing in the picture. If where the red cap is, somewhere below you find a + sign, then it was wired in reverse polarity. Like Chris wrote, the reason it would kill all batteries.1 point
-
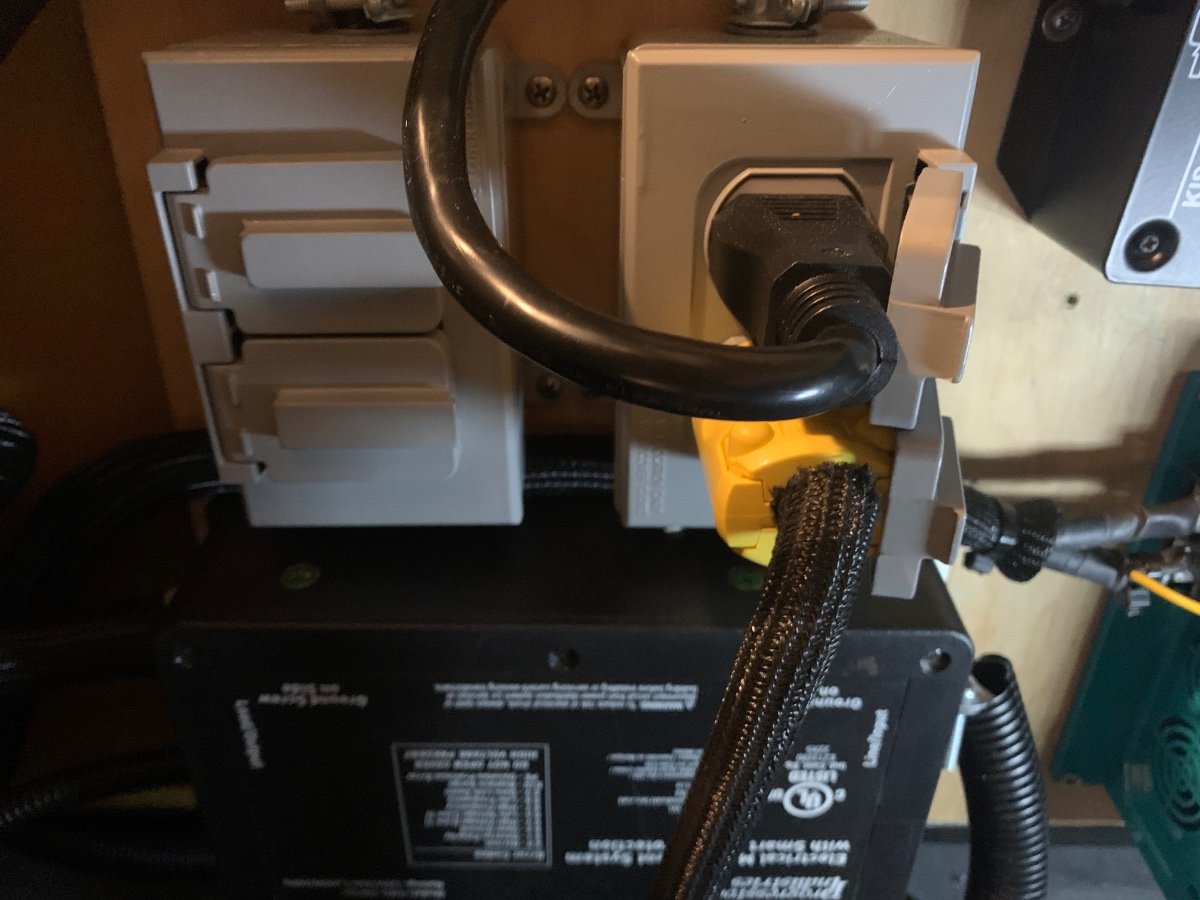
This is a view of my panel. However, I had enough room in it for two additional 20A breakers (seen unlabeled at the bottom of the row), which are pre-wired and ready for use by way of a single individual 20A outlet for each; think future electrical expansion projects! The two plugs to the right are connected to the inverter, the left two are the single 20A outlets in waiting. I needed an extra plug from the inverter for a transfer switch I installed to enable operation of the A/C on the house batteries.
1 point
-
Anything but "plug and play." Unless you are an experienced DIYer, it is wise to hire it done. I would not be surprised if you can find a local RV repair shop to do a lithium upgrade, perhaps with Battleborns rather than Lithionics, for much less than $11K+a drive to Hohenwald. This thread may give you a starting point for the learning process:1 point
-
Monitor your power source. You can do this easily by looking at the EMS panel. In our Oliver the panel is in the attic and its readout is in red LEDS. If the voltage drops to around 104V, the EMS will cut off shore power. If the Xantrex is drawing a lot of power (as it will by default when charging your batteries), with an unstable shore power source this could bring down the voltage to the point of EMS shutdown. This removes the power drain and allows the voltage to rise. Once it is sufficient, the EMS cuts back in and eventually powers the Xantrex. The resulting battery charging draw will bring down the voltage, etc., etc. I had this happen to our trailer at a campground that had unstable 30A shore power. Even if your batteries are fully charged, the Xantrex starts off by attempting a full charge and then rapidly changes from Bulk charging to the Absorption stage which draws much less power. You can also reconfigure the Xantrex to charge batteries at a much slower rate so its power draw is not so severe. May help, may not... We have the Lithium Pro package and Xantrex charging is set by default to 150A.1 point
-
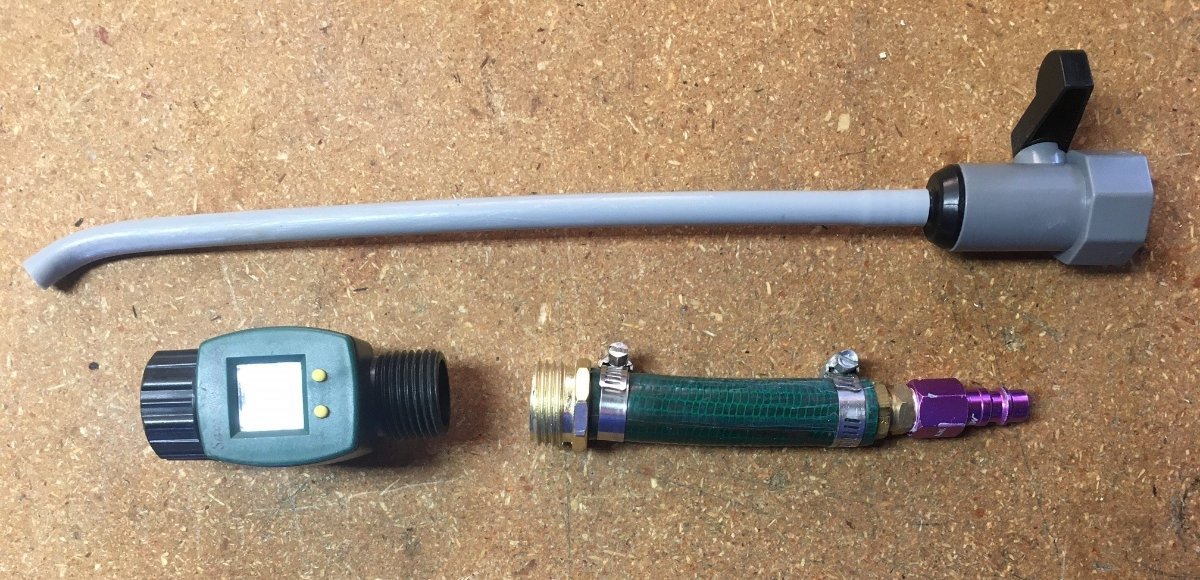
Because we live in the SW, we do more camping over the winter months, spring and fall of course, and none during summer (think Snowbirds RVing in Quartzite AZ). So, we don't truly "winterize" but live at 5400 FT elevation and it can get COLD overnight. Whenever the weather report forecasts several consecutive nights low 20s or in the teens, I'll blow out the water, but we could be heading out next week! This occurs often, 2-3 times a winter. I could not see adding antifreeze and flushing it clean on this basis. If winterizing the Oliver with antifreeze takes you 20 minutes, then using air should take 10-15 minutes. Yep, you need an air compressor. Mine has a 100' hose so I can fill RV tires all the way out on our road. Good time to check tire pressure and overfill your tires 10% for winter parking. This way when you are ready to leave again all you have to do is check pressure, let a little air out. The real difference is when we are ready to head out, everything is done and ready. No flushing antifreeze, just fill the freshwater tanks at home or at the campsite depending.1 point
-
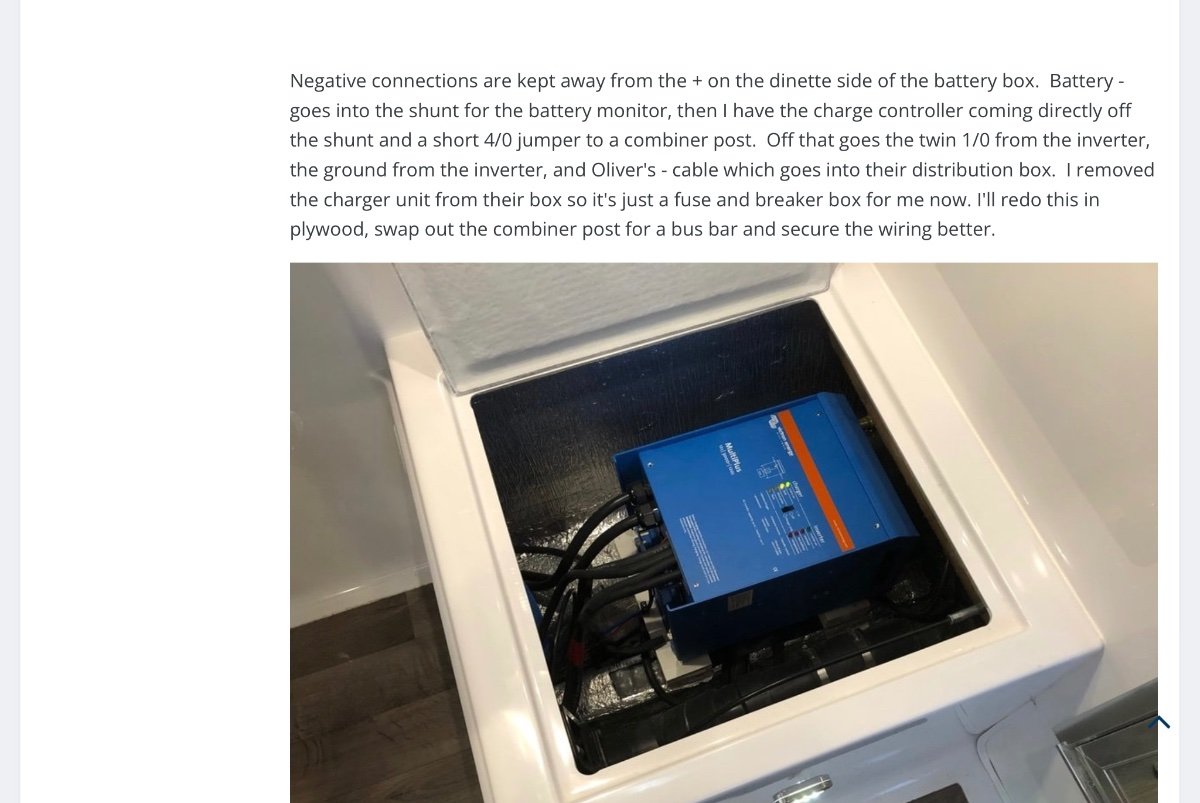
This is a picture of the first MultiPlus installed in a LE2 that I am aware of. This is a link with more details. Mossey
1 point
-
Plus one on Custer SP. And the wildlife loop road, at dusk and dawn!1 point


-
Recent Achievements
-


")


