Leaderboard


Popular Content
Showing content with the highest reputation on 09/01/2024 in all areas
-
I spoke to Cindy and her husband and they will give our suggestions a try. Mossey5 points
-
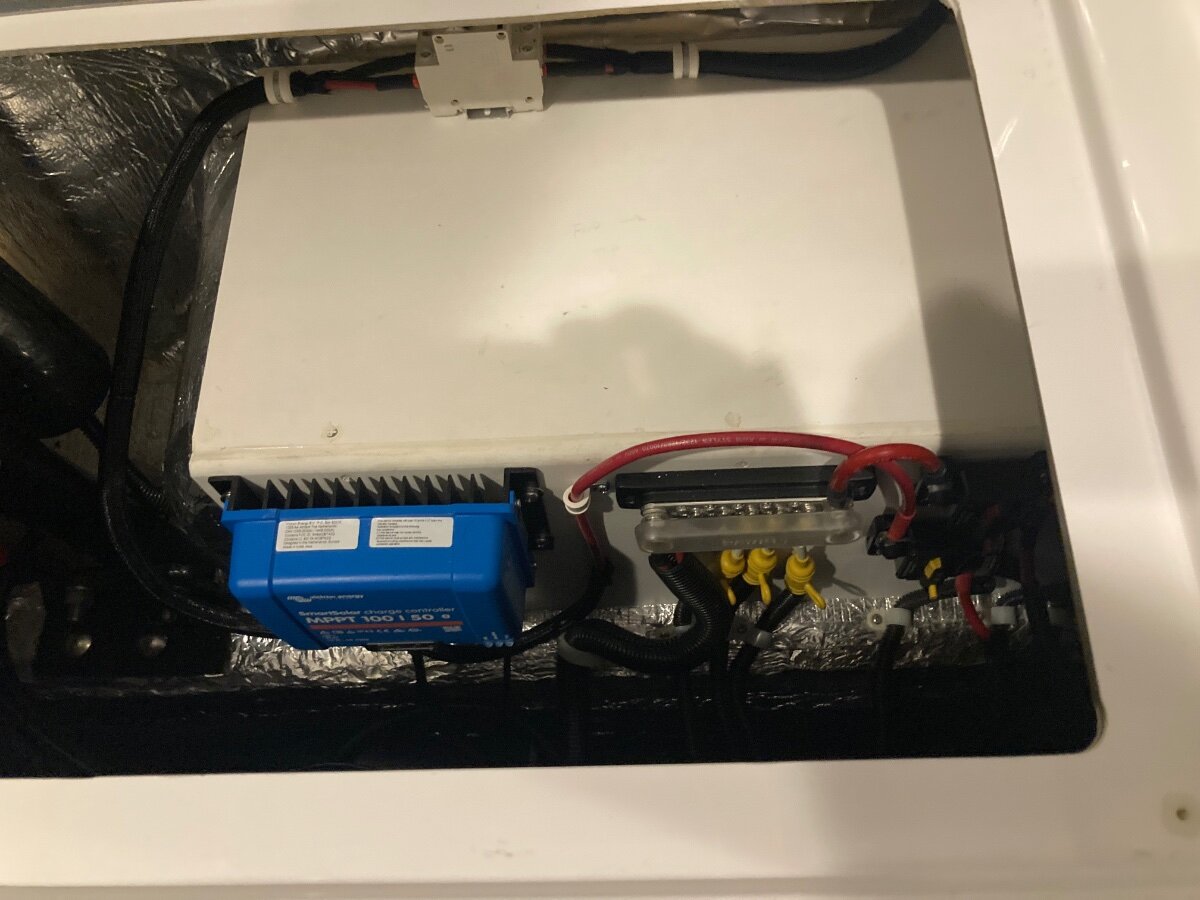
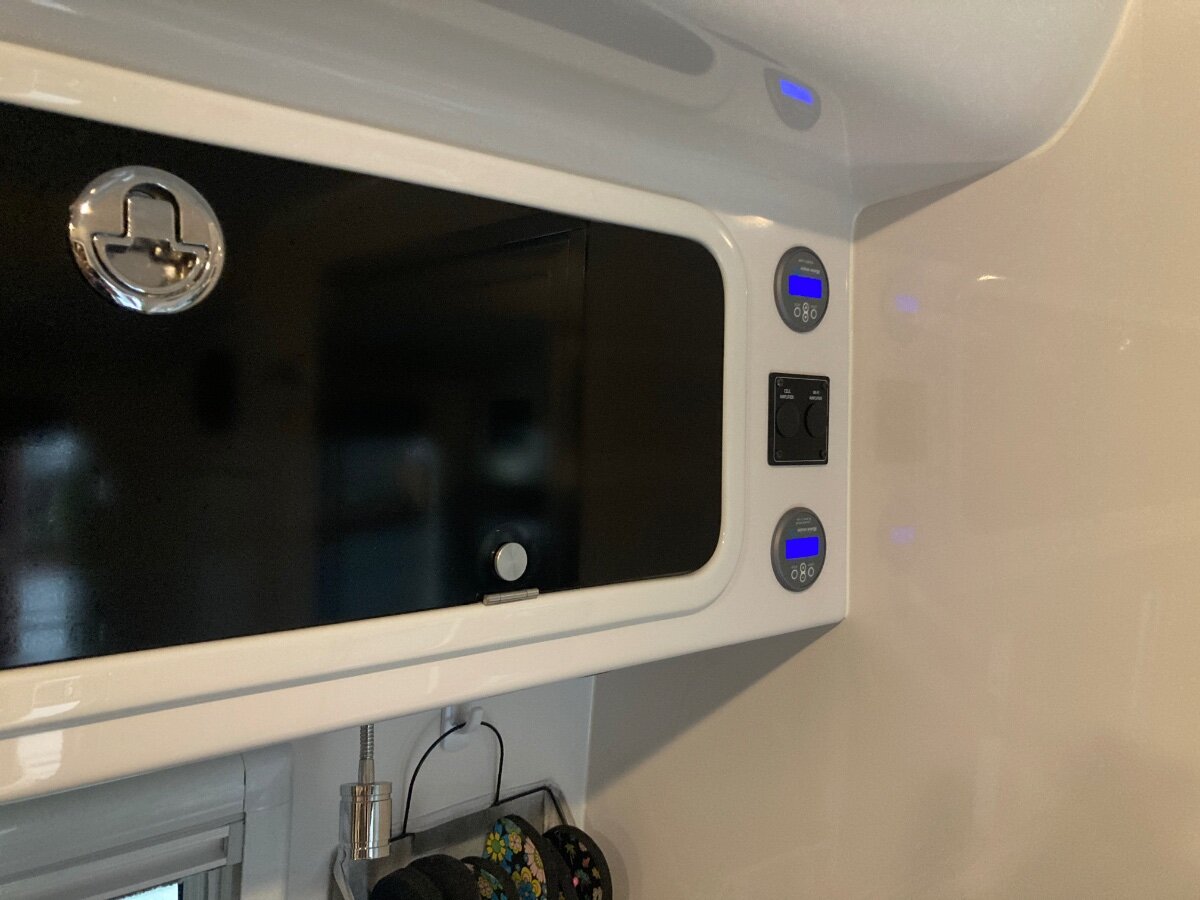
Finished up the rest of my solar install. Went with the Victron 100/50 controller installed under the street side bed. Took the opportunity to clean up this area and made some room for any future upgrades with some PVC sheet I was able to find at local Home Depot. Also wanted to clean up the battery compartment so I have only (+) and (-) 4/0 cables in there. Forward street side bed under the pantry installed victron shunt and a negative bus bar. Under rear dinette installed a positive bus bar, battery to inverter cutoff switch and a solar cutoff switch. Finally installed the MPPT and shunt displays on forward street side cabinet above the dinette. I wanted to leave the area above the radio open in case I decide to install cerbo gx display later. Had to purchase the longest v.e.direct cable victron offers in order to make this run. The only area I get wires pushed through was from the basement to the rear attic by following close to the AC drain line. I was then able to route the wires across the back of the upper cabinets.
 4 points
 -
Mossey asks all the right questions. If the cable is no longer attached to the valve it is probably just a matter of pushing the handle all the way in and then loosen the set screw on top of the valve, reinsert the cable and tighten it down. I’ve pulled both the black and gray cables all the way out from cleaning and lubing. They easily insert back into the sleeve to the valve. Then it’s just a matter of putting the cable under the set screw and tighten it down. Mike4 points
-
I am going to have to make some assumptions with the limited information you have provided. I am also going to ask some questions so I can try to help. 1. Did the pull/push handle stay attached to the stainless steel wire? 2. Did the SS wire pull all of the way out out the black sleeve? 3. Do you know where the grey tank valve is located? 4. Do you have a twin or full size bed? 5. Do you know how to access the area below the street side bed and front dinette? Mossey4 points
-
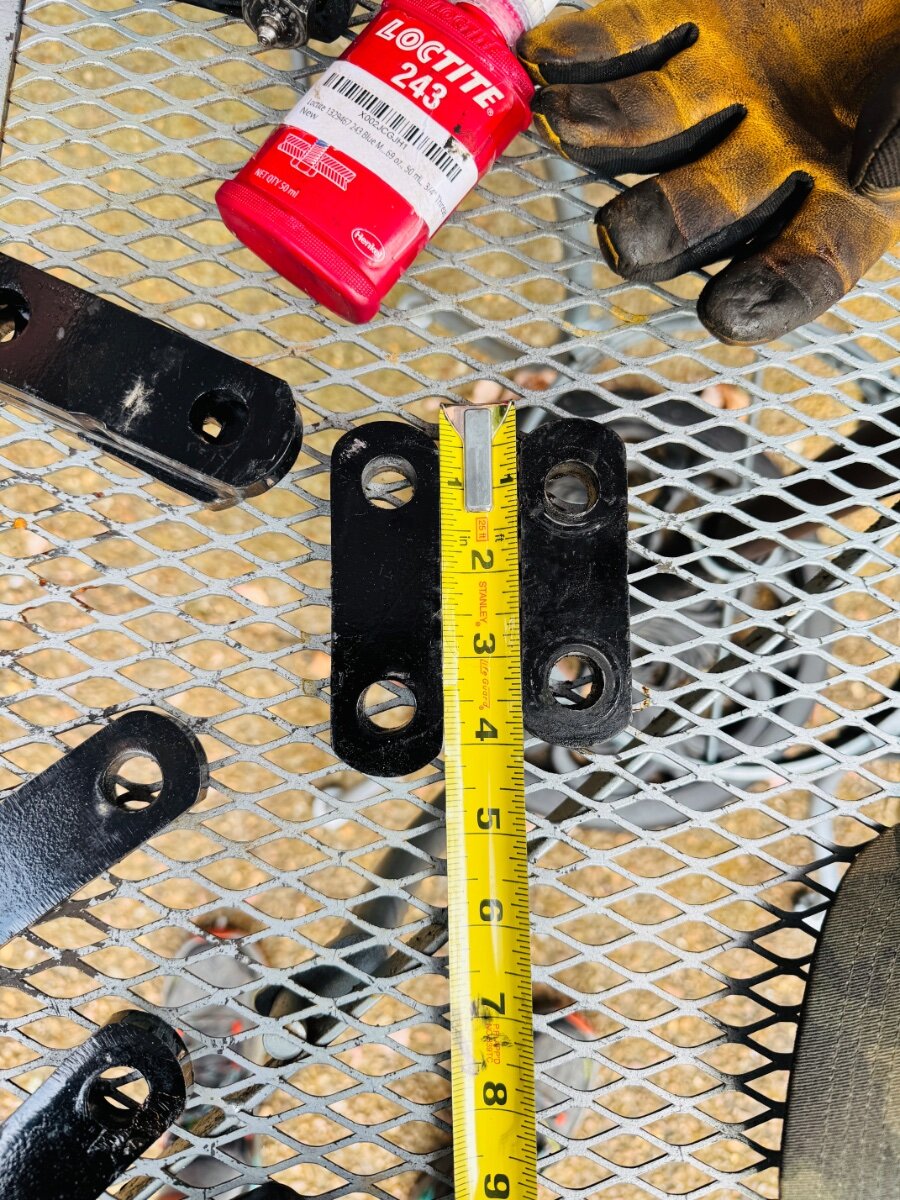
Finally, leaf springs do not hit the Easy-Flex. Installed the 2 1/2 in shackles Lew sent me without difficulty. Two jacks, 13/16 socket, 11/16 socket, 13/16 wrench, 3/8 and 1/2 in torque wrench, hammer, vise, Impact wrench, wrags, and LockNLube grease gun. I know I was 2 out 1500 on the coupler issue but I can't believe that I am the only one this was happening to after upgrading to the ALCAN springs. Happy that I did not cut them to fit and theoretically the increase in 1/2 in shackle length should lower the camper by the same. So the first pull up the driveway will be the test but I did cut off about 1/2 in of bolt length on the back of the bike rack to make up difference. Again, just happy that everything is back together and working. Looking forward to fall trip and going on the ALCAN eventually! Best, Mike BEFORE AFTER
4 points
-
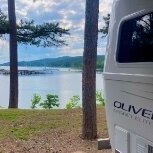
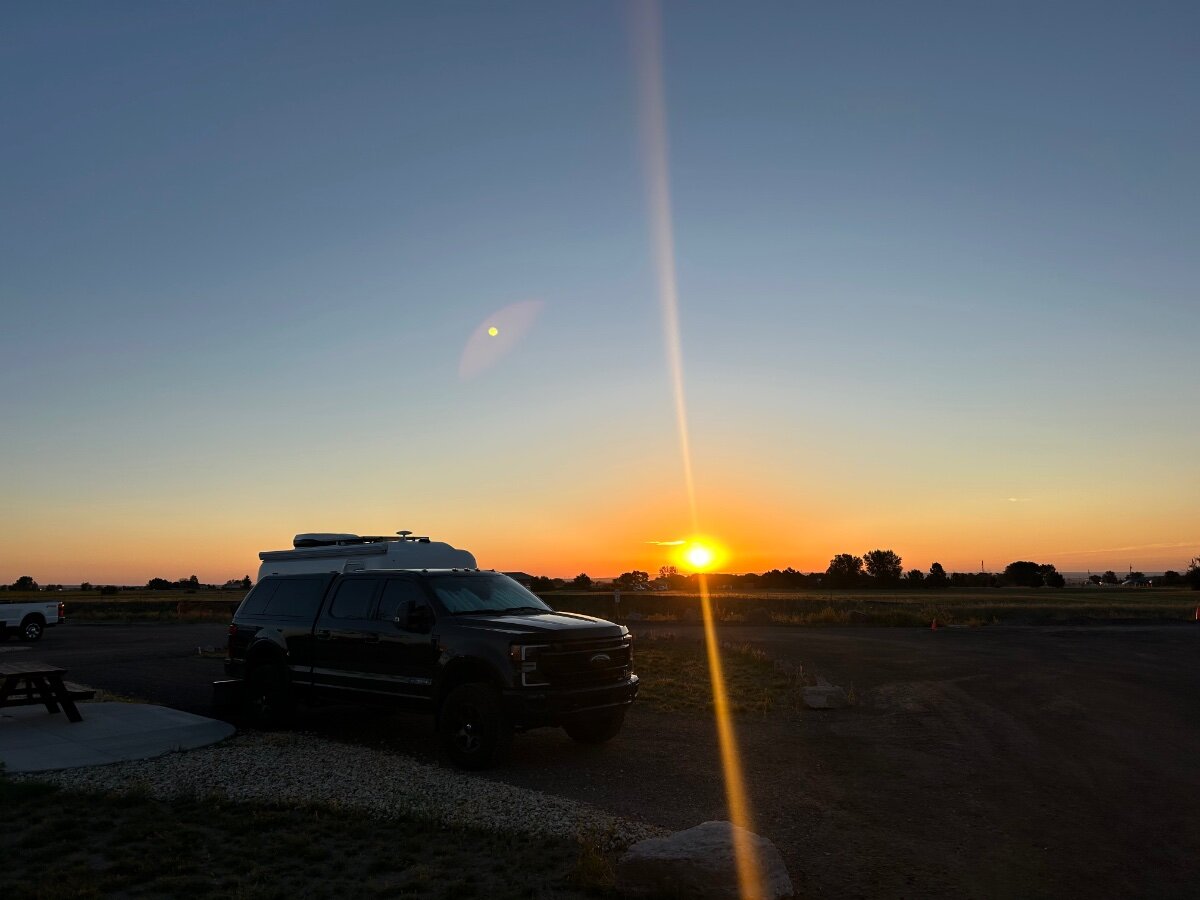
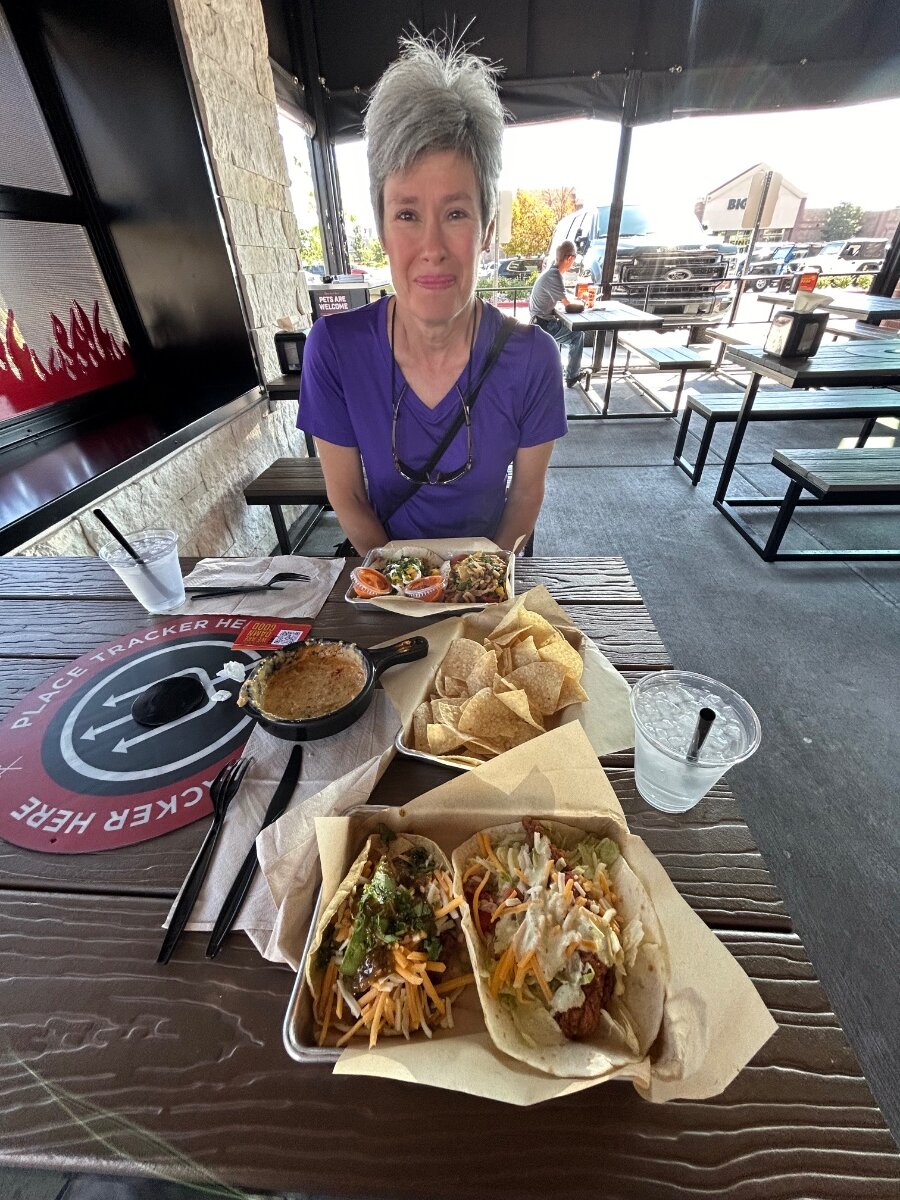
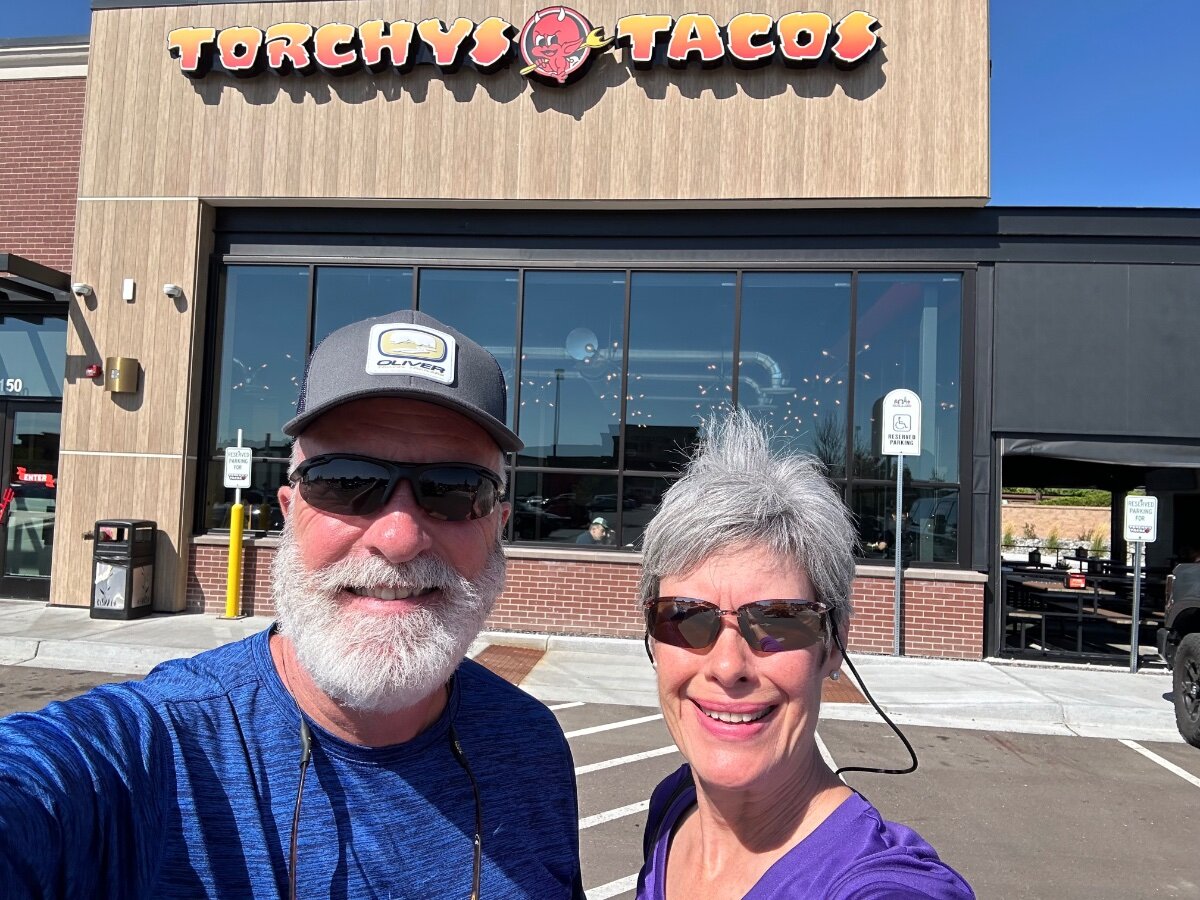
After a great blueberry harvest we are finally back in beautiful Colorado! We are base camped for a few days here in Colorado Springs and the weather so far has been awesome. We are enjoying the cool 50 degree nighttime sleeping temps with our windows wide open and the cool desert breeze is great for sleeping. The day time temps have been in the 70’s to 80’s. Our plan to make our way to South Fork, then Durango and onto Montrose. Eventually we will end up in Grand Junction to get the 5 leaf pack installed. From there we will head to Utah, Wyoming and possibly Montana. If in Colorado Springs area check out Torchys Taco’s 🔥 for all kinds of yummy tacos with a kick! The “foodies we are” Ha! 😝 Safe Travels to All! Sunrise, and sunsets are my favorite times of the day. SL mini deployed - a total game changer! My lovely bride enjoying lunch. Needless to say we skipped evening dinner.
4 points
-
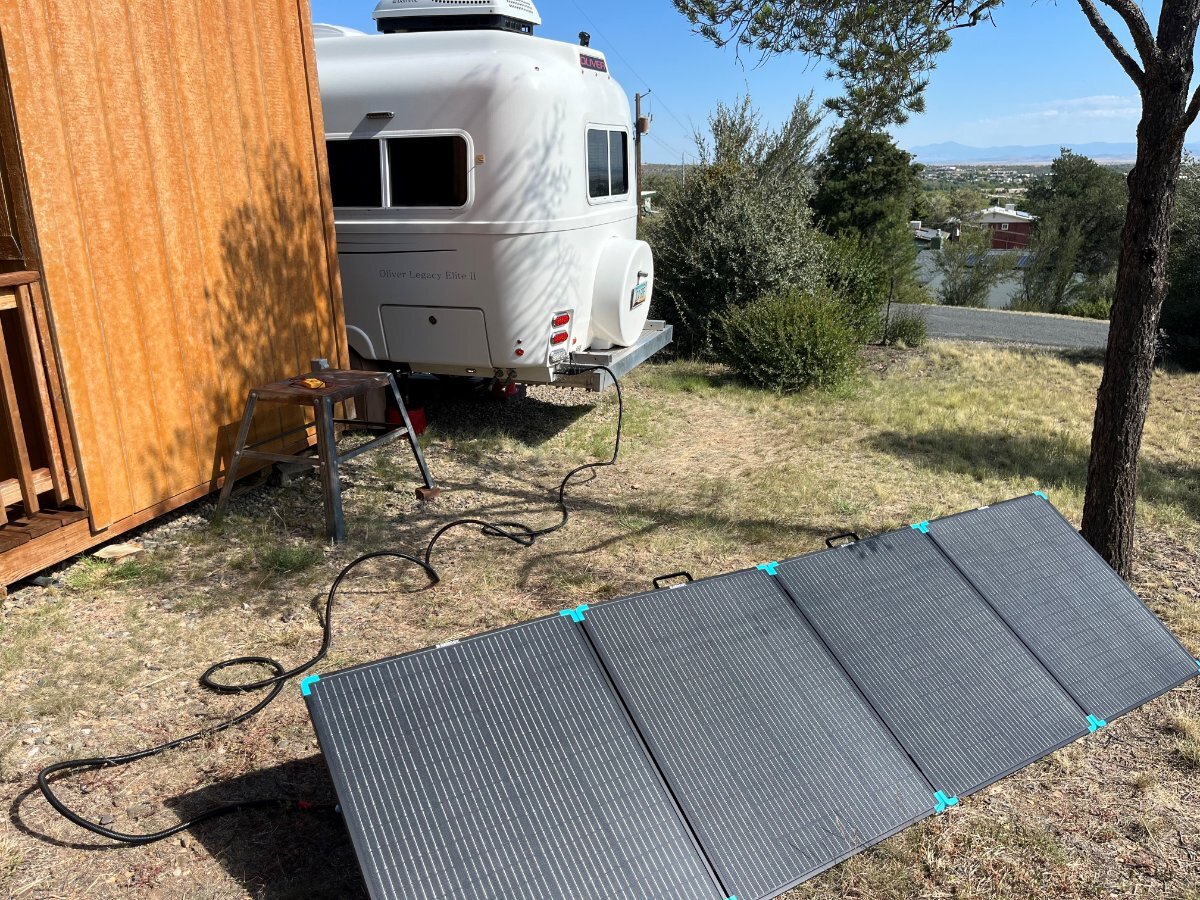
Now that we upgraded to 600AH Epoch LiFePo4 and 3KVA Victron MP2 Inverter/Charger, it was time to add solar power in addition to the OTT installed rooftop panels. This Amazon link offered "Amazon Used" which I love since it usually is only damaged packaging. I watched it for 2-3 weeks and grabbed one when "Very Good" condition was offered for $525. Mine did have a small scuff on the handles which stick out flush to the foam packaging, NP for the cost. Amazon.com: Renogy 400W Lightweight Portable Solar Suitcase, Foldable Solar Panel for Outdoor Activities, Durable & IP67 Waterproof for RV, Camping, Off-Grid, Fast Installation with Sturdy Kickstands : Clothing, Shoes & Jewelry Installed a Victron MPPT 100/30 where the OEM inverter was previously under the rear dinette seat. This solar charger is capable of running two of these 400W suitcases since open-circuit voltage is rate at 47.2 V and short-circuit current is 11.0A, more than enough.
3 points
-
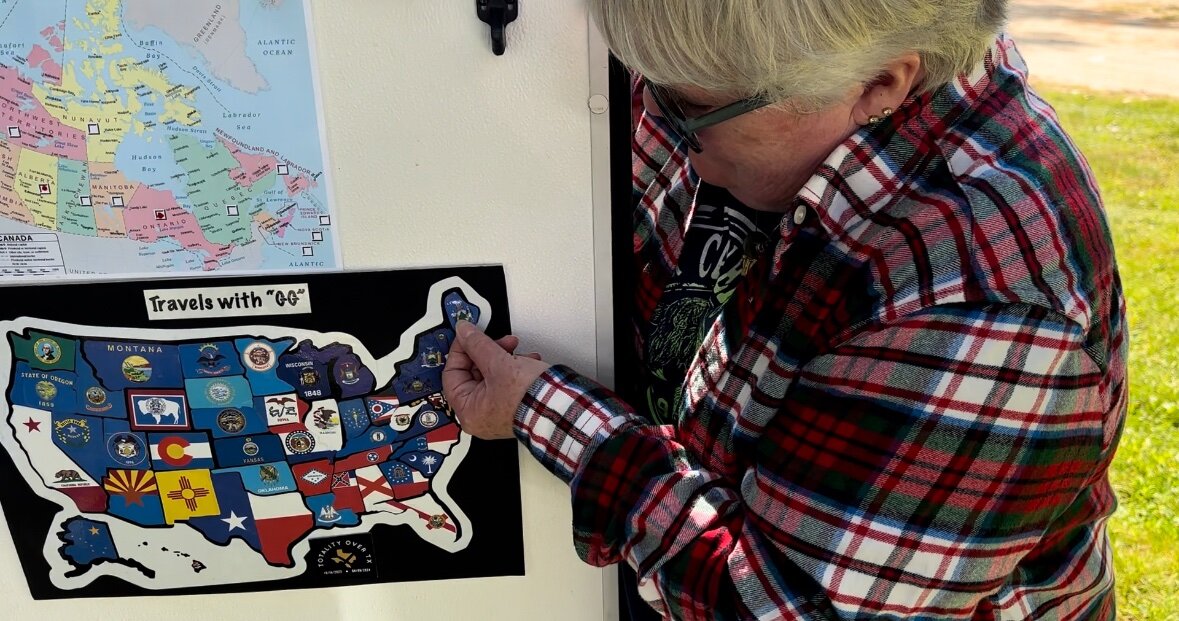
We are in Maine which makes the last state we had to visit with our Oliver to have a blackout of the US. We absolutely love this NE part of the US and have resolved to come back again. Onward to Nova Scotia. Craig & Rose Hull 505
3 points
-
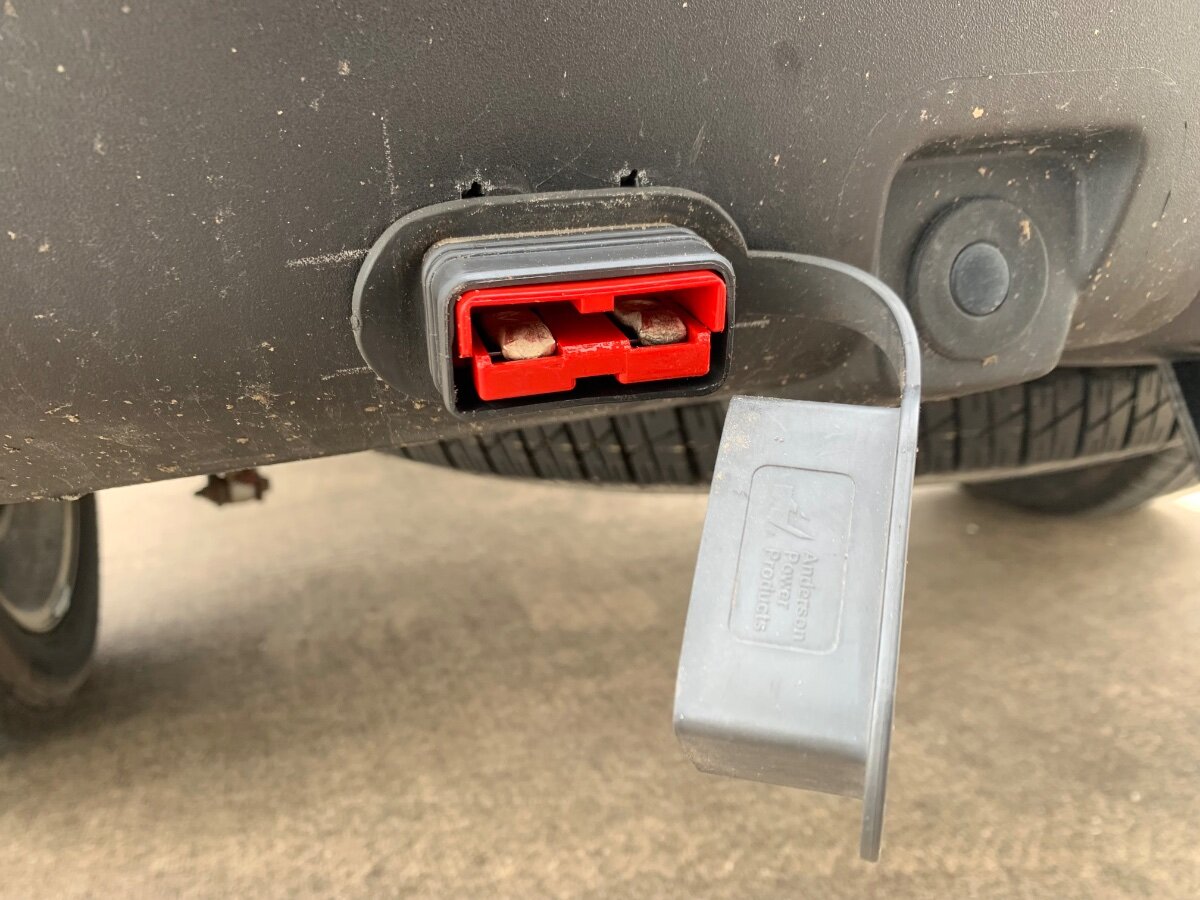
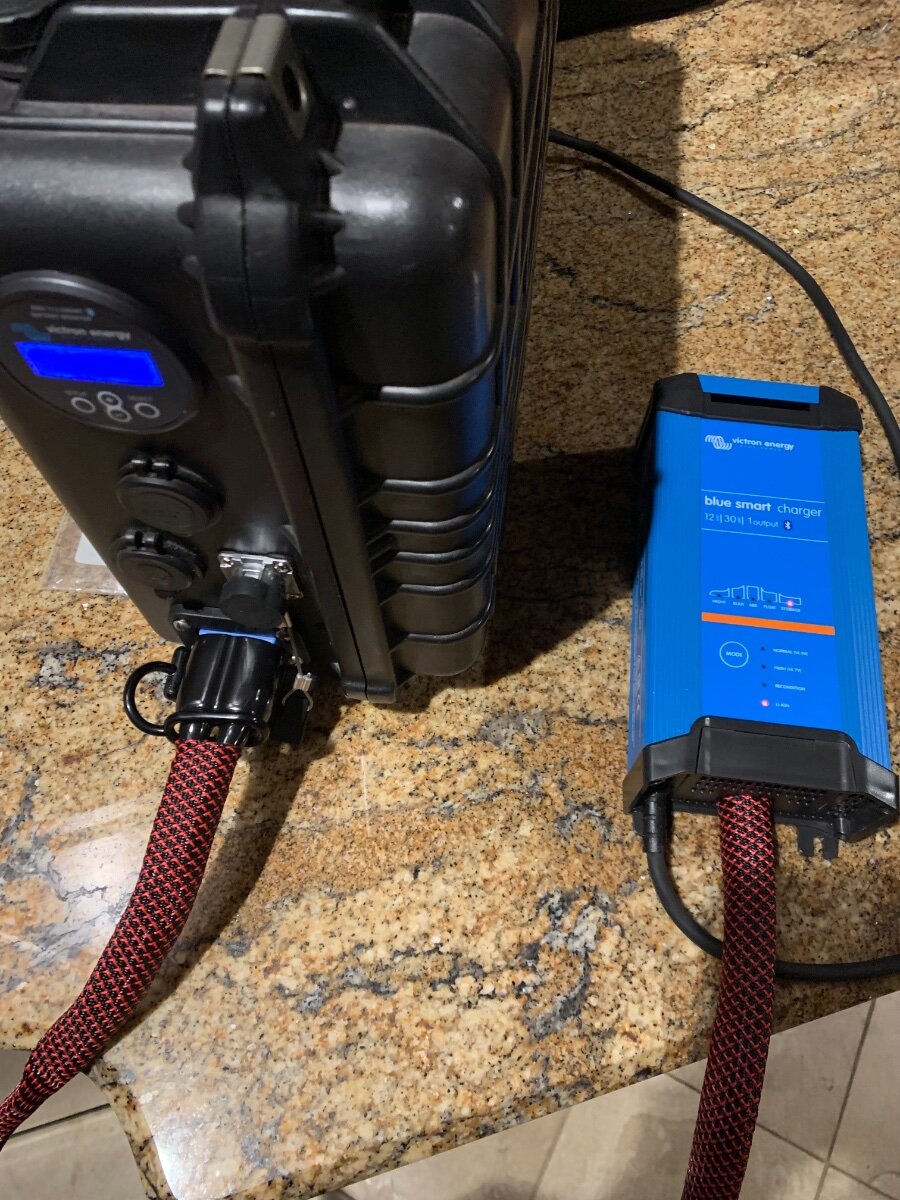
Indeed, used them for my DC-DC install three years ago at the TV rear bumper connection. Not only a great waterproof connection when underway in inclement weather, but dust proof, as well! All things Anderson: In similar manner, made an extension to utilize the rear bumper port to power my Dometic fridge/freezer staged under cap in the TV bed, as needed. Anderson conversion to either run my VIAIR from the rear bumper or TV battery. Anderson conversion with my portable power station (staged to run the aforementioned Dometic) to easily charge, as necessary, when the TV mounted solar array input is dismal. I simply run an extension cord from the front outlet at the propane housing to power the charger via the Oliver’s inverter.
3 points
-
It's been partially to mostly cloudy for the last 3-4 days which will happen in our Monsoon Season. I was able to get a good reading at 366W at one point when the sun was strong. You can see total charging current at 38.7A with 26.1A from the suitcase, leaving 12.6A from the Blue Sky MPPT rooftop solar. When it's cloudy here, it's cooler too. I've been able to run the old Dometic P2 all day for two days now, no shore power, thermostat set at 82F though I will kick it down 76F while I'm inside. It's been low-mid 80s during the day, but keep in mind the Oliver is sitting in the sun and the sun is strong when the clouds do roll by (and more solar charging). SOC has ranged from 85% as you see at 11:45 AM and would get down to low 60s, one day lowest was 55% late afternoon. This should work great when I replace the old P2 with an efficient A/C model requiring half the amperage for when it is truly hot outside. Another great mod for old hull # 113! 😂
3 points
-
I've got the DC-DC install still on my list. Will use Anderson connectors for 4 AWG cable and likely a similar "pigtail" design mounted on the hitch where the 7-blade trailer connector is located. Thanks Ron!2 points
-
I purchased 10 AWG THWN wire at Lowes, on clearance for $0.23/ft, nice! Yes, do note the economic theme behind much of my modification work (I promise not to get political re the economy, but it stinks)! 🤣 Had a lot of 1/2" split wire loom from a past project, the same kind OTT uses. It was an easy run the along the bottom of the basement to feed wires up to the dinette. 10 AWG wires in loom go all the way from the rear opening to the MPPT charger. Used the exact same wire and loom to make a 33 FT exterior cable, crimped MC4 connectors on one end with a Renogy 15A fuse on the positive lead, and the mating Anderson plug on the other end.
2 points
-
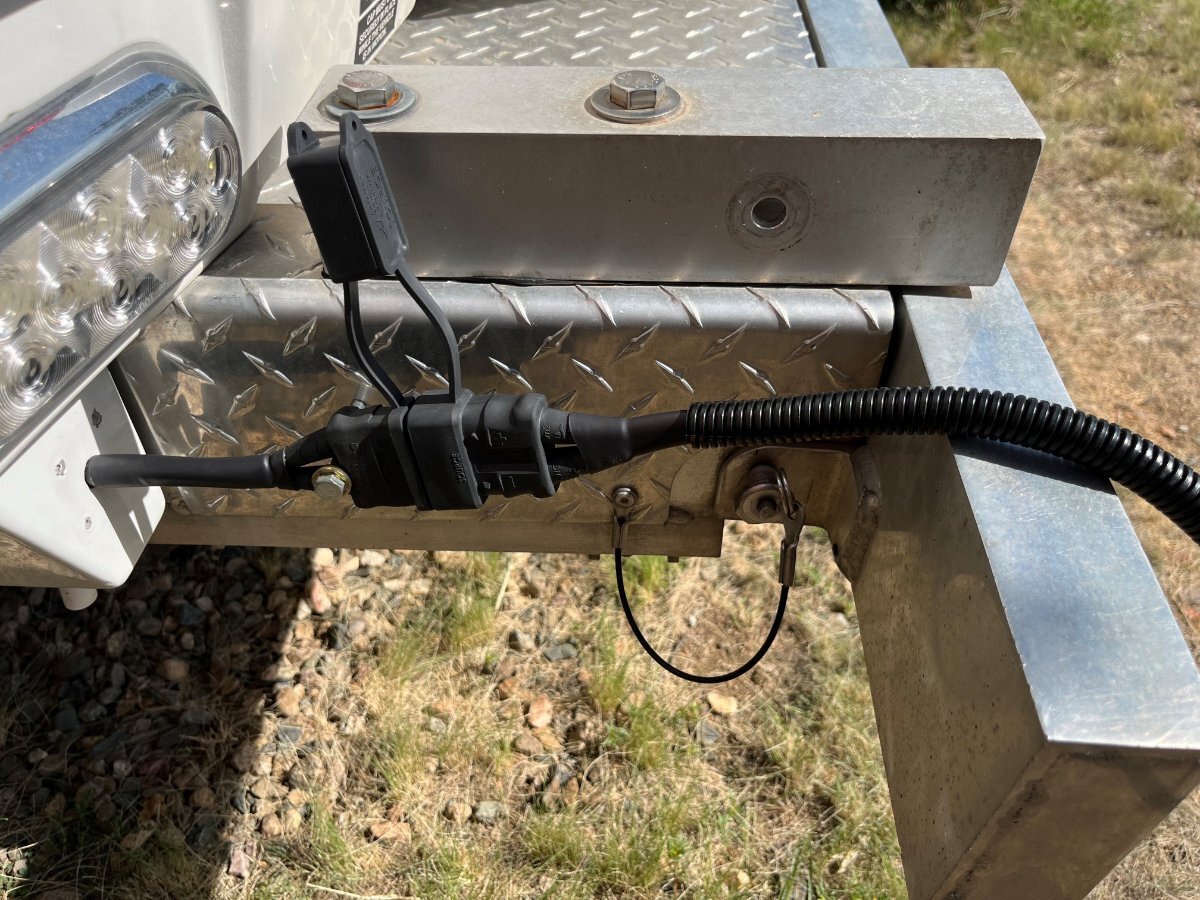
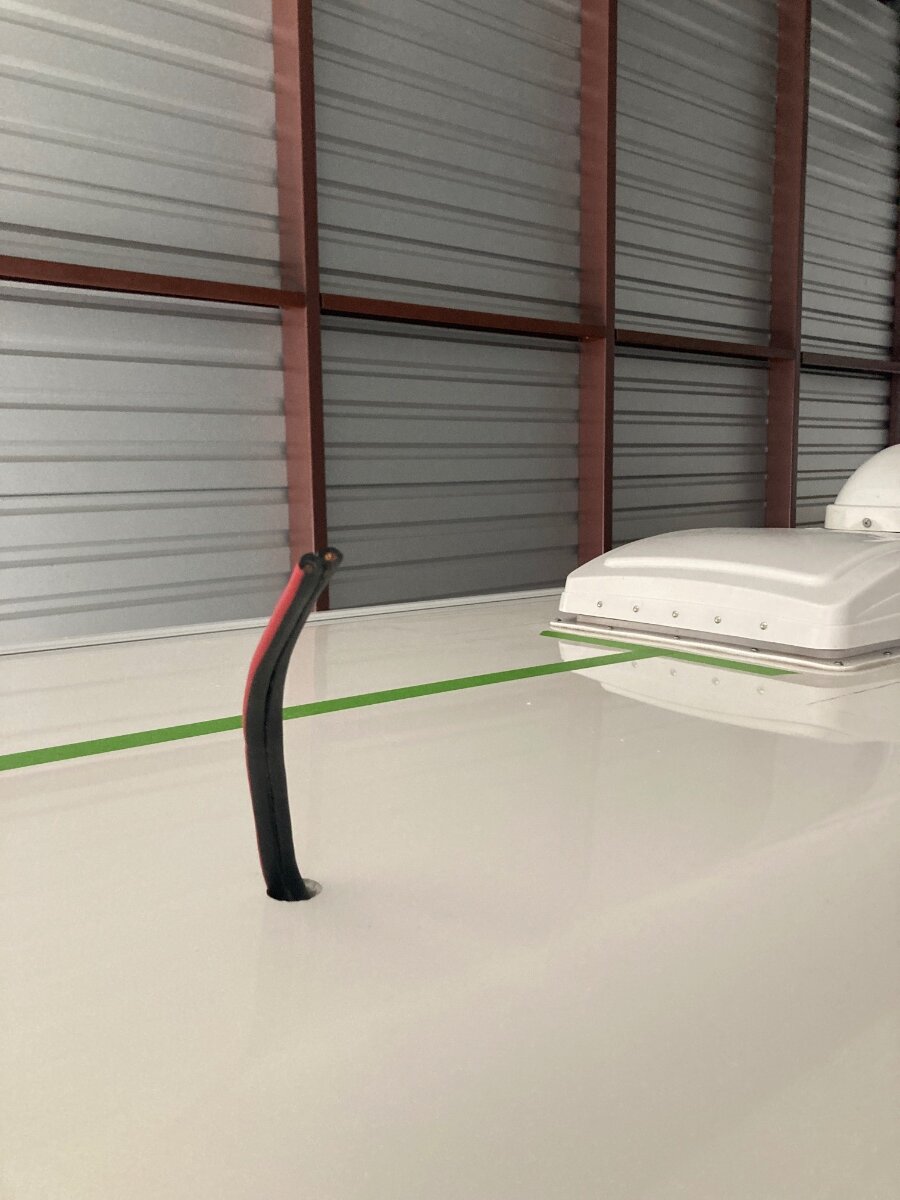
When hull 113 was built there was no Zamp port installed (glad for that). I read several threads on Zamp issues and replacing it. Then I realized I didn't want to drill that size hole on the side of our hull. I suddenly came to the idea of using the rear cable TV connection. We will never connect to RV park cable, and the rear is truly the best location so the suitcase can be easily positioned either side. I first purchased a CNLINKO plug connector. They are extremely well-built, but first it would be difficult to drill a 1/2" hole to 15/16". And the body mount was so shallow it would be impossible to effectively insulate the terminals in this location. I came up with the idea of a pigtail-style terminal made with Anderson SB50 10 AWG connectors. I found Powerwerx and they sell these amazing "Environmental Boots." They even make custom length cables with choice of connectors on each side. I preferred to make my own cables. This is everything I purchased for $29 shipped (ordered two of the SB50 connectors for 10 AWG): Anderson Power Products SB50 SB Series 50 Amp Connector Kit | Powerwerx SB50 Environmental Boot with Cover, Source Side | Powerwerx SB50 Environmental Boot with Cover, Load Side | Powerwerx This is the bodyside connector. I used heat shrink tubing on each wire, then on both. Then I fed the wires through a length of clear tubing I had with 1/2" OD, a snug fit inserted 4-5" into the hull. Wrapped the exterior side with larger heat shrink to wrap everything. To keep it still, I used a 1/4-20 3" bolt, mounted in-between the two tails of the boot, and tap-threaded a hole to secure it to the bumper. She is sitting pretty for now and will soon work the fiberglass repair to fill in the 4 unsightly screw holes.
2 points
-
Craig & Rose, Congrats on your travels, adventures & accomplishments. You have documented them well for all of us to follow. So when are you going to do Hawaii? (Has anyone ever OTT camped in Hawaii?) Let me know what route you will be taking. Since Sept '20, We have only the 11 western states, Newfoundland, Labrador & Nunavut remaining. The last one will be the toughest... no roads at this time. B~Out2 points
-
As promised here is a quick update on our SL mini field use. It’s a game changer for us. No more local WiFi or cell hot spot to think about. We are presently in Colorado Springs and the mini took about 8 min to deploy and we were up and running. Certainly the wide open Colorado skies allowed for quick recognition of the satellites. I do think the mini will serve us well. It’s a cinch to pack up and stow. Onward to South Fork and then beautiful Wolf Creek Pass, then make our way to Durango, Ouray, Montrose and then Grand Junction. Cheers all! We are happy to be traveling!
2 points
-
E6000 is useful for all sorts of stuff in and out of the Ollie. I always have a small tube of it with me while on the road. Its available (of course) on Amazon, WalMart, Ace and (probably Lowes and Home Depot too. Bill E6000 on Amazon2 points
-
Concrats to you guys for filling it in. Now, a couple of oars and, don't forget to plug those scupper holes you are well on your way to getting all of the States.😁 Bill2 points
-
Do yourself a favor and pick up some E6000 adhesive too. I haven't found a brand of wool pad yet where the "loop" section of the pad doesn't pull away from the pad well before the wool section is worn out. The second the edges start to pull away on them I remove them completely and re-glue with the E6000 leaving a 10lb weight on it overnight. Haven't had one that I've re-glued this way come apart yet.2 points
-
Just drove the northern section plus Shenandoah this week on our way north to Nova Scotia. Will plan for the Southern section in the future.
2 points
-
We hope to camp at Linville Falls and Mt. Pisgah on the BRP in September. We like Doughton Park, but road construction in that area of the BRP. Crabtree Falls is a nice hike from the BRP; Sunset taken from the BRP: Two Ollies at Mt. Pisgah on the BRP one morning: Mt. Pisgah:2 points
-
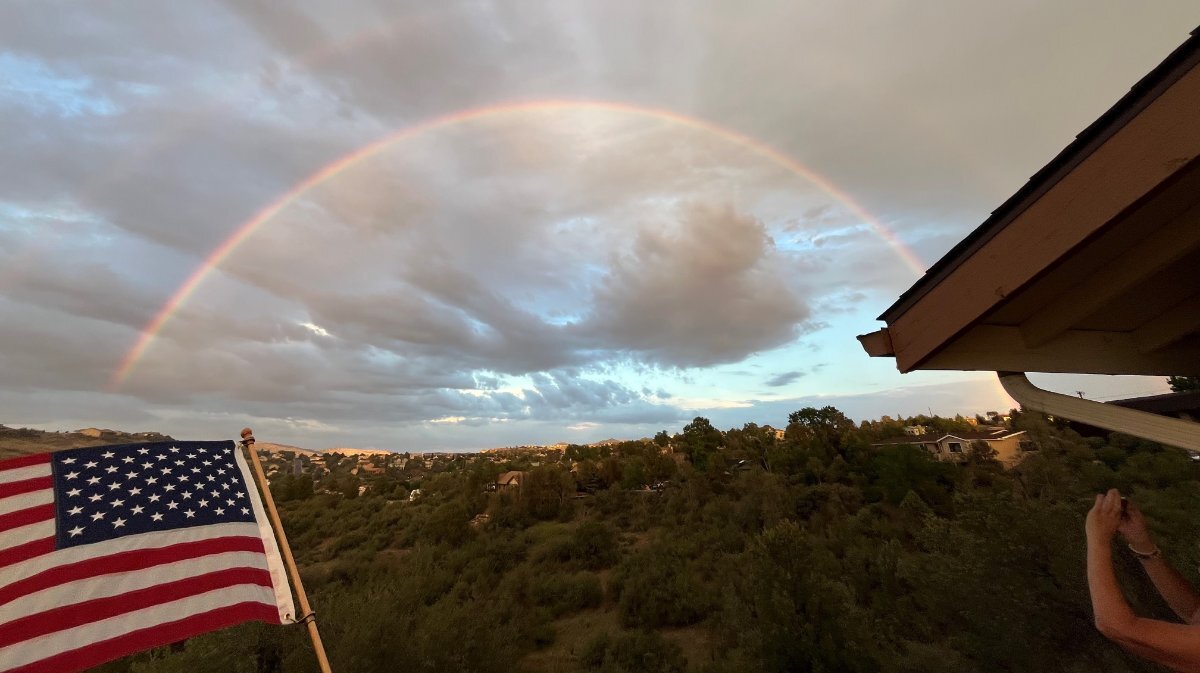
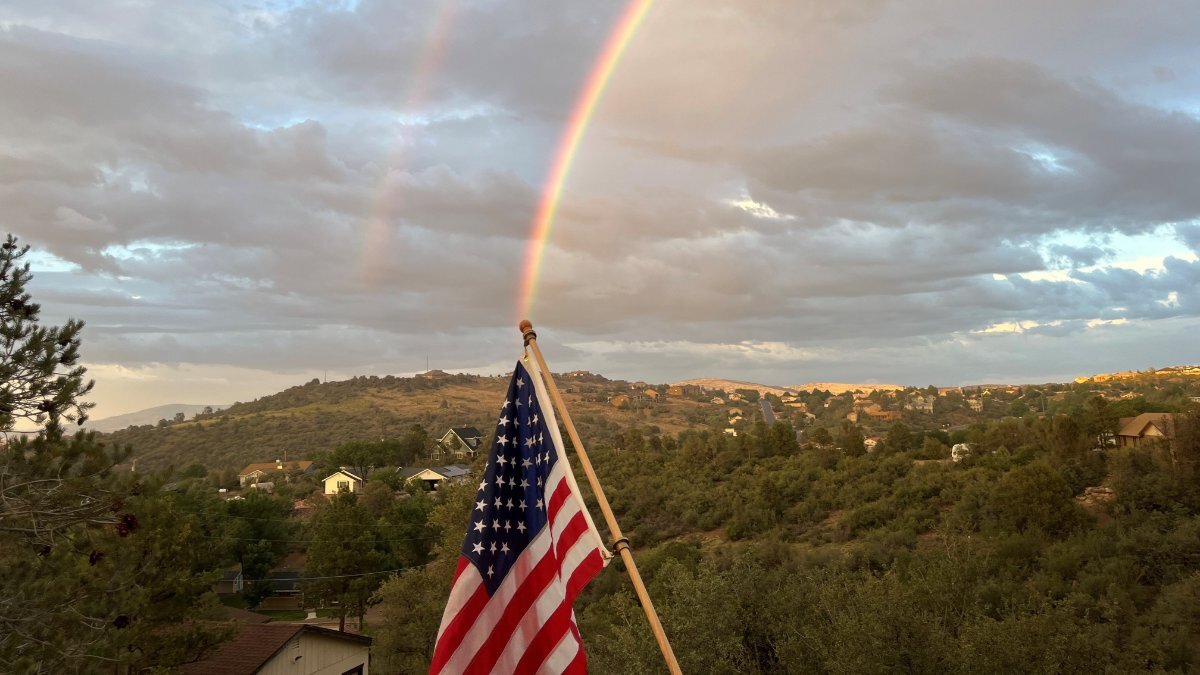
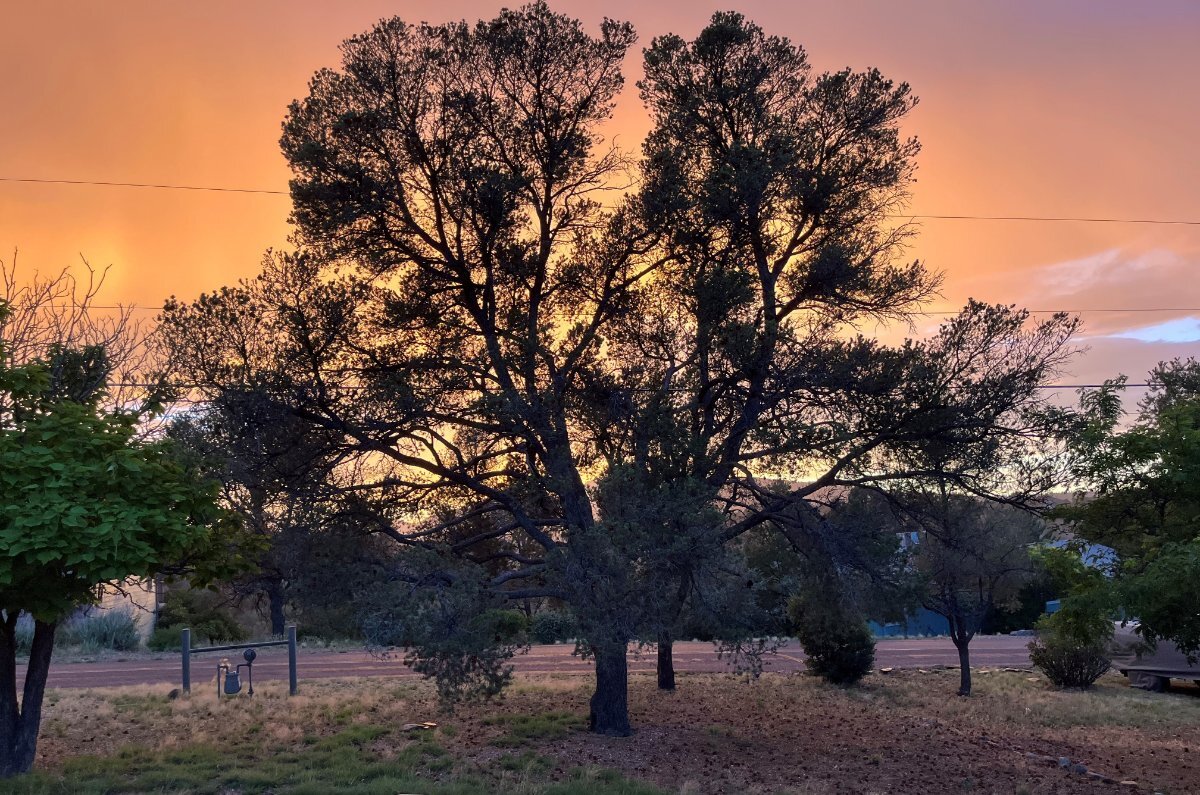
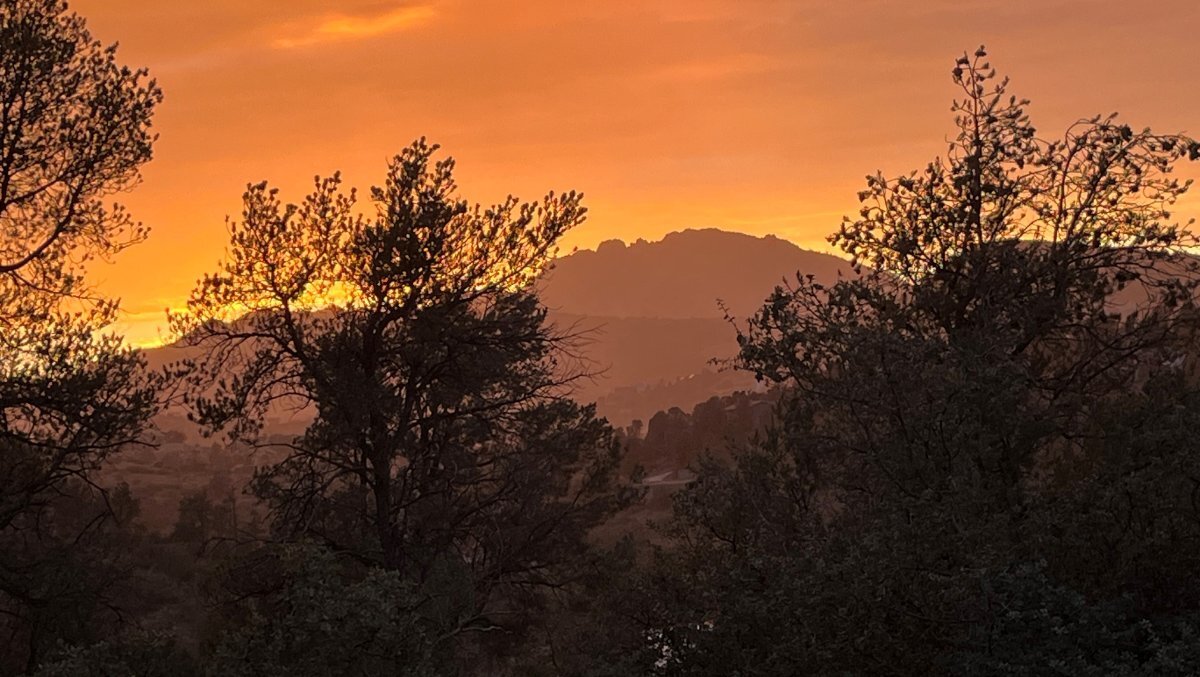
Never posted in this section of our Forum before, yet after reading the topic it seemed appropriate for this post! After what you will soon learn we enjoyed a breathless day today. In a way it's about our story, how we found Prescott AZ some 30 years ago on weekend side trip, off my regular Motorola business trip to Phoenix, and we had a great weekend! Fast forward 10 years later and our family did a 3-week car trip west to find a new place to live somewhere west, leaving comfortable surroundings of Northern Virginia. We left VA heading to Houston and had Christmas with Chris' daughter. The rest of the family left to San Antonio, the Alamo of course, Sante Fe and Taos NM, other stops and had a New Years HomeAway rental for a week in Flagstaff. Flagstaff was cold, sitting on I-40, a transient town for those to-n-from California and visitors to the Grand Canyon. We did day trips to Sedona of course, Cottonwood and the Verde Valley and it only took one more day in Prescott to know it is the place. Closed on our N VA home in Hamilton VA, June 2005, and moved to Prescott. I thought of living west most of my life. Attending High School in DuPage Co IL and all there was to do was drive west through miles of flat cornfields, with nothing to do, nothing to see. Our friends here and elsewhere come back from trips to Italy or South America and say, you got to go! Others ask, why are you not out on the road more in your RV (or now the Oliver)? When we lived in Chicago, everybody had to leave the city as often as possible. "Escape to Wisconsin" and "Say Yes, Michigan" were the local sayings, meaning "get outta Dodge!" We moved from the city to North Barrington, IL. 50 miles out! I started liking staying home on weekends. Actually LOVED doing yardwork, of all things (though I'm a weedwhacker and not a planter). I felt bad for the people who needed the escape to Wisconsin, as where we then lived, we were halfway there. Hmmm. Why do I want to leave a place as great as Prescott AZ? It is the greatest small city in Arizona, carefully selected over time. It is the ONLY city of any size in Arizona not on an Interstate. Think about that fact!? Literally 50 miles SE to I-17 or 50 miles north to I-40 and I-10 is a whole 110 miles away. You got to want to go to Prescott to drive by here. It's not Phoenix or Tucson, thank goodness and it's not the desert valley, nor the snowy higher elevations. We had an amazing day today. Played pickleball and won 5 out of 6 games. Adam joined the club today and he met many good people. Always do a spa after sports. For 6 years, I've been trying to figure out how to mod a camper with a hot tub. 🤣 Drinks on the deck and we cooked dinner together (I'm in charge of drinks, Adam and Chris are very good cooks). We have GREAT weather up here. I'm going to end with pictures from our night, all from tonight. It was spectacular, most are from our deck, and a few are front of house. Monsoon season started early this year, and we will have another dozen crazy evenings over the next few months! Many of you would pull your Olivers for days, to experience such a camp as we have right here at home. PLEASE COME VISIT as all of you that I know here are certainly always welcome. We have partial hookups too! I promise to pry my older fingers off the weedwhacker and the other tools I love, just long enough to get 45 days away in the Oliver during our upcoming 2024-2025 season. Hope to meet many of you during the October Texas Meet. God Bless y'all on this Sunday.
1 point
-
When I get around to adding this mod, I want to do it right and I understand @MAX Burner and @rideadeuce and others here have gone down this path. I want to add DC-DC capability but not overload the TV alternator. I also want to understand cable gauge minimum requirements, wanting required AWG without paying extra for overkill. Obviously a 30A charger requires less ampacity in cabling than a 50A model. I'm thinking that 30A is enough at 60% the cost of the new Victron 50A model. What would you do? Victron doesn't even list this model on their website anymore. Amazon.com: Victron Energy Orion-Tr Smart 12/12-Volt 30 amp 360-Watt DC-DC Charger Non-Isolated (Bluetooth) : Automotive They do show their new 50A model: Orion XS - Victron Energy1 point
-
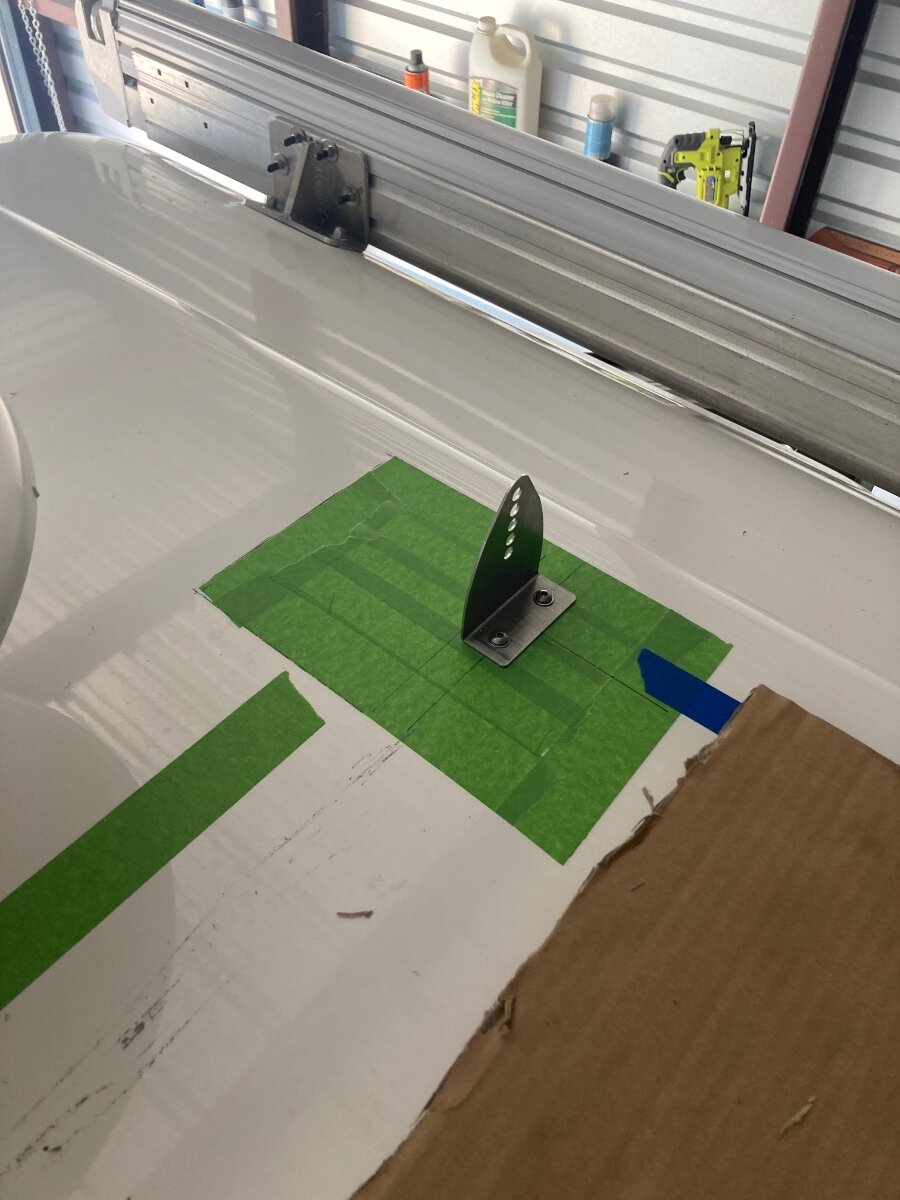
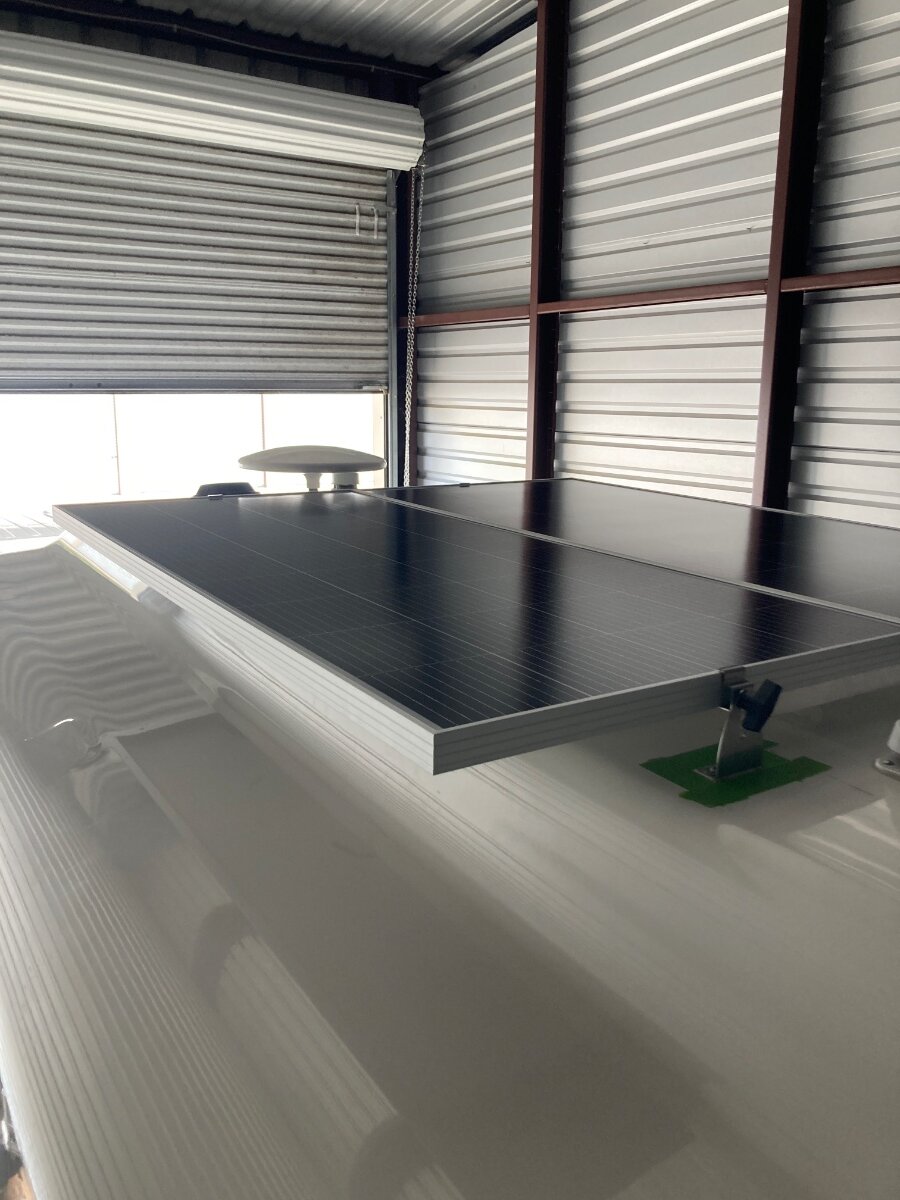
Started installation of solar on Hull 484. Little bit of background information. I purchased a 2019 LE II in April 2024. Although the trailer was not ordered with a solar package it was prewired for solar by OTT during the build and also had the aluminum mounting plates on the roof under the fiberglass. Thank you to owners @AndrewK and @carnivore that have completed this before and posted on this forum. @carnivore ran through his install over the phone with me and even provided me with spare mounts he purchased from AMSolar during his install. I would not have had the confidence to start drilling holes into my roof to locate the preinstalled wiring without these owners doing it before me. Panels are mounted, just need to complete the wiring on roof and seal around the mounts. Mounts were secured with VHB tape and screws by drilling and tapping into the aluminum plates. I went with 2 - 200 watt panels from Rich Solar for 400 watts total. Ordering a victron solar controller and smart shunt. Will post update when the electrical side is complete.
1 point
-
Those of you who work mods as often as I do may want to take advantage of this sale! I need 15+ ft of two colors to install a rear solar port. Bought 50 ft each color to have extra on hand at this price. Lowes has been clearing out bulk stock to sell pre-packages rolls. Only the white and green is at this price. Black is more $, red not available. I will use white for B+ and green for B-. I’m working now on a project, moving all DC buses, switches, breakers and fuses out from under the street-side bed to access under dinette seat instead. More on that later. Inflation fighter if you need any wire!
1 point
-
@Patriot - Glad to see you've got the mini SL up and operational. We knew y'all would love it! FYI: Headed up the spine of the Rockies in a week for the annual MC ride - first stop is at Soldier's Stone monument near Saguache, CO 163 miles north east of South Fork. It's adjacent to the Continental Divide Trail and accessible from a nearby parking area. Very moving monument, worth the "look-see." Soldier's Stone is a monument dedicated to all those who died during the VN War from over a dozen nations from the mid-50s to 1975. Well worth the visit, IMO...
1 point
-
I'm going to play with that when I bring the trailer home and fill it.1 point
-
@rich.dev you are my new best friend. 🙂 We have hot water. I should have mentioned that we have the LE I, so it looks a little different but not much. I had not yet seen the video you linked so that was very helpful. Thanks a bunch, and have a great holiday weekend. Hope to see you at an upcoming rally and thank you in person. Bob (and Barb) Campbell1 point
-
Was a great time visiting and knocking out the Wardrobe Closet shelving effort for our Olivers. For those contemplating the effort, having a good table saw and other wood butchering tools was exceptionally helpful. One suggestion that I cobbled together, that was then "professionalized" by Art, was a shelf removal and insert jig. I piled up boxes and stuff I had laying around to serve as another set of hands. Art made a much more stable, and professional "jig" to do the same thing. Made removal of the top shelf to use as a template easy. The curves for the two shelfs in our trailers were the same. But the top added shelf curve is different than the bottom shelf we added. For those with the telescoping ladders, I moved mine from the fore side of the wardrobe to the common bathroom side. installed two "footmen" and a Rainier Strap. This allowed space for the two shelves. We used 12" wide material that tapers with the curve going towards the curb side. GJ1 point
-
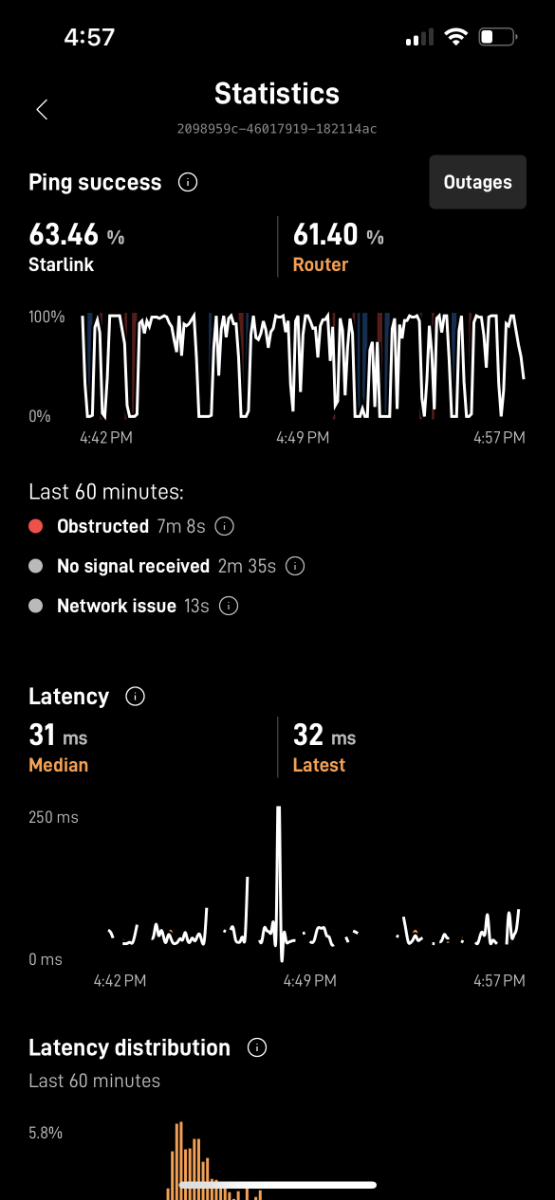
One more update on this front. We got out on another trip for a week and needed Starlink for the internet for work and other things. We were camping in a state park with many trees so I had to make my way 10 mins out to a trail head parking lot with more sky. I had to run Starlink and my laptop off my Bluetti AC200 and it worked great. I had about 15 hours of run time over 4 days I needed to power Starlink and recharge/power my laptop. At the end of the week, my Bluetti had about 13% charge left. Overall, I am very happy. I ran it from two locations (a parking lot at the trailhead and a side spur, sorry forgot to grab a picture of these. But both were good skies but by no means a fully clear sky with no obstructions. A few pine trees in front are less than 10 yards away and pine trees block the horizon). Both had a pretty open sky straight up but still had pine trees blocking areas, but I still get speeds over 100 Mbps. Here are my stays. 99% connection uptime and pretty consistent < 30W draw from the mini. At one point we had two video calls going at the same time with no issue.
1 point
-
My trailer has been outdoors 24x7 since new. Looks good still from prior years hand washing and waxing using 3m ultra marine paste wax, however this Spring I noticed the beginning of oxidation along the top leading edge. I have a small orbital but decided to bite the bullet on a Makita 9237 and assorted cutting and polishing pads. Per #Seadawg’s recommendation I will learn to use it on my 1989 Whaler first.1 point
-
Hi Randy, I’d be happy to help you, and the first thing that comes to mind is polarity. Some of the SAE solar connectors are intentionally wired backwards for specific solar chargers. In fact you can get polarity reversing connectors for them. Check that out first thing. However, I’m a little confused that your using an SAE to RJ45 adapter? We should first confirm that you're hooking up a “Starlink Mini,” which is completely different from other Starlink units. The Starlink Mini has an RJ45 connection, but it's not a power connection. You must use the 5.5mm barrel power cord. Other Starlink units are powered differently and this modification will not work for them. There are 5.5mm to SAE adapters that could be used in your application, if you are in fact powering a Starlink Mini. The picture shows one from Ebay with a polarity reverser included. I hope this helps and please feel free to contact me privately is you have more questions. Cheers, Geoff
1 point
-
@Ronbrink You are motivating me. I want to see those kind of numbers. Great job!1 point
-
Yes, those would be the numbers. I and other Oliver owners have cited here in a few posts that even the old Dometic 13.5K BTU Penguin II draws 15 amps. 15K BTU by the numbers should increase amperage by 11.1% to 16.67A. Given you're seeing 18A then the 15K model at 18A is even less efficient, while a newer model today should be more efficient. One member has measured the new Atmos 4.4 15 BTU model at 7.5A (waiting soon on a second installation to verify this number). Given you have a sales receipt for the 13.5K model and they installed the 15K without your consent, perhaps you can request to a return/refund. Hope this works out in the end to your satisfaction.1 point
-
I can only state ‘what I did’! Started off with a Renogy 20A DC-DC charger and the 50’ WndyNation 4 AWG wire set @rideadeuce mentions. The larger than necessary gauge wire was installed to accommodate any future upgrade in charger size, which eventually came into play. The charger was installed in the rear dinette seat hatch, mounted vertically on the interior wall, in like manner as the Xantrex, but on the opposite side just forward of the above battery box/pantry. This position allowed for the shortest cable run to the battery bank, being four 6V Trojan T-105s at the time, and this charger was the alternative of choice since my OTT did not have solar. However in short order, I ungraded to LFPs to be able to run the a/c via the inverter, and subsequently upgraded to a Renogy 40A DC-DC to further offset draw on the battery bank when running the a/c while underway or during brief stops with the TV at idle. This practice proved to be too stressful on the aging stock alternator and thus a high output alternator was installed. I convey all of this knowing that you are fully aware, but there may be some that read this and find it helpful information. I simply choose Renogy as a cost saving measure, half that of a Victron, and have been very pleased. A Victron SmartShunt was also installed at time of the lithium upgrade and the Renogy’s output can be monitored via the VictronConnect app.
1 point
-
@jd1923 said, Guess when I work this, I'll have to bite the bullet for the $400 Orion XS and likely another $200 for cables and connectors. I placed a bid of $280 for a Orion XS couple of days ago that was listed on eBay @$328.10. At $280 it was still over $300 to my house. I received a counter offer of $308.10 which I declined because I'm really not ready for that job, a refrigerator repair/replacement has top priority. Mossey1 point
-
I find this helpful when selecting wire: https://mgispeedware.com/wire-size-chart/ I also prefer using marine grade wire.1 point
-
1 point
-
As always, John E Davies has documented this project:1 point
-
Rabbit Hole: OK... how about jacking up one side with the rear levelers, remove the rims on that side (take them with you where ever you're leaving to), torque down a keyed lug nut on one or more studs on the rimless wheels...? I'm thinking that would really slow 'em down.1 point
-
Jumping from a pop-up truck camper to the Oliver was one of the best decisions we have made. A bad inverter breaker right after pick-up and the AC heating element on the Norcold fridge are the 2 things we dealt with. Oliver sent a replacement breaker, and the fridge heating element was covered by Norcold and replaced by a local RV place. The build quality is second to none.1 point
-
After a lot of due diligence and briefly looking at a few other brands, the quality we saw during our factory tour sold us! We are very happy with our 2020 OLEll. Everything you need and nothing you don’t. 😊1 point
-
The first use of the mini out in the wild. I was surprised it worked pretty well given the tree cover we had. The setup is super easy and does not seem to care much about how it is pointed. Pull it out, plug it in, open the app, and follow the instructions. The app does all the work to align and celebrate based on where it is pointed. You can see in the images below how it was set up and how many trees we had creating obstruction. The screenshot shows based on that setup how it performed over 60 mins. 2 mins of no single and 7 mins of obstructions. For streaming and video calls not great but for web surfing and some slack messaging it worked great!
1 point
-
I picked up this hard case from HF awhile back and decided it was now going to be storage for the Mini while we are wheels up in the bed of the beast. If nothing else it keeps it all organized.
1 point
-
My Stiker protective case arrived this morning and I have to say I am impressed with the high quality, fit and finish. Striker crafts a nice product. I think this will serve us well. Decisions on were to mount and deploy the mini will likely depend on our base camp location. I really like how compact this dish is. I am considering 4 of the Seasucker marine grade mounts. But may just roll with the flag pole mount. 🇺🇸 https://www.strikerfab.com/ The case allows use of both the standard mount and the flagpole mount. You just swap out the mount below.
1 point
-
Today we pulled the trigger on the Starlink “mini”and I also ordered a custom fabricated aluminum protective Striker mount case made by a small family owned company in Florida 🇺🇸 called Strikerfab.com. I will post up thoughts on connectivity, speed and use once we receive it and get some camping and travel time in with it. https://www.starlink.com/us/roam?fbclid=IwZXh0bgNhZW0CMTAAAR3VXVoA8Gb9hdnLaMWqBcXsa1BfRBdqm_l2iKkNW-Va5r6RJiPc2u8PpD0_aem_DeHBx7JMI-i_vIWAYBg03Q https://www.strikerfab.com/1 point
-
I too would do that if unable to stabilize with cam-lock wheels. I’m careful when positioning and once the cams are set it stays put. With the shape of the Oliver, the only potential point of contact on the sides is where the top and bottom halves are joined. However, extra caution is needed forward at the propane cover when straddling the tongue. The rear is not a problem.
1 point
-
Like your scaffold idea. I personally would need several pool noodles on the trailer side though. GJ1 point
-
The inspiration for my nose art was my two Border Terriers. And of course, also the fact that my wife did not wholeheartedly embrace a travel trailer as an RV of choice. She would have preferred a Class B or C if she was going to move out of the Hampton Inn. The hard part was finding a silhouette that was an accurate image of a Border Terrier and was not copyrighted. I found this one on Etsy and bought a piece of the artwork and asked for permission to use it on my caravan, as he called the Ollie. He was impressed that I had even asked for permission and was kind enough to send me a soft copy to use as I pleased. I added the script to the original and Oliver printed for me. Mossey
1 point
-
This is what we do. I’ve had both cables out to clean and lube. The gate usually closes but we’ve found it a good practice to manually seat it after dumping.1 point
-
Yep - that's the stuff (there are a couple of brands that are similar). I only use it a couple times a year and all seems to operate smoothly. Bill1 point


.thumb.jpg.e34bf01ef7f7d5e99ad31856d45afbeb.jpg)


-
Recent Achievements
-


")


")


")


