Leaderboard


Popular Content
Showing content with the highest reputation on 12/31/2024 in all areas
-
First thing I would do is to open the dinette seat and give a push on the silver cylinder on top of the valve. Can you push it down (this is after closing with the cable)? If you can, then a simple cable adjustment may be all that is needed. There’s a set screw on top that holds the cable in, it may have slipped over time (mine did). I’ve adjusted it a couple of times over the years. Also, you could have some black water debris that is stuck in the bottom of the slot where the blade rests when closed. I also had that happen and after taking it out and cleaning it all was well. Mike5 points
-
A couple more steps that I would add to @jd1923 suggestions is to make sure that both the black and grey blade valves are closing completely. Both black and grey tanks empty out of the same pipe at the rear bumper, so either blade valve may be leaking. Try pushing down on both blades to check for any movement which could indicate the need for a cable adjustment. And if you haven’t previously lubricated the valve cables, it will help valve opening and closing. It goes without saying that troubleshooting the sewer system it much easier to do at a full hookup site. Mossey4 points
-
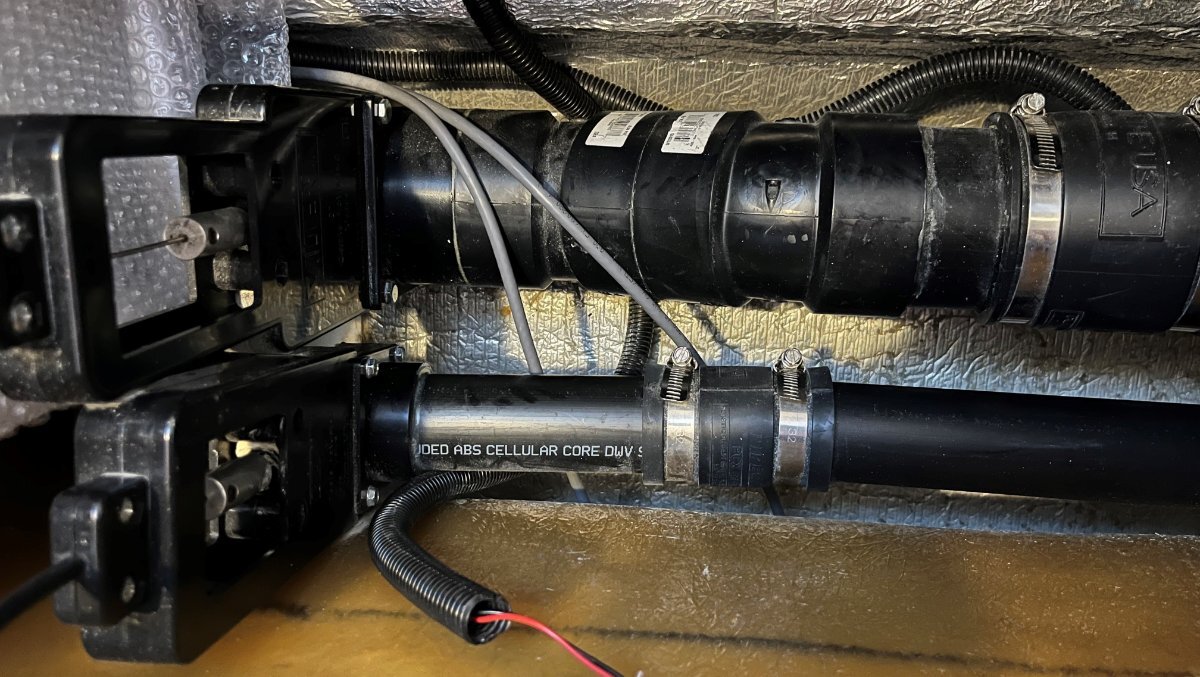
The larger of the blade valves under the front dinette seat is for the black tank (see pic). The smaller is to cut off drain water from going out on the shower floor while traveling and it's the gray tank valve that is under the streetside bed. First, I would fill the blank tank with water to be certain of leak. If it's just a little black water after travel, it is likely black drain water left in the main line when dumping with the trailer level or forward leaning (without raising the front of trailer higher which is a good practice). Quite a bit of black waste can sit in this long plumbing. Question, are you getting a quart of black or gallons? I would work the drain many times prior to the pain of replacing! After filling, open and close the blade repeatedly. This may dislodge something lodged on the blade. You could use a chemical drain cleaner letting it soak for a while and then again open and close. I forget, but there also may be a way to remove the valve blade for cleaning without replacing the entire valve. Best wishes.
 4 points
 -
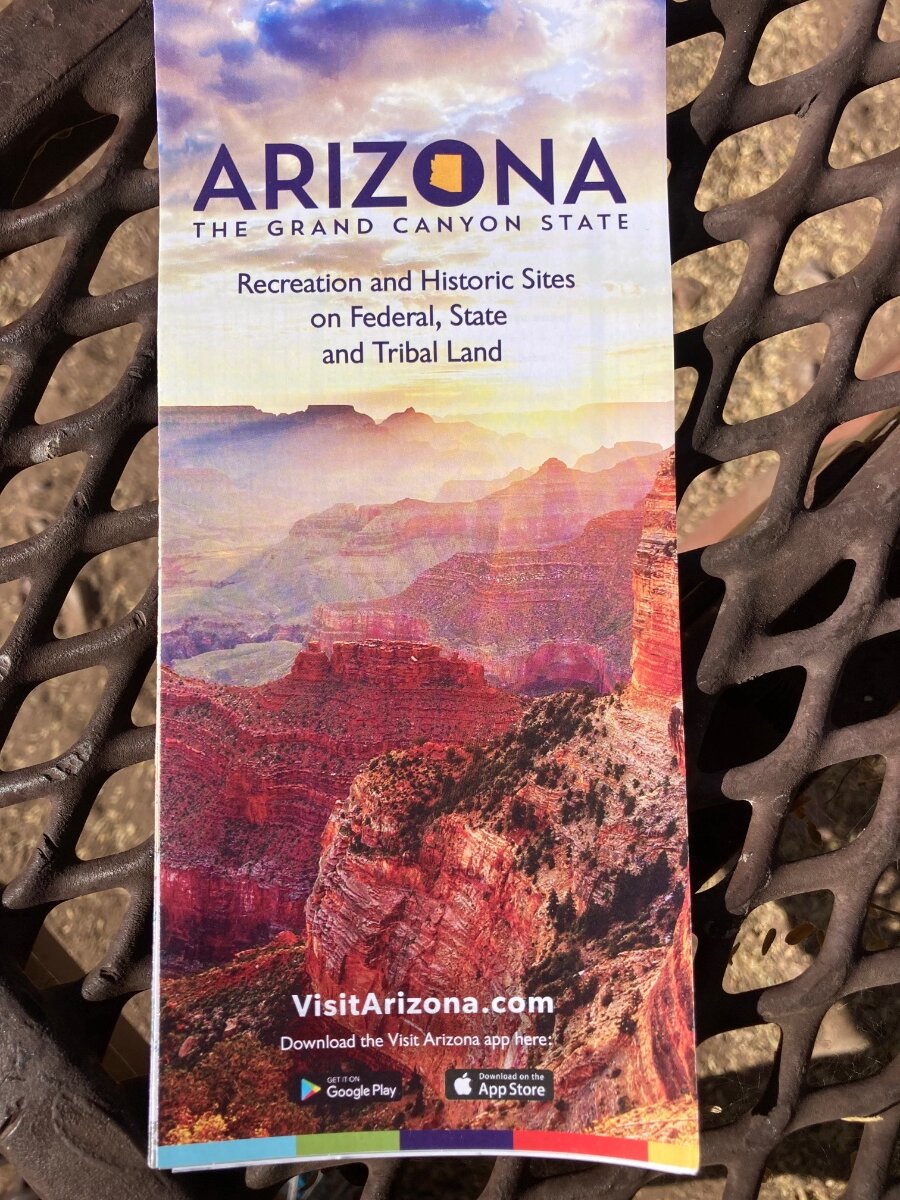
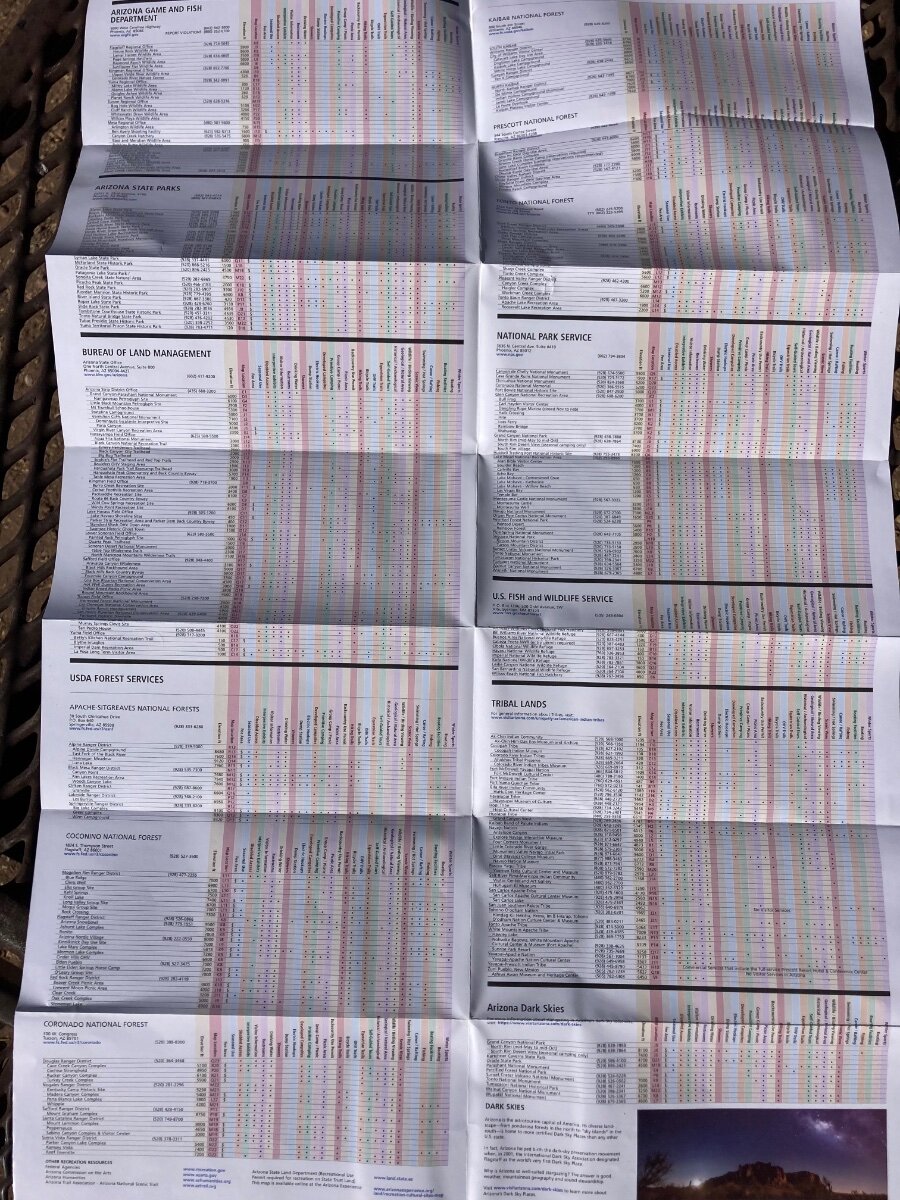
This map is valuable in showing type and location of recreation across Arizona. E.g.Arizona Land Trust, BLM are shown as well as whether camping is allowed. This map went out of print for a few years but I found a new version recently at a Arizona Tourist Information site. It is a free brochure I highly recommend carrying one of these if you enjoy boondocking in AZ
3 points
-
Distinguishing black from gray water is definitive, so concentrating on the black tank valve should be your priority. Regarding valve blockage, some owners have experienced the tank hole cutout being the culprit. I experienced leakage once, turned out the pull handle was turned in such a manner as not to be fully seated. Both black and gray handles are in a recessed box and can hangup on the edge if not paying attention to proper orientation.3 points
-
Blade valve lube works - I've use THIS and another brand or two over the years just following directions on the bottle and the blade operates much easier. I suspect that dumping a small amount of vegetable oil, mineral oil or the like would serve the same purpose but I've never tried that. Bill3 points
-
Great info from JD and Mosseim!. I believe you have 4 or 5 years on your OTT. A good reason to lube the cables to the valves before starting the below. Having a flow control valve on your gray water hose discharge end would work if a helper is not available. Also a head lamp to see down the toilet tank or bathroom sink drain line is helpful in not over filling and causing a flood in the bathroom. First dump and rinse the tank at a dump station. Adding a bit of food grade dye in one tank will quickly help you figure out which tank is the problem. Most likely it will be the black tank so I would start there. Would not suggest using blood red as if it gets away from you, it could traumatized the neighbors. 🙂 Blue frosting dye would be a better choice. Full Hookup and a clear fitting at the end of the dump hose is also useful. Once you know which tank is of concern, you could use your gray water hose to fill your tank. Black tank is easy just open the toilet valve. If it is the gray tank, then modulate the flow down the bathroom sink to hyper flow the gray tank. Start with the blade valve closed and fill the tank with close coordination with your partner on the hose bib valve. In an emergency situation kink the hose twice and you'll slow down the flow a lot. With a full tank, then open the valve and keep the gray water hose wide open filling while the tank is draining. Likely anything bad will find itself down the sanitary line to the treatment plant. If this does not work, then go aggressive with harsh chemicals. When done, lubricate the drain valves. Hope this works for you. GJ3 points
-
Thank you all. I am going to try these suggestions and I will keep you posted. Imelda2 points
-
@Cameron, I had the same problem at my storage facility, the Hughes Autoformer RV voltage booster I installed helped a lot! Setting the Xantrex charge rate lower, as others have suggested, is a helpful measure!2 points
-
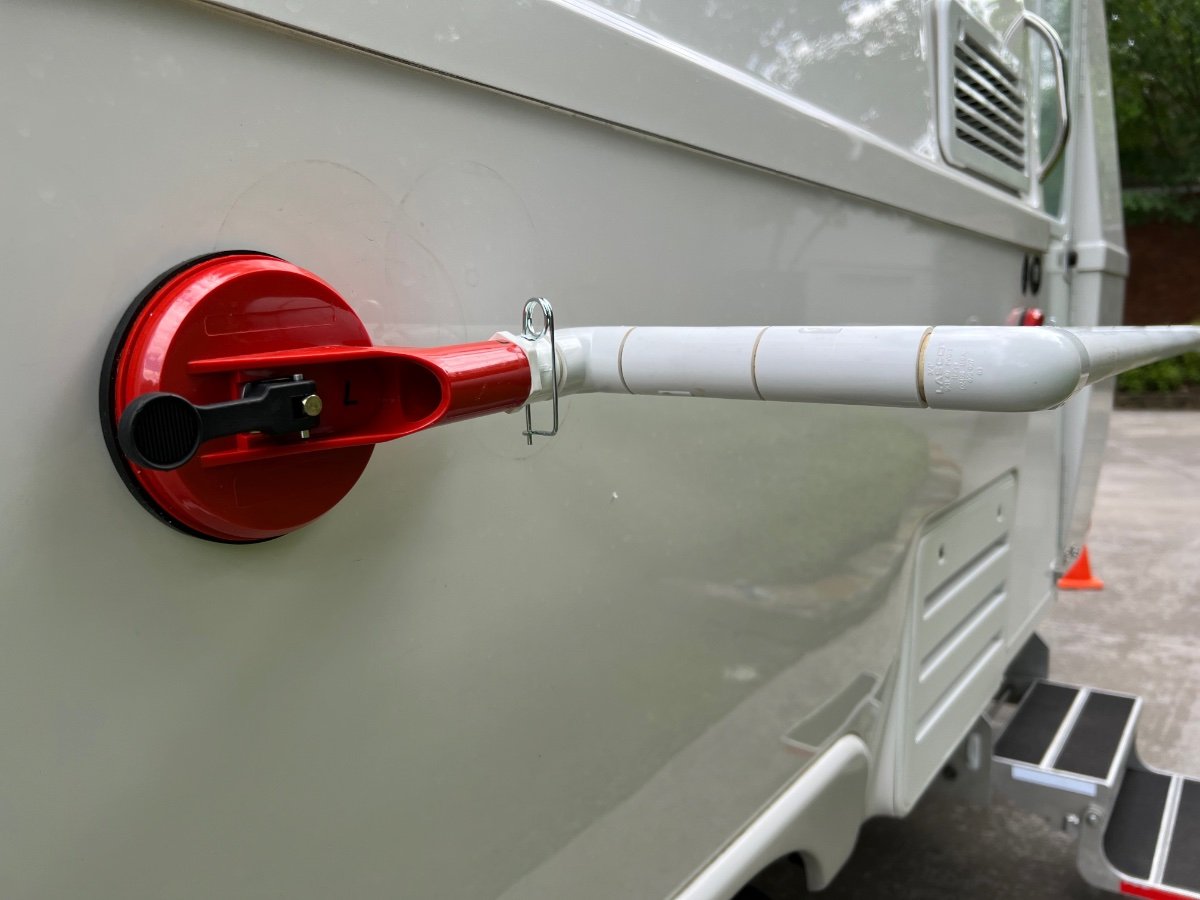
I made mine using a section of an old swimming pool telescopic pole and a glass lifting suction cup handle holder cut in half. Collapses for easy stowage when not in use. Stainless steel ‘S’ hooks used for shoes, hats trash bag, etc..
2 points
-
It could if you know there will be a really good ground, but why take a chance with sensitive electronics? That said, 1) best practice is to have a dedicated cable from the battery and 2) many DC-DC manufactures recommend it. I paid $115 for cable in 2020, here’s the current price. I used every bit of the 50’ cable with the Renogy 40A mounted under the rearward dinette seat hatch, your 60’ calculation should suffice.
2 points
-
I’ll throw another theory into the pot: This has the hallmarks of a high resistance connection such as loose fitting plug or broken wire. These can change resistance with very little movement or vibration, and resistance means voltage drop. A prime suspect would the 30 amp to 20 amp adapter, since the problem occurs when it’s being used. While looking at your readout, have someone give the adapter connection, and the whole shore power cord, a good shaking to see if that's the cause. Good luck and let us know what you find. Cheers, Geoff2 points
-
Certainly, true when OFF. Those of us who have upgraded to the Victron Multiplus II are in the practice of leaving the inverter ON 24x7. It can be switched from OFF, to ON, to Inverter only, or Charger Only modes via the VictronConnect app. It has to be in one of 3 defined ON positions to allow shore-power pass-through power. We do not store our Oliver so for us this means 365 days a year as well. The Victron MP2 draws 13W (1A) continuously unless switched off or in other power saving mode. We have the same ~0.5A parasitic draw and I leave the Outside Courtesy lights on 24/7 so that underneath the Oliver does not become nesting ground! So, we are burning about -1.75A regularly and right now on a sunny afternoon we are reading +7.2A from solar. Ours has been parked and unplugged for 2 months, batteries SOC at 80% +/-. I understand those of you who store your Olivers indoors over the winter have different concerns. Ours must sit outside in the sun and covers are just a PITA and damage the finish equally when blowing in the strong western winds!2 points
-
Try bringing charge rate down to 20A and if "mooch docking" voltage is less than 115V I would not plug into that source at all. Run your fridge and OEM furnace on LP!2 points
-
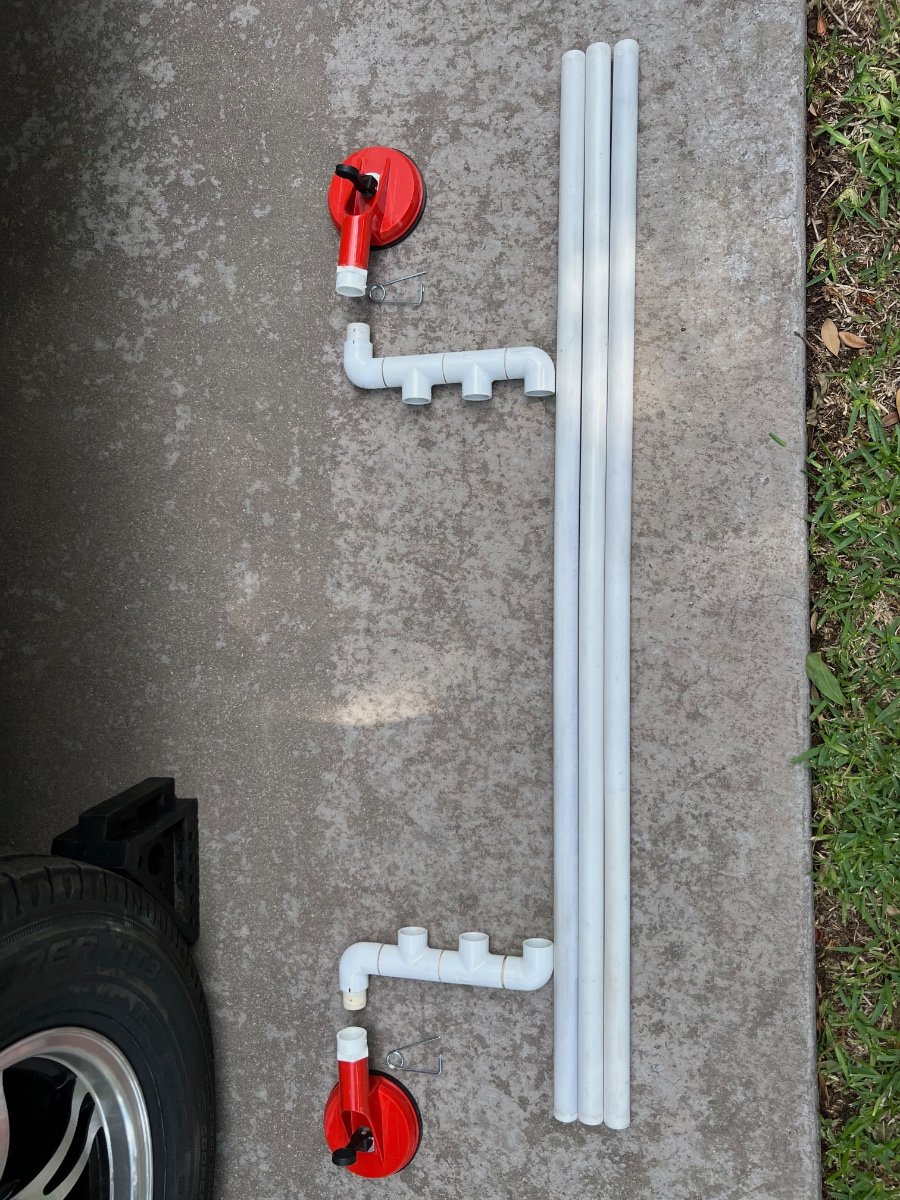
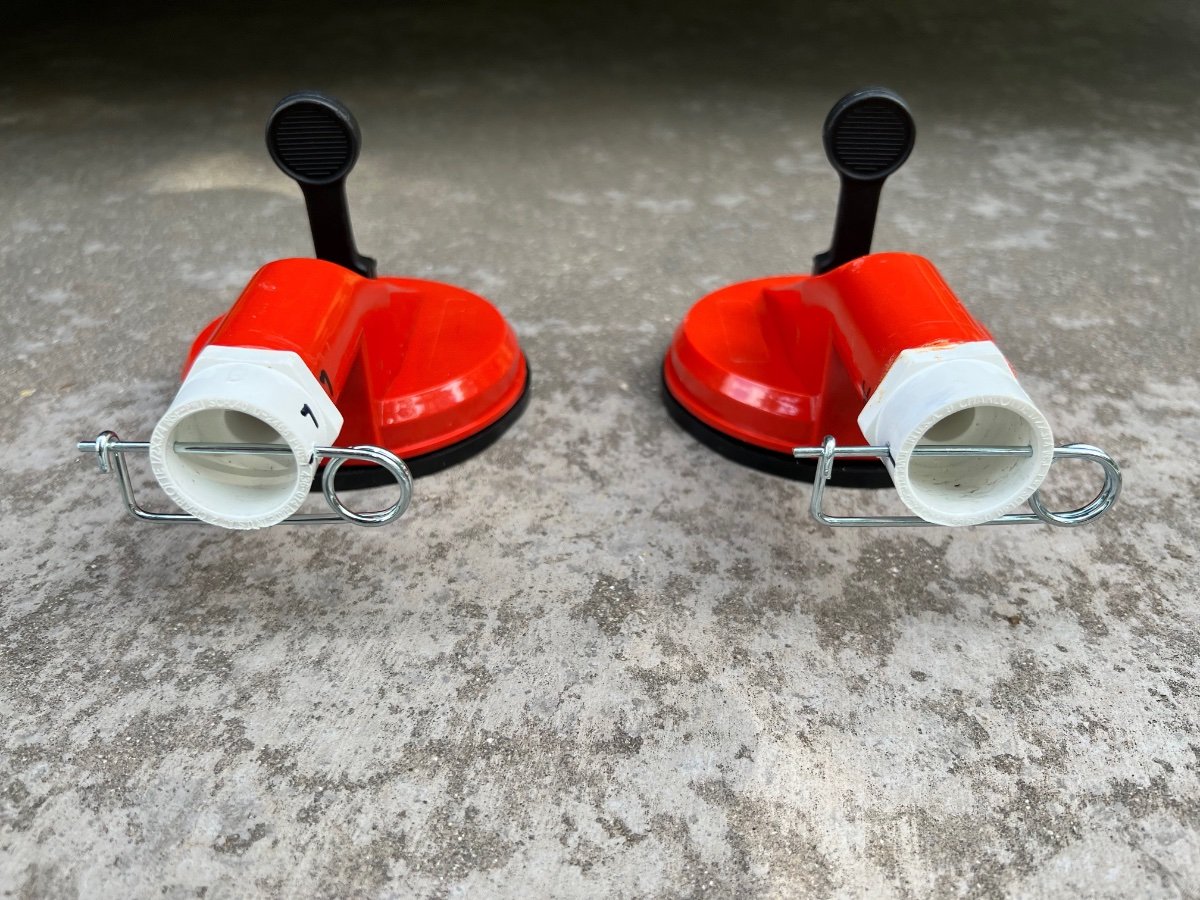
I had seen the posting on 4/22/21 by @Calypso showing an externally mounted towel bar on the side of Hull #520. The towel bar was made from a suction cup lifter and a piece of ¾" PVC tubing. I thought this a great idea and made one for our LEII picked up on 2/17/22. Due to nearly constant downpours in central TN the week we picked up Hull #990, we had immediate need for an external towel bar. We recently returned from a two week trip during which we also encountered several downpours. We used the towel bar nearly every day, often not having enough space to hang damp items. Upon our return I was about to make a second towel bar. I was thinking of adding an improvement to offset the bar/tube further from the hull of our LEII, to avoid having towels in contact with dirt on the hull. After mulling over a design for several days, I had an Aha! moment. I could modify my existing PVC towel bar assembly and add additional tubes for greater capacity, while also moving the tubes further away from the hull. Below are photos and a description of the result. Materials (Quantity, Description, Source, Cost, URL) 1- 4-2/3 In., 125 Lb. Dual Suction Cup Lifter (Harbor Freight, $8.99, https://www.harborfreight.com/4-23-in-125-lb-dual-suction-cup-lifter-57501.html?_br_psugg_q=suction+cup+lifters) 2- 3/4 in. PVC Schedule 40 MPT x S Male Adapter (Home Depot,$0.71/each, https://www.homedepot.com/p/Charlotte-Pipe-3-4-in-PVC-Schedule-40-MPT-x-S-Male-Adapter-PVC021090800HD/203811638 4- 3/4 in. PVC Schedule. 40 90° S x S Elbow Fitting (Home Depot, $0.75/each, https://www.homedepot.com/p/Charlotte-Pipe-3-4-in-PVC-Schedule-40-90-S-x-S-Elbow-Fitting-PVC023000800HD/203812123) 4- 3/4 in. Schedule 40 S x S x S Tee (Home Depot. $0.85, https://www.homedepot.com/p/Charlotte-Pipe-3-4-in-Schedule-40-S-x-S-x-S-Tee-PVC024000800HD/203812197) 2- 3/4 in. x 10 ft. PVC Schedule 40 Plain-End Pipe (Home Depot, $6.98/each, https://www.homedepot.com/p/Charlotte-Pipe-3-4-in-x-10-ft-PVC-Schedule-40-Plain-End-Pipe-PVC-04007-0600/100348472) 1- 0.091 in. x 2-3/4 in. Zinc-Plated Safety Pin (2-Piece) (Home Depot, $2.31, https://www.homedepot.com/p/Everbilt-0-091-in-x-2-3-4-in-Zinc-Plated-Safety-Pin-2-Piece-815408/204276312#overlay) The finished towel bar/drying rack shown in place below. The disassembled parts are shown below: I chose NOT to cement the entire assembly, since it would be much harder to store when in transit. Construction Cut the handle of the HF Dual Suction Cup Lifter in half transversely. A hack saw or bandsaw is recommended. File/sand the cut edges to remove burrs. Use PVC primer and cement to fasten the threaded end of each 3/4 in. PVC Schedule 40 MPT x S Male Adapters to each of the cut ends of the handles of the Dual Suction Cup Lifter. Cut the ¾" PVC tubing for the hanging tubes I chose to make 3 hanging tubes, each 45" long. This length easily fits in our rear cargo carrier and sags very little Adjust length to suit yourself. Cut 8 pieces of ¾" PVC tube to 1-½" in length. These short pieces serve to couple the elbows, tees and adapter together. Using a belt sander I slightly beveled the cut ends of the hanging tubes and the connector tubes so they would more easily slide into the tee and elbow sockets. Assemble the two "manifolds" as shown above, each having: 2 elbows, 2 tees and 4 of the 1-½" connector tubes. Use PVC primer and regular PVC cement to assemble one joint at a time. Be sure to align the open sockets of the tees and elbows. Hold each joint until cement prevents movement of components. The manifolds should be identical. NOTE: do not put PVC primer or cement on the short connector tubes which will be inserted into the adapters cemented onto each handle of the Dual Suction Cup Lifter. When the manifolds are assembled insert the hanging tubes into the three open sockets on each manifold. Again, I chose not to glue the hanging tubes to the manifolds for ease of storage. Insert the connector tube on each manifold into the adapters cemented to each half of the Dual Suction Cup handle. Again, do not use PVC primer or glue. With all components assembled, do a test fitting on the hull of your Oliver. Slightly dampening the suction cups significantly improves their grip on the hull. The hanging tubes and manifolds assembled should largely support themselves horizontally. I had leveled my trailer and used a level to also level the towel bar/rack. When the towel bar/rack is level drill a 7/64" hole vertically through the adapter coupling joining each half of the Dual Suction Cup Lifter to the short connector tube of each manifold. The purpose of the hole is to permit insertion of the zinc plated safety pin which will prevent the towel bar/rack from sagging, while still permitting the rack to be disassembled. Insert the zinc plated safety pins through the holes drilled into the adapter couplings to maintain the towel bar/rack in a horizontal position extending from the hull. I marked the suction cups and manifolds Left and Right to avoid difficulty later inserting the pins through the connectors. I also put an index mark on the adapters and manifold connectors for easier alignment. I have not yet tested this assembly in the field, but am confident it is strong enough to hold as many towels and clothes as will fit. I expect it could also support wet shoes or hiking boots. I hope this is useful to other owners. I welcome suggestions for improvements. As a final note, update your departure checklists to include removing and stowing the towel bar/rack.
1 point
-
For those with the 12 volt Isotherm refrigerator - What are you doing when you want to store the Oliver during non-use times? The main issue as I see it is keeping the refrigerator door open for air circulation. But, then the light is on all the time. I pulled the refrigerator fuse but, now there's an LED on where the fuse was removed. For now, we store ours outside but we will be moving it inside in the spring. We have the 390 AH Lithionics with solar so I suppose this is a moot point as long as the panels are on? I also realize that being a child of the 60s/70s, it's just not in my nature to leave a light on! We really love hull #1550 and the upgrades from our original 686 (including the fridge)!1 point
-
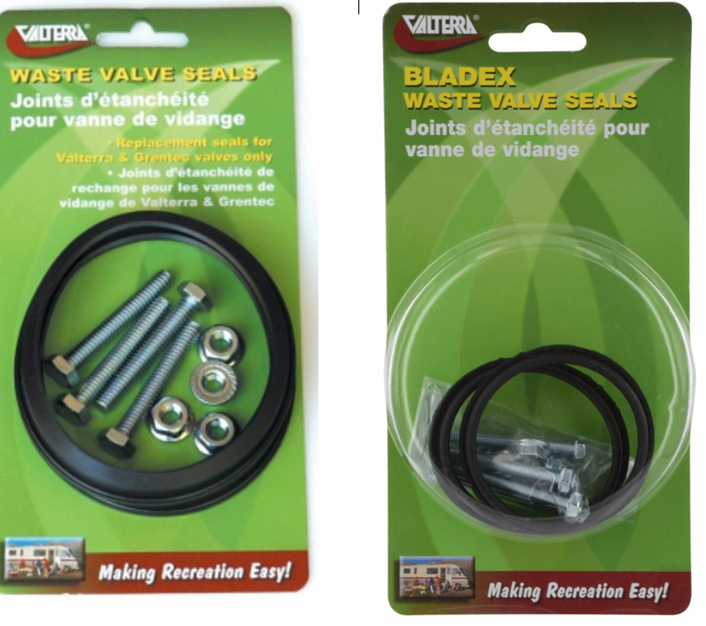
For the Pro's: Should all the above fail, then knowing some replacement/repair info would be helpful. Are our valves the Valterra 3"? If so, which one? Are one of these the proper repair kit for the blade?
1 point
-
We have been using these quick dry micro fiber beach and shower towels for a few years. Simply laying the towels over our camp chairs in the sun or a light breeze, they dry out fast. https://www.amazon.com/4Monster-Camping-Absorbent-Microfiber-Backpack/dp/B07WJKZDTZ/ref=sr_1_7?crid=36GBWCVUZJGKX&dib=eyJ2IjoiMSJ9.dFe_c20sdlYzd-zyAsq_funKLO06H91apK9OV9Uo-B7K1TMNfYxCxmi5cCdNK4IrLIQRvTpSDp6OaqhWtkb0ZBZT4wgdUppjio_L8576pU4U1gPhIuAOCgZF91aJ_QJM42KtEGegGWH53DHZ99w6oFy4Fj178JhJCTjhnvv-1u8fB8ItzaZjKrY1Q2MTLmj7_jDgOlgEZQ_YgZstv1PeJieqA8lAJ4mhL3xZ9IP8HITAiBlvV0ZrD69UPC6Rf9JZOA9vz21rNOpNOUhy6bVSP5JIwRiuA8jsc0R1wVaTLyVr4OuPxSIo-POjdFFAni-Pboun0cjE227CyA-EXBVHI8oGdfRViE0peDPoSTYM3kAH5cmGNqro2eEAf-0O1FukZUKXVAgjhq50SuasdLtwxhRflhfIr983VMsXroufMJJ9VBRKFdKdyGwBGbS5-bxi.gaUk0TUySiVC8Pc-2DEnvwQcjauvHndLZHUItmP3P-8&dib_tag=se&keywords=camping%2Btowels%2Bfast%2Bdrying%2Blightweight&qid=1735633114&sprefix=Camping%2Btowels%2Caps%2C112&sr=8-7&th=
1 point
-
@ghopkins1033, Yes, we still regularly use our exterior towel bar assembly. It has held up well. I have not had to replace any components. I had added two support tubes which connected to two tees in the outer bar, at the suggestion of @Bill and Nancy. The support tubes had suction cups at the opposite end to connect to the body of the trailer at approximately a 45 degree angle. I no longer use the two supports, due to another suggestion from @Bill and Nancy. @Bill and Nancy, operate The Bird Store, which offers bird feeders which utilize suction cups for mounting. They recommend their customers apply a thin coating of petroleum jelly or olive oil to suction cups to improve their holding capability on smooth surfaces. The lubricant applied to the primary suction cups eliminated the need for the additional supports. I now apply a very thin coating of petroleum jelly or olive oil to the 4" primary suction cups before mounting the assembled rack to the body of our LEII. The addition of the lubricant to the suction cups substantially increases their holding capability. The two 4" suction cups now easily maintain a load of as many towels as we can fit on the 4 tubes of the rack. The suction cups are easily removed by raising their levers and lifting an edge of the suction cup. A plastic putty knife is also useful for releasing the grip of the suction cups. We have learned to use clips on towels/clothing hung on the PVC tubes of the towel rack to prevent the wind blowing them off. The clips also help to keep the towels from blowing against the body of the LEII, which is not always free of road grime. I usually put a clip on a towel just below the PVC tubes, holding the towel on either side of the tube. We have found clips for chip bags serve well for this purpose. Walmart is a reliable source of inexpensive clips. I usually assemble the towel rack on a picnic table, where I also apply the lubricant to the suction cups. A small amount of lubricant also helps the PVC tubes to slide more easily into the couplings. Disassembly is very quick. Little space is required for stowage when knocked down. Regards, Don1 point
-
Thank you jd1923. about quarts of black water not gallons coming out so there may be a blockage preventing the valve shutting and I has noticed that to get all the tanks drained I have to tip the front of the Oliver up (it cannot be flat) to get both tanks drained. I will try filling and flushing the black tank and see where I get , I will keep you posted.1 point
-
Planning on adding the Victron Orion 50A DC-DC charger in the new year. The Victron Amazon store just lowered price on these: Amazon.com: Victron Energy Orion XS Smart DC to DC Battery Charger 12/12 50A (700W) - IP65 Dust & Waterproof - Fully Configurable - Remote Management Possible - Advanced Battery Protection : Electronics I will go with TEMCo 4 AWG cable. I measured distance from battery to rear bumper at 21 ft (long bed TV), then from hitch to rear dinette to my main busses another 15 ft, adding 10% for 40 ft total one-way. Wondering what Geooff, or @MAX Burner, @Ronbrinkand others did with the ground wire at the TV? It doesn't seem necessary to run the B- cable all the way up to the batteries. Could it not be grounded at the rear frame of the TV? The truck batteries are also grounded to the frame. This saves 18 ft of cable, so I'm planning on 60 ft total. Wire got more expensive in the last year! BTW, I did upgrade to a Nations 180A HD alternator last summer which is about 50A higher than the OEM alternator.1 point
-
@Ollie-Haus Chris very impressive! I have an appointment with the factory in April to add the 2" receiver and this is exactly the end result I'm aiming for. If you don't mind when you have a moment could you please measure the inside dimension of the UWS box please and thanks? No rush.1 point
-
If your batteries are low your charger will draw a larger amount of current which will likely exceed a standard residential outlets current capability. You can adjust the settings in your inverter / charger to lower the charger current. This will require a longer time to recharge your batteries.1 point
-
Are you checking the voltage and amperage of the various 120V supply circuits you are "mooching" off of, with a multi-meter? That may solve some of the mystery. Many residential 120V circuits are overtaxed and cannot support the significant additional power demands of an Oliver Elite II. Do you carry a heavy-duty (like 10-gauge) extension cord in your Oliver? When "mooching", I use a 10-gauge cord with a 30A adapter. I also recommend checking for incorrect wiring with an inexpensive outlet tester before you plug in. I have avoided some unpleasant surprises by checking unknown receptacles before plugging in, with one of these: https://www.amazon.com/Receptacle-Tester-Klein-Tools-RT210/dp/B01AKX8L0M/ref=asc_df_B01AKX8L0M?mcid=4df224494ad63027958a05dc381a06a5&tag=hyprod-20&linkCode=df0&hvadid=693608794701&hvpos=&hvnetw=g&hvrand=5705870914769089309&hvpone=&hvptwo=&hvqmt=&hvdev=c&hvdvcmdl=&hvlocint=&hvlocphy=9029558&hvtargid=pla-498023562957&psc=1
1 point
-
Inquiring minds want to know! It’s true that inverters are complex devices because they can invert, convert, charge and switch large currents, and they have notable efficiency losses when doing so. However, with the inverter turned OFF, the only “parasite” load I can think of might be the Bluetooth or a memory function. Thats why I conservatively guessed an estimated ballpark value of approximately under 20 milliamps (+/- 20.) 😁 The inverter OFF load was too small to register on my shunt and therefore I consider it inconsequential. . . like years to discharge the battery. But, if I ever disconnect the battery, I'll let you know exactly what the load is and let's not be surprised if it's zero! Also consider this: Even with the inverter “inadvertently” left ON, with no AC devices turned on, the “parasite” load is only 0.2 amps per my shunt as I previously mentioned. That’s because it’s actually operating to power the microwave clock . . . speaking of inefficiency. But that's also a small current that would take months to run down the 390 amp battery. Good discussion! Cheers! Geoff1 point
-
Happy camping and happy New Year!1 point
-
Congratulations! Always happy to welcome another Ollie to the Sunshine State! Welcome home!1 point
-
Nice install. Great safety touch too with the split loom over Sparky Spots. GJ
1 point
-
Give in! Give in! Give in!1 point
-
Ah, you are entirely correct! That's a page I hadn't found searching their site. I'm sorry to confuse the issue. It looks like the Oliver kits are $10 more than the head alone, which is probably a better deal than buying just the head and my cost to ship the adaptor to you. I recommend one of the kits with the trickle valve, to keep your water temperature consistent. Enjoy!1 point
-
Apparently they are making the shower head to fit both Oliver trailer configurations by year model unless I am confused ? I stay confused 🤔 https://www.highsierrashowerheads.com/product-category/oliver-handhelds/ copy and paste email below Hi Robert, We will have a black Friday sale, but the discount on the Oliver shower heads won’t change from 15%. The shower head for your trailer is the one with a female hose connection: https://www.highsierrashowerheads.com/product-category/oliver-handhelds/ Thanks, David Malcolm Tel: 888-445-19411 point
-
We pull the fuse, open the refriderator door and then flip the freezer door open. The freezer door prevents the refrigerator door from closing completely. Just be careful to not bump into the door when working inside the trailer.1 point
-
I've got no solution (other than pulling the plug on that LED) for the fridge light(s) problem. But, in order to keep any odors at bay while in storage, first take a half dozen newspaper pages, crumple them up and stick them in the fridge and freezer with the door(s) cracked open. Bill1 point
-
Nice mod and great write up! Thanks! Mike1 point
-
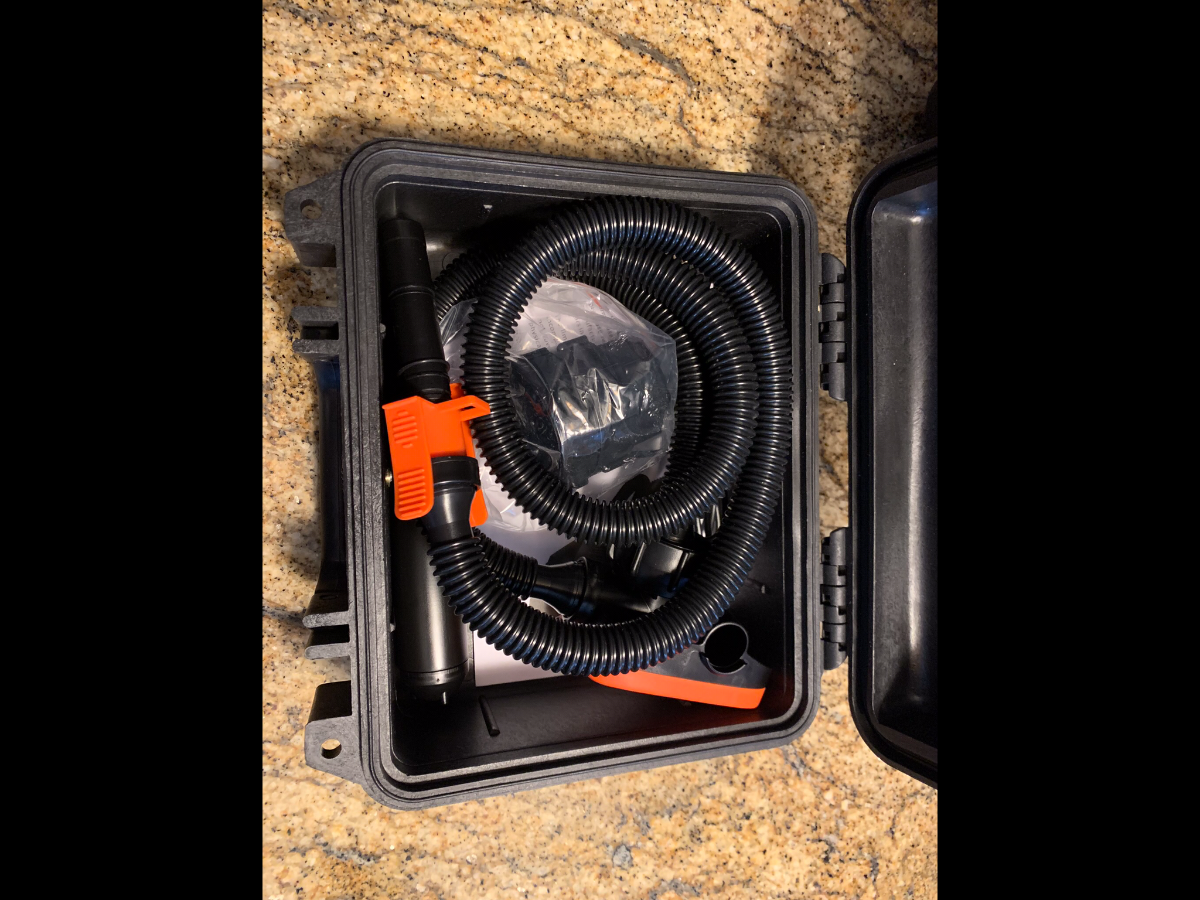
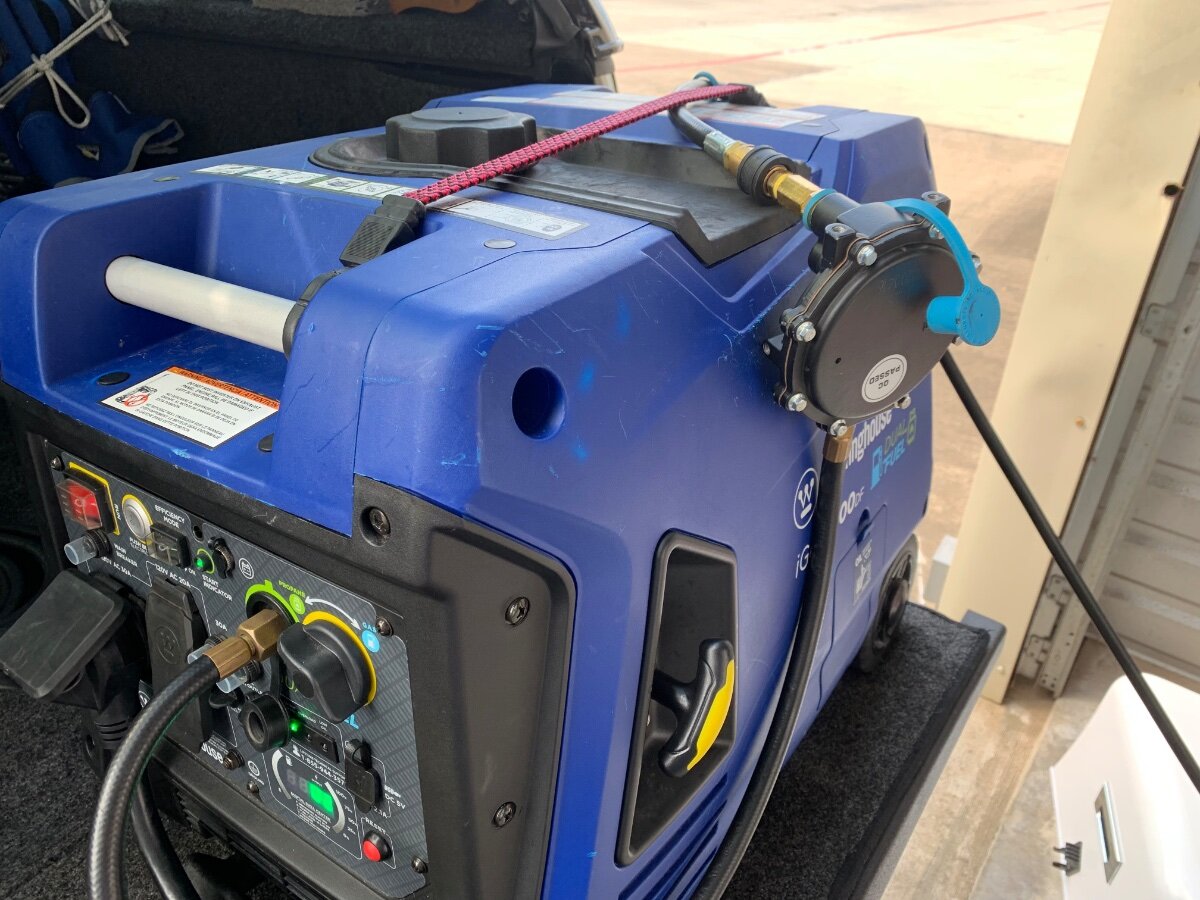
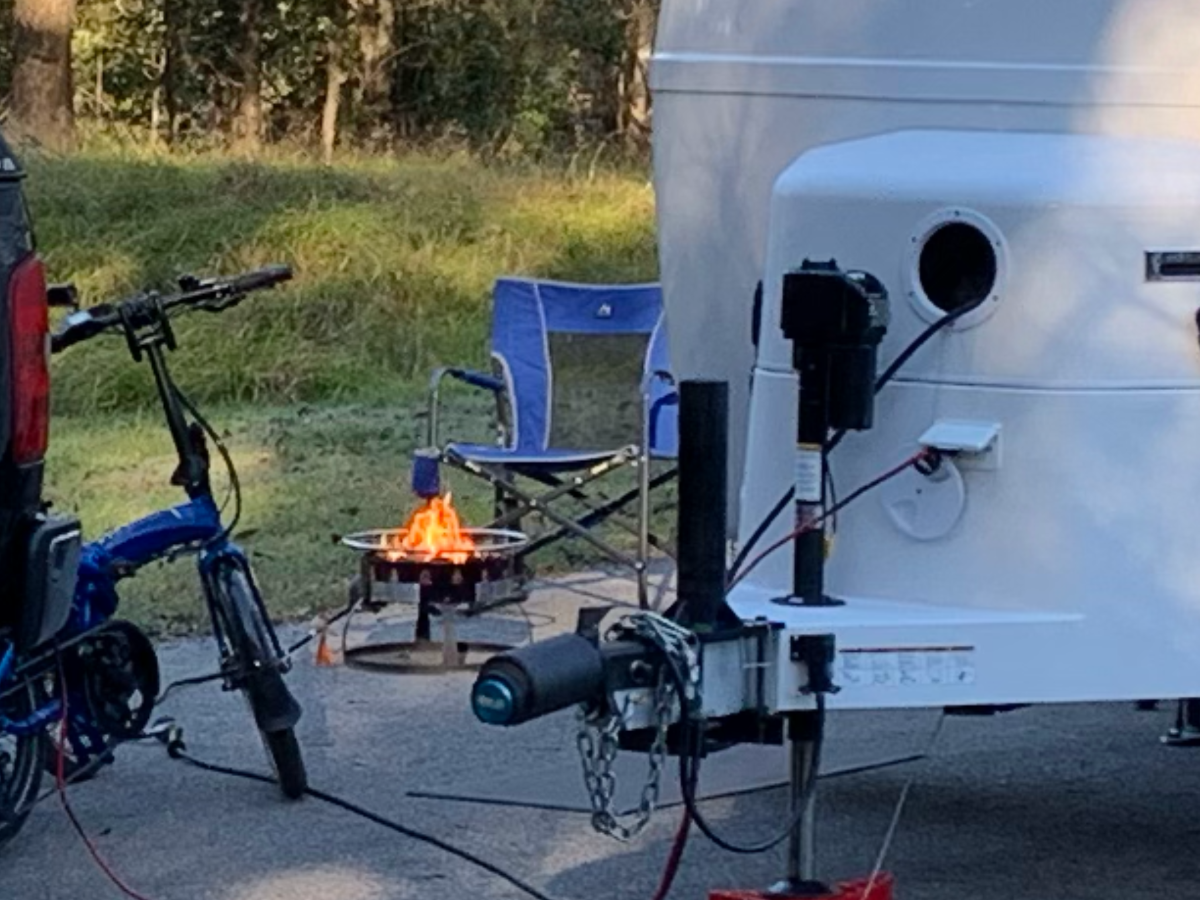
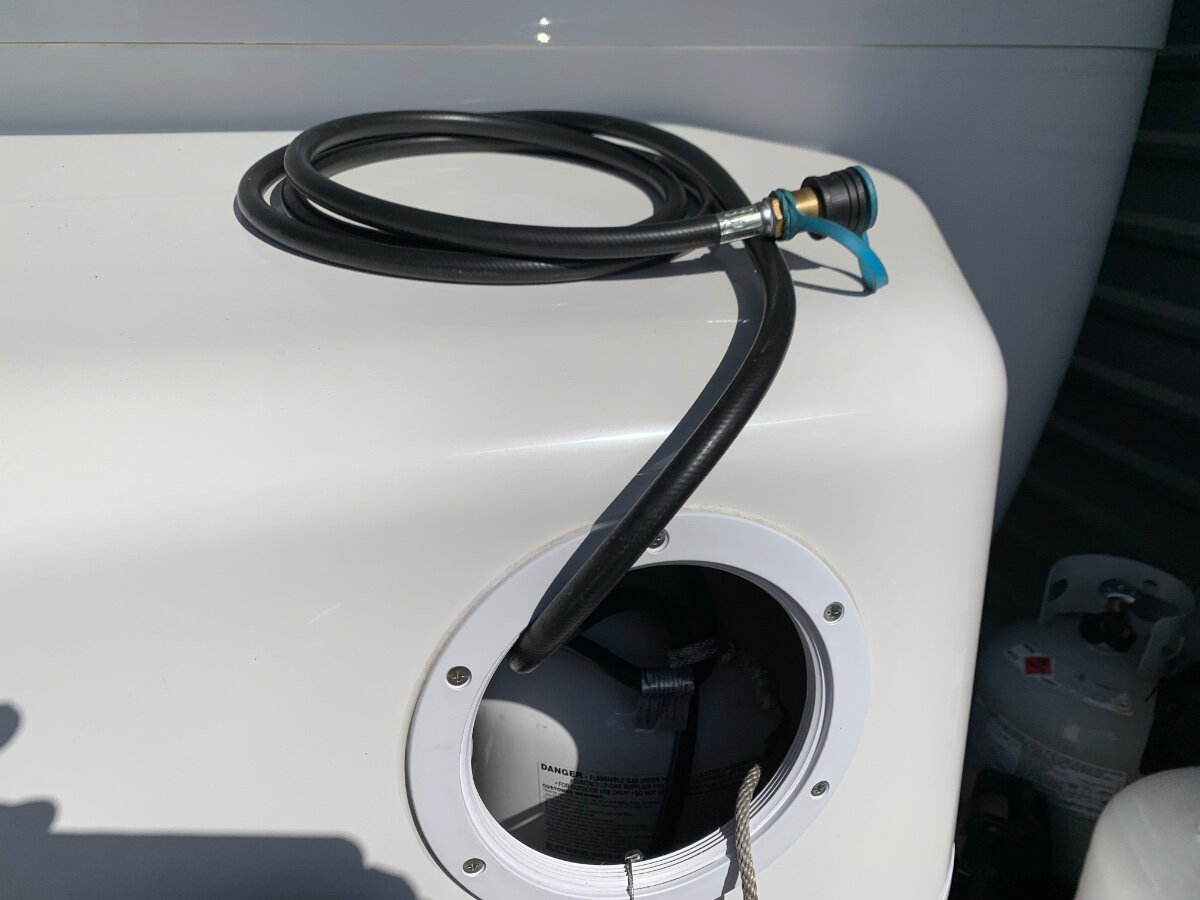
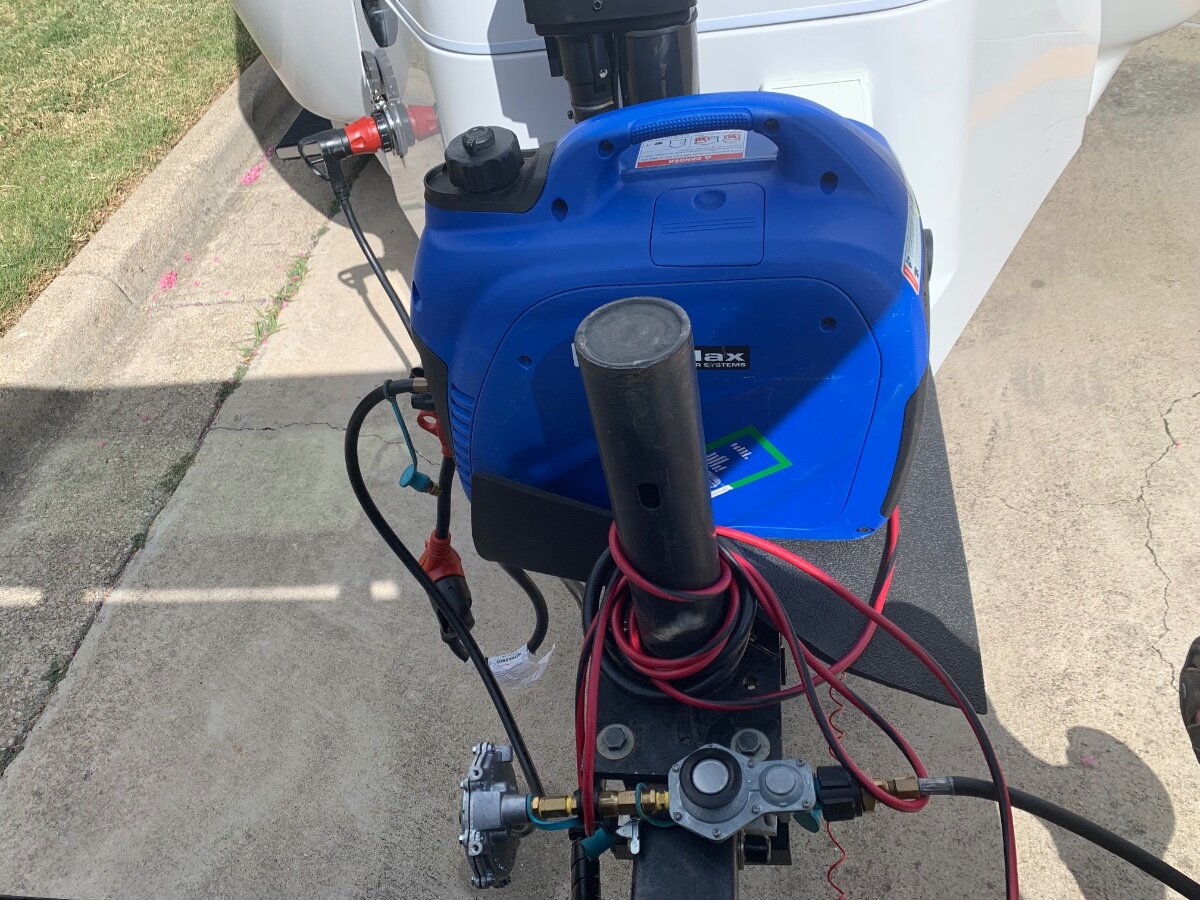
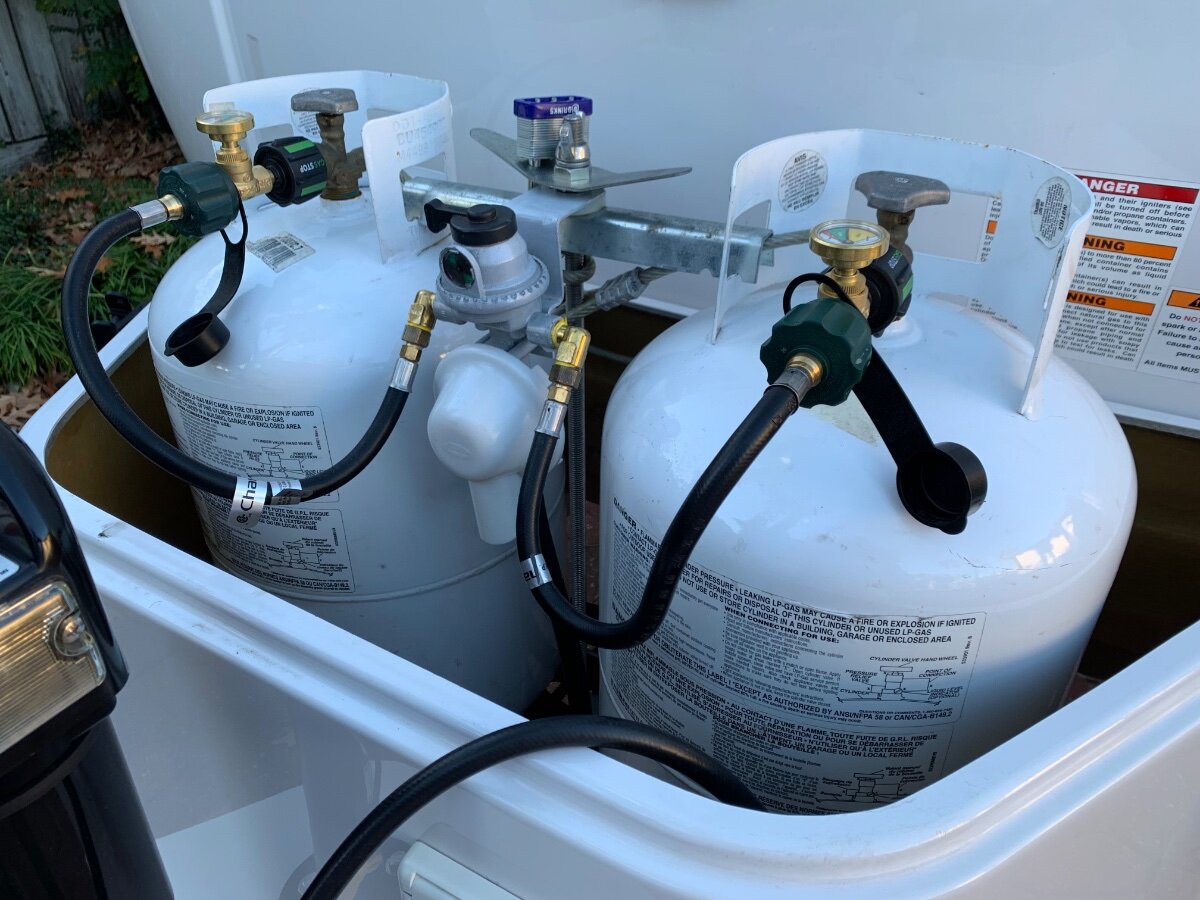
I have two dual fuel generators and generally only run them on propane. The exception would be during hurricane evacuations when our Oliver becomes an escape pod; it is more cost effective to run the Westinghouse 4500W on gasoline for continuous 24-hour durations for several days. Run time is 16 hours on a tank of gas with a/c on. I always carry two WAVIAN (NATO-style) jerrycans, one with ethanol gasoline for the TV and other with non-ethanol for the generator(s), as needed. I have made use of these fuel reserves on several occasions when the TV’s low fuel indicator light comes on; yep, that happens, drives my wife nuts! My SOP is to routinely rotate said fuels rather than stabilize with an additive. Regarding the jerrycans, I have never smelled any fumes, even when enclosed under cap in my former TV and currently inside our Savana van. To your point however, gasoline or any residue in a generator fuel system will reek, so another practice is to run the carb dry, drain the tank and throughly air it out, as necessary. Fuel transfer, especially into a vehicle, can be cumbersome and messy, but I resolved both issues with a portable rechargeable pump. Simply set the gas can on the ground, deploy the pump/hose, flip the switch, easy-peasy! Better yet, once done I let it air out before stowing away in a small Pelican Case to conceal any residual odor. I have my generators set up to either run directly from a dedicated propane tank or utilizing the Oliver’s QC ports. By dedicated, I mean either a spare propane tank carried in the TV or one of the trailer-mounted tanks, in which case the regulator hose would be disconnected. In this instance, remote regulators (primary and secondary) would be utilized. However, if connected to one of the Oliver LP ports, only the secondary regulator comes into play. I modified one of the generator supplied regulators with QC fittings between the two sections, thus enabling multiple usages. Use of secondary regulator only when running from the Oliver QC port. Use of both primary and secondary regulators when running from a dedicated propane tank. I installed GasStop automatic shut-off safety devices on all tanks, great for gauging, as well as priming! Note the propane hose draped over the tank housing at bottom pic. Aforementioned propane hose is tapped into the forward QC port for better access. I didn’t like having to get down on my knees to hookup. This is a 10’ hose extension. Extension hose stowed on top of tank and can be deployed via the screw port for added convenience. This hose also serves use of my fire pit.
1 point
-
This is all true JD. But I am also thinking emergency use of the generator at home where options of multiple fuel use would be an advantage. While having fun in my Oliver, I would only ever run the generator on propane for all the reasons you mentioned, and a few more! I also try to never run ethanol gas in any of my gas powered tools. Only high octane non-ethanol gas is used. Where I live, it is pretty easy to find. There is also a website that will list local "pure gas" locations in your area. https://www.pure-gas.org/ Dave1 point
-
According to the SoftStartRV website, they only provide two models, which leads me to believe they are universal in application and thus, not brand specific. Thanks for providing pertinent information regarding Truma’s business practices, much appreciated!1 point
-
We drove to Truma in Indiana in September and had the soft-start installed. While there and in the presence of the technicians, I connected my Honda 2200i Companion generator with propane conversion and we tested it. Worked perfectly. The technicians were impressed. When we got home, I tried it again and ran the generator and air conditioner for several hours. I did this test three times. I am very happy with the set up now and confident going forward. Instead of running two generators I can now run one. The big test will be when we get some altitude to see if the generator can handle it - after changing the carb jetting of course. As a side note, I can now run the air conditioner off the 2000 watt inverter. We tested this too at Truma with success.1 point
-
We’ve been up and down 550 a lot, towing, and it’s really not too bad. Everyone goes slow enough that there’s not the “white knuckle” experience you would think. An alternative that we’ve done from Fruita (be sure to visit the Colorado Nat’l Monument there) is to head towards Ridgway on 50, which turns into 550. In Ridgway, turn right towards Telluride so that you avoid the Million Dollar Highway part of 550 (Ouray to Silverton). Go past Telluride, through Rico and you’ll be able to pick up 145 south to Cortez. We are usually heading to Durango so we bypass Cortez. It’s a scenic drive without the mountain passes that are on 550. Mike1 point
-
Eagle Rock RV in Idaho Falls, ID1 point
-
FWIW, an update on this facility. I contacted the service manager, Adam, who said to bring it in. As chance would have it, I found myself in the area again this year, one year later, and dropped it off. Adam took care of everything and threw in a lube, all comped. Wow. I now again can fully recommend this RV service center.1 point
-
On our way over to Cortez CO we detoured into the town of Telluride aka “ski meca” with our Ollie in tow and actually scored a spot to park right on Main Street. The Aspens are just popping in peak color in many areas. We enjoyed a great lunch in town and took the free gondola ride up the mountain. It was short sleeve weather and really a great day. We will do a little exploring in Mesa Verde NP today. Onward!🇺🇸 Telluride from the mountain side State route 145 is a really beautiful drive especially this time of year.
1 point
-
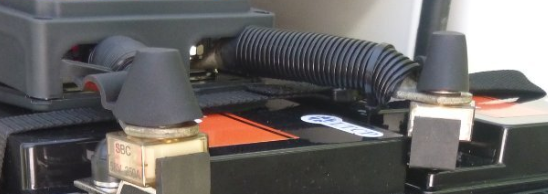
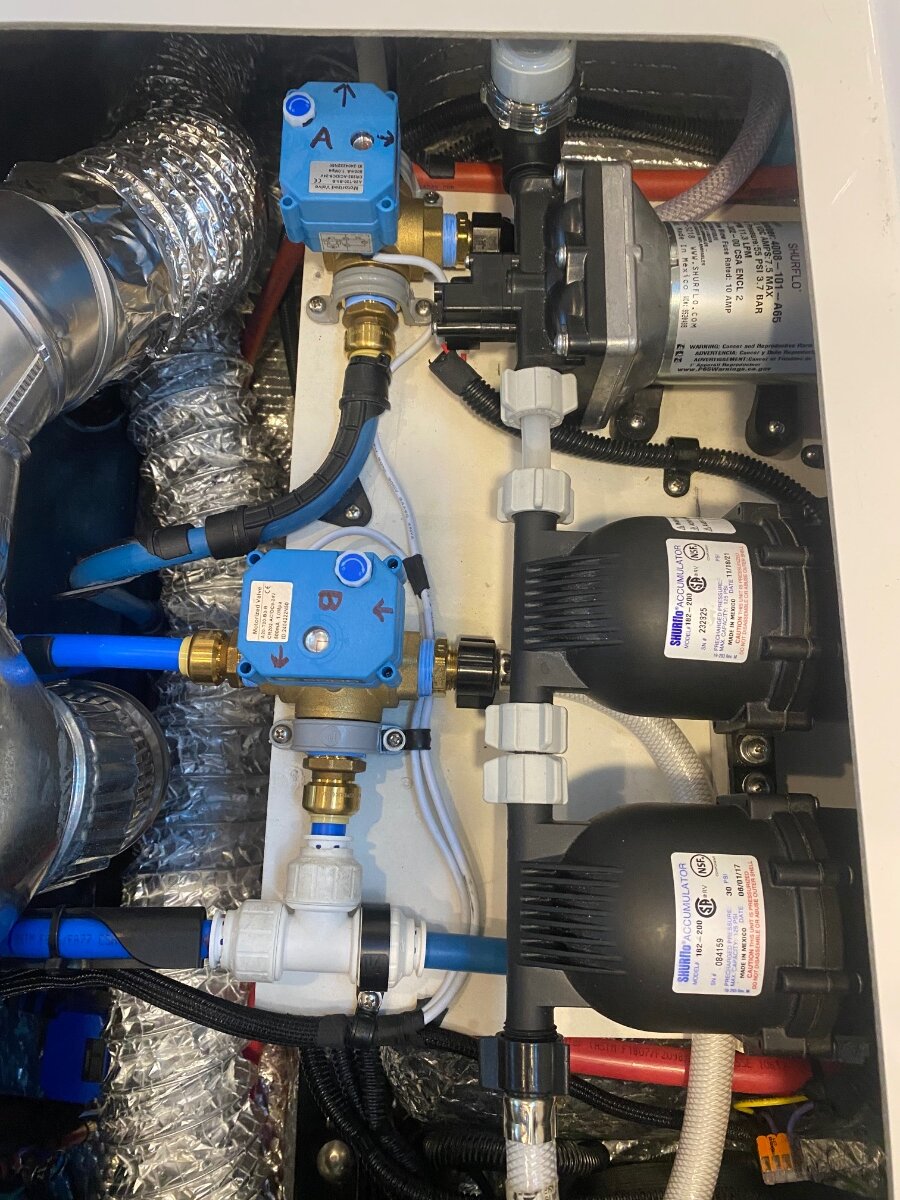
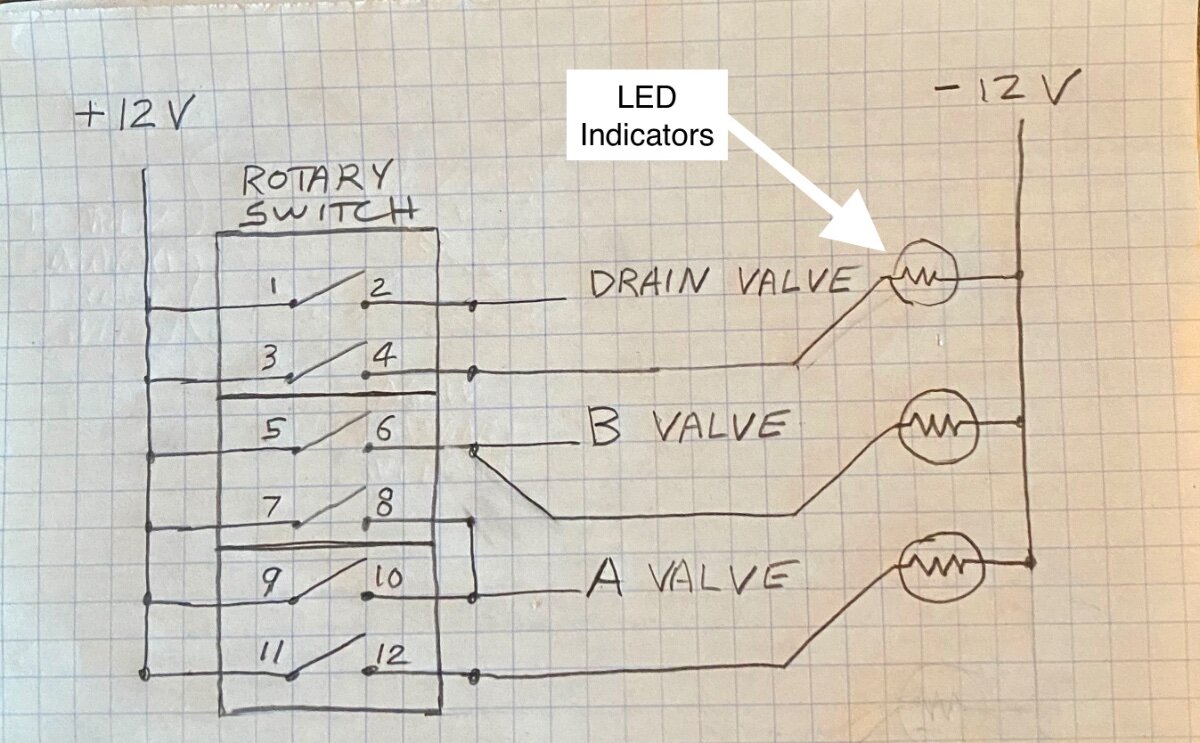
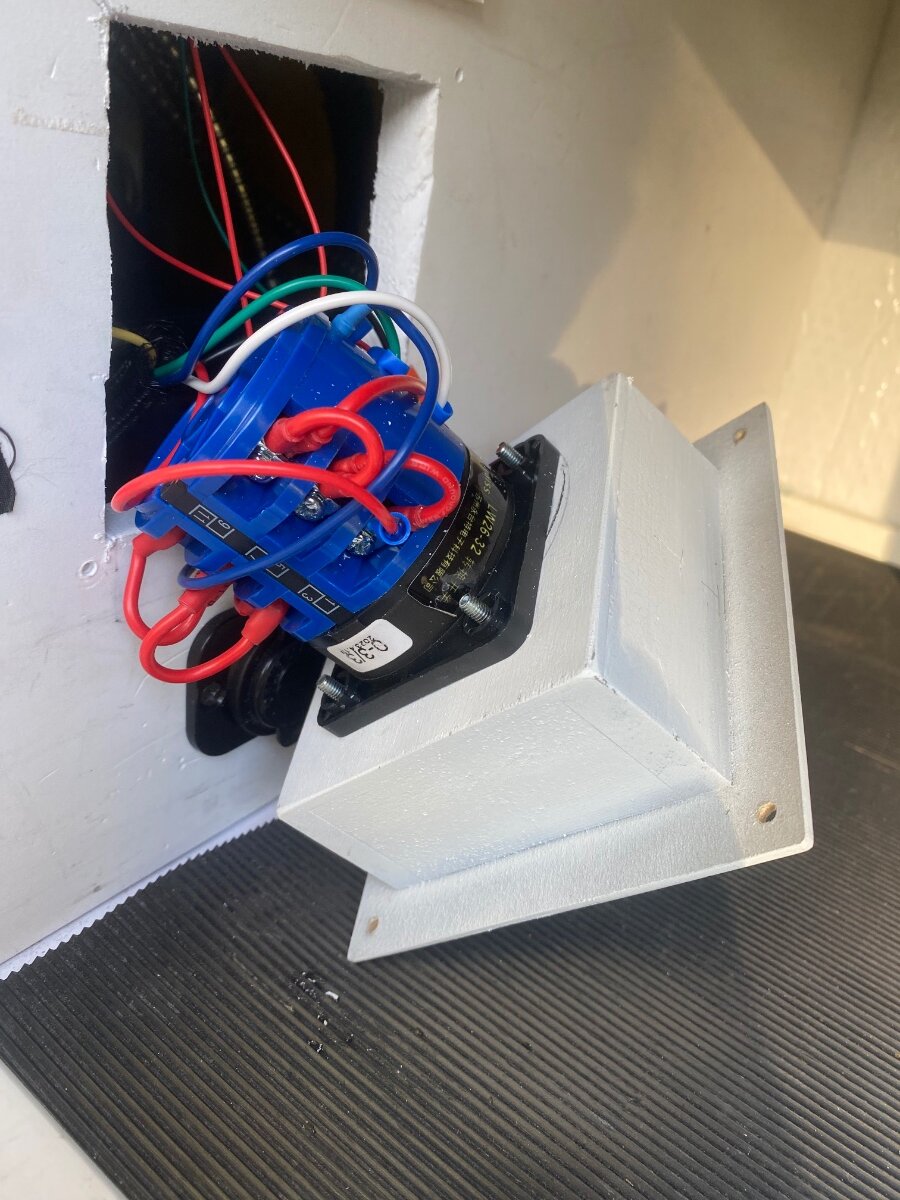
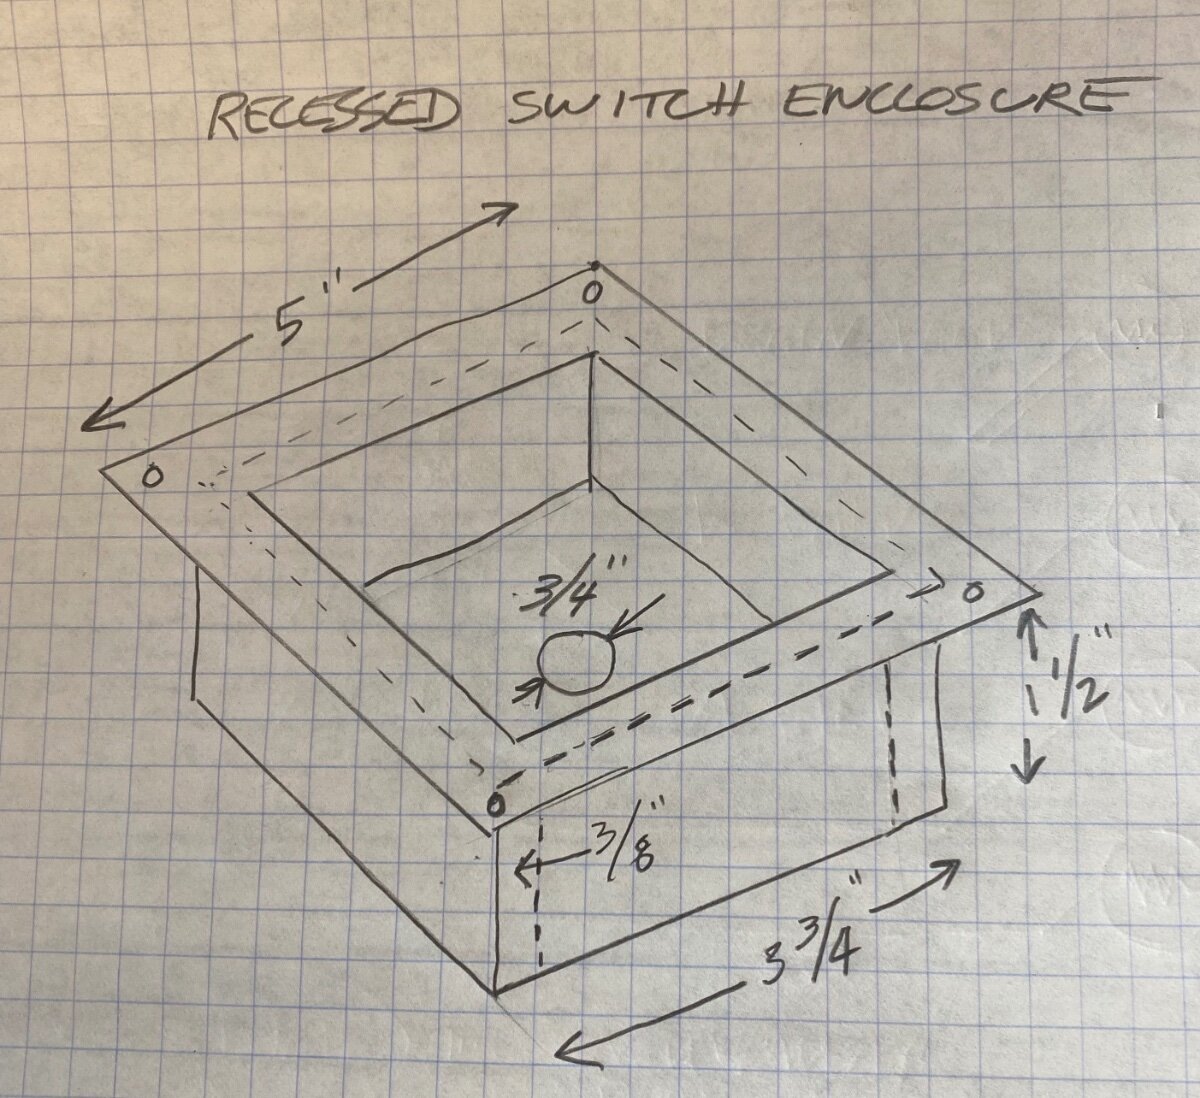
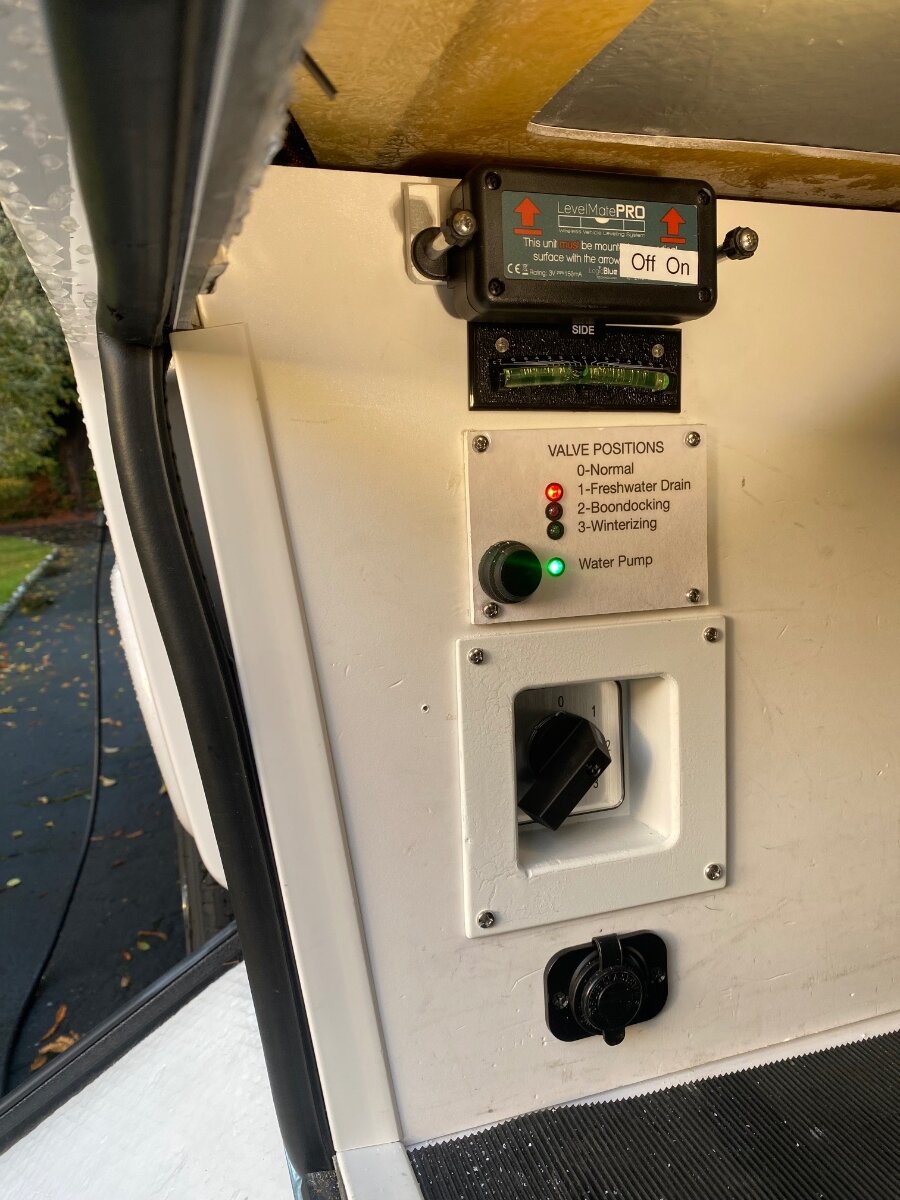
This modification improves electric valve control by adding a rotary switch to select the four different valve line-ups: Normal, Freshwater Drain, Boondocking, and Winterization. I was really inspired by JD1923 and C&M Currie who replaced their quarter-turn valves with electric valves so they didn’t have to lift the bed mattress to change valve positions. This is a fairly extensive modification because the heater vents had to be removed for access to the valves, the new electric valves had to be installed, a recessed enclosure was needed to protect the switch, and number of new wires had to be run Four of the original quarter-turn valves were replaced with two 3-way electric ball valves in the orientation shown in the photo. I used 3/4” valves with 1/2” adapters and SharkTooth PEX fittings for better flow. A little heat helped to slightly bend the PEX pipe into position, and the valves were clamped down with 1” electrical PVC clamps. A 1/2” electric ball valve was used for the freshwater tank drain. There was limited room to work in this area so it helped to pull out the PEX drain pipe where it penetrates the floor. The switch was mounted on the forward facing wall of the outdoor garage where it’s more convenient to conduct the valve operations. To keep it out of harms way, I made a recessed mounting plate out of 1/8” hobby plywood and moulding stock as shown on the drawing. The plywood can be cut with a razor knife if needed. The following legend helps explain how the rotary switch is configured. It shows the original five quarter-turn valves and the replacement motor operated valves. It also shows the four switch positions as they correlate to the valve line-ups, and the wire terminals used per the wiring diagram. Original Oliver Valves 1 2 3 4 Drain New Valve Identification Switch Position Switch Terminals Valve Line-up A (3-way valve) B (3-way valve) Drain 0 None Normal* Open Closed Closed Open Closed 1 1-2 3-4** Freshwater Drain Open Closed Closed Open Open 2 5-6** 7-8*** Boondocking Closed Open Open Closed Closed 3 9-10 11-12** Winterizing Closed Open Closed Open Closed * Valves in the de-energized position ** Terminals used for optional LED indicators *** Terminal-8 is Jumpered to Terminal-10 The rotary switch needs jumper wires that can be pre-wired on the bench using ring terminals. This will keep them in place while connecting the field wiring using the included forked terminals. The valves use very little current so the +12Vdc can be picked from any convenient power source and protected with a 5 amp fuse, I used a nearby breaker. An internal capacitor powers the valves back to the “Normal “ position when de-energized (Position-0.) Five wires were encased in 3/8” split sheathing and routed under the floor to the valves. This included three power wires for the valves, one ground wire daisy-chained to each valve, and one spare wire for an optional pump LED that I’ll cover in a different post. I also added an optional 1/8” plywood label board with LEDs to indicate which valve line-up is selected. I printed out a switch label, had it laminated, and glued it on piece of 1/8” plywood with holes drilled for the LED’s. This was a fun project and just as I finished, I had a big surprise! 😃 Another Oliver owner, Taylor.Coyote, just happened to drive by. 😃 It was great to meet Chris and I look forward to meeting again. Cheers! Geoff Shopping list: 2 - U.S. Solid 3/4” 3-Way Motorized Ball Valve #USS-MSV10004-G 1- U.S. Solid 1/2” Motorized Ball Valve #USS-MSV00007 4 - 3/4” NPT male - 1/2” PEX fittings 2 - 3/4” NPT male - 1/2” NPT adapters Four position, 12 terminal (6 contact) rotary switch Taiss #LW26-32 0-3/3 3/8” split wire sheathing Misc. PEX fittings Optional PEX crimp cutting tool Optional PEX crimping tool Optional - Amazon 12 Volt 5mm LED Lights with mounting bases
0 points


-
Recent Achievements
-


")


")

