Leaderboard


Popular Content
Showing content with the highest reputation on 03/09/2025 in all areas
-
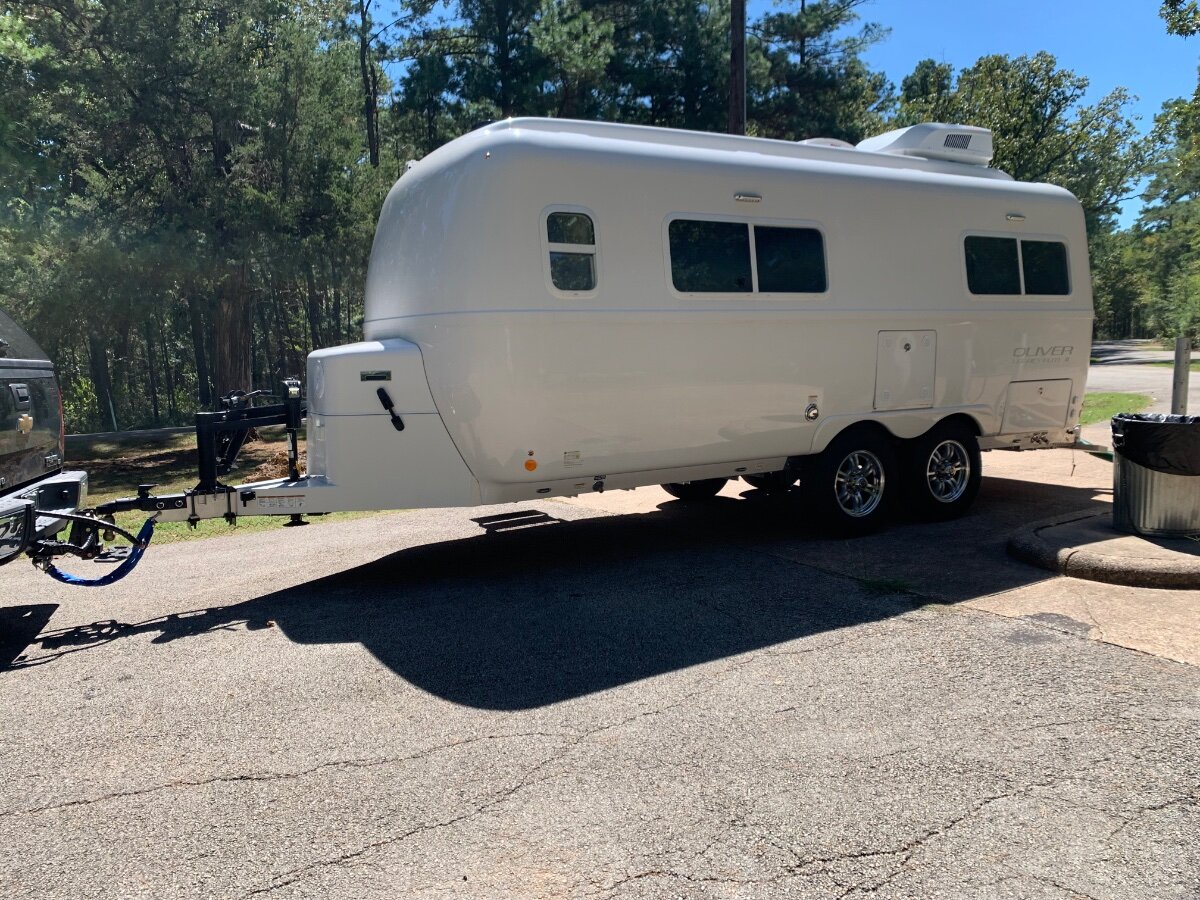
The simple answer is NO, and since when does an E-rated LT tire have thin sidewalls? Please do not take advice from Overlanders, Van-Life or or Rock-Crawler types! 🤣 The Oliver is simply a 7K LB rated trailer. Ours weighs in at 6500 LB and 40 PSI is enough according to pressure-weight tables, so I go with 45 PSI. Yes, OTT suggests even more pressure for legal reasons, since not everybody checks tire pressure each time out. https://tirepressure.org/lt-metric-tire-load-inflation-chart More pressure AND more plies in the tire construction makes the tire stiffer, the ride harsher, which is not helpful to Oliver trailer systems. Many owners have drawers and cabinets opening, which is a sign, but a stiff ride also causes real damage. You want a softer ride, in fact the E-rated tire is already too stiff. Most 7K trailers run on ST tires. Many Oliver owners have run the OEM tires at 80 PSI because that's what the label says on the side of our older hull and that's what OTT used to spec which was very wrong. Like you, we very often go, "down some bumpy dirt roads and truly off-gridding." There are more wash-board roads where we live and travel than most of you. You need strength in the drive tires on your tow vehicle, but the trailer should glide slowly over the rough terrain as much as possible. Think, why do off-road types air down when the terrain is rough? (to make them soft and flexible for better traction). And based on your location, cold weather also makes tires stiffer! We owned a class-C where a prior owner install G-rated 12-ply tires instead of the spec for Load Range-E. The ride was horrible. Every time the front tires hit grooves on the highway (almost everywhere) the front-end felt like it was being hit with a 100 LB hammer! Another example - we own a Lexus GX AWD truck. I added a 2-inch lift and suspension goodies. This truck comes OEM with P-rated tires (P for passenger). I wanted LT tires for our dirt roads. Everybody goes with an E-rated tire which makes sense if you are always pressuring down and crawling rocks but we are on city roads and highway 90% of the time. I purchased a Cooper AT tire because I could get the size I needed in a Load Range-C which is stronger than the P-rated tire but not stiff and harsh as E-rated. We run at only 32 PSI (not towing) and the truck glides down most roads. LOVE the ride and was so happy with this purchase decision! I will likely replace our Oliver tires with Range-C tires when the time comes, since it is all we need and the Oliver will ride more smoothly at lower pressures. We only need 45 PSI, not 80 and certainly not 110 PSI. BTW, welcome to the OTT Forum and congrats on your first post! I hope that my explanation helps! JD5 points
-
TravelWell: This appears to be your first post, so welcome to our forum. For a 6,000 (loaded) trailer, the OEM use of an E-rated (80 PSI) tire is unusual. Oliver could easily have gone with less stout and lighter C or D rated. But true to the exceptional quality of OTT's, they went with the stronger and much thicker tires that are rated to carry WAY more load. The E-rated tires are much more resistant to road damage as our owners typically include boondocking and roads such as yours in our travels. There are penalties with going with an higher rated tires and they are weight, cost and ride as JD discusses above. That said, I have yet to hear of any OTT owner complain about having too good of a tire tire on their rig. On the other hand, going to an even heavier duty tire such as you proposed would gain little in endurance or failure resistance. But the weight and cost increase would be significant. The third consideration is the forces that high pressure tires transmit up into the trailer. Although our 80 PSI rated tires can handle this pressure, most of our owners are running their trailer tires at the 50 PSI or less on highway and 30 PSI or less off road. Doing so keeps stuff in the cabinets and cushions off the floor. Finally, I know of no OTT owners that use 110 psi rated tires on OTT's for all of the above reasons. GJ2 points
-
True that, but not very much! Added benefit of the on-board air pump: each time the ignition is turned ON a few seconds of inflation is initiated to bring the bags up to the set pressure. Regardless of whether the vehicle is a daily driver or infrequently used, when the ignition is engaged the lost pressure is immediately restored. However, if wired to a constant 12V circuit and left unattended for a period of time the starter battery will be drained and possibly damaged in time. No bueno!2 points
-
According to "The Dyrt" the top three are: 1 - Cougar Rock 2 - Ohnanpecosh 3 - La Wis Wis Note that I've never been to any of these. Bill2 points
-
Excellent points! I still carry a small generator and at times two, especially when in hurricane evacuation mode! Both are dual fuel models and mostly run on propane; the smaller DuroMax XP2200EH exclusively on propane, the larger Westinghouse iGen4500DF on gasoline, as needed during said evacs for multi-day continuous runs, otherwise propane when camping. Since my TV change from a pickup truck to a cargo van, I no longer carry the 4500 routinely as before 1) the 2200 meets my needs to run the air conditioner during nights when needed, 2) it was primarily a backup when leisure traveling/camping, but no longer considered a necessity, 3) it occupies space, adds weight and has a slight smell of gasoline, which wasn’t a problem in the truck bed, but now is since the van’s cargo bay is within, and 4) there’s comfort in knowing I can always run the Atmos on inverter as a backup for a/c!2 points
-
Steve, you should add an electrical sub-panel for your garage. You can replace the 20A double breaker with a 60A. Run 8 AWG wire from there to an inexpensive 60A panel. Buy a panel kit that includes some 15A or 20A breakers. Try to separate the wiring to freezer, etc. to separate breakers in the new panel wherever possible. You could add a 30A breaker and a 30A RV outlet on an outer garage wall. You have 150A service, so this is possible for about $200 at the Depot. I’ve added sub-panels for 2 outbuildings, our spa, and one in the kitchen so that we can have the fridge, microwave and air-fryer all on separate 20A breakers. You can bring your home out of the 70s. Ours was built in 1980, but I learned in the 90s, on my first project, a 1943 farmhouse with a pole barn that needed power. One new sub-panel is a good weekend project after some good planning. Best wishes, JD2 points
-
Since your profile and signature does not say what your truck is,,,, and I did not read every post.... If you have a F-150, the forum repeatedly says that the Bilstein's on the rear are a great improvement, and air bags also. But it not worth the cost to install 5100's on the front of a F-150, unless you really want a ride height adjustment. GJ2 points
-
My house, built in 1976 with apparently no building codes observed, is severely under-powered and under-wired. It is an all-electric home with a heat pump for heating/cooling, and only has 150A service. The entire garage is on one 20A breaker, with two wall outlets, one ceiling outlet, and two ceiling light sockets (one of which has a screw-in outlet for four LED shop lamps.) There are way too many continuous and/or intermittent loads on that one 20A breaker: the aforementioned LED shop lights, garage door opener, 40 year old chest freezer, dorm fridge, stationary air compressor, 3-4 Battery Tender Juniors, the Oliver, an extension cord to my truck to run the fridge/freezer at home, a buried extension cord to an outdoor weather station and security camera, occasional woodworking tools, two Makita 2-slot battery chargers, a Bose Wave radio w/Raspberry Pi attached, cable TV signal booster, and probably more that I'm forgetting. So, I keep the Xantrax set low to limit how much it draws from the house. The only loads are the fridge, battery charger, parasitic loads, and occasionally the AC. The vast majority of the time the trailer isn't plugged in to the house at all. The batteries can handle any typical loads, and even AC if I'm not using it continuously.2 points
-
If label is missing or hard to read, look at the backside of the wheels. If the drum brakes backing plate shows it is bolted on in a 4-bolt square pattern, you have 3500# axles and 10” brakes. If you see 5 bolts in a pentagon pattern, you have 5200# axles with 12” brakes. Good to check, just to be sure, in case of mis-labeling!2 points
-
Maybe this post will provide you with some answers.2 points
-
Good question. As chairperson and founder of the Oliver Rabbit Hole Society, I think you may in time have the experiences and qualifications to be a member. 🙂 GJ2 points
-
Thinking how I’m going to get the ethernet cable from my Starlink Mini into the LE2 and plugged into my router and powering the dish from my camper batteries. (Rather do DC power and not have to use the inverter.) Has anyone installed the SmartPlug dual data port, replacing the factory satellite port? That would give me ports for both the ethernet and power cables to exit the hull. I’m thinking I could use the 12V port in the attic with the Starlink 12V cable kit, but that won’t leave me with much power cable length outside the camper to move the dish around. My goal is to use the camper batteries for power and a third party router inside instead of relying on the built-in wifi in the dish. **I know the Mini does not support POE, However, Mobilemusthave.com has a kit that carries the power over the ethernet cable and then splits it back out at the dish. Sort of a POE solution that allows you to have only one cable going out of the hull instead of two.1 point
-
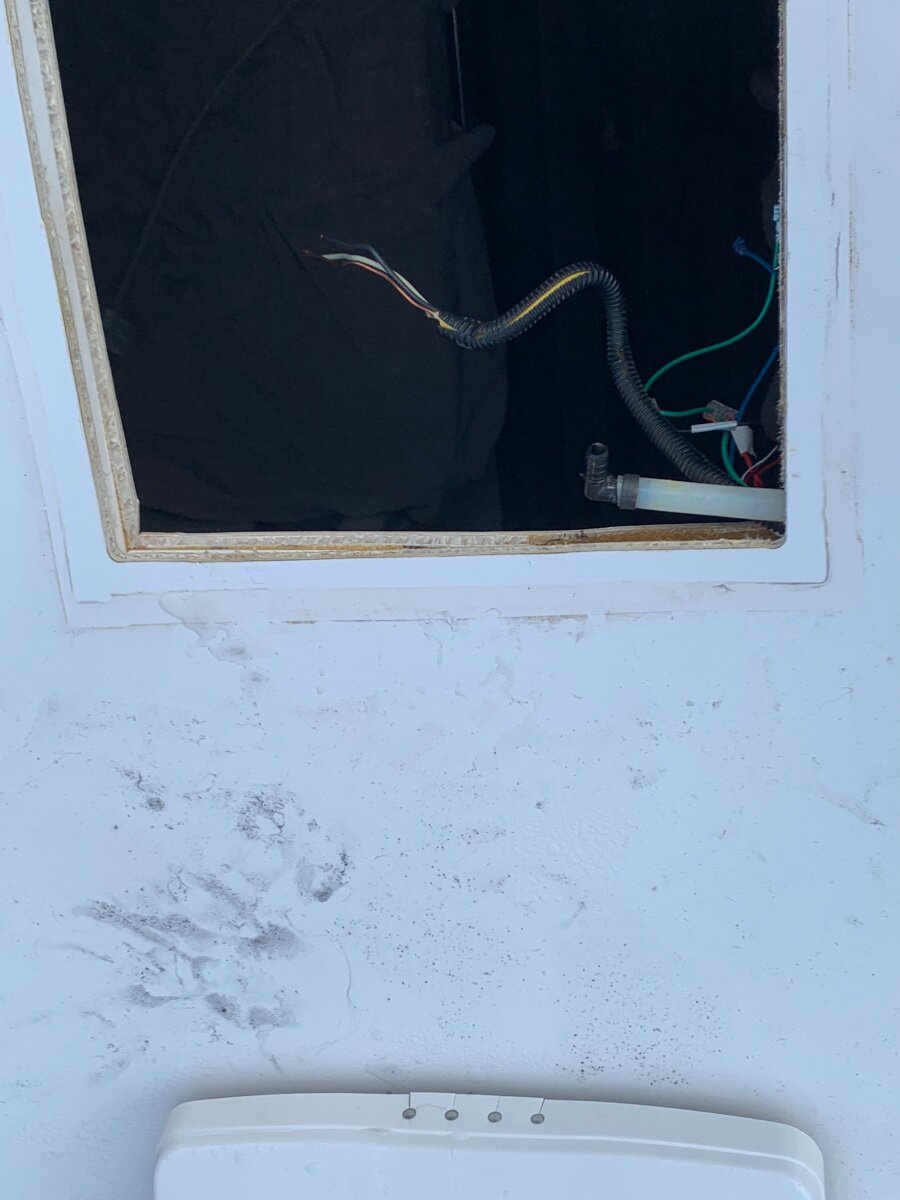
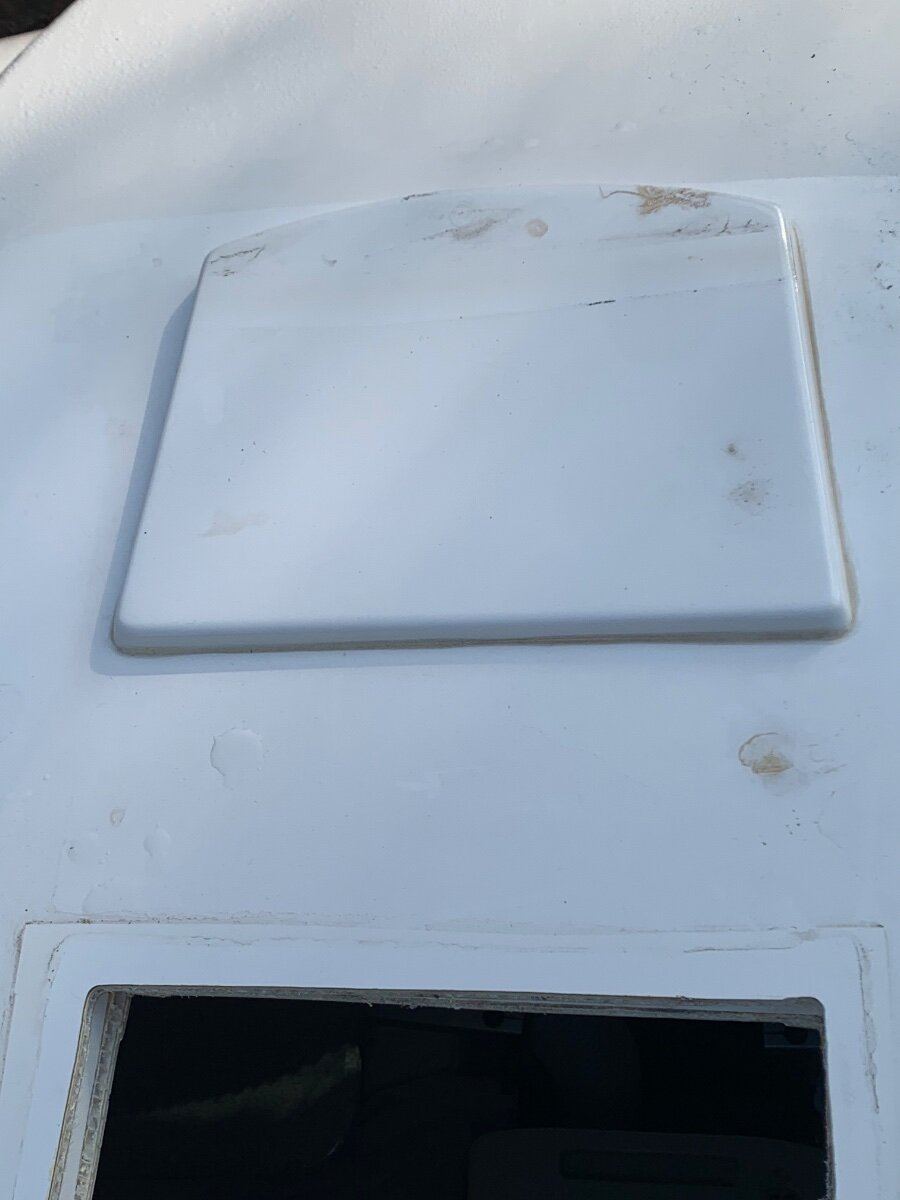
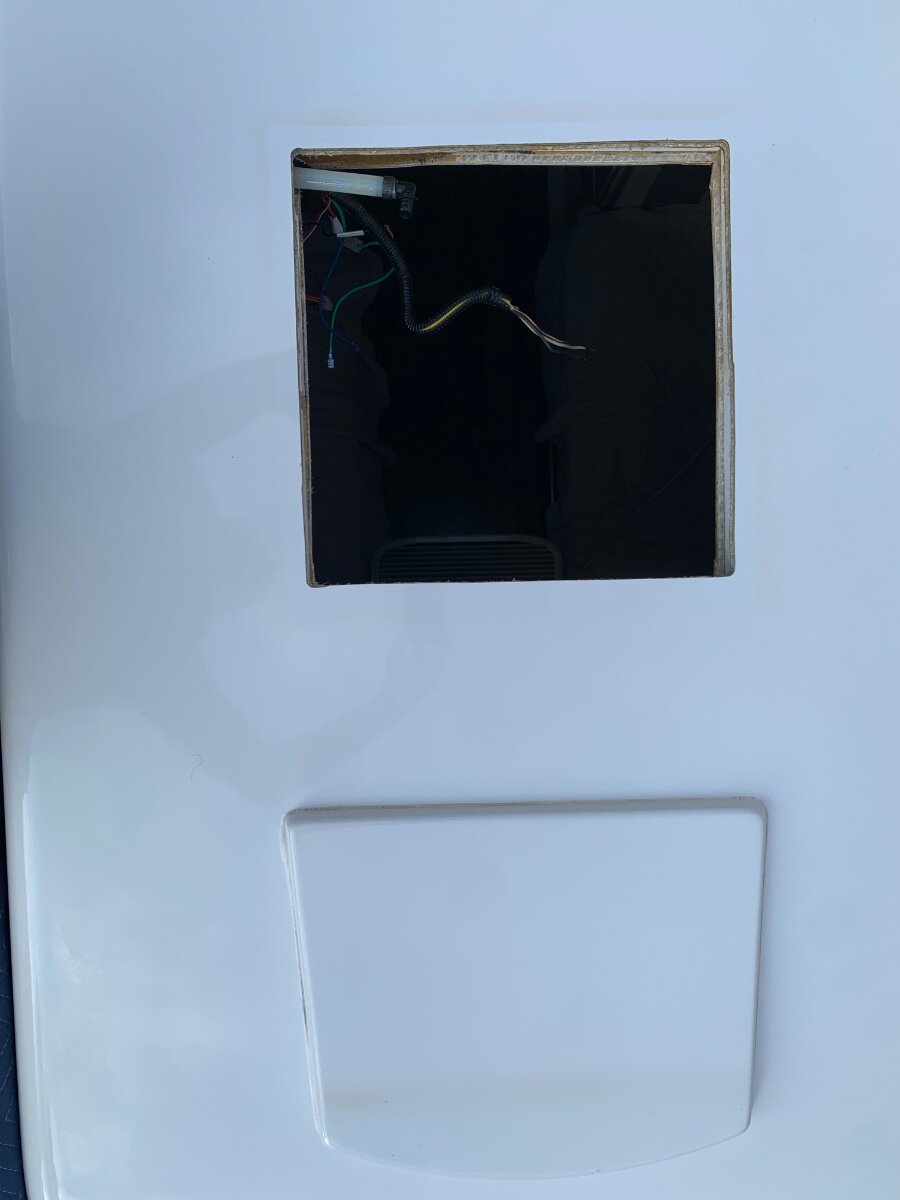
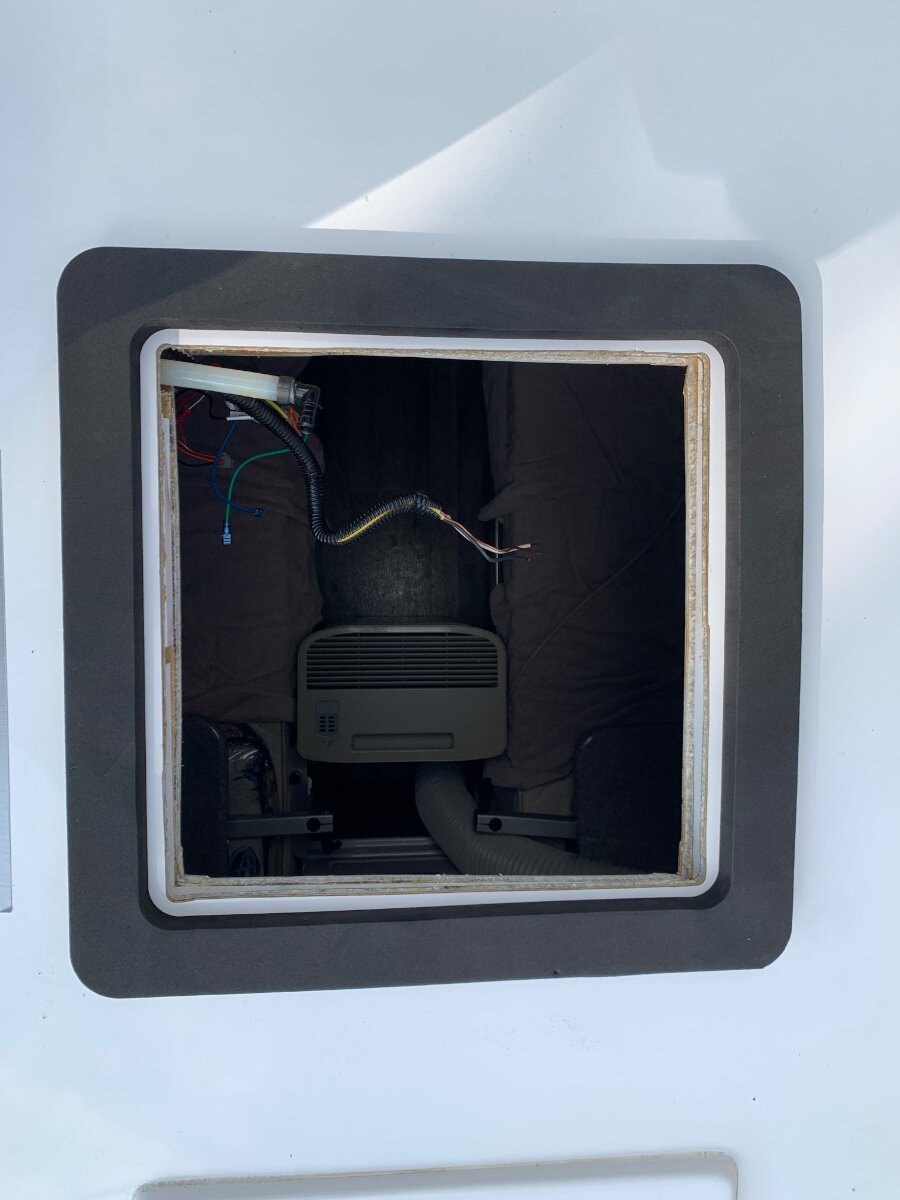
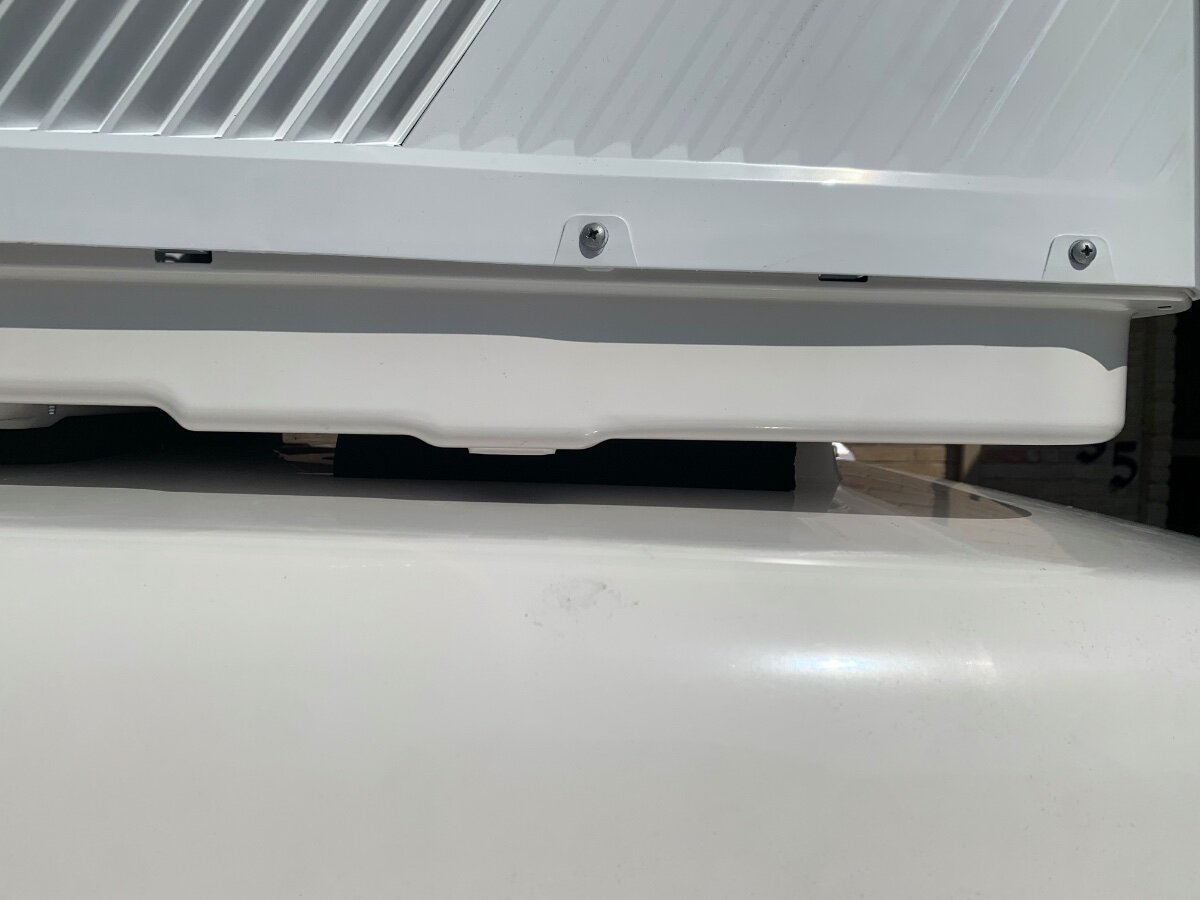
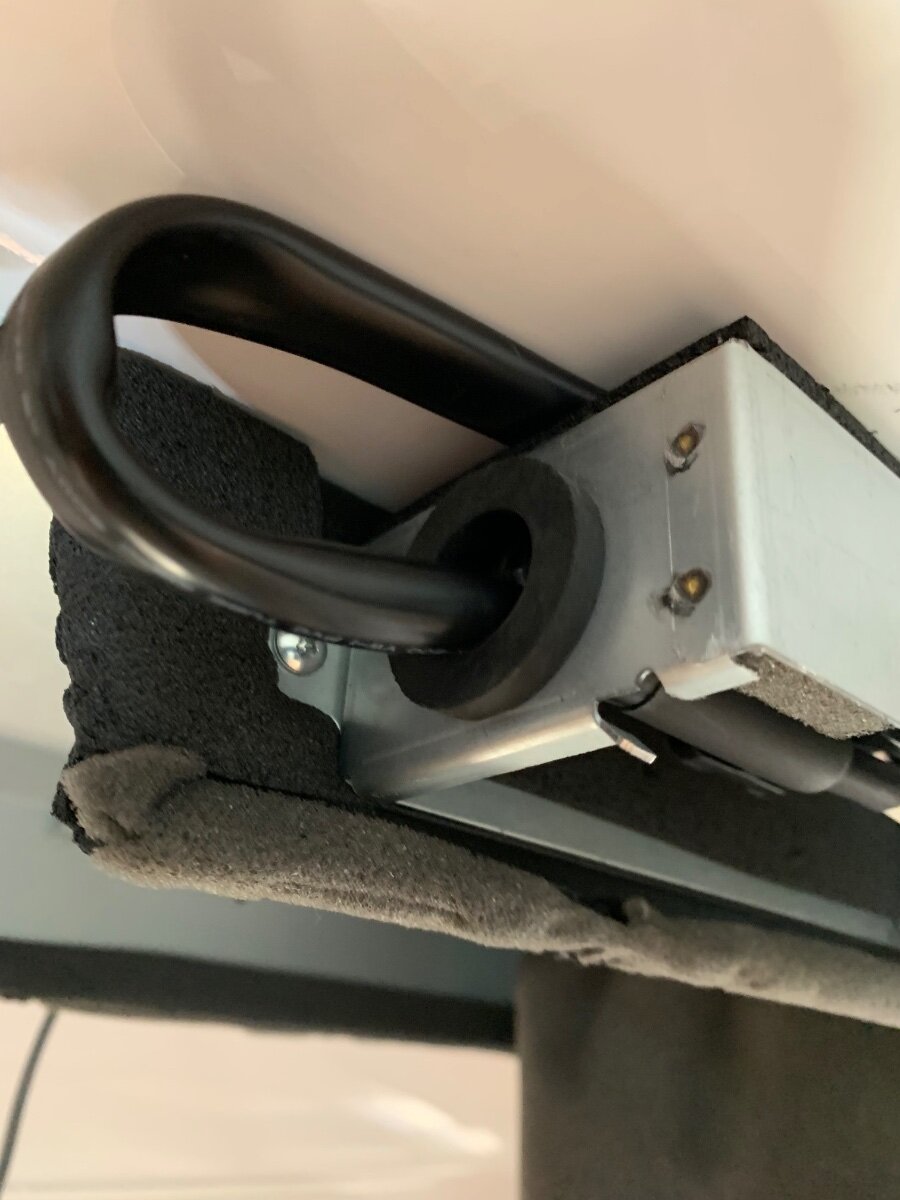
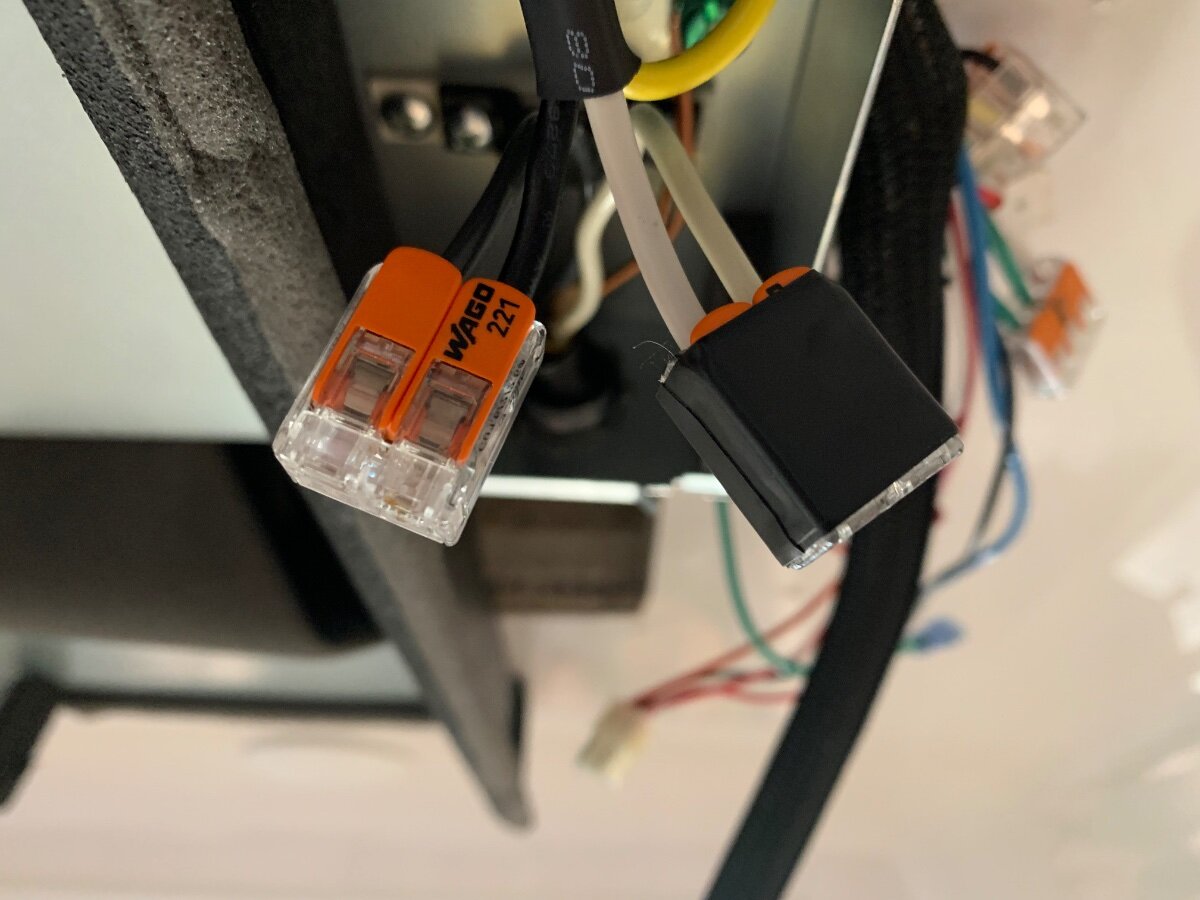
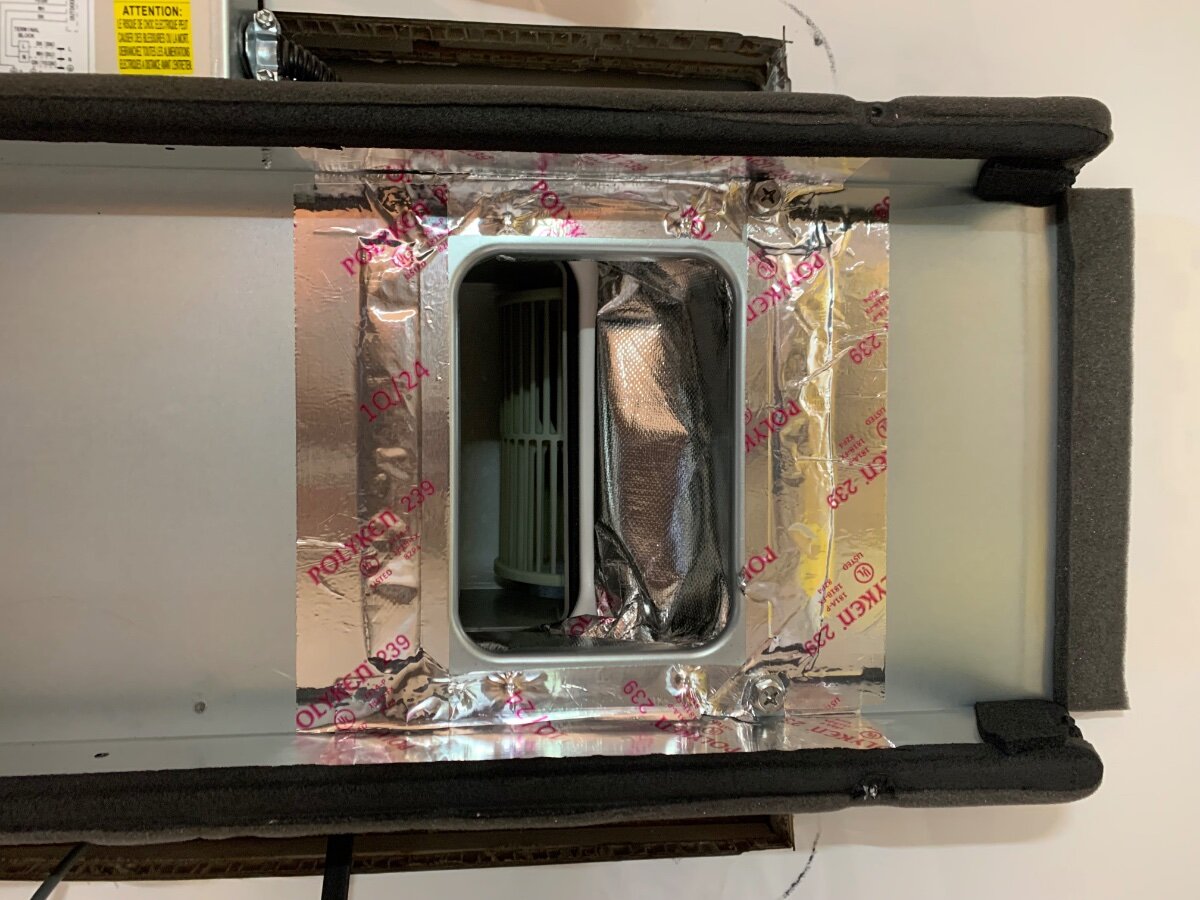
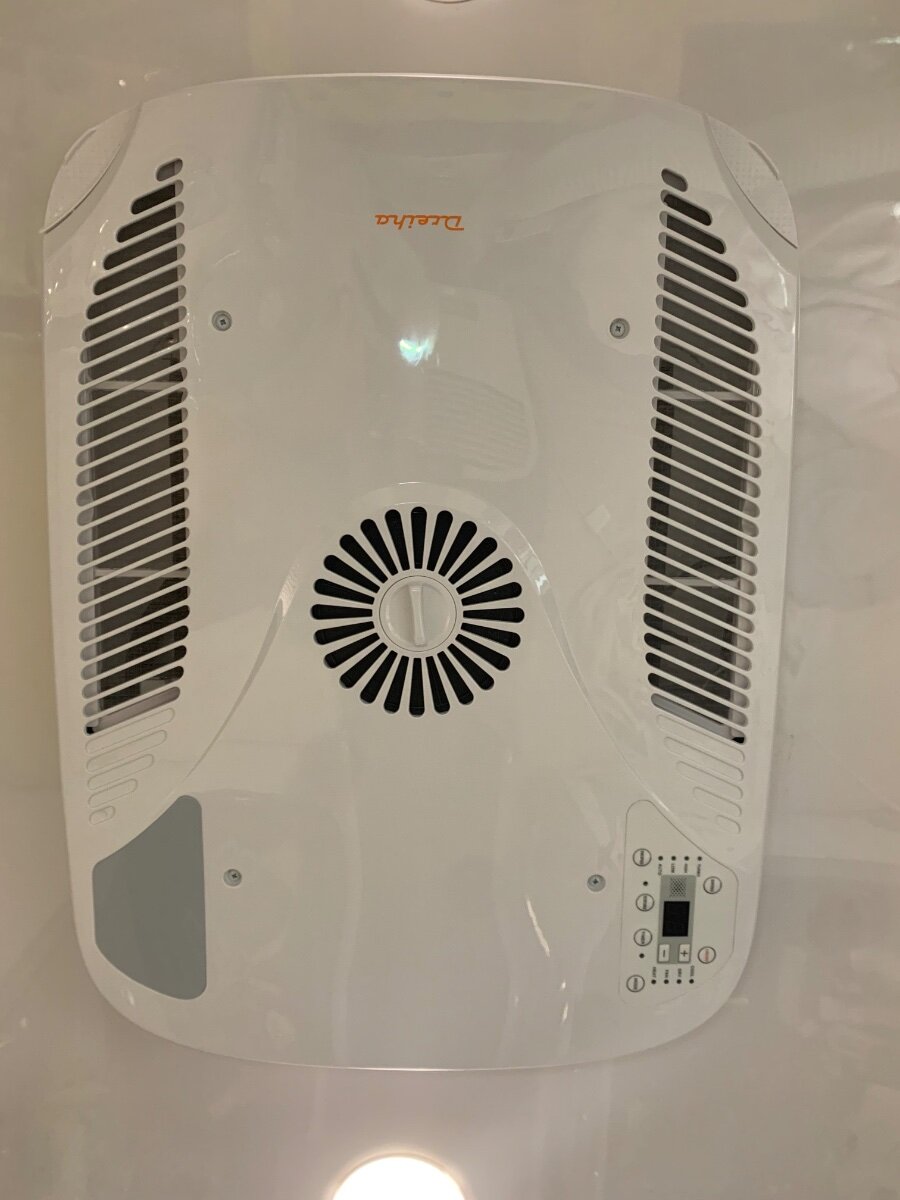
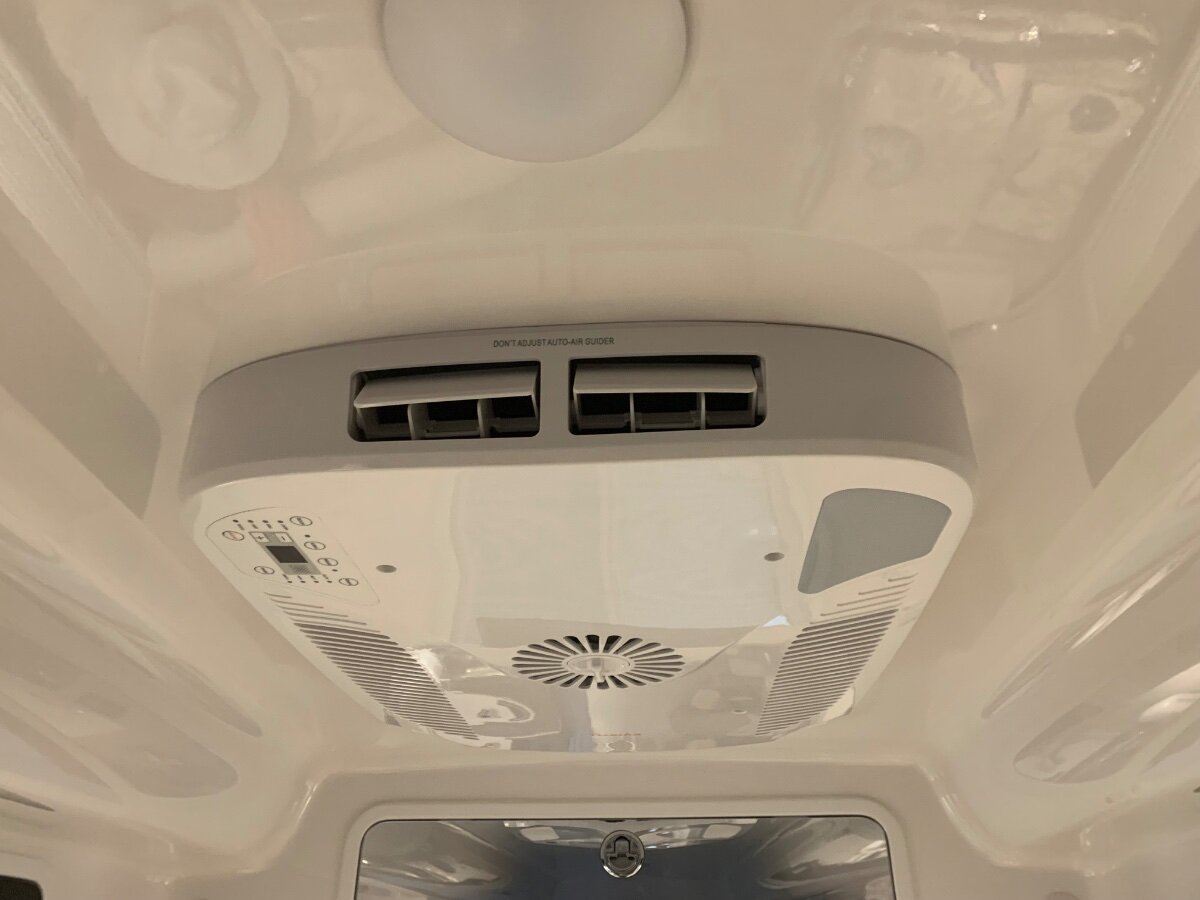
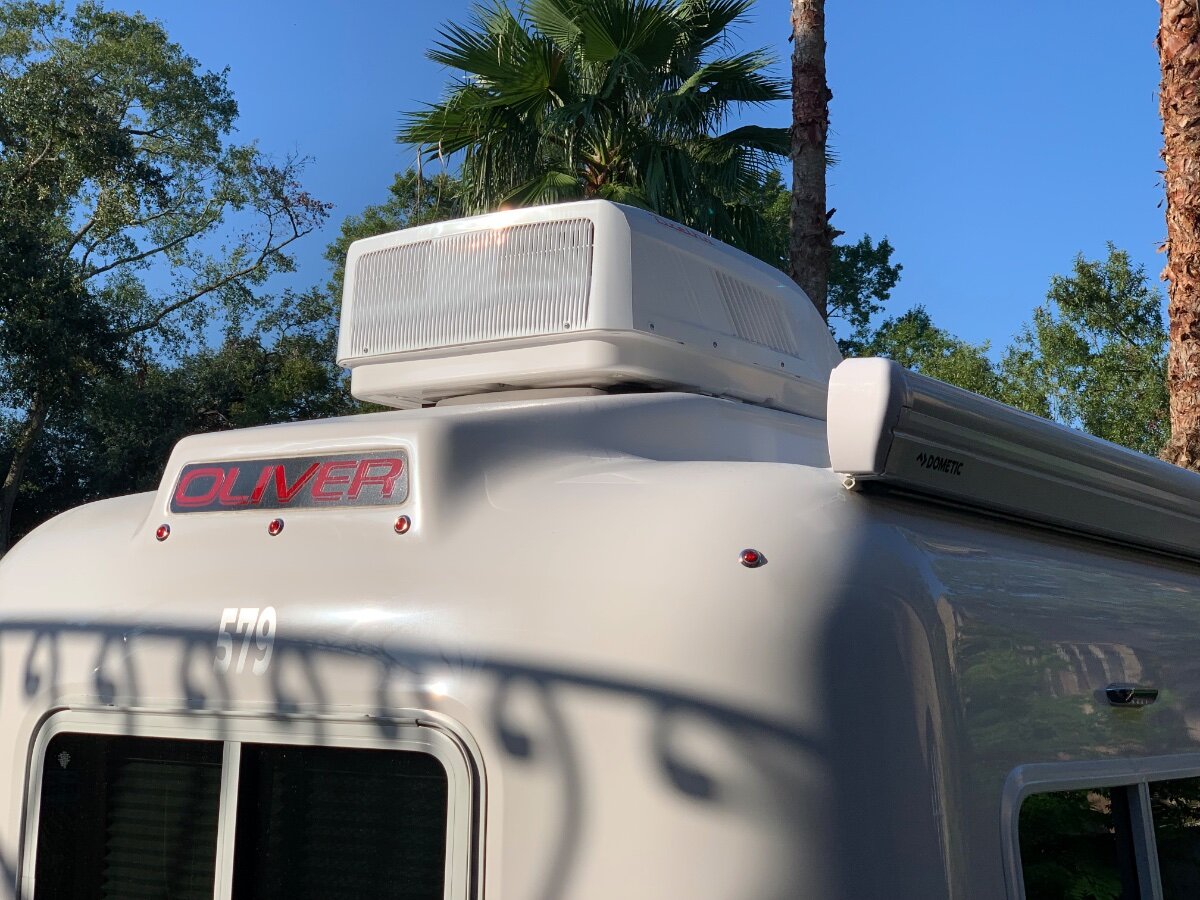
This long awaited swap-mod is now checked off my to-do list! Like many, I tolerated the noisy Dometic Penguin ll long enough; so glad I was finally able to take decisive action with this install. After a couple years of mulling over the various replacement models being marketed, a unit emerged that caught my attention; the newly available Atmos 4.4 seemingly met all of my expectations. I will forego the removal of the Dometic, here is how I proceeded forward: First and foremost, all AC and DC power sources were turned OFF! Scaffolding and equipment/supplies were then staged for Dometic ‘liftoff’ and subsequent Atmos ‘lunar landing’ (only appropriate since I live a couple miles from the NASA Mission Control Center in Houston). Roof area in need of cleaning. Notice the raised fiberglass landing on my year model and that the former condensate drain tube was simply disconnected rather than cutoff. Roof area throughly cleaned and prepped. I decided to adhere the square self-adhesive foam roof seal directly onto the fiberglass and then apply non-leveling Dicor around the cutout perimeter to further ensure the best seal possible. In positioning the foam seal, care was taken to center it as evenly possible, thereby allowing about 1/4-3/8” of exposed fiberglass to lay a bead of the Dicor and finger smooth to finish. Interior view of the Atmos being positioned over the roof cutout. Note the use of the mounting bolts as a guide, as recommended by SDG. Because the ‘rough cut’ edges of the layers of fiberglass (inner and outer hulls, and spacial filler) were inconsistent, I used the foam seal as a reference to accurately center and align the unit; distances measured to each respective bolt. Initially, installation instructions were followed by adhering the supplied straight piece of self-adhesive foam onto the bottom of the unit as a rear support, but it did not make contact with the roof due to relief of the aforementioned fiberglass landing. Alternatively, the foam piece was cut in half and each adhered onto the fiberglass, in like manner as the square seal, along the outer edges of said landing. This adaptation proved very effective in application and purpose, as the last of the next three pics demonstrates. Now that the exterior unit is properly positioned and supported, it’s back inside to further installation. As a side note, I made use of a portable a/c to buffer the heat and humidity of the day! Although my son helped with the heavy lifting and positioning, I cut him loose and completed the remaining tasks solo. Before proceeding, I used foil tape to treat the end of the aforementioned condensate drain tube and secure it to the side. Next the installation of the fabric air plate duct subassembly was started (provided Dreiha Atmos 4.4 Manual details the process). Note I used foil tape on both the upper (at Atmos bottom) and lower (at mounting frame) duct plates, even though most installs viewed applied to the mounting frame plate only. Between the upper and lower duct plate installs, the ceiling assembly mounting frame was bolted in place and hand torqued using a screwdriver only (torque specified in Manual). The AC power connection was very straightforward. The ceiling assembly’s junction box cover was removed, a strain relief fitting installed at one end (the other end had a preinstalled protector) and respective wires routed inside. I reused the Wago Lever-Nuts from the Dometic install, but first tinned the stranded wires of the Atmos lead for optimum assurance in application; electrical tape was used to further secure the Wago connectors. Ground wires were secured per the Manual. The junction box cover was then replaced, DC thermostat wire bundle loom wrapped and tucked away for future use, and ceiling grille fastened in place. . I’m very pleased with this mod, quality of the Atmos and ease of installation! I should mention that SDG preinstalled a SoftStartRV. I will provide an update once the furnace wiring and thermostat mount is completed. A special shoutout to @rideadeuce for forging the way with his install of an Atmos!
 1 point
 -
@TravelWell, welcome to the forum. The Oliver tires are fine for highway and off-road. We’re nearing the end of life on our second set of tires, Cooper AT’s and they have done well. We don’t run at 80 psi, 50 psi is plenty. Our first year or so we kept inflated to 80 psi because Oliver said so. Much too harsh and we aired down several years before Oliver decided 80 was too much. As far as bumpy dirt roads, I think a lot of us have quite a few miles of bumpy dirt roads under our belts on the standard tires so I wouldn’t worry. Good question! Mike1 point
-
Steve: In a former home in Houston, I had only a 100 amp service. My home electrical panel only had 12 beakers, but was not terribly old, just too small. Same situation as yours in the garage. We needed more breakers and a larger service to the house. I removed the small panel and installed a MUCH larger 42 breaker space panel, kept the main as 100 amps. Moved the old panel to the garage and ran wires to it for a 100 amps garage sub service. Called the power company and complained that every time I struck an arc on my Lincoln welder the lights dimmed in the house, our clocks needed to be reset, and the A/C system would shut off. They sent out a service tech and he determined we needed a 200 amp service. They wanting to sell more power cheerfully installed new overhead at no cost. I then proceeded with construction of a 900 SF addition and a bunch of new wiring throughout the house. GJ1 point
-
Welsome to the forum and congrad's on your Ollie purchase. I would stay away from any chemicals on the firerglass. I use Star brite boat soap and Meguiars Flagshio Premium Marine wax. There is a lot of discussion on this frum about what people like for fiberglass wax. Use the Search bar in the upper right of the forum to locate those posts. If you have not already use, Oliver's University page to learn more about your Ollie and all of its equipment.1 point
-
We have had the Garmin In reach Explorer. Nice security. We haven't had any issues today.1 point
-
This is the POE injector kit I am considering. It boosts 12V coach batteries to 48V up to 100W over ethernet, and on the Starlink end splits out the power back to the DC port on the dish. The converter has a LAN port to connect to an external router. This solution would allow you to only send a Cat6 ethernet cable out to the dish, negating the need for a separate power cable. My router is the Beryl AX3000 WiFi 6 portable router, which can be powered though a USB C PD port for a completely DC solution.
1 point
-
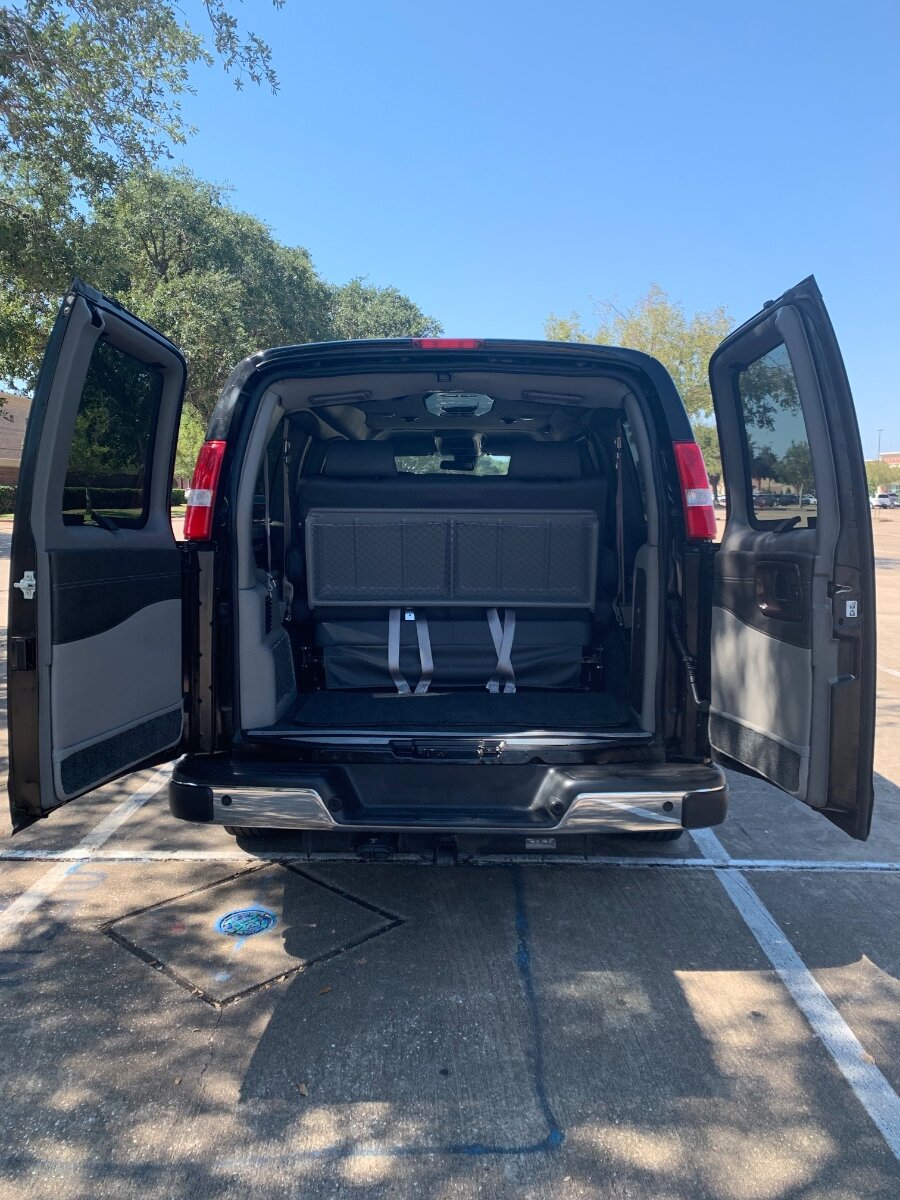
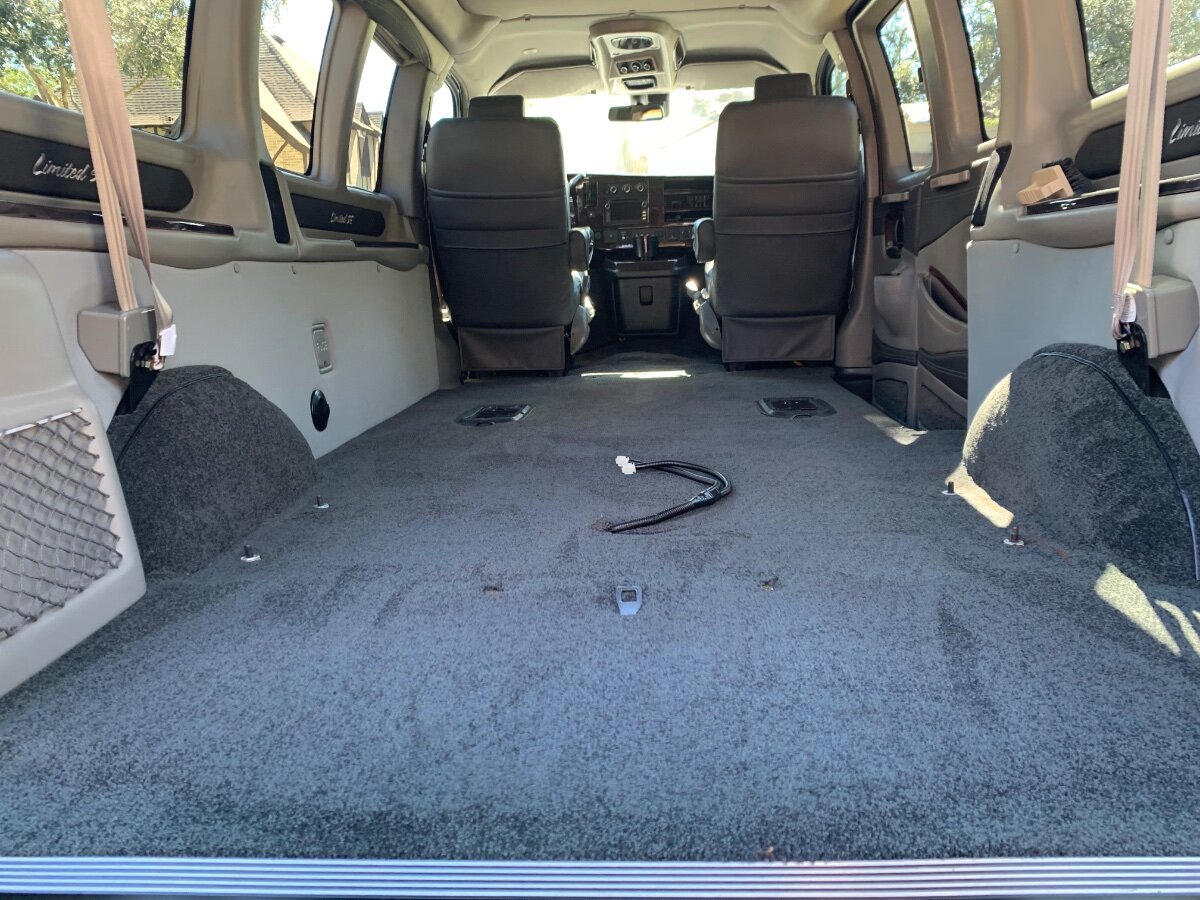
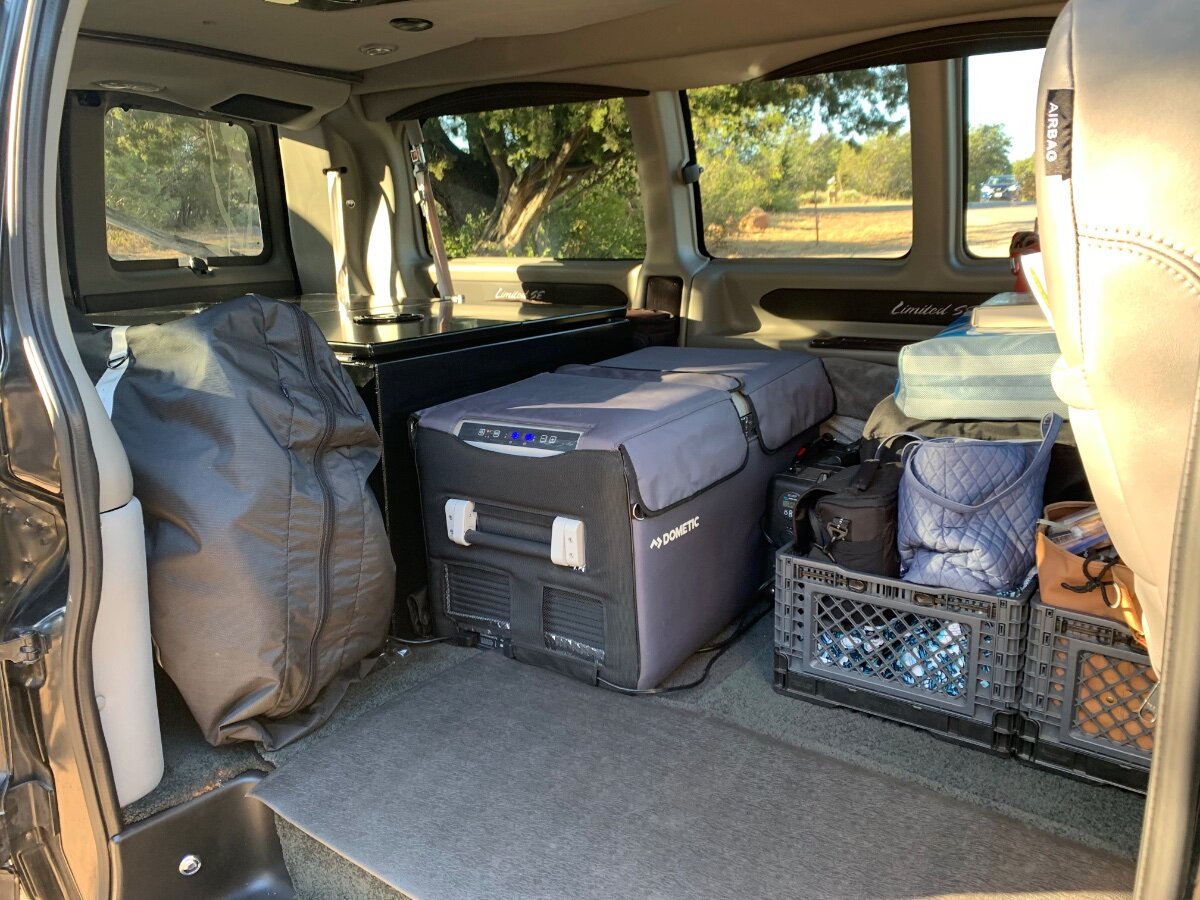
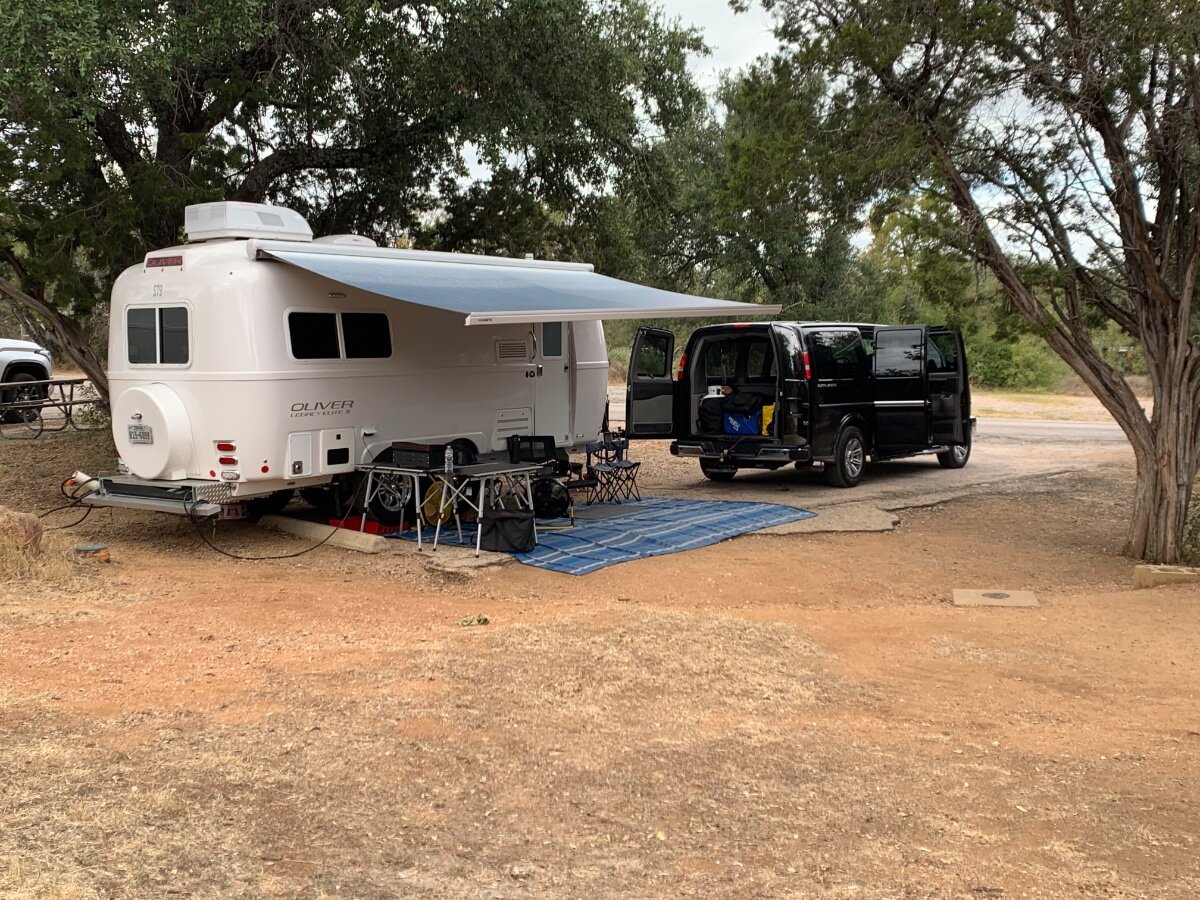
After several months of researching a suitable replacement TV, a van was decided to be our best choice based on perceived criterium, ie engine/drivetrain, cargo/tow capacity and tongue weight requirements for our OLEll and style of camping. The former 2012 Silverado 1500 4x4 was reaching ‘retirement age’ and I’ve been pushing its limits, regarding carrying capacity, for a couple of years. I will acknowledge up front that we are not minimalist! That said, this Explorer conversion van well exceeds my expectations in both spacial and towing considerations, as well as comfort and convenience. BTW, I told my wife “remind me to never buy another tow vehicle days before a planned trip!” Although ‘well appointed’, the passenger seats had to go; at least when towing our Oliver. The two second row captain’s chairs are easily removed via a release mechanism from the floor mounting base for occasional use, as needed; the third row couch/reclining bed not so much and will go to storage. By removing the passenger seats, I now have 10’ of open cargo space from the rear doors to the front seats; the Silverado’s bed only measured 5’8”, plus limited space in its back seat. Having double doors on both side and rear of the van vastly improved access to the cargo area. The two vehicles were positioned end-to-end to facilitate easy cargo transfer for organizational purposes. Ultimately, two storage boxes were acquired to safely stow much of the cargo; specifically, underbody tool boxes. Yep, delivered one day before our departure to the Texas Oliver Rally at Inks Lake SP, what was I thinking! The boxes are serving their purpose by providing secured organization of supplies and gear, with ample room for our folding e-bikes, Dometic fridge/freezer, portable power station, generators, spare 30 lb. propane tank and a couple of small bins. Camp R&B, Inks Lake SP, Site 227; Texas Oliver Rally, October 20-25, 2024.
1 point
-
1 point
-
If that’s left to right, new 12” brakes, bearings everything… that’s decent. If that includes their installation labor that’s a very good price! 😂1 point
-
Hey JT, Also take a look at my other post for getting your ethernet cable into the Oliver in a neat and professional manner: "Don’t cut your Starlink Cable! There’s a better way to install Starlink…" For the Mini, you will still have to run both the power cable and ethernet cable to do what it sounds like you'r describing. The second router is a great idea because, as you know, the WiFi/speed decreases when the Mini is placed further away from the trailer. We travel in the Pacific Northwest with lots of trees so we often have to move the dishy farther away to find a clear sky. Flexibly in that regard is a must for us too! Cheers, Geoff1 point
-
Lew wrote back that it's 916.83 for each axle. John1 point
-
Alaska Suggestions: The Stone Stompers help for sure. After our 30 days in Alaska, I wish I had also installed the "Yoga Mats" as one very wise owner posted several years ago. Looked dorky, but if I had it to do again.... I would be Mr. Dorky for Alaska. Beware of puddles in the road. I saw where one had broke the back of a well made camper. Have a good spare, air compressor and a plug kit too. Have industrial strength bear spray for each adult. Get Tek Campground reservation/pass six months ahead. Don't sweat boondocking as the opportunities abound. Get the Mile Post Long sleeve, long pants and boots.... YEP! New springs, shocks and serviced bearings. GJ1 point
-
Yup, I just saw a previous post by @John and Debbie stating he saw the 3500lbs on the label and assumed that was for the axle.1 point
-
I’ve never seen a generator catch on fire. I would not want a gasoline model on a trailer and don’t use generators anymore. Built-in ones are always LP.1 point
-
If I recall my conversation with Oliver and Dexter we have the updated axel, 052:3500. If I remember it is the 4-leaf spring which gets the 3500, so when you get the 5-lead springs you will meet the 5200 axel. Again you would need to verify this. You shouldn't need to change out your axels.1 point
-
I installed the Airlift Loadlifter 5000 system on our 2019 Tundra two years ago. It effectively reduced both squat and "jounce" when towing our Elite II, and added cornering stability. Our air bags rely on a manual air pump, which I prefer. It only takes me a couple of pumps with a bicycle pump to raise each spring to the 25 PSI level we prefer when towing. I was already carrying a bicycle pump for my mountain bike. I always carry a tire pressure gauge, so measuring the PSI of the airbags is easy. I cannot compare to the Firestone or RAS Roadactive systems, as I have no experience with either. But it appears to me that the RAS Roadactive system is not adjustable. We like being able to reduce pressure with our Air Lift system when not towing, then raise it again when towing. For what it's worth, the RAS Roadactive system presently costs $589 for our Tundra vs. $379 (with rebate) for the Airlift Loadlifter 5000. Given our positive experience so far, I would again choose the Airlift Loadlifter 5000 because it works well, for a significantly lower price.1 point
-
You should have the updated axel. +2 Rich.Dev. Our 2022 has the updated axel. Verify with Oliver.
1 point
-
A couple of years ago a friend of mine had a bearing fail on his work trailer with the never lube axles. He was able to get a new Timken bearing through Summit for around $50 which is far less than Dexter charges for their Chinese bearings. He said they use these same bearings on some production cars.1 point
-
I believe the 2022's have the higher rated axel. Check the label on the axel. The 2022's have the Never-Lube.1 point
-
I wore my arms slap out the first couple of times on the 90ftlb nuts. The 65 pounders weren't so bad. Glad I didn't wait for this mod 5 years from now! Hi from us both!!! Going to a music rally this week (Dogwood). Safe travels my friend. Are the blueberries in bloom yet? John1 point
-
John, You keep that torquing up and you will have arms 💪🏻 like Popeye! 😄 Hello to Wendy from Kathy and I, Mod On Brother!1 point
-
My suggestion is that you join a Ford F150 forum to ask this question where there is specific towing expertise for your truck. That’s what I do for my TV. I’m a member of the Cummins Forum and the wealth of their experience is amazing. On a Ford truck forum you can certainly read the experiences of many F150 owners that have installed and used all of the aftermarket suspension helpers that you are considering. Best wishes an hope this helps!1 point
-
Excited to be a new Oliver owner. I have a lot to learn about my LE II and am sure this forum will be valuable in that process. Hope to meet some of you somewhere down the road.
1 point
-
Thanks to Neil’s RV in Orem Utah! Our ‘shakedown’ trip completed (5000 miles over 18 days!) with 50-70 mph crosswind gusts… Very happy!
1 point
-
Don't know how many of you have heard about "Salt-A-Way" but, this stuff really work good on salt. Anytime when my trailer incounters salt i.e. salted roads, salt air, I wash the underside of my trailer with Salt-a-way. You can purchase a mixer with the solution. Spray the underbody well and you will not have issues with the alunimun frame or axles. Salt-A-Way neutalized salt. Don't have to rinse. This stuff also work well in removing the salt buildup in natures head urine bottles. I just add some with clean water, let it sit overnight and the salt disolves itself. Rise and you ready to go.1 point
-
Salt is extremely water soluble, so in my experience, just hosing off your vehicle should remove salt. I spent my youth in Chicago where 120,000 TONS of salt are used on the roads every winter. I never got 100,000 miles out of a car before rust doomed it. Salty, slushy water and snow get into crevices that defy washing away. We can try, but it’s a losing battle. As for the urine bottle on Nature’s Head (or anywhere exposed to urine) any deposit is more likely akin to “stone”. Whether it’s something like “lime” or some other mineral like in hard water I can’t say. Even the rubber seal in the porcelain toilet can get a whitish deposit that can build up on it. I find that plain old distilled white vinegar is extremely effective at removing it. I guess you could use CLR.1 point
-
We've found that using a simple box fan blowing across our outdoor seating area is the best way to stay mosquito free. Seems to keep them out of the Ollie too.1 point
-
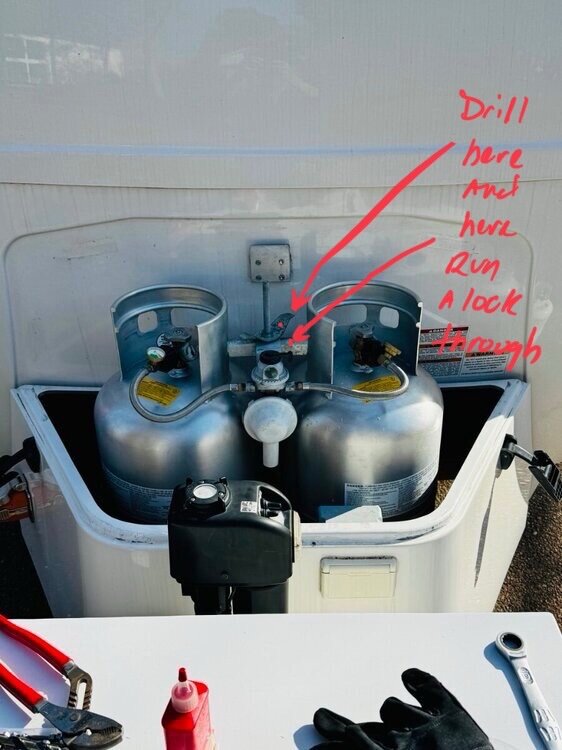
Surely no man ever said I have too much LP, so I am in the 30# tank club here. 😄 We enjoyed rarely having to fill out LP tanks on our 48 day trip out west last fall and rarely had thoughts about LP. Never had any issues with locating an LP supplier out west during our travels. I digress. Nice work @rideadeuce nothing better than a clean fit and finish DYI install! The only thing you may want to consider is adding a lock to your T-handle where you secure those pretty new aluminum tanks. Will it completely stop a theft likely not. But it may cause the thug to move on to a more target rich environment. Although, I have never had anybody attempt to steel our tanks, it is merely a peace of mind and an easy mod. Simply flatten your T-handle out a little after tightening it down mark and drill a hole through the T handle and the tank security bracket (pic). I ran a small pistol cable lock securing the T handle to the mount bracket. Or you can just use a decent pad lock. Again nice work on the scooping up the tanks and mount fab! Patriot🇺🇸🇺🇸
1 point
-
Have you taken a look at THIS YouTube Video? Bill1 point
-
We didn’t blow that fuse - but had to pull it when the original CO/Propane detector started throwing false alarms - at 3am of course. No fun being awakened without real cause, being deaf for 5 minutes, or having to dislodge the two panicked cats from the ceiling. And yes, it’s not an ideal location for a fuse. I was loathe to replace the failed detector - still supposedly WELL within its stated service life - with another unreliable one. So we ordered this one. https://a.co/d/3SUEvPm It sticks out a bit further, and it’s brown instead of white (which I actually like) but it has the advantage of actually having a readout that shows the propane or CO PPM that it’s detecting.1 point
-
I sent a message asking the folks at RV Trip wizard if they had a feature to overlay multiple trips on one map...and they said no but to try exporting to Google Maps and using layers....here's a result as an example of what's possible, I'm still learning. So Google Maps allows direct import of the .gpx files that are output by RV Trip wizard. Normally the .gpx are used to load into Garmin devices, but Google Maps reads them as well. I started by opening up a new map in Google Maps created "My Map" as a BASE map with the first 2019 trip where we picked up the trailer, and added a layer for each subsequent main trip. I found that 6 is the maximum number of individual layers you can add in Google Maps. There are controls to change the type of marker, color, line width etc. There are also controls to turn on/off the titles for each stop. To create more graphic maps, Google enables embedding photos by geotag into the maps as well. I'm considering adding pictures of each campsite for each stop to see if it's at all useful. The map below lets us see big holes in our travel...so we've still got miles to go before we sleep! Craig & Rose Hull 505 - Galway Girl
1 point
-
Our Hull # 050 has exactly 11 inches from the floor of the garage to the bottom of the rear jack feet. BUT, our early build came with the (then standard) 16" wheels and tires. The standard for the currently produced trailers is 15" wheels and tires which might make about 1/2" difference.1 point
-
If you have front struts yes, just shocks then no. BTW, you can visit an Oreilly's, AutoZone or other national auto parts stores and borrow a spring compressor for the day (they charge your credit card for the tool and refund upon return). Hope you find another alternative. Shops here usually get you in the next week (service shops not RV shops). I should head north and open an auto service shop if there is that much demand! just kiddin'!1 point
-
I run 20 psi when just truck’n around, 30 when towing the Oliver, Today’s dump at 60 psi!
1 point
-
After four years of towing my LE II and reading countless threads on the Anderson and cargo capacities in general, I have come to the following conclusions. The Anderson improves the towing experience and aids in control of the vehicle in emergency maneuvers. The additional time to hook up the Anderson is negligible compared to the increased safety and driveability it provides If your manual states that a weight distributing hitch is required when towing over 5,000 lbs, it is because it is probably not possible to take advantage of the entire cargo capacity of the TV without using a weight distributing hitch. This is because cargo capacity as stated on the doorjamb sticker is always a product of the maximum front axle loading capacity plus the maximum rear axle loading capacity. It is often overlooked, but you can be driving down the highway with your Gross Vehicle weight 300 lbs UNDER the rated GVWR, but if the rear axle is loaded over the maximum rear axle weight, then you are overloaded. When a vehicle manufacturer states that a weight distributing hitch is required when towing over 5,000 lbs, they have assumed that when towing a trailer with a 500 lb tor higher tongue weight, it is not possible to load the vehicle to its rated cargo capacity (i.e., loaded to maximum GVWR) without overloading the rear axle axle. If you weigh at a scale, it is important that you weigh the front axle and the rear axle. If one is over its rating, the maximum rated cargo capacity of your TV is irrelevant. I am no expert and I hope others will correct me or provide the appropriate caveats to my description above if advisable.1 point
-
Try it with and without and you will soon know what you prefer. I skip the Anderson around town, campsite to nearby campsite, but always use it on the highway. There are so many threads here where owners' of 250/2500 trucks voice opinions, many do not use it. My manual says yes for 5000 LBS or 500 LB hitch weight. It's night and day to me when towing over bouncy roads.1 point
-
In a perfect world you would be correct. On dead flat slabs, fine, but if you encounter a sloping, uneven, unimproved site like in many older National Park or USFS campgrounds, there needs to be lube on the tubes, especially the front one. After chocking and then unhitching, the trailer will always shift, sometimes a fair bit. With dry tubes that have a strong sideways force on them, you will experience creaks, groans and pops, and the jack won’t operate smoothly. It won’t hurt the mechanism, but it is disconcerting and should in theory be prevented. I suggest Redline CV-2, the same grease inside the gearbox. Apply a very small amount and rub it hard into the (degreased) metal with your palms. Disposable gloves! It should look a little shiny but you shouldn’t see grease. John Davies Spokane WA1 point
-
Doesn't she look pretty! It did not look like this when I pulled the head! It's hard to do this work without getting the wheel bearing grease here and there. So, take advantage of that. I pushed and rubbed the grease in every nook-n-cranny, every piece of plastic and metal and the grease removes the dirt and corrosion. Kept rubbing with clean paper towels and this is the end result. When I started this, there was a full 1/4" up-n-down play in the main shaft. By packing grease under the drive gear, there is now no play at all - hope this lasts! I need to mount the head and clean the main jack post. I'll get back in a day or two to show that. When the head is mounted, I'll spray a little Super Clean on the head, brush it some, and hose it off to remove any remaining grease.
1 point


.thumb.jpg.e34bf01ef7f7d5e99ad31856d45afbeb.jpg)


-
Recent Achievements
-


")