Leaderboard




Popular Content
Showing content with the highest reputation on 11/05/2026 in all areas
-
This happened to me a couple of years ago. There was no way to retap the hole without removing the axle as it was a top zirk and I was not prepared to do so. Eventually, i got a new zirk to somewhat thread into the existing hole. It was a real struggle, do to the limited access, and i recall i did remove both wheels. I cant recall but i might have used a metric threaded zirk of a slightly different size. I doubt its threaded in properly but it has held in place now for a couple of years. I am very careful when i apply grease through that one and i do not use a power grease gun on the oliver. Not a pretty or satisfying fix but so far it has worked.3 points
-
If you have an electric pressure washer it will make it a little easier. Here is a bug remover you can use if regular Ph neutral soap and water aren't working: https://link.amazon/B0fsiodKg Here is a youtube short on CGI using it: The more oxidized a trailer is, the harder it will be for the bugs to be taken off. Hope it helps!2 points
-
Way back there in June after 40 nights you did not report any condensation issues. Now you have issues. What chanaged? The weather most likely... i.e. cooler temperatures. Likely you do not have adequate air changes in your unit AND are seeing lower temperatures especially in the cabinets and other non-heated areas. Combined you will have condnsation. It IS necessary to open up your MaxFan just a bit and one of your windows a bit to allow moisture to exit. When cooking inside, using a higher setting on the max fan and a wider window opening are required as well. Give this a try and see how it works for you. Good luck. GJ PS: I would wager that 90% of us have had condensation issues at some point, and learned how to manage air changes as much as we must monitor our SOC's.
 2 points
-
Likely. But as a retiree from within the auto repair business and specifically from a "Muffler Shop" I'm a bit prejudiced in that respect. If someone had brought me the parts I would have probably done it for nothing.2 points
-
John, After reading a few of your thousand-plus posts, I've come to realize that you're usually the one providing troubleshooting advice, not asking for it. I mainly wanted to say that I agree a properly functioning 50-amp Orion charger is not overheating the way you have it installed. The real question is what changed between when it was working correctly and when it started behaving differently. I'm sure you'll track down the cause and let everyone know what you find. My guess is that it's a connection-related issue, possibly something as simple as a poor connection between the tow vehicle and the trailer. Are you using an Anderson connector? I have had wires work loose in what I thought was a good crimp on the Anderson lugs. Given your track record, I suspect you'll have it figured out before the rest of us.2 points
-
Hey Steve, first off this is nothing to do with your new grease gun! Love a power grease gun! 😎 Zerk grease fittings when screwed in are held in place by just 2 threads. They can easily strip after greasing a few times. I had one strip just before I replaced our axles/springs last year. Your current fittings sb 6mm (.236"). I know they are on Dexter wet bolts, so likely the same on the EZ Flex. Replace your Zerks, not with a metric size but with the SAE 1/4"x28 size. Two methods... 1) Also get a 1/4"x28 tap to get the new threads right. 2) Just push/thread in a new 1/4" Zerk into place to form new threads, then throw out that piece and lightly thread in a new 1/4"x28 Zerk. Choice #1 would be the correct method. Choice #2 has worked for me several times in a pinch2 points
-
Thanks for the update. I'm still waiting on an order that I placed back in July and was planning on given them another call. Your update saved me making a call.2 points
-
Thanks Geoff @Snackchaser, Lots here to get started and of course I'll keep our community posted. BTW, we were running A/C on inverter, but not while towing this time. Never thought heat would be a leading issue. The basement near the MP2 has seen 104F at highest, more often 80-90F. The Orion is under the rear dinette seat, a lot of air up there and nothing else producing heat while towing. Fall temps in the 70s. Next time out is not coming soon, but I'll fix a Ruuvi sensor directly to the Orion. Testing at idle on our property likely would not produce much heat, but I'll hit the Orion with my IR temp gun after an hour idling to see. My alternator is a built Nations brand HD alternator. I wouldn't think 2 years later it's the issue but yes, it should be tested. We just got a week of unprecedented HEAVY rains. Much of AZ had flooded. We are safe on high ground, but I have weeks of some repair and yardwork to do first. I should take some time later in the year to work on this. Thanks again.2 points
-
My M7 thread checker can start in the existing hole, but I don't want to bugger up the aluminum threads on the gauge, so I'm not forcing it. I couldn't use my drill index because there isn't enough clearance in situ. I looked for an M7 set screw to use to help start the thread, but there doesn't seem to be one. So I'm going to get a short M7 hex head screw, notch the end, and use a ratcheting box wrench to create the threads. I'm also going to go ahead and get the M8 self tapping grease fittings. They are recommended for hole sizes .299" to .303" diameter. I'm already sloppy loose on a .250" diameter. fitting, but can't get my calipers or internal micrometer in there to measure.1 point
-
I think I probably did choice 2 as well. Whether it was an M7 or the original 1/4-28, I can't recall. I know I had both on hand as I struggled.1 point
-
We're a Dewalt house which made adding the bare tool an easy addition. You will enjoy the ease of use, no more contortions to hand pump both TV and TT. I would try the M7 first. 7mm converts to .276" which is 10% over 1/4" easy tap without drilling. The 8mm (.315") is a big step up requiring the correct drill size and tap. (I'm starting to love the convert function on the iPhone calculator!)1 point
-
It wasn't my grease gun. I wanted to see how well it works. I now have a Dewalt kit on order. I'm all Makita, but either Dewalt or Milwaukee were the only quality choices. I looked at battery adaptors to use my batteries on either brand. But the Dewalt kit with case, battery, and charger was only $30 more than the bare tool. So I went that route. My fitting is 1/4-28 SAE-LT, so the next size up is either an M7 or a self-tapping M8. I think I'll go the M8, but I need to check the hole size first, using my drill index as gauges. It was raining all day yesterday, so I put it off. Drying out and a bit warmer now. https://www.mcmaster.com/1095K142/ https://www.mcmaster.com/8742T15/1 point
-
Are you using Bounty, the quicker picker upper? Or do you use a specific brand?🤔😉😂 Mossey1 point
-
I read it somewhat differently. Lithionics does recommend fully charging the batteries periodically to keep the SOC reading accurate. In the SOC drift document you linked, they cleverly compare it to a leaking bucket with opaque walls. You can’t see the level, so you have to fill it to the top now and then to know where it stands. Charging the battery to a true 100% (not 99%) resets the SOC to a full bucket. However, as the battery ages, its amp-hour capacity decreases (the bucket gets smaller). You can recalibrate the bucket size using a fairly complex procedure to fully charge then discharge the battery. I don’t think many folks do that, and IMO it’s not necessary for most Oliver owners. Unless of course there is gross error, say if the battery shuts off while the app still shows 20% or more. The firmware updates aren’t so straightforward either. In the internal BMS firmware, Lithionics added, then rolled back, corrections for large SOC errors because they weren’t precise enough and could make readings worse in parallel battery banks like ours. There still appears to be an automatic correction at the 10% point in some internal BMS models, but it's unclear which ones. The newer external BMS module actually makes corrections at a number of points during discharge. Good stuff! Cheers, Geoff1 point
-
Yeah, the 30A Orion has the large heat sink (cooling fins), similar to my Victron 30A MPPT SC (on left in pic). The 50A Orion (on right) is half the size without the need for cooling fins. I’ll have to check temp on the SC next time I use suitcase solar. 🤠 Keep in mind these two devices would never be used at the same time, so when towing only the Orion 50A can create heat in the entire front basement area and some air is moving through when towing. I still cannot see heat build-up unless something is broken. It worked fine for a long time.,
1 point
-
Very likely as you have the 50 amp version. Those of us with the 30 amp.... another story. These units have a relatively low efficiency and as such could warm the entire trailer in some conditions. Mine shuts down after an hour or so if I don't open up the lid to let the heat out. GJ1 point
-
Cotter Pins and Washers would be a lot less expensive. GJ1 point
-
Sound recommendation for sure that also applies to hot water heaters that have an anode. Plugging the hole also is done to allow winter condensation to drain and to keep critters out of the tank. GJ1 point
-
Unplug from shore power and fire off your Inverger to feed a 1500 watt electrical resistance heater. Recommend pluging it in to the patio plug. That give the system some exercise and not work your A/C. 🙂 GJ1 point
-
As a friendly reminder I’m bumping this topic up for those winterizing their Oliver for the cold season. This thread is a good reminder for folks winterizing their Truma Aquago water heater, that once you have switched the supply valve to bypass and drained the water heater, you must not reinstall the filter plug for the duration of the winter season in storage. It seems reasonable that once drained of water it would be safe to reinstall the plug, but you must follow the manufacturer instructions and store the plug somewhere other than the drain port, otherwise residual water that could be in the internal coils could cause damage. I know new owners can be a little intimidated by the process, and us “seasoned” owners can forget some of the simple steps because the process is so easy. Hope this helps all of us avoid a simple but potentially costly mistake. 👍1 point
-
As @jd1923 said, the Lithionics should reset itself if the batteries are kept fully charged while not in use. The new firmware also helps with this by making corrections at various charge states. It’s worth updating them. The Xantrex Code 1 is a voltage issue, it means the inverter isn’t getting enough voltage from the batteries while the microwave runs. This isn’t necessarily because of low SOC, it’s more likely a poor connection somewhere in the heavy battery cables. Think of it like a like old car with corroded battery posts, everything works fine until you try to turn the engine over and the connections can’t handle the heavier starting current. There are some easy checks you can try. Make sure the inverter’s low-battery cutoff is not set higher than 12.1 volts per Oliver’s recommendation for Lithionics batteries, and that the battery type is set to lithium. Some owners have found that software updates changed these settings. The Victron is a different design, but not necessarily better. In this case, when the Xantrex trips, it’s warning us there could be a problem. A Victron with default settings would keep running while a bad connection heats up, until the battery’s BMS protection shuts everything down, including the lights! Although Victron uses load compensated cutoff, owners should also check their low-battery settings. The factory defaults are very low, and they should be set per their battery maker’s recommendations. I've done some fair research into the Victron, and unless you also opt for an expensive Cerbo based system, I believe it's not a better upgrade over the Xantrex. Another easy test is to watch the voltages from the SeeLevel panel and Xantrex display, then start the microwave. Note each display’s voltage before starting and just before the inverter trips. If the SeaLevel (battery voltage) stays about 13 V, but the Xantrex drops to about 12 V, then there is a voltage drop (poor connection) in the wiring between the batteries and the inverter. If they both drop together, then the batteries may be weak or not sharing the load evenly. The 300 amp breakers internal resistance is a an easy first test. Put a DC voltmeter across the terminals with a full load (while running the micro). Anything over 0.1V across the two posts is too much internal resistance. You can also use an infrared thermometer to look for warm (poor) connections after the inverter trips, or run a smaller load, such as a heater on low. It might not be enough load to trip the inverter, but enough to warm a poor connection. Don’t forget to look at the grounds! Of course it might be something else altogether, and there are other voltage tests that can isolate the problem. This is a good start to help narrow it down. Let us know what you find. Cheers, Geoff1 point
-
There must be 10+ threads in the last two years on the 3KW Xantrex shutting down and I’m not saying search vs. posting. Please everybody always feel free to ask any question! 😎 It’s usually something re low voltage cutout. Likely you need to run through setup configuration to lower this number. Experienced Xantrex owners may chime in otherwise, search for ‘Xantrex’ from the forum home page and you should find instructions for changing this parameter. Also 50% SOC is not LOW with LiFePO4 batteries! We have a Victron inverter with 900 Ah. The Victron allows for this, since we can run our A/C AND the microwave (oven) with SOC <20%! Both the inverter and batteries have low voltage cutoff protection. I’ve never read here re Lithionics cutting out. The Victron inverter never cuts out. There are only Xantrex cutoff issues. Also it’s not your microwave given it runs long when plugged into shore power. Check your Xantrex manual and their Tech Support if necessary.1 point
-
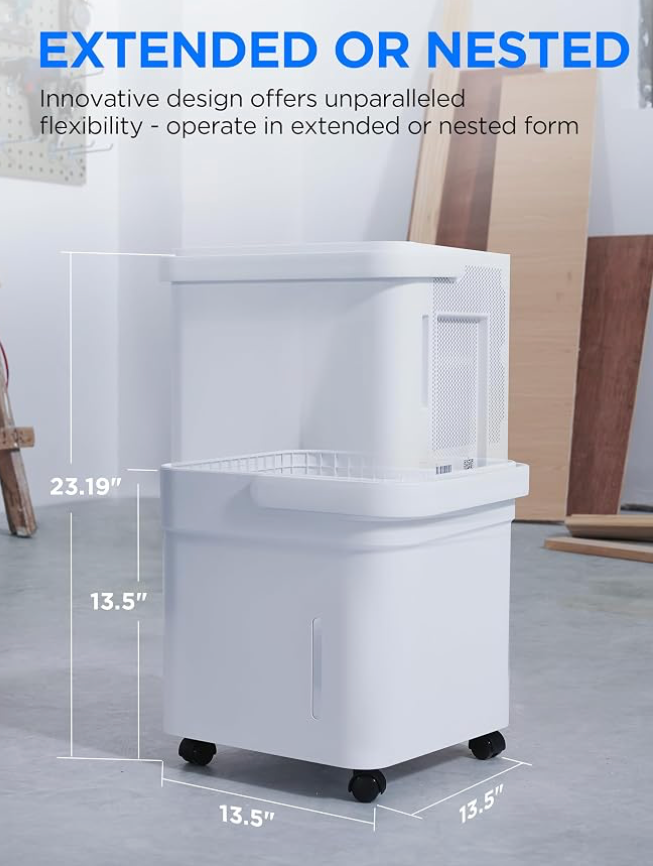
Here on the upper West Coast we can get incredible amounts of damp, cold humidity. The little Peltier dehumidifiers don’t work worth beans, and using your AC just puts on the freeze. So I took a chance on the Media Cube 20 pint. https://www.amazon.com/dp/B08ZMY8BC8 Fits nicely between the twin beds, I’ll just keep it there by the bedside table which is a great spot. Note in tank mode it blocks the door, I’ll look into a drain hose sometime (OTOH it won’t be on every trip, mostly likely I’ll just bring it along based on where we’re going). So anyhow not for summer humidity - just use the AC - but for winter humidity this works perfectly. It acts like a little 200W space heater, is pretty quiet and pulls an enormous amount of water out of the air. When traveling or storing the top half nests inside the lower half tank.
1 point
-
I must agree, I like my vintage gear onboard #110. I'm sure someday I may regret not being able to run my A/C off batteries, but I will still need a generator to re-charge those beastly batteries, or a truck that can do it IF I drive the next day. When these 2024 AGMs are used up, I'll upgrade the rig to all new Victron & good lithiums. We'll see how my retirement travels work-out for me.1 point
-
"colors" ?1 point
-
At the very worst, you temp use two bolts in each end. Available almost anywhere fine bolts are sold.1 point
-
Yeah John, thank you. She’s pretty again and our 11-year-old Oliver is also more capable than ever! 😎 Not a chance we would trade our newly upgraded and restored Oliver for a brand NEW 2027 Apex or Elite. We are better optioned than either new model. It would be less dependable without going through everything again, and way too much trouble to do so.1 point
-
The NEC, and maybe others, require a service disconnect for appliance maintenance. A plug is the cheapest way to provide a disconnect for service. GJ1 point
-
I spent a LOT of time at the showroom looking at the APEX. There are a few things I liked, but honestly the #1 item keeping me away was the 48-volt Eco flow system. I did some research once I got home and it appears to be quality product. My issue was that the AC runs through the system full time - if you need AC cooling the EF system must be working: the AC running through the inverters. We all use our Olivers differently and times and needs can change - from boondocking to a ritzy RV park in AZ. Long term I could see an extended time in a hot area of the country; I would want my AC running off 120-volt shore power. That and the fact it is a system that is not component driven - but rather a closed system. But that's not my specialty - so I leave it here. I really like the slam latches over the standard ones in an EII. The axles and Alcan leaf springs are another improvement - one that honestly should be standard on all the EII's - that topic for another day. And yeah, the black high Lites appealed to me - call me strange.... The tires - make no sense to me - but what do I know. The solar awnings were also a no go for me. However - I can see as an off the beaten track boondocking rig it makes sense. I preferred the EII with appropriate solar system.1 point
-
You may need one of these. I’ve found many steel parts in spots I couldn’t even see! https://a.co/d/0dLcMRie1 point
-
"My Bad" but, I have found that if wifey starts a conversation with, "Honey, I think you need a tool to help you do this", she has my complete attention for the duration of the conversation, no matter what else we discuss... I think she realizes it too, as we have had some rather meandering (like what do tools have to do with making sure my daily work clothes are in the hamper on laundry day...) conversations, but I was paying attention to every word until we were done. Before we were married, my father told Maggie, "He is not hard of hearing, He is hard of listening..." Now I have hearing aids, and I still do not listen. 🤭 B~Out, I just heard the word "tool".1 point
-
Difficult to tell from the existing picture but it's also possible the duct work has dropped out of the knockout panel. If you haven't already I would move your bed aside, open the hatch from above to make sure the duct has not vibrated loose and onto the floor.1 point
-
I found replacements that work on both size grommets on Amazon https://www.amazon.com/dp/B0CVQR21J7?ref_=ppx_hzsearch_conn_dt_b_fed_asin_title_11 point
-
Ours has two sizes of grommets, double the trouble!
1 point
-
Grok gave these Here’s a list of mobile RV techs and repair services in Florida. These provide on-site repairs, maintenance, and service at your location (home, campground, etc.). Coverage varies by region, so contact them to confirm availability in your area. dandlmobilervrepair.com Central Florida (Orlando, Lakeland, Tampa, etc.) Florida Mobile RV — Central Florida focus, 30+ years experience, insurance/warranty work, full repairs. floridamobilerv.com Interstate Mobile RV Service, LLC — Orlando area (including Clermont, Kissimmee), certified techs, maintenance, holding tank cleaning, AC, plumbing, electrical. Phone: 407-861-6380. imrvs.net Matt's Mobile RV Repair — Based in Lakeland, serves Central Florida (Tampa to Orlando to Zephyrhills). Veteran-owned, NRVTA certified. mattsmobilervrepairfl.com D & L Mobile RV Repair — West Central Florida (Bradenton, Brandon, Clearwater, Lakeland, Largo, etc.). Phone: 813-340-4391. dandlmobilervrepair.com Speedy Mobile RV Repair — Tampa Bay metro and surrounding areas, full range of repairs and maintenance. speedymobilervrepair.com Happy Camper RV Repair / Mobile RV Tech — Zephyrhills area, licensed for LP gas, etc. Phone: 813-485-4103. happycampermobilervtech.com North/Central North Florida (Gainesville, Ocala, etc.) Honest RV Mobile Repair — Gainesville, Alachua, High Springs, Newberry, Ocala, and north central Florida. RVTI/RVTA certified, licensed, insured. honestrvrepair.com MobilePro RV Service & Repair — Gainesville area, 20+ years experience, works with RV parks. mobileprorvrepair.com Southwest Florida First Responder Mobile RV Repair — Southwest Florida, veteran-owned. firstrespondermobilervrepair.com Action Mobile RV Repair — Southwest Florida, on-site maintenance. actionmobilervrepair.com Other Areas Shaffer's Certified Mobile RV Service, LLC — Sarasota, Bradenton, Venice, St. Petersburg, Clearwater, and surrounding counties. RVTI certified, LP Master Qualifier. scmobilerv.com JCRVs Mobile RV — Minneola, Winter Garden, Clermont area. Repairs, renovations. Phone: 352-207-6056. thejcrv.com Open Road RV Repair (Camper-Repair.com) — Central and Southern Florida (Jacksonville, Orlando, Miami, Fort Lauderdale, West Palm Beach, etc.). Certified, insured. Phone: 1-800-708-1976. camper-repair.com A1 RV Repair — Statewide mobile techs across every county in Florida. Phone: 866-623-1340. a1rvrepair.com Additional Resources RVHelp.com — Directory with vetted mobile techs in specific Florida cities (e.g., Old Town, Florida City). rvhelp.com Check Yelp for local reviews in cities like Orlando or Spring Hill. yelp.com Tips: Verify licensing (especially for LP gas work in Florida), insurance, and certifications (e.g., RVIA, NRVTA, RVTI). Ask about service radius, common repairs (AC, roofs, slides, plumbing are frequent in FL), and availability. Many are independent or small teams—reviews and references help. If you specify your city or region in Florida (e.g., Miami, Panhandle, Tampa), I can refine this list further!1 point
-
Sounds like a new inspection item to put on my list. Thanks all for sharing.1 point
-
Let me guess..... The person you spoke to has the initials MS...0 points
-
"The price for a horoscope varies from around $30 to hundreds of dollars. " Darn Spell-changer's... 🤣0 points

















-
Recent Achievements
-