Leaderboard


Popular Content
Showing content with the highest reputation on 02/24/2021 in all areas
-
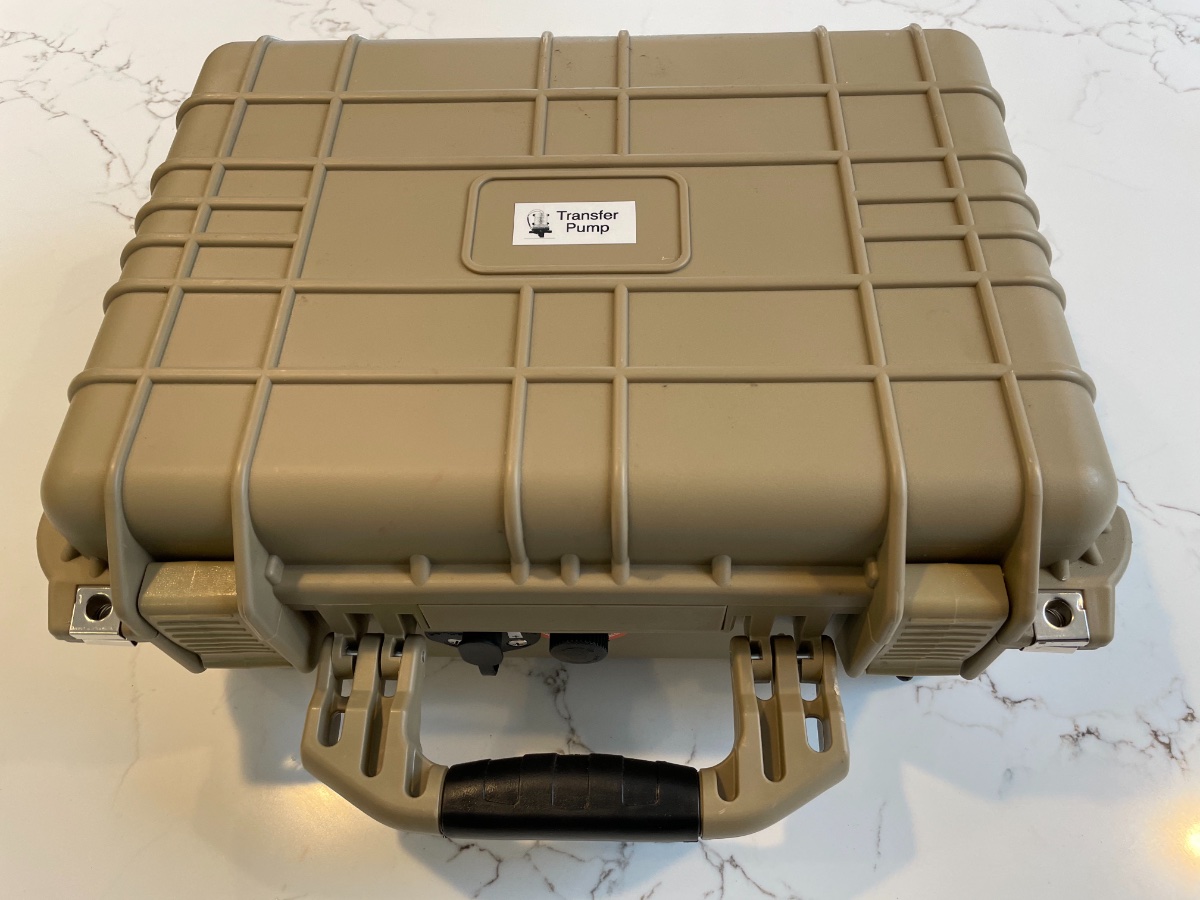
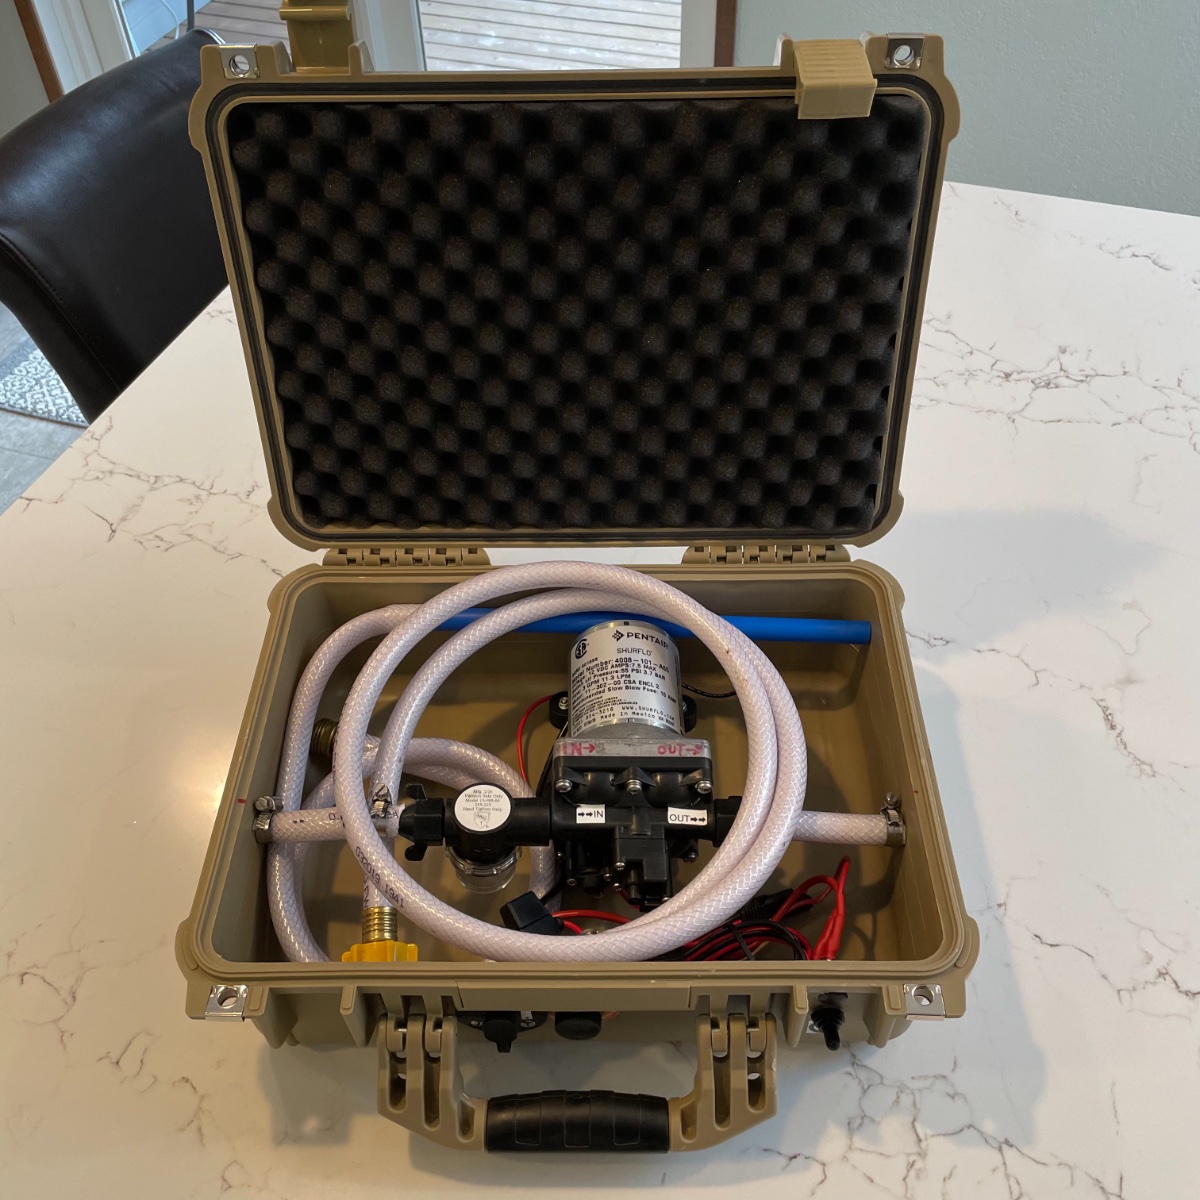
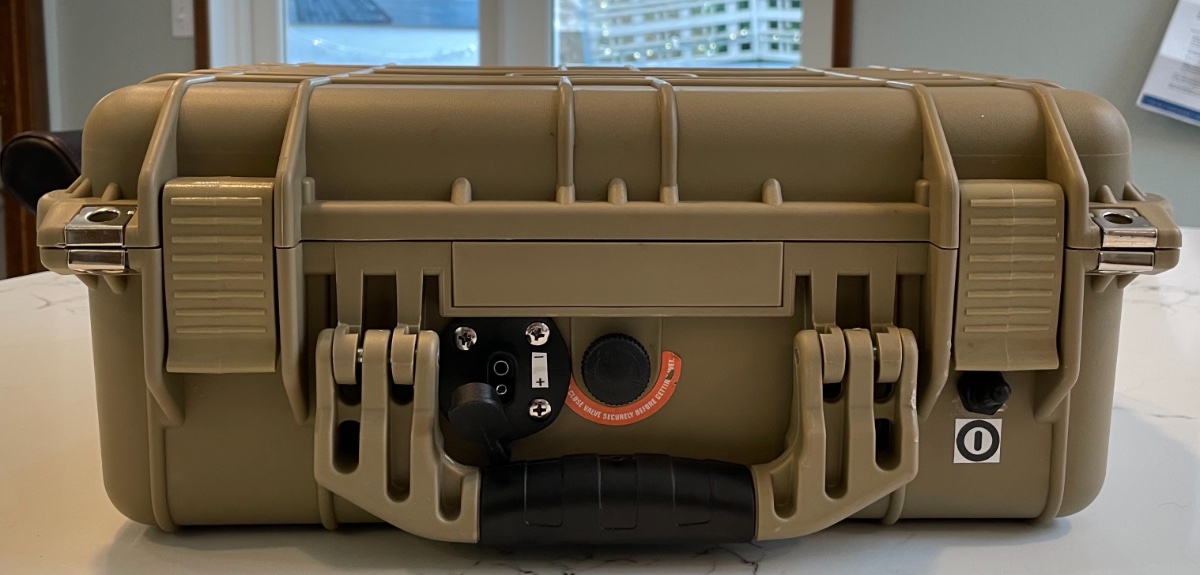
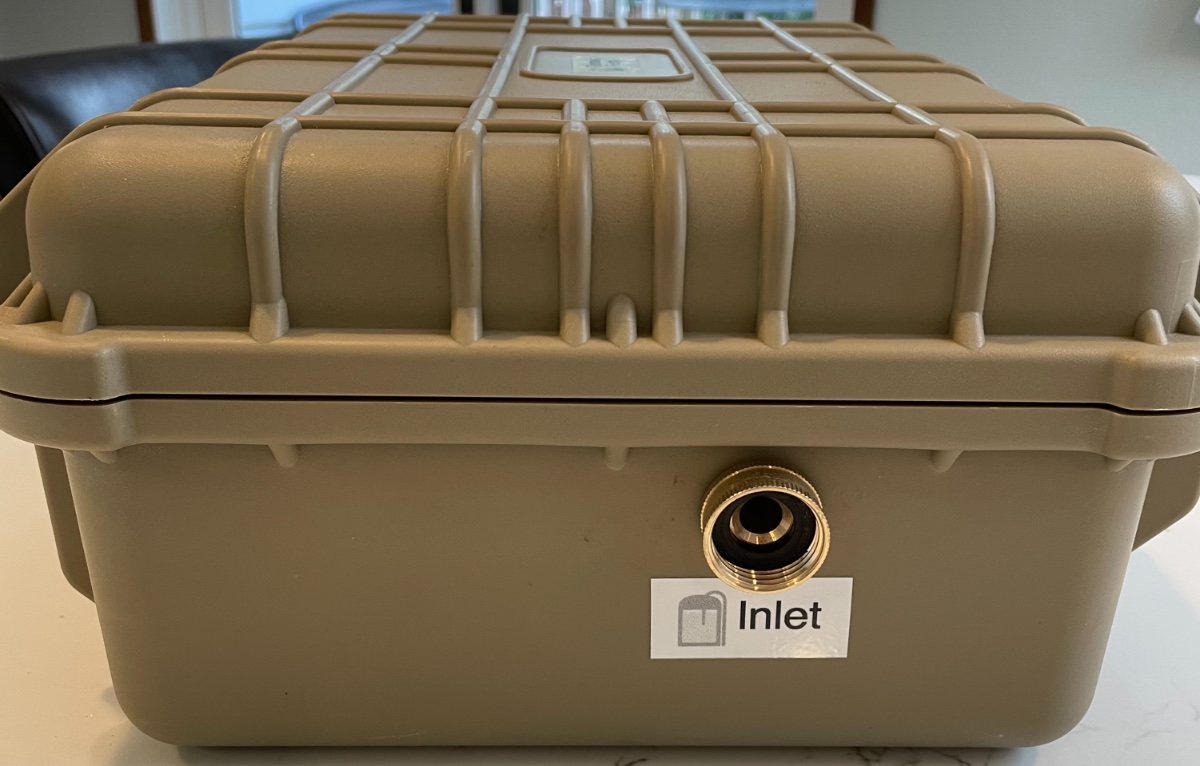
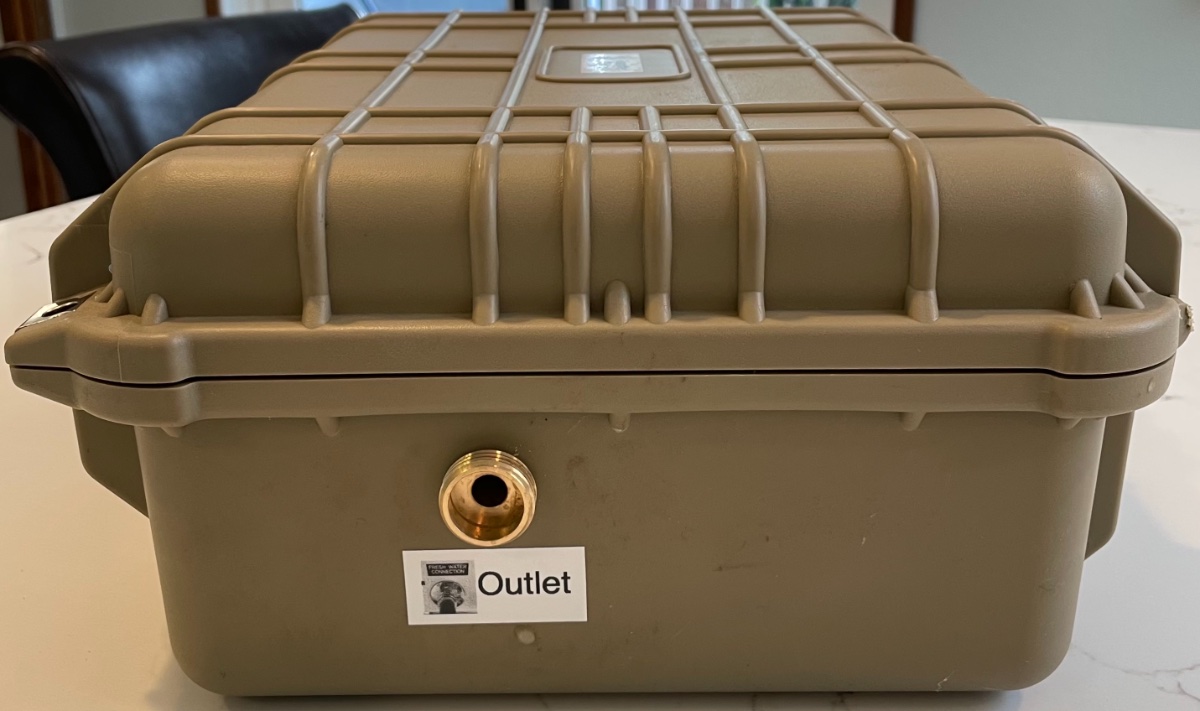
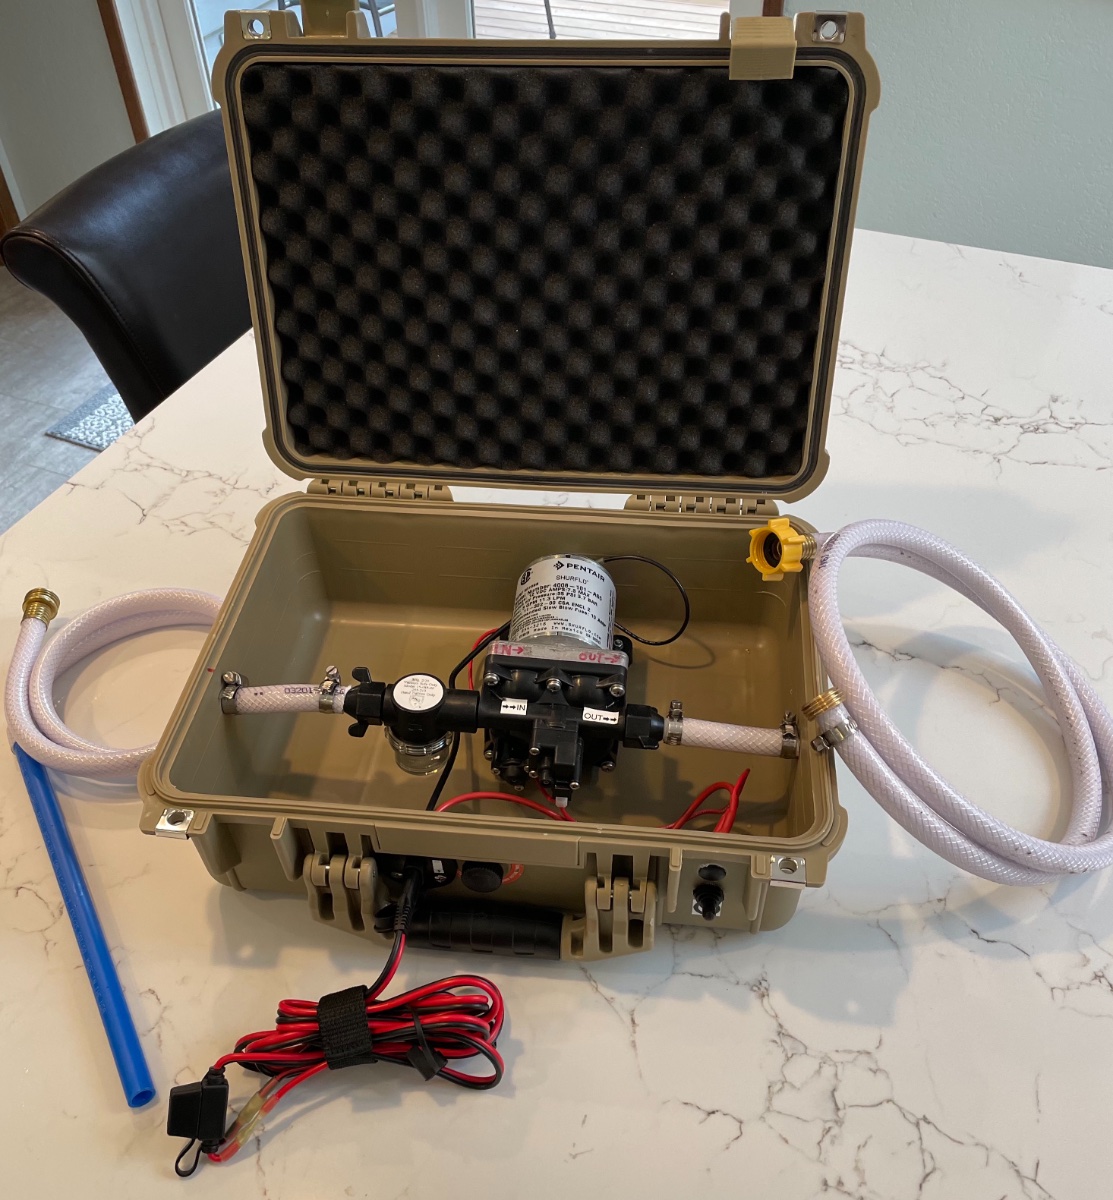
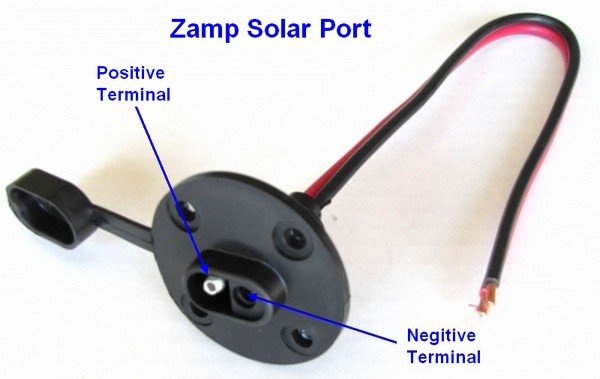
Here'a a fun project that provides you a backup 12v Pump for your Ollie. I bought a spare 12V Shurflo water pump to carry with me on our coming long long adventures around the US. I decided to build it into a water transfer pump that I could use for multiple uses and still have a backup pump. Some ways I can use this transfer pump: Transfer fresh water from portable tanks and bladders directly through the Oliver fresh tank port. (This is without using the boondocking port.) Use as a pusher pump for a bladder to the street side water port on the Oliver Use around the campsite as a portable pump for wash stations etc. Use as a backup pump should my main pump fail. Electrical Consideration: I designed this so it can hook it directly to the Zamp Solar Port on the side of the trailer as the 12V source. That SAE Zamp port has direct connection to the batteries in the Oliver. I wanted to make sure to create a fused connection, and also be sure to wire it to match the Polarity on the Zamp port. I put a matching ZAMP port on the pump case, and build the fused connection cable out of a pair of fused SAE solar cables. The fuze is closest to the Oliver's ZAMP port for safety. (Zamp also sells an excellent "replacement" cable that could be used for the project.) ZAMP Solar Port Polarity is reversed from typical SAE Connectors: Zamp wires their solar ports in a way that the + lead on the solar cable coming from the solar array is into the plastic covered end of the cable. (That's opposite normal SAE use. They do this to protect users from plugging into the solar array and touching the male exposed connector.) Here's a basic material list (if you want specific part numbers of connectors etc. PM me on the forum.) I bought all of the material from the combination of Ace Hardware, Harbor Freight and Amazon. Total cost $190.73 1) Case: $39.00 Apache 3800 Transit Case - : Harbor Freight ( Interior Dim: 14 7/8"x10 5/8" x 6 1/8") Fits pump perfectly bolted into the case without the bottom foam. 2) Shurflo Pump model 4800, $72.00 - : Amazon/RecPro 3) Inline Shurflo Filter Model 15-085-00 included with pump - : Amazon/RecPro 4) Basic Fresh water hose (white) - $17.00 : Amazon cut to use short pieces for pump connections and used the other pieces as the input side hose (with a rigid piece of 1/2" pex as the drop lead) and outlet hose with repaired male end connector. 5) Qty 1 - Inlet side Female Swivel Garden Hose Connector (barb connector style) $1.50 ea - : Ace HW 6) Qty 2 - Male Garden Hose Connectors (barb connector style) one used on outlet, one to repair the outlet hose. 7) Qty 4 - 1/2" stainless pipe clamps - $4.00 : Ace HW 8) Qty 2 - SHURFLO (244-2926 1/2" x 14 NPT x 1/2" Barb Straight Wingnut Swivel Adapter - : Amazon 9) Qty 1- Zamp Waterproof Solar Port - : Amazon 10) Qty 1 - SPARKING 6' SAE To Ring Terminal Harness Quick Connect/Disconnect Assembly & 10A Fuse + SPARKING 2' SAE Quick Connect Harness (this is to make the other side of the cable) - : Amazon 11) Qty 1 - Fastronix SPST HD 20 Amp AC/DC Toggle Switch with Weatherproof Neoprene Boot - : Amazon So here are some pictures of the finished project in the transit case. Case in closed ready for travel position: Case opened to show hoses and electrical connectors stored inside: Contents removed so you can see the pump connection setup: Hoses and electrical connectors shown beside case: Handle side shows DC connector (that matches the ZAMP port wiring) and on/off switch: Inlet side: Outlet Side: Assembly comments and learnings: 1) Pump body - originally I was going to mount it onto a pvc board but found that the depth of the transit case and height of pump worked out better if I could simply bolt into the case. I used 4 bolts with baking washers to secure the pump into the case. 2) Port locations - I tried to figure out a way for the ports to exit out the handle side of the box, in fact I bought some elbow connectors for the pump, but quickly found that they interfered with the closure clasps. As a result I went for a simpler straight side to side flow. 2) Electrical Switch Location - My initial hole for the switch ended up interfering with the closure clasp once the switch was installed and in the ON position. I decided to plug that hole with an automotive plug and move the switch mounting down a bit further. (See handle side view.) Pump Performance: 1) I used the pump yesterday to pump a 6 gallon container of my tank sanitizer solution into the fresh tank. The pump operated smoothly and the 6 gallons were pumped into the tank in 58 seconds. (The pumps spec is 3 GPM ...so it met that spec.) 2) I also tried the pump on the street side water inlet, and the pump would cycle on and off as I turned on and off the sink faucets. So another use is to hook it up to a bigger bladder tank external and use it as the main water supply. (*Note - The pump has a 55PSI max, and is factory set for 45 PSI working shutoff pressure.) The case stores nicely run the Oliver Elite II basement on top of my water filter holder. Possible upgrades: 1) I might add a stainless vent pair on the box so I can run the pump with the box closed. The vent would allow for airflow in/out and adequate cooling space around the pump body if running for a longer time. 2) Build a Zamp (SAE) to Anderson Connector so I can plug this into my truck power port's that I'll install this summer. 3) Try running this pump off of a small rechargeable 12v Lithium Battery bank. Make up appropriate 12v connectors. Questions and comments welcome. Craig Short Hull 505 - Galway Girl
 9 points
 -
As it pertains to newbies queries, let me offer this... I come from a family of tent campers. Travel trailers are a totally new thing to me. I have learned a great deal on this forum, mostly by reading responses to questions posed by others. I found this forum to be an invaluable tool in helping me make decisions regarding my model choice and my tow vehicle choice as well. If not for the patience and understanding of the members of this forum in dealing with newbies questions, many of us may have become frustrated and made uneducated choices. In general, I have a rabid dislike of social media and have thus far avoided FB since its inception. This is the first forum that I have ever joined. Since being here, I have not encountered anything that I found to be sketchy, arrogant, or rude. Just nice helpful folks. I am grateful to all of you, and special thanks to the moderators who somehow manage to keep junk and morons out of this forum.9 points
-
We always welcome newbies with a legitimate interest and questions (we were all newbies at one point). 🙂 This forum helped many of us make our buying decision. And yes, a big thank you to the moderators here for keeping this site pretty focused.6 points
-
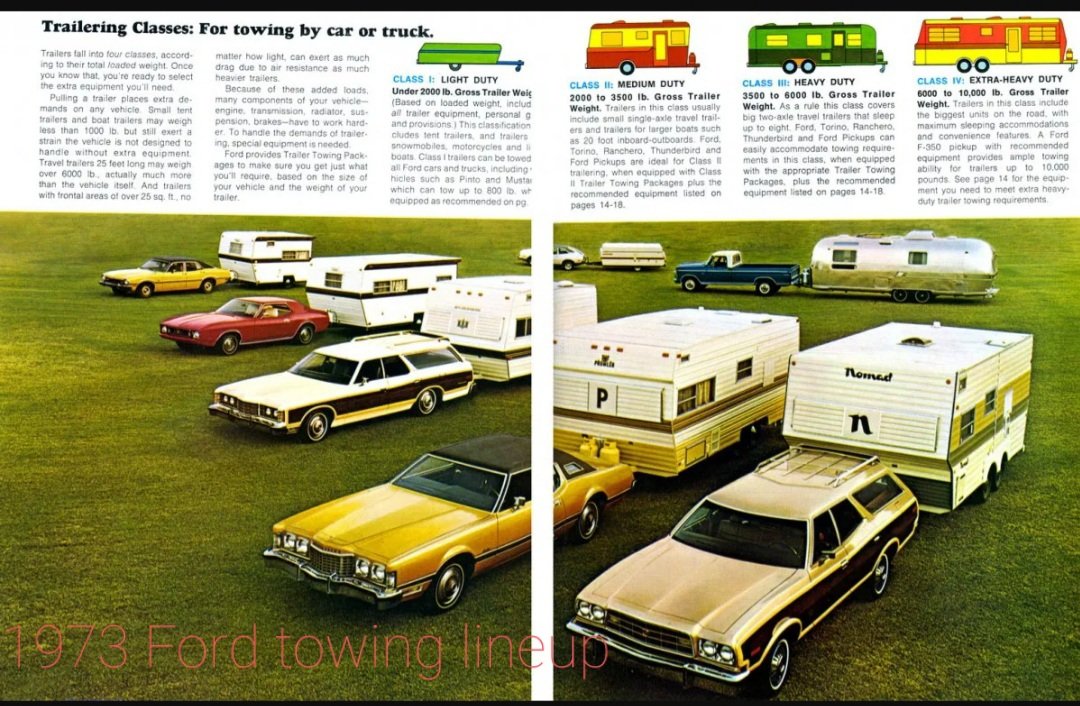
As a teenager, we had a Ford Country Squire station wagon (like the one shown in the lower right of the pic above). It must have been as long as our F-350 pickup! It had a huge fuel tank - I remember filling it up and it took $10 worth of gas . . . . What was gas then . . . . . 30 cents a gallon or less? I'm sure it would have pulled an Ollie . . . . but probably only got 6 mpg. Wouldn't this look great with an Ollie in tow?
5 points
-
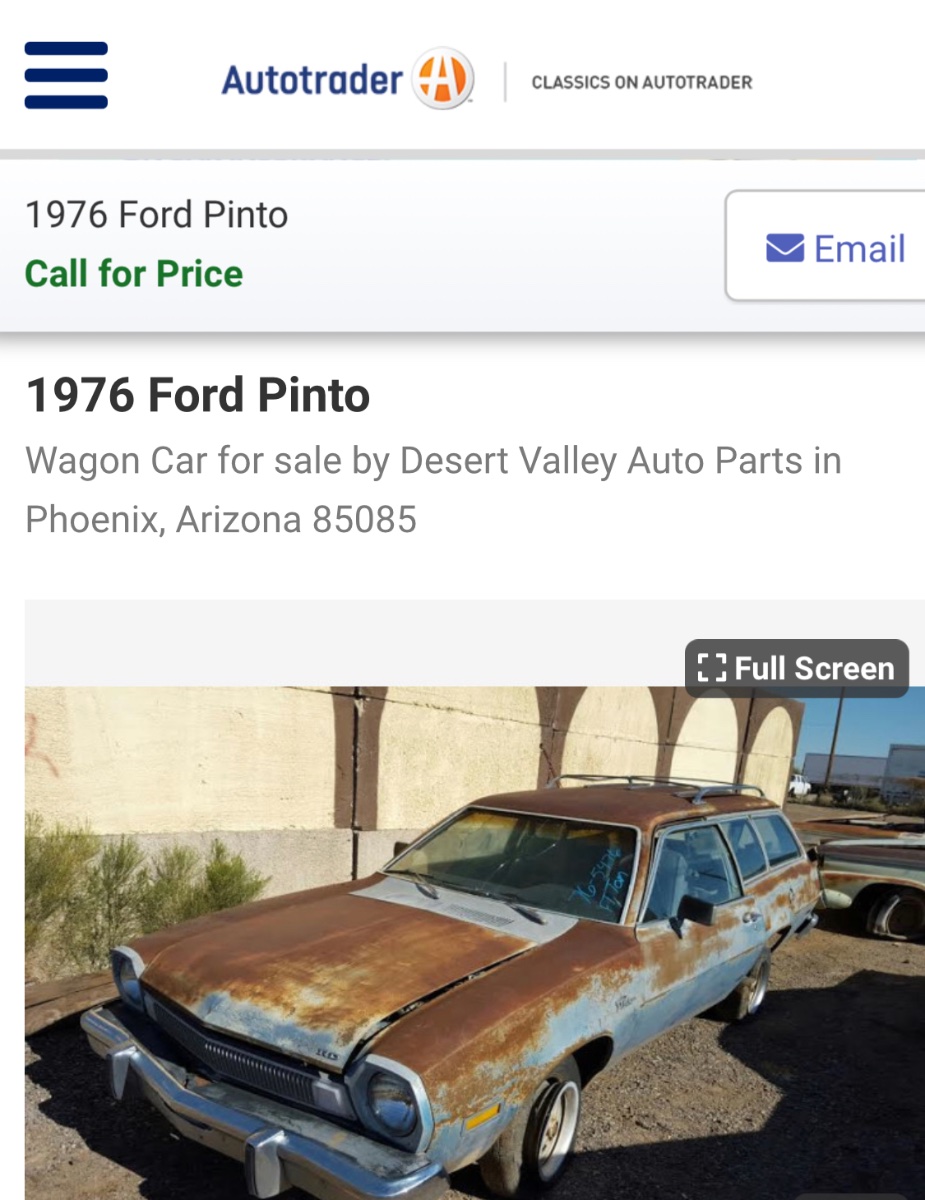
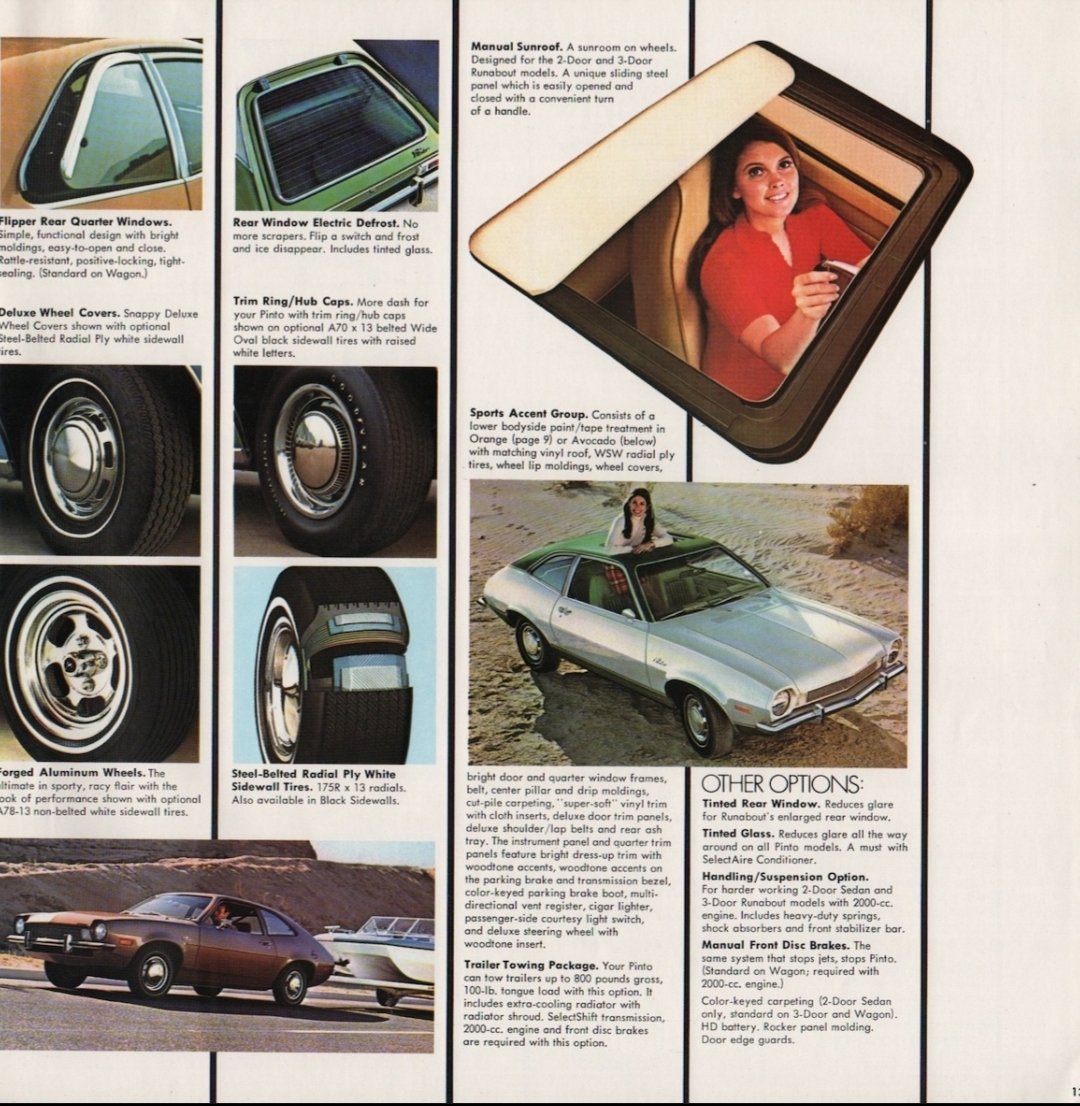
I am looking for a new tv, anyone know where I can find that '76 Pinto? I don't go on Facebook or instaface or snapwaggon. (Thanks Belichick) I did ask my wife to show me the Facebook announcement. I have no issues with what they are proposing. They have already been solicited by someone looking for a deal on an Ollie if they provide content. I guess that is social media marketing. I like this Forum and the only other other Forum (Downeast Boat Forum) that I belong to because they are well moderated, informative, and leave politics, religion, self promoting influencers, and drama off of the site. I hope this Forum continues in that vein. So what do you think about the 76 Pinto as a tv???4 points
-
I too appreciate that the forum has been open to non-owners. I've benefited immensely from the information that has been posted over the years, and from your willingness to answer questions (both on the forum and via PM) as I prepared our build sheet. Thank you to Oliver for hosting such a clean site, to you (the participants) for your ongoing contributions, and to the moderators for many hours spent keeping the forum friendly and on track. Now, back to the thread ... Stock Pinto? -- perhaps not so much. But what about a slightly modified version?
3 points
-
Yes thanks to the Moderators - I have been called a moron - a time or two.(I can be hard on myself) With out great moderators - well, moderate on... And all this Pinto stuff is hard - taken subjectively - I could make a case for towing an E-I - no - wait that was the sales guy at the local truck place.....3 points
-
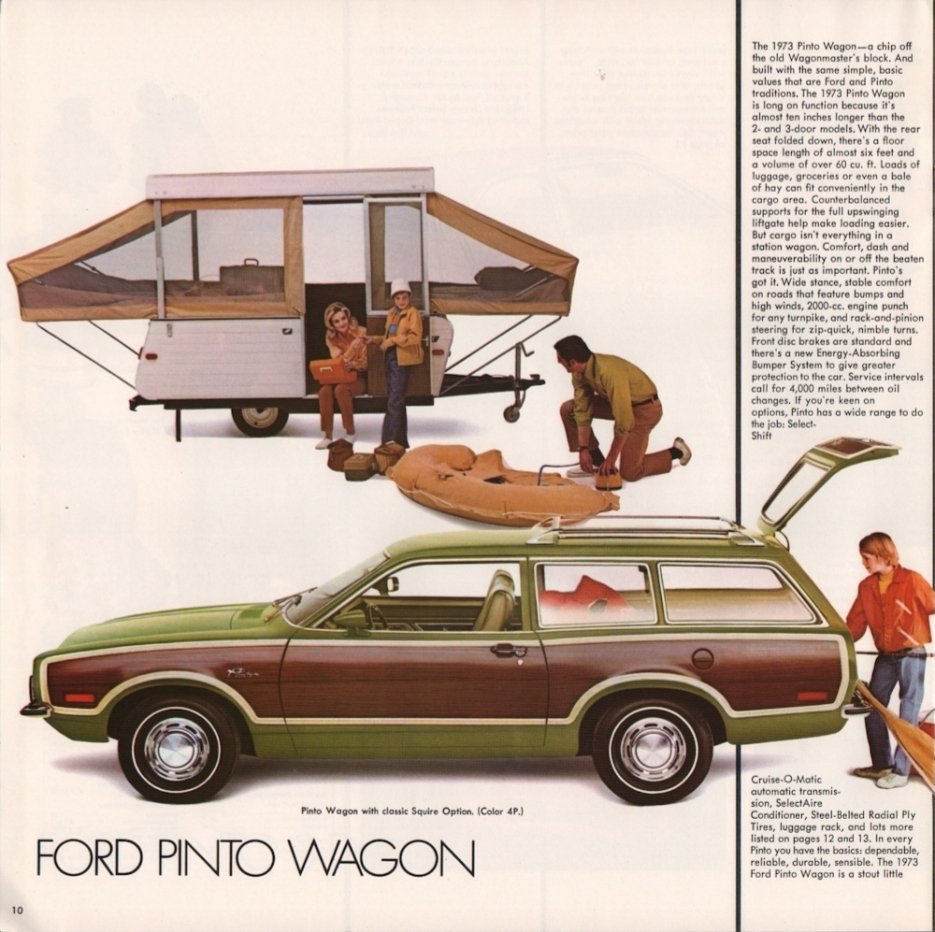
Here you go. I think the wagon version is much better suited to camping. 🙂
3 points
-
We have had good results on Ollie using Meguiar's #67 Marine/RV one step compound then Meguiar's Flagship Marine wax.3 points
-
The best boss I ever had shared this advice with me, "Talk to your people ever day. And listen. You can learn something every day, from anyone. The newest and least experienced guy in your group may just have a new insight or a great idea." I usually learn something new everyday. It is what I learned yesterday, was wrong!2 points
-
I know this will be a serious disappointment, but the 1973 specs (with tow package) only allowed 100 lbs tongue weight, and an 800 lbs tow rating. 😅
2 points
-
I have to agree the site lacks search and book mark features resulting in a lot of repetitive questions and frustration on the part of current owners who prefer to discuss the latest mods they just performed, its interesting to see how ingenious owners of these trailers have become, but on the other hand how much did you know when you purchased your first travel trailer? I agree youtube can answer just about every question about RV life and provide product reviews on a broad number of RV must haves, but all of this can overwhelm a newbie! Understanding weight distribution and how it affects towing, what size TV will best fit my needs, understanding solar and battery power management, composting toilets are just some topics better left to google search and youtube! I have never owned a trailer or towed one but I feel confident reading topics from this site will always benefit my RV travels.2 points
-
I think it's in the plastic, but not sure. Houghton has always touted "high quality" plastic and uv resistance. Important to us in Florida, but even more so in Australia. We took it out of the box to check it out. Our old Dometic shroud is much thinner. And, the shroud is cracked in so many places that it's probably 20 per cent Eternabond tape, now. (Before anyone gets riled up, our unit is 13 years old, sits outside 24/7/365 , still works, and I could have bought a new shroud.) We really wanted the new unit for space considerations for the sidemount solar adjustment, increased efficiency, and the quiet.2 points
-
The best boss I ever had shared this advice with me, "Talk to your people ever day. And listen. You can learn something every day, from anyone. The newest and least experienced guy in your group may just have a new insight or a great idea." I tried to follow that advice. And, I still do. Personally, I welcome the questions from new members, even if the question has been asked before. I don't mind looking up old threads, and adding links, either. Some people don't have the same skills, or time, that others do. I also very much appreciate the input from older members, who are so generous and kind with their responses, time, experience, and expertise. All if this is why, in my opinion, we have the best forum. It's welcoming, and interesting. And quite often fun. I will open a discussion on FAQ on the moderators' forum. Maybe a group of pinned topics could be helpful. We'll see. Sherry2 points
-
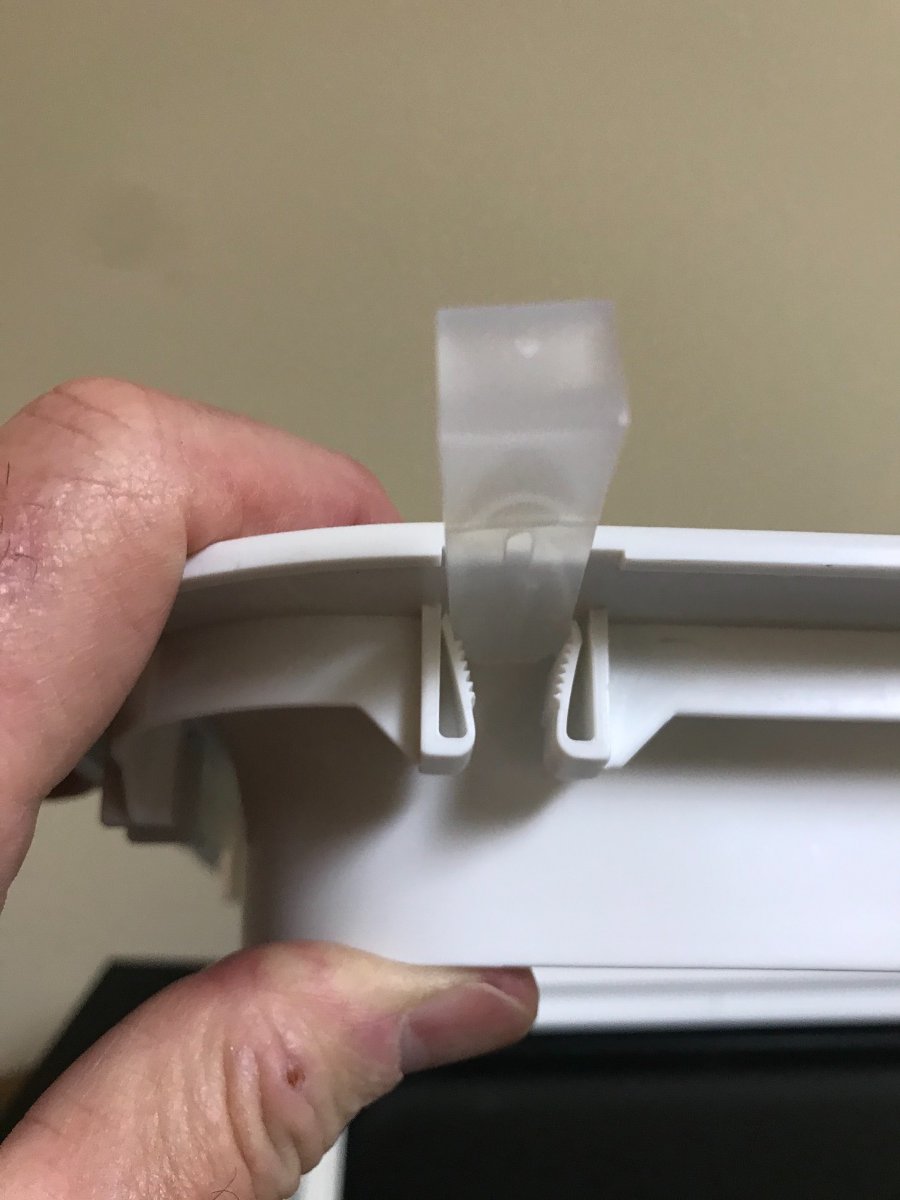
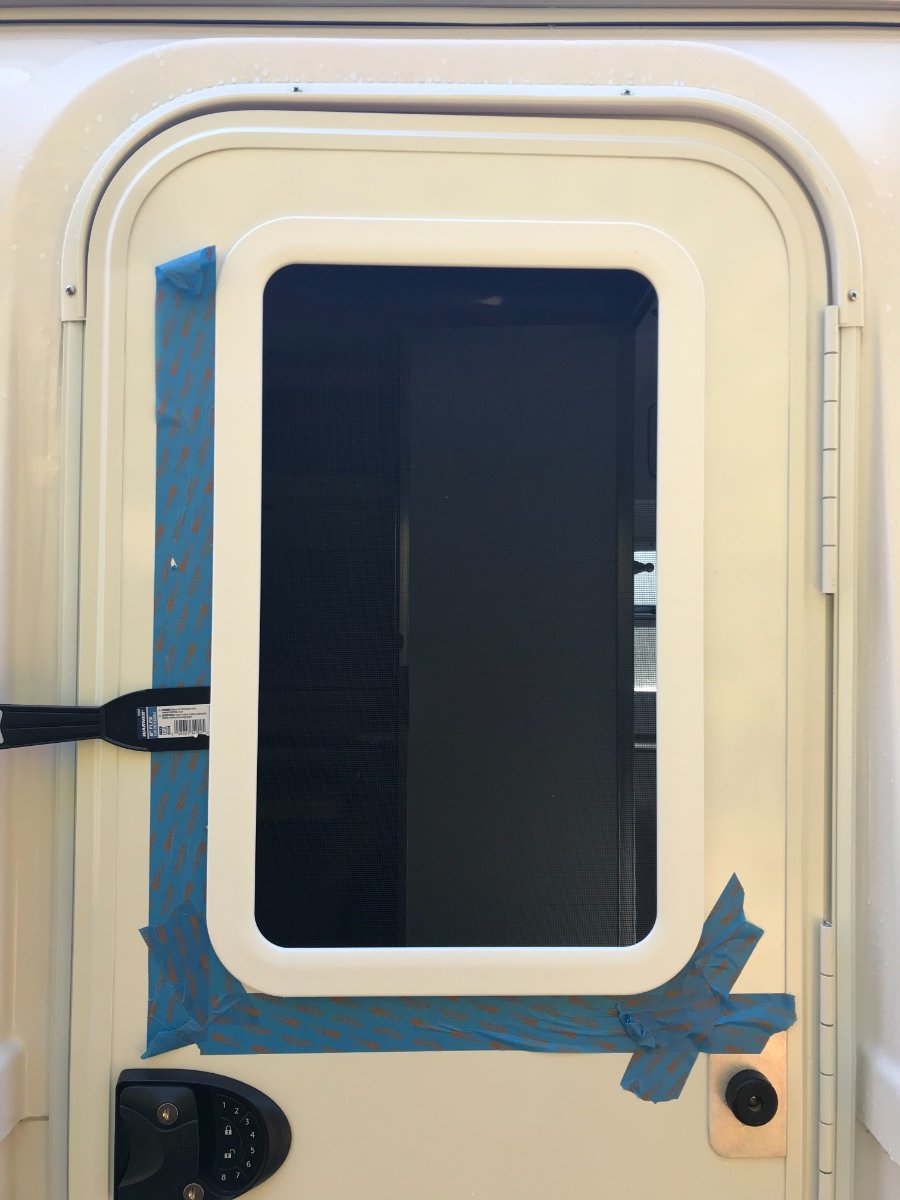
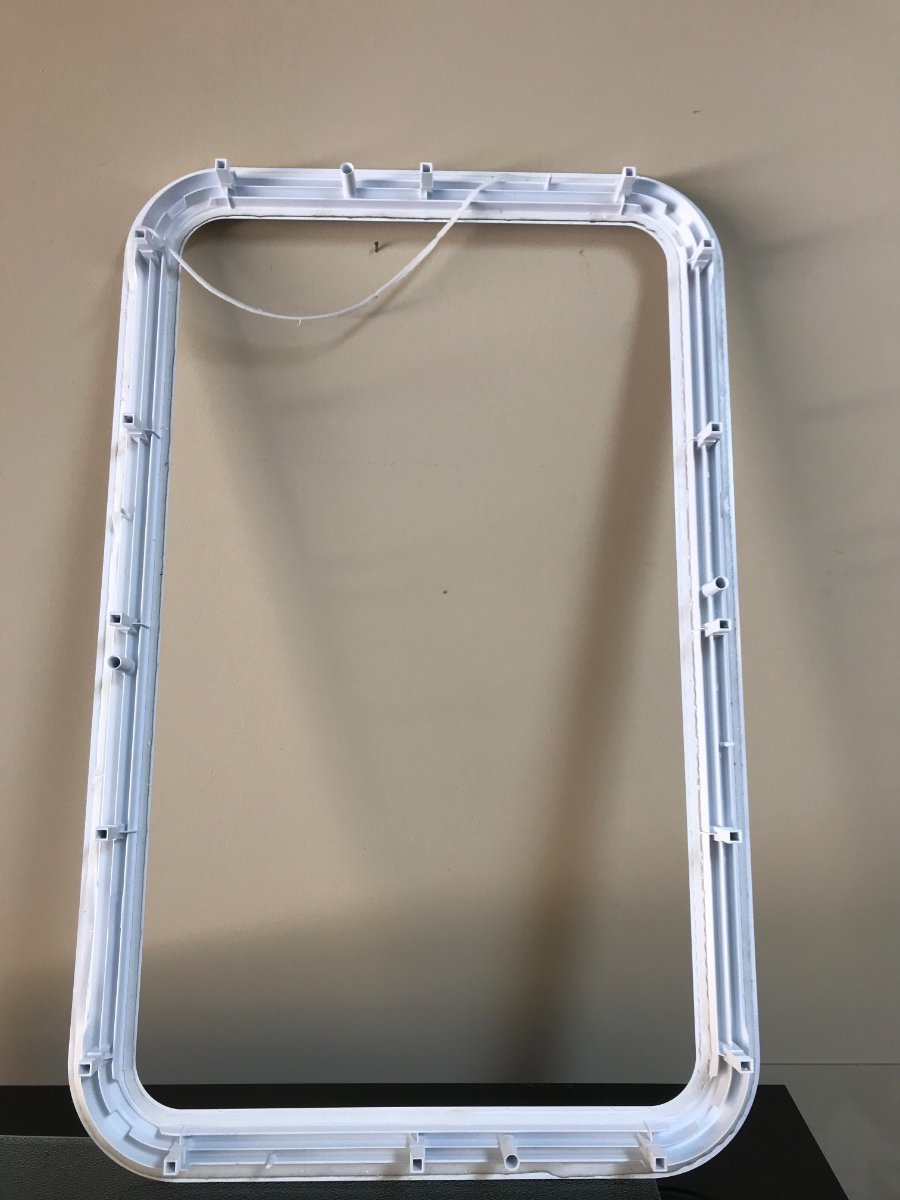
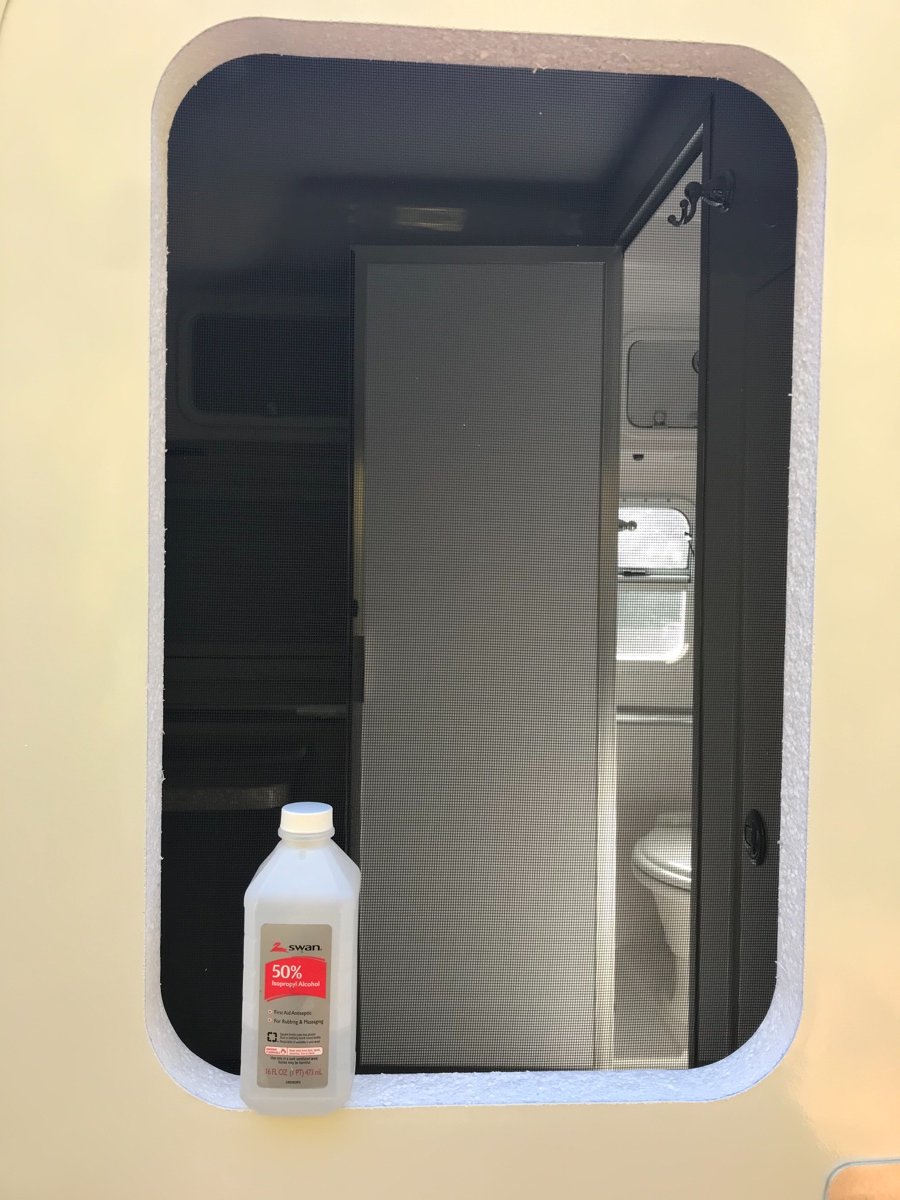
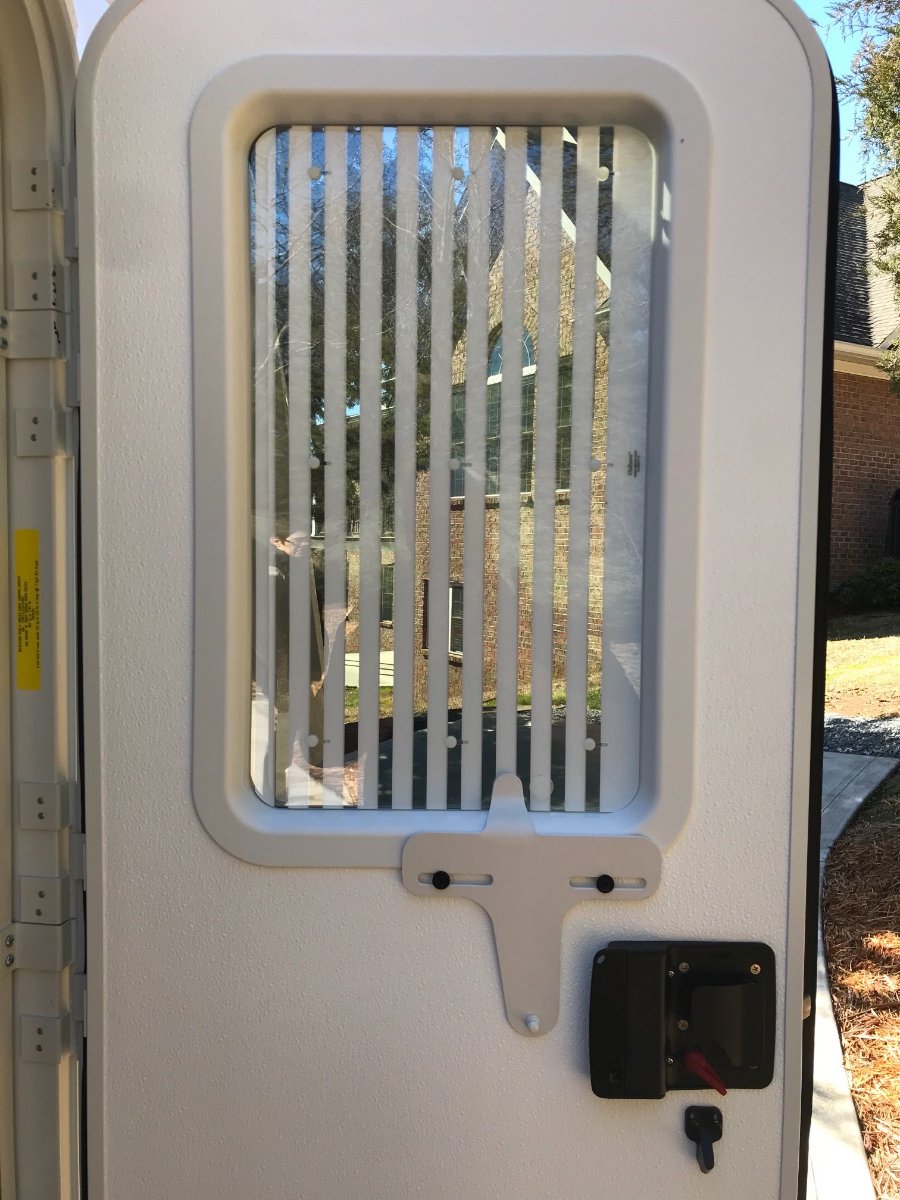
Long install post- I decided it was a gorgeous sunny North Carolina day and just a good day to install the new tinted glass and blind I ordered from Zarcor. I made this a stand alone post as this window install was a bit different from other installs I have read about here. It appears the Lippert now uses a sealant on the exterior window frame which adheres the frame to the door frame opening. They also use a similar sealant on the interior of the exterior frame, which holds the glass FIRMLY in place inside the window. I could not remove the old opaque glass from the old frame. I decided since this really appears to be a one time use sealant that purchasing a new exterior frame would be required. Reusing the old frame and compromised sealant was not an option for me. You will see where the sealant on the old frame came off after removal from the Ollie window door cut out or frame. Some of the old sealant came off on the old opaque window. I was glad I had purchased a new frame through Zarcor to do the install. The new frame was $28 plus shipping. Once I removed the old frame and opaque glass, the install was pretty straightforward. The new window frames use what appears to be a ratchet mechanism which once both frames are sealed together they lock into place. No more rope caulk or screws to tighten down when you sandwich the new window interior and exterior frames together. Zarcor sends (16) little plastic tabs (pics) that release the frames from each other. Without these tabs you cannot remove the frames. Below are a few photos to help describe the process. It’s not terribly difficult; just take your time and read the instructions. We are really happy with this mod and like the idea of seeing who is knock knock knocking on our Ollie’s door. $175.00 for this mod including shipping from Zarcor. The staff at Zarcor made this mod seamless by answering all questions I had before moving forward. Just really great folks to do business with in San Antonio,Texas. This is a fairly easy window mod and I would highly recommend it if you prefer being able to see who is knocking at your door. Take your time and remember be gentle as your working with plastic and glass. link - https://www.zarcor.com/rv_products/rv-door-window-kit/ (16) tabs provided by Zarcor to remove existing frame. You insert equally around slots on the exterior of the interior frame edge. You will see the slots. Ratchet mechanism that holds frames together. Likely to speed up window/door plant assembly production cut costs. After removing the interior frame, a thin bladed puddy knife can be used to separate seal. Old frame and compromised sealant - Another photo of old exterior frame after removal- Throughly clean off old sealant off door frame- Installed new frame, and tinted glass, my bride was a tremendous help with an extra set of hands 🙌 👍🏻. The blind install was again pretty straight forward and it works great! It attaches with several small Velcro tabs. The blind can be operated with the interior screen door closed, just slide screen door plastic opening for access. Finished exterior - we like the way this tinted window matches the rest of our glass. The contrast of the tint vs natural light -
1 point
-
Nicely done!1 point
-
Patriot Nice work. Great pics. I plan on doing the same mod. I don’t like the idea not being able to see out the door. As a safety reminder I’m sure most know this. At night and you need to look outside if you hear a noise or someone is at your door. Always turn on your outside lights on, and leave all interior lights off. Any one who is outside will not be able to see you inside due to the tinted windows, turning on interior lights you be seen plain as day.1 point
-
David, Beautiful installation!!!!!1 point
-
Great job David! And it was a great day in NC.1 point
-
Neuman's comments are 'right on the money'. Gelcoat on boats (same as Oliver) commonly can be buffed and waxed to like new for easily 25+ years. The next step is painting with something like AwlGrip or AwlCraft and your ready for next 20 years.1 point
-
Jim/John, I was camping in Zion when I read John’s original post on the subject and thought what a good idea to reduce the furnace’s sound level. The furnace was on (27 degrees out!) and I grabbed my pillow and just covered the intake. To my suprise, there was little/no appreciable change in the sound level, air volume output or the sound from the fan, suggesting no load change. Andrew1 point
-
The official Ford truck towing guide has an asterisk footnote that says towing capacities are based on "a 150 lb. driver and passenger". Ford is overly optimistic about what most of us weigh. 😄1 point
-
Good install job! Looks very similar to what I did a few years ago. Ours has operated flawlessly. It is very easy to open and close the blind without opening the door. The slider is accessible through the sliding panel for the door handle.1 point
-
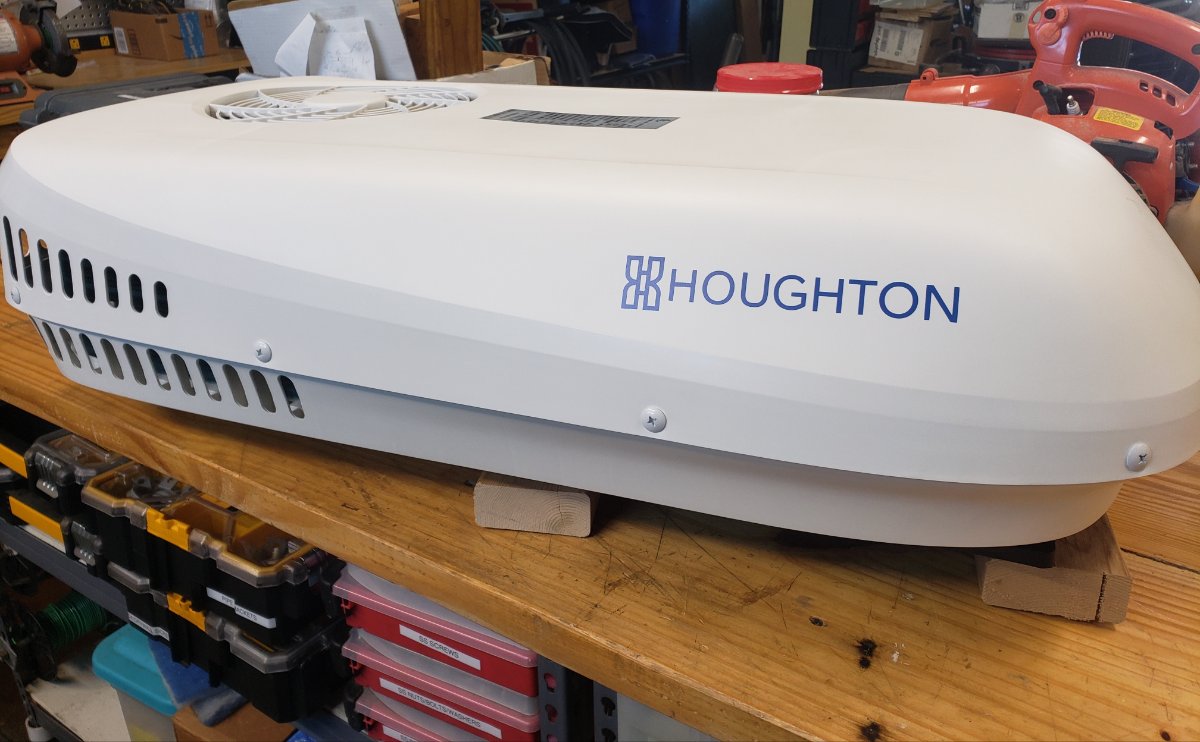
Our Houghton 2801 (9500) arrived today, via FedEx freight. As AC units go, it's quite sleek. And, at the same time, seems to be pretty stoutly built.. Between removing the old Kingdome, and replacing the taller Dometic AC, we should pick up a few inches of height clearance. Our 9500 is cool only, (no heat) unlike Katanapilot's bigger 13500 unit. We were ok with that, as we needed the rooftop real estate for the bigger solar panels we added earlier, and room to adjust them. Everything is a tradeoff in replacing equipment. I doubt this will move off the bench this week. We have sailing plans this weekend. We'll see.
1 point
-
For those that may not have stumbled upon it - there already is a FAQ section here on the Owner's Forum. Yes, it could be improved but there are some things there. See: Oliver FAQ Bill1 point
-
Can you?...😳...hahaha... now thats a interesting topic... Do I need a Anderson hitch....1 point
-
Yes, several polite translations of that. "Read The Fantastic Manual", or "Read The Full color Manual". 😄1 point
-
FrankC: interesting slant on the issue. I must admit - at times I shared several of your thoughts - and I usually tack back to - maximum participation - protected as much as possible from the scammers and evil doers. Here - I must give credit - to the team- of one? = J Walmsley. An excellent job sir. Whether here or elsewhere - people need to learn how to post safely. Although I have been known to mutter under my breath - RTFM - (Read the Fruitful Manual - no?) In the end this forum is a perk of Oliver ownership - current and future - and thus I am bound by a decorum of be nice.... Let the SOB'ers drool and stew - the overall feedback here is positive, fruitful, and entertaining. I appreciate moderator tolerance and Oliver's support. Let them all in - at FB expense.... RB JD's comment prompted me to add - I often learn something when knowledgeable Oliverites answer mundane, banal, or simple questions - I remain a let them all in - the water is fine.1 point
-
I'd like to see a forum page and/or Facebook page option that limited members to actual current verified Oliver owners for discussion of mods, experiences, problem solving, etc. I still think that both this forum and the Facebook page have many members that are just trolling (Airstream owners? 🙂), or scammers looking for personal info, because a lot of people, despite cautions, still will list their personal phone numbers or e-mail addresses in their posts. I do give a lot of credit to the Oliver owners for their patience in answering the endless repetitive questions from potential owners and newbies. "Is the Oliver better than Airstream?", "Can I tow the Oliver with a 1976 Ford Pinto?", "Should I get the composting toilet?", "How do I winterize?", etc. I belong to a few other FB pages and web forums for various pieces of musical gear/recording studio equipment, and the users are merciless when a newbie asks a question about something covered in the manual or a topic that's been discussed endlessly. RTFM is a very common response. 🙂1 point
-
LCTraveler, There is enough room to fit the one leveler between the tires without problem. When coming off of them, you do need to be a little careful or you will wedge the middle one between the two tires. It is not a problem but you may need to move the trailer an inch or two one way or the other. If you find the need to talk to someone regarding your preparation, feel free to PM me with your contact information. I am always happy to talk about Rv'ing and the Oliver. I love the distraction! Andrew1 point
-
Being Floridians, we, too, have seldom RV camped here. Places we have stayed & enjoyed are: Jacksonville- Kathryn Hanna Park St. Augustine- Anastasia SP High Springs- O'Leno SP Sopchoppy- Ochlockonee River SP (Only stayed 1 night.) Pensacola- Top Sail SP Chipley- Falling Waters SP (1 night, not much to do once you've seen the falls.) Lakeland (home)- Sanlan RV Resort (it's where we taught ourselves how to use camper. Nice pools & trails through reclaimed phosphate pits.) Pre-camper days we enjoyed tent camping with our boys at Fort De Soto CP, Hillsboro River SP, Lake Kissimmee SP, & Myakka River SP. Friends whose opinions we trust like Hardee Lakes CP, Colt Creek SP, & Kissimmee Prairie Preserve SP. We're looking forward to seeing where you go!1 point
-
Hi everyone, I decided to go the “new” route. I just finished taking to OTT and put down my deposit for an Elite II, delivery in December 2021. I have until September to decide about options and finishes.... Fred M1 point
-
Re-gelcoating is not even remotely practical. It can be done but the cost would be well north of 10 - 15K and there is really no point in it. If your gelcoat has gone beyond buffing and waxes, than painting is the next step. This is done all the time with fibreglass boats. In fact, I don't think I have ever heard of anyone re-gelcoating an entire boat ... small, damaged areas yes but not large surfaces. You can do an amazingly good job by rolling and tipping some of the high tech paints commonly used in the marine trades and professionally done sprayed two part urethane paints will out-shine new gel coat. When your Oliver reaches, say 40-50 it may need paint but not before.1 point
-
Yes, fwiw I recently rehabbed the long neglected white fiberglass top of a sixteen year old camper van with a buffer and two steps of buffing compound and then some paste wax, per pointers SeaDawg had given somewhere on the forum to Practical Sailor magazine, which has a fantastic set of articles on the topic including well done tests/reviews of various products for each step. I used it as an excuse to get another power tool 🙂 - I went with a pretty decent Shurhold dual action buffer rather than the awesomely powerful but perhaps hard for newbies to handle DeWalt - forsaking a little efficiency in favor of not burning my fiberglass. It will come in handy for the regular wax jobs required for the trailer too (presuming I stick with the paste wax which does seem to do a pretty great job). Here's one of the multiple PS articles I read to help guide me through this rewarding if time consuming task. There are businesses that do fiberglass work that will probably be up for doing this for you as well - often clustered around businesses catering to boaters but not always. The van top now looks great and more importantly is not a dirt magnet as it had become, and water beads up and runs off instead of just spreading out in a film on the formerly very chalky surface.1 point
-
You can usually bring gelcoat back with fine rubbing compound, and buffing, waxing etc. Gelcoat isn't a paint, or a coating. It's fiberglass, without the "fiber", and sprayed onto the mold before the rest of the fiberglass is built up. The gelcoat on our trailer is marine grade, fairly thick, and you'd be surprised at what some buffing and waxing can do. Even when it looks chalky and tired.1 point
-
GMC owners' jealousy is so transparent. 😛1 point


.jpg.fbf446be28e6321c3e31058146b3719d.jpg)


.thumb.JPG.dd838cdb3df463dab6a16861fa23a319.JPG)
-
Recent Achievements
-


")


")


