Leaderboard


Popular Content
Showing content with the highest reputation on 03/12/2021 in all areas
-
As many of you know, I craft custom upgrades for Oliver Travel Trailers. As we head into the camping seasons I have refreshed my catalog to reflect my current products and a pricing increase. If you have an order on my production list or I have sent you a price quote, your price will not increase. You can find my catalog - Foybles Catalog V2.3f below. Onward, Foy Sperring 48ocean@gmail.com Foybles' Catalog V2.3f.pdf7 points
-
On the bright side... Maybe the rising fuel prices will thin out the hoards of travelers out there and I can get a reservation somewhere!😳.... I miss spontaneous travel!...Planning is not one of my strong suits... And sticking to an itinerary just seems anti-retirement 😂.... Ok... back to my Positivity training.....Ohmmmmmm🧘♂️3 points
-
3 points
-
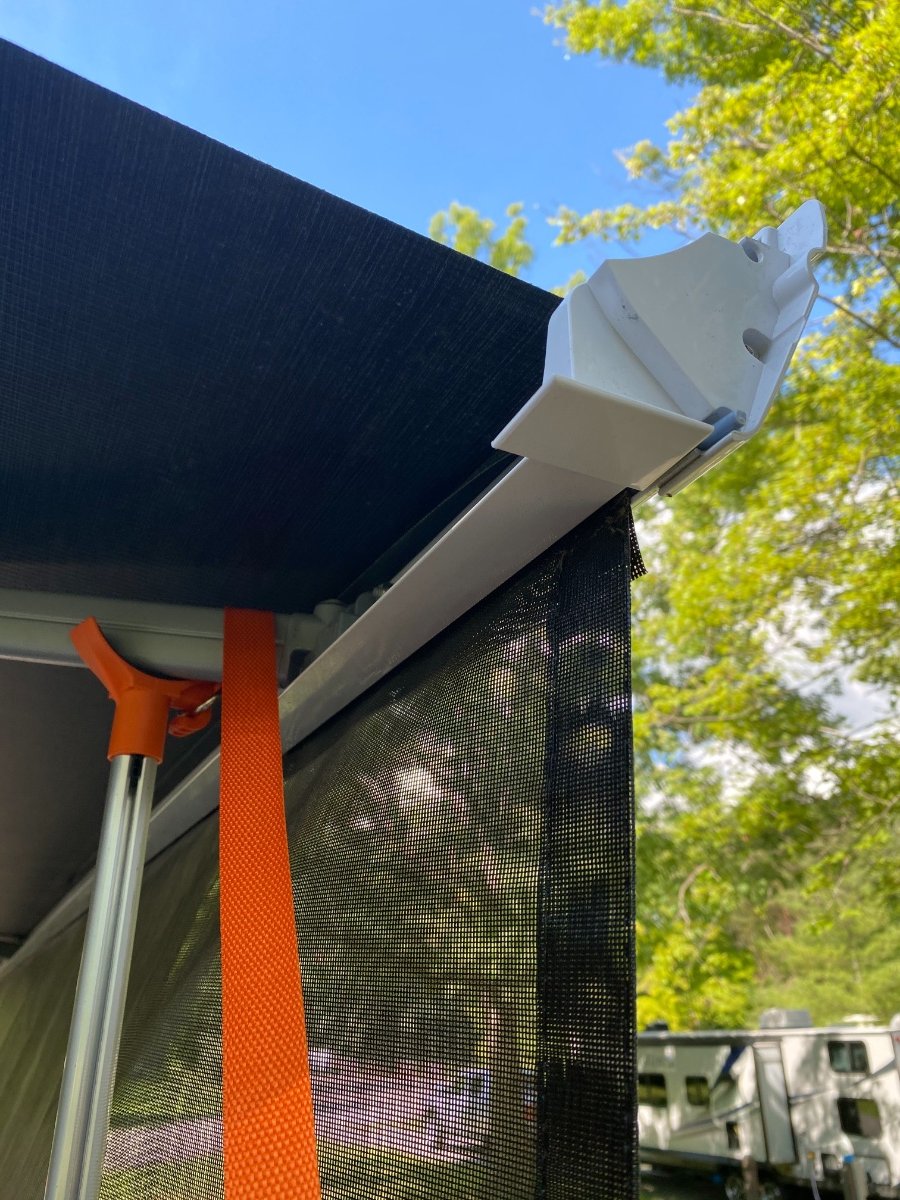
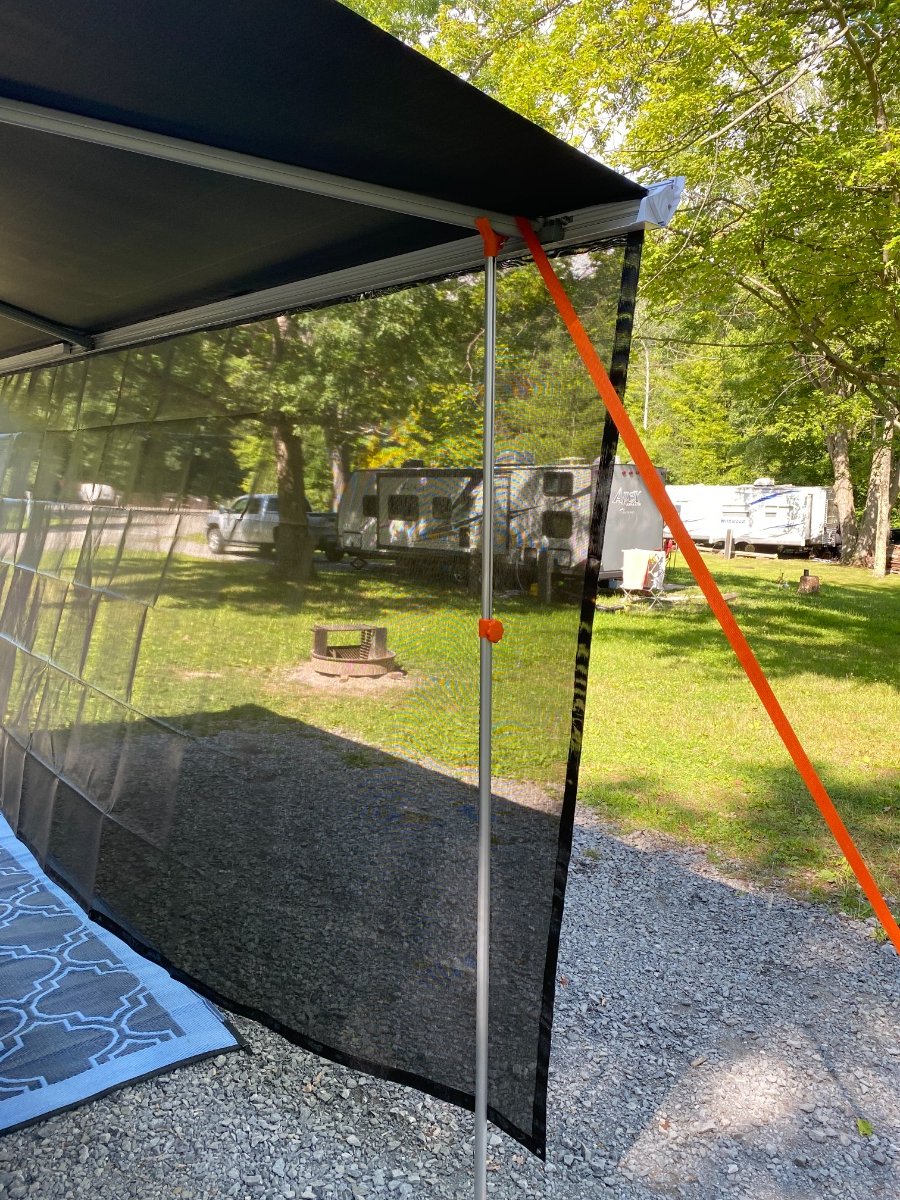
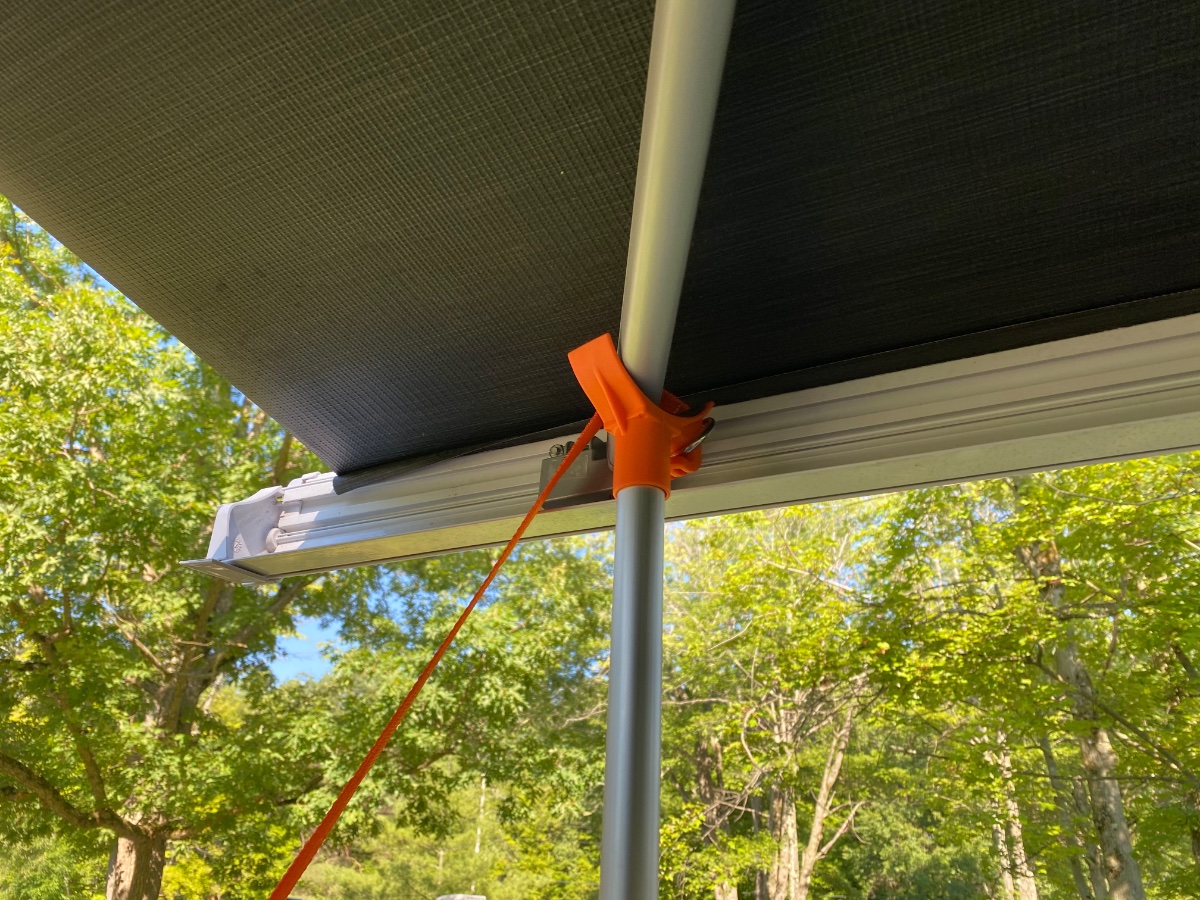
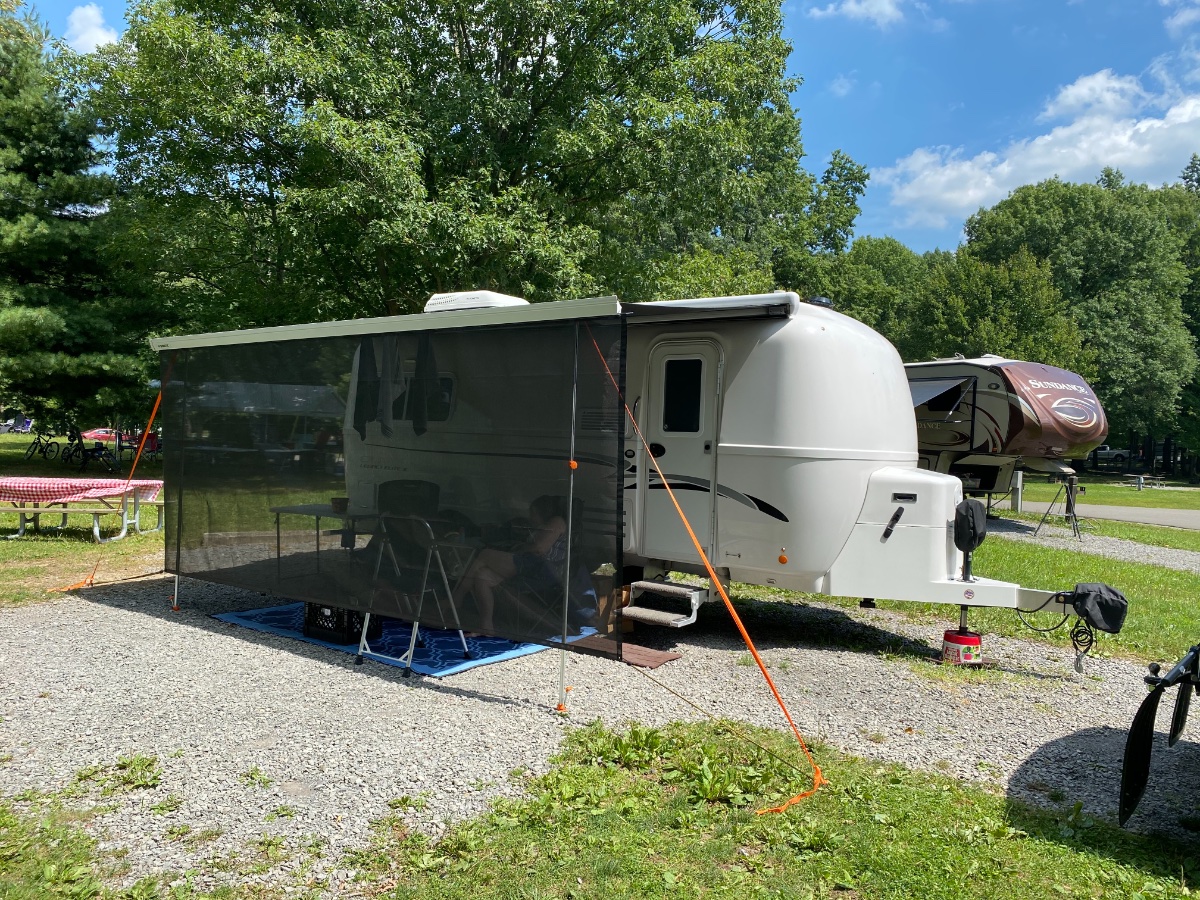
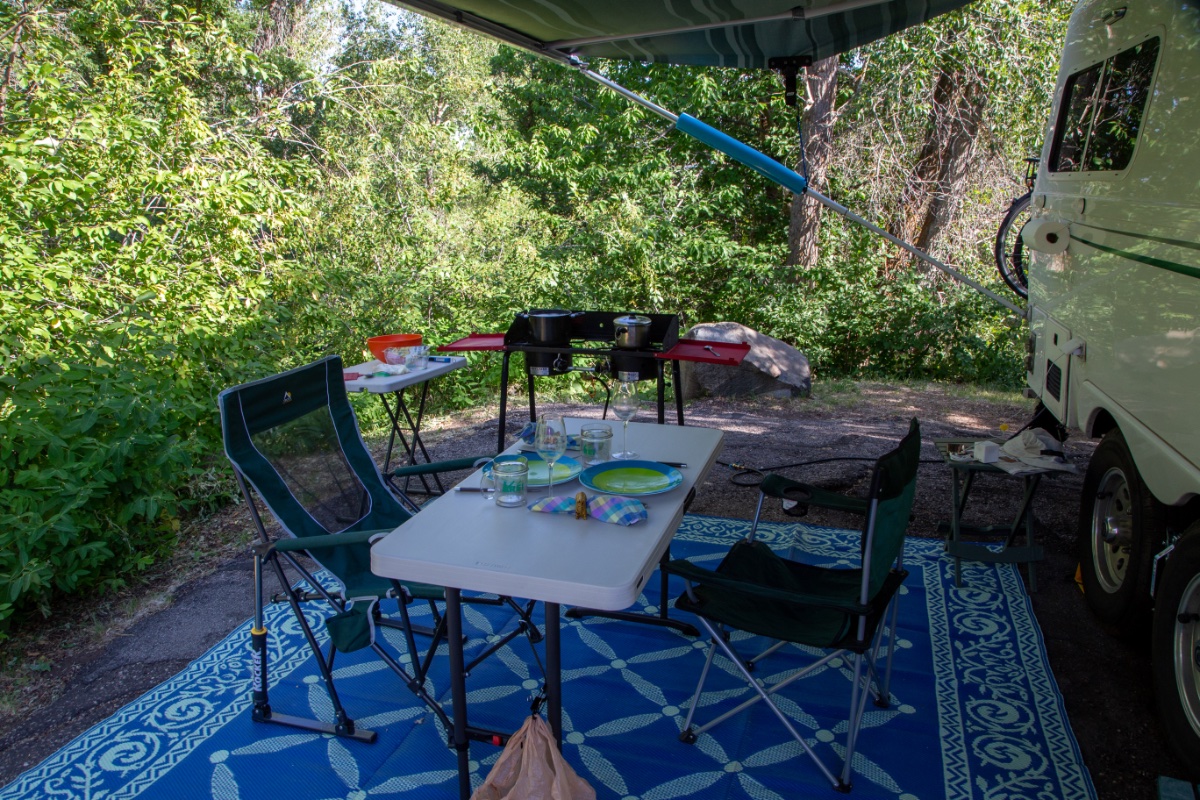
The Carefree poles have a cradle and strap setup to hold the awning arms. They also include a small jaw clamp attachment option to clip to the edge of the awning rail instead but it’s useless. The cradle/strap option works well. Here are some pics of our setup with the poles. We have the Dometic power awning. We shut off the awning power when using the poles and straps so we don’t accidentally try to retract it when it’s anchored down. And then turn the power back on when it’s time to retract. Carefree HD Stabiliz’r Awning Support Pole Kit - R019399-002 https://www.amazon.com/dp/B08528L363/ref=cm_sw_r_cp_api_glt_fabc_7WGPCPPHQ46HZ5NZ6FXZ?_encoding=UTF8&psc=1
 3 points
 -
Thought I would put this up here in case anyone else is having the same issue I had. Soon after leaving the factory, the plastic strip that lines the bottom edge of the tank cover started to come off. It was a very cheap piece of 'L' plastic kind of glued on here and there. Really, it was pretty ugly even when new. So I finally found this very nice 'U' channel on Amazon that fits perfectly. These trims come in a vast variety of sizes and colors. It appears to be a very high quality vinyl compound and has internal fins that grab the cover on both sides, so no gluing is involved. I just set it in the sun to warm up and gently tapped it on with a rubber mallet. Before doing this, I carefully scraped off all the old glue residue with MEK and a plastic razor blade, followed by a light scrub with a 3M WHITE scotch brite pad (love these for tough cleanup jobs on the trailer, no scratching) Then I filed all the edges to make sure there were no sharp edges or bumps in the fiberglass. Then a good wash. Here's the product: https://www.amazon.com/gp/product/B01F9FXQLU/ref=oh_aui_detailpage_o01_s00?ie=UTF8&psc=1 This looks so much better to me, and the fit is great, better than with the stock plastic trim. It's supposed to be marine grade, so hopefully it will last. My Elite took 5 feet to do. Those with the Elite 2 will need to measure, but the stuff is available in different lengths. It's all in the details! Dave
2 points
-
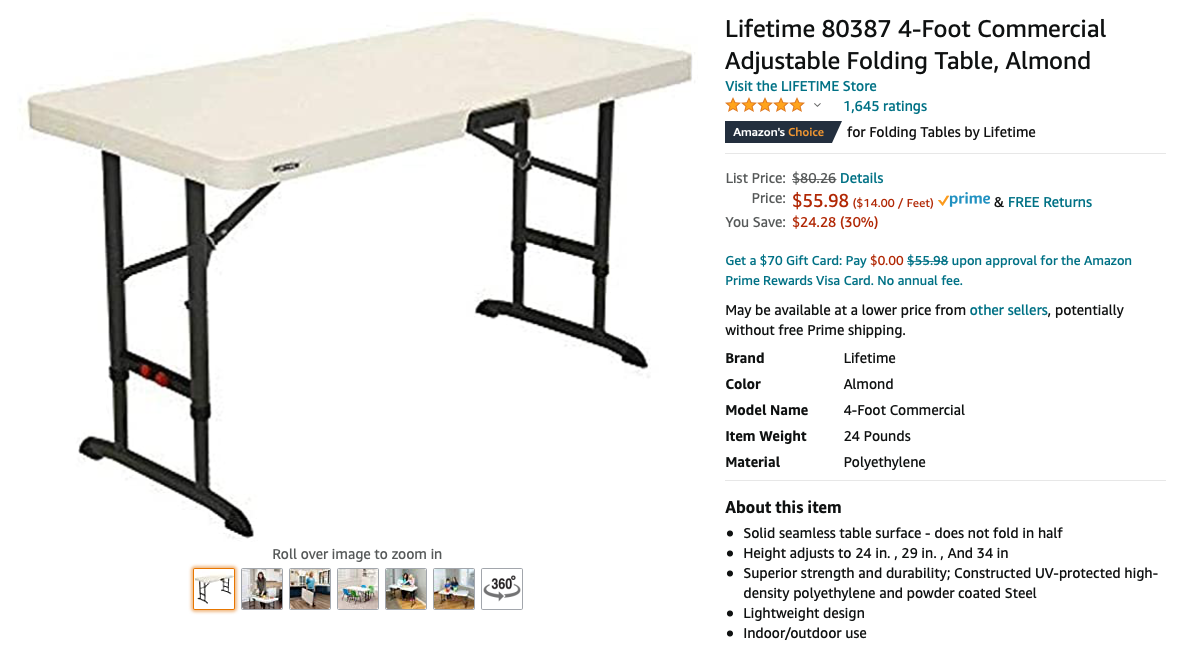
We like to cook outside, and we wanted a small table as prep space for cooking. We bought this Lifetime table at Costco for about $25. Amazon has it for $47, and Lifetime has it for $50. The table is 30 in. x 20 in., and weighs 10 lbs. It is adjustable in height, at 21 in., 24 in., 26 in., or 28 in. It also fits between the twin beds in our unit. We found this out when camping with family and a major rainstorm hit during dinner time. We sat two at the dinette and two on the beds, using this table for eating. We had an ALPS Mountaineering Dining Table left from our tent camping days. It is probably identical to the one Russell posted a link for up above. We used the ALPS table as a dining table on a couple of trips were we were boondocking at a location lacking a provided picnic table. We found it a little bit rickety for our tastes. We decided to buy another Lifetime table, this one 48 in. x 24 in, weighing 24 lbs. This table has three adjustable height settings (24 in., 29 in., and 36 in.). We bought it at Costco for $40. Amazon has it for $56, and Lifetime has it for $85. While the Costco website lists other Lifetime tables, these two tables are not on the website. But they are available at our local Costco. In addition to boondocking, this 48 in. x 24 in table has been really nice when our campsite picnic table is in the hot sun, and we put this dining table under our awning. The two tables fold flat and store easily in the tow vehicle. I think the Lifetime primarily sells its larger tables to institutions; their website prices the 48 in. x 24 in. table at $85, but if you by 20 or more it is only $52. I note that because these tables are incredibly sturdy and well built, suitable for regular use by institutions; think tables in a hotel ballroom. Oliver says they called the trailer the Legacy because it is well built and you can pass it on to your children. These tables are made the same way.
2 points
-
But I still think about just how many IPA's or bottles of Kim that is just being burned.🤑2 points
-
That does bring a certain visual!2 points
-
I vote Overland’s wife to be party coordinator at all Oliver Rallies... “ Zeppelin Bunny mosh pits”.... Man!... that a whole-nother level Egg Rally... sign me up!2 points
-
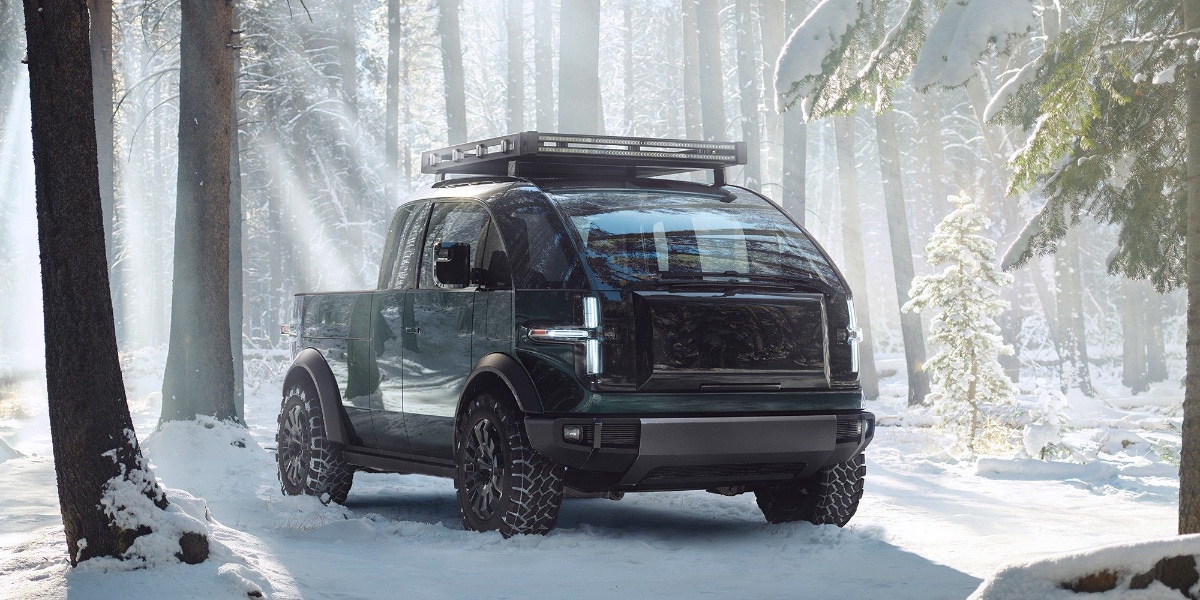
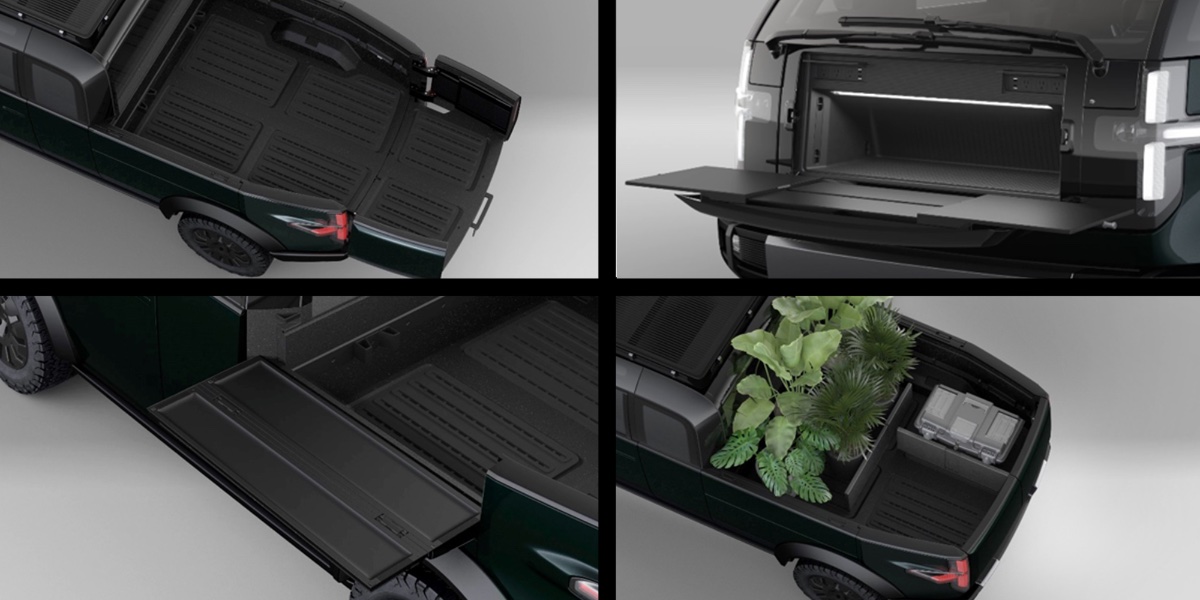
Alright, here's another new one, this one a forward control layout - nice! I think this is great looking, with some cool features. The tilt-down bed side is an awesome idea and the topper looks amazing. https://www.caranddriver.com/news/a35812872/canoo-electric-pickup-truck-revealed/ https://electrek.co/2021/03/10/canoo-unveils-fully-electric-pickup-truck-set-for-2023/
2 points
-
Fuel cost doesn’t really factor into our travel plans. It’s tiny compared to the other expenses of this Oliver addiction. 🙂 The amortized per mile cost of the Ollie itself, the new truck, all the camping gear, meals, campground costs, buying bottles of wine at Harvest Host overnight stops, etc. are by far the bigger expenses. $3 per gallon gas would cost me about $270 for a 1,000 mile trip (I get about 11 mpg, so about 90 gallons for a 1,000 mile trip). At $4 a gallon it would be about $360 in gas for the same 1,000 mile trip. That extra $90 over a 4 day trip isn’t going to make that much of a difference compared to everything else.2 points
-
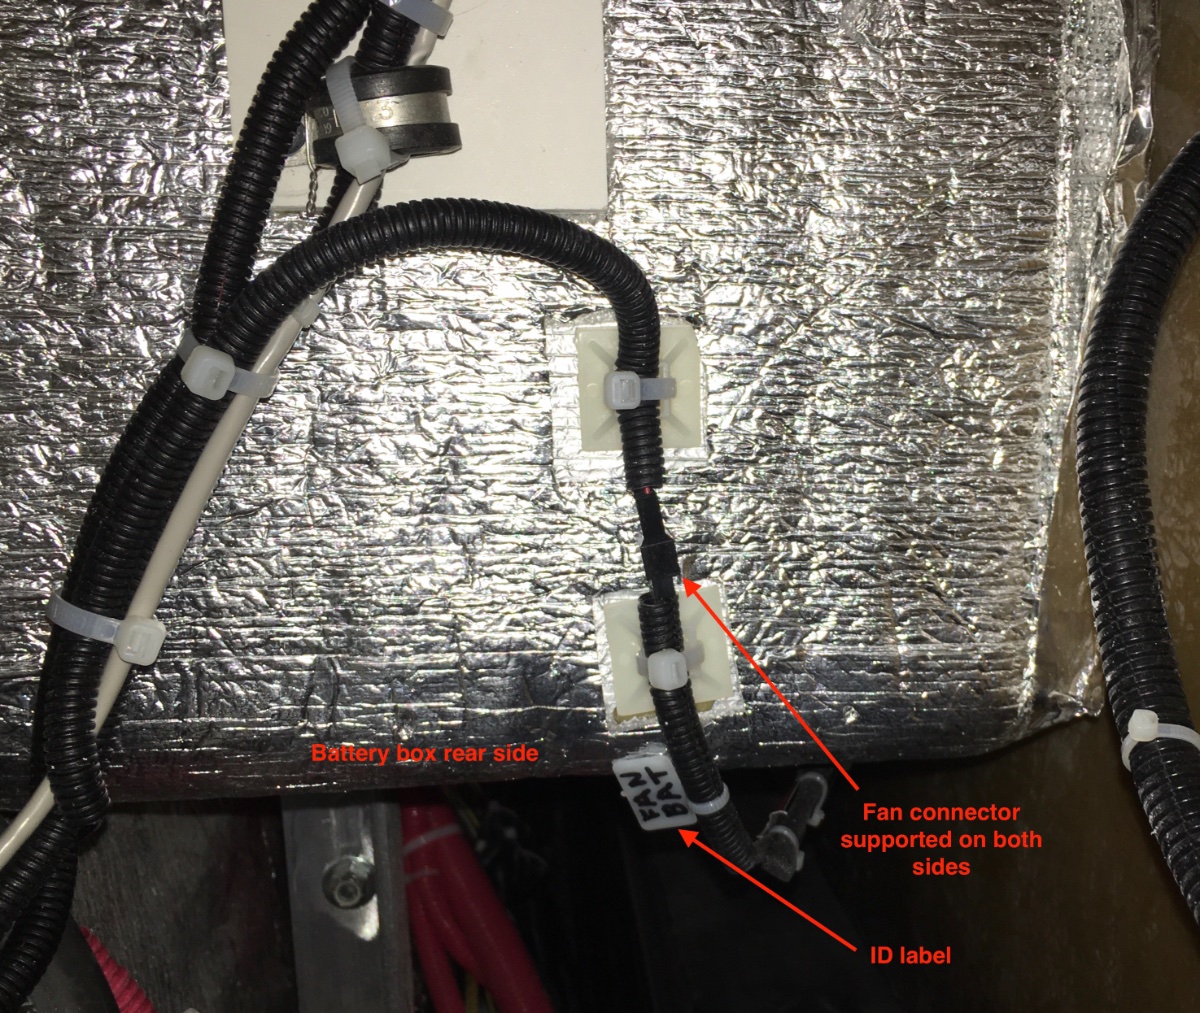
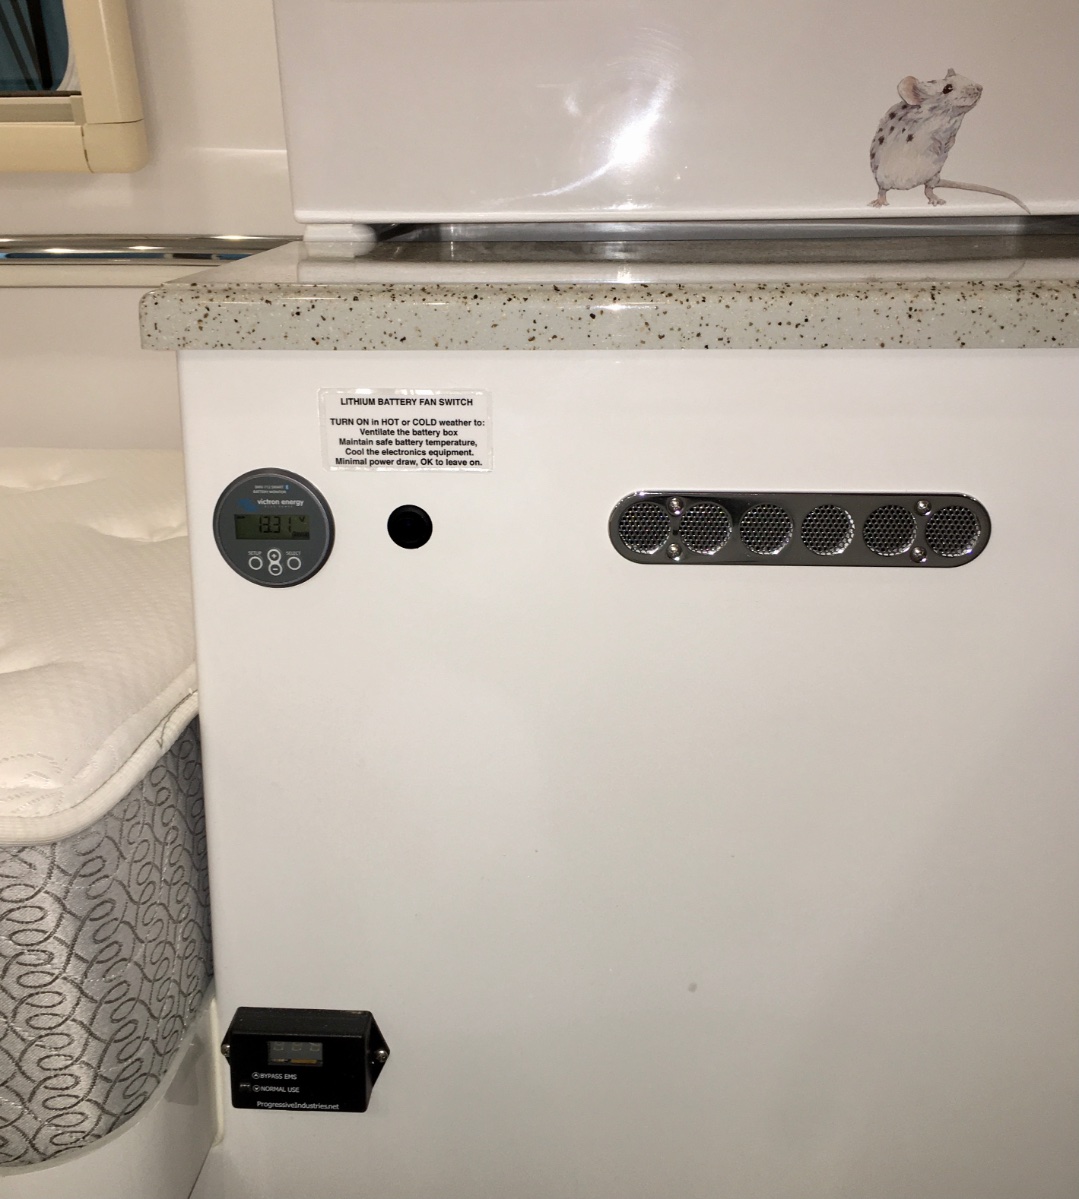
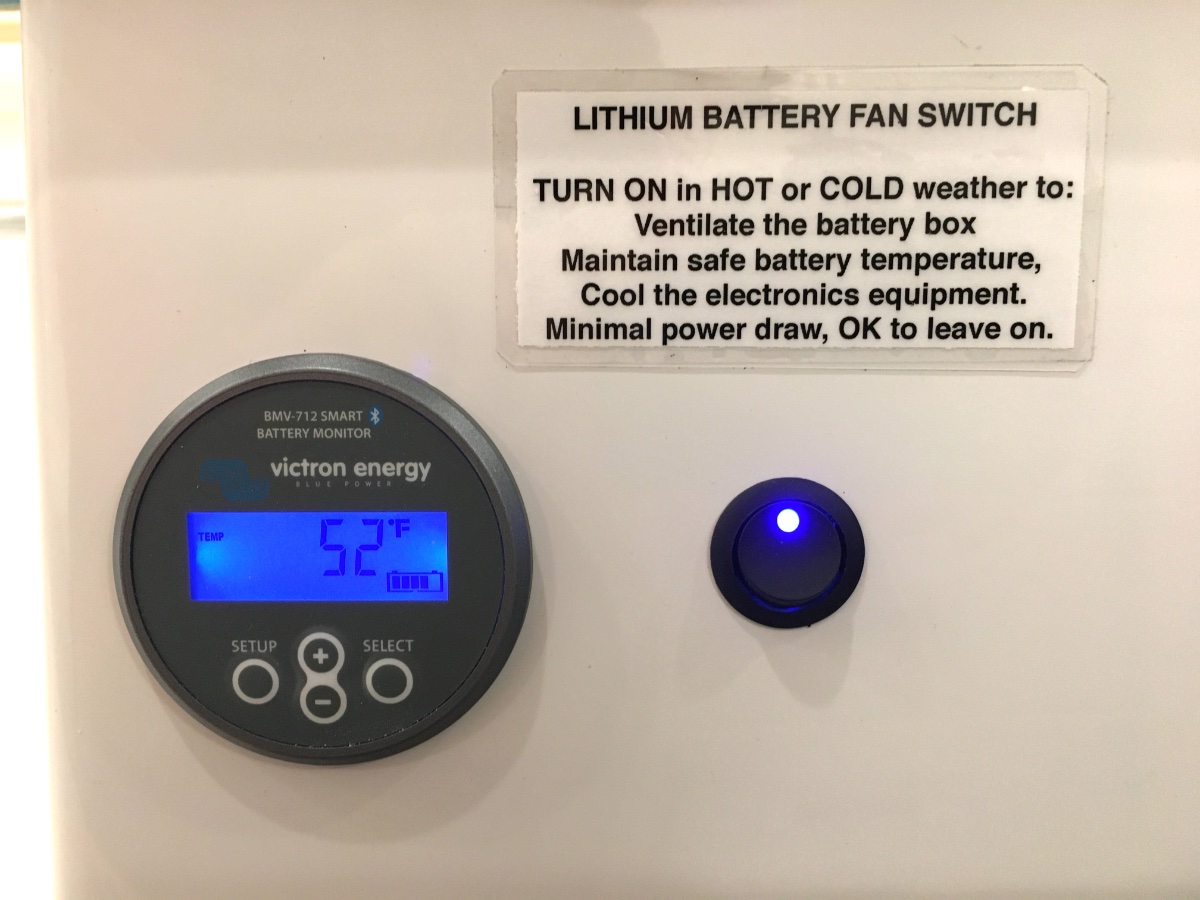
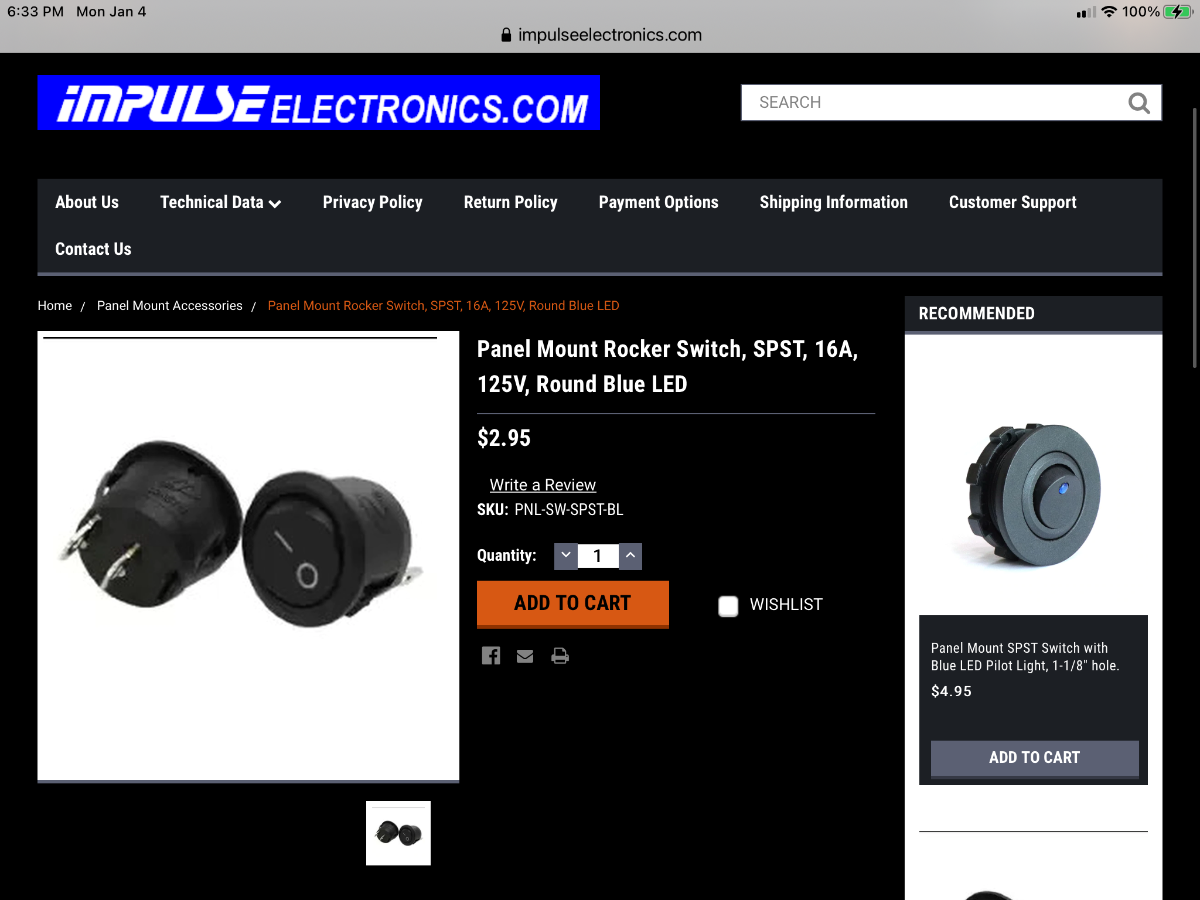
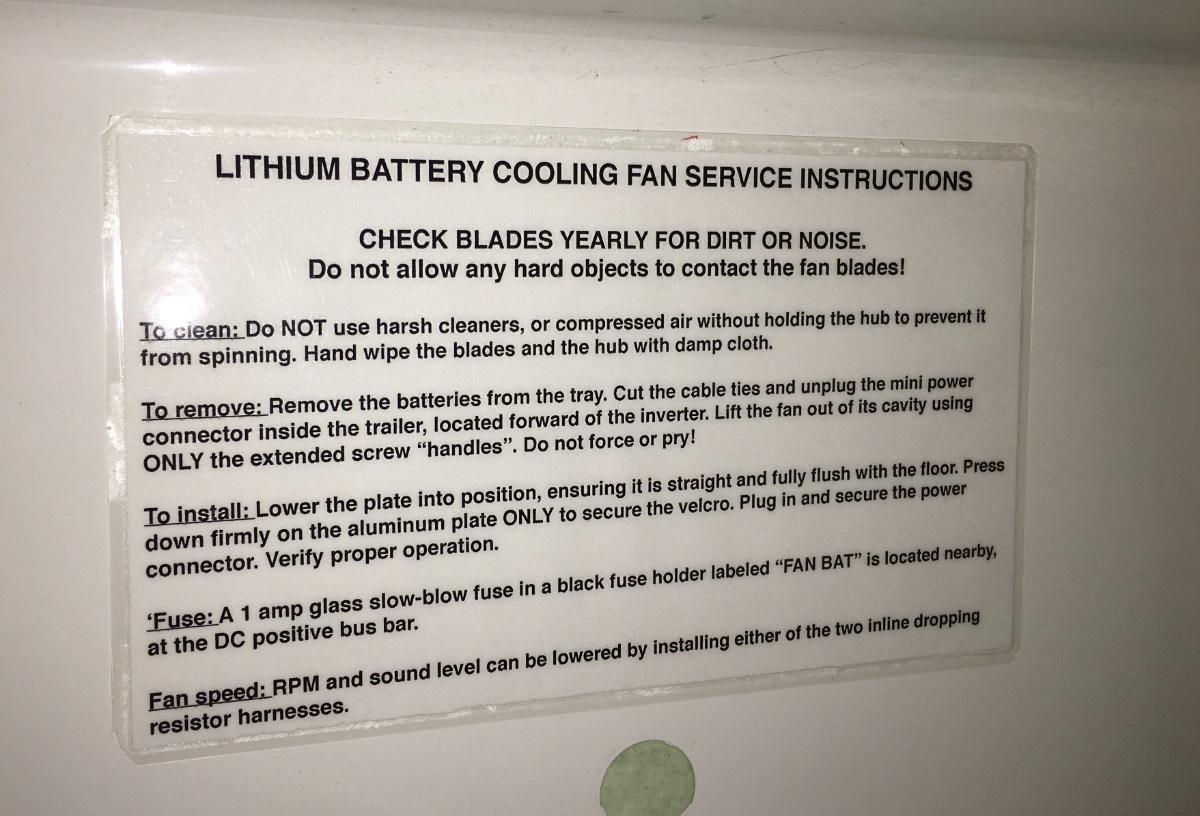
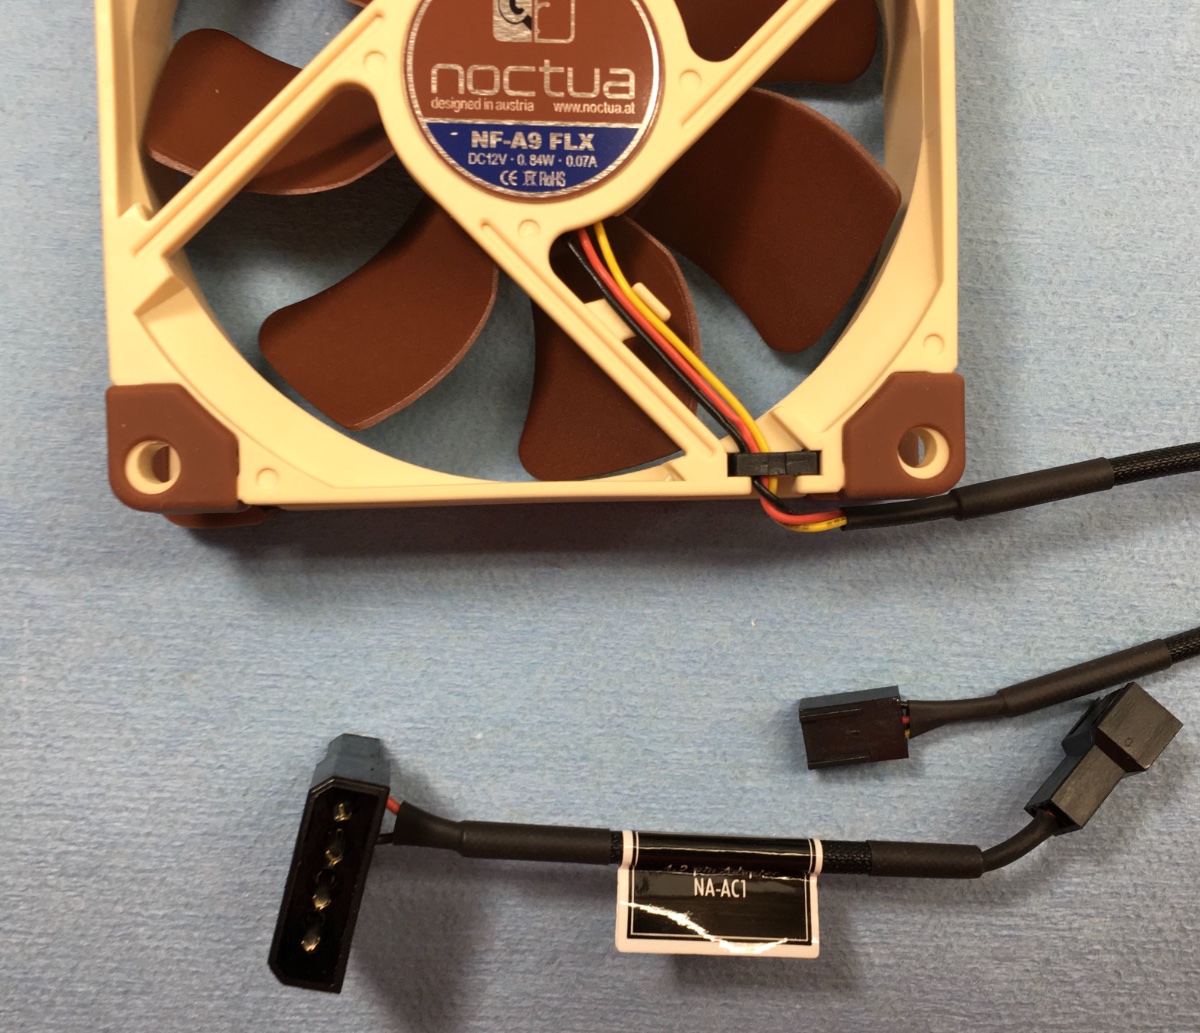
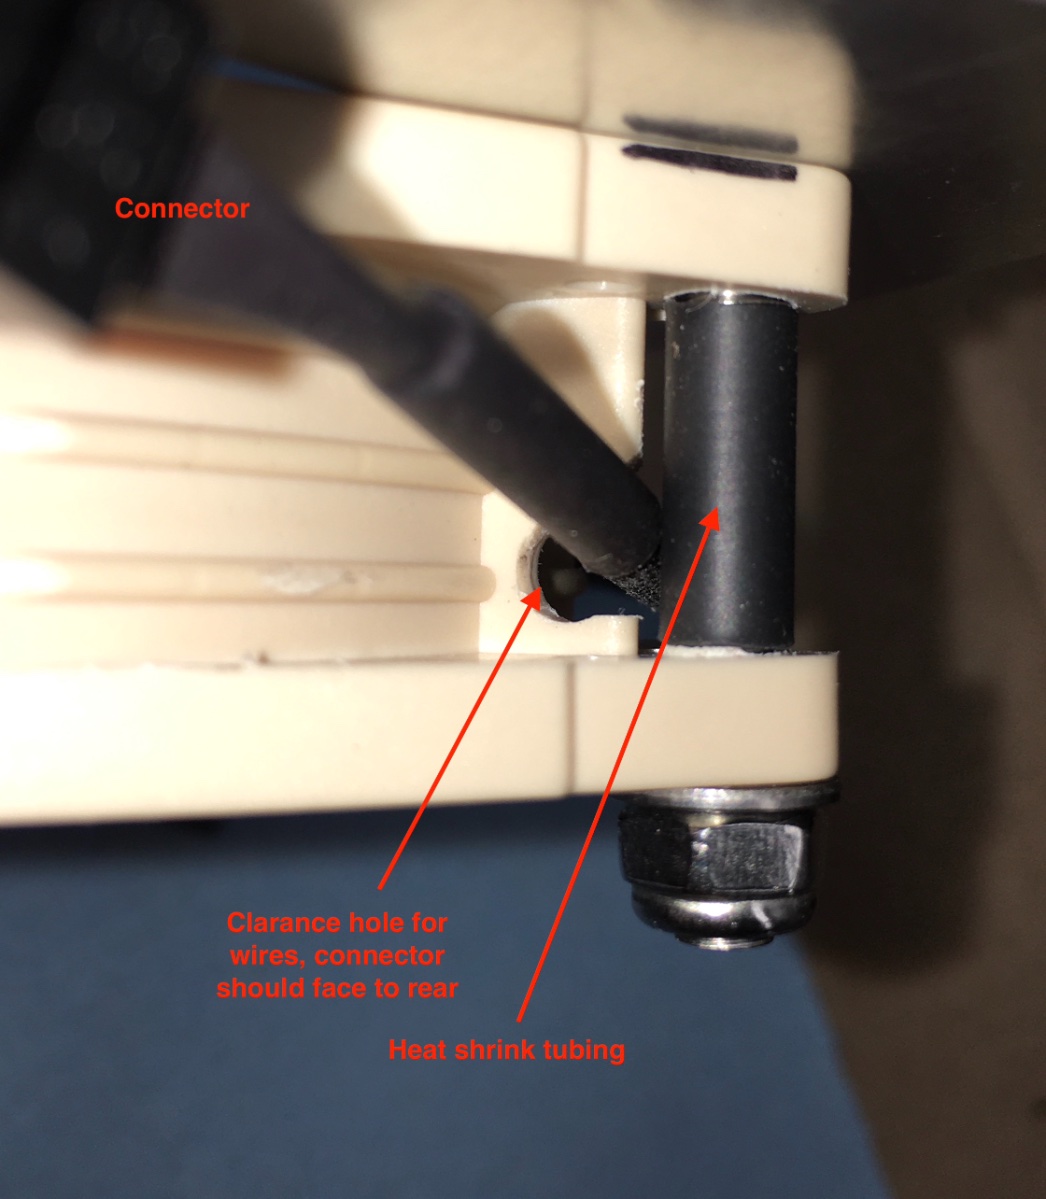
Battery fan wiring and switch. I used the supplied adapter cable and simply cut its 3 pin connector off and butt spliced the wires to a new 18 AWG red/ black wire pair. I secured the connector at the bottom of the battery compartment wall, forward of the inverter: Power comes via a 1 amp inline fuse connected to the rear DC bus. I mounted a switch next to my Victron BMV-712 Smart battery monitor display, below the pantry counter top. An additional ground wire is needed if the switch has an LED (this one is blue, to match the Victron backlighting): Finally, an instruction placard for a future owner or an RV service tech. This is laminated and taped on the rear wall of the battery compartment, and a copy is in the Owners Manual: John Davies Spokane WA
2 points
-
Hull 688 has this issue. The trim keeps coming loose during every trip. I've tried some duct tape because I didn't want to glue the strip on. That hasn't worked. I got super lucky when search actually found this thread! I do believe this is the first time a forum search has provided a result I was looking for. 😉 The link is still good after nearly 4 years!2 points
-
I second the recommendation to TRNP, There is a North Unit & a South Unit of the Theodore Roosevelt NP, in ND. The North & South Units have primitive sites, which I believe are all pull thru. i know the North Unit has a dump station. There are some great hiking trails, with spectacular geological formations and lots of wildlife. The south unit is more developed; it has the town of Medora in it. If you are interested in a “Western Theme” you will enjoy it. And If you are into it, the Medora Musical is a great show. There is a "Pitch Fork" Fondue, not to be missed. You can Camp at the South Unit, Hike, View the Wildlife, and if you want excitement, go into Medora. The North & South Units are accessed by completely different roads. the only way to get from one to another is over the Maah Daah Hey (Mountain Bike) Trail. if you want to do this, read up on it. it is rated difficult. but you do not have to try it all at one time. Do not take selfies with the BUFFALO, they are NOT POSERS...2 points
-
Classic Bluegrass. Tony Rice was a legendary bluegrass guitar player. He just passed away a few months ago.2 points
-
So far the awnings have never failed inside the showroom - floor shine and all! The sensors for retraction would be a few nanoseconds to late in most sudden gusts. As the awning curls up and over the solar panels - the retractor motor strains to understand why it is struggling ''''''' I'll put mine up. RB2 points
-
I wrestled with this after replacing my AGM’s with Lithium’s. I also store under cover, so solar isn’t a factor. I also didn’t want to leave the charger on long term. I turned everything off I could and unplugged what I could and still had about 1 AH draw. So, I was leaving the charger off and every few days I’d stop by and turn it on for a while to put some charge into the batteries. That got old pretty fast. Now, I just turn the batteries off. I think we should be out camping! Mike2 points
-
One of my favorite. But I have many & varied genre I listen to.2 points
-
Seems to be more of a factor - these rising fuel prices - on my summer trip planning. Previously I didn't give it much thought - but if the rise continues, my fuel cost could double over last year. For diesel the lowest last trip was $1.65, currently around here it is $2.75. Perhaps I'll use a fuel price app, plan on less miles, more quality time in location, or just spend the kids inheritance. Do fuel costs account for anything in your planning? I do remember $5 diesel a decade back, and $3 something on the west coast last year - it adds up- for sure. It will probably just require a mindset change - and become - just another thing.... Progress RB1 point
-
We're entering 14th season with stock cushions plus topper. It's given great nights of sleeping. 3rd topper going in this year, so up til now, our expense was under $200. Now, $2601 point
-
Yup... me too.. crazy amount of dust down below... no need of it. If I’d taken the trailer home after picking it up I’d have been able to do a real clean up... blast out with compressed air, fans, vac.. whatever it would take.. but we will have been on the road almost 5 months before that happens. What I wonder about is impact on the inverter and or furnace that are likely sucking the stuff into themselves1 point
-
GJ- The Rock Tamers have a couple of "bolts" that are supposed to be used to both "lock" the Tamers in place and to help "level" everything. In my case, I had to install a couple of small shims in order to get it looking level with the rear bumper. There is absolutely no problem with the backup camera and the "zoom" feature still works great when hitching. However, the bars at the top of the Rock Tamers do interfere with the sensors in the bumper. This causes them to "sense" that I'm too close to something and they sound an "alert" whenever I put the truck into reverse. I could adjust these so that they would sit below the level of these sensors but I don't like the looks of them that way. So, I simply put up with the warning.1 point
-
I use gas buddy, and Google, to look ahead at fuel prices. We often buy gas at Costco, if it's not too far off the route, where we save a lot. Unfortunately, no diesel at most Costco, but some samsclub and many walmart/Murphy stations have decent prices, and diesel. Costco has Top Tier gas, though, and Sam's doesn't. The big savings on long trips are looking down the road, as county discretionary taxes can make a 10 or 15 cent difference in a few miles, sometimes. It adds up in a hurry. We've not let it curtail our adventures, though.1 point
-
I bought an extra mounting plate for my Lagun table when I ordered it. Hoping to do something like this with either a hitch mount and the lagun or might try and figure out a way to affix a mounting plate to the side of the front storage box.1 point
-
Miss him.1 point
-
Perfect. Overdrive and all. Edit add Keb Mo - he's my more modern - blues. I'd guess you have listened to Gretta Van Fleet - so what if they sound like Zep.1 point
-
And I will end with one of my favorite old blues:1 point
-
Compared fuel burn towing Ollie with a Tundra with and without rear differential airbags over the same route, duplicating speeds. Something to occupy time while towing. Ollie in a level attitude compared to slightly nose down, found 1/2MPG better with Ollie's nose slightly down. Still tow Ollie in a level attitude because the black/grey tanks drain better at dump stations. Our average miles towed per day is around 250 miles. This gives plenty of time to wake up late, tow at a slower speed (better MPG), time to visit places of interest along the route, and plenty of time to set up before dark. We have towed up to 720 miles in a day when a Hurricane was moving up the east coast in an effort to get home ASAP, fuel economy was not very good that day. 🙂1 point
-
In the Immortal words of Ross Parro.... "Whats that sucking sound you hear".... Oh its my Oliver😂1 point
-
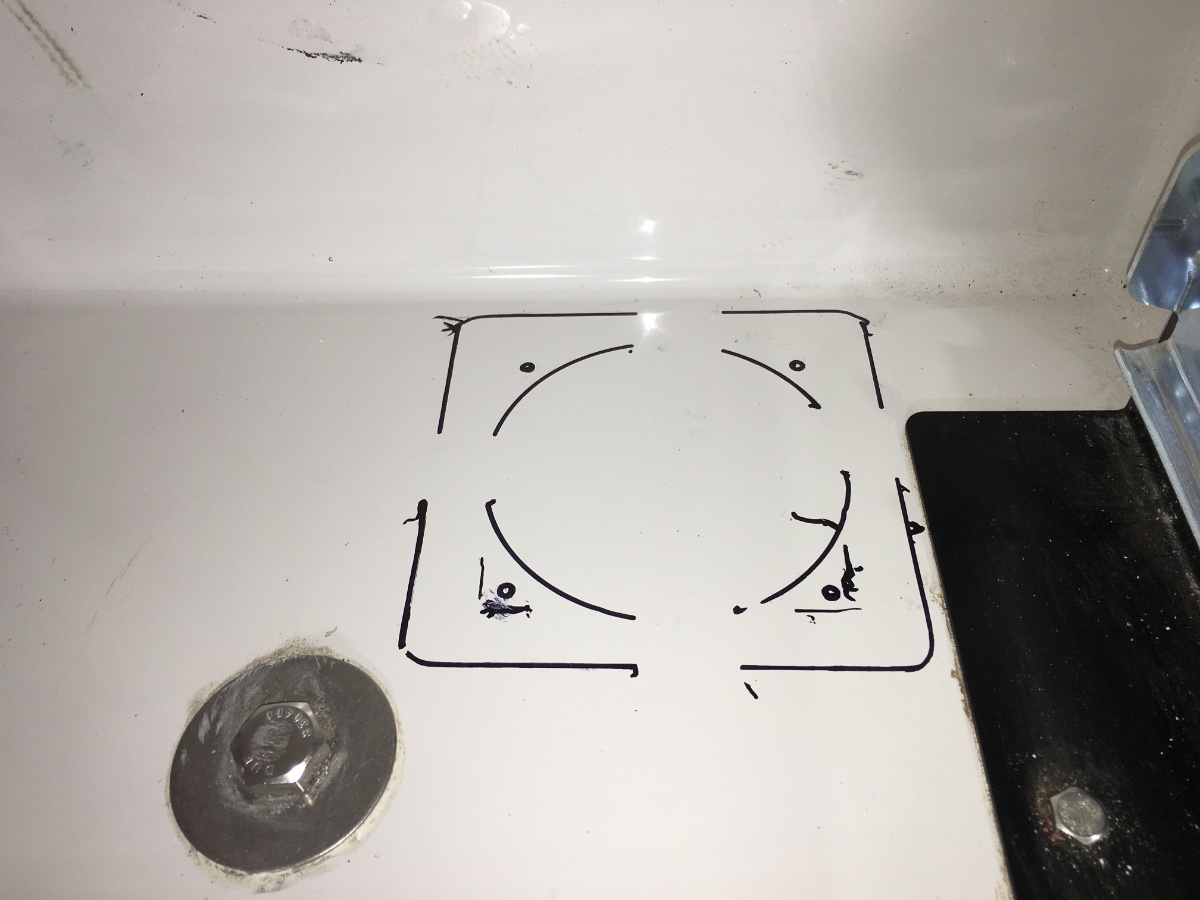
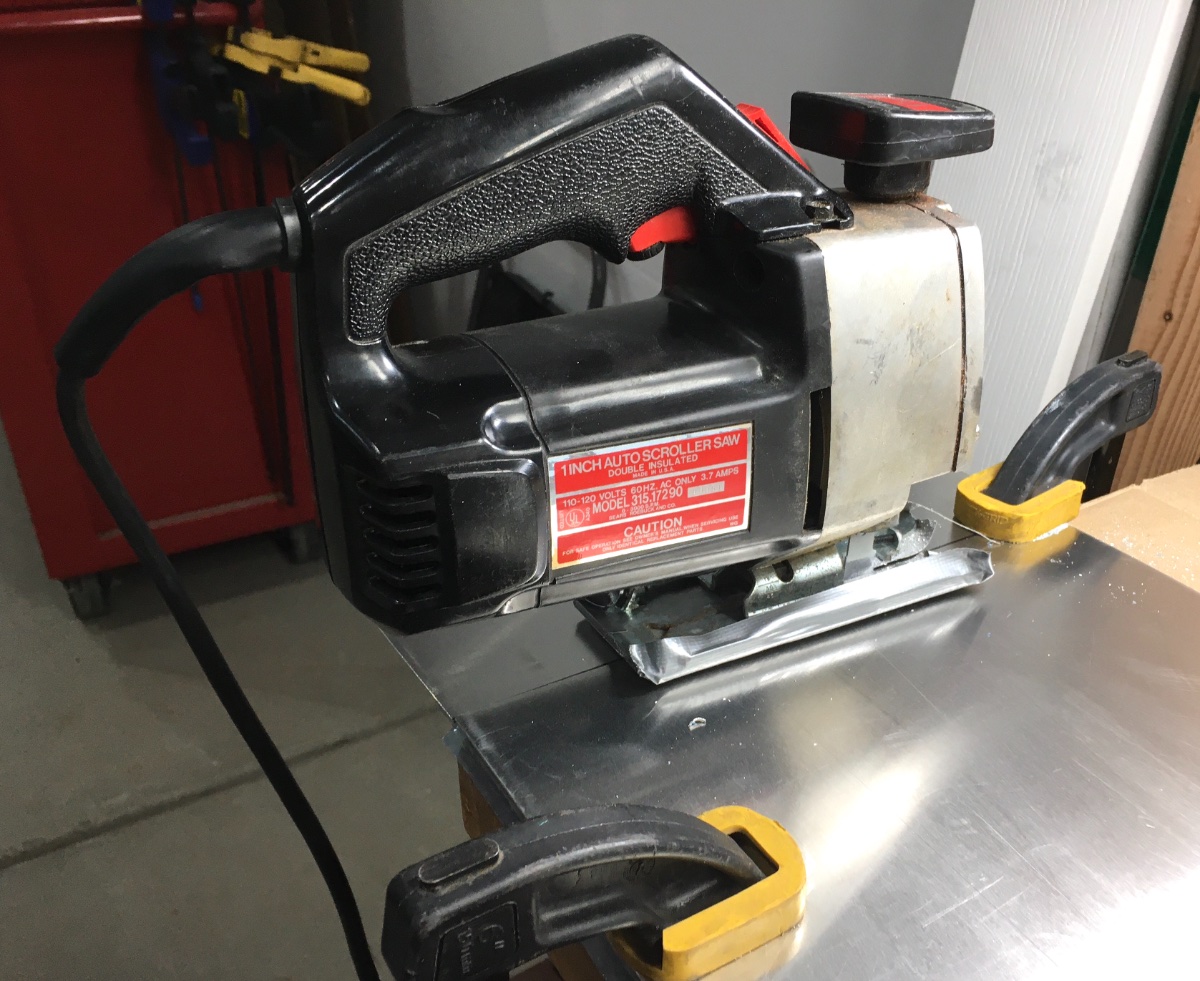
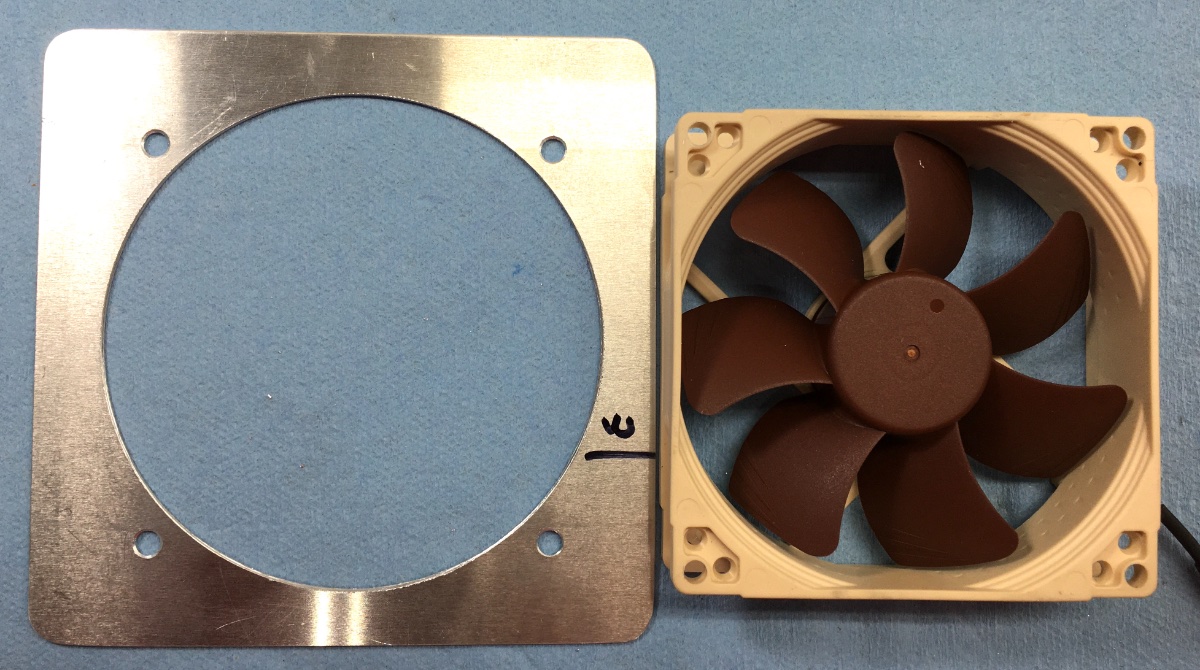
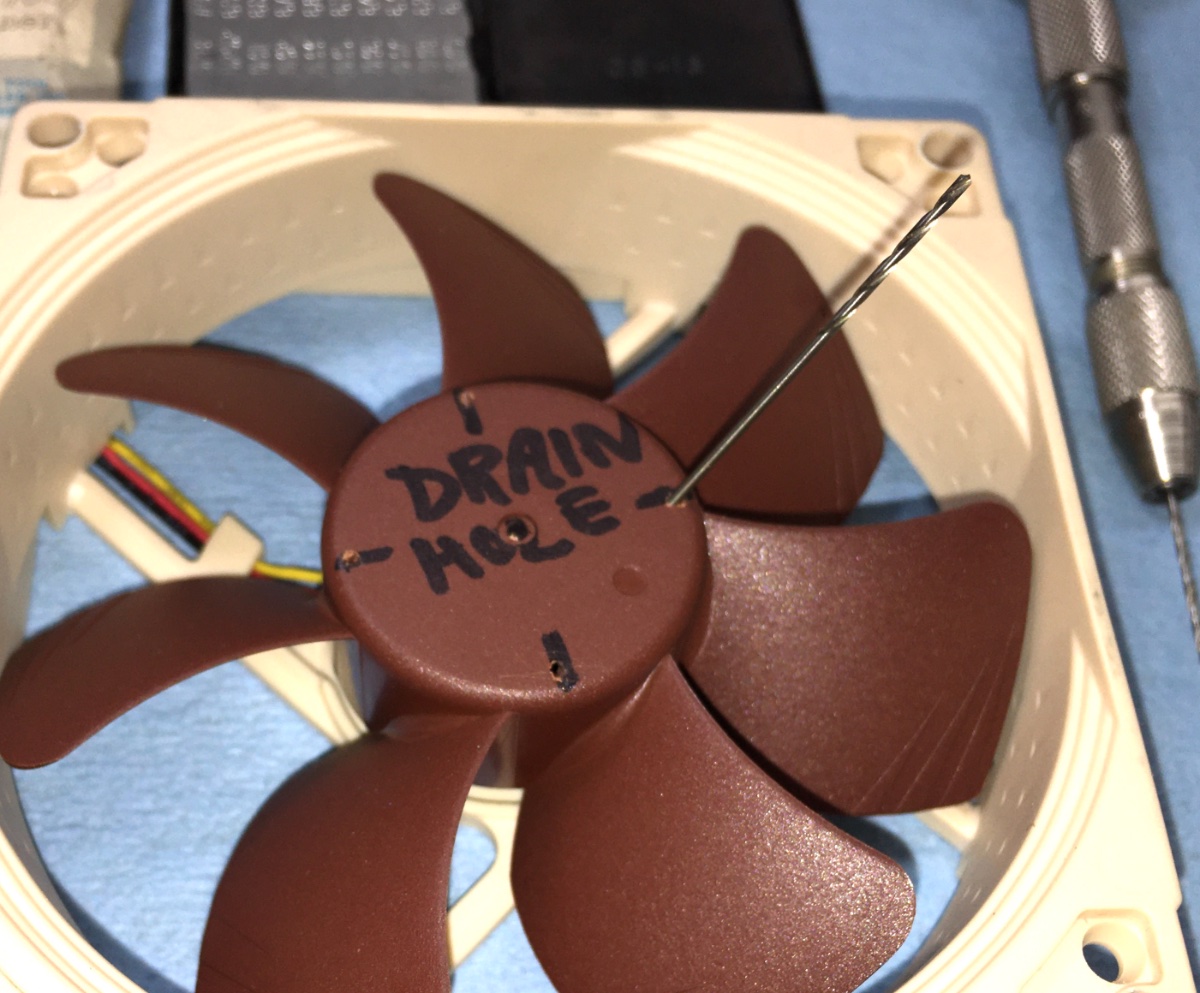
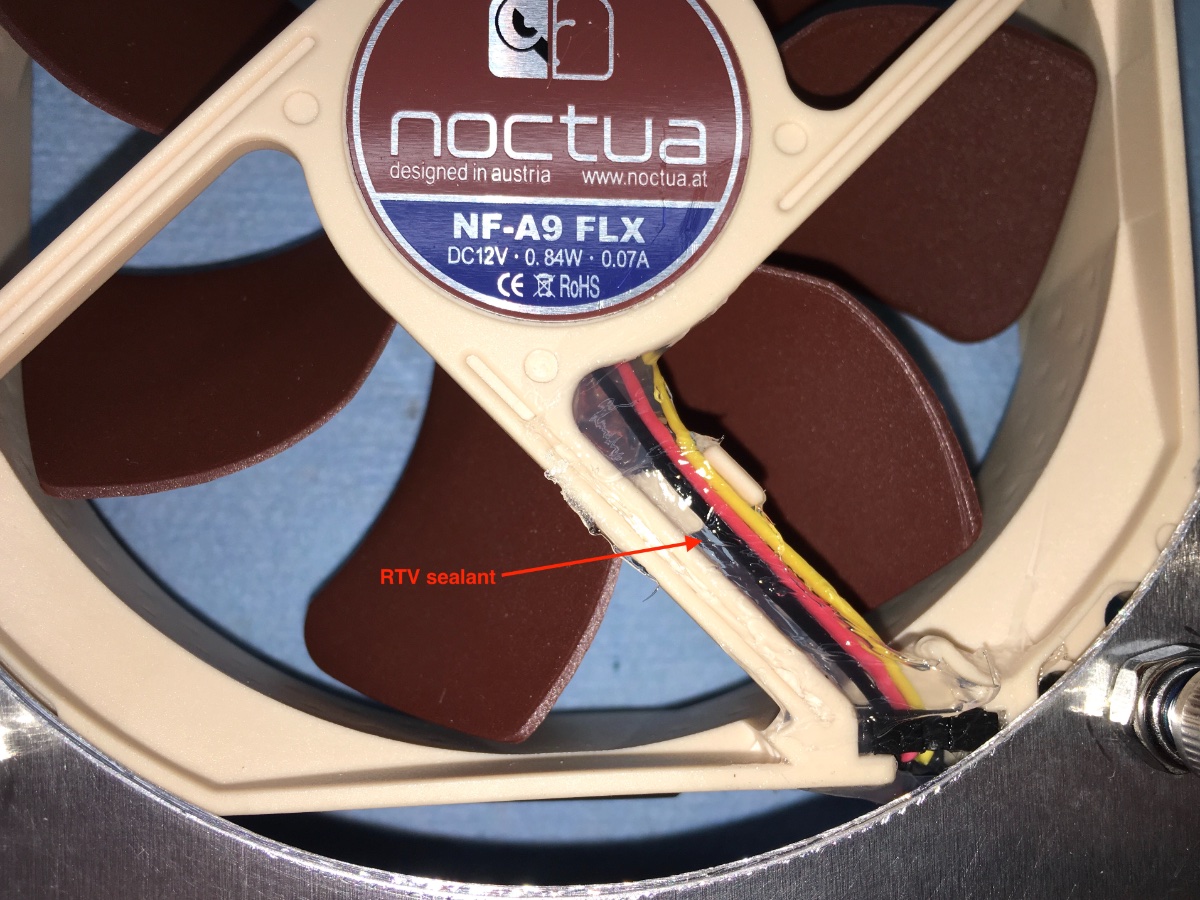
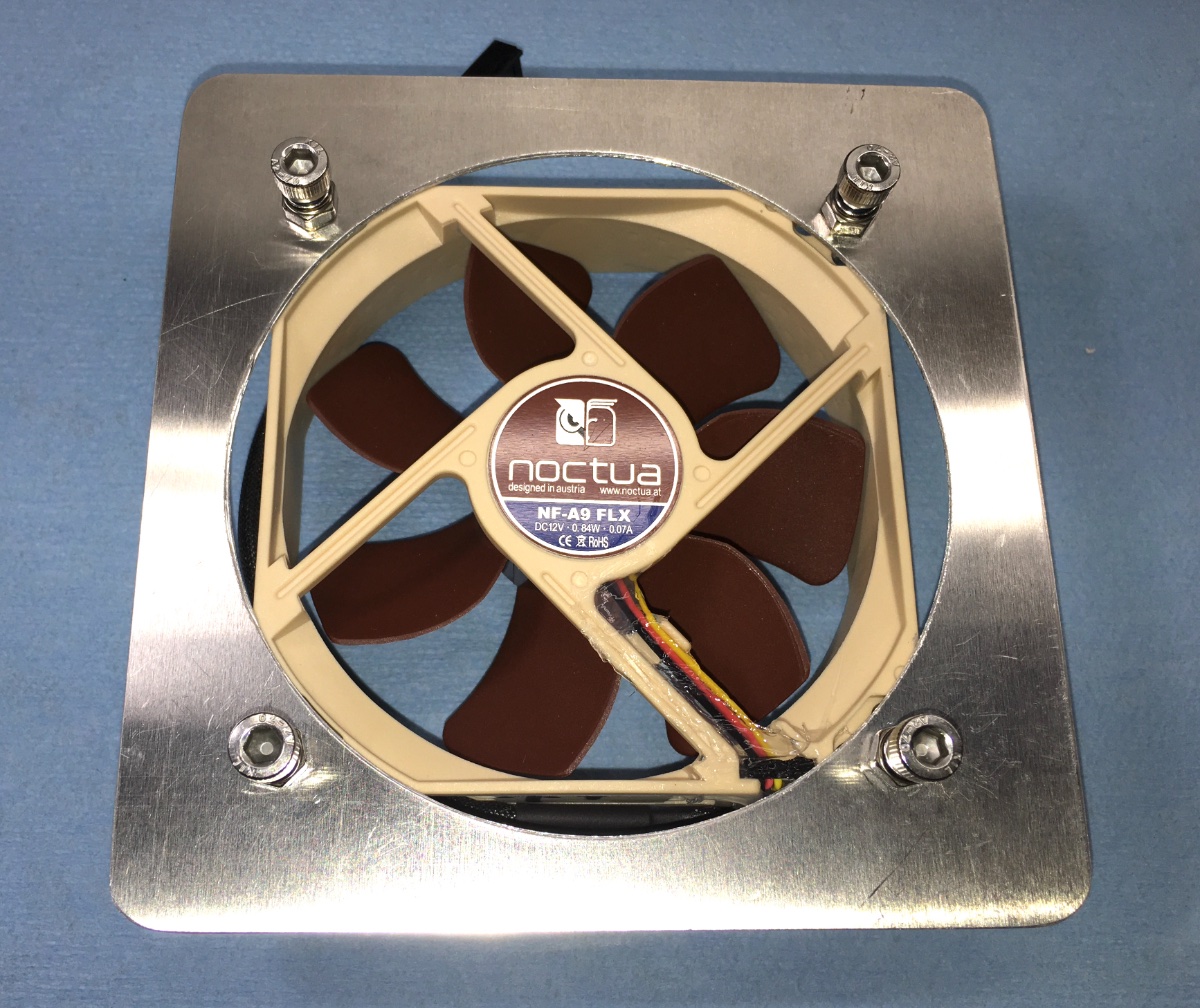
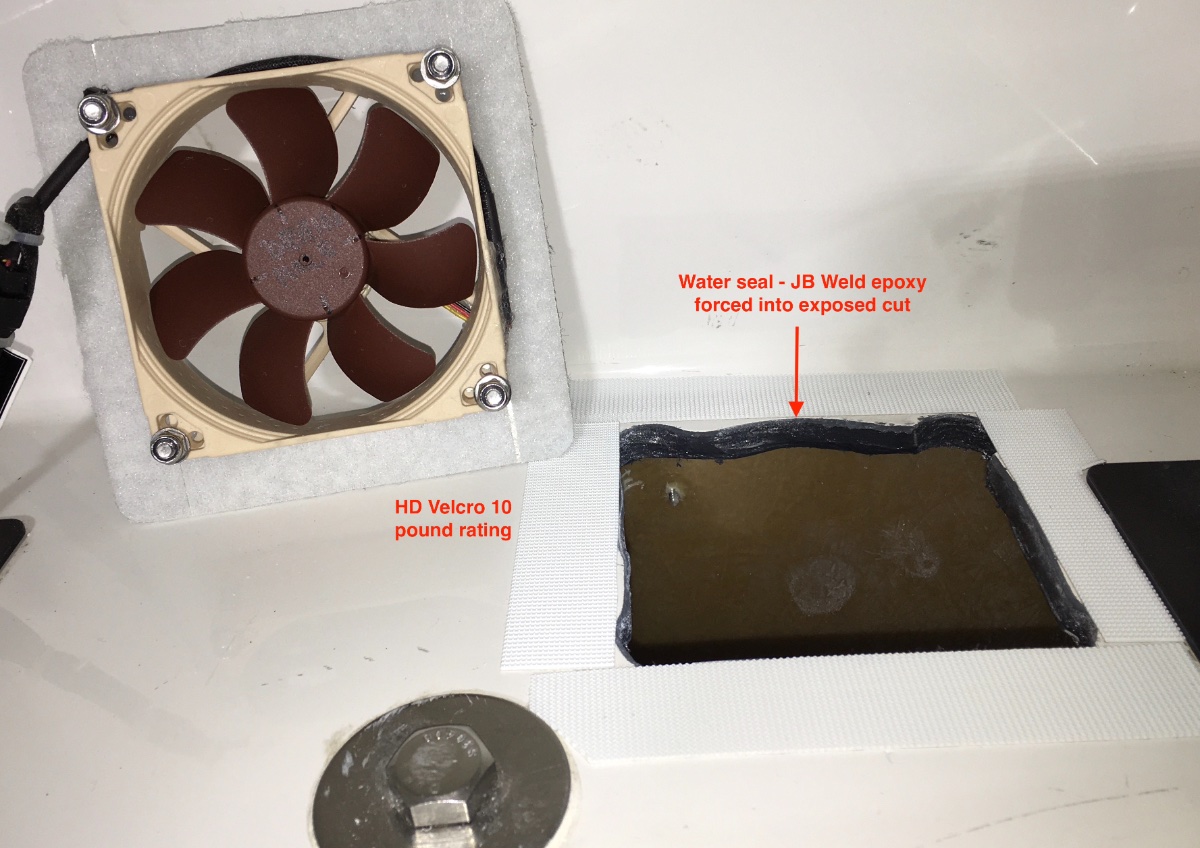
Battery box cooling fan. This one is high quality and well regarded. It has sealed ball bearings and uses just 70 milliamps (0.07 amps), so it can run as long as needed. Flow rate is 38 cfm on high, they supply two dropping resistor harnesses if you want to slow it down to reduce the sound level. It is pretty quiet, though a light sleeper on that side of the trailer might want to turn it off at night. But it is “white noise” which sometimes you do want..... Noctua Fan I really wanted the fan to go in the bottom at the rear wall, so it was centered between the two electronics compartments. The problem is that the floor of the box is not fiberglass honeycomb as I thought, rather it has a hard (6061?) 1/8" aluminum diamond plate bonded in the center! So cutting a large opening was a challenge. If you have access to a scroll saw (pivoting head) it is easy enough. Otherwise, choose to locate the fan at the bottom edge of the rear wall instead! That is thin (1/'8") fiberglass. Screws are 5mm, and are double nutted so that the heads will stick up enough to use as "grab handles", for servicing: John Davies Spokane WA
1 point
-
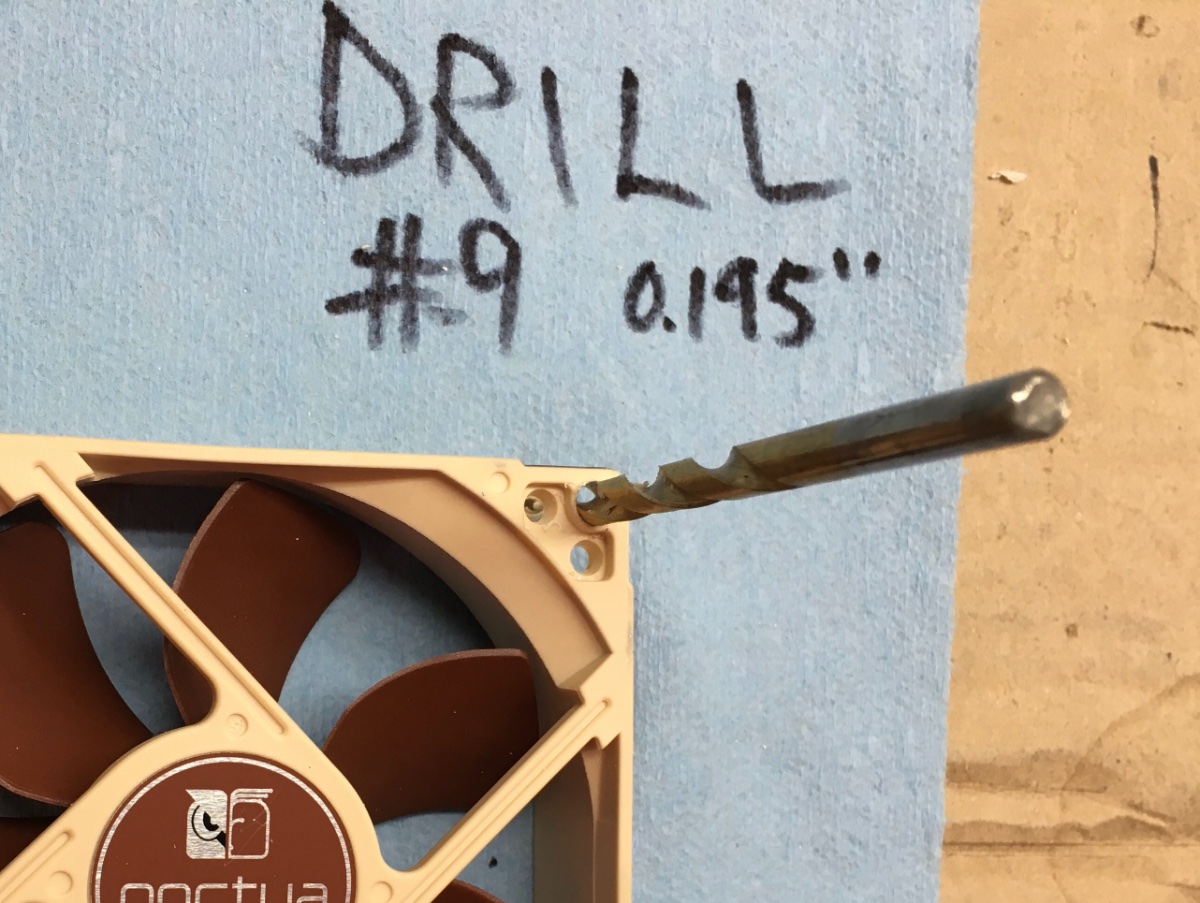
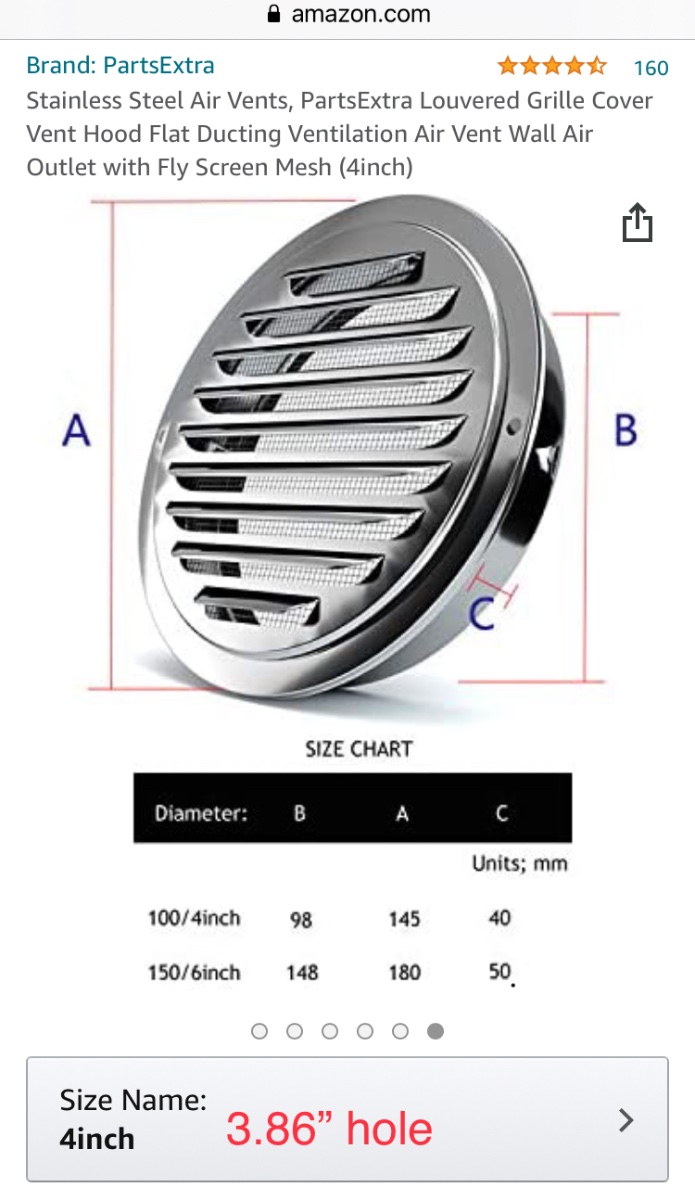
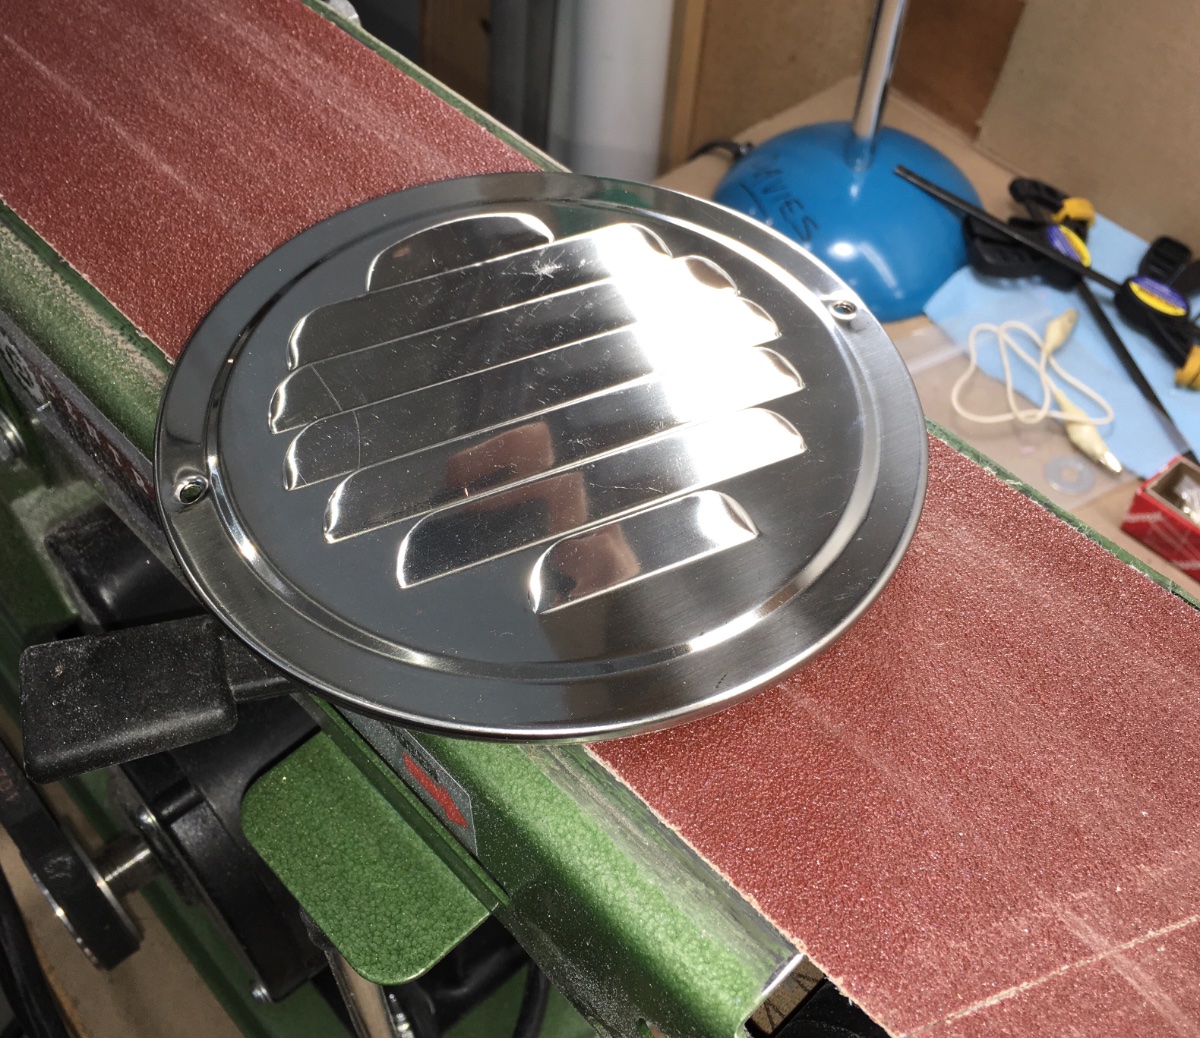
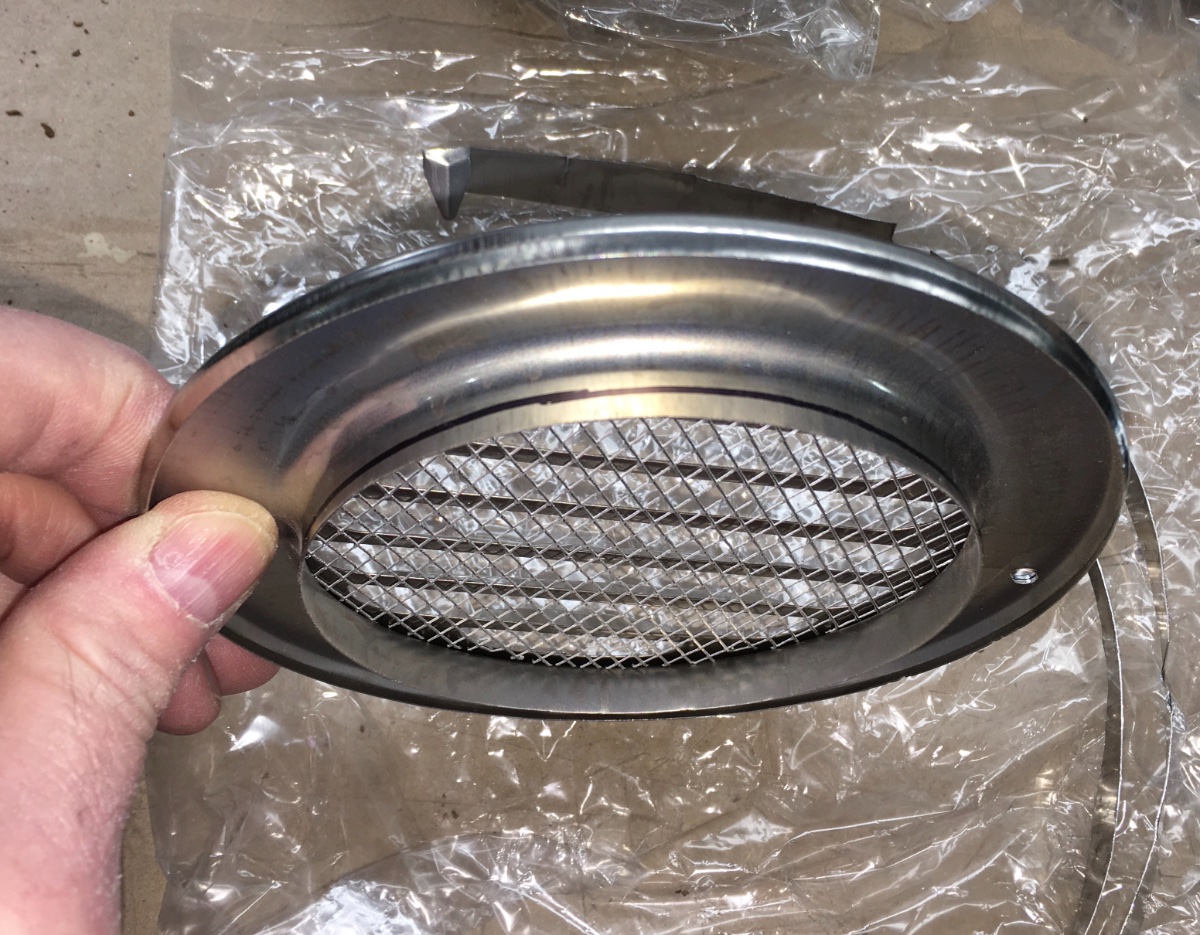
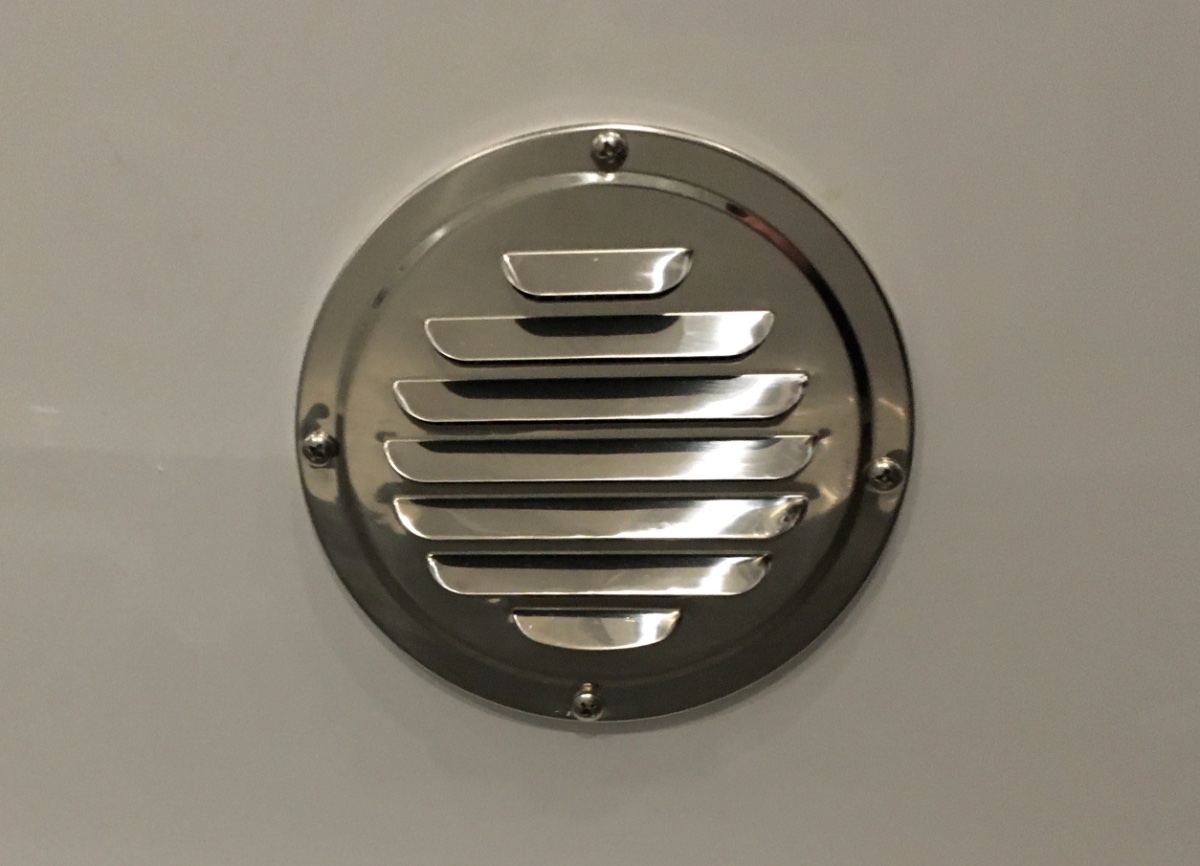
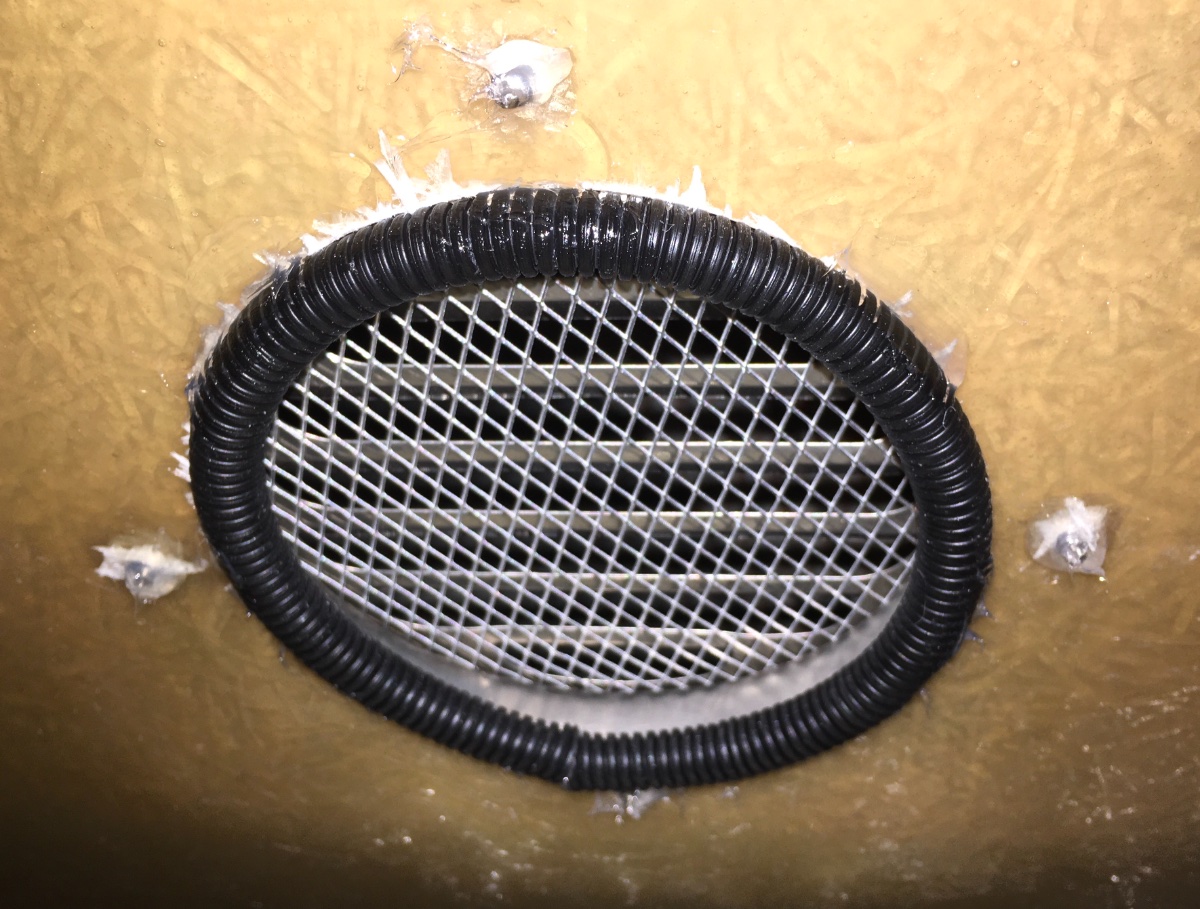
Battery box intake vents. Originally I wanted aluminum louvered vents, so I could paint them white to blend in, but the ones I bought turned out to be way too flimsy. They would have been destroyed by a wayward kick. I ended up with these and am fairly satisfied. They are sturdy and very pretty. Unfortunately they need trimming and the addition of two more mounting holes, so they would pull down tight and flat. Drilling stainless is possible, a drill press makes it less frustrating. It requires a lot of pressure on the bit. Use a 4" hole saw or a jigsaw to cut the holes in the fiberglass. I placed one under the rear bed and one under the rear dinette seat, centered front to back and up/ down. The center is approximately 9 " off the floor. Even though sanded smooth, the edge was pretty dangerous, so I used 1/4" split loom to protect fingers. I added a blob of silicone on each protruding screw tip. In the future I plan to add third vent at the bottom of the closet door opening. John Davies Spokane WA
1 point
-
If you have a bike hitch on your trailer.. This might work...
1 point
-
If you visit any of the winery’s or distillery’s you will definitely have to stay the night. Taste testing🤪1 point
-
We just joined Harvest Hosts this morning. We used discount code MARCH which dropped the annual membership to a one time new member price of $67.15. The regular price is $79 annually. It will be interesting to see how this works out for us. Using it once or twice will likely pay for itself and it surely will beat a Walmart or Cracker Barrel parking lot. Happy Travels!1 point
-
Is that Oliver's new showroom? That, my friends, is a shiny floor.1 point
-
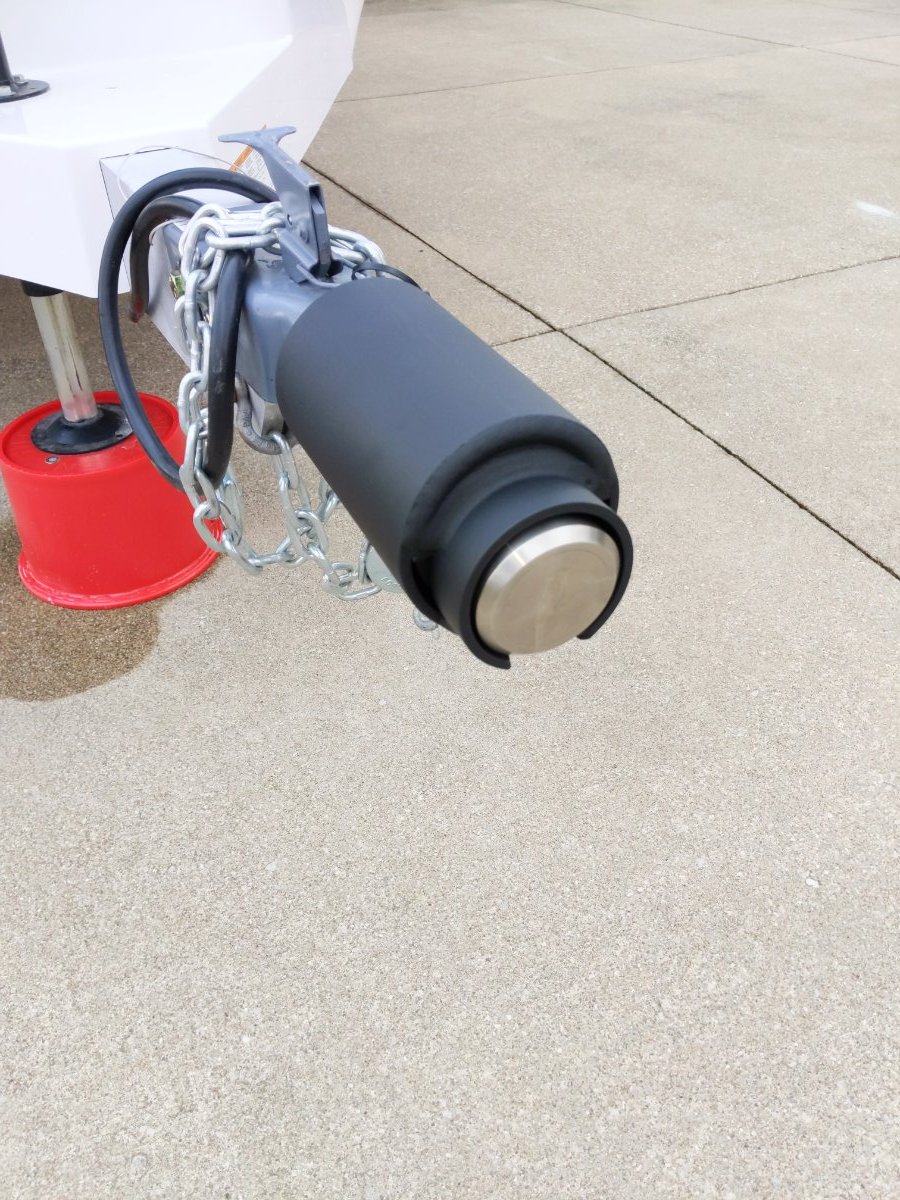
Here is the Proven Lock\Proven Industries setup on the 2-5/16" coupler. It is heavy and overkill for anything other than long term storage. Even then it is overkill 😜
1 point
-
I'd use a little bit of caution when using tie downs at just the ends. With a decent breeze, we can see the outside rail of ours visibly bending when we've only staked out the two outside points. Another strap in the center prevents that; and with that setup, we've weathered some pretty intense winds. We use REI awning poles with ours. They're sturdier than the Carefree ones, but require you to drill small holes in the bottom of the rail to accept the pin on the end of the poles.1 point
-
One good Bee cough will test most awnings. A few of the poles as stated help out a lot. Overland has posted some pics of a setup that looks about as secure as possible. We have learned - put it up when you will be gone for any amount of time. Murphy is always watching. RB1 point
-
I believe Oliver is still installing both LifeBlue and Lithionics. They added Lithionics because they had more lithium orders than LifeBlue could handle.1 point
-
Yes, we too were warned by the campground host . . . . . lesson learned: Heed the warnings of the camp hosts!1 point
-
Our was obviously cleaned but there was still quite a bit of dust in various places. We had ours delivered so who knows what shook out post cleaning during the 400 mile trip. They should really tape over the AV/DVD player during construction; the HDMI port, USB, and audio jack were caked in white powder. I can't imagine cleaning these for a living so I can seriously sympathize with any missed areas. White on white is hard to clean!1 point
-
Oh Yea!.... Nothing says long road trip like a little "Trombone choir"...😂...I'm Fired up now..ready to go!...Oh wait.. where's my vaccine?.. Man its been a long winter1 point
-
I can’t advise about Rushmore, except to say it is usually insanely crowded in warm weather. I suggest that you continue north to the Roosevelt NP area. https://www.beyondthetent.com/camping-in-theodore-roosevelt-national-park/ John Davies Spokane WA1 point
-
John, I couldn't find the exact item I purchased on Amazon, it was two years ago, it was a two pack, 22"x22" and 12 holes per inch, stainless, nice stiffness to work with and I cut it with tin snips. This is as close as I could find, https://www.amazon.com/Woven-X60cm-Coarse-gauze-Stainless/dp/B01N4RCHFU/ref=sxbs_sxwds-stvp?crid=2TB5WP8VAGXPQ&cv_ct_cx=stainless+wire+mesh&dchild=1&keywords=stainless+wire+mesh&pd_rd_i=B01N4RCHFU&pd_rd_r=0747b075-0572-49a2-b5ac-03427d1b9482&pd_rd_w=3kc4Q&pd_rd_wg=HcgJq&pf_rd_p=183579a1-f0e6-4556-8e39-8fe08e8f8141&pf_rd_r=Z1JE72FRXHZTFB9QNK7T&psc=1&qid=1587303256&sprefix=stanless+wire+mesh%2Caps%2C179&sr=1-131-dd5817a1-1ba7-46c2-8996-f96e7b0f409c due note here this material is 10 holes per inch, but I did measure mine and the hole openings are right at 2mm. Make sure you get material that is long enough to cover the longest opening on your refrigerator vents, I didn't want to piece mine together. I did think about using an adhesive on the heater screens, but just went with the stainless NBW's as I have a good selection of them. I did also make a totally different system to attach the Camco screen to the furnace, I just didn't like dealing with those springs, and went with my own design which will screw on and off. trainman1 point


-
Recent Achievements
-


")


")


")


