Leaderboard


Popular Content
Showing content with the highest reputation on 03/24/2021 in all areas
-
@John E Daviesis right on. His description is how I did it. I did NOT use a filter since we don't put any food / grease into our grey tank so it's soap and hair only - not a problem for the pump (as of yet). I'm not sure what good pictures would do - I didn't take any - but it would show a hose coming out of the back bumper (connected to the black / grey drain pipe with this: Camco Durable Sewer Cap with Hose Connection- Caps the Sewer Connection to Prevent Leaks, Easy Install and Simple Use (39463)). Then there's a pump like this Trupow 1/10HP 330GPH 115-Volt Mini Portable Electric Utility Sump Transfer Water Pump with Water Hose Kit that attaches to the drain hose and subsequently another hose to the black water flush port / inlet. Hook it up, then pump in some grey water until the black tank is full. Common sense provides the valve configurations... when filling the black tank, the black tank valve must be closed and the grey must be open. Problems can be avoided with the vent, etc. by not overfilling the black tank. It's not that hard to be careful. I timed how long it took my pump to transfer 15 gallons of grey water to a bucket before I tried this. It took that pump listed above 3 minutes and 45 seconds for 15 gallons. I ran the pump for 3 minutes and 30 seconds and then checked my black tank SeeLevel monitor and it was at 95%. I figured that's close enough, so I can run the pump for 3.5 minutes safely. There's no other way I can think of to easily use the black tank without plumbing modifications. I wanted to preserve everything for resale just in case. It's also worth noting that we ordered the composting toilet with our Ollie, so the black tank is there but has NO hole in the top cut out. If you upgraded to the composting toilet and you still have the hole on top of the black tank you would have to cover / seal the hole.4 points
-
We made our reservation with the Recreation.gov app. The kids loved this place.
 4 points
 -
Steve, Your plan to add another regulator is feasible, but it seems clumsy to me. I have three propane items that each came with their own regulators: A Camp Chef stove, a Weber Q1000 grill, and an Outback Firebowl firepit. For each I was able to replace the connecting hose with a regulator with a hose with a propane quick connect. For the stove I used an 8 foot hose (currently $61; I paid $26), and for the firepit I used a 4 foot hose. Converting the Weber grill was more complicated, and covered in this post. The quick connects are really convenient, and it might be worthwhile to see if you can make them work.3 points
-
I have found the grey and fresh tank SeeLevel indicators to be confusing for the most part (black tank sensor works much better). At first I thought they were good for "ballpark" estimates, but the readings are never consistent and repeatable so I've come to the conclusion that relying on them is risky. The tanks are just so "shallow" that the slightest difference in leveling can result in huge discrepancies in the SeeLevel readings. My strategy is going to be to fill the fresh tank and use the onboard pump rather than just city water pressure. By using the fresh and grey tank level indicators together I'll have a better "estimate" of how full / empty the tanks are.3 points
-
@Scribe With A Stylus: We had the 4 cylinder with the 7 speed trans. Single rear wheels. I think they were 15 PAX machines with about a 4+ foot equipment storage area in the rear. These MB vans were slated to be driven by younger coaches, mostly hauling our athletes and their gear. This setup would not be my recommendation for pulling an Oliver Elite II. Just not enough power. The sleeper recommendation for a TV on the cheap would be a Toyota Sequoia with the 5.7 L engine. I still have our 2005 with the 4.7 and towed Ollie for my first 12,000 miles or so. It needed more power. In 2019 I upgraded to a F-150 Lariat, 3.5 EcoBoost, FX4, Heavy Duty Tow Package. Now that truck is a beast! But the cost difference over a good used Sequoia 5.7 is not something that a lot of folks would want to entertain. Good luck, GJ2 points
-
We started by connecting the way we were showed during our orientation, just the way Mike described it. Admittedly, my backing up and straight line positioning skills need some work. This admittedly took some time and trips in and out of the cab of the truck. I will admit I now generally use the method described by SNY SD UP. This seems to work better for me. When perfectly straight and level the chains are equally tight. A slight change in elevation of the truck or trailer, or slight angle left or right does manifest in a difference in chain tension. To me this is an indication we have this set up about right. I checked but have never needed to adjust the red bushings yet. I can tell you after this thread I will definitely check that link regularly and may add a little lock-tite. Thanks for sharing. One more thing to the exterior check list!!2 points
-
I've only used that brand of pump a few times now and it seems fine - comparable to others I've had in the past. This particular one does have parts / kits available to repair it, but ones I've had in the past just had the motor die after a few years of pretty heavy use before anything else broke. I use it for different things around the house. Examples are transferring water from rain buckets to my pool (a lot) or getting water off of my boat cover when it caves in and turns into a pool 😁. A rainproof switch with a permanent, long cord would be SUPER NICE (and smart too) - right now I just unplug it from an extension cord coming out of the exterior 120V receptacle on the curb side. Definitely don't want to be standing in a puddle! It does get warm when I run it for extended periods - like 20 minutes or so transferring water from rain buckets - so I give it time to cool down when needed. I didn't think pictures of this setup would be interesting, but I stand corrected! Next time I have it set up I'll update this post with a few if someone doesn't beat me too it. 😉2 points
-
"WE" were probably advised to do the above at pick-up day, but that among others... did not sink in... so we were struggling to get the "A" plate in position for each setup of towing & camping. I always used a rubber mallet... but a 2-3 pound mal would have worked better, but we all know that is not the thing to do. Then about the 4th site breaking camp and struggling to get the plate on, a wonderful (are there any other type of Ollie Owners...) couple (a shout-out to Laura & Tim) from FL, said they connected ball to hitch and then lifted the front end of the TT up just an inch or so, (it was like someone showed me how to start the motor on a CHAINSAW to cut wood) how easy everything slipped into place "YES"... From then on we have not had any trouble attaching the "A" plate, or lining up the safety pin underneath the plate, the same when we unhitch. And to make a short story even longer... It has occurred to me that on your pick-up day, your TV will probably be loaded down with things that would normally go in your TT. So when the nice OTT person telling you everything you need to know, but cannot possibly remember. YUP, the one under the OTT adjusting the chain tension for the "A" Hitch, it may be that that adjustment is good for "Right Then" but as soon as you offload from the TV to the TT... it needs to be re-adjusted. I plan to hookup and re-adjust "our" chain tension with what would be the items we now normally carry in the back of the TV as well as the items we now have in the TT. Regards,2 points
-
A "relatively" simple solution would be to drain the bathroom sink water into the black tank. You could achieve this with gravity only. Pull the black tank valve to dump at any time. I would save 15 gallons of space in the gray tank.2 points
-
These 2 little guys fit on the little bed, but I’m betting they’ll out grow it two years. Right now though, they’re having a blast!
2 points
-
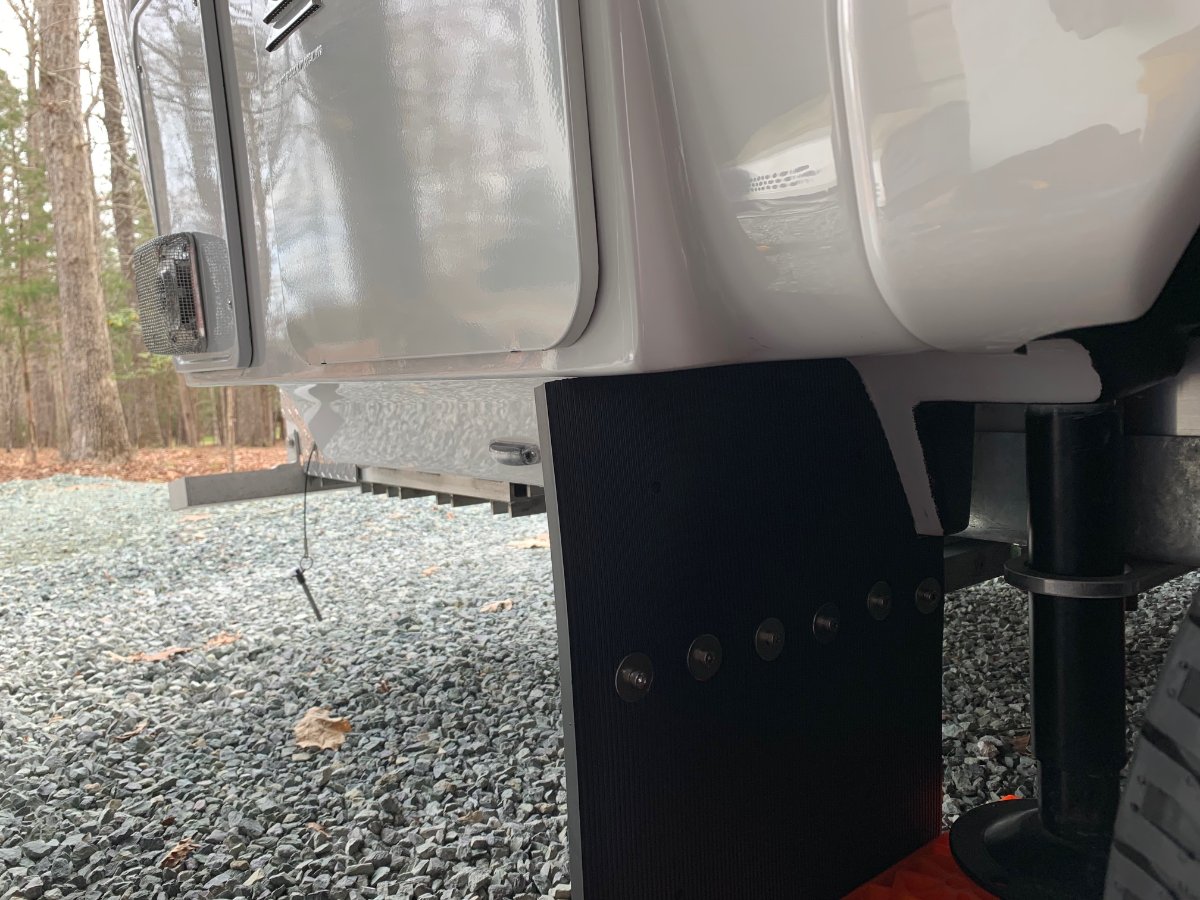
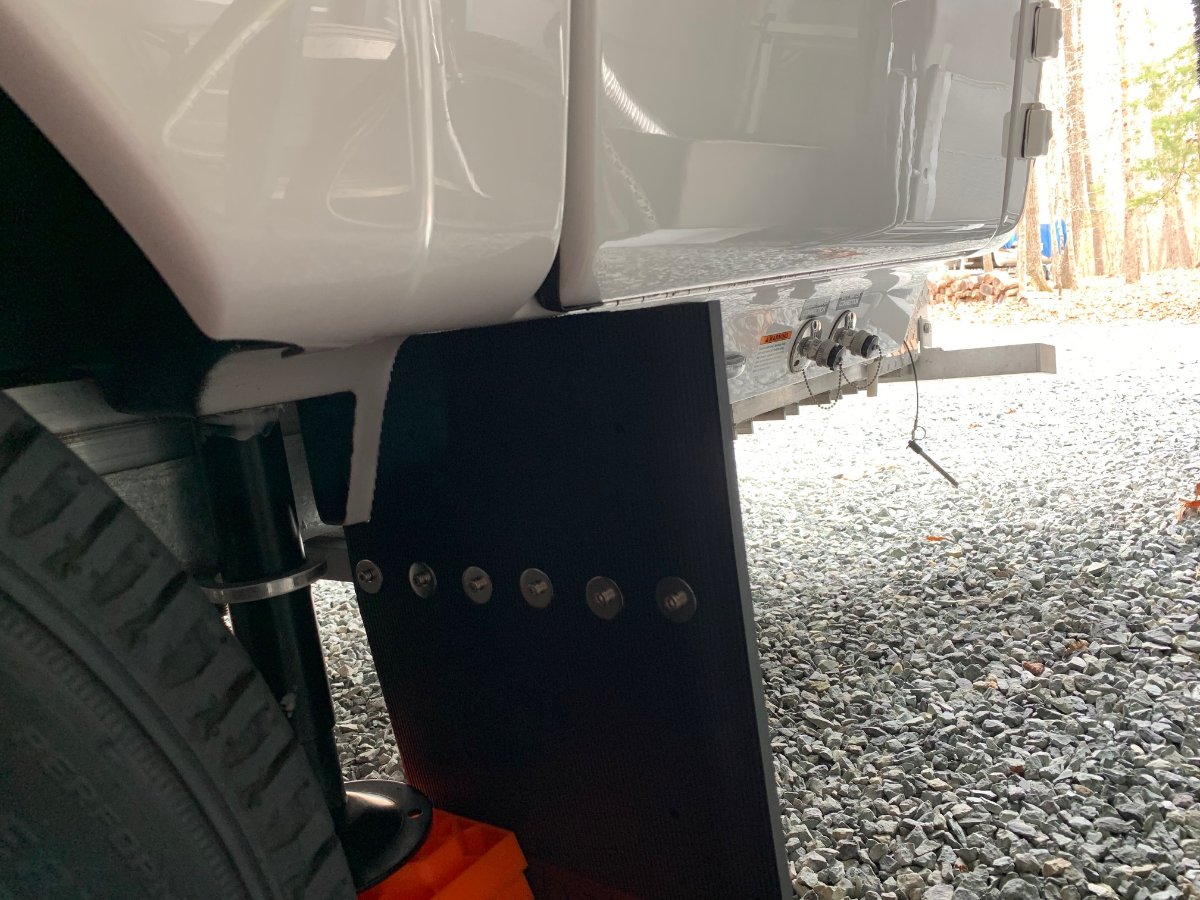
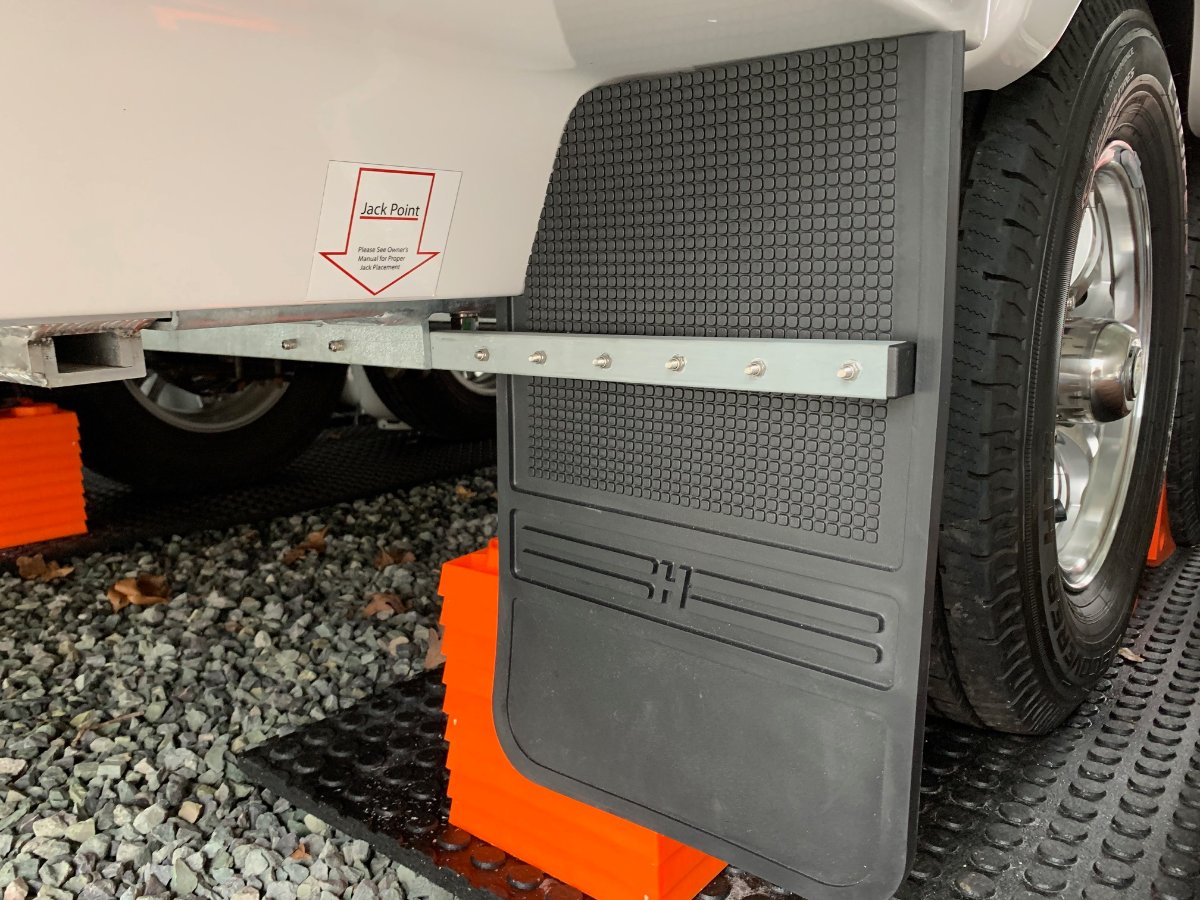
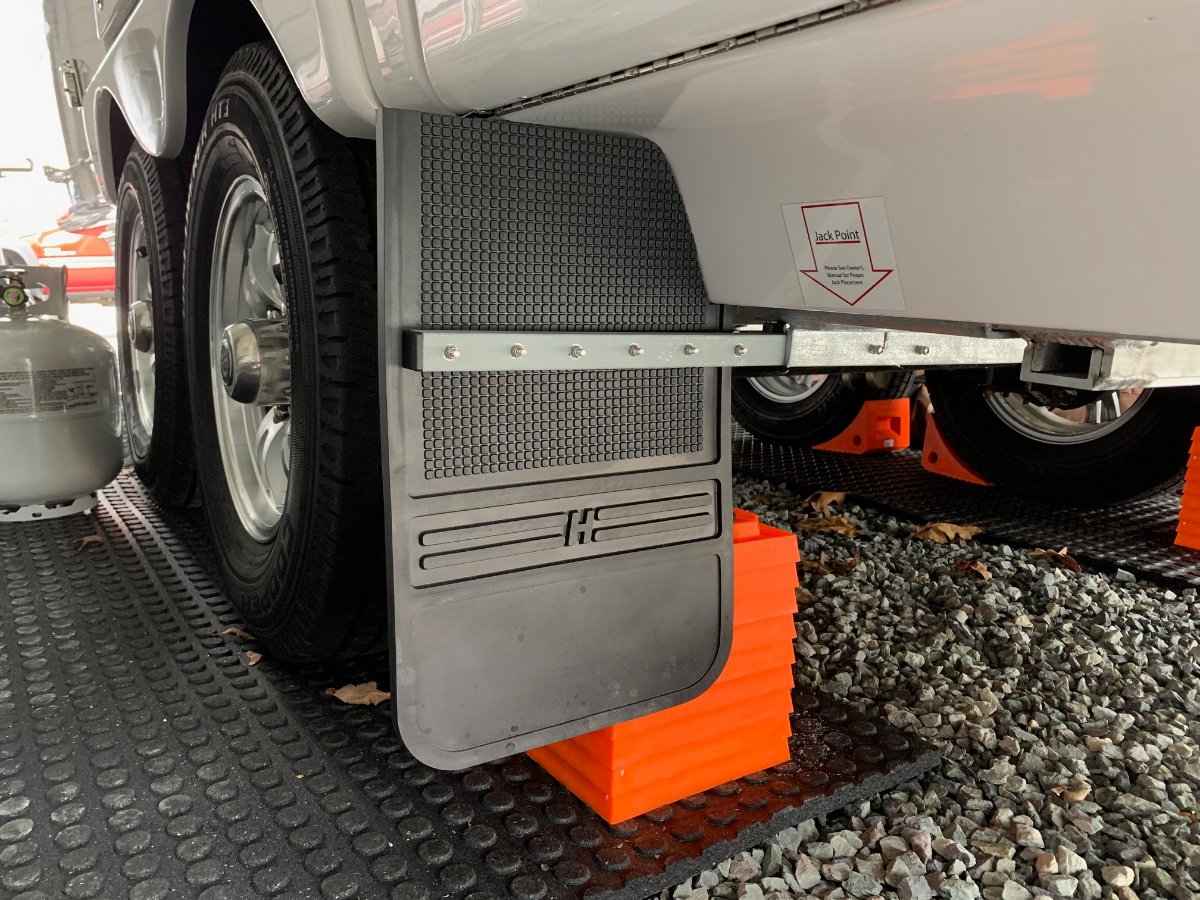
I did end up using the 1"x1" steel since it's galvanized, I plan on towing in winter / salt, and needed to find something useful for it. I "galvanized" it again after cutting and drilling. I'm going to keep a close eye on it and if it starts to rust, I'll take it off and replace it with aluminum. I used M5-0.8 Socket Head Cap Screws for everything. I did not use washers on the 2 bolts / screws that attach the bar to the frame. The screw / bolt head diameters are not much larger than the threaded portion of the bolt so l "hope" that's my "fuse" to protect the frame if there's a solid strike on the bar. I sure wish OTT had mud flaps standard or as an option. I already had a few "dings" in the gelcoat from driving it home after delivery that could/would have been prevented with flaps. 😞 Numerous owners have done this mod, so I'm not adding anything innovative or new here, but I know pictures are worth thousands of words and maybe will help someone thinking of doing this mod, so here they are:
1 point
-
On the other hand, here is the Dexter AWG wire sizes chart. With an OEII, we would be on the 4 brakes, under 30 feet = 12 AWG. So the text book answer is 12 AWG. But I still think that 14 AWG would work very well. That said, when my time comes to replace the cable.... I'll ponder it a bit more. 🙂 For those wanting the full Dexter Service info, it may be found at: http://www.dexterpartsonline.com/files/2036913/uploaded/600-8K Complete Service Manual.pdf GJ
1 point
-
That pump looks interesting, can you buy replacement impellers and gaskets? It doesn’t have a switch, maybe adding a waterproof one would make it safer. Does it come with silicone grease? BTW we really like to look at pictures😀 Thanks. John Davies Spokane WA1 point
-
These are the ones that I purchased, hoses, quick couplers, and both male and female fittings. https://www.amazon.com/s?k=rv+lp+quick+connect+fittings&crid=3QB4TMUH1SNXC&sprefix=rv+lp+quick%2Caps%2C187&ref=nb_sb_ss_ts-doa-p_4_11 trainman1 point
-
I agree with this method of using the hitch, it works well for me, but just this last year I've given it some thought and I did feel that it was putting a lot of pressure on the hitch and ball and have now taken the steps to loosen and tighten the adjusting bolts on each side when hitching and unhitching the trailer. I find this very easily done and I will keep doing it this way most likely in the future. Trailer tongue weight and tow vehicle squat are different between vehicles, so what might work well for one may not work so well for the other. trainman1 point
-
On our LE1 water will back up in the sink and the shower if the valve is closed. I have not traced it down as to why, but my best guess the valve also blocks in the vent thereby not allowing the water to flow down into the tank. Perhaps the LE2's are piped differently. Easy thing to check the valve position.1 point
-
Be sure and check to see that you opened the grey water valve in the bathroom. We have forgot to do this when traveling from one site to another and experienced the water backing up in the sink and shower drain. Once opened back up, all flowed well again.1 point
-
Yes. Raise the nose a little and see if it helps. Read this thread1 point
-
How old is this sticker? I was told the limit has been increased to 150#. Call Oliver to check on this, though.1 point
-
Spray the slot with WD-40, work the step in and out a few times and you will be amazed how smoothly it works. Aluminum has a tendency to "stick" to itself when it is dry.1 point
-
Transfer the grey water through a portable pump (with a good inlet filter) into the black tank rinse port (on the left side in front of the tires.) A simple solution indeed, except for keeping hair and food debris from clogging the filter. That could get tiresome....we need pictures please. There is also the problem of venting, the tank connects to the 1.5” black vent pipe that goes out the roof, it tees into it under the sink. If the black tank should get too full, the water will flow into the sink, and then onto the floor, and back into the grey tank via the drain. Hopefully the blade valve is open! What a computer geek would call a waste water Infinite Loop . 😀 That could be very entertaining. Maybe it’s time to revive this thread... https://olivertraveltrailers.com/forums/topic/3213-grey-water-recycling/. It really is a shame that the black tank is several inches higher than the grey one, if they were level you could gravity feed one into the other quite easily. John Davies Spokane WA1 point
-
I just lifted up on my "countertop" and it came off, held on by Velcro. Opens up possibilities. I wanted to make some changes/additions to the countertop. I have a leak around the sink to fix. And wanted to put an extension off the end, next to the rangetop. There is essentially no countertop as is. I have a different refrigerator than you, I think. I don't have the cubby below the countertop. My countertop was lifte in the front a bit. When I replaced it, I smushed it down, and it is no longer lifted.1 point
-
Or it might not be the countertop. Looking closer at your photo, the countertop looks straight with the bottom of the microwave, so maybe it is the cubby that is misaligned.1 point
-
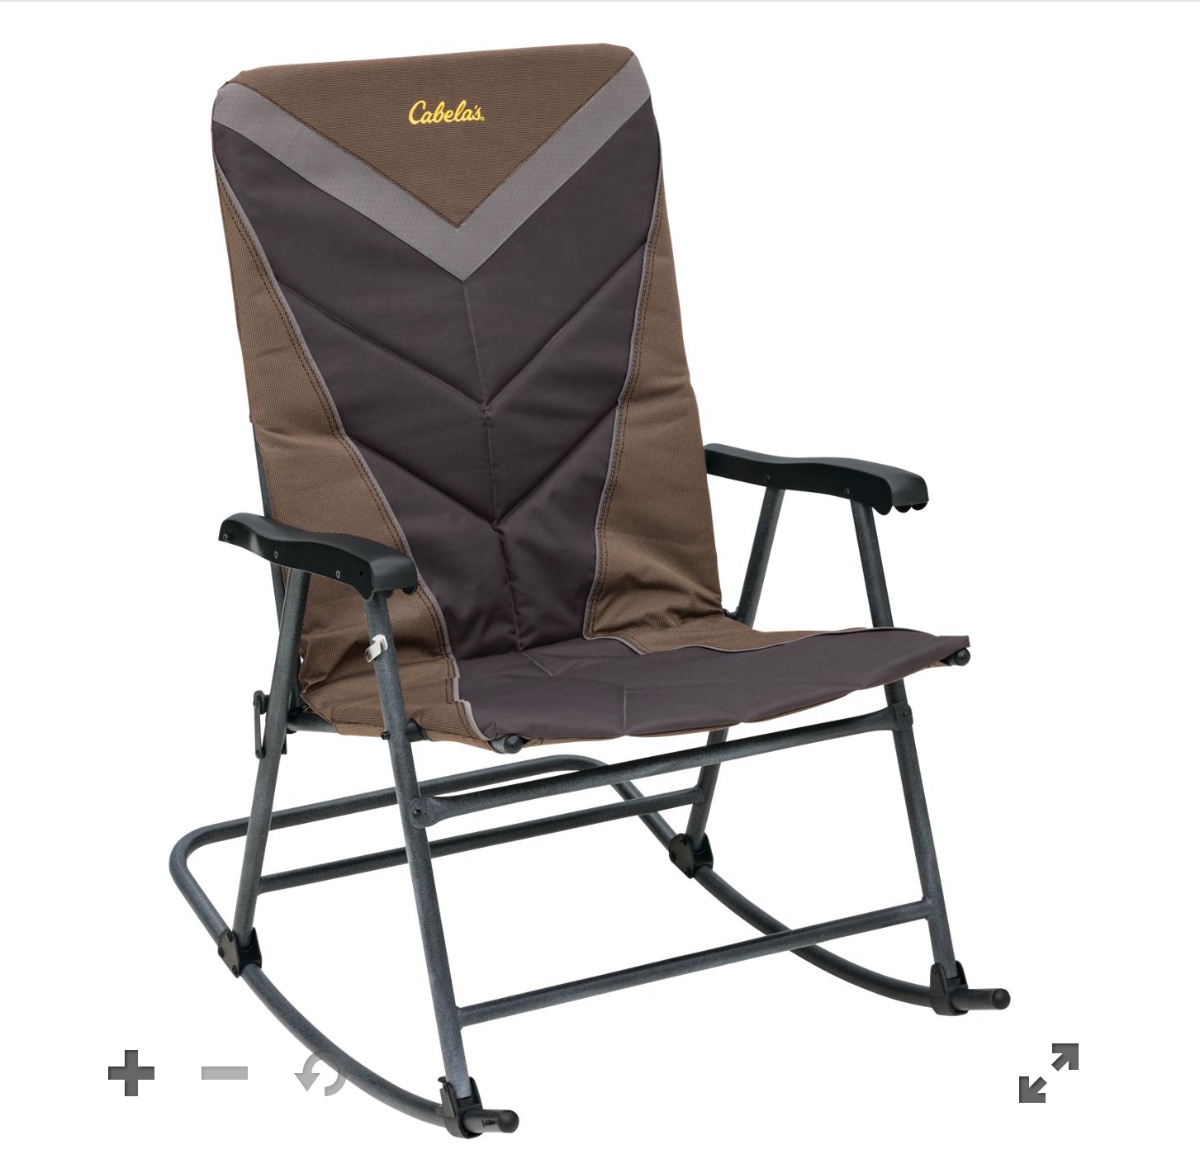
We’ve got a pair of these.. because of the storage system I built into the back of the truck they stow easily and can be quickly deployed as needed.. comfy and we like rocking chairs.. 🙂
1 point
-
This entire thread just comforts me - the vast array of music and artists displayed here span almost the entire spectrum of music genres. ( don't think I've seen any Opera, little classical) My hats off to you all, one would be hard pressed to characterize the group as a bunch of doddering old folks, quietly enjoying their RV, waiting for the sun to set. Once again - I find there are not enough hours in the day - and now I have to find time to add new music to my systems. Jeesh, what next, I fear to think. RB1 point
-
The double live album with this on it is incredible and still in my playlists. “Mercenary Territory” and “Spanish Moon” on same live album are amazing!1 point
-
Your coupler, AKA "repair link" needs to be rated for at least the rating of the chain. Quick-links like the one that failed are typically not rated very high. More like something that one would put on a dog chain. Oh yes, they do have their place. I use them to connect to the eyelet on my bird feeders hanging from the eaves on my garage. IMHO, something like this would be much safer...
1 point
-
If you haven't done so already, I would encourage you to open a service ticket on the home screen here. Even if you fix it yourself, Oliver should be made aware of it.1 point
-
@JRK: I share most your thoughts. Some more pondering on my part is in order for the below: I am wondering how the brake controllers wires for millions of brake controllers, from the drivers position all the way back to the rear RV axles, are handling the max braking events? None of my many TV's and Trailers I have owned have had mega sized cables as suggested. I suspect this is the case for lots of reasons. In our case, my first one is that the max amp pull of 12 amps (3 amps X 4 brakes) is rarely a long duration continuous load. Secondly, modern brake controllers sense when a vehicle is stopped and back off the power flow to the magnetic coils when stopped, again shortening the duration. As such, maybe these ideas contribute to having used smaller wires for many many decades in millions of TV's. Using commonly used American Wire Gauge Cable/Conductor Sizes and Properties as a guide is not commonly practiced for short runs such as a TV and Ollie. For example, it lists a #12 AWG wire (assumed to be copper) as only carrying 9.3 amps. Where as they are allowed a continuous use rating in residential of 16 amps, and 20 amps intermittently. Hence they are protected by a 20 amp breaker. A #10 conductor is listed with a max current of 15 amps. Yet our Oliver, and about a million other similar trailers use these as 30 amp conductors and breakers. My experience as an engineer suggests that 14 ga would be a sufficient choice. However, your 10 ga would certainly work! Overkill, but it will work great! All that said, when it comes time to replace my brake assemblies, I'll certainly upgrade the wiring, not to 10 ga, but for sure larger than that which Oliver used. And as JD pointed out, it will not be run inside the axle. Finally, and it is a very rare occasion that I have ever suggested taken a JD suggestion even further. But here I go into unchartered regions....., My recommendation is to also run the larger replacement wires through a gray plastic (UV Resistant) conduit (Maybe 3/8") across the back side of the axle. Where the cable inters and exits the pvc, I will heat shrink wrap the cable with a 4" section (2" inside and 2" outside the PVC), and seal both ends of the conduit with a suitable Silicon sealant. These extra precautions are to protect the line from physical road damage, hungry rats. BONUS SUGGESTION: Spray all exposed wired outside the hull (IE under the hull, in the front basket, and for the cables going to the TV) with peppermint oil and water solution. Most wire insulation eating critters (Mostly rats and mice) hate peppermint. It is also useful to spray tires, and jacks to dissuade those critters. I look forward to your and our owners thoughts. Thanks, Geronimo John1 point
-
As many of you know, I craft custom upgrades for Oliver Travel Trailers. As we head into the camping seasons I have refreshed my catalog to reflect my current products and a pricing increase. If you have an order on my production list or I have sent you a price quote, your price will not increase. You can find my catalog - Foybles Catalog V2.3f below. Onward, Foy Sperring 48ocean@gmail.com Foybles' Catalog V2.3f.pdf1 point
-
"Raspy, you’ll always be part of the family..a lot of people have enjoyed and learned from your posts. Don’t be a stranger when you get that Black Series." Sherry, Thanks for the kind words1 point


-
Recent Achievements
-


")