Leaderboard


Popular Content
Showing content with the highest reputation on 09/19/2021 in all areas
-
My domestic fridge just stopped cooling, no signs of leakage. Everything testing good on the troubleshooting guides. The opinion of the local RV guy was that I had a failed cooling unit. That left me with two options: buy a new unit or replace the cooling unit. After talking to Jason at Oliver and him telling me that to remove the fridge from the trailer you need to remove the door, I thought I would try to replace the cooling unit myself. I found some places that would ship a unit for $500 to $1000 and I do the install. I watched many videos and researched the work. In this research I found several people talking about burping this kind of unit, it entails flipping the unit on its side, top and allowing the ammonia mixture to reposition and displace any air pockets. Since I had to remove the fridge from its housing I thought I would try it...and it worked! We just took a 10 day trip and it worked fine. Some RV techs said it was a wive's tale. Glad I tried it. Hope this might help somebody.4 points
-
While we would love to have more of you join us we cannot take another trailer or guest and manage the events in a way that accommodates everyone comfortably. We will do this again next October. Foy & Mirna Sperring3 points
-
Saw a "naked" (no stripes or decals noticed) Oliver in the wild of Maine. It was about 4:30 on Saturday afternoon and you were on 95, just north of Augusta. Safe travels, and know the leaves are starting to turn...2 points
-
1. Yes, and yes it is! 2. I've had good luck using a magic eraser pad. You can also minimize the streaks by sealing the light gaskets with Captain Tolleys.2 points
-
Yeah we make heavy use of our little weber portable grill too. I often make compound butters and a salsa or two to take along on trips to put on grilled fish and meat for super easy and very tasty mains.2 points
-
Sometimes Olivers are talked about in whispers and hushed tones out there in fiberglass and aluminum trailer land. Here on this forum most of us are loud and obnoxious when talking about our trailers! 😆 I also enjoyed your write up on Starlink. It’s good to get first hand experience. Thanks! Mike2 points
-
Sure do! I've been married for almost 50 years and she lets me know all the time.🤣2 points
-
Your welcome! That was my first post! Wanted to give back a bit after devouring the forum for the last few days. I only just heard about the forum a week ago when looking at some fiberglass camper brands (I was already familiar with Bigfoot and Escape) and hearing of the Oliver name spoken of in hushed & awesome tones. Did some research - was absolutely amazed there was a company making a camper how I'd want one to be made - true durability, good service, and who is responsive in changing their features for their customers. The info here is great as we try to decide if we want to wait for a used Oliver or get a production slot.2 points
-
My only regret is that had I made better choices when I was 18, maybe I could afford something like an Earth Cruiser today. Our Ollie had an incredibly difficult birth, partly because we customized it so much, and party because Oliver was undergoing some difficult growing pains at the time. Despite that, having lived with the trailer for almost a year now, I can't imagine anything better matched for the way we travel. Except for that Earth Cruiser. In fact it's hard to believe it hasn't even been a year. Camping with the Ollie is so natural that it feels like we must have had it forever.2 points
-
Hi, We bought 007 or the 7th one made. We saw it in Oregon over 10 years ago. It was a demo driving around the country. It wasn't really finished. Lots of wires/etc not in finished places. The Oliver company paid to have it finished here in Seattle. Now 10 years later it is still in mint condition despite living outside in 10 months of rain. The Oliver Brothers started an excellent company and they make the best travel trailer on the road. NB and CJ Seattle2 points
-
From reading through various things, it seems the only usual regret from those that have left was that they upgraded to a larger trailer, not actually having been prepared for the realistic size of the fiberglass trailers after being overwhelmed with the quality. Most who ended up here, had been looking at Airstreams, as there is no denying their beauty, both to look at and to look out of (all the windows), they just fail in every other aspect. In my personal opinion the quad hull design of the Oliver is what makes it a completely justified purchase, even at today's prices. I prefer the easy to clean "antiseptic" (as some have said to describe it) layout and feel of the Oliver, so many trailers still being built today give the feeling of a 70's apartment with shag carpeting and green, yellow and orange appliances.2 points
-
I'd say go for the cheapo battery to get you by. It will work with everything you've got, though the zamp controller has a separate setting for lead acid vs AGM, which you should change - choose the WET setting for traditional lead acid. It's in the manual how to do so, which is in the Oliver University section if you don't have it with you, but I think it's just pressing the battery type button until it displays the right type. The PD converter doesn't have a separate lead acid setting. As for the Battleborns - I'd call them in the morning to verify this, but I'm pretty sure they'll tell you that you will be fine at least temporarily hooking them in to your system without making any other changes. The charge profiles between AGM and lithium aren't that different. Your PD converter will eventually need a new board that has a lithium specific charge profile, which Battleborn may have in stock, and I don't know for sure if the Zamp controller from that period will have a lithium setting or not. I think it does, but hopefully someone else will know for sure (or just flip though the battery type setting and see if it shows up). Regardless, the nice folk at Battleborn will walk you through everything you need to do - I've found them to be extraordinarily helpful and patient. They'll also be able to help you find a good installer in the area. Or maybe just drive over to Reno and let them do it, lol. Sorry for the issues - best of luck getting everything sorted. It might be a good idea to ask the electrician if he can run through the very brief troubleshooting instructions for the converter, which you'll find in the manual. Just to be certain that the battery issue was't caused by the inverter.1 point
-
Yes. Sealing gaskets isn't what it's made for, but someone here tried it a few years back and found that it does the trick. I sealed mine I think early 2018 and haven't had to redo it yet.1 point
-
Yes, I wash and wax the roof. When I was experiencing the black streaks waxing removed them if I recall correctly. Mike1 point
-
These sure are hard to find!1 point
-
I recently dove into this thinking I had a problem with the wiring to the camera. To find the junction you are looking for, I had to remove the hard divider by unscrewing the 2 lag screws. My insulation pulled down easy and went back in place just as easy. As it turned out for me, my antenna had fallen off and I had no real problem. But, the dogwood beside my parking space did! It’s much stubbier now.1 point
-
I certainly hope so. We are thinking of making a trip there. Reservations stop and it becomes first come first served so I have heard...1 point
-
I have not experienced any sway wIth the OLIVER. Nor do I want to. I just want to know who is boss. You know what I mean?1 point
-
Thank you Mike, I appreciate this info! 🙂1 point
-
I've never heard of, nor have I experienced, any Oliver that swayed even under fairly violent circumstances. Having said this - I'm a firm believer in that it is not a bad thing to have as many contact points as possible between the tow vehicle and any trailer. Certainly the Andersen helps on that front. Also, I agree with you that the Andersen is really not that big of a deal (most of the time) to put on and take off. Bill1 point
-
I hear you but after fifteen years with our standard size van (with raised top) we've gotten the utensils and ingredient shuffle down (a few Rubbermaid storage boxes work quite well for this) and frankly just prefer to spend more time outside in the lovely sites we tend to camp at. When we chose how to customize our van we didn't include a counter mounted stove and instead chose to just use a portable (which we can take indoors if really needed) and that worked super well. I think we'll be doing some more very cold and also very rainy camping in the Oliver so will surely be cooking indoors a bit more now that we have that option, but if the weather is good see ya outside!!1 point
-
I've had Starlink since March. Figured I'd chime in with my experiences - - I've yet to mount the dish permanently (it will end up on the roof using their volcano mount), it's still sitting in our yard on the ground. I just move it to mow. It is heated, so I have no concerns about snow. Indiana isn't exactly Arizona, but it still gets warm here in the summer - no issues with overheating. - Outages are minimal. Had more outages when we first got it - typically ~15-30min/week if I had to guess. There was a single 4hr outage right after we got it. Outages were usually no more than 2 minutes back then, with the rare longer one. For the last several months - I have never noticed an outage in usage. The outage tracking in our app shows about 4 per day, but they're like 2 seconds each. They do sometimes push updates - this is typically around 3-4am, and one or both of the dish or router will reboot/update - this is typically in the 15-20min range. The app is used to control both the dish & router - they've consistently updated it to add functionality over time. I can reboot both the router & dish remotely. It has stats and you can run a speedtest. - The included router is pretty decent. It originally had almost no user controllable features - now it has a few more via updates, but still not very many. It works great though - I've kept the 2.4ghz signal on my cell phone mowing our 5acre yard for example. I've had it in our garage, so it's pretty tolerant of heat as well. The 5ghz signal penetrates to our bedroom - furthest away from the garage you can get, so it doesn't propagate too bad either. You can replace it with your own router if you want. I've so far seen no reason to dig out a more advanced router I have from our last residence. - Speeds are very good. There is some variation. The outer range limits are typically about 50-300Mbps download and 10-35Mbps upload. Ping is typically in the 25-60ms range. I'd say the average is typically in the middle - I almost always hit the 2.4ghz bandwidth limits on the wi-fi (50-80mbs in the house, depending which room), and I'd say 80-120mbs is the typical download range (15-25ish upload). Ping tends to hang closer to 45ms on avg. All of these speeds have improved since we first got it. - We live on a hill in the middle of a field - there are no obstructions close except the house, and I didn't put it close enough for that to be an issue. The app has a few ways to help check for obstructions/monitor for them. Users who have obstructions can still get service - just with some limits due to the arcs - lots of reports in other locations of people with some very tall trees around them - would be worth reading up on those. You still need line of sight to enough of the sky though. Some reports of people who have put it on the top of telephone poles and such. Rain has yet to cause any interruptions - the satellites are only around 250 miles up or so. Snow shouldn't cause issues either, nor should any accumulation (the dish is heated). The service is a game changer in rural areas IMO. My only internet options are cellular and a local WISP. I can see the interstate from my house and a small town - I'm within 20 miles of three different small cities (pop 20k-60k each). I can see two cell towers from my front porch. The cellular - our local towers are not upgraded for any of the Home Internet options, and two of the cell companies are in a position that we can get good high speed service with an exterior antenna, but inside the house (and neighbors not on the hill) service is much slower. Plus, since there is no home internet option, we'd blow through cell data caps instantly. Prior to Starlink we were doing illegal tethering to our cell phones vis usb. Traditional sat internet is just bad. The WISP is pretty decent, but I'd have to put up a 30-40ft tower to get over some treetops to get line-of-sight with some of their equipment. They have speeds slower than Starlink for less, but for $100/mo I'd be getting speeds 1/3rd the speed of Starlink. Plus there is sometimes weather related issues with the microwave dishes. Starlink, at this point, is functionally identical to our old Comcast cable internet in town - the speeds are almost the same. Comcast had a slight edge in latency and price, but even those differences weren't super large. I can't wait to see their mobile options. While nice for RVers, it could also be a game-changer for boats. The technology behind the dishes, satellites, and how they work is pretty amazing. Musk can be controversial, but SpaceX and Starlink are a lifeline to a ton of underserved rural areas & remote workers. I would highly recommend Starlink based on our experience to anyone in similar circumstances.1 point
-
My favorite part of camping is being the camp gourmet. I have an outside tent for my full setup. This works great but takes time to setup. When we are traveling full time I might have to downsize to make things easier from day to day.
 1 point
 -
I suspect John has hit the nail on the head with the Charger current being set at 150 amps when the 1600 W the generator is running at is only able to support 133.33 amps (at 12V) theoretically. Given losses, I would predict that you can still use the 1600 Watts at 120V (13 amps) to charge your batteries at 100 amps (12V) without issue. I charge my pair of 200ah lithiums all the time at 40 amps (12V) because I have the time and I can - that fills my batteries at about 10% per hour. I'm not positive what John means by stating 13 amps (at 120 Volts) is marginal for lithium - I guess it's marginal if you only have a limited amount of time and 100 amps per hour is going to take too long - otherwise from my understanding you can charge lithium as slowly as you want - in fact, it's better for the ions / longevity if you charge at a lower amperage.1 point
-
The link below just might be for the louvers that CSEVEL mentioned in another post. Bill https://www.fiberglassrv.com/forums/f56/window-louver-vents-93317.html1 point
-
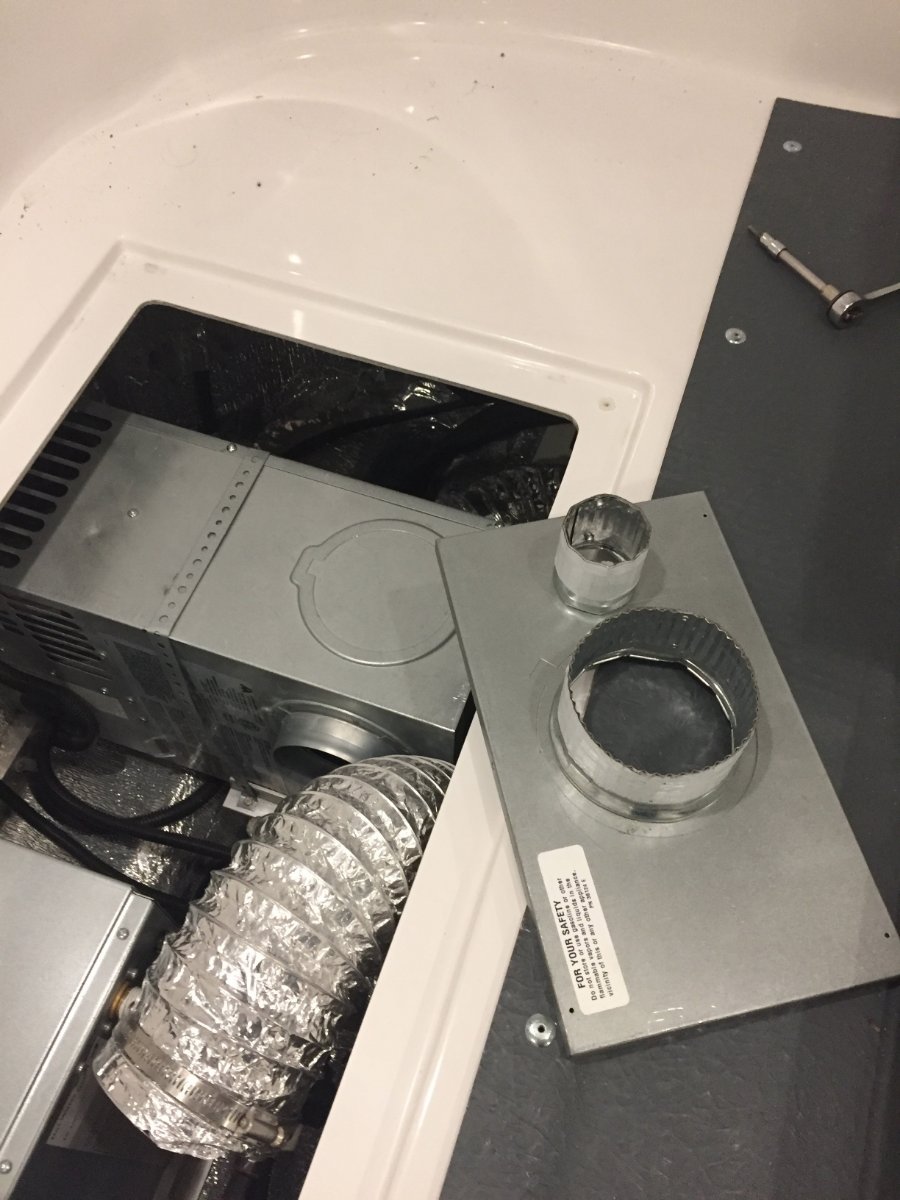
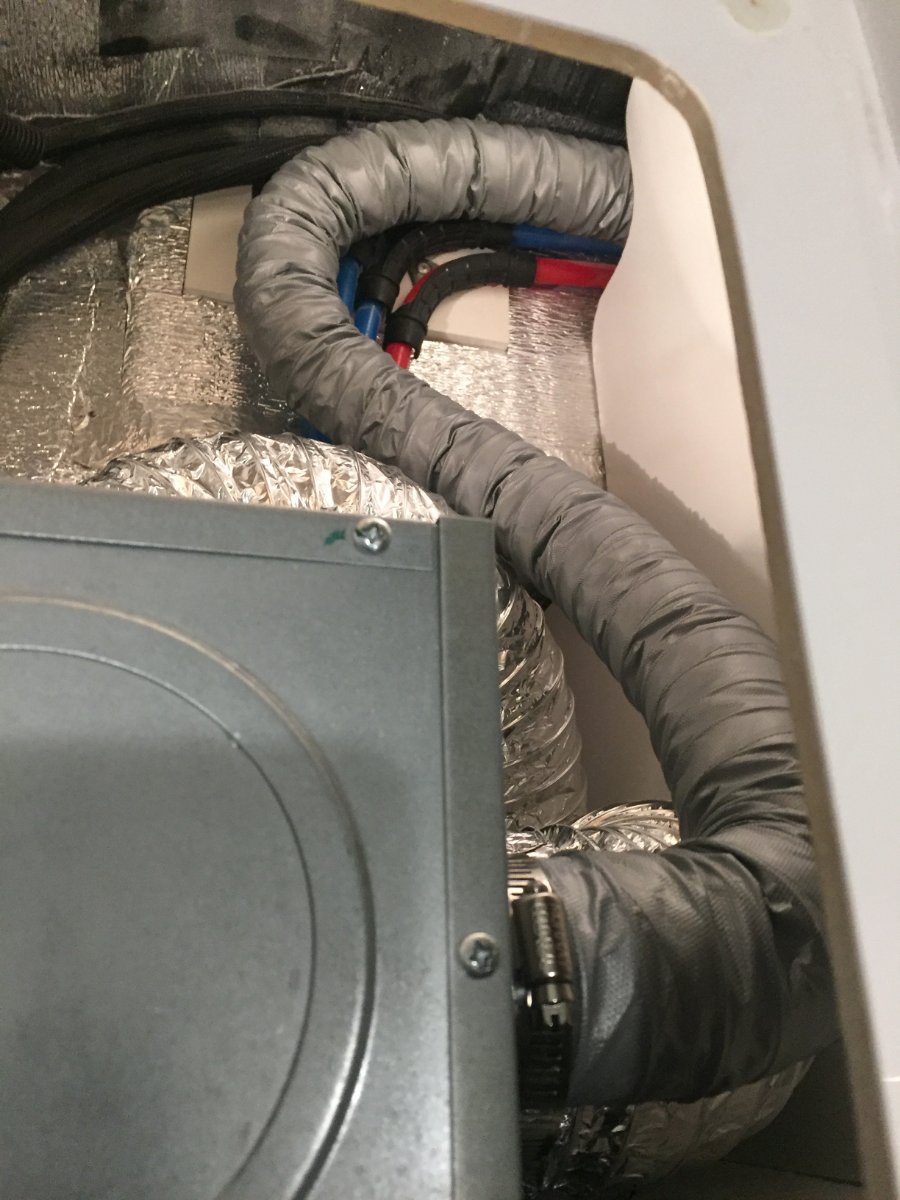
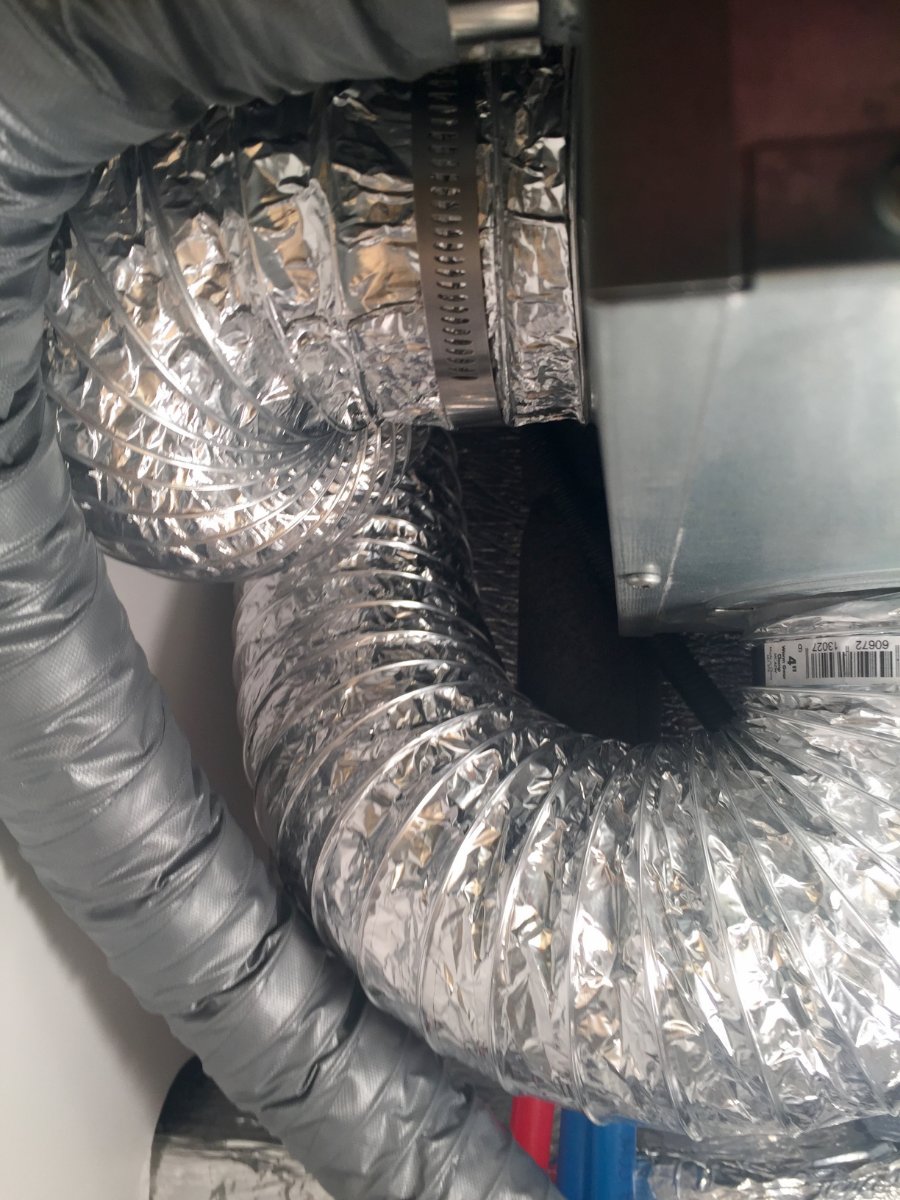
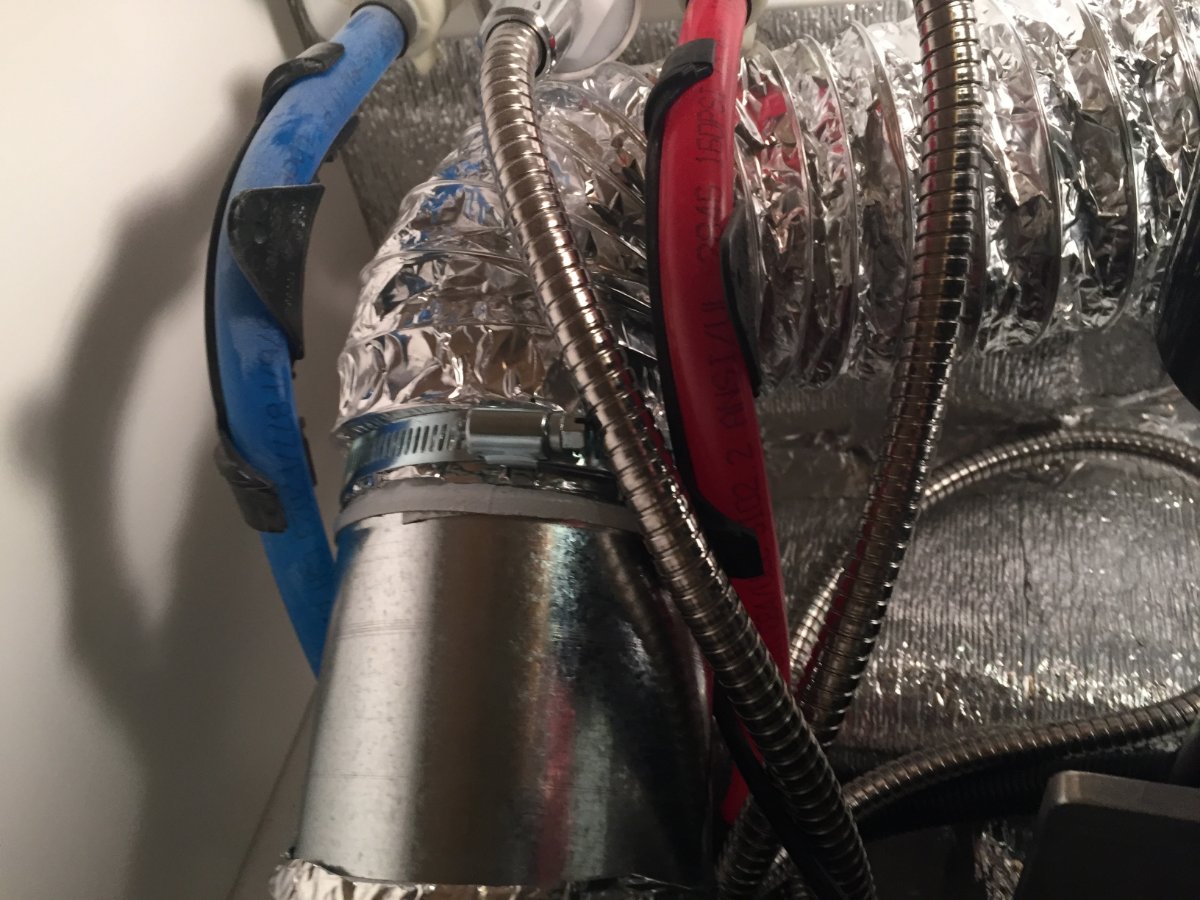
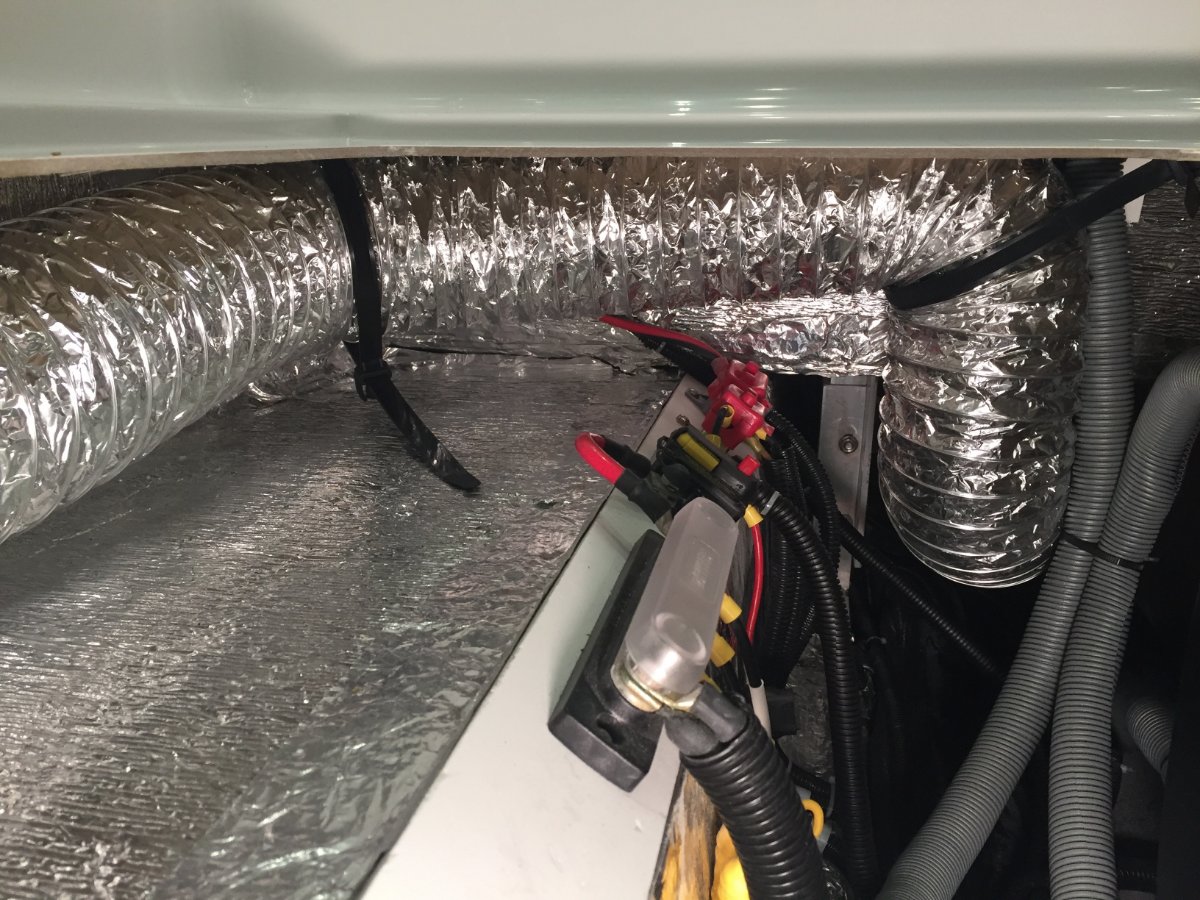
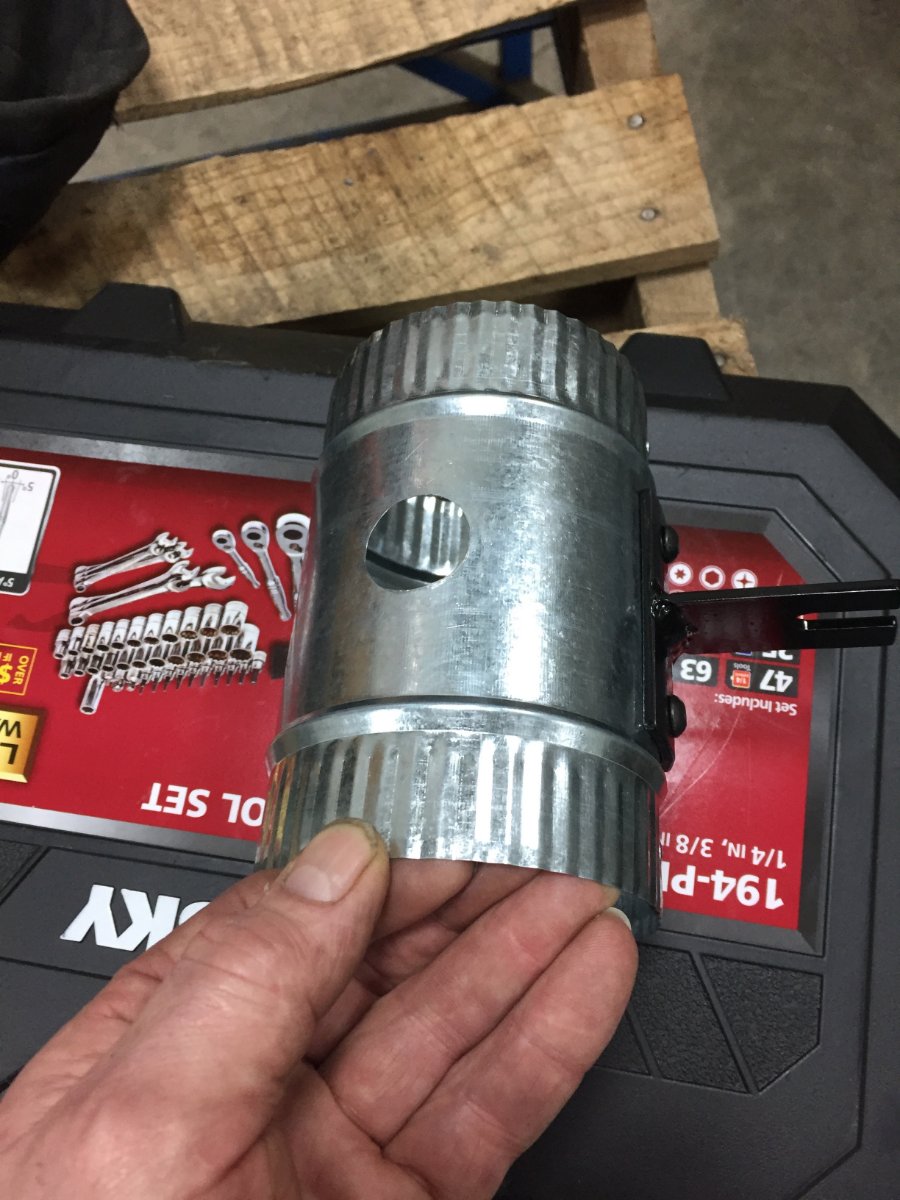
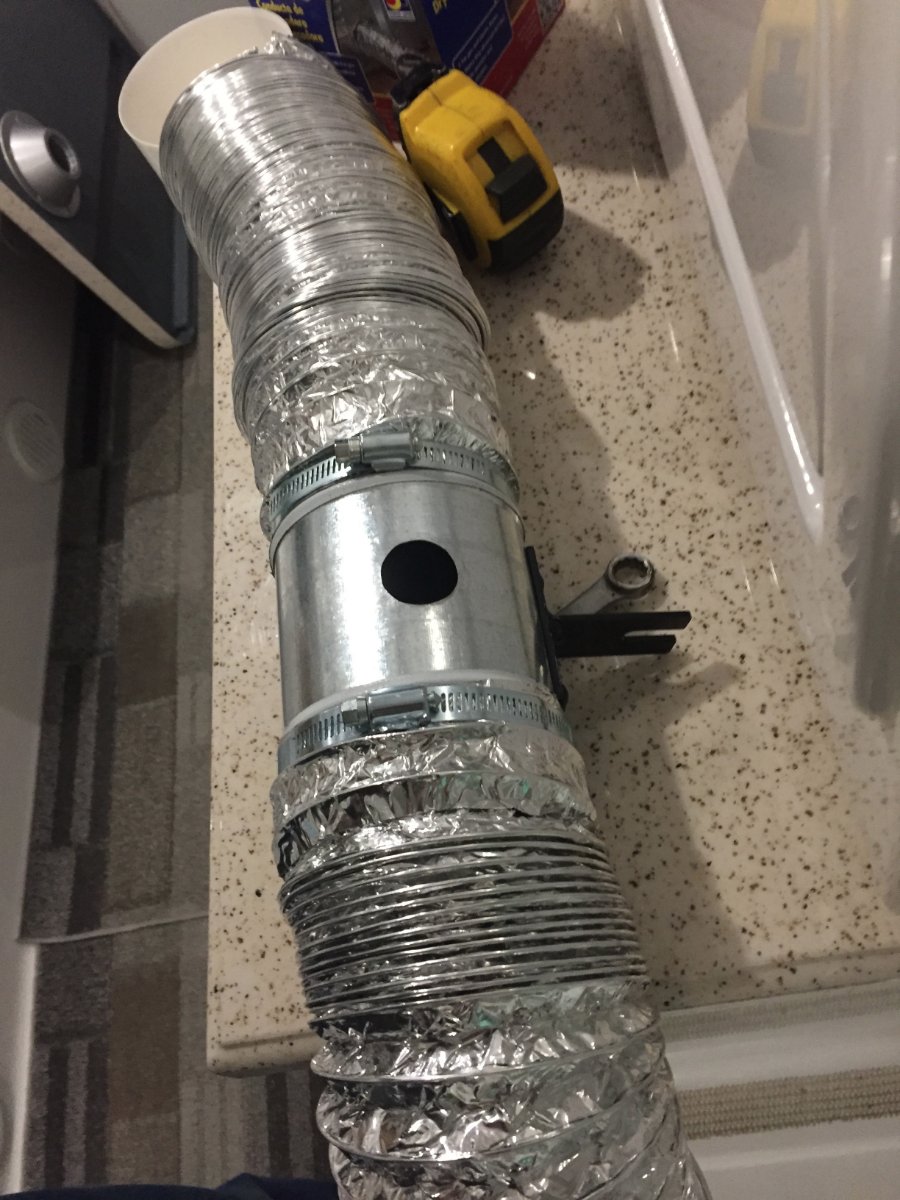
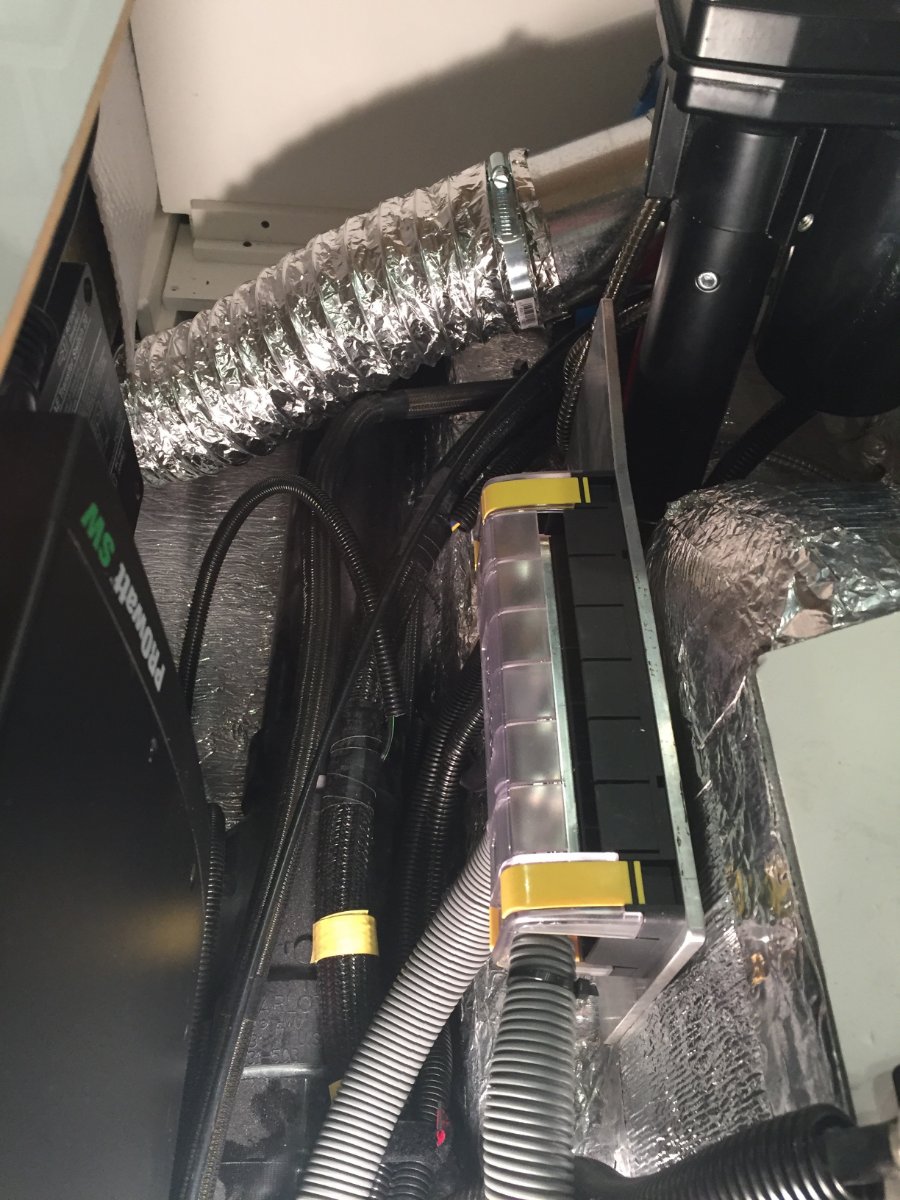
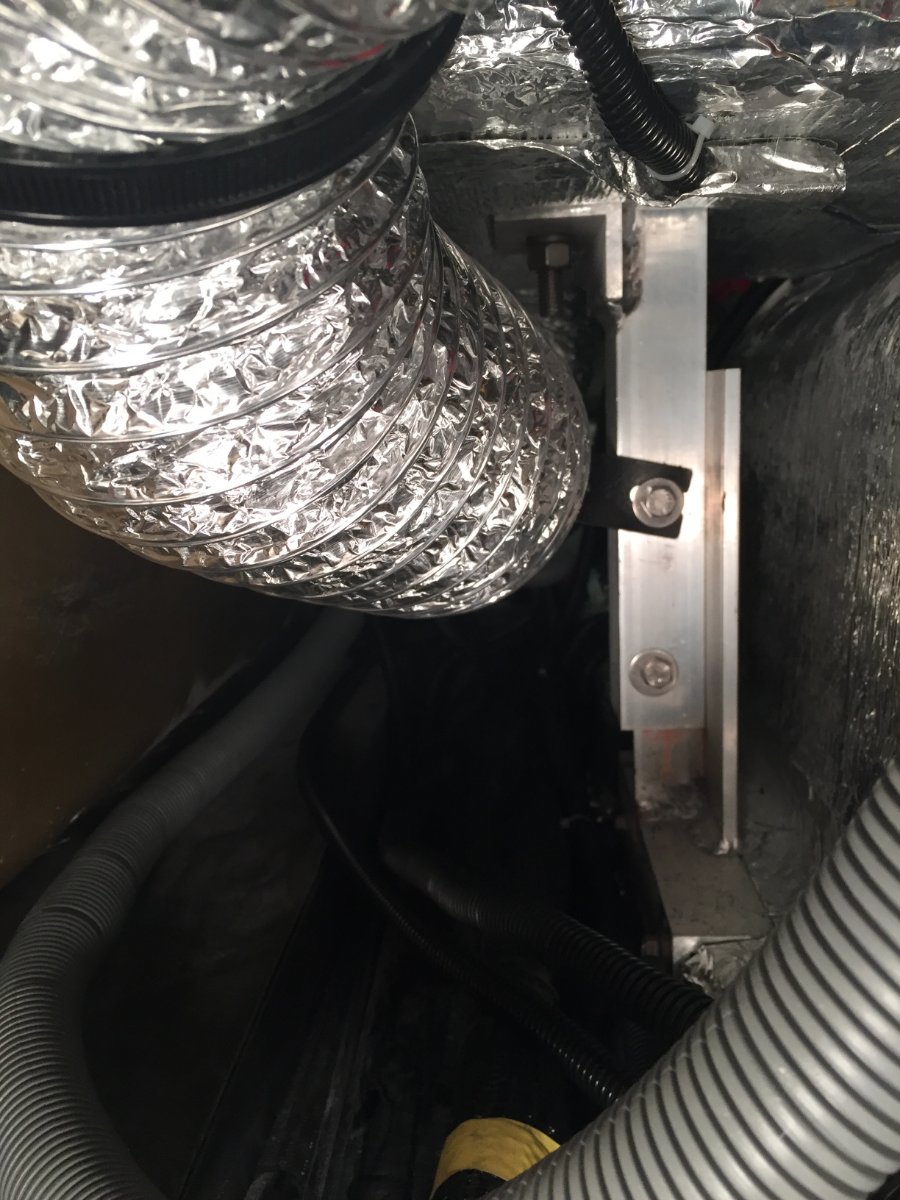
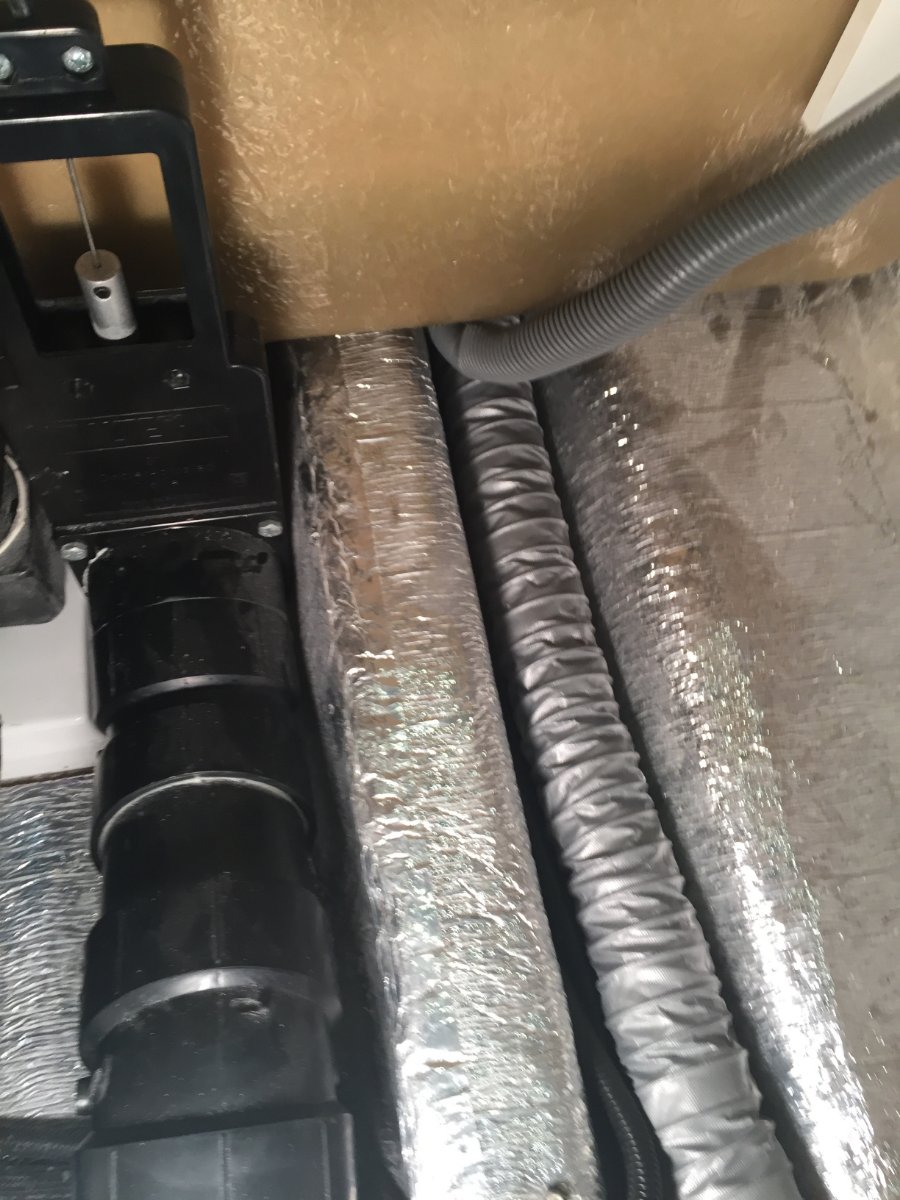
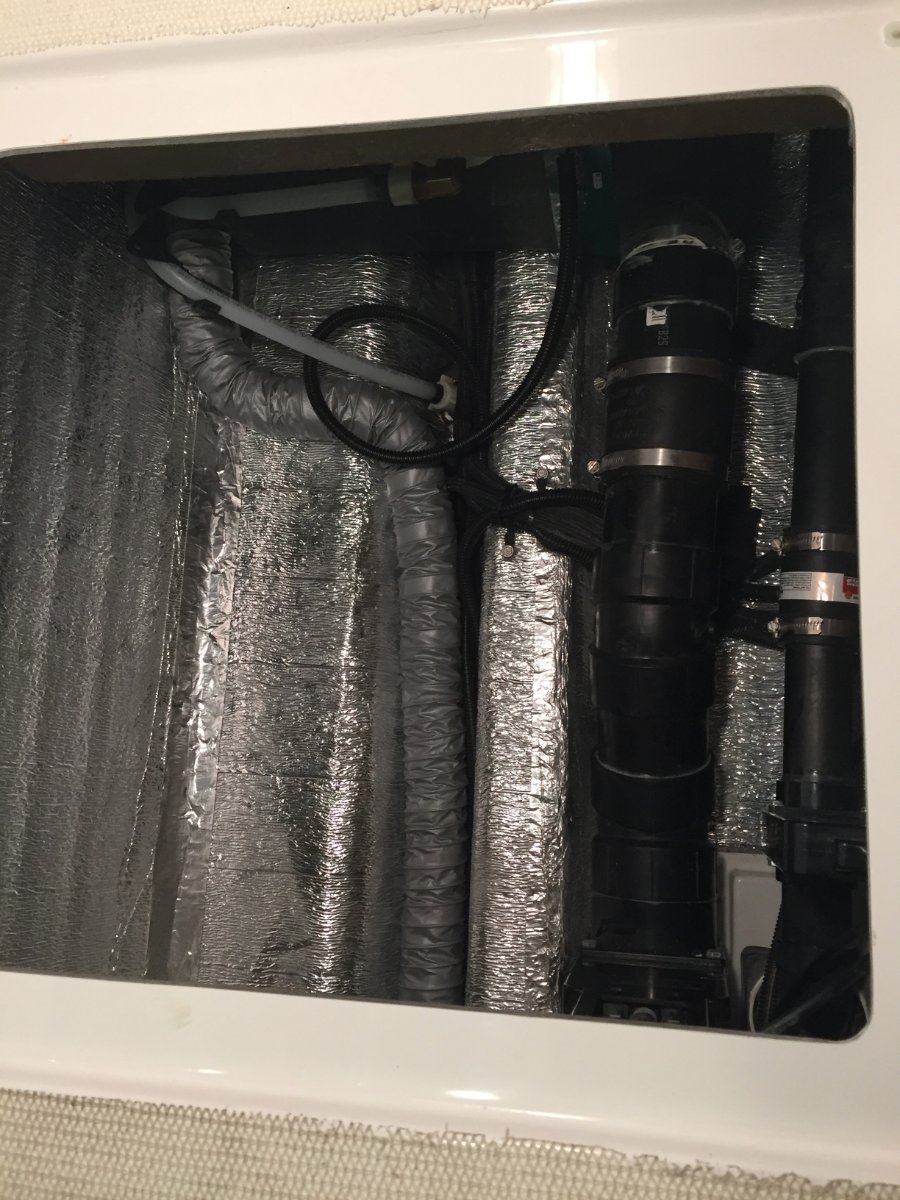
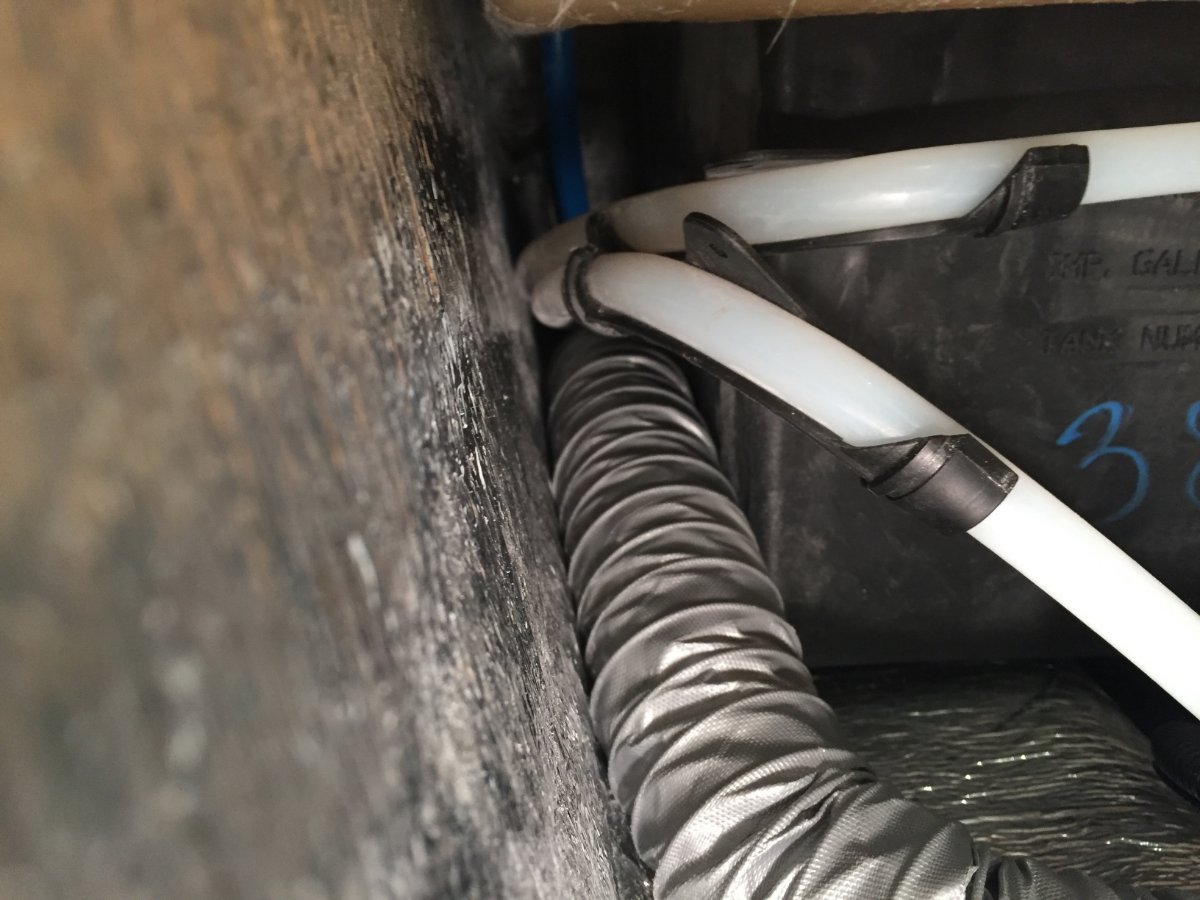
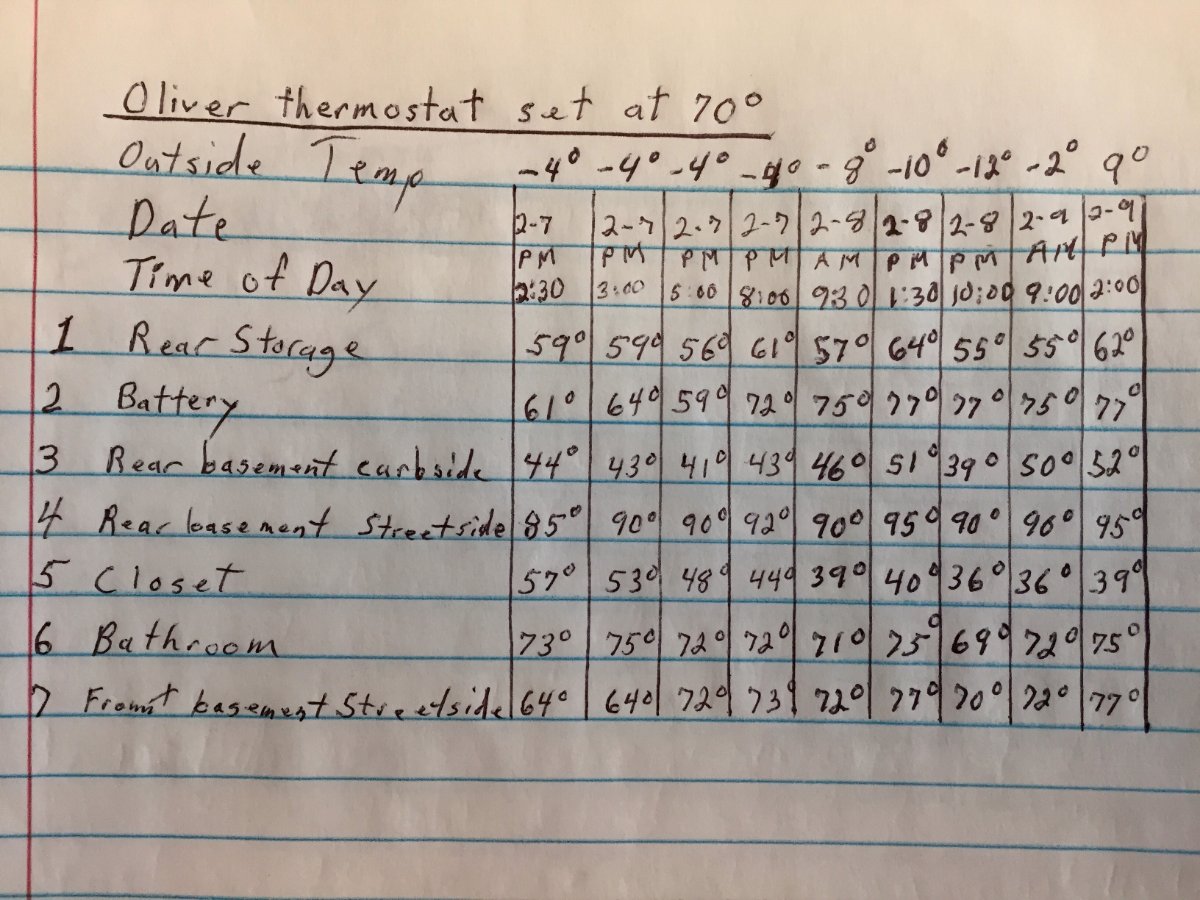
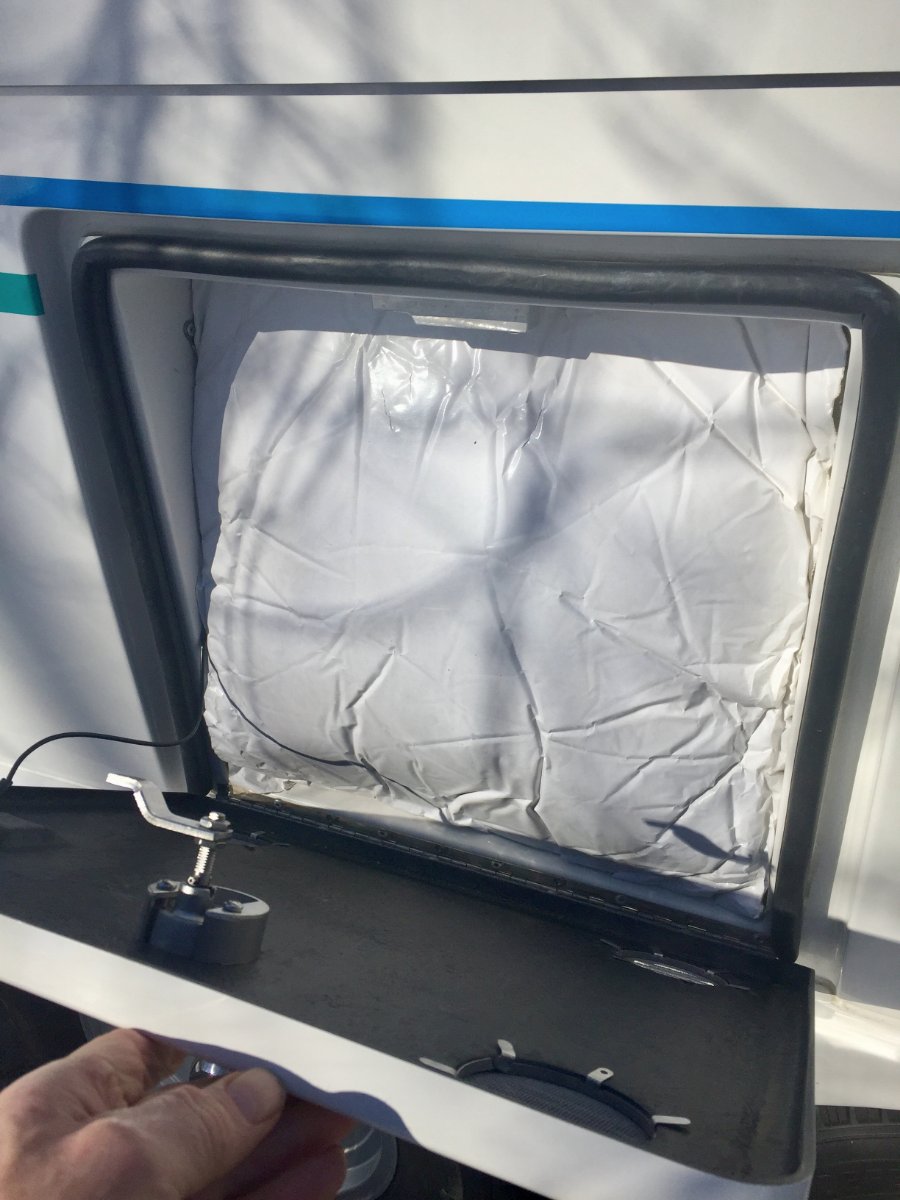
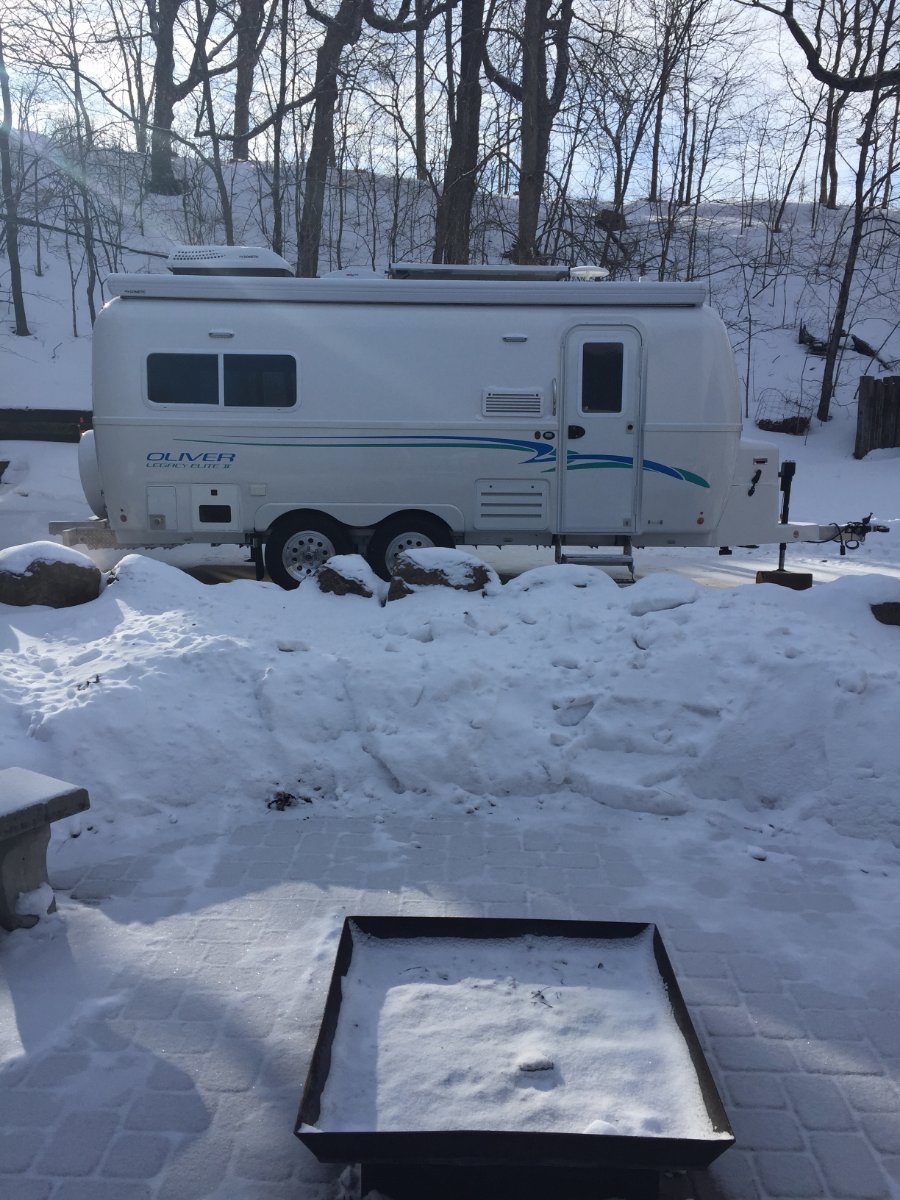
The seed was planted for this furnace mod when we grabbed a canceled reservation three weeks out at a Minnesota State Park. This reservation was mid October and when the date arrived the weather forecast had changed for the worse. We stayed for only two of the three days and we received our first snow of the season, 6 inches of wet snow. We had a non electric site and my batteries were having trouble making it through the night and I was concerned about the water freezing in the Oliver. I have already addressed switching to lithium batteries and posted about it on Oliver Forum. Now I want to share with you what I have done to relieve my worries about water freeze ups in the Oliver, provided that I have a functioning furnace. I first tried to identify the weak spots and came up with the following. Boondocking Inlet Outside Wash Station Fresh Tank Fill Inlet City Water Inlet Black Tank Flush Port Toilet Water Supply Line Hot & Cold Lines Crossing Back Of Oliver The Oliver has all of it's heat ducts run on the curbside which protect the kitchen and the bathroom faucets from freezing. My plan is to run a 2" ducting along the back to the street side and terminating in to the trough that the water lines run in for the city water inlet, fresh tank fill inlet and outside faucet. This trough also has the check valves for those two inlets and has the floor of the exterior storage compartment covering over the top of it. To get at the trough you will have to remove the back wall of the storage compartment and flip the mat back that covers the floor. This exposes the water lines that come across the back of the trailer and drop into that trough. There is a wall that separates the furnace compartment from storage and extends past the wall you just removed. It has a opening for the water lines and it is large enough to run the 2" duct through it and on top of the water lines across the back and into the trough. Now you can flip the mat back down and they are long enough to cover the water lines and the newly installed 2" duct, then the wall is put back in place. On the connection to the furnace I removed the back of the heat exchanger. There is one hard to get at screw on the bottom but the rest are easily accessible. I made two holes, a 2" and a 4" in that back plate. I could not find a 2" starter collar locally so I bought two 4" and removed the rivets on one of them and formed a two inch collar, cut to length and re-rivet. I then installed the 2" and 4" starter collars to the heat exchanger back panel and then the panel to the furnace. I then hooked up the 2" duct to the furnace. Looking in to the access hole under the street side bed you are able to see where the water lines come up and out of the trough and to the valve of the out side wash station. When the furnace fan is running it will blow out a lit Bic Lighter held in that area. So we're protecting water lines, the check valves and dumping warm air underneath the outside wash station valve. Now back at the furnace I attach a 4" heavy duty aluminum foil duct to the newly installed starter collar. It is routed forward a short distance until it can be routed across the basement to the street side and then fed between the hot and cold water lines that go to the outside wash station valve. At this point I need to use a 4" coupler that is 6" long to attach the next 8' piece of 4" duct. I use the 6" long coupler so I can add holes if I need to flood a area with heat, this particular coupler did not need to. I then routed the duct from the wash station valve along the outer wall and over the wheel well, make the corner by the battery compartment and then once getting past the wheel well go down and under battery compartment. Up in that corner I attach a adhesive base 3/4" cable anchor so I can loop a 20" releasable tie strap through it and around the 4" duct holding it up and out of the way. A second 20" tie strap is used were the duct heads down under the battery compartment, it utilizes the loop that anchors the 4/0 cable coming out of the battery compartment. Next I prep another 6" long 4" coupler by adding a metal mounting bracket. It is bolted to the coupler using two 10-24 machine screws that go through the bracket the coupler wall and then a backing plate that has tapped holes. This coupler I will add a1" hole that will be pointed up to flood heat at the battery compartment. The mounting bracket will be utilizing the upper bolt of the support leg for the battery compartment. This keeps the duct up and away from the inverter and electrical components and positions it to flood heat up against the bottom of the battery compartment. The next length of 4" duct is clamped to that coupler and routed up from under the battery compartment over to and along the wheel well. It is held by two 20" tie straps similar to the other side. Because I want to run the heat duct under the foot space of the dinette I need to transition to 2" duct. There is access via the same trough that I utilized in the back of the trailer, but at the front there is more room and I am able to pull the 2" ducting through. From there it continues toward the front until it reaches the black tank flush inlet where it then follows that pipe back along the black tank and terminates by the water supply line for the toilet. At the transition point I add two more short pieces of 2" duct and route them down to where the main black tank drain pipe goes under the dinette foot space, they are terminated on either side of that pipe. There was not enough room to run the 2" duct but enough to force air along either side. At the transition from 4" to the three 2" ducts I simply inserted the three 2" into the end of the 4" and used aluminum foil duct tape to seal the transition. I also want to mention that I used the aluminum foil duct tape to reinforce the ends of every 4" duct by wrapping outside and inside before clamping. That should cover the install, now lets talk about the results of the test in subzero weather. I rounded up seven digital thermometers and put them in the areas I was concerned about. Was placed just inside the empty rear storage compartment. Was placed on top of the batteries and a piece of acoustical insulation that was for large generator enclosure, it was 1-1/2" thick and 19" square. This was squeezed in the opening before the door was closed. Was placed in the rear basement curbside next to boondocking inlet. Was placed in the rear basement street side below the outside wash station valve. Was placed on the floor of the closet with the door left closed. Was placed on the lower shelf in the vanity in the bathroom with the door left closed. Was placed in front basement street side next to the black tank flush port line. I moved it out of the heated shed at 1:00 pm on Sunday 2-7-21. I moved it back in at 3:00 pm on Tuesday 2-9-21. The furnace was cycling off and on at -4 ' but I noticed at -8' and colder it ran continuous. I have the Truma water heater and that was also turned on. I checked propane consumption by putting on two 20 pound tanks that I had weighed and left them in place for 12 hours. It was -12' when I put them on and -2' when I took them off. Because of the subzero temperature the propane was not gasifying very well and the regulator automatically changed from the primary to the reserve after only consuming 2.353 gallons. The total consumed out of both tanks in 12 hours was 3.294 gallons, so that would be .274 gallons in one hour. My Victron BMV-712 was telling me that I had depleted my 400 Ah Battle Born batteries to 47% and at rate of use I had two days and nine hours left. I thought I would comment on a couple of things I like about the outcome of the project. The bathroom was comfy warm and the wall next to the bed was not icy cold. I am not planing to take up subzero camping but it does gives me a benchmark to go off of for any situation that I might run in to. If you have any suggestions or see something that is of concern please let me know. Paul
1 point
-
Thanks. I try to share some of my projects to give back to the Oliver forum for all the great info and ideas I have gleaned from it. To answer your question yes that is part of an upgrade I did to the heating system. Last winter here in Minnesota I was able to test my heating modification in sub zero temperatures. I loaded the Oliver with water and with no added insulation I spent 2 1/2 days in temperatures reaching negative 12 below zero. This was done using only battery and available solar to power the trailer. If interested check out Breaking Subzero | Oliver Furnace Mod under Ollie Modifications. Thanks Paul1 point
-
Dave and Kimberly, welcome and congrats on the upcoming Oliver. I hope you’ll find it a good match for your travel and camping needs. We’re in our 6th year in our EII and are having a great time. We’re on our way to Maine and just spent a couple of days in Ohio. Hope to see you on the road! Mike1 point
-
HI, glad to have you on the forum. With the purchase of the E II with the options you describe - minimalism kind of goes out the window. You will discover - over time - just loosely putting stuff in the Oliver - will not work in the long run. You will develop systems for storing the "stuff" you find you need/want. It will be more than you believe - at this time. You will not need a generator if you don't plan to run the AC -much (if at all) - or you don't do a lot of boondocking. In the 3 years we have enjoyed Ollie - this is the first year we will have a gen set along - due to our desire to avoid the crowds at the more established camp areas. And it is really only due to a desire to run the AC when we are trekking across the mid west in 100 degree temps, and not hooked to shore power. You will have to discover what your preferences will be over time. As to the TV - your main inquiry - - As others have replied, you will be fine at the onset - and over time - depending on where your RV travels take you - may find you need - more payload, more power (Torque), more room, and a more planted feel while pulling on the interstates and in the mountains. The 3.5 is a good powerplant, and the Ford a good vehicle - but it will be asked to perform at the upper reaches of its design intent - on anything considered "grade challenging" . Comfort - and how tiring it can be - will also begin to play into the equation. I must admit I wasn't aware of this until I went from a similar vehicle to my current 2500 GMC. Worlds difference at the end of a 600 - 800 mile day. By the way - as good as the 2014 powerplant is - it is worlds less than the current crop of engines - all manufactures have made great improvements in power, efficiency, and features. Boggles the mind. Ford is now building a truck that is more power generator than vehicle..... well sort of😁 The Oliver It is a great start for your journey. And it is a Journey - both in destinations, experiences, and equipment. Here is a thought experiment - Pile into a heap all your stuff you take on the first trip - take a picture. After 5-6 trips do it again - compare. Good luck. I failed at minimalism - I am attempting to reform - but failing ...... Have fun RB1 point
-
FYI, with the same size tire, and the same load rating (10 sidewall plies, Load E), you can use the old chart, no worries. If there are any differences in recommended pressures between tire manufacturers, they would be so small as to be negligible. You should use tire operating temperature (and tread wear over the very long term) as an indicator and adjust air pressure as needed. And if your interior is showing signs of distress (utensils and dishes thrown around) then lower your pressure a bunch.... or don't drive so fast over speed bumps. 😉 Try 50 psi, lower them gradually from that to where the tires seem to be 'happy'. John Davies Spokane WA1 point
-
I think this is the raw data used for making the Table John Posted at the start of this thread about 2 years ago. *the data seems to match from 40 PSI up... Just putting it here in case the original data set get's lost as those tires are no longer put on Olivers...nor appear to be mfg in Canada.
1 point
-
Update to an old thread. I am now running 42 psi which seems a decent compromise between tire temperature, tread wear and cushioning. I do notice a negative effect on fuel economy when they are not rock hard. Coincidentally, that value is the exact same as in my Land Cruiser LT 10 ply tires. The truck and trailer weigh about the same and that makes it easy for me to remember .... If you don’t have TPMS in your Ollie, run a higher pressure for a better safety margin. John Davies Spokane WA1 point
-
The only regret I have is about the interior space. We camp with our 5-year-old and two small dogs...a lot of beings for a small space, and I realize we're not the target market for the Ollie. During clement weather it isn't a problem as we're mostly outside anyway. But when it's really cold or really hot or raining, when people want to be inside, it feels pretty small. If you're just a couple (or a single) with or without some pets I'd say the Oliver is the perfect size. I am ashamed to admit I looked at larger options like Bigfoot recently. But they're expensive, poorly balanced (25 footer has 1200lb+ tongue weight) and still require a lot of costly upgrades to get to where Oliver is already. And that interior.... I know a larger Oliver would be pushing the weight and cost envelope and give up some of the excellent tow-ability, but I would seriously consider it. But other than that the quality is what we found attractive about Oliver and it hasn't disappointed so far. Although that may not be saying much since we're less than a year into ownership. The mechanic that we take our trailer to for maintenance has been "in the biz" for 20 years and says our Ollie is the best-made RV he's ever worked on. Once we decorated inside it isn't "sterile" anymore and simply looks modern and CLEAN! Love the solar and beefy battery bank that makes boondocking easy peasy; not some piddly 120w panel and "upgraded" single battery that other manufacturers try to pass off as a boondocking setup. Mounting the four heavy batteries over the axles is a great design which ensures a properly balanced trailer, unlike just about every other travel trailer on the market. That's just one example of the superior design that you get in an Oliver. Another is the sewer storage bumper setup. I dislike not having a dry bath (separate shower) but what I like a lot better is a big, extremely useful closet and pantry in a trailer this size. I don't need a big 9 cu ft refrigerator/freezer like other makes offer. A) those trailers can't be off grid for more than a day or two anyway and B) where do you think you're going that you'd need that quantity of refrigerated/frozen provisions? We've taken five-day off-grid trips and the Dometic in the Ollie has been the perfect size. The benefit of the smaller-ish size is that we can fit into the vast majority of state/national park and forest service campsites, which was a priority for us since that's where we like to go.1 point
-
I regret that I did not find out about these trailers a decade earlier Sorry about that, jd. I'm only 11 years in. Happy camper, so far... what else can I say?1 point
-
The Oliver Owners site on Facebook is fluffier. I like it. It's mostly photos of beautiful campsites & new Ollie owners. For the real meat & taters, this is where I come.1 point
-
Sorry to hear about your problems. Which fridge do you have? We had various issues with our dometic early on, and all of them were corrected by Camping world under warranty, no charge, after we did the basic troubleshooting to rule out any operator errors. Is your fridge running at all, or just not cooling properly? Any number of us would be happy to help, if we can. Sherry1 point
-
My only regret - not having the opportunity to use my Ollie - MORE! . But that will come...…..1 point
-
We were looking at Airstream for over a year, then found the Oliver web site, drove from Kansas City to the plant for a tour, and placed our order. Now when we look at the inside of any other fiberglass trailer, we know we made the right decision to go with Oliver. Stan1 point
-
Ten and a half years with hull #12. Still very happy with our camper. It's still looking pretty fine, too. Sherry1 point
-
No regrets. But being a first-time travel trailer owner was a bit overwhelming to say the least. I am of the opinion that you cannot study, read, and learn enough of everything about travel trailers before making the plunge. But there is not enough time to do it all the way. At some point you must pull the trigger and let the bird fly. The forum here has been extremely helpful and important to me. Oliver's service support (especially Jason Essary) has also been willing to handle any problem in a kind and fair manner. I was warned before purchasing a trailer that there will always be problems. That nothing is perfect. I have found that to be true. Oliver Travel Trailers factory is not exactly easy to get to or even a smart idea as a service center for probably most of us who own one. That makes learning how to do the maintenance and simple repairs even more important. I believe I can handle this. Because we sold our home in Florida and our cabin in northern Michigan, all I have to take care of now is this trailer. We built a garage/base camp in the panhandle of Florida and are heading there now. I look forward to washing the Ollie, waxing it, and learning how to do the basic maintenance required to keep things running smoothly. I also have to replace the water pump (I am not a plumber) due to a problem of my fresh water tank filling up when on city water connection. I opted to just replace the entire pump instead of fooling around with check valves, cleaning, flushing, and whatever else is necessary. I am hoping that afterwards I will be a water pump expert with pics to prove. We love our Oliver. It is our new cabin on wheels.
1 point
-
No regrets here. Money well spent. We like the reliability and company support. We’ve come to really appreciate the capabilities and amenities our Oliver brings to our travels and camping. Mike1 point
-
Dwain, Welcome! First time we saw an Ollie, we really liked the layout and exterior/interior finish. Ollie is our third camper. We purchased our Ollie used 2016 and paid the original owners close to what they paid new in 2015. We never dreamed our Ollie would gain value, but it has and what a pleasant surprise. We always have folks interested to look at Ollie wherever we camp or stop. Ollie is pleasant to camp in and it's easy to clean inside/out. It's a dream to tow, very stable and not too large for maneuvering. There are many knowledgeable folks here willing to answer questions. We're happy we purchased Ollie and would do it again, no regrets!! Good luck in your search!!!!1 point
-
Ours was 5,565 from the factory. With 'stuff' I'm sure we're well over 6. I imagine ours is one of the heavier ones, though. Bigger axles, extra solar, etc.1 point
-
Don’t forget the cast iron cookwear, firearms and ammo ..... they are pretty darned hefty. I haven’t bothered going to truck scales, but I am guessing that, for Mouse, 6ooo lbs is a typical towing weight. I actually try to keep the weight down, other than a full fresh tank always.... The folks that live months at a time in their trailers carry a LOT more stuff than those of use who take short trips. Merry Christmas. John Davies Spokane WA1 point
-
I noticed today that the tire placard on the Oliver says that the recommended tire pressure is 80 psi. Now when I took delivery last month Rich told me to keep it at 60 psi as the averaged weight of the Oliver is about 5000 lbs. with “stuff” so add that to the thread...????1 point
-
You can't get hurt by quickly touching the center caps on the wheels, but they aren't a very good measure of problems either. The infrared thermometer can look at the brake drums though. A failing bearing is likely to make the drum hotter and it will also develop play that you can find by grabbing the top of the tire and then pulling and pushing on it to look for play. This is a good thing to do at the campsite in the morning.1 point
-
An infrared thermometer from Harbor Freight is real cheap these days. Flash it at a tire and done. But, on the plus side you can quickly check wheel bearings too. Try that with a bare hand on a faulted bearing and your troubles will be compounded quickly...1 point
-
My Ollie weighs probably 5,500 lbs. when towing. I run my tires at 60 PSI and I set them there when cold before we leave. This is a good default pressure that will handle the trailer load just fine and keep the tires cool. It still has some flex and is not rock hard like it would be a 80 PSI. It also allows them to build pressure on hot desert highway runs where the asphalt might be at 140 degrees and the air at 100 or more. I can tell the temperature difference in the tires even at 55 PSI. They are warmer. Every fuel or grocery stop, I go around and touch each tire. They are always the same temp, if inflated the same, and they are just slightly above ambient air temperature. On the road, I don't use a gauge, I just touch each one and compare the felt temps. Every time you use a gauge you let some air out and run the risk of the valve leaking. It's not necessary to use a gauge when stopping for fuel, just use temperature. Warmer tires are under more stress and they make the trailer harder to tow. This is why I would never run them at 45 psi, for instance, even if the chart said they could handle the load at that pressure. The chart is more a minimum guide than a definite number that you must follow. And as John mentioned, you have no head room at the lower pressure in the event of a slow leak. Off road, or on secondary gravel roads, it's a different matter. I'm talking about droning down the highway at speed. That is when the higher pressure is a good policy. On back roads, it's a good idea to air down and travel slowly, but you have to factor in the difficulty of airing back up. This applies to the truck too as I like to air it down on rough roads or in the snow. When going into Death Valley I'm on gravel, or worse, for a hundred miles or more and when I come out, I can get back to town with limited speed on paved roads to air back up. I have a compressor, but it's for emergency use as it's not real easy to use. If we are only going five miles on a rough road, I'll just go slow and keep the pressure up. This is what we did at Sun Valley for the Eclipse. Just idled along for a few miles on a rocky road as we climbed to our spot out in the forest, then idled back out. No need to hurry in that situation.1 point
-
Actual load is more like 3150 lbs per axle (maxed out) on an Elite II, since some of the weight is carried by the TV, not the axles. It's up to you to decide what works for you, everybody has an opinion. If you have trailer TPMS and watch it (not rely on the warning alarm), you can run lower pressures. But if you run over a nail and the tire starts to slowly deflate, a tire set at 45 psi will quickly get hot and give problems. A higher "starting pressure" gives a bigger time leeway, and more miles down the highway, when things do go wrong. With tires set at 60, and your TPMS warning at 55, you have some driving time after you are alerted, before the tire is overloaded. I would not hesitate to deflate to 35 psi on rough forest roads to reduce jarring, if I kept the speed below 30 mph.... The final factor is how hot are the tires? They will tell you when they are unhappy. Overloaded tires at highway speeds are HOT. John Davies Spokane WA1 point
-
John. I noticed in the other current thread on tire pressure that you said your tire pressure was at 60 PSI. I may be confused but I thought the axles on the Oliver were rated at 3500 lbs. So according to the table for psi, a max loaded trailer would be about 45 psi. If I read the other thread currectly 80psi is the max, but appears to be way over what is recommended.1 point


.thumb.JPG.dd838cdb3df463dab6a16861fa23a319.JPG)


.jpg.b4fb182c2dd38b005d42f99a3317e409.jpg)


-
Recent Achievements
-
")


")


")


