Leaderboard
Popular Content
Showing content with the highest reputation on 12/18/2021 in all areas
-
I'll likely reserve it, rally or not. If the Ollies don't bite, I have lots of friends who will. It's truly one of our favorite spots. I have the site reserved this June for 10 days -- sort of a last hurrah for all of our friends whose youngest kids head to college next fall. I'll be able to better guage if things have changed post-covid, and will take a lot more pictures of the site itself. Stay tuned!3 points
-
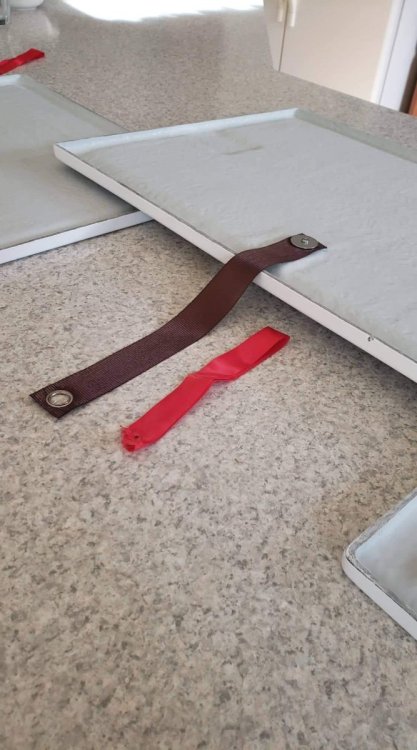
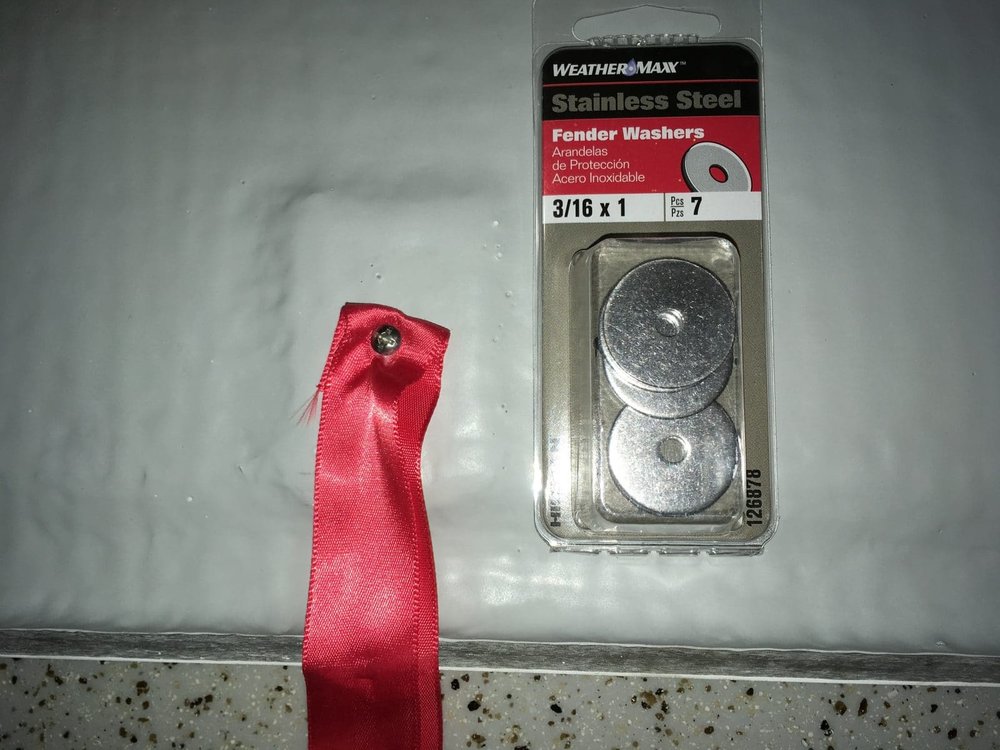
I've hated my red satin compartment straps since the day I brought ILOVHER home. They never seemed to be on the outside of the lid! I found some of these grommet straps at my local discount outlet store for three for a buck! More robust nylon, longer and and nice grommet to hang on to. A washer and screwdriver and you're done! Here's a link to similar. https://www.amazon.com/TCH-Hardware-Nylon-Strap-Grommets/dp/B085CNGRFP3 points
-
That waypoint is correct. And the 90 minutes is without rush hour up 285, according to Google Maps. 58.1 miles from downtown. The road after you turn off of 285 is very windy and steep in places. Most posted speed limits are 25mph, slower if you are pulling a trailer. And once you are on the dirt road, you are travelling even slower. Twisty, not quite 2 lanes in a lot of places. Maybe 15 miles an hour. Unless things have changed radically due to covid, this site is not swamped with people. The lack of any type of services other than pit toilets tends to keep a lot of people away.2 points
-
It actually isn't packed with visitors, or at least it wasn't for the 10 years I camped there pre-Covid. 2020-2021 are the only two years I haven't been in the last 15. The dirt road in has a number of dispersed campsites, and there is a FS campground about .5 mile from these group sites, but this is fairly isolated. The upper campground that we usually reserve is several acres, and while some mountain bikers do wander through along the Colorado Trail occasionally, they hardly qualify as swarms. This is one of my favorite campgrounds to relax and enoy some time away. That said, I can't do anything about the no cell service, but then I usually don't want to. When Mark and I were working full time, we recognized the preciousness of being forced to "unplug" for a week. Occasionally, one of would have to drive up to the paved road to take a phone call, but otherwise, we enjoyed the isolation. It's not for everyone....2 points
-
Thanks for the message "bump" . . . . . yes, the holidays have been busy and I've not been monitoring the forum much . . . . barely keeping up with my email! I'll try to do better. It's been a while since we (my husband) installed the new 3000w inverter. What JD says is most important: disconnect all power sources (Jason outlines what/where to disconnect in the attached instructions). I don't know if it was necessary, but we also disconnected the solar controller. Our 2021 has a cutoff switch in the compartment over the street side bed on the outside of the pantry wall. It's a big red switch; you can't miss it. Oliver Support (Jason) helped us through the entire process, stepping in when Xantrex drug their feet in resolving our issue. Attached are step-by-step instructions, as per Jason. While the task seemed daunting, at first, it really wasn't bad at all; having written guidance made all the difference. Though Oliver offered to walk us through the entire process, via phone, we found the attached instructions very straightforward and easy to follow. My husband has some experience working with electrical things, but we are hardly what you'd call professionals. I'll try to recall a few of the intricacies of our installation and offer tips to avoid the minor problems we did encounter. 1. As you have probably discovered, the inverter is not situated in a way conducive to replacement. 1. Remove mattress and prop open the hatch to allow the best access to the inverter. 2. Our inverter was held in place by 4 screws at each corner, to the inside wall of the bed base. You'll be working upside down and from the street side in a dark hole; make sure you have good lighting. 3. We utilized our phone to inspect and take pictures of the installation prior to removal. 4. IMPORTANT: absolutely lay a cloth, or something on the floor under the inverter to catch any dropped screws; voice of experience, "there will be dropped screws!" The phone camera also comes in handy here. 2. The only other issue I recall encountering was something Jason neglected to mention. Because Xantrex was not willing to send us a new inverter, our replacement inverter came directly off Oliver's shelf. Having not been handled by technicians, it was programmed, as from the factory, with default settings. Once you have the new unit installed and communication established with the remote panel, you will need to go through the programming and adjust it according to your specific installation. I suggest you contact Oliver for the proper seettings. Once the new inverter was installed, everything worked as intended. As for the annoying fan noise, I can't say, difinitively, that the new installation eliminated the constant cycling on and off of the inverter fan while connected to shore power (charging mode), though it does seem to be less annoying than before the replacement - maybe we are just getting used to it! Don't hesitate to ask Oliver tech support for guidance . . . . . you can do this! If you have any specific questions, don't hesitate to ask. Susan Oops! Forgot to attach file: Steps to remove old and install new Xantrex inverter.docx2 points
-
2 points
-
Overland I once had a portable fire pit table for the deck. I replaced the lava rocks with glass pieces for fire pits. It gives off a different fire patten cool look, it took a lot more to fill the pit not sure it would be good bouncing round while traveling.2 points
-
We don't have a portable firepit, but we have a natural gas firepit on our home back deck. We use the fire glass instead of lava there. It's kind of pretty, day or night, though we cover it usually in the day with a metal lid, and use the pit as a coffee table. It's been fine for 7 years. But, the glass bits weigh twice what lava rock weighs. I'm sure you've already researched, but I'd buy glass from a reputable source, if you go that route. Some of them on Amazon have reported shattering in heat. We spent the extra $$ and ordered the true fire glass with the pit. There's a company on etsy that makes hollow steel "logs" and pinecones. More pricey, but interesting. And, probably lighter than glass bits.2 points
-
Recent events in Mayfield surely temper that, but I suspect it's a lifelong attitude, and a positive force to those around you. I'm very thankful your niece and family are ok.2 points
-
I am somewhat kidding but you may also remind them that your quick thinking may have saved some lives and additional property damage resulting in much larger payouts. I am not sure if you have the same insurance company on your home or your driveway sustained any damage. Rivernerd is far more versed in this than I am. Good luck you did the Insurance company solid by being resourceful and putting out the fire your self. If you waited for the fire department no matter how quickly they arrived, it would have been worse. Good luck to you.2 points
-
As a retired attorney who was retained to defend claims by many insurance companies when I practiced, I second Mattnan's advice. Insurance adjusters are trained to close claims for minimum payouts, and to get them closed as quickly as possible. To "arm" yourself with facts, I would invest some time getting educated about the demonstrated caustic effects of the fire extinguisher you used, and which steps are necessary to remediate those effects. And, I would insist that any remediation done at the insurer's expense be effective to fully address those caustic effects. If you get pushback from the adjuster, I recommend you mention the term "bad faith." That is a term of art in insurance law, which refers to claims for breach of the insurance company's duty of good faith and fair dealing with its insureds. In most states, successful bad faith claims against insurers include an award of not only full compensation for loss by the insured, but the insured's attorneys' fees as well. Your odds of success on such a claim can only be reliably evaluated by an attorney in your state who specializes in bad faith claims, and who is appraised of all the facts, which will likely include how fully the damage from your fire, and fire suppression, has been remediated. But, be prepared for delay. A more fair settlement is usually a much delayed settlement. If your cash flow situation does not allow you to purchase a replacement tow vehicle (particularly in today's crazy-high market) without the payout from the insurer or sale of your repaired Tundra, you have a cost/benefit decision to make regarding how long you can afford to wait for payment by the insurer. Good luck! I would be interested in a report describing how it goes. Ralph Pond2 points
-
This is too bad. And it really sucks on the vandalism. What are we comming too. It might be worth while to give them another call and inform them of how unhappy you are with their decision and that the trade value of the truck is greatly diminished due to the fire and corrosion. I would mention to them that you would prefer to not have to engage a lawyer but you may have to do that. The adjuster doesn't want to have to engage legal either internally or outside counsel. They generally have some flexibility. I worked for a different but very large national brand insurance company for over 20 years. While I was not on the casualty side of the business I did have many colleagues that were. I was able to use this approach when I was hit from the rear. I slow played the adjuster a bit refusing to sign off. Eventually they came up with more money and and I didn't have to engage a lawyer. Just a thought. Very fortunate you're ok. But wow. Good luck.2 points
-
There have been numerous posts in this forum about Oliver’s lithium battery systems—about their usefulness, limitations, and value with respect to cost. Despite reasonable arguments against it, a number of us have purchased the lithium package. Reasons for purchasing the option have included the ability to run the air conditioner (A/C) for short durations (like at highway rest stops), greater usable energy (more boondocking in cloudy weather without needing a generator), faster charging, and longer battery life. This post summarizes things I’ve learned over the last 6 months about the Xantrex/Lithium/Zamp system. This post might also be titled “Things I Wish I’d Known from the Start.” This summary is a work in progress. Hopefully, with your corrections and additions, this thread will be of use to others that have purchased the Lithionics option or are considering doing so. At the time of this writing, manuals and other information for the Lithionics batteries are in the Service Center Knowledge Base — see links at the end of this post. I assume at some point Lithionics information will be compiled with all of the other trailer manuals in Oliver University. Battery State of Charge A key component of the Lithionics system is the app that lets users monitor State of Charge (SOC) and voltage (see links below). The reliability of the SOC values (which describes the amount of energy remaining in the battery) depends on (1) maintaining SOC calibration and having (2) up-to-date Lithionics firmware. The SOC should be near 100% at 13.6 volts, and about 50% (+/- about 10%) at 13.2 volts. If this is not what you’re seeing on the Zamp controller, Xantrex remote, or Lithionics battery app, then something’s wrong. By way of example, a couple times we’ve experienced the SOC readings of 60% when the batteries were dead -- not good. Note that the voltage reading on the app while there is a load on the system (e.g., electric heater) is different than when there is no load; the “resting” voltage may be higher. SOC Calibration The SOC requires periodic calibration. According to the manual for the 130 Ah batteries, the SOC can be calibrated simply by charging the batteries to 14.4 volts. The manual also states that fully charging the batteries to 14.4 volts should be done at least once every two weeks for battery life. Get the 130-Ah battery manual from Lithionics using the links below; at the time of this writing, Oliver has the incorrect manual posted in the Knowledge Base). When charging with shore power, it is not always apparent that the batteries have reached 14.4 volts, because when charging, the batteries only stay at ~14.4 volts for a short while before dropping back to about 13.6 volts. You can verify that batteries have reached 14.4 volts by monitoring battery voltage using the Lithionics app during a charging event. If you are unsure that the batteries are reaching 14.4 volts, you can at least confirm that the Xantrex charger/inverter is set to charge to at least 14.4 volts in the Xantrex app (https://support.olivertraveltrailers.com/portal/en/kb/articles/xantrex-remote-bluetooth-pair-operation) and, under Settings, check the custom absorption voltage. Ours came from the factory set at 14.6 volts, which is sufficiently high to get the batteries to 14.4 volts. Lithionics Firmware At least some of us that picked up our trailers in spring or early summer have batteries with outdated firmware. As I understand from Lithionics, more recent firmware versions have an improved SOC algorithm (our initial SOC readings were unreliable). You can check firmware version with the Lithionics app by clicking on a battery, then clicking on the settings “sprocket” in the upper right side, and then clicking on firmware. Our battery came with firmware version 1.0.05; I’ve recently updated to 1.0.07 by clicking on flash firmware. This has to be done with your phone in close proximity to the battery, and has to be done separately for each battery. Updating firmware comes with a “…this is a critical operation…” warning; you might want to check with Oliver or Lithionics if you have any questions about doing this. Has updating firmware improved our SOC readings? I’m not sure yet, but I think so. So far, the readings seem more reliable, but I’m still testing. SOC Calibration by Cycling A Lithionics rep told me that the SOC can be calibrated by “cycling” the batteries, and that this should be done every two months. Cycling consists of discharging the batteries to reserve voltage (e.g., ~12.1 volts) and then charging to 14.4 volts. However, the rep could not point to written documentation supporting this form of calibration. As the batteries support more partial cycles than full cycles (see graph below), calibrating by simply charging to 14.4 volts (assuming this effectively calibrates the SOC) seems better for battery life. Lithionics batteries will not charge from tow vehicle The standard 7-pin connection from tow vehicle to trailer cannot be used for charging the Lithionics batteries. Charging the batteries from the TV requires a DC to DC charger, which is an aftermarket installation. For more discussion on this, search for John Davies’ Redarc DC-to-DC charger installation description. Batteries Turn Off Twice now one or two of the three 130-Ah batteries have turned off when reaching low voltage (which happened because we were relying on incorrect SOC values). The SOC readings themselves looked OK, but the voltage did not correspond with SOC. The battery State in the Lithionics app reads “Off” for each battery when it is off. There is no flag on the Zamp or Xantrex control panel that alert the user to one or two batteries being off. The lesson (at least for me): monitor all three batteries, not just one, and note the Current, Power, State, and Status Code settings. If one or more batteries are off, turn the battery(ies) back on, and fully charge to 14.4 volts. Inverter Noise The Xantrex charger/inverter can be noisy charging the batteries with shore power (I’ve measured 60-64 decibels in the cabin when batteries are charging, and about 72 decibels adjacent to the inverter). The noise comes from (1) the charger/inverter fan and (2) the way in which the inverter is mounted (the fiberglass wall to which the inverter is mounted propagates noise into the cabin). The noise can be masked by turning on the A/C. Alternatively, the noise level can be reduced somewhat by lowering the charger current. In the Xantrex app, go to settings, and change the Charger Current from, for example, 100 amps to 30 amps. This will reduce fan noise. It will obviously take longer to charge the batteries with lower current. If you would like to be connected to shore power (to run an electric heater or the A/C, for example), but not charge the batteries (to avoid keeping them fully charged for long periods of time, or to reduce inverter noise) you can set the charger ignition control in the Xantrex app settings to “auto-on” (thanks to NCEagle for figuring this one out). In this mode shore power energizes the 110 outlets, the A/C, and the fridge, but does not charge the batteries. Turn the charger ignition control “off” to resume charging batteries with shore power. There are likely ways of re-mounting the inverter so that noise does not propagate into the cabin, with either a different mounting location or perhaps mounts using rubber bushings. Has anyone tried this yet? Xantrex Communication Errors Too often, I’ve gotten “Code 20” communication errors on the Xantrex remote panel. This can be resolved by pushing the red button on the 300A breaker under the streetside bed, waiting for at least 30 minutes, and then pressing in the little red flag on the breaker. Yes, this is a pain (I wish this breaker were more accessible), but it usually resolves the issue. Leaving the Xantrex inverter on battery mode for 25 hours or more will result in the Code 20 communication error. The time limit can be changed in the Xantrex app, but cannot be lengthened to more than 25 hours. As long as the inverter has not timed out, turning the inverter off and then on again at the remote panel resets the 25-hour time-limit clock. Battery Storage Lithionics provides guidance for storing the lithium batteries (see link below). Long term storage can include lowering the SOC to about 50%. Discharging to the appropriate SOC can be accomplished by turning on an electrical load (e.g., A/C or space heater) while in battery mode and monitoring frequently. Theoretically one could set the inverter cutoff voltage (in the inverter app, under settings), to something like 13.2 volts, but the highest cutoff-voltage option is 12.8 volts. Lithionics recommends keeping a log of SOC and voltage readings prior to and after storage for warranty purposes. ------------------------ Hope this helps. Again, please correct any errors that you see, and please add your observations and tips. Fritz ------------------------------------------ Relevant Links Lithionics battery app: https://support.olivertraveltrailers.com/portal/api/kbArticles/386680000012415191/locale/en/attachments/lpqvx861bbc9c842d48f7995281b07d0a193d/content?portalId=edbsnfe5dceb1ade7571879ff200cb63e14a94b62f48e3338c31a6401acd00130b0bc&inline=true). Lithionics battery manual: At the time of this writing, the Oliver Knowledge Base has links to Lithionics manuals for 125 Ah and 320 Ah batteries. However, our LE2 has three 130 Ah batteries as part of the 390-Ah package, and the manuals for the 125-AH batteries and the 130-Ah batteries are not the same. A manual for the 130 Ah battery can be found on the Lithionics website: https://lithionicsbattery.com/wp-content/uploads/2018/12/12V130-G31LRBM8-Battery-User-Guide-R1.pdf. Lithionics Storage Procedure https://support.olivertraveltrailers.com/portal/api/kbArticles/386680000012415191/locale/en/attachments/lrotz3ebee5a7020f42a58eb0d4db18a41356/content?portalId=edbsnfe5dceb1ade7571879ff200cb63e14a94b62f48e3338c31a6401acd00130b0bc&inline=true Lithionics FAQs https://support.olivertraveltrailers.com/portal/api/kbArticles/386680000012415191/locale/en/attachments/lrotz0edc34bc92ef4dce941bbb7f3f2d89db/content?portalId=edbsnfe5dceb1ade7571879ff200cb63e14a94b62f48e3338c31a6401acd00130b0bc&inline=true Xantrex Remote Bluetooth Pairing and Operation https://support.olivertraveltrailers.com/portal/en/kb/articles/xantrex-remote-bluetooth-pair-operation1 point
-
Well, after some serious life-changes and nearly four months full-time living in the LE-II, I've taken a new job in Georgia and leaving North Carolina. Time to prep the trailer for storage. I do have some upgrades in mind soon. I want to order all new shades as my strings are starting to fail on the beige colored shades. I want white next. I might upgrade the suspension when I replaced all the break assemblies. New sink faucet, maybe sink too, we'll see. Also, if you all don't know yet, AT&T and Verizon now have reasonable cellular hotspots (pucks) with high data plans for a reasonable price. I lived on 100GBytes / month and only used 50 GB once, but then, I was only in the trailer in the evenings and rarely stuck around on the weekends. I streamed everything using an Amazon Fire TV 4K stick. I live mostly on YouTube Premium though. Everything else in the trailer is working perfectly. I learned a lot while full-timing in the last summer and early winder in North Carolina. Once I find a storage location and might start showing the trailer again thru Oliver. Happy Holidays!1 point
-
Good to know that you and your wife are OK and safe. You have a good attitude about the gravity of the situation you are in versus others. Stay safe and positive.1 point
-
For those going to the Oliver rally in Alabama, early June might be a challenge. We’re retired so we can stay out for extended periods. Also, no cell service is no problem, we often camp unconnected. It can be restful! Mike1 point
-
John, Take a look at the schematics within the manuals for the 2019s and see if they help you. Charlie.1 point
-
1 point
-
This concerns me as I have a '20 Tundra and I thought I would only have to worry about my cat in my '97 Ford Econoline van, but now BOTH?! I have a friend who loved my truck and wanted similar. He paid more for a pretty stripped 2019 Tundra than I did for my 2020..crazy times! I also say push back a bit more for a total. Good to know that your family is safe. Blessings to you!1 point
-
There is no wobble at all. The nylon is thicker but it doesn't seem to matter. Since I tend to be a little obsessive, I even took all the stickers off the hatches that 'aren't for storage' and also removed the screws. I added some white snap caps to the screw holes and now have access to all of the compartments in the event of a mechanical need. Obviously, I'm bored. 😉1 point
-
When we purchased our Oliver, I asked for a list of serial and model numbers for all components. When we purchased our previous RV (Leisure Travel Van), we were provided with such a list. At the time of my inquiry, Oliver had no such documentation. Apparently they considered my request important. In addition to serial numbers for warranty claims, it is helpful to have the component model numbers in the event you have to call the vendor for tech support. I think I heard that Oliver now tracks all serial/model numbers of installed components and supplies these at delivery - or at least I think that's how it works. Unfortunately, we are stuck with relying on physical inspection to retrieve this information. Dometic stove top is a case in point; accessing the model number required removal of the stove which should be done by a tech certified in LP installation; reportedly not user servicable.1 point
-
1 point
-
Since were talking about the bed extensions, my wife and I would actually be fine without them even while keeping a twin bed setup. I understand that wouldn’t work for everyone, but it does for us since we use sleeping bags which aren’t much wider than 24”. We’ve kept them though, since the extensions allow us to leave the back cushions in place when sleeping, which provide good insulation against the side wall, plus we aren’t stacking cushions all over the place at night. We also couldn’t do without the nightstand - that’s a tremendous amenity to give up.1 point
-
OK, note in the pic below the piece of fiberglass that a spray can is sitting on. Or, that same piece that sticks out into the aisle starting at the battery box (just below the pantry) and extends back to the nightstand. This piece (as Mike said) sticks out into the aisle about 4 inches or so right about at knee level. Thus, it makes the aisle more narrow at right about knee level. With the "standard floor plan" this piece (extension) is not there. Thus, the aisle is full width at that point. Bill1 point
-
Nice job I’m also not to fond of the strap’s only because when you forget to leave them out when putting the cover down, out comes the screwdriver or butter knife. Almost like forgetting to pull the valve handle in the bath. 🤬1 point
-
Greetings from Washington state. I have the 3 130ah batteries in our Oliver and I have seen pretty much the same thing you have on the phone app. The fact that the voltages are the same tells me your batteries are fine. lithionics has admitted that the percentages shown are not always as accurate as we would like. A few things they recommended I do has helped the app SOC to be more accurate though. I updated to the latest firmware for the BMS. This can be done in settings on the app. Make sure your phone has good Wi-Fi connection when you do this because the battery bms needs to go out on the lithionics site and get the correct firmware. Next I drew my batteries down until they shut themselves off. This is called the reserve voltage cut off. Then I charged my batteries to 100% or 14.2 volts. This seems to have helped make the % state of charge numbers more accurate. Hope this helps, Mike1 point
-
June would be good, especially if it’s before “bugs”!1 point
-
I can’t comment on that brand, but the Battle Borns need to be fully charged to 100% so that the individual batteries can balance with each other - current flows from one to the other until their state of charge matches. I suspect that is true for yours, have you taken them all the way to 100% to see what they show after a day’s rest? Again, the following info is NOT for Lithionics, but they may be a very similar recommendation: “As for balancing the lithium-ion batteries, we typically expect them to be charged up to 14.4V as that’s when the passive balancing mechanism kicks in. If you’re floating at 13.6V, there’s no balancing happening and you’re not going to balance the cells until you charge it up to around 14.4V, or at least 14.2V. This won’t be required if you’ve got a solar charge controller or if you have a battery-to-battery charger for alternator charging. These devices can accommodate 14.4V on every charge, so you don’t need to worry about it. If you don’t typically charge at up to 14.4V your cells may get a bit out of balance because of temperature extremes or larger loads. To rebalance your system, we recommend being able to charge it up to 14.4V once a month or even once a week. Please note that it depends on your system usage. You may not notice anything, but if the batteries are hitting high voltage disconnect sooner than you’d expect, for example at 14V, or if they’re hitting low voltage disconnect sooner than you’d expect, such as at 11.5V , then you may want to think about rebalancing the battery cells internally and all you must do is charge it up to 14.4V in order to rebalance the cells. “ https://battlebornbatteries.com/understanding-lithium-ion-getting-started-with-your-battle-born-batteries/ John Davies Spokane WA1 point
-
Mid-to-late June is prime time. Otherwise the biting flies and mosquitos are out in force. Mid-September could work as well, but after having gone for 10 years in early August, I am over it. 🙂1 point
-
Ad I thought it was just us! 🙂 Nice solution. Will definitely put this on the list.1 point
-
We used Overland's design and a custom made top that folds like Overland's. We have Southern Mattresses that are similar to KTT. We will occasionally use the Lagun table for dinner and you can get 4 people around it. The folding leaves add great versatility. Our table is up all the time. We just fold up the leaves and swing it to the back of the trailer to keep the center isle clear when not in use. No tripping or stepping on those table brackets. I followed Overland's instructions on bracket installation. Out table is slightly narrower than Overland's. I am a little too short for my weight!! The Lagun bracket that attaches to the table top has grooves so you can attach the leg if you decide to remove and store the table. I rigged something up in our closet but have never used it. When we travel I swing the table over to the bed and drop it down on to the bed. I tighten the handles and put a pillow between the table and the wall and another between the table and the night stand just incase. The table has stayed in place. If Foy can make all of the components for you this is not a huge deal to install following Overland's instructions. We masked everything before drilling any holes and measured several times and made sure the the trailer was level so you could make sure the vertical leg is level when you mark your holes. One last key is for the best results you need to place the Lagun table bracket off center and not in the middle of the table tol as the Lagun set up is mounted to the side not center of the trailer. Overland's arrangement allows access to the basement door and night stand draw with the table attached and raised. Good luck. I think after using this arrangement for 70 plus days it is well worth the effort to install it using using Overland's method. Good luck1 point
-
Tundra Fire Update Well the good news for all of you Tundra owners out there is that the fire was not Toyota's fault. Someone cut my fuel line and the return line while attempting to steal my catalytic converter. The thieves are lucky that it did not ignite when they cut it. It took several weeks for Toyota to respond back to me with their findings, and a month for State Farm to decide what they are going to do about it. State Farm will not total the truck. They are going to replace the entire wiring harness, fuel lines, and assorted melted or otherwise damaged parts. I put out the fire with a dry chemical fire extinguisher. It is a powder finer than talcum powder and it is everywhere under and in the engine compartment on the drivers side and all over the firewall. My research indicates that the chemical used in my extinguisher is corrosive, particularly to electronics. It has been sitting on there for a month. State Farm does not think that this is an issue and the adjuster contests that it may have caused hidden damage. By the way, the adjuster never came to look at it. State Farm sent an independent agent to take photos and send them to their adjuster for analysis. I don't want to go through the aggravation of pursuing a lawsuit that will drag on for months with a company as large and powerful as State Farm. Until this is all settled I have no tow vehicle. My wife's Xterra has enough power, but the suspension and short wheelbase make it unsafe (IMHO) for towing a travel trailer. I can ill afford to have some hidden damage pop up and give me issues when far from home with Ollie in tow. I have authorized repairs and I will end up trading it in or selling it. It is probably the worst time ever to be shopping for a new truck, but that is what I am faced with. Rather than wallow in self pity, when the chips are down I tend to look at all the good things in my life that I am thankful for. One thing in particular is that my niece and her family are safe. They live in Mayfield KY and the tornado passed just beyond their backyard. Only damage they suffered was the loss of a big tree. They lost their church though, and possibly some friends or acquaintances, but they are okay. I don't know if they have power and water restored yet. I simply can't imagine the magnitude of despair those folks down there are going through. Many of them have lost everything. Makes my current truck problem seem very petty indeed.1 point
-
dewdev - Never trust the memory of an old guy first thing in the morning (or any other time for that matter)! 😉 Since my Ollie is in storage at the moment I'm only giving you what I remember off the top of my hat - using the button that allows you to switch from AM to FM you can simply keep pressing it until the WB shows up (only four or so presses gets you there). Once there you can scroll through 5 or 6 "bands" to get the clearest one or the one closest to your present location. Bill1 point
-
We don’t drink out of our fresh tank. I pretty much do what John does, I leave the tank (sometimes a month or two between trips) and top off with fresh water letting it overflow for a few minutes. I do the bleach thing once a year or so. Mike1 point
-
Are you drinking the water out of the fresh tank? If so you probably should stop, then you won’t be worried about an occasional odd plastic taste. I typically leave my tank partially filled and then right before a trip I fill it and let the water run out the overflow for five minutes or more. That flushes out or dilutes most of the “stale” water. I don’t use a filter at home (chlorinated city water) but I always do when on the road. I have been using this for three seasons and it works great. https://olivertraveltrailers.com/forums/topic/4376-7-cup-pur-water-pitcher-fits-neatly-in-pantry-affordable-filters/ FYI replacement filters are currently in short supply, buy a three-pack when the price is down to a reasonable figure, I keep several filters in reserve for this reason. John Davies Spokane WA1 point
-
I received this question as a private message (PM), but am posting it here as others may benefit from the discussion, or wish to weigh in... "Does the inverter automatically shut off when the batteries reach their full charge state? If so how would I know this? Is there any setting that would tell me this? Since our fan keeps running I am thinking in my head that the inverter is still trying to charge the batteries... I am thinking that the inverter is still drawing some power from our batteries when we are disconnected from shore power if that is at all possible. Maybe that is why our batteries are draining so fast with nothing on in the RV?" My understanding (which is very far from complete, and may in fact be flat-out wrong) is that the Xantrex unit really has two components: (1) a charging function and (2) an inverting function. When connected to shore power, the Xantrex unit is on, but its sole function is charging the batteries. The Xantrex unit is not inverting (changing 12V current to 110 volts) because it doesn't need to; the 110V outlets (and A/C, microwave, etc) are powered with shore power. The uppermost "esc" light on the remote panel is lit when the trailer is plugged into shore power and the Xantrex unit is set up to charge. The only way that I know to really "turn off" the Xantrex entirely is to trip the 300A breaker under the streetside bed. When in charge mode (i.e., plugged in to shore power) the Xantrex fan is running while charging. When the batteries are full the fan kicks on for about a minute every 15 minutes or so. When the batteries are full (or as full as you want them to be), you can set the charger ignition control in the Xantrex app to "auto-on" (again, thanks to NCEagle for this tip). In this mode the 110 outlets, the A/C, and the fridge get electricity from shore power, but the Xantrex unit is not charging the batteries. The inverter portion of the Xantrex unit is (or should be) active only when the trailer is not connected to shore power and the inverter is turned on (i.e., the button on the remote inverter panel is pressed in). The "bat" light on the remote panel is lit when the inverter is on. The Xantrex fan may run briefly when the inverter is first turned on (I suppose the fan could also run if the inverter is inverting to meet a large load). If the batteries are draining overnight there is likely another problem. Here are some ideas for troubleshooting the problem: Update the battery firmware to version 1.0.07 if you have not yet done so. In my experience, the SOC is completely unreliable if this is not done. Unreliable SOC might lead you to think there is a drain when there really is not. If updating the firmware, be sure to fully charge the batteries to 14.4 volts afterward to calibrate the SOC. When disconnected from shore power, turn off the solar (by turning off the the knob at the front of the streetside bed upper cabinet), turn off all lights, fans (including the toilet fan), etc., and check to see if there is a load on the batteries by checking the Lithionics app (2 upper right boxes below the SOC). The current and power should both be zero. Then... With updated firmware (and solar off, and no obvious load on the batteries), record the SOC and battery voltage on the Lithionics app. Let the trailer sit overnight and check again. The batteries should have a SOC and voltage very close to where you left it. If not, then... Turn off the inverter by tripping the 300 amp breaker under the streetside bed and letting the trailer sit overnight again. The SOC and battery voltage after a day or so should be the same as when you started the test. If this is the case, then there may be something in the inverter. If this is not the case, then there may be some other phantom load that is drawing down the batteries. (smoke, propane, etc detectors will draw down the batteries some, but it should not be very much over 24 hours). Record the SOC and battery voltage. Turn off each of the 3 batteries (button on top of the battery) and let them sit for a day or so. The SOC and battery voltages should be the same as when you started the test. This should confirm that the problem is not in the batteries. Next, .... Call Oliver. Any suggestions of mine are those of a well-meaning amateur, not to be confused with those of a real professional. They really should be able to help with this stuff; hopefully the results from some of the above-described steps will help them. Good luck!1 point
-
Glad you're ok. You might want to report this to the NHTSA so they can follow up as well: https://www.nhtsa.gov/report-a-safety-problem#index History shows you can't always rely on the manufacturers to promptly report vehicle defects and initiate a recall.1 point
-
Looking forward to knowing the cause as I too have a '20 Tundra. Glad to know you're safe!1 point
-
We have a 2018 Toyota Tundra and just got a preliminary service bulletin on potential fires related to the wiring harness connected to the high beam head lights. No remedy yet. No idea if there’s any connection to your truck. Glad you and your wife are okay. Quick thinking with the fire extinguisher.1 point
-
The dealership has disconnected the battery and will do nothing further until a Toyota inspector comes to look at it. Due to the serious nature of this failure Toyota wants to send their own expert to try and determine how this happened. I had to call Toyota USA and report the incident so they could open a case file. They gave me a case number and said that an investigator will call me back. I used a dry chemical fire extinguisher on the fire and used up about the whole thing. It was a full size household type. Never smelled gas when I went out to the truck. I can't rule out rodent damage, but I have never had a problem with them fooling around in my vehicles. Plenty of more comfortable places for them in my 92 year old garage! Thanks to all of you for your concern. We are sad and upset but safe and unharmed. We are fortunate this happened at home rather than on the freeway with our Ollie in tow!1 point
-
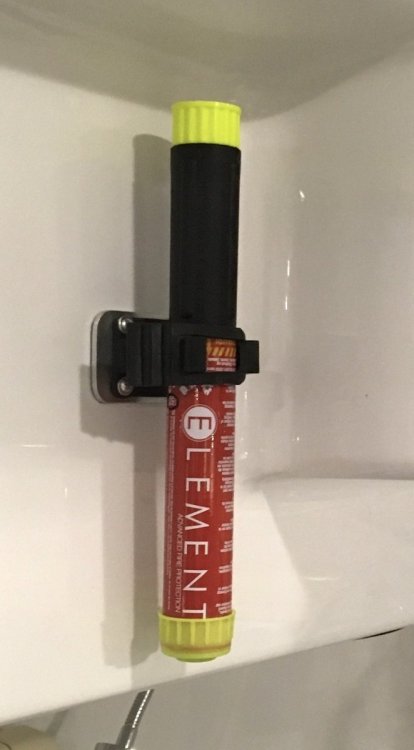
I am sorry and also very surprised to hear about your fire. That engine has been stone reliable in the past, it must have been a build issue… did you smell gasoline or could this have been electrical? Every vehicle needs an onboard extinguisher. A cheap dry chemical one will do if it is rated for fuel fires, but the powder residue is highly corrosive and must be removed immediately after! I suggest that everybody buy one of these for each of their vehicles, it fits in a glove box easily, runs for 30 seconds, leaves zero residue and never expires. I hope the price will come down, it is definitely too high IMHO, but it might save somebody's life one day. Most likely you would have to use it on another vehicle, but you never know. Do not call me anal, but my LC200 has two cheap box store extinguishers in the rear door pockets, for fast access from either side, and an Element in the glovebox…. And my small house has five extinguishers. 😳 Like bear spray, if you do not have a backup and need it, you could be in deep trouble. https://olivertraveltrailers.com/forums/topic/4291-how-to-element-fire-extinguisher-install/ Please post some pics and keep us advised. Good luck. John Davies Spokane WA1 point
-
Wow! Glad you are okay. Will be very interested in what might have been the cause! Mike1 point
-
Thank you everyone for these suggestions about Advanced RV! We are currently camping at Wild West Campground & Corral near Amherst, WI. I just now saw your messages and am overjoyed to think we could get this done in Ohio. That would certainly be a doable trip from Illinois. Although I must say that we are sort of getting accustomed to the jet plane loudness, we have not yet faced any long-term use during seriously hot weather. Like many of you, we lean toward trips in the cooler climes. Still, we like to be prepared and think Advanced RV will probably be the path we take. We appreciate everyone and their expertise. This forum is so cool.1 point
-
Tip: If I remember correctly, I located the sticker using a mirror, then put the phone on selfie mode which put the screen facing up so I could tell if the lens was picking up the serial number.1 point
-
One other comment - if you deal with Xantrex they will want the serial number. It's of course on the side of the unit that faces the floor, BUT that side is a few inches above the stuff below so I was able to get a readable photo of it with my phone (with flash turned on) after blindly taking about 15 photos of various spots along that side.1 point
-
We had the exact same issue with our 3000w Xantrex inverter (hull #699); apparently ours came from the same mold as yours 😏 There must have been a batch of bad components when ours were assembled - namely the communication board. Here is our story: The inverter/remote panel functioned fine the first couple of days, while we were still in Tennessee. The "20" code did not pop up until we were headed West for home (of course!). When we returned home, we read posts and decided we needed to update the firmware; Oliver concurred and Jason emailed use the update file. After multiple attempts to install the update, and phone support with Oliver, they ran out of ideas at which point Jason suggested we contact Xantrex. This was back in March, I believe. At any rate, Xantrex was not inundated with support requests at the time. They spent a lot of time on the phone with me trying to get to the bottom of the issue - multiple reboots, checking communication cables and connections, etc. They finally decided the inverter had a bad communication board; inverter/charger itself works fine and the display on the inverter was functioning. Using it without the remote panel, wasn't an acceptable option, since it it hard to get to the inverter and even harder to see to display to monitor power. At that time, Xantrex wanted us to send the inverter in for repair, estimating a 2 week turnaround. I called Oliver because that would put us without power for a long period of time. Jason tried to convince Xantrex to send us a new inverter, but they declined that option. Thus, Oliver stepped in and sent us a new one from their stock and instructions on how to install. We then returned the defective unit. I will say, the bad inverter was no fault of Oliver since it worked when we took delivery and they were not yet aware of the "20" code problem. The installation was easy, though removing the attaching screws was a bit tricky (I suggest you put something on the "floor" under the inverter in the event one of the screws is dropped; the voice of experience speaking). Oliver offered to walk us through the install, but I had them email written instructions and, being it was pretty straightforward, we attempted it on our own and had success. Kudos to Oliver, for going above and beyond to keep us on the road. We had another component warranty problem with the Dometic stove; On a trip to Utah, one of the burners detached from the stove. We had to take it to a Dometic Service Center (2 1/2 hr drive, one way from home), for them to diagnose. They determined they were unable to repair the stove and would have to submit a request for replacement under warranty. The service center kept us posted, but were not getting a prompt response from Dometic, which is to be expected with current demands. All the while, Jason and I kept in touch with the situation (I had submitted a service ticket). Last week, the service center called and wanted us to bring the trailer back in because they needed more pictures for the warranty submission. They tried to tell me Oliver was requesting the pictures, which was not true; I asked and Jason had not contacted them about this. So, I expect someone in the Dometic Service Center didn't get or send the necessary pics. I was a bit abrupt with them - expecting us to return, only to have the stove taken out again for inspection, then have to return again (who knows when) to have a replacement installed. I don't know if this is Dometic's way to get you to give up and just buy a new stove (if you can find one) or simply an honest mistake. At any rate, they said they could fit us in to get it taken care of. At this point, Jason stepped up and said he was certain Dometic would (eventually) honor the warranty, but knew they were taking a long while to processes warranties. However, making multiple trips back and forth to Medford and being without a stove was not acceptable. As we speak, a new stove is on the way from Oliver. Jason spoke with the Dometic Service Center, telling them he was sending us a new stove. And, since they had already planned to remove the defective stove and put it back in, he expected them to do the installation at that time. Oliver is covering the cost and will process the warranty for reimbursement at their end. If you need to know more about the inverter install, I might be able to locate my notes 😇1 point
-
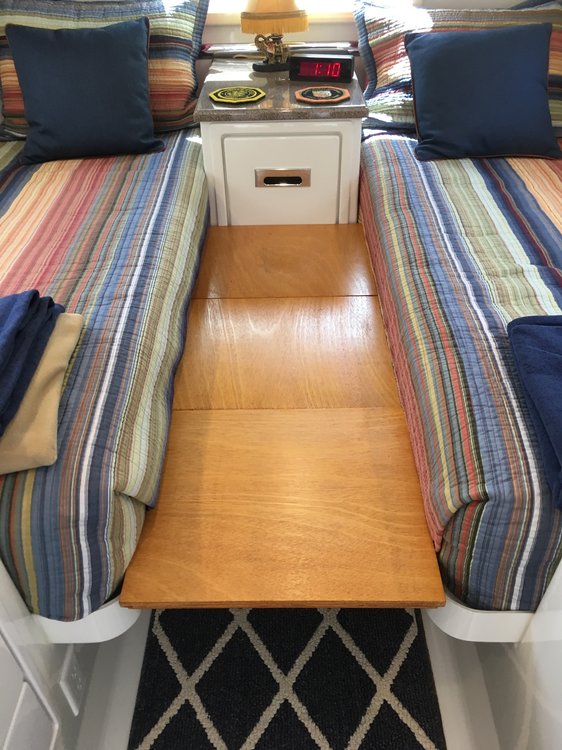
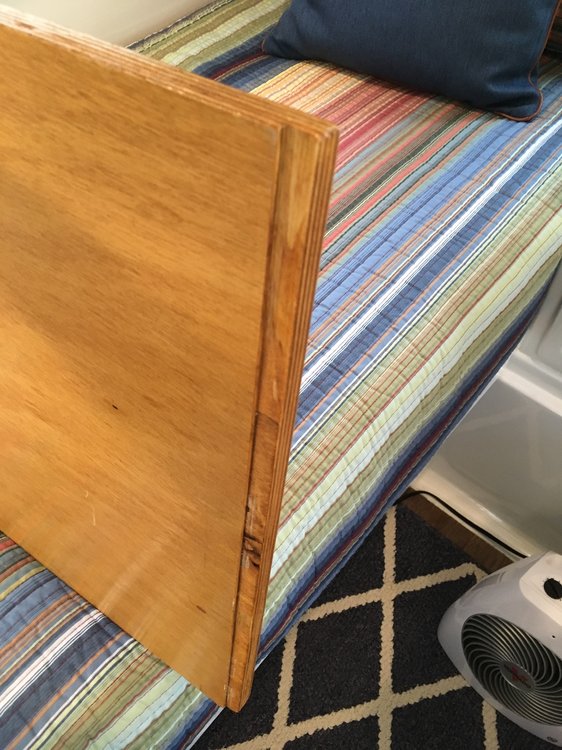
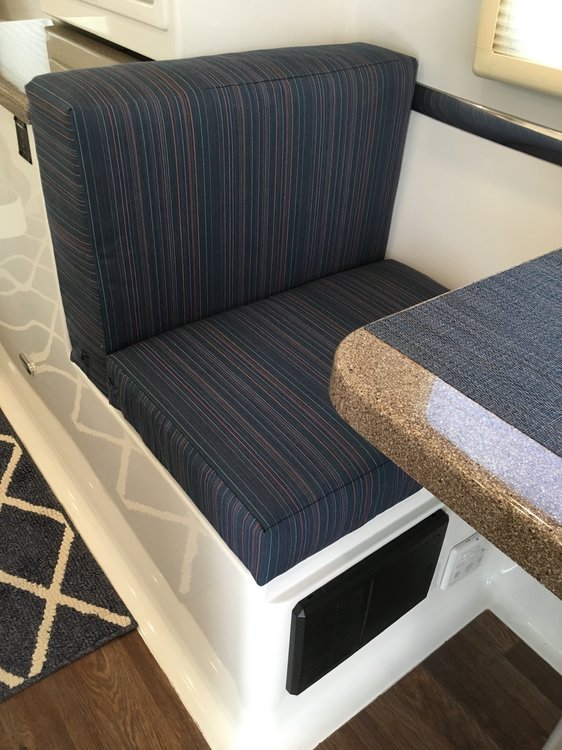
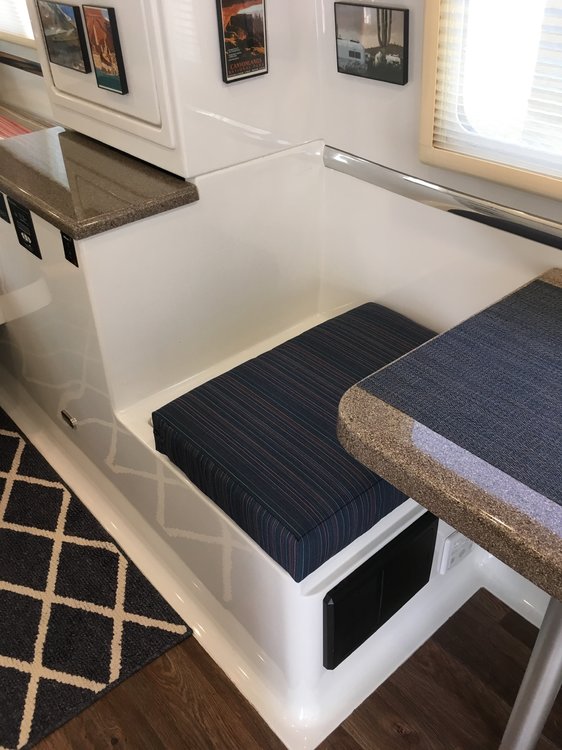
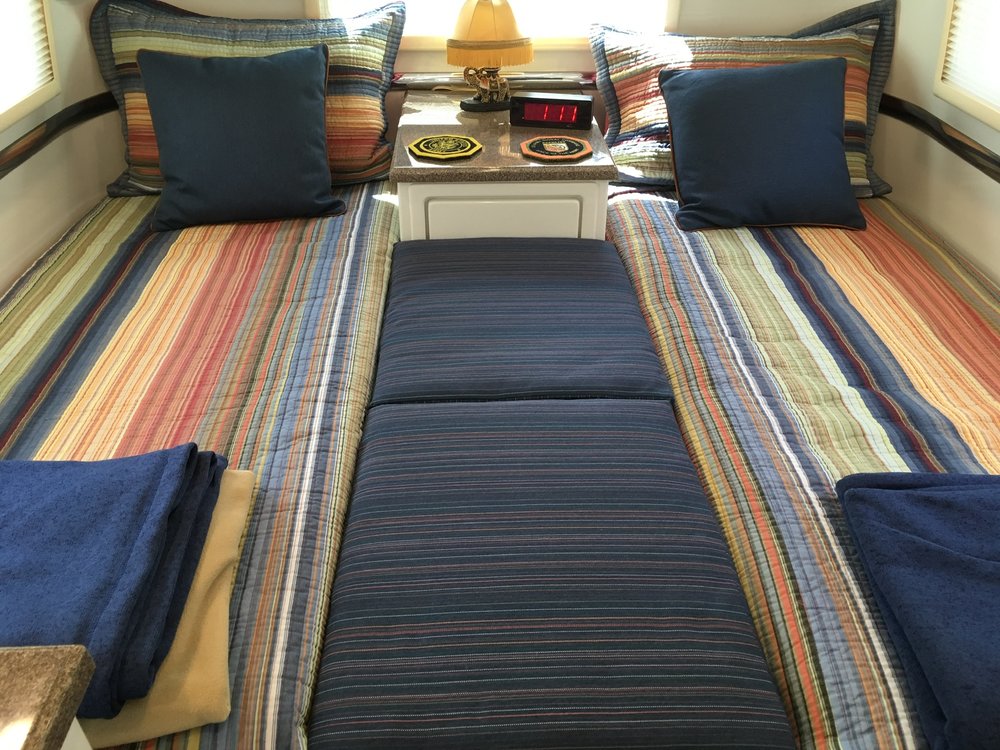
We have the twin bed version of the LEII. After the first year we realized that we were so used to sleeping together that it would be nice to be able to occasionally convert the twin beds to a double bed. I made some plywood pieces to span the gap between the twin beds and we bought some foam to sit on the plywood and create a double bed. We went with this for a year+. The problem was storing the foam when we were in the twin bed mode. So, we measured and discussed and this is what we came up with to eliminate the extra foam. We are leaving tomorrow for a month or so to go up to South Dakota so we’ll see how it works. Here is the gap between the twin beds. It measures 18” X 51”. It’s actually 50” from the nightstand to where the curve starts on the bed frames. Here is the same gap with the plywood. There are three pieces measuring 19” X 17”. It’s 3/4” plywood. The plywood stores easily under the mattresses when not in use. I cut a 1/2” X 1/8” recess on the short side of the plywood so that when placed on the fiberglass mattress frame is locks in place and won’t slide. In order to eliminate the extra foam that required a place to store we reconfigured the dinette cushions. We had new cushions made that included a larger back cushion that measures 25” X 19” and is 6” thick. In the dinette it sits on the fiberglass, not the bottom cushion. The new bottom cushion is smaller, 25” X 17” and butts up against the back cushion. The larger back cushions sit on the plywood when in double bed mode. Here are the new dinette cushions. Notice the back cushion does not sit on the bottom cushion. Here’s a shot with the cushion removed to make the double bed. Here are the cushions on the plywood. We were a little concerned that the dinette seats wouldn’t be as comfortable with the thicker back, but sitting in the driveway the last few days it seems okay. Also, we wondered if the bottom cushion would stay put without the back cushion sitting on top of it. We’ll see how it works out this next month on the road. Mike1 point
-
We’ve had a couple of good trips since this and we’re getting ready to go out again next Thursday. The mod has worked well. It’s important that the density of the middle cushions match the mattresses, otherwise it’s a bit uncomfortable. We found this out on the first iteration just using some high density foam for the middle. The new dinette cushions are a very close match to the mattresses and are much more comfortable. The larger back cushion on the dinette has not been an issue. The new bottom cushion configuration does move more when you get up, but it’s easy to straighten back out. The only thing I would do different is to make two plywood pieces instead of three. I did three because I had some scrap cabinet grade plywood pieces that weren’t big enough. All in all, we’re happy with this modification. Mike1 point
-
Excellent solution and execution. It’s funny because I always thought we would order a standard bed when the time came. I didn’t think my better half would go for the twin bed version. Low and behold, we found a 6 month old 2017 standard bed and used the big bed for 1 trip. We did not like devoting 40% of the space to a bed and did not like converting it to booth table each morning. So we tried different sleeping arrangements and settled on the dinette for Krunch and the back bench for me and the dogs stay on either side bench. And then over Labor Day week the factory converted it to the twin bed configuration. We bought mattresses from Southern Mattress and they shipped then to Hohenwald. Next week is our first trip as a twin bed and I am hoping for the best.1 point
-
1 point
-
Recent Achievements


