Leaderboard


Popular Content
Showing content with the highest reputation on 06/19/2022 in all areas
-
Case in point, consider Jason spent 2 hours via phone helping to resolve a non-warranty situation for a second owner.6 points
-
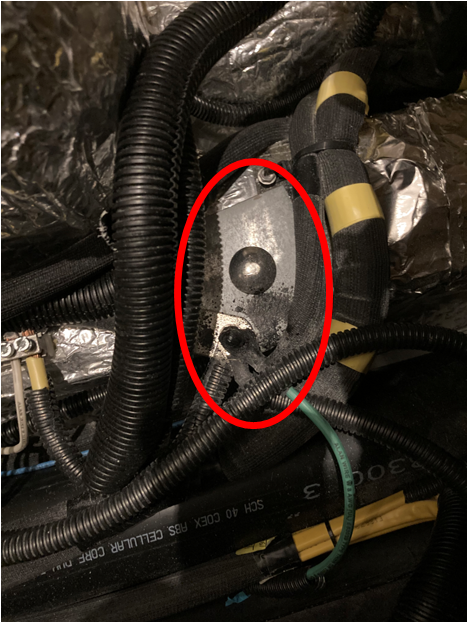
Mine has the black coating on the chassis ground. 2019 Hull 461. Haven’t had any electrical/ground issues at all. But not sure why Oliver feels that coating is needed on the chassis ground stud since the entire ground bus bar right next to it is exposed.
 4 points
 -
@Katjo, glad your story had a happy ending, over the many chapters here. Now, you can salvage some of the shorter Michigan camping season. For future reference, could you please complete your signature with hull #, model, and general location so folks can more easily answer questions? As you begin your new Ollie adventures, I'd also recommend that you dive into the videos in Oliver University, and read through some of the manuals. Your trailer has so much technology, and different features from your previous trailer, that there will be a bit of a learning curve for you, but I'm sure you'll find it a worthwhile investment in time. https://olivertraveltrailers.com/oliver-university/ Also, do get that multimeter, watch a video on YouTube and practice the basic functions, as it will be very helpful if and when you have another question. You might also consider taking a vacation to middle Tennessee, and schedule a complete annual service with Oliver. It could set your mind at ease that all systems have been checked and functioning properly, since your trailer is a pre-loved unit with apparently unknown maintenance. The area around Hohenwald offers great camping opportunities (though a bit hot right now, of course), and you'd get a chance to meet those very knowledgeable and helpful guys in the service department. There would of course be a charge, but you could get an estimate ahead of time. Best of luck, and happy camping.4 points
-
Sometimes I feel like the buyer is the final quality control agent in the process and that we have to go through each and every component in the trailer and make necessary corrections and repairs. Of course if I lived in Hohenwald I could just pop over to chat with Jason and the team. But I don't. The upside is that each problem solved (and shared on this fantastic forum) increases our ability to keep our Ollies going wherever we go out on the open road.4 points
-
A spread sheet. We document all maintenance we do and any Service Oliver does to our Ollie. My Bride deserves the “administrivia”accolades. 😄 She is an excellent book keeper. I am a very blessed man.4 points
-
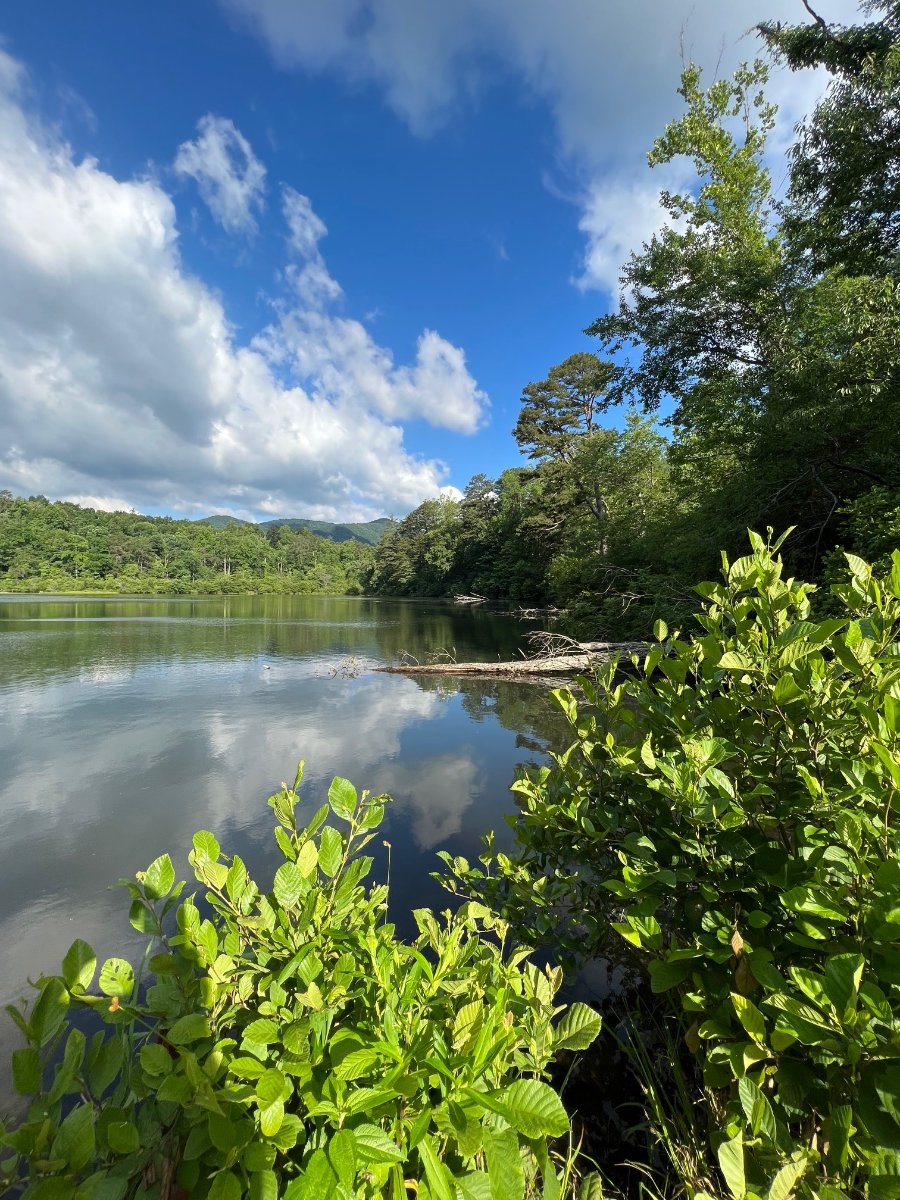
I have no cell service at the campground. A huge change in the weather occurred Friday night, and this weekend is one for the records, under 40% humidity, upper 70’s, bluebird skies! Lake Powhatan site 51 is tough to back into! We found ourselves at The Moose restaurant by recommendation of a new friend at Powhatan….fantastic heart-attack-on-a-plate dining. Just say “YES” to gravy on everything! We didn’t bring bikes, just ourselves and our 14+year-old mutt….we’re all good with relaxing….Oh, and eating….I almost forgot, drinking, too(lol)! We’re heading home on Sunday, but will be back in the area at Mt. Pisgah campground from 7/1-7-9….loop A. Plan on the Farmers Market, and a bunch of other fun when we’re back in 2 weeks!
3 points
-
2021 LE2 , Hull 806 On mine, the top of the ground stud is also covered with the black soft sealant. I take this to indicate to not add any other grounds to this primary ground point. None of the other ground points have it.
3 points
-
During my two month fly fishing trips in the Rockies I almost always use a solar shower. I fill it and during the day it sits on my Tonneau cover over the bed of the truck. When I'm done fishing for the day, most often the water is simply too hot to use for a shower. However, THAT is the perfect excuse to take a seat, reflect on the day, and have an adult beverage while the water cools down. If the water isn't hot enough I simply heat a pot on the stove and mix it in. I used to use the solar shower's little shower head but those are fairly pathetic. So, a couple of years ago I got a little shower pump like the one SeaDawg mentions above and it works great either outside or inside the Oliver. Bill3 points
-
Thanks for the suggestion regarding the camp shower. We will get one in anchorage. In my last conversation with Truma, they indicated that I don’t need to go to an RV tech (since they are too busy up here) and that they can tell a plumber or other certified repair specialist who can work with propane what the next steps would be. So I have an appointment with a plumber in Wasilla who indicated he wasn’t familiar with Truma, has never seen one, but would be glad to give it a shot. He does work on on demand residential water heaters. So at this point, the plan is to go to the plumber. Given the few camp showers on hand at Cabela’s, I am going get one even if he can fix it. . It would be nice to have as a back up. Thank you very much for the suggestions. The camp shower may be a real help.3 points
-
I’ve had only one light stop working in galley. Could have been my fault as I was tapping them instead of touching them, my wife finally trained me. A quick call to Service had a new one sent immediately.3 points
-
The up side is the service Oliver provides. You wouldn’t get half that attention from another company. Glad the elec was an easy fix.3 points
-
Mossey, To answer your questions, we have the touch lights in our Ollie. One is over the sink, another over LP burners, one above on the ceiling over each twin, and one over the dinette. There is no dimmer function. I had two touch lights that began to flicker and eventually go out. Both were in the galley sink and and LP burners. The replacement was not very difficult. To remove the light cover, drill out the tiny rivets, remove the light from the opening and cut the wire close to the old light fixture to leave plenty of wire to attach the new light to. I simply turned off the master switch to these lights, reattached and braided and taped the wires and used shrink tubing where the wires connected for the finish. I have not had any issues with these lights since this repair. Each touch light has its own touch switch in the dead center of the light cover. It’s simply a delicate pressure switch to turn them on. These touch lights or at least ours, only require a gentle touch and nothing more to turn them on and off. -Patriot3 points
-
Krunch and I stayed at Lake Powhatan for a night in April of 2021 on our way to Virginia. It is a very nice campground that we plan to revisit in the future. I picked it because it was close enough to have dinner with topgun2 and his wife, which he bought. It was a win win campground for us. If for no other reason than it’s our turn to buy, we’re going back! Mossey3 points
-
Thanks for posting the pics, that badly repaired ground stud would certainly throw a bunch of circuits out of whack! The black tar stuff is perfectly fine too, it is generically called “liquid electrical tape”, and it is used for putting a flexible waterproof coating on any connection that you want to stay corrosion free indefinitely. The down sides are it’s quite messy, and it can cover up a lot of sins like your crappy welded repair. STAR BRITE Liquid Electrical Tape - 4 FL Oz Can With Applicator Brush Cap - Protective, Airtight, Waterproof, Flexible, Dielectric Coating - Indoor & Outdoor Use It is very similar to pruning spray or liquid used on trees. If I did this repair to “Mouse” I would probably NOT recoat it, but the stuff is most excellent inside a 7 pin trailer connector, for example. I am not sure why the person applied it inside your trailer, it is not a wet or corrosive area. John Davies Spokane WA3 points
-
I respect the opinions here and acknowledge there are valid reasons this is not a 100% safe idea. My feeling was that several things were in place that made it OK: Y-valve that is only open to the flush when I open that particular faucet output that always has positive water pressure flowing out of it San-T-Flush has a check valve Black like I attached has a check valve Regardless, you folks have given enough reasons that this isn't the great idea I thought it was. Thank you.3 points
-
Wish you'd posted earlier today. We were within 5 miles of you. Took a trip to WNC farmers market, for a case of tomatoes to take home. And a few other items. If you need produce, cheese, etc., this is a very fun place to visit. (Even if you don't ) Every trip, we take home honey, jams, cheese, in season produce, etc.. Toe jam is one of my favorites to buy for friends. And, moonshine jelly. Lol. My mom loves the no sugar added apple butter available in a number of stalls. There's a guy from Jamaica selling weird blueberry and other hot sauces and BBQ sauces, who makes amazing sauces. (Lwser enclosed climate controlled building) Prices are better in the lower indoor shed,usually. I love the black wax hoop cheese, in vac pac, upper house. And, jalapeño pimento cheese. Oh, and the Amish butter. I love good butter. In the lower sheds, open air, down the hill, it's mostly local grown, great prices. Some have smaller baskets. Many are cases and bushel bags only. Definitely worth the drive, and the visit, from your location. Moose Cafe, on the highway just barely beyond the entrance has an all you can eat breakfast. I don't love breakfast, but my husband does. Their hash brown casserole is almost as good as my own. Their homemade biscuits are complimentary, with local apple butter. I'm not fond of biscuits, but theirs are awesome, as is the apple butter. Bacon is really good, too. I like their trout. I just scrape away the breading. Asheville area is really big on farm to table dining. We don't eat out a lot, but Asheville makes it worth the trek into town.3 points
-
Thank goodness for kind neighbors! I'd note that rivernerd, backofbeyond, and katana pilot suggested poor ground, early on. Thank you, guys. So often we've chased our tails, and it turned put to be a grounding issue.3 points
-
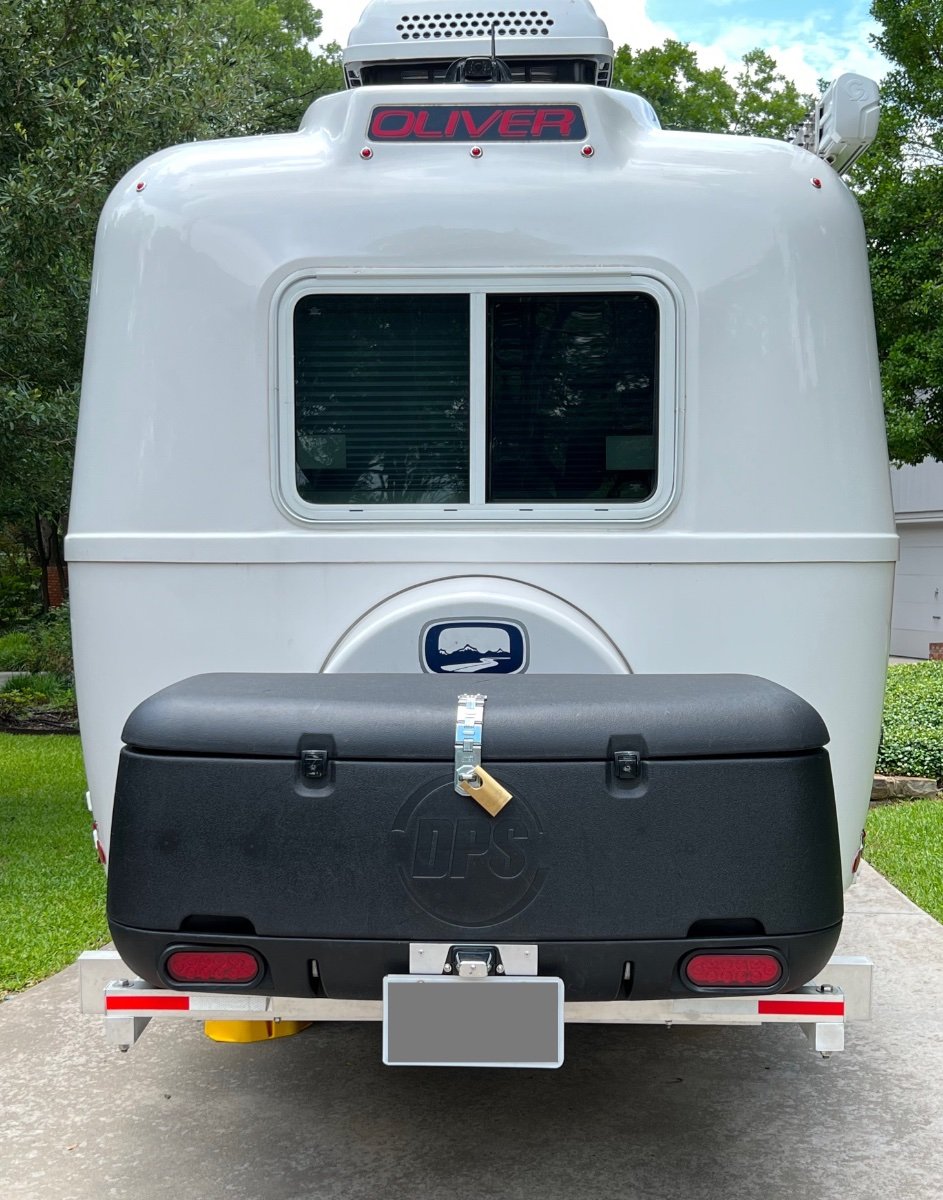
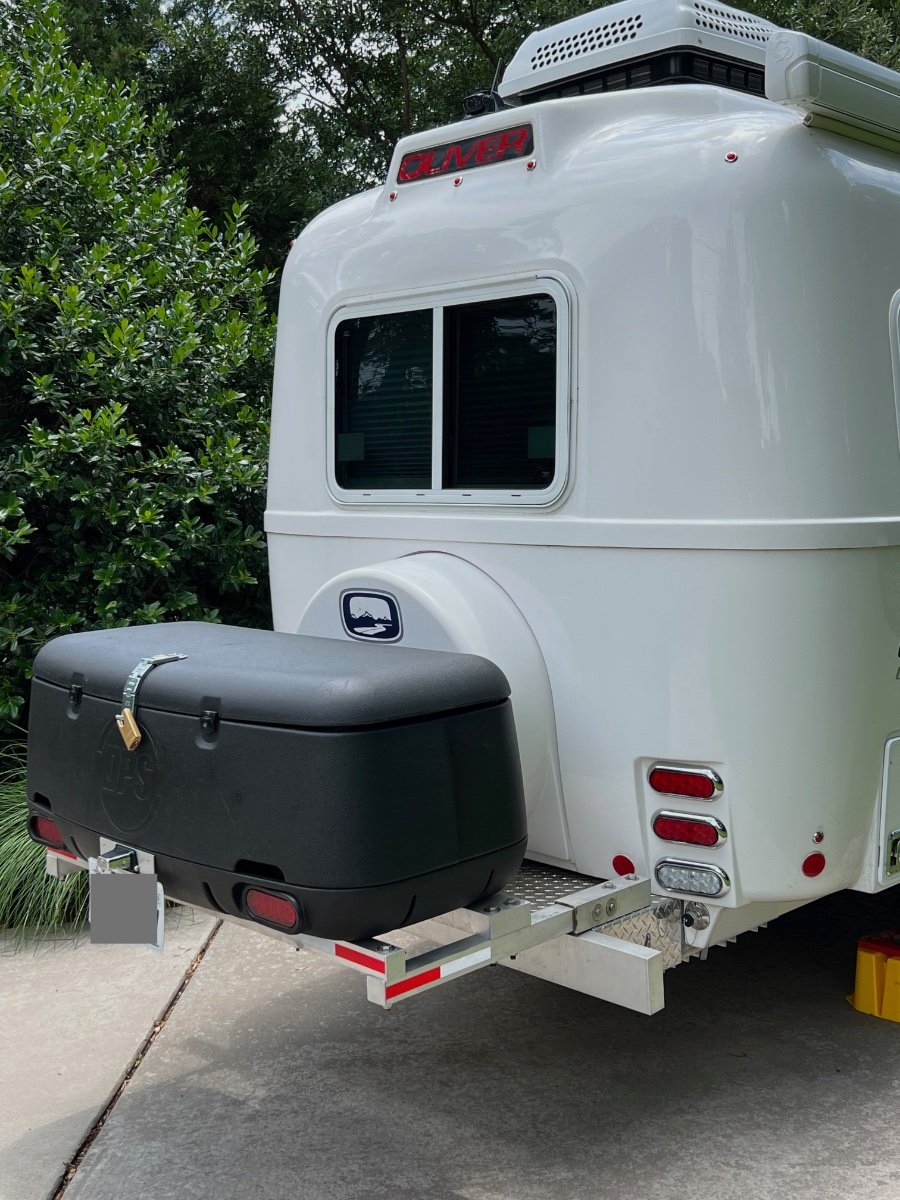
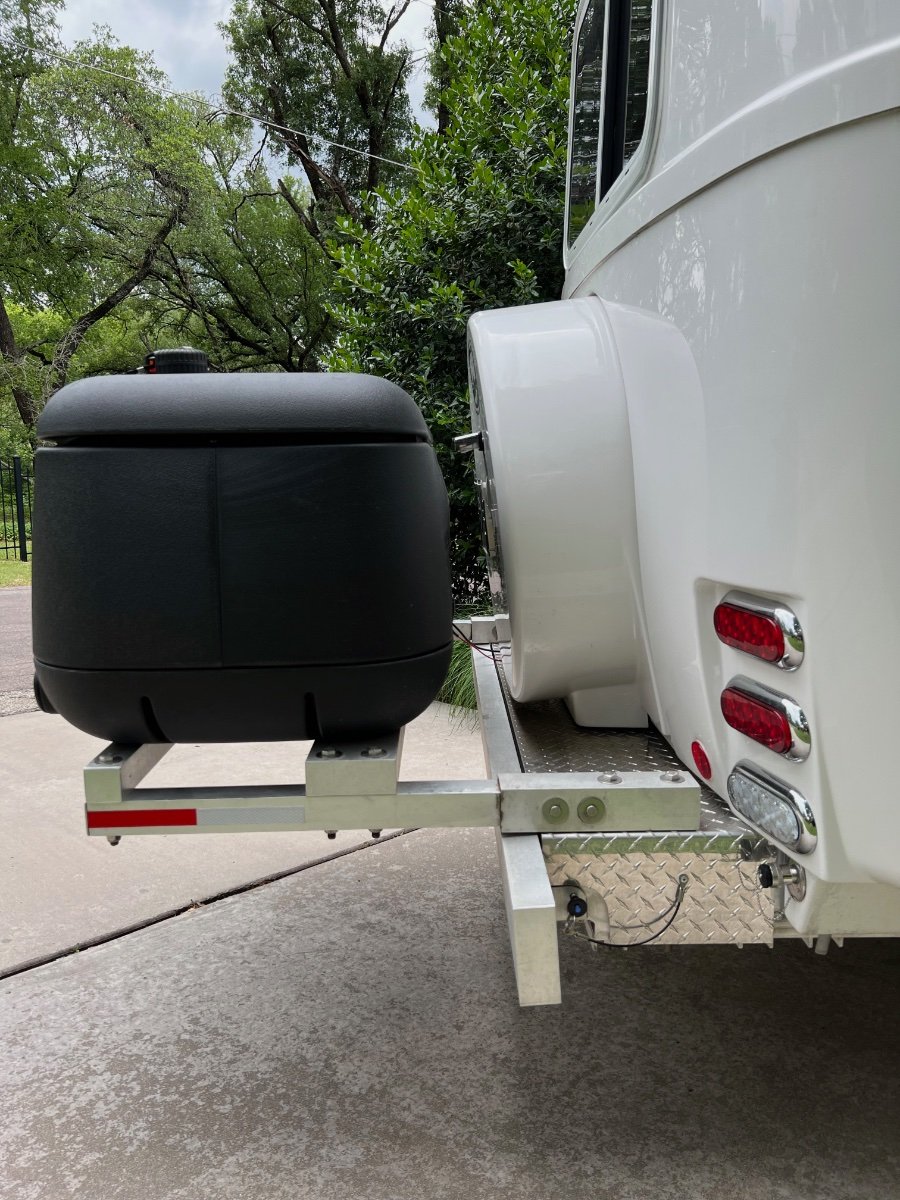
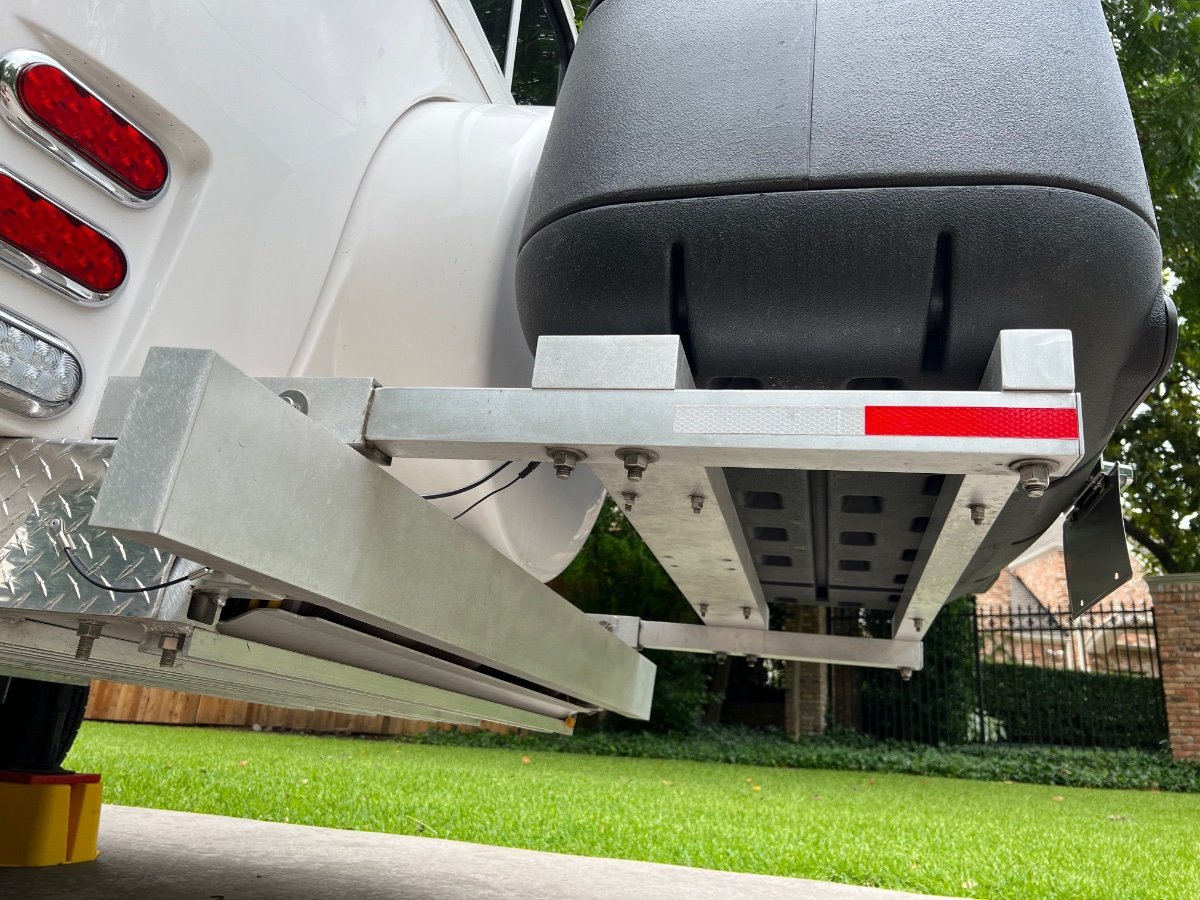
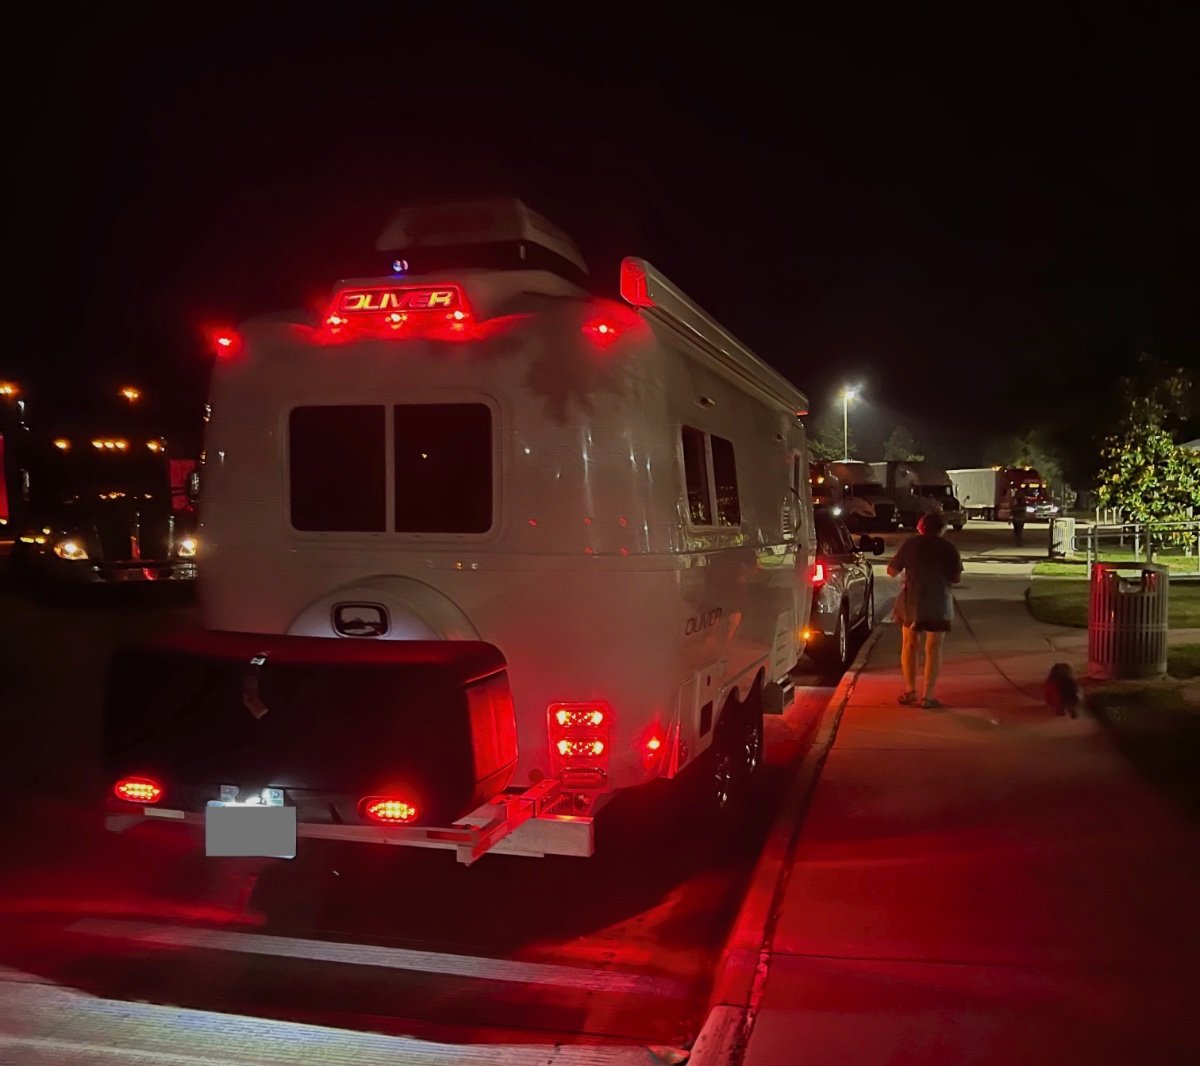
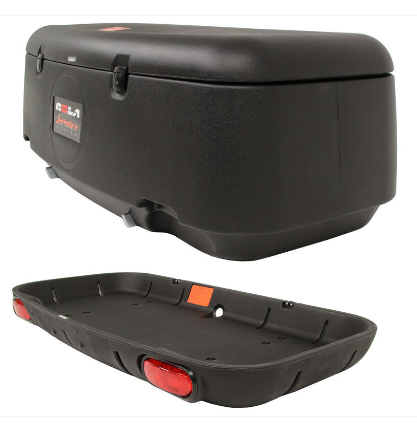
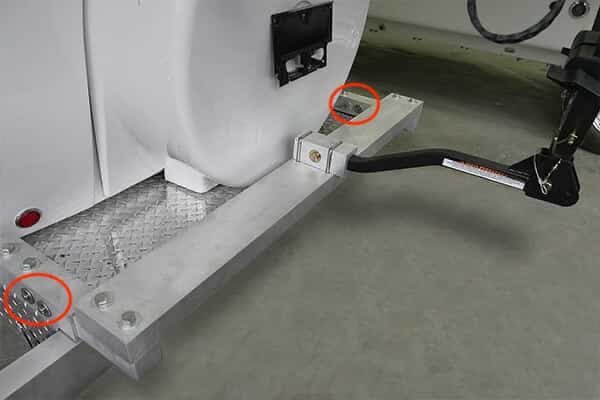
Summary I have installed a rear mounted cargo carrier, with lights, to our 2022 Oliver Legacy Elite II (LEII) travel trailer. We recently completed a two week, ~2000 mile trip, using the cargo carrier, which performed flawlessly. Below are photos of the installed cargo carrier, which are followed by a detailed description of its installation. Storage Constraints Prior to ordering our Oliver Legacy Elite II (LEII) travel trailer I knew we would need additional storage space on the trailer. We are using a 2014 BMW X5 35d (diesel) as our tow vehicle, rather than a pickup truck. Thus, we could not plan to use the pickup bed for supplemental storage. We also needed to stay within the tow vehicle's cargo capacity of 1100 lbs and maximum tongue weight of 600 lbs.. Expecting a tongue weight of approximately 500 lbs. plus two occupants at approximately 300 lbs, we could only accommodate a maximum of 300 lbs. of other cargo. The available payload will be partially used by our camera gear, which must be protected from exposure to moisture. A tongue mounted cargo carrier was not viable, given the tongue weight limit for the tow vehicle. Storage Requirements I anticipated needing additional storage space for the following items: Champion Dual Fuel Generator- 2500 watt (~45 lbs.) (too large for basement storage) Napoleon TravelQ™ 285 Portable Propane Gas Grill and hose (~35 lbs.) (too large for basement storage) Anderson Ultimate Leveling kit (~25 lbs) Harbor Freight rubber chocks (4) (~20 lbs.) Camco Stabilizer Jack Supports (3) (~10 lbs.) Miscellaneous accessories All of these items can tolerate some exposure to moisture, which is likely when stored in any external cargo carrier. A closed and reasonably secure cargo carrier was needed. Searching the owners' forum, I found examples of rear cargo carriers/bike racks and found several examples, including: Oliver's original bike rack design using twin receivers and extending approximately 3 feet beyond the rear bumper; Various rear mounted metal cargo boxes, including custom designs; Rear mounting of an Oliver tongue cargo box by John E. Davies. I also looked extensively at aluminum cargo boxes from various manufacturers, trying to find options which could accommodate the cargo items listed above. I already owned a cargo carrier which we had used on the BMW X5 tow vehicle. This carrier has a heavy steel swing-away frame which mounts to a standard 2" receiver. Mounted on the steel frame are a polypropylene tray and an enclosed container with 13.5 cubic foot capacity. The tray and enclosed container interlock. This cargo carrier also is equipped with fully functional lights (running, brake, turn, flasher). Interlocking pins on the enclosed container mate with the tray. Locking latches secure the container to the tray. Solution Approach I decided to re-use the polypropylene tray and enclosed cargo container, but not the heavy steel frame. Instead, I would use a design similar to the original Oliver bike rack. I ordered the current optional Oliver bike rack when we placed our LEII order, planning to utilize some, but not all, of its components. The current Oliver rear hitch (photo below) utilizes twin receivers that are 11" long, constructed to receive 2" x 2" X 0.25" (wall thickness) T6061 aluminum square tube support arms, which are 17 inches long. The receivers are each mounted to the LEII frame by two long 0.5" diameter stainless steel bolts and nuts. The other components of the rack are a 2" x 5" x 0.25" T6061 aluminum cross-member, 51-1/8" long (with end caps), and a 1-1/4" receiver for connecting a bike rack. I planned to use the twin receivers, and the cross-member, but not the support arms, nor the 1-1/4" receiver. Instead, I would replace the 17" long original support arms with longer equivalents, whose length was to be determined. I would utilize the original 2" x 5" x 0.25" T6061 aluminum cross-member and add another cross member, this one 2" x 2" x 0.25" T6061 aluminum, also 51-1/8" inches long with end caps. The cross members would be bolted to the support arms, in the same manner as on the Oliver rear hitch. The tray and enclosed container from my existing cargo carrier would be mounted to the cross-members. Note the clevis pins circled in the photo below, there are two 0.50" diameter horizontal clevis pins securing the support arms in their receivers. Each clevis pin has a washer on either side of the receiver. Removing the clevis pins permits the support arms to be pulled to the rear, enabling removal of the spare tire cover and spare tire without dismount the support arms. Solution Model A critical dimension to be determined was the length of the 2" x 2" x 0.25" support arms. The new support arms need to be long enough to: Support the polypropylene tray and enclosed cargo box and attach using the molded mounting holes in the tray; Allow the lid of the enclosed cargo box to open without striking the spare tire cover; Permit removal of the spare tire cover and spare tire without removing the cargo carrier and support frame; Permit access to waste water hoses stored behind the bumper; Minimize the additional length of the cargo carrier and support frame to the LEII's length. I fabricated 2" x 2" wooden support arms, approximately 40" long. Using woodworking equipment, I cut slots into one end of each support arm to fit around the bolts holding the twin receivers to the frame. I also drilled horizontal holes for the clevis pins which retain the support arms in the receivers. Positioning the Cargo Carrier on the Cross-members The wooden support arms were inserted into the twin receivers and secured with the clevis pins. Then the 2" x 5" x 51.125" T6061 cross-member was placed across the support arms near the bumper. The additional 2" x 2" x 51.125" wooden cross-member, was also placed across the support arms, but further from the bumper. Clamps were used to hold the cross-members in place on the support arms. The polypropylene tray and enclosed container, latched together, were positioned on the cross-members, centering both to the trailer's width. I opened the lid of the enclosed container and adjusted the spacing (fore and aft) between the lid and the spare tire cover to ensure they did not contact each other. Once I had located the joined tray and enclosed container in what appeared to be a desirable position, I adjusted the positions of the cross-members fore and aft to establish alignment with the mounting holes in the tray. The 2" x 5" cross-member engages two mounting holes on each side of the tray. The 2" x 2" cross- member engages only one mounting hole on each side of the base of the tray. Six 5/16" carriage bolts will fasten the tray to the cross-members. Only four carriage bolts attached the tray to its original steel support frame. I used a mason's string stretched across the width of the tray with weights on either end to aid in aligning the mounting holes in the tray with the positions of the cross-members. I also used carpenter's squares to verify the cross-members were perpendicular to the support arms. Another check of squareness was made by measuring the distance from the trailer bumper to the cross-members. Once I was satisfied with the position of the tray and enclosed container on the support structure, I marked the locations for the holes to be drilled for the six mounting bolts to secure the tray to the cross-members. The tray overhangs the rear cross-member at the rear. With the cargo carrier tray and enclosed container in place on the clamped cross-members, I wanted to determine if the spare tire cover could be removed without removing the entire cargo carrier and support assembly. I found I could remove the clevis pins and pull the support arms aft approximately 7 inches out of the twin receivers and enable removal of the spare tire cover. With the tray and enclosed container positioned on the cross-members, I could now determine the required length of the support arms, which is 33.75 inches. The location of the rear cross-member determines the length of the support arms. After locating the mounting position of the tray and enclosed container I marked all key positions and hole locations on the wooden support arms and wooden rear cross-member. I cut the wooden support arms to the desired final length. Material Sourcing and Machining The required T6061 aluminum components required are: 2" x 2" x 0.25" x 33.75", square tube, quantity 2 (support arms), cost= $110.18 2" x 2" x 0.25" x 51.125", square tube, quantity 1 (cross-member), cost= to $99.08 2" x 12" x 0.125", flat bar, quantity 1 (to be cut into 2" squares for end caps on the support arms and rear cross-member), cost= $6.86 Sales tax= $17.83 No shipping charge. I picked up the materials at the local Metal Supermarkets warehouse Total cost= a $233.95 The above T6061 aluminum components, cut to specified length, were obtained from: Stainless steel bolts and nyloc nuts were obtained from: I was referred by Metal Supermarkets to a local machine shop: When I received the materials I took them and my wooden mockups of the support arms and cross-member to Air & Earth. I also took one of the original support arms. I discussed the machining needed: to cut the slots in one end of the support arms and to drill the needed 0.50 diameter holes for the clevis pins and mounting bolts. I also asked them to cut the 2" x 0.125" flat bar into 2" x 2" squares. I did not ask them to drill the smaller holes for mounting the cargo tray to the cross-members. I was quoted $220 and turnaround of the job within a week. They did an excellent job within the promised timeframe. Finishing and Assembly of the Support Structure After Air & Earth completed the requested machining, I performed the following finishing steps, which included: Rounding the edges of the 2" x 2" square tubing on the slotted end to be inserted into the receivers. I used a 3" wide belt sander with 100 grit sanding belts to round the corners of approximately 12" of the tube which would be inserted into the receivers . The original Oliver support arms also had the corners rounded to more easily slide within the receivers. Several trial fittings were required to verify smooth insertion and removal to/from the receivers. The support arms and the rear cross-member were sanded with an orbital sander using 200 grit disks. This sanding removed markings on the tubes and made the surface textured, similar to the Oliver rear hitch components. The support arms were inserted into their receivers and fastened with the clevis pins. The cross members were aligned with the mounting holes on the support arms and bolted into place. The cargo tray was positioned on the 2" x 5" cross-member at the previously determined mounting position and holes drilled to mount the cargo tray. Holes were then drilled in the 2" x 2" rear cross-member. Carriage bolts, flat washers and double jamb nuts were used to secure the cargo tray to the cross-members. Once all test fittings of the support assembly were completed, lithium grease was applied to the ends of the support arms which are inserted into the receivers. 2" x 2" x 0.125" caps were attached to the open ends of the support arms and the rear cross-member, similar to the end caps used by Oliver. These were attached to the square tubing using JB Weld epoxy. Cargo Carrier Lighting The cargo carrier partially blocks visibility to the taillights of the trailer, which is most noticeable when viewed from close behind the trailer. At a distance the taillights are largely visible. The cargo tray is fitted with two LED light fixtures and a wiring harness with a 4-pin flat connector. A corresponding 4-pin flat connector was installed on the LEII to integrate the lighting on the cargo carrier with the trailer lighting. Details of the installation of the 4-pin connector in the trailer are covered in a separate article. The lights on the cargo carrier ensure the trailer is quite visible from behind. A license plate mount was added to the cargo carrier tray, since the license plate mount on the spare tire cover is blocked by the cargo carrier. Lighting for the license plate mount is provided by adding a Y connector to the license plate light cable under the spare tire cover and adding an extension cable routed to the cargo tray mounted license plate mount. I also added reflective tape to the support frame members. I used the following reflective tape: https://www.amazon.com/gp/your-account/order-history/ref=ppx_yo2ov_dt_b_search?opt=ab&search=reflective Conclusion This addition to our trailer provides significant benefits, with no significant disadvantages. It does add approximately two feet to the length of the trailer. Besides the additional storage space, the cargo carrier and its load slightly reduces the tongue weight. I measured the tongue weight, using a Sherline scale, at 450 lbs., with no water onboard. Tongue weight seems sufficient, as no swaying or other handling issues have been observed. This project had a successful outcome due largely to the information I was able to glean from the Oliver Owners Forum. I hope this information is useful to others on the forum. Comments and suggestions welcome. Regards, Don
2 points
-
Early morning at Lake Powhatan, near Asheville, NC.
2 points
-
We are going to have to check Lake Powhatan out. Thanks for the great photos and info. Happy Camping!2 points
-
Well picked up Hull 1144, 14 June 2022, very impressed by overall build quality in light of how many trailers they are building per week! very few minor problems that i managed to fix my self. Been almost a year in wait but worth the wait!2 points
-
At our last Oliver service visit I purchased (2) extra touch lights to keep as spares. I think they were like $3 or $4 ea.2 points
-
Not really, with respect to the effects of longer term humidity, at least that's my understanding from my woodworking days (where we used a lot of spray on polyurethane and still paid attention to things like attaching table tops to aprons in such a way as to allow for expansion/contraction of solid wood tops). But that's a bit academic IMO, because as I noted (and is described numerically at the link I shared) plywood does not expand/contract very much with changes in humidity. It would help a bit with any spills or leaks as long as you catch them reasonably quickly.2 points
-
They don't?🙄2 points
-
I would also suggest a visit to Stanley Park in downtown Vancouver if possible. It is similar to Central Park, a little larger and bordered by water on three sides. But don’t take your Ollie, it’s in the city. Mossey2 points
-
When you get to the beautiful Provincial Park on Boya Lake, check out the amazing beaver dam to be found at the end of a short hike out of the park. It is amazing... massive - makes me think beavers must use backhoes and bulldozers.2 points
-
Katjo's experience was very educational. The pictures she shared and the comments were valuable. I do want to learn as much as possible before we get our Ollie in five months. The forum has been great for learning.2 points
-
We're fortunate & have a slot in door for mail. "USPS Informed Delivery" sends an email daily that has images of what's being delivered that day. All bills paid electronically so there is rarely anything important. A good friend stays at our house a few days a week. House looks lived in & she runs appliances, toilets etc. The best part is she deep cleans the house. A neighbor drives our other vehicle to work a couple days a week and parks his car in our driveway. Yard service, yes. HVAC Thermostat & irrigation controllers on wifi. Emergency contact list contains names of people we trust to make decisions re emergency house repairs. Plumber, electrician, carpenter ... Keyless entry on back door so repair people can get in. ♡ Harvest Host.2 points
-
I am glad it's fixed for you. That was a bad way to start life with your Ollie. Hope it's all trouble free from here on. Have a great first summer with it.2 points
-
Sherry, I wish I had known you were in Pooler..I would have driven to Costco and said hey.2 points
-
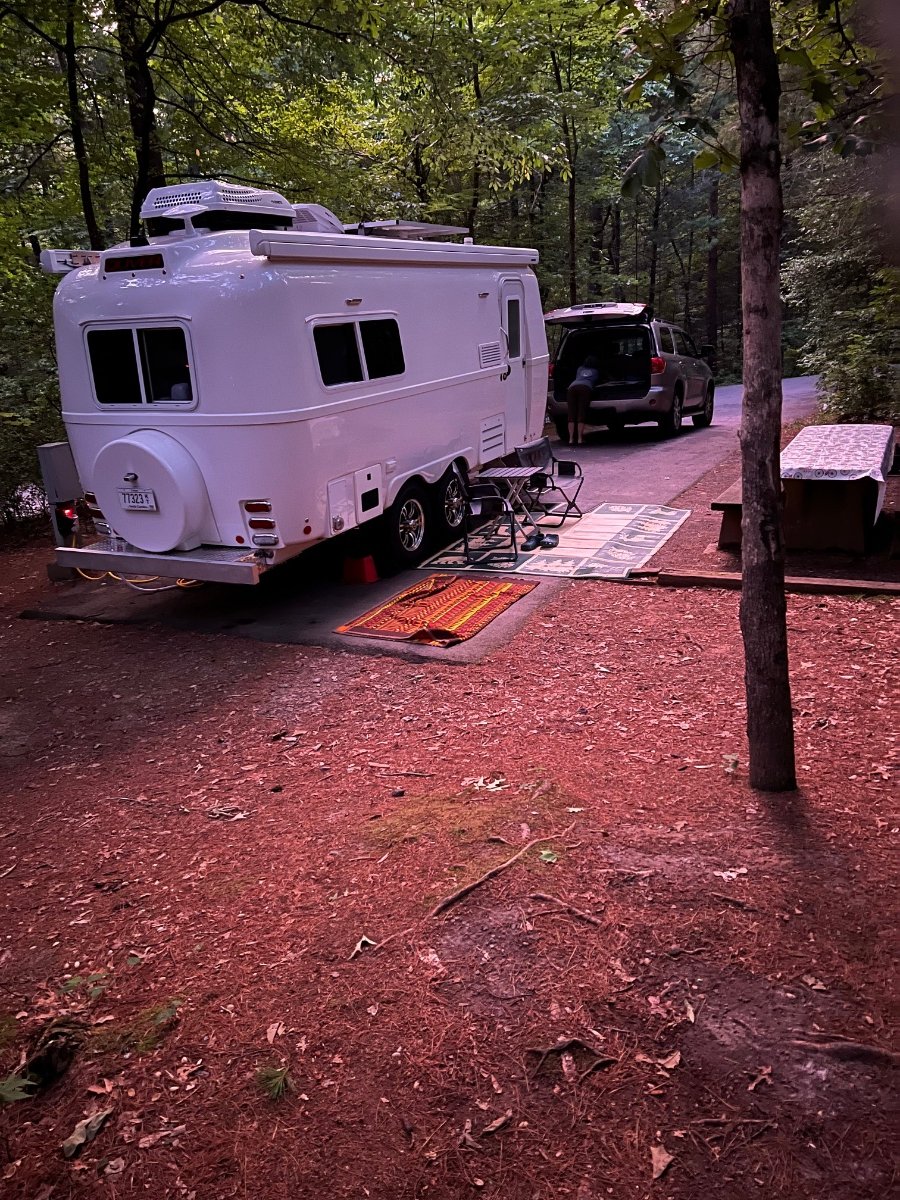
Yes, when you plug in the trailer cable to the bumper, it notifies the software that there's a trailer there. The software then reminds the driver to put the truck into tow/haul mode, which switches over the dash gauges to include a tranny temp gauge. It also tells the tranny to act like a trailer brake (common on diesels) when going down hill so that it shifts to a lower gear to try to hold your downhill speed and not rely on braking. The trailer tab on the center screen also shows trailer tire pressure and temp (when the GM TMPS is installed), and it also keeps a trailer odometer so I know how many miles I have on the Ollie. There's a bunch of other stuff but overall I'm very happy with both the diesel engine and with the trailering software on the truck. I know most of the companies have something similar on new models but so far so good with the Chevy/GMC system.2 points
-
That black tar coating came like that from the factory as did the poor weld job. The spatter from the weld on the screw would not let the screw make full contact, it only had a partial contact on the electrical spades on the wires which caused the poor ground and a very minimal ground contact. Because of the weld spatter the spade could not make full contact and there was a arc spot on the spade from only touching that “blob” of weld spatter. Now, the plate, nut and the screw after we repaired it is covered with dielectric grease and now full contact between all connections including the screw in plate.2 points
-
Like many lake campgrounds, most camping is off the lake. We've not camped there, just driven through. Beautiful in the woods, too.
2 points
-
I’ll take and post a picture tomorrow of where the ground wire was not connecting properly and more detail on how they fixed it.2 points
-
Update: Are Ollie is fixed! *insert happy dance* After a cry for help that I posted in a local camper group a virtual stranger from my neighborhood came to our house today and fixed it! He discovered it was a faulty main ground wire. I cannot thank him and every single one of you who reach out to try to help us, we are eternally grateful.2 points
-
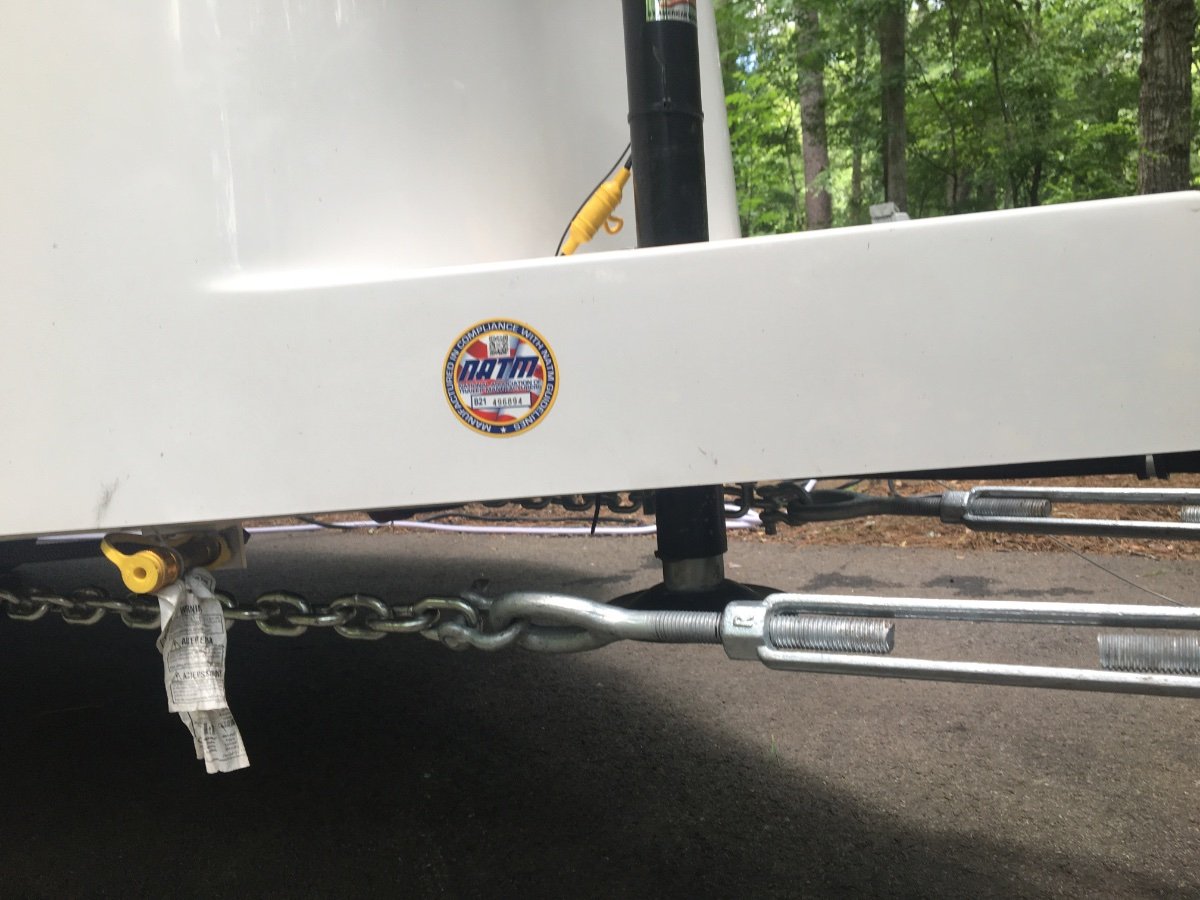
Here is another option for the Andersen WDH. I found it easy to connect and disconnect in just minutes by turning the two turbbuckles . Black marker on threads provide a guide to the correct tension when ready to connect again.
1 point
-
Since I always have a 5 gallon bucket along - I usually simply dump the solar shower water in the bucket, sit the bucket on the toilet and have at it. The solar showers I have are either 4 or 5 gallons - at roughly 8 pounds per gallon that weight is/was a concern. However, on the inside of the Oliver I've found that the "shower hook handle" doesn't budge, but, I still use the bucket on the toilet seat just to be safe. On the outside I either use a Harbor Freight suction cup on the side of the Ollie or my shower tent (if I need to be modest). Speaking of shower tents - the ones at WalMart get the job done and are a bunch less expensive compared to those found at Cabela's and the like (WalMart shower tent). Bill1 point
-
Glad you are back in business. Those ground connections can wreak havoc sometimes. RB1 point
-
We were there in late March for a week and loved it. Decided we hadn't stayed long enough and are planning another trip sometime so we can see what we missed! Paula1 point
-
Service sent me a rivet gun, rivets and five new puck lights. I've started with one so far, drilling out the rivets, pulling out the old light, replacing with a new puck light, and installing three rivets. Works just like new. I'll do the other four the same, but I'm hoping that this problem is solved. What caused it? That's still a mystery.1 point
-
The excel file still works! Thanks!!!1 point
-
Hello, I'm also towing with the new(ish) GM engine, the 3.0 diesel, which is in both the Chevy and GMC half-ton trucks. On a 800-mile trip a couple weeks ago I averaged 16.7 mpg. Before the recent changes in fuel prices, back when diesel was less than unleaded, I was very happy. Now, not so much. Plus i do have to add in DEF, which I used to get at Walmart (store brand) for $8 but now it's $14 for a 2.5 gal jug. When not towing, the DEF lasts for a long time. When towing, the engine uses more DEF. So, even though right now I don't like that I'm paying more for fuel than anyone else, I do like the mileage and the low-end torque that makes it a breeze at the freeway onramp or going up steep passes. PS to Tallmandan: I've done my own calculations on mileage when filling up and found that I'm actually getting 1 to 3 mpg more than what the truck computer says.1 point
-
Costco and Sam's are very helpful memberships on the road, for us. We filled up at the new costco gas station in Pooler , Georgia (near Savannah Airport, just off 95) this morning at the "bargain rate" of $4.12, when most other stations were 25 to 35 cents higher. Gasbuddy checks revealed the lower price in Georgia vs Columbia SC, costco, and, our big fuel tank allowed us to get there from North Carolina. Their gas stations are always one way in, one way out, so no jumbled messes pinning your rig, or requiring tight turns,, like some of the truck stops. But, most don't have diesel, just regular and premium. Our fuel savings more than pay for our membership. Everything else is a bonus. It's nice having both, as there are more costcos in Canada and Alaska than Sam's. Not sure if any sam's left in Canada . Conversely, more Sams in many states than costco. We have three favorite Costco spots between our home in Florida, and our camping spot in north carolina, but only Sam's in Asheville. (But, Murphy and some of the Ingles grocery stores are often as good or better than Sam's. GasBuddy is my real buddy.)1 point
-
Did you or your helpful neighbor take any photos of the faulty main ground wire, and the properly connected main ground wire that provided the solution? Those would help others, including me, to more quickly diagnose similar problems in the future.1 point
-
I like Google. Waze, campendium. Allstays. Gasbuddy.1 point
-
Now, the issue will be trying to bring your lithionics batteries back to life, if they're really 9 volts,,as you suggested, in an earlier post. Usually, to revive lithium you need to charge very slowly, and separately, from what a friend told me, to bring cells back into balance. Any suggestions, from those of you with lithionics? I still run with agm batteries.1 point
-
My tmobile plan gives me a "welcome to canada" message, and my plan is the same as home. Verizon is very different. We get free Internet to .5 gig. Pretty much nothing. Then it drops to 2g, dialup speed. Since we rarely have Verizon, anyway, we turn off that phone, and use the tmobile/rogers. It is important to check (and understand) your plan as @John E Davies suggested1 point
-
Vancouver Island is spectacular! Living literally within view of Vancouver Island, we have had the opportunity to visit the island a great deal, both by boat and by land. With only a week available you will only be able to scrape the surface. Victoria is a must followed by a visit to the outer coast near Tofino - great camping but weather is likely at that time of year ... luckily you have an Oliver. Vancouver Island is big - the largest island in North America. Those two areas will give you a feel of the island but there is so much more.1 point
-
I am sorry for your trauma, and finding a reason for a flaky electrical system can be very hard. With so many 12 volt circuits being involved in the problem it seems to me that the cause is between the batteries and the distribution panel. Maybe inside the panel itself. Can you duplicate the failures by moving wires? A detailed inspection of every wire may be in order, perhaps there is a failed crimp or a loose terminal. I know for SURE that the 12 volt fuse holders are very prone to getting loose, the little brass “ears” that grab the blades of the fuses can be bent back by careless fuse installation, then the connection goes away entirely or becomes sporadic. This has happened to my fridge and the Natures Head toilet, both quit unexpectedly. Both are on separate circuits, both had loose fuse contacts. Get a small pair of precision needle nose pliers, insulate the tips with tape or heat shrink tubing, and check every single fuse holder, Remove the fuse, tighten the two pairs of ears slightly by squeezing them together, and reinstall the fuse straight in using the pliers, do NOT just jam it in with your fingers. That bends the ears! I borrowed this pic from dhaig, I hope he doesn’t mind. It clearly shows those ears.. Do some detailed poking around, eventually you should figure this out. Good luck. And for all buyers, always insist on a pre-purchase inspection if you are not able to do it yourself. If a trailer’s systems don’t work as advertised, or the trailer has signs of neglect, run away. John Davies Spokane WA
1 point


.thumb.JPG.dd838cdb3df463dab6a16861fa23a319.JPG)


-
Recent Achievements
-


")


