Leaderboard


Popular Content
Showing content with the highest reputation on 02/01/2023 in Posts
-
All this is like the “rule” that you can’t utilize the rear jacks to lift the side of your trailer completely off the ground when that capability used to be a major selling point. If you knew the real reason behind their change of heart, you’d be flabbergasted. Come by at the rally in May and I’ll fill you in on the details. We’ve been sitting at Dome Rock for a week now with both port side tires a couple of inches off the ground, held up by only the jack and, as far as I know, the earth is still spinning around the sun at about 18 miles a second with no ill effects so far. I’ll update you here if anything untoward happens.7 points
-
You can’t see the trailer behind, as it is still in the parts bins in Hohenwald. 😉 @bugeyedriver older cousin; 1958 MGA 1500 Roadster
 7 points
 -
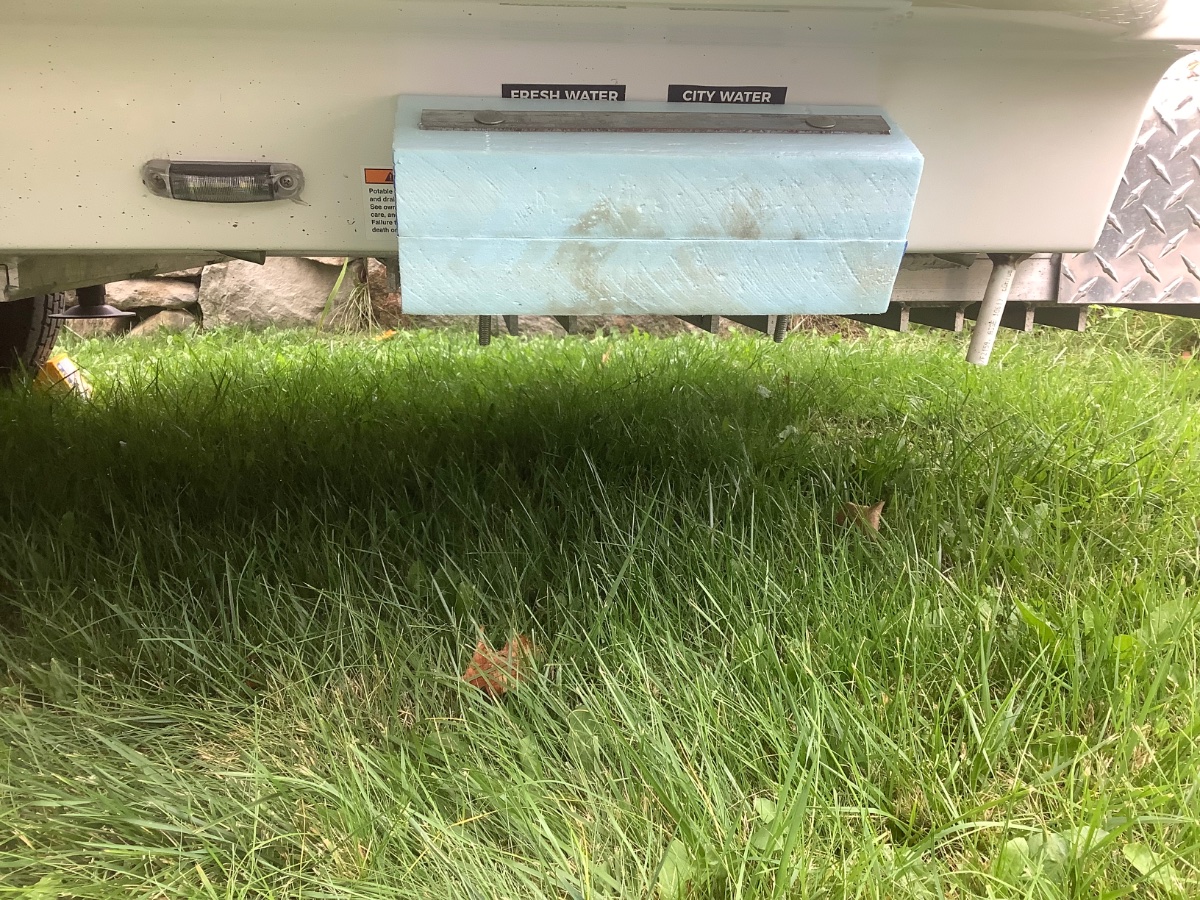
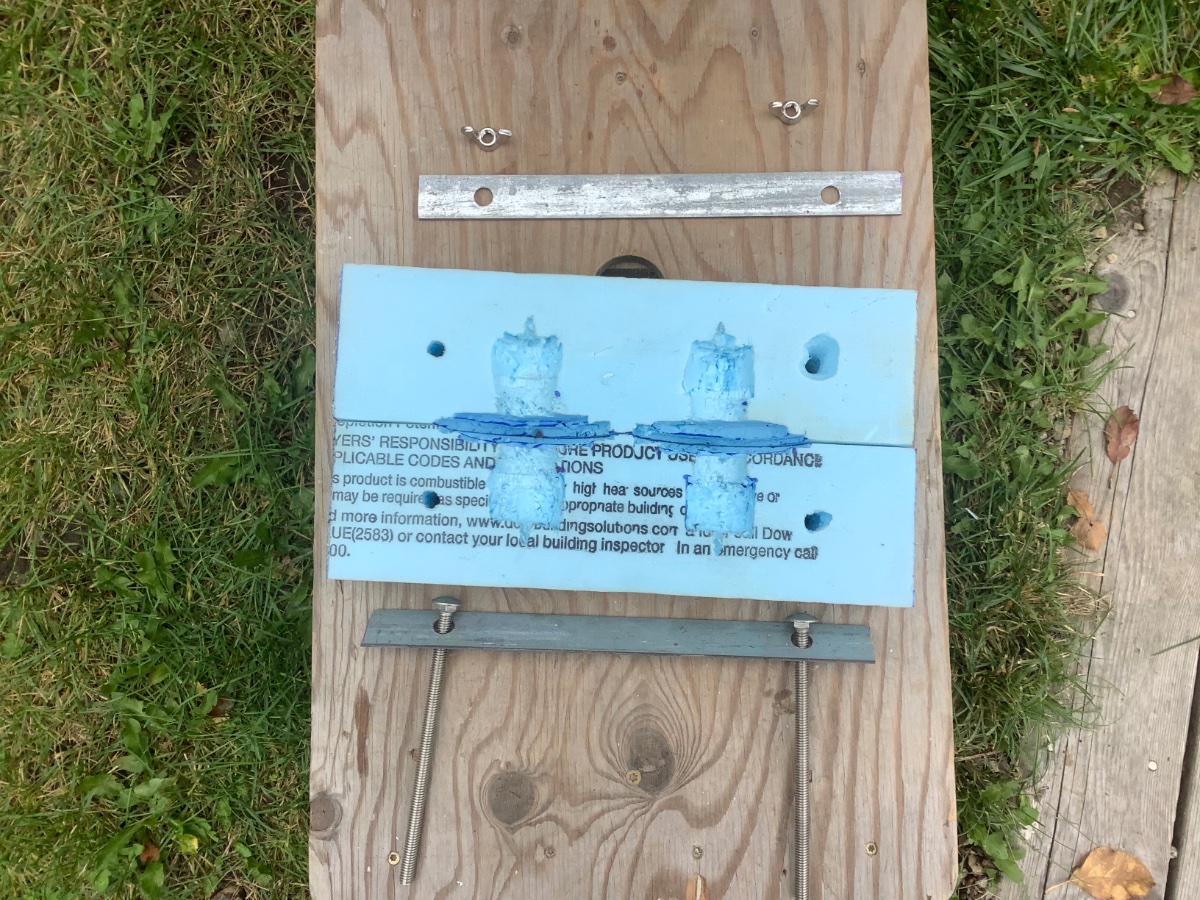
I’m not sure what I did to help deal with the potential freezing of this pipes in the garage is a good idea or not, and since I’m not out playing in the same cold temps you are it may not apply…but.. what I did was to cut a “hatch” through the floor of the garage area under the rubber mat that allows me to access the pipes and fittings. This gives me the ability to stuff “handwarmers” under the floor on top of and around the pipes. I haven’t set up sensors and have no idea as to the efficiency of such a strategy but my pipes haven’t frozen yet, and maybe it might help you out in a pinch. I also built a sort of insulation “block” which fits very tightly over the city water and fresh water intakes, as I worried about those fixtures, and figures it might help out with those pipes located just inside.
5 points
-
Well, dang! I've been wondering why my inner ear vestibular system has been just a smidge off lately and now I know.4 points
-
1959 Austin Healey "Bugeye" Sprite
4 points
-
After all the suggestions to fix the heater... ended up having one loose wire. John Davies had it correct . "check the voltage.. do some basic electrical troubleshooting"4 points
-
That depends on which side the gas tank of your tow vehicle is on: driver or passenger. Our Tundra tow vehicle has a gas tank on the driver side. Our Subaru Outback's gas tank is on the passenger side. Oliver strongly recommends running an absorption fridge only on DC when on the road. I expect this is because a possible ignition while in a gas station could have a very bad result. It would arguably be like smoking at a gas station. Does anyone know Oliver's position on running the furnace while on the road? Like every other manufacturer, the lawyers tell them to recommend dc, I'm sure. Real life, most of us with 3 ways run on gas. We always did. Furnace? Probably same. You're on your own.3 points
-
Do you use a WDH with this tow vehicle? Nice ride though.3 points
-
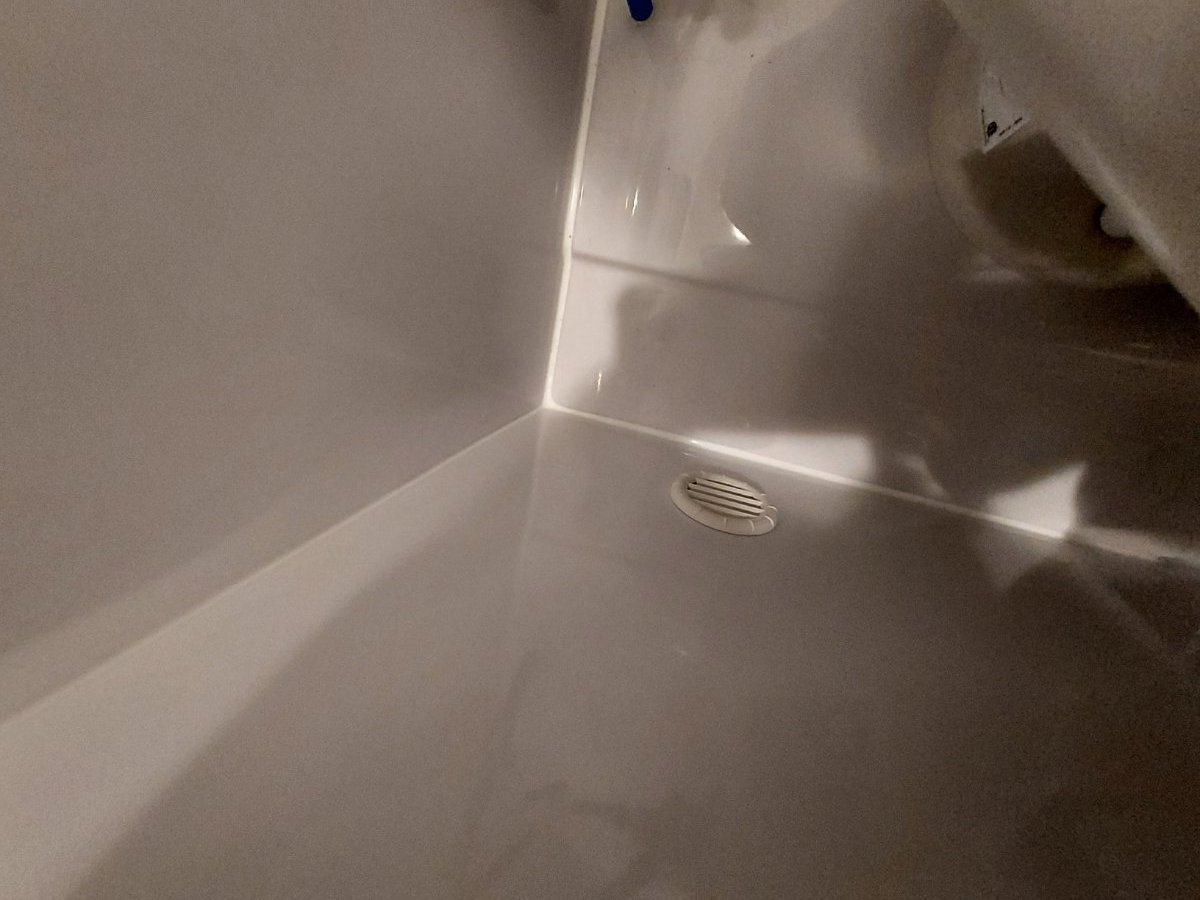
I'm sure that there was no water in the sink before departure. After looking at the auto drain drawing, simply a typical gate valve with a motor and rack gear, I suspect that the gate was either not completely closed or there was some small amount of debris preventing it from sealing. What I should have done was to not open the valve immediately after finding the water in the shower pan and see if the water would seep back into the tank on it's own over time. I can certainly do that test but I won't be able to do a "slosh test" as the rig is now winterized ( and it's going to be -4 degrees soon ☹️).2 points
-
If the gate won’t let water drain it won’t let water back up into the shower drain. I agree with Andrew, you may have run water in the sink after closing the gate. That’s the only source of water in the bath. Hydraulic pressure won’t do it. We’ve traveled thousands of miles with a nearly full gray tank, never any issues. Running water with the gate closed causes issues everytime, mostly wet socks and wet bath rug. Mike2 points
-
I put a REMOVE BEFORE FLIGHT keychain on the bathroom faucet handle when I close the valve before travel. Too many wet socks... 1x Remove Before Flight Red Key Chain by Apex Imports(1 Pack) https://a.co/d/2OxwnZE2 points
-
Hope to be there in a week :)2 points
-
Ya know? I looked all through that 1959 manual and saw nothing about a WDH . . . so, naaaaaah.2 points
-
I just added two 4" vents, one high and one low, to the closet in our Hull #1291. It cost me about $20 (I already had the necessary 4" hole saw and cordless vac) and took about 1.5 hours. We wanted to better heat the closet in cold temps, and to increase air flow to limit mold and mildew formation when in moist environments (like one of our favorite vacation spots, the Oregon coast). My tests yesterday confirmed much better warming by the furnace in cold temps. We expect the better air flow will also help prevent mold and/or mildew formation when we visit the Oregon coast this April. Worth the limited investment of $$$ and time to me. See this thread:2 points
-
That is a great idea, but be sure to leave access to the four big bolts on that flange, so that they can be retorqued routinely. They DO loosen over time. Some sort of “hat” with foamed insulation inside it might be possible, as long as it is easily removable. For example cover the flange with plastic wrap. John Davies Spokane WA2 points
-
I just wanted to mention that we have a Laveo dry flush toilet and we love it. I haven't seen anyone mention it on the forum before so I thought I would mention it. It may not be for everyone but if you dont want to deal with black water or the pee bottle of a composting toilet this may be your ticket. If you Boon dock as we do it makes life so much easier. Work prevents us from traveling a whole lot and we can only get out for 1 or 2 weeks at a time and then back to work so its a perfect solution for us. We often only get out for a day or 2 at a time so the convenience of this toilet makes shot trips so much easier. If you use it for a few days then park the trailer you dont have to do anything, just walk away. Its odor less and takes about 2 minutes to change a cartridge. You can get about 14 flushes out of a cartridge so we usually flush it 2 times a day and we go a whole week, we have gone 10 days but that was pushing it. Another interesting feature is you can remove the whole thing with one wing nut and bring it in. So if you need a portable toilet for some crazy reason and your not using your trailer just pop it out and take it with you and its 1/2 the price of a Natures head. Its not for everyone but it is perfect for us, we think its the Cats Meow! Check out the link and watch the video its interesting to watch. And its made right here in the USA Check it out Bill https://dry-flush.com/1 point
-
Just happened to us as well. Followed Steph and Dud B, and Conner77's lead and the result was "a fix"! Yay :) John1 point
-
Rivernerd: I posted an update based on your feedback. What a pain. I wonder if the connector changed at the factory or if the holder inside dimensions changed.1 point
-
That's easy - Simply "copy" the coordinates above, then go to Google Maps and "paste" the coordinates in the "search box" and hit the enter key. A regular street map will first come up - click on that to enlarge the map. A larger map will come up and look to the left side of the screen and there will be a box that says "layers". Click on that box and the overhead satellite view will come up and you can zoom in or zoom out as you need by clicking on the + and - arrows Steve's trailer is not in this view - he must have run into town!😇 Bill Or - click on THIS1 point
-
There is one more possibility - If you were on rough roads and/or took turns too sharply - it is possible that water from the toilet came out of the bowl, particularly if you had the bowl full before you hit the road.🤢 Bill1 point
-
We have the latex bed option... the very comfortable, heavy latex bed option. While we like them - we hate them. We like sleeping on them. We hate making them up everyday or moving them to access the basement. It has become a chore. Sleeping bags are not an option for us. Does anyone have a light-weight option they'd recommend? Charlie.1 point
-
Charlie, We have had Tochta Utopia mattresses for about four years now and like them. The wife likes it better than our mattress at home. They are lighter than latex. Andrew1 point
-
Thanks, this was discussed a while back, 43 ft lbs. https://olivertraveltrailers.com/forums/topic/6812-check-your-rear-jack-mount-hardware-bottom-frame-bolts-were-1-turn-loose/ John Davies Spokane WA1 point
-
As always John, you bring up a great point. Do you have any idea what the torque on those bolts should be? I've never checked them.1 point
-
This seems pretty high risk for a thief. Probably don't realize how rare the LE1 is and that we are a well connected community. It has no scrap value, and using it regularly in public would be very risky. Maybe it will turn up and somehow you will get it back. Unfortunately if it does it will probably be way down the road.1 point
-
@anglerWow..😔This is the first time I have read about an Oliver being stolen. It’s sad to hear about your news. I hope that you are made whole by your insurance company and that the thieves are caught and swiftly brought to justice. If I see or hear about an Oliver for sale I will PM you with information. If and only when you are comfortable doing so would you consider sharing the details of how this theft occurred?. This information could really help other owners with situational awareness, as well as step up of additional security of their Olivers. If you have not already done so, I suggest you inform Oliver TT of this theft as well. Hang in there, stay positive, surely good will over come evil. Patriot🇺🇸1 point
-
We’ll still be here (33.64244° N, 114.30655° W) if the crick don’t rise. 😃1 point
-
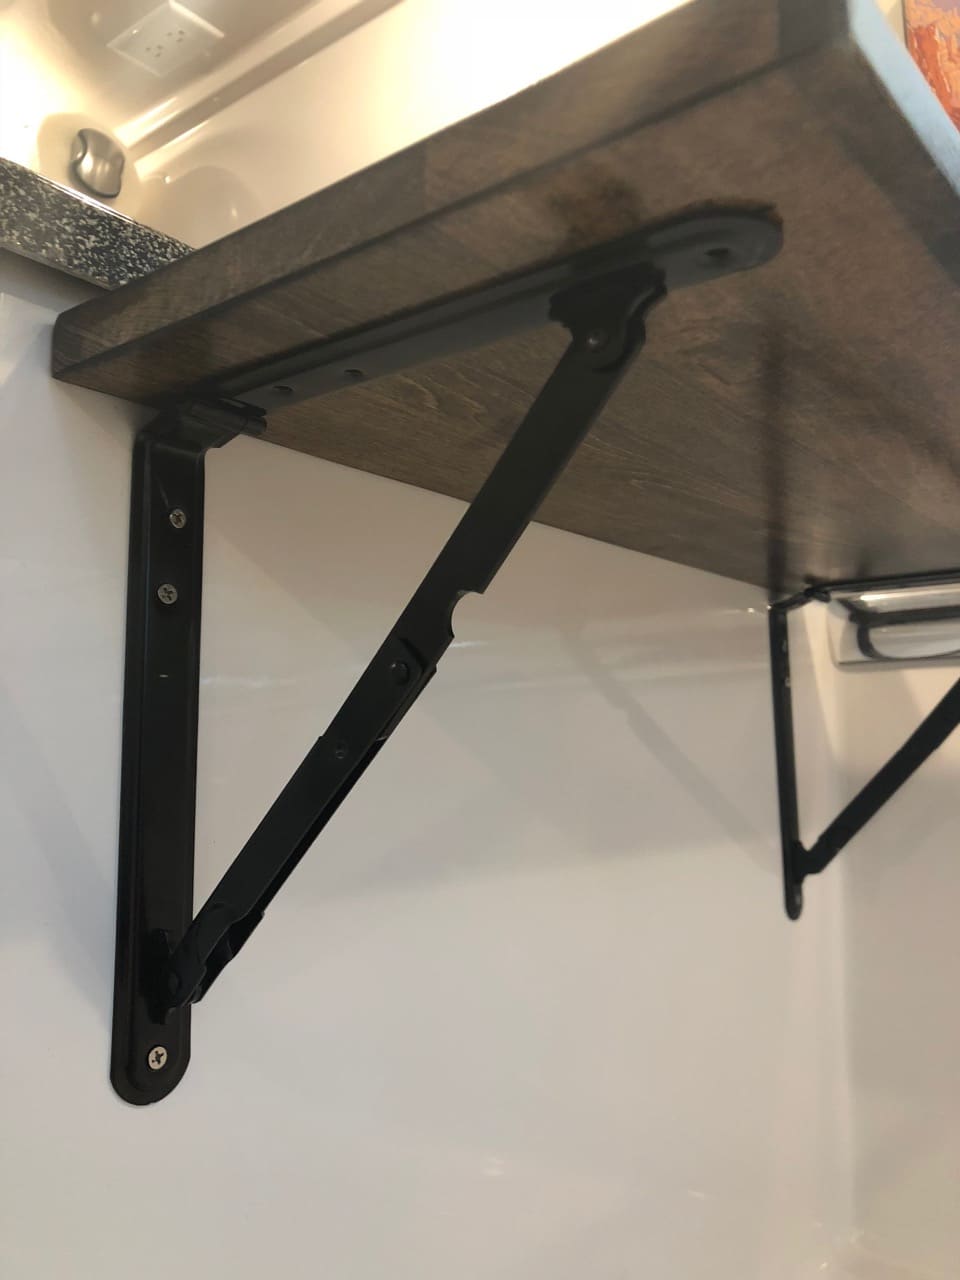
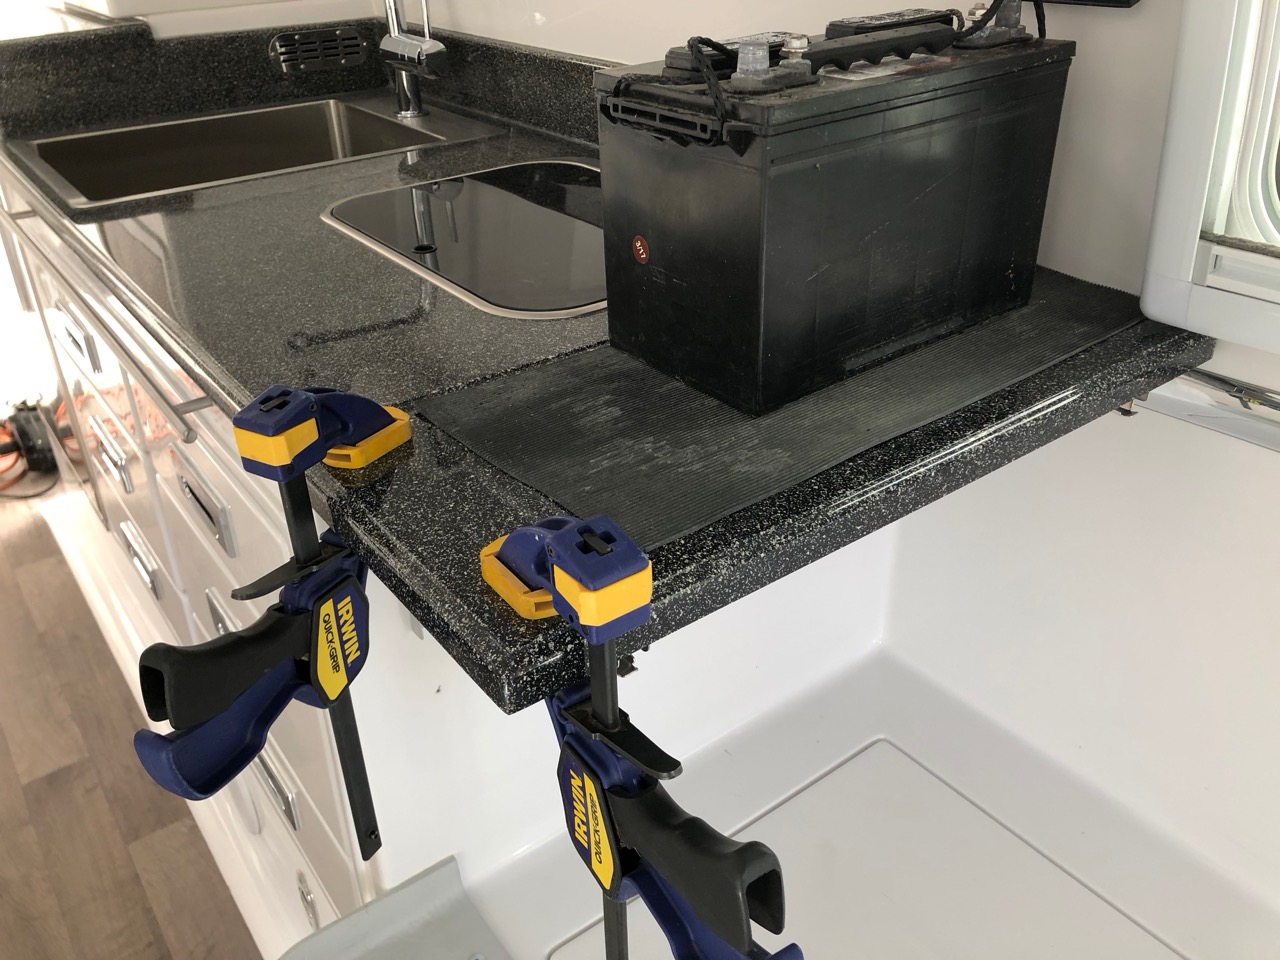
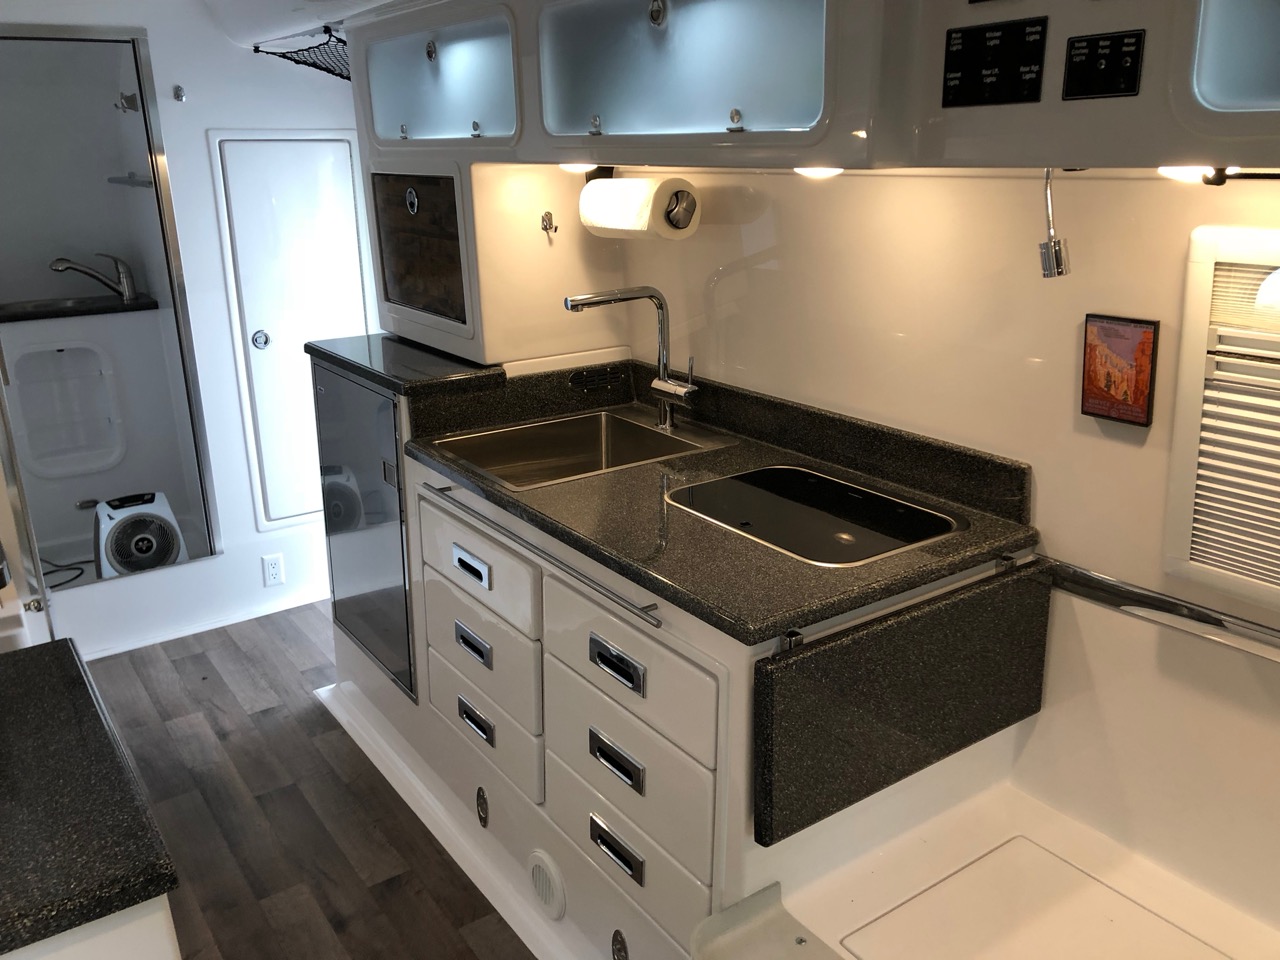
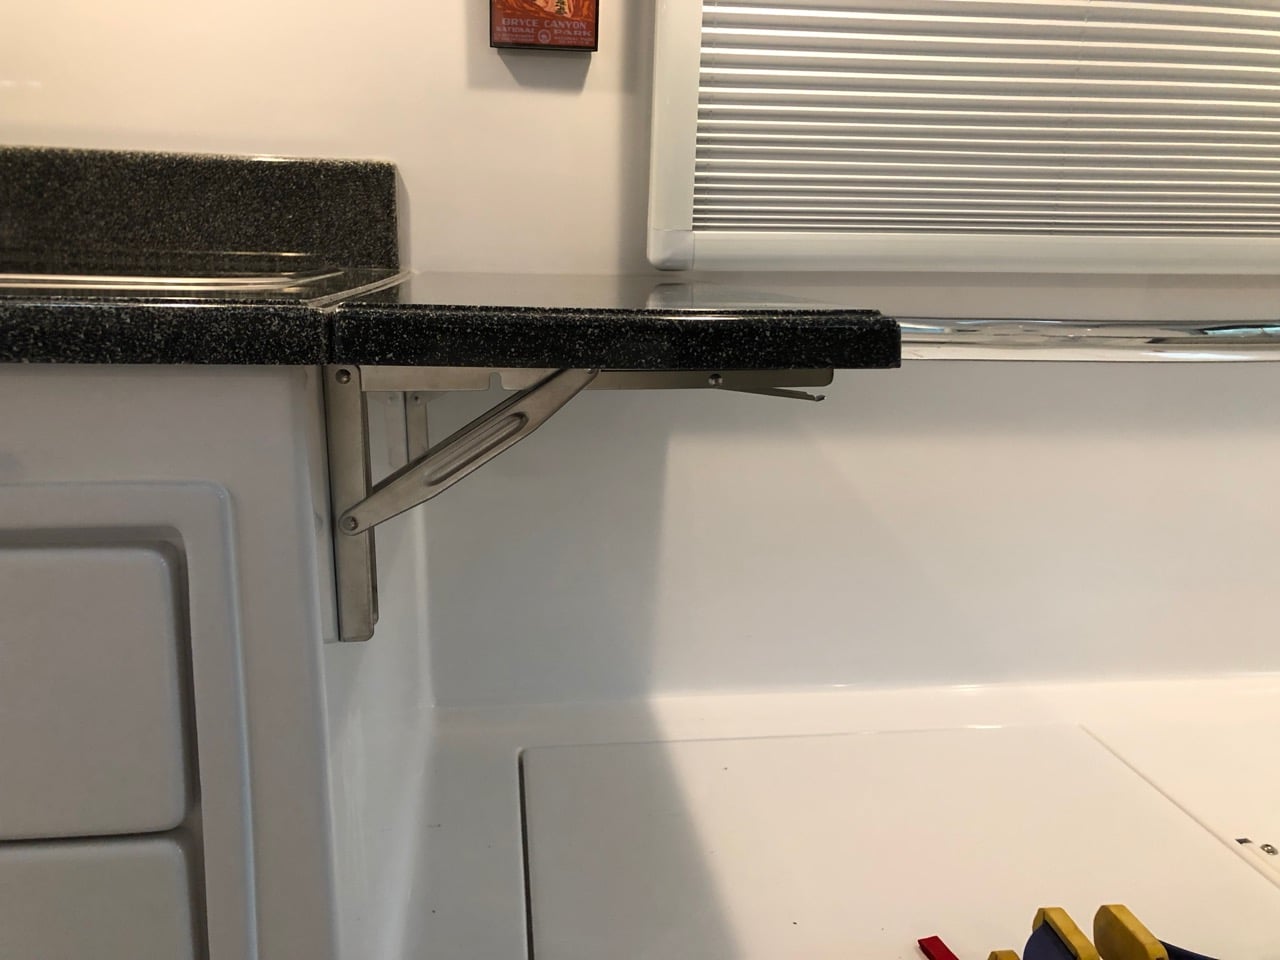
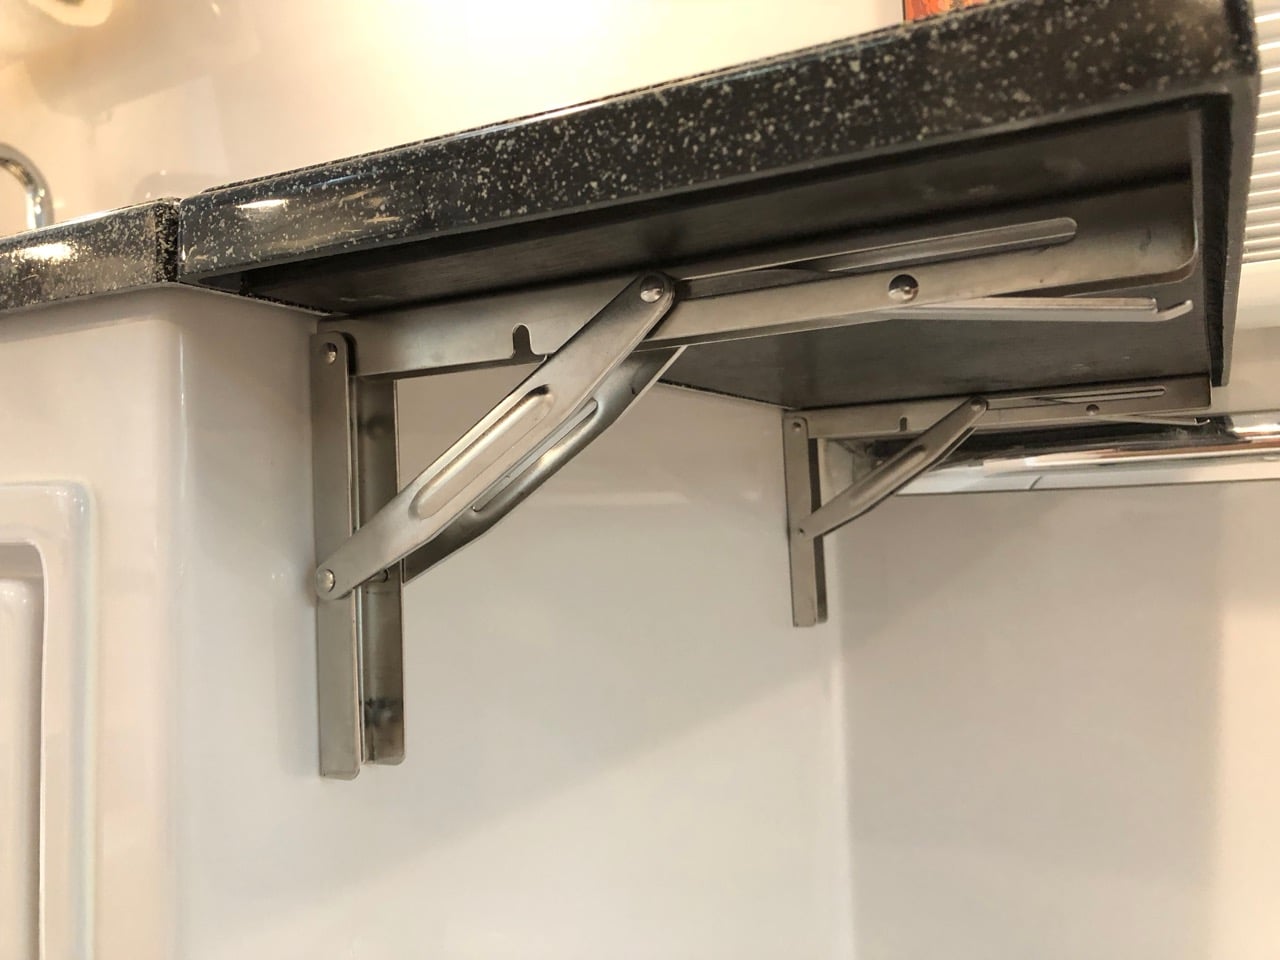
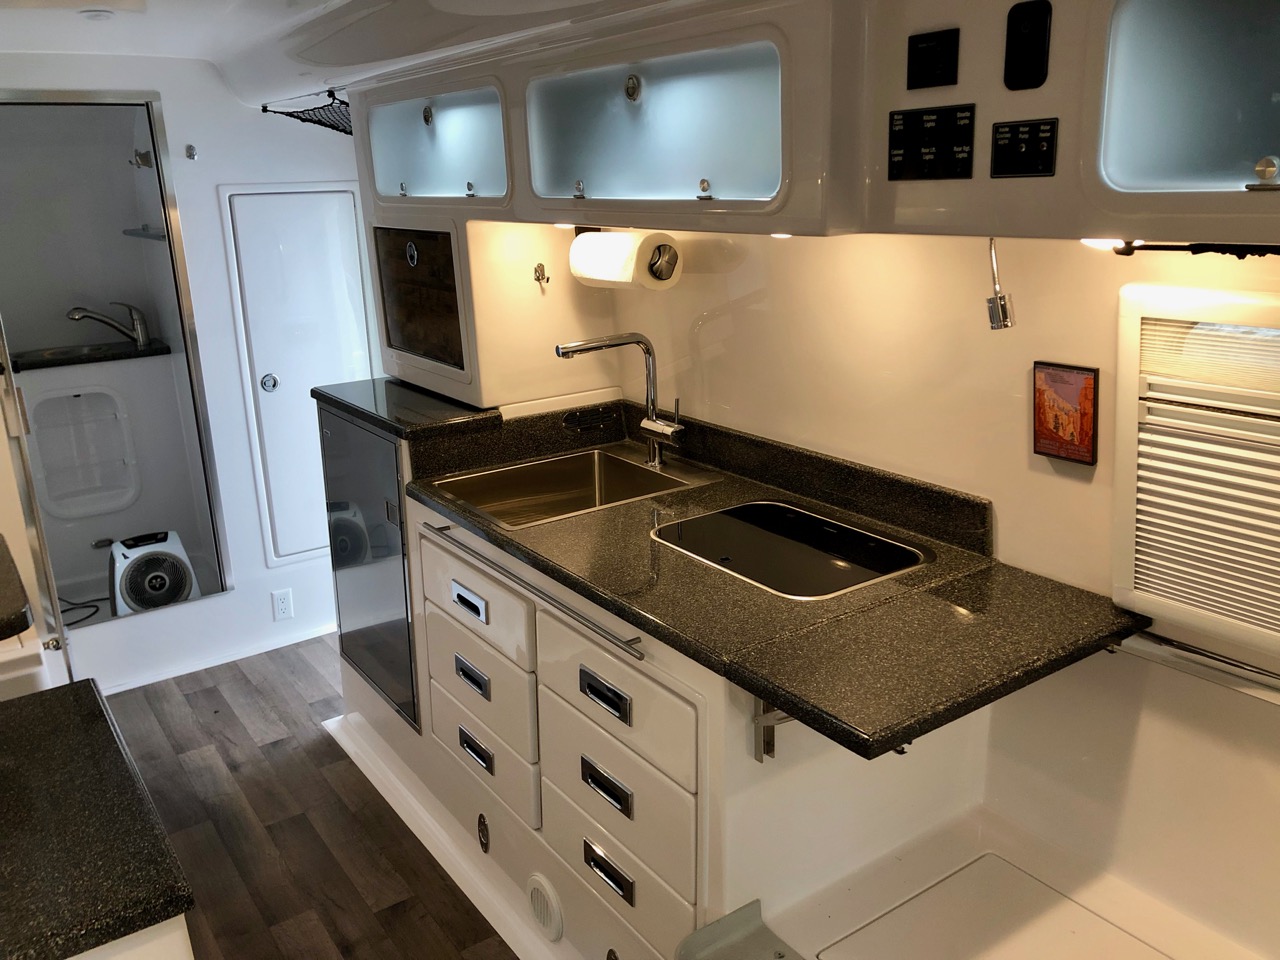
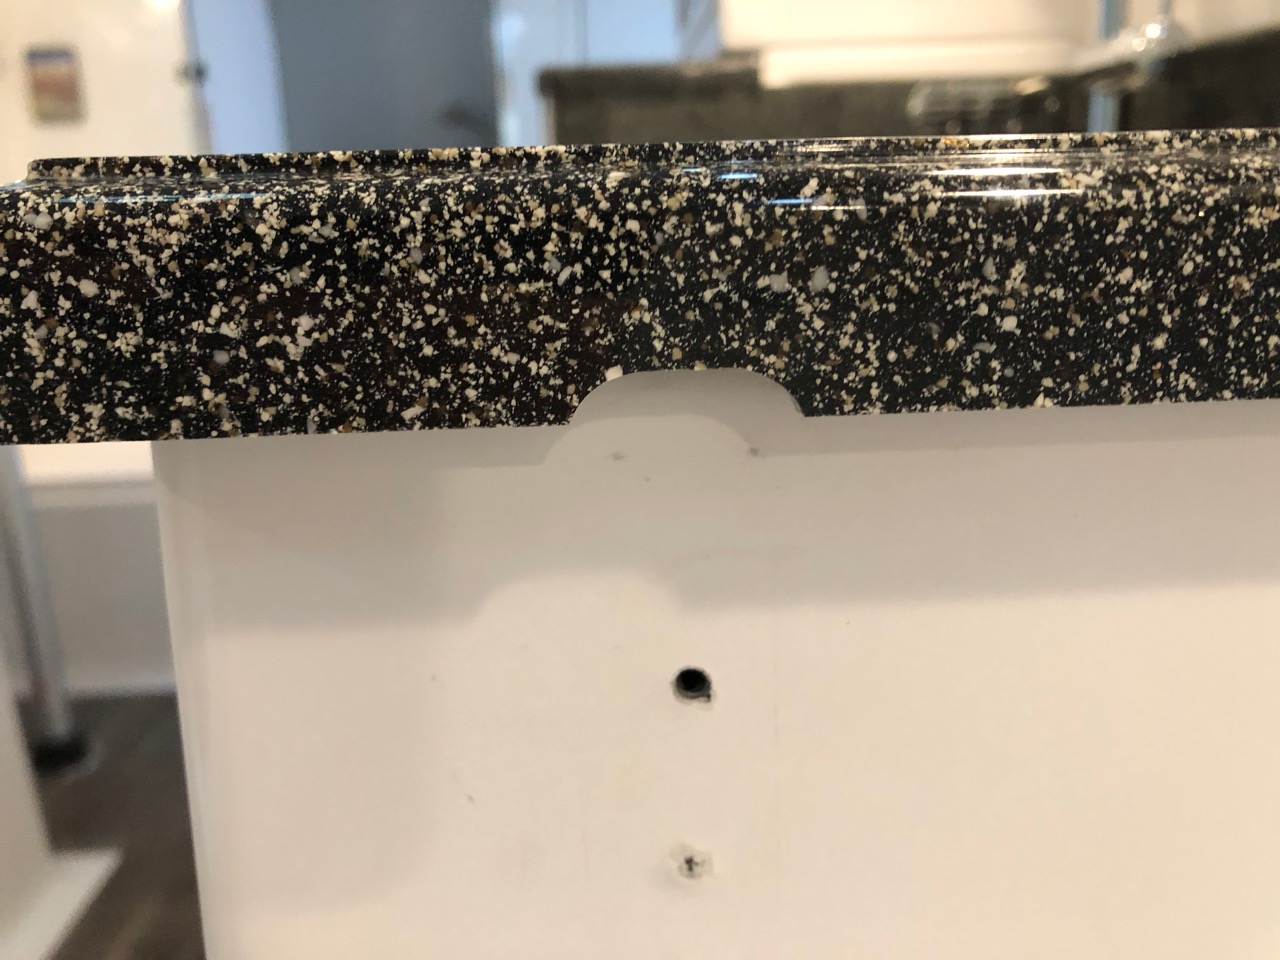
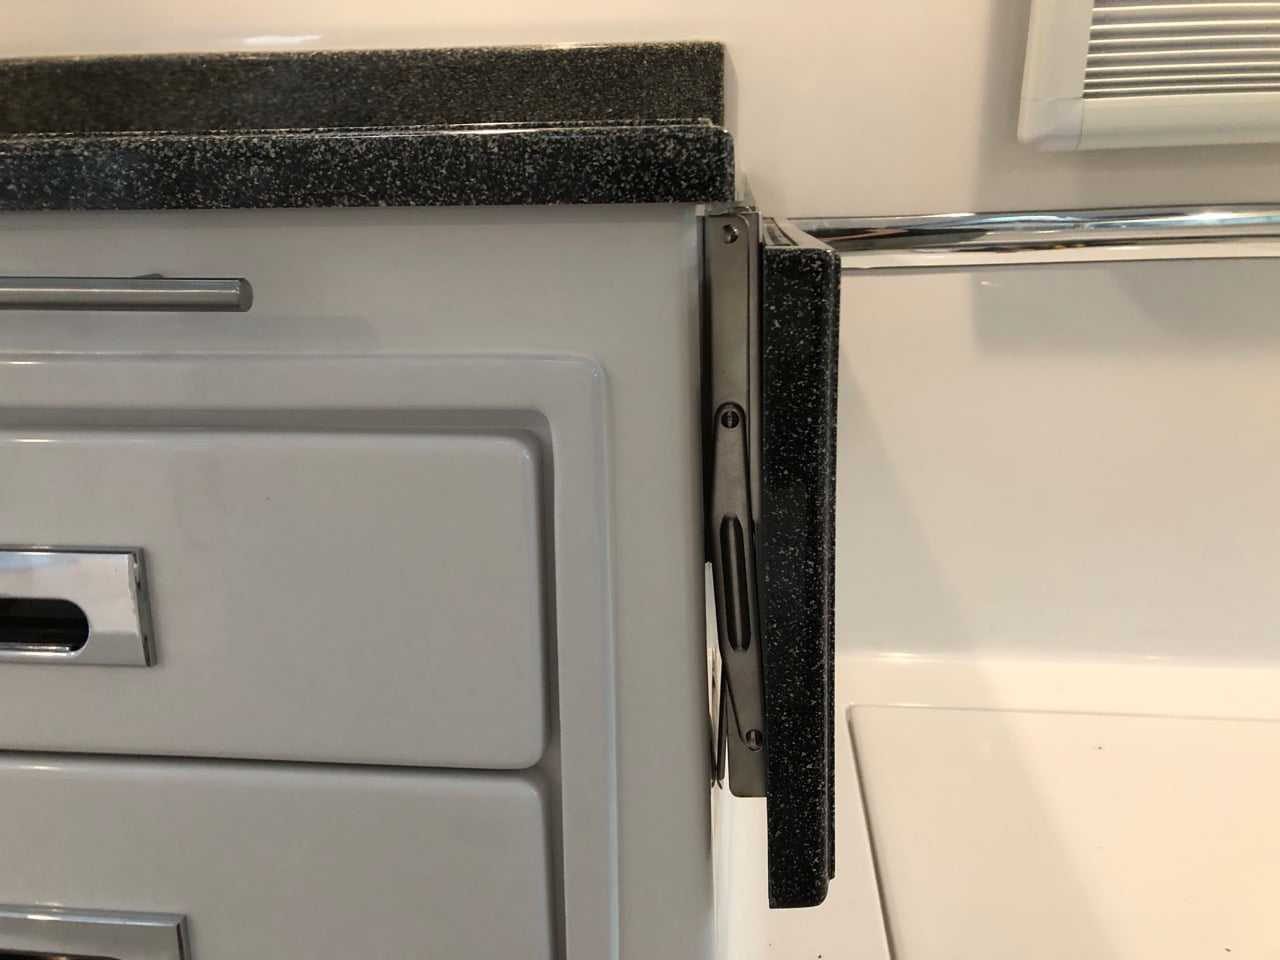
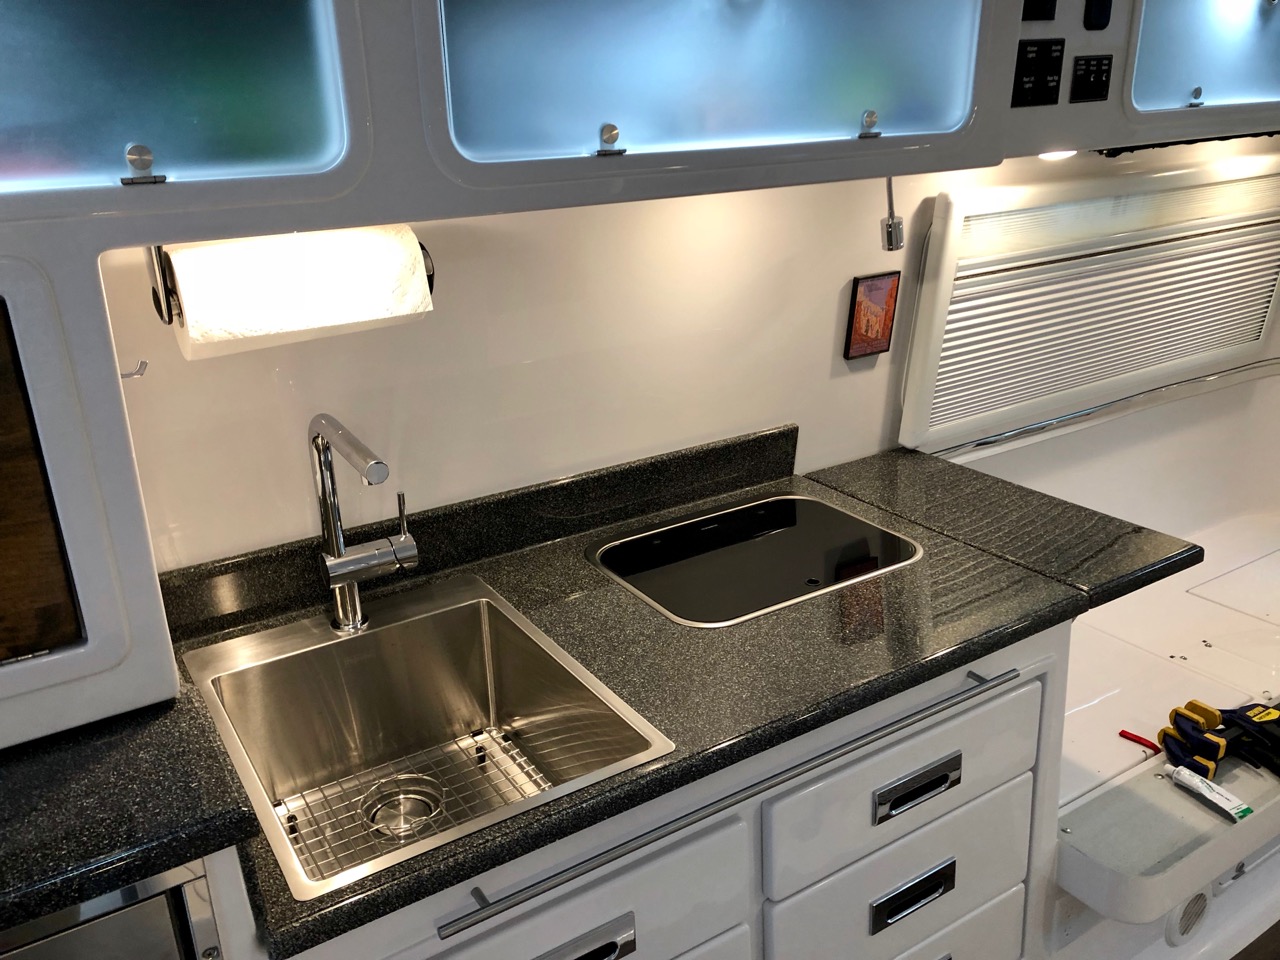
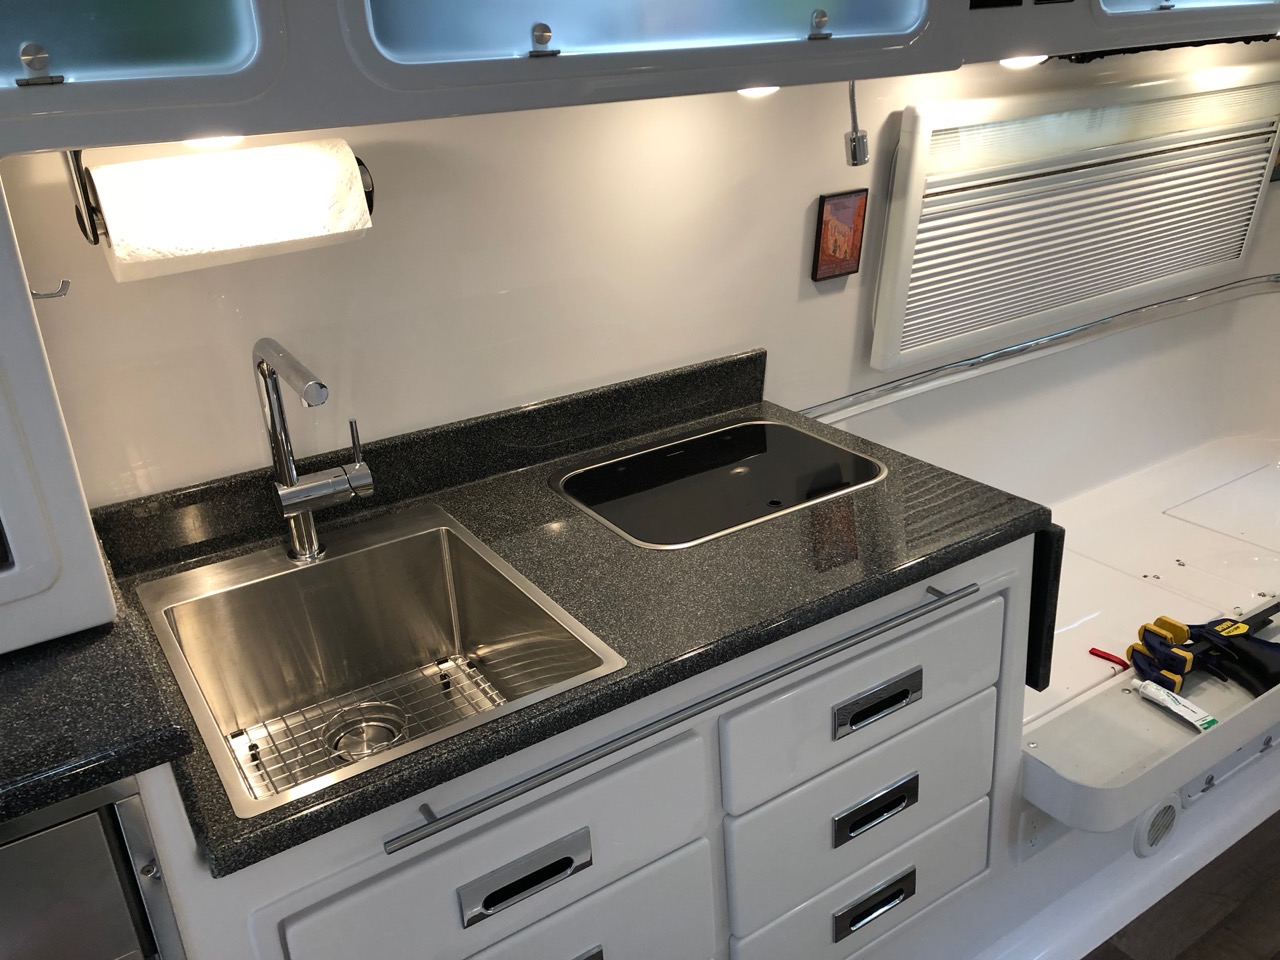
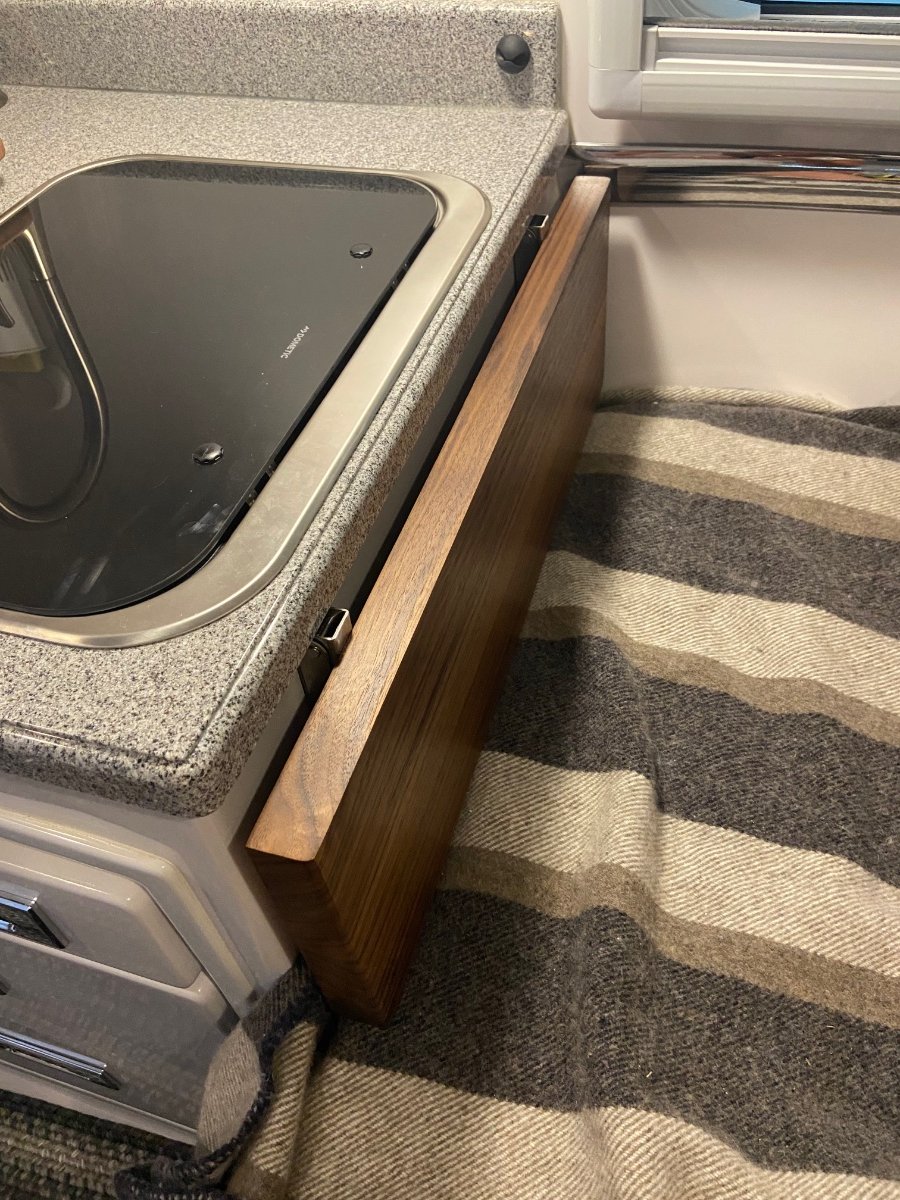
One of the things I asked Oliver to do for me was to install a 12" counter extension to the right of the cooktop that could be folded down when not in use. I figured we could use the extra counter space, plus I wanted a buffer between the cooktop and beds for splatter. This is what they came up with - This was perfectly fine and exactly what I was expecting, and we've really enjoyed using it. The only thing I didn't really like was that the hardware was finicky and just didn't work well. And the top ended up about 9" rather than 12", so it was a little small. And we had asked if they could make a piece of fiber granite to match, but they'd have to make a new mould for it so that wasn't going to happen. It also would have been nice if the extension were flush to the counter. So maybe a lot of problems. But we were happy with it nonetheless. But one day when I was running some wires through the pantry, I had removed the countertop beneath for access and just naturally set it down on top of the counter extension. Well, it fit perfectly; and thus, a new project was added to the list. I asked Oliver if they would sell me an extra top and picked it up when I got my trailer out of service a few weeks ago. I believe they charged $150 for it. Since I was redoing the top, I figured I'd search for better hardware as well. I found several options, but the ones that stood out were these from Amarine. They're super heavy duty and stainless steel. They work much better than what we had, and look nicer to boot. The only problem was that they were about a half inch too long for the countertop, so they'd have to be cut to size. But worth the trouble, so I ground the ends off a half inch. If you don't want to go through that trouble, my second choice was these, which are small enough to fit without modification. I cut a ½" piece of plywood that I could screw into to use as the base for the top. A ½" sheet will sit flush to the lip of the counter, which is what I wanted, but to make the countertop flush to the existing counter, it meant the hinges had to be high enough that I had to grind out a small notch for each hinge to clear. No big deal - btw, a Dremel with a small sanding cylinder works really well on the fiberglass, and leaves a smooth edge and no chipping whatsoever. Wear a mask. Here are the notches - The brackets are easy, just mark the holes, drill, and screw. I used ¾" #10 stainless on the bottom legs and ¼" #8's on the top. And 3M 4200 along each leg and on each screw going into the fiberglass to prevent it from backing out over time. Since none of the surfaces in the trailer are perfectly 90°, I needed to shim something to make the counter level. I considered grinding down the latch that holds the brackets at 90°, but that would have been difficult and if I ground off too much, I'd have to buy another bracket. Instead, I decided to shim between the plywood and fiber granite and then glue the top to the plywood with more 3M 4200, which I'm using so much that I've started referring to it around the house now as Snowball Glue. It's only about ⅛" max to shim - I used some stainless washers that I had lying about and just glued them down in each of the corners. I found that the top was a bit warped, so I had to weigh it down while the glue set - See, I knew lead acid batteries still had a use. I let it sit overnight and in the morning, I had what's in the photo above. Cool. BTW, if you want to do this and have mattresses, then you'll want to check their thickness to make sure the extension will clear when folded. Measure down 12" from the bottom lip of the counter. If your mattress is below that, you're good. If you have cushions, then no problem, but you'll need to move one of the back ones out of the way when raising or lowering the top. More pics -
1 point
-
Loved this mod so much, I implemented it myself on my smaller Elite I . I was going to cut the wood, but decided to reach out Foy and have him make a beautiful walnut version of what I was envisioning. Of course, he did an outstanding job, couldn’t be more pleased with his craftsmanship. With my KTT mattress I could only go with 8” of width but it still makes a world of difference.
1 point
-
It's not on the gas pump side. Some people go into the trailer, turn off the fridge, in an abundance of caution, and turn it back on after leaving the pump. It's not an open pilot flame, like the old days. It's electronic ignition, doesn't run all the time. And, as stated before, opposite side if the trailer. Furnace is also opposite side of the trailer, for us. I've never run with the furnace going, as we winterize if we think lines will freeze.1 point
-
Rivernerd, From my mad scientist experimentation, there are four things you can do to improve this situation. 1). The column of the leveling jack and, most especially, the metal flange the column is attached to, makes for a great cold radiator. some creative work with reflectix and silver tape would go a long way 2). unscrew the ext shower head, bring that line into the compartment and reattach the head. Pull the hot and cold knobs. Now there is enough room to add a block of closed cell foam under the little door to the ext shower compartment 3). cut two layers of reflectix material to cover the entire exterior access door. Cut to fit around the latch but wide enough so it gets pinched by the rubber door gasket to make a seal. Adjust the latch enough so it squeezes the reflectix to close gaps but not so much that the hinges to the door are straining when door is closed. 4). add a small return vent under that bed. Mabey do this last to see if required as it's the most invasive. I went entirely overboard there and replaced the most rearward heat vent on the curbside, snaked under the floor, pst the inverter and fed out to the isle across from the existing galley heat vent. Had to insulate the hose from existing electronics. It works great and certainly heats the battery compartment but bet if I had started with the points above, would not have been necessary. Hope this helps.1 point
-
I have shut off the propane at gas pumps. Most of the time my trailer is well away from pumps, if not I shut the propane off. When I do I leave it off, the fridge stays cold for hours while off. Mike1 point
-
"I am learning more and more and feeling more comfortable each time out about how things work. This is our first travel trailer so we were alittle overwhelmed at first." There is a steep learning curve at first, but it's rewarding to understand all the systems. It does get easier. It's easy to feel overwhelmed at first. John1 point
-
I totally agree if we were out months at a time the cost would probably be a deal breaker, but for us it is the perfect solution. I figured it works well for us maybe others would like it also. Bill1 point
-
If your trailer came equipped with tires containing balance beads Oliver should have sent you new valve cores. These replacement cores have a screen on them that keeps the beads out of the valve. You can also get this type of valve core at any tire shop.1 point
-
I have the Tire Minder TPMS system, with 4 sensors. Installing each of the 4 sensors caused the stem to leak, briefly, until I got the sensor screwed all the way into the stem. Then, the leakage stopped. This might be the simple answer to your query. But, if you they leak again, I recommend you submit a service ticket to Oliver. Oliver sent new "plug-resistant" tire valve stems, with $25 gift cards to cover some of the installation cost, to all those they knew of that ended up with balance beads in their tires when they picked them up from the factory. I was told, when we took delivery of Hull #1291 in November, that the balance beads had been removed from all of our tires. Maybe they missed your Hull # 1242, and maybe it has balance beads. If your leaks persist, Oliver should "make it right" by sending the right "bead-compatible" tire stems to you, or paying to have the balance beads removed from all of your tires, and new valve stems installed.1 point
-
Back in the day, we called high maintenance cost on lesser entry cost a "razor blade" marketing plan. The laveo is a cool concept, but high per flush cost. If you rarely use the toilet, seriously easier to maintain than a composter. Everything is a tradeoff. We all just have to pick what works for our own camping styles.1 point
-
The overnight low last night here in central Idaho got down below 0 F. So today, I took advantage of the cold temps to test the performance of the Varioheat furnace system, with the additional return air vents I added on the aisle side of the front dinette seat and the closet last week The results? First, the good news: The closet and the area under the front dinette seat were significantly better warmed by the Varioheat furnace. With cabin temp at 62 F, the area under the front dinette seat was 6 degrees warmer than before the addition of that return air vent (an increase from 38 to 44 F). The closet improved even more, a total of 10 degrees (from 44 to 54 F). Now the bad news: My hopes that the increased airflow overall would also result in significantly warmer temps in the vulnerable area on the street side by the external shower controls, were not realized. The temps in that rear area of the trailer stayed above freezing once cabin temps got above 60 F, but only 2 degrees higher than before adding the new return air vents (40 F now vs. 38 before). Thus, there was some measurable improvement, and maybe enough to keep tanks and pipes from freezing when ambient temps are in the single digits, but not as much as I was hoping for. Conclusion: Installation of the new return air vents in the front of the cabin and the closet significantly improved the ability of the furnace to warm those areas. But, that installation only marginally improved warming of the sensitive rear underbelly area of the trailer--maybe enough to keep that area from freezing down to single-digit ambient temps, but likely not below 0 F.1 point
-
So this is what happened to us. When we were in the Oliver camp ground I put on the tire sensors. We took the trailer for a short test ride of a few miles and came back to the camp ground. I figured out that I had put the wrong sensors on two of the tires so when we got back I took one sensor off and it was fine. Took the other one off and it was leaking so I quickly screwed it back on and I figured I would deal with it when we got home. That afternoon I stopped by an auto part store and pick up some new stem cores. That night I decided to change the valve stem and I couldn’t get the stem out it was stuck and in the process I lost all the air. So I got out my handy dandy air compressor and to my surprise It had the wrong connection for the 12volt and I couldn’t plug it in. So I put the spare tire on and drove 10 days no problem until we got home. I then took the tire to a garage and said I’ve never had a valve stem get stuck, first words out of his mouth do you have balancing beads. He then explained what I told you and he said it is a common problem.I called Oliver and mike said that they used to put balancing beads in the tires but they no longer do it. Guess what we had beads in our tires. So with some struggling we got the core out and replaced it with a new one and all is good for now. But when I get some free time I think I will either take the beads out and balance it with weights or pay the money for internal sensors . I think I will just balance them with weights and move on. hope this helps Bill1 point
-
I thought I responded to this query, so I apologize for the delay. We bought the VMAX XTR-235AH marine batteries and they did fit in our 2019 LEII battery tray but required me to strap the long way on the battery tray as indicated in our posted pictures. I purchased directly from the VMAX distributor in Michigan and order on Monday or Tuesday and received the batteries on Thursday or Friday of the same week. I did take the time to insure they were fully charged before installing including letting them sit for 24 hours. The batteries have only gotten stronger since the install. I did do a test early on to insure that I wouldn't have a recurrence of the issue running the furnace for several days after a full charge. They worked well. I am also going to try to keep the SOC above 80 percent to make sure we get the number of cycles expected. This important for AGM or VRLA deep cycle batteries.1 point
-
No because when you screw tire sensor onto the valve stem it opens the valve core and it remains open. Then the balancing beads get stuck and jamb it open. Things will be fine until you remove the sensor to add air and it starts to leak and you can't stop it. If you move the trailer so that the stem is at the top of the tire and then add air it will usually blow the beads out and it will stop leaking. The only way I know to resolve this is to either remove the beads or buy internal tire pressure sensors and have them installed by a tire garage. I had exactly the same problem Bill1 point
-
No - that is not what KYD said. Since Olivers have an enclosed "belly" and there is heat in that area, according to KYD the Oliver IS a four season camper. For me, living in the mountains of western North Carolina, the Oliver is certainly a four season camper. However, a person living in Fairbanks, Alaska probably would not consider ANY RV a four season camper. As I said above the answer to your question will at least partly depend on the person you ask. Bill1 point
-
I believe that the answer you seek will be determined by the source from whom you seek it. In a recent video on YouTube( by "KYD - Keep Your Daydream" they stated that when the term "Four Season" is used relative to RV's it means that the RV has heat directed to the areas containing the water and sewer tanks and the water lines. Obviously, that in and of itself does not necessarily mean that these lines and tank will never freeze. In any case - there are some good hints, practices, etc. in this video if you intend to camp during cold weather. Bill1 point
-
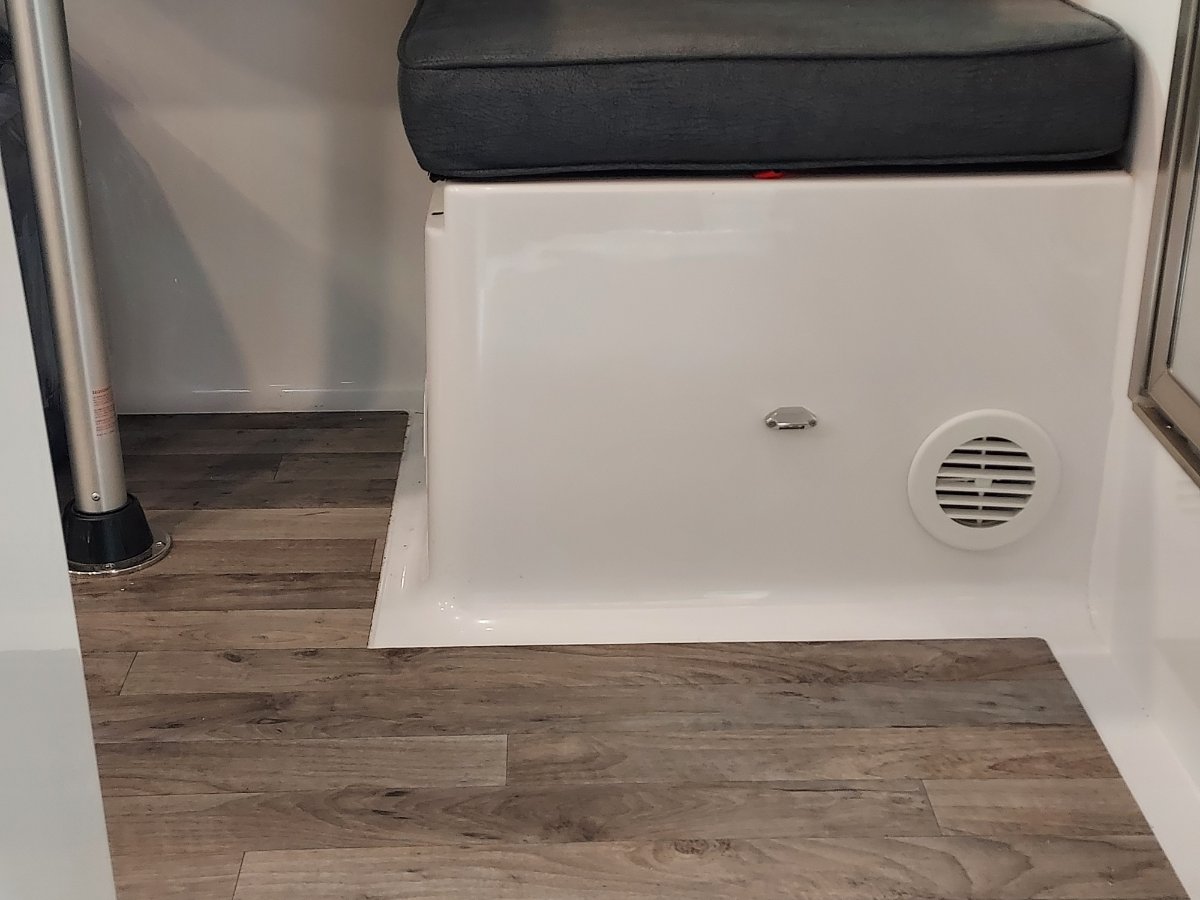
Low on the wall between the toilet and the dinette. The photo below was shot looking down. The toilet is visible on the right side of the frame. That return air vent allows airflow into the area under the forward dinette seat, which connects to the under-floor area.. Data gathered during our return trip from Hohenwald to Idaho last November indicated that this 2" vent made a notable difference in below-floor temps on cold nights in the single digits and teens, F. Based on those observations, if one had not been installed in our Hull #1291, I would install one.
1 point
-
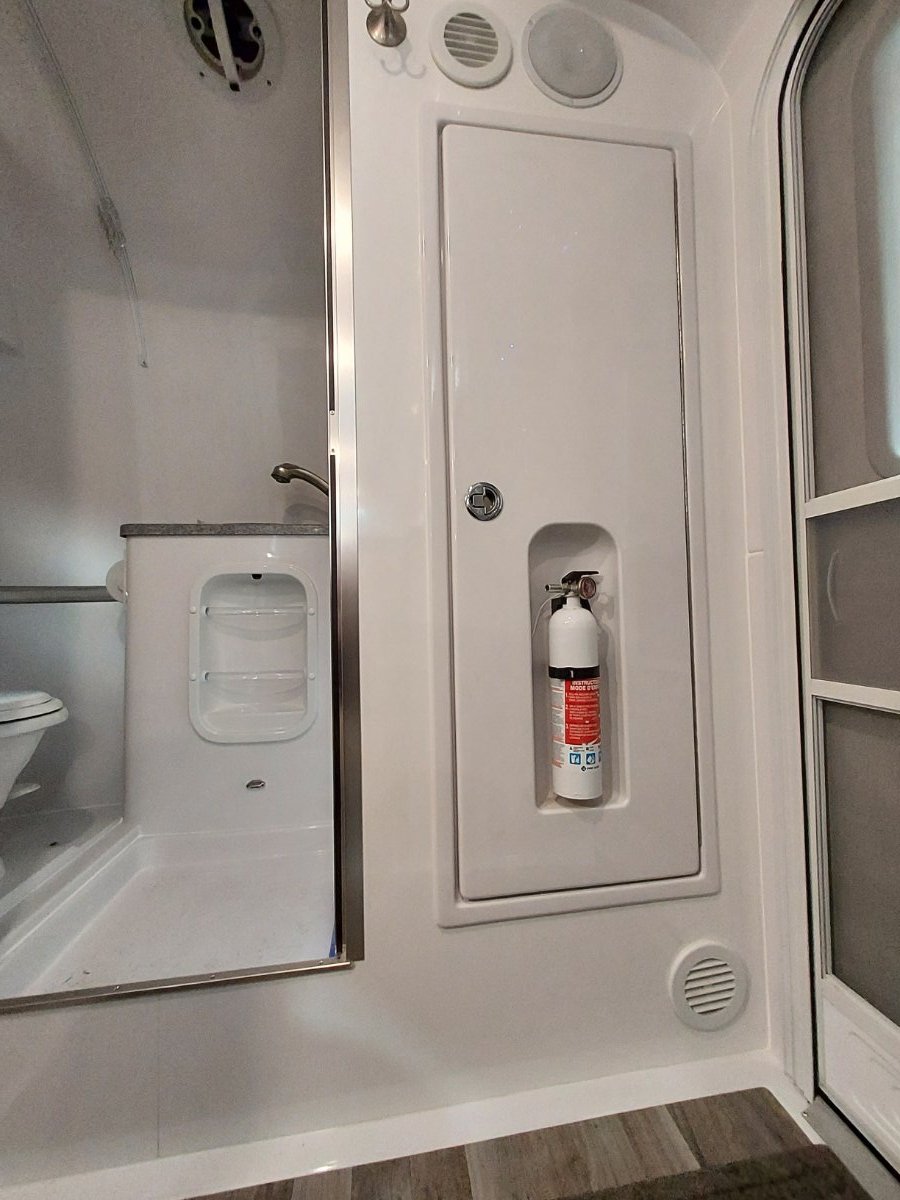
Although we have a Truma Varioheat furnace with a return air vent in the bathroom, I chose to add a 4" round return air vent on the aisle side of the front dinette seat. See photo below. I did this in the hope it will further improve circulation of warm air through the areas under the floor, to help keep water tanks and pipes from freezing when camping in really cold temps. I chose this location because it is about as far away from the two main cabin supply vents as possible, yet close to the floor where return heat vents should be. I am advised that maximum separation between supply vents and return air vents provides the most balanced air circulation. These Valterra A10-3345VP 4" vents are available here: https://smile.amazon.com/dp/B07D2Z8HBV?ref=ppx_yo2ov_dt_b_product_details&th=1 They are installed using a 4" hole saw. The vents have large bumps on each side which should be filed down to fit through the 4" round hole. They come with two attachment screws that fit in recessed holes on the side flanges, for which you should pre-drill with a 7/64" bit. The drilling makes quite a mess, so you will need a good vacuum. The forecast is for temps around 0F here the nights of Sunday January 29 and Monday the 30th, so I plan to fire up the furnace one of those nights and monitor temps to verify what, if any, impact this additional return air vent has on below-the-floor conditions. While I had my 4" hole saw chucked into a cordless drill, I opted to add two 4" vents to the closet, one high and one low, as Jason recommended. See photo below. I also plan to monitor the impact of these return air vents on closet temps. When camping on our way back to Idaho from Hohenwald in some very cold ambient conditions in November, the closet remained quite cold, even when the main cabin was heated up to around 70 F. I expect the effect of these new return air vents will be temps much closer to those in the main cabin. I will report the results of my temperature monitoring next week.
1 point
-
Jason said: "I requested that"... and told us why. It's nice to know that the Oliver staff pays attention to us! THANK YOU! Charlie1 point
-
Without a volt ohm-meter (VOM) you are just drifting in the wind. You need to be able to check voltages and do some basic electrical troubleshooting. We cannot do that for you from across the country. You cannot go wrong with this excellent one, it is perfect for RV use. YIRU UNI-T UT210 Series True RMS Digital Clamp Meter AC/DC Voltage Tester with ohm, Capacitance Measurement If you are not comfortable doing that, you need to hire a pro. John Davies Spokane WA1 point
-
These couplers are heavy duty forged steel and I see no way for one to bend without any other signs of damage. The big coupler is rated for 12’,500 pounds! You need more info from Service. What exactly is damaged? The hinged door or its pin? The only way that could happen is if you towed with the door open (not latched). Maybe the manufacturer should get involved. I am sure they would want to know about any faults. IMHO you would see the ball snap clean off before the coupler failed. Good luck. John Davies Spokane WA1 point
-
Who installed the larger hitch?1 point
-
For the last 50 years I have just let my trailer plugs hang down, I also try to store it somewhere under the trailer tongue where it is somewhat protected from rain, etc. I give it a shot of electronic grease every year or so, always works for me. I was thinking of purchasing a plug cover, but then thought why, 50 years and no problems. trainman1 point


-
Recent Achievements
-


")


