Leaderboard


Popular Content
Showing content with the highest reputation on 10/02/2023 in all areas
-
The three black wires with the large yellow fuse holders are the 12 volt hot leads for the three stabilizer jacks. On mine they are labeled for a 30 amp fuse. And on most Ollies (including mine) the front jack has another redundant fuse holder located at the jack itself. And you are correct that I have no solar panels on my Ollie. But if you look in my earlier post of my street side bed wiring, you'll notice the coils of heavy gauge red and black wire. At that time (and maybe still now) Oliver was installing the heavy gauge wiring for the solar package, even if the solar panel option was not installed. So the wiring is in place between the hulls from the roof down to the street side bed so the panels can be added in the future if desired. I use a Zamp portable solar panel setup instead connected to a Zamp port that I installed.4 points
-
You can also get TST sensors to be mounted INSIDE the wheel and, like @Mike and Carol mentioned, the separate display does not depend on your phone to be on and the app to be opened. Safe travels! BL3 points
-
It's also why I almost immediately got rid of the gray/yellow hose that came with the Ollie and went back to my normal Rhino Extreme hose. I have never had an issue with Rhino's but I have known several people that have had the gray ones fail. BL3 points
-
Absolutely @topgun2! We dumped this AM at the house after returning from Mexico yesterday PM... We've always released a small amount of grey water before dumping the good stuff. It may also assist in moving the black effluent down what would otherwise be a dry hose. With the OTT wastewater holding tank flushing feature, (we didn't have this in our previous RV) we're now in the habit of running a wastewater holding tank full of freshwater to dump through the hose after the gray water's been eliminated. A final step that seems to work for us - on many levels. HA!3 points
-
And your experience is a classic example of why those of us with the "standard" toilet should always release a bit of grey water first prior to dumping the black. This makes sure that the hose connections are solid AND that the hose is not going to leak. Bill3 points
-
Sun rising over Old Mexico....
 3 points
 -
I about to join the "re-stringing club"! How many cans of beer or glasses of wine (whine?) does it take? Bill3 points
-
I looked through their website. Interesting manufacturing process, and certainly lightweight for size. Sadly, each and every floorplan listed eliminates the possibility for a big rear window, which I would really miss. I also dislike being able to see the honeycomb pattern of the plastic sheets in the photos. But, a number ofvthe floorplans would be great for a small family, and a smaller tow vehicle. Their dealer network is apparently one company, with several locations. One is about an hour and a half from me, and if I'm out that way for another reason, (there's a great old time Florida seafood restaurant that we like, not far away, and a seafood market that sells walleye in Hudson, itself), I'm curious enough to drop in and check it out. That location has three models in stock.3 points
-
Interesting concept. Looks like a nice trailer, the weight will be something that people with smaller TV’s will appreciate. The price isn’t bad either. I had to raise an eyebrow at the standard “electric fireplace”. Mike3 points
-
Thanks for the reply and mechanical word correction. Woodworker and geologist here; so when we talk rocks and/ or wood sometime maybe I can do better for you.2 points
-
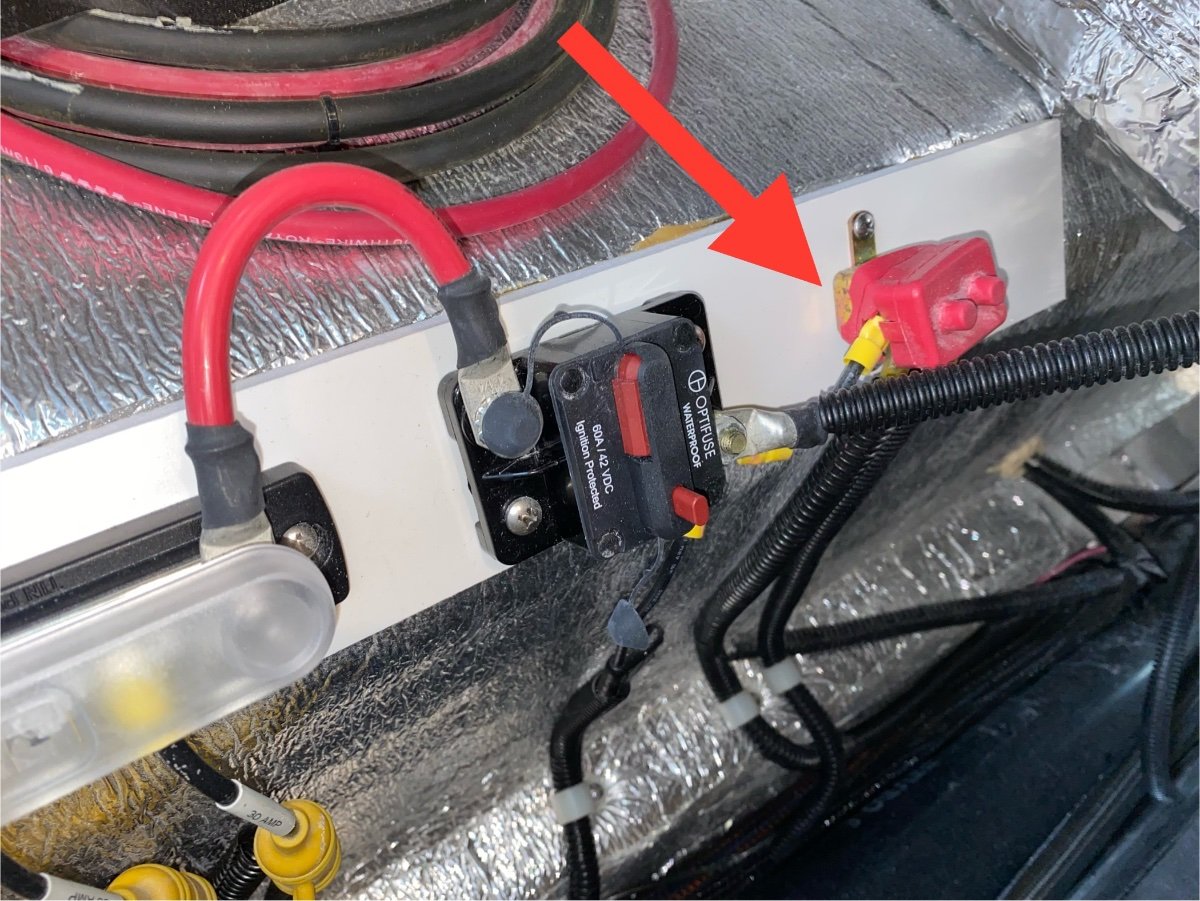
In my 2021 OEII, there is a red switch like the one pictured above, but it is located in the upper street side cabinet near the pantry and right near the Zamp solar controller. That switch breaks the power connection between the solar panels and the controller. The switch in your photo (being so close to the Blue Sky box) might do the same. The switch is useful when disconnecting battery cables so they are not carrying charge while disconnected.2 points
-
We haven't had to restring shades (yet) in our 2008. I do remember, vaguely, Oliver changing up manufacturers at some point. So, maybe some need the Allen wrench, others don't?2 points
-
A new company. This one's made of plastic with welded seams. I think the interior might be plastic, too. Very lightweight. https://www.theautopian.com/this-new-lightweight-plastic-camper-promises-a-leakless-future-with-no-rot/2 points
-
Awesome that you are back in business. We'll thank @Dave and Kimberly, and @Frank C. I just did a search. Glad it worked for you. Happy to help, in my very small way. Enjoy your time in the canadian maritimes, and Maine.. Wish we were there, too! Such a beautiful place!2 points
-
I also have a composting toilet. I needed 2 gallons. Don't forget to winterize the black water flush valve (even though you aren't using the black tank, I was told that it still needs to be winterized.) There is a video on Oliver website about winterizing the Truma Aqua-Go. Be sure to review that first.2 points
-
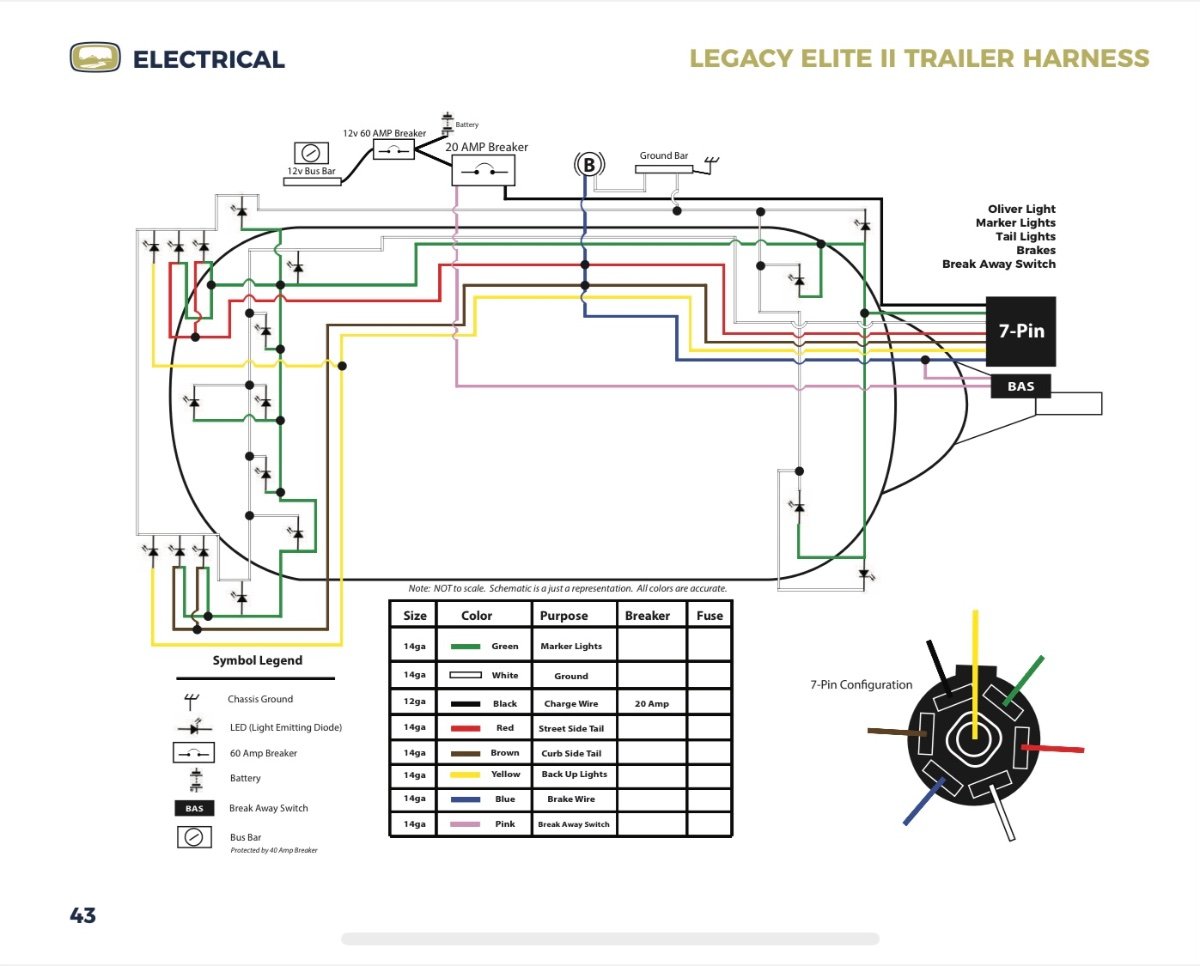
On older Oliver trailers with lead acid batteries (before the lithium battery option availability) the black wire on the trailer 7 pin harness is the charge wire for the batteries and it IS a direct connection to the positive side of the battery bank (through a 20 amp in-line breaker, see wiring diagram). So that wire/pin on the 7 pin trailer plug connector is energized with 12 volts from the trailer batteries, and that connection allows the trailer batteries to be charged from the tow vehicle while driving. And it is per the SAE standard. It worked with the old Olivers like mine with lead acid wet cell batteries because the tow vehicle alternator charging voltage was sufficient for lead acid batteries, but not with lithium batteries, so Oliver now disconnects that wire on newer trailers with lithium batteries.
2 points
-
It appears that 12VDC is back-feeding from the battery out to the plug. Getting shocked there would mean you'd also have to be touching the ground wire, the frame or the basket as well. @mossemi Check one of your wiring diagrams and see if the black wire from the 7-pin doesn't run directed to the battery. It probably does not currently, but I think it did in some of the earlier builds.2 points
-
We had an electric fireplace in our last fifth wheel. I thought it was silly, but it was a standard feature. Turned out, we really liked it. It was basically an electric space heater, so it was good to take the edge off on a chilly night if we had hookups. And the fake fire glow was actually kind of nice. 🙂 Here's another article from the same source, this one a review of the production Cortes units. Saw a couple of those at our local dealer this summer. https://www.theautopian.com/this-new-fiberglass-camper-has-some-great-ideas-wrapped-in-terrible-marketing/2 points
-
Those are hub center CAPS. I sure hope your axle hubs don’t come off. File a Service Request and Oliver can send you a new one, or a new set. There is no other source for them, I am sure. John Davies Spokane WA1 point
-
Rivernerd - As per the quote by jd1923 above. Bill1 point
-
Our Pro Breeze works fine as long as our interior temp is an above 45 degrees. As for battery draw down, I can’t answer that question as we have never run ours all night on 12v.1 point
-
@jd1923 that is perfectly normal wiring. Our previous trailers all had that wire hot to the batteries. (As others have said, it is not that way with our lithiums.) We even made a jumper plug to connect that terminal to the running lights so we could leave the running lights on if we had to leave the trailer on the side of the road at night because of a breakdown. You might see some campers leave their trailers lit that way in campgrounds, too. Kinda a newbie thing.1 point
-
Cheffing up good eats at our base camp in Montrose, Co this evening.👨🏼🍳😋 IMG_9806.mov1 point
-
Agree, believe you’re right!1 point
-
Out of season, especially on the south, this is great advice. We actually have no winterizing season in Florida, so supplies run out quickly. (Folks returning north buy it up.) We keep a gallon spare in the trailer, use it as a door stop. A gallon or two in the cabin in nc. Yes, we live in Florida, but we love shoulder season camping, so every once in awhile, we would rather have it on hand, than be without. You never know when shoulder season turns into early winter. Been there, done that , and lost an outside shower, unnecessary.1 point
-
Do not cut the wire pigtail on the camera. The will not allow any credit if you do.1 point
-
Thanks Toni, we have talked an I'm looking forward to seeing you and your Oliver!1 point
-
As long as you make sure that you have closed the water heater bypass (assuming that you have the standard water heater) then two gallons will do the job. Don't forget to add a bit of antifreeze to the toilet bowl (assuming that you have the standard toilet) in order to keep the seal in there in good shape. And once you've done that put some "Saran wrap" over the top of the toilet bowl so that this antifreeze does not evaporate over the storage period. Bill p.s. If I find the pink stuff either on sale or at a good price I buy enough in order to always have 2 to 6 gallons on hand. There have been times (like this time of the year) when RV antifreeze is difficult to find.1 point
-
Hello! I'm still here in Jackson. I sent you a PM -- you are welcome to come see my Oliver E2. Call me asap because I'm only here for another week. I sent you my phone number, the best way to reach me while I'm not on wifi. I hope we can connect -- seeing one in person is the best way to make your decision.1 point
-
Omg, no way to chock those wheels... 🤣🤣🤣1 point
-
1 point
-
As far as I know - OTT only stopped doing this for those trailers equipped with lithium batteries. Bill1 point
-
Thanks @John Welte, @Mike and Carol and @topgun2. There are several reasons why I'm interested in the new Dill product, vs. TST and other like products. The Dill sensor is installed in the tire on an integrated valve stem vs. small plastic valve-stem-cap devices mounted outside in the elements. Dill sensors, like OEM automotive sensors, advertise a 5 to 7-year battery life. So, you replace the batteries when you replace tires every 5-7 years. Another feature is not having to mount and wire a proprietary screen! Just read the tire data from your cell phone. Soon I will be mounting a small screen for gauges integrated to the truck computer (OBD II port), to read EGT on the diesel, trans temp, and much more! I have a good place to mount that, down behind the cup holder and really do not want anything on the dashboard. Full specs are not yet out on this new product, to be released by October end, but you must be setup a cell phone alert when tire pressure or temp is outside of control limits. Having the data view portable will also be handy when filling tires. I'm holding off on my new tire purchase until these are released, price and full specs advertised.1 point
-
On my Elite II, the 20 amp breaker is under the street side bed. It’s covered by a red rubber cover. It’s a self resetting breaker, but you can disconnect the black wire that comes from the 7 pin harness. And I get all the electrical/plumbing diagrams from the Oliver university resource on this website. It has manuals by year for the trailers.
1 point
-
And - this is why in at least one video by Jason Essary (Service Manager) he recommends that owners disconnect this plug from the tow vehicle when stopped for over a few hours. This is due to the fact that even while the tow vehicle is shut off the Oliver batteries can still draw power from the tow vehicle and, therefore deplete the tow vehicle battery. Bill1 point
-
HDRIDER - As per the very first post in this thread by Matt Duncan, Oliver was/is in the process of collecting this information. To my knowledge - any names on this collected list have not been published to date. Bill1 point
-
The first picture is from the 2017 Oliver LEII manual and the second is from etrailer.com. Both indicate that the black wire is the hot/charge wire. Mossey
1 point
-
I used Eagle Rock RV Service in Idaho Falls, ID for a lube and wheel bearings pack. They were great.1 point
-
Just got back from a trip to Steens Mtn, where I noticed the curb side USB was loose from the side of the nightstand. I am afraid of the possibility of there being a metal nut that might short the wiring and cause a fire. I haven’t looked to see if the two ports are in a front panel that can be unscrewed, but before I start tearing things apart, are there any words of wisdom about how to access the back of the USB port. The Steens were stunning as usual, with the first dusting of snow at the top. From the Alvord Desert side.
1 point
-
A properly designed bus bar should have close to ZERO ohms resistance. I suspect that poor wiring construction practices are contributing and that there is more to this story. John Davies Spokane WA1 point
-
That sounds right, the invoice is in Ollie. We were at Hohenwald a couple years ago, purchased new shades, really like them, too!1 point
-
OK, we broke a string. Can’t afford $500 or a sharp stick in the eye. Since we’re on the road it will have to wait until we get home. Question: where is the best place to get string? We will use the instructions in this thread. They don’t make the beige shades anymore and Jason quoted me $660 to replace all shades with the new white ones. When we get home I’ll open a bottle of wine, clear off the dining room table and earn my Shade Restringing Merit Badge. Mike1 point
-
OK, Tali and I restrung the shade with the broken string this evening. Not the most enjoyable task we've ever done but it beats a sharp stick in your eye. A little complicated until you've done it a couple of times but once you "see" how it works it's really not too bad. I had to partially disassemble another one to see how much tension to put on the strings. I'll be happy to restring one for anybody for only $500.00 string included.1 point
-
These schematics are great! I haven't needed to replace a cord yet, but I did have an issue with sagging shades. I found the tension on the strings can be adjusted by moving a small metal shuttle that slides up or down in the channel on the side of the frame. A small Allen wrench us useful for this fix.1 point
-
Used 1.5MM shade cord which is about 30% larger diameter than original cord. Cord routing in end of each shade handle: Cord routing in 90 degree portion of frame:1 point
-
Springs maintain tension on the cords. Each cord is fixed and taped in place where indicated in the previous post. Cord in shade handle is not fixed allowing the handle/shade to slide up and down on the cord. Hope this helps.1 point
-
Had some extra time today and started making better sketches of my Ollie's shade cord routing. The following shade sketch shows the cord routing on the day and night shades. If the night shade is being threaded (shade in top of frame), the taped side of shade is positioned at the top. If the day shade is being threaded (shade in bottom of frame) the taped side of shade is positioned at the bottom. The cords from night shade are routed to the spring in the bottom of the frame. The cords from day shade are routed to the spring in the top of the frame. I'm working on additional information and will post as soon I have it. Hope this helps!1 point
-
Great job. I've got to tackle my broken one also. For some reason this intimidates me a hundred times more than drilling holes in the hull. Weird...1 point
-
This info was available because I did the research and discovered it. I don't own an owner's manual but I'd bet a month's salary that it's not there and if you were to call Oliver they could only tell you the name of the company. As far as finding it 4-8 years from now, I'd write it down. I keep information like this in my phone. And it's backed up, multiple times. The only answer for the question of color seems to be the fact that they choose not to produce it in pure white. They used to, the shade frames in our first Outlaw Oliver were white but sometime during Oliver's travel trailer building hiatus (2009-2013) the company switched to only Black and Almond.1 point
-
Hmm, that is exotic and very expensive. I wonder what would be a good alternative that would be available in say 4 or 6 ounce tubes instead of the big grease gun cartridges, which are hard to store and carry once opened...? http://www.ebay.com/itm/Mobil-SHC-460-H-D-Grease-2-pc-Synthetic-Grease-/141903892885?hash=item210a219195:g:d~8AAOSwll1WwMrl&item=141903892885&vxp=mtr http://www.timken.com/EN-US/products/lubrication/Documents/GreaseInterchange.pdf The Red Line CV-2 grease is a different type, I think, but it is simply stellar in axle CV joint applications. https://www.redlineoil.com/product.aspx?pid=82&pcid=17 When non-standard grease is used it is important to not mix in an incompatible type, or unpleasant things can happen. John Davies Spokane WA1 point


-
Recent Achievements
-


")


")


