Leaderboard


Popular Content
Showing content with the highest reputation on 10/10/2023 in all areas
-
During our present trip touring the (4) gorgeous Colorado NP’s and a few Service Parks our Atwood CO/LP detector started alarming and would not reset. Of course it alarmed in the middle of the night. 😄 I removed the detector and saw that it had a manufacture date of 2018. We took delivery of our new OLE2 in June of 2020. So our Atwood detector was actually 5 years old. I called Oliver and asked about purchasing/shipping me a replacement. Mike Sharpe said they are no longer installing the Atwood’s and Oliver is now installing RV Safe model #RVCOLP-2W CO/LP detectors. So not wanting to go a day longer without a detector I opted to just buy local and made a call to a local RV dealer in Montrose CO. They said they had plenty on hand. I swapped out the old Atwood and installed the RV Safe and we are back in business with no alarms. The new RV Safe detector comes with a choice of (2) backing plates. So Pro tip- If you have to replace the old Atwood use the larger backer plate that comes with the RV Safe detector as it will take cover the hole in the hull wall under the dinette that the Atwood required. It’s a pretty straight forward clean install. Onward!! Patriot🇺🇸
 5 points
 -
Art, it appears you still have a bit of aluminitus left over from the Airstream days. I like it.5 points
-
I personally can’t envision not having exactly the right tool for any and every job I do. You’ll soon learn that using the wrong size socket will quickly round off the flats on either bolt heads or nuts.5 points
-
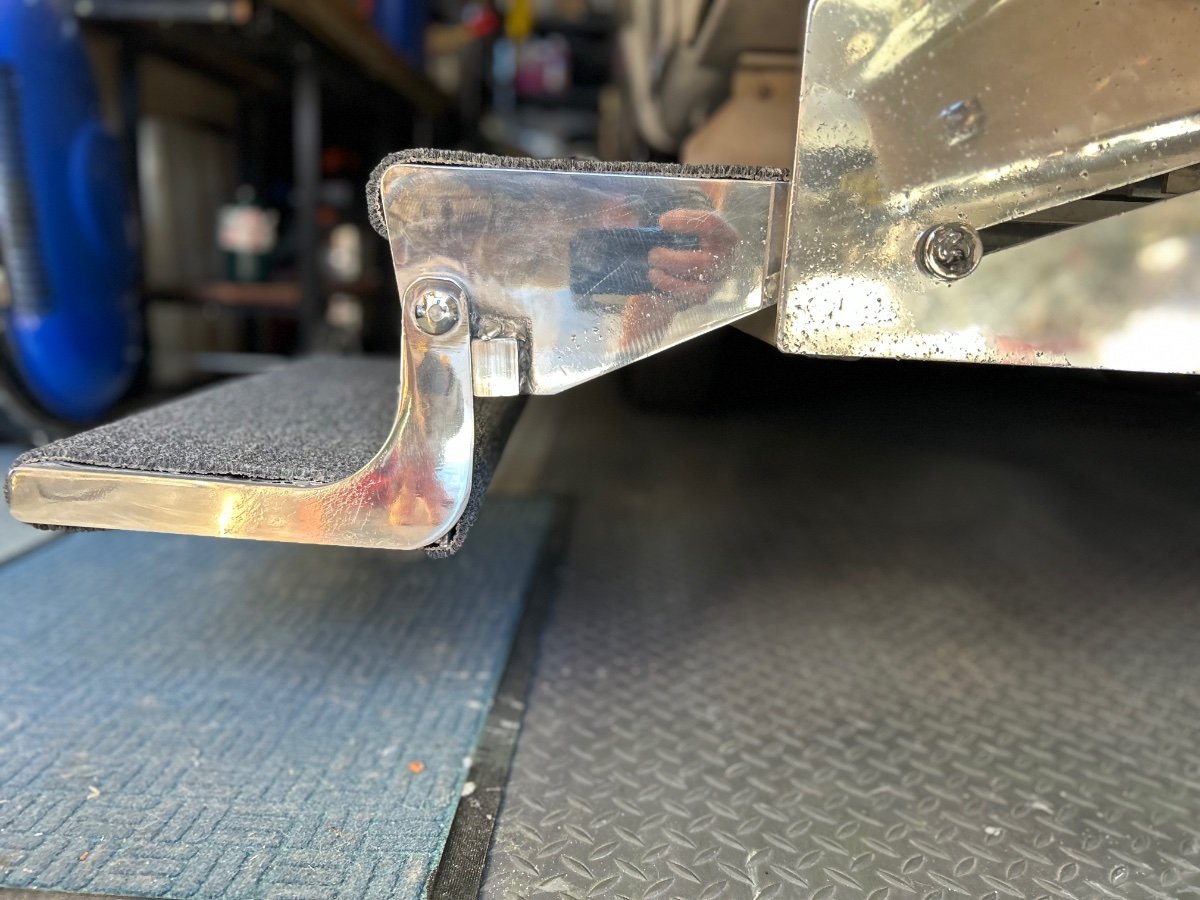
Installed new carpet treads a couple days ago and planned to clean and lubricate the step mechanism with CV-2 grease. FYI: Just a small amount of CV-2 applied to the rail slots make deploying/retracting the steps quieter and much easier with a lot less effort. Noticing that the leading edge/forward aluminum step frame had been quite hammered by road debris after 6+ years of usage, we decided to address this situation with an angle grinder fit with a polishing wheel and green rouge. Here's what happened after about 30 minutes of effort: We're liking the results and should allow being able to keep this area cleaner over time... Cheers!
4 points
-
We spent 3 days at David Crockett State Park after picking up our Elite II last November. When we drove back to Hohenwald the following Monday morning, the Oliver Service staff jumped right on the few issues we had discovered during my thorough 3-day inspection and testing. Their commitment to ensuring that all issues were promptly, and properly, resolved before we took the trailer home to Idaho was exemplary.3 points
-
@FLYnGATOR Congrats, first off, on retirement!! It is a beautiful time in life where you are free to do the things YOU want to do. Here are a few suggestions. As much as possible DO NOT take delivery on a Friday. If you have an issue Oliver service is closed over the weekend and you will burn two days sitting at Camp Oliver waiting to get your issue addressed on Monday. Another suggestion is to consider few extra days at David Crockett SP to do your shakedown of your new Oliver. A few days spent at the SP will allow you to familiarize yourself with your Oliver. While at Oliver Service, go through every system, push every button and make sure EVERYTHING works. If you have an issue and new Olivers can have issues, you are close enough to OTT to get it addressed before heading home. Before heading home, take as much time as you can. Now is the time to hit the books and watch the videos in Oliver University. This gave us an edge up delivery day. Oliver goes to great lengths to provide this info and the more you learn the better it gets. Scour this forum. There are lots of pro tips and suggestions on mods that will help you make your Ollie your own. Enjoy delivery day, and get out and travel!!! 😊 Patriot🇺🇸3 points
-
Our lessons learned with Girard remotes.... 1. We purchased a back-up controller (one is none philosophy) and after multiple calls with Girard Support we still can't get two remotes to simultaneously work with the motor controller. So, we keep it as a spare to pair with the controller should the other fail. 2. Battery life - is not very good (even using good quality batteries). 3. We had a motion control module un-pair and was not working right (root cause was likely me fiddling around with lesson 1!). Re-pairing the module with the controller requires the infamous "P2" button on the remote. Our remote, like yours, has no P2 button. SECRET - press the "IN" and "STOP" buttons simultaneously whenever the instructions call for the "P2" button to be used. This is not shown in any of the Girard manuals (included in our Oliver manuals or on the Girard website) that we've seen. 4. One does need owl eyes to see the remote displays. 5. Blow off / clean off before retracting - having a small ladder and blower is nice for cleaning sticks/leaves off awning before retracting. I am sure this helps the life of the awning fabric and motor parts. The times we failed to do this, many of the leaves end up sticking to the bottom of the awning when it is extended. Overall we very much like the Girard awnings.3 points
-
For this purpose while on the road - I bought a cheap Harbor Freight "set" that includes both metric and SAE plus a hammer, set of screw drivers, etc. - something like THIS ONE While at home I've already got both sizes covered in both regular and deep sockets. Bill3 points
-
FYI: The plates are in fact flat aluminum, they look like diamond plate because they're reflecting the diamond plate floor mat that the trailer is positioned on. The second photo shows the plate finish without the reflection.2 points
-
Indeed - putting your Ollie inside a building when you're not using it is the best storage solution. However, I've been storing my Oliver for almost the past eight years at a storage yard that is totally open (except for the fences and cameras, etc.). For each of those years it has been stored under a CalMark cover. I make sure that it is clean before storage and that the cover is always snugged down with the rear bumper and the solar panels padded so as to not tear the cover. There have been no signs of abrasion due to this cover. It should be noted though that the cover is not waterproof . Therefore, when taking the Ollie out of storage it still needs a bath before hitting the open road. But, this bath is much easier than cleaning the grime off of it that would have accumulated without the cover. Bill p.s. Once a year I also give the cover a bath.2 points
-
Count us as another saying that solar is worth it. Our previous trailers were lead-acid batteries and generator. The solar package is so much better in every way.2 points
-
That's exactly what we carry, too. Just used it yesterday, in fact.1 point
-
Thanks Max! This has been an incredible trip. Wolf Creek Pass yesterday was just beautiful! 🇺🇸🇺🇸1 point
-
@Patriot: Sano install, brother! Enjoy your time in the Rockies - beautiful time of the year to explore them. Stay safe and press on, regardless!1 point
-
When replacing the stock grease zerks on the Dexter Axle suspension with angled zerks, I found some to be SAE and others metric. A return trip to Grainger’s got it done!1 point
-
That is true of any rv, as far as a 3 way fridge. Doesn't matter what brand, trailer, motorhome or fridge. If you are comfortable walking around and sleeping, the fridge is likely ok running. If you are parked on an incline, the fridge is in danger of crystalizing the coolant. Period. Driving up and down mountain roads is irrelevant, as you're obviously going up and down, and redistributing. Parked without running fridge, also no issue. Statement is a little more "true" for the low and flat fresh and grey water tanks, BUT they also have significant advantage. Water weight is kept low, adding to stability. Enclosed, not exposed to parking bumpers, etc. And, add to the towing stability, imo. (Someday, let me tell you about a used rv we delivered, with exposed grey tank that some previous driver had damaged.... and our repairs, over a ditch, on our backs, on a tarp, in the yukon. I miss that belt I sacrificed, and the hours we spent hunting down stainless strapping.. ollie enclosed system is so much better!) We manage water by filling the freshwater tank, and monitoring. We rarely hook up to city water. (Three or four times in 15 years?) If the grey shows full, fresh is close to empty. Or vice versa. We can "see" black level with a flashlight, if necessary, and leave it out of the equation. It's not rocket science. Eventually, you'll know if you are close to full.1 point
-
Just a thought to consider. Upgrading to a solar package is not as easy as starting with one from the factory. This includes a factory upgrade after the camper is built. There are numerous components that must be changed besides the batteries, as well as adding the solar panel system. This question came up at the rally last spring as numerous owners of older models were considering upgrading to Lithium. Jason made it clear that the initial build was the best time to install a solar/lithium system, especially from a cost perspective. It can and has been done by several owners but the add on system is not very comparable to the factory system. We have the larger lithium package on our 2023 LE2 and it actually requires less maintenance attention than standard lead acid battery system. The lithium batteries have a much longer service life than the lead acid batteries as well. Just my thoughts. Either way you go, battery management becomes a part of your life owning a travel trailer.1 point
-
jd1923, Do not discount the fire risk of your old Dometic fridge! Just because you never heard of this issue with other makes doesn’t mean it isn’t a serious problem. With a used trailer you have no idea how the previous owners used the appliances. RV Fire – 3 Things You MUST Do Today! There is a lot of useful info here, https://www.arprv.com/products.php but be aware that you cannot install one of their kits into your older hull without removing the refrigerator fully into the cabin to gain access to the working section. Remove your fridge and inspect it, it will most likely be in a dangerous condition. John Davies Spokane WA
1 point
-
Well, certainly it is almost not possible to fill the Oliver water tank to 100% full if you are not reasonably level. But, my Ollie isn't perfectly level (nor do I spend the time to make it so) when I have it in my driveway preparing for travel. Interestingly, while in my driveway my Ollie is slightly high at the front and slightly tilted to the street side. Being slightly high in the front means that the overflow tube in higher than it would be if things were level and with the tilt being low on the street side it also makes the over flow tube higher than it would be at level. All this results in a fresh water tank that basically gets "overfilled". No problem for me except for that first time I pulled out of the driveway and my wife started yell that I had a leak - due to the "excess" water now coming out of the overflow tube. Having said all this - I normally don't fill my fresh water tank with any more water than necessary. If my plan is to simply be driving for the day and I know that I'll be stopping at a campground that night, I just might not fill that tank at all - why tow around the weight of the water. Note here that I always have a couple of milk jugs with water in them stored by the toilet in order to have water to flush my standard toilet when necessary. Don't forget - one of the main benefits of the tank design in the Oliver is that the weights of the liquids in these tanks is distributed low down and relatively evenly from side to side. This is a major contributing factor in the towing stability of Olivers. Bill p.s. both the fridge and the fresh water do not require that the Oliver be perfectly level in order to fill and/or use them. Specific degrees of "off level" can probably be found in any particular manufacturers owner's manual. I simply use my senses in order to determine what is OK for level - if I can sleep relatively comfortably and if my adult beverage doesn't roll off the dinette then I'm good to go.1 point
-
I'm realizing that in my haste I've replied to some of you without saying thanks. How rude of me. Please know, ALL of your comments are so very much appreciated. TY!1 point
-
"Do you have to have air conditioning? " the whole point is to go places where it's not required. If we are still in FL, I'd be happy to be using full hookups. " have found that living in western North Carolina I only actually use my air conditioner less than 6 times a year." Exactly what I hope my future holds.1 point
-
The answer to this question has a bunch of variables - the time the pump is run, how many times is the pump run, what is the pump being expected to "pull" and from how far, etc. I've never had a water pump fail under virtually any circumstances while others have had them fail after only a short period of time for a myriad of reasons. Having said all this - under the circumstances you describe, I think that you should do fine and that the standard water pump should serve you well for a number of years. But, if you are planning to really be way out in the boonies and/or don't want to take the chance on the pump failing, then simply by a "spare" to cover that base. I've virtually always used a 25 foot hose for the purpose you describe and the draw has usually been from the back of my tow vehicle or from a container located right at the inlet port. However, on two occasions I did draw from approximately 50 feet without difficulty. And, I've drawn from the back of my tow vehicle through a 25 foot hose while using a Camco water filter. If I understand your question correctly - the standard procedure is that the port draws water into your fresh water tank and you must configure the water valves in order to do this. Then you must reconfigure those water valves in order to pressurize the water lines inside the Oliver. I've never actually tried to draw directly from my tow vehicle and use that water inside the Oliver at the same time. My guess is that you can't do that. Bill1 point
-
I made the trip there and back with my LE1 this spring, 7 days from San Antonio to Fairbanks if you're driving with purpose though i wouldn't recommend pushing that hard for most folks, the drive through canada is almost as stunning as alaska so enjoy it. a couple things to keep in mind, many of the campgrounds in BC/Yukon are out of cell signal range so best to either plan fuel stops and breaks the day before or plan on having a non phone based GPS. there are some fuel spots that are listed on google maps that you cant use unless you work for whatever logging/drilling company is operating in that area so try not to wait till youre real low on gas to fill up just in case you accidentally end up at one of those. Bring a tire plug kit, tire shops are few and far between in the western half of Canada. most campgrounds once youre into remote BC and the yukon are first come first served with no way to check availability online beforehand as theyre generally self serve/envelope payment. many are also only open during prime summer travel months. they'll have free firewood but dont count on having hookups aside from a single water spigot if anything to serve the whole campground. A couple of favorite spots for me is laird hot springs on the northern edge of BC and Congdon creek campground in Yukon. ive also seen plenty of folks with campers just staying overnight in the many pullouts on the side of the road do so at your own risk i dont know the actual rules about that.1 point
-
At Oliver's request, in late 2013, I designed the first solar system that would go on to be installed in all the OEII's from 2014 and beyond from Hulls #050 thru #199. I included the best equipment on the market at the time. Blue Sky was the cream of the crop. Victron was just a future dream. Victron does not work any better than the Blue Sky stuff, it's just slicker, has more bells and whistles and better integration. My panel was not mounted where yours is. It is up at eye level where it should be because that's where I told them to put it. I don't know who's bonehead idea it was to start putting them down below the pantry, but I told them is was a bad idea. Just like I told them switching to Zamp was a bad idea when they began installing them starting with Hull #200. It took them years to finally change to something better (Victron). Most of us have moved all the wires out of the battery box except the jumpers and the main cables that feed the cabin. All those wires are now attached to buss bars, one for negatives and one for positives. It really cleans up the inside of the box and makes adding or changing things much simpler. Plus, you don't need taller posts on the batteries. You could use copper bars but the buss bars are cheaper and come already purposed for what you want to do.1 point
-
Well, those grommets aren't doing a thing for you, right now. Nylon or some other type of plastic, useless if not seated in the opening. Rough fiberglass is abrasive. Now's a great time to replace with a barbed grommet, or cable glands, that will stay put, since you're pulling the batteries, etc.. Material of your choice. Also, carefully inspect the cables for any apparent abrasions in the sheathing. Hopefully, none, but you do want to know. I'm always inspecting ours, as battety compartment is pretty much under our heads. Btw, in Florida heat, we inspect water levels in the sailboat (fla batteries) monthly, or at least every 6 weeks, in summer. I would certainly do the same in Arizona. Use distilled water only, as you know, of course. Winter, we can check every two to three months, and seem to be ok. Our trailer has agms. As @John E Davies suggested, I would definitely check all 4 batteries. Your system will only charge to the level of the weakest, and if you have a bad cell in one, you'll have issues. If I were you, I'd still check in with Ryan at bluesky/sunforge, and make sure your settings on the charger are correct for your type of batteries. I do agree with you, that for many of us, fla or agm, is plenty, if we limit power consumption. By the way, not for you, but for future readers of this thread, do NOT go over your skill level zone , with electricity, and electronics. If unfamiliar with making connections, get a professional to help. Make SURE panels are covered and turned off before attempting work . Better to be double safe, than sorry, and fry something. Or, hurt yourself.1 point
-
The cable lugs with the spacers have been address, but I have to say I was shocked, no pun intended, to see these kind of connections. This is grossly out of standard and a serious problem. It's hard to tell from the overhead photo, but it appears there may be additional spacers at other connections as well under the cable lugs. As was mentioned above, you need to have sparkling clean connections and all lugs should be stacked together against the lead base of the battery terminals, no spacers if possible. Any resistance at any and all of these connections will play havoc with your charging control system and it's efficiency. I firmly believe this could be a root cause that needs addressed before you trouble shoot other components downstream. I would systematically check/correct every connection in the system as a starting point. I wouldn't replace any component without verifying it's function first. Doing otherwise just introduces more variables to the problem, and of course adds undue cost.1 point
-
That post extension is very bad. Steel is VERY wrong for this application. Put back the OEM style short stainless bolts, never put steel washers or extensions of any kind between a cable terminal and the battery terminal. If you feel the need to have increased height, use a solid brass or copper extension. Also, the cable should not be stressed like those are, the tight curves will cause wire strands inside to break. John Davies Spokane WA1 point
-
We've found the Blue Sky equipment to be almost bulletproof (we did manage to short out our 2512ix around 5 years ago, but it was completely our fault.) Are any of the lights lit up on the 2512 controller? What does the indoor (in pro) panel tell you about charging? Do you have a battery disconnect switch, and is it on or off? If you don't have the manual you can download it on the sunforge/blue sky site. There are also great videos to assist you in troubleshooting. You probably want to look through the manual, and the videos, and send an email to Ryan Gurin at Blue Sky, or give him a call. He's an amazing tech, and very helpful. Ryan really knows his stuff. (Watching the videos and reading the manual first helps you gain familiarity, and you can probably eliminate a few troubleshooting steps before you speak with Ryan next week.) https://sunforgellc.com/learning-center/ Solar panels don't often "go bad." They may not generate all the power they once did seven years ago when new, but degradation would likely be less than 3 to 5 per cent. Because of the reliability of Blue Sky, and Ryan's great customer service and technical support, we kept our Blue Sky gear, and added to it when we upgraded from 200 to 400+ watt panels a few years ago. Before you do any actual "work" on the system, other than checking with your meter, I'd cover up those panels, as they are undoubtedly producing power. We use dark blue packing quilts to cover ours.1 point
-
Wet batteries need to be checked when fully charged, using a cheap electrolyte hydrometer. Each cell should be close to each other. The acid should be clear, not dark grey. Even one low specific gravity cell will cause the other two to discharge. The two front batteries are probably damaged beyond repair - they must be strapped down solidly to prevent motion, which causes major internal damage to the lead plates. The exception is if the trailer was parked all the time, but if that were true, why even add a bungee? When you service them you should make sure that all the terminals and cable ends are very clean and all the hardware is tight. Clean the batteries with a baking soda mix to neutralize any vented acid. Never add tap water, distilled only. Have you read through the battery owners manual? All your manuals are available to download. Wet batteries are insanely heavy, a continual PITA to maintain, a risk of corroding your battery tray and the aluminum support structure, and are really are not suitable for RVs any more. This isn’t just my opinion. Consider replacing them with SLA. Upgrade the system right, don’t band aid fix an “older” design that isn’t ever going to provide peace of mind and low maintenance. Unfortunately lithium$ are very inappropriate for your hot desert location, if the trailer is stored outside, they do not tolerate lots of heat very well. It should be easy to relocate the remote solar display to head height. It will tell you exactly what is going on with the panels. There may be a loose or corroded connection up top. The terminals on all these parts should be cleaned, including the hidden ones inside the controller and under the master switch. Blue Sky is uber high quality, marine grade hardware. Better than consumer grade stuff from Zamp or Renogy. Have you verified that the solar switch is in the ON position? John Davies Spokane WA
1 point
-
. My TST repeater install, inside the battery box with direct connection to the batteries. No connectivity issues for three years, other than from weak monitor batteries which are easy to replace. I also have monitors on the TV. The ‘early warning’ a TPMS provides is most definitely a preventative measure to lessen the occurrence of a blowout or other catastrophic situation.
1 point
-
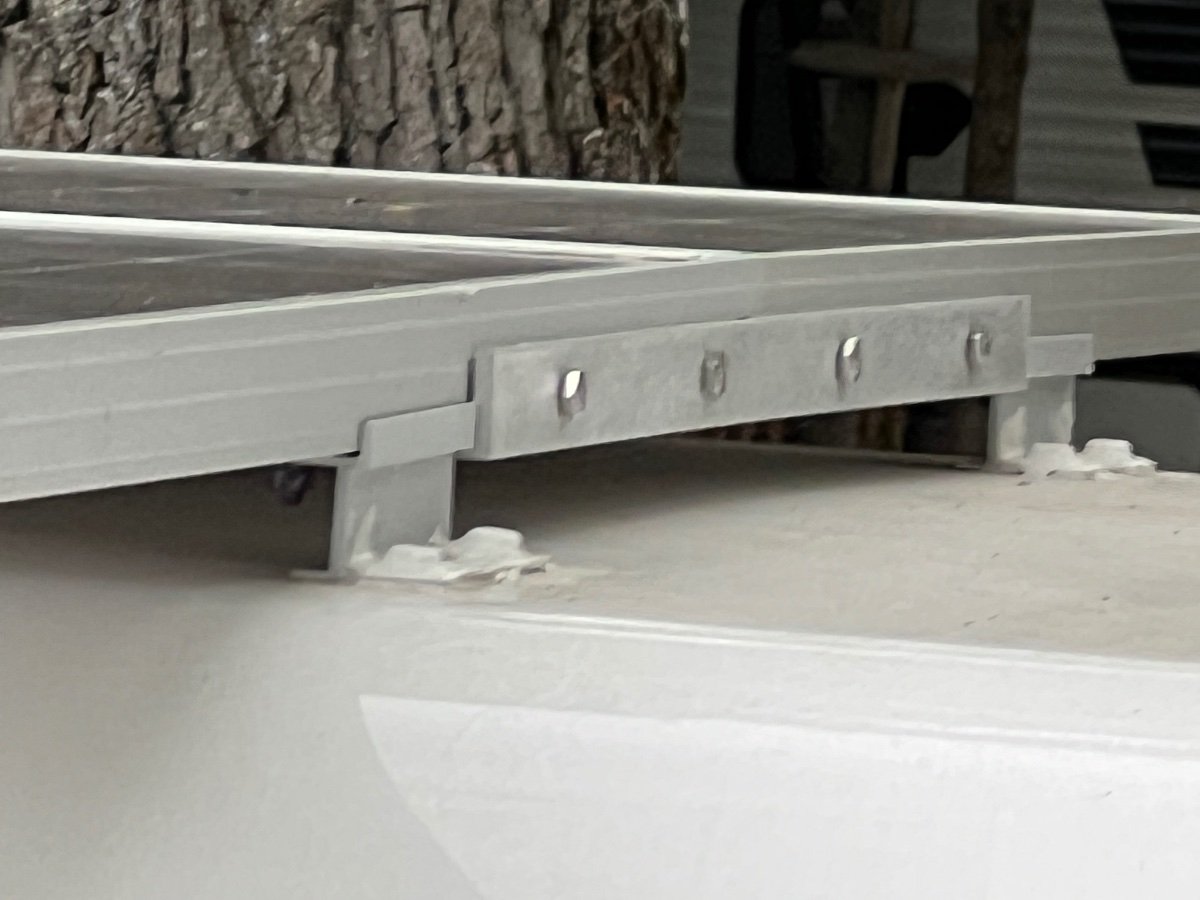
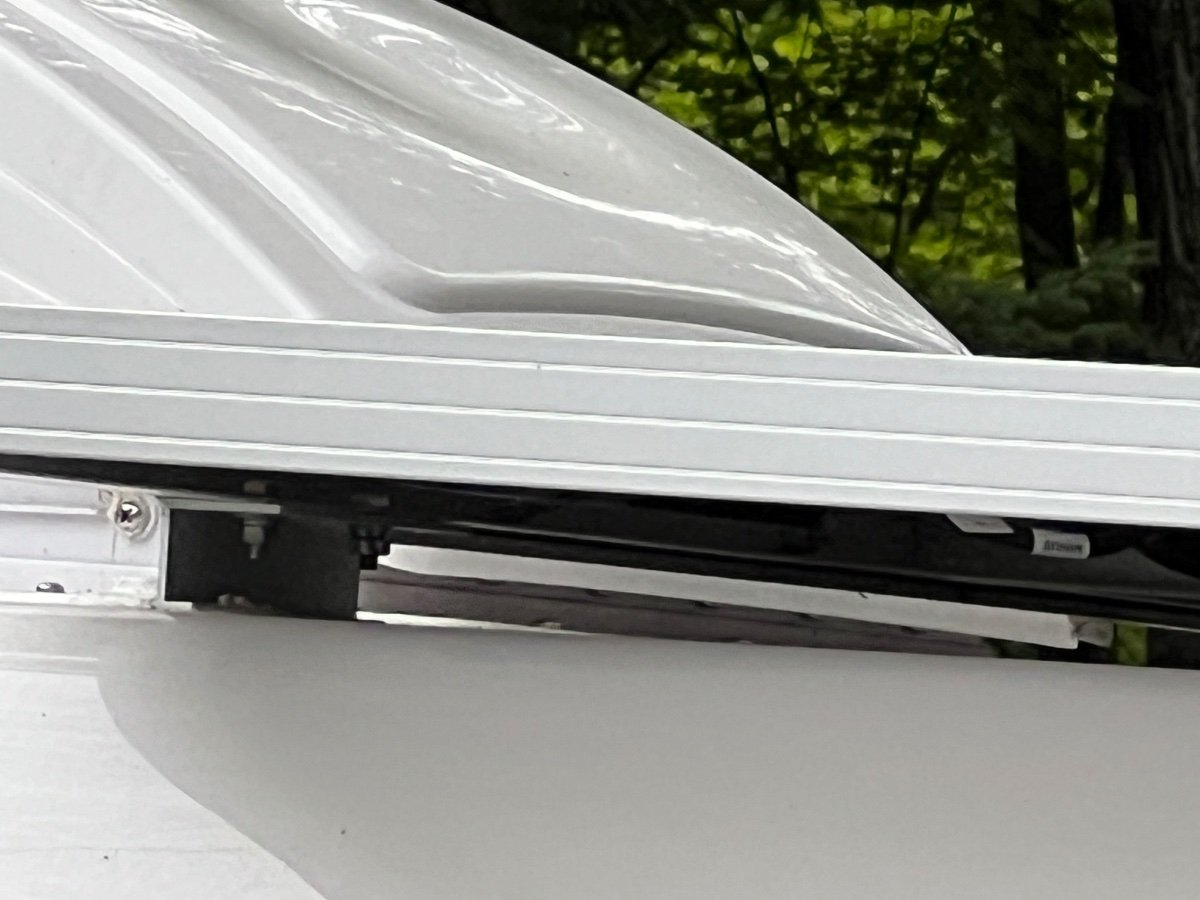
I tried the supports last weekend and am posting my follow up. They fit great and I was astonished at how dirty it was under my panels. They are going to be a great help once I get the trailer home and cleaned off before winter storage. Unfortunately they didn't help improve the charging as I'd hoped, in fact, they made it worse. Last Saturday was a very overcast day. The panels were only putting out two amps. My wife was inside calling out the charging rate as I repeatedly tipped and lowered the panels. When flat they put out the two amps, when raised they repeatedly put out only 1.4 amps. I know I was a little off on my aim with the panels towards the sun, but I was pretty close. I would have had to move the whole camper to improve the solar tracking aim by maybe 10%. I expected some improvement by tipping the panels up, but never would have guessed it would make it worse. It did drive home how important it is to keep the whole panel in the sun. With just the shade from my hand, the panel would drop from 2 amps to 1.1 amps. I've heard the individual cells that make up a panel are wired in series. This would seem to confirm it. One shaded cell practically kills the whole output from the panel. I'm not done experimenting with the tipped panels, but for now I am keeping the generator handy to top off the three Battleborn batteries when they get low. Next on the fall to-do list is a temperature driven relay to turn the battery heaters on if I'm sleeping or not around during the day when the temperature dips. I think I've got all the parts on hand, so it won't cost anything more to give it a try. I'm really impressed with this battery monitor from Thornwave a friend gave me to play with. Not only does it internally store all of it's charging data when I'm away, it has a relay control that can throw a relay signal due to voltage, temperature, timers, and a few others. I'm not sure why more people aren't using it. I mostly hear about Victron charge controllers, but not this one.1 point
-
Sorry….I didn’t see this until now. The service person at the TMobile store activated the SIM before I left the store.1 point
-
Thanks! All is going great and we are reeeeally enjoying Colorado and all it has to offer. So much to see!
1 point
-
Actually they are called "scupper" holes or drains. These serve a couple of purposes: 1 - they "vent" the area between the inner and outer hulls. Any condensation that might form between the inner and outer hulls will either drain or be evaporated due to increased air movement from these. Actually when you are driving down the road these cause a "venturi" effect which actually draws air/moisture out from the hulls. 2 - they allow for the draining of any "leaks" that might occur. In turn, this reduces the chances of mold or mildew that might be caused by any water collected within the inner and outer hulls. If you ever actually see any liquid draining from these scuppers, it would be advisable to search for the cause of that as soon as possible. Bill1 point
-
Are you searching for a more comfortable and enjoyable mode of travel? Look no further than small travel trailers! These compact gems offer an exceptional option for individuals desiring a perfect blend of nature and home-like comfort. Compared to larger campers, they are more budget-friendly and maneuverable, bringing forth many additional perks. Join us in this informative blog post as we delve into the advantages of selecting a small camper for your upcoming vacation. 1. Easier to tow If you’re a newbie to towing, small travel trailers are the perfect choice for a hassle-free experience. Unlike larger trailers, these lightweight and maneuverable gems make towing a breeze. Bid farewell to concerns about handling a hefty load, as they offer a lighter alternative. You can embark on your journey swiftly with effortless hooking up and unhooking. Furthermore, their compact camper size allows for convenient storage during the off-season. Discover the convenience and simplicity of towing with a small travel trailer, making it an excellent option for towing beginners. 2. Lower cost Choose a small travel trailer if you’re seeking an affordable option without compromising comfort. Thanks to their compact size and streamlined amenities, small travel trailers come with a lower price tag than larger alternatives. These lightweight trailers not only make towing a breeze but also simplify storage. While they may have fewer amenities, such as bathrooms and appliances, this contributes to their cost-effectiveness. Perfect for short trips, small travel trailers offer a cozy and enjoyable experience, even for those with a smaller budget. 3. More fuel efficient Discover the fuel-efficient travel option with small travel trailers. With their lighter weight compared to larger counterparts, small trailers require less power to tow. This reduces fuel consumption for your vehicle, allowing you to cover more ground while spending less at the pump. Furthermore, small travel trailers often come equipped with efficient and contemporary amenities like LED lighting and modern appliances. These energy-saving features contribute to lower fuel costs, requiring less power. Embrace the economical and fuel-efficient journey with small travel trailers, ensuring environmental friendliness and cost-effectiveness. 4. More maneuverable When it comes to ease of maneuverability, small campers reign supreme. These compact wonders outshine traditional RVs thanks to their lighter weight and smaller size, presenting a convenient option for travel enthusiasts. Driving becomes a breeze as these trailers require less power and space for parking and maneuvering. Moreover, they can be effortlessly towed behind an SUV or minivan, making them an excellent choice for those without a truck to handle a larger RV. The convenience doesn’t end there – storage becomes a cinch as these trailers can easily be tucked away in a garage or storage shed when not in use. Experience the joys of RV camping without the hassle of managing a larger vehicle with small travel trailers, providing unmatched convenience and simplicity. 5. Easier to store Small travel trailers have a clear advantage over their larger counterparts when it comes to storing. With their smaller footprint, these trailers easily fit into a regular-sized garage, ensuring hassle-free storage. Their lighter weight not only makes towing a breeze but also simplifies the process of moving them around when needed. Additionally, small travel trailers can be stored in outdoor areas without requiring ample space or the need to construct a shelter. In summary, storing a small travel trailer is significantly more convenient than keeping a larger one. 6. Less intrusive in campgrounds Small travel trailers are an impeccable choice for campers seeking the ultimate balance between comfort and embracing the great outdoors. Unlike their larger RV counterparts, these trailers are less intrusive in campgrounds due to their smaller size, leaving adequate space for a serene camping experience. Furthermore, the ease of maneuverability and storage of small trailers allows campers to effortlessly navigate and explore various campgrounds without the burden of handling a larger RV. Small travel trailers provide the perfect solution for campers who yearn for the comforts of home while immersing themselves in nature’s beauty, delivering a truly memorable camping experience. 7. Less maintenance Enjoy the RV lifestyle without the demanding maintenance tasks by opting for small travel trailers. These compact wonders require significantly less upkeep compared to their larger counterparts. Their limited features and efficient components, like smaller engines, contribute to reduced maintenance needs. Additionally, they are often constructed with lightweight materials such as aluminum, which require less maintenance than heavier materials like steel. Furthermore, the streamlined design of small travel trailers means they have fewer features to clean and maintain, saving you time and effort. Suppose you’re seeking the RV experience without the extensive commitment of maintaining a trailer. In that case, small travel trailers are an excellent choice. Embrace hassle-free adventures and relish in the joy of the open road without the burden of excessive maintenance. 8. More options for towing vehicles Experience the freedom of choice with small travel trailers, as they offer a wide range of options for towing vehicles. With a typical weight below 2,000 lbs., small trailers can be easily towed by lighter vehicles like minivans, crossover vehicles, and SUVs. This simplifies the towing process and enhances maneuverability in tight spaces. Another advantage of small travel trailers is their lower power requirement for towing. Smaller engines and even some hybrids and electric vehicles can handle the task. Are You Looking for the Perfect Travel Companion? At Oliver Travel Trailers, your satisfaction is our top priority. We are here to assist you in discovering the ideal small travel trailer that perfectly suits your requirements. With our extensive range of options, you can explore lightweight trailers that won’t burden your vehicle or larger trailers that provide ample space for your loved ones. Our dedicated team of friendly and knowledgeable staff is ready to address any inquiries and guide you through the selection process. We are committed to delivering exceptional customer service, ensuring that your The post The Advantages of Choosing a Small Travel Trailer appeared first on Oliver Travel Trailers. Read the Full Article1 point
-
Just wanted to say Thank You to John for putting this mod documentation together. I knocked out a set of extension arms tonight. Tomorrow we are heading up north to some property we have. The camper is parked there for most of the summer and fall, but it's boon docking only. As the sun drops lower and lower on the horizon, the panels often can't keep up after a number of cloudy days and the additional load of running the heater occasionally at night during the fall. The fall color prediction from the Minnesota Department of Natural Resources this weekend is 50-75% of peak up at the camper. Temps will be 60-80 degrees, so not much use for the heater this weekend. I'm looking forward to trying out the arms and seeing how much they might improve solar charging. Thanks again John.1 point
-
Hi all! These topics here in the forums are auto-created when a new article is posted on the main website. Thanks for the feed back on the ones that were posted with broken links, it was something else I was testing out yesterday and were not actually anything to be posted here but the main website thought it was. Corrected! All of the manual information can be found in our University found here: https://olivertraveltrailers.com/oliver-university/ Thanks everyone! PINNED1 point
-
Selecting the right tow vehicle is one of the most important decisions you’ll make when purchasing a travel trailer. It’s important to get the right tow vehicle to ensure that you and your family are safe and that your trailer can handle the journey. Selecting the right tow vehicle is a combination of understanding your trailer’s capabilities, knowing your tow vehicle’s power and towing capacity, and knowing the roads and terrain you’ll be traveling on. Step 1: Establish Your Towing Needs The first step in selecting the proper tow vehicle for your travel trailer is to establish your towing needs. You need to determine how much weight you need to tow and the type of trailer you plan to use. If you’re planning to use a lightweight trailer, you may be able to get away with a smaller tow vehicle. On the other hand, if you plan to use a larger trailer, you’ll need a more powerful tow vehicle. In addition to trailer weight, you also need to consider the size of the trailer. If you’re planning on taking longer trips, you may want to consider a larger tow vehicle as larger trailers require more power to tow them. Step 2: Understand Your Vehicle’s Towing Capacity Once you’ve determined your towing needs, you need to understand your vehicle’s towing capacity. All vehicles have a maximum towing capacity and you need to make sure that your tow vehicle is able to handle the weight of your trailer. To find out the towing capacity of your vehicle, you can consult your owner’s manual or look it up online. You also need to consider the power of your tow vehicle. Some vehicles may have the towing capacity but lack the power to tow a trailer, so it’s important to make sure your vehicle has the power to handle the load. Step 3: Consider the Terrain Another important factor to consider when selecting the right tow vehicle is the terrain you’ll be traveling on. Some roads may require more power and a larger tow vehicle. If you’re planning to travel on mountain roads, you may need a more powerful tow vehicle as these roads require more power to navigate them. Step 4: Test Drive Your Tow Vehicle Once you’ve determined the towing capacity and power of your tow vehicle, it’s important to take it for a test drive. This will give you the opportunity to get a feel for the vehicle and make sure that it can handle the load. You can also use this time to practice hooking up your trailer. It’s important to practice hooking up the trailer to make sure you can do it safely and correctly. Step 5: Choose the Right Hitch Another important factor to consider when selecting the right tow vehicle is the type of hitch you’ll need for your trailer. Different trailers require different types of hitches, and you need to make sure that you have the right one for your trailer. You also need to make sure that your tow vehicle is compatible with the hitch. Step 6: Get the Right Accessories The last step in selecting the right tow vehicle is getting the right accessories. This includes items such as tow mirrors, safety chains, and a trailer brake controller. These accessories will help ensure that you and your family are safe while towing your trailer. Step 7: Consider Fuel Efficiency When choosing a vehicle to tow your travel trailer, you should definitely consider fuel efficiency. Depending on the size and weight of your trailer, you may need a strong engine, but that does not mean you have to sacrifice fuel efficiency. Many modern vehicles are designed to tow with power and with improved fuel efficiency. When considering fuel efficiency, you should look at the engine size, transmission, and towing capacity. Look for engines with lower displacement, such as a four-cylinder, as these are typically more fuel efficient. Also, look for overdrive transmissions, which helps reduce fuel consumption. Finally, make sure the vehicle you choose has enough towing capacity to safely handle the weight of your trailer. You should also research the fuel economy ratings of the vehicles you are considering. The EPA provides fuel economy ratings for most new vehicles, so you should be able to easily compare the ratings of different models. This will help you decide which vehicle will be the most fuel-efficient for your towing needs. Conclusion Selecting the right tow vehicle for your travel trailer is important and should not be taken lightly. It’s important to understand your towing needs, your vehicle’s towing capacity and power, the terrain you’ll be traveling on, and the hitch and accessories you’ll need. Taking these steps will ensure that you and your family are safe and that your trailer is able to handle the journey. At Oliver Travel Trailers, we understand that choosing the right travel trailer for your needs can be daunting. That’s why we strive to make the process as easy and stress-free as possible. Whether you’re looking for a lightweight fiberglass trailer to tow behind a small SUV or a heavy-duty steel trailer to tow behind a pickup truck, our knowledgeable staff can help you find the perfect trailer for your family’s needs. We start by evaluating your towing needs, considering the vehicle you plan on using to tow the trailer, the distances you plan on traveling, and the types of terrain you plan on encountering. With this information, our staff can help you narrow down your choices to the trailers that are best suited for your particular needs. We also take into consideration the type of camping you plan on doing and the amenities you’d like to have on your trailer. At Oliver Travel Trailers, we make sure to find the perfect trailer for you and your family. We’ll guide you through the entire process, from selecting the right trailer to helping you find the perfect financing plan. We’ll also be there to answer any questions you have after you’ve purchased the trailer. We want to make sure your travel trailer experience is as stress-free and enjoyable as possible. The post <strong>How to Select the Proper Tow Vehicle for Your Travel Trailer</strong> appeared first on Oliver Travel Trailers. Read the Full Article1 point
-
Ah! To confirm you did not need to authorize the SIM, right? Basically you had instant Internet as expected. Guess I’ll try some more troubleshooting with CP support who, by the way, have been helpful.1 point
-
Coy Gayle @hardrockis part of that group and I believe they are still working on it. You could send him a PM if you’re interested. Mike1 point
-
We use the original am solar bars on our panels, but our panels are sidemount, ( already angled), not flat like yours. Back in 2008, they were part of the package.... They work well for ours, though we rarely adjust them unless we know we will be in the shade for several days. Sherry1 point
-
What a bummer I can’t do the same mod on my 2023 panels with different mounting feet (no pivot points)!
0 points


-
Recent Achievements
-


")


")


