Leaderboard


Popular Content
Showing content with the highest reputation on 12/27/2023 in all areas
-
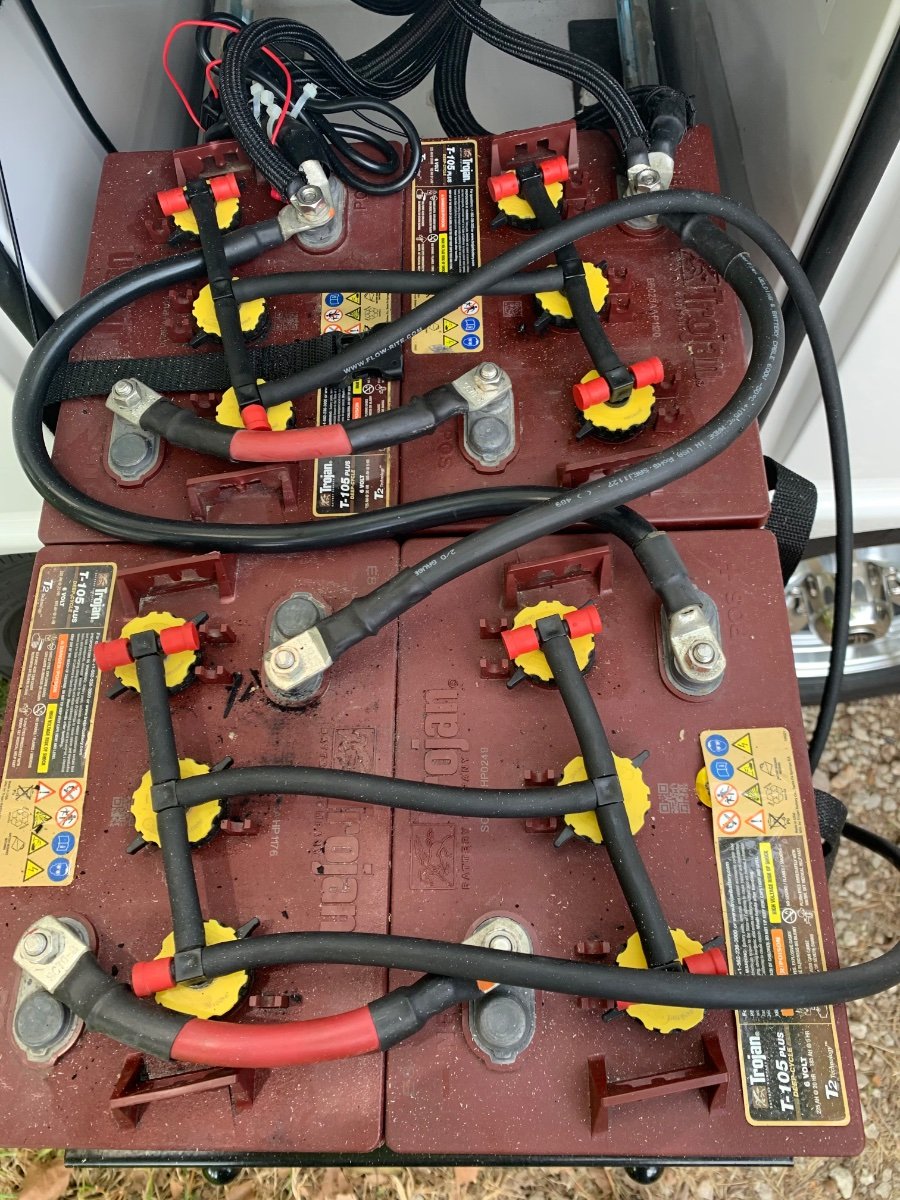
Looks like 4 12v batteries wired in parallel. If you know which battery is bad remove it and continue on. With the batteries over 4 years old and if you are not sure of the history I would replace them all with a couple lithium units or new wet cell batteries if you want to keep things the same.4 points
-
Although all of my 2020 OLEll outlets are wired with 12 gauge wire and 20A breakers, I would still be hesitant to use the Oliver’s exterior outlet for that particular Ninja. I think best to just utilize one of the remaining outlets at the shore power post, separate from the one supplying power to your RV. Either a 30A and/or 50A male to 20A female dogbone cord adaptor would suffice, plus an appropriately sized extension cord (10 gauge) would be my recommendation. As you know, some CGs provide only 30A in loops for smaller trailers, whereas others will have both a 30A and 50A, or only 50A for loops servicing larger rigs. Even in the case when only a single RV service (30/50) is provided, there is usually a 110 outlet/breaker available, as well, that may or may not be sufficient to meet your stated needs. Personally, I’m more concerned about being able to hookup the 30A RV service cord to household current, as thus carry a locking 30A female to 20A female reducer, in addition to a 50A to 30A reducer, a 20A male to 30A female dogbone cord adaptor, and a variety of extension cords.4 points
-
I agree it is pricey even being completely custom powder coated and fabricated in Tenn. 🇺🇸3 points
-
Did we all survive the holidays? Minimal political or religious discussions with family members of opposing views? Christmas presents we received and don't know just how to say we'd prefer to exchange this item! These are the little things, and there are greater concerns. It was nice Christmas was on a Monday this year, allowing a long weekend! We were home and as much as we enjoy camping, we have a wonderful home we've built over the years. We enjoy being home with family, and for us this year was just our immediate family. I give thanks to ALL we have! The world today is a troubled place, worse we've seen in recent years and perhaps in our lifetimes. Many of us are "baby-boomers" and we worry for our children. It is extremely difficult in our society for those who are younger today. How can the young today be accepted, afford a home, and be secure today? 🙏 God bless you all, God bless our freedoms as outlined in the Constitution of the United States of America! God bless we have the freedom to exist, to travel and camp, enjoy this life, and live the lives we all love! This is what I am thankful for today and in the time to come. Happy New Year! 🤗3 points
-
Although 4 years is on the short end of the optimal lifespan for wet cell batteries, replacing just one battery in the bank will ultimately be "penny wise and pound foolish." In your shoes, I would "bite the bullet" and invest in a completely new battery bank. And, if you can afford it now, I would upgrade to lithium.3 points
-
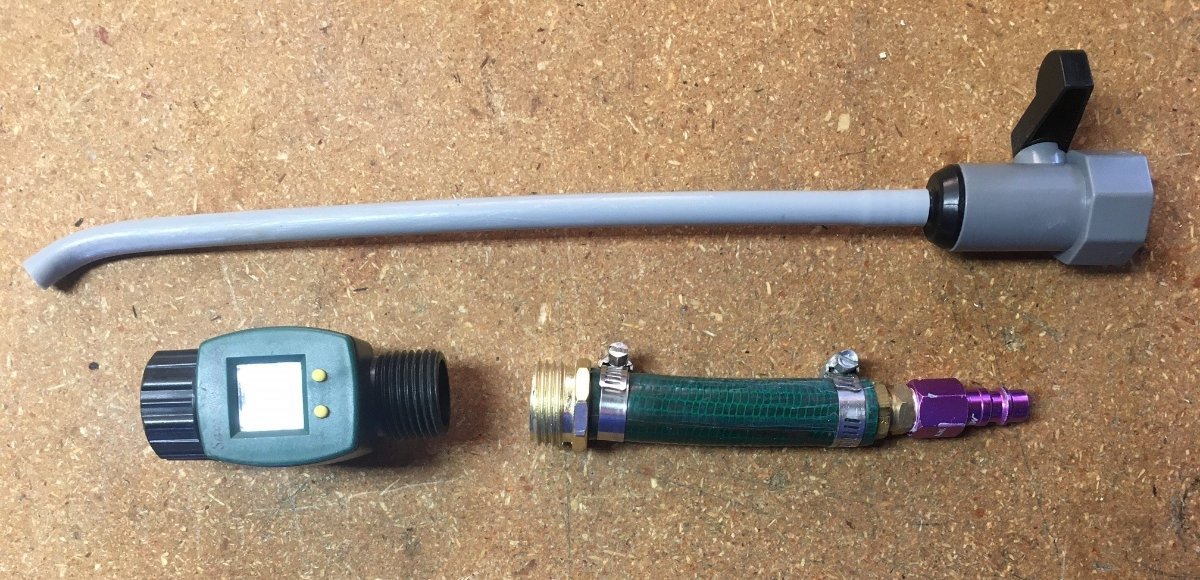
That's one way to say it. Another way is to say, "to winterize, expel all water from the plumbing system using compressed air." I do understand OTT does not advise this procedure, I've heard and read this several times, but I've never been very good at reading directions or listening to advice (some say an attribute of the good engineer). I have used this method for years in other RVs and just worked this yesterday on our Oliver. This is more complex in the little Oliver than say on our past Bigfoot Class-C RV, because of having four (4) hose water inlets. Please allow me to list my procedure and please comment if you believe I missed something, where there may still be some water in the system. I learned this from a Bigfoot owner, on the BOCI forum, who lives in Calgary BC Canada. He uses no antifreeze where of course lows are sub-zero for several months of winter. 1) Park your OTT nose uphill and start draining the Fresh Water tank. 2) Drain Hot Water Heater (HWH) and set HWH bypass valve 3) Reduce air compressor pressure to 50 PSI and use an air to hose fitting (see pic of one I built with spare parts). The fitting must be connect to the hose first, unless yours has a shut-off valve. 4) Turn your water system draw valve to the Winterize/Sanitize position. 5) Open the kitchen faucet both hot and cold sides 6) Connect the compressor airline to the rear Sanitation inlet (a few seconds is all required). 7) Change water valve back to Normal Camping Position. 8) Connect the compressor airline to the Fresh Water inlet (a few seconds is all required). 9) Connect the compressor airline to the City Water inlet (leave it connected). 10) Go inside and close the kitchen faucet. Then open each faucet separately. The toilet, then hot and cold, one at a time, for the bathroom sink, and kitchen again. Run the water pump at some point to expel internal water. Go outside and do the same for the outside shower. Go back inside and check each faucet again. They should all blow water mist when the lines are mostly empty (empty enough). 11) Close Fresh Tank drain when empty. Finish up with the HWH and reset the bypass valve. Get everything back to Normal Camping Position. 12) Empty Black and Gray tanks. Connect airline to Black Tank rinse, or at least remove cap to release water in this line.
 2 points
 -
Looks like a nice box. Pretty expensive though. My $150 Amazon aluminum box has done well the last 5 or 6 years.2 points
-
Ouch! Are you in the middle of an extended trip in your Ollie? If so, buying 3 more AGMs may be the best way to complete your trip, presuming the one you just bought is still o.k. AGMs, although not cheap, will buy you another 4-7 years of service, during which time the price of lithiums may continue to drop. If you are at home, this is the time to "cut your losses" and make the switch to lithium. If I read your posts correctly, someone at Camping World told you it was o.k. to mix AGM with wet cell? Then, when it didn't work, they now want to sell you 3 more AGMs? If your one new AGM is fried, I would lean hard on Camping World to sell me 4 for the price of 3, as it was their advice that killed your first AGM in the first place. Good luck!2 points
-
Great! I look forward to meeting more owners. If my count from here, the Oliver Facebook group, and the Egg Rally Facebook group is correct, that's 11 Olivers expected to attend!2 points
-
DO NOT DESPAIR! I went from four aging 6V Trojan T-105s, 248 lbs/225 usable Ah, ….. …..to two lithium LiFePO4, 90 lbs/460 usable Ah, at a cost of less than $1600, to also include a Victron SmartShunt, necessary fuses and a couple new cables. Some of the stock cables were utilized in the swap.
2 points
-
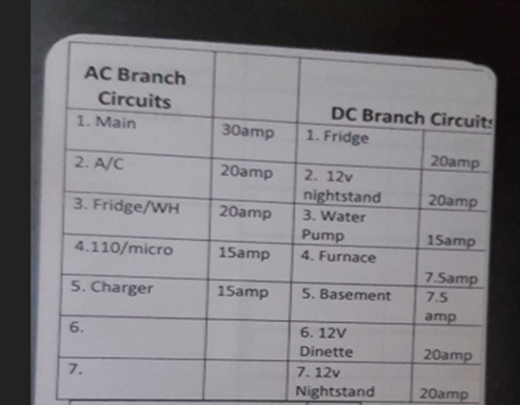
Our 2018 and older Ollies have the below breaker info. I am not sure where the outlets are loaded, but suspect either circuit 4 or 5, and they are 15 amps rated. Even if it was tied to circuit 3, it would not be possible to pull the needed power (1800 watts) plus the Fridge and Water Heater. GJ
2 points
-
I can think of only one way to do so that does not badly mess with or put the existing panel and electrical system in jeopardy. The below only works well if you have a 30 amp shore power source. Just be aware that doing so will greatly reduce your power flexibility inside Ollie as a result. Purchase a small panel with a 30-amp main breaker and add two 20-amp breakers for distribution. Locate it adjacent to the Furion Power Port on the side of your Ollie. From one of the new 20-amp breakers, connect the output to the existing 30 amp wire going to the existing 30 amp breaker in the OEM panel. NOTE: Doing so has power flexibility disadvantages as stated above. The existing Ollie outside power outlets are pretty much daisy chained. To figure out which one is at the end of the line is pretty easy from the circuit diagram that came with your year of Ollie. Now run a new 12 AWG Copper Line (White, Black and Ground) to the end of line outside outlet (See Below). Connect to the end of line outlet. Make safe the original feed for later reuse should you determine down the road that the cooker was not THAT important, or simply want to restore the Ollie to Factory Condition. The specific electrical cord I would use is called SOOW. The SOOW cord is a heavy-duty portable cord used in many rough duty applications. Since running it across Ollie at this point likely will result in the cable not being properly supported along it’s way. Using SOOW with a rubber casing will go a long way in ensuring that it remains serviceable for many years. It is also water and weather proof, just in case you flood your basement. GJ2 points
-
I've been thinking about this and my gut feeling is that you shouldn't... because where do you go from here... eventually the others slowly die off... each time replacing it with a new one. I'd agree with Bill.... just change them all out at once. That said...I'm wondering... if the others are still "good", why could't you continue operating on those remaining batteries until they die as well. I'm thinking 12 volts is 12 volts and the number of batteries simply creates "capacity". So just continue on with the remaining batteries until the your capacity becomes unacceptable for your needs. (I have lithium... but I suspect the same logic would apply) Then when its time... upgrade, replace... whatever, and start over.2 points
-
Just run the pump while working the procedure. Only if a pump freezes filled 100% with water can it be damaged from the expansion of freezing water. BTW, when y'all get around to up grading your pump, most high-end pumps today can run dry for hours without issue.2 points
-
BLUF*: If you are just starting to look at DIYing Oliver electrical projects, and are not experienced with major electrical surgery, then I suggest reading further. As an Oliver DYI guy, I have relied heavily on more electrically inclined owner's guidance and suggestions. This forum has been invaluable in planning and execution of the installation of my Houghton, Battleborns, Victron 712 Smart, DC to DC Charging, and 3,000 watt inverter projects to name a few. A common thread of each of these projects have been the use of electrical cable, lugs, and specialized tools. As a Mechanical Engineer, I have always purchased very high quality tools and materials for my mechanical efforts. But for electrical efforts, I was far less informed. Frankly, my electrical hand tools were junk, my electrical lugs were Chinese Junk, and my hammer actuated lug crimper was not up to the task either. Worse, I would not know a quality cable if you hit me over the head with it. Then came Ollie. I knew I wanted my Ollie DYI efforts to be first rate and I had to learn about electrical tools and materials. But that process took a lot of time and effort. So good choices were made only because I listened to the DYI Owners who had already plowed the path. But what I did not really understand was why the high quality (and expensive) electrical components they recommended really do justify the higher costs. So, for the new to the DYI Oliver electrical system upgrade team, the below rather long winded video will fill in some of the voids. Shameless Plug: I do highly recommend and use: Kline Tools, Blue Sea Systems (anything) and BatteryCables USA (Pure Copper Cables, Lugs, Heat Shrink) GJ * NOTE: Bottom Line Up Front (BLUF)1 point
-
I recently did a fairly deep dive on lithium battery powered leaf blowers in attempting to come up with the best blower to use after washing our rig. I wanted a cordless blower since I occasionally wash our truck and Ollie while on the road. Yep, we like a clean rig, just us.😊 This YouTuber does a a pretty decent in-depth comparison of (8) battery powered blowers. His info helped me finally decide to purchase the EGO Lithium powered 765. So today with my Lowe’s Veterans discount I paid $296.10 for the EGO 765 with charger, 56v battery and attachment's. I ordered the shorter nozzel/tube with silicone tip soft tip off Amazon. This shorter nozzel/tube seems to be much easier way to maneuver the blower while drying a car or truck. The 765 will travel with us in the bed of our truck. After charging the battery and briefly testing out the EGO 765 on our rain soaked Ford Ranger today, I am initially very impressed with its water removal/drying power. It will be interesting to see how well it will perform regarding battery run time on our rig. I will post up additional info after putting the EGO 765 through its paces. A clean shiny rig makes a for a happy rig owner!😄 Patriot🇺🇸 https://www.lowes.com/search?searchTerm=ego leaf blower https://www.amazon.com/gp/product/B0BQMR622L/ref=ppx_yo_dt_b_asin_title_o00_s00?ie=UTF8&psc=11 point
-
The new Starlink Gen-3 system is out, and it works great! I got one early because Starlink did a special invitation for Gen-1 users only, but now they are available for mobile accounts too. So here are my thoughts on some of the great new features and disappointments that are important for mobile users: 1. Gen-3 uses RJ45 connectors, and it works perfect with the Oliver installation described in my “Don’t cut your Starlink Cable” post. I had previously, and incorrectly, assumed that all Starlink’s systems used RJ45 connectors because thats what my Gen-1 dishy and Gen-3 router had. But alas, the far more common Gen-2 systems did not. Hmmm… that explains why Gen-2 users can’t use the upgraded Gen-3 routers. 2. The Gen-3 dishy is bigger than Gen-2 and it has a wider sky view. I’m not going back on the roof to measure it, but the shipping box is 25 x 15.5 x 3.75 inches to give an idea of the size. I’ve heard complaints that it’s bigger and harder to stow when traveling. In my opinion it’s way easier to stow because It has a convenient fold-up kickstand that eliminates the bulky tripod that came with older dishy’s. I really hated that tripod, it took up as much room as my BBQ. 3. The Gen-3 dishy has no motors or other moving parts, which should be more robust for the rigors of mobile use. 4. The Gen-3 power consumption is 195 watts per the label. That’s higher than Gen-1 (185w) and Gen-2 (about 65w.) This is not great news for boondockers. 5. Starlink still doesn't have a DC power option as many hoped. It has a separate 110v AC power supply with a 57vdc output (3.42amp) and a standard DC power connector. I’m sure someone will soon come up with a 12 to 57vdc volt power supply that can handle that wattage. 6. The Gen-3 router has longer WiFi range and it supports Mesh Node. Of course, the farther away from the router you get, the weaker the WiFi signal gets, and slower the internet speed gets. The Gen-3 router really helps with that. I’ve had a Gen-3 router on my Gen-1 dishy for a few months now and it made a huge difference in internet speed throughout the house. The Mesh feature allows you to add Nodes, sort of like radio relays, that give even further WiFi range, which is a good way to make new friends at camp. 7. The Gen-3 dishy comes with a built-in fold down kick stand designed to sit on a level surface. A pole mount option can be bought separately. You have to use the Starlink App during set-up to get it manually pointed in the right direction. I put mine on the peak of my roof facing West, and tilted it on the sloped roof to approximately match what the kickstand tilt would be if placed on a flat surface. The Starlink App liked the direction it was pointed, but it made me adjust the tilt a few degrees upwards before it would connect to the satellites. I don’t know if there is a work-around for that, but it might be a concern for fixed flat surface mounting such as an RV roof, and for the direction the vehicle is facing. From my almost 3 years of RV experience with Starlink, a fixed dishy mounting is not ideal. You need the flexibility to move the dishy around to find a clear sky view, so its going to be sitting on the ground a lot of time if you want to get a satellite signal. In conclusion, with its wider sky view, built-in kickstand, and the ability to lengthen the cable with a store bought RJ45 cable, I like the Gen-3 despite it’s short comings.
1 point
-
You would really have to determine cause. @Cort how did you know you had one bad cell, not dead battery, but one dead cell? How did you know the others were good at the time? How did you get a 240V reading? My shop air compressor runs on 240V! Another member thought it might have been 24V, could it have been 2.4V? That would be a near dead battery. What caused them all to go bad? It wasn't adding a new AGM, if wired correctly. Immediately I would remove all 4 batteries, test each voltage independently and get the new AGM on a charger. The others may have been toast when the 4th went bad. Try charging them all. Recently I left an accessory on in a car and 2-3 days later went to start the car and got nothing. The voltmeter showed the battery had about 2V in it! Because the battery was only 1 year old, with care I got it back up to full charge. Car/truck starter batteries should be regularly at 12.6V, if less then it's getting older. Deep Cycle Batteries should sit at 13.1V with a full charge.1 point
-
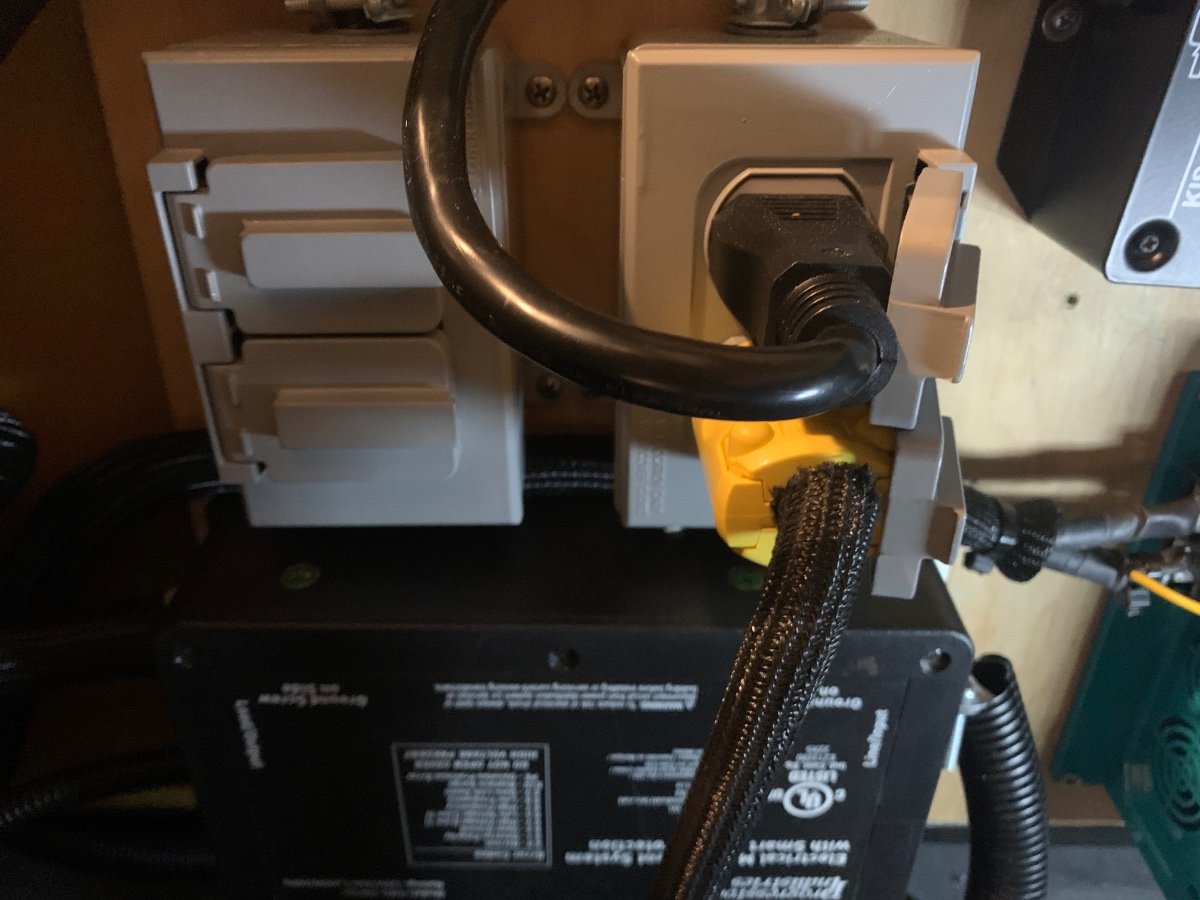
@DonnaDuane here is a list of the EMS codes, looks like open ground! this box should be under your rear dinette. Check out this thread, sounds like (might be) your ground bonding plug is faulty, so either get a replacement neutral ground bonding plug, or turn off the EMS and trust the generator. IF it’s a faulty ground bonding plug, a replacement bonding plug is not that expensive, that would be my go to. Stupid question, did you check if the ground bonding plug is seated properly in your generator?
1 point
-
Cort, sorry to hear that things have worsened. Like @Rivernerd said, I’d lean hard on Camping World to make things right. If needed, escalate up the chain of command, even beyond the store manager if needed. The 4 AGMs for the price of 3 seems reasonable. Good luck!1 point
-
Don't most campsites have 3 connections? A 50A, a 30A plus a standard 120V 15A household outlet. Not sure you need any splitter to wire this cooker to the shore power pedestal. This is what I've generally seen where we have camped.1 point
-
Sorry, did not see your post. So here are a couple of pictures. I am a bit concerned about stability but I think with the cushion it will be okay. Also, no claims to be a master carpenter just want some options, pickup next Wednesday so we will see. Second picture looks lopsided but I set it up unlevel in the drive.
1 point
-
I saw this on the Oliver FB page. It’s a nice looking storage box and appears well made. https://seabiscuitmetaldesigns.com/product/oliver-box/
1 point
-
It sounds like a possible mis-wiring during the replacement procedure and also an incorrect interpretation of the meter reading. Could it be possible that the replacement battery was wired in series (rather than in parallel with the other batteries) by mistake and the meter reading was 24.1 volts rather that 241.0 as stated?1 point
-
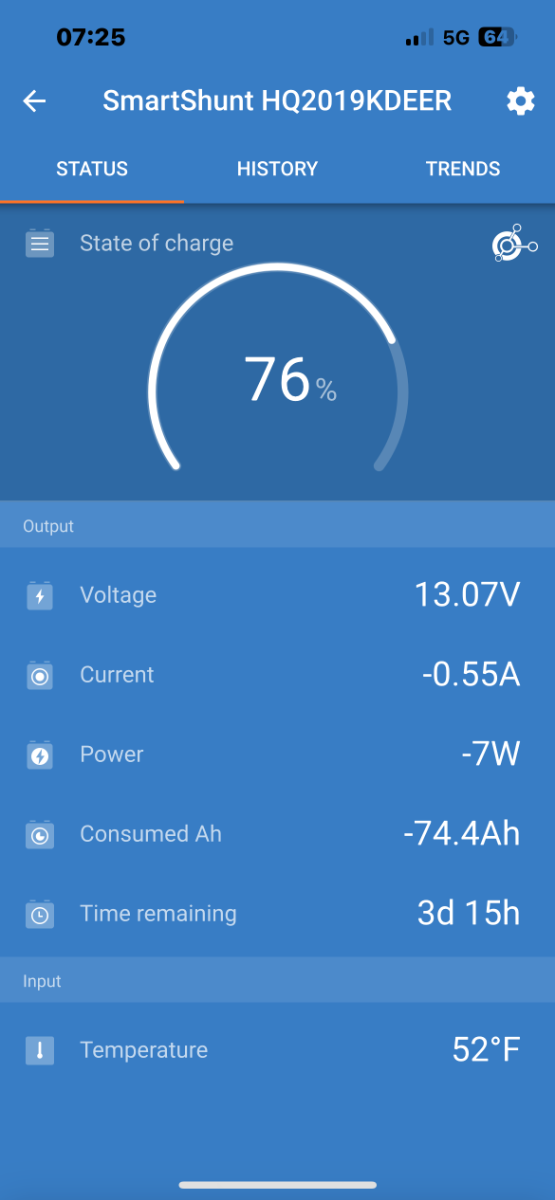
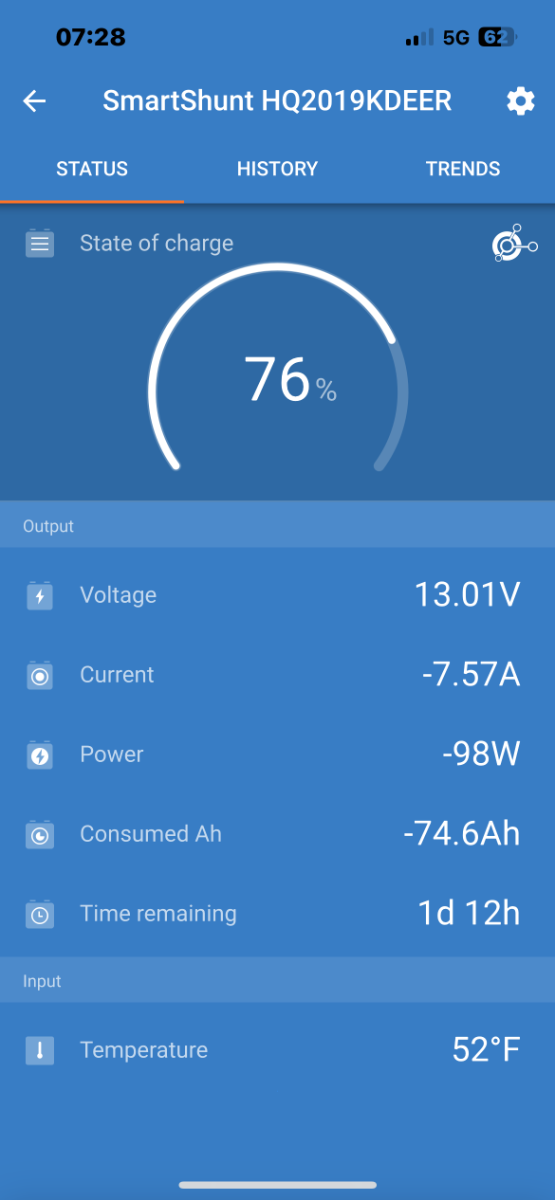
We don't have nearly the experience with Starlink as @Snackchaser, in fact we're still in our "personal beta testing mode." As I'm writing this, our SL is being powered by our 2kw inverter at our boondock location in North Texas. So let's try measuring the actual SL energy usage.... Condition 1: Our Victron SmartShunt reads our current values at 76% SOC, current draw is -0.55A, power usage -7W (with all electrical components off except for Fridge in GAS mode, Microwave LED clock on, SL off, and normal phantom draw). It's wall-to-wall sunshine now at about 0725 - solar modules are adding about 2.80A/36W into the BB's. Condition 2: Same background current draw as in Condition 1, but we energized the 2KW inverter. This bumped up the current draw to 1.08A and power usage to -14W. So, roughly, the inverter itself draws 0.53A or 12.7Amp-Hrs daily - just idling with no AC appliances being energized. Good to know number, IMO. Condition 3: All the same as above, except we energized the Starlink system. Current draw now up to -7.57A and power at -98W. The SL literature notes the unit will draw approx. 65W of power. Clearly, in our configuration, it's really more like 84W and pulling 6.5A. Without the SL energized, our phantom current draw is usually around 0.15 - 0.45A/-2 to 7W that's with the Fridge in the GAS mode and MicroWave in LED clock mode, and Smoke/LPG/CO2 detectors and various Victron components drawing a few 10ths of Ampere's. We're not that sad about the SL power consumption, however we're preparing to convert it over to a 12vDC system after this trip to save even more battery bank energy while boondocking. More on that upgrade later. Here are the screenshots of the 3 test conditions, FYI: Condition 1: Condition 2: Condition 3: If your "RV-style" of on the road needs reliable access to the internet like our's does (due to D's work requirements) the Starlink system is a viable option, IMO. It's been Uber-fast in cloudy/rainy conditions both day/night. Here's a screenshot of a speed test from this morning: More info to share later... Cheers!
1 point
-
My 579 came equipped with a Xantrex Freedom XC 2000; I recently added a transfer switch to operate the Dometic Penguin 11,000 BTU A/C with Micro-Air EasyStart via the house batteries. Of course, be mindful there are limitations on run time and load restrictions in doing so. I use the A/C in this manner primarily during rest stops and lunch breaks when traveling, and the DC-DC serves its’ purpose when back underway.1 point
-
This is a view of my panel. However, I had enough room in it for two additional 20A breakers (seen unlabeled at the bottom of the row), which are pre-wired and ready for use by way of a single individual 20A outlet for each; think future electrical expansion projects! The two plugs to the right are connected to the inverter, the left two are the single 20A outlets in waiting. I needed an extra plug from the inverter for a transfer switch I installed to enable operation of the A/C on the house batteries.
1 point
-
Where ever I park Ollie, I use my 2" X 6" X 11?" blocks, and I never just use one. My purposes are to shorten the amount of jack travel, and to act as a slip point should the trailer be moved in error. Having a shorter jack sticking down increases the odds that at least two of my blocks will slip against each other and save my jack and rear jacks as it falls. Point is if I were to take two of them and router out a pattern of the frame and spring plate, they likely would stay in place for our scenario. So, please measure them up for us when you get around to thee retest. Sure wish I had a wood router!!!! Nope I had not thought of that one. Moving the support point back increases tongue loads and decreases load on the axles. Good idea. Rates right up there on "Using your very best tire out of the five (or possibly 9 for some TV's) on the lame side. So, adding another item for the list: Will you TV spare tire fit your Ollie? Good to know in advance. If so, what rating and CONDITION is it? Better than Ollie's? At some point I'll take all the above suggestions and make a check list out of them and repost the group in a condense version. By laminating them and placing the half sheet of paper on top of the spare (Sorry John D.) the check list would be where you discover it (again) in your moment of most need. Ok after that brief diversion: What else should we be thinking we should have in mid for the scenario? GJ1 point
-
We use a bedrug liner in the Ram (fastens with velcro/hook and loop) , a two step Rubbermaid lightweight foldable ladder, and an extendable boat hook. You could also purchase containers with wheels, to make it a bit easier.1 point
-
Anything but "plug and play." Unless you are an experienced DIYer, it is wise to hire it done. I would not be surprised if you can find a local RV repair shop to do a lithium upgrade, perhaps with Battleborns rather than Lithionics, for much less than $11K+a drive to Hohenwald. This thread may give you a starting point for the learning process:1 point
-
Yes- we needed power now - so I went to Camping World and bought one battery - and everything is online but we will either upgrade to lithium or replace the other batteries shortly. I always planned to upgrade to lithium - I have lithium in the van and it works great. I asked Oliver the cost to upgrade to lithium - I just wanted to see what they would say - and they quoted $11,000 for 3 130 AH batteries (!) so it must be much more than a plug-and-play type thing. I'm not sure about lithium now and am trying to figure out what's required.1 point
-
I agree completely GJ! My specialty is making furniture and I've found over the years quality tools are nearly always the best way to go. Typically they are expensive for a reason. Quality materials... quality tools and some quality skill sets! The young man in the video is a bit long winded... but one can tell he knows what he's talking about. I can do some simple wiring, but while I recognize good work when I see it, I am a bit intimidated by doing some of the projects I hear others taking on. I'm sure I could do it once I set my mind to the task... but I'm not there yet. I hope someday to install a dc to dc system so that I can utilize charging benefit while driving from point A to B. I seem to remember JD doing something like that and if I remember correctly it had the main component installed on the Oliver... and not in the truck, which makes a lot of sense to me. The advantage being that the capability stays with the Oliver and not the tow vehicle that is likely to get traded out at points in the future.1 point
-
John, the Marine Corps put me through nearly a year of training (AE A & AE B) to become an aircraft electrician, and I continue to learn from great posts like yours. Thanks and keep them coming.1 point
-
One disadvantage of using an adapter like this the direct connection to your smoker will not properly protect it (the cord or unit) as well with a 30amp breaker vs 15/20amp unit. Otherwise it sounds like a good idea. I’m curious what the voltage difference would be inside the trailer using the adapter. Will there be a voltage drop in the camper because of the adapter, especially if something like the AC or Microwave is used? Or will the voltage remain higher in the trailer when the smoker/adapter is being used because the shore power cord is not being stressed as much?1 point
-
I think an important distinction is do you have the base 12v wet cell batteries or the upgraded 6v deep cycle units? Not sure if that was an upgrade available in ‘19… If you have the deep cycle upgrade the wiring will be both in series and parallel and removing one battery is not advisable. Just replacing one battery will probably not provide a well balanced battery array. So if all four batteries are 12v the new battery will probably work considerably harder vs the older units. During the charging cycle, at a given voltage, a higher amperage will flow to the new battery. The opposite will happen during discharge. Short answer, if you have the base battery setup (I thought it was 2 12v wet cell but it might have changed to 4 12v in 2019) that utilizes 12v batteries, you can…remove one and run on three, replace one and know it will work harder, or use this as an excuse to upgrade to lithium (1-4 batteries).1 point
-
Unfortunately the general wisdom is that all batteries should be of approximately the same age. Sorry. Bill1 point
-
Be careful where you setup camp1 point
-
I had the same thing happen to me at a nearby campground. We pulled in with the lithiums about 50% discharged and plugged into the 30 amp pedestal. Initially everything was fine but then I could hear the xantrex cooling fan turning on and off every 30 secs. I also got a communication error with my xantrex remote panel. I later did a software update on my xantrex and the problem never occurred again. I later learned from the campgrounds website that the 30 amp hookup was rated at 20 amps. I didn’t think it was my ems because it was cycling too quickly. My advice would be to try to reproduce the issue with another power source. Another possible solution would be to decrease the breaker rating on your xantrex phone app to 15 amps from 25 amps.
1 point
-
Thanks Geoff! I was asking for holes in my procedure, and you found one. IMHO, I feel expansion in a P-trap goes 99% upwards, like an ice cube tray, and has not concerned me. We can add a step 13 to the procedure: 13) Add 3-4 OZ of RV antifreeze to each drain (bath, shower, kitchen) and in the toilet bowl (with water). There is no additional maintenance in this step, as p-traps do not need to be flushed and cleaned later like the freshwater plumbing system. You can drive on and use them as-is. Great addition!1 point
-
When using compressed air, and have done that many times on other campers/trailers, I always worried about water left in the pump. With the Oliver, it’s just so easy to use the pink stuff.1 point
-
Because we live in the SW, we do more camping over the winter months, spring and fall of course, and none during summer (think Snowbirds RVing in Quartzite AZ). So, we don't truly "winterize" but live at 5400 FT elevation and it can get COLD overnight. Whenever the weather report forecasts several consecutive nights low 20s or in the teens, I'll blow out the water, but we could be heading out next week! This occurs often, 2-3 times a winter. I could not see adding antifreeze and flushing it clean on this basis. If winterizing the Oliver with antifreeze takes you 20 minutes, then using air should take 10-15 minutes. Yep, you need an air compressor. Mine has a 100' hose so I can fill RV tires all the way out on our road. Good time to check tire pressure and overfill your tires 10% for winter parking. This way when you are ready to leave again all you have to do is check pressure, let a little air out. The real difference is when we are ready to head out, everything is done and ready. No flushing antifreeze, just fill the freshwater tanks at home or at the campsite depending.1 point
-
Not advice 😄 I just never use compressed air. When we recently winterized, it took my wife and I maybe 20 minutes really taking our time. I think Oliver puts their winterization instructions in place to ensure that it’s easier for folks who might not own an air compressor and may not clearly understand that ALL water must be removed from the system lines or diluted with antifreeze. Side note: Tightening the white compression fittings is a regular inspection point for me. If one of those compression fittings is slightly loose, compressed air likely won’t get the rest of the plumbing clear of water. We don’t get long deep freezes here in Western NC, the land of long summers and short winters and I still use AF. All this said, I would never know that I have cleared every bit of water from my lines, so being risk adverse, I choose to use RV safe antifreeze and sleep really well. Surely others will chime in, and if compressed air works, I say go for it! Patriot🇺🇸1 point
-
While EVs may be coming and ICE engines going, it cannot be accomplished on an arbitrary date. Population density and relatively shorter distances in the northeastern corridor of the nation are not the same conditions as west of the Mississippi. A reliable and well spaced charging station infrastructure must exist before mandating the end of ICE vehicles. And then, we will need a reliable 24hr energy infrastructure, capable of supplying the enormous amount of energy to replace all of the BTUs found in the gasoline and diesel in all the vehicles plying our nations's roads. We do not live in ' Fifteen Minute Cities'. We hit the roads and explore . . .1 point
-
Merry Christmas and Happy New Year everyone!!! My wish for the new year is safe travels for all and many camping trips this coming year. Looking forward to catching up with friends and making new ones this coming year!1 point
-
Merry Christmas everyone! Hoping for a New Year full of travel and camping for everyone! Nice bottle of Amber Falls wine in the video, they are a HH if you want to do serious tasting then just walk back to your Oliver! Mike1 point
-
Don't be! I promise it doesn't feel your pain. Before I drill, I think "will I ever want to remove this?"1 point
-
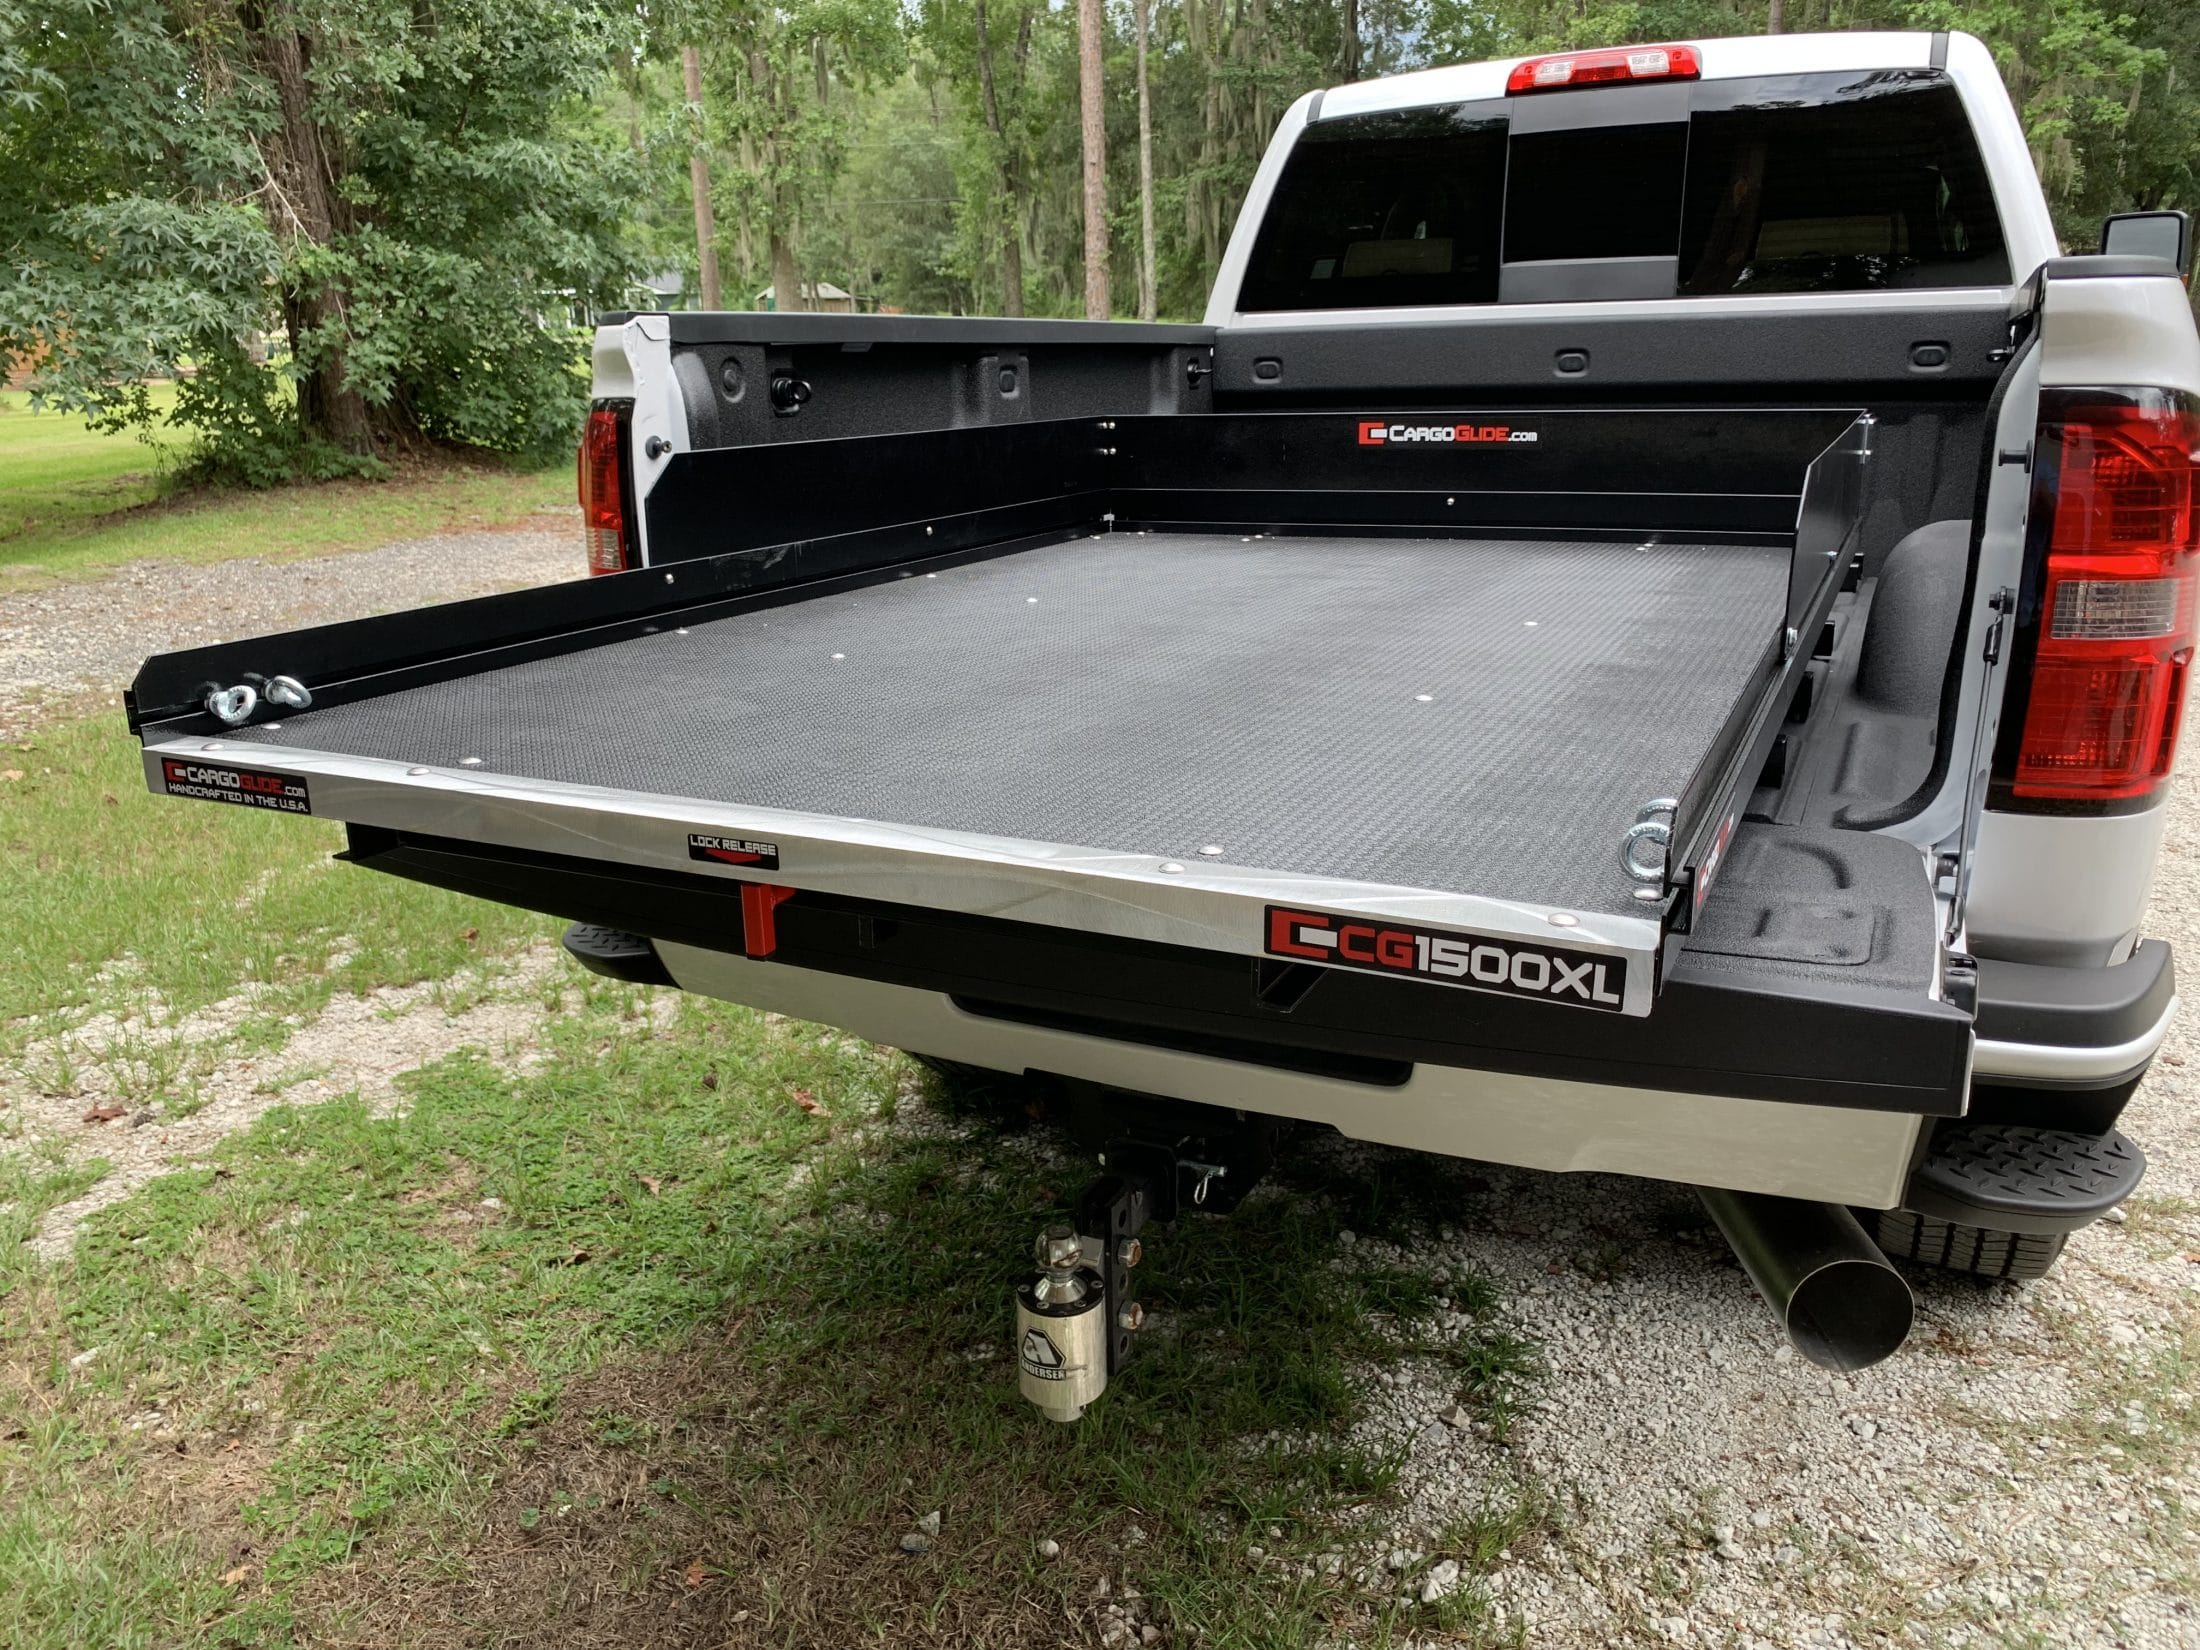
In preparation for my ARE truck cap, I recently had installed (1 hour at $120 - the installers have a forklift) a Cargo Glide, 100% extension, 1500lbs cargo capacity, stops at every 12 inches. Crawl around in truck bed looking for that chair I thought was packed, careful not to bump my head on the truck cap, simply slide the bed out and take a look.
1 point
-
Things have taken a turn for the worse. After consulting with Oliver I bought a new battery from Camping world - same power output etc - but an AGM - I was told by Camping World that it was ok to substitute an AGM for a wet cell. The power came on but this morning all 4 batteries are dead - and all now read the exact same voltage (241.0 V. I put a ticket in with Oliver and am consulting with a Camping World nearby.0 points


-
Recent Achievements
-


")


")


