Leaderboard


Popular Content
Showing content with the highest reputation on 04/05/2024 in all areas
-
To Oliver Owners and Valued Customers, The Oliver team and family greatly appreciates and values our current owners and individuals that are considering the purchase of an Oliver. Without you the organization and Oliver brand would not be what it is today. As most of you know, Oliver Travel Trailers is going through a transition period and some of the decisions have created some questions and potential uncertainty as it relates to the direction of the company. Oliver is paying attention, listening, and monitoring all of the feedback and comments on the forum, social media, emails, and phone calls. Oliver Travel Trailers’ intent is to be very straightforward and honest with our owners, potential customers, and employees. Integrity is the foundation of the Oliver brand. Oliver feels an official company update is appropriate to help clear things up. The following are some key facts: The rumor that Oliver Travel Trailers is positioning the business to sell is absolutely a false statement. The Oliver sales team is still actively working with all new and existing customers to answer questions and assist in the purchasing process. If you are interested in purchasing an Oliver or have questions, please contact us directly. The Oliver service team is still actively providing technical support to our Oliver owners to ensure issues are resolved as quickly as possible. If you have technical support needs, please contact us directly for assistance. The decision to close the service department at this time has not been received well by many Oliver owners and potential customers. Oliver leadership is listening and plans to have discussions on this topic next week. Oliver will update our owners in the coming weeks regarding any changes. Again, Oliver Travel Trailers truly values the voice of our owners and potential customers. We’re listening and we care. Oliver Travel Trailers isn’t a prefect organization, but we are committed to ensuring our brand, our owners, and our future customers have a product and customer support that is the best it can be. Thank you for being part of the Oliver Family. Rodney Lomax Director of Operations Oliver Travel Trailers Sales & Service12 points
-
That solution has been over four years in the making but will be on the market in the next month or so. Keep watching.7 points
-
UPDATE: The 500-mile torque inspection was actually a 527-mile torque inspection at a QT in Wichita Falls. The process is now taking only a couple minutes longer than it takes to fill up our 30+gallon tank in the Tundra. Still amazed how the new U-bolts stretch - each nut took several quarter turns to reach the target torque value! We'll be check them every 1k miles for a while. Interesting Side Note: Speaking with Mike/Alcan yesterday on a particular boring stretch of HWY 287 somewhere near Electra, TX, we learned how springs are "weight rated." Evidently, there are several algorithms used by spring manufacturers that rate springs once several parameters are uploaded. Keep in mind that ll algorithms are not exactly the same - some are more accurate than others. Values for steel type, width, thickness, alignment pin size, eye-to-eye length, etc., all determine the weight rating. Alcan uses a highly rated program with a reputation in the industry as being very accurate. Turns out that virtually all RV manufacturers, industry-wide, use spring packs that either just barely meet RVIA standards or don't meet them at all (depending on the algorithm program used to rate the springs). When Alcan ran the dimensions of the Chinese-made AXLE TEK spring used on my Oliver, it was "quite a bit less than the rated 1,750# target", according to Mike. IMO, this issue goes back to DEXTER and not necessarily Oliver - because, as I understand - but could be wrong, the axle kit (including the spring packs) are supplied by DEXTER. But even if the AXLE TEK spring packs were tested to and achieved the 1,750# target at manufacturing, after some time (not necessarily road miles, but age) - those springs will flatten (all 4 of our's did) and they will not be able to meet the target rating going forward. This is due largely to the low quality metallurgy of Chinese steel. Labor costs, environmental regulations, and manufacturing standards in China are much less, if exist at all, as compared to the US steel industry. With a suspension travel of barely 2" (just measured it) before the top of the U-bolts smack into the my Oliver's aluminum frame, I want to be sure the springs are doing what they are there to do. So owners that find themselves crawling around underneath their rigs, this is another inspection point - if your suspension ever "bottomed-out" it will leave an imprint on the frame from the top of the U-bolt. That's a good indicator your spring-packs have flattened and need attention. Also IMO, the choice between Chinese-made and US-made leaf springs for travel trailers depends on the specific needs and priorities of the manufacturer or end-user, including considerations of cost, quality, and supply chain reliability. For businesses emphasizing cost control, the Chinese-made springs may be appealing, whereas for those prioritizing quality, safety, and supporting domestic industries, US-made spring packs might be the preferred option. So, mindful owners should think about: (1) having their running gear/suspension inspected, and/or (2) upgrading their suspensions if needed, or (3) never approaching their 7k# OTT max GVWR, or (4) towing slowly only on pristine roads, or (5) not worrying about it and see what happens down the road. Sorry in advance for my rant, it's just my $0.02...5 points
-
Spotted an EII in an HEB store lot on south side of San Antonio today. It had a white Ford truck as the tow vehicle. Left our card in the drivers side window to say hi. Craig n Rose4 points
-
Spring Replacement Build Sheet: Somewhere up above here in the scores of pages of this thread is a suggestion to get your Dexter axle build sheet(s). I did so today. You will need to record the serial numbers of your axle(s). I took photo's. Then call Dexter at (574) 295-7888, Option 1. Ask them for a copy of your axle build sheet(s) and give them your e-mail address. That's it. Be sure to keep a copy of your build sheet(s) in your trailer so that down the road you are not wishing you had it. Great Customer Services from all four of the Dexter areas I have spoken to today. GJ4 points
-
Yes -the English language is a wonderful thing. As is the wonderful world of statistics. Certainly it is possible that the Dexter axles ARE made in the USA. But, the other parts that are "attached" to those axles could be made in other countries. I thought I read in one of the posts above some calculations which basically tried to prove that there has been a relatively small number of Olivers that have had the type of spring failures identified in this thread. Is even one spring failure beyond what is acceptable? Just because something was made outside the USA doesn't necessarily mean that it is sub-standard or non-premium or less than luxury. Perhaps there was a "bad batch" of springs due to ?????. Or, perhaps there was an error in the assembly of certain "packs" of springs. Or, perhaps the conditions that certain Olivers have been subjected to have been outside the design boundaries of these springs. Or, etc., etc.,etc.. Is Oliver at "fault" in this regard because they purchased a component of the Oliver Travel Trailer from one of the most reputable axle suppliers in the USA? Is Dexter at "fault" in this regard because they purchased from a supplier in China and I assumed that they (Dexter) made sure that they (Dexter) was receiving what was paid for? I concur with what GJ says in this regard. Yes, it is each owner's best interest to inspect the suspension (and all other parts within reasonable bounds) - both now and into the future regardless of wherever parts were made or assembled. Bill3 points
-
Mike in Oliver Service had asked for the specs and contact info for the US made springs I had found as he said they were not aware of any US sourced suppliers and would be interested in what I had found. I told him I would send the info once I had them on my trailer. I forwarded the specs and some pics along with Alcan contact info to him today and he said he would pass it along within Oliver.3 points
-
We turn the water pump off after each use. Just a habit we developed over time. With 2 switches, we are never too far away from one. And under the subject of TMI, we don’t flush yellow at night, we accumulate and flush in the morning. We also turn off the city water supply when we leave the campground. Mossey3 points
-
We loved all things HEB when we lived in San Antonio. HEB actually made our wedding cake and it was excellent. Great bakery, deli for sure. Nice of you to leave a card! 👍🏻😊3 points
-
First side is swapped. Old Chinese Dexters will go to the recycler and bring scrap value…maybe enough for a soda pop. A few observations: 1) I put a set of calipers to my 3500# Dexter axles and they are 3” dia. Ubolts provided by Alcan are for 3” dia axles fit perfect 2) Alcan ubolts are 9/16” rod vs. the smaller (1/2”?) that were stock on my trailer. No worries installing as the holes in the spring retainer plate are large enough to accommodate the larger bolt diameter 3) Alcan ubolts are longer to accommodate increased spring pack height (5 vs. 4 leafs). About 1-1.5” of thread extend below nuts. I plan to leave but you could cut the excess off if it bothers you 4) Torque specs from Alcan for 9/16 ubolts is 90 foot lbs. See attachment 5) Two of my shocks were blown so I am replacing them A Irwin squeeze clamp works wonders for compressing and installing the shocks after the springs have been bolted in 6)reversed the wet bolts so that the zerks point inward even with a 90 degree lock-n-lube fitting it was a PITA before hoping this will be easier 7) the front springs were still in “ok” shape but starting to flatten. one rear spring had snapped and the other was bent 8)the parts for my trailer were sourced during COVID and at the height of demand for RVs. I cannot help but ponder if the RV frenzy and skilled labor shortage during this time played some role in my broken spring and the quality of the other one that was bending. Oh well, just glad to be safe and be replacing the stock springs before heading out in a month for another Season of seeing this great Country Very straight forward swap. Heck, I did it on a tarp in melting CO permafrost. Cannot imagine doing the swap inside on concrete. 🤪 That would be Lux.
 3 points
 -
We keep 2 1-gallon containers of DampRid in our trailer. We also have Eva-Dry charcoal packets. I don't like leaving things plugged in as our storage place is 1 hour away.3 points
-
Pool noodles - simply use a razor blade to slit the noodle length wise and then shove it onto the edges of the solar panels. This will protect the cover. I have this exact situation and get around it with the use of a small external solar panel to charge the 4 AGM's that I keep onboard while my Oliver is in storage. Bill2 points
-
SPRING REPLACEMENT OPTION: Here is another option for our spring replacements via Dexter. With the help of a Moderator, we know that the axle springs on most of our OE2's is their PR4B springs. They are made in China and we can purchase replacements for $38.95. I worked my way up three layers at Dexter and their very helpful Technical Services Rep identified another Dexter option that will fit. It is their PR4 2400 # double eye spring PR4. This is a four leaf axle spring made of thicker and wider steel. The cost is $61.99, and it is also made in China. DEXTER WARRANTIES: Dexter manufactured springs come with a 5 year warranty. Their Chinese made springs have a 1 year warranty. THE QUESTION: That said, we now know how Chinese springs got onto our trailers. They are Dexter sold. In at least one perspective, that's good news I think. GJ2 points
-
Sure - but - its still fun to just sit there and count all that money I saved. 🤑 Ha Ha.2 points
-
This test result, when paired with the fact that a number of Elite II owners have experienced leaf spring failure within the first few years of ownership, is distressing to me as an owner of a 2022 LEGACY Elite II. We paid a premium price (over $80K) for a "Premium Luxury Travel" trailer, which I now know came with cheap, sub-standard Chinese 4-leaf springs that will likely fail soon. My ALCAN 5-leaf replacement springs have already been received, and will be installed soon, because I don't want the cheap OEM springs to fail on the road somewhere. Apparently the term "Legacy" is just marketing hype. Oliver would be well advised to specify that higher-quality, 5-leaf springs be supplied by Dexter with its axles going forward, particularly now that the Elite II base price is over $95K. How Oliver addresses this issue will tell me a lot about the company. Perhaps when asked, I should describe it as a "premium-priced trailer with some cheap critical OEM components."2 points
-
If you all had a compost toilet, you would not need the water pump on at all for flushing. Just making a little light of the subject. Ha Ha2 points
-
Krunch and I climbed Star Dune in August of 2009. The 750' climb was like walking in quick sand. It being August, we started climbing before daylight to beat the heat. Mossey2 points
-
According to the new brochure (linked) it shows the Truma Aventa in the photo on the OLEll at 9’ 8”. Our 2020 LEll has the 16” wheels. I believe in late 22 YM and 23, and 24 YM Oliver went to the smaller wheel/tire set up which would reduce overall height. I have never measured the exact height of XPLOR post our Truma install. Given the slight slope or drop where the new fiberglass foundation to accommodate the Truma retro fit was installed, I will go with what Oliver states as the overall height being 9’ 8”. This is also listed in the 24 YM info packet. here- https://olivertraveltrailers.com/travel-trailers/?gad_source=1&gclid=Cj0KCQjwn7mwBhCiARIsAGoxjaIXJnMBHitUfd5XEnvEsEIi3T8dGClqwAk2LL7Bl9L5W_LKGy6ufhQaAvv5EALw_wcB2 points
-
I got some good comments whether the second accumulator should be in series or parallel, so before I changed the plumbing, I decided to call the Surflo customer service for their opinion. Their Technician provided a lot of great information, and he confirmed that a 2nd accumulator will provide more reserve water, and it doesn’t matter if it’s in series or parallel. More interestingly though, he was of belief that one 24 Oz accumulator would only provide 2 to 4 Oz of reserve water. That sort of answered another question of how much reserve water to expect, and I was happy to know that I was getting more than twice that much. The technician also recommended that I set the PSI at 2 lbs. less than the pump “turn-on” pressure. Without knowing exactly what that was, I did some experimentation with higher and lower pressures and found that 30 PSI provides the most reserve water, which was about 13 Oz between pump cycles. This is definitely a project where the juice may not be worth the squeeze for everyone. But for us, it was all about the noise. That water pump can wake the dead during a late night bathroom visit, or early morning tooth brushing, and any improvement was worth the small effort. One 24 Oz accumulator wasn’t adequate in this regard, and there’s just not enough room for any of the larger accumulators. In conclusion, I didn’t get the amount of reserve water I originally expected out of two 24 Oz accumulators, but the improvement was good enough to get a flush and brush without waking the dead. I’m a happy camper . . . already looking for the next project! Cheers, Geoff2 points
-
Spot on. I spent 40 years designing sealant projects and saw my share of failures due to silicone contamination. Edit. Oliver uses a white silicone, so best to stick with that. The sealant is actually the sacrificial layer to protect the sealant tape2 points
-
Harbor Freight currently has what looks to be the same socket set at a "reduced price" of $10.99. It is SKU #96322. Bill2 points
-
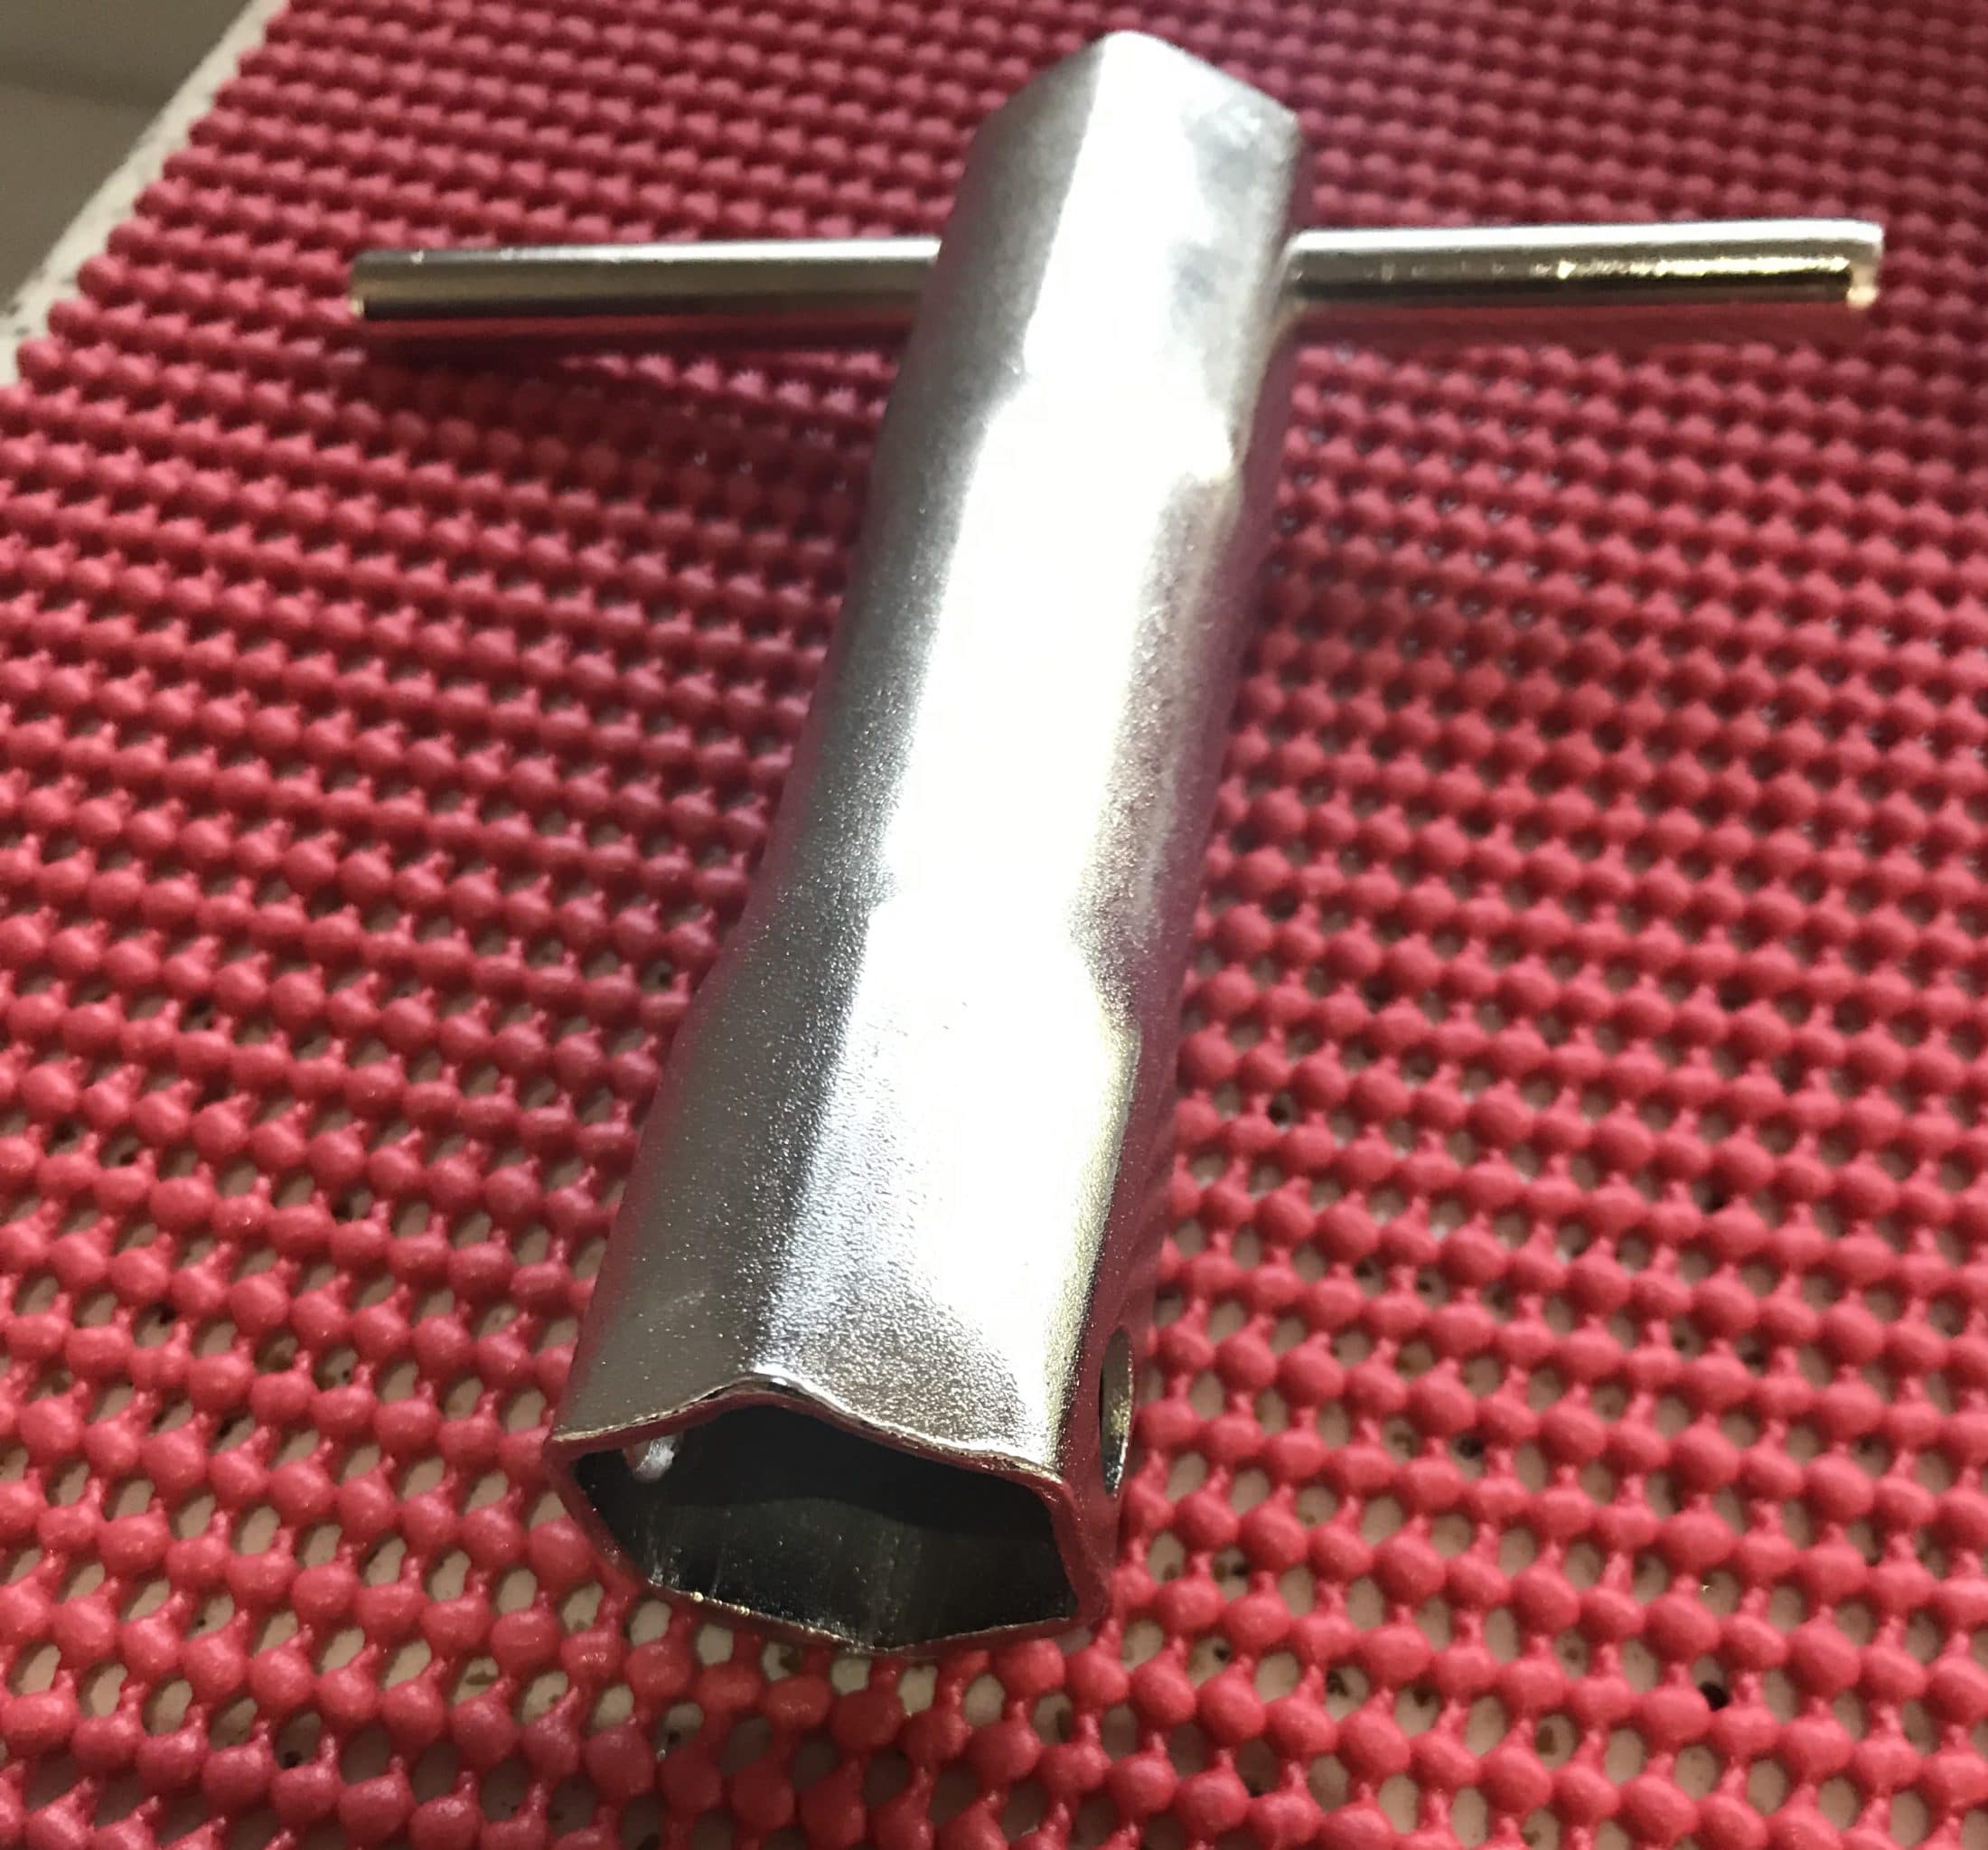
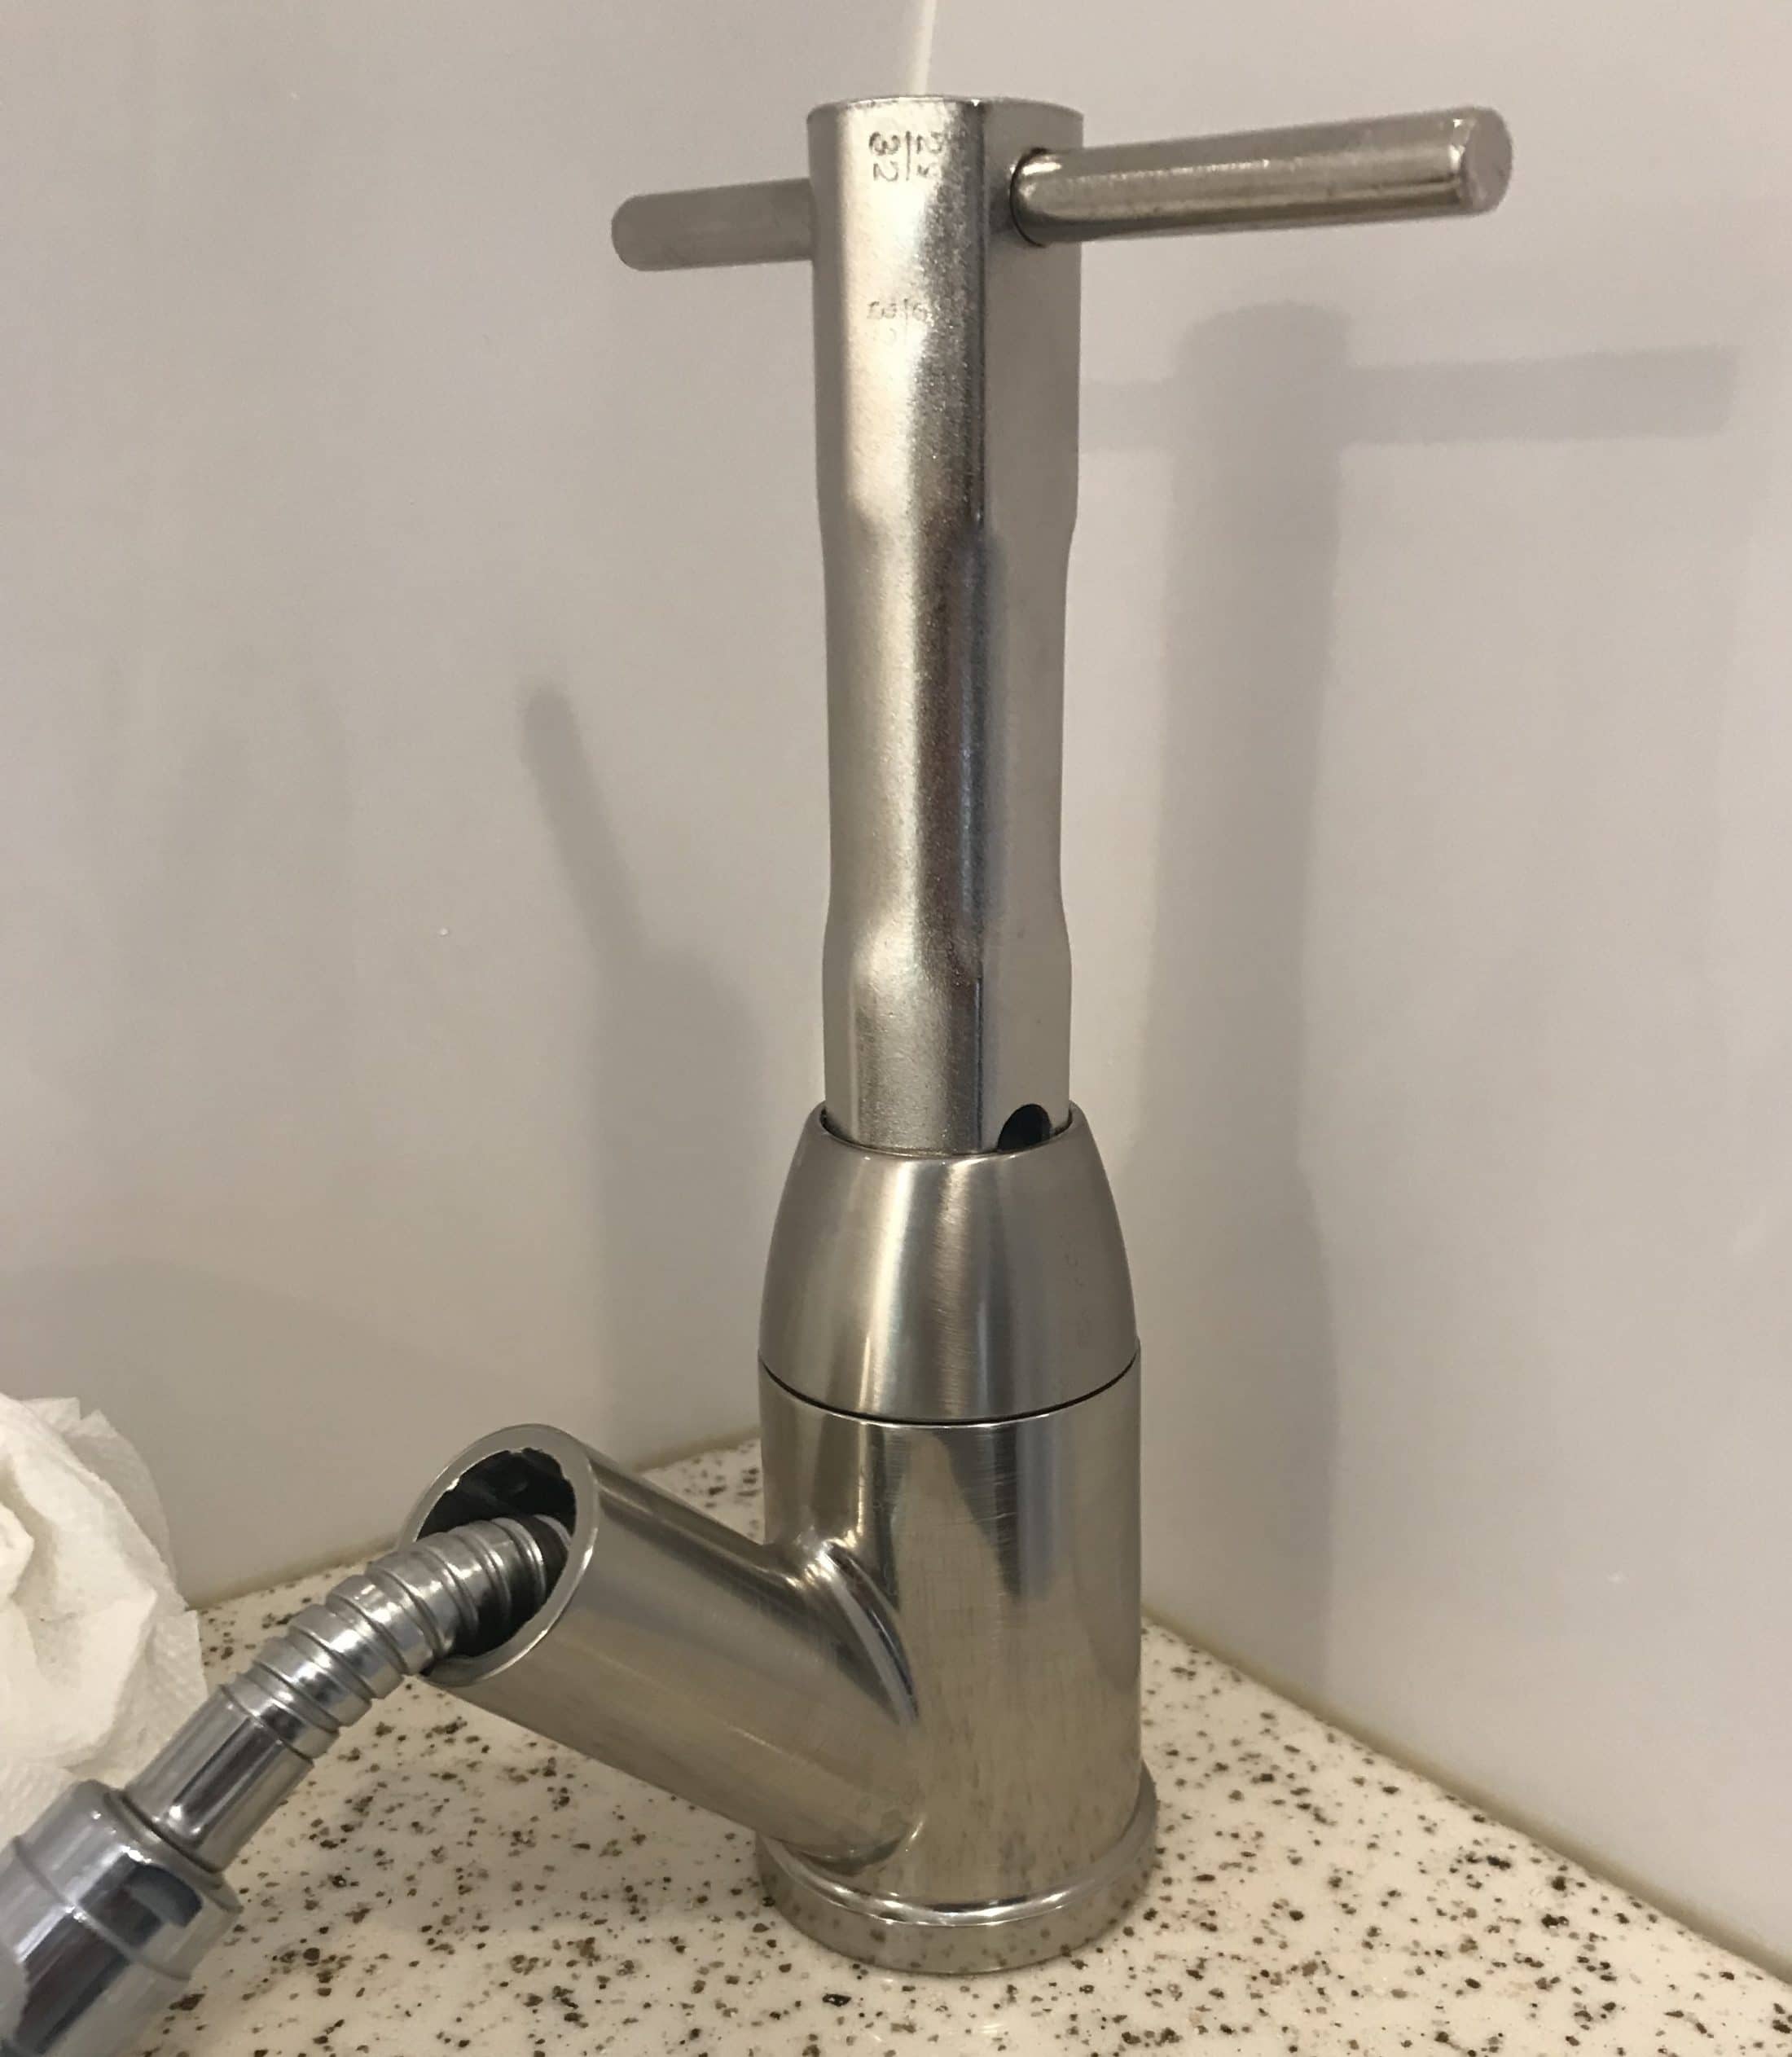
Here is the response I received from Jason in July 2019 regarding faucet model number used in Hull 313. Here’s the cartridge I used. Get a couple of spares. I ordered one from Amazon and Dura sent me one under warranty. I need to replace mine again. https://www.amazon.com/Dura-Faucet-DF-RK601-Cartridge-Replacement/dp/B072BVH7KB Don’t forget the socket wrench. Mine came from a set that I bought at a Menards in Marquette MI. It’ll make the job real easy. You may have to clock the faucet base if it has been twisted out of position. See my write up in this thread.
2 points
-
Much better on the pic - thanks. Before putting Twist to bed in the late Fall I make sure to clean those tracks well - this includes taking the black tracks out of the channel. Then I use a CalMark cover over the winter and in the Spring those tracks are basically just as I left them in the Fall. A dehumidifier might help a little but I believe that the major help will be in the cleaning. Good luck. Bill2 points
-
Trusting that RVIA has the consumers interest and safety at forefront is akin to expecting that NADA (North American Automotive Dealers Association) has the end consumers interest at heart. Prepping to finally install my Alcan springs today now that the snow has melted. 😀2 points
-
Scuba Rx, that ASI 0240 sounds pretty good. Especially interesting it can be used as a tooling lubricant. I will try that. What I have been using with great success is Debond, and it is even more expensive! So I think it's going to cost you Geronimo John! Debond The big problem with silicone from a refinishing point of view are the oils it contains. You can clean it off with solvents and plastic razors to where the gelcoat looks pristine, but when you spray the surface with water, it still beads up all over. This is caused by the silicone oils having penetrated the pores of the gelcoat. Not completely removing these oils will interfere with the full bonding of any sealant you want to use, including silicone! You have to break out some 1000 grit automotive sandpaper and wet sand it out with the solvent of your choice (in my case, Debond). When it's all gone, I hit it with some finer grit (1200-1500), then a good polishing cleaner. The gelcoat will then look great, and be ready to be sealed, and most importantly, the sealant will adhere to the gelcoat! All this work is why I never use silicones to begin with, except in some rare instances. Also, if you do any finishing in your shop, be extremely careful to keep any rags, pads, sandpaper, or anything that was used cleaning your silicone problem separate and away from your regular shop supplies. Silicone contamination in your shop can be a total disaster for the finisher. Good luck! Dave2 points
-
Our 2021 OEII came with a 2" hitch mount rack receiver but the installation was (in my view and with respect to a lot of other good work done by the prior owner of our trailer) not quite up to 'factory standard'. In fact the U-bolt-based attachment method distorted the receiver shape just enough to make installation, and especially removal, of our 1Up hitch rack next to impossible. So I sought to improve upon it. After some research I settled on a receiver ostensibly designed for use on certain Lexus GX460 models: https://www.amazon.com/dp/B0BRKR1Q4X Drilling and attachment was straightforward given a drill press, a decent 1/2" bit, appropriate measuring tools, and a center punch. The aluminum is relatively soft and drilling oil was not used. I have not been able to get all the chips out of the interior, but did not try too hard to remove an end cap and access the box section beam interior that way. The hardware is 3 1/2" x 1/2" stainless with stainless and yellow zinc washers. We have not tested the setup on the road yet, but static fitment went fine. The receiver and backing plate are fairly heavy; according to the retailer, about 10 pounds. This item is designed for towing, when attached to a GX460; it is likely overkill for this application, but that's OK by me. A side benefit is the receiver has safety chain mounts through which a cable lock could be passed. I discussed this with Jason and he indicated the factory were considering offering a 2" receiver option moving forward. Our bike rack is 2", our cars and TV have 2" receivers, and use of an adapter was not appealing to me. In hindsight I might have painted it white, or silver 😀 Enjoy! Tim
1 point
-
I salute you and your bride for your 750’ climb! So very wise to get it done early. 👍🏻👏🏻👏🏻👏🏻1 point
-
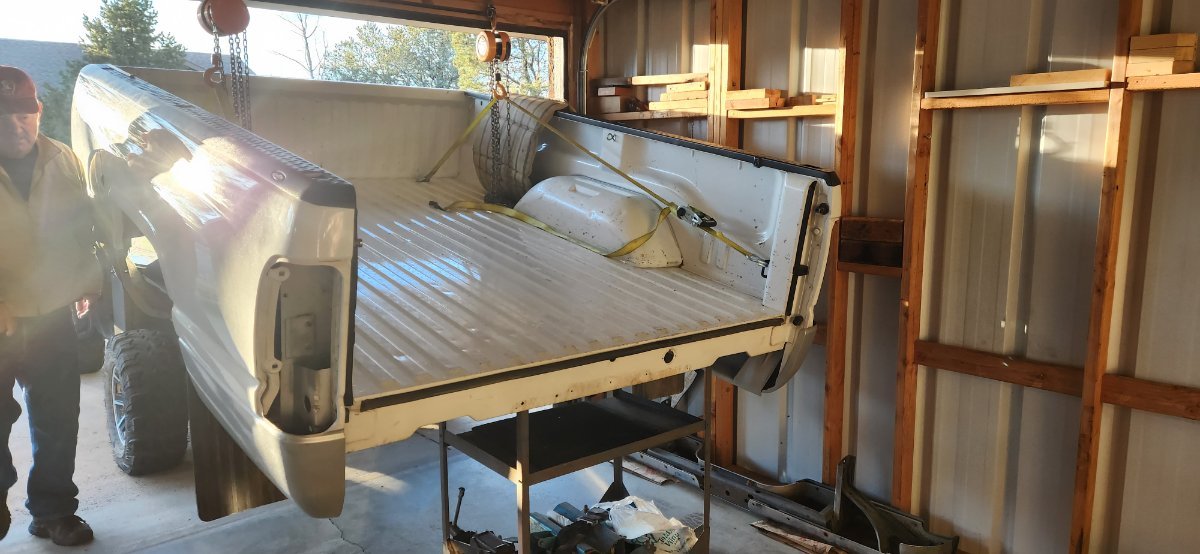
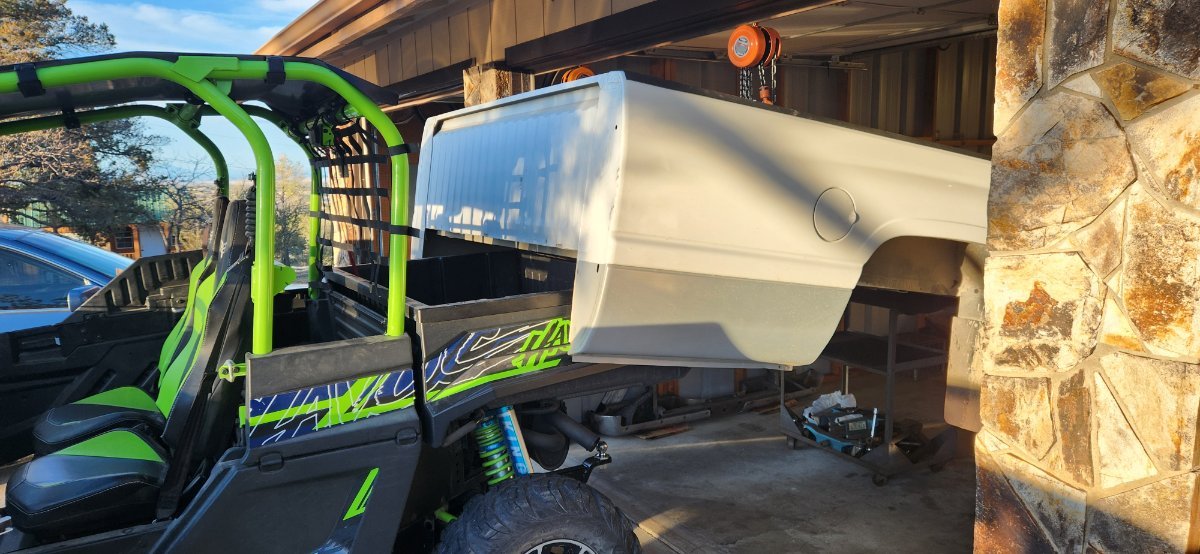
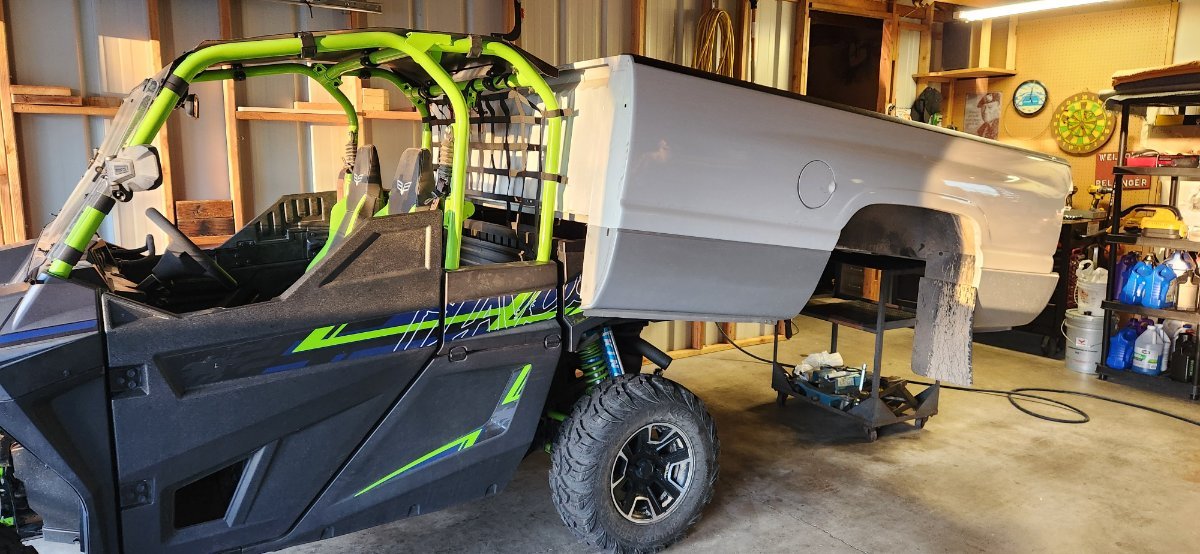
Watched a few YouTube videos on this. Not too bad a job if you have a 4-post lift, and I have about every automotive tool, but not that. What a pain it would be working under the truck and it's not truly safe to have jack stands raised high enough to remove the fuel tank. Knowing this, we returned from Casa Grande and the Sonoran Desert NM with an empty tank. The trip computer states 8 miles DTE which makes Chris nervous, but we got home with just enough gas. I posted this on the Cummins Forum where one very knowledgeable senior member wrote that he installed the same Fleece kit. He did not pull the tank from the bottom; he removed the truck bed! OMG, which route is better? Took me less than a day to decide, I'm pulling the bed. The truck stays on all fours, I will not have to crane my neck, laying on the cold garage floor, etc. It's amazing how easy it is to remove a truck bed, this being my first experience doing this. Remove the taillights and make sure all frame-mounted wire ties are disconnected. You do not have to remove the rear bumper (only 6 bolts), but it is safer unless you can lift the bed straight up. The bed is attached to the frame, 8 bolts on my long bed and 6 bolts on a short bed. The real trick is how to hoist the bed. The senior member mentioned used a gantry and hoist. A basic gantry costs $800 and could not find one to rent locally. I figured I could buy two inexpensive chain hoists to do the job, but the only location strong enough to mount the hoists, was to the header of my garage door. Then the bed would be hanging half-in and out of the garage. It was truly scary driving my truck out from under the bed, but son Adam was guiding the rear end while Chris was keeping an eye on the underside! I was determined to get the bed fully in the garage stall as we are in the SW windy season now. It's crazy how recently we use our side-by-side more for home projects than for enjoying the AZ dirt trails! The bed will sit just like this until the install is completed.
1 point
-
Would love to have tilt panels, but I'm not climbing ladders when away, don't want to carry one either. We mostly winter camp, so the tilt would be helpful. Last outing somehow the fridge got switched to DC overnight, woke up to 63%. It was a very sunny day in the Sonoran Desert, and we got back up to 89%. With a tilt, I figure it would have gotten to high 90s instead. Come up with a motorized solution for 2-panel Olivers and I'm in!1 point
-
BLUF: When we get into a hurry, sometimes we miss the elephant in the room. I was trying to find an on-line way to get my axles SN/LN Configuration Build Sheet. Was not successful, so I'll take two aspirins and call Dexter in the morning. In the mean time, for reasons unknown, my pea brain wanted to know where our axles are made in China. So Mr. Google stepped in and told me: From Dexter Web Site: Founded in 1960 by Leonard Dexter, Dexter is recognized as a progressive industry leader providing quality products manufactured in the U.S. and Canada, employing state-of-the-art robotics, precision welding equipment, and automated machining processes. Well that can't be true because we have Chinese springs???? So asked specifically a different way: Are Dexter axles made in the USA? A second reference said the same thing. YEP! All right now I know that can't be right. I've seen those Chinese springs. So I asked WHERE ARE THE DEXTER SPRING PLANTS? Dexter Plants: Answer is here, and not over >>>>>>>>>>>>>>>>>>>>>>>>>>>>>>>>>>>>>HERE So at this point I am beginning to believe Mr. Google. But wait... WHO OWNS DEXTER? Dexter Parent Company: Dexter is owned by DexKo Global, which was formed in 2015 by combining Dexter and AL-KO VT. This combination created a global leader in highly engineered trailer running gear components and systems, with over 130 years of trailer and caravan componentry experience. DexKo Global is managed out of Novi, Michigan, by a strategic staff focused on leveraging the resources of the combined companies. Well Ok. But maybe it's a shell company being run by those guys overseas! Right? So I asked WHO IS THE LEADERSHIP TEAM FOR DEXKO? DexKo Global Leadership Team: So now, my brain has to ask if Dexter makes their axles in the USA, supervised by an American leadership who work for a parent company who is also all American........ How is it that we have Chinese springs in our Dexter axles? Friends, my brain jumped me into the rabbit hole and we are buried there. If you want to find us, bring a backhoe because the answer is way beyond me. GJ
1 point
-
We still haven't installed an accumulator tank in rhe trailer. My solution to th night time racket is to just turn off the pump, through the night. "If it's yelliw, let it mellow." Hand sanitizer. Bottle of water. We had a huge rattle after the (properly sized) accumulator tank in the cabin. (We run off a tank and pump there, too, sometimes. ) We installed a longer line section, with an upward loop in a flexible section, and pretty much solved the problem. Peace and quiet at night. We chased the noise for a month. It's not fun, and every situation is different.1 point
-
My rear window was sealed by the same guy that did JD1923! In retrospect... it's possible that something along the lines of the "chemical incompatibility" mentioned by a few of you took place. The instructions Oliver Service gave me was to use this "black rope like" caulk around the inner flange of the bathroom window during the installation. Then they sent a tube of silicone sealant to finish off on the outside (I should have taken note of what it was, but I'll assume it was the ASI-335). It turned yellow as it dried. There was no mention about waiting for one to cure before using the other... and the "white" sealant never actually touched the black caulk they sent... but there could have been some off gassing that created some coloring of the outside sealant. Wow... that ASI-335 and the ASI 0240 cleaner is expensive!1 point
-
Hey, John: If you're only talking a couple inches of height - air-down your 4 tires enough to get that clearance. Roll the rig into position in the barn. This shouldn't damage the tires. Air them back up once in position. Problem solved.1 point
-
The Dunes are about a 90-minute drive northeast of our cabin near Mogote, CO; we go there often... Never get tired of that location - very cool. Thanks for posting @Doug S! Cheers!1 point
-
Here is a photo:
1 point
-
I spent a couple hours taping both sides of every seem on a shower floor we did a couple years ago. I'll put myself with @Geronimo John as I fall short on anything that needs the artist touch. Using the blue painters' tape, it came out pretty nice. I can fix anything automotive mechanical, though tried bodywork once in the late 70s, and never again. The one thing I will contract on the Oliver is anything fiberglass gelcoat work. After our next outing, I need to clean off all that "gnarly" crude on every exterior seam. Readers here would likely be interested in your choice of "silicone finishing tools." Thanks again.1 point
-
Really BIG levelers on one side? 😇1 point
-
Man I hear you! And that is a pretty gnarly sealant job on your rear window!😖 I pretty much have to tape everything off on each side of the joint (sometimes, just one side is necessary). It takes time, but gives me the best result. I'll wet tool the sealant before removing the tape. Then a final very light tooling (my finger usually) to take the tape/sealant edge off after tape is removed. It's important not to get too much sealant in the joint or you'll have a mess removing the tape and too thick an edge for the final tooling. The thinner tapes leave less of an edge to deal with. I'm still trying different things to get the clean look I want. I bought some silicone finishing tools I want to try next time I get in to it. Dave1 point
-
I asked service what was being used and the response was ASI 335.1 point
-
I didn't see an answer to the question of what is the sealant to use on our Olivers? I just inspected the various sealant places on the roof of our Ollie while washing and waxing after we got home. It doesn't look like it needs it yet but I want to be prepared. I have noted and recorded the above recommendations for both the cleaner and sealant. Which brings me to my next point. When we picked up our Oliver in May of 2022... we noticed a poor bead of seal around the rear window and asked them to touch it up. They did, but what they used (there in the pre-delivery bay) dried very yellow and to this day, stands out like a sore thumb on our pristine white Oliver. It is completely different than what was used when building the Oliver. Then a couple of months later we had a service ticket for the bathroom window to be replaced and I agreed to let them send me the parts and materials to replace it. I did so... but evidently got the same "yellow" sealant! When time and UV rays do their damage.... I want to be sure to have a replacement sealant that is "bright white"! For those that have done this, what was your experience?1 point
-
From past experience, I suspect that OTT will be updating us on this spring issue. My recommendation is that if you must replace your springs now, do so. But if you have the luxury of time, I suggest awaiting what OTT's investigation reveals. But DO take some time to inspect your springs. I have taken the liberty of plagiarizing all I could find info about our spring replacements. Additionally with the assistance of MaxBurner (Art) we have incorporated his replacement procedure into the attached DIY MS Word document. . For the attachment, If you find any info that we collectively have missed, please PM Art and I and we'll make it better. If of wider concern, post it here in the forum DYI - OE2 Replacement Springs Replacement with Art's Install Procedure (1 APR 2024).docx Good luck, GJ and MaxBurner.1 point
-
The supply line is fitted with a "T" fitting and feeds each accumulator equally. The discharge from each accumulator connects to the system with the same "T" configuration. Thus each accumulator is supplying equal amount of pressurized water. You now have twice as much water available under pressure from the two accumulators operating equally at the same rate. This of course is limited to the total flow capacity of the water lines supplying and receiving, and both accumulators must be operating equally. With two accumulators connected in series, the one closest to the demand starts depleting and the second one is only trying to recharge the first one rather than supplying additional water flow to the open tap. It's kind of like several people standing next to each other and trying to pass objects to each other in a chain and filling a box with widgets. If the four people would just individually transfer the items they could from the one container to the other, the rate of transfer would be much faster than if each person has to handle every item being transferred. Edit: One other thing is the space is very limited so configuring the parallel connection would be the biggest challenge. On the other hand, what's wrong with the pump coming on when the faucet is opened? What's the difference between 5 seconds till pump kicks on compared to 10 seconds? You have used no extra water in the process and the electrical usage is negligible. Complicating a system for nearly zero gain is kind of pointless.1 point
-
You have them connected in series. They will actually "fight" each other in this configuration and this would actually reduce the effectiveness of the system. They would have to be connected parallel to have a beneficial effect.1 point
-
Interesting other 'Former Airstream Owners' that found the Oliver Elites as excellent choices. Both are heavy travel trailers and ride firmly 'attached to the road' and very stable owing in all kinds of conditions. I was going to sell our 27/28 foot 2019 Airstream, after the first year testing out the 2019 Oliver Elite II. But just could not do it after making it a very reliable Off the Grid Airstream. 🙂 After 'tweaking' the 2019 Airstream with added hardware and improved the interior pop rivet issues with Lath Screws... it was solid. Interior cabinets had been attached to the walls with unreliable screws and few brackets. After improving the interior, I could not let it go after making the Airstream Off the Grid upgraded. Also upgraded to 16 inch wheels and Michelins. The Oliver... has much less to upgrade to be an 'Off the Grid' upgraded. Fewer screws to manage on hinges and hardware to secure cabinets. Less is best... Not much to go wrong as far as cabinets. Even the appliances have been cooperative. The Truma hot water system was not repairable after purchase and removed it. Probably going to find a simpler system and not concerned with 'instant hot water' when Boondocking. A folding table, a pot of hot water off the propane stove... and maybe jump into a river... makes you feel.... ahhhhh some. Yep. The plug to the electrical outlet of the Refrigerator had dropped out and found that once we put the Oliver on home power and did not work. Pulled the drawer out and saw the plug not plugged into the outlet. The Truma had three service receipts, two I have in my folder for repair and obviously was not replaced or repaired. My mistake not doing a 100% top to bottom inspection. You may want to remember this if you plan to buy a Travel Trailer out of Warranty. My only complaint. After owning three Airstreams, the third was easy to upgrade with better brackets and hardware from coming apart. On or Off the paved roads. Each Airstream was modified from the 2006 Airstream. The Oliver worked out so well for us, it is now our 'Special Purpose Boondocking Travel Trailer'. The manufacturing and marine hardware make the Oliver the #1 Choice for anyone who camps out and needs a reliable 'Home on Wheels'. The Airstream in comparison uses similar hardware that your home uses for hinges, and fabricated cabinets that are mounted inside with screws. The Oliver 'build' leaves little to vibrate loose, when being used, compared to the majority of other Travel Trailers. I would not hesitate to call the Oliver much easier to go from paved to unpaved camping locations. Fewer parts to come loose. I am a Geologist who is always 'looking for interesting' places to explore. Wife and Heelers enjoy the open spaces, mountains to wander among and come home satisfied with our choice of trailers and know which is best for the NEXT Adventure. 🙂 I also Tow on the Ball with the a 2016 F350 Diesel 4x4 without worry or sway. Same with the Airstream, towing on the ball without needing Weight Distribution or Sway Control. A smooth ride and never regret experimenting with towing options. The Airstream or Oliver Elite are easy to sell when the time arrives. We plan to keep both and am confident that the Oliver and Airstream will manage to provide everything we expected from a Travel Trailer while Boondocking.
1 point
-
Because of this thread I had repacked my bearings over a year ago, wow, over 1.5 years. Oy! Time flies. Anywho, when putting on my tire I had got checked out at the tire shop I noticed not one, but two wheel bearings needed to be snugged up a tad bit. It was a good find and a quick tweak. All-in-all, a good night for minor repairs and improvements. Maybe a step closer to a super long trip. I still prefer these forums over Facebook. 🙂1 point
-
With appropriate maintenance, I would expect the bearings to last decades. Your original bearings are of what came in the axles supplied by Dexter to Oliver. To the best of my knowledge, Oliver doesn’t actually have a dog in that race.1 point
-
That’s just an area that could use a pool noodle! Mossey
1 point
-
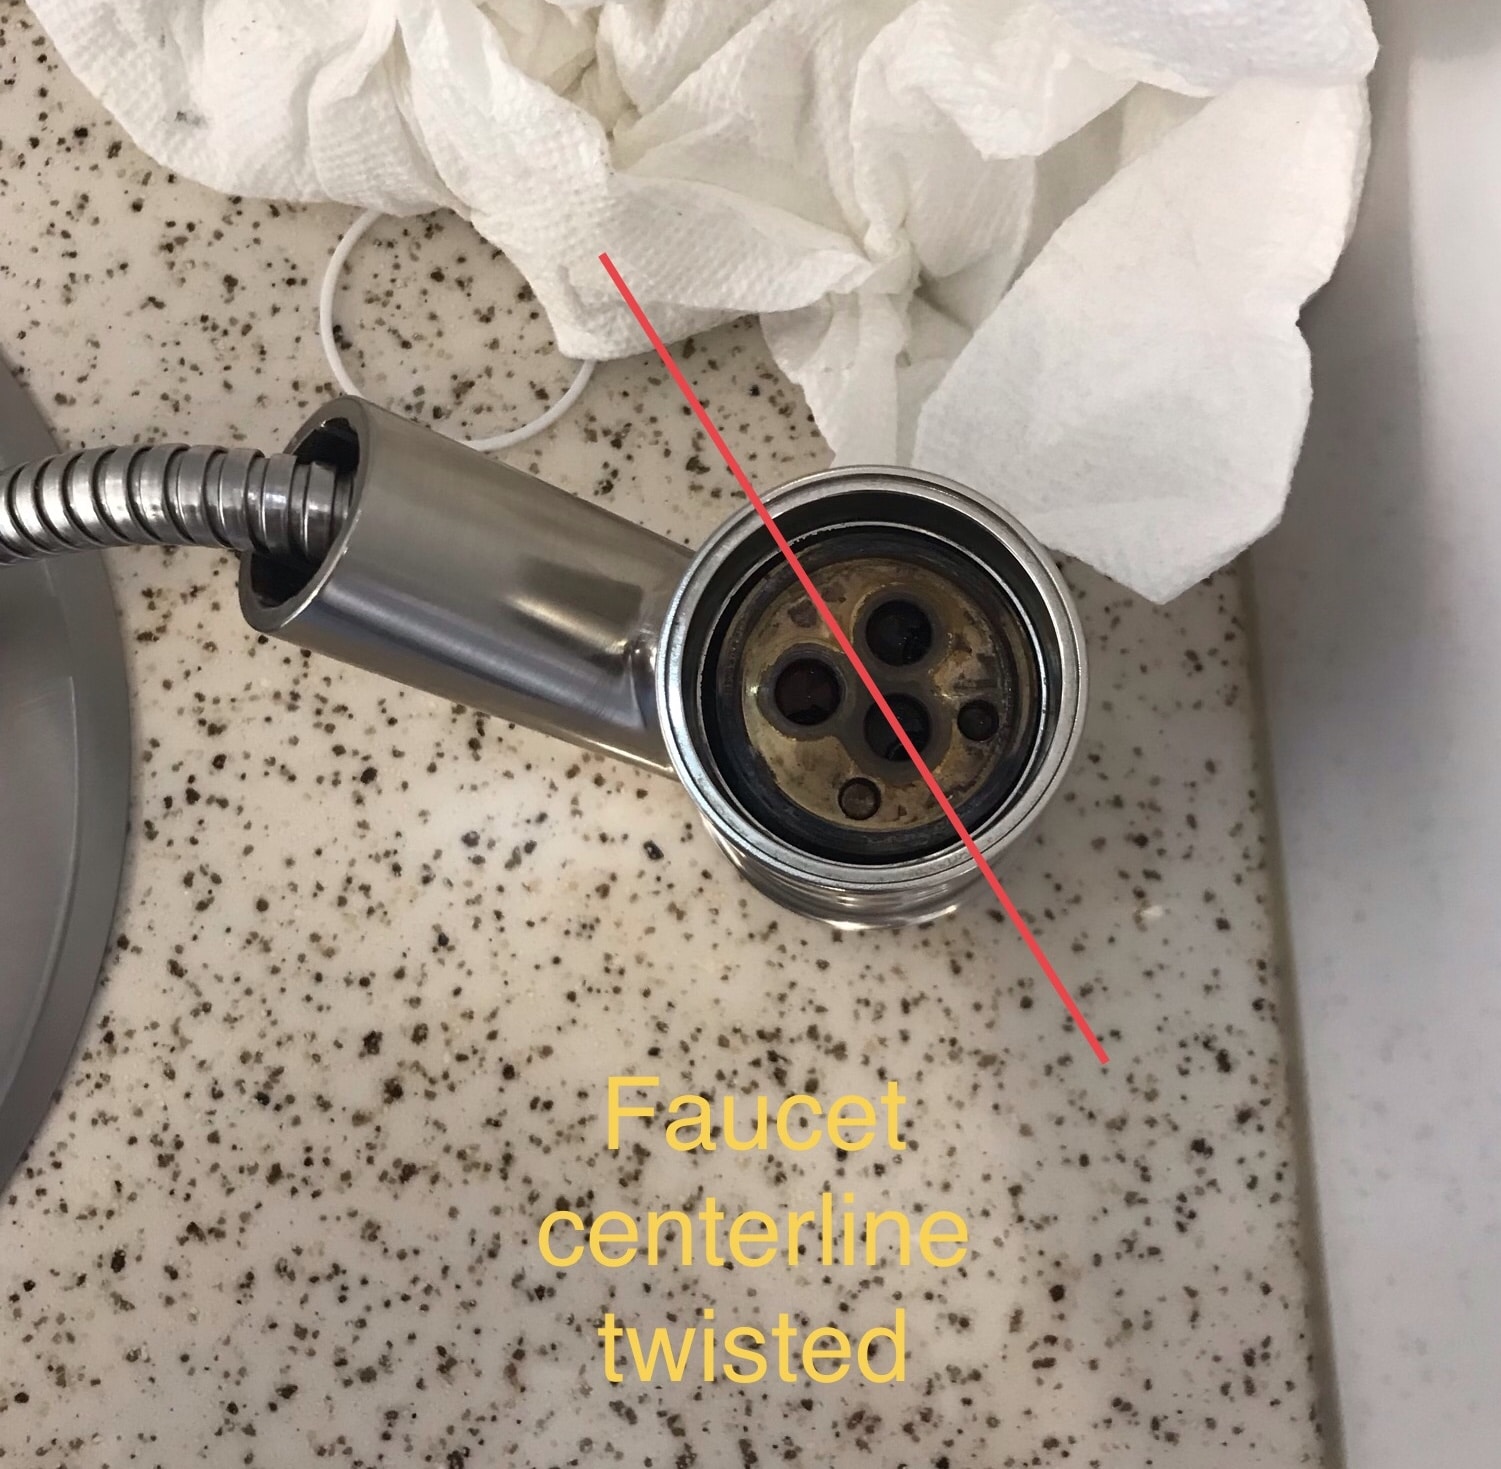
Thanks Bill, for the reference to this post. This will be helpful to untwist the hose. If I knew which way to turn it, or if it would be able to be untwisted without removing the front panel, I would do that. Maybe I should remove the front panel anyway to fix other issues, or to verify other issues are not there (or are). Not securing wiring or plumbing is a surprise. That is rather important for any use, but when in a moving vehicle subject to vibrations and bouncing, it is imperative. At delivery, I was told that the refrigerator plug is now secured with a tie wrap. It would fall out due to vibration and weight of the cord. I don't like using a tie wrap. A "space saver" plug would have helped a lot. But it should be better than it was, for a while. John1 point
-
Stuff you will need https://www.americansealantsinc.com/adhesivecleanerandremover/ https://www.americansealantsinc.com/asi-335-neutral-cure-silicone-sealantadhesive/ PLASTIC razor blades. Do not use steel. Change these plastic blades often. https://www.oreillyauto.com/detail/b/titan-5120/paint—body-repair-16614/body-repair-16510/body—trim-tools-25197/razor-blades-scrapers-17948/1c24653634cf/titan-scraper-blades/12038/4753744?pos=17 Remove the steel blade from this holder and insert a plastic razor blade. https://www.oreillyauto.com/detail/b/titan-5120/paint—body-repair-16614/body-repair-16510/body—trim-tools-25197/razor-blades-scrapers-17948/1c24653634cf/titan-scraper/12031/4753743?pos=181 point
-
I’ve been under my sink to realign the faucet after replacing the cartridge. Use plastic razor blades to remove old caulk from the shelf and vanity. ASI 0240 works real well to remove old caulk. ASI 335 is what I just used to reseal my shower pan. I think you’ll need one of these wrenches to keep from having to use a pair of Channellock plies which will mar your new faucet Wrench in use What it looks like under there Be sure to “clock” the faucet centerline so that it is perpendicular to the wall otherwise the wand will either hit the wall or swivel out from above the sink and the hot vs. cold adjustment will be awkward.
1 point


-
Recent Achievements
-


")


")


")


