Leaderboard

.thumb.jpg.e34bf01ef7f7d5e99ad31856d45afbeb.jpg)


Popular Content
Showing content with the highest reputation on 07/12/2024 in all areas
-
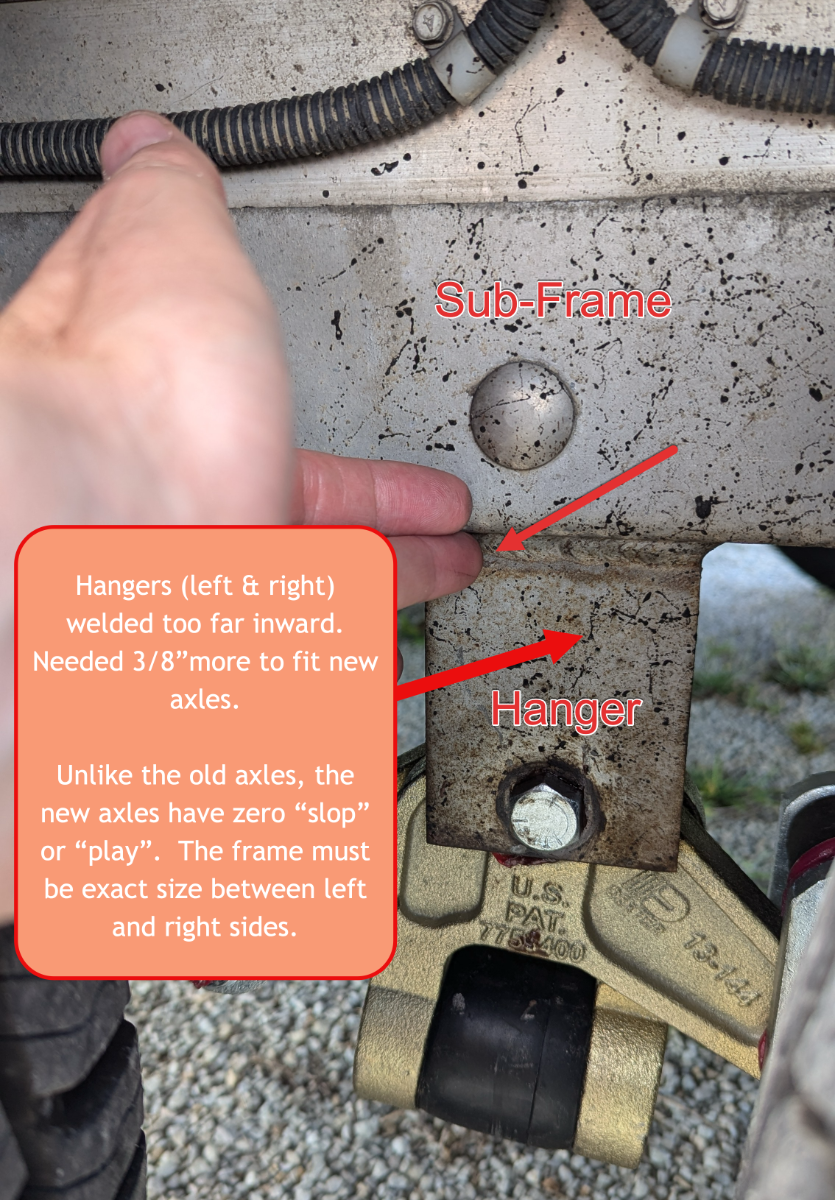
Okay, here are more details on the new axles not able to be fit onto #110. In the attached picture, my trailer's hangers are welded a bit too far inward on the sub-frame. The new axles do not have ANY "play" or "slop" in them for a fudge-factor. This is unlike the original axles. The frame hangers MUST be spot-on in regards to measurements. So, between the left and right hangers, there is not enough room. They needed 3/8" more to make them fit correctly. Oh well, it saved me a bit of $$. They said my shocks are still good and they installed my self-provided EZ-Flex suspension parts for me. The new windows and shades look awesome and the new batteries are working with more Amp Hours than I had with the crappy Interstate batteries. Jason seemed to give me a "facial & verbal compliment" and said the trailer is still looking great. I think he was a bit surprised due to the age of the camper. Wait until CGI gets their hands on it tomorrow. Oh, also, they are out of trailer covers and likely will not order them again, since not too many folks get them and .... some other reason, can't remember. He suggested I call Calmark Covers to see if they can still get me one. It will make the ceramic coating last longer. Mostly only cover it in winter and early spring.
 3 points
 -
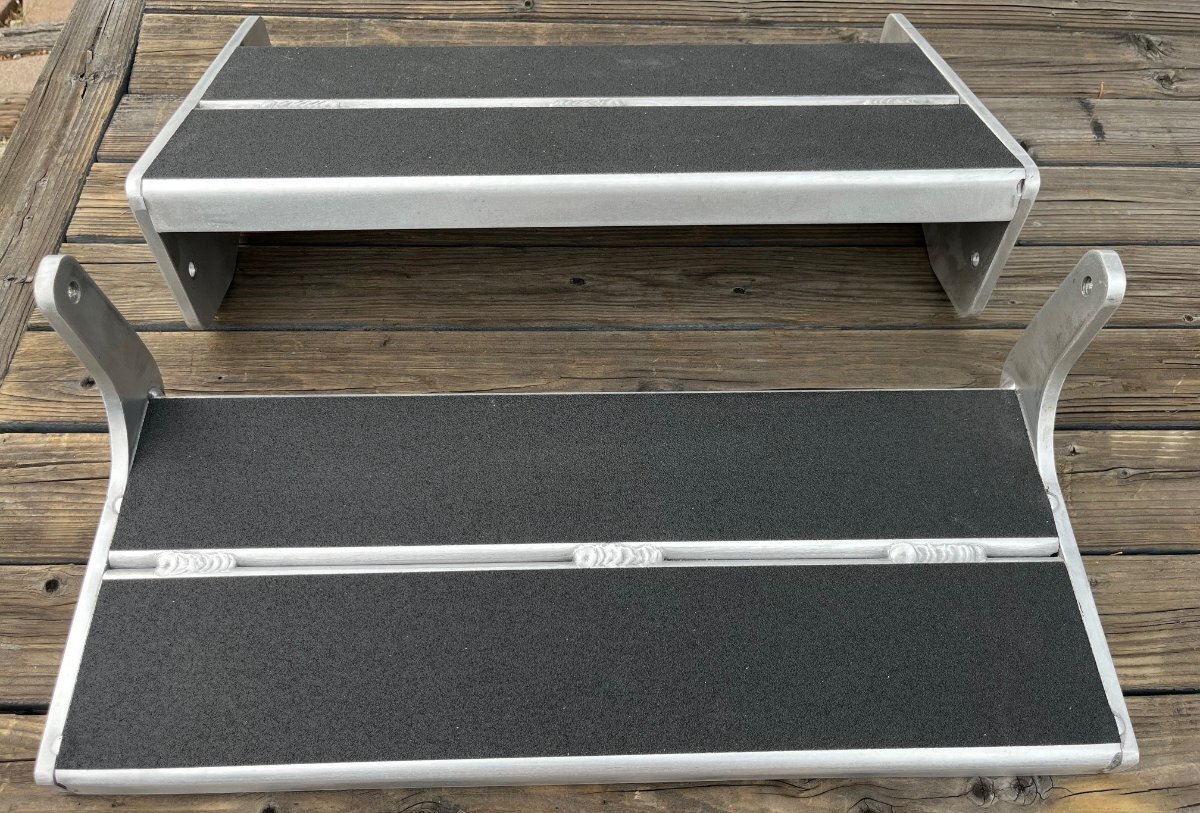
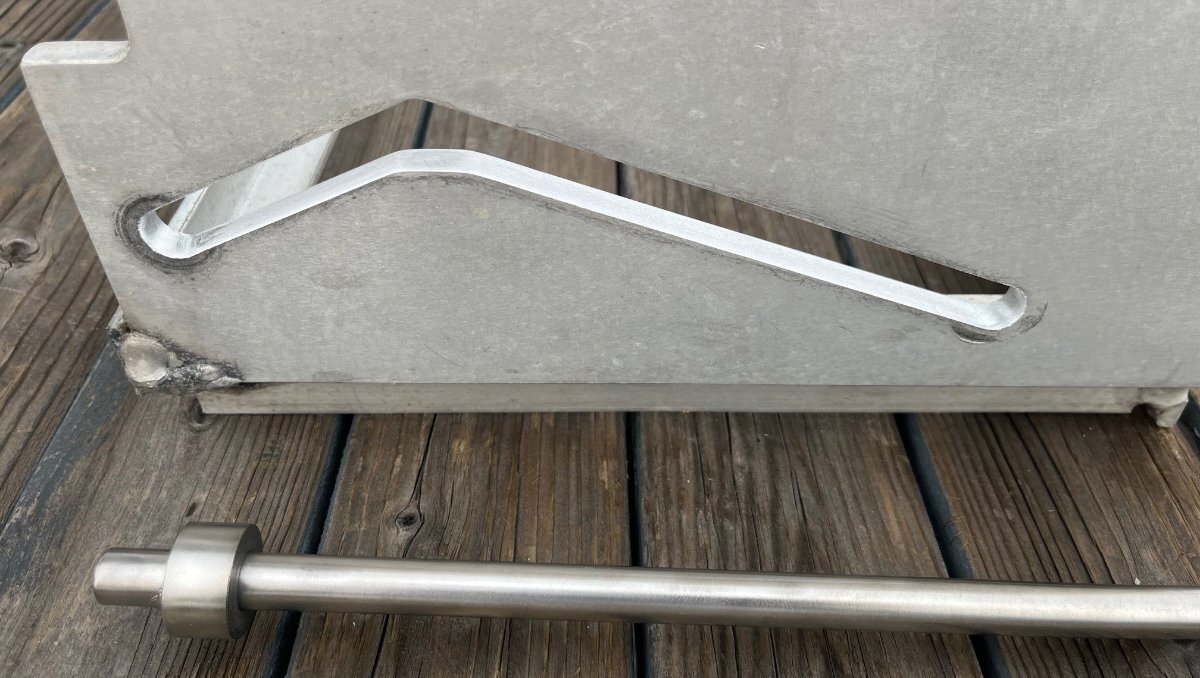
Hull #113 now being 8 years old has needed a lot of upgrades and M&R our first year of ownership. A point of contention as always been the manual stairs, the back-breaking effort it takes to pull them down, metal on metal, and more so to put them up. I had greased the moving parts, and it did not seem to help much. Pressure washing it last time, an edge of the slip-resistant tape came off. Prior owner had wrapped the steps with some kind of rubber cushion and that dirtied the steps where it laid. They looked awful. It was time for proper restoration! I disassembled all components of the stairs so they could be cleaned and reconditioned in my shop. If you do this, make sure you have everything you need out of the Oliver as it is very difficult to get inside afterwards! First, I used a heat gun to loosen the glue on the tape and scraped it off. The glue residue was intense. I used 3M General Purpose Adhesive Cleaner, and it barely budged it. The rest I sanded off using a cordless Dewalt orbital sander and near a dozen sanding discs. There are better sanding tools, but this is what I had. After more and more detail sanding the aluminum started to look pretty good. The key detail work to getting the stairs to operate easier was to file the groove the axle slides within (see pic 2). I used a small hand file and spent an hour working it in the direction of the movement. Most of the machining marks were 90 degrees the wrong direction. I only sanded this groove on the base as I did not want to detail that whole frame, just the steps. I used this product for the stair surfaces: Amazon.com: 3M Safety-Walk Slip Resistant Tape, 4 in x 15 ft, Anti Slip Tape, Adhere Without Wrinkling, Curling, Tearing, Shrinking or Lifting, Self-Adhesive Backing For Quick & Easy Application (610B-R4X180) : Industrial & Scientific After sanding and placement of the anti-slip tape, I applied an automotive ceramic coating to all the sanded aluminum to slow oxidation. Got to this point today. Friday I will have time to remount. The frame is held on with 4 standard carriage bolts and nylon locknuts. The two stairs are connected to each other with a short, geared press-fit specialty bolt with a Torx-55 head, that are not easy to remove. Pictures were taken before applying the ceramic coating. It should look great when mounted. Boy, I hate sanding and polishing work! 🤣
3 points
-
At 6’6”, now down to 200#, I wondered the same. 1 king or 2 twins. I am a side sleeper, and must have like the fetal position so much in the womb, that I sleep (legs) tucked up a bit. So no brainer for me. 2 twins. Added benefit, if I get a leg cramp, rather than have to jump up in the middle of the night, then try to stand up to stretch out a calf/foot… I just stretch out that leg an press against the wall. Works every time. And Maggie sleeps right thru it. Bathroom shower is difficult for me. So I sit on regular toilet seat and then shower. I am looking for a reinforced lid though… the thought me splitting/cracking the lid and part of me that is sitting down getting pinched does concern me, however, I have not heard of that happening. B~Out3 points
-
The first thing I would do is to plug the MW into a standard 110 outlet using a GFCI extension cord like This one. If it doesn't trip when you open the door then your GFCI outlet on your Ollie is most likely going bad, and if it does trip, then the MW itself is the issue.3 points
-
Thanks for the details. I just looked at mine and the outside of the hangers are flush with the subframe so I assume I'll be OK if I ever need to change my axles. There I go "assuming" things again.. 🤣3 points
-
theOrca, The Dometic FreshJet comes with a very nice factory seal where it makes contact with the Oliver. It also comes with four additional factory installed blocks at each corner that help distribute the weight of the unit over a larger area. In addition the FreshJet weighs less than the Penguin. The bolt pattern is inside of the opening, the same as the old noisy Penguin. I hope this answers some of your concerns, you are welcome to message me if you have any questions about my AC installation.2 points
-
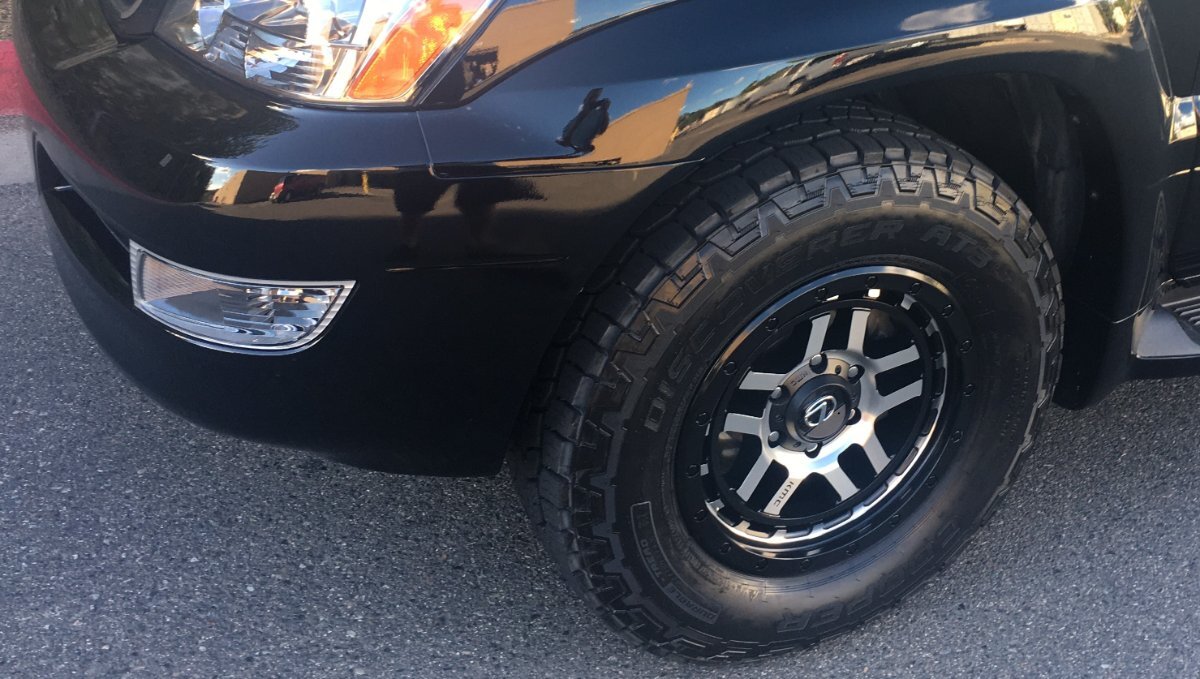
Rich, I cannot swear by this product, just something I chose two years ago (wow, price has gone up 50%). The product works likes a paste wax easy to hand buff: Amazon.com: McKee's 37 Ceramic Wheel Sealant | Top Coat Polish, Brake Dust Repellent, and Ceramic Protectant for Wheels… : Automotive When restoring our '08 GX470, I purchased new KMC wheels. I felt the need to protect this investment for dirt roads we travel. As soon as Tire Rack delivered the wheel/tire combo, Chris helped with her better patience and rubbed this product into every opening of the new wheels. I rubbed it out and we worked a second coat. I don't have a recent picture, but they still look very nice. We run them through the car wash, and I pressure washed them a few times to clean within. I hope the Oliver steps look as good in a few years or more. I was thinking what can I use to slow aluminum oxidation after such deep sanding? I did some online looking and ceramic came up when I remembered, I have a tub of that!
2 points
-
You may be able to adjust the bracket so that the TV is closer to the ceiling so it can fold back. We were able to do this on our 2022 LE2 when we installed our Free Signal 12 volt 32" Platinum Smart TV and it folds up just like the original TV.2 points
-
Yes. I'm in that "no inverter " camp. I'm used to 12v life, for 40 + years. We had one, for a few years, didn't use it much, so removed it. Everyone has a different camping style. Pick your batteries and gear for what you need, and want. It's all good.2 points
-
Did you switch to a 12V DC TV, or stick with the AC version? When/if I replace mine, it will be 12V, and I've already converted the AppleTV to 12V. So I'll only need the inverter for the microwave or the air conditioner.2 points
-
That's a question for the manufacturer of the AC unit. Many make optional compressor blankets for their units to reduce the sound level when needed and since the compressor is cooled via the refrigerant it usually isn't a problem to run one. A problem can occur though if it affects the flow of air through the condenser coils.2 points
-
John, that is good looking work. The oldest of these double steps have now been on the road for over 10 years. The first 50 or so trailers came with a folding single step. Many of the early builds had their single step replaced with the double ones. Since aluminum has some sort of natural tendency to stick or bind on itself, most all owners of trailers older than a few years have likely encountered this issue. I've always just hit it with a little WD-40 and called it good. MY solution in no way compares to what you've done, but it will last long enough to get you home from a month long trip when you can do a really good job. Thanks for the write-up.2 points
-
We did too.2 points
-
@MAX Burner Pre delivery, we had Oliver custom cut a hole in the shower ceiling directly above my head and then add a water tight automatic rain locker “moon roof” for that little extra 1” of clearance. This is a one off mod and Oliver wanted me to keep it low key. 🤣🤣 In all seriousness, it has not been an issue for me at all at 6’3. I can’t stand completely straight up, but it all works out, a total non shower 🚿 issue here. 😊 Onward!2 points
-
It never fails to amaze me how far out in front of Oliver corporate we owners are. I inquired of HWY RV in Salem Oregon as to the install of a Dometic Fresh Jet 3 to replace the Penguin II noise generator in my hull number 615. They messaged Jason E, and he advised them that "as we have not installed a Fresh Jet 3, we advise caution as the fit might not support the unit properly." That is a very reasonable decision, and stopped me from proceeding. However, in searching the Forums it appears that at least three of us have switched out the A/C and no one mentioned any problems. Lack of reporting is not "data," so I have asked Dometic to provide me with footprint and bolt pattern drawings of both the Penguin II and Fresh Jet 3. Will they do it? I guess that depends on the attitude and enthusiasm of the person at Dometic who gets my email. I sure hope they do as I am very leery of proceeding when "not 100% sure." Could someone who HAS switched a Penguin II for a FreshJet 3 please comment on footprint and bolt pattern? (Please!) In summary, so far I have not found actual data as to the direct comparison of any of the three units mentioned. If and when I get actual data, I will append it to this topic. I can say that I really liked the attitude and professionalism of the service folks at HWY RV in Salem, Oregon. If my replacement project becomes a go, you can be sure that they will be the folks that do the work.1 point
-
Just waiting for the Xantrex 3000 in our 2023 to kick the bucket when I will definitely upgrade to the Victron multiplus II, mainly for the power assist/load sharing functionality of it….explained nicely in this video.1 point
-
You can use them temporarily, for example lifting high enough to mount the spare tire if you get a flat. As far as when camping, you want to have 90% of the weight on the tires and front jack. Use the rear jacks just for finish leveling. I use these to bring the trailer to the right height, left or right, and then apply the jacks for enough pressure so that the trailer does not wobble in the wind or when climbing the steps. Amazon.com: ANDERSEN HITCHES | 3604-2 2-Pack Camper Leveler System Must Have RV | Camping Travel Easy Storage Jack Stabilizer Block | Levelers Blocks for Campers and Fifth Wheels : Automotive1 point
-
Footprint and the required opening are different subjects, not at all the same. Footprint equates to where and how much support the roof provides the upper unit. You do not want unsupported weight when fiberglass is being stressed by having that weight transferred to it by leverage. It is desirable to have the entire floor pan of the upper unit supported by the roof. Bolt pattern is always "outside" of the 14x14 opening, and is sometimes very different between brands. These are subjects which require "data" to resolve.1 point
-
Black tread and white powder-coat steps to match the Ollie. That would be so cool! I didn't consider that for the expense and a couple days driving back and forth to Phoenix in the summer (been 115 down there lately). Too bad there are no metal cleaning or powder coating services up here.1 point
-
AI T, from Alberta, We saw you headed south, as we were headed north a few weeks ago. We did not recognize you as an ‘Ollie’ as you approached because of your wrap. But as we passed we did, and we loved it. Almost did a U-T to chase you down for an introduction & picture… but a saner mind prevailed and we kept heading north. Bryan, Maggie & Willis (aka Kamper Kat)1 point
-
The two rear jacks are exactly the same mechanically as the front one, they just don't have a control head. Barker makes them specially for Oliver so you won't find them listed online.1 point
-
Here are the ones I have. Hope it helps. BOM - Baker VIP 3000 Power Jack Parts List.docxOM - Barker VIP Power Jack 3000 Manual.pdf1 point
-
You may want to consider replacing the stock alternator with a high output unit. I started running into trouble when I swapped out the Renogy 20A DC-DC for a 40A, same brand. At idle, the Renogy was only providing around 25 amps and the TV battery was not being properly maintained. When using the A/C via inverter during brief stops, I generally keep the TV running so the DC-DC can augment the power consumption of the A/C; this has proven to be detrimental to the vehicles charging system! Also, I have issue in stop and go traffic when transiting cities. When running at speed, I get full charger output, but the alternator struggles to keep the TV’s battery appropriately charged. I recently purchased a 320A alternator (at high rpm) to replace the stock 165A, which produces 200 amps at idle; awaiting delivery of supplies needed for the install.1 point
-
I failed to get that measurement and I won't see them again. If those hangers are perfectly flush with the sub-frame, you have a good chance of them working. My hangers are not flush at all. Maybe the welder had a really good party the night before. LoL1 point
-
I should get mine off the shelf and install it. The list is still long!1 point
-
Brilliant, I see you included the Wasilla, AK store. We will be passing through there. Maggie will not give me any grief if ‘Another Tool’ helps us resolve this issue. Kind of a toss up though as far as the expense of a MW purchase vs. the effort to replace the GFIC on the inverter. Thanks again1 point
-
CRM, TY FOR THE REPLY We are in Valdez, for a few days. I’ll look into that type of GFIC cord at local hdwe store tomorrow. Otherwise it will be Anchorage. I was thinking the same, but unplugging the MW from trailer receptacle and plugging into a #12 (<20’) ext. cord, then plug that Ext cord into the 110 receptacle w/GFIC at power post, and testing it that way. I know there electrical ‘formulas’ about drawing a current through an ext cord, dealing with the wire size & length of the run. And do not want to skew the test, that you have recommended. Which makes sense to me. BMW1 point
-
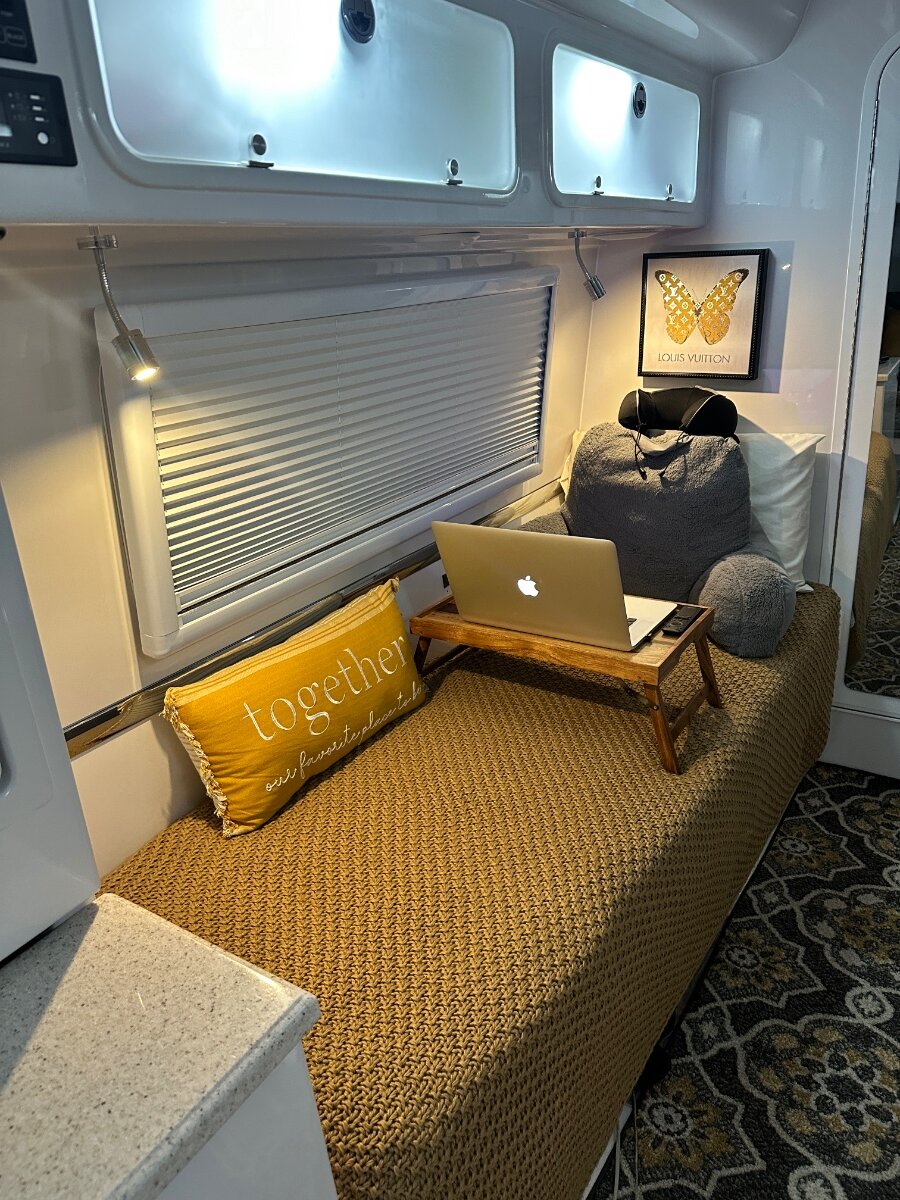
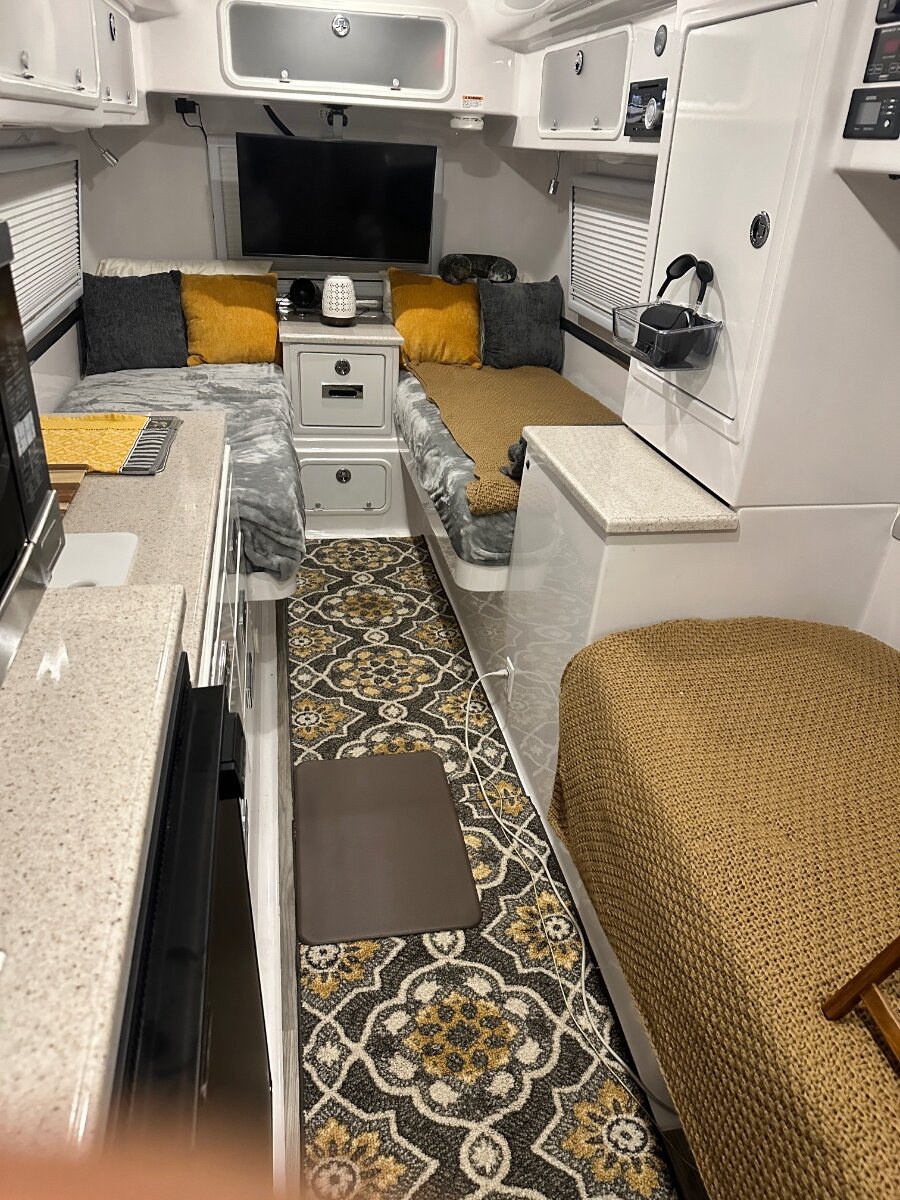
24” TV and dinette are no more, replaced with 32” TV and permanent “day bed”—dare I say, living room vibes?
1 point
-
Any chance you can ask for the hard measurements? I’d like to measure mine to see. Thanks1 point
-
That is the European model John. There are two models for here in the USA,, 15,000 and 13,500 BTU.1 point
-
No, they are their miniature twins… Welsh Terriers 20-22 lbs. I still have not worked out the kinks on my DC/DC charger setup, averaging 11-15 amps on the road. So nowhere near the potential of the 50amp charger. Going to try a couple of things when we get home from our trip and the Atmos is installed. Cheers, Mike1 point
-
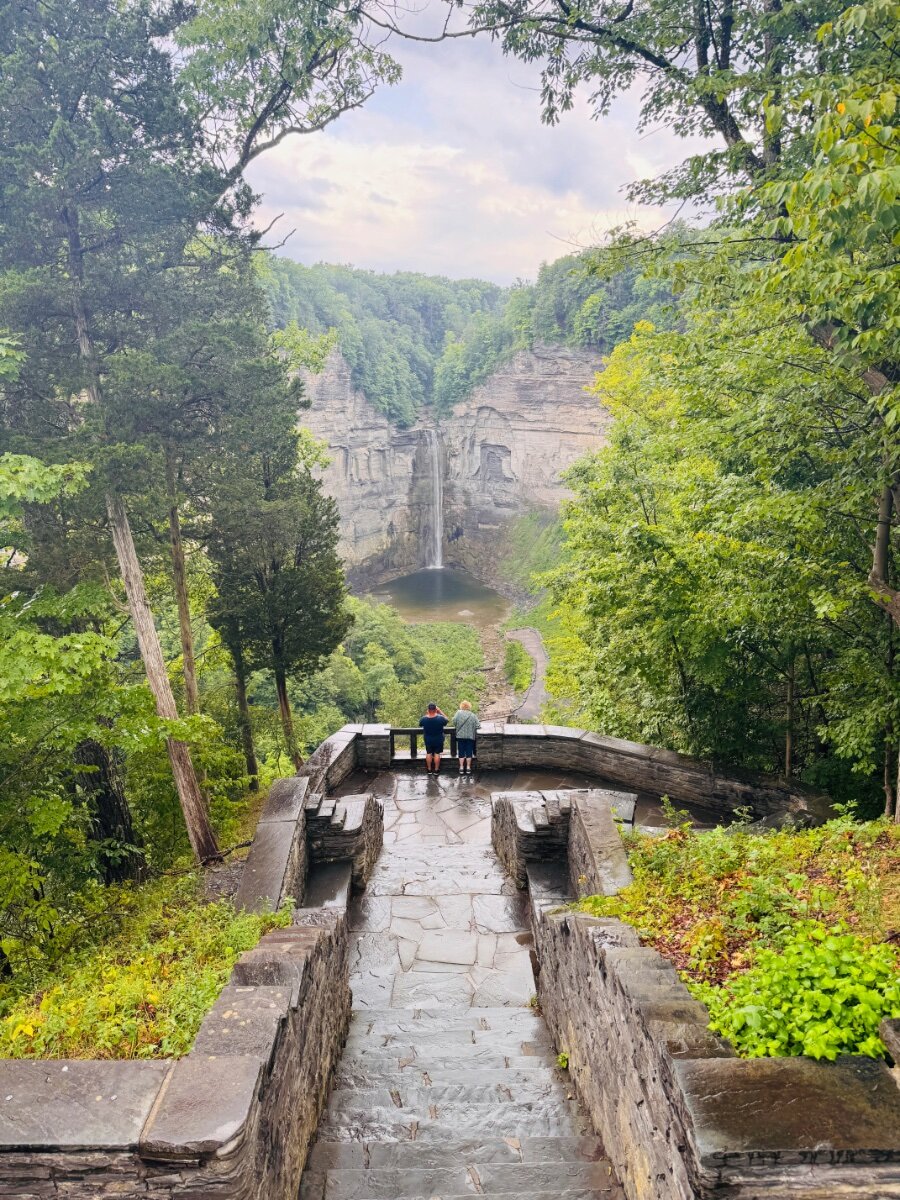
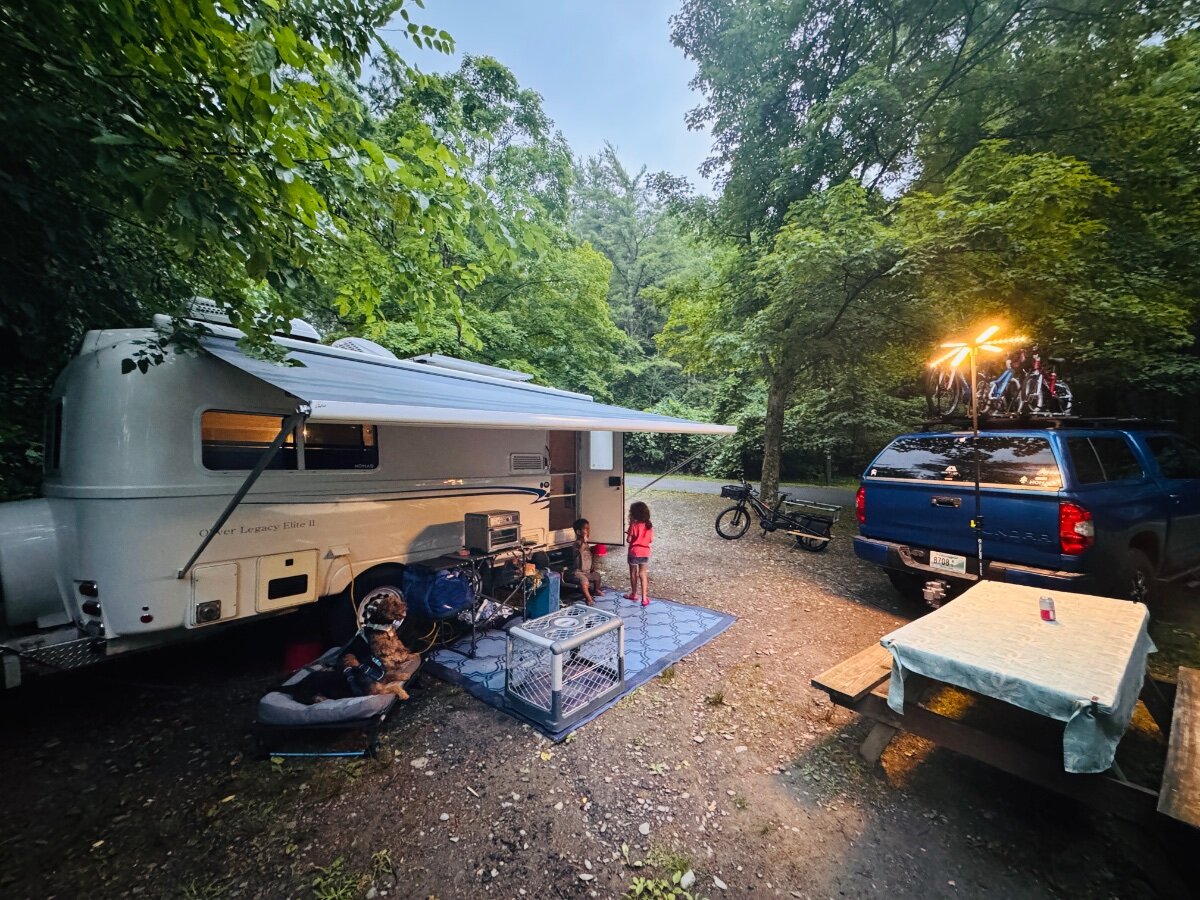
Sitting outside at Taughannock Falls, NY in a primitive campsite with 25% battery life left (920aH bank). I have been running the AC off and ON for 2 days. First time I have had to put to use all of my battery backups (GZ4K, etc). And yes most of the AC run time has been for the 2 knuckleheads we enjoy so much. Mimi is expecting again! And, I agree, It just depends how much boon-docking you plan on doing. I wish I had 2000AH! Best, Mike Side note: Starlink is working great!
1 point
-
Not sure what Jason's comments meant regarding new Dexter axles not fitting on @Wayfinder's hull....??? @ScubaRx's hull #050, as well as our #226 retro-fitted the D52's w/12" drums and Alcan 5-leaf spring packs - both are config'd with the EZ-Flex system. We'll be interested in hearing the back story....1 point
-
No, too much insulation in some of these mods will produce too much heat retention and bearings or seals will fail over time.1 point
-
For sure, Melissa is top notch! We love staying with her :)1 point
-
My order arrived yesterday and it *did* have the LED light included. Was a little worried with so many receiving theirs without one when buying though Amazon and Ebay.1 point
-
It's hard to find a simple wire gauge chart. This one is not bad. 14 AWG can handle 10A on short runs <10 and 5A up to 20FT. I did buy the Beech Lane fan. It will get here before the weekend, so I hope to work this install then. The spec is 7.2W which translates to only 0.6A in 12 VDC. According to the chart, you could use as small as 18 AWG. Most DIY installers go with heavier than required when cost is less a concern. For me, I've had several spools of 14 AWG, one 12AWG, a spool of thermostat cable and some others from a commercial project back in the 90s. I've used this inventory on dozens of auto/home/RV installations ever since. Wonder what shelf life is on stranded copper? It still looks like new; copper is bright, insulation supple. What does copper cost today? Likely 5x what we spent 30 years ago.1 point
-
All working - we had filled the tanks. I just got it in my head that I needed to switch the valves to pull from the tank. Not sure where that came from except a combination of our longest drive day, a thirty minute plus standstill after a wreck closed our only route, and just not having done a dry camp in a year or two. I sat there doing the prime step ( silver lining - was able to remove a thimble full of plastic shavings from the filter ) with the valves in boondock position. Finally in frustration switched back to normal and everything primed water started flowing etc. I then decided to etch my stupidity in stone by making this post questioning the diagram on the bench cover back. I seem to be determined to make the switch from the LE I to the LE II as traumatic as possible I guess. Have not even started my post on Truma Heaters and Truma Water Heaters and error codes that I never saw on my LE I. But I am making sure I have all my ducks on the same pond before posting that. (Gave up on ducks in a row long ago.)1 point
-
The City Water hose connection is to use sinks/toilet directly. Prior to Boondocking, at your last water source, you must connect the supply hose to the Fresh Tank connection to fill your fresh tank. The City Water connection will not do this. With a full Fresh Tank and the valves pictured above in the Normal position, your water pump should pull from the Fresh Tank for use. Perhaps you missed the fill step and if so you will have to drive for water.1 point
-
I have been following this thread (when I log onto the computer)... I learned to grease my zerks last year during my first "long" trip. No problems. But this year, when I greased them, there were 2 that did not accept the grease the way I expected. Thank you to all the members of the Oliver Family who help those of us who are learning. This thread is very helpful.1 point
-
Another way to think of it: The "Boondocking" configuration is only for when you need to add water to the fresh tank from the rear inlet when boondocking (i.e., you do not have access to a "city water" connection). "Normal" configuration is for when you need to use water from either the fresh tank or a city water connection, regardless of whether you have a water hookup or are "boondocking" at the time of use.1 point
-
Ok - so city water connection and fresh tank configuration are the same. (Facepalm) Have been traveling with our LE I for two years and somehow this never sank in. I keeping getting wrapped around the double axles on this LE II. yep - I blame the altitude. Hypoxia for sure. I need to go start making controversial posts on Facebook 🙂1 point
-
Correct, normal configuration would pull water from the fresh tank. The boondocking configuration is to pump water into the fresh tank from the inlet on the curbside (starboard) rear of the camper. In case you are boondocking and you need to "add" water to the fresh tank. I have several 5 gallon containers I can put water in and then pump the water from them into the fresh tank. Does that make sense?1 point
-
Picture is showing normal configuration.1 point
-
I have is a blank where that switch would typically go. That said, one could add a switch to serve purpose of powering the fans and control panel. However, the control panel acts as a switch in similar manner.1 point
-
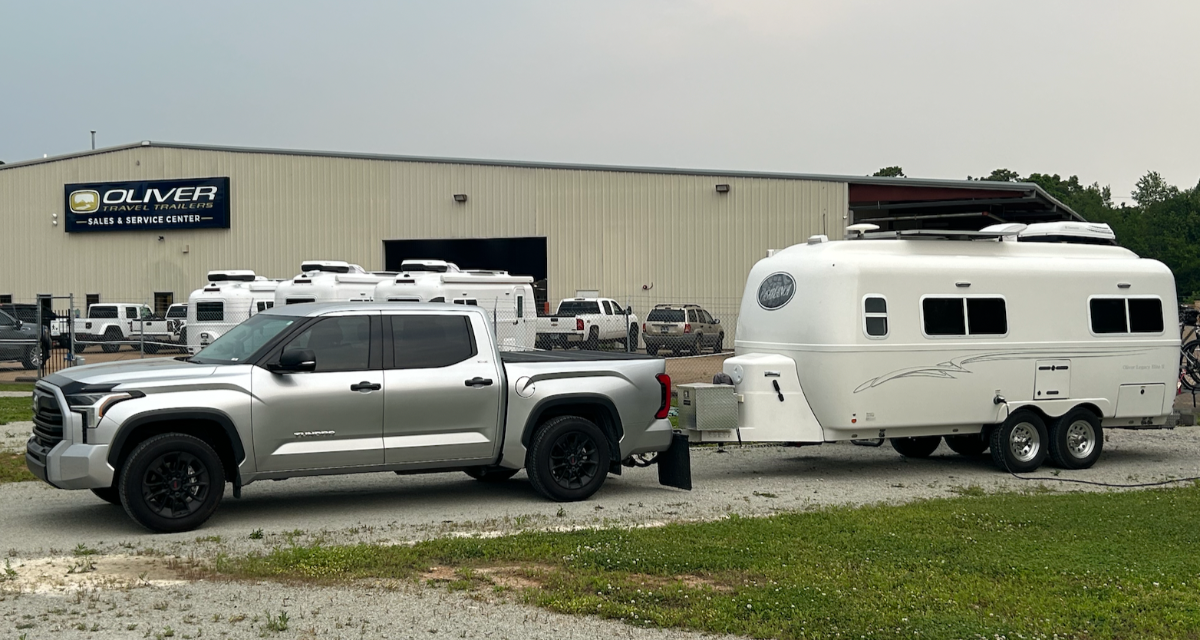
If you're planning to stay at "Camp Oliver" just outside the perimeter fence at the factory, site #3 is a good one if available.... Enjoy your time there - be sure to get some "swag." Mid-MAY at the factory:
1 point
-
@jd1923 My power draw is <1400W, perhaps the difference being in the 11,000 vs 13,500 BTU units. I too had my Xantrex 2000 shut down once when the batteries, under load, dropped near 12V; a ‘red’ triangle was displayed on the remote panel, yikes! I never really paid attention to the display voltage reading until that happened, just relied on the SOC per the VictronConnect app; lesson learned! I’m still thinking the Atmos 4.4 will be a satisfactory replacement unit. I know of two owners that have planned installs, awaiting their initial impressions.1 point
-
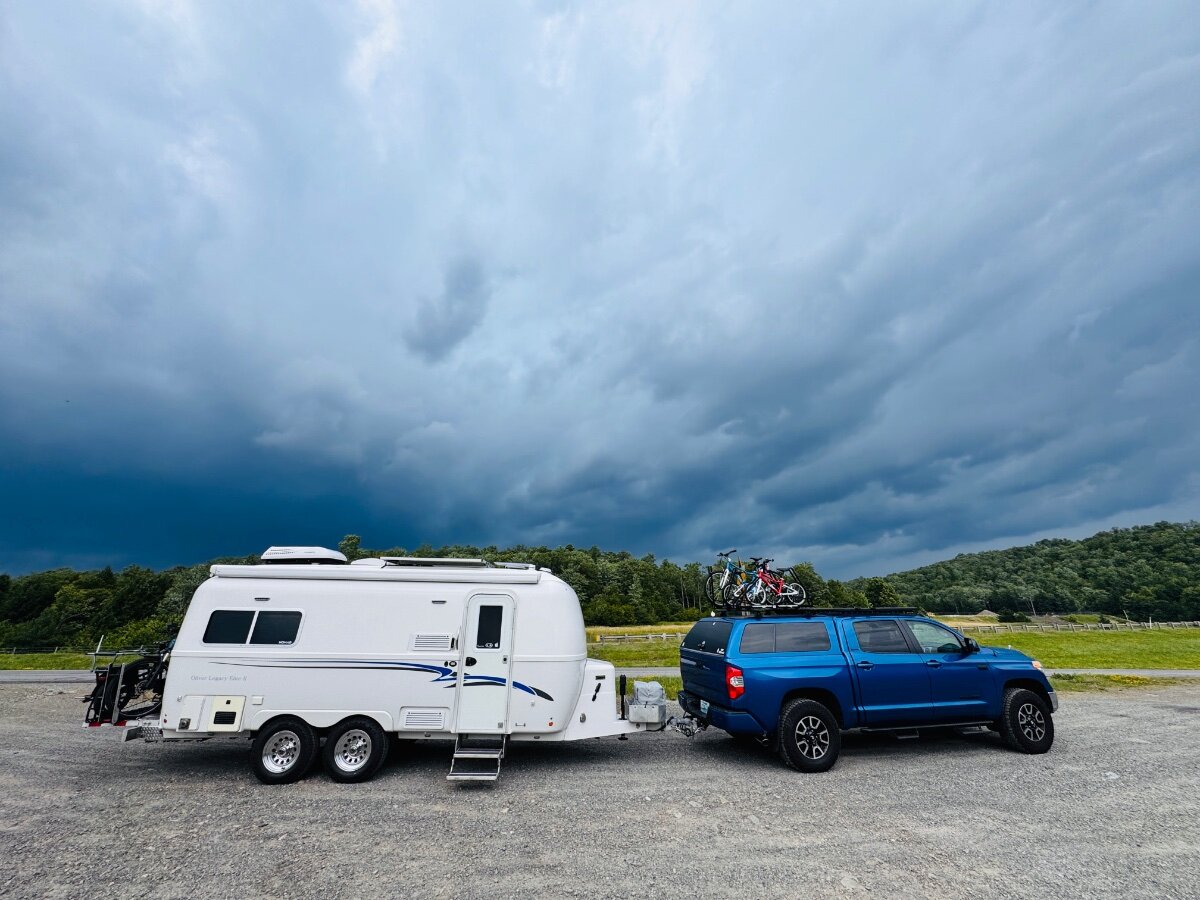
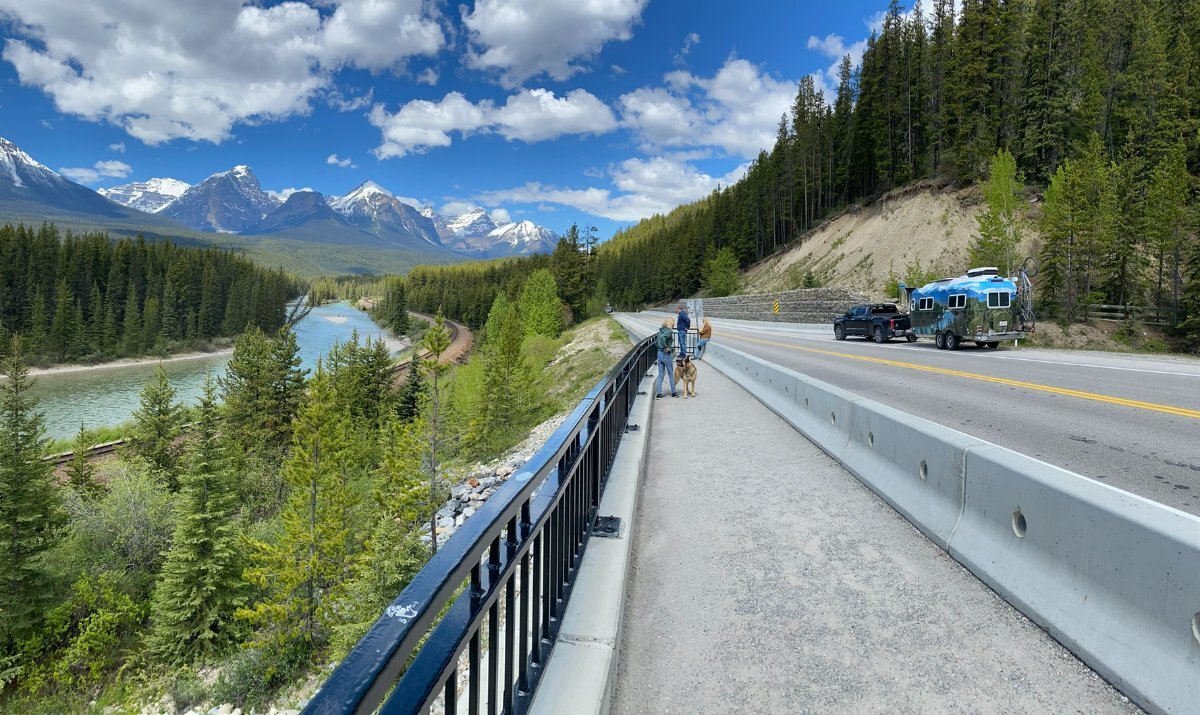
Truck/trailer living up to their promises. Here's pics of our mounted bikes (test fitting carriers before paint), the vinyl wrap we dressed our trailer up with and our trailer at...the physical location captured on the wrap!
1 point
-
Yeah, I thought it should work pretty good. I have a drain in my attached garage which works really well when the cars melt off in the winter. Not sure how much I'll be going in and out of this one in the winter but, the drain was a do it now or don't do it at all decision just like the in-floor heat plumbing. So, I opted for both and am glad I did now after seeing it done.1 point
-
For those that are worried about voiding their warranty, I installed the ez-start in a way that it can be backed out with no evidence of install. I just used extra wire with some spade quick connectors instead of cutting the wire from the control board to the compressor and one of the wires on the capacitor. John1 point


-
Recent Achievements
-
")


")


")


