Leaderboard


Popular Content
Showing content with the highest reputation on 11/08/2024 in all areas
-
Found the problem. Wires behind Seelevel II were not connected completely. Easy fix once found. Jason at Oliver was a great help; thanks to Jason!5 points
-
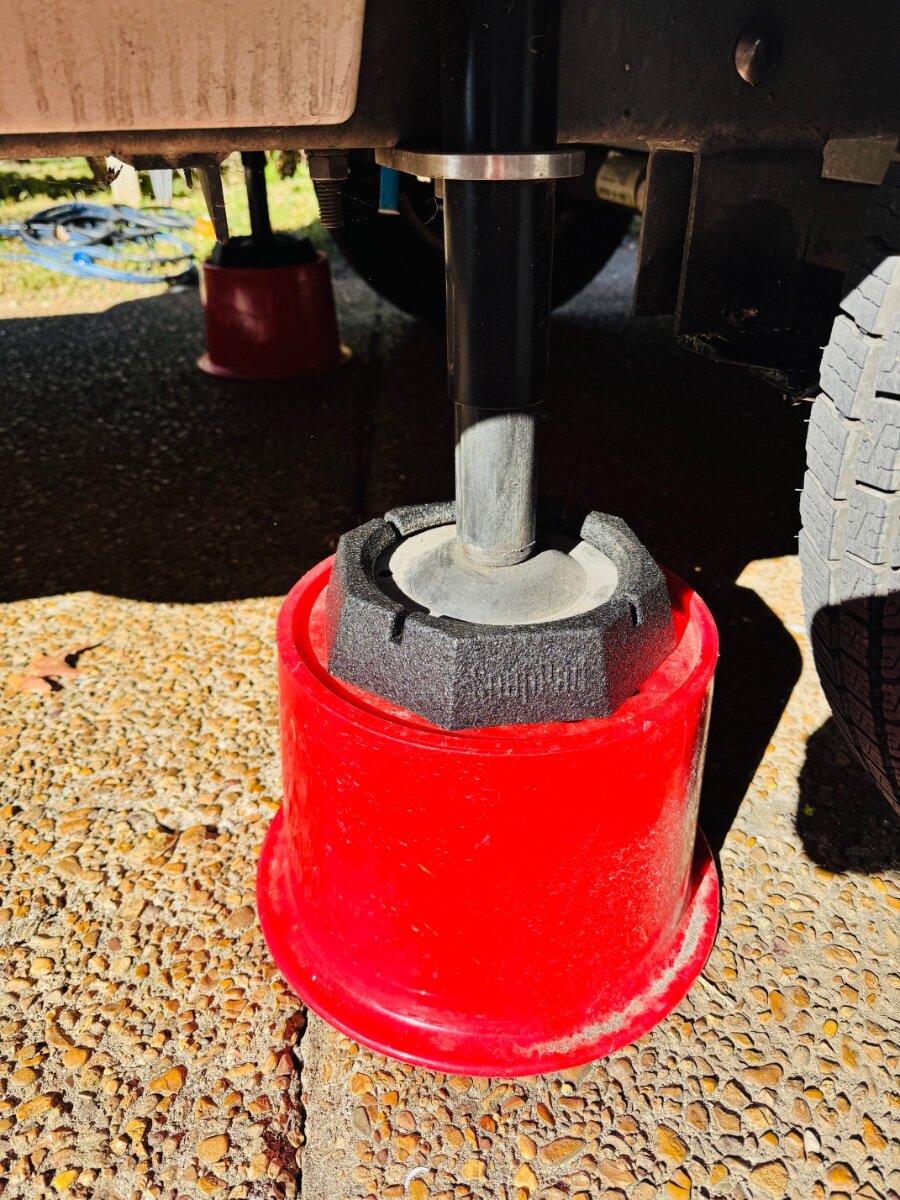
I believe I saw these on one of the forum members Oliver @Galway Girl and did a little research to find them. Pop on and never have to take them off. Quality, thick, durable rubber. Pretty cool. Not sure if there has been a previous post but thought I would share. M https://www.etrailer.com/RV_Jack_Pads/SnapPad/SN59FR.html
 3 points
 -
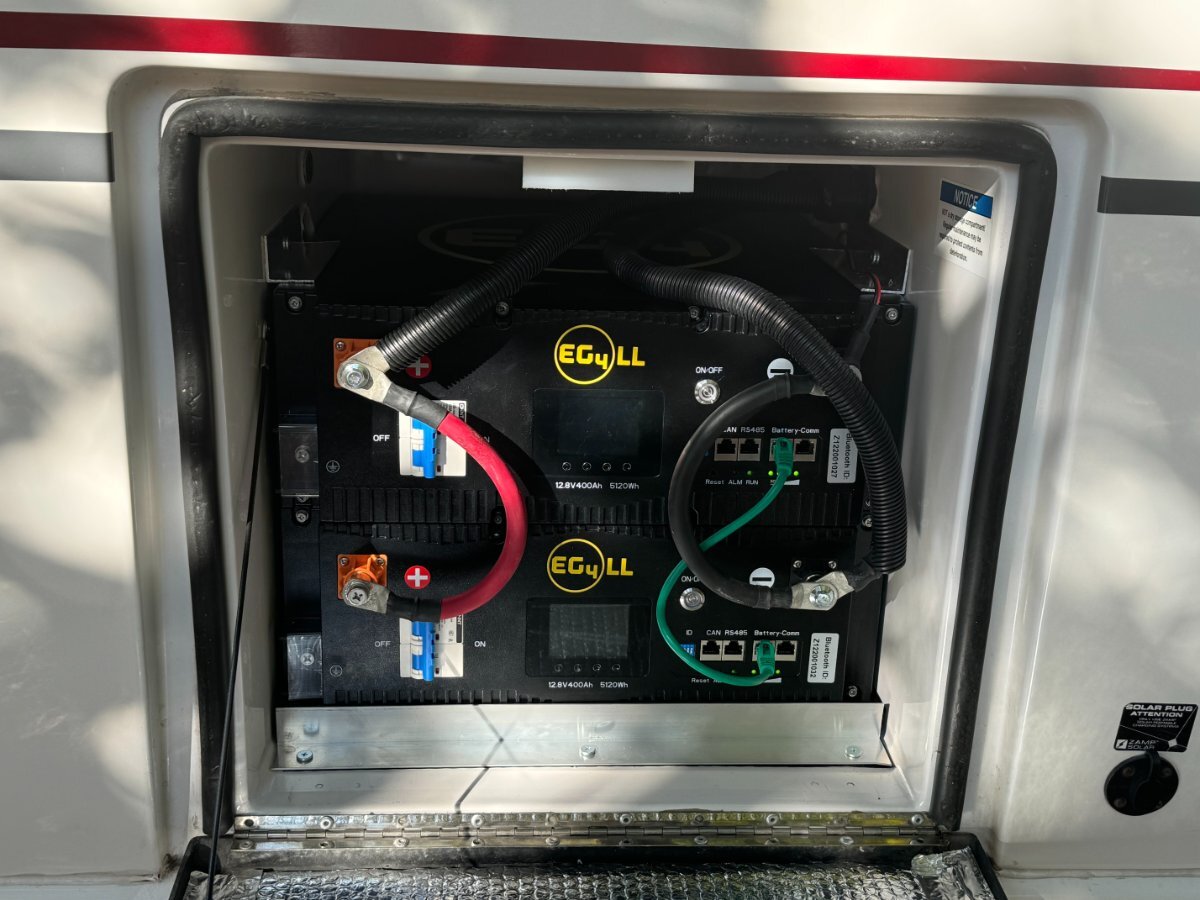
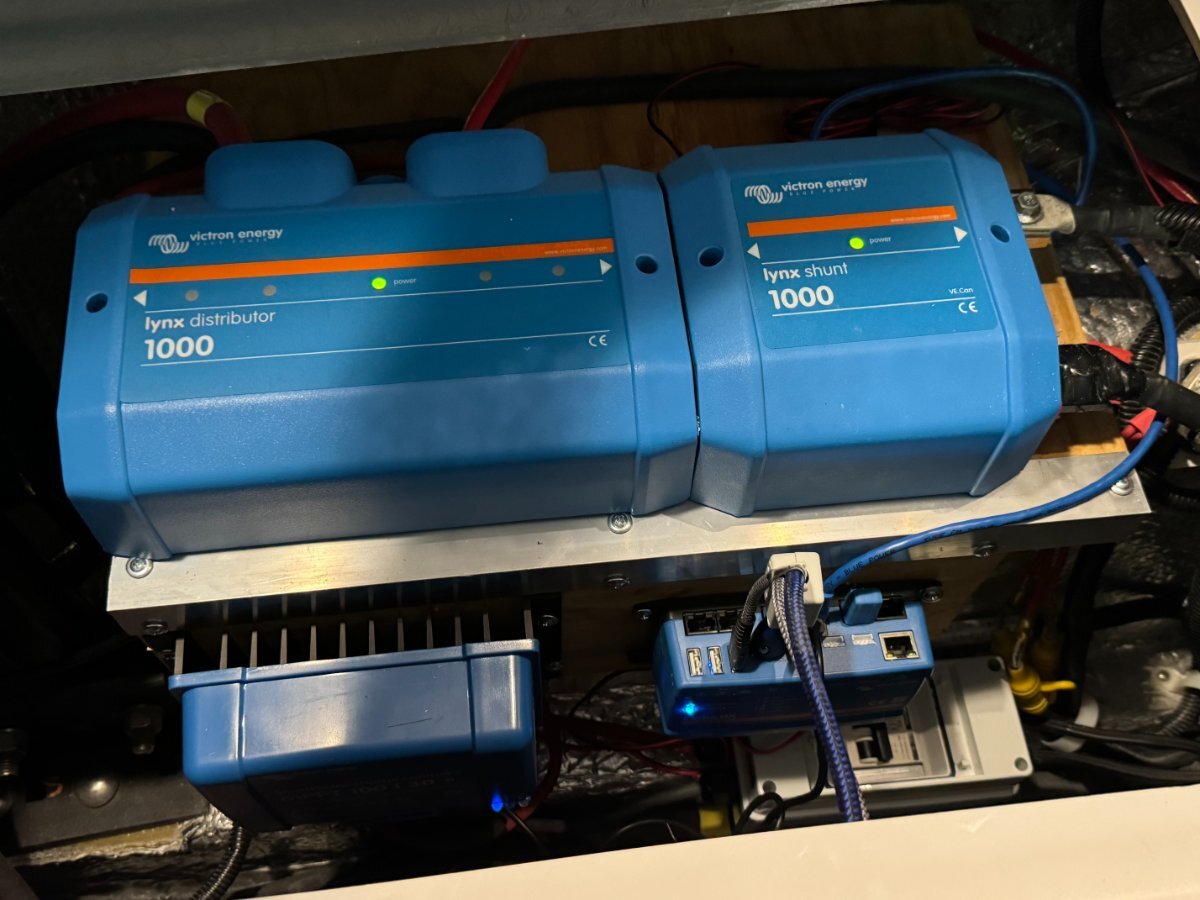
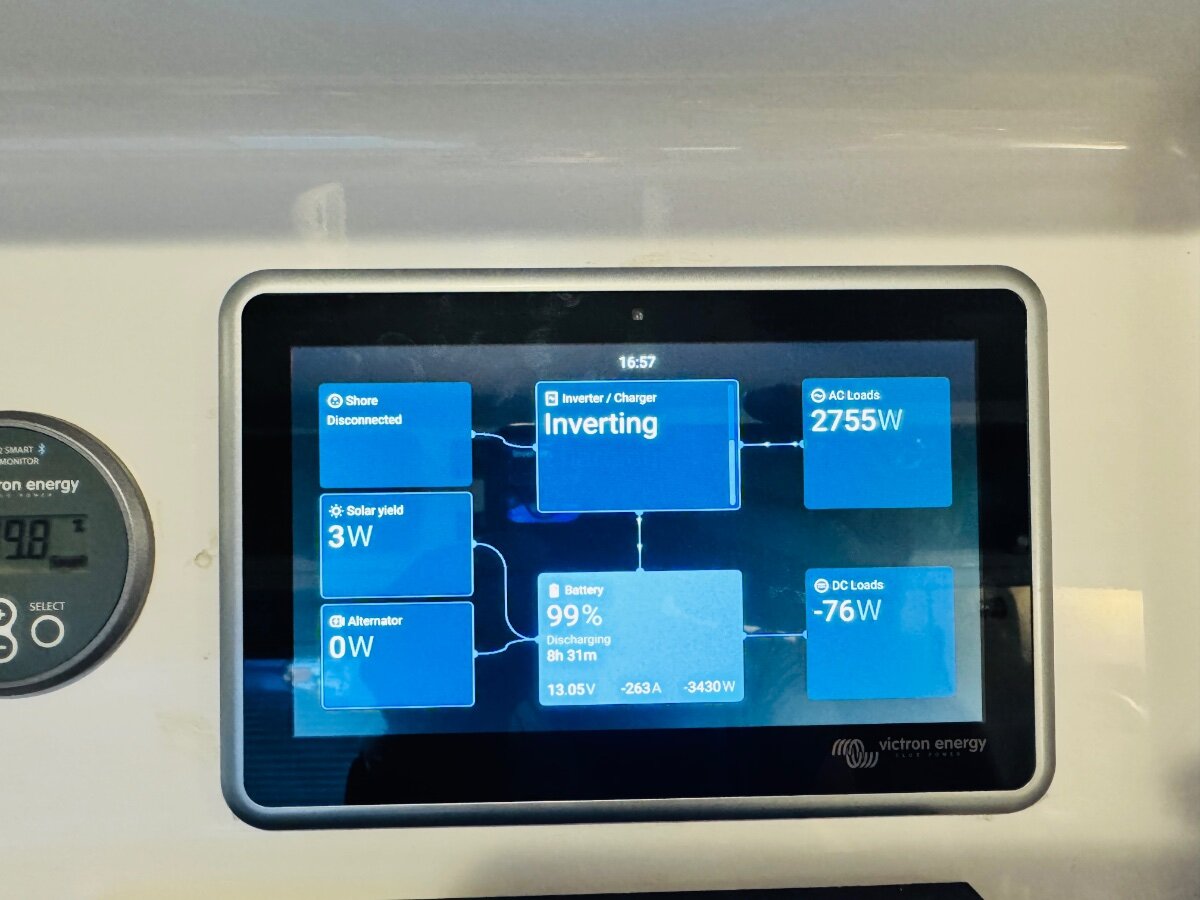
I updated my batteries with assistance of a friend who does solar installs for a living. This is a bit different than most of the installs I have seen here in that we used two 400 AH EG4 rackmount batteries. After removing the rackmount handles from the batteries and the battery tray from the Oliver they fit perfectly. There was a bolt in the bottom of the battery cabinet that was an issue. We put in 1 inch square aluminum rods on the floor of the cabinet to raise the batteries above the bolt head. We also replaced the Xamp solar charger with a Victron solar charger 100/30, added Victron lynx shunt, Victron distributor, and Victron cerbo with a touch screen (7" model). This fit perfectly in the hole left by the removal of the Xamp solar charger. To get the cables from the cerbo to the touch screen I ordered an extra HDMI extension cable and USB cable (approx. 15'). I ran the cables to the back of the camper in the tray behind the cabinet and then down the wall in the back, under the basement, and back up under the street side bed. Trying to pu the wire down next to the pantry would not work. It was too tight. I believe Victron is planning on replacing the HDMI cable with the small USB connections this spring. Didn't help me, but maybe it would help you. In addition we added a solar disconnect which you can see below. In the pictures below. These batteries can be powered off and the breaker thrown to disconnect. They also come with automatic fire suppressants, two per battery. Cost was $1200 per battery (400 AH, each). This was the first stage of the upgrade. At some point I may replace the Xantrex 2000 inverter, but for now it works well for us. Unfortunately the Xantrex and Victron do not talk to each other. That is why you don't see information on the touch screen about the AC loads and AC input. We have taken it on a couple of trips now and we do not come close to making a dent in the batteries. I added an extra battery in case we need to replace our 3-way fridge in the near future. So far it is doing well. I replaced a power board on it a while back, but since then no issues. Parts are harder to come by now though.
2 points
-
+2, I use the buckets and have a piece of 90-mil single ply roofing I place on the surface and then the Andersen Jack Base. I just couldn't come up with a reason to spend the $$.2 points
-
Strange how this works!😁2 points
-
I installed snap pads a few years ago. They help to not leave a foot print on black top paved sites at campgrounds. We also use the Andersen red buckets for both the front jack and rear stabilizers. For some It’s more of a want than a need I suppose. They do look great. 👍🏻2 points
-
Read voltage at the fuse connected to the water pump (red wire), to the ground (black wire). If you have 12VDC then you need a new pump. If so, I suggested upgrading to a premium model. If no voltage, then there may be another fuse, or a disconnected or bad wire. Testing for voltage is always step one. Use voltmeter/multimeter or a simple 12V test light: https://a.co/d/if7BSpi2 points
-
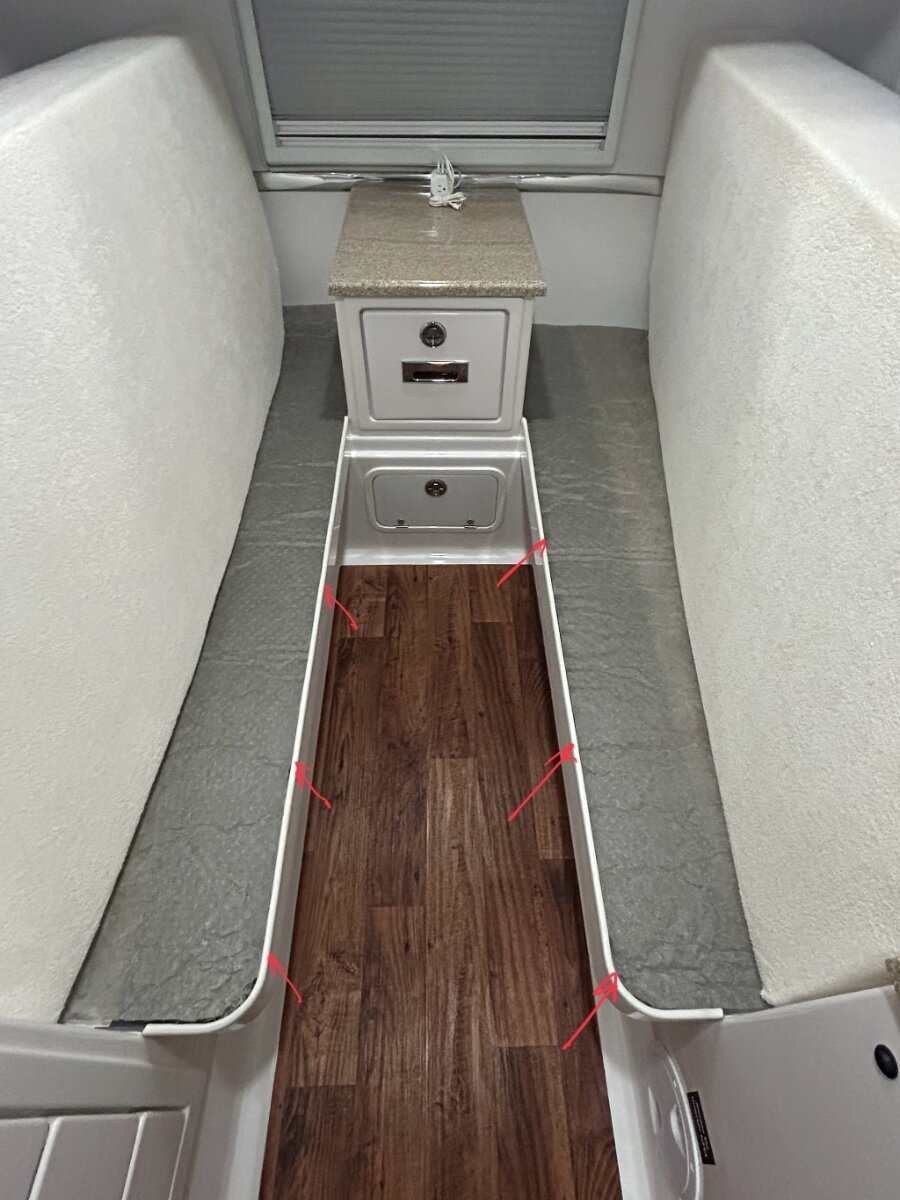
@Dave Mazone If you order this for your LP tank lid and base - https://www.amazon.com/dp/B00QAJJJ3Y?ref=ppx_yo2ov_dt_b_fed_asin_title&th=1 and you have a twin bed configuration, consider ordering enough material to run two strips along the rough edges of the bed rails if you have a twin bed model. Let’s just say it really takes the edge off. 😊
2 points
-
Epoch is getting a lot of traction on YouTube.2 points
-
Same here. Maybe a Christmas gift? I still think they’re cool.1 point
-
I agree that they are cool and attach easily and will probably last a long time... But, this is one of those items that I've told myself I need but I simply can't figure out why I need them. Bill1 point
-
Yes I have them on all 3 jacks.1 point
-
Never heard of a generator that could run on gas or diesel. Must be a misprint. There is a dual fuel gas/propane version of this generator. Champion Power Equipment 4000-Watt Dual Fuel RV Ready Portable Inverter Generator with Quiet Technology and CO Shield1 point
-
Yes, I like Tito, also if Will Prowse gives it his rubber stamp of approval it must be good.1 point
-
When I was ordering my Elite II, and knew I wanted to boondock a lot, I considered ordering the 30# tanks -- but once I understood how much they weigh when full, the decision was easy. I use 20# tanks and I carry 3 of them (2 in the dog house and one in the bed of the truck). I have never run out of propane, though I have allowed 2 of the tanks to be out (once). I have learned to be mindful of where I can REFILL my tanks and also to keep a watchful eye on tank levels (watching for the sensor to show it has switched over to the second tank) -- so I know as soon as one runs out. Remember that if you are boondocked somewhere, you might need to be able to lift the tank into the bed of your truck (unless you want to tow your Oliver every time you refill) -- so it's not just lifting to get into the doghouse, but also in and out of the bed of your TV.1 point
-
My wife and I did New Foundling and the same port you are going to stayed at Conroy's just up the road. many roads have no swalls and deep drainage ditches to hold snow in the winter but the roads would not hold me back , did Alaska twice and there you really have the frost heaves but marked slow down and all is good. Plan your trip, great people and sights do all the fingers even take the ferry north of Gros Morne and go over to Labrador for a couple days well worth the time and cheap ferry ride short enjoy.1 point
-
FEDERAL INCOME TAX CREDIT FOR QUALIFIED SOLAR ELECTRIC EXPENDITURES The Residential Clean Energy Credit (“CEC”) provides taxpayers with a credit in an amount equal to 30% of the costs of new, qualified clean energy property installed anytime from 2022 through 2032.1 The CEC applies to costs towards the purchase of property which which uses solar energy to generate electricity for use in a dwelling unit located in the United States and used as a primary or secondary residence.2 As relevant to the CEC, a “dwelling unit” generally includes mobile homes having basic living accommodations such as sleeping space, toilet, and cooking facilities (as are included with each Oliver Travel Trailers model).3 Property eligible for the CEC includes new solar panels, qualifying batteries having a capacity of at least 3 kilowatt hours, and related storage components (e.g., inverters, wiring, and monitoring equipment). If applicable, the CEC will reduce, on a dollar-for-dollar basis, the consumer’s federal income tax liability in the year of purchase. Excess unused credits can be forward to future years. ILLUSTRATIVE TAX BENEFITS Solar Package Lithium Pro Lithium Platinum Legacy Elite $5,330 N/A Tax Credit (At 30%) $1,599 N/A Legacy Elite II $7,120 $12,425 Tax Credit (At 30%) $2,136 $3,728 CLAIMING THE CREDIT After purchasing your Oliver Travel Trailers camper with solar package, keep your receipts for the total price paid to document your eligibility for the CEC. Include Form 5695, Residential Energy Credits, with your tax return to claim the credit. When filing, include the tax credit calculated on Form 5695 onto your IRS Form 1040 and file your tax return with the IRS to receive the credit. Depending on your state of residence, additional state tax credits may be available. The information contained in this summary is informational in nature, is not a warranty or certification as to applicability of any tax credits to the products described herein and should not be construed as tax advice to any specific individual or entity. Customers should consult with their own tax advisor with respect to your eligibility for the credit. 1 IRC § 25D(g)(3). 2 IRC §§ 25D(d)(2); 280A(f)(1)(A); IRS Notice 2013-70, 2013-47 I.R.B. 528 (11/1/2013). 3 Prop. Reg. 1.280A-1(c)(1) https://olivertraveltrailers.com/tax-credit-information/1 point
-
I know this has been discussed on the forum but not sure if anyone has done this or if it can be done. Been thinking about the water inlets and the outdoor shower controls. Is there a way to put a shut off valve to the lines going to them? Would it be practical? I am thinking that by shutting off water to the points going out of the trailer and draining it would eliminate those parts of the plumbing system from freeze damage. The rest of it would be kept warm either by the furnace (while camping) or by running a heater inside the trailer with the hatches open (while stored) We have a garage that rarely gets below freezing in winter but it could if outside temps really dropped. Then I would just run the heater over night. TIA, Scotty1 point
-
I re-plumbed the entire rear end of the trailer. I straightened out some lines and rerouted others so that they are neater than they were when our trailer was built in 2014. While I was at it, I put electric valves, that are controlled with a switch in the basement, in both the hot and cold lines going to the outdoor shower. I also ran an airline, that can be controlled with a valve in the basement, to these two valves so that the plumbing of the entire trailer can be blown free of water. The airlines also run to both wheelwells where an air fitting is available for airing up the tires. This entire air system can be supplied via the onboard compressor mounted in the back of the Silverado.1 point
-
The drain vent is a good extra. Without it use compressed air (<40 PSI) to remove water from lines prior to closing valves. Insulate shower opening or trunk door.1 point
-
Two of these 1/2" Sharkbite valves with drains (one for hot, one for cold) plus a PVC pipe cutter, should be all that is needed. Depending on how much room you find around the Pex lines, I recommend making just one cut and trying to insert the Sharkbite fitting on both sides of that cut. If there is room, that is best. If some of the Pex must be cut out because there is not room otherwise, cut no more than 1/2 the length of the new valve out of the Pex pipe, to ensure enough Pex remains for insertion into both ends of the Sharkbite fitting. FWIW, when we camped with Hull #1291 with outside ambient temps of 9 degrees F, the lowest temp in the bottom of the hull was near the outside faucet. So, be sure there is no water left in the flexible hose to the shower handle as well.1 point
-
I would consider a shutoff valve with a drain vent like this SharkBite; available in 1/2 and 3/4”.
1 point
-
Yes - this has been done by more than one owner (not me - yet). Yes - there is a way to place shut off valves in each of the lines mentioned. Being "practical" is in the eyes of the person doing the work or paying the bill for having the work performed for you. Good luck with your plumbing skills and working in tight quarters! Bill1 point
-
I suspect you were, but we're you downshifting, going down the mountain?1 point
-
On our madden voyage with the Emeril Air Fryer/oven (and so many other mods). We’ve baked potatoes, made toast for breakfast, cooked veggies, reheat leftovers! This oven has a dozen settings. Last 2 days in NM it’s been WINDY, up to 40 MPH! So tonight, at Rockhound NM SP, we are truly baptizing the oven! Set at 350F bake for 50 minutes, we’re having pork tenderloin with Au’ Gratin potatoes. First time for meat fats in this oven, though we cook whole chickens in our larger home model and could here as well. Oliver camping is NOT roughing it, not hot dogs and Smores by the campfire!
1 point
-
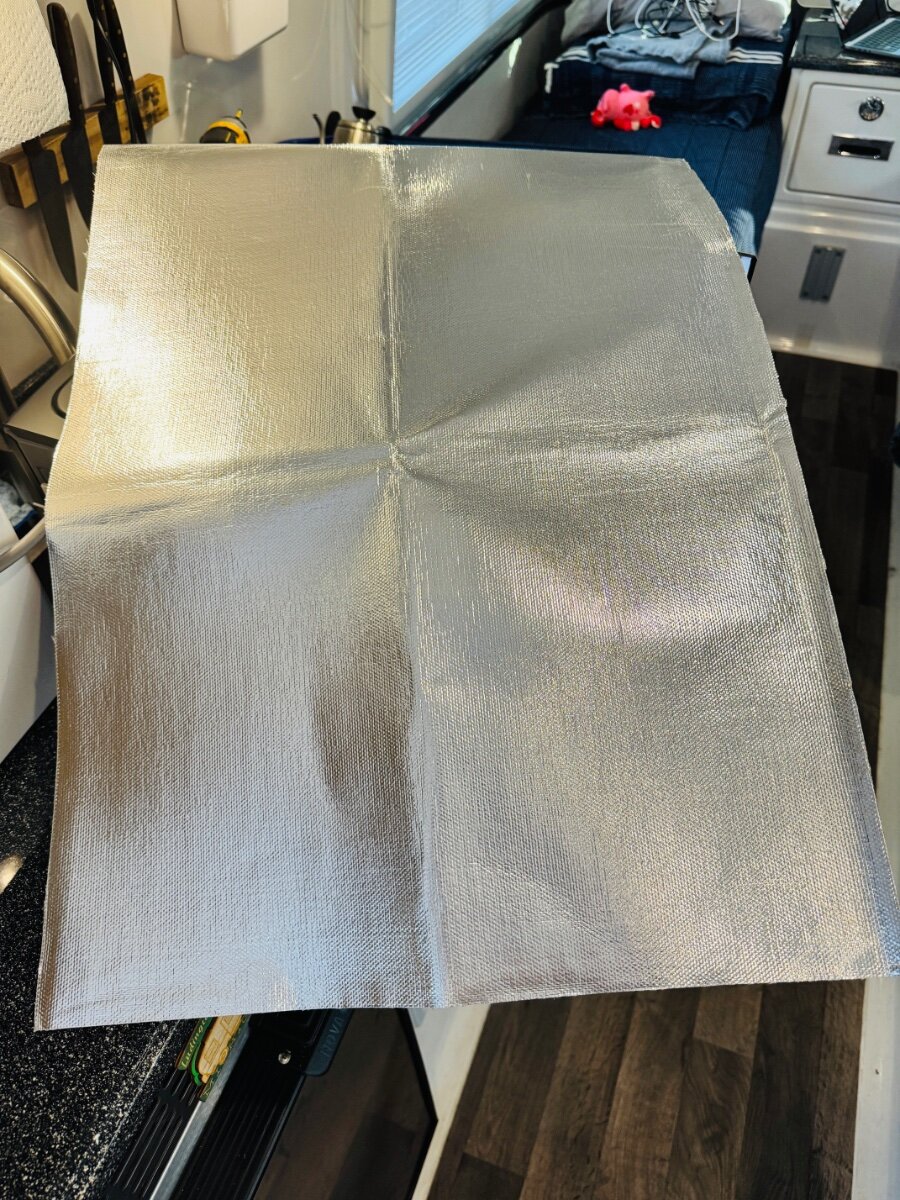
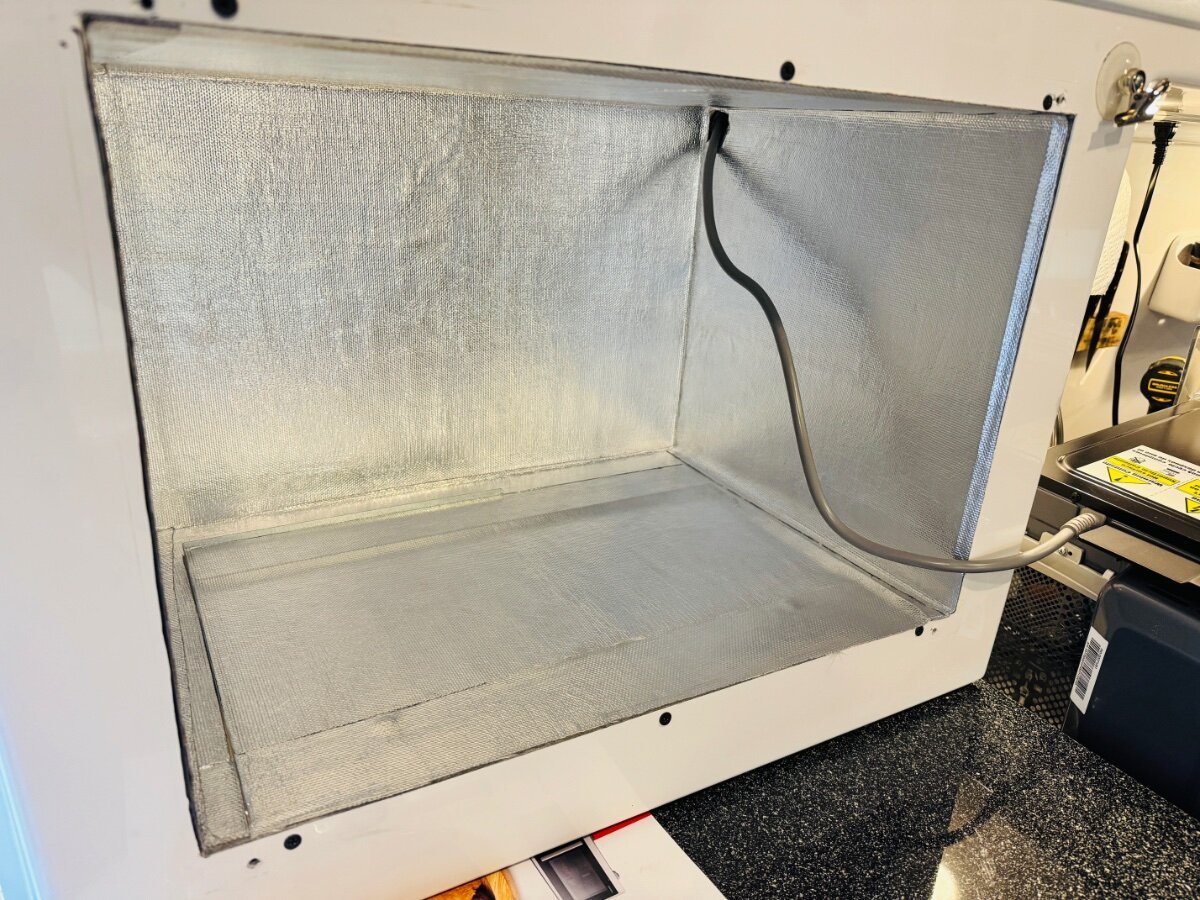
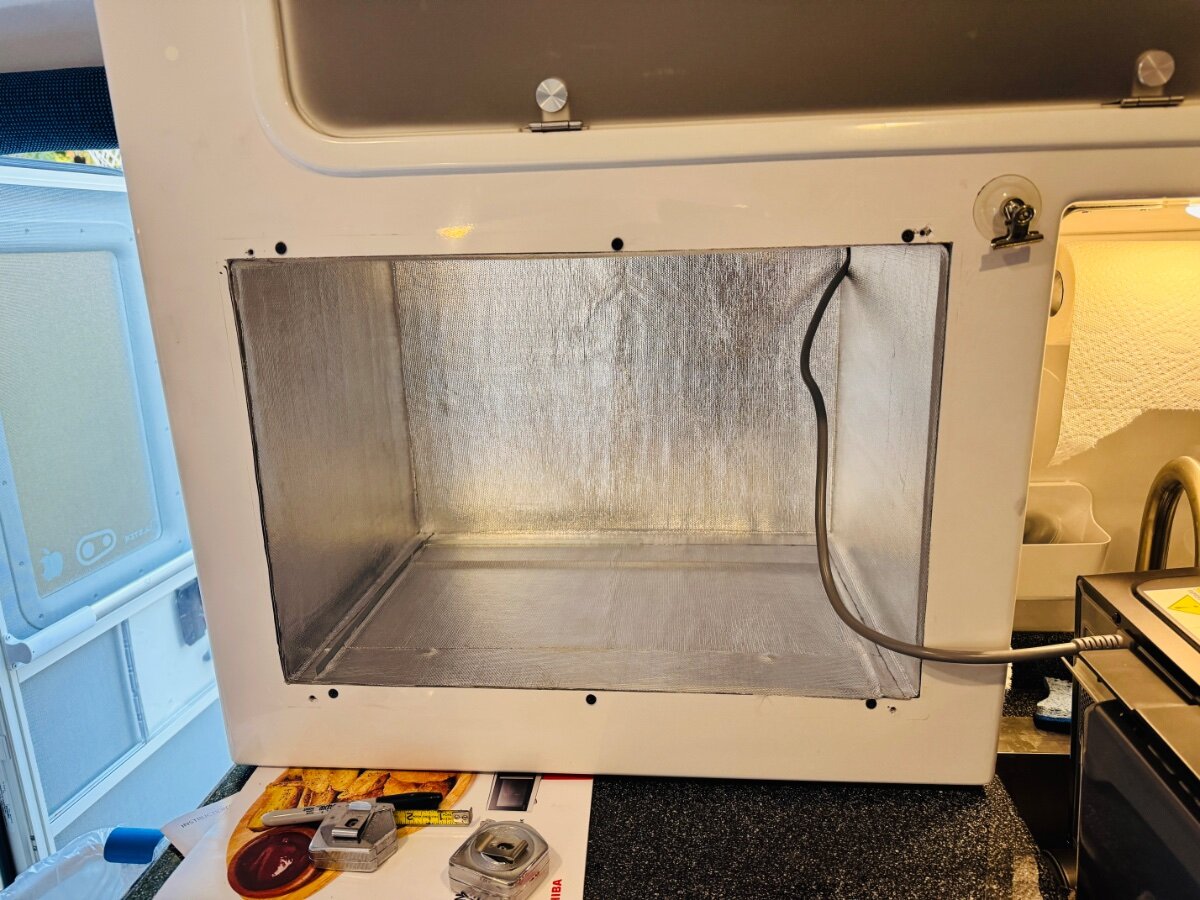
Finally, going to have an oven. I checked the hotspots of the Toshiba MW/oven and the only place it got warm was the back and on top. So I decided to take the plunge with an abundance of caution while using it because I really miss: warm cookies, birthday cake, biscuits, pizza, etc. I did line the cabinet with 1 mm adhesive backed fiberglass high heat barrier. Luckily with a little modification I was able to use the old MW SS trim kit. So plug and play essentially. Again, I will be measuring the cabinet temperatures while using. I think the most likely problem may be that the unit gets too hot or prematurely stops working. Although every looks good so far, nothing abnormal or high temps The highest wattage pulled that I saw while using the convection oven and AC on high was around 2800 watts. Will try to only use one at a time though. Links: Heat shield https://a.co/d/14NmCvX Toshiba https://a.co/d/gGyB2Gc Best, Mike
1 point
-
I added these both sides.
1 point
-
I think you will be very happy that you had Alcan do the job. I know I was. Good for you on getting an appt with Lew and his team. 👍🏻1 point
-
Smart! Many 1500 watt heaters do not have robust cords. Upgrading to a 12 AWG provides typically better insulation coverage that also reduces the potential for heating from older likely crimped cords.1 point
-
If anyone is interested in trying the Bulldog shocks, AutoZone sells them for $53.99 online only and claims to have them in stock. They state they have a Limited Lifetime Warranty (you can read it at the link provided below.) The part number is HD1214-0656. This link should get you there.1 point
-
If it has a good power cord, doesn’t get hot to the touch, you’ll be good. I’ve used some old classics and usually replace the original cord with a cut-off #12 extension cord.1 point
-
Generally, I'd agree, especially as I'm cargo capacity limited. However, we're spending two months in Florida this winter, and will be plugged in most places we stay. So saving propane by using free electricity for seven weeks is appealing to me.1 point
-
It works fine. Been on for years. Our original seal around the edge of the propane cover departed this earth after only a year or so. (2016 LE2) It was a pretty flimsy plastic strip. The only problem now might be finding it in white. I did an Amazon search and there are some white edge seals (non trim lok) but only black from Trim Lok. You could measure the thickness and find one that you think will work and if it doesn't look good when it arrives send it back. Amazon is pretty good that way. Good Luck Scotty1 point
-
I hate these things. Takes a lot of elbow grease to remove them. I'm sure there is a product out there that will make it easier for $ but I'm a bit cheap.1 point
-
Good to hear from you Mike. Another great upgrade in your list of many. Good work and I especially like your thin insulation fabric. Thanks1 point
-
I used Milwaukee multi material hole saws and drilled slow and steady in reverse. I did all of the layout on blue tape over the fiberglass and used new hole saws. If you are really uncomfortable drilling the holes, call Oliver service and request some scrap fiberglass pieces to practice with or find a place in the Ollie you would like to place an air vent and practice in a location that is less visible. Maybe an air vent in the wall between the toilet and the basement area below the front dinette. Mossey1 point
-
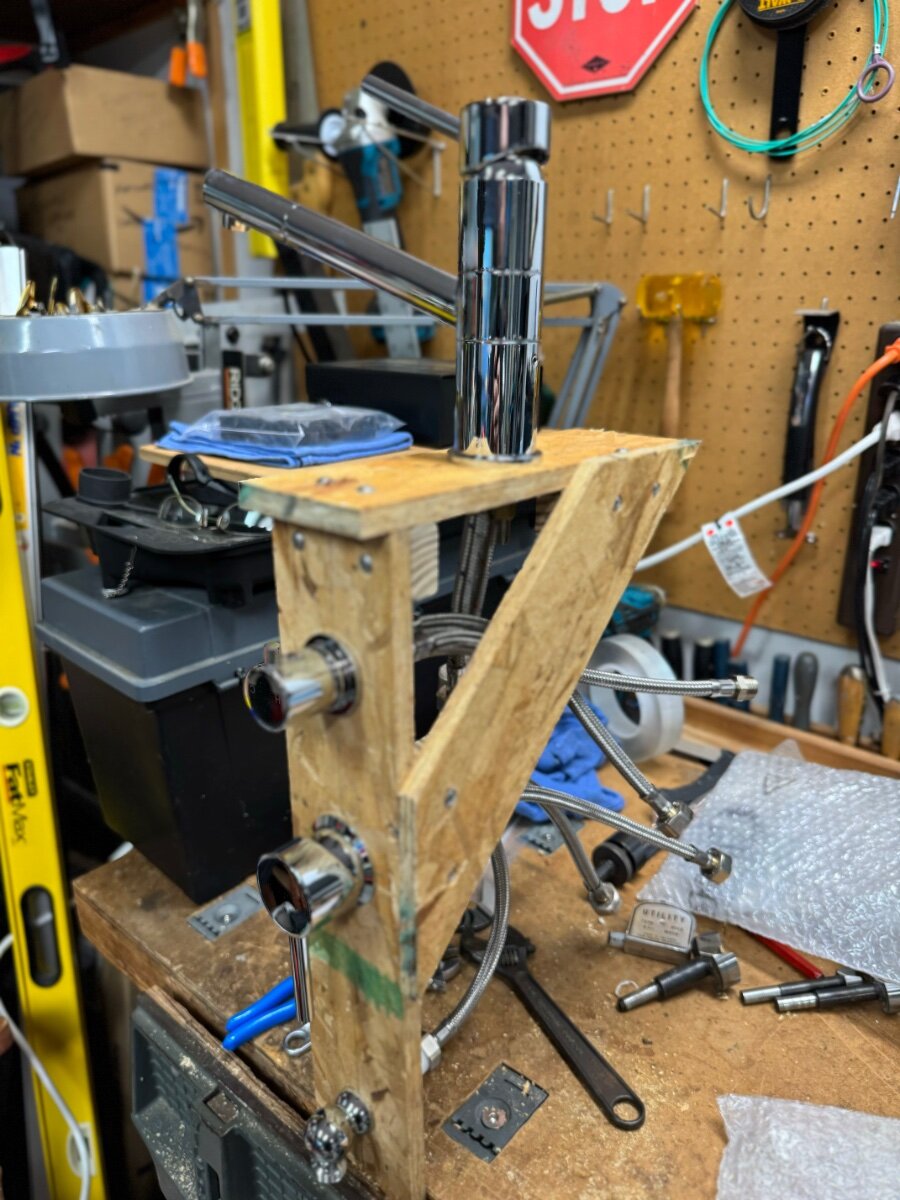
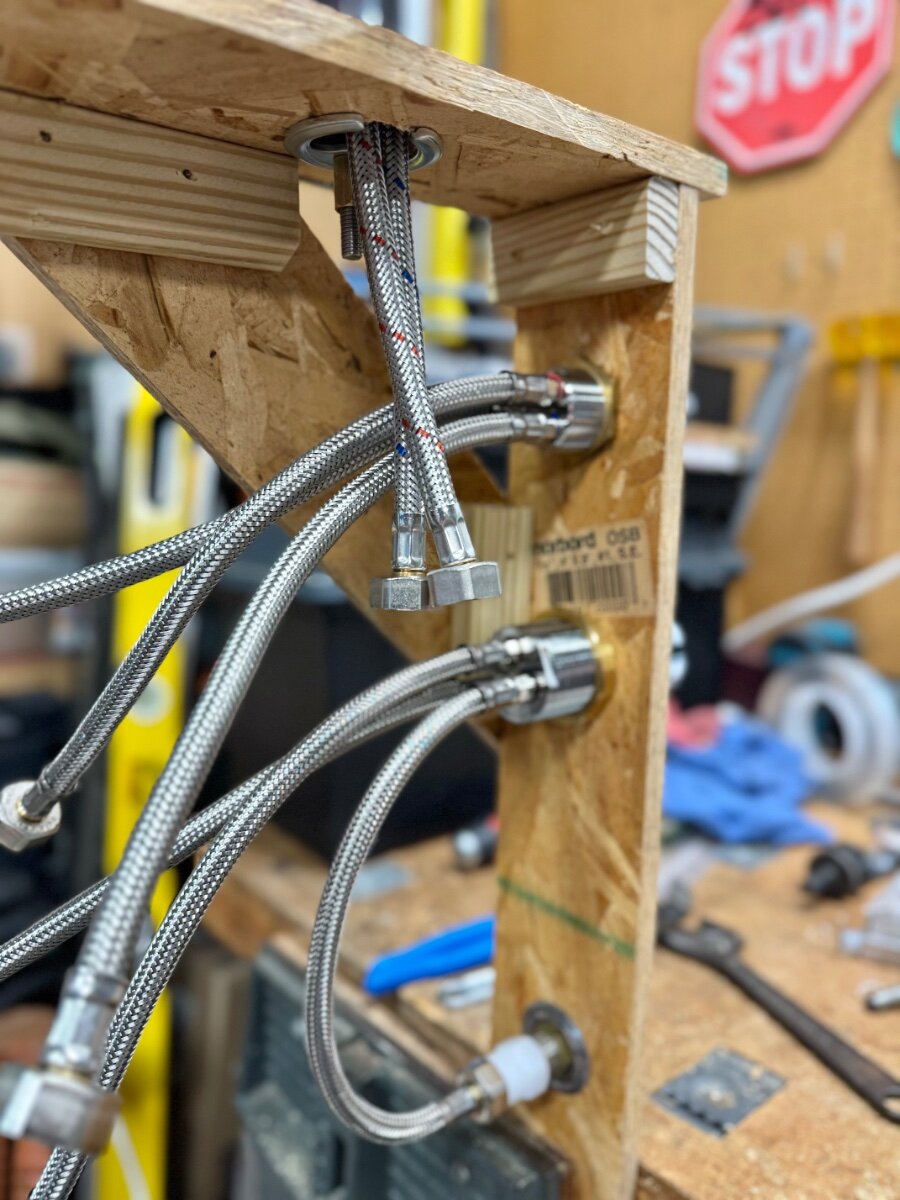
A huge thanks to Mike for letting me photograph his bathroom plumbing upgrade back during the rally in May, and for sending details on the connections and hardware. I’ve had the Scandvik and High Sierra components for months, but just now getting to that project. I’ve mocked up the system for location, and I just need to collect the fittings to tie it all together. And drill those big holes! Have I read that a diamond grit tipped saw is best for fiberglass? Or is a fine toothed carbide tip a better choice? Thanks @mossemi!!
1 point
-
There are a few installs documented. @Galway Girl and @rideadeuce to name a couple. Just search for keyword “Starlink.” These are not the Mini, but installation cannot be much different. I hope to buy one Dec-Jan and will document my installation. @Patriot has a recent thread on the Mini, and he is adamant on its being portable, stating the need to use it when the Oliver is camped where view of the northern sky is blocked. This is an important valid point. Mine will be installed on the tow vehicle, plugged into our Pepwave router, also installed in the TV. The Pepwave would look first to cellular signal, switching to Starlink when needed to minimize Starlink data used saving $$$. I figure that if the Oliver is blocked from the northern sky, which is rare in the SW where we do not have the tall trees of the east, I can park the TV in a better position which could be 100+ FT away and still have Wi-Fi access, broadcasted by the powerful Parsec antenna. I'm trying not to add more portable gear, the setup and tear down. Kinda sorry I invested in suitcase solar vs. another rooftop panel or just a DC-DC charger. It’s great that Starlink now has affordable options. Oh, and we have a monstrosity of a Winegard Dish Sat device, front of ours, yes bug collector, that I will remove soon. What a mess with all the screw holes OTT drilled in the roof (use 3M 4950 VHB tape).1 point
-
I’ve had to replace the antenna once. If you want to remove the antenna completely there are a few steps. The antenna has the upper part big disc) and the lower part (mount) that is screwed to the roof. To disassemble there are three steps 1) the top part (dish) of the antenna is pushed straight down then twisted. This unclips the top of the antenna from the clips on the shaft. 2) With the top removed the top part rca cables can be unplugged from the top of the antenna. They will be tucked into the roof later. 3) Unscrew and remove the base shaft. You’ll need to cut the sealant to get it loose. Finally tuck the wires into the roof and cover the hole with a suitable body material and seal it with a marine sealant like 3M 4200.1 point
-
Claudia: I don't have any experience with the removal. But for the hole it will leave when removed I suggest using a piece of scrap white cutting board to cover the hole. Suggest cutting it into a circle and then use some white acrylic sealant to keep it in place. You could taper the edges for aerodynamic smoothing if your as particular as I am. I would not suggest using JB Weld or other adheasives we use for hanging heavy equipment as they would not meet your goal of being able to reinstall down the road. Hope this helps, GJ1 point
-
I agree on formerly being able to beat the projected travel times. In 1978 a friend and myself left home at 1900 one evening headed west. Twenty Six hours later we were sitting at the North Rim of the Grand Canyon. About 1600 miles. We were driving my brand new 280-Z and averaged over 60 mph.1 point
-
My first rain gutter install was a total fail. I did it in sunny 80 degree weather, perfect! Unfortunately, we went from 80’s to 40s overnight and all the corners popped off. I reinstalled in 90 degree weather and overnight low was high 70s. Left the tape on for 24+ hours. It’s been years now and no issues. Pay close attention to the weather! Mike1 point
-
Not sure when you plan to install the new rain gutters. We installed ours when the weather was in the high 70’s low 80’s giving the adhesive time to cure and just making the gutter material much easier to work with. Something to consider when you install the new product. It also made the trim easier to line up, cut and apply after laying it stretched out in the sunshine over top of my truck. I think we left the blue painters tape on for a day or so. No issues yet. I hope it all works out well for you.1 point


-
Recent Achievements
-


")


")


")


