Leaderboard


Popular Content
Showing content with the highest reputation on 12/23/2020 in Posts
-
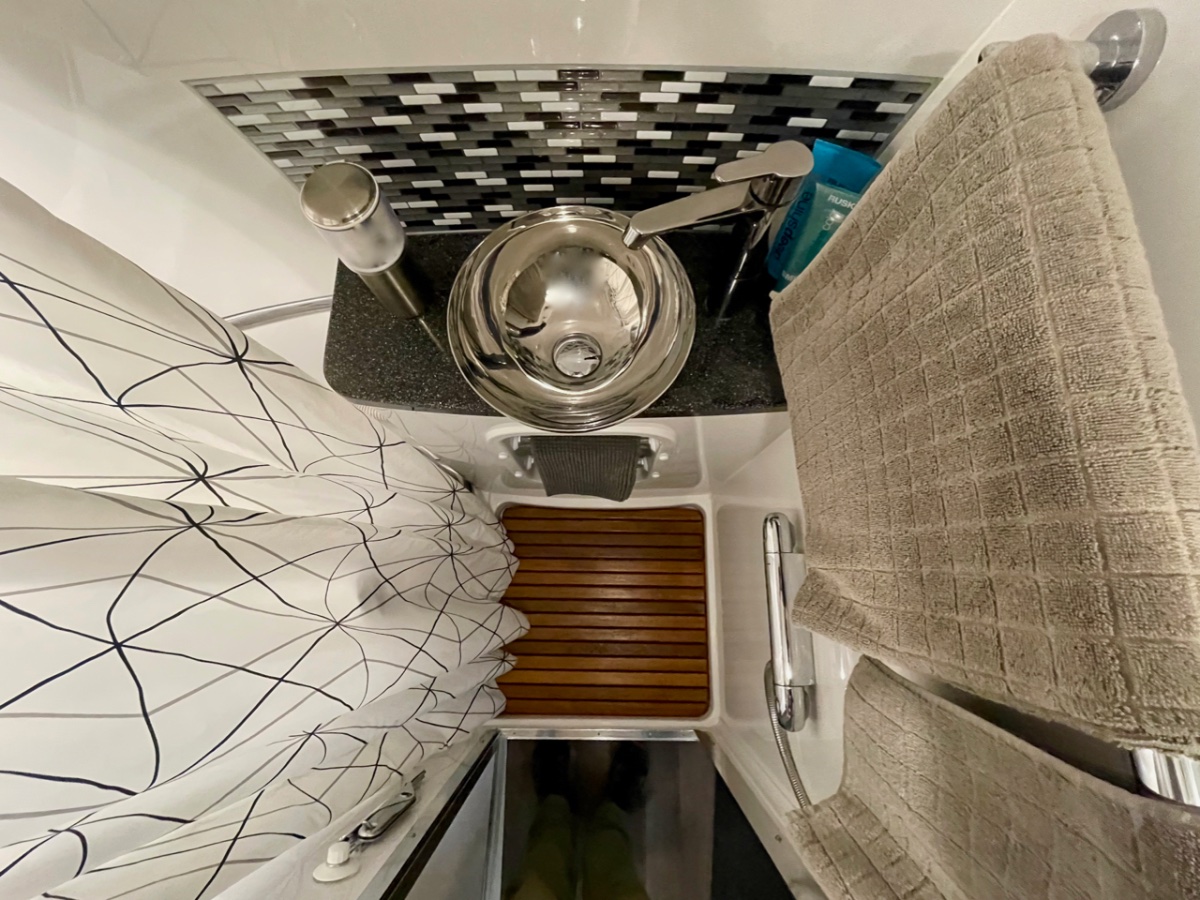
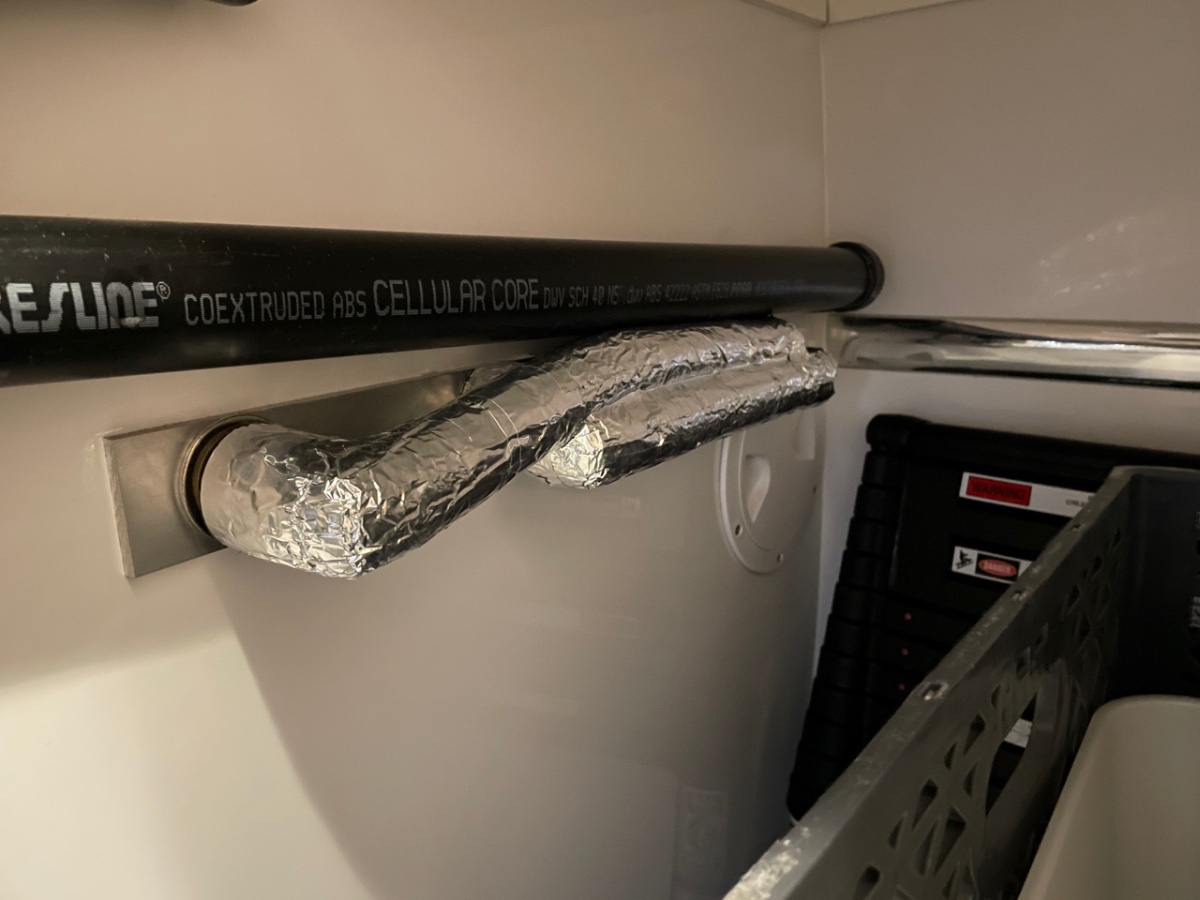
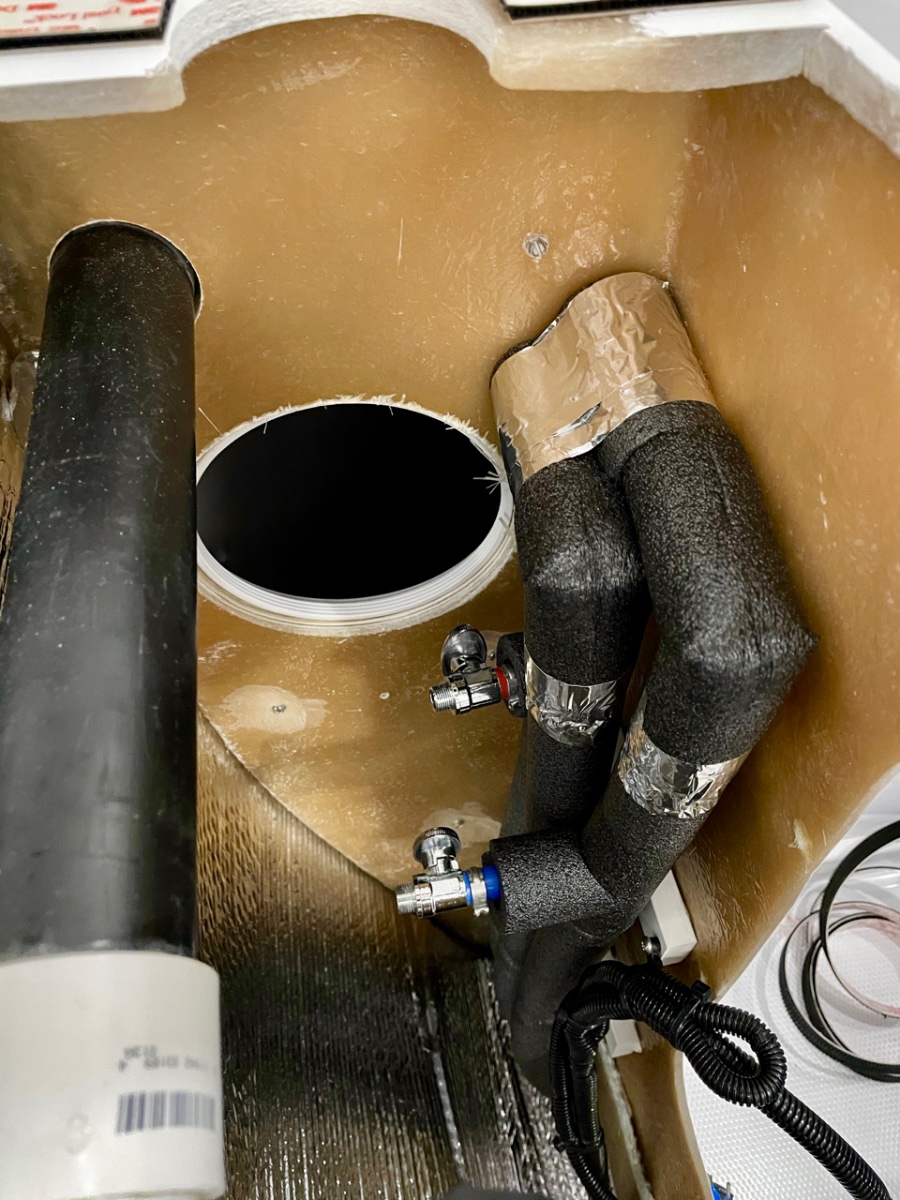
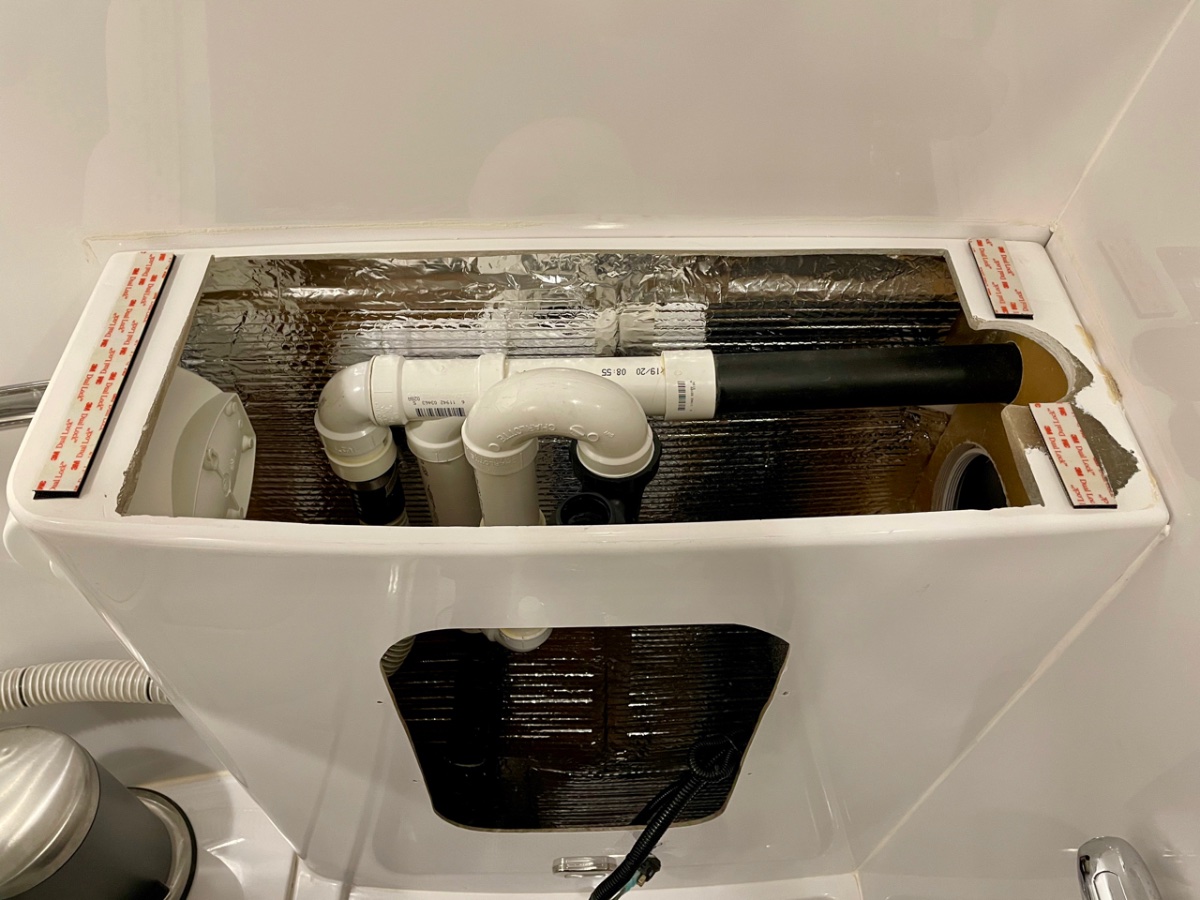
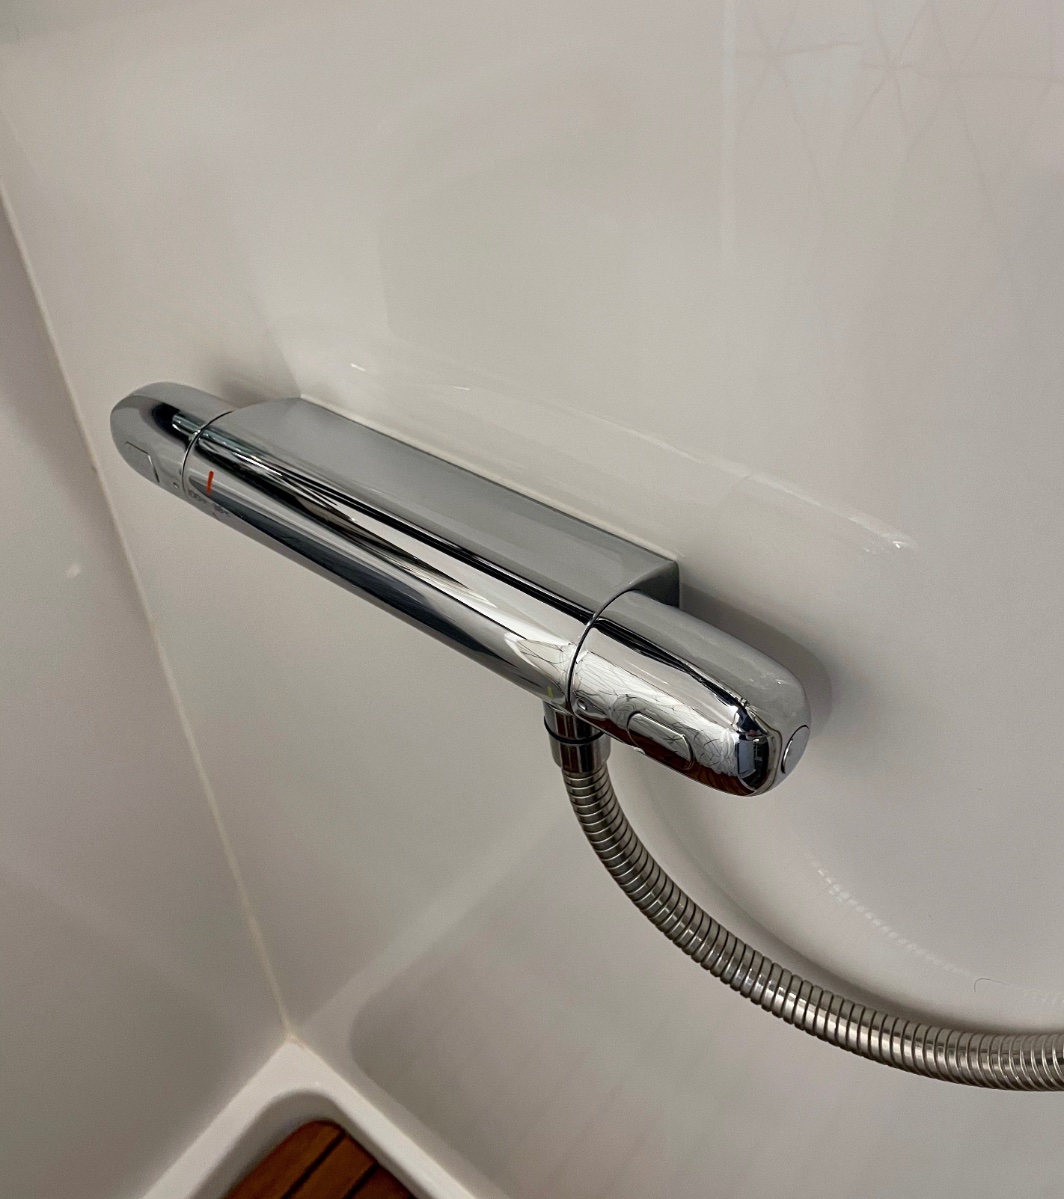
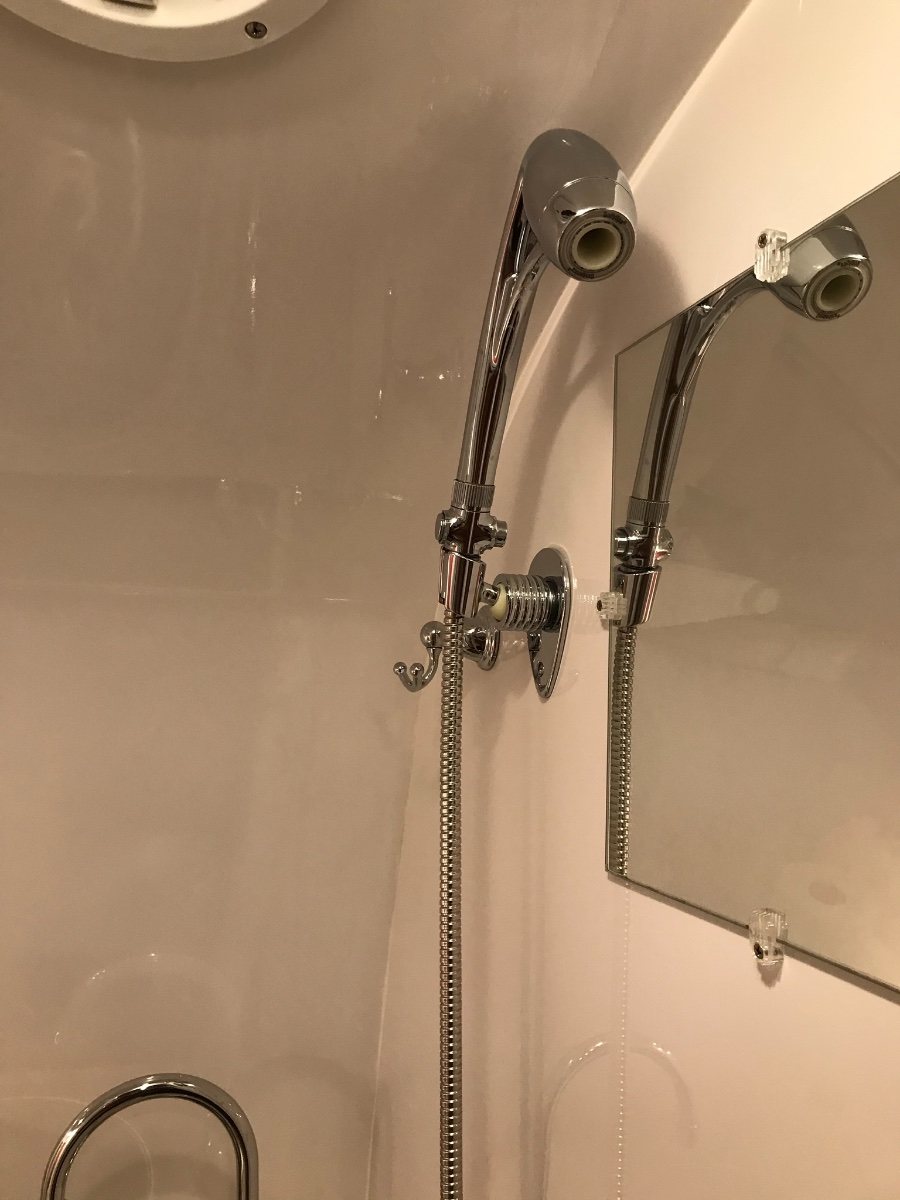
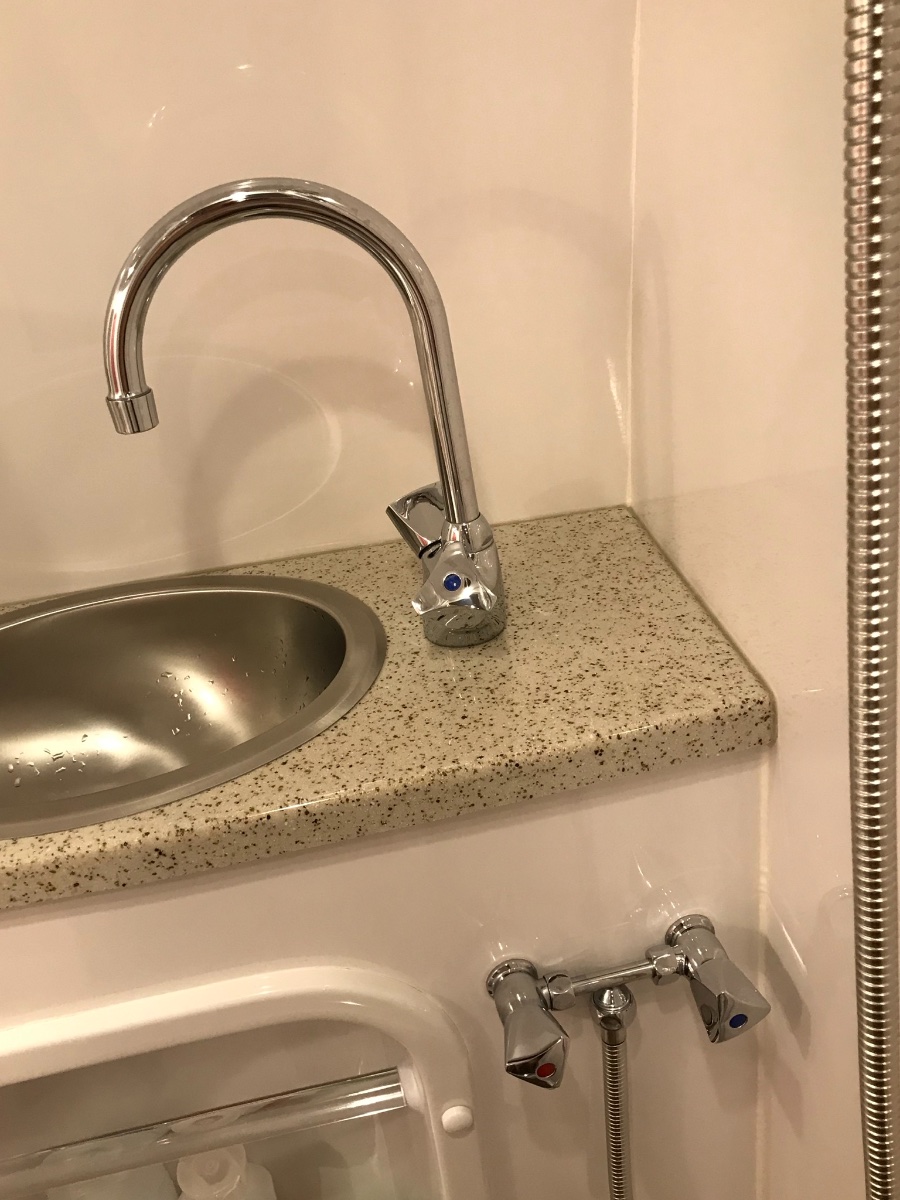
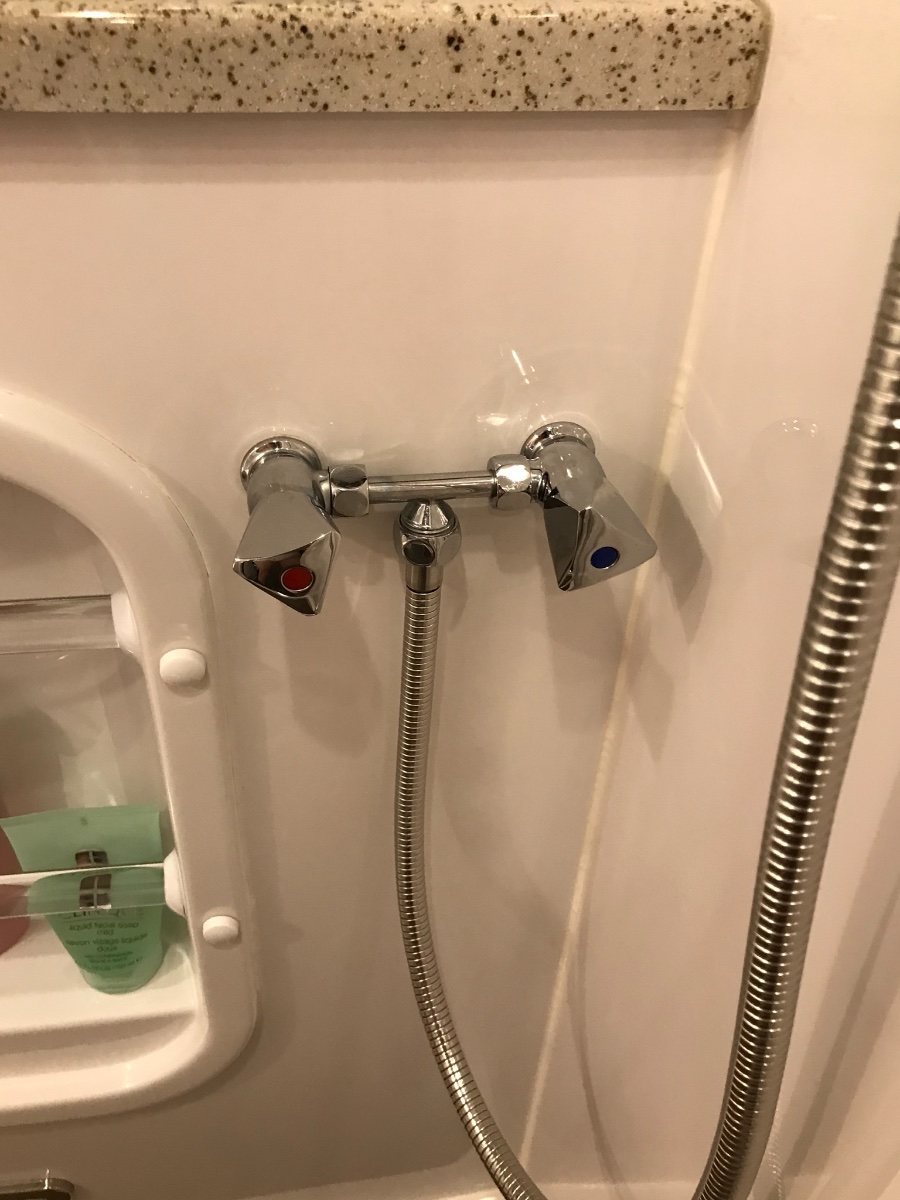
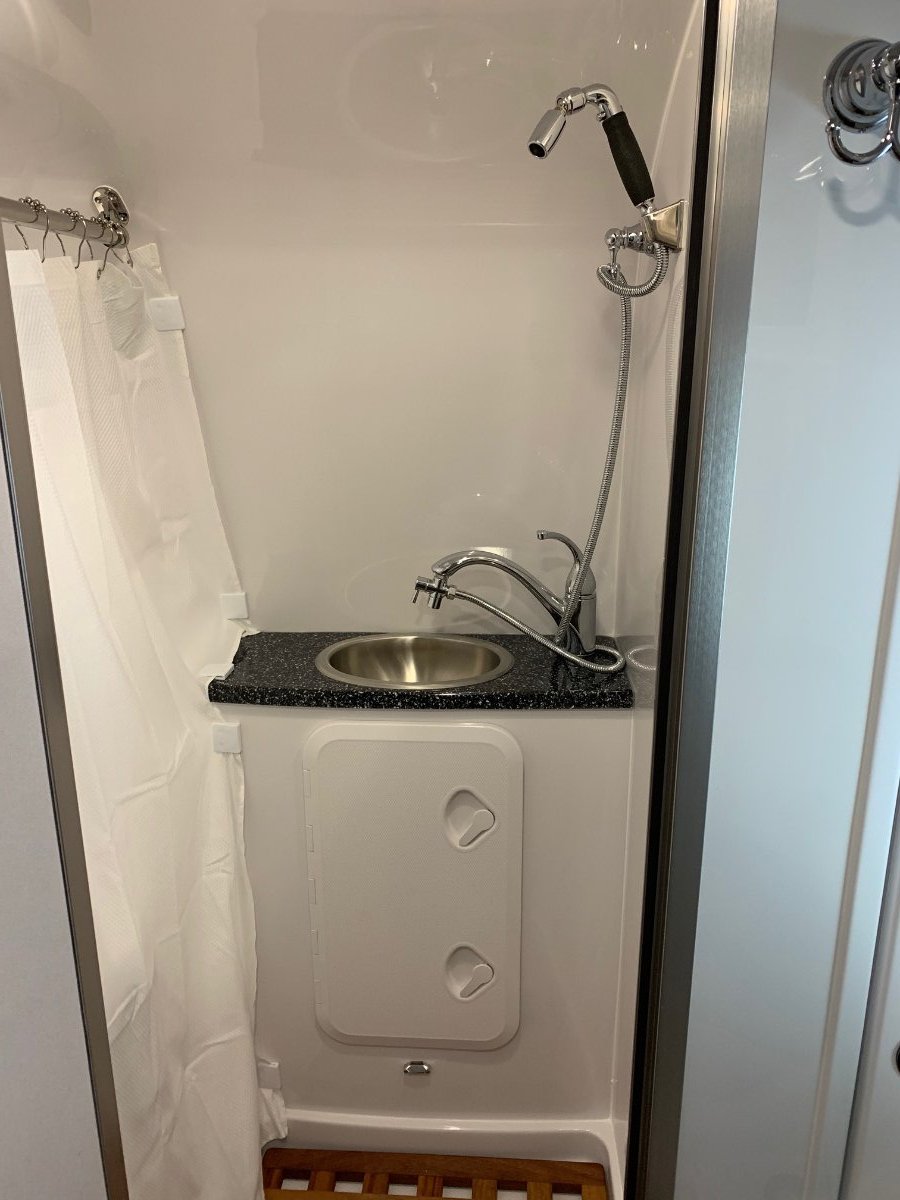
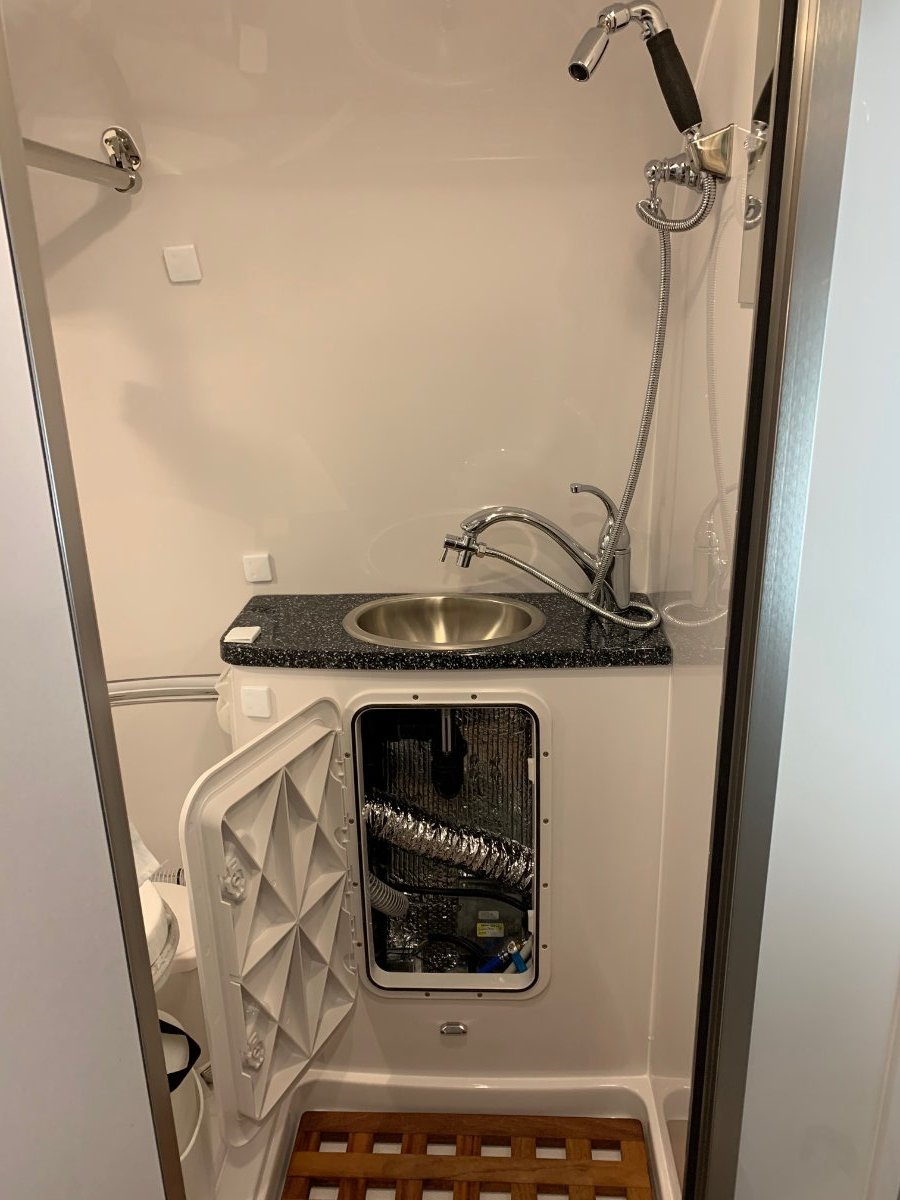
Many of you know that this has been a long, drawn out project. I think I started talking about it to a few people at the 2019 rally - so it's been well over a year in the making, almost two. Not that it was particularly difficult (though certainly a more major mod), but because of laziness and indecision on all the components it ended up being a start and stop project, with months sometimes between fits of activity. And then it snowballed into a complete plumbing overhaul, which was unnecessary - but then that's how the trailer got its name, after all. I'll post about all the plumbing stuff later, but since there have been a few recent posts about shower and bath mods, I figured I'd go ahead and toss this one into the mix. This project started for a few reasons. One, I've always found the bath sink to be mostly useless. It's fine for washing hands, but for most anything else, you've got to crane your neck around with the front wall curving in to hit your head. And trying to use a tiny little sink for washing your face just leaves water everywhere. So we found that were using the kitchen sink almost exclusively. That was fine - no big deal - but with the bigger sink, I was getting tired of wasting water cleaning toothpaste residue out of the sink, and it seemed silly to have a bath sink that got little to no use. The second reason for the upgrade is that after we redid the kitchen sink, the bath sink just looked sad. In addition to functionality, the bath needed some sexy. So the obvious solution was a vessel sink of some sort. Since a vessel sink sits on top of the counter, I'd have much more leeway in size and placement. I could pull it forward as much as I wanted, plus it had the added benefit of raising the sink to a more comfortable height for us. Some experimentation with kitchen bowls of different sized showed that I could get a fairly generous sink that didn't take up too much shower space. I settled on something in the 11" to 12" range; which proved to be a little difficult to source, especially after deciding on the material. I had bookmarks for dozens of sinks of different materials, but I couldn't find one that I really liked. I almost picked a glass one off Amazon, but in the end I thought that was going to be too heavy. What I really wanted - since I had already swapped out almost all of the brushed chrome fixtures in the bath for polished - was a simple polished stainless sink. There were a few out there, but nothing in the right size, nor at a reasonable price. So the project bogged down a bit at that point; but I was confident that I'd find something eventually, and so I went ahead and ordered a new vanity top from Oliver, without any cutouts for the sink or faucet. I’m glad I did, since Oliver has apparently now stopped offering our countertop color And sure enough, a few months later I came across a discontinued sink on Overstock.com that was exactly right. 11.25", polished inside and out. It's the Acquaio sink from WS Bath, if you can find one. I know that other sizes are still available. It was still pricy even on discount, but by that point I didn't care. To make up for the splurge, I got a faucet from Ikea, which is actually pretty nice. The colors from chrome to stainless don't exactly match, but they're close enough and it doesn't bother me. Since I was swapping out the faucet, I needed to find a separate shower valve, which was another lengthy quest. I thought at first that I'd put one to the right of the bath caddy, like @mountainoliver has in his trailer. But most everything I found was just a bit too big to fit (I didn't know about mountainoliver's mod and the mixer valve he used until later). Then I found the Grohe Grohtherm valve, which was interesting in a couple of respects - it didn't recess into the vanity at all (which eliminated a potential issue with the plumbing), it matched the Grohe faucet that I had already installed in the kitchen, and since it was linear, I thought that it might actually fit in the space above the caddy, between it and the vanity top. And it did fit, but looked squished in place, plus I didn't think until trying to place both it and the sink that the the sink drain and trap was going to be difficult to work the plumbing around. Plus putting it there meant that the shower hose was going to be strung across the vanity and generally look bad and be in the way. The problem with this realization was that I'd ordered the valve and the sink before one of my 3-month breaks in the project and now neither was returnable - so I had to make it work. This meant that the shower valve was going on the closet wall. I also realized during the test fitting that when I pulled the sink forward, the drain trap was going to hit the top of the bath caddy, meaning that I couldn't get it far enough forward to work. Small disaster. But I realized though that the bath caddy wasn't symmetrical, and if I turned it upside down, everything fit. I'd lose the flat shelf on the bottom, but we only use the caddy to hold the bath mat, so not a problem. Small problem with the water pump switch placement, though, since it would be on the bottom - but a quick email to Oliver had a new caddy that hadn’t been drilled for the switch on the way. At that point, all the pieces were here, all the logistics worked out, and I was ready to go. Time for another couple months off while I built up the courage to drill through the closet wall. Then finally... First step was to remove the existing vanity top, which is possibly one of the most firmly attached things in the trailer. It's glued in place, so the only way I could find to get it off without completely destroying the vanity was to cut through the joint with an oscillating saw. That's a slow, tiring, dusty endeavor; and it generates a great deal of heat, so you've got to work in spurts to keep the fiberglass resin from burning - which is fine really, since working through the caddy access, your shoulders will welcome the rest. I had to do a tiny bit of trimming on the new top to get it to fit as snuggly as the old one; and once in place, I sealed it with silicone like the original. Top off, new drain lines in place, and I decided to attach the new top with industrial velcro to make it easier to remove in the future (works well). Next, shower lines teed off the existing plumbing, line to the nonexistent toilet removed, and some insulation added to both the plumbing lines and the outside wall behind the vanity. (I have a circulating pump on the hot water, hence the extra line.) I also glued a small PVC block to the back side of the vanity wall to tie down the water lines and prevent them from vibrating too much. And as always, cleaned out as much fiberglass dust as possible, cleaned up and wrapped wiring, etc. The access port on the closet side is something that Oliver gave me in the original build. The sink valves and drain trap are accessible from that port, and since I used velcro for the top, I have the option now of cutting the silicone on the top and pulling that off for access, in addition to taking out the caddy. New plumbing in the closet for the shower. I drilled out a short piece of aluminum as a backing plate for the shower valve. The plumbing is protected somewhat in the closet by the ABS vent, and we really don't keep much in there that could bump around and damage the plumbing. But a few layers of aluminum tape should help protect the insulation from getting beat up and gives a bit of a spaceship vibe. The valve is supposed to stand out from the wall about an inch or so, but I decided to recess it so that it attaches flush and as out of the way as possible. I caulked around the valve and it ended up making a nice little shelf for a razor, and I placed it low enough that my wife can use it to prop a foot while shaving her legs. You can also hang a bar of soap on one of the handles to drip dry. The faucet has a neat feature with stops on both valves, which can be custom set to whatever temperature and flow you prefer. The little buttons on the handles allow you to go past the stops when you want. And that's really it. Installing the sink and faucet is just drilling two holes and following the directions. The only change I made is that the sink came with a short stainless ring to mount between the sink and counter, but I didn't like the look and so just used one of the black rubber gaskets that was inside the ring. That way the sink looks like it’s sitting right on the counter instead of a pedestal. We tested everything out on our last trip and functionally, it all works as expected. The sink isn't in the way at all while showering, and really is so much more usable. Plus I think it looks great. The shower functions just as nicely, with the valve not being obtrusive. I added a second holder for the shower head up high, which works better for me, though my wife prefers the original one. I still need to swap that one out, since I think it's the only bit of brushed chrome left in the trailer. I added the same backsplash material that a few other owners have recommended. I wanted to order a new, wider mirror; but the original one is glued on and so I didn’t want to go through the trouble of trying to get it off. I suppose I could just place one on top of the other, so maybe that’ll be a future project. Glamor shots -
 8 points
 -
When you pick up your unit - Oliver does a good once over to introduce you to all the various systems, and it can be an all consuming - data overload for some. Try to take your time, take notes, and insist on reviewing anything you don't fully understand. As you go through the review - look at everything - fit, finish, action, workability, - anything that catches your discerning eye - make a note of it - and come back to it at the end. Run every system you can - Oliver will/should take care of your concerns. If possible take advantage of the night in the local campground - and test every system - make sure it works properly. As you are just down the road from the Service shop - any issues can be remedied quickly. Take time to read and review the owners manual - it is amazing what happens when one reads the instructions (note to me!!) As I think back - There would have been a few issues to clear up - all minor. I did have an issue with the furnace (didn't run it at delivery) - which required a return. Over time there have been other issues - but most were not initial quality failures. Luckily, I'm just a few hours drive from the Oliver factory - and every issue has been taken care of by the service folks. I am a satisfied customer - were I to purchase again- I would do just as I have posted - but mo better! RB5 points
-
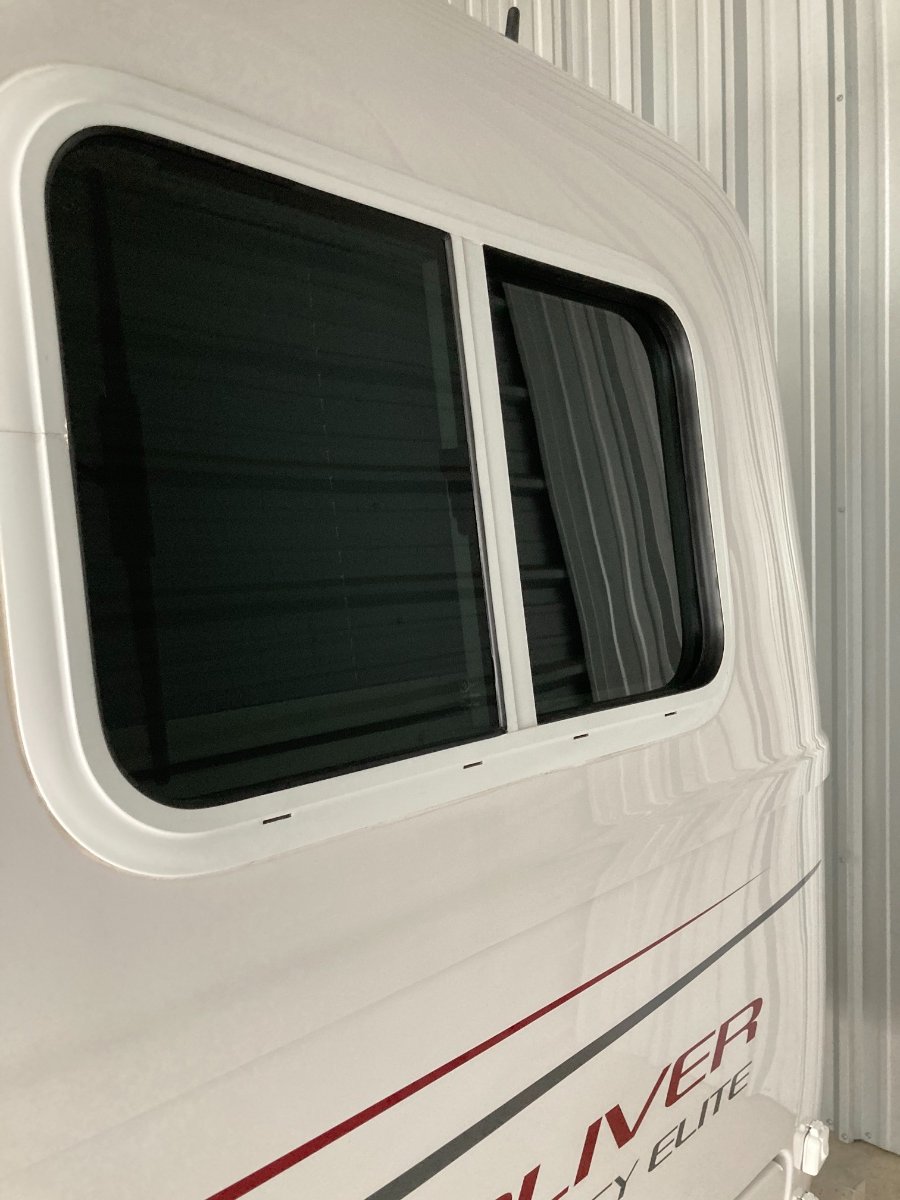
Oliver Owners, We picked up our new trailer (Legacy Elite I #664) on Sept 16, 2020 and have been using it on/off since this date. Overall, our experience has been wonderful and the quality of the trailer has been much better than what we have read about other manufacturers. In an attempt to help others with our recent learnings, I am listing some of the items were have learned about, fixed, and/or submitted a tickets for: Initial Pickup: - The bathroom interior window frame was bent due to being over tightened - Jason and the person showing us the trailer located a new frame and installed. - Window shade over the rear driver's side window had damage to the felt liner at the bottom of the night shade. - Orientation team replaced. First Night Camp @ Davy Crockett State Park: - Noticed that the propane alarm was not on. - Contacted Jason via telephone and he walked me through installing the 1A fuse that was included in the box of spare fuses provided. The fuse holder is located under the dinette seat and is somewhat hard to find as it is black and not easy to see. - Upon opening the rear compartment door, the bracket where the wire attaches to keep the door from swinging down came unglued. - Contacted Jason to let him know and he said they would send me some epoxy to fix. Ended up purchasing some a few weeks after getting back home as it never arrived. I let Jason know we no longer needed as I had fixed per his recommendation of Gorilla 2 part epoxy. - Shower floor squeaks a lot - Contacted Oliver Service and have a ticket for them to repair when we take the trailer back to TN for its annual checkup. According to Jason, the squeak is most likely from the shower tub not being cut correctly or the padding under it not installed correctly. No biggie for now as we have learned to live with it knowing that it will get fixed. If your spouse decides to use the bathroom at night, It will wake you up. No liquids right before bedtime. 🙁 First Long Drive from TN to AR: - Had someone flag us down and let us know that the rear compartment door had come open during travel. Upon pulling over and inspecting, we noticed that the screws had come loose on the latch and allowed the door to open with the latch locked close. I was lucky enough to have some blue lock-tight with me to use on the screws when retightening. No further issues experienced. We let Oliver know that this happened and they indicated that lock-tight should have been added to the screws at the factory. I am confident they put new procedures in place to keep this from happening again. First Time Back Home: - Spent time learning about the solar system, inverter, appliances, etc.... - Realized that both the Solar Controller and the Inverter were both set to flooded batteries vs. the AGMs we had installed. Changed both to AGM. No issues noted so not sure if it really mattered. Texas State Park Close to Home: - Noticed a small gap at the top of the external door window frame. - Contacted Oliver and was told that the frames are designed to click together but requires special plastic keys to take the frame off to inspect. From my reading this is a common thing from the door factories with the tabs getting broken. We tried several time to get the internal frame to snap together with the external frame. No luck. Contacted Oliver again and Jason said he would have a new frame (and plastic keys) sent to us so we can repair/replace. The suppliers are backed up, so it has now been two months with the door window frame and glass loose. I was successful in learning that there is a supplier zarcor.com that has the window frames (Lippert) in stock and can be purchased/delivered within a couple of days. We will most likely end up just ordering and replacing as they also offer a clear tinted glass and window shutter for the door. There is another post in this forum with pictures if you are interested. Being that this repair is taking a long time to get resolved, I would recommend anyone picking up their trailer inspect this and have it repaired before taking delivery. Arkansas State Park (Crater of Diamonds): - Upon arrival at the State Park we noticed that the trailer was squeaking loudly with every small bump in the park. Upon inspection, I did not notice any lose bolts, nuts, fittings on the suspension. We contacted Jason at Oliver and he had not heard of anyone having this problem before. We ducked our heads down and slowly made it to our campsite without disturbing the other campers throughout the park. We did get some stares tho with the squeaks. Once setup, I made a quick trip to the local hardware store to purchase a small grease gun/grease, 90-degree zerk fitting as the zerks are not accessible without having the pull the tire off, and some dry lube spray. Utilized to the stabilizers to take some weight off the trailer and utilized the grease gun. Fun fact - the top zerk fitting (wet bolt) that attaches to the frame bracket actually serves no purpose as the bolt is not contained within a bushing (Only on the single axle trailers). I would not recommend you go to town putting grease in this wet bolt as the grease will just exit the bolt and make a nice stream of grease falling on the lower spring eye. Not sure why dexter/oliver designed it with a wet bolt in this location. Sad part is that, the squeak we had was between the shackle and the trailer frame bracket and without the trailer bracket having a bushing there is no real way to get grease between the two. Only option at this point was to use the dry lube spray. Happy to say that this resolved most of the squeak until we could get back home (~400 miles). Upon getting home, I used a spray can of Fluid Film to spray down the area between the shackle and trailer bracket. No more annoying squeak! I have some pictures on another computer that I can attach at a later time if you are curious. Other trips - Nothing new to report beyond what has already been said above. Improvements - As recommended by others on this forum, we did go ahead and install the black window seals available on pellandent.com due to some of the white window seals had stains on them from the factory and were cut about 1" too short. I must say that the black seals look much better and should eliminate an excess amount of water needing to travel through the window drains due to them now being long enough. If you do a search on this forum for pellandent you will see some pictures posted by others. Once again, the point of this post is to inform others of our experience and to share some of the things we have learned. As with anything, enjoying life comes with opportunities to improve oneself and help others on their journey. Mark
3 points
-
The Legacy Elite I trailer has two interior 12v ports and one dual USB port located under the cabinets just before you get to the bed. We replaced one of the 12V ports to a dual USB port after we discovered our USB adaptor for the 12V port pulls out easily. I would frequently end up with my phone not charged the next morning.🙁 Perhaps it was just my adapter as the 12v ports have a twist-lock feature that is supposed to reduce this from happening. Can't ever think of a reason we would ever need the 12v port anyway and this allows my wife and I to charge our phones and apple watches (4 USB ports now). Here is a link to what I installed: https://www.amazon.com/gp/product/B086PRHKC1/ref=ppx_yo_dt_b_asin_title_o02_s00?ie=UTF8&psc=1 Installation was very simple as you can access the 12v port via the access hatch within the cabinet. Simply unscrew the holding ring from the back of the 12v port, lower it down to slide off the connectors (make sure you look at the color of the + wire as you will need to hookup correctly on the replacement plug), put the new holding ring onto the wires if you do not use the existing holder, attach the new dual usb plug to the +/- wires correctly, and reinstall into the existing hole. Total time to replace was about 5 min.
3 points
-
As someone getting a new trailer in 2021 I really appreciate this thread. This also has me worried about quality control. Are you still getting level of quality build and control expected for the price point. I’m happy to pay for a quality product but your experience would leave me disappointed and questioning if the premium is still justified.3 points
-
John is right how easily a pneumatic grease gun operates. After a grease gun discussion here last year, I purchased a Lube-Shuttle one hand manual grease gun with flex hose/straight coupler and G200EP multi purpose grease from Amazon. It's expensive, but very nice manual grease gun/cartridge system. This grease gun system does not take up much storage room on camping trips and no drips/mess with the Lube-Shuttle grease gun system. Also use RedLine CV-2 grease in a tub from Amazon, for packing wheel bearings on four trailers including Ollie, great grease. Lube-Shuttle®: One Hand Grease Gun - The Lube Shuttle (lube-shuttle.us) Locking Grease Couplers and Lube Shuttle - YouTube EZ Flex installation/maintenance manual: 059-867-00_ez_flex_complete.pdf (dexteraxle.com) Red Line Synthetic Oil. CV-2 Grease (redlineoil.com)3 points
-
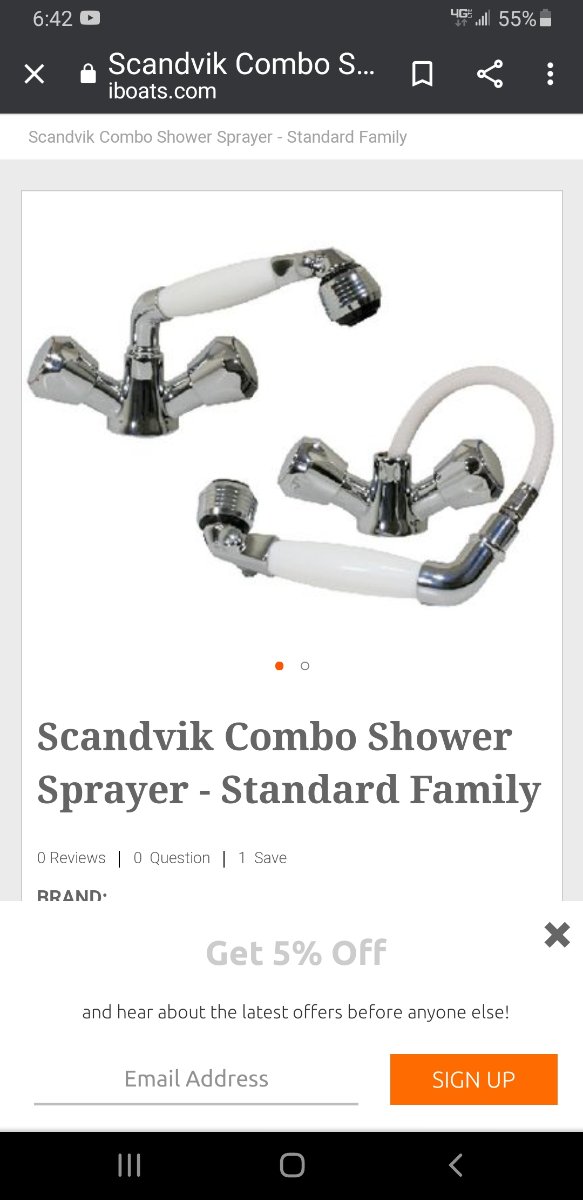
Seeing the shower head changes reminded me that when I ordered our trailer I wasn’t real fond of the shower arrangement so had Oliver make a modification for me. I liked the idea of being able to select the shower head that I wanted and be able to replace it whenever. I used Shurflo brand “Trinidad” model shower diverter valve. Both bath/kitchen faucets are the same design for fewer parts inventory and are the Shurflo “Trinidad” type as well.
3 points
-
Oliver Owners, It was mentioned to us when picking up our Oliver that we might want to consider purchasing a portable water softener for use with the trailer. We arrived on pickup day with a water filter but never considered the need for a water softener before. Not sure if others on this forum have had issues with hard water but our orientation rep indicated that they had several trailers in the shop for decalcification while we were there. Upon returning home I purchased an inexpensive kit to measure the hardness of our water here at home and was surprised to find we were on the upper end of the scale. Hence, we went ahead and purchased a portable water softener to use while traveling. I have listed what we purchased below but there are several other options out there to consider. We have found it easy to use, simple to regenerate with table salt, hooks inline easily when attaching the trailer to a water supply and have even used it when washing the trailer to reduce water spotting. Something you might want to consider if you find yourself frequently hooking up to hard water supplies at the campgrounds you visit. On The Go OTG3NTP3M Portable Water Softener Please note that when you use a water softener, a little bit of soap goes a long way when washing hands, hair, dishes, etc.
2 points
-
Not sure if others came across the same problem but when we went to pickup our trailer with our F150, the original trailer breakaway cable was not long enough to connect to the hitch on the truck as required. We have since replaced the original standard cable with a longer "coiled" cable that allows for the cable to reach the hitch connection point on the truck and eliminated any slack in the cable while towing. Below is a link to what we purchased and installed on the trailer and have been very happy with it. Fastway Zip 6 Foot Breakaway Cable 80-01-2160 To replace you only need to cut off the old cable and install the new one. Takes about 2-5 min.
2 points
-
Or - Accept that dealing with grease is probably going to be messy - cleaning off the old stuff, wiping away any excess new stuff, crawling around in un-comfortable places, etc. Get a bunch of paper towels, gloves, plastic bags and newspaper and a relatively cheap grease gun that you will only (probably) use once or twice a year. Invest the money you save in adult beverages and bask in the glory when your significant other thinks that you have just returned from the wars having completed the "manly" chore of dealing with the "dreaded" grease gun. Bill2 points
-
If you have a compressor at home, even a really small one, a pneumatic grease gun will work very well. 90 psi is plenty, and the gun just goes “click swooosh” each time you pull the trigger. Once you have tried one you will not go back to a lever type. Unless you go for a battery operated one, to lose the pesky hose, but they are very expensive and most suitable for a maintenance tech. Mine is not a fancy one but it works fine. https://www.homedepot.com/p/Lincoln-Industrial-Air-Operated-Grease-Gun-LING120/306824341? You will probably be OK with just a flex hose and straight fitting at the end. If you can stomach the price, one of these Alemite swivel tips will make even those “impossible to reach” zerks accessible. I bought one a few years ago and now would not be without it. I had a big assortment of different tips, now I never use anything but this one, or maybe a needle tip. Alemite swivel grease coupler Most greases will separate, the oil comes out from the wax carrier, and runs everywhere. So even if you keep your gun sideways, in a stable environment (no hot garage!), six months later you will find the lubricant has leaked out. Plus this happens on your trailer suspension, and it makes a huge mess. I have switched from a regular cheap lithium grease to Redline CV-2. It is expensive, but it does not separate at all. I have four year old cans, and the grease looks like new. Use it in your wheel bearings and electric jacks too. Redline CV-2 14 ounce tube John Davies Spokane WA
2 points
-
My mission after the first few camping trips was to install a better shower head in the Oliver. I especially didn't like the fact that I had to turn the water off at the faucet handle and lose the setting. Research turned up a highly regarded brand called High Sierra. I searched for those on this forum as well and found that at least one person (Overland) has also upgraded to a High Sierra. I chose the same ugly one with a nice new faucet but an even uglier diverter. 😄 I also hope my wife doesn't notice that her washcloth holder is gone now. 😬 I decided that a permanent access hatch (DasMarine Marine Deck Access Hatch & Lid with Lock, White, 24" Length X 14" Width (606MM. Length X 353MM. Width) in it's place was a better value (at least to me!). I can get at all my new valves now.
1 point
-
I want two that are a little larger, with larger holes, and no more than 10 or 12” long. I did find this louvered one ..... https://www.amazon.com/dp/B002IV6PD0/?coliid=I2BOYQ3KRAV24E&colid=1X5H11EH41351&psc=1&ref_=lv_ov_lig_dp_it .... but I really want a design with a smooth “no snag” surface, since they will be located near the sleeping areas and might get bashed by a wayward arm. Plus these are way prettier! Somebody who has installed a compressor fridge, what air vents did you use in the galley? Thanks. John Davies Spokane WA
1 point
-
LongStride, Welcome to the forum and congrats on your Elite l, very exciting! This forum has a wealth of knowledge and a great Oliver family to become acquainted with. Everyone is more than willing to lend an ear and answer your questions. You also have plenty of time to study up on your Ollie and become Oliver University Alumni. Being fairly new Oliver owners ourselves, Oliver University has been extremely helpful. Oliver even takes there customer service to another level with great maintenance videos. So dive in snd enjoy. Welcome to the Oliver Family, now hit the books. 📚👍🏻😄 -Patriot1 point
-
In the description for this one (The James) it states that it has a divider. Does that prevent your cell phone from going all the way in it? Measures 8.5 x 5.5 x 2 and holds 5# The Frank has a slight V to the front (as opposed to straight on the James) and says it measures 9.5 x 5.75 x 3 holds 10# and has no divider. It seems like it would be larger than needed for cell phones/pens/etc. Planned to order online but now I’m thinking I should probably just go to BB&B to see which fits better. Planning to use near the beds for cell phones and misc stuff. Thanks!1 point
-
And - that's the long and short of it. Really, welcome. There are a bunch of us that got here in a way similar to you guys. Congratulations on joining the family. And even though June might seem a long ways away, there is plenty to do between now and then. In the meantime, let those questions fly, get to reading, get to planning all those Ollie trips, and, Merry Christmas to you two too. Bill1 point
-
We use the one on the outside, far more than the two on the inside. We used to use one on the inside for a small (700 watt?) Inverter for a laptop. We really only use it for usb converters now.1 point
-
small air compressor Even though I had one installed near the 110 volt outlet on the exterior during my build, I could have used the ones on the interior and simply passed the cord to the exterior. It makes for adjusting the tires on the Ollie much easier. Bill1 point
-
I use one for my APAP (CPAP) machine. Much less of a draw than running off an inverter! Andrew1 point
-
mjrendon, The smaller Elite 1 trailer also has a 12v port located in the attic. Post this install, we now have two open 12v ports (1 under cabinet, 1 attic) and 2 dual usb ports. Perhaps we will need the 12v ports for other uses we just haven't come across yet. For now, wife and I are both happy we can now charge our phones/watches at the same time without the need of an adapter.1 point
-
I have an elte 2 with both USB and 12V connections available in the kitchen and dining areas. but the attic has only 12V (or110). Seems like there is always a need for another USB port and most of the time the 12V ports remain empty.1 point
-
Wow, you should go into your own business customizing trailers. Given the space constraints you had to work around, the plumbing is amazing to me. The décor and final look are spectacular upgrades. 🙂1 point
-
Wow! Very impressive.1 point
-
Nice job!!1 point
-
We've found that a quick squirt of water from the shower works fine if you don't want to bother with the vinegar.1 point
-
This update is gorgeous! What a great job you did. I love the colors and finishes.1 point
-
Ours has the solar with 4 wet 6V batteries. We have not plugged in at home, since bringing it home 4 years ago. It is always charged up and ready to go. It has given tours, acted as a TV room, a reading room, and an occasional guest room. You would never know it wasn't plugged in (AC is not often needed in Maine). A remote CG on Moosehead Lake runs on a generator for an hour, three times a day. With the solar you never know, or really care, whether the generator is on or not. Went for a solo trip once that lasted 8 days. Never plugged in once. (The best night was alongside an old stone mill with a turning waterwheel). As you might guess, our vote is for solar. We don't have a plug for a suitcase, or a need to run AC. But it still works in the winter. Runs the blower for propane heat, and gives us light.1 point
-
I am always amazed at the modifications Ollie owners can do! Well done! And beautiful too.1 point
-
Wow, that's amazing sir!1 point
-
Don't forget to get "permission" to use a dollar store picinic table cover. Easier to slide around on, when under the trailer. Also you don't leave any unwanted grease residue laying around for the next site visitor. All said and done..I don't find the grease task all that difficult. Guess the hardest part is trying to get up, after laying down to grease, or maybe deciding whether or not I can get under the axle or I should go around?1 point
-
Those straps look fine, but you need to come up with a way to protect the nylon material where it goes through the sharp steel tray slots. They will wear rapidly otherwise, because the load will be pulling upwards hard at a concentrated location. If you can use the front and back slots, not the side ones, you can thread them through the rear slots, then route those ends under the tray, not back over the top. It might help. This won’t be possible if you are using the side slots since it will bind up the slides. Or just use the same kind of hook straps and slide a piece of thin (22 gauge , 0.025”) stainless steel between the battery case and each hook. The steel itself will not hurt the battery, and it will spread the load to prevent chafing. And it will look good too. You can buy it new online, or repurpose an old stainless bowl or kitchen item. You only need a small amount. https://alcobrametals.com/product/22ga-t304-4-polish-stianless-sheet/ John Davies Spokane WA1 point
-
The scandvik isn't a "looker," either. But it works well. Except for the little knobs for controls, imo. They're difficult to operate with soapy hands.
1 point
-
Very nice indeed! That would really simplify the mess I created with the diverter. 🙂1 point
-
That's very nice. Mine is similar now, but with the shower mixer on the closet wall. It's a much better arrangement than the pull-out faucet, for both the shower and sink.1 point
-
#707 logo Mock-up... what you say when you are about to take a different tack...
1 point
-
To be fair - I do not know about the agreement between Oliver Service and QuestionMark regarding his particular situation. QuestionMark has been very nice in both reporting his difficulties and in letting us all know how things developed/were resolved by Oliver. However, in all of the cases that I'm aware of Oliver Service has given the owner the option of taking the camper to a RV repair facility for needed warranty repairs or (if they feel comfortable/qualified) to do the repairs if the owner can do the repair themselves. This is not to suggest I accept nor condone quality control issues such as those reported by QuestionMark. But, Oliver has a long history of "making things right" when things do not go according to the way they should. Yes, things of this sort should never happen and, yes, it is a real pain in the tail for all concerned when they do happen. But, contrary to virtually every other company I've ever dealt with, Oliver does whatever is necessary to make things right and to correct production QC issues if that was the culprit. Bill1 point
-
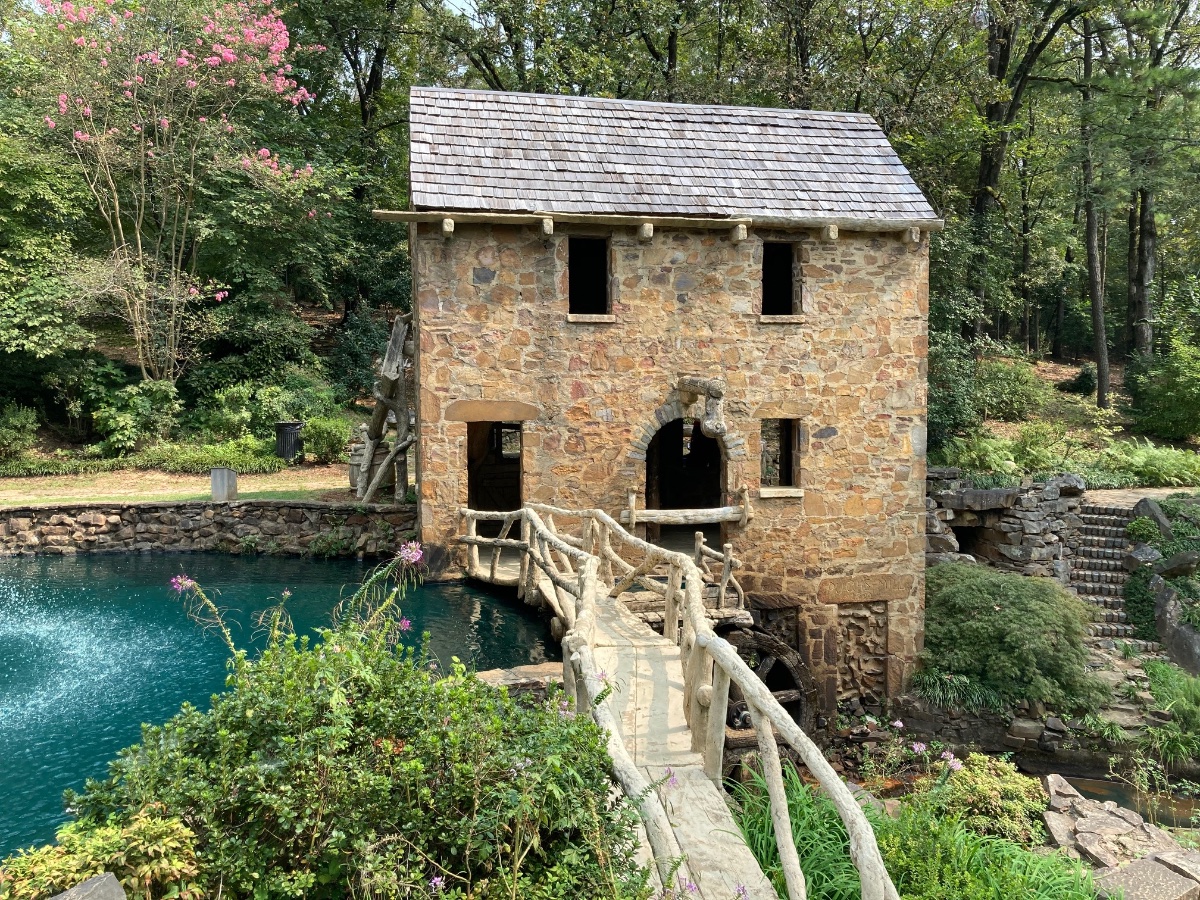
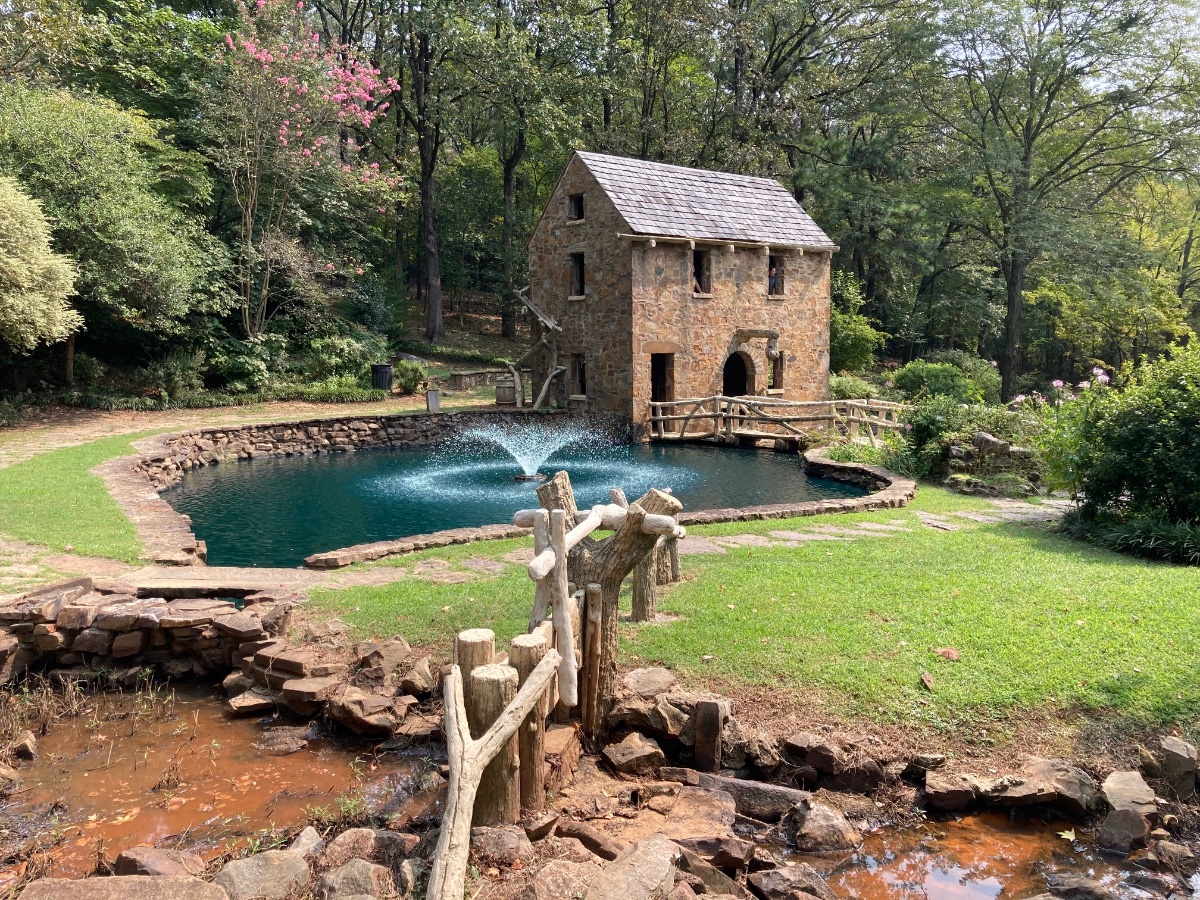
On our drive back home to SE Texas after picking up our Ollie, we stayed at the COE Maumelle Park (Highly recommend). After unhooking the trailer, we made a short drive of about 10 min. to the TR Pugh Memorial Park located within Little Rock. I thought I would share the photos as it was a wonderful place to see and highly recommend you visit if you find yourself in the Little Rock Area.
1 point
-
I agree COE projects have beautiful campgrounds. When we are not boondocking our first choice is a COE campground.1 point
-
Oh yes, algae, I remember that stuff, and swamps, and humidity, and brown slow moving rivers. All that “back East” stuff. I was kidding mostly, I love Corps of Engineer projects, they have beautiful campgrounds along many waterways here in the PNW, like along the Columbia River. They are nicely manicured, green (even in desert locations), well maintained and inexpensive, especially with a half-off Geezer Pass. Unfortunately most are still closed due to Covid. John Davies Spokane WA1 point
-
This stuff is very tough and thin. Might do the job you described. Mossey
1 point
-
There are so many beautiful places that we have enjoyed that it's hard to pick one. So, I'll go with Deer Island Point campground in New Brunswick. We took the (free) ferry from letete, nb, and planned to stay one night, then ferry to Campobello, and on to Maine. The campground was "officially" closed for the season, but the tourist office said we could dry camp. No services, but no fees. Don't leave a mess. Our site, right at the point, (may have been a tent site, not sure) was just amazing. Marine life, walk down to see the maelstrom, (old sow), and watch the ferries. Absolutely incredible. We kept rearranging our schedule, and stayed four days, leaving our special quiet place, with a heavy heart. The little island is lovely, and quiet, off season. It was cool/cold, but so very beautiful. Probably more crowded in season. Campobello was a fascinating day, when we finally left.1 point
-
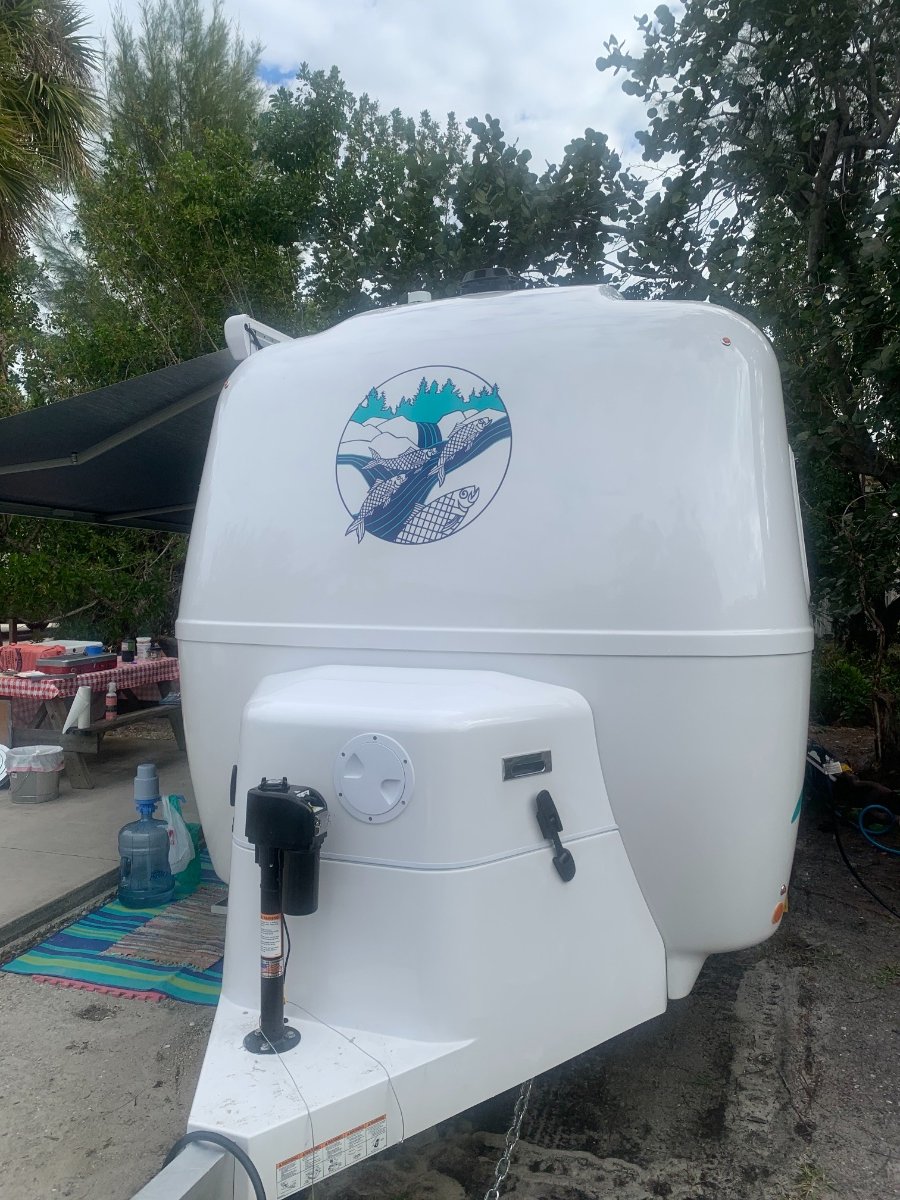
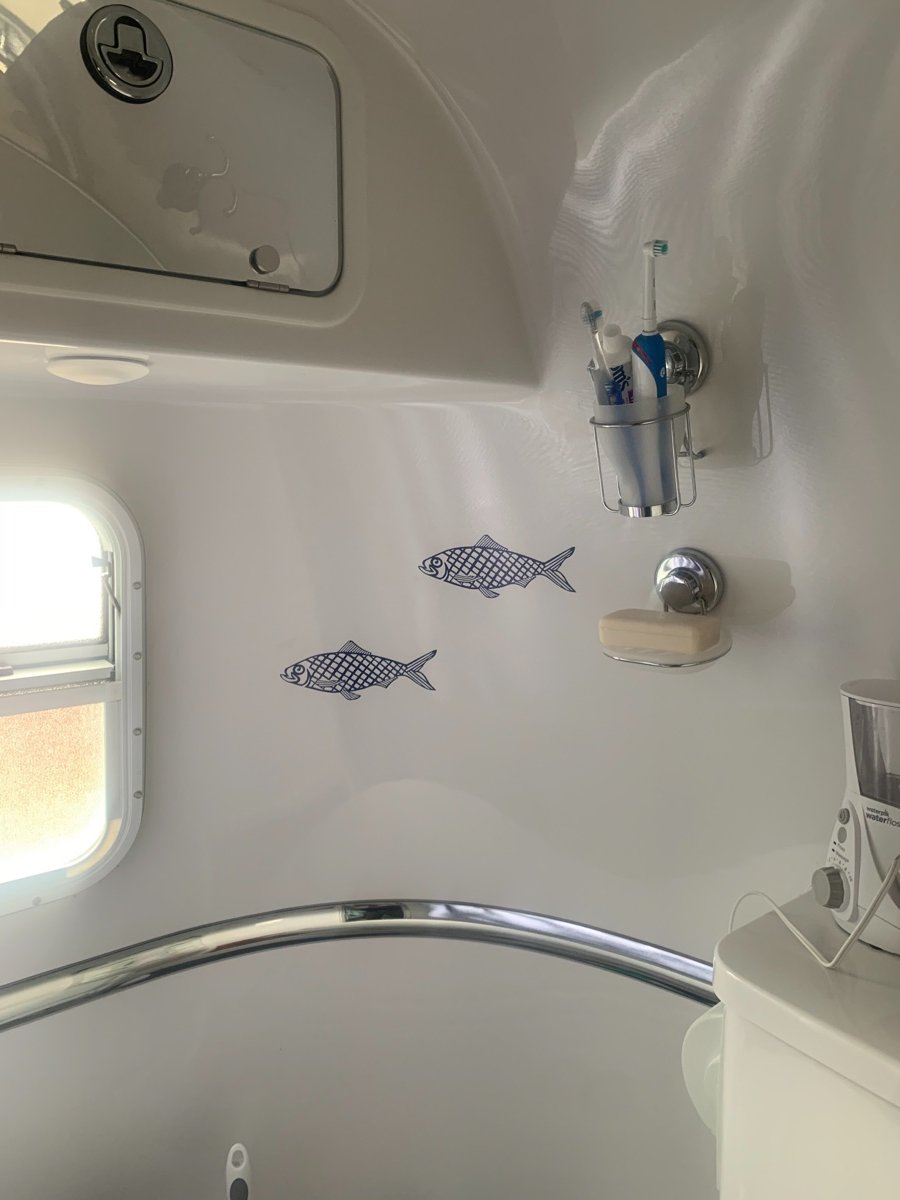
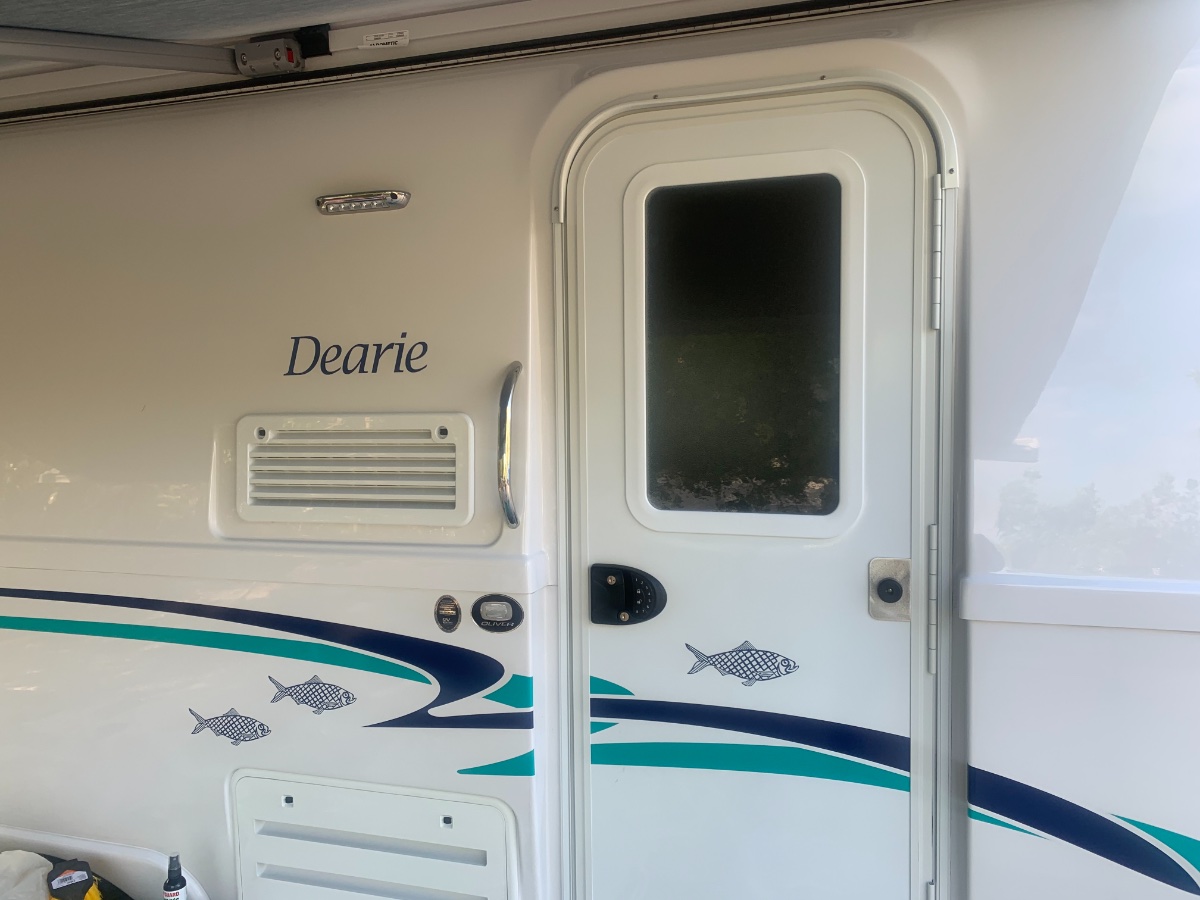
Thank you to Mattnan and Mainiac for pointing us in the direction of Banana Banners for our graphics..
1 point
-
I think our favorite campsite of 2020 is the one we’re sitting in right now on Sanibel Island hanging out in our brand spanking new Oliver....1 point
-
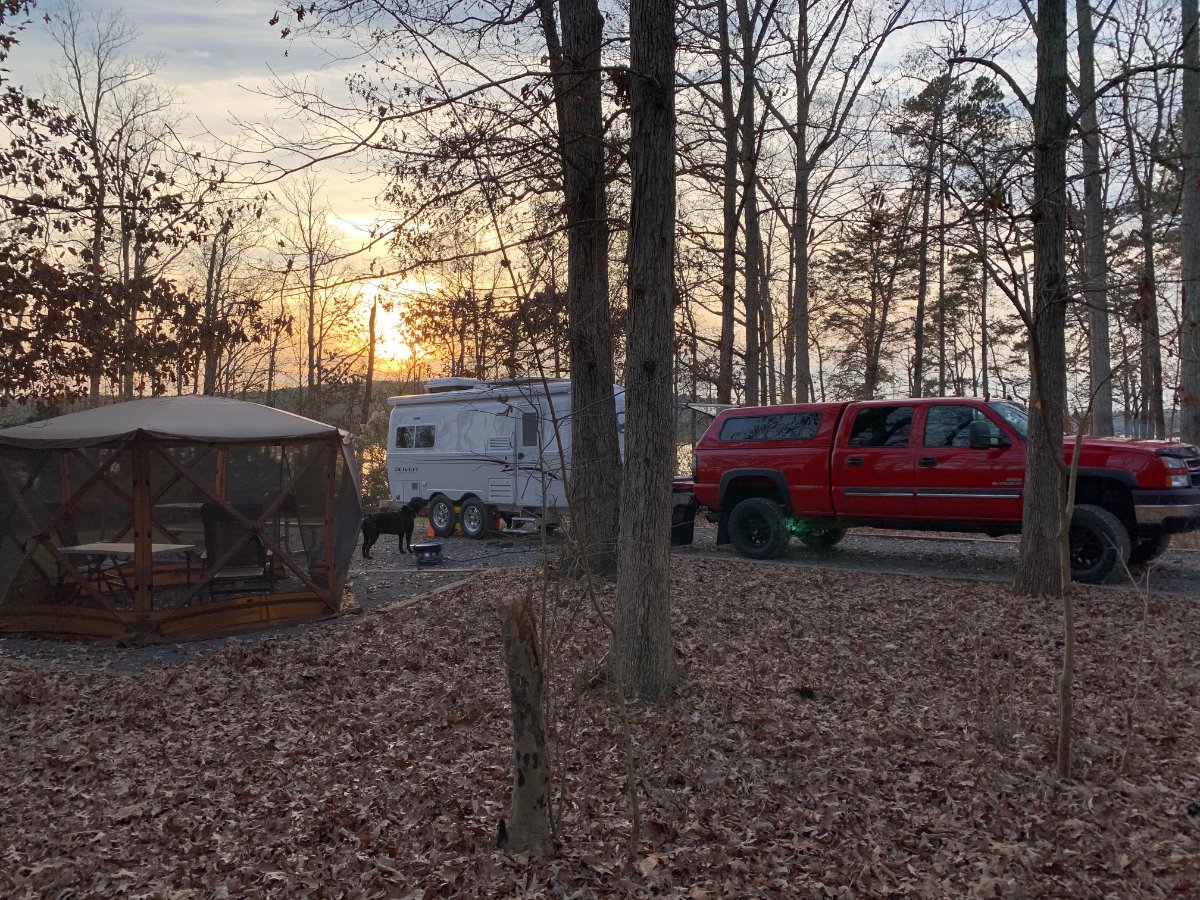
Super easy for us since we just picked up last month and have only camped at David Crocket SP and now Badin Lake CG in Uwharrie National Forest (close to home in NC) in 2020. DCSP was nice, but we were too busy unpacking and checking things to really relax. This latest trip to Badin Lake was fantastic (just got back today). Our first boondocking trip and I am happy to finally color in my own state on the map! 🙂
1 point
-
Bob - For me this is easy - Box Creek de-commissioned NFS campground. N 43degrees 51 minutes 42.5 seconds W 110 degrees 17 minutes 39.0 seconds.
1 point
-
Beautiful pictures. Looks like a storybook 🙂1 point
-
Thanks for posting the picture. We are planning on going through Little Rock this spring. Looks like an awesome stop. Safe travels.1 point
-
Looks like you had the place all to yourself. A great place to take family photos as well.1 point
-
Looks like a location to put on our list! Thanks for sharing. Mike1 point
-
Thanks for taking the time to post your experience and letting Oliver know where QC is lacking.1 point


.thumb.JPG.c11094a6a8c73946473572dfe3e34685.JPG)


-
Recent Achievements
-
")


")


")

