Leaderboard


Popular Content
Showing content with the highest reputation on 02/11/2021 in Posts
-
I still think this is a lot of drama over numbers in technical specs without much in the way of real world failures actually pointing to an issue. I’ve been running lithiums for three years now with no circuit board failures and this thread is literally the only thing on the entire internet that I can find expressing concern over lithium charge voltages. IMO, go camping and stop worrying.3 points
-
After getting the materials to do this job more than a year ago, I finally finished it this past month. Thanks John.3 points
-
Nicole, the full size (53 or 54 inches wide bed) is 6 inches wider than a lot of other small travel trailers (including many small airstreams). But, a queen is 6 inches wider, yet, at 60 inches. Adding 6 inches to the bed of an Elite would make the kitchen and small dinette super tiny and uncomfortable, or require an expensive mold redesign and change to add 6 inches to the trailer. I totally get it. We have a king at home. Used to have a queen, so the difference wasn't much. It still doesn't bother us. Especially during cold weather camping, the smaller cozy space is nice. Oliver doesn't really monitor this space, so you might want to send your suggestion in an email? Years ago, I used to say that if Oliver would make a little larger trailer, with a queen bed and a bigger fridge, I'd consider trading up. At this point, I don't think I would. We love our 13 year old trailer. It may not be "perfect " for us, but it's pretty close. Sherry2 points
-
Several of us use the Pur. Some use Brita, but I think Pur filters more contaminants. https://www.pur.com/why-pur/filter-comparison-pitcher2 points
-
https://expeditionportal.com/forum/threads/sold-oliver-fuso-fuso-fg-4x4-oliver-fiberglass-camper-for-sale-75k.209216/ Yes an Oliver I on a FUSO from EXPO2 points
-
Ready? I've only included sites between just west of Vail CO and Saint Louis that are on or very near interstate 70. Before I forget - when headed east on I-70 through the Saint Louis metro area, it is best to exit I-70 some 25 miles west of the city onto I-64. Generally there is a bit less traffic on I-64 and it is a bit of a straighter shot. Once on I-64 you can stroll along until you obviously hit near the center of town - then be sure to be in one of the two LEFT lanes. These will automatically dump you onto a bridge over the Mississippi River. From there just follow the signs or your GPS to I-70 (actually it simply goes straight over the bridge and straight onto I-70 unless there is construction). River Dance RV - 39.65006, -107.00831 (regular RV camp right off I-70 some 35-40 miles west of Vail - nothing fancy but OK showers, h2o and electric at site and dump) Gypsum BLM camp, Edwards, CO - 39.65570, -106.97616 (right on CO river west of Vail - no water, electric or dump and right by I-70) Free Wolcott BLM, Wolcott, CO - 39.71200, -106.69586 (again right on the river closer to Vail but no services and right next to I-70) Free Gore Creek, Vail - 39.63069, -106.27221 (nice campground very close to but east of Vail on north side of I-70) Might be snowed in though in March. Red Lion Inn in Vail has a great burger and Vail is a great place to people watch. Or Three Amigos mexican is not bad and relative cheap for Vail with a great view of the slopes. Pine Cove Camp, Frisco, CO - 39.58692, -106.06897 (nothing but a parking lot on SE side of the reservoir, pit toilets, h2o in season, no dump. might be spots in regular campground that you will see as you drive in. Frisco is a nice little town right on I-70 for drinks/dinner. High Plains Camp, Oakley, KS - 39.18561, -100.87067. A restaurant and bar and gas station are very close. This is a regular RV park very close to I-70. h2o, electric at site and dump on exit. If you stay here it is worth taking a short drive towards the town of Oakley if it is a clear day to see the Buffalo Bill Statue right near the road. Kansas Country Inn, Oakley, KS - 39.11988, -100.84371. Less road noise than High Plains but not much else there. Motel Breakfast used to be included with camping fee. Sites have full hookups. It is still worth the short drive to see that statue. There is also a free "fossil" museum in Oakley if you are into that sort of thing. Blue Spring Lake Camp, Kansas City, MO - 38.86822, -94.32020. One of my favorites but Google shows that it is "temporarily closed" - check at 816-503-4805. Easy to get to off either I-70 straight through KC or (better yet) take the southern belt around KC and exit to camp off I-435. Full hookups or h2o/electric with dump are available with decent showers/restrooms. Bass Pro Shop and Duluth cloths are near if you care. From here, Columbia, MO is right at 2 hours drive and there is a Cracker Barrel there. Then Saint Louis is about another two hour drive from Columbia. Lazy Day Campground, Danville, MO - 38.89626, -91.56015. Nice commercial camp about 1.75 miles off I-70. Very nice restrooms/showers. Flying J/Pilot Gas, Warrenton, MO - 38.84047, -91.22814. If you think you will need fuel get it here. Shortly after this traffic and congestion will get worse and after ST. Louis fuel will get more expensive due to higher taxes in Illinois. In addition, they sell Kettle Corn in a tent outside the station! That's all I got. If you have questions - yell. Bill p.s. Phil Long is the owner of the Red Lion Inn in Vail. He also puts on a good show (singing one man band) that usually starts about 7-7:30. Please tell him I said "hi" if you go there.2 points
-
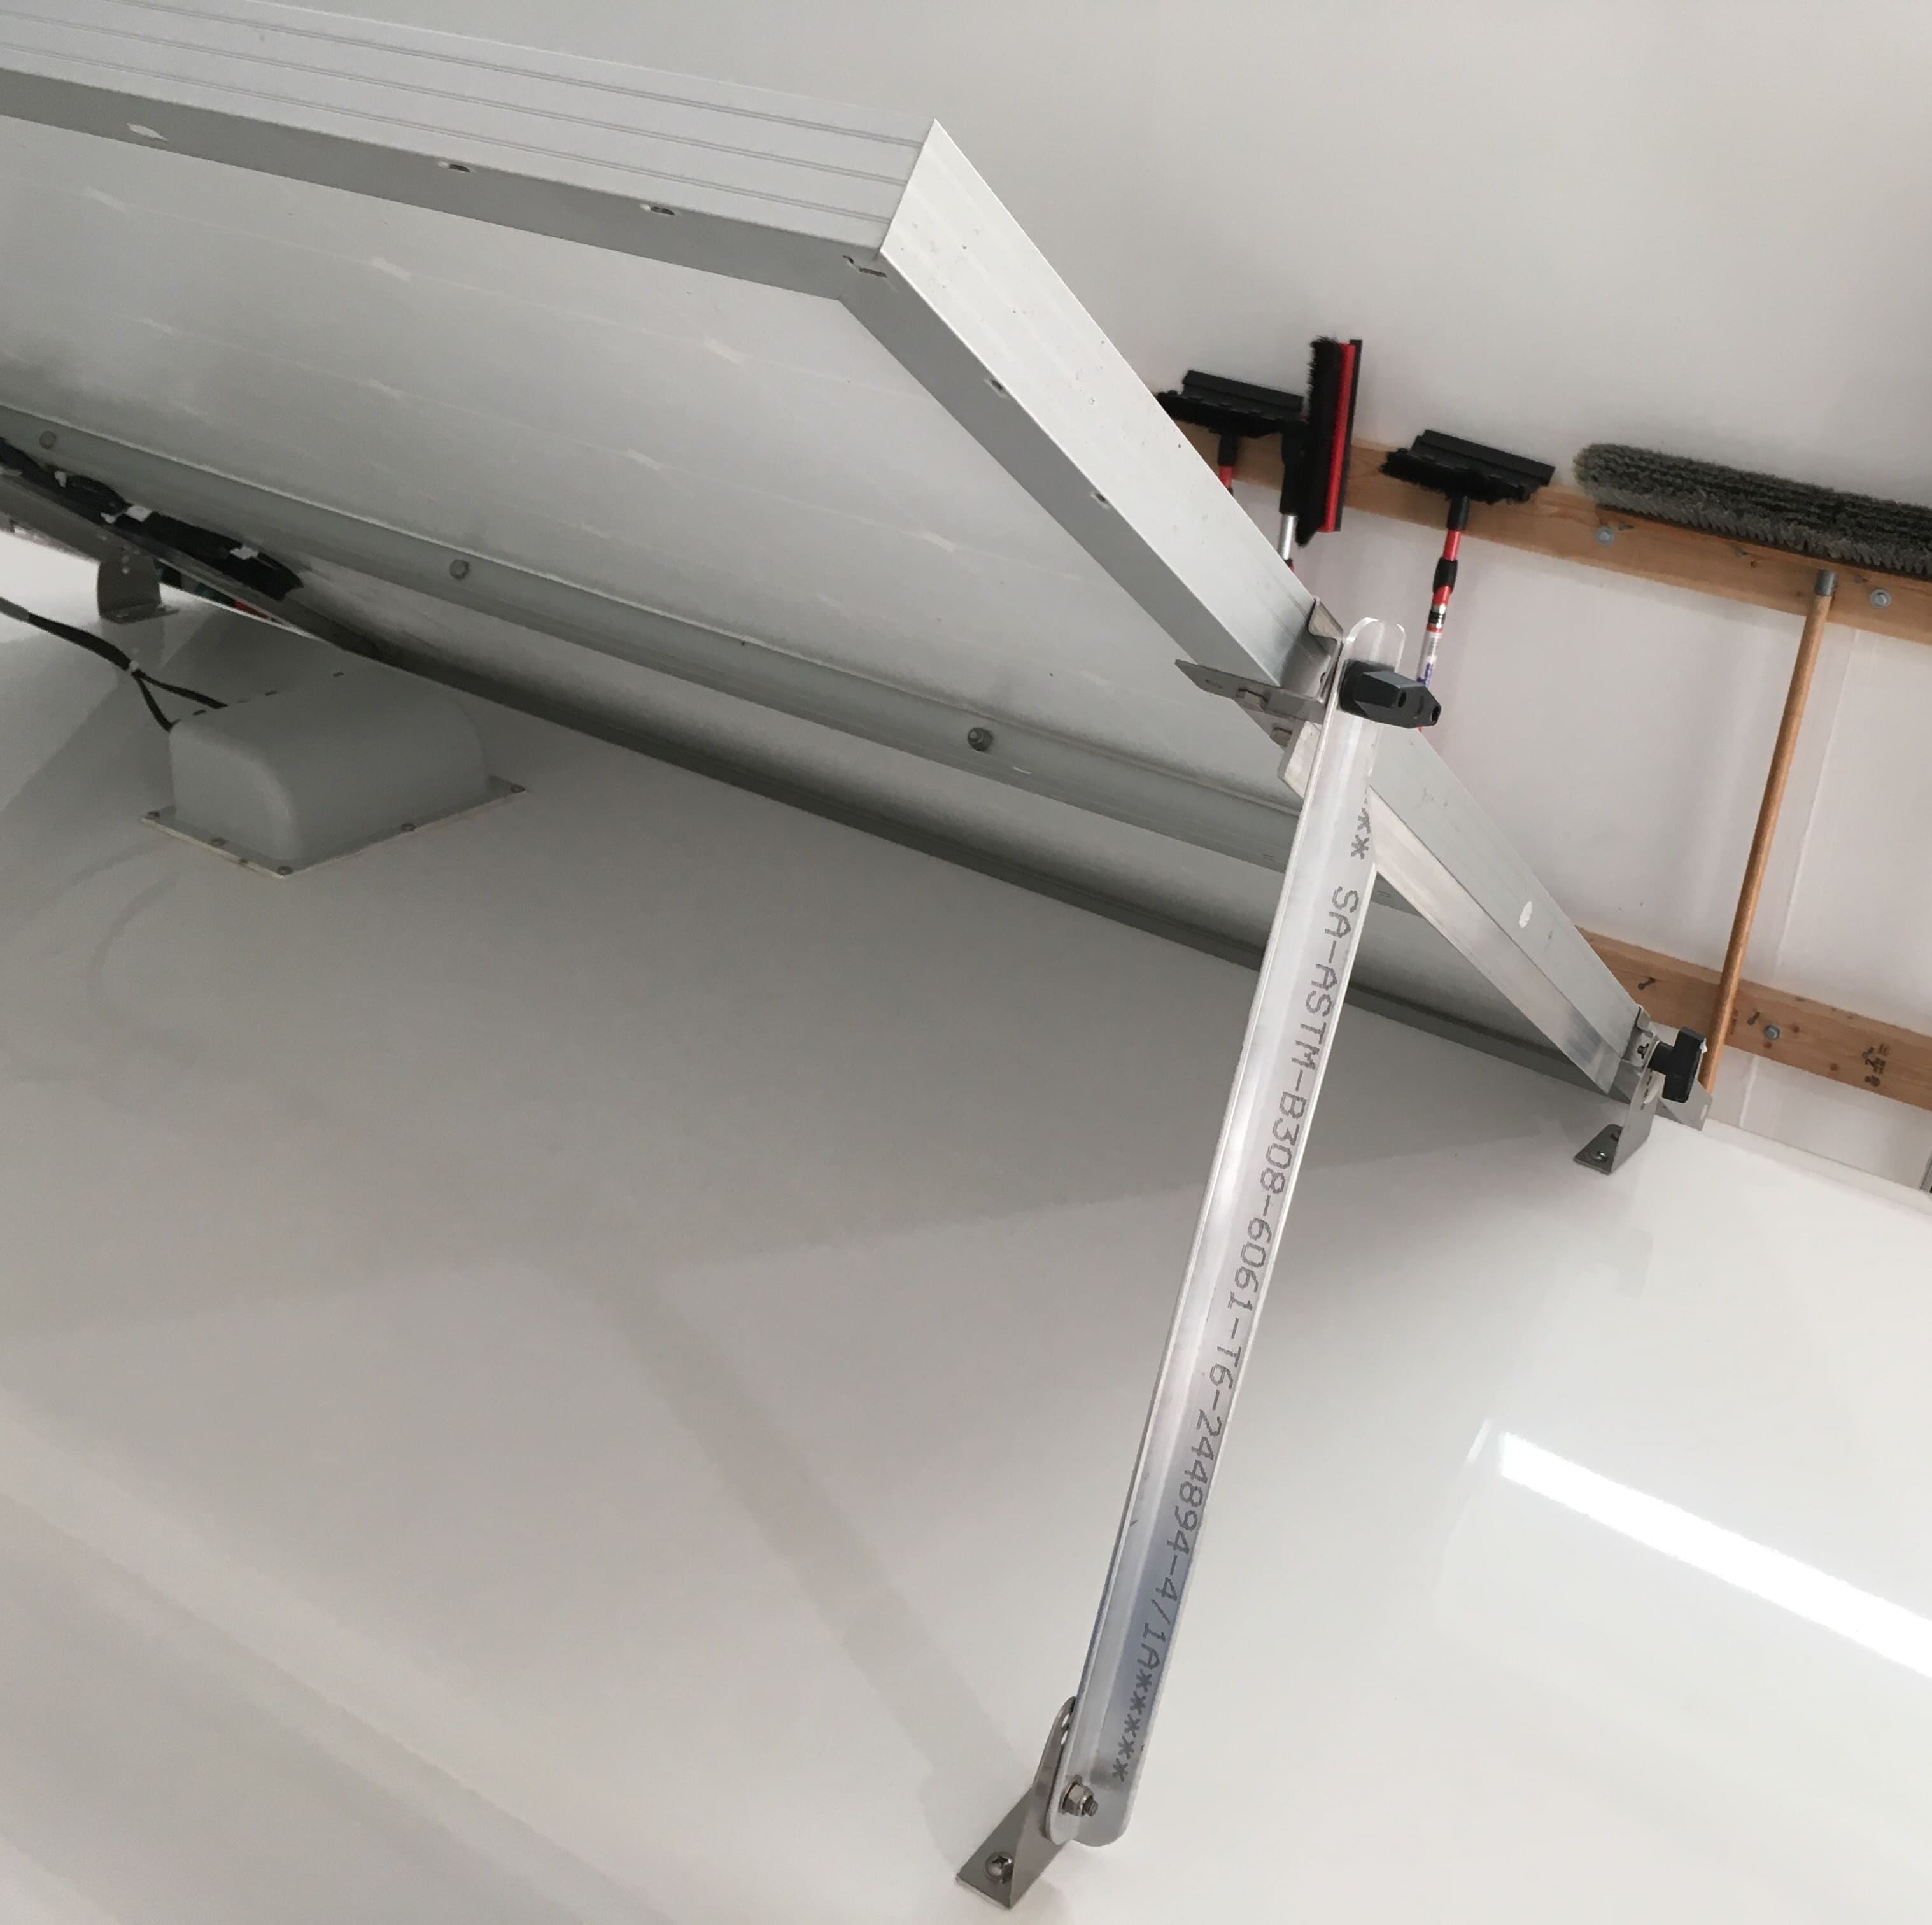
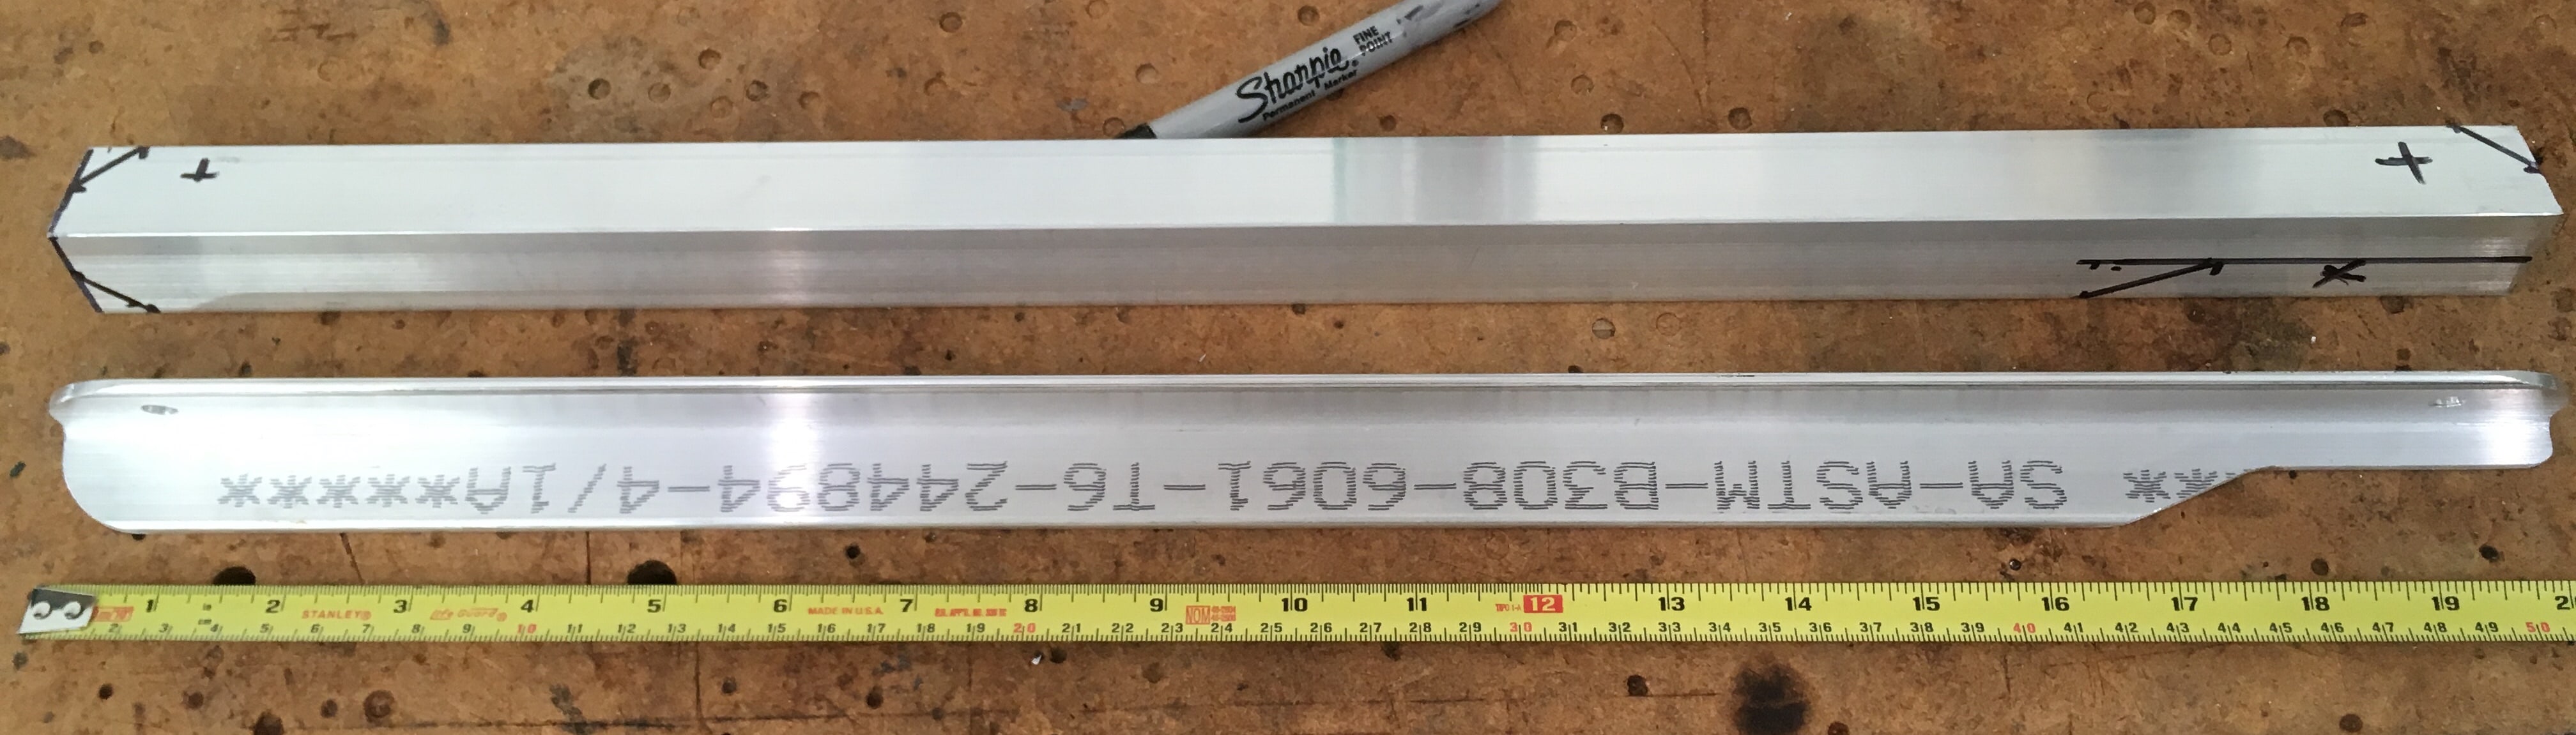
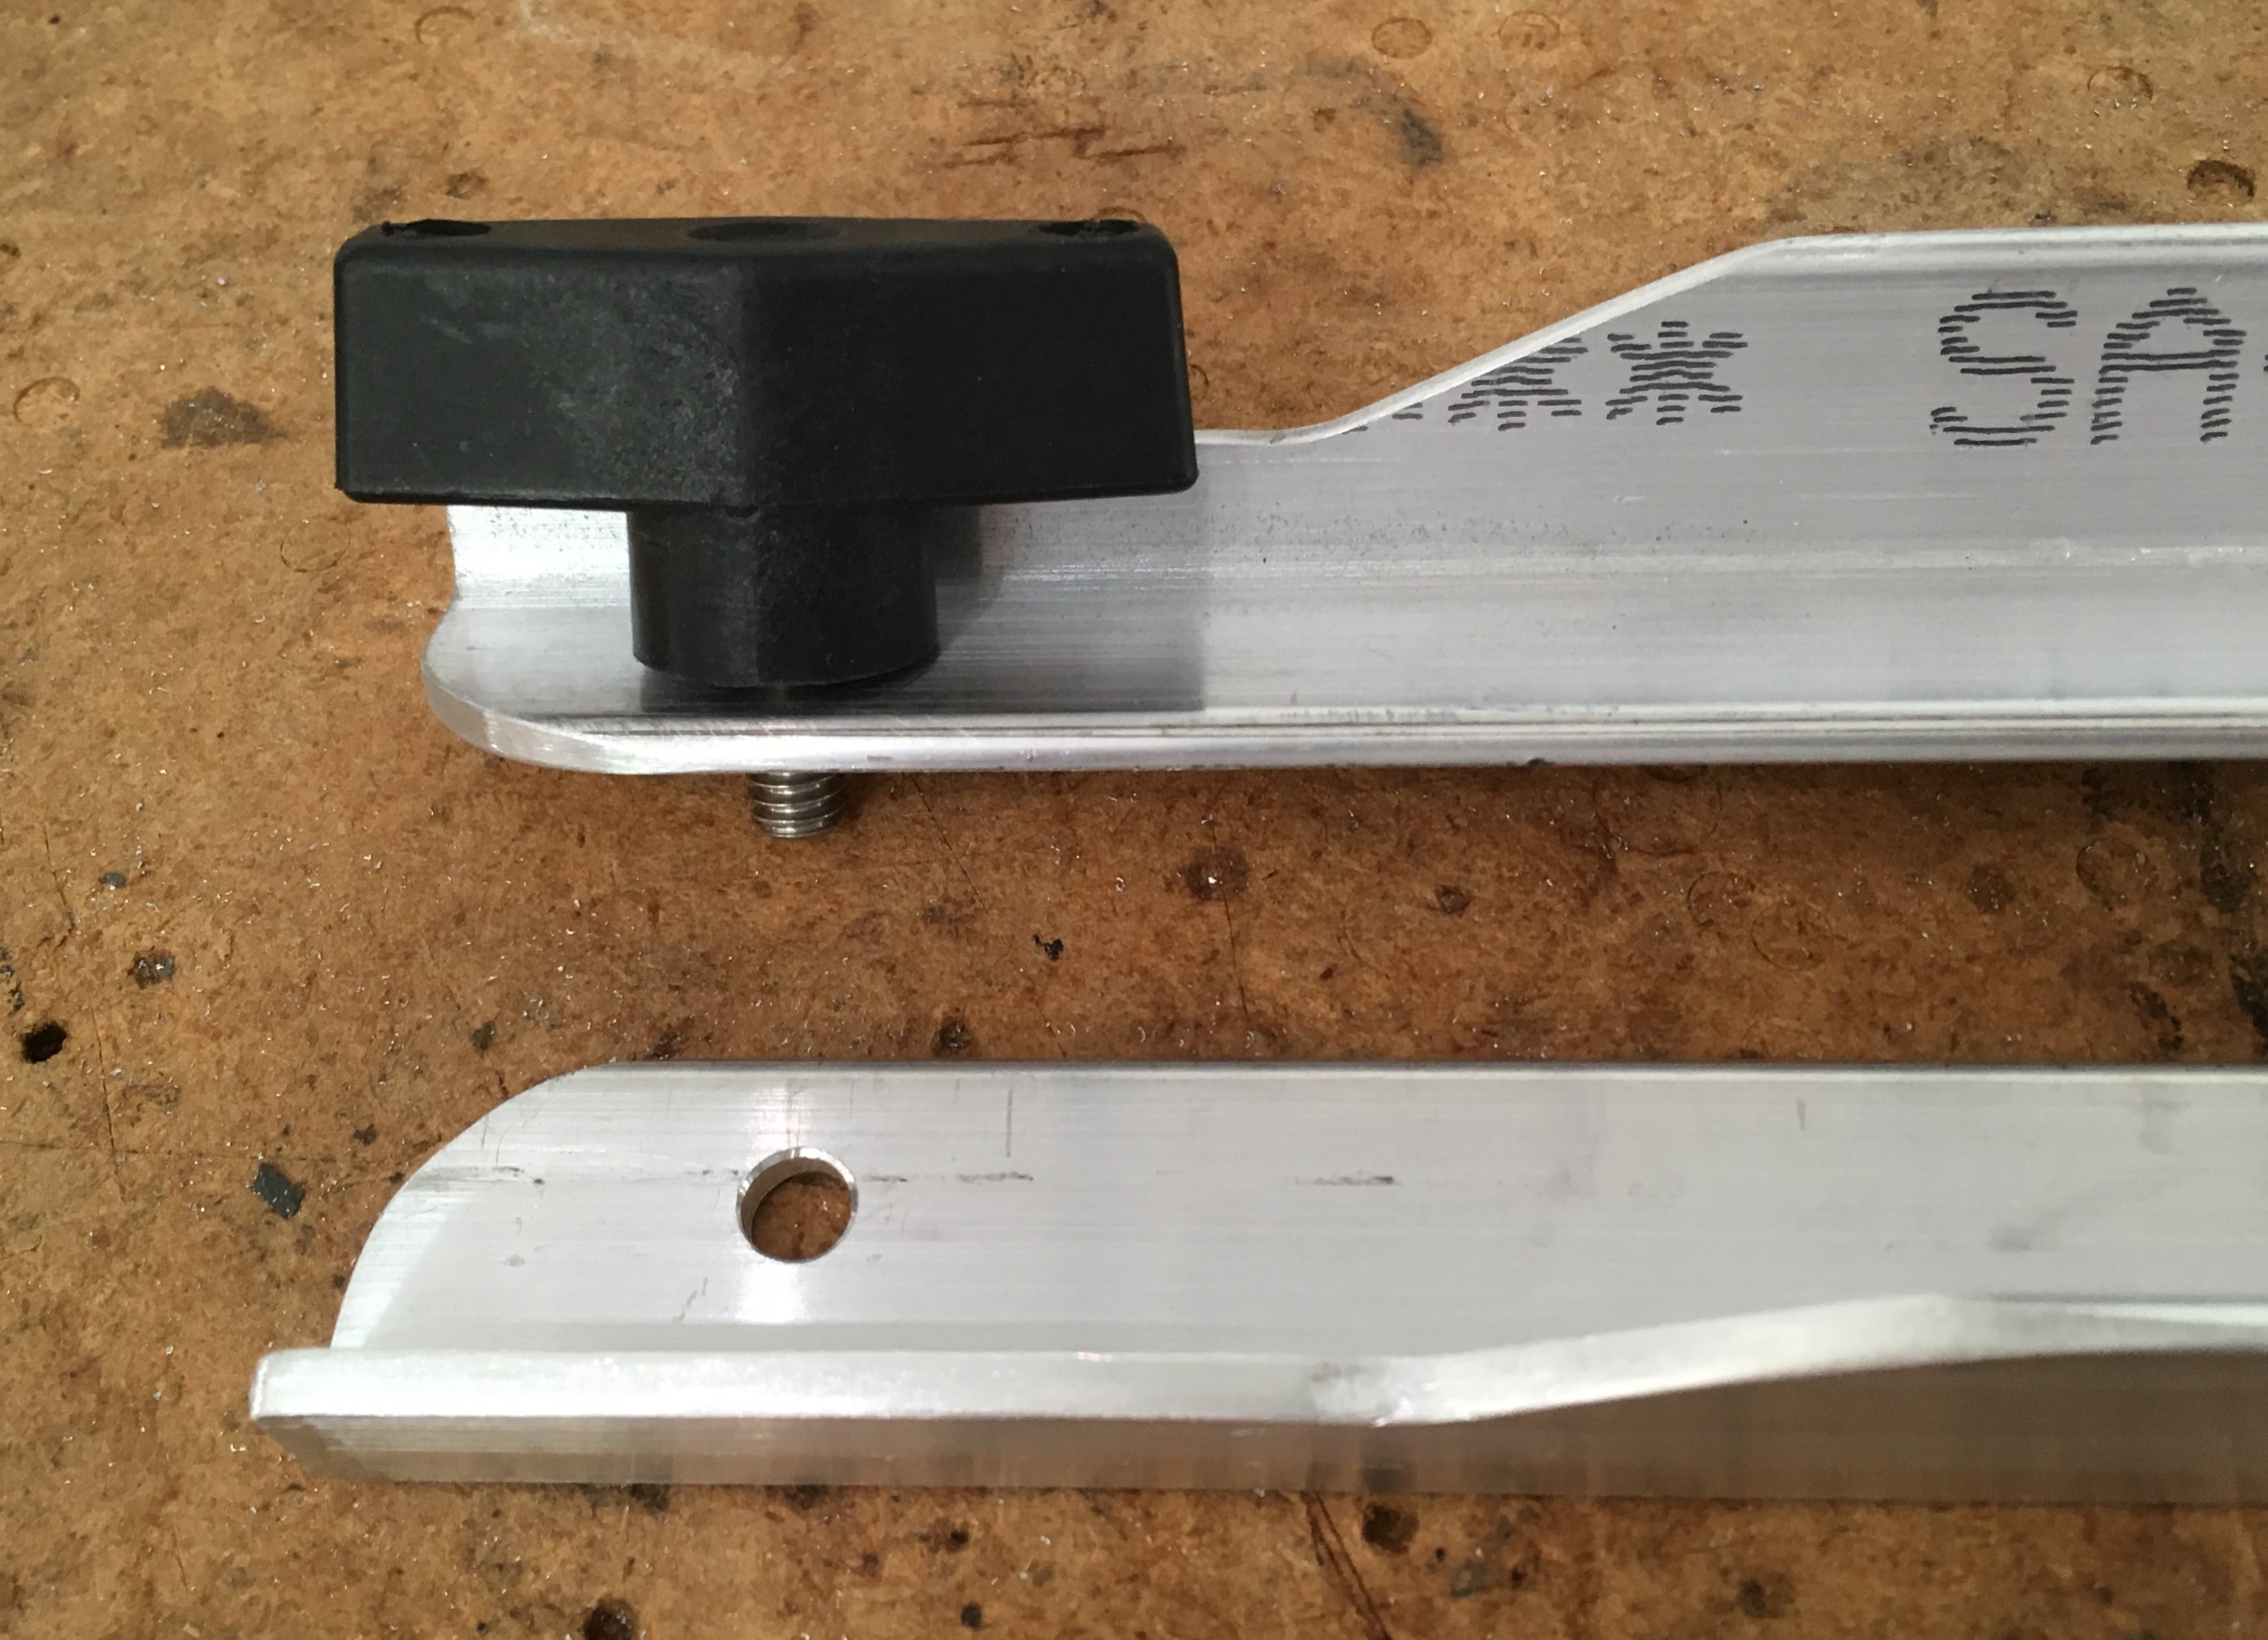
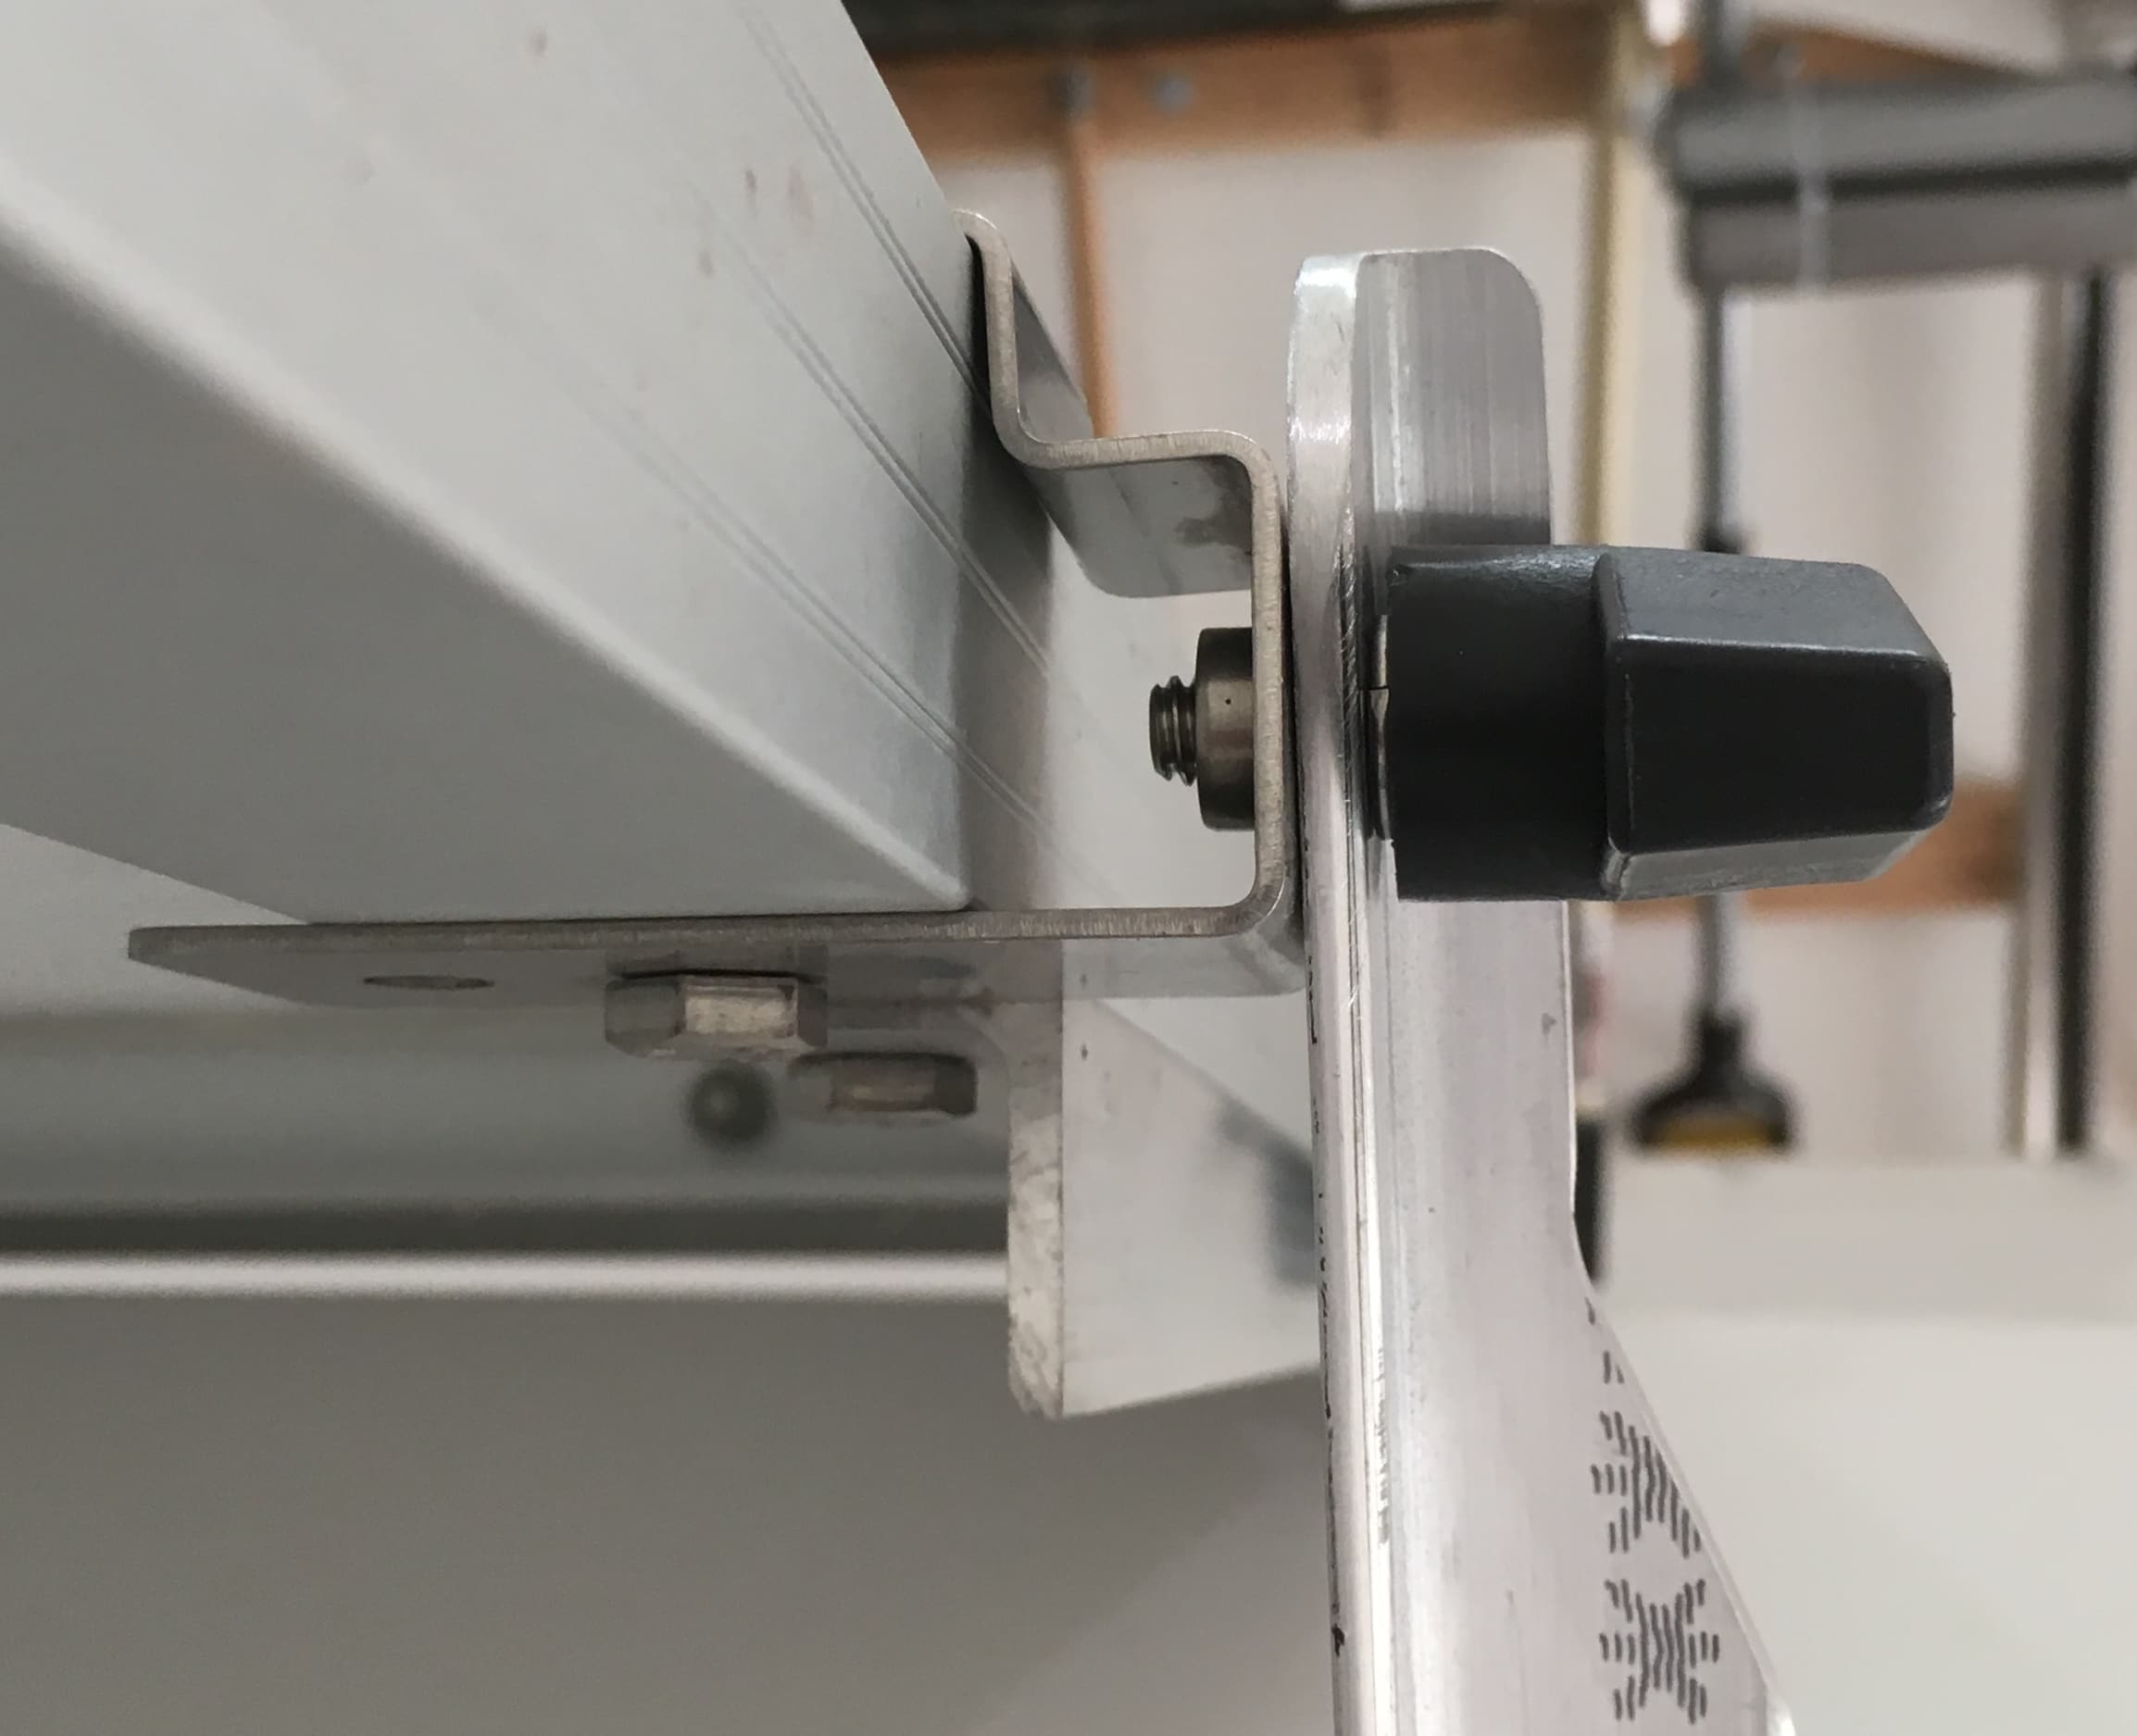
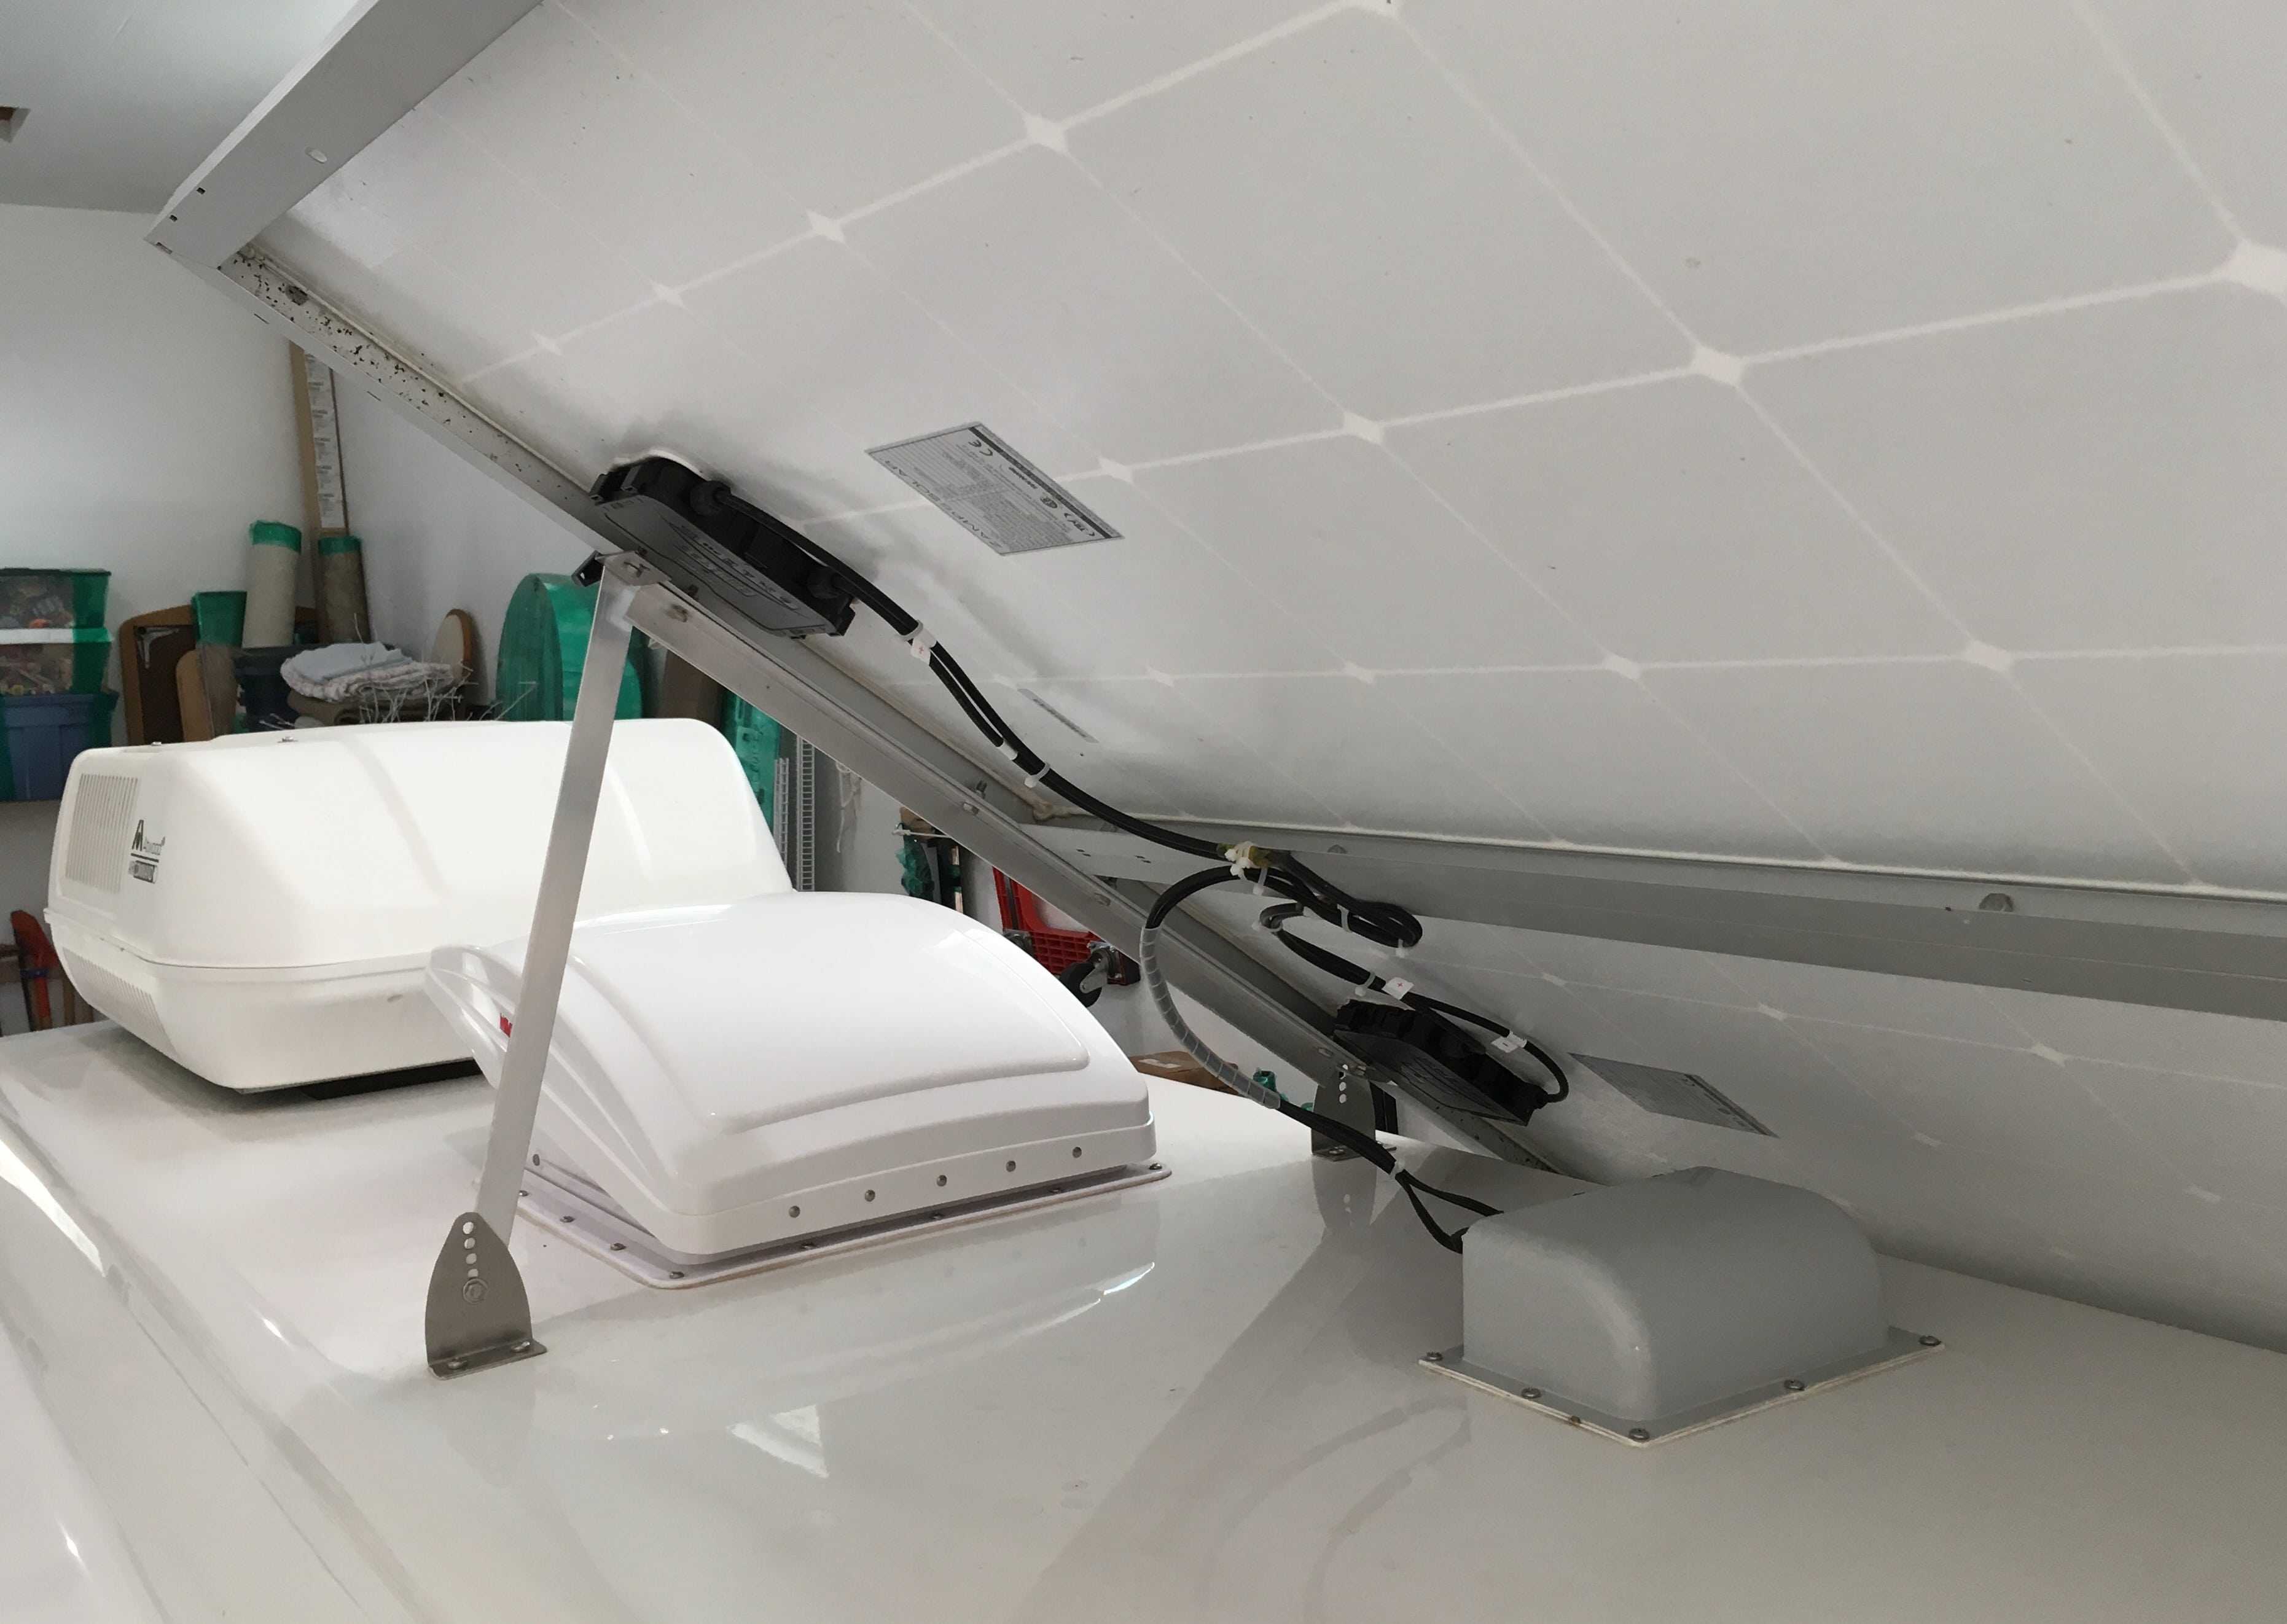
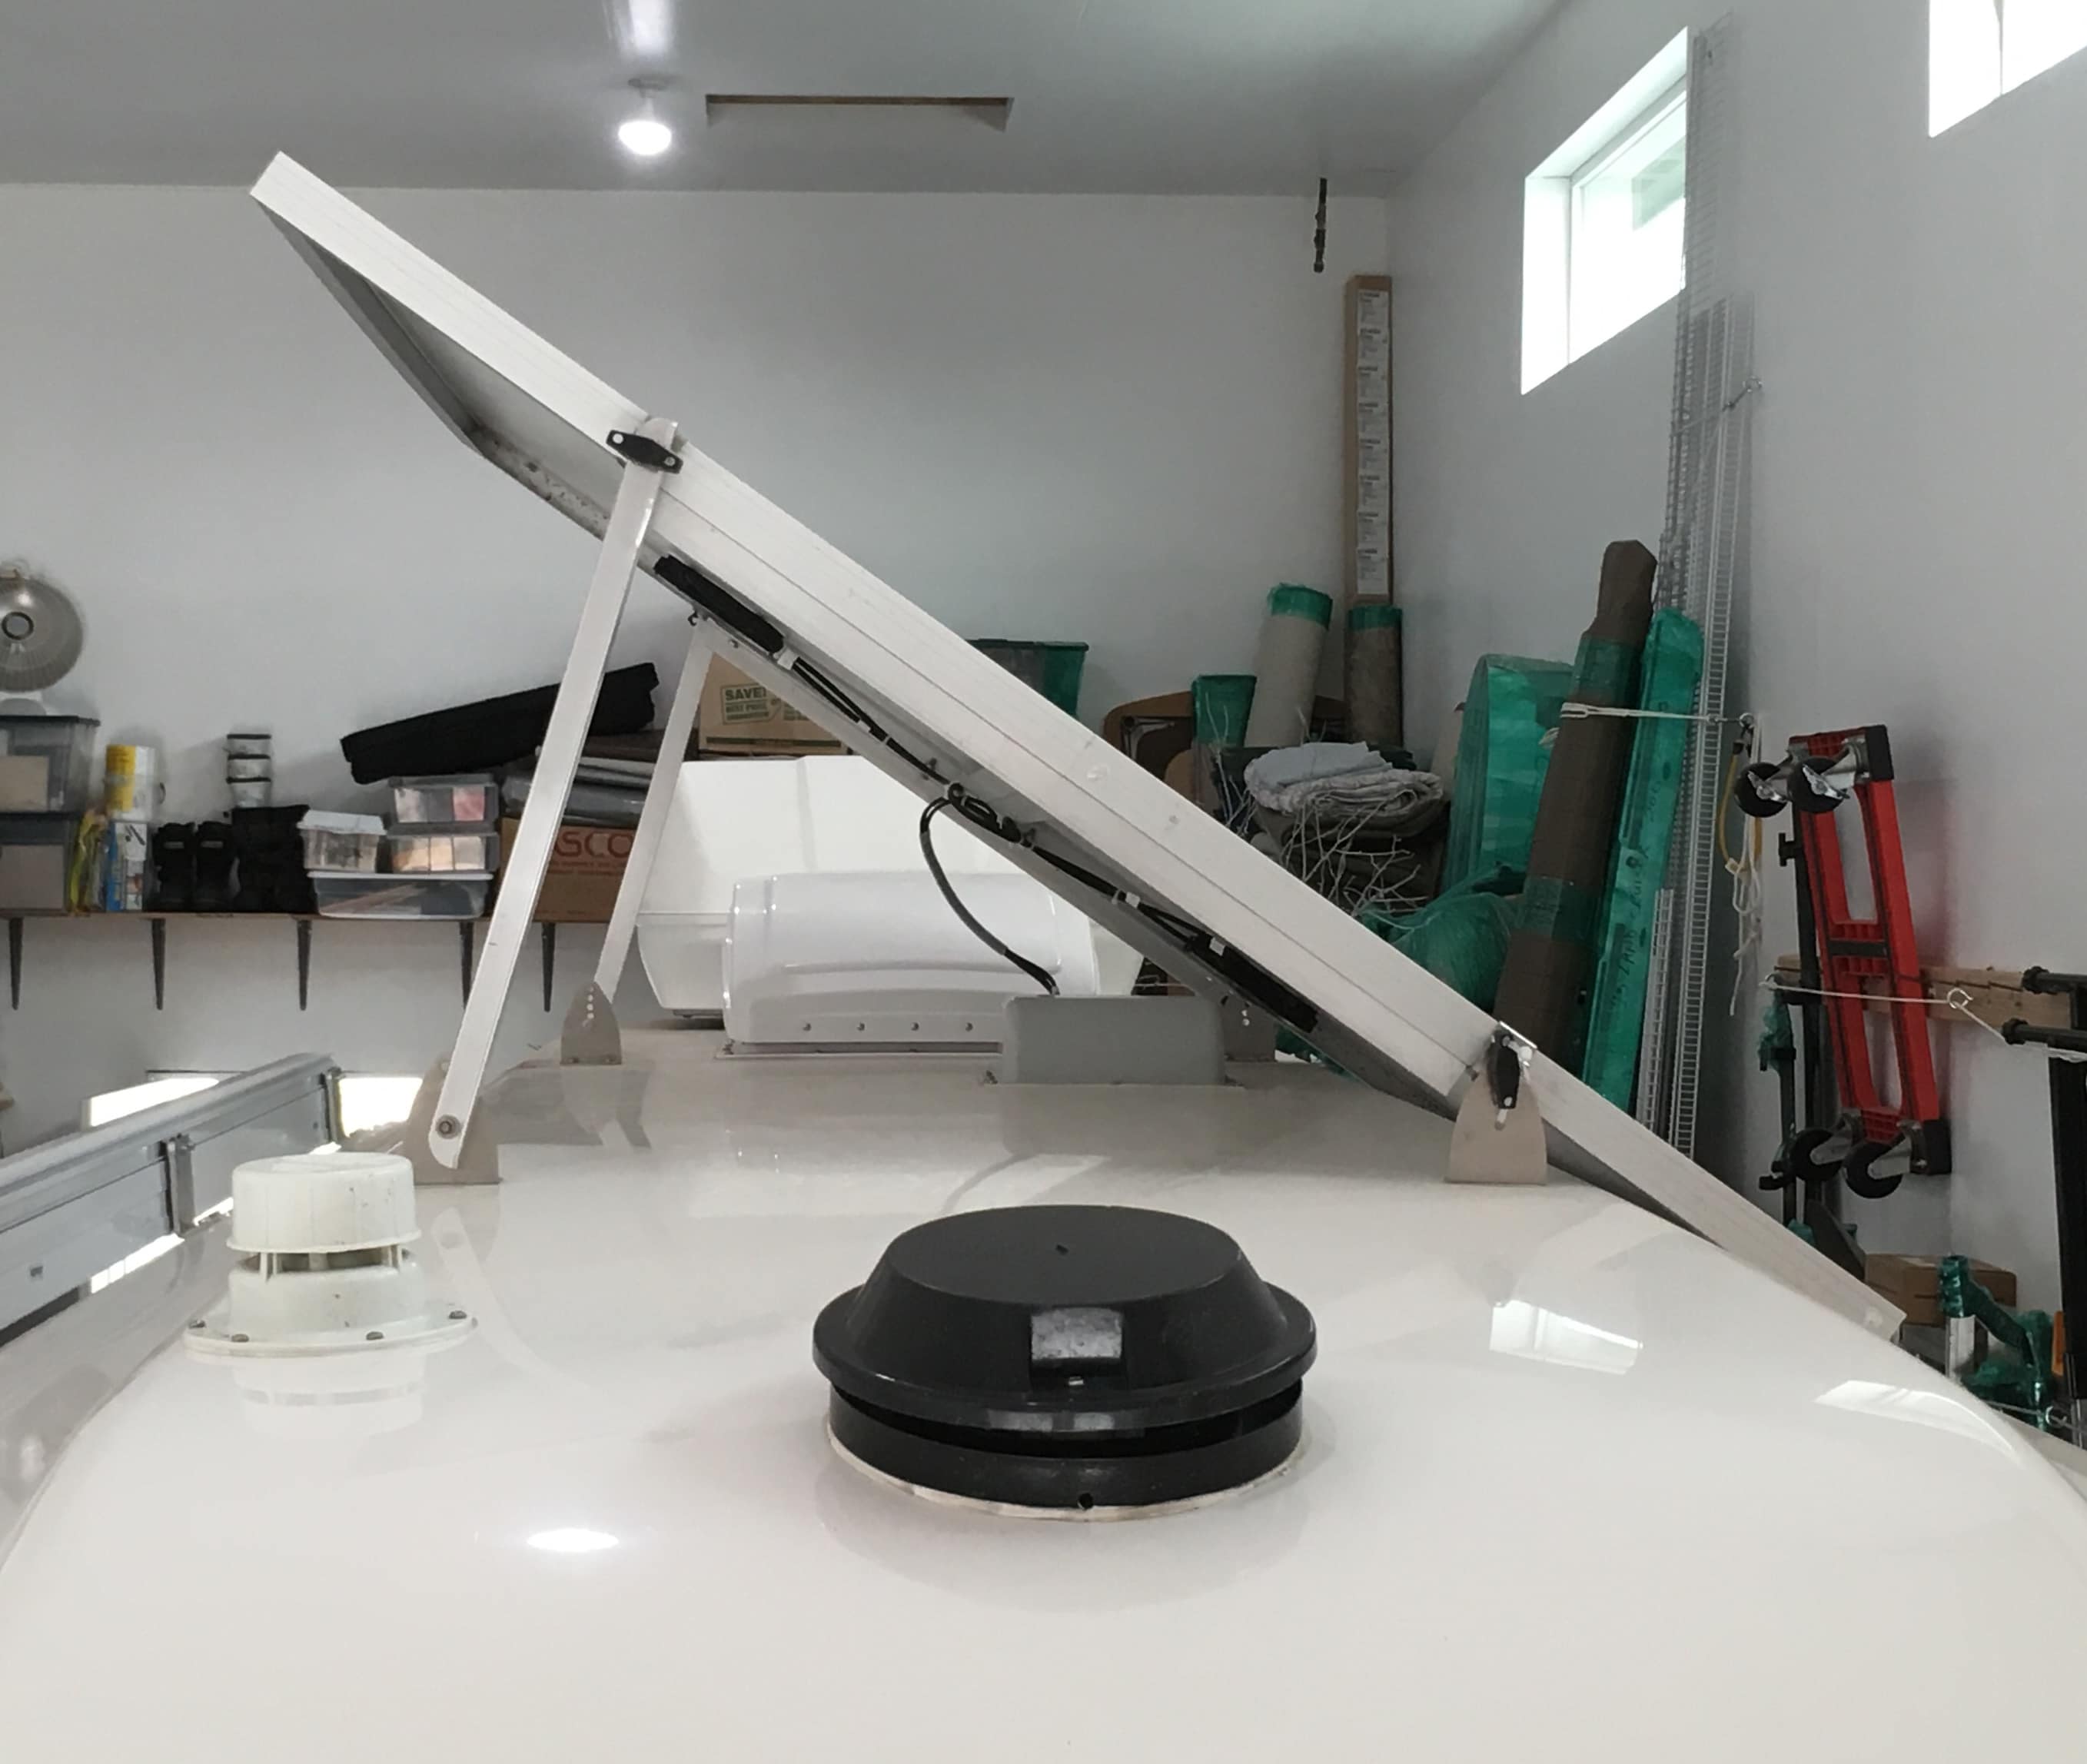
This mod is great for either working on your roof, for repairs or detailing, or for angling the panel toward the sun if your Ollie is parked long term, such as in the off-season. I used the following: 40” of 6061-T6 angle, 1 x 1 x 1/8”. For ease of fabrication, you could use 1 x 1/4” flat bar. I wanted angle since it is more rigid for the same weight, but I think the flat bar would be adequate. 2 - 1/4-20 x 1” stainless bolts, 4 - flat washers 2 - self locking nuts (nylocks) Cut the material into two 20” sections. Drill a 1/4” hole 1 inch from each end along one side of the angle. Center the holes in the inside of the angle (3/8” in from the edge). Since I wanted to use the existing knobs at the top of the arms, I trimmed away a section to allow the “ears” to clear. I left a 3/8” wide section for strength. You need to make two “mirror image” arms (front and back). Radius the corners, and file and sand with 180 grit paper. A workbench belt sander like my 4x36” Harbor Freight one works great for this. To use the arms, you have to climb up carefully with a ladder with padding under the top part. You can start at either end of the panel, the right side is shown in the pics. Attach the appropriate arm at the bottom hole of the bracket using a bolt, snug it down. Make sure that it can rotate up. Remove the knob and let the panel settle. You can put some foam underneath but I didn’t need any. Go to the other end and attach the second arm. Remove the knob, raise the panel and screw the knob back through the arm, into the panel. Go to the other end, raise the remaining arm, and secure it. You can see in the above pic that there are lots of threads sticking out the back of the nut, so if you use thicker 1/4” flat bars, they should work fine. If you are going to leave the panel up long term, in the weather, tighten the lower bolts and all knobs. If you are just going to have the panel up for maintenance you can leave the lower ones slightly loose. With the arms in the bottom holes of the roof brackets, the panel will be at a 35 degree angle. You could get a few extra degrees by selecting higher holes, but the other end of the panel frame might hit the gelcoat on the roof. Use caution. I have NOT tested this mod outside in strong winds. It feels very solid when the hardware is tight, but I cannot guarantee how well it will work in violent weather. Use caution. I thought about not mentioning this last part, but I will anyway.... Please leave a prominent note inside the trailer on the table, or a bright piece of surveyor’s tape flying from the panel, so you do not drive away with the panel up. John Davies Spokane WA
 1 point
 -
What do others use to help assure the water they use, either from the onboard tank or direct, both from the faucet at an RV park, is potable? In addition to the inline filter, we are considering a Britta counter pitcher, or something similar. Just don’t want to use a bunch of disposable bottles.1 point
-
Hello Everyone, I am looking for the best 1/2 or 3/4 ton short box truck to tow an elite 2. I would rather not invest in the Anderson Hitch, as I already own a really nice adjustable B & W hitch. What type of truck do you own and how does your truck handle pulling the elite 2 up and down steep grades, 6-8% grades? Do you have any issues with trailer sway at interstate speed, during cross winds, or when a semi truck passes you? What type of mileage do you get with your truck when towing and type of engine is in your truck?1 point
-
Probably because he didn't have any to install.1 point
-
We also changed our stems to metal and had the tires rebalanced with the TST TPMS sensors installed about 4 years ago.1 point
-
Assuming that you know that Oliver provides the water hose and pressure regulator for hook up to your acquaintances property. I have an extra water hose too that can be used if the bib is very far away. You could also use their water to fill your water tank and be self sufficient. You will want a water filter either way. You can get a good Camco filter at Walmart. I did buy and adapter to convert the external connector to be used with a heavy duty 12/3 extension cord. Alternatively, there are adapters that work on the power cable that Oliver will supply too. We have the Andersen levelers and also Balco X-Chocks. I love both. If you have a composting toilet, you will want either some dry peat moss or Coco Coir for the bottom of the toilet. If you will only be using the toilet for peeing, you can skip the peat or Coco Coir. Hope this helps.1 point
-
That is a great suggestion. Once we get the trailer, I will look closely at the layout and see what options we have. I like the idea where you are using the electric heater as a supplement to the furnace. I also like the remote temperature sensors to help me learn about the distribution of the ambient heat. As always, this forum is always the best. Thanks for the time you take to help others out! Carl1 point
-
@Carl Hansen I also have an Elite 1. I just picked it up last week in Hohenwald and spent 3 nights on my way home to central TX. The nighttime lows reached the mid 20s to mid 30s each night. I had full hookups each night and used a small (750W) space heater for two nights. Each of those nights I set the thermostat between 60 and 65 degrees. The furnace never kicked on when using the small electric heater. Here is the heater I used. https://amzn.to/3aVFTxr Happy trails.1 point
-
We are getting the Elite I. A "shorty". Carl1 point
-
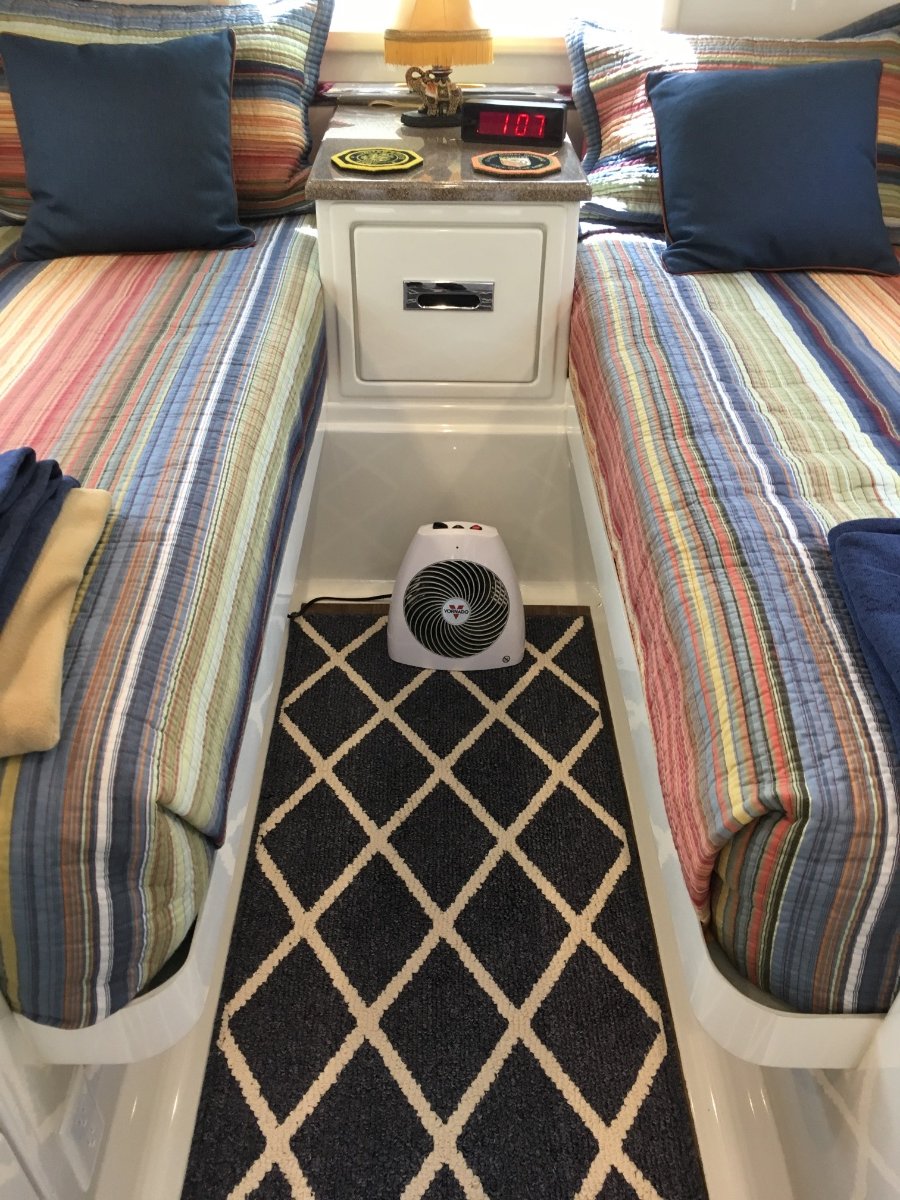
Our particular model is no longer available, replaced with new models. I will say it is 5 years old and still going strong. It is a Vornado Whole House heater. Ours has 3 settings, 750W, 1150W, 1500W. It was available in white, which we got. Small, so it doesn’t take up much space. The way it is made makes it very hard to tip over and it does have a safety switch on the bottom in case it does. It has manual controls, some of the newer ones have digital controls. The closest I could find on Amazon is this one.
1 point
-
being a newbie, we will be bringing our Vornado Mdl: EH1-0012. there are newer models out there now. about 5 yo. but very nice.1 point
-
We’ve used a small Vornado electric heater for the last 5 years in our Oliver. We put it right in front of the nightstand blowing toward the bathroom. With the inside of the trailer in the high 60s/low 70s we’ve never had a freezing issue in temps down to low 20s (19 degrees one night at Pinnacles NP). If it was colder than that I’m not sure just an electric heater would be enough, but we don’t like to camp in single digit or teens temperatures so I can’t really say. Mike1 point
-
Ray and Susan, This is great information! Thanks so much for sharing. I'm sorry your heater died. I have been looking around for an appropriate electric heater. There are so many to choose from. As I read the reviews of the various models, there doesn't seem to be any one that everyone is happy about. Have you taken your trailer out since you got home or have you put it to bed for the winter? We plan on following I-40 home ourselves to visit Joshua Tree NP and then turn North to visit family and head for home. Carl1 point
-
We use an electric heater when shore power is available. On our trip home from picking up our 2021 Elite II (December 9-15), we traveled via I-40. In the higher elevations of NM and AZ, it was in the upper to mid 20's at night, but above freezing during the day. We did not winterize during the trip home, though we came prepared to, if necessary. We put remote temperature sensors in the basement and under the bed where the plumbing resides, monitoring temperatures closely. At night we ran the space heater to maintain upper 50s inside and opened the basement access hatch in the nightstand. I don't know how much having the access hatch open affected the basement temps that ranged from the upper 30's to low 40's during the night. We did hand pump antifreeze into the two water inlets (city and tank fill); the winterization and black flush ports had not been used, so we did not winterize them, as per Jason E's suggestion. We used onboard water the entire trip as most of the RV parks we stayed at recommended not connecting to water, since the supply hose would most likely freeze anyway. We kept the standard water heater running on electric during the night. While camping last weekend at a local park, our electric heater quit working so we used the furnace, but only during the day. Nighttime temps were around 37 deg. With no heat on at night, the basement stayed in the low 40's until we arose and turned on the furnace. During our trip home we monitored the internal temp of the Lithium batteries via bluetooth. Never did we have to turn on the battery heat mat.1 point
-
Wowie Bill, that is an amazing list! Thanks so much, I’m going to enjoy going thorough it and checking all the places out. Even if we don’t use any of them this trip, we have lots of East/West runs in our future ( grandkids on both coasts ) so this kind of intel is invaluable... thanks again, mark1 point
-
Are you 100% positive the sound comes from the chain brackets? Are they fully tight on the frame, including the little grub screws? These older hitches typically get embarrassingly loud “Spawn of Satan” shrieks and groans when water and debris get down inside the friction cone, but that sound happens only when turning.. The new updated ones do not seem to have that problem. So far. I agree about putting grease on the chain links, at least try it for one trip to see if the sound goes away. If the sound remains, then the source is elsewhere. I do grease my chain adjuster threads and under the washer where it contacts the red bushing, mainly so the nuts turn easier. I have never put any grease further forward. Good luck. John Davies Spokane WA1 point
-
Another point to remember is that bearing don't have a recommended change interval. Don't just assume because they have 12,000 miles on them they're shot. The number one cause of trailer bearing failures is infrequent use and the subsequent corrosion or pitting that can occur due to grease contaminated by condensation/moisture forming inside the hub. Routine inspection and repacking, or more frequent supplanting of old grease, are the accepted ways to extend bearing life.1 point
-
If Oliver would go back to installing a two-inch receiver on the back bumper then a person could use a standard hitch propeller. Steering? Well, perhaps from the flying bridge up on the solar panels. Stability? Someone (John Davies?) would have design and fabricate a keel to attach between the mudflaps. Sideways propulsion while docking? — perhaps the outdoor shower?1 point
-
Grease “as needed”, use your judgement. Keep in mind that the typical travel trailer may never go over a few hundred miles each year. Annual service would be prudent, base the interval on miles driven (keep a travel log) and most importantly, the weather conditions. If you tow in heavy rain or on soaked highways, or on wet forest roads, the water blast will literally wash the grease away. I grease in the late fall, or “about” every 6000 miles. I would push it to 10,000 on a long trip. I never (intentionally) tow in the rain. John Davies Spokane WA1 point
-
No need whatsoever. If anything I should apologize if I came on too strong. We all have our opinions, things we stress over, don't stress over, etc. Like anyone else, I'm just a guy with an opinion, and a year from now I may have changed it. I just don't want people to think that this is something that they absolutely have to do if they swap out to lithiums. Some people may read this and decide to take the extra precaution, and some may want to just wait and see if it really turns out to be anything worth worrying about.1 point
-
I wonder if Oliver would help fund the first Ollie Antarctica Expedition?1 point
-
We have the 2020 2500HD Duramax w/10sp trans. The more we drive (21k as of today) the more we like it, incl the controversial Chev Grill. The Duramax and 10sp are so smooth!1 point
-
Seems like many of you have gone the Lithium route. My 1st two AGMs petered out this past month, so I am glad to read here that many of you successfully retrofitted. I will likely follow the trail blazed here and do the same.1 point
-
Do I see hull #50 in New Zealand? Or is Steve waiting for that "new" model first?1 point
-
I'll take that as confirmation that Oliver is working on a seaworthy model. Will there be an upgrade for existing owners?1 point
-
And, everyone who wants to, watches him for free. I don't begrudge him his revenue. At one time, he lived on his van, pretty much homeless. He's done the work, and if he makes money from ads, I'm certainly ok with that.1 point
-
I have never seen or looked for the 24 hour break-in instructions in print on paper or a soft copy. It was a comment made while discussing the intermittent problem I was experiencing. Mossey1 point
-
I find it immensely entertaining to watch as folks eventually work their way to the correct answer..... But honestly, I could be fine with a Ford, Ram, or GMC. - Arguing about the very small differences - well let em rip.1 point
-
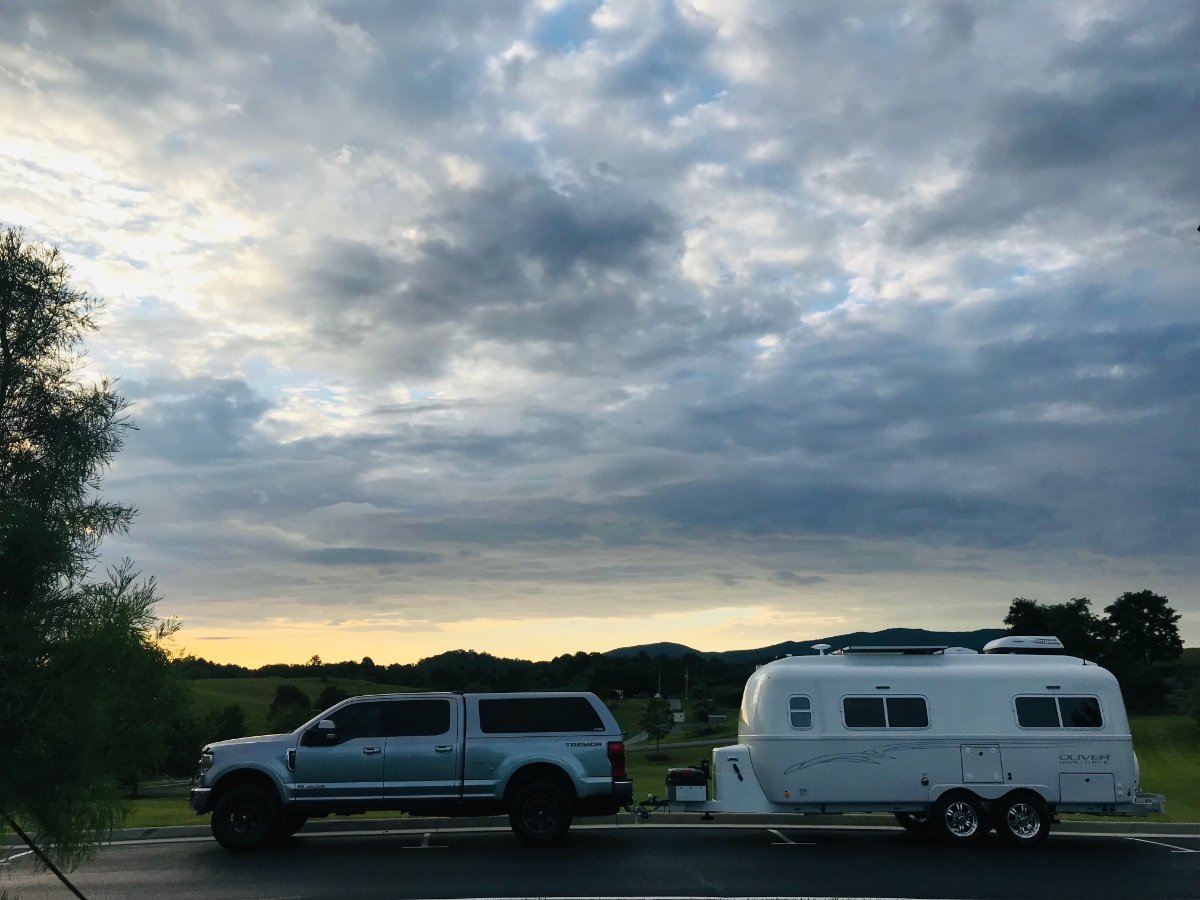
Nicole, We recently opted to purchase a 3/4 ton 2020 F250 Lariat Ultimate with the “Tremor” package. We wanted more long distance travel comfort, better road sight distance when traveling and touring. This truck sits approx 4” higher than a stock F250, no weight distribution hitch, larger fuel tank, and all the hp and torque we could ever possibly need. So a simple no to all questions you asked. We also have the tow haul pkg, trailer anti sway pkg and a bunch of other options. Mileage is around 20-21 highway when not towing. We are getting ready to take a trip towing the Ollie and will learn more about towing mileage. As previously stated there are lots of options out there so enjoy being in the buyers seat! As long as you are happy in the end that is all that counts! So far we really like the power, handling and most of all comfort level in this truck. Welcome to the forum! Happy Truck shopping and Happy Adventures! -Patriot
1 point
-
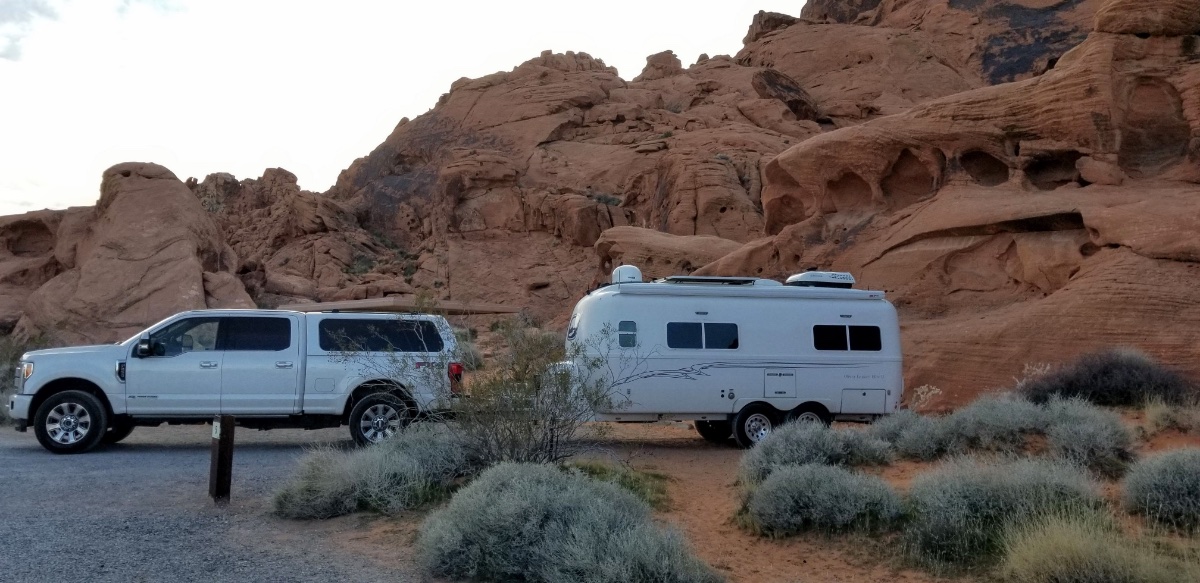
We are choosing to keep our dependable 2013 F-350 SD diesel 4wd crew cab long bed to tow our Elite II. 55K trouble free miles, but the interior was looking "used". Installed these custom fitted seat covers from Cover King and detailed the interior. Everyone says it looks like a new pickup! Waiting for a Garmin 890 to complete our cockpit.1 point
-
Using my 2017 F250 without an equalizing hitch, no problems ever with sway, cruising I10 at the legal speed limit of 80mph.
1 point
-
You might notice the folks towing with 1/2 ton don’t have fiberglass caps.1 point
-
Wait a minute! I thought we all agreed that a Chevrolet 2500HD Duramax was the perfect tow vehicle? Are some of you all “crawfishin’ “ now? Read my post, top of page 2 in this thread:
1 point
-
The best - one by far - is one rated for the load - and with in your cost budget- Other than that - the choices are many. All of your concerns are handled with a modern 3/4 ton truck - diesel are the preferred- but not necessary. Many modern 1/2 ton trucks, SUV's and such are also in the mix. The number one thing I will caution - don't go on the word of a sales person, an internet forum, or the neighbor - consult with the GVWR label on the vehicle you are considering - it is the legal rating of that vehicle. You also will need to consult the owner manual for other spec's. Good hunting.1 point
-
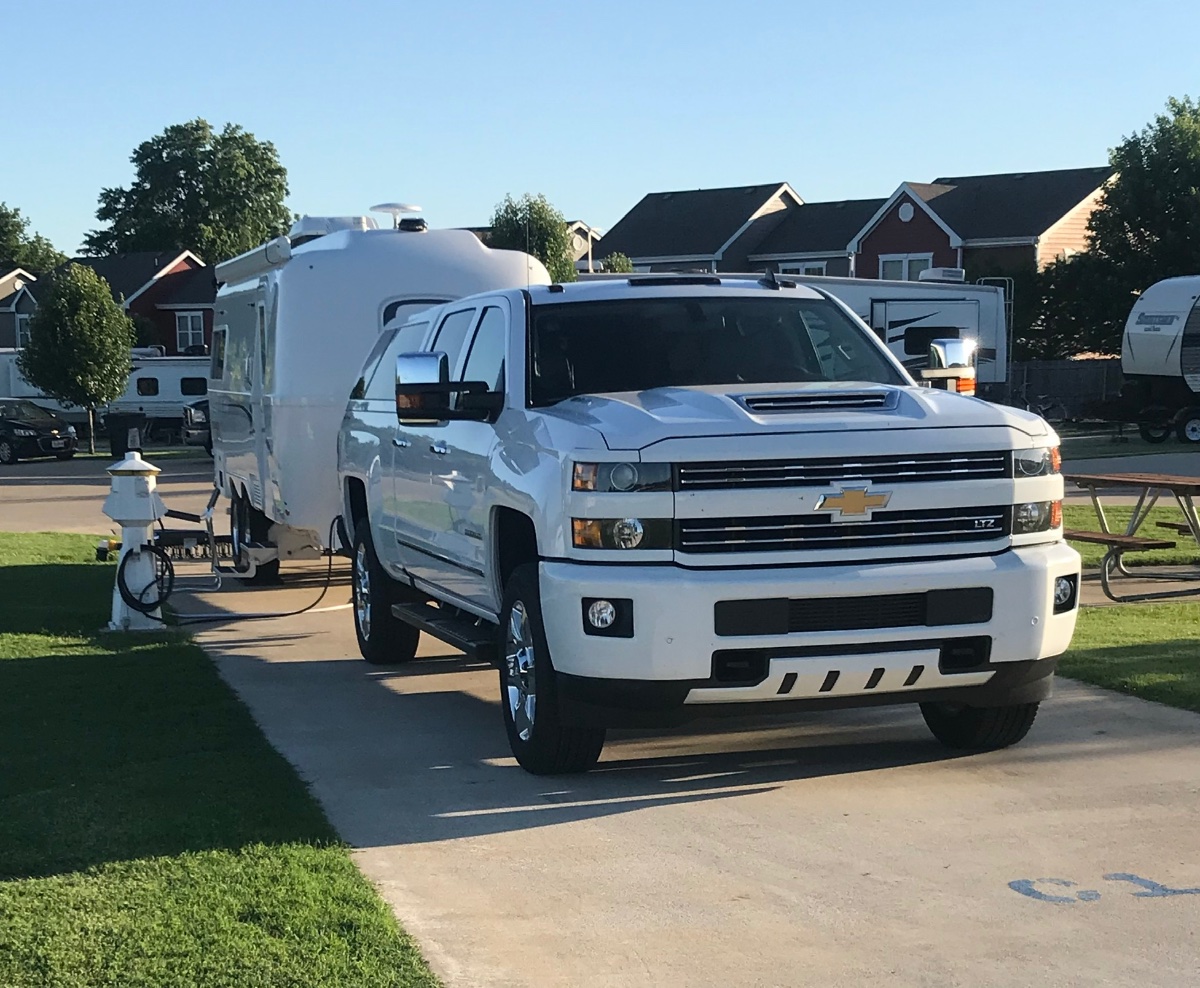
I’ve used two Ram 1500’s to tow my Elite II. If you want to forego a WDH you’ll need to bump up to a 2500 or F250. Sway is not an issue with 1/2 tons, weight distribution is. I have my Andersen set to remove about 1.5” of drop in the back so that everything stays level. I have the 5’ 7” bed and we have enough space to carry our camping stuff. Mike
1 point
-
Nicole - Good to have you here and thanks for posting. I believe that you are looking for a 3/4 ton truck. All of the 1/2 ton trucks currently on the market require a weight distribution hitch when towing something like the Oliver Legacy Elite II. I have tried to make my Oliver sway without success and I've never heard of even one instance where any Oliver trailer swayed due to wind, passing semi's or any other circumstance. I happen to own a 2017 Ford 150 and, yes, I do have and use the Andersen. My truck has the 3.5 liter Ecoboost engine with the max trailer towing package. This truck gets in the low 20's mpg while not towing and averages between 12 and 13 mpg while towing. I have towed my Elite II through out the mountain west and have never experience any trouble with any grade under any circumstance. Hope this helps. Bill
1 point
-
With a 1/2 ton payload is an issue and your choices are limited. For a 1/2 ton with a heavy payload package with a 6 ft bed is limited to an F150 XL or XLT super crew with Max payload and Trailer packages or the Silverado/Sierra with at least LT or SLE trim and the max trailer package. Ram doesn’t offer a heavy payload package. The F150 is more capable than the GM models. Both the Ford and GM need to be ordered.1 point
-
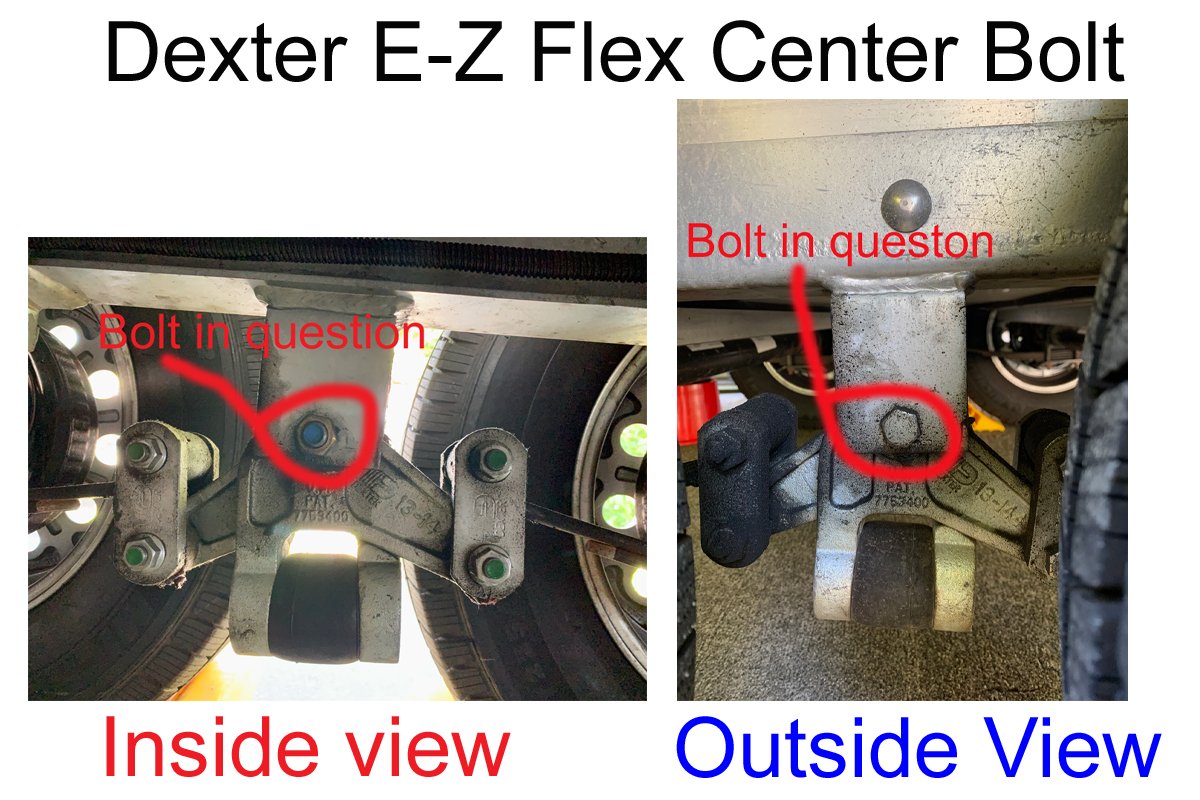
I assume the bolt you're discussing is the one circled below:
1 point
-
Everyone who has the EZ-Flex equalizer needs to read the following explanation I put together for this condition. I know from experience that there is a disconnect somewhere as to how this bolt should be torqued. If the EZ-Flex center bolt is not properly torqued to the 65-75 ft lb specification, the steel center bushing that is supposed to provide the lubricated pivot point for the two individual arms, will not be held stationary allowing it to rotate directly on the un-lubricated center bolt. The center bolt now becomes the pivot point for the entire equalizer assembly as a single unit. This un-lubricated bearing contact will tend to rotate the center bolt, which will in turn eventually loosen the prevailing torque locking nut. Hopefully the frame hanger will not have been destroyed by the rotating serrations of the center bolt. I would recommend removing the EZ-Flex and inspecting the hanger and steel bushing to see if either hole is out of round and/or enlarged. Then, if neither of these conditions exists, you may get by with just replacing the bolt and nut. Worst case could be replacement of the complete EZ-Flex and/or frame hanger repair or replacement. I don’t think Dexter will supply just the steel bushing as an individual part because replacement requires specialized shop equipment and tools. That would be the desirable alternative to replacing the whole equalizer though. GJ: Please keep us updated.1 point
-
So many things I use are online or on my phone/tablet...so I'll break this down into 3 parts: 1) My favorite "online - web based" roadtrip/camping planning tool: RV Trip Wizard is an Online tool I used for planning my trip to/from Hohenwald...it's great. - https://www.rvtripwizard.com/ 2) Apps my Phone/Tablet Tools for Finding and Reserving Campsites: Allstays Camp & RV - also a good lookup tool for campgrounds - https://www.allstays.com/ Campendium - For reviews of campgrounds - https://www.campendium.com/ The Ultimate US Campground App - For locating boondocking sites.= http://www.ultimatecampgrounds.com/ All Trails - for finding localized hiking info - https://www.alltrails.com/ Recreation.Gov - for doing many of the reservations in Nat'l forests, and parks - https://www.recreation.gov/ Harvest Hosts App - for one night stays at wineries, farms, etc. - https://harvesthosts.com/ RV LIfe - All round app I use as a portal into reviews and new campground info. - http://rvlife.com/ 3) Seeing the actual campground sites: I've found so far that I use several apps when planning a long trip. Some are great for finding "camping" others are good for planning the drive. In addition, there are resources we use that help us plan by showing actual campsites as photo's or drive through's including these three sites: Campsite Photo's - https://www.campsitephotos.com/ Campground Views : https://www.campgroundviews.com/ - featuring drive throughs of a campground in 360 deg format so you can look around. The Dyrt - a great site for what's good about a specific campground: https://thedyrt.com/ Hope that helps... Craig & Rose Hull 505 - Galway Girl1 point
-
Horace - I carry a grease gun with me and give the equalizer zerks a shot any time I get over 3,000 miles. Since I've always got a tarp with me too there is never really any excuse not to lay the tarp down and take care of business. Besides, after all that hard work I deserve an adult beverage - as if an excuse is really needed. Bill1 point
-
You are a lucky man.... the bolt has shallow splines close to the head that grip the steel of the hole in the spring mount. It is important to not turn the head, instead tighten the nut while holding the head motionless with a big wrench. If you let the head turn the splines will wallow out the hole, making a loose fit. It would be interesting to inspect the failed bolt, set it down beside the new one to see if there are any obvious flaws.... Check all the other nuts and also the ubolts holding on the axles. I bet there are others that need tightening. Please keep us updated. John Davies Spokane WA
1 point
-
After several experiments with leveling, we have found this process to work for us, allowing us to set up quickly: 1. Check the lay of the land to estimate the best place to place the trailer tires. 2. Place the trailer there and check the side-to-side level with a Stanley 42-324 24-Inch I-Beam 180 Level on the bumper. 3. If one side needs lifting, roll back or forward a foot or a little more to place the Andersen levelers under that the trailer on that side. 4. I roll up on the Andersens while my wife observes and then checks the level telling me to pull forward, back, or stay put. 5. Once, level, we chock with two Camco 44414 Wheel Chocks and one CAMCO 44652 WHEEL STOP CHOCK. 6. We use four or five Lynx Levelers to form a block for the stabilizer jacks so the jacks do not have to reach the ground and, if we make a big error by driving off without retracting the jacks, we don't damage them. 7. Use the front jack to level front to back. It is interesting that we found the best place for us to place the level when doing this is atop the top refrigerator vent cover. It can be set in place by placing one end in the handle used for entering and existing the trailer. 8. Use the rear stabilizing jacks to fine-tune the side-to-side leveling. Also interesting, when ascertaining how level we are, is that we hang a dog leash on a suction hook right by the door. It is easy to see how level the trailer is front to back by how parallel it is to the side of cabinet holding the microwave and refrigerator. In addition, if the bathroom door can stay open at about a 45-degree angle--not swinging street side or curbside, open or close--we are confident that the trailer is level.1 point


-
Recent Achievements
-


.thumb.png.fbbde3486e933f990ff511bff8d6bda0.png)


")
