Leaderboard


Popular Content
Showing content with the highest reputation on 02/13/2021 in all areas
-
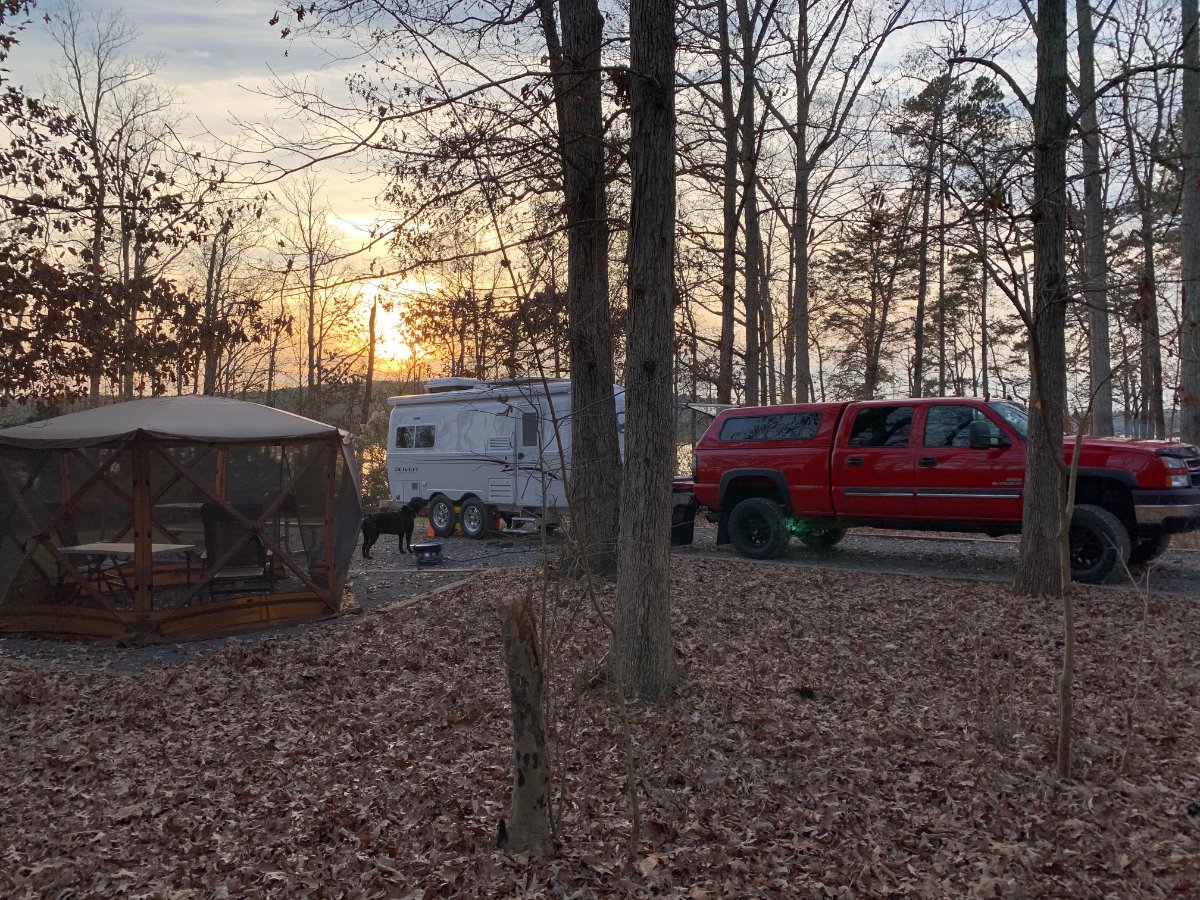
We were camped with Sheri this past week at Lake Livingston State Park near Houston. She has resolved some issues and is heading back to TN to have Oliver take care of some. We had a nice visit and I think she is doing better. This RV life is so new to her with lots to learn, frustration happens easily. Mike6 points
-
Oliver sent a technician to the campground in TX who fixed the issue. The fridge was not plugged in and it was difficult to reach. Mike4 points
-
Thanks All. The thread above from mjrendon was very helpful and I believe I am ok for now. I am in the process of replacing my batteries and determining whether to go back with AGM or Lithium. Appears my current Trojan's are at the end of life (almost 6 years old). I have researched the Lithium option via this forum and with assistance from Mike. I am also looking at the AGM option and possibly going with the Bright Way Group EVGC6 - 6V 220AH Deep Cycle Golf Cart Battery which OTT have moved to from the Trojan batteries. While this option does not have all the benefits of Lithium it appears to be easier for me in terms of plug-and-play and cost for my 2015 (#104) Ollie. The Bright Way AGM's have the same foot print of the Trojan T-105's and I would not have to replace my current PD power control center. However, I would have to reprogram the Blue Sky IPN ProRemote as the Bright Way do not have the exact characteristics of the Trojan. Bright Way is sending me the particular spec sheet for their AGMs. Once I have it I will send to Ryan (Blue Sky) who indicated he can provide the new settings. Thanks everyone for your help thus far and I will let you know what I find out and will post information as received. Thanks, -Walter4 points
-
Horace: Looking at getting them from "batterywholesale.com" but have not ordered yet. In talking with Bright Way Tech (Wes Way) he indicated that Bright Way does not sale direct to the public but through distributors and recommended getting batteries with close to the same production dates (heat stamped date on top of battery) in avoid issues. I indicated I was looking to purchase from battery wholesale.com and Wes indicated that Bright Way owns BatteryWholesale.com and the batteries come directly from his warehouse, thus there would be no issues in terms of production date mismatches. He should be sending me the tech sheet (not on their website) next week so I can review and provide to Blue Sky who will then provide appropriate settings for the IPN ProRemote. -Walter3 points
-
In order for the automatic switch over to work - both tank valves must be open. Many of us leave one of the tank valves closed so that we know when that first tank runs out of propane (i.e. we do not use this automatic switching feature). When the first tank runs out you will notice that something running on propane simply isn't working. If this happens to me with the fridge or the water heater or the furnace I will try to light the stove just to make sure that it is not an issue with that particularly appliance. It also helps that after awhile you get a sense for when you are about to run out of propane. If the stove doesn't light, I simply go outside open the access port, open the full tank, go back inside and light the stove. Perhaps there might be a couple of seconds before the stove lights but usually it lights very quickly. If you are using the automatic switch feature then you will have both tanks open. Basically when the switch occurs you will not know it. This is very nice if you are right in the middle of something or if it is pouring rain, gloom of night, middle of a long hot shower, etc.. But, it could be very bad if you do not remember to check to see if you have run out of propane in that first supply tank. Bill3 points
-
Had a similar experience with our Elite (#409 - late 2018) shortly after pickup. Fridge was working fine on AC at first, then it wasn't... After a bunch of poking around I discovered the AC plug was dangling almost out of its receptacle, which was located on the curbside wheel well (to the left of the refrigerator as viewed from the outside lower vent panel) behind a foil-sealed "plastic cardboard" panel. It was tricky to get in there without messing up that panel. No way to tell if that plug was initially fully seated or not. Haven't had a problem with it since. I'm surprised that such a "buried" outlet location meets code... or maybe it doesn't? Seems like that outlet should be in plain sight behind the refrigerator lower vent cover, probably with a weather-proof cover on it. Also had issues with the window shades falling off a few times. I found & replaced a couple of broken clips... and... lowered the tire pressure to 55-60psi. No problems with either of those issues since!2 points
-
Purchased the Truma propane gage. Easy to use, simple, and accurate - just like the hot water trick - really.😀 I'm not sure why I am so anal on this topic - I can never remember the settings - in the middle - left - right, leave both tanks open, leave just the one - on. The damn thing is green, no red, no wait - turn the other tank on. Watch this - hold my beer - damn, the tank is empty. RB2 points
-
To be clear, I believe this was a local repair tech, not an Oliver service person that drove from Hohenwald to Houston to do this work. Just like any of us who have an issue at home or away from Hohenwald, we get a local repair tech to do the work. Oliver picks up the bill.2 points
-
BlueHighways> From experience, yes indeed, make sure you back up a set of .ABT files before you do anything. Also you can to to the Ford Support Pageand get the "AS Built" .AB file for your truck by VIN #. https://www.motorcraftservice.com/AsBuilt That .AB file can't be directly imported in total on one go, but it can be imported at the module by module level in Forscan to perform a reset back to original if things for each module if things out of whack. For example, you would go to the Instrument Control Panel module, load and write from the ford .AB file, and Forscan will parse the data and load just the Ford Original ICP data. (I had to do that because I fat fingered some data on a line.) Also be aware 2020-21 was a key year when Ford changed the formats for the As Built codes. This was because starting in 2020, they added MORE computer/control modules...so the line numbering changed in the file structure for official Ford .AB files. Now we must be careful to look for the appropriate year AS BUILT spreadsheets. Some of the older 2017 lines still work, but many other don't in 2020/21 models. Craig2 points
-
Regardless of the tax rate - the yearly fee to own personal property just seems over the top. I have come to accept sales taxes and yearly Real estate property tax - but the "rental" fee local governments levy is too much for me. I am glad we have choices on where we call home.2 points
-
Please check this thread to see if it is what you are looking for.2 points
-
Oliver includes the socket for the trailer wheel lug nuts and a lug wrench as well. But if you really want to be prepared here’s what I carry. The extra socket sizes come in handy for helping other motorists. You’ll need the torque wrench as recommended by Oliver to make sure the lug nuts are tightened properly. And the breaker bar is for loosening / removing lug nuts since you should never use a torque wrench as a breaker bar. ARES 1/2-inch Drive 4- Piece Flip... https://www.amazon.com/dp/B01FT26IGS?ref=ppx_pop_mob_ap_share Craftsman 1/2-Inch Drive 18-Inch... https://www.amazon.com/dp/B00065T0MS?ref=ppx_pop_mob_ap_share eTORK (C3250) 1/2-Inch... https://www.amazon.com/dp/B07BYG66BT?ref=ppx_pop_mob_ap_share2 points
-
Having lived in ON, IL, PA, IA, FL and now NC. I have experienced huge differences on tax pressure among them. The services provided argument, is relative, as I usually are not on the receiving end... it just boils down to how wasteful you local politicians are with your money....so far IL the worse.2 points
-
 I bought one of these for my trailer toolkit on Amazon. I know it's quite a bit more than the small 15/20 amp testers I also own, but I consider it a convenience for the 30A checks. They come in 30A or 50A, and you can also buy a version that is just a small inline surge suppressor (see second pix) . Or you can by both the Tester an Supressor in kits...
 2 points
 -
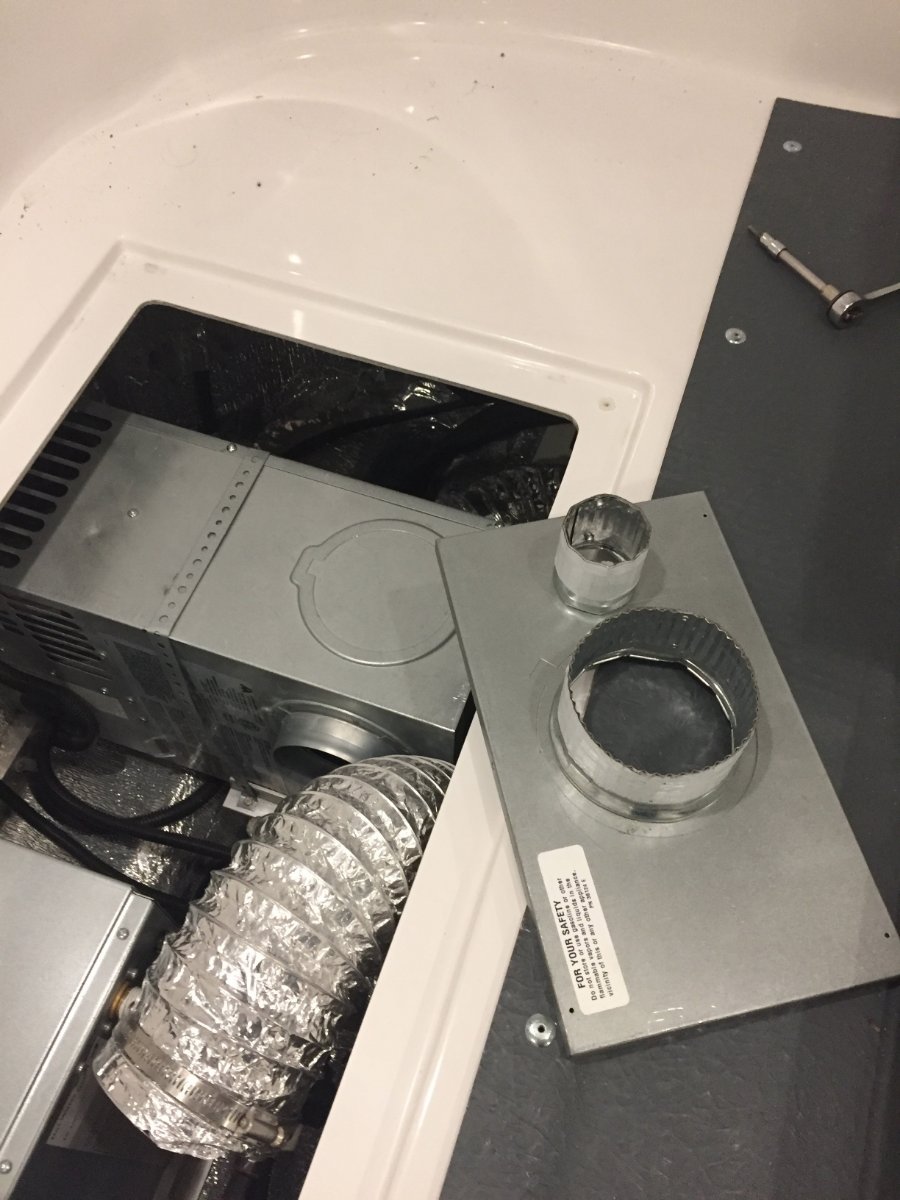
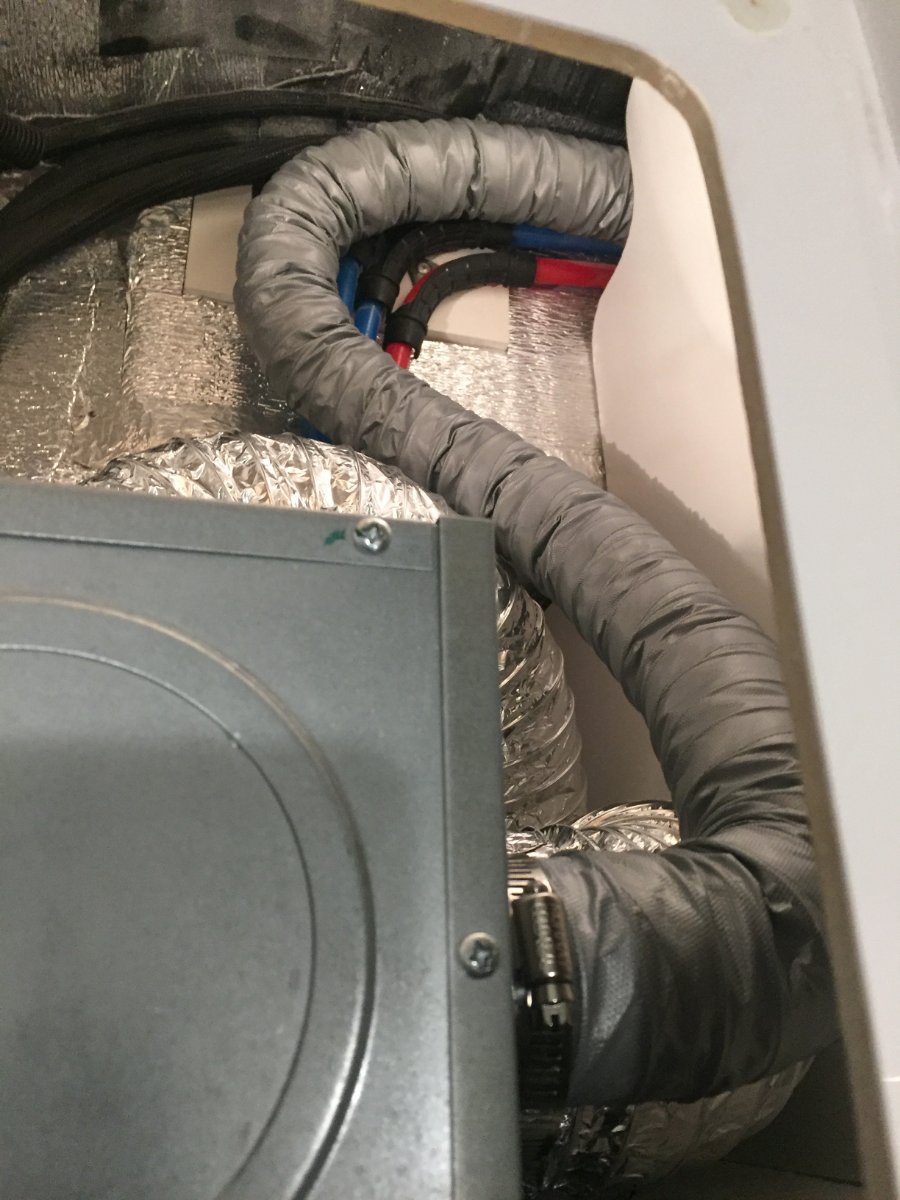
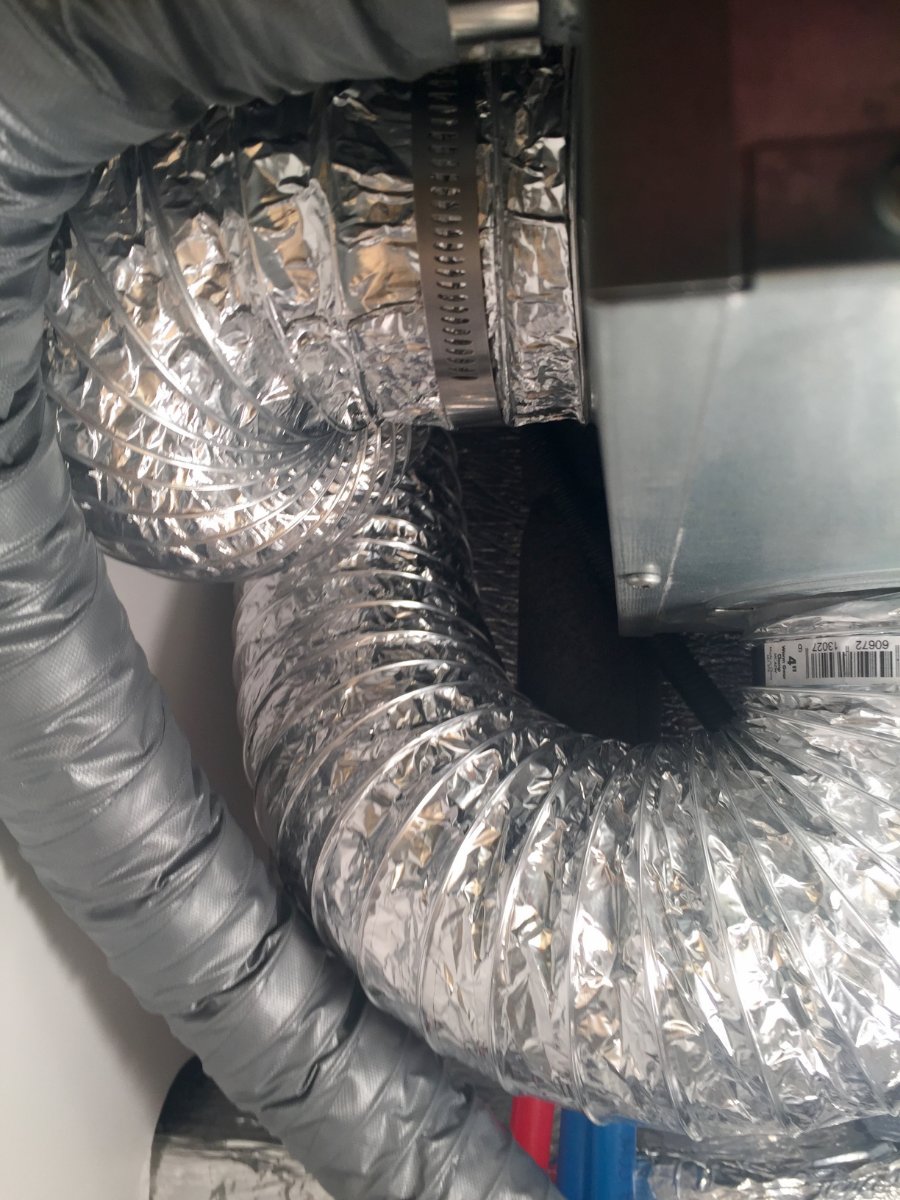
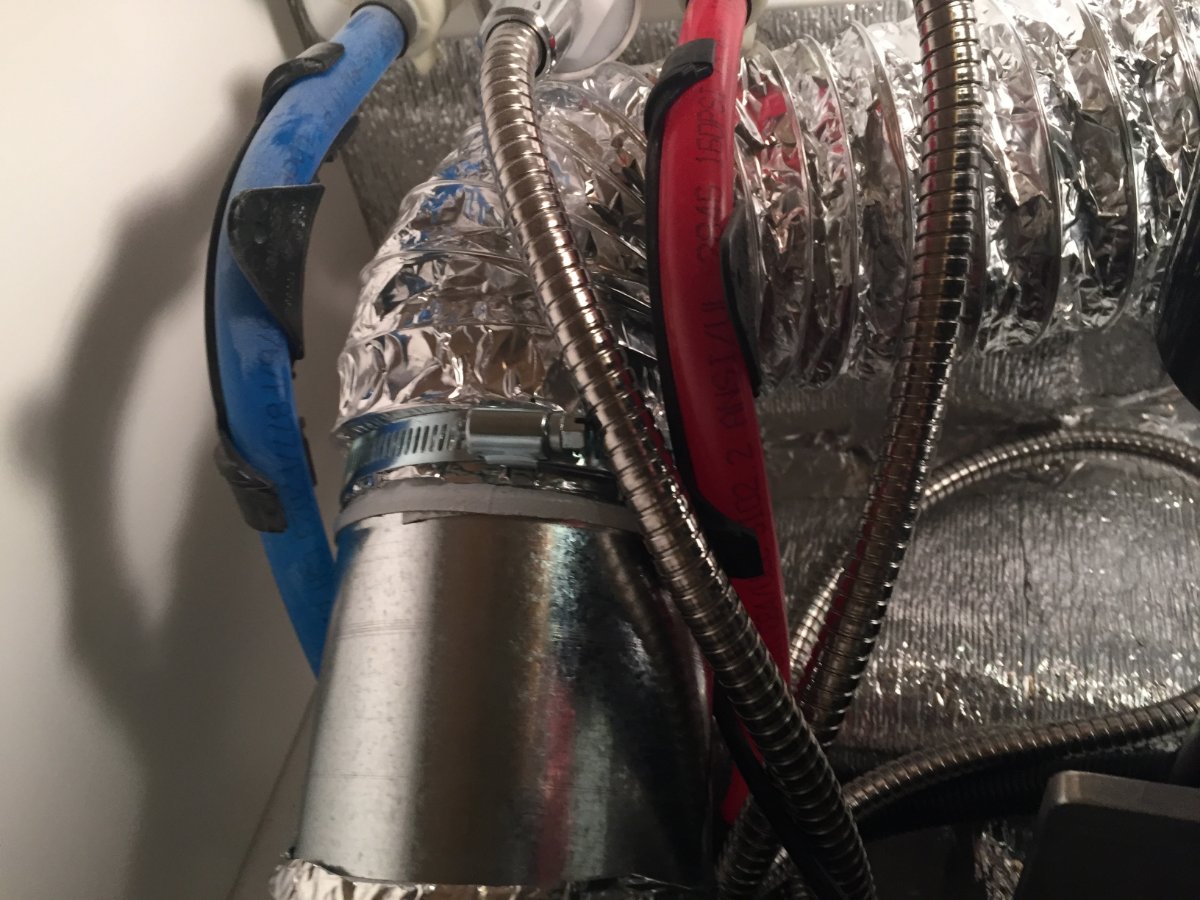
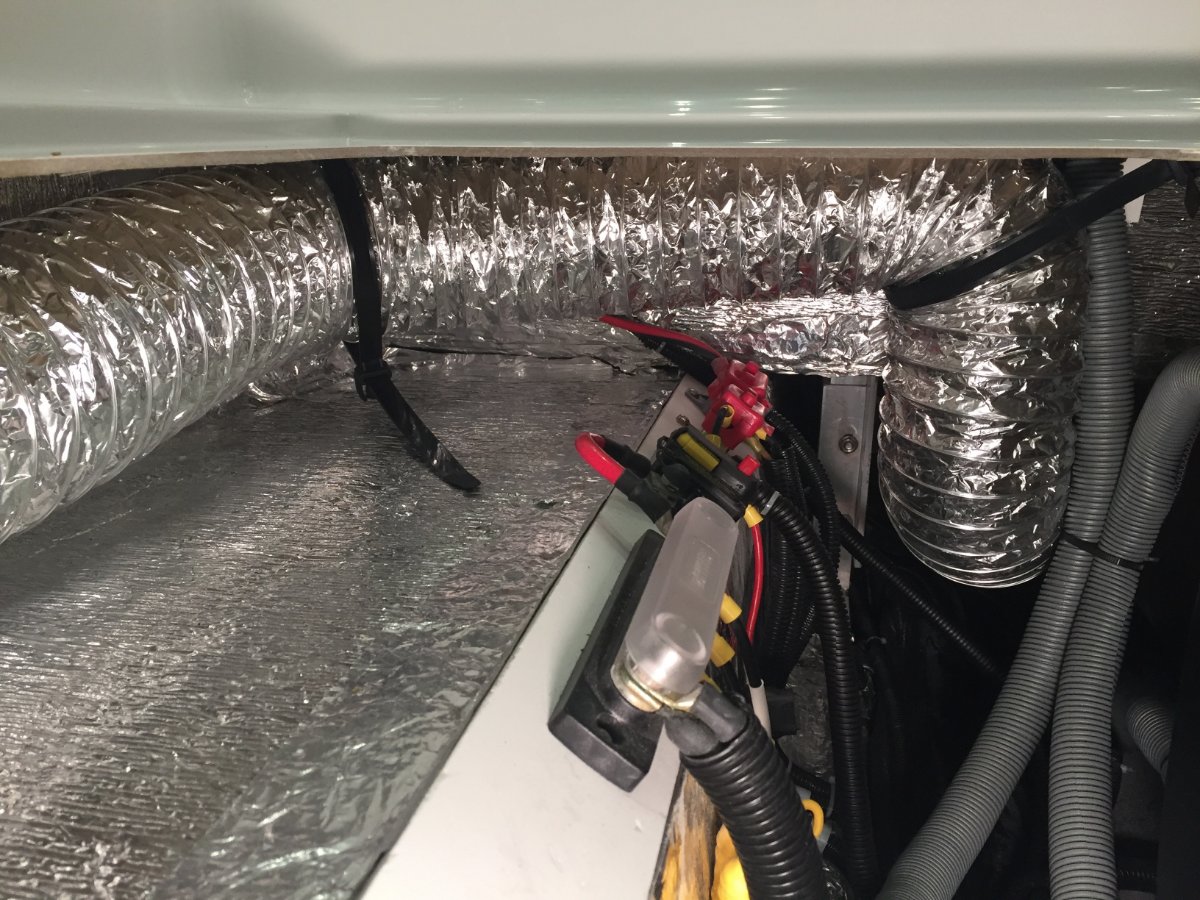
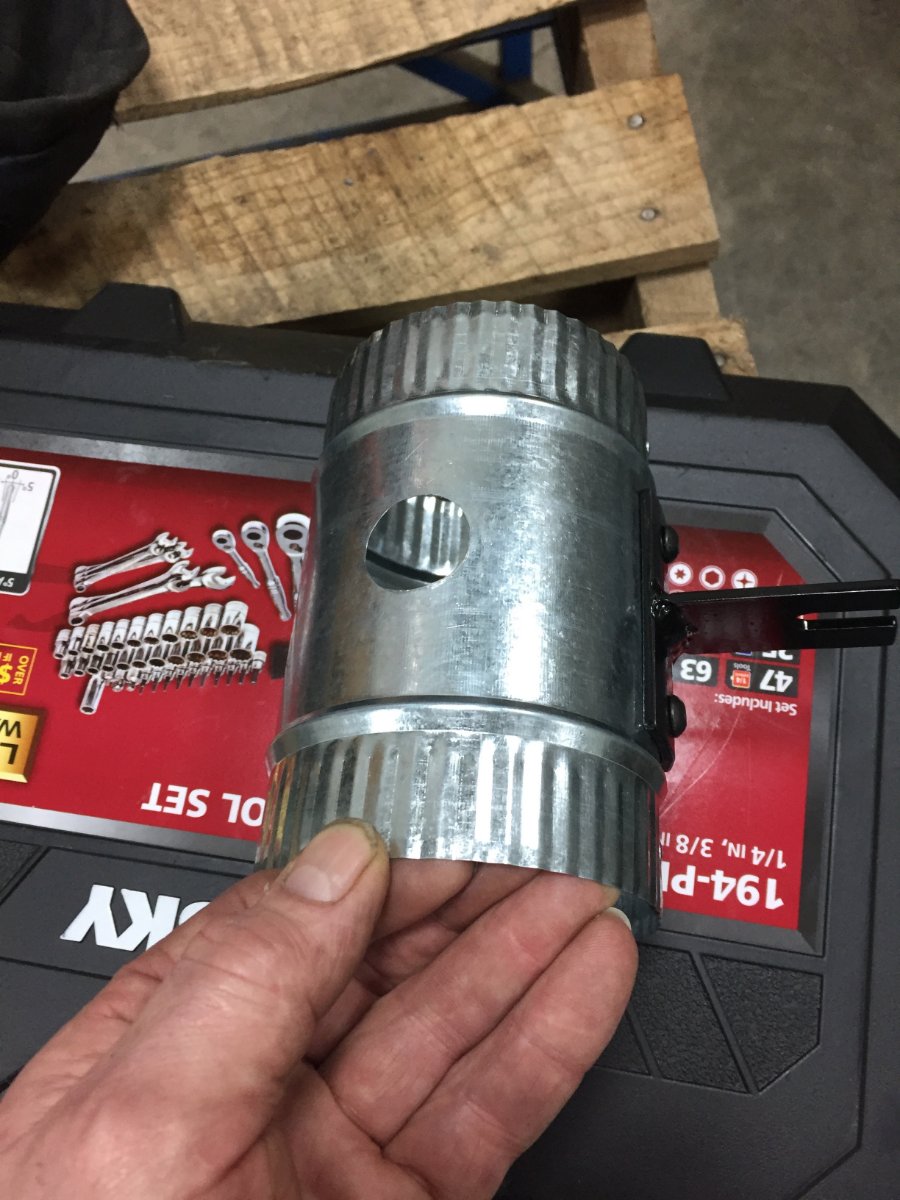
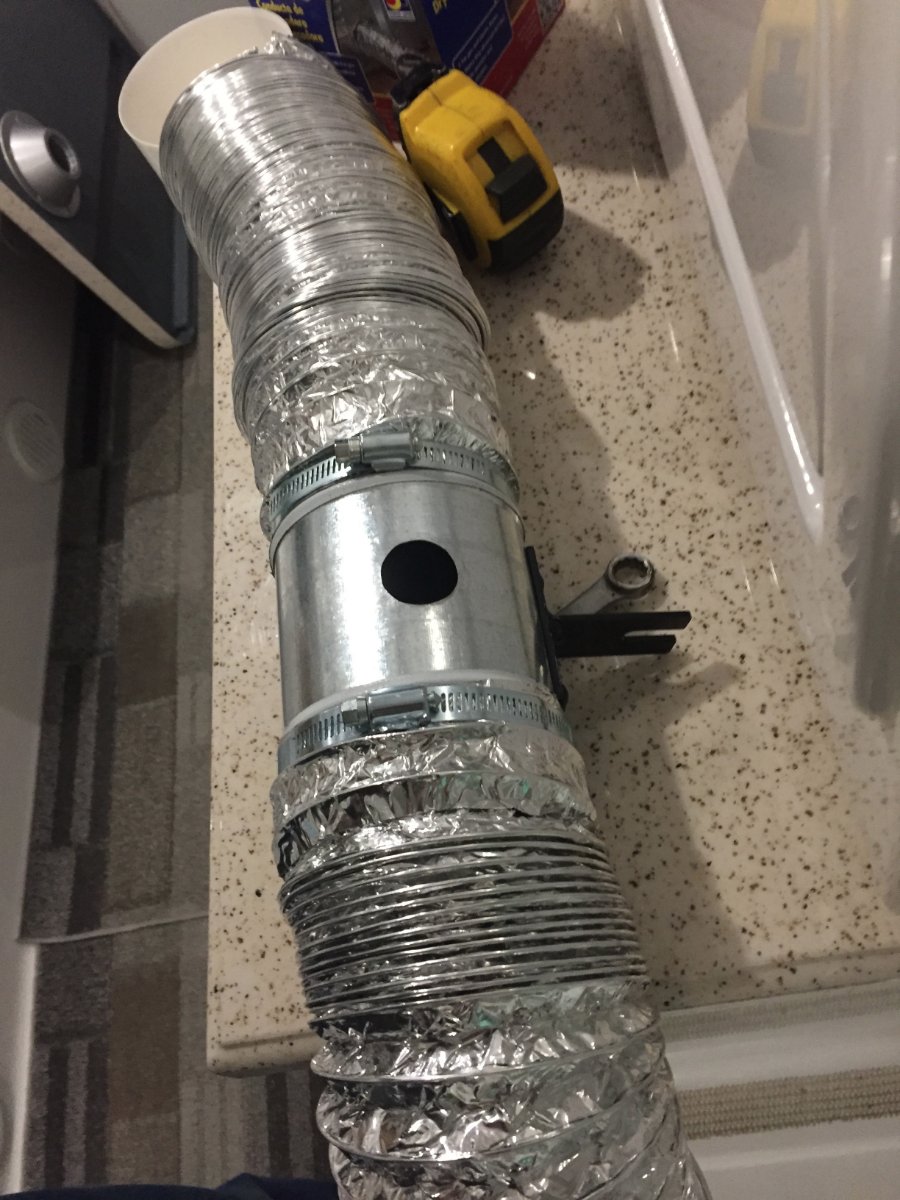
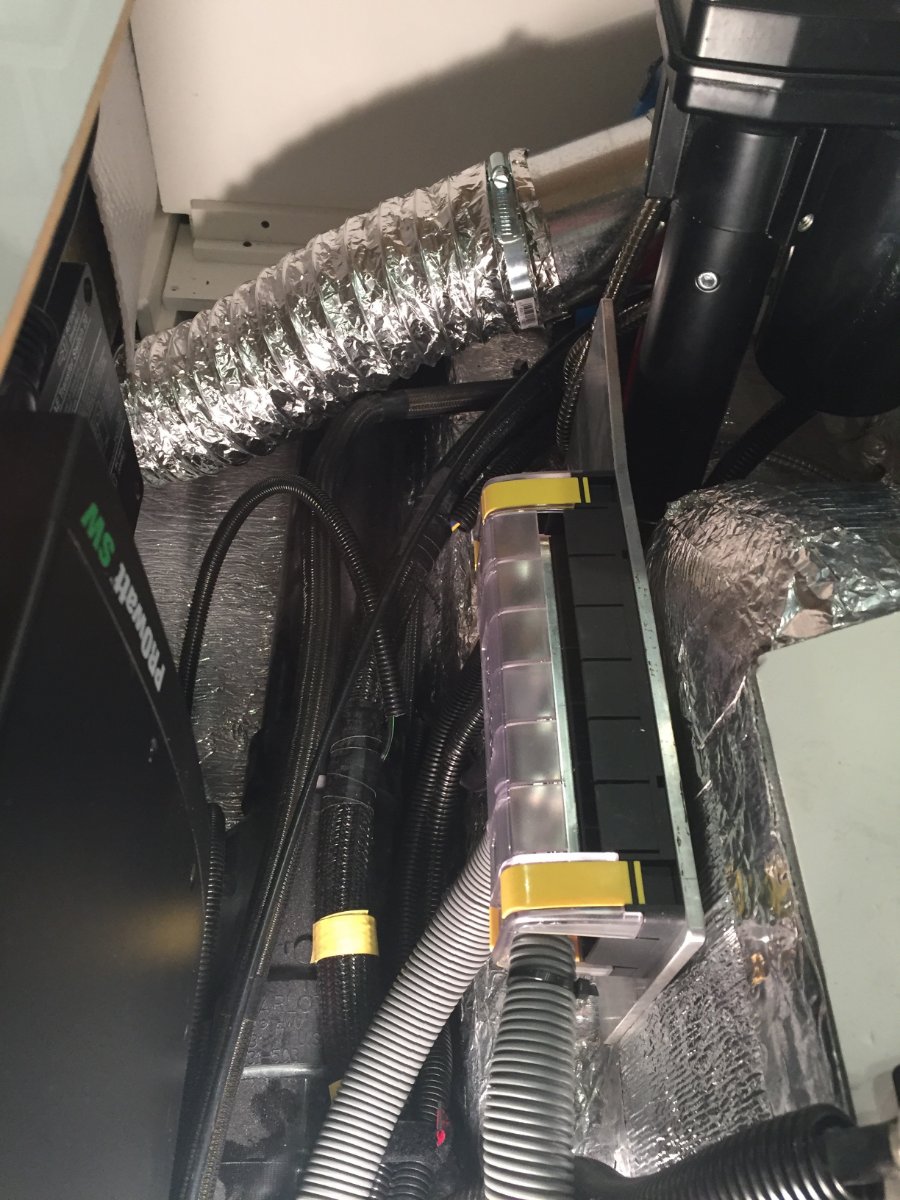
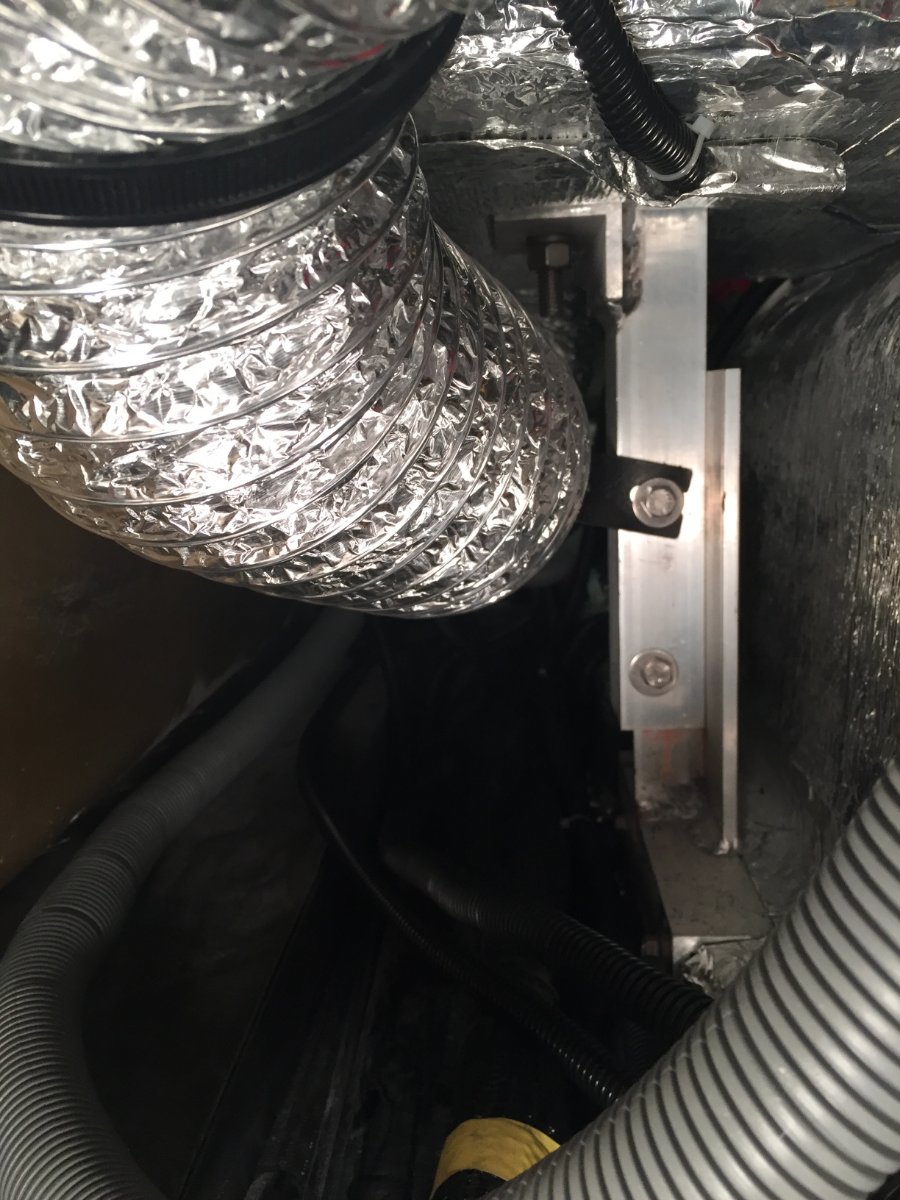
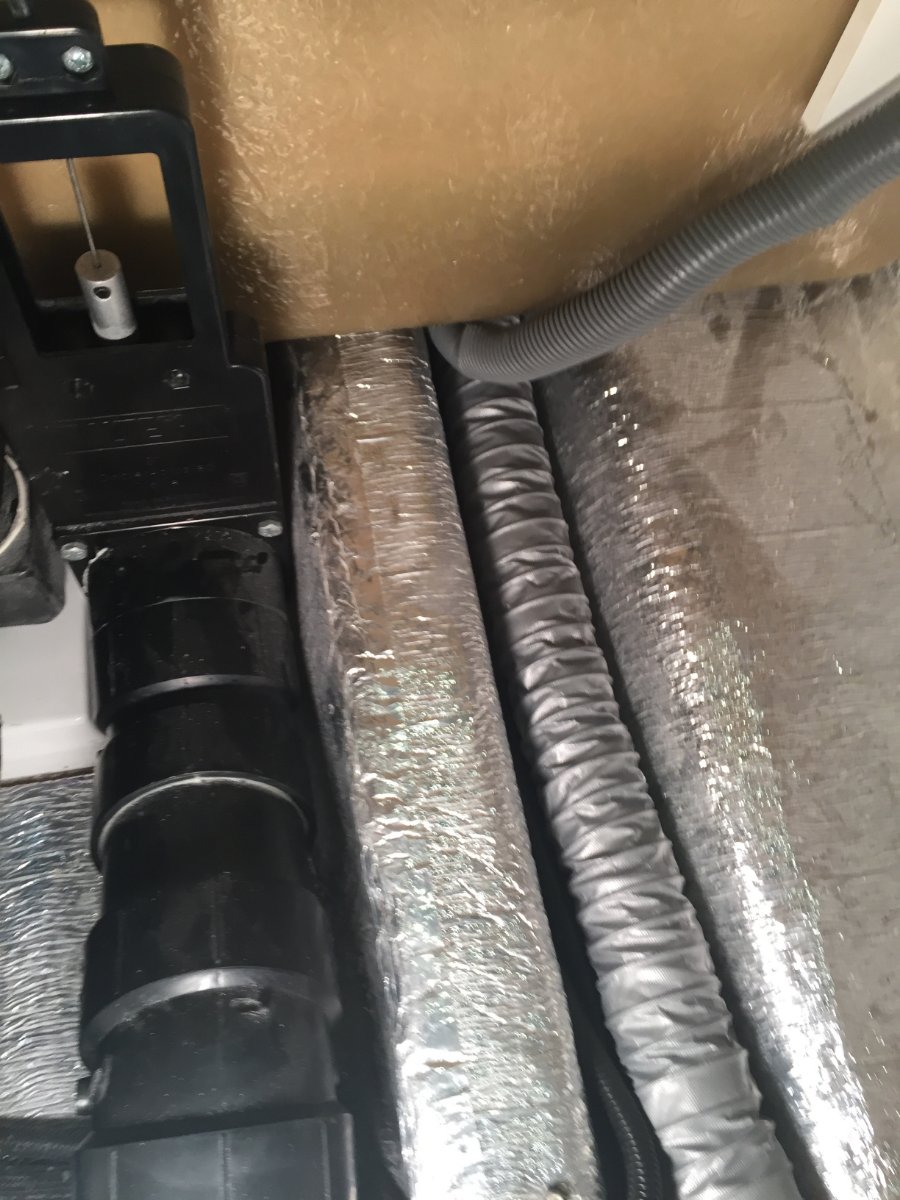
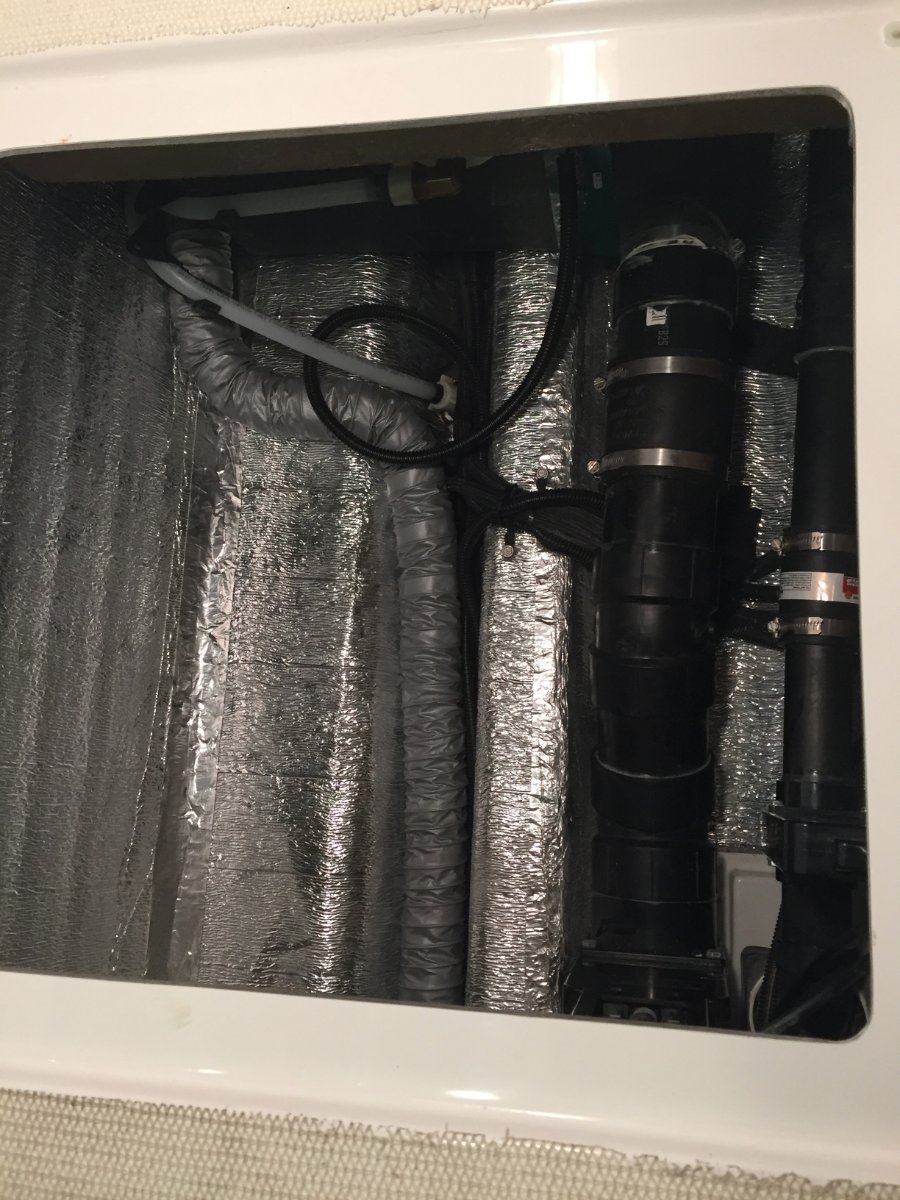
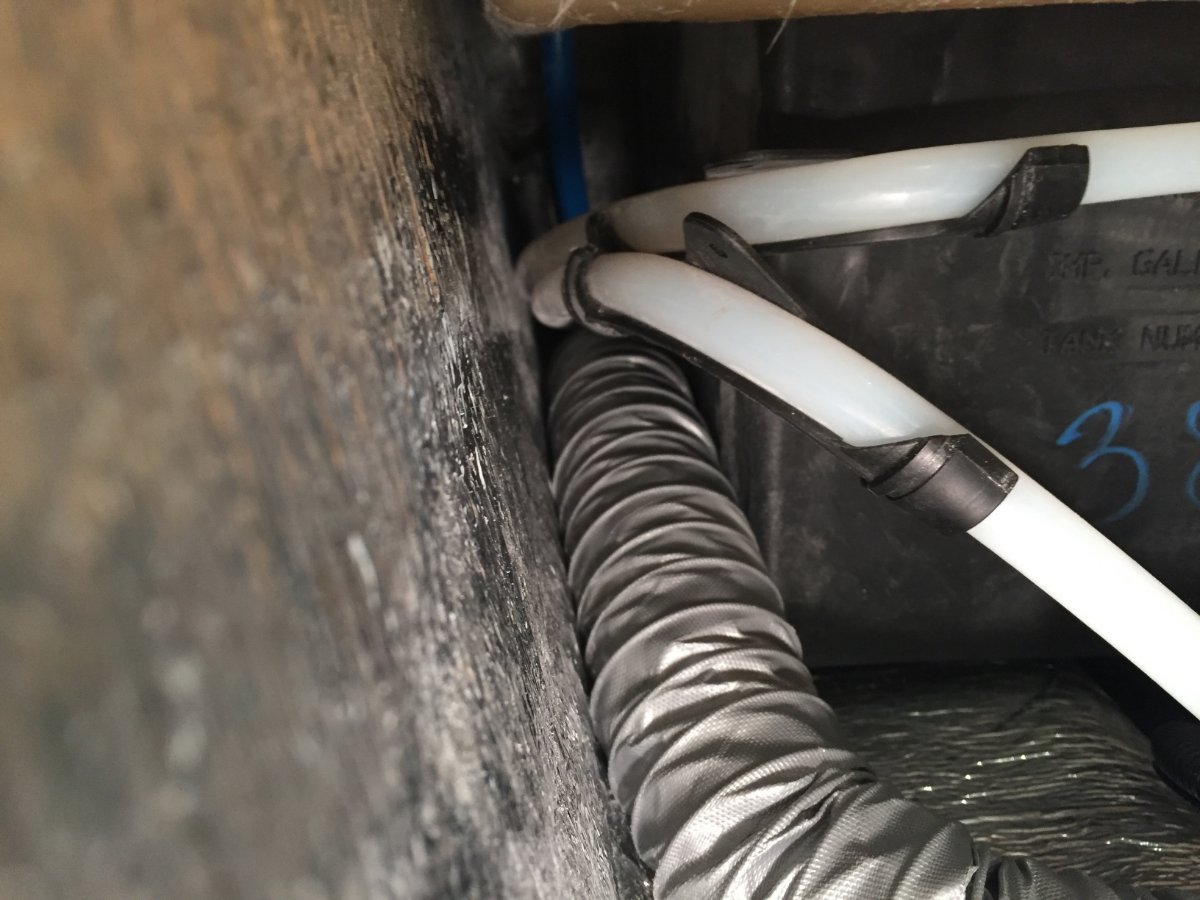
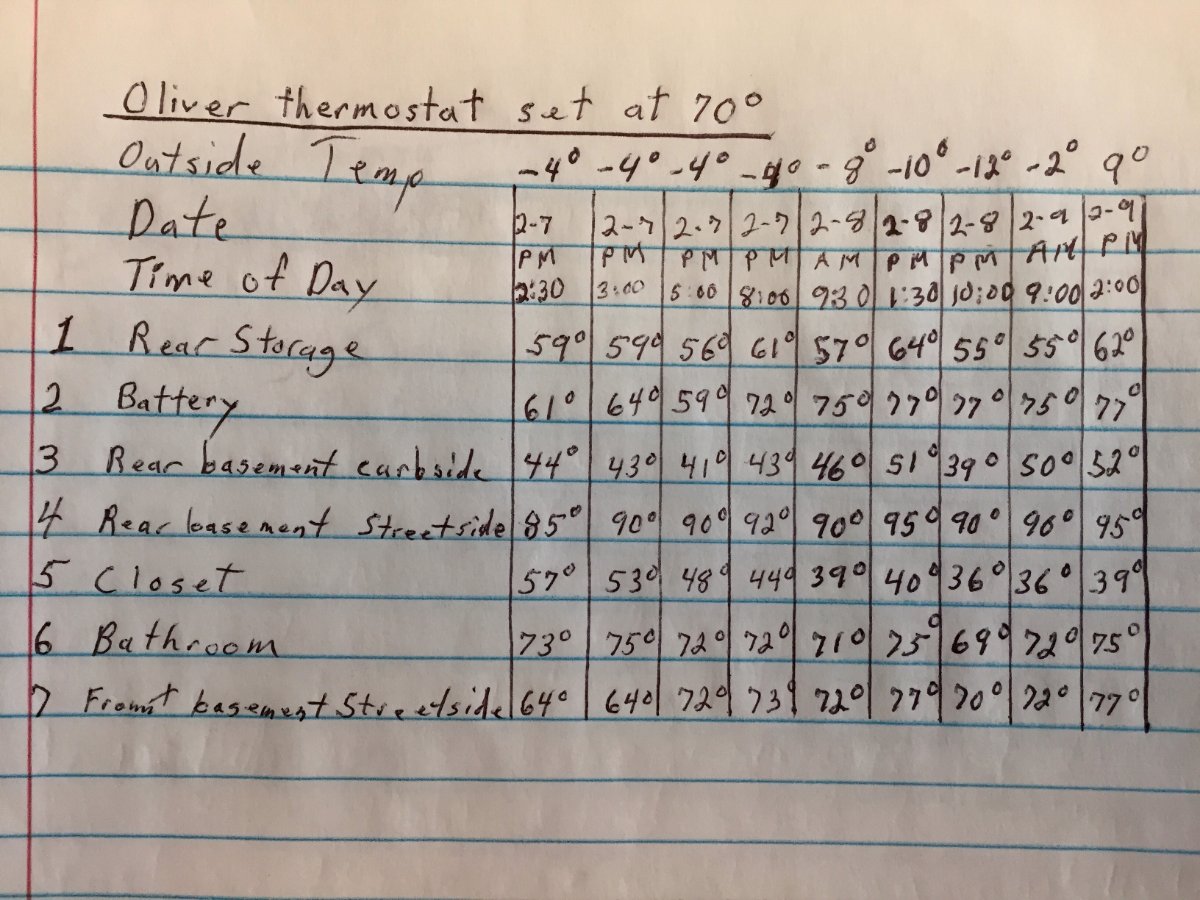
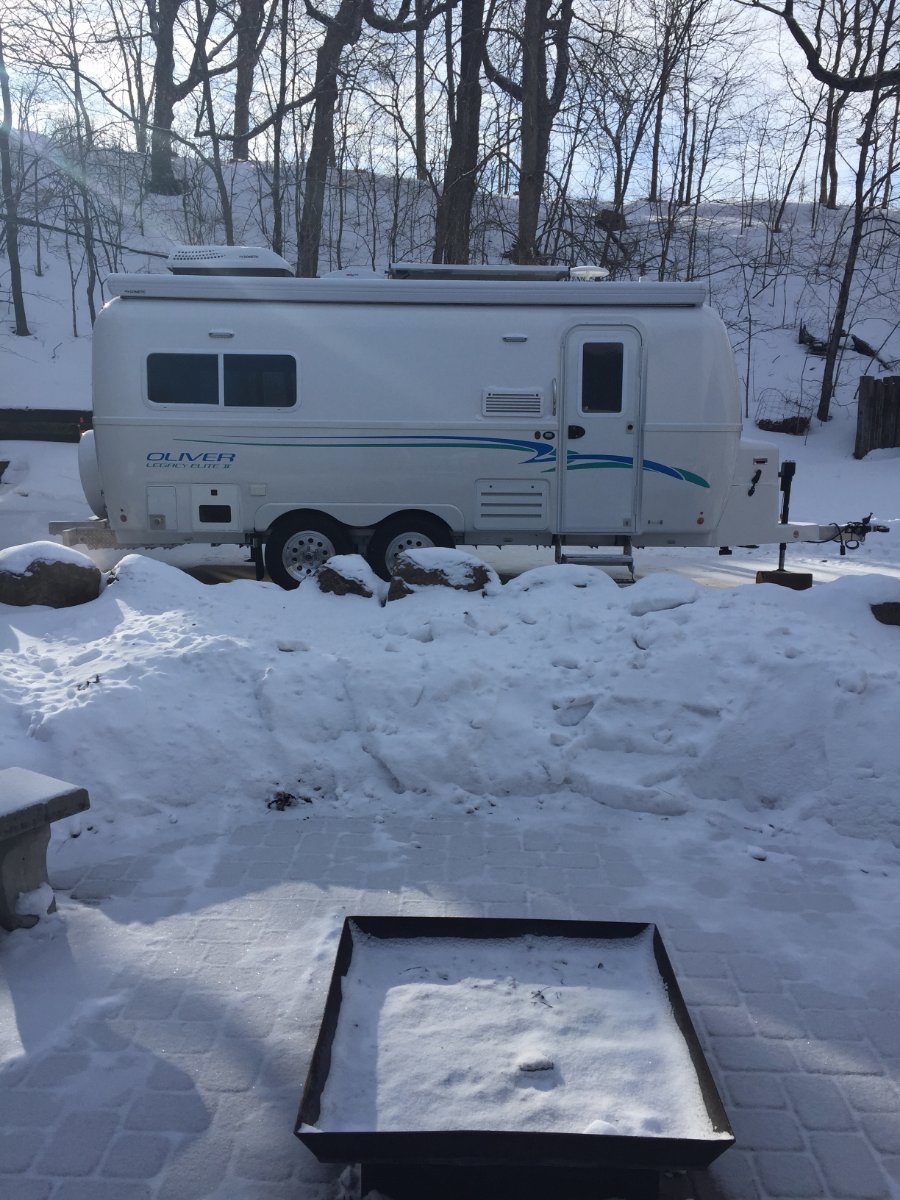
The seed was planted for this furnace mod when we grabbed a canceled reservation three weeks out at a Minnesota State Park. This reservation was mid October and when the date arrived the weather forecast had changed for the worse. We stayed for only two of the three days and we received our first snow of the season, 6 inches of wet snow. We had a non electric site and my batteries were having trouble making it through the night and I was concerned about the water freezing in the Oliver. I have already addressed switching to lithium batteries and posted about it on Oliver Forum. Now I want to share with you what I have done to relieve my worries about water freeze ups in the Oliver, provided that I have a functioning furnace. I first tried to identify the weak spots and came up with the following. Boondocking Inlet Outside Wash Station Fresh Tank Fill Inlet City Water Inlet Black Tank Flush Port Toilet Water Supply Line Hot & Cold Lines Crossing Back Of Oliver The Oliver has all of it's heat ducts run on the curbside which protect the kitchen and the bathroom faucets from freezing. My plan is to run a 2" ducting along the back to the street side and terminating in to the trough that the water lines run in for the city water inlet, fresh tank fill inlet and outside faucet. This trough also has the check valves for those two inlets and has the floor of the exterior storage compartment covering over the top of it. To get at the trough you will have to remove the back wall of the storage compartment and flip the mat back that covers the floor. This exposes the water lines that come across the back of the trailer and drop into that trough. There is a wall that separates the furnace compartment from storage and extends past the wall you just removed. It has a opening for the water lines and it is large enough to run the 2" duct through it and on top of the water lines across the back and into the trough. Now you can flip the mat back down and they are long enough to cover the water lines and the newly installed 2" duct, then the wall is put back in place. On the connection to the furnace I removed the back of the heat exchanger. There is one hard to get at screw on the bottom but the rest are easily accessible. I made two holes, a 2" and a 4" in that back plate. I could not find a 2" starter collar locally so I bought two 4" and removed the rivets on one of them and formed a two inch collar, cut to length and re-rivet. I then installed the 2" and 4" starter collars to the heat exchanger back panel and then the panel to the furnace. I then hooked up the 2" duct to the furnace. Looking in to the access hole under the street side bed you are able to see where the water lines come up and out of the trough and to the valve of the out side wash station. When the furnace fan is running it will blow out a lit Bic Lighter held in that area. So we're protecting water lines, the check valves and dumping warm air underneath the outside wash station valve. Now back at the furnace I attach a 4" heavy duty aluminum foil duct to the newly installed starter collar. It is routed forward a short distance until it can be routed across the basement to the street side and then fed between the hot and cold water lines that go to the outside wash station valve. At this point I need to use a 4" coupler that is 6" long to attach the next 8' piece of 4" duct. I use the 6" long coupler so I can add holes if I need to flood a area with heat, this particular coupler did not need to. I then routed the duct from the wash station valve along the outer wall and over the wheel well, make the corner by the battery compartment and then once getting past the wheel well go down and under battery compartment. Up in that corner I attach a adhesive base 3/4" cable anchor so I can loop a 20" releasable tie strap through it and around the 4" duct holding it up and out of the way. A second 20" tie strap is used were the duct heads down under the battery compartment, it utilizes the loop that anchors the 4/0 cable coming out of the battery compartment. Next I prep another 6" long 4" coupler by adding a metal mounting bracket. It is bolted to the coupler using two 10-24 machine screws that go through the bracket the coupler wall and then a backing plate that has tapped holes. This coupler I will add a1" hole that will be pointed up to flood heat at the battery compartment. The mounting bracket will be utilizing the upper bolt of the support leg for the battery compartment. This keeps the duct up and away from the inverter and electrical components and positions it to flood heat up against the bottom of the battery compartment. The next length of 4" duct is clamped to that coupler and routed up from under the battery compartment over to and along the wheel well. It is held by two 20" tie straps similar to the other side. Because I want to run the heat duct under the foot space of the dinette I need to transition to 2" duct. There is access via the same trough that I utilized in the back of the trailer, but at the front there is more room and I am able to pull the 2" ducting through. From there it continues toward the front until it reaches the black tank flush inlet where it then follows that pipe back along the black tank and terminates by the water supply line for the toilet. At the transition point I add two more short pieces of 2" duct and route them down to where the main black tank drain pipe goes under the dinette foot space, they are terminated on either side of that pipe. There was not enough room to run the 2" duct but enough to force air along either side. At the transition from 4" to the three 2" ducts I simply inserted the three 2" into the end of the 4" and used aluminum foil duct tape to seal the transition. I also want to mention that I used the aluminum foil duct tape to reinforce the ends of every 4" duct by wrapping outside and inside before clamping. That should cover the install, now lets talk about the results of the test in subzero weather. I rounded up seven digital thermometers and put them in the areas I was concerned about. Was placed just inside the empty rear storage compartment. Was placed on top of the batteries and a piece of acoustical insulation that was for large generator enclosure, it was 1-1/2" thick and 19" square. This was squeezed in the opening before the door was closed. Was placed in the rear basement curbside next to boondocking inlet. Was placed in the rear basement street side below the outside wash station valve. Was placed on the floor of the closet with the door left closed. Was placed on the lower shelf in the vanity in the bathroom with the door left closed. Was placed in front basement street side next to the black tank flush port line. I moved it out of the heated shed at 1:00 pm on Sunday 2-7-21. I moved it back in at 3:00 pm on Tuesday 2-9-21. The furnace was cycling off and on at -4 ' but I noticed at -8' and colder it ran continuous. I have the Truma water heater and that was also turned on. I checked propane consumption by putting on two 20 pound tanks that I had weighed and left them in place for 12 hours. It was -12' when I put them on and -2' when I took them off. Because of the subzero temperature the propane was not gasifying very well and the regulator automatically changed from the primary to the reserve after only consuming 2.353 gallons. The total consumed out of both tanks in 12 hours was 3.294 gallons, so that would be .274 gallons in one hour. My Victron BMV-712 was telling me that I had depleted my 400 Ah Battle Born batteries to 47% and at rate of use I had two days and nine hours left. I thought I would comment on a couple of things I like about the outcome of the project. The bathroom was comfy warm and the wall next to the bed was not icy cold. I am not planing to take up subzero camping but it does gives me a benchmark to go off of for any situation that I might run in to. If you have any suggestions or see something that is of concern please let me know. Paul
1 point
-
I recently upgraded from a 34 gallon stock fuel tank to a 60 Gallon S&B Fuel Tank. The install was into our 2021 F350 6.7L Crew Cab/Short Bed. It fits in midship as shown in the image below from the S&B Tanks Site: As part of the upgrade process, I needed to use Forscan to update the "fuel tank size" so the dash display correctly displayed distance to empty. I now have a scanner, and the Forscan software and have learned quite a bit on how to "safely" make modifications to things like the display settings (added TEMPs to gauges) and the features. Now with the upgraded tank we're ready for the long road trip planned for later in 2021. Here's how the updated range looks on the Ford app...and that's after a 50 mile drive. Any questions just ask. Craig rs=w-1280.webp
1 point
-
As I don't know what Oliver provides any more - The basics - You will most likely be on a 15 amp circuit - perhaps 20 - that is shared with other needs of the dwelling - and I believe Oliver supplies the 30 am to less - adapter. Water- they give you a hose - long enough? - site dependent. Any hose will do in a pinch - but the non smelly ones are preferred. Wheel chocks - I love my Andersons - work in most places - but again - site dependent. It is always nice to have a few extra wooden spacer blocks for the jacks. Have fun - it will come to you - grasshopper!😃 RB1 point
-
If any prospective Oliver customer ever had their doubts - post this thread. Drop the mic - as they say. Oliver management - I applaud you. RB Whether an Oliver tech - or a local service - that is how you do it.1 point
-
John, Thanks for the tip, I just removed the pix with the detail...left one with the QR code. CS1 point
-
Wow that says a lot about OTT commitment to customer satisfaction. I bet sending a mobile tech out wasn't cheap.1 point
-
Thanks for the feedback folks. I do have the wheel covers on. One thing for sure I've had 3 instances where my TPMS has been a great feature to have. I would highly recommend them.1 point
-
Maybe we should resurrect the old airplane term "flying boat"? Or a kind of hover plane? Cool video: What Happened to Giant Ekranoplans? John Davies Spokane WA
1 point
-
A couple of summers ago I was showing another person how to use a torgue wrench - they had never even seen one before. For those that have never used one THIS VIDEO should help with the most common type of torgue wrench. Bill1 point
-
From the reports I'm seeing this morning it appears as though things are getting worse with this set of storms. Please everybody - be very careful out there. Bill1 point
-
For those who are buying the tools for tire removal for the first time. A suggestion, it would be a good idea to practice changing the tires if its your first time. It would be better to learn how to change the tires on the Ollie in your driveway and get comfortable with it than have to change a flat tire on the side of the road. Which in most cases will be in poor conditions. Un even surfaces. Not a lot of walk around room given that vehicles and trucks will be wizzing by you at 60 -70- 80 mph’s scary. you should also check with your insurance carrier most policies now have some kind of road side assistance for tire changing. The down side to that option is a very long wait time or you may not be able to get service. It all depends on the situation your in at the time you have a flat. Safety first.1 point
-
The installation of the RV refrigerators and the extreme amount of precaution surrounding the refrigerators is most likely due to the quite large number of fires associated with rv refrigerators, and even a few deaths. Dometic and Norcold have been responsible for numerous fires. RV refrigerator fires have paid for a truck for my business, and has continued to this day. You can google RV refrigerator fires for a detailed explanation or I have attached one of several hundred reports. Dometic and Norcold has paid out millions in claims for their part in causing these fires. John RV Absorption Refrigerator Fires.pdf1 point
-
My scanner came in yesterday! Tomorrow, I’ll be braving the weather to start downloading backups of the modules. My main purpose is to toggle the dash power points to “on”.1 point
-
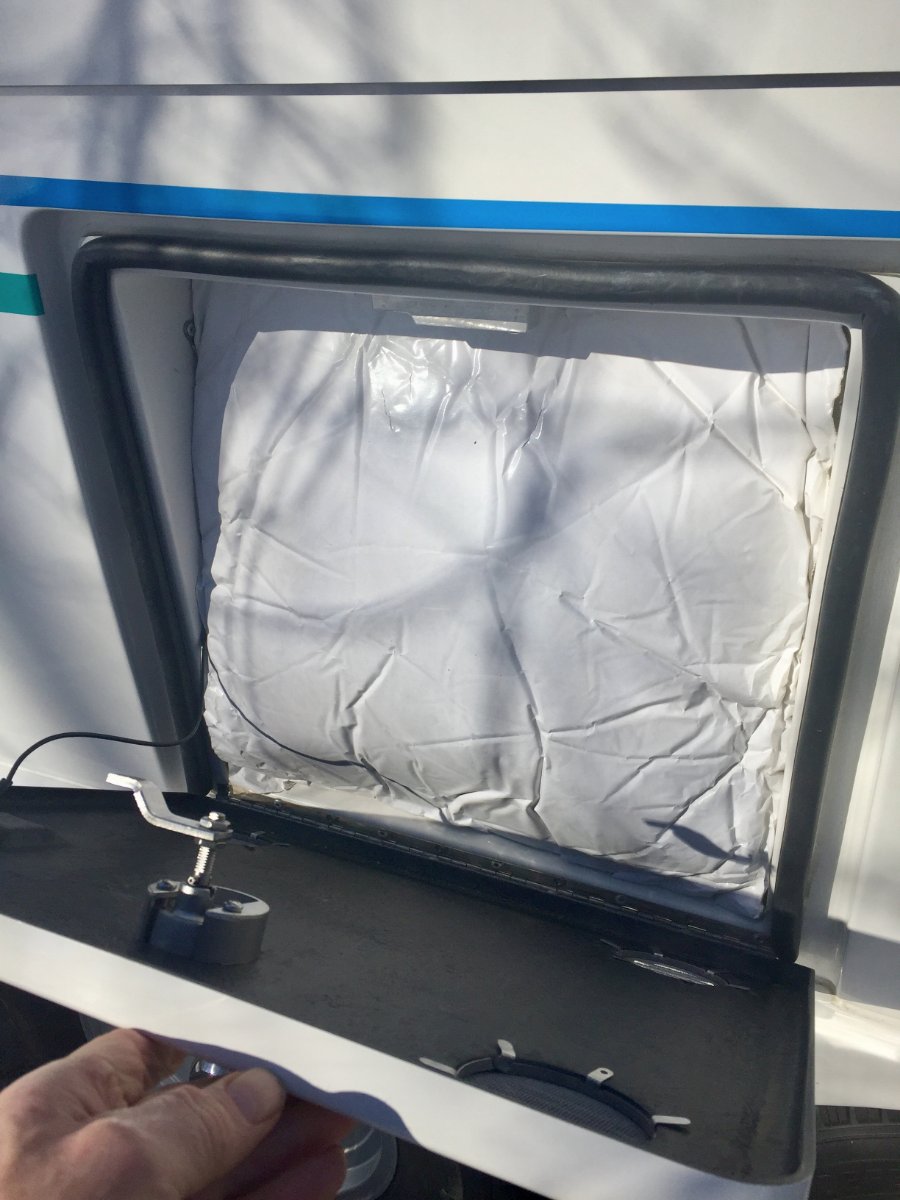
Ray & Susan - YES! (EDIT) - I just re-read your post and you are talking about "EXTERIOR" while my reply below is mainly for interior. AS long as those panels you have are at least somewhat waterproof then I'd still say you are good to go. I did exactly this a few years ago. At the time, my goal was to get the water pump to be a bit quieter. After I put in an accumulator tank and added some Stainless Steel braided lines along with pipe insulation, I was still not happy with the sound levels. So, I happened upon some sound deadening I had in the workshop and placed it on the underside on each of the access hatches. This did make a difference with both the sound deadening and (slightly to my surprise because I was not thinking about this at the time) with insulation. I initially used foil duct tape to hold the material in place but later had to go back with a glue gun to better secure this stuff. Bill p.s. if you do this mod - don't forget to allow for the red ribbon material so that you have something to lift the panels by.1 point
-
I want to thank Minnesota Oliver for the very detailed report. Have to say, I loved the photo of the outdoor shower spraying. 👍 As much as I love my native Minnesota, I'm always glad (in the winter) that I live in Florida. Though, I miss my family.1 point
-
The learning center at Blue Sky is great. So is their customer support. Ryan has answered all of our questions over the years. Bluesky support (760) 208-21491 point
-
We have an Acurite 3-zone monitor. I like that all four sensors are shown on the screen; you don't have to cycle through the channels. We did not camp in cold weather in our previous RV since it was not 4-season, so we used the sensors in the fridge/freezer/outside. While camping in our Oliver during cold weather, the sensors are used in the basement (near the exterior hatch)/fridge/freezer. When parked at home, we monitor the basement and water heater compartment (so we don't have to drain the water heater). If the HWH area starts getting near freezing, we simply turn it on. The basement temp isn't that much of an issue when the Ollie is parked at home, since we always put antifreeze in the water inlets and outdoor shower when cold weather is predicted. In our previous RV we had to monitor the refrigerator constantly as it (a Dometic) struggled to maintain desirable temperatures. With the Norcold we monitor to ensure it isn't too cold . . . . . thus far, the Oliver fridge is so much better than the "Demonic" ever hoped to be. Setting the temp to levels 2-4 has been good so far; we'll see how it performs when outdoor temperatures warm up.1 point
-
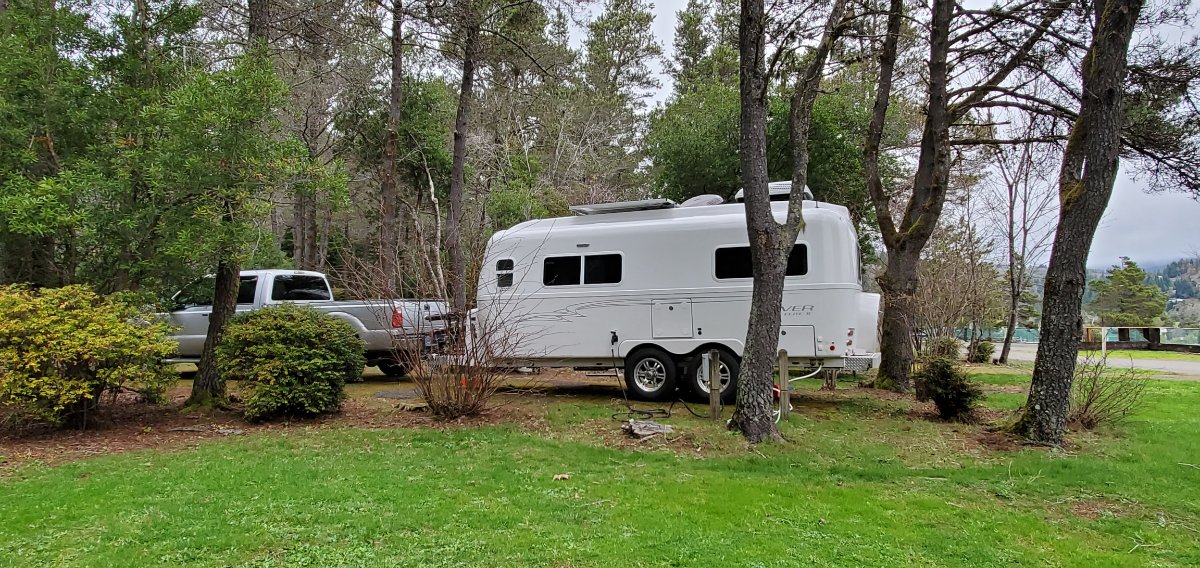
Spent three nights last weekend at a local park - Powers (Coos) County Park. It's less than an hour from home, so we often stay here while exploring the surrounding USFS. There is a large pond, for fishing and kayaking, but it was too cold for that. We did some biking and explored FS roads. Powers Park is our basecamp for the annual Tour de Fronds bike ride that we and several of our family participate in each year. It was cancelled for 2020 (Covid), but they are hoping the event will go on this year. Wishing you safe travels.
1 point
-
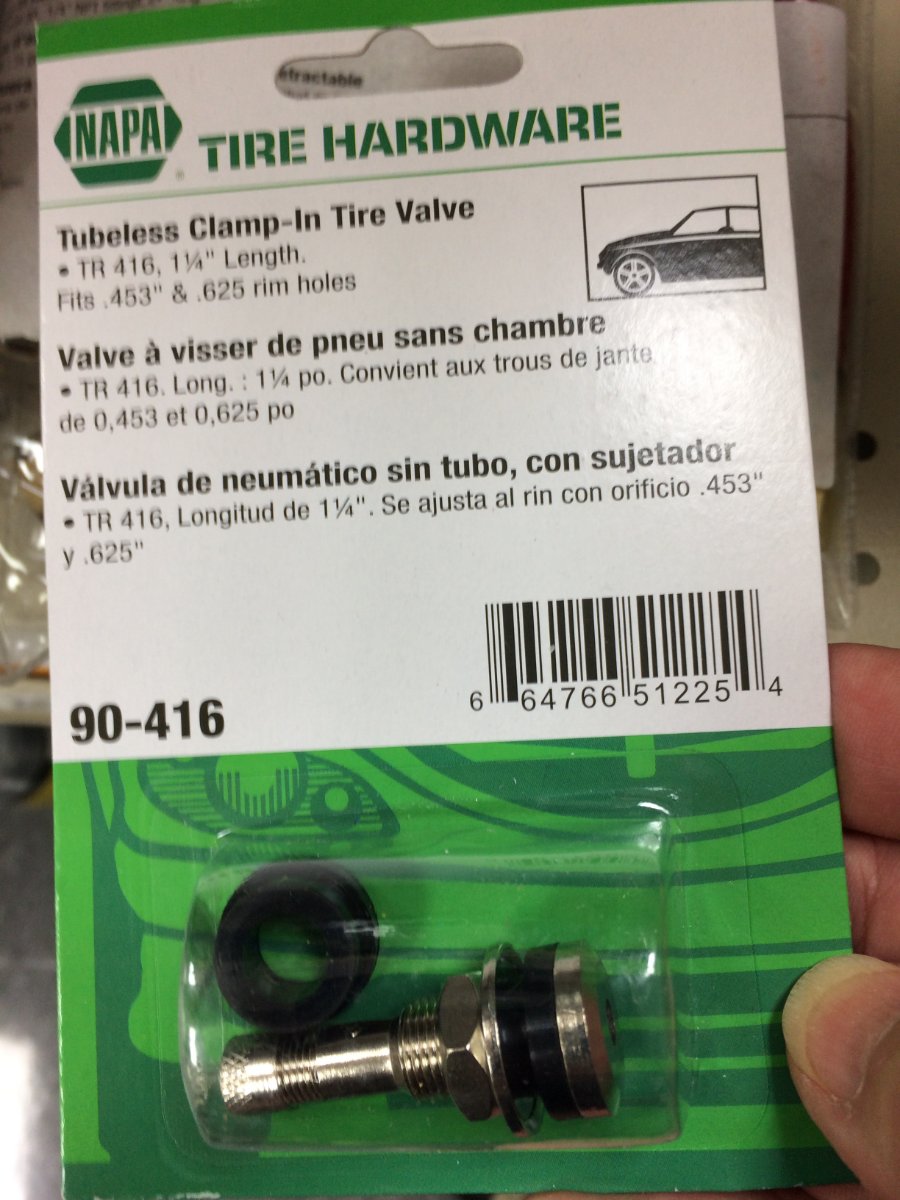
If you have a NAPA auto parts store near you, they stock the metal valve steams.
1 point
-
I reversed the bolt that had no splines left on the mounting tab. As bhncb states it is a lot easier to inspect. However if your mounting tabs have the factory splines, then I recommend you not swap the bolt direction.1 point
-
7500 pounds rated ball, at a minimum. That gives you some reserve strength. The stronger the ball, the less you will worry if you find yourself on a potholed forest or ranch road (or even some National Park “main” roads, like in Glacier NP). GVWR for an LE2 is 7000 pounds.Some owners have reported a fully loaded weight higher than that, I do not recommend it. This one works great, or pick another similar brand. The longer shank also allows you to stack 1” inside diameter HARDENED Grade 8 flat washers to raise it up in small increments if you want to fine tune the height. .... https://www.etrailer.com/Trailer-Hitch-Ball/Curt/C54CR.html John Davies Spokane WA1 point
-
Also a note to remember we are dealing with actual truck tires. Not the china bomb tires found on most travel trailers one of the selling points for me. Very happy to have them.1 point
-
We have the dual fuel Champion that is rated for sustained 28xx/29xx watts using Propane. I leave it in the back of the truck and pull it forward insuring the exhaust doesn't hit anything that might get too hot or even melt. I have an additional regulator and hoses to connect to the Oliver Propane QC. I plug in the neutral grounding plug, the 30amp TT power cable provided by Oliver and get the generator started. If it is raining I do have a tent to use on the generator to keep the electronics dry. This generator does have a battery powered starter. If you don't run this unit regularly, the battery charge will need to be maintained to extend its life. I will never run this using gasoline, but can use a standard propane cylinder setup with accessories Champion ships with the unit. I have used this unit at home to power my furnace or during an outage in the summer, my refrigerator. I have used my Honda EU2000i too that runs on gasoline. It works fine too and also requires the neutral bonding plug so I do have two of those, one I made and one purchased on Amazon. When you add the weight of the gasoline you would carry, the weight is almost equivalent. David1 point
-
When I worked building interactive computer based museum exhibits, I quickly learned that when the phone call came, the first thing to check was "is it still plugged in?" 🙂 I boiled that and a few other helpful reminders of stupid things to check first when customers call into the observation "You can't fix it if it's not broken!"1 point
-
Yes, we've been watching.. It's been a real bummer for usa. But, as always in the sailing (and camping) community, everyone reached out and helped when the foil broke away last week. Thank you, especially, New Zealand! No one lost, the vessel saved.1 point
-
One more thing, before you call for service, or do any other machinations, try resetting the fridge 110 breaker, again, for the fridge. (Probably under the small dinette seat?) If you're running on propane, this will not affect your fridge operation. You don't need 110 to run the fridge on propane. Make sure you are resetting the correct breaker. Look at the chart. Turn it off for 30 minutes to an hour. Some electronics take a surprisingly long time to reset. Take a photo, so we know it's the right breaker. There is a manual reset for norcolds, with a series of button presses, but the user can only reset it once, and you may be locked out if it doesn't work. At least, that's the way it worked on our old norcold. And, it might disable everything, if it doesn't work. Reading your posts, I would not encourage you to even try.1 point
-
Yeah I have several. Used to ride motorcycles. I am a woman of many talents but disassembling cabinetry is not among them, nor does it interest me. $61k. I’ll get the vehicle inspector — appt tomorrow for truck and trailer — to do all this. Not his/her job. Call walmart. Or, do it yourself.1 point
-
You have the same tires I just put on. Go to Walmart and buy a tire pressure gauge. Take off the green cap and measure your pressure with the gauge. Then, push the little thing in the middle of the tire stem to let pressure out. Do that for 3 or 4 seconds and check again. When you get down to what you want (I run at 55 psi) put the cap back on and you’re done.1 point
-
Oliver made the first night's reservation, but we wanted more nights and called the park directly and added two nights. This worked out great for us too. It gave us an entire day to do testing of all systems. David1 point
-
You might check your tire pressures to see if Oliver is still filling them with concrete. I keep mine at 40-45, which for us eliminated the flying blinds. That's for an Elite 2, so the single axle might need higher pressures.1 point
-
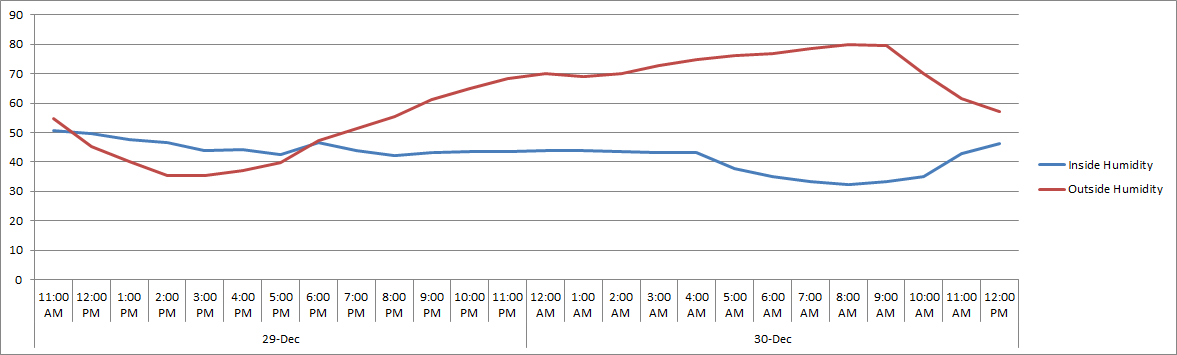
Ok, for the data geeks like me out there, here's the test results with no heat other than an electric space heater set to ~65: This was a "real" test since I actually showered and slept in the trailer last night. Some of the interesting things that impacted the data: - Showered at 5:30PM yesterday and again at 9:30AM this morning. You can see the associated spikes (about +5%) in the inside humidity from that. The humidity also stayed in the low 40's with me in there as compared to the low 30's without anyone. So each person may raise the humidity by 5-10% to JD's earlier point. It starts to go down again once I turned the heat up (see next point). - The temperature dropped to about 62 during the night and I woke up cold at 3:30 AM. I had the space heater on low and it couldn't keep up. I put it on high mode at the same temp and slept fairly warmly for another hour. You can see that the temp does spike during that time and it does not drag up the basement temps at all - as expected. - I added a sensor to the floor of the closet at 10:00 PM. It's just as cold in the closet as it is in the storage area and front street basement. I'm convinced I need to gain access to that area (somehow?) and poke a hole in the duct. 🙂 - At 7:30AM I pulled the plug on the test and started the furnace up. The temps in those 3 areas mentioned were around 38. The low overnight was 28, so maybe could have survived a few more degrees without the furnace but not much with the fresh water and city water valves probably at risk the most. I may have to address that risk as well. You can see everything shoots up pretty quickly once the furnace is started. Would have been nice to see how the temps rebounded on their own and how close it tracked to the outside temp, but I'll have to do that next time. I suspect they would not have rebounded fast at all given that when I cranked up the space heater at 3:30 AM it didn't stop the basement temps from plummeting at the same rate as the outside temp. - I ran the space heater on the inverter for a while to see what kind of drain they put on the batteries. I charged the batteries at 5:30PM before I started and again at 8:30 PM after I finished. You can see the heat goes up in the street side basement from the inverter fan during charging. The batteries drained 45% (180 amp hours) over that 3 hours and it wasn't even that cold out! I had the heater set on low and it was drawing about 80 amps consistently when on. That's incredibly high drain, so electric heaters aren't going to work well for boondocking. - All in all, it looks like all the basement temps came down about 10 degrees closer to the outside temps with the space heater as compared to where they were with the furnace. More importantly, the furnace is keeping the basement temps from falling as fast as the outside temp does. It's also a great way to get some heat into the basement areas pretty quickly if needed.
1 point
-
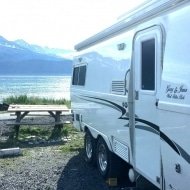
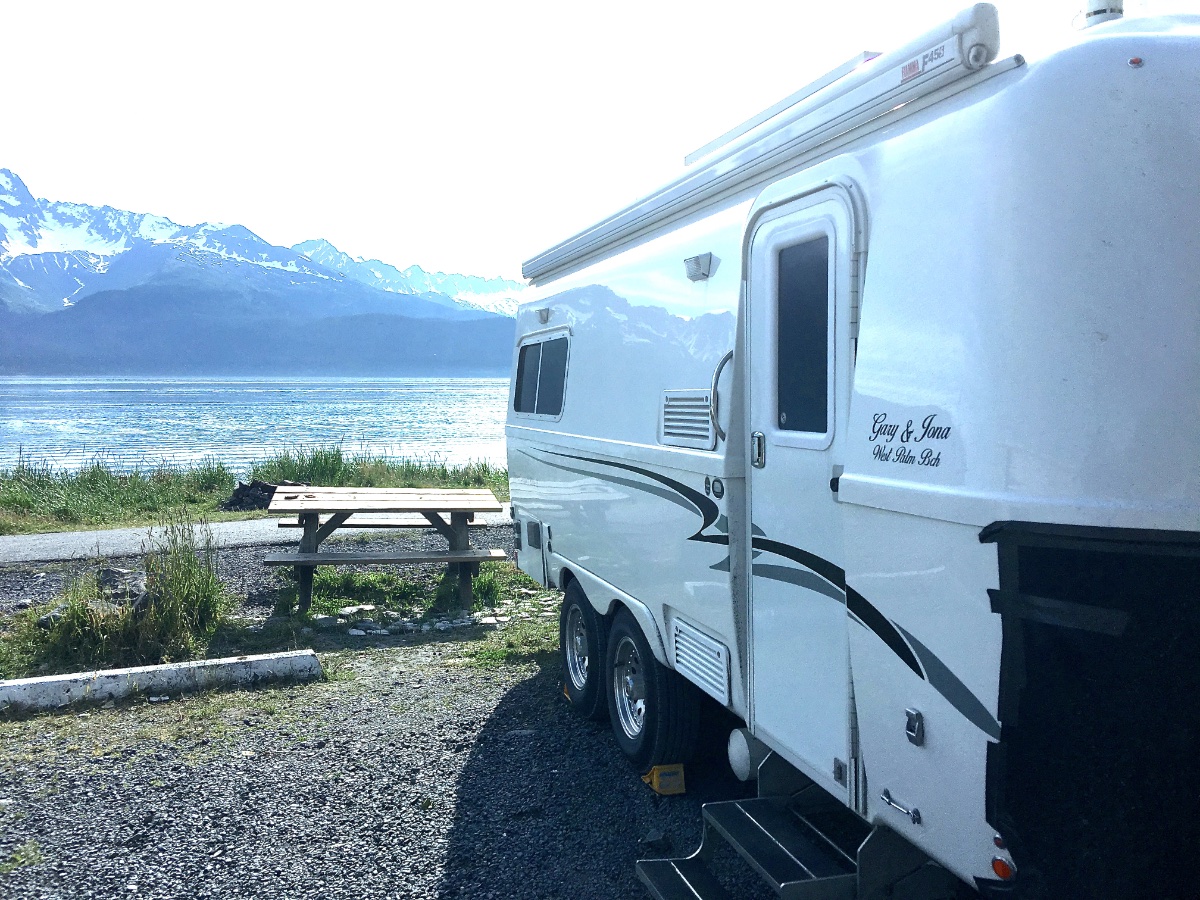
On the bay in Seward Waterfront Park , Alaska. life is good but I could go on to on the ocean along the 101 in Washington state again Life is good. Enjoy them all.
1 point
-
Super easy for us since we just picked up last month and have only camped at David Crocket SP and now Badin Lake CG in Uwharrie National Forest (close to home in NC) in 2020. DCSP was nice, but we were too busy unpacking and checking things to really relax. This latest trip to Badin Lake was fantastic (just got back today). Our first boondocking trip and I am happy to finally color in my own state on the map! 🙂
1 point
-
I would write “or compressor refrigerator?” but then this post would head off in a much different direction and it would soon be about tow vehicle size!😂1 point
-
We get the HH news letter and I read the recall list. Quite long. We’re going on five years and we haven’t had any expenses other than normal maintenance (bearings, brake wear, etc). We had some warranty items but Oliver covered the expense for them or they corrected the issue. At this point, looking back, I’m not sure an extended warranty would have been worth the cost.1 point
-
Nice to read through these old threads! Most folks don’t know that Chris and Cherie (Technomadia) were early Oliver owners. I used to worry about monitoring my propane levels. Now, I just use one tank and when it goes empty (or close) I switch to the full tank and fill the empty when I can. They last so long it really isn’t a big issue. Mike1 point


.jpg.b4fb182c2dd38b005d42f99a3317e409.jpg)


.thumb.JPG.dd838cdb3df463dab6a16861fa23a319.JPG)


-
Recent Achievements
-
")


")


")


