Leaderboard


Popular Content
Showing content with the highest reputation on 11/09/2021 in all areas
-
I do frequent gel coat repairs to kayaks as Im a rough water instructor. There is no difference between the layup of our trailers and my kayaks. A few things to consider: - While your ding goes through the gel coat and exposes the glass matt under, there is no chance that occasional moisture exposure will do any further damage. - Ideally, you would repair the damaged gel coat with an application of gel coat. It's easy enough stuff to work with, the stuff you need can be found at most hardware store or, for more $, at a West Marine and there are plenty of Utube type instructionals. Standard boat repair 101. The downside is that Oliver, from what I've heard, does not use a standardized or even consistent (from unit to unit) white. Nowadays, there are RAL based color options which, in short, means that if Oliver always used a particular white found on a RAL chart, we would be able to order gel coat in that exact color to make a perfect match. Store bought gel coats come in slightly varying array of whites so your repair will be a little off. If you want to try to match, you can experiment with a store bought gel coat and add a little coloration which is usually pricey and comes in primary colors only. - An option may be to contact Oliver to see if they still have or stock gel coat to match your hull number. Could luck out. If so, ask whether their product has wax already mixed in or if you need to add. If the latter, the wax is available from West Marine and includes a formulation of how much to add to a given amount of gel coat. - If you are willing to accept a slight color mismatch, John's suggestion is spot on. Marinetex is a flat, very slightly greyish white which, given the tiny area you have to fill, may be perfectly fine and makes for a super easy repair. If you go this route, I often prep the hole as John suggested, clean out hole and surrounding area with isopropyl alcohol and fill in with the product. Use a tad more then it takes to fill the hole, cover the area with a little piece of rolled plastic clear sheeting like visquene or the stuff you put over windows for the winter and use a spoon or tongue depressor to carefully smooth out the Marinetex which willspread a little beyond the hole - which is good. Peel up the plastic an hour later, let cure entirely, then wet sand with 800 then 1200 sandpaper. Finish with lite rubbing compound then a finberglass polish/wax. Good as new and easier then it sounds. BTW, that process is the same for how I work with gel coat. Best of luck. Gerry5 points
-
I would be more than willing to 3d print these if any one is interested. Pictures to come.3 points
-
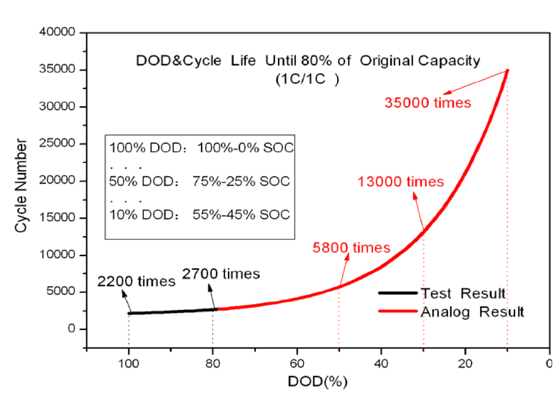
There have been numerous posts in this forum about Oliver’s lithium battery systems—about their usefulness, limitations, and value with respect to cost. Despite reasonable arguments against it, a number of us have purchased the lithium package. Reasons for purchasing the option have included the ability to run the air conditioner (A/C) for short durations (like at highway rest stops), greater usable energy (more boondocking in cloudy weather without needing a generator), faster charging, and longer battery life. This post summarizes things I’ve learned over the last 6 months about the Xantrex/Lithium/Zamp system. This post might also be titled “Things I Wish I’d Known from the Start.” This summary is a work in progress. Hopefully, with your corrections and additions, this thread will be of use to others that have purchased the Lithionics option or are considering doing so. At the time of this writing, manuals and other information for the Lithionics batteries are in the Service Center Knowledge Base — see links at the end of this post. I assume at some point Lithionics information will be compiled with all of the other trailer manuals in Oliver University. Battery State of Charge A key component of the Lithionics system is the app that lets users monitor State of Charge (SOC) and voltage (see links below). The reliability of the SOC values (which describes the amount of energy remaining in the battery) depends on (1) maintaining SOC calibration and having (2) up-to-date Lithionics firmware. The SOC should be near 100% at 13.6 volts, and about 50% (+/- about 10%) at 13.2 volts. If this is not what you’re seeing on the Zamp controller, Xantrex remote, or Lithionics battery app, then something’s wrong. By way of example, a couple times we’ve experienced the SOC readings of 60% when the batteries were dead -- not good. Note that the voltage reading on the app while there is a load on the system (e.g., electric heater) is different than when there is no load; the “resting” voltage may be higher. SOC Calibration The SOC requires periodic calibration. According to the manual for the 130 Ah batteries, the SOC can be calibrated simply by charging the batteries to 14.4 volts. The manual also states that fully charging the batteries to 14.4 volts should be done at least once every two weeks for battery life. Get the 130-Ah battery manual from Lithionics using the links below; at the time of this writing, Oliver has the incorrect manual posted in the Knowledge Base). When charging with shore power, it is not always apparent that the batteries have reached 14.4 volts, because when charging, the batteries only stay at ~14.4 volts for a short while before dropping back to about 13.6 volts. You can verify that batteries have reached 14.4 volts by monitoring battery voltage using the Lithionics app during a charging event. If you are unsure that the batteries are reaching 14.4 volts, you can at least confirm that the Xantrex charger/inverter is set to charge to at least 14.4 volts in the Xantrex app (https://support.olivertraveltrailers.com/portal/en/kb/articles/xantrex-remote-bluetooth-pair-operation) and, under Settings, check the custom absorption voltage. Ours came from the factory set at 14.6 volts, which is sufficiently high to get the batteries to 14.4 volts. Lithionics Firmware At least some of us that picked up our trailers in spring or early summer have batteries with outdated firmware. As I understand from Lithionics, more recent firmware versions have an improved SOC algorithm (our initial SOC readings were unreliable). You can check firmware version with the Lithionics app by clicking on a battery, then clicking on the settings “sprocket” in the upper right side, and then clicking on firmware. Our battery came with firmware version 1.0.05; I’ve recently updated to 1.0.07 by clicking on flash firmware. This has to be done with your phone in close proximity to the battery, and has to be done separately for each battery. Updating firmware comes with a “…this is a critical operation…” warning; you might want to check with Oliver or Lithionics if you have any questions about doing this. Has updating firmware improved our SOC readings? I’m not sure yet, but I think so. So far, the readings seem more reliable, but I’m still testing. SOC Calibration by Cycling A Lithionics rep told me that the SOC can be calibrated by “cycling” the batteries, and that this should be done every two months. Cycling consists of discharging the batteries to reserve voltage (e.g., ~12.1 volts) and then charging to 14.4 volts. However, the rep could not point to written documentation supporting this form of calibration. As the batteries support more partial cycles than full cycles (see graph below), calibrating by simply charging to 14.4 volts (assuming this effectively calibrates the SOC) seems better for battery life. Lithionics batteries will not charge from tow vehicle The standard 7-pin connection from tow vehicle to trailer cannot be used for charging the Lithionics batteries. Charging the batteries from the TV requires a DC to DC charger, which is an aftermarket installation. For more discussion on this, search for John Davies’ Redarc DC-to-DC charger installation description. Batteries Turn Off Twice now one or two of the three 130-Ah batteries have turned off when reaching low voltage (which happened because we were relying on incorrect SOC values). The SOC readings themselves looked OK, but the voltage did not correspond with SOC. The battery State in the Lithionics app reads “Off” for each battery when it is off. There is no flag on the Zamp or Xantrex control panel that alert the user to one or two batteries being off. The lesson (at least for me): monitor all three batteries, not just one, and note the Current, Power, State, and Status Code settings. If one or more batteries are off, turn the battery(ies) back on, and fully charge to 14.4 volts. Inverter Noise The Xantrex charger/inverter can be noisy charging the batteries with shore power (I’ve measured 60-64 decibels in the cabin when batteries are charging, and about 72 decibels adjacent to the inverter). The noise comes from (1) the charger/inverter fan and (2) the way in which the inverter is mounted (the fiberglass wall to which the inverter is mounted propagates noise into the cabin). The noise can be masked by turning on the A/C. Alternatively, the noise level can be reduced somewhat by lowering the charger current. In the Xantrex app, go to settings, and change the Charger Current from, for example, 100 amps to 30 amps. This will reduce fan noise. It will obviously take longer to charge the batteries with lower current. If you would like to be connected to shore power (to run an electric heater or the A/C, for example), but not charge the batteries (to avoid keeping them fully charged for long periods of time, or to reduce inverter noise) you can set the charger ignition control in the Xantrex app settings to “auto-on” (thanks to NCEagle for figuring this one out). In this mode shore power energizes the 110 outlets, the A/C, and the fridge, but does not charge the batteries. Turn the charger ignition control “off” to resume charging batteries with shore power. There are likely ways of re-mounting the inverter so that noise does not propagate into the cabin, with either a different mounting location or perhaps mounts using rubber bushings. Has anyone tried this yet? Xantrex Communication Errors Too often, I’ve gotten “Code 20” communication errors on the Xantrex remote panel. This can be resolved by pushing the red button on the 300A breaker under the streetside bed, waiting for at least 30 minutes, and then pressing in the little red flag on the breaker. Yes, this is a pain (I wish this breaker were more accessible), but it usually resolves the issue. Leaving the Xantrex inverter on battery mode for 25 hours or more will result in the Code 20 communication error. The time limit can be changed in the Xantrex app, but cannot be lengthened to more than 25 hours. As long as the inverter has not timed out, turning the inverter off and then on again at the remote panel resets the 25-hour time-limit clock. Battery Storage Lithionics provides guidance for storing the lithium batteries (see link below). Long term storage can include lowering the SOC to about 50%. Discharging to the appropriate SOC can be accomplished by turning on an electrical load (e.g., A/C or space heater) while in battery mode and monitoring frequently. Theoretically one could set the inverter cutoff voltage (in the inverter app, under settings), to something like 13.2 volts, but the highest cutoff-voltage option is 12.8 volts. Lithionics recommends keeping a log of SOC and voltage readings prior to and after storage for warranty purposes. ------------------------ Hope this helps. Again, please correct any errors that you see, and please add your observations and tips. Fritz ------------------------------------------ Relevant Links Lithionics battery app: https://support.olivertraveltrailers.com/portal/api/kbArticles/386680000012415191/locale/en/attachments/lpqvx861bbc9c842d48f7995281b07d0a193d/content?portalId=edbsnfe5dceb1ade7571879ff200cb63e14a94b62f48e3338c31a6401acd00130b0bc&inline=true). Lithionics battery manual: At the time of this writing, the Oliver Knowledge Base has links to Lithionics manuals for 125 Ah and 320 Ah batteries. However, our LE2 has three 130 Ah batteries as part of the 390-Ah package, and the manuals for the 125-AH batteries and the 130-Ah batteries are not the same. A manual for the 130 Ah battery can be found on the Lithionics website: https://lithionicsbattery.com/wp-content/uploads/2018/12/12V130-G31LRBM8-Battery-User-Guide-R1.pdf. Lithionics Storage Procedure https://support.olivertraveltrailers.com/portal/api/kbArticles/386680000012415191/locale/en/attachments/lrotz3ebee5a7020f42a58eb0d4db18a41356/content?portalId=edbsnfe5dceb1ade7571879ff200cb63e14a94b62f48e3338c31a6401acd00130b0bc&inline=true Lithionics FAQs https://support.olivertraveltrailers.com/portal/api/kbArticles/386680000012415191/locale/en/attachments/lrotz0edc34bc92ef4dce941bbb7f3f2d89db/content?portalId=edbsnfe5dceb1ade7571879ff200cb63e14a94b62f48e3338c31a6401acd00130b0bc&inline=true Xantrex Remote Bluetooth Pairing and Operation https://support.olivertraveltrailers.com/portal/en/kb/articles/xantrex-remote-bluetooth-pair-operation
 2 points
 -
I have had a NOCO Genius 10 on my batteries for a few days now. I wired my (2) 6V AGM's together as suggested by JD and I am using the 12V AGM setting. The batteries are charged up and the unit is in the "maintenance" mode. No problems whatsoever. I like it. Thank you all for your helpful suggestions.2 points
-
"Another"?🙊🙉🙈2 points
-
Sounds like another "couple's activity" challenge in the little Ollie......2 points
-
We have had some odd issues pop up from time to time on our Jensen radio/DVD like loss of sound or settings issues. We usually just do a menu reset, I recently had to trip the 60 amp breaker to do a reset on the Jensen. It wouldn’t stay powered on long enough me to get into settings and change the time. I tried several times and it kept powering itself off. Finally I resorted to tripping the breaker. I could have used a fuse or possibly a circuit breaker on the converter, but opted for the main breaker cutoff instead. It resolved the issue immediately after I reset the breaker. David2 points
-
For that location, I would use some white epoxy filler, it is something you can do yourself and it should not be noticeable down there. For an eye level gelcoat repair, a professional is needed, unless you are comfortable working with that tricky substance. This is most excellent. https://www.amazon.com/Marine-Tex-RM305K-White-oz/dp/B0014419V0 http://marinetex.com/products/marine-tex-products/marine-tex-epoxy-putty/ You could just dab it in there, but a much better repair will result if you use a dremel tool with a small round steel grinding bit (not a sanding drum) and VERY carefully cut away any loose material and sharp edges around the perimeter. Make a neat bevel. Vacuum away all the debris and then clean with a solvent. That way the epoxy will stay in place and not get ragged around the edges. I can't tell how big that chip is, if it is small, you could just use a countersink drill bit for that, and it won't slip and scar the neighboring gelcoat. Plus a neat circle will look better than an odd shape. Usually a towel bar support bracket does not snap in place, it hooks on at the top and then you tighten an internal hex or slotted set screw underneath. Once tight it might need an occasional snugging down every few years, but it should NOT fall off constantly. If it does, it is defective and should be replaced. You need to address the problem, not the symptom... 😉 John Davies Spokane WA2 points
-
Don’t expect perfection. Your Oliver will be better built than about any other brand trailer out there, but will probably have a glitch or two. Mine did, I posted about it years ago, got it fixed (at Olivers expense) and have been camping trouble free since. Oliver doesn’t censor this forum, it’s all about owners helping owners here. Mike2 points
-
Some of this is understandable considering the large degree to which they've ramped up production in the past couple of years. New employees to train, altered processes, etc. But it is somewhat concerning. My hope is that the "newbie-camper-due-to-COVID" surge will run down as my production date approaches and the factory will settle into a more comfortable pace and rhythm with a higher degree of QC. But, to be fair, look at all the reports of massive QC failures being reported in the mass-produced RVs of the past 18 months. Still better off buying an Ollie, as far as I can tell.2 points
-
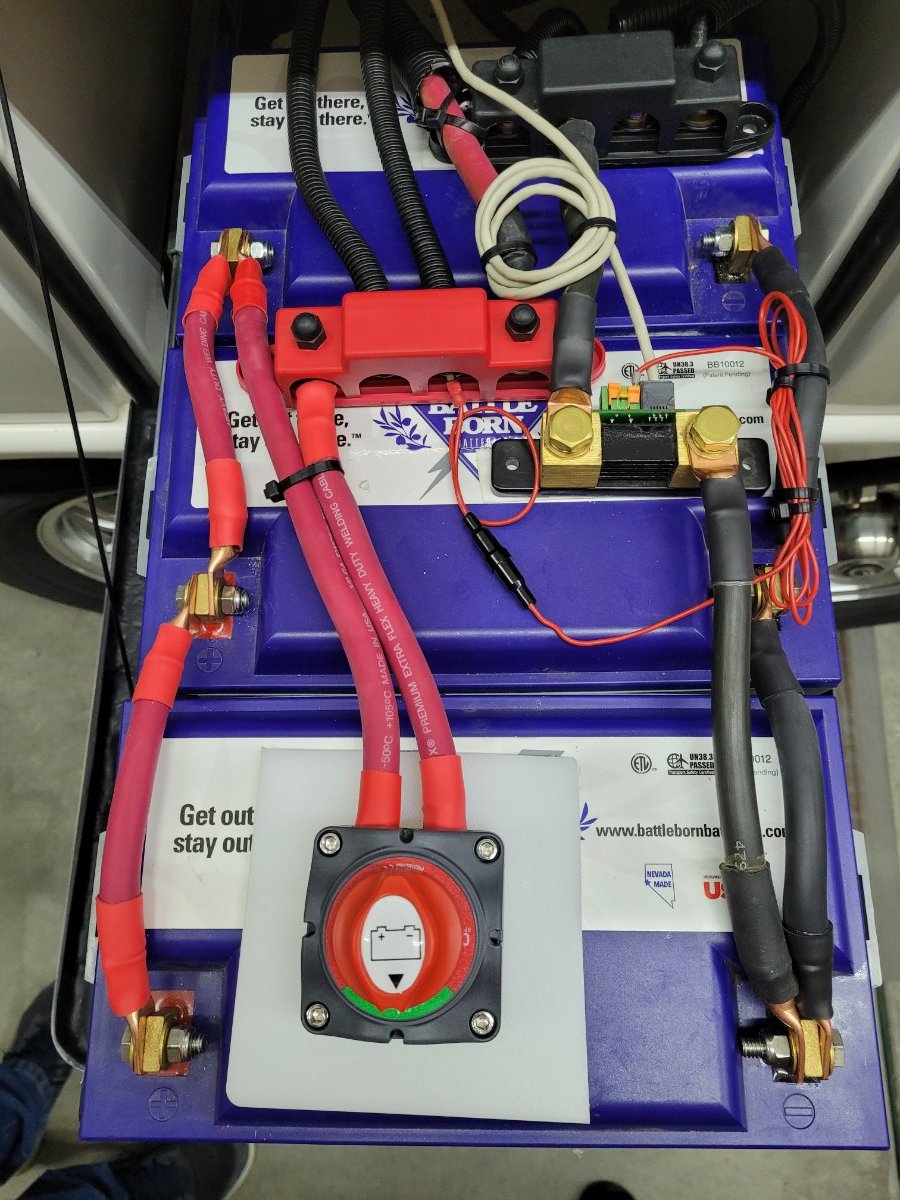
Hi, we're coming from experience with Battleborn batteries and Victron equipment in an Airstream Interstate motorhome. Having recently purchased a 2020 Oliver E2, we're now selling our Airstream. I wanted to note that our experiences with Battleborn as a company over the past several years has been exceptional. With 4 BBGC100s, 350 watts of solar, a Victron 100/30 MPPT, a Victron 712 shunt, a Victron 2000 Multiplex and a PC lithium battery isolator for alternator charging - we frequently went a week boondocking without using the on-board generator. In fact, the black tank was the frequent limiter to longer boondocking. Our "new to us" 2020 Oliver E2 came with three Battleborn batteries hooked up as one would connect a "dumb" lead battery. I spend Saturday building new cables so we could make the three lithium batteries compatible with each other - I'm specifically referring to their BIMs. Now the number one battery is the system's positive and the number three battery is the system's negative. I was amazed the 2020 Oliver E2 has no readily available "master switch" to isolate batteries. So now, we have the main positive running to a battery switch before going to other positive connections via a buss. We also corrected the Victron 712 shunt connection. It had one terminal connected to one battery negative and the other terminal connected to a different battery negative. Clearly it could not report total usage in and out as was intended. So, we took the main negative lead to one side of the shunt and the other to the load side via a negative buss. Now that it's connected correct, I need to manually go through the settings to check if everything else is OK and that the unit isn't "locked." If it is locked, any settings made via the Victron app will not be saved! I learned this the hard way by going from 200ah to 400ah and finding the reported SOCs were never correct. I think I remember scrolling to somewhere near the mid-sixties in the manual menu settings to unlock the 712 and then used the Bluetooth app to make changes. BTW, I started this response to agree that SOCs are frequently reported differently by different instruments and to point out just one example - I had a Victron 712 which had the wrong inline fuse installed by the factory in some units. That simple fuse caused the units to report the SOCs incorrectly. Our next task for the 2020 Oliver will to place a master switch into the line before the solar controller to isolate the solar panels - I'm trying to decide whether to just bite the bullet and install a Victron 100/30 at the same time.
2 points
-
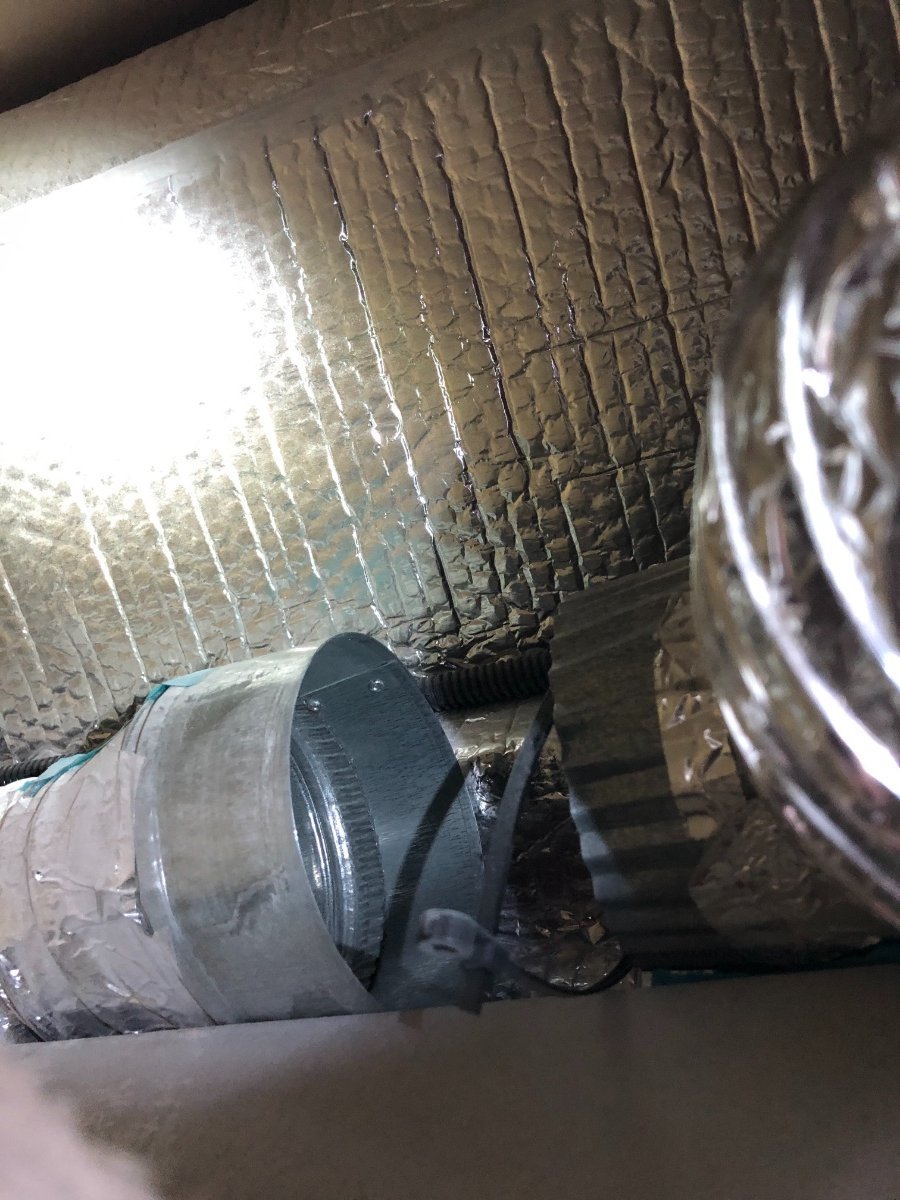
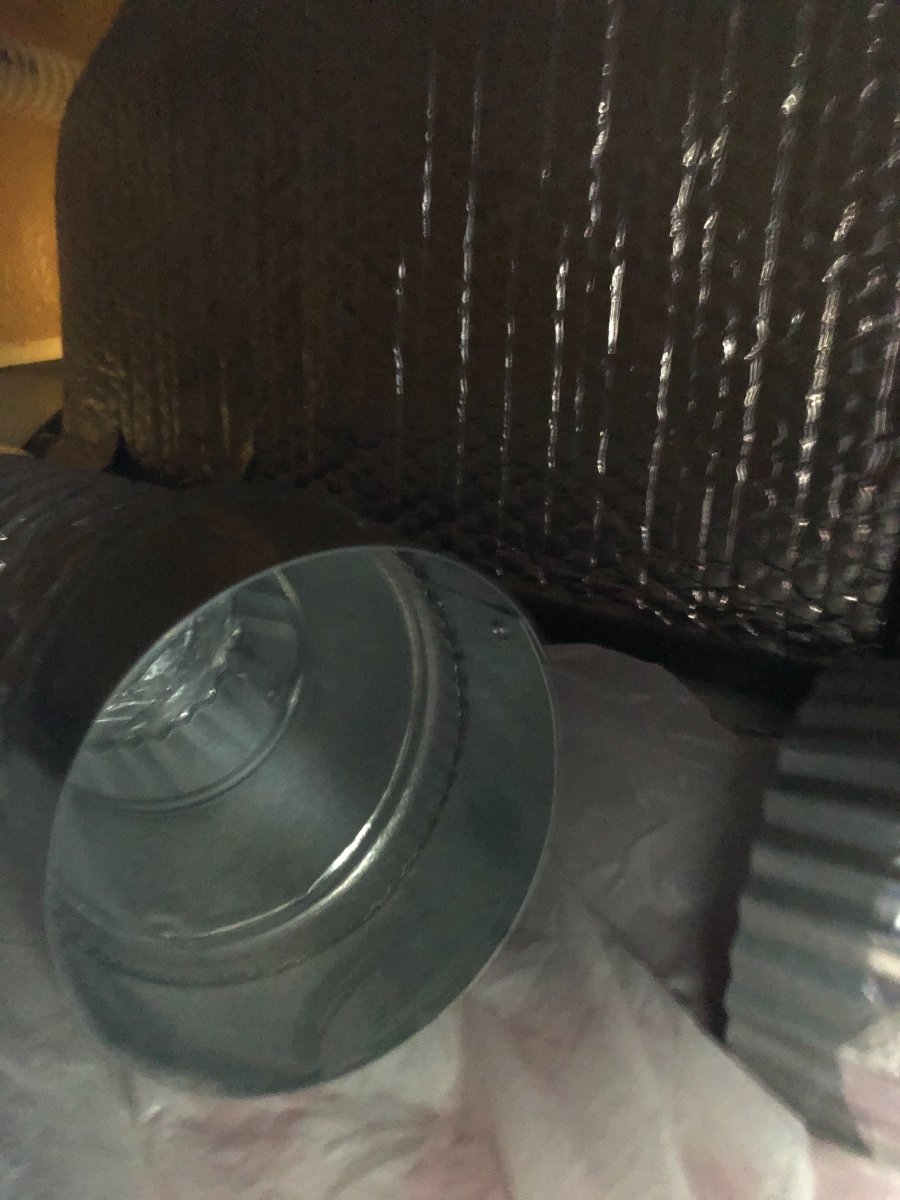
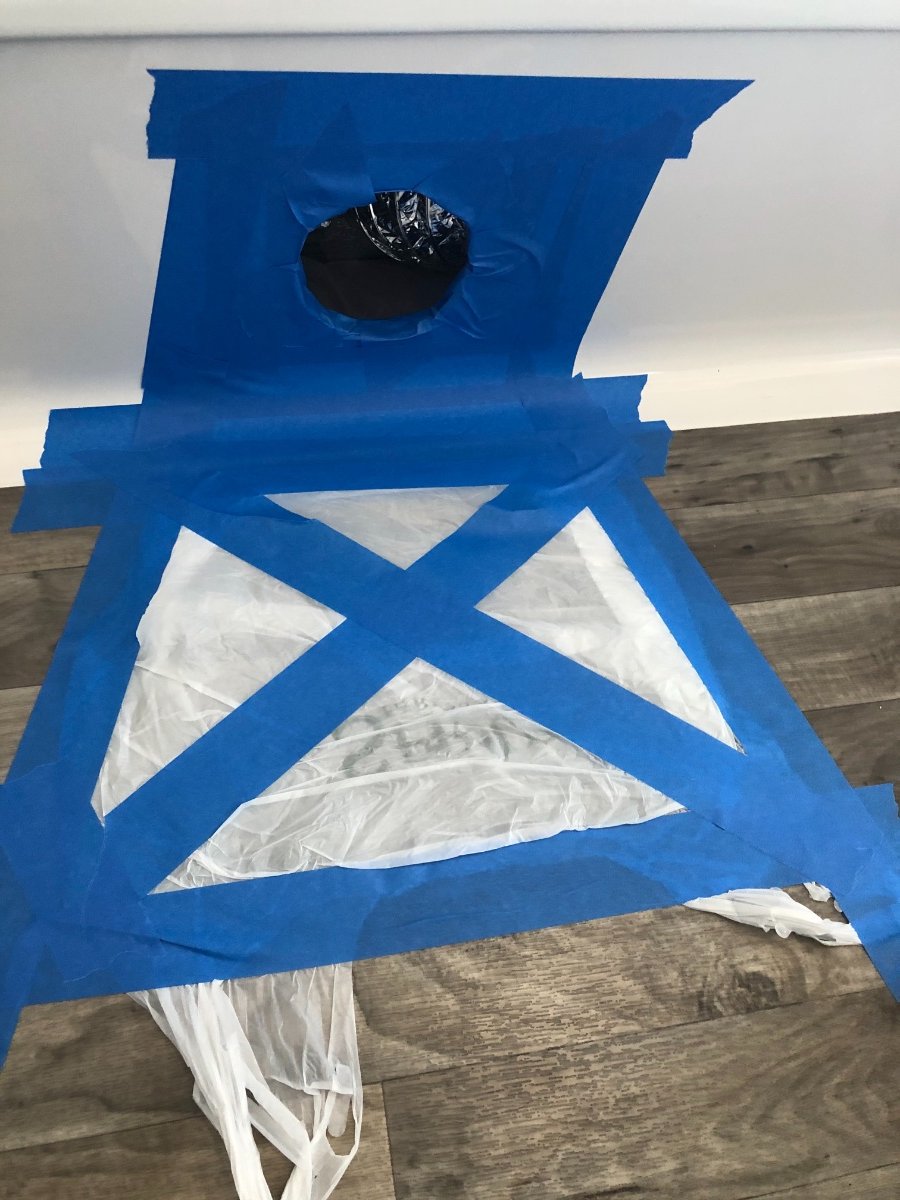
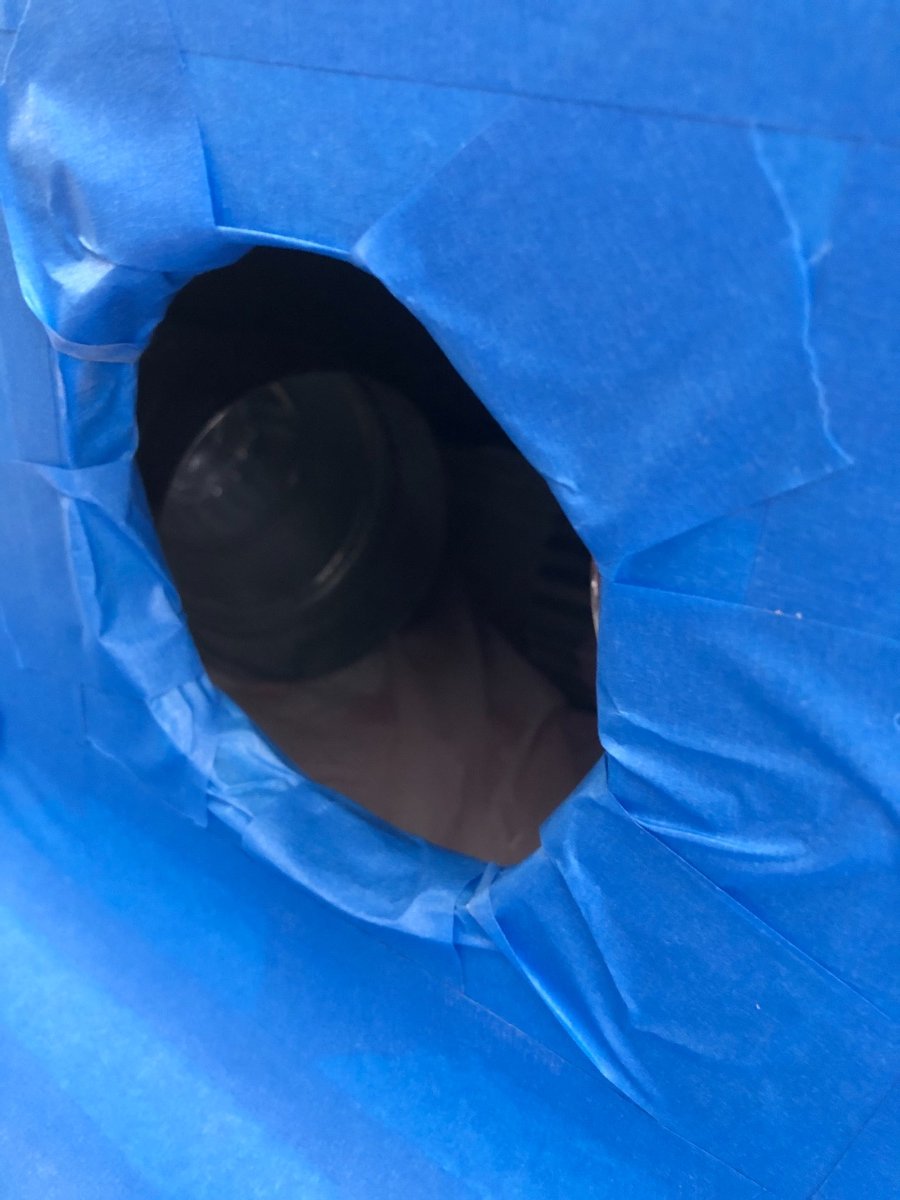
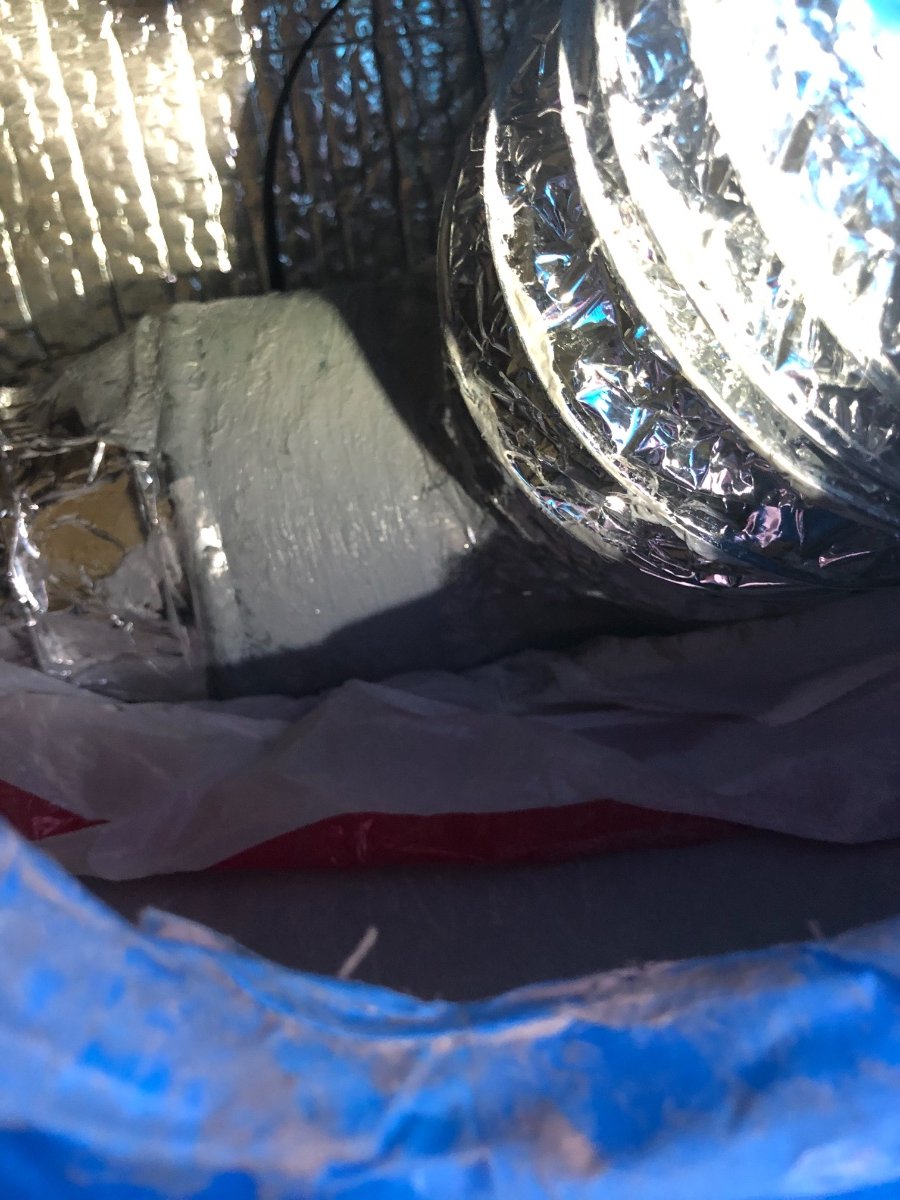
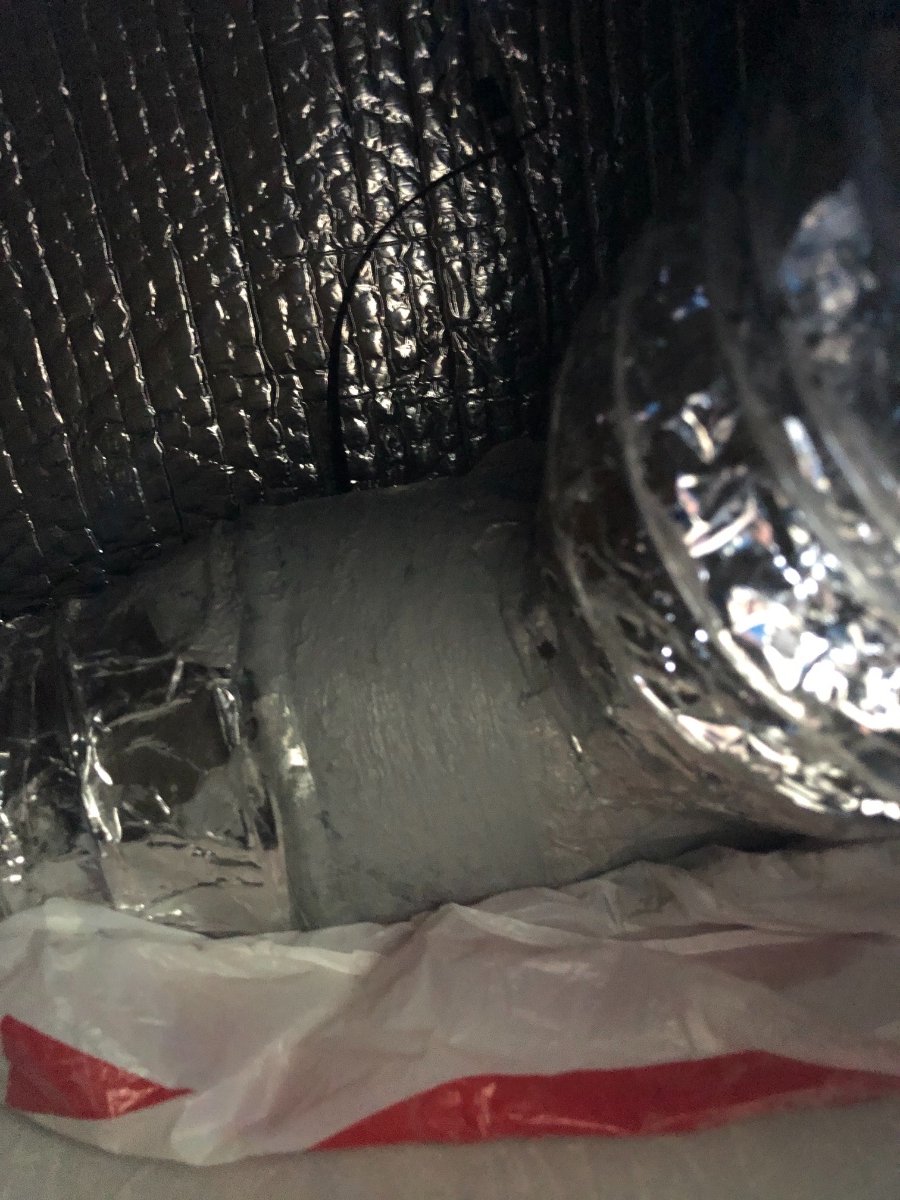
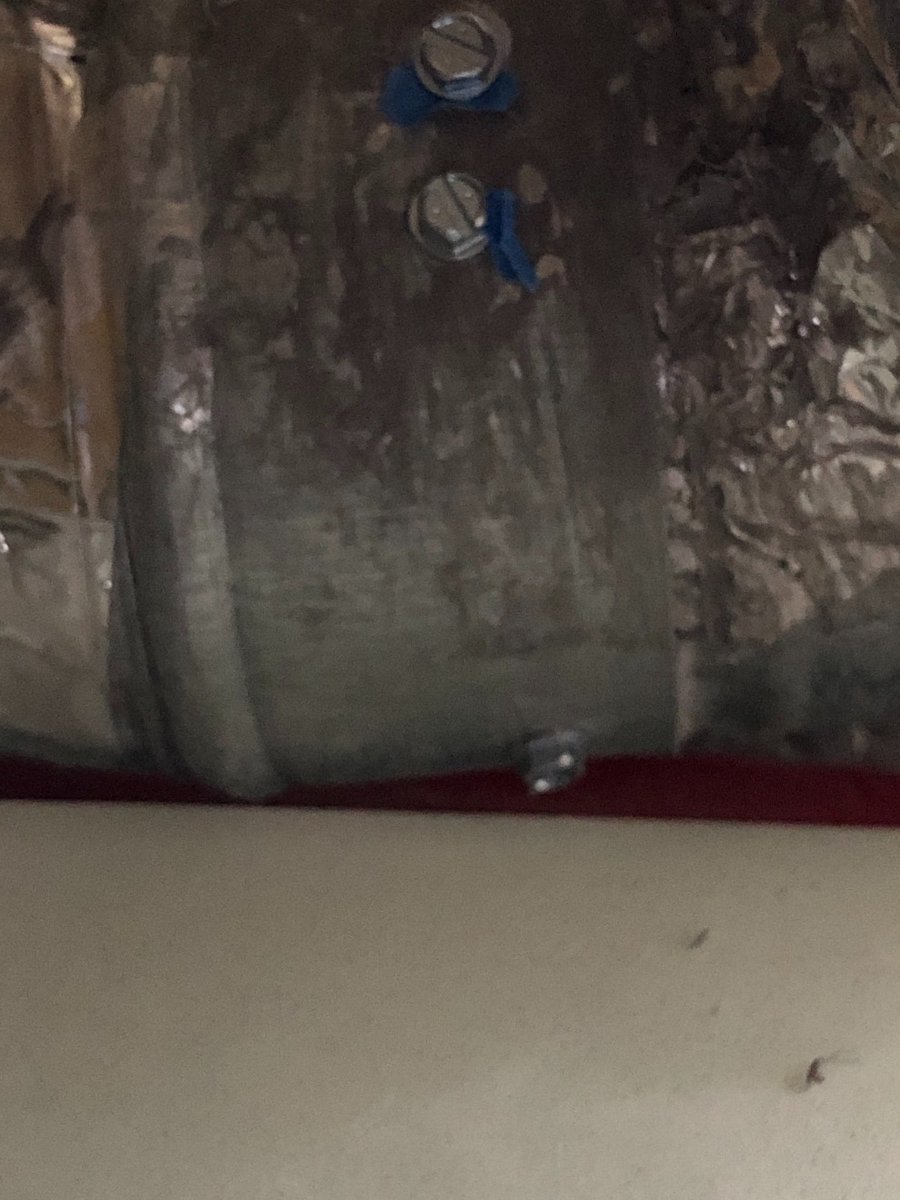
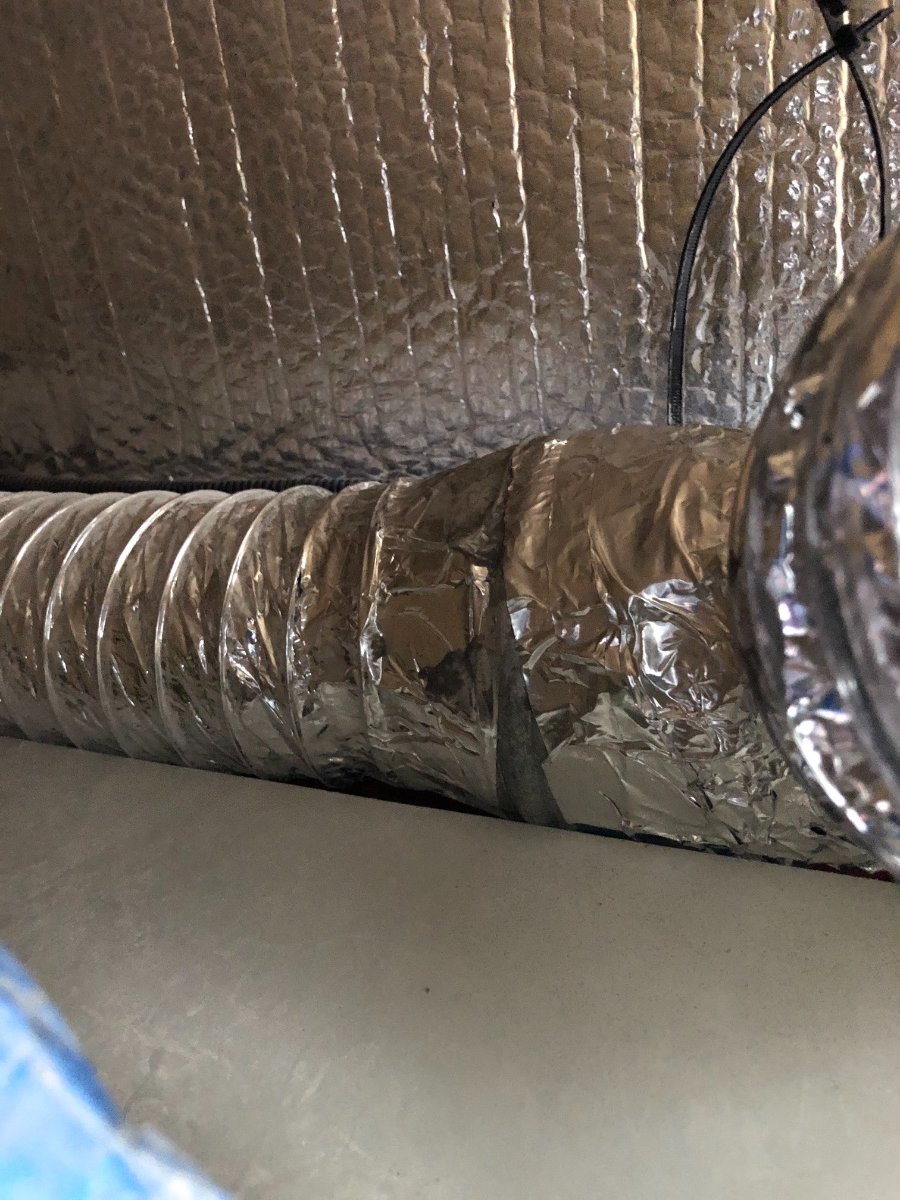
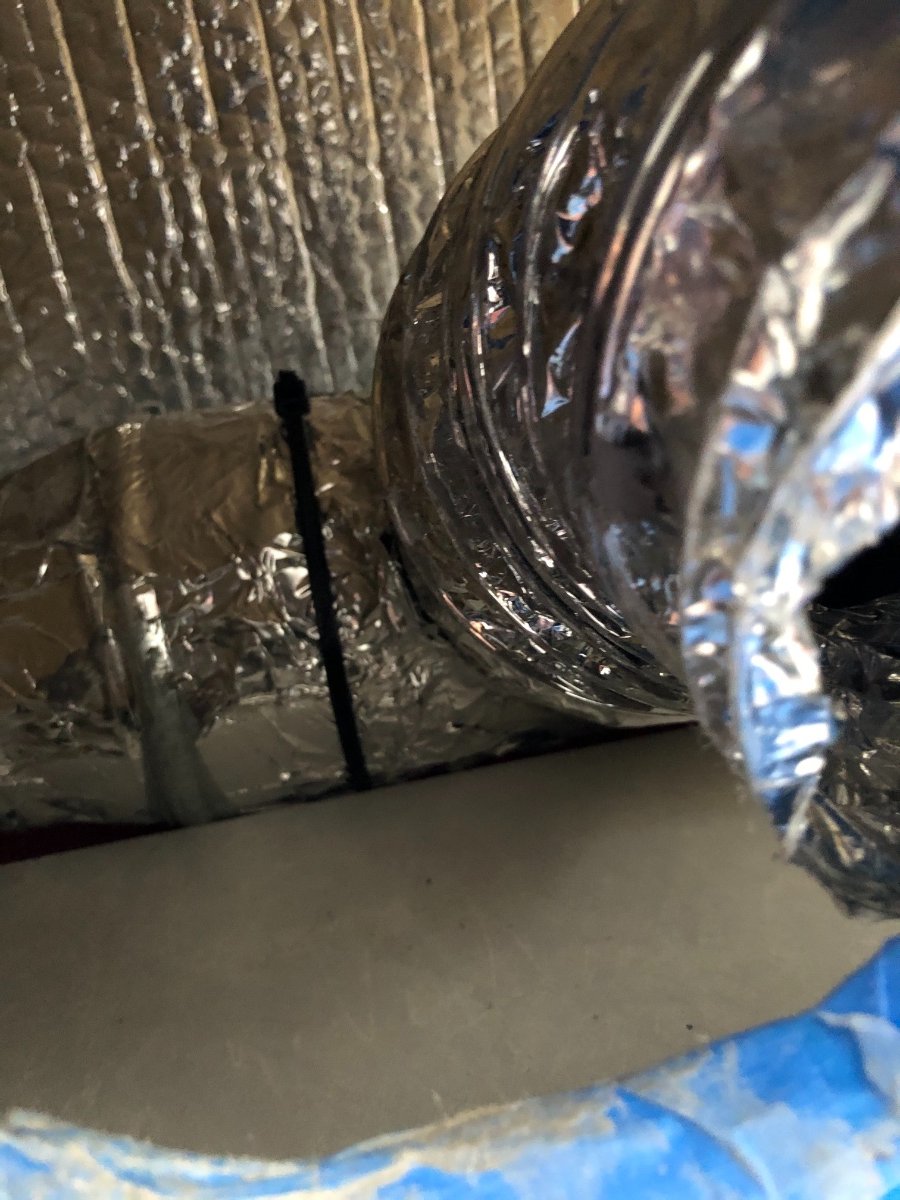
Hi Everyone! In the past, I've seen talk in the threads regarding the low flow from the furnace to the bath vent, well, I experienced that too. Here's what I found after a little detective work... Well no wonder! It helps when you connect the duct together. Yes, it was never connected, no wonder I only felt a very faint breeze from the bath vent. This shot was taken looking toward the kitchen sink, directly under the galley sink. The only way I could access this was to remove the plastic vent cover under the galley sink to connect the duct together. If this had not been possible, then the ONLY way would be to destroy the cabinetry to gain access to it. This was my first view, not touching anything and snapping this photo after I gained access. As you can see in this shot, there is no duct sealant or sheet metal screws, only a lone zip-tie that could not have possibly held this together properly. Notice, I put a plastic bag underneath to get ready to apply duct sealant. This blue tape was on the duct in two locations, possibly to note that this needed to be corrected before this area was closed up? Prepping the floor so I don't get duct sealant all over the place. Here's a look inside through the vent access directly looking at the disconnected furnace vent. The proper solution... three (3) sheet metal screws to follow. Keeping it neat and clean and getting a good bond. All dry, ready for the sheet metal screws... Due to the extreme limited space and only able to work with one hand, I had to tape the screws to the vent and use a hand driver to get the three sheet metal screws in the vent. It was impossible to access the other side however this is more than sufficient, especially with a generous application of the duct sealant and what is to follow... Ah yes, after the duct sealant completely dried and three sheet metal screws, I wrapped the joint with real duct tape and finished it with a fresh zip-tie to complete the surgery. And there you have it ladies and gentlemen... mission accomplished! I later purchased some inserts for the vent ducts that allow me to open and close the amount of flow that I want from the furnace in the bath. I simply adjust the two in the galley to my desired comfort and I'm a warm, happy camper! BTW, the awesome folks at Oliver Travel Trailers were very kind and reimbursed me for the materials, so we're both delighted with the result! For anyone experiencing low/no flow to their bath, this is the very first place I would look. Simply remove the vent cover under the galley sink, carefully disconnect the duct and see if your distribution tee is properly connected. If it is, I would strongly recommend the adjustable registers that can be purchased for these vents, my Ollie did not come with them. You only need two (2) for the sink vent and the bed vent. They are approx. $10 ea. When I run my furnace, I adjust them and can get a good flow of warm air in the bath. Problem solved!
1 point
-
I was on the phone with Renogy today exploring home made extension cords for my suitcase next summer project. I asked what the maximum distance I could run my extension from the Solar Charge Controller to the panels was? Answer Given: 40 feet using #10 AWG wire. For #12 AWG it was 15 to 20 feet. I like your idea as it means I can get double duty from my existing #10 AWG and #12 AWG Generator extension cords!1 point
-
I agree it is very simple and easy, especially with the boondocking port. I use a hybrid method blowing out the lines and then filling them back up with antifreeze. I like to just make sure the lines are all antifreeze with no water diluting it. But, I live in Massachusetts and it can stay below freezing for weeks. I would be leery of just trying to blow out the lines and not using anti-freeze, I am not sure this would get the water out of the pump.1 point
-
This might be in a TMI category (and if so, I apologize), but our solution for a shower when the trailer is winterized is to use a solar shower bag. We heat water from the jug on the stove, pour it into the bag, perhaps add a bit of cool water to get the temperature just right, and hang the bag in the shower. The only thing that might need attention in severely cold temperatures is to drain the gray-water tank more frequently, and add antifreeze to the drain trap. The shower bag and sprayer hangs lower than the normal shower head, so we sit on a stool for a shower. This also keeps incidental spray to a minimum (no shower curtain needed!). Actually, we use this shower-bag method whenever we're boondocking and trying to conserve water, regardless of season. We fill the bag at the galley sink with water heated from the tank, or heat water from an outside supply on the stove (or heat water from an outside supply in the bag by placing it in the sun for the day). The spray from the shower bag is finer than that of the installed shower head, so less water is needed. Using the shower bag saves the volume of water needed to fill the hot water line between the galley sink, and the amount of water normally needed to adjust the temperature at the shower. Between the composting shower and the shower bag, we can conserve tank water for a very long time, and extend the time to when we need to empty the gray water tank. ** Moderators: I'm responding to a post in this thread, but putting this response into its own thread might make it more searchable later... **1 point
-
Thanks John. I did get genuine Timken seals for repacking the bearings, plus an extra full set of Timken bearings (SET4 and SET17) to have for emergency on the road just in case, from an authorized Timken distributor, and verified as genuine with the WBA app as well. And yes, the motorcycle fork and bearing seals I’ve worked with have all been rubber coated.1 point
-
I did an epoxy repair like John Davies describes to a fiberglass shower unit in a home we own. After the repair had cured for a couple of days, I hand sanded it smooth with super-fine automotive finish sandpaper, then applied 2 coats of Nu Finish car wax. It made the repair almost disappear.1 point
-
Mike, your post aptly summarizes the reasons we remain committed to finalize the purchase of our Elite II next year, instead of an Airstream. We expect we will not only have the benefit of Jason's exemplary customer service, but continuing access to this forum, with its remarkable collection of knowledgeable veterans who generously give their time to share their experience. That so many of you remain fiercely loyal to Oliver despite the issues with your own trailers "speaks volumes" to me.1 point
-
I'm not sure how this product compares to other spray on paint protection films that have been out on the market. Several years ago I used one of these sprays for two years in a row. To apply I had to mask off the areas where I didn't want the spray, apply several coats, quickly take off the masking (or else the edges would be ragged). Cheaper than having the paint protection film applied - not counting my time involved with the spray product. But, this spray stuff had to be removed at the end of the season - harder to do than I had thought it would be. The main body of the sprayed areas was fairly easy but there were areas that took a bunch of time and polish to get off. Bottom line is - I had the film applied and have not looked back. It has lasted now for three years - yes, it does have a few nicks in it but nothing major and I'm fairly certain that given the roads I drive every summer there would be far greater damage to my Ollie. However, if I were planning a trip to Alaska I'd use something much heavier - like yoga mats and the like. Bill1 point
-
As I search this forum for technical advice, I keep finding new threads addressing yet more, and recent, production oversights. This one adds another item to the checklist I am preparing for when I take delivery on my Elite II: "Verify that furnace air flow to all vents, including the one in the bathroom, is adequate." While I laud Oliver for sponsoring this forum, and for leaving exposed errors like this one publicly visible, I surely hope Oliver's QC folks bring their "A" game when my Ollie is built......1 point
-
The triple port version is the same product Oliver installs as part of their solar package and the connector is the same as the single solarport you referenced above. The only difference is the plastic or ABS housing. If you like the Furion Solar Port just install two of those, maybe one on each side of the battery box. Are you going to combine the output of both suitcase panels into a single SCC before connecting to whichever port/ports you decide on? Mossey1 point
-
There are others that can go farther back in Oliver history than I can but when we started looking 2015 there were very few Olivers on the road. Time on the “assembly line” was longer. There were not nearly as many units for service to work on. So, flexibility for mods and service projects was there. As Oliver went from one hundred trailers then to 1,000 or more now it resulted in that flexibility necessarily going away. I think you’ve got it figured out. Mike1 point
-
I think Oliver got this winterization thing right. 2+ gallons of $3/gallon antifreeze (Super Walmart RV Section Before Fall) and we are done. No worries. Or, the cost of an air compressor that may or may not get the job done for sure. = worries to me. I like no worries better.1 point
-
I think the craigslist title is woefully incomplete. It should read “Free, you haul. Bring front-end loader and dump truck. And skid-steer for cleanup.”1 point
-
As John rightly points out, I did forget to mention pouring some of the pink down the traps. I do currently store my rig outdoors. Am buying a portable, "hoop house" garage but that will do nothing really to protect the trailer from the cold. Moving the lines as suggested for better heating sounds prudent. - Installing cut offs for the outside shower leaves me wondering how to clear that line once water is introduced for a mid winter trip? I understand that water would not make it to the hot/cold water controls or the shower head but it would fill those lines up to the cut off valves. If using the "blow out method", would re-winterizing the outside shower simply be a matter of opening the shut offs, blowing out the water and resealing the cut off's? - Why John did you suggest placing the three way w/drain close to the furnace? Doesen't the fresh and grey water tanks themselves (I have a composing toilet so nothing in black tank lines) offer the best low point drain opportunities? I do not doubt that winterizing with the pink is more fool proof and easier but given our frequent mid winter usage, doesen't seem like it would really work for us.1 point
-
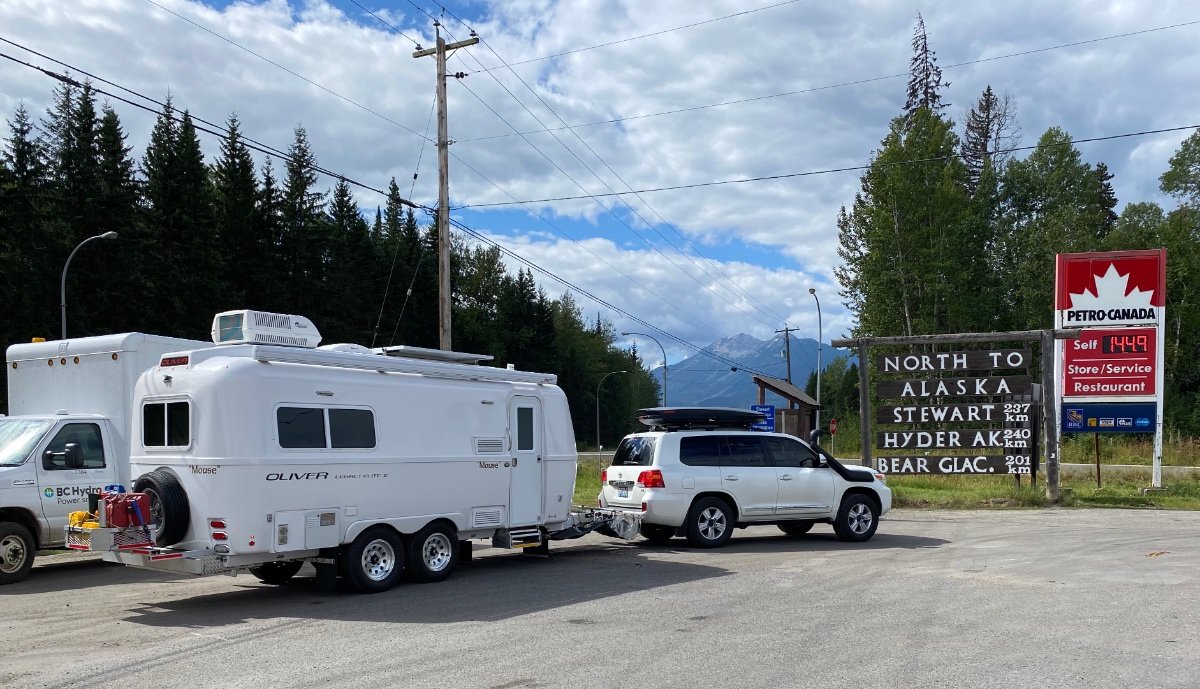
I have been trying to get pics from my wife's DSLR camera since September, when we returned form our four weeks in Canada,, She finally got me some. Here is the south end of the Cassiar, the truck and trailer look reasonably clean. There had been no rain yet, just lots of wildfire smoke and ashes. The price is per liter, that is US$4.40 per gallon, about average for the trip, we did see it as high as CAD$1.93 (US$5.86) First gas stop, this is typical along here, the single gas island is pay inside first, so everybody is jockeying around the waiting cars, and a single big rig really gets in the way. About a third of the way up, near the Stewart turnoff, we hit 25 miles of road construction, in the rain. The truck is actually a little cleaner here, there was about five miles of pavement before this gas stop, so some washed off. Notice how clean the back window and hatch are! Most of the chaos (gravel and water spray) is channeled under the fabric. The trailer did not fare so well. No chips, just spray:: Then there was 50 km of freshly chip sealed pavement, posted 50 kph; although we only encountered a handful of cars, they were doing 90. Rain and no striping. Yikes..... The southern third is nice fresh asphalt, well striped for the tourists. The northern third is mostly unstriped chip sealed pavement. Here is the north end of the highway, in Yukon Territory, 540 miles from the start, after two days of steady light rain the mud is mostly gone, what is left is oily sludge from the chip sealing. This is in Whitehorse, Yukon Territory at the RV park: Another week of steady rain eventually removed most of that gunk. A car wash would have been pointless. I will eventually do a trip report, later in the fall or winter, it will be quite long. John Davies Spokane WA
1 point
-
Is the inverter turned on, and if so, have you checked to make sure the GFCI isn’t tripped at the outlet?1 point
-
I just got back from a 2000 mile trip after tightening the nuts on the through bolts using a partial split nut to to secure the bolt (note to Oliver: we need carriage bolts as through bolts to prevent spinning!). Put 30 ft lbs of torque on bolts using a box end torque wrench adapter and cleaned and resealed the joints. NO MOVEMENT!!!1 point
-
Have to agree with Steve - I’m immensely impressed at the dexterity and patience involved there. Another route that people have used when making repairs in that space has been to cut access hatches in the bottom of the drawer cabinet. Oliver should really do that in construction anyway. It’s easy to do with a router, using the sides of the cabinets as your jig. They don’t lessen the cabinet’s structural integrity and will save you a bit of weight. Plus you save all that time of training the octopus. If you do that, though, just be sure to cut some ¼” plywood covers for the hatches since things in the drawers can bounce out and end up in that space, and you don’t want to have to search through the hull space for an adventurous fork.
1 point
-
We've owned two different Oliver's over the past 12 years. Collectively, we have traveled over 150K miles. I have had one fitting to break and it did cause a mess. I agree that brass fittings are better than plastic and they should be using them. I always carry several feet of tubing, a few different brass pex fittings, and the tools to replace them in case that ever happens again.1 point
-
I understand why (money) plastic fittings are used but it couldn’t coast more than an extra $30 to do it correctly and use brass fittings. At this price I would expect the best materials to be used during manufacturing. John1 point
-
No need for a voltmeter here. The error code 6 tells you all you need to know. The Norcold has two separate 12 volt connections. One is for powering the controls and the other for the heater. When these refrigerators are installed in a motorized camper, the control input is wired direct to the battery and the heater input is connected to an "engine running" source. This scheme is intended to prevent the vehicle battery from being run down inadvertently. In a travel trailer where this isn't a concern, the two 12 volt inputs should be jumpered together so both are powered by a single circuit. Definitely open a ticket with service. This is an installation error they should resolve for you warrantee or not.1 point
-
On the other hand, here is the Dexter AWG wire sizes chart. With an OEII, we would be on the 4 brakes, under 30 feet = 12 AWG. So the text book answer is 12 AWG. But I still think that 14 AWG would work very well. That said, when my time comes to replace the cable.... I'll ponder it a bit more. 🙂 For those wanting the full Dexter Service info, it may be found at: http://www.dexterpartsonline.com/files/2036913/uploaded/600-8K Complete Service Manual.pdf GJ
1 point
-
@JRK: I share most your thoughts. Some more pondering on my part is in order for the below: I am wondering how the brake controllers wires for millions of brake controllers, from the drivers position all the way back to the rear RV axles, are handling the max braking events? None of my many TV's and Trailers I have owned have had mega sized cables as suggested. I suspect this is the case for lots of reasons. In our case, my first one is that the max amp pull of 12 amps (3 amps X 4 brakes) is rarely a long duration continuous load. Secondly, modern brake controllers sense when a vehicle is stopped and back off the power flow to the magnetic coils when stopped, again shortening the duration. As such, maybe these ideas contribute to having used smaller wires for many many decades in millions of TV's. Using commonly used American Wire Gauge Cable/Conductor Sizes and Properties as a guide is not commonly practiced for short runs such as a TV and Ollie. For example, it lists a #12 AWG wire (assumed to be copper) as only carrying 9.3 amps. Where as they are allowed a continuous use rating in residential of 16 amps, and 20 amps intermittently. Hence they are protected by a 20 amp breaker. A #10 conductor is listed with a max current of 15 amps. Yet our Oliver, and about a million other similar trailers use these as 30 amp conductors and breakers. My experience as an engineer suggests that 14 ga would be a sufficient choice. However, your 10 ga would certainly work! Overkill, but it will work great! All that said, when it comes time to replace my brake assemblies, I'll certainly upgrade the wiring, not to 10 ga, but for sure larger than that which Oliver used. And as JD pointed out, it will not be run inside the axle. Finally, and it is a very rare occasion that I have ever suggested taken a JD suggestion even further. But here I go into unchartered regions....., My recommendation is to also run the larger replacement wires through a gray plastic (UV Resistant) conduit (Maybe 3/8") across the back side of the axle. Where the cable inters and exits the pvc, I will heat shrink wrap the cable with a 4" section (2" inside and 2" outside the PVC), and seal both ends of the conduit with a suitable Silicon sealant. These extra precautions are to protect the line from physical road damage, hungry rats. BONUS SUGGESTION: Spray all exposed wired outside the hull (IE under the hull, in the front basket, and for the cables going to the TV) with peppermint oil and water solution. Most wire insulation eating critters (Mostly rats and mice) hate peppermint. It is also useful to spray tires, and jacks to dissuade those critters. I look forward to your and our owners thoughts. Thanks, Geronimo John1 point
-
3 D printing is most useful for a one-off prototype, or for making repair parts in the field (military) or in outer space, where a supplier is not readily available. it is way too time consuming and expensive for mass produced parts, that is what injection molding, die cast metal, and other methods are for. If the company wants to sell us Ollie trailer models in the future Ollie Store, they will have to have them mass produced in China by a toy manufacturer. An order of 100 would probably get the selling price down to a reasonable figure, I am guessing less than $100. A 3D printed one, with many hours and final hand trimming, unless you can do it yourself, would be way more than that. My son had a number of false starts before they got to this final version. John Davies Spokane WA1 point
-
😀 Well said, but we should keep trying with stuff like this. At some point, maybe when RV sales are in a deep slump, they will decide to offer more “adventurous” options for us, the fringe market. It certainly does NOT hurt to keep asking. John Davies Spokane WA1 point
-
Highly unlikely that you'll get Oliver to make that change. It's a DIY job for sure. Besides, Oliver's m.o. for the past two or three years has been to carefully study what owners want, have researched, implemented, are satisfied with, etc., and then do something different.1 point
-
http://rvwanderlust.com/how-to-protect-the-front-of-your-rv Airstream interiors are easy to modify, how nice..... and they also fall apart when taken off pavement, literally. Owners have found overhead cabinets completely pulled away from the walls. Do not expect any RV cabinet with a dozen tiny self tapping screws to be even remotely sturdy. If you replaced them with machine screws going onto steel nutserts in the frame ribs, then they would be greatly improved. Ollies don’t drop cabinets onto the floor, though earlier hull numbers will spit a drawer’s contents or even an entire drawer across the length of the cabin. Disturbing (and a little funny) indeed, but not so much as a completely failed cabinet or vanity..... and the drawer problem is super easy to correct. John Davies Spokane WA1 point
-
Set aside the aluminum vs fiberglass. The most destructive source of any Rv is water. It can delaminate rot wood corrode metal and short out electrical systems. The airstream would do all that, I know from experience. 2017 30’ airstreams serenity. I had a leak in the bathroom which was in the walls. The plywood floors got soaked. The bat insulation in the walls were saturated with water. Because the floors were wet it delaminated the flooring. After everything dried out, then noticed the frame starting to rust. Should I continue? And not to mention carrying a pop rivet gun to replace rivets popping out. Keep comparing the apples to oranges. The Oliver wins.1 point
-
I can’t speak to your questions with any authority as my EII is being built now. However, we have been going through the decision making process for over 12 years, anticipating 2020 as the year for us to purchase. We’ve toured multiple factories, visited at least 40 dealerships and researched specs for everything from A’s, C’s and B’s. We were constantly stopping and going back over our criteria and finally focused on 3 class C models. While at a dealership last fall, my wife randomly walked into an AS. Once again we shifted our thought process to add the possibility of a towable. Just before we went to the Tampa RV show in January, I convinced my wife to visit the Oliver factory (38 miles from home). Walking in one and getting the factory tour was life changing. When we got to Tampa, we literally walked into 4 RVs and found ourselves comparing everything to the Oliver then left and went to the beach! One of the things we were most excited about with Oliver was NOT having to go through a dealer or anything like we experienced at the Tampa show. Through the years of dealerships, test drives and being pursued by sales people, I cannot tell you the name of one sales person we worked with nor remember anyone that built trust with us to feel confident about our major purchase. So, I recommend using the resources at Oliver to find one to tour in your area. If you can swing it, get to the factory and see the whole process. In lieu of a visit, use YouTube. After all these years, this was a huge paradigm shift for us but, we have never looked back or had buyers remorse and are completely comfortable with our choice.1 point
-
Thank you Susan for asking this question about redundant CO detectors. My 2017 LEII came with two CO detectors. One of them is paired with the Atwood Propane/CO detector under the dinette. The other is paired with the First Alert Smoke/CO Alarm unit, which is under the attic near the television. And I will state that I am not sure if the 2020 or 2021 Oliver’s are equipped with two CO detectors, so there is a small chance that topgun2 is correct. I must admit to a small amount of pleasure I gain when correcting a forum moderator.😂😂😂 Mossey1 point
-
Older (I'm not too sure what that means) alarms had an expected life of 5 years. But I've been told that the newer ones (not sure what that means either) have a life of 10 years. Supposedly, the newer ones will also give you a warning via a certain series of beeps as to when they are at of approaching this end of their expected life. All of the above is still no reason for the detector to die after only 18 months in service. Once I get (another) reply from Dometic I'll update. Bill1 point
-
Suggestion, test your brakes as described, in a controlled setting, to see how hot they get. If one or more is hot or cold in relation to the others, you have a problem. If you are willing and able to do your own work, you can futz around forever and try to figure things out. If you have to pay a shop $100 per hour, then just have them install four new brake assemblies, and YOU supply the brakes, Otherwise they will charge you full MSRP or even higher. Buy your brakes at eTrailer, they are cheap and you will save a lot. Be aware the shop will not be happy and they will not offer their own warranty on the parts, just on their labor. But Dexter has a five year limited warranty on their brakes, so you should be able to get reimbursed from them if there is a problem later. This is an Old School "manual adjust" brake, which I strongly recommend. The self adjusting ones just do not work well and they add extra springs and friction points to cause drag. These are the ones I ordered.... https://www.etrailer.com/Accessories-and-Parts/Dexter-Axle/23-27.html John Davies Spokane WA1 point


-
Recent Achievements
-


")


