Leaderboard


Popular Content
Showing content with the highest reputation on 06/04/2022 in all areas
-
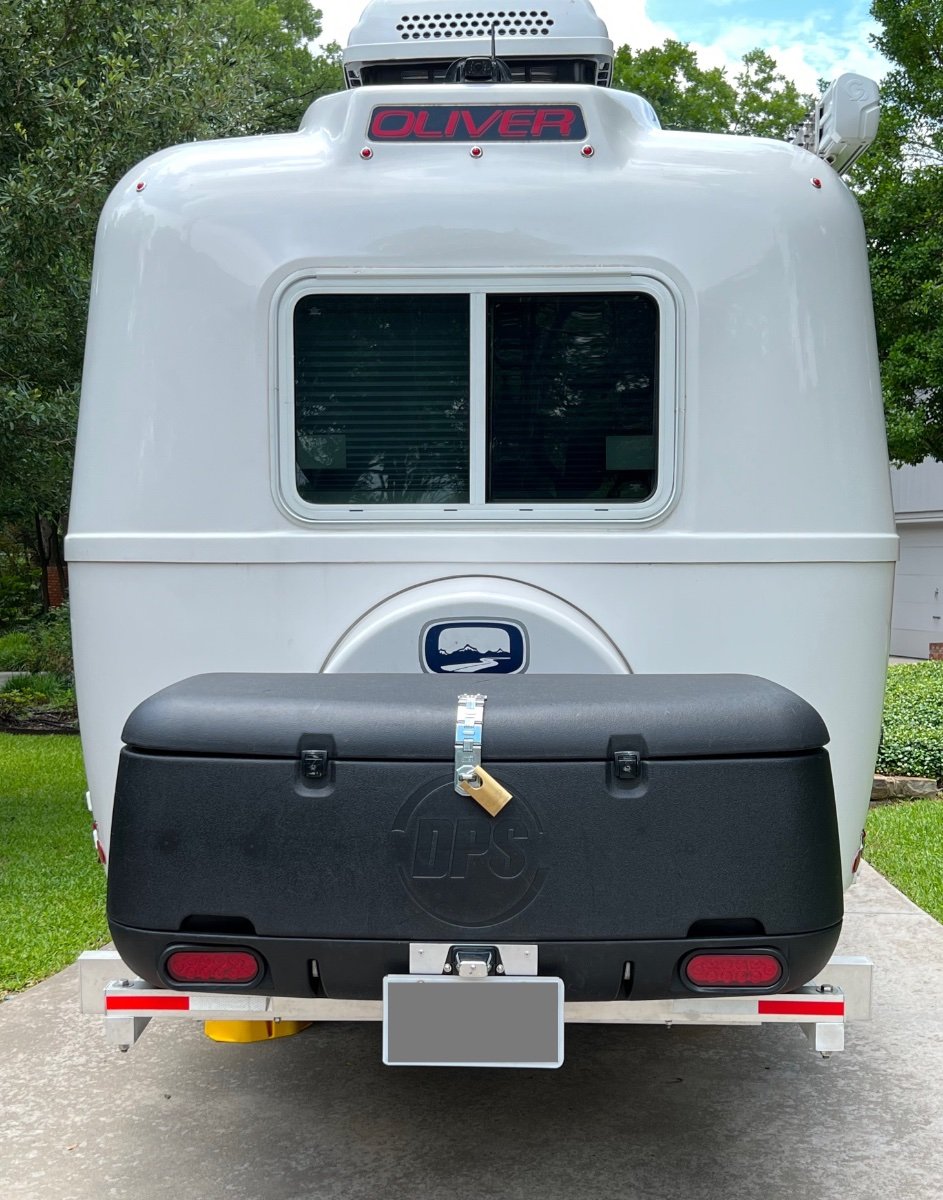
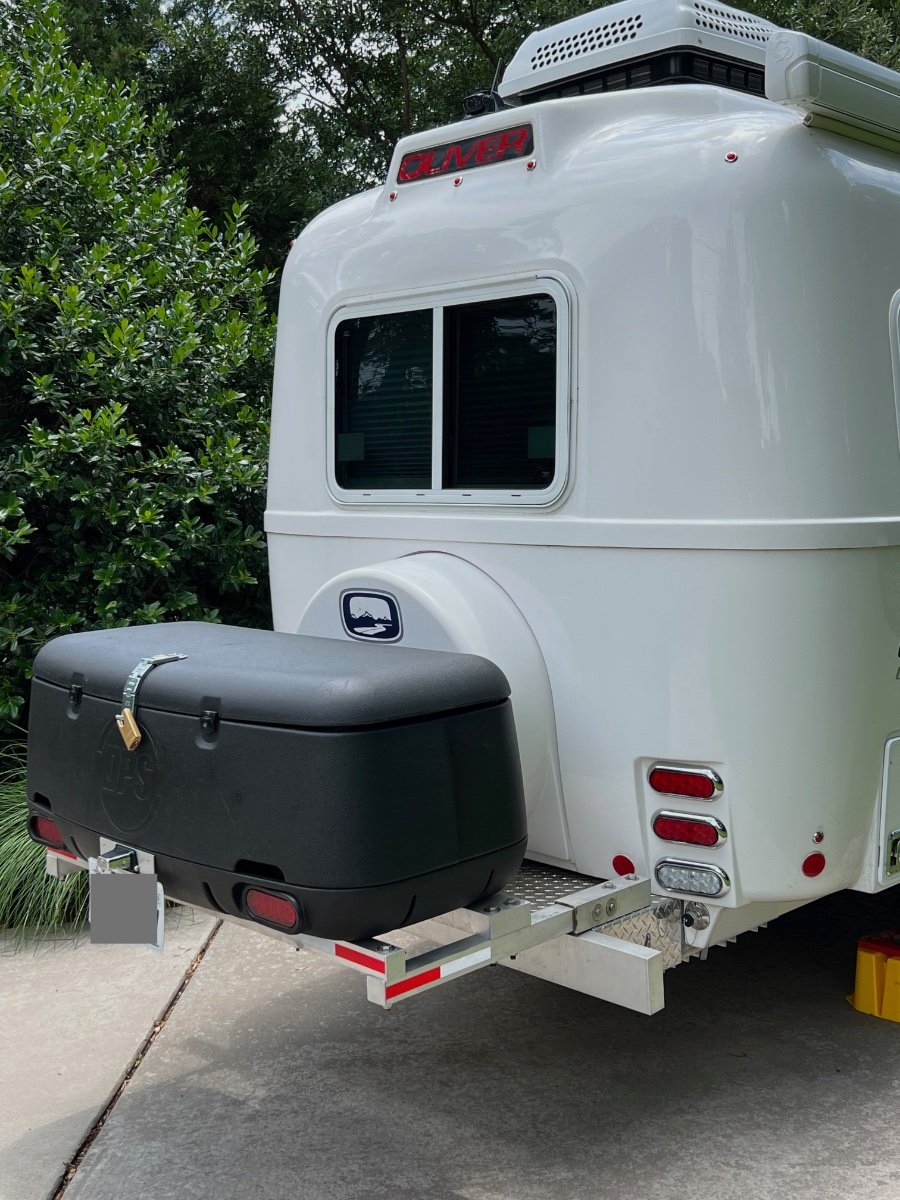
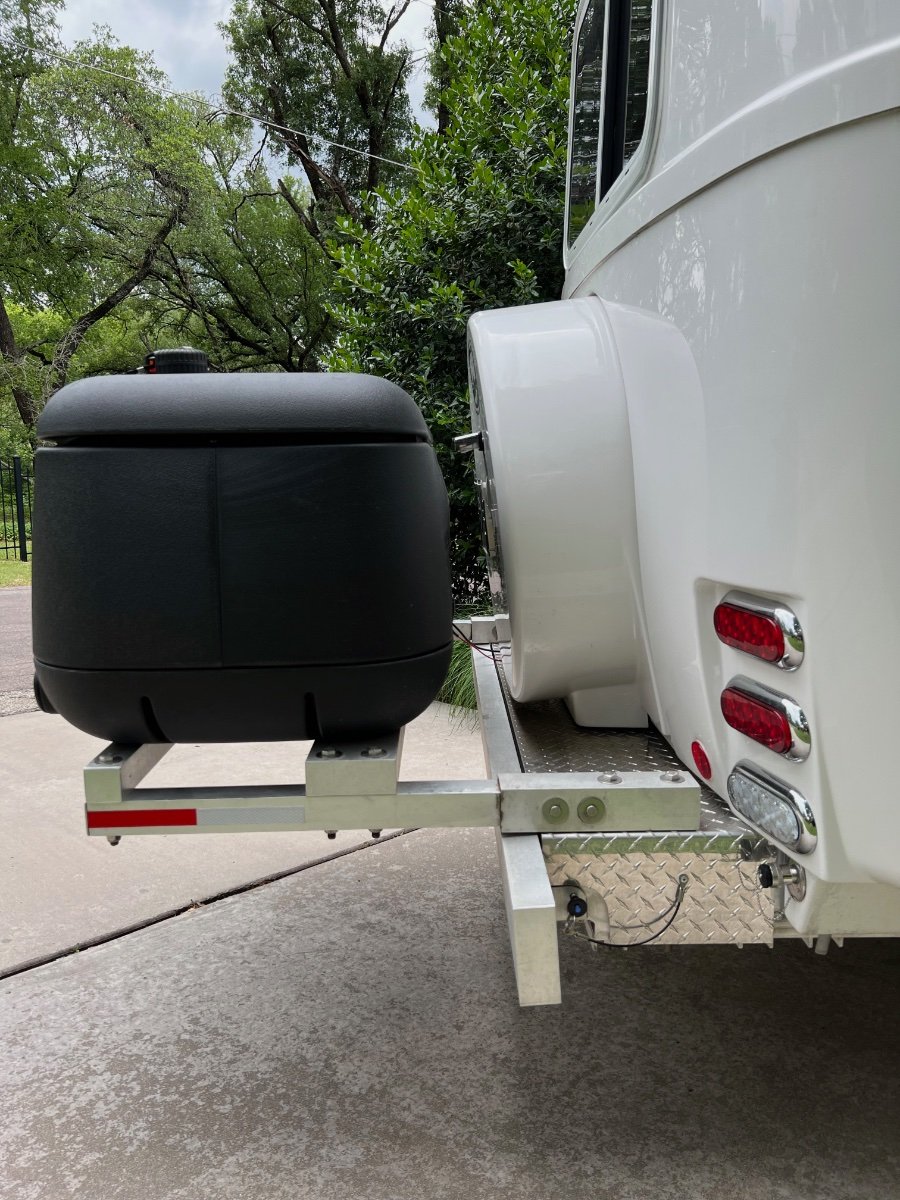
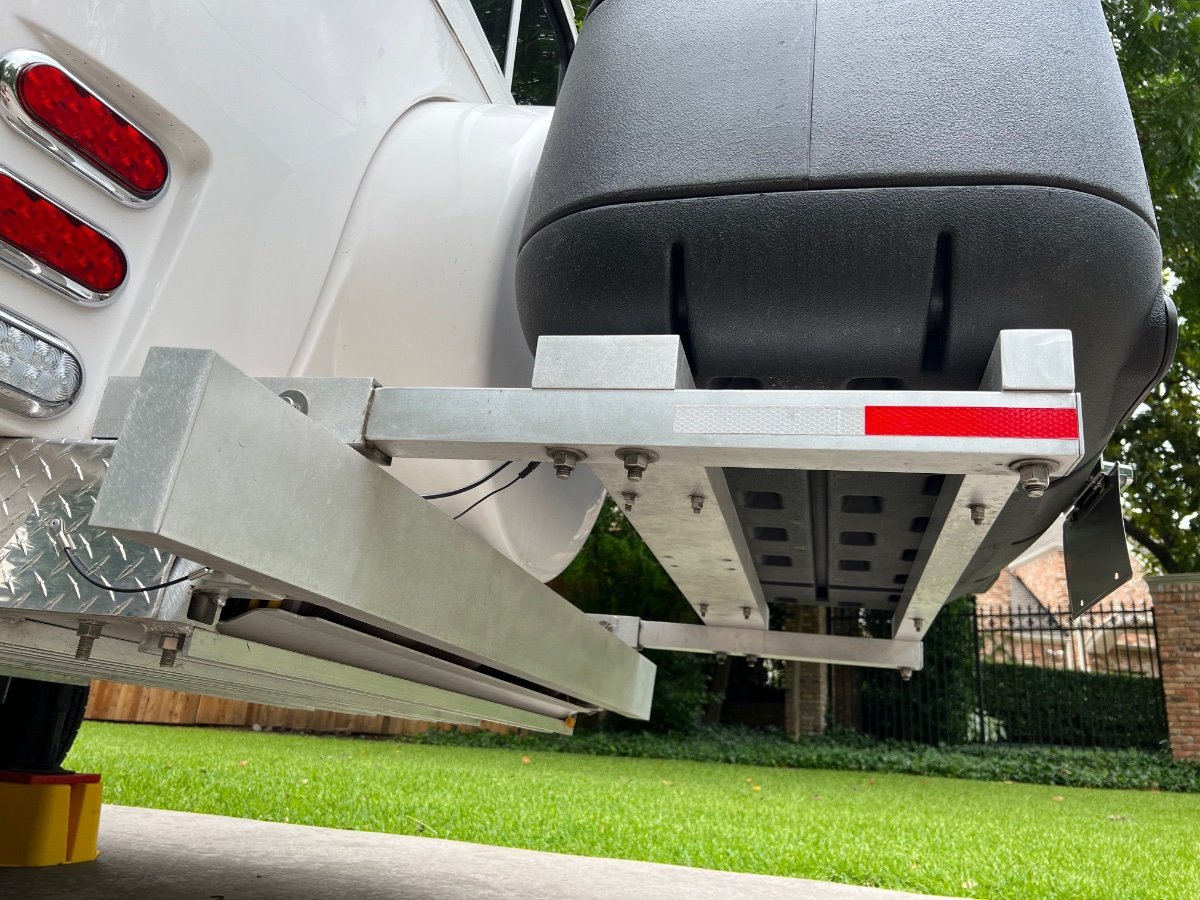
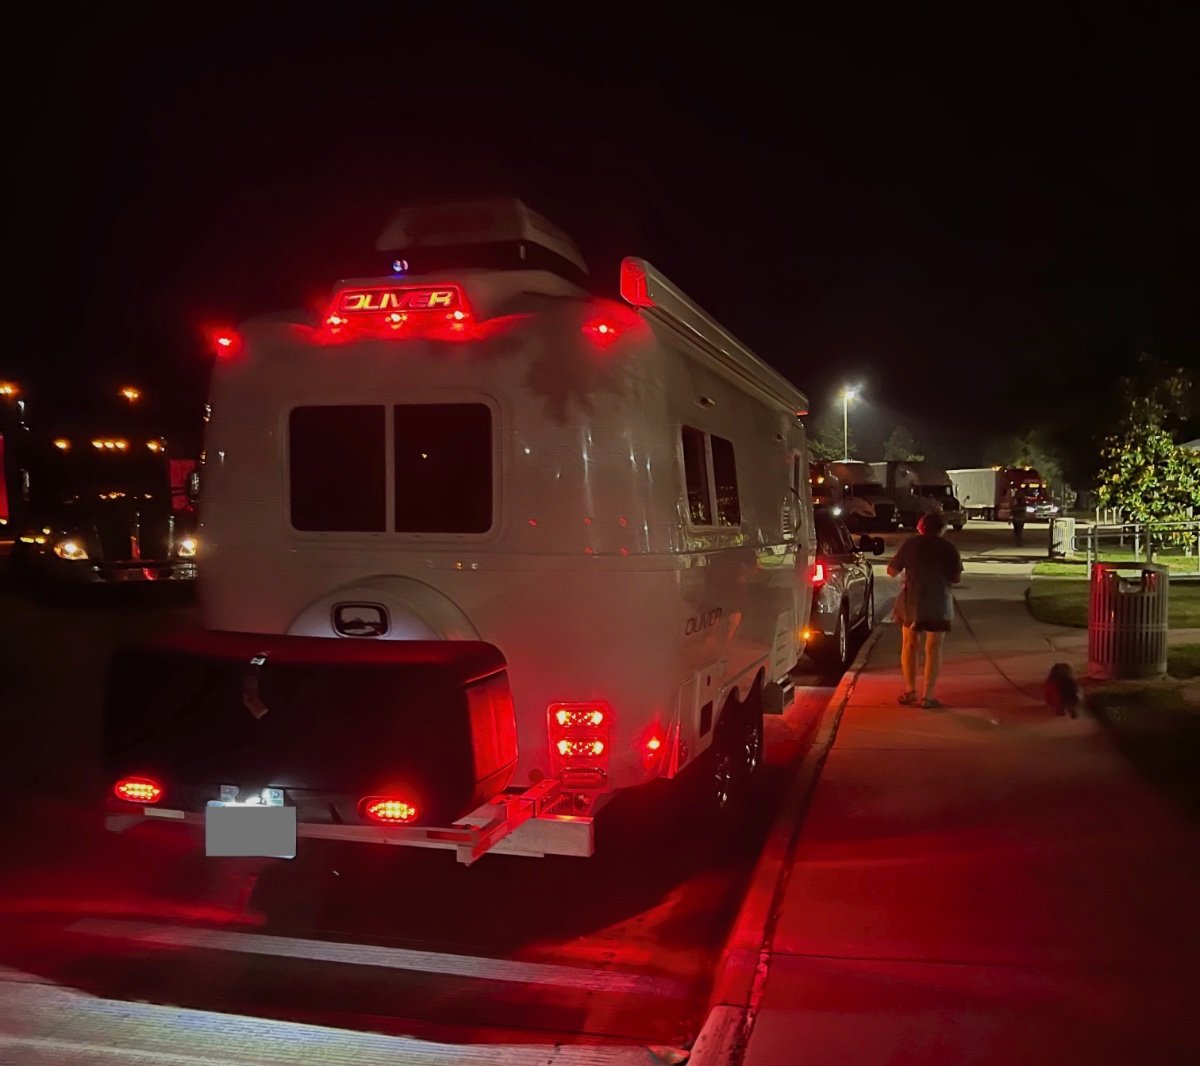
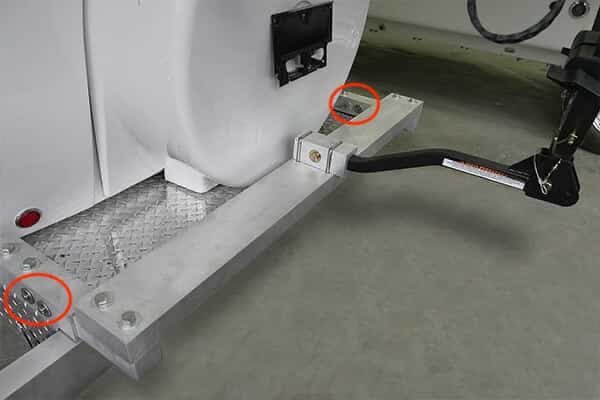
Summary I have installed a rear mounted cargo carrier, with lights, to our 2022 Oliver Legacy Elite II (LEII) travel trailer. We recently completed a two week, ~2000 mile trip, using the cargo carrier, which performed flawlessly. Below are photos of the installed cargo carrier, which are followed by a detailed description of its installation. Storage Constraints Prior to ordering our Oliver Legacy Elite II (LEII) travel trailer I knew we would need additional storage space on the trailer. We are using a 2014 BMW X5 35d (diesel) as our tow vehicle, rather than a pickup truck. Thus, we could not plan to use the pickup bed for supplemental storage. We also needed to stay within the tow vehicle's cargo capacity of 1100 lbs and maximum tongue weight of 600 lbs.. Expecting a tongue weight of approximately 500 lbs. plus two occupants at approximately 300 lbs, we could only accommodate a maximum of 300 lbs. of other cargo. The available payload will be partially used by our camera gear, which must be protected from exposure to moisture. A tongue mounted cargo carrier was not viable, given the tongue weight limit for the tow vehicle. Storage Requirements I anticipated needing additional storage space for the following items: Champion Dual Fuel Generator- 2500 watt (~45 lbs.) (too large for basement storage) Napoleon TravelQ™ 285 Portable Propane Gas Grill and hose (~35 lbs.) (too large for basement storage) Anderson Ultimate Leveling kit (~25 lbs) Harbor Freight rubber chocks (4) (~20 lbs.) Camco Stabilizer Jack Supports (3) (~10 lbs.) Miscellaneous accessories All of these items can tolerate some exposure to moisture, which is likely when stored in any external cargo carrier. A closed and reasonably secure cargo carrier was needed. Searching the owners' forum, I found examples of rear cargo carriers/bike racks and found several examples, including: Oliver's original bike rack design using twin receivers and extending approximately 3 feet beyond the rear bumper; Various rear mounted metal cargo boxes, including custom designs; Rear mounting of an Oliver tongue cargo box by John E. Davies. I also looked extensively at aluminum cargo boxes from various manufacturers, trying to find options which could accommodate the cargo items listed above. I already owned a cargo carrier which we had used on the BMW X5 tow vehicle. This carrier has a heavy steel swing-away frame which mounts to a standard 2" receiver. Mounted on the steel frame are a polypropylene tray and an enclosed container with 13.5 cubic foot capacity. The tray and enclosed container interlock. This cargo carrier also is equipped with fully functional lights (running, brake, turn, flasher). Interlocking pins on the enclosed container mate with the tray. Locking latches secure the container to the tray. Solution Approach I decided to re-use the polypropylene tray and enclosed cargo container, but not the heavy steel frame. Instead, I would use a design similar to the original Oliver bike rack. I ordered the current optional Oliver bike rack when we placed our LEII order, planning to utilize some, but not all, of its components. The current Oliver rear hitch (photo below) utilizes twin receivers that are 11" long, constructed to receive 2" x 2" X 0.25" (wall thickness) T6061 aluminum square tube support arms, which are 17 inches long. The receivers are each mounted to the LEII frame by two long 0.5" diameter stainless steel bolts and nuts. The other components of the rack are a 2" x 5" x 0.25" T6061 aluminum cross-member, 51-1/8" long (with end caps), and a 1-1/4" receiver for connecting a bike rack. I planned to use the twin receivers, and the cross-member, but not the support arms, nor the 1-1/4" receiver. Instead, I would replace the 17" long original support arms with longer equivalents, whose length was to be determined. I would utilize the original 2" x 5" x 0.25" T6061 aluminum cross-member and add another cross member, this one 2" x 2" x 0.25" T6061 aluminum, also 51-1/8" inches long with end caps. The cross members would be bolted to the support arms, in the same manner as on the Oliver rear hitch. The tray and enclosed container from my existing cargo carrier would be mounted to the cross-members. Note the clevis pins circled in the photo below, there are two 0.50" diameter horizontal clevis pins securing the support arms in their receivers. Each clevis pin has a washer on either side of the receiver. Removing the clevis pins permits the support arms to be pulled to the rear, enabling removal of the spare tire cover and spare tire without dismount the support arms. Solution Model A critical dimension to be determined was the length of the 2" x 2" x 0.25" support arms. The new support arms need to be long enough to: Support the polypropylene tray and enclosed cargo box and attach using the molded mounting holes in the tray; Allow the lid of the enclosed cargo box to open without striking the spare tire cover; Permit removal of the spare tire cover and spare tire without removing the cargo carrier and support frame; Permit access to waste water hoses stored behind the bumper; Minimize the additional length of the cargo carrier and support frame to the LEII's length. I fabricated 2" x 2" wooden support arms, approximately 40" long. Using woodworking equipment, I cut slots into one end of each support arm to fit around the bolts holding the twin receivers to the frame. I also drilled horizontal holes for the clevis pins which retain the support arms in the receivers. Positioning the Cargo Carrier on the Cross-members The wooden support arms were inserted into the twin receivers and secured with the clevis pins. Then the 2" x 5" x 51.125" T6061 cross-member was placed across the support arms near the bumper. The additional 2" x 2" x 51.125" wooden cross-member, was also placed across the support arms, but further from the bumper. Clamps were used to hold the cross-members in place on the support arms. The polypropylene tray and enclosed container, latched together, were positioned on the cross-members, centering both to the trailer's width. I opened the lid of the enclosed container and adjusted the spacing (fore and aft) between the lid and the spare tire cover to ensure they did not contact each other. Once I had located the joined tray and enclosed container in what appeared to be a desirable position, I adjusted the positions of the cross-members fore and aft to establish alignment with the mounting holes in the tray. The 2" x 5" cross-member engages two mounting holes on each side of the tray. The 2" x 2" cross- member engages only one mounting hole on each side of the base of the tray. Six 5/16" carriage bolts will fasten the tray to the cross-members. Only four carriage bolts attached the tray to its original steel support frame. I used a mason's string stretched across the width of the tray with weights on either end to aid in aligning the mounting holes in the tray with the positions of the cross-members. I also used carpenter's squares to verify the cross-members were perpendicular to the support arms. Another check of squareness was made by measuring the distance from the trailer bumper to the cross-members. Once I was satisfied with the position of the tray and enclosed container on the support structure, I marked the locations for the holes to be drilled for the six mounting bolts to secure the tray to the cross-members. The tray overhangs the rear cross-member at the rear. With the cargo carrier tray and enclosed container in place on the clamped cross-members, I wanted to determine if the spare tire cover could be removed without removing the entire cargo carrier and support assembly. I found I could remove the clevis pins and pull the support arms aft approximately 7 inches out of the twin receivers and enable removal of the spare tire cover. With the tray and enclosed container positioned on the cross-members, I could now determine the required length of the support arms, which is 33.75 inches. The location of the rear cross-member determines the length of the support arms. After locating the mounting position of the tray and enclosed container I marked all key positions and hole locations on the wooden support arms and wooden rear cross-member. I cut the wooden support arms to the desired final length. Material Sourcing and Machining The required T6061 aluminum components required are: 2" x 2" x 0.25" x 33.75", square tube, quantity 2 (support arms), cost= $110.18 2" x 2" x 0.25" x 51.125", square tube, quantity 1 (cross-member), cost= to $99.08 2" x 12" x 0.125", flat bar, quantity 1 (to be cut into 2" squares for end caps on the support arms and rear cross-member), cost= $6.86 Sales tax= $17.83 No shipping charge. I picked up the materials at the local Metal Supermarkets warehouse Total cost= a $233.95 The above T6061 aluminum components, cut to specified length, were obtained from: Stainless steel bolts and nyloc nuts were obtained from: I was referred by Metal Supermarkets to a local machine shop: When I received the materials I took them and my wooden mockups of the support arms and cross-member to Air & Earth. I also took one of the original support arms. I discussed the machining needed: to cut the slots in one end of the support arms and to drill the needed 0.50 diameter holes for the clevis pins and mounting bolts. I also asked them to cut the 2" x 0.125" flat bar into 2" x 2" squares. I did not ask them to drill the smaller holes for mounting the cargo tray to the cross-members. I was quoted $220 and turnaround of the job within a week. They did an excellent job within the promised timeframe. Finishing and Assembly of the Support Structure After Air & Earth completed the requested machining, I performed the following finishing steps, which included: Rounding the edges of the 2" x 2" square tubing on the slotted end to be inserted into the receivers. I used a 3" wide belt sander with 100 grit sanding belts to round the corners of approximately 12" of the tube which would be inserted into the receivers . The original Oliver support arms also had the corners rounded to more easily slide within the receivers. Several trial fittings were required to verify smooth insertion and removal to/from the receivers. The support arms and the rear cross-member were sanded with an orbital sander using 200 grit disks. This sanding removed markings on the tubes and made the surface textured, similar to the Oliver rear hitch components. The support arms were inserted into their receivers and fastened with the clevis pins. The cross members were aligned with the mounting holes on the support arms and bolted into place. The cargo tray was positioned on the 2" x 5" cross-member at the previously determined mounting position and holes drilled to mount the cargo tray. Holes were then drilled in the 2" x 2" rear cross-member. Carriage bolts, flat washers and double jamb nuts were used to secure the cargo tray to the cross-members. Once all test fittings of the support assembly were completed, lithium grease was applied to the ends of the support arms which are inserted into the receivers. 2" x 2" x 0.125" caps were attached to the open ends of the support arms and the rear cross-member, similar to the end caps used by Oliver. These were attached to the square tubing using JB Weld epoxy. Cargo Carrier Lighting The cargo carrier partially blocks visibility to the taillights of the trailer, which is most noticeable when viewed from close behind the trailer. At a distance the taillights are largely visible. The cargo tray is fitted with two LED light fixtures and a wiring harness with a 4-pin flat connector. A corresponding 4-pin flat connector was installed on the LEII to integrate the lighting on the cargo carrier with the trailer lighting. Details of the installation of the 4-pin connector in the trailer are covered in a separate article. The lights on the cargo carrier ensure the trailer is quite visible from behind. A license plate mount was added to the cargo carrier tray, since the license plate mount on the spare tire cover is blocked by the cargo carrier. Lighting for the license plate mount is provided by adding a Y connector to the license plate light cable under the spare tire cover and adding an extension cable routed to the cargo tray mounted license plate mount. I also added reflective tape to the support frame members. I used the following reflective tape: https://www.amazon.com/gp/your-account/order-history/ref=ppx_yo2ov_dt_b_search?opt=ab&search=reflective Conclusion This addition to our trailer provides significant benefits, with no significant disadvantages. It does add approximately two feet to the length of the trailer. Besides the additional storage space, the cargo carrier and its load slightly reduces the tongue weight. I measured the tongue weight, using a Sherline scale, at 450 lbs., with no water onboard. Tongue weight seems sufficient, as no swaying or other handling issues have been observed. This project had a successful outcome due largely to the information I was able to glean from the Oliver Owners Forum. I hope this information is useful to others on the forum. Comments and suggestions welcome. Regards, Don
 6 points
 -
Here is another option for the Andersen WDH. I found it easy to connect and disconnect in just minutes by turning the two turbbuckles . Black marker on threads provide a guide to the correct tension when ready to connect again.
4 points
-
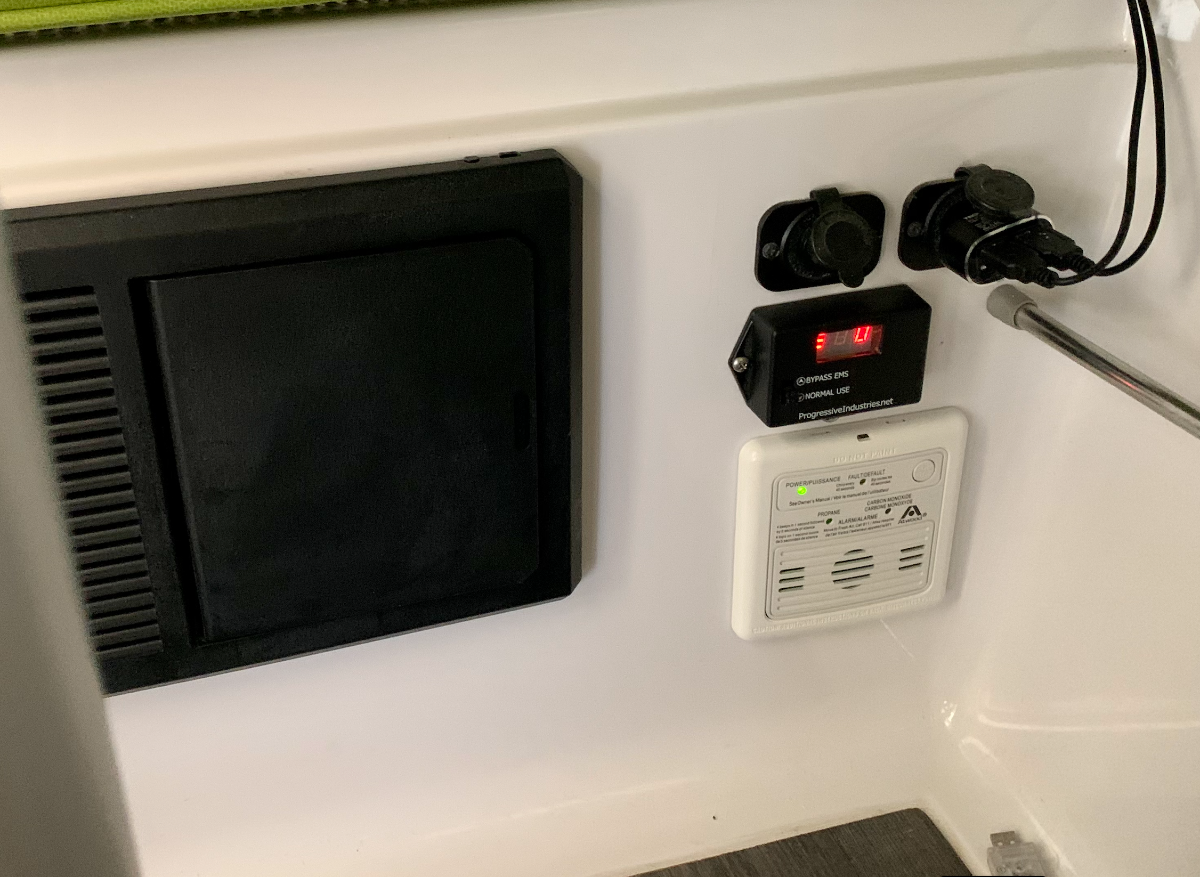
I finally got around to relocating the EMS display. When plugging in I can now quickly see the display.
3 points
-
@John E Davies, Thanks, John, for kind words. Thanks also for reviewing and commenting on my design approach. In answer to your questions: Yes, I did write the dimensions on the wooden mockup pieces. As I mentioned in my writeup, I also took one of the original support arms to the machine shop and explained the most critical dimensions are for the horizontal holes through which the clevis pins pass to secure the arms to the receivers and the vertical slot. I had initially assumed I would need to provide dimensional drawings to the machine shop. However, when I asked if they needed drawings, they said no, the dimensions on the wooden mockups and having the original support arm were sufficient. Thanks for reminding me to drill drain holes! I had planned to do so, largely from reading some of your write-ups. I agree with the need for them. This is relatively easy to do with the support structure in place. I composed the article initially using the Safari browser interface for Gmail on my MacBook Pro M1 laptop (MBP). I used Gmail because I am very familiar with its behavior, particularly the autosave function. I had to break the article into two draft emails when I reached the 25 MB limit of Gmail, after which it loads images to Google Drive. I wanted the images kept in place in the text flow. Once I completed composition and proofreading I copied the contents of both draft emails into a new topic page in the owners forum. Not having previously composed a long article directly in the new topic page, I was concerned about possible loss of content before completion. All of the photos were taken with my iPhone 13 Pro Max, which automatically stores the images in Apple's Photos/iCloud. I created a smart collection in the Photos using keywords, to make it easier to see all of the related photos together. I selected photos for inclusion in the article and exported them as JPEGs to the Downloads folder on my MBP. I used Apple's Preview app on my MBP to do some minor cropping of the photos and used the annotation features to add arrows, circles and text. I got lazy and used a grey filled rectangle to mask the license plate in a few photos, rather than take the photos into Photoshop for a more elegant edit. The Preview app is surprisingly robust. I do not know of any comparable utility in the Windows or Android worlds. I have previously used Window PCs extensively, but the Android world is foreign to me. I suspect you use a similar annotation process, having seen many of your annotated photos. Finally, yes, posting informative articles is time consuming. I spent most of the day yesterday drafting and editing. I also found I needed to take a few more photos yesterday, in addition to those taken during work on the project. I also had to confirm some measurements and materials details. I have benefitted significantly from reading your well crafted articles and those of many other contributors to the forum. I feel an obligation to contribute. Regards, Don3 points
-
I agree geO, Frank’s method is very good. I haven’t had to do it yet, but if I were removing wheels at home to do maintenance, I’d use the equipment I have, which includes large floor Jack, Jack stands, wheel chocks etc. all on a level concrete floor. However, your original post and objective wandered off into roadside repairs, which is what my posts referred to. How I will change a tire on the side of the road is different than how I will change it in my garage, due to the equipment & conditions.2 points
-
Yes, this is correct. The way I read your post, I cannot tell if you are asking if you need a neutral ground plug. As mossemi advised above, the answer is yes. If you have a neutral ground plug, but it is malfunctioning, it can be easily checked with a simple circuit tester. I have an older Honda EU2000, and I have no trouble running the same AC you have, with the Micro-Air Easy-Start. I cannot run it in Eco mode. Your EU2200 should have no problem. If all your equipment is functioning, it could be as simple as too many loads as mentioned in previous posts. Some things to check if you have not already…Inverter Off, Charger Off, Refrigerator on propane or Off, Suburban hot water heater (if equipped) AC switch OFF. To test, just turn off all AC breakers except the AC. To confirm your trailer indeed has the Easy-Start option you paid for, turn off the AC when connected to shore power, then turn it back on. The AC fan will start up, but warm air will come out. There is a 3 to 5 minute delay before the compressor kicks in. This is a built in system safety feature of the Easy-Start.2 points
-
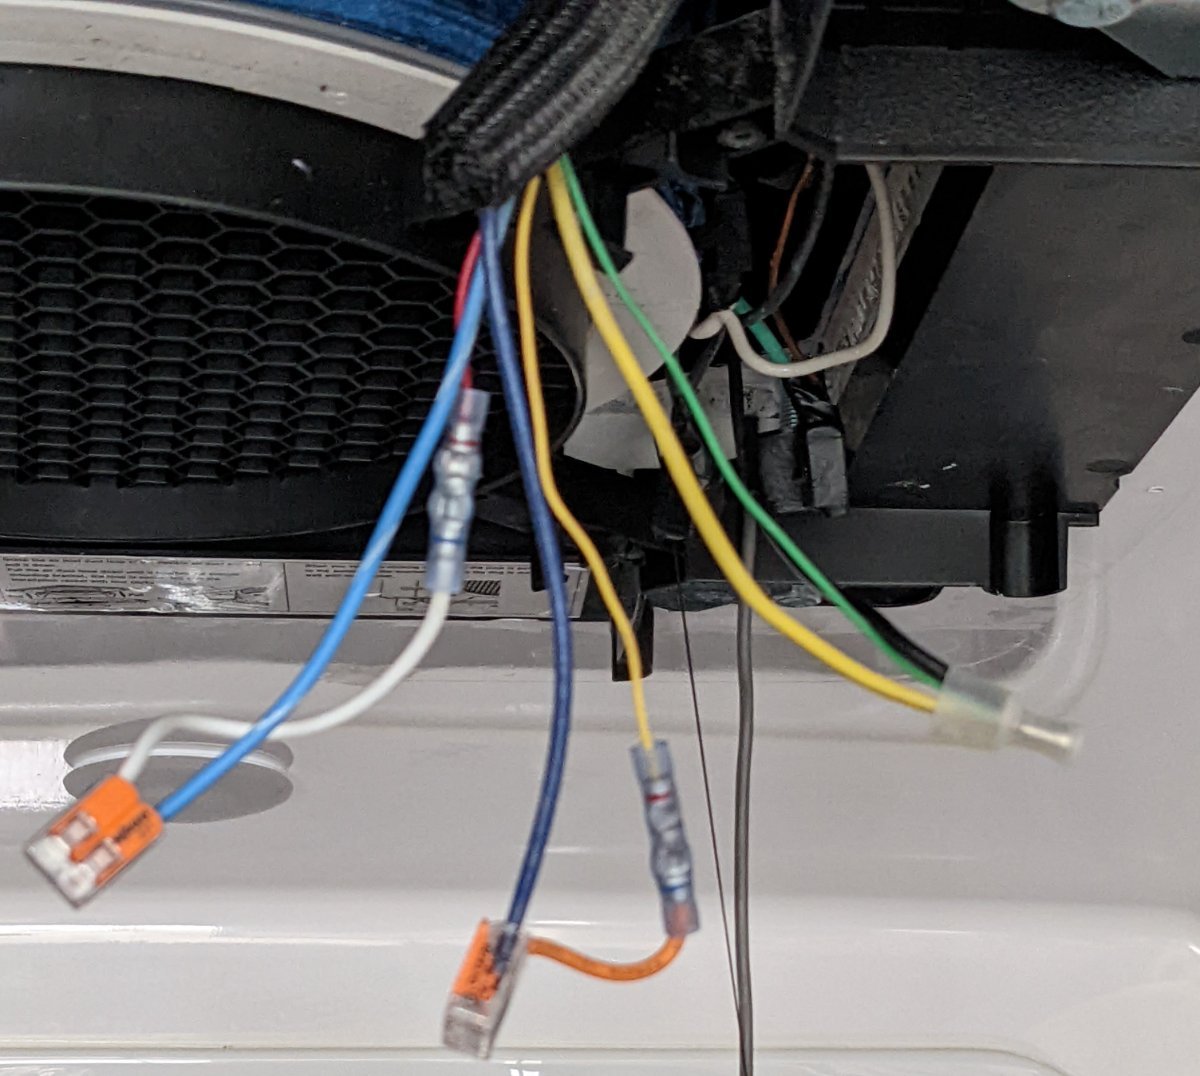
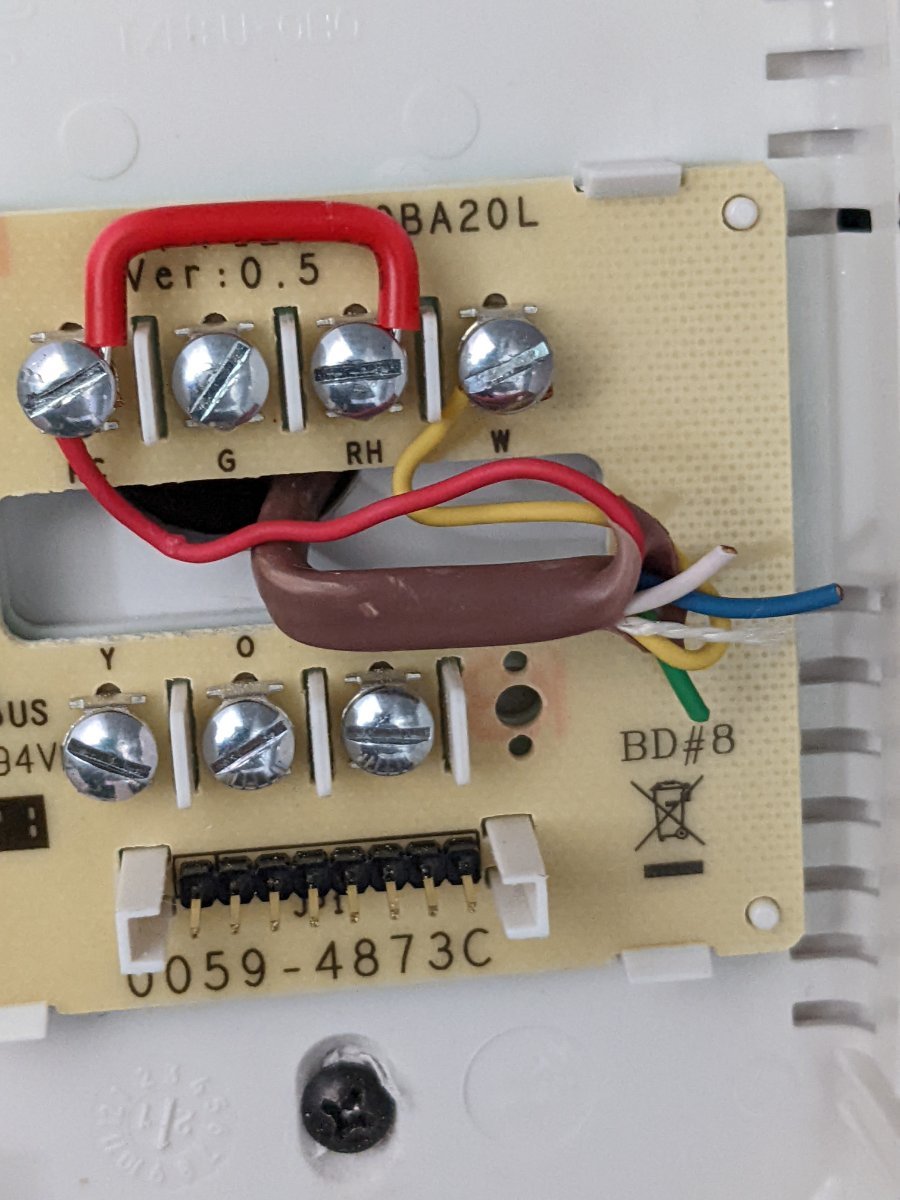
Here are the photos of the final wiring. I used the Red (spliced on AC side to white) and Yellow (spliced on AC side to orange) thermostat wires. As you can see in the photo the blue/white was the 12 v and the solid blue was the wire to the heater as @Minnesota Oliconfirmed. I checked with a volt meter and connected them at the AC side to confirm the heater would turn on. On the Tstat side the wiring is self explanatory from the picture. The only casualty in the install was blowing the 7.5 A fuse which is located under the dinette. After closing everything up and THEN putting in the new fuse so I would not blow it again everything is working great. What an excellent upgrade the low profile inside portion along with the reduction in operating noise was well worth it. BTW: if you are in the metrowest Boston, MA area and need any RV repairs; I used TRIC Mobile RV to do the heavy lifting to remove and replace the actual AC unit. https://tricmobilervrepair.com/ They did a fantastic job so I would definitely recommend them.
2 points
-
I read this thread with interest, as we have an Elite II with the Lithium Pro Package on order for November delivery, and I use a CPAP machine. I believe one way to reduce CPAP power consumption when boondocking in an Oliver would be to use a 12V DC CPAP plugged directly into a 12V outlet, rather than a 120V receptacle powered by the inverter. Because I use a CPAP on extended wilderness river trips, I buy machines that run on 12V DC, and power them with 12V LiFePO4 batteries when on the river. My machine draws about 1 amp per hour of usage, or about 8 amp hours on an average night. Those machines also come with "wall plug" adapters that convert 120V power to the DC voltage compatible with the machine, which I use when at home. When not connected to shore power, I plan to plug my 12V DC machine directly into one of the 12V DC "cigarette lighter" receptacles in our Oliver, rather than using the 120V "wall plug" adapter plugged into one of the 120V receptacles. This will bypass the inverter, avoiding the power consumption required to take 12V DC from the battery bank, invert it to the 120V AC supplied at the "wall plug" in the Oliver, then back to DC for use by the CPAP machine.2 points
-
Thank you! The Platinum Package is much more descriptive and useful for troubleshooting than "battery package our $$$ could buy". I know you all are newbie’s, but when speaking about your Ollie, please remember that there is no such thing as TMI. To much information equals more accurate support from the forum members. Mossey2 points
-
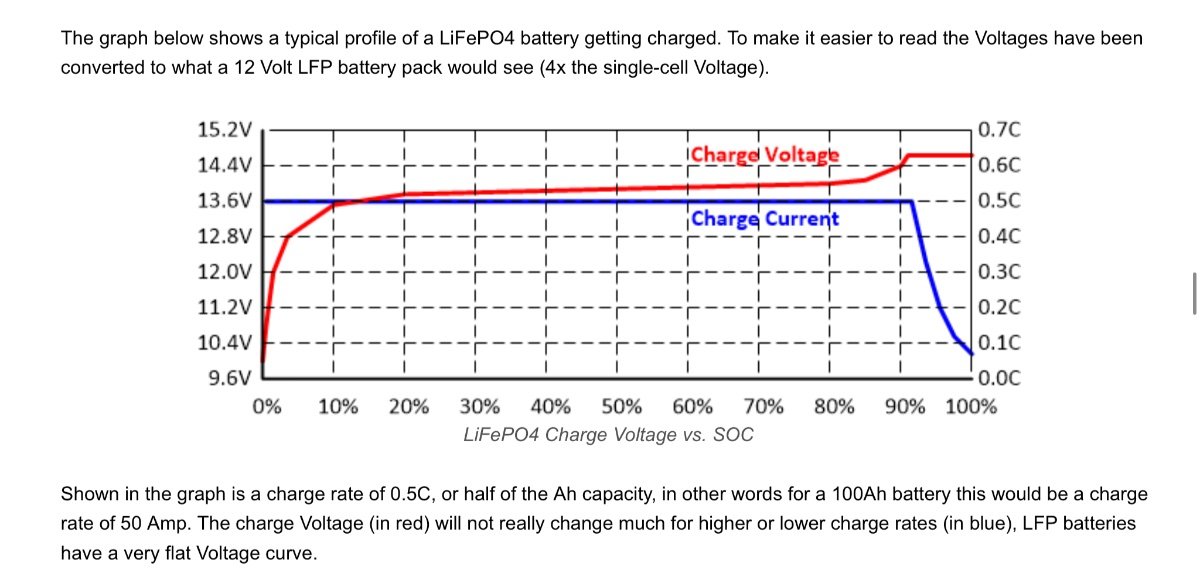
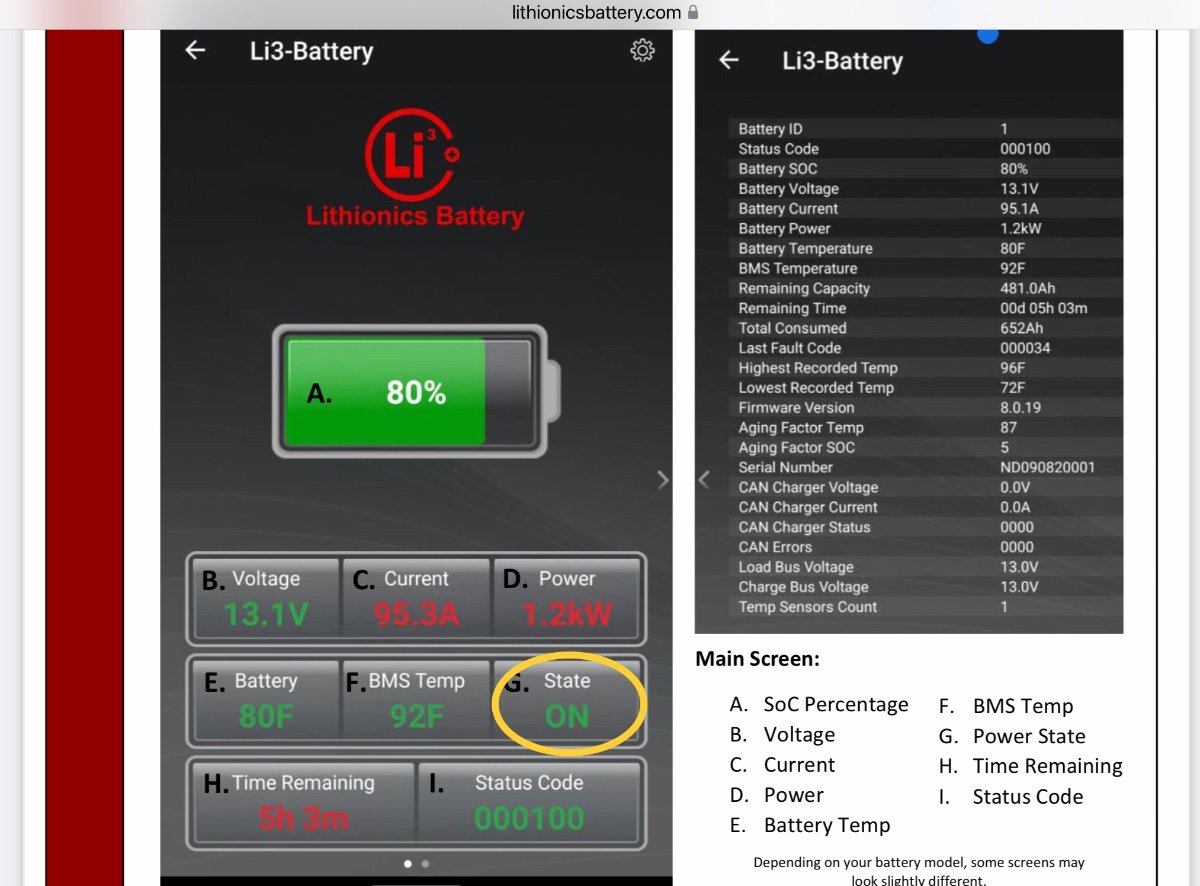
The percent State of Charge (SOC) can be a little deceptive, it isn’t an absolute condition, it is the result of the little computer chip doing all sorts of calculations about charge and discharge rates. My Victron smart bus system actually has a calibration button to “Set SOC to 100%”, for example when it reads say 98% but the charge rate has dropped down to zero. Where I am getting is, don’t rely too much on that figure. OTH I would tend to believe the lithium battery results rather than the solar monitor one. Fully charged resting voltage (no load) should be around 13.5 to 13.6. Your 12.7 volts means a dead battery bank. Do you have a generator? You need one, in this case you should connect it and charge that way for at least three hours. Your tow vehicle doesn’t do anything, Oliver leaves that charge wire disconnected for the lithium packages, and your solar may just not have had enough actual sun exposure. What has the weather been like? The 75% SOC Zamp solar figure sounds very bogus to me.You need to read and understand more about how your lithiums work, they are completely different form the typical lead acid battery in your truck. From an article linked below: Your voltmeter shows not just the condition of the battery but the voltage of what is charging it, for example in full sunlight at full charge my battery voltage is around 14.4. That shows the result of the current coming in from the panels, which operate at a higher voltage than the batteries, otherwise nothing would happen (no current would flow). If the sun goes behind a tree, the panel voltage drops and what you see is the resting battery voltage. Without any major loads it should be about 13.2 to 13.4. Your 12.7 volts represents a dead battery. The battery voltage typical changes very little as it discharges, then it quickly tanks at the bottom. If you have a lthium battery powered drill, you see that when it works fine up to the very end, then it just dies. https://olivertraveltrailers.com/forums/topic/6629-how-to-find-happiness-with-lifepo4-lithium-ion-batteries-solacity-article/ I think you are not getting nearly enough sun exposure, plus maybe there is an issue with your Zamp controller. This is a prime example of why we carry generators. If you do not have one, get one 😬 Good luck. John Davies Spokane WA
2 points
-
Kimberly and I have had our inaugural road trip… and feeling pretty good about my understanding of the various systems of our new Oliver. A big thanks all in the forum! IMG_5046.MOV1 point
-
I bought my Oliver in 2017 and an honest review would reflect high grades in every aspect of owning it from customer service and all in-between. I would add the customer service is above the industry hands down!1 point
-
Thanks John for mentioning Tirerack.com. I got all 5 new tires in just 2 days.1 point
-
I used 3/4’ Χ 9’ galvanized turnbuckles. Checked several local hardware stores but they did not have them in galvanized, found them in Amazon for around $ 50. Just returned from a 450 mile trip and did not see any loosening issues at all. I will keep an eye and if I need to I would prefer to add a backup nut. If I drill a hole for a pin it may weaken the SWL ratings. I saw the build in clevises but the 3/4’ pin of the clevise would not go through the Andersen provided chains ( the OD of the clevise pin is a bit too large. As a matter of fact the 3/8” shackles need to be tapped gently in the eye of the 3/4’ turnbuckle. You could of course use the 5/8” X 6” that you suggest, dont see a problem with it but I opted for the 3/4”1 point
-
As JD says above - most any decent chassis grease will do the job. Other than the crawling around the job isn't really very difficult. However, you might want to consider getting some of zerk grease fitting caps like THESE to help keep those fitting cleaner. Bill1 point
-
Don - Nicely done with a great description. Thanks for posting it! Bill1 point
-
Bravo, very nice, and what a great description. I have a couple of comments, since I can’t seem to leave the back end of “Mouse” alone. Using wood for mocking up is a neat idea. Did you write the actual dimensions on the pieces before dropping them off at the machine shop? The shop needs quite precise measurements. Relying on your holes in wood might not be precise enough. Drain holes? This can be a super wet part of the trailer, each part needs two openings, at a minimum, for water to escape. (I leave my parts wide open and simply blast them with water when washing the trailer.) A little moisture will naturally escape from the bolt holes, even with the hardware in place, but those will eventually plug up with debris and corrosion. A hole at each end of each cross beam allows water to egress regardless of the angle of the trailer. And do not forget to add some to the Ollie bumper, the factory does not drill any! Be prepared for water to flow out onto your drill, so drop the bumper down first. I really like your annotated images. That is very easy to do with an iMac or iPhone, I don’t have a clue how you would do it with a PC or SOB phone. What did you use? Thanks for posting such an informative thread. I think members should be aware of how much work is involved in doing an article like this. John Davies Spokane WA1 point
-
@dhaig Your cargo carrier and mounting solution looks very robust, well planned and based on your 2000 mile test run, very functional. Thank you for the detailed write up which even I could follow and other OTTO’s can use to their advantage and solve their own cargo carrying limitations. Mossey1 point
-
Heck - I have 4 lead acid batteries that (via the inverter) easily run the microwave. I really don't know how long it will run the microwave before the batteries would run dry but I do know that a 2 minute bag of popcorn followed by a 5 minute baked potato, followed by a 2 minute cup of water for hot tea don't hardly make a dent in the battery power I have available. Bill1 point
-
No question that this is true. Simply put - it takes energy to do each of these conversions. Bill1 point
-
@Landrover, that's really kind. And, thank you. I'm camping in North Carolina, and my daughter reports zip for poor weather a few miles from our home. The Weather Channel does like drama, right?? Another time, I may take you up on that. So very kind of you, if there's room for our small ollie in your drive.1 point
-
They are saying not much to happen in the ocala Marion county area. Sea Dawg if it changes for the worst you can head my way plenty of room to wait it out.1 point
-
Thanks. Our home is in the "path. " It's way too early for big storms. Hopefully, a bit of wind, and some significant rain. We rarely worry til late August, unless we're sailing. Different story, there. My daughter says not even raining at her house. Grateful.1 point
-
Mossey - At home or in a friends drive way I have a 110 to 30 amp adapter plug. I plug the adapter into the 110 outlet then the surge protector into the adapter. ScubaRX - No rain but a heck of a lot of wind that night. Keep plastic bags to cover any exposed plugs if the forecast call for rain. There are no issues with using an external surge protector in addition to the EMS onboard one. Jason at the rally said that is something he would recommend. It has been a while but I can see if I can find the thread on another forum. The guy had pictures of a chard end of a power cord and chard receptacle where it plugged into the RV. The on board surge protector saved the trailer and its electronics. But the power cord and the plug in on the side of the RV both had to be replaced. The EMS seems to be working fine now. This may not be a big deal. But my concern is this something that will return. I would have thought turning the power off and back on would have reset the EMS if that was the problem.1 point
-
I don't see an issue with piggybacking a surge suppressor - not a second EMS - inline. The external unit simply passes normal power and would absorb the first hit of a surge, potentially saving the onboard EMS surge protector circuitry. How could it cause an issue?1 point
-
This link covers a lot of storage ideas as well as Tooletries and Sudski. And I found it by searching for Tooletries. Mossey1 point
-
I would love to see a pic of this install when you have a chance. No hurry. It's something I've been meaning to do. The Lithionics App drives me nuts. Thanks! mb1 point
-
Thanks Boudicca! Again, probably most people don't need to have it so detailed, but I will attach the latest version of my doc here. If you see any errors or have any questions about it, let me know. Thanks! Check List (for everything!) - Copy.docx1 point
-
Tina and I find ourselves back here on this lake like it’s a magnet. Osprey Campground on Priest Lake in Idaho. We are out on an excursion needing to be back home around the 24th of June. We will see where the gas prices take us. Payed 5.15 in Tonasket WA. Just letting all the great folks on the forum know you and your info are appreciated. It is very interesting to find that a lot of crickets can create a slick spot in your travels. Mike
1 point
-
We just completed a five week trip from NC to Grand Canyon, Grand Teton and Yellowstone....mostly boondocking. Running the fan or furnace at night we would use about 10% SOC which would easily recharge with clear weather. When we got to Yellowstone, I had to use the generator on the forth or fifth day because it was overcast & snowing every day (lost a little SOC every day until SOC got to 50%...and with 19 degree temps we did not want to chance the furnace fan operation). Another setting to consider is the inverter battery low voltage cut off. From the factory, mine would not let me deplete batteries below 70%....then I learned how to change that setting. You can use the battery app and inverter app to help gain an understanding of amps used by each appliance. We try not to use more than one "amp hungry" electric appliance at a time (Kerig, fry pan, microwave, hair dryer...etc). And I monitor where we're at on our daily "amp budget" and make consumption decisions accordingly. It gets easier with experience and practice.1 point
-
Open the Lithionics App....here is the initial screen showing three batteries in my case. If you don't have all batteries showing....make sure they are on and then tap the discover button shown below. Tap on each battery to see the specifics as you show in your attachment. By the way your screen shot is showing 95 amp load....which seems alot if you have more that one battery. Boondocking....my AC will pull 28 amps each battery.
1 point
-
Mossemi: In the Lithionics app you see each battery as it's own entity. They have a specific SN and you can rename them ...like Battery 1, Battery 2 or Front/Rear etc. In the Lithionics app then you see each battery on or off and it's specific details. Folks with 3 Lithionics battery configurations have 3 different battery screens available to look at the details. For the Platinum Package with 2 of the 315AH batteries you see 2 screens. In our case we also installed a Victron Smart Shunt on the negative side of the bank of 2 batteries. This way we monitor the total of both batteries. (To do that we're using 2 bluetooth based apps, one from Lithionics and one from Victron.) CS1 point
-
Would the battery on/off state show on the app like the picture below? Does the picture below show the status of 1 battery or a battery bank? Or would the app show on even if only 1 of 2 or 3 batteries is on? I do not have Lithionics batteries, but I am trying to understand them a little better? Mossey
1 point
-
If you have Lithionics Batteries, please check that the batteries are actually turned on (Blue lights and switch should be on the top of the batteries). I've heard of some cases where one or more of the the Lithionics batteries weren't turned on at all...and as a result the owners were only using 1 battery out of a bank of 2 or 3 Lithionics depending upon the battery package you have. Also there is a service note out you should check out :1 point
-
Karin, we’re currently on the road. I’m assuming you have the 630 Ah LiPo4 batteries. We upgraded our 7 year old AGM’s last year to 3x100 amp hour Battle Born lithiums. Last night we ran two CPAPs and two fans for about 8-10 hours. We used 45 amps overnight. It’s now 1320 hours and we are back to 100%. I would contact you by phone, but your profile has not been completed.1 point
-
I would also dump the mediocre Zamp PWM solar controller and get a shunt based MPPT system. Victron would be an excellent choice. This will be the standard for the 2023 Oliver’s.1 point
-
I have never had any upgrade batteries in our trailer, only the stock factory deep cycle ones that come with the trailer. All being said, our batteries have always lasted through the night running the MaxFan and possibly some other 12v item without the batteries discharging to a low level that things quit working. I'm sure you will get your answers soon on this forum as many are hovering over there computer as I speak. trainman1 point
-
Foy & Mirna - As usual your "stuff" is absolutely beautiful. Certainly the wood you use is very nice in and of itself. But, how you treat it really brings out its best qualities. Bill1 point
-
Well.... yes. I've heard this from several people, and it is a logical approach. But for some people, they might require going through the process multiple times before getting close to home! I can appreciate the effort that @tripmushrv made in putting these together. Organizing a list is a way to walk through a process, and it can serve as a way to envision a series of actions that might seem complicated when one doesn't have access to any of the parts and pieces ahead of time. (I'm in that bucket of people right now). Being a first-timer and trying to be prepared can be a real hoot. There is a lot to remember. I can't count all the "don't forget" statements in the forum! I've tried following those threads, but haven't successfully taken notes on them all. The forum has proven to be a wonderful resource, and seems to also serve as a way for individuals to hash out thoughts about subjects. I really appreciate that.1 point
-
This may be of interest: I just estimated the weight reduction by replacing my 4 6-volt AGM batteries with the Battle Borns, and replacing the Dometic AC with the Houghton. Our Ollie may have lost about 300 lbs (along with about 1 inch of height).1 point
-
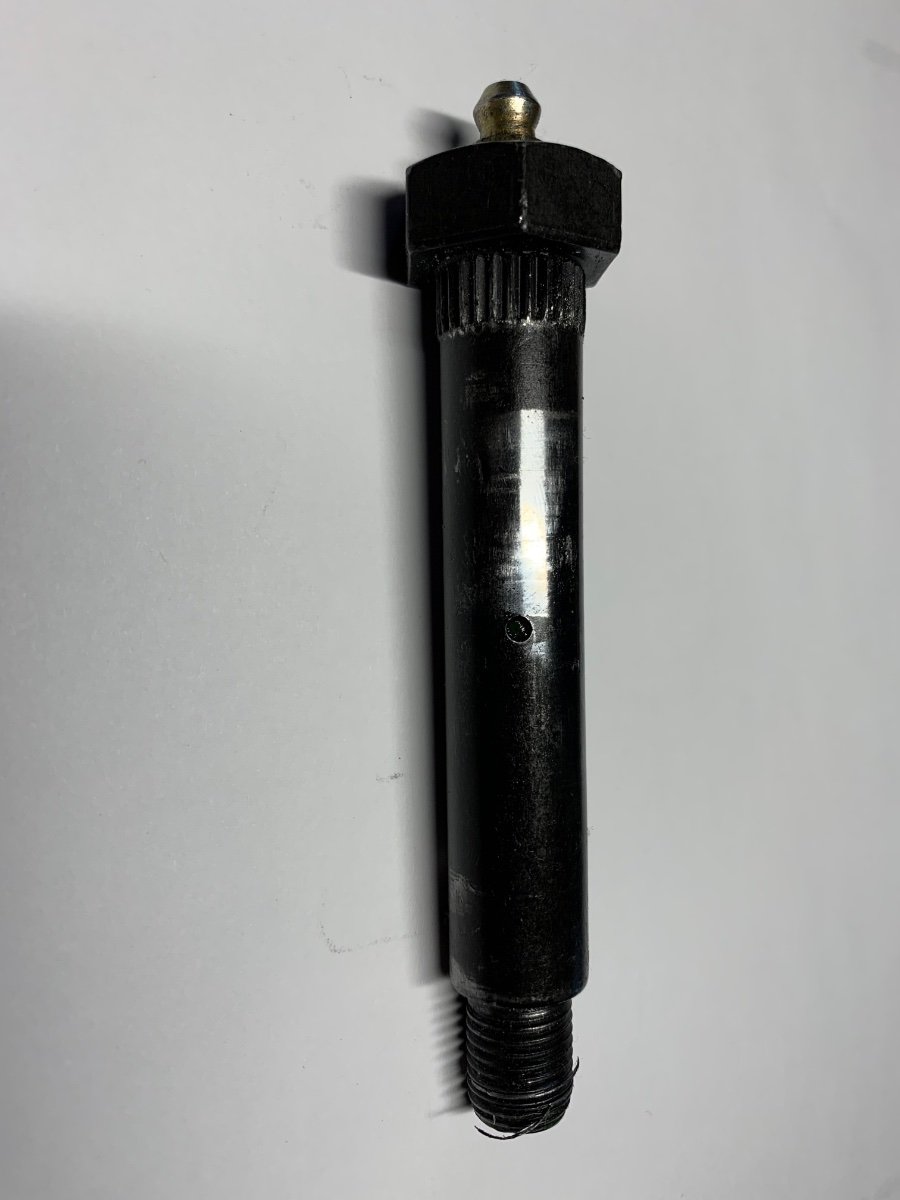
The replacement zerk fitting did not solve the problem of the wet bolt accepting grease, so I submitted a ticket to Oliver. Jason responded quickly, saying that they would send a replacement bolt, and that I could replace the bolt myself, or have a local service facility do the work and submit a reimbursement claim to Dexter. Coincidentaly, two days earlier a friend had highly recommended a local family-owned RV service facility, so I opted to have them perform the work. When I went there to schedule the repair, they told me to bring the trailer by that afternoon so they could determine if the bolt was truly faulty, or just needed a more powerful grease gun than the mini-grease gun I use. The bolt was indeed faulty, and they had a replacement in stock (the one from Oliver had not yet arrived), so they set about replacing the bolt. It took close to an hour, but they only charged for half an hour of labor (work stopped for a while as everyone in the shop had to come inspect and drool over my exotic fiberglass trailer. A happy ending to a small, but nagging problem, and I now have a trusted local repair facility to turn to when things get above my pay grade. Attached is a photo of the offending bolt. I'm not sure if the wear is normal after only 3500 miles or indicative of a lack of sufficient grease.
1 point
-
Wow, I never had a list for trailer camping and setup, it just all seemed to work together and with a little commonsense it always seemed to work out well. For those who feel uncomfortable and are first timers that you might consider setting up and taking down the trailer at home, maybe you will have to go through the process 2-3 times and all will start to fall in place for you. For me it's a three step process, 1. find your camping site, check it out by observation and then pull in, level and unhitch from tow vehicle, 2. hookup all the utilities and check each operation for correct operation, 3. setup chairs, tables, grill, and everything else that you will need for your camping pleasure. I would say this should take no more then 30-45 minutes to do, unless you stop and talk with other campers which can be distraction at times. My wife does the inside setup and I do the outside, but inside usually goes quick, so she will also help outside with chairs, lights, etc. Do remember it's not a race to see how fast you can do it, you don't get prizes for being first. I would say here that teardown takes longer, mainly because I clean and re-roll all lines and return them to there storage area for use again. Last remember that not all camping sites are perfect and you will find yourself making repairs at the electrical and water hookup faucet connections, yes bad and worn out leaking faucets are common, being a electrician and plumber are required for your camping success at times, so carry tools you will need them for something, for sure. trainman1 point
-
Ok - after actually owning my Ollie for a couple of months now (and taking some trips with it), I have updated my checklists. Here is the newest one....for those that are interested. Check List (for everything!).docx1 point
-
Same situation with my 2021 model. I was greasing the chassis this week and took one of the nuts off. Only the top of the shock has this problem, the lower end is fine. No serious cracks in the rubber yet. Perhaps some heavy duty fender washers between the rubber and the brackets would improve the rubber life.
1 point
-
The best person to answer this question is your sales rep at Oliver (in the event that there have been any recent changes). Bill1 point
-
Most of the other truly necessary gizmos are available at Hohenwald walmart, or tractor supply. What you want to buy ahead are locks, leveling system, and whatever you like to outfit the interior. My Advice: Don't go crazy. A lot of stuff is available anywhere, and people buy a lot of unnecessary, never used stuff, ahead of time. Try out minimalist camping. Then add.1 point
-
I should probably use a torque wrench too but I just use one of those extendable lug nut tools. Usually they are tight, but occasionally a few need some tightening. I don’t carry my torque wrench when camping. I’ll get it out when we get home and see if my brute force method is close to the standard. The important thing is to check them before each trip and occasionally during long trips.1 point
-
TL/DR so I don't have feedback on the details of your long lists, but I'm wondering if you've seen the checklists for getting ready for towing and for setting up camp that are in the Oliver user manual (available on this site at the Oliver University section)? They strike me as a great starting point and a nice balance between being thorough while avoiding numbing the mind with detail. They also have good steps for sanitizing as well as winterizing the water system. I've added a few things on top of their list for my pre-flight process but only a few.1 point
-
When draining your grey tank, I noted you elevated the front of trailer that is good. Also you should open the drain valve inside the trailer when at dump station. Probably already open when connected to full hookups at campsite. Opening the shower drain valve lets the gray tank drain faster because it allows air to enter the tank. Make sure to close it prior to heading off down the road. Like Mike said I am not aware of any stove vents that need opening or closing. Not sure I would drive with and a/c cover on. Overall I think your lists are pretty thorough. You may adjust things as you get more familiar with it. Like Mike said, just go out and enjoy it!1 point
-
I may make a couple of replies here as I read through. Also, I am not sure if you actually mean 1a (inside trailer setup) precedes 1b (outside trailer setup) or if that is the order you wrote them in. I would set up the outside before setting up the inside. So let me start with 1b. Also sometimes the order is important and sometimes it is not. I will only comment if I think it would serve you better to change an the order. One more thing, we have only had our trailer for a year so someone else with more experience may have better input, but hopefully I can get you started. After backing in to the site and before doing anything like unhooking or anything else for that matter I check my power with my surge suppressor and make sure the water is working. I have never had problems so far, but better to find before you unhook if you have power or water issues. With power breaker off, plug in your surge suppressor and then power on your breaker. My surge suppressor gives a blue and green light if proper wiring. All good, turn off breaker. Check water. Maybe add this to step 4. All good, then you can proceed with your list. I have made adjustments to 7. I wasn't sure what you were talking about in some cases so I reworded a couple 1b 7) To unhitch trailer (after you are sure you are close enough to water/electrical/sewer): A) Detach safety emergency brake cable from truck and stow. B) Detach 7-pin electric pigtail from truck and stow. C) Detach safety chains from truck and stow. D) Put leveling blocks under front jack leg so it doesn’t sink in. E) Lower front jack leg so tongue is raised about 2-4" until chains are slack. F) Pull cotter pin from WDH triangle pin. G) Pull WDH triangle pin from WDH (you may have to wiggle triangle back and forth while pulling out). H) Insert cotter pin back into WDH triangle pin (so you don’t lose it) and stow WDH triangle pin. I) Drop WDH triangle and chains on ground. J) Adjust front jack so tongue is level with truck hitch. K) Remove hitch coupler pin L) Pull up on hitch coupler lever. M) Lower front jack leg to raise tongue and release tongue from ball. If necessary, use foot to push down on hitch to help separate ball from hitch. N) Lock trailer hitch with hitch lock. Continuing at 12. Since I already verified power working from above and my surge protector is connected I connect my cable to Oliver, make sure breaker is off on power pole, attach cable to surge suppressor and turn on power. Also I just noted that Mike and Carol replied so I read through their thoughts and will not repeat their input now. I will try to read through departure and pre trip stuff in a bit.1 point


.thumb.JPG.dd838cdb3df463dab6a16861fa23a319.JPG)

-
Recent Achievements
-


")


