Leaderboard


Popular Content
Showing content with the highest reputation on 10/26/2022 in all areas
-
Been planning for a travel trailer for several years getting ready for retirement. We finally purchased the new tow vehicle last year and got it paid for. We finally settled on the Oliver LE II and decided to place the order this week. We have a build schedule of March and deliver around the middle of April. We can't wait to begin this chapter of our lives and start exploring all the places we've only dreamed of till now. We aren't new to camping, nor are we inexperienced with travel trailers. We had a 34' Jayco Eagle with a super slide back in the late 90s. Sold it by around 2002 and haven't owned a camper since. We started researching brands about three years ago, watching tons of YouTube channels about full timing and all the other RV topics that are there for the watching. We started narrowing down the brands and models we like last year and the Olivers were at the top of the list. We did take the factory tour about a year and a half ago and were blown away. We are both semi retired right now, meaning my wife works part time for social outlet and fun money at a local farm market, and I work for myself at my own pace when I feel like it. We have several hobbies we enjoy and I'm also in the middle of remodeling our downsizer retirement home in the country in preparation for full retirement soon. We have two dogs, Border Terriers, at home. We have one married son and one grandson a year old. Part of our RV life will include spending extended periods in Texas with our son's family and enjoying our grandson as much as possible. We look forward to becoming seasoned Ollie owners and participating and getting to know the greater Oliver family.5 points
-
Well - There has been "rumor" of this very thing happening for at least the past three or four years. Unfortunately, due to a number of circumstances the "Ollie Store" is not open - yet. While getting annual service done last month (September, 2022) I had a discussion with a reasonably senior management employee of Oliver and they told me that "the final details are presently being worked out" and that the "store" should be open for business by the end of the year. Hopefully this will turn out to be true. Bill5 points
-
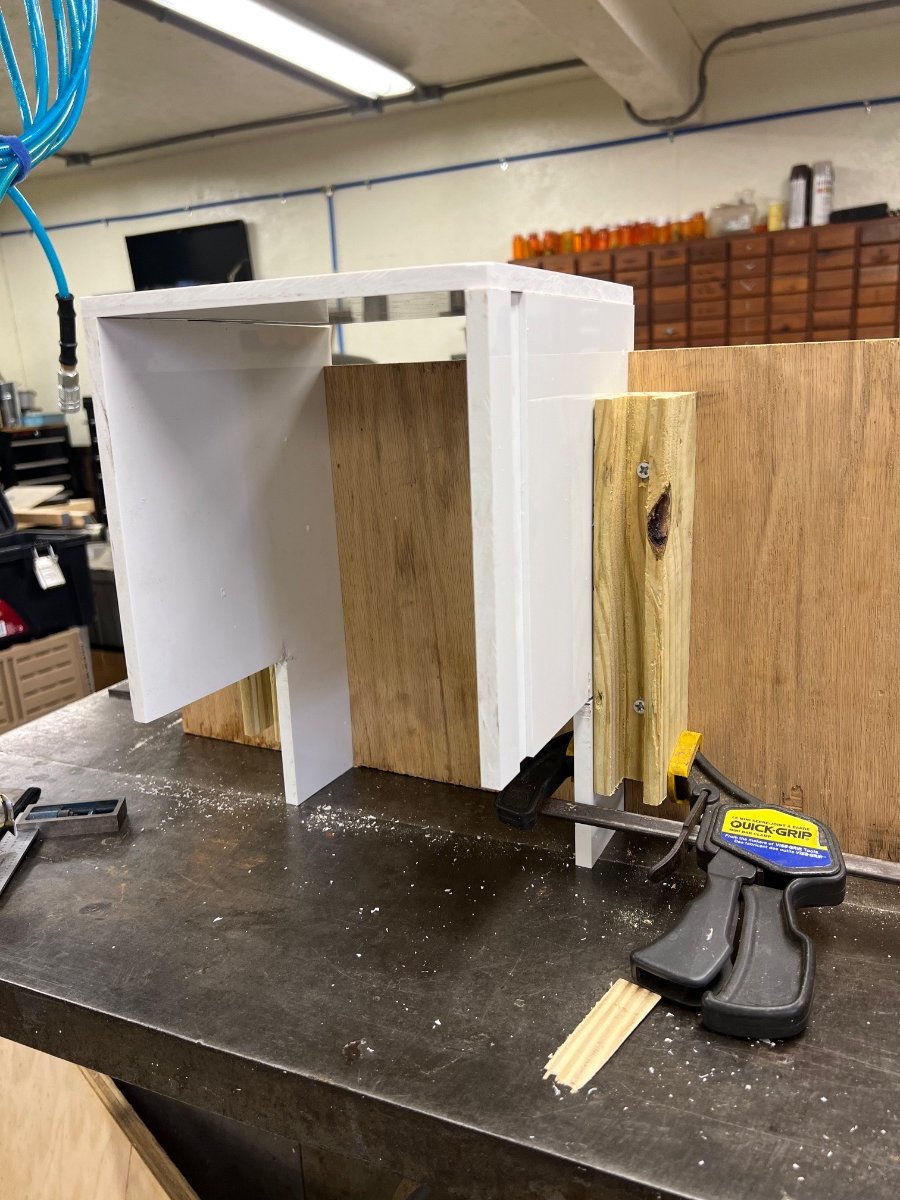
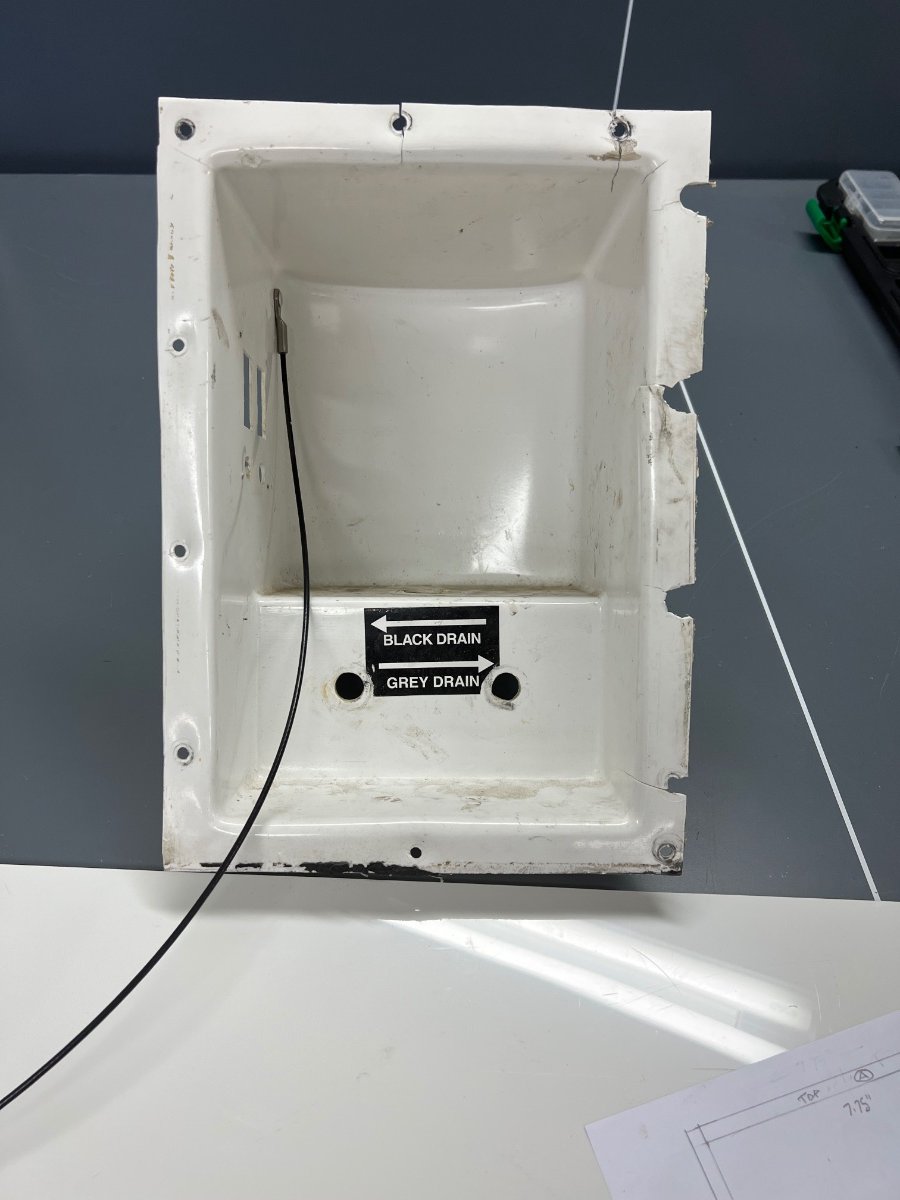
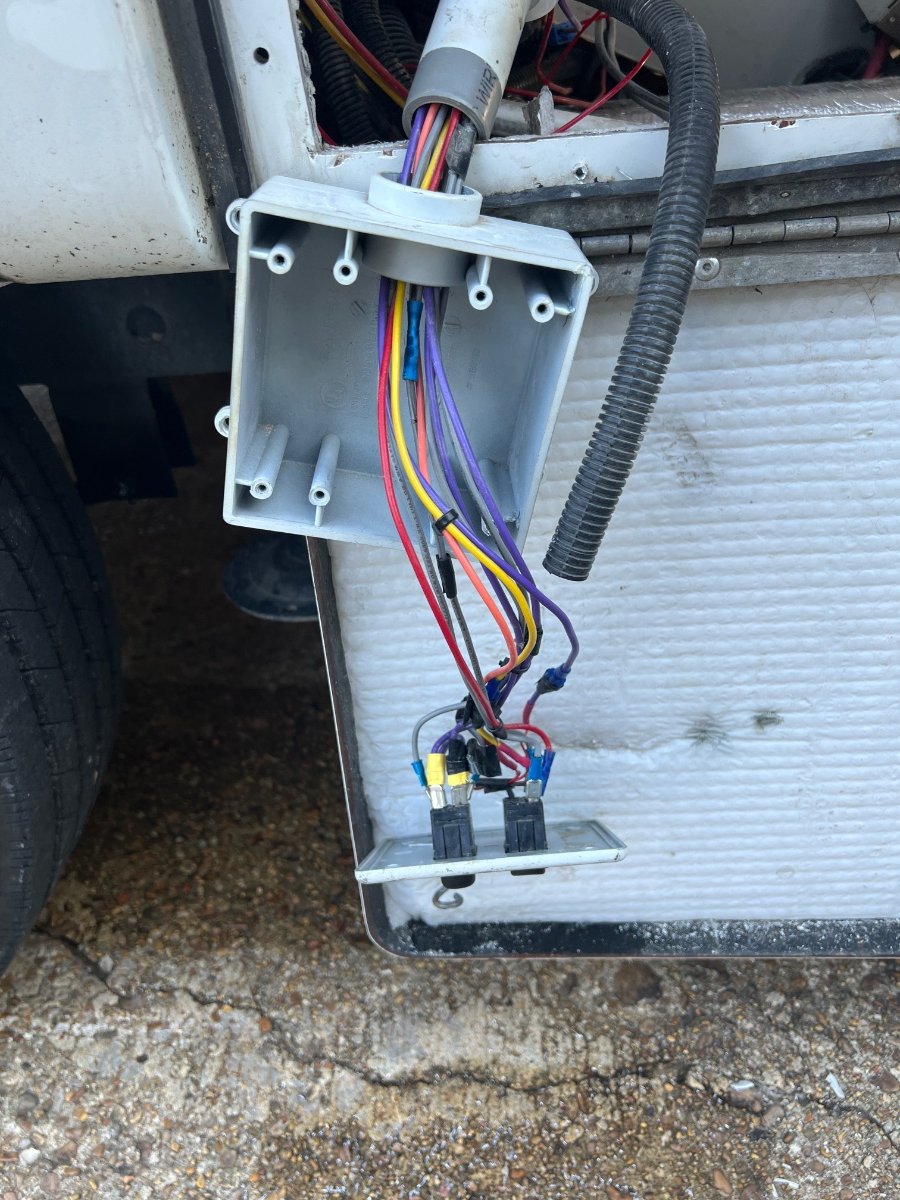
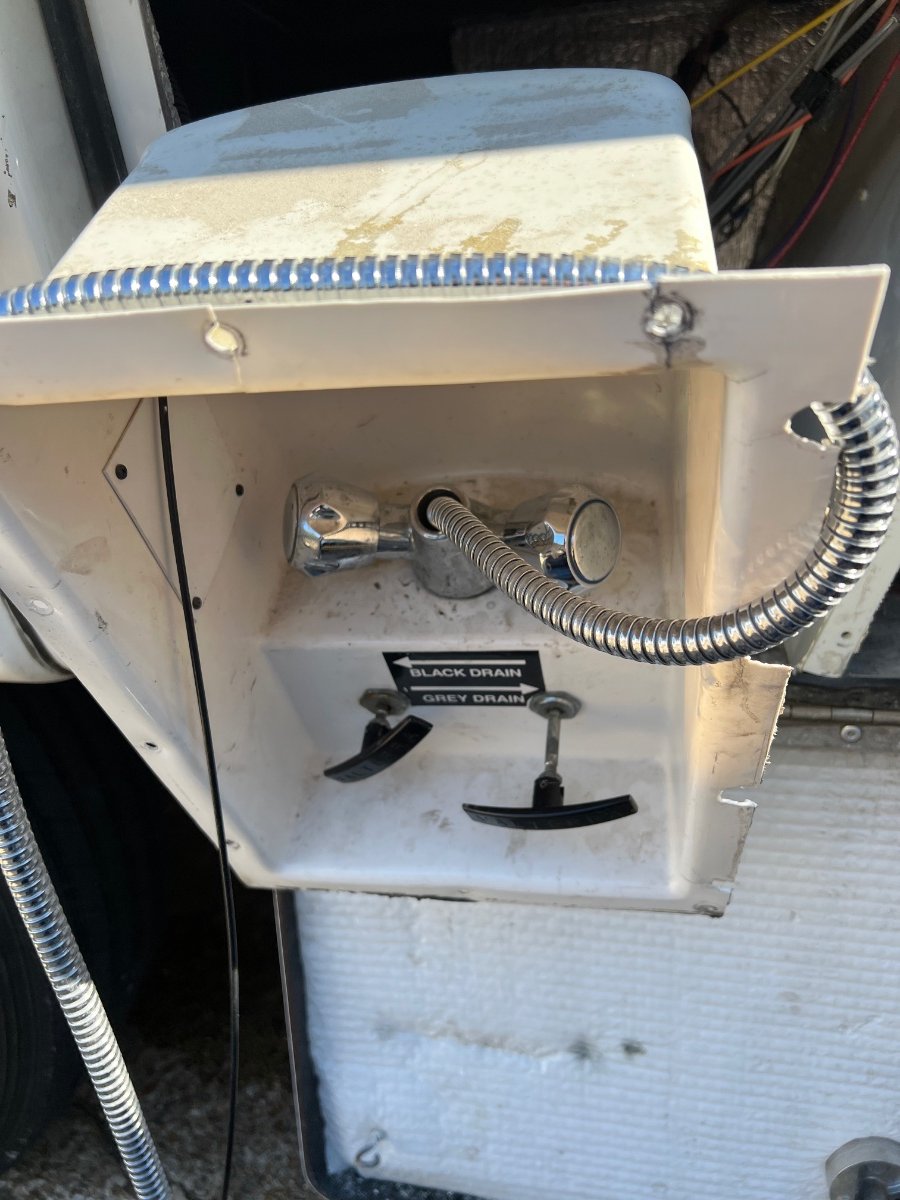
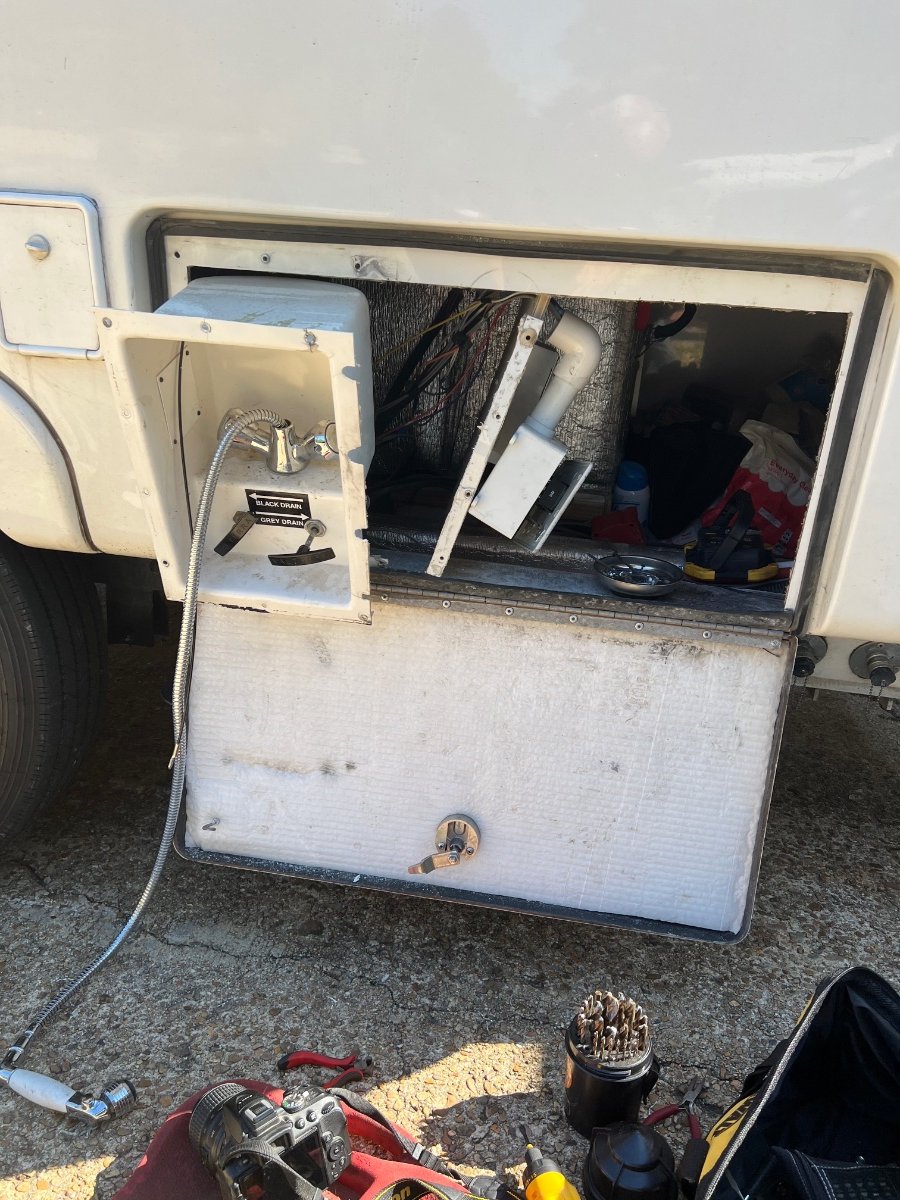
The key word here is “structural”. Although, no longer used, the front wall that separates the bath and closet and them from the rest of the cabin plus the basement floor were originally made in-house from a very high grade plywood coated on both sides with fiberglass and gel coat. These areas are now constructed using a commercially available 1/2” thick polymer plastic sheeting cut to fit. My basement flooring right inside the exterior hatch was delaminating like yours from it having gotten wet so many times through the years. We store our hoses there and apparently I’ve occasionally stowed them away without making sure they were completely drained AND the seal on that hatch has been known to leak while driving in the pouring rain. In addition, there have been times the outside faucets were left slightly open and that water found its way onto the basement floor. All of this is user error, but I decided to tear the entire inside of the basement out and redo all. This is involving construction of a new outdoor faucet and tank valve box as all the early trailers had a vacuum formed box made of really thin plastic. Mine was broken all to pieces and looked horrible. Also, I plan to reroute the plumbing away from that cold susceptible area right next to the outer hull to a more inboard position where it will be subjected to more between the hulls heating. My plan is also place electric valves in those lines so they can be isolated from the rest of the plumbing and drained if necessary. There will be some effort made to relocate some of the electrical wires in that area.
 5 points
 -
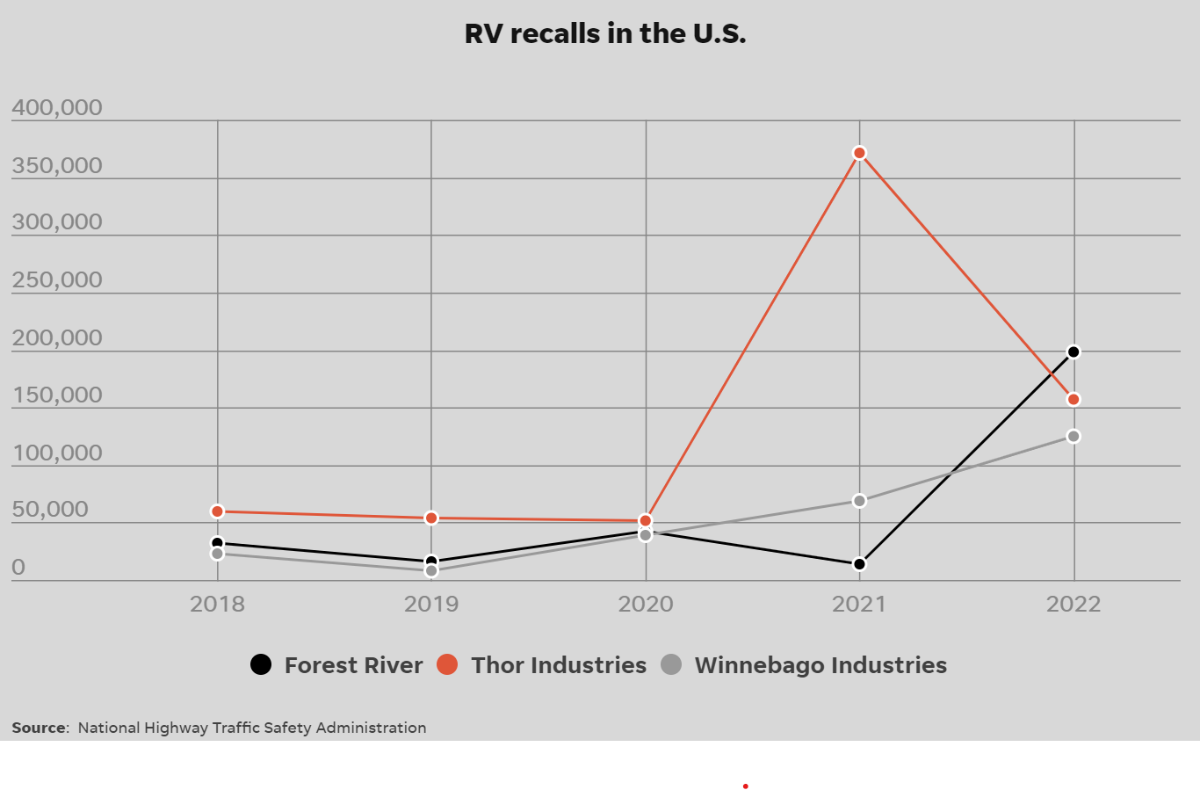
I know people have talked about this a lot on this forum, but this reporting is really eye opening. Untold stories behind Indiana's RV boom: A punishing pace, safety issues and broken bodies: A look at the grueling conditions RV workers endured as companies saw record sales and profits during the RV boom of the pandemic. It is really stunning some of the stories from this investigation. Since this 3 own a huge chunk of all the brands out there this is concerning. It is a long read but covers issues from labor environment to quality of end products. I know it is often said "everything has issues" but this stuff is crazy! Thor with almost 400k recalls in 2021! Really sad to see these companies report record profits the last few years while doing this!
4 points
-
His Oliver was built in 2008-2009. I believe he is the third owner.3 points
-
Congrats on your order! Before you know it you’ll be on your way to Hohenwald to pick up your new Oliver. If you can attend a rally you will meet a bunch of Oliver owners. It seems that we run into fellow owners quite often all over the US. Look forward to meeting you. Mike3 points
-
I don't have lithium batteries but I don't think that has anything to do with leaving the inverter on or off. As a matter of course - I simply turn on my inverter on the rare occasion when I need 110 volts and turn it back off when I'm done. I've just never seen a reason to leave it on since it does burn energy (not much) just sitting there waiting to do its inverter thing. Bill3 points
-
Jason recommends in his 2021 walk through video to turn off the inverter when not in use. Maybe leaving it on will wear it out sooner?3 points
-
I heard Oliver was working on a website to purchase parts, apparel, Oliver branded gift items, etc. Not sure if that was a rumor or not but it sure would be nice to be able to shop online rather then call directly, most often then not you have to leave a message and wait for a callback to order anything. I would love to see some apparel, hats, tees, sweatshirts, jackets, joggers in both men and women styles.2 points
-
Several customers have had this issue so I wanted to try to get it out to everyone. Cookies is something with your internet browser and depending on which browser you use there are different ways to enable, disable and customize the settings. I pulled this from various places for the most common browsers as I am not an IT person but I have run into this issue as well on other sites and had to deal with the frustrations of not getting a website to work when I wanted it to. I hope this helps ENABLE COOKIES Table of contents HOW TO ENABLE, DISABLE, CLEAR COOKIES iPhone & iPad Users SAFARI Browser: https://support.apple.com/en-us/HT201265 Google Chrome Browser: Cookies are on & stay on. No interaction necessary Android Users In the Chrome app On your Android phone or tablet, open the Chrome app . At the top right, tap More Settings. Tap Site settings Cookies. Turn Cookies on or off. https://support.google.com/chrome/answer/95647 Fix problems If you can't use your Google Account and get a message that cookies are turned off: Follow the steps above to turn on cookies. Try signing in again. If you still get the error message, here are some possible solutions. Try each one, then try signing in. Open a new browser window. Clear your browser's cache and cookies. Learn how to clear cache and cookies. Browse in private. Learn how to browse privately in Chrome. Change your browser's privacy settings. Learn how to change privacy settings. For Browsers other than Chrome on Android you will need to visit the support website for your browser. Computer Users In Chrome On your computer, open Chrome. At the top right, click More Settings. Under "Privacy and security," click Site settings. Click Cookies. From here, you can: Turn on cookies: Next to "Blocked," turn on the switch. Turn off cookies: Turn off Allow sites to save and read cookie data. Learn how to change more cookie settings in Chrome. Fix problems If you can't use your Google Account and get a message that cookies are turned off: Follow the steps above to turn on cookies. Try signing in again. If you still get the error message, here are some possible solutions. Try each one, then try signing in. Open a new browser window. Clear your browser's cache and cookies. Learn how to clear cache and cookies. Browse in private. Learn how to browse privately in Chrome. Change your browser's privacy settings. Learn how to change privacy settings. For Safari Enable cookies in Safari on Mac You can change Safari settings so that Safari always accepts or always blocks cookies and website data. In the Safari app on your Mac, choose Safari > Settings, then click Privacy. Deselect “Block all cookies.” Websites, third parties, and advertisers can store cookies and other data on your Mac. Prevent cross-site tracking in Safari on Mac Some websites use third-party content providers. You can stop third-party content providers from tracking you across websites to advertise products and services. 1. In the Safari app on your Mac, choose Safari > Settings, then click Privacy. 2. Select “Prevent cross-site tracking.” Unless you visit and interact with the third-party content provider as a first-party website, their cookies and website data are deleted. Social media sites often put Share, Like, or Comment buttons on other websites. These buttons can be used to track your web browsing—even if you don’t use them. Safari blocks that tracking. If you still want to use the buttons, you’ll be asked for your permission to allow the site to see your activities on the other websites. COOKIES ARE SOMETHING USED BY YOUR BROWSER AND WEBSITES THAT YOU VISIT. OLIVER TRAVEL TRAILERS HAS NO CONTROL OF COOKIES AND CANNOT ASSIST WITH YOUR BROWSER. WE HAVE PROVIDED THE INFORMATION ABOVE WITH LINKS TO CORRESPONDING BROWSER SUPPORT PAGES TO HELP BUT YOU MAY NEED TO CONTACT THE SUPPORT CENTER FOR YOUR PRODUCT WHETHER IT BE APPLE, GOOGLE OR ANY OTHER BROWSER. DO NOT CLEAR YOUR BROWSING HISTORY UNLESS YOU ARE CERTAIN OF THAT STEP AS IT WILL ERASE ALL YOUR BROWSING HISTORY, SAVED PAGES VISITED, ETC...2 points
-
There is no need to spend $300 (!!!) on a Lithionics charger, any name brand lithium capable one will do, I personally would steer well clear of any $50 no-name Chinese clone. I would pick this Guide: …. Blue Smart Charger John Davies Spokane WA
2 points
-
Congratulations on your decision to buy. For us it was difficult to commit. My wife was hesitant to buy because they're expensive, but we did order an LE2 that we pick up in less than two weeks. Your time to pick up will go fast. Maybe we'll see you on the road. John2 points
-
So now you understand why all of us bought Oliver’s.2 points
-
We owned a 34' Jayco Eagle with a single super slide and were somewhat pleased with the quality. I was about a 1996 model and we had very few issues with factory defects. I know things have changed tremendously in the industry over the years, and especially the last 2 years. Finding quality employees is extremely hard these days in all segments of manufacturing and quality control has taken a big hit in most manufactured products. The RV industry apparently has take a very big hit and there't probably going to be fallout for a while. Another reason we were convinced that an Oliver was the best choice we could make with our recent order.2 points
-
We are very excited too, and have a lot to do between now and delivery day. I'd like to build a covered parking space next to our garage before then. But I'm also trying to finish the remodel of our new to us home so that we can enjoy a lot more free time and lower budget during retirement. All this will make the wait go very fast I'm sure.2 points
-
I suspect the initial model years were pretty much one-offs, as construction materials and techniques evolved. That massive aluminum framework in the picture is certainly impressive. Oliver likely used encapsulated plywood for the basement floor because of its superior strength. Ultimately, the virtues of expand PVC became too hard to ignore. What a great clean-slate-start to a uniquely personal LEII this one can be.2 points
-
No one said they don’t work hard or they don’t care. It doesn’t matter that they are a small company, Marketing and Branding is all a part of growing your business. It’s just smart business.1 point
-
Looks like you may be a keynote speaker at next years Owner's Rally. What time slot do you prefer?1 point
-
It will be great if it opens before the holidays ie Christmas gifts!🎅🏼1 point
-
IWBIWISI I will believe it when I see it. John Davies Spokane WA1 point
-
John makes a very good point. During the wait for your Ollie you should view as many videos as you can - some more than once. Visit the Oliver University often. Read what you can here on the Forum and ask questions about anything that is not clear to you. Add all of this to those projects that you already have going on and you will most likely find that all of a sudden you are sitting in Hohenwald and trying to absorb all the information they will give you. Enjoy the process! Bill1 point
-
Welcome to the Family (almost). What are you going to tow your new Ollie with? Have you made reservations for the annual rally yet - if not then I'd suggest that you look into getting a site reserved at Lake Guntersville, AL very soon. Bill1 point
-
I shudder to think why you might need a ladder at the dump station!1 point
-
I guess I should take a closer look at my faucet and tank valve box.. Didn't notice any cracking, but it's definitely the same one as yours and it might be better to change it out now and not have to get back into this a year or two down the road. I will also be putting in valves to isolate the plumbing but will be using manual valves since I hope to never camp in freezing temps anyway.1 point
-
I just saw your other thread, I don't know any heater-guys. I do know of a good fiberglass repair shop in Denver.1 point
-
Thank you for the welcome. We're looking forward very much to the annual rally. Having followed the previous rallies, it just looks like a great time with soon to be friends.1 point
-
Pretty sure that the insulation is original as it goes under the tanks. Looks like fiberglass in the pic but I'm fairly certain that it isn't. Looks and feels more like wool. Edit- It also has the lizard skin spray-on insulation which seems to be everywhere else other than the basement. Plan on adding some Reflectix once I'm finished with the flooring.1 point
-
My money would be on a modification by a prior owner. The insulation is also interesting. Bill1 point
-
Old thread, but.........might help someone. We have 2. The light weight 5 step will reach most of the fiberglass top but not all of the solar panels. I use a telescoping mop to reach. You cannot use this one to get onto the roof. We use it most of the time as it's pretty light. The telescoping aluminum one comes in a bag but weighs 31 lbs. Not easy to get out but is very heavy duty and easily allows you to get up on the roof...use on the awning side as you have something to hold on to. https://www.amazon.com/dp/B09PH8ZPW1/ref=emc_b_5_t https://www.homedepot.com/p/XTEND-CLIMB-12-5-ft-Aluminum-Telescoping-Extension-Ladder-with-300-lbs-Load-Capacity-Type-1A-Duty-Rating-780P/3098970471 point
-
I don’t use a ladder anymore. After being bitten by some weird looking spider in the Amazonian jungle several years ago, I found that I could just crawl up the side of the trailer.1 point
-
Your primary hazard when using the furnace is indeed CO poisoning (from a stress crack in the combustion chamber, which is impossible to predict). You are putting a lot of faith in the two Oliver installed “yes/ no” CO detectors. The one under the galley isn’t going to be helpful, CO is lighter than air. The combo smoke/ CO unit below the attic is good, if it works. I recommend this digital CO detector as a failsafe, it will show you trends, for example, the current level (should be very close to zero, but up to 50 is acceptable in the short term) and the highest reading since last reset. https://olivertraveltrailers.com/forums/topic/6780-how-to-replace-the-propane-co-detector-with-a-gas-only-one-and-a-digital-co-detector/ I have three of these, one in the trailer up high, one in the RV bay, one inside the house (because I have gas appliances and heating). The Rv bay unit shows elevated levels briefly when I have run a car in the attached garage, it has never actually got to an alarm level. Those who camp in milder weather should crack a rear window and open the bath vent half way and not stress too much. If you are running electric heat, there is no worry at all about carbon monoxide death…. Which I understand is quite nasty, but OTH it is quite hard on your family and friends. Symptoms of carbon monoxide poisoning may include: Breathing problems, including no breathing, shortness of breath, or rapid breathing Chest pain (may occur suddenly in people with angina) Coma Confusion Convulsions Dizziness Drowsiness Fainting Fatigue General weakness and achiness Headache Hyperactivity Impaired judgment Irritability Low blood pressure Muscle weakness Rapid or abnormal heartbeat Shock Nausea and vomiting Unconsciousness John Davies Spokane WA
1 point
-
This is really helpful information for those of us storing our Ollies with Pro package in cold environments. I was planning to remove my batteries for winter but am relieved that with shore power and the heating pad on, they can be left in place.1 point
-
I will be keenly interested in the results of your test. My wife and I take delivery of our Elite II with the Lithium Pro Package on November 10. We plan to winterize and store it in an outbuilding when we get back to Idaho in late November. Like you, we have shore power available in the storage shed. I would love to be able to do what the Lithionics Rev. 7 Storage Procedure instructs for their batteries with internal heaters: leave the trailer connected to shore power and walk away for the winter. I do not yet know if that is recommended for Lithionics batteries with external battery heaters. If so, why does Lithionics limit their Rev. 7 winterizing instructions to batteries with internal heaters? For what it's worth, this is what Oliver says about the external battery heater in the Knowledge Base under the topic Electrical Systems: "The heating pad is powered by the on board battery bank in the camper. It is controlled by the lighted switch and an ambient temperature sensor which measures the internal temperature of the battery box, not the batteries. When the switch is turned on and the internal ambient temperature falls to 35 degrees the heating pad will come on and heat up to 135 degrees until the ambient temperature reaches 45 degrees and then the pad will shut off. Once the switch is turned on the light should come on to let you know the system is on. The power passes through the switch and into the temperature sensor that then controls when the heating pad turns on and off." I infer from this language that the external battery heater is 12V, since it is powered by the "on board battery bank." It is my understanding (and someone please correct me if I am wrong), that the Xantrex inverter/charger transforms incoming 120V shore power (or solar power) to the proper voltage to charge the batteries, depending on what the battery "needs" at the time--something in the 13-14+V range. It seems intuitive to me that in cold weather, the shore power connection should keep the batteries charged if they are left on, so the batteries, in turn, can power the external battery heater, which should keep the Lithionics G31 batteries above freezing, enabling them to receive a charge. Logically, that should be how the Lithionics 315 Ah batteries with internal heaters are kept safe, per the Lithionics Rev.7 Storage Procedure. But, I know just enough about electrical systems, particularly the combined 120V/12V systems in an RV, to be dangerous. So, I hope one or more of the electrically-savvy Oliver owners out there will weigh in, and correct what I have said here if I am wrong. I offer one other significant datum. I emailed Lithionics yesterday asking if the external battery heater Oliver installs with the Lithium Pro Package will enable me to safely leave the three G31 batteries in the Elite II battery box connected to shore power over the winter. Reuben, the helpful gentleman from Lithionics who called me in response to my email message, was not sure. But he did advise that one of the KF series chargers Lithionics sells would keep the G31 batteries safe over the winter, in conjunction with the external battery heater installed by Oliver. He recommended the KF12V20DL, which is a 20A, 12V Lithium battery charger. I would really like to avoid removing the batteries from the trailer every year, storing them in a temperature-controlled building and running periodic charge/discharge cycles while the trailer is in winter storage. If just connecting the trailer to shore power is not recommended, then I may buy a KF series charger from Lithionics so I can avoid having to follow the protocol detailed in the Lithionics Rev. 7 Storage Procedure.1 point
-
Story with a happy ending so that's great. In our case, a tech from Xantrex walked us through the analysis of the inverter itself and the remote panel. While our trailer was brandy new in December, both the inverter and panel were a couple of updates behind. The tech emailed firmware and instructions. Took another call for some handholding but all is good. We are three days into a trip and with no problems. It too some time resolving the Xantrex issues but Jason stuck with us and shared a few great ideas and insights along the way. The folks at Xantrex were also super helpful. They helped me figure out how to reset my charge rate to reflect source. I had been having problems when using the inverter on sources other than 30a service including household 20a and my 2000i generator. The Xantrex tech talked my through how to adjust the inverter demand depending on available amperage at the source so 15a for 15a household circuit, 20a for 20a circuit, 18a for little generator, 30a at campgrounds.... They also assisted in setting up specific to lithium batteries: New bulk and float charge rates and an auto cut off at 10% battery vs 50% for AGM. These units ship with factory presets that assume certain conditions (plugging into a 30a circuit and using AGM batteries) so it is worthwhile to figure out how to tweak to reflect how it is actually to be used.1 point
-
We also had the inverter remote panel "20" error. Xantrex determined it to be a bad communication board, after troubleshooting and attempting to install a firmware update did not resolve the issue. While the inverter was still functional, the batteries were still charging, but to use the inverter, we had to get under the street side twin bed to turn the inverter on and off, or to check function. Xantrex wanted us to return the defective inverter to them for repair, which meant at least a two week turnaround and down time, since we would be powerless, unless we recharged the batteries manually. Oliver deemed this solution unacceptable, since we should not have to lose the use of our Oliver for that length of time. After attempting to get a replacement sent to us from Xantrex, Oliver simply sent us a new inverter from their stock and assisted in the swap. Kudos to Jason, the service crew, and Oliver for stepping in and keeping us "on the road"1 point
-
It took me about 8 hours to remove the previous sealant and sign. Guess I was lucky being able to remove the sign without damage to the sign and re-use it. Used several layers of micro fiber cloth under the modified wood paint stir stick tool to help lift the sign preventing surrounding fiberglass damage. Did not see any signs of epoxy under the sign on our 2015 LE2, but the sealant used to install the sign was very tough to remove.1 point
-
Btw, the older coleman cub was more quiet than today's dometic. Also, much smaller for smaller trailers. If you mostly camp at elevation/cool temps/ boondock, I'd let it go til more of the European and Australian units become readily available. We recently replaced our dometic with a houghton 9500 btu, mostly to make space on the roof for our solar panels. Since we run the ac only once or twice a year, to check it out, noise is irrelevant to us . But, I am not dismissing the issue. Most usa rv ac systems are really noisy. Fortunately for us, we've only used rv ac a few times, camping.1 point
-
As an aside, ive said it before. I truly wish Oliver would adopt an applied light. The third tail light has been an issue for over a decade, requiring maintenance and care . It's certainly not impossible, but could be easier. In my opinion. Sherry1 point
-
A new lens cost us something like $30. It was a pain to remove, with the spots of epoxy. Ours already had hairline surface cracks, so we ordered a new one before we began (Remember, our trailer is now 14 years old.) Like you, we're not newbies. We could have cut a new lens ourselves, but thought it easier to order. I don't love the "new" typeface, but, its ok . The lens was a perfect fit in our 20081 point
-
Back to Claudia's third tail light lens question. In our 2008, the lens was attached directly to the fiberglass with some type of tough marine adhesive sealant, I'm guessing probably 3m 4200. We were able to remove that with a heat gun on low, from the inside, and a putty knife, working carefully. Unfortunately, a couple spots were held in place with a dab of epoxy, which was much tougher. Yours is likely held in 3m4200, or something like that. I know you've seen my thread on what we did, using butyl and stainless screws, but that's an experiment in progress. If you can get the lens out in one piece, (we couldn't, because of the dabs of epoxy), you'll want to clean it and the surrounding fiberglass thoroughly, and apply and seal with a compatible marine adhesive sealant. If we had gone that route, my choice would have been loctite marine fast cure, or Dow 795 (dowsil), as they're compatible with fiberglass, polycarbonate, and most plastics/acrylics, and easier to deal with and remove later than silicon or polyurethane. I don’t know if the lens is polycarbonate or acrylic, so I'd want a sealant compatible with both.1 point
-
Wow that does seem like a really long list, and I'm sorry to hear of that many problems. Our 2019 EII has had one issue with the electronic door lock (which was simply shipped as an overnight fix) by the maker of the Lock. We also had an issue with the Dometic Awning which needed a re-adjustment, that was done at a local RV shop under Dometic's warranty. Other than that we've been having a great experience. We recently upgraded our batteries to the Lithionics 315GTX and are on the road for a month so I'll report back after that month long trip. Galway Girl - Hull 5051 point
-
I'm guessing "obnoxious amount of Gorilla tape" is not something that came from the factory, so this must have already been an issue for the previous owner.1 point
-
Just so you guys know..I went ahead and peeled the insulation back from the interior rear brake light and ScubaRx is the winner winner chicken dinner. There is definitely moisture back there! I'm not sure exactly how to take it apart but I took the obnoxious amount of Gorilla tape from around it and am studying how it's fixed in there. It looks like it slides out..but I'm not sure. I'm off to buy some Fllexseal tape and figure out how to proceed. If you have any tips ..please keep them coming! Oh, and just so you guys know, I DO have EZ rv rain gutters over every window..might try to add some to above that brake light! Thanks guys/gals! Claudia1 point
-
The new to you Oliver- is not new - and seems to have been mothballed incorrectly. I too have had issues - with our 2018- but overall I have gotten to the bottom of them all. Leaks - can be tough - it is a process that requires systematic trial and error. My windows leaked - but it was really just a design issue - I make sure the channels are clear, have put the gutters over them - and the best corrective action - I enlarged the weep holes to about twice the original size. I am now pretty much leak free - other than direct higher pressure spray - spray hose or wind driven rain. I regularly check the dreaded rear light and after a good wash - for any moisture in under around the cushions and such. I am good to go for last year or so. While you are searching - put some thirsty towels under the windows - helps with discovery - and such. As for you water inlet and flow complaints - mine work very well - I must assume yours are just restricted due to prior ownership letting bad water sit for to long - although I just don't understand how that would happen with normal h2o. I am not certain just bleach is the answer. As for the AC - it sucks - as does mine. Dometic is slang for POS. The only solution is replacement with the newer designs. Yes the cost seems to imply perfection - but as we have all found - that is a pipe dream. A perfect Casita - to me- well - nevermind. Good luck learning about YOUR Oliver- they all seem to have their own personalities. RB1 point
-
On the positive side, you are getting a crash course on some parts of your Oliver. Steve suggested some work in the attic, I’ve had that insulation out several times for various projects. Learning where all the possible leak location are, where the weep holes are, etc will come in handy in the future. Every time I have a maintenance issue I look at it as another short course in my Oliver expertise. Plus, all of your Casita experience will be invaluable. Pretty soon you won’t be the question asker here, you’ll be one of the professors. Mike1 point
-
Purchased our LE2 Ollie used, it is our dream retirement camper, too. Our Ollie's "Rear Oliver Sign" leaked and the top of the dinette window leaked, too. The dinette window leak was from from the exterior porch light above the window. The light was removed and wire holes in the hull sealed along with top and sides of the old style exterior fixture. Also drilled a drain hole in the bottom of the old style light fixture. No more leaks in that area! 👍 Old style porch light fixture: The following photo shows where rear Oliver LED light sign leak was dripping between hulls. Water traveled between the inner and outer hulls coming out of the bottom left side of the rear window on the curbside mattress. Removed the Oliver lens and cleaned out all of the old sealant. Resealed Oliver lens and no more leaks! 😁 All campers will eventually leak, good thing about the Oliver, when a leak is repaired there is not any wood damage to worry about!1 point
-
I had this exact problem. It took me three years, several trips to the factory and constantly blaming the wrong thing to find and finally fix the issue. It wasn't the weep holes. I'd bet a month's salary it's the high tail light leaking and it's unlikely you'll see a hole in the caulking from the outside. In order to find the leak, you'll need to tear out all the insulation that's glued inside the upper rear cabinet. This is no big deal, it's just sprayed with adhesive and pressed into place, it will go back up although you may need to respray it. Then you need to remove the inside cover over the light itself. Wherever the water is entering it is running down the inside of the outer shell and then between the shells until it gets to the top of the window frame. This is below your level of sight from the upper cabinet. From there, it runs around the frame and drips out the bottom corner of the window on the inside and runs down to the top of the belly band. This allows the water to run to either side, depending on which side of the trailer is lowest. If it's still raining and hard enough, the leak will be obvious, if not, you'll need someone outside with a hose. Also, observe the backside of the adjacent marker lights, they can provide an entry point as well. Here is a photo I took nearly seven years ago during my quest to find a solution. Feel free to duplicate if you deem it helpful.
1 point
-
Sorry you're having these issues in a 4 year old trailer. Tey putting a layer of blue shop toweling in the attic. The leak you are describing is almost always a third tail light that has lost some of its seal. The rainwater finds its way down. Barring that, put some clear duct tape around the light. If the leak stops, it's the light lens. If not, try some over the top of the rear window. Work your way down, and around. It's also possible that the bedding or caulking for the rear window has failed, and never been renewed. The weepholes aren't very big, for the size of the window. We installed ez rv gutter years ago, and it really helps to divert water from the window/weepholes.1 point
-
I use this on the road and while at home to do stuff up top. We carry it in the bed of the truck. I cut a pool noodle to fit the top couple of feet of the ladder where it rests against the trailer. https://smile.amazon.com/gp/product/B06XTBXTXG/ref=ppx_yo_dt_b_search_asin_title?ie=UTF8&psc=11 point


.thumb.jpg.e34bf01ef7f7d5e99ad31856d45afbeb.jpg)


-
Recent Achievements
-
")


")


")


