Leaderboard


Popular Content
Showing content with the highest reputation on 02/02/2023 in all areas
-
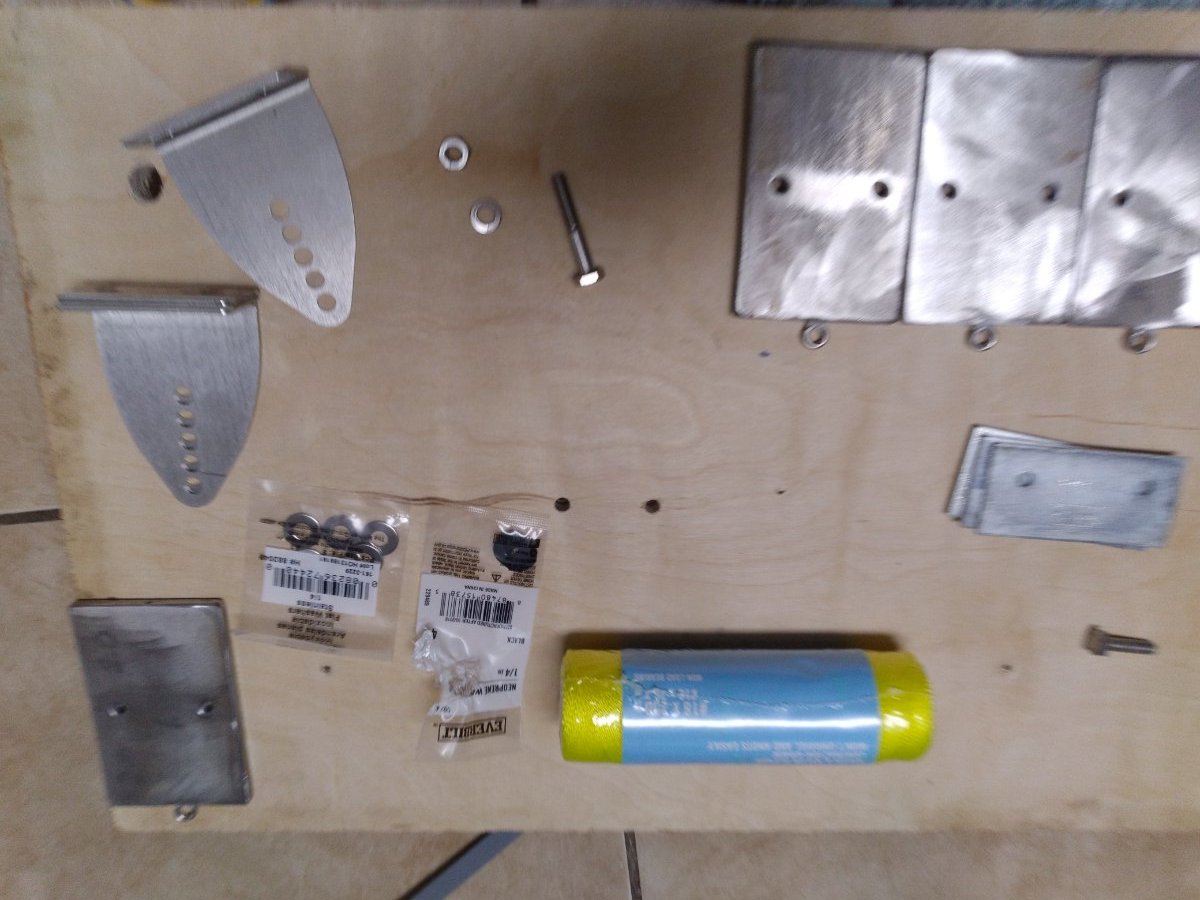
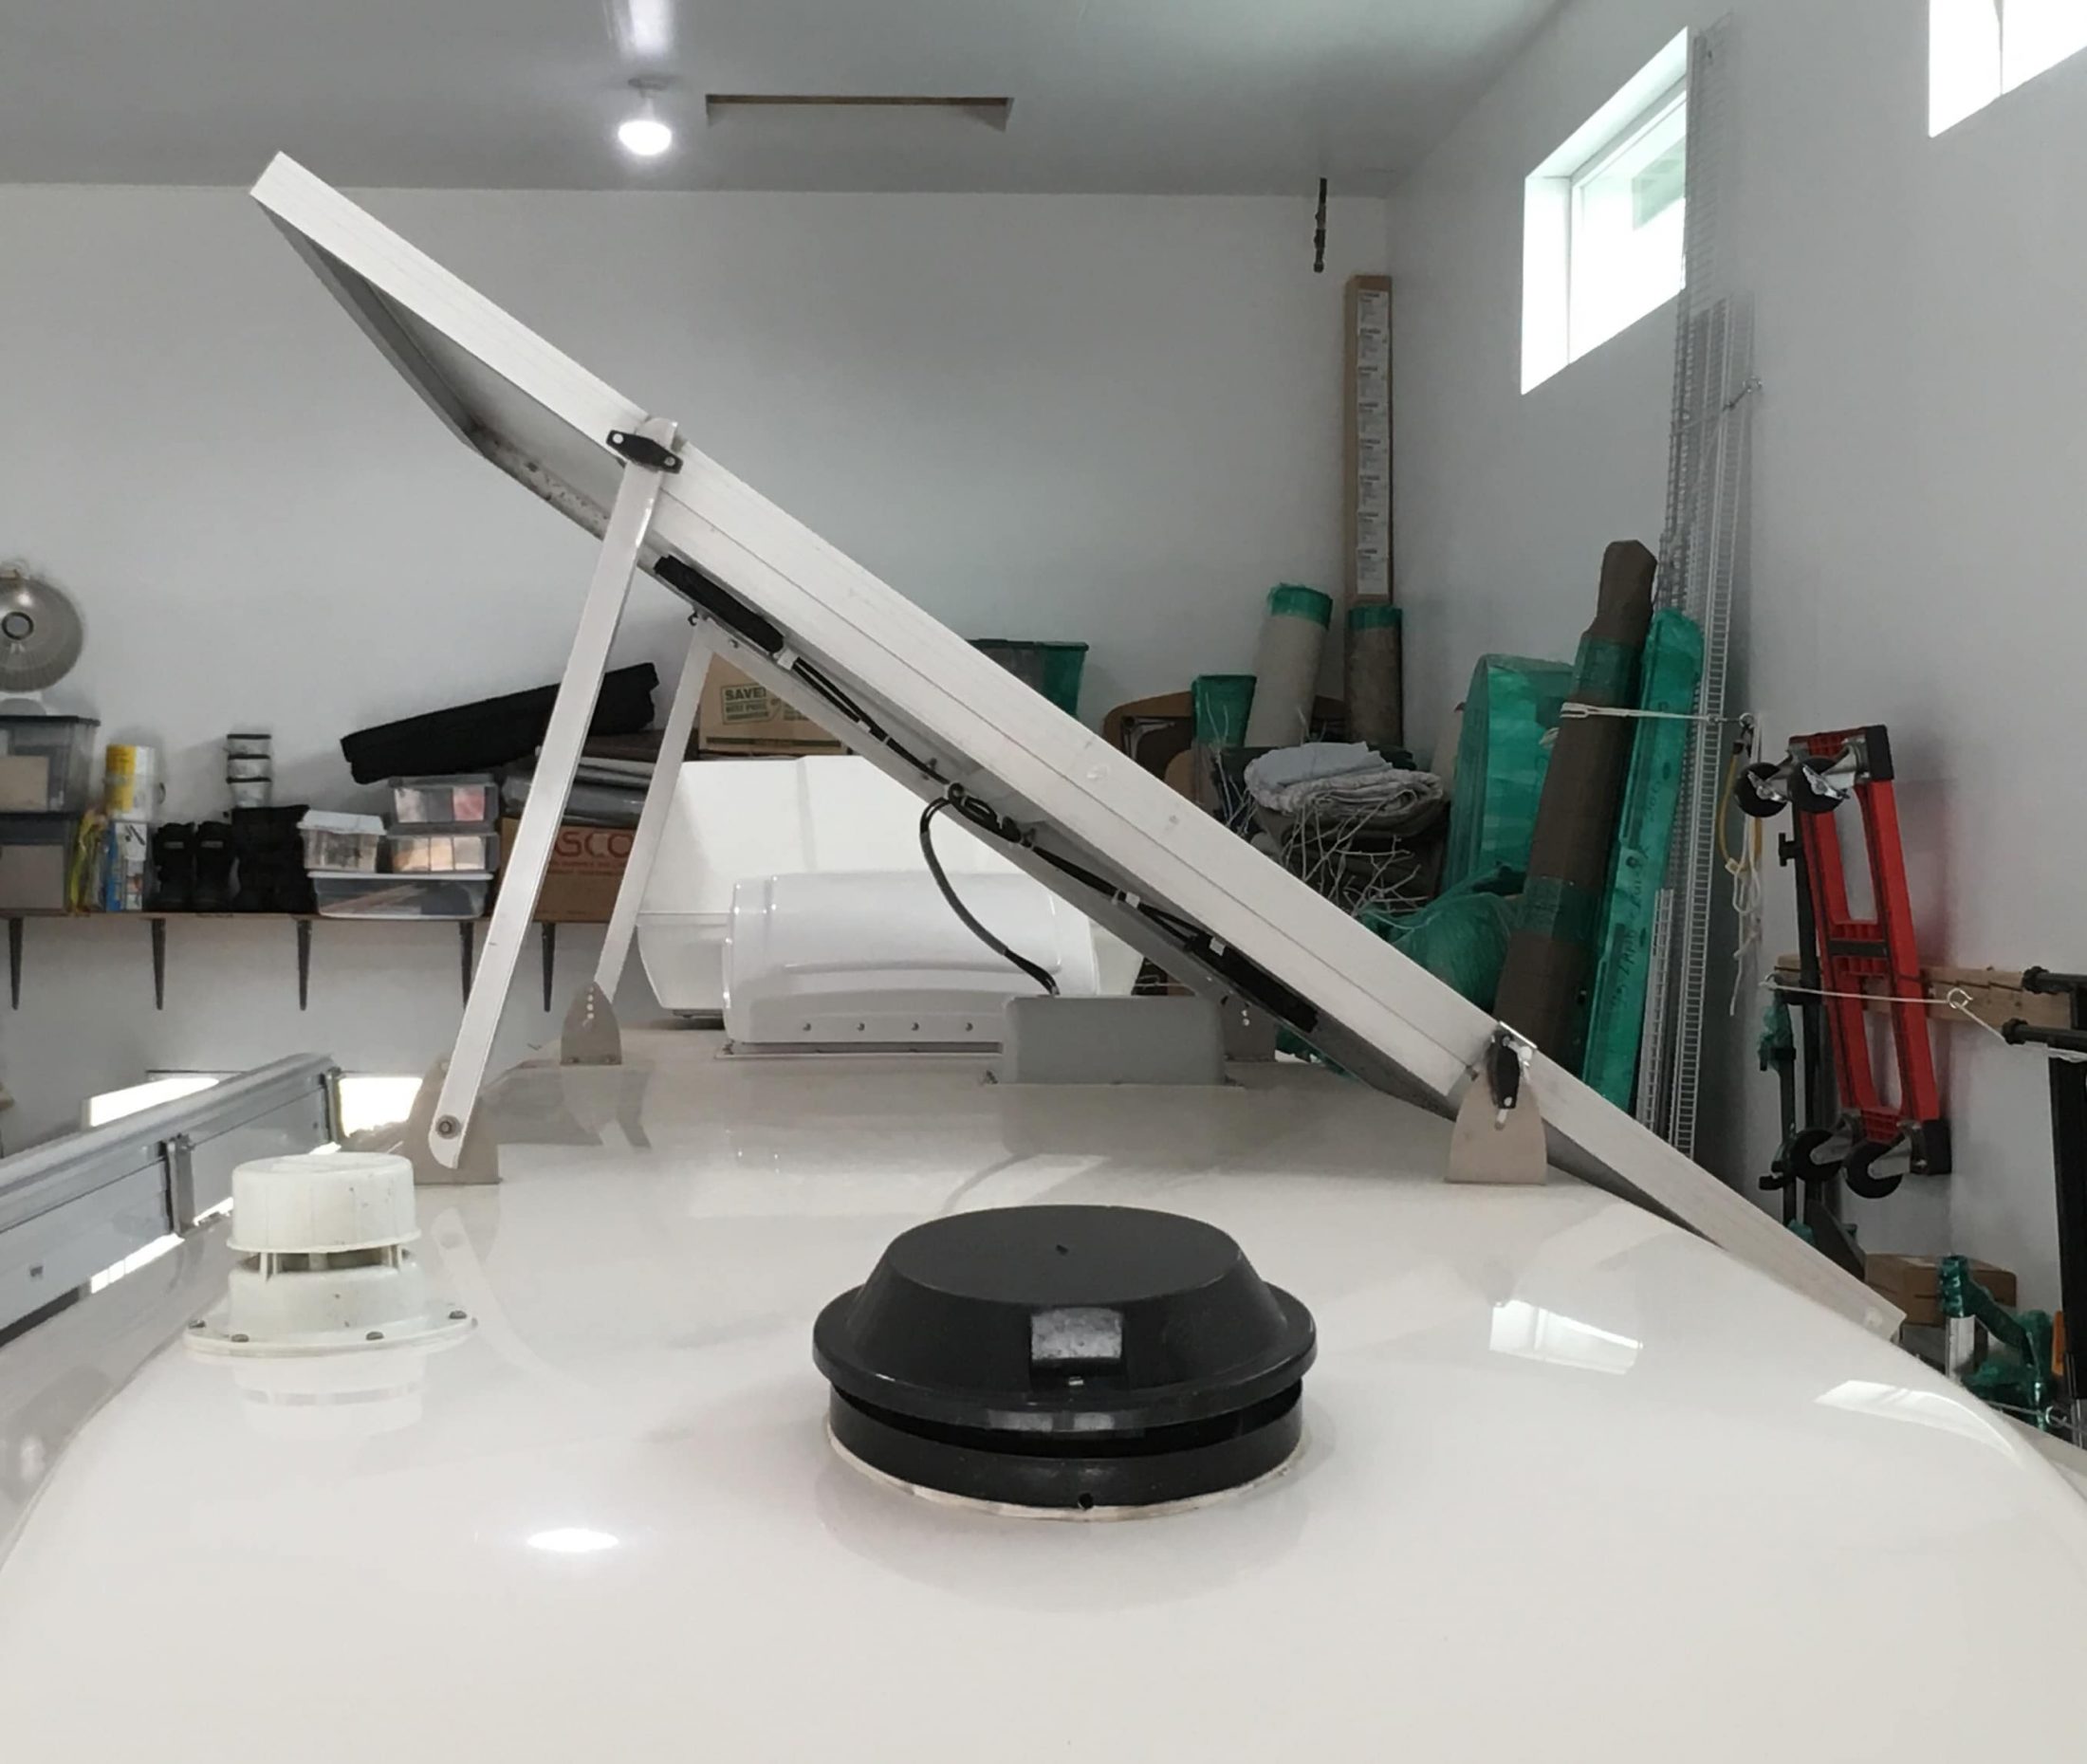
Yes, it is possible to add solid metal mounts between the hulls without cutting up the fiberglass, I know because I did it. My trailer came stock with the solar panels already attached. However, back in 2021, my solar panels got damaged and the mounts got bent. Thankfully, it was only the solar panels and their associated mounts that got damaged; the fiberglass was perfect. I attempted to take off the mount by unscrewing the bolts, but they just turned in place. I would have hoped the factory would have permanently attached the nuts to the underside plate, but they did not. I called the factory and spoke with someone (don't remember who, it was almost two years ago though) who advised the only way to get old mounts off was to either cut into the inner fiberglass hull to get a wrench on the nut, or to try and cut off the bolt from the top. Furthermore, I was advised to attach new mounts with hardware, I would still need to cut into the inner hull. I detested the idea of cutting into the inner hull, and so I found a way around it. I took off the MaxxFan which is only held on by four screws to its mount. This allows access to view the area between the hulls. You'll notice when you do this, the factory epoxied a plastic PVC spacer around the perimeter of the MaxxFan. You'll need to drill a hole in this and it will allow access to the space between the two hulls. I bought a cheap borescope off Amazon with a long extension wire. This allowed me to view the nuts and plates used by the factory. I used a piece of metal bar and duct taped a wrench to it. I was then able to insert the metal bar and carefully manuever the wrench around the nut. Then with a friend's help, he unscrewed the bolt from the top side. I had put some duct tape around the bottom of the wrench which thankfully stuck to all 8 nuts, allowing me to remove them (I put new duct tape on each time. Now, on my hull #220, which is a 2017 model, the factory had not permanently attached underside plate. In fact, they didn't even use a high quality set up, they only used some Fiamma awning metal plate spacer for each solar mount; it looked terribly pathetic, and they weren't even epoxied to the underside of the outer hull. They just fell down when the nuts were removed. To remove them, I duct taped a magnet to my metal bar and dragged them out one by one. Now, the dilemna was how to attach the new solar mounts without cutting up the inner fiberglass hull. Here's what I did: I sourced some 410 stainless steel that was a 1/4 inch thick. The factory had used screw and nuts for 1/4 x 20 threads, which results in a nut thickness of around a 1/4 inch. I used 410 stainless steel because it magnetic which would allow me to use a magnet to grab it if it wasn't in the right place. I cut the stainless steel to around 2 or 2 1/2 inches wide and around 3 to 4 inches long. This mimicked the Fiamma metal plates the factory used, except my steel was thicker and stronger. I then paid a machinist to drill and tap the metal plates for 1/4 x 20 threads. I also added an eye bolt and put a string through it so I could easily drag the plate back if necessary. You can see the plates in the above picture. You can also the Fiamma plates the factory used on the middle right of the picture. To get the plate in position between the hulls was tricky to figure out, but ended up being easy to attach once I figured it out. I put two pieces of string down each hole for each mount. Prior to putting the string down, I attached a piece of metal. I then inserted my magnet on the metal rod, which connected to the metal on the string, and I was able to drag the string to the opening I made at the MaxxFan. I then threaded the string through the holes in the metal plate. I then dragged the strings from the top of the outer hull, which put the plate right underneath the old holes for the old mount. To attach the mount, I took a 1/4 x 20 threaded brass screw and drilled it out so it was hollow inside. I then put the string through the hollow bolt. While pulling tight on the strings, I threaded the hollow brass bolt into the stainless steel plate. Once that was attached, I used screws and attached the other side of the plate. I then removed the hollow bolt and attached another regular bolt. I know I'm not describing this very well, but I thankfully made a few cellphone videos when I did it back. I never bothered to make it into a youtube video, but I have Saturday and Sunday off, and I'll turn my old footage into a quick clip and upload it Sunday. Once you see the video it'll all make sense. The end result I was able to attach new solar panels and mounts, with underlying metal plates, all without drilling into the inner fiberglass hull like the factory told me to do. The only cutting I did was to the spacer around the MaxxFan, which is easy to repair and is completely hidden by the MaxxFan trim. Anyway, I'll post the link to my Youtube video on Sunday.
 8 points
 -
I researched this extensively when I bought my LE II back in 2020 and confidently claimed a 30% tax credit for the cost of my solar system option (including inverter) from Oliver plus the $2800 I spent on four LiPO4 batteries (Oliver did not offer a lithium option at the time). The total tax credit was just over $1,800. As I remember, you could not claim a tax credit for lithium batteries by themselves. The batteries had to be purchased and installed at the same time as the solar system and inverter to claim a tax credit on the batteries. The rules may have changed since then.5 points
-
Congrats, the next two months will fly by! We will be in Hohenwald next week taking delivery of ours and are excited to be joining the Oliver club!4 points
-
Minimalists!😜
3 points
-
Bryan, we have an LE2 and find it's easier to back up than our smaller tent trailer that we had before. The shorter the distance from the hitch ball to the tires of the trailer, the harder it is to back up. At least that's what I experienced. I think you made a good choice. Ours tows very easily behind our Ford Expedition. Congrats on your upcoming trailer. John3 points
-
I suggest that you investigate flexible panels that can be bonded directly to the gel coat. There are pros and cons - such as they transmit heat to the mounting surface and they can scratch - but they are WAY lighter than flat glass panels , don’t look bad, and don’t create any aero drag. I believe they have been obtaining better efficiency ratings in the last few years. https://news.energysage.com/flexible-solar-panels/ At least run that by Oliver Service to get their feedback. I love my panels but IMHO they are beyond ugly on an Ollie. John Davies Spokane WA3 points
-
I remember getting to the production line. Back in the day when there was more "free" time the folks at Oliver would sent pictures of the new baby rolling down the line. In hind sight I'm not so sure that this was a good thing - is it a boy or a girl, what do you think the color of its hair or eyes is going to be, will ours have all four tires the same, is it really smiling at us? The anticipation is bad enough without also "expecting" pictures every couple of weeks. Now's the time for that final prep work to start - trip route, reservations, one or two nights at the Oliver camp? Sort through things into piles of what to bring - only to be sorted again when I realized that all of what I wanted to bring would not fit in the tow vehicle. And then sorted again when I realized that I would not be taking a 6 month trip. What tools? What cloths? What paperwork? What cleaning supplies - sure its a new baby but they do tend to soil themselves so quickly. What did I do with those checklists? Did I call my insurance people with the VIN - what did I do with that "proof of insurance" card they gave me? OH! Did we remember to pack the checkbook? 😇 All sounds fun and exciting! Bill3 points
-
Hi Brian and Sondra, Chris and Stacie Neuhaus here from Indiana. Exciting to know they are "breaking ground" on your new home away from home. I know you guys must be feeling the excitement build. The folks at Oliver are a joy to work with, almost like family. They make the whole experience a lot of fun. We are feverishly working on a total remodel of a very small retirement home we bought a couple years ago. The plan is to live in a very small house out in the country that will require minimal upkeep and free up time for travel and exploring seasonally. I'm getting to the end of the project just in time to move in and anticipate the arrival of our Oliver. We ordered our LE2 in November and have a start date in early March and delivery is scheduled for April 19. We struggled for a number of years ourselves with the type of travel trailer we wanted for retirement, but in our case we thought we needed room for toys. We've become more realistic in the last year and finally knew the LE2 was really perfect for the type of travel and camping we wanted to do during retirement. Thanks for sharing and we look forward to crossing paths and getting to know you and everyone in the Oliver family in the years ahead.3 points
-
Those of us that occasionally or frequently encounter very cold weather when pursuing our passions with our Oliver can benefit immensely from the experiences and insights of others on this forum. Those that never do, or that always winterize, probably don't care as much, especially those that never boondock. Let's face it, if you have full hookups, you can put two electric space heaters in the basement and run the propane furnace at 70 and not worry. Absent shore power, cold weather can be stressful. I would like to see the Moderators expand the category of "Oliver Boondocking" and call it "Oliver Boondocking and Cold Weather Camping" so those of use that do find ourselves in frequently in cold weather and unwinterized can share our questions and insights in one place. I have spent over two years trying to figure out the eccentricities of the Oliver when it comes to balancing temperatures throughout the trailer in cold weather and I wouldn't trade my Oliver for anything else. However, what I have learned or not learned can't be shared in one giant post. And I haven't figured it all out either. After two years of moving remote wifi temperature sensors around to different places, changing out the thermostat, and opening different pathways for return air to enter the basement, I have learned a lot. Importantly, I have come to the tentative conclusion that the biggest reason that the basement temps can drop so far below the cabin temp in places is due to the fresh water tank. Heat travels through water 20 times faster than it does through air. Conventional wisdom would say that the fresh water tank would act like a hot water bottle to help keep the basement warm. However, the fresh water tank in the Oliver appears to sit on a rubber mat on the floor of the basement and that creates a direct coupled path for the heat in the water tank to be lost through the bottom of the trailer at a rate up to 20 times faster than heat is lost through the rest of the shell. This sucks heat out of the basement faster than the furnace can replace it. Even a small air gap under the fresh water tank would slow this heat loss dramatically. Unfortunately, insulating under the fresh water tank is not an option for us, although Oliver should consider doing something like it in future builds. The rapid heat loss from the fresh water tank could explain why the basement temperatures drop so much compared to cabin temperatures, unless the furnace runs constantly. I am wondering if it would help to add 2 inch or 3 inch rigid pink foam panels to the underside of the trailer between the ribs of the frame to reduce the heat loss from the fresh water tank. Am I crazy?3 points
-
Last I checked, an RV is considered a second home if you live in it at least 14 days of the year. You can claim the cost of solar generating equipment (the panels, controller, and wiring to the batteries) but not the storage batteries or any non-solar charging equipment like the converter/inverter. (You can only claim the batteries if they can only be charged by solar and have no provision for charging by shoreline, etc.) I asked OTT to send me the dollar value of my panels, controller, charging wiring, and installation and they did so. This is mostly from memory, so check further before committing.3 points
-
That’s what I’m talking about.2 points
-
It goes surprisingly fast. Nice to get yours in the Spring so you can start using it asap. We got ours in November. John2 points
-
Woohoo! Don't use up all the parts. Ours is six days behind you. 😉 It's gonna be a long 50 days!!2 points
-
Chukarhunter I think that there are three things in your post. 1. While I don't normally camp in the winter season, I have encountered winter conditions during the "summer" months. 80 degrees during the day and mid to high 20's and snow at night while at altitude in the western mountains. By having a category called Boondocking it includes (hopefully) all those things that one might experience when camping off-grid, including cold weather. 2. You have an interesting thought on the location/insulation of the fresh water tank. Since it is a distinct possibility that your suggestions in this regard would not be seen here by the appropriate people at Oliver, have you sent an email/letter to Oliver specifically suggesting this? 3. I too have thought about the addition of foam panels on the underside of my Oliver. If it weren't for the vanity of dealing with how it might look, I probably would have already tried this mod. I have stuffed insulation into just about any place I could think of and/or reach between the two shells though. There is a YouTuber named "Slim Potato Head" that has a single shell molded fiberglass camper. Last year he did this mod to his camper and the finished product really didn't look too bad. In any case - I'm a big fan of more insulation from both heat and cold. Bill2 points
-
I’ve looked at that one. I’ve got regular toilet in my Ollie but have a truck camper on order for smaller adventures and was really intrigued. Good to have so many options out there.2 points
-
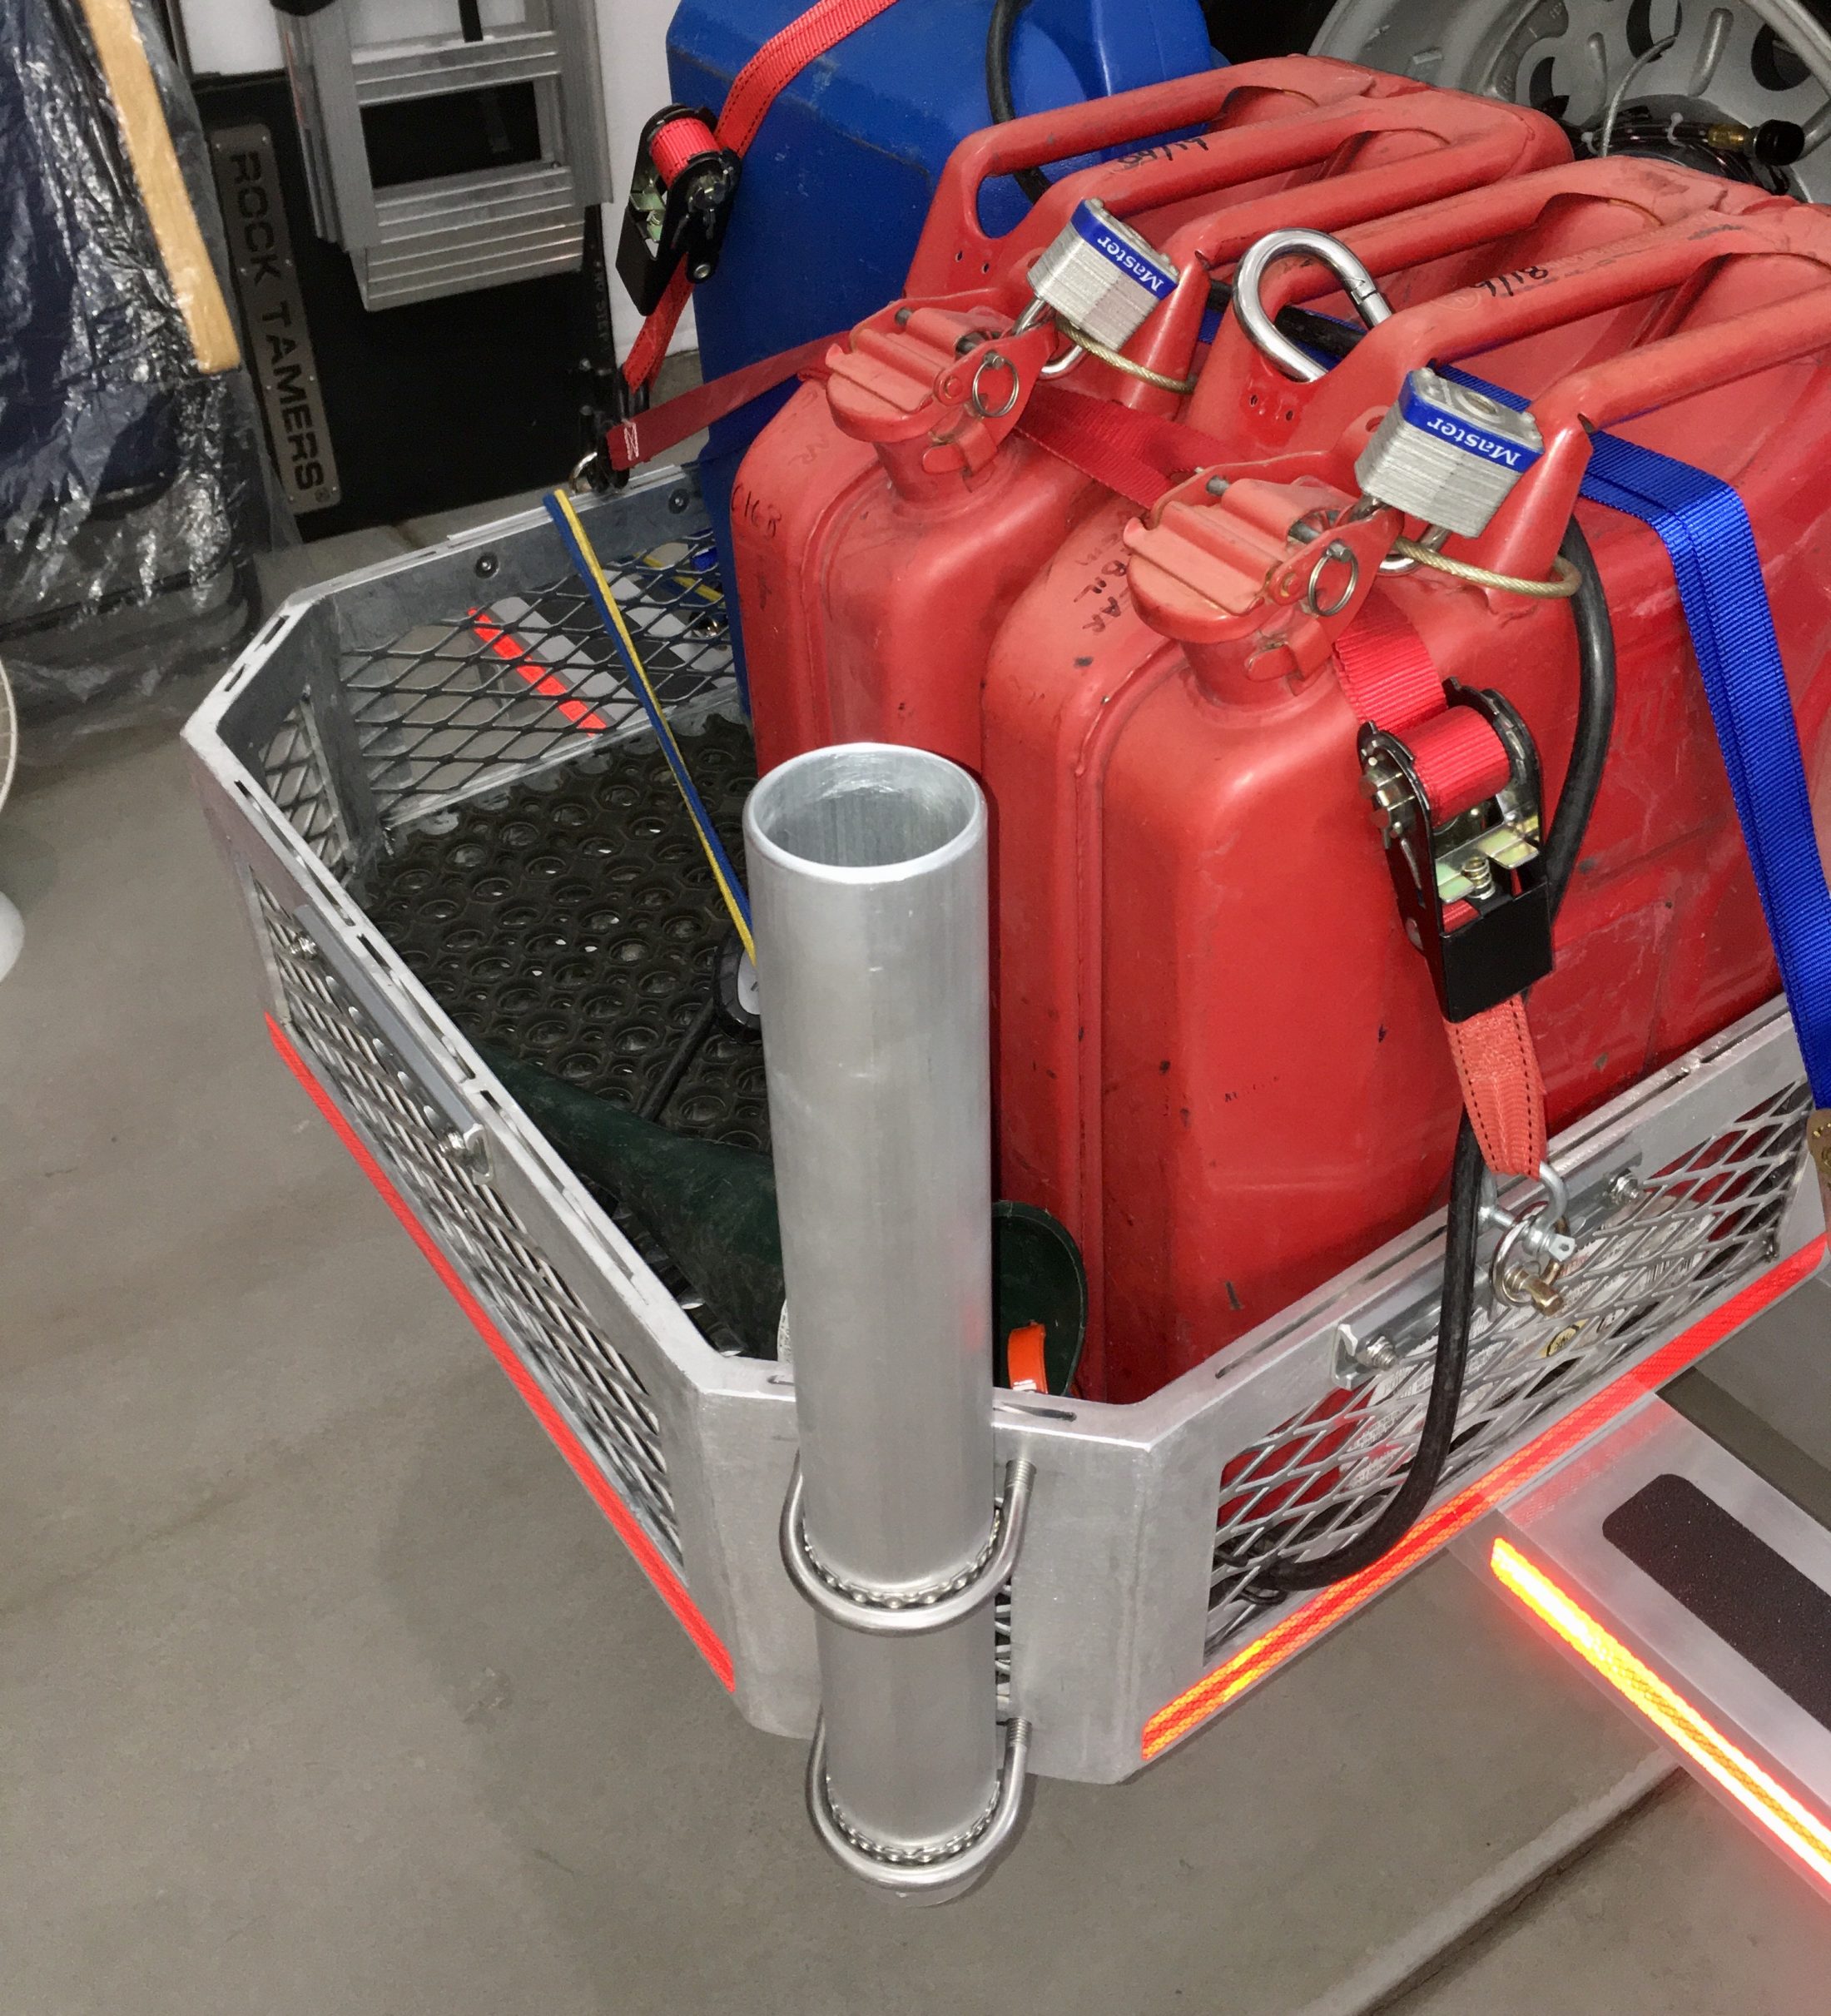
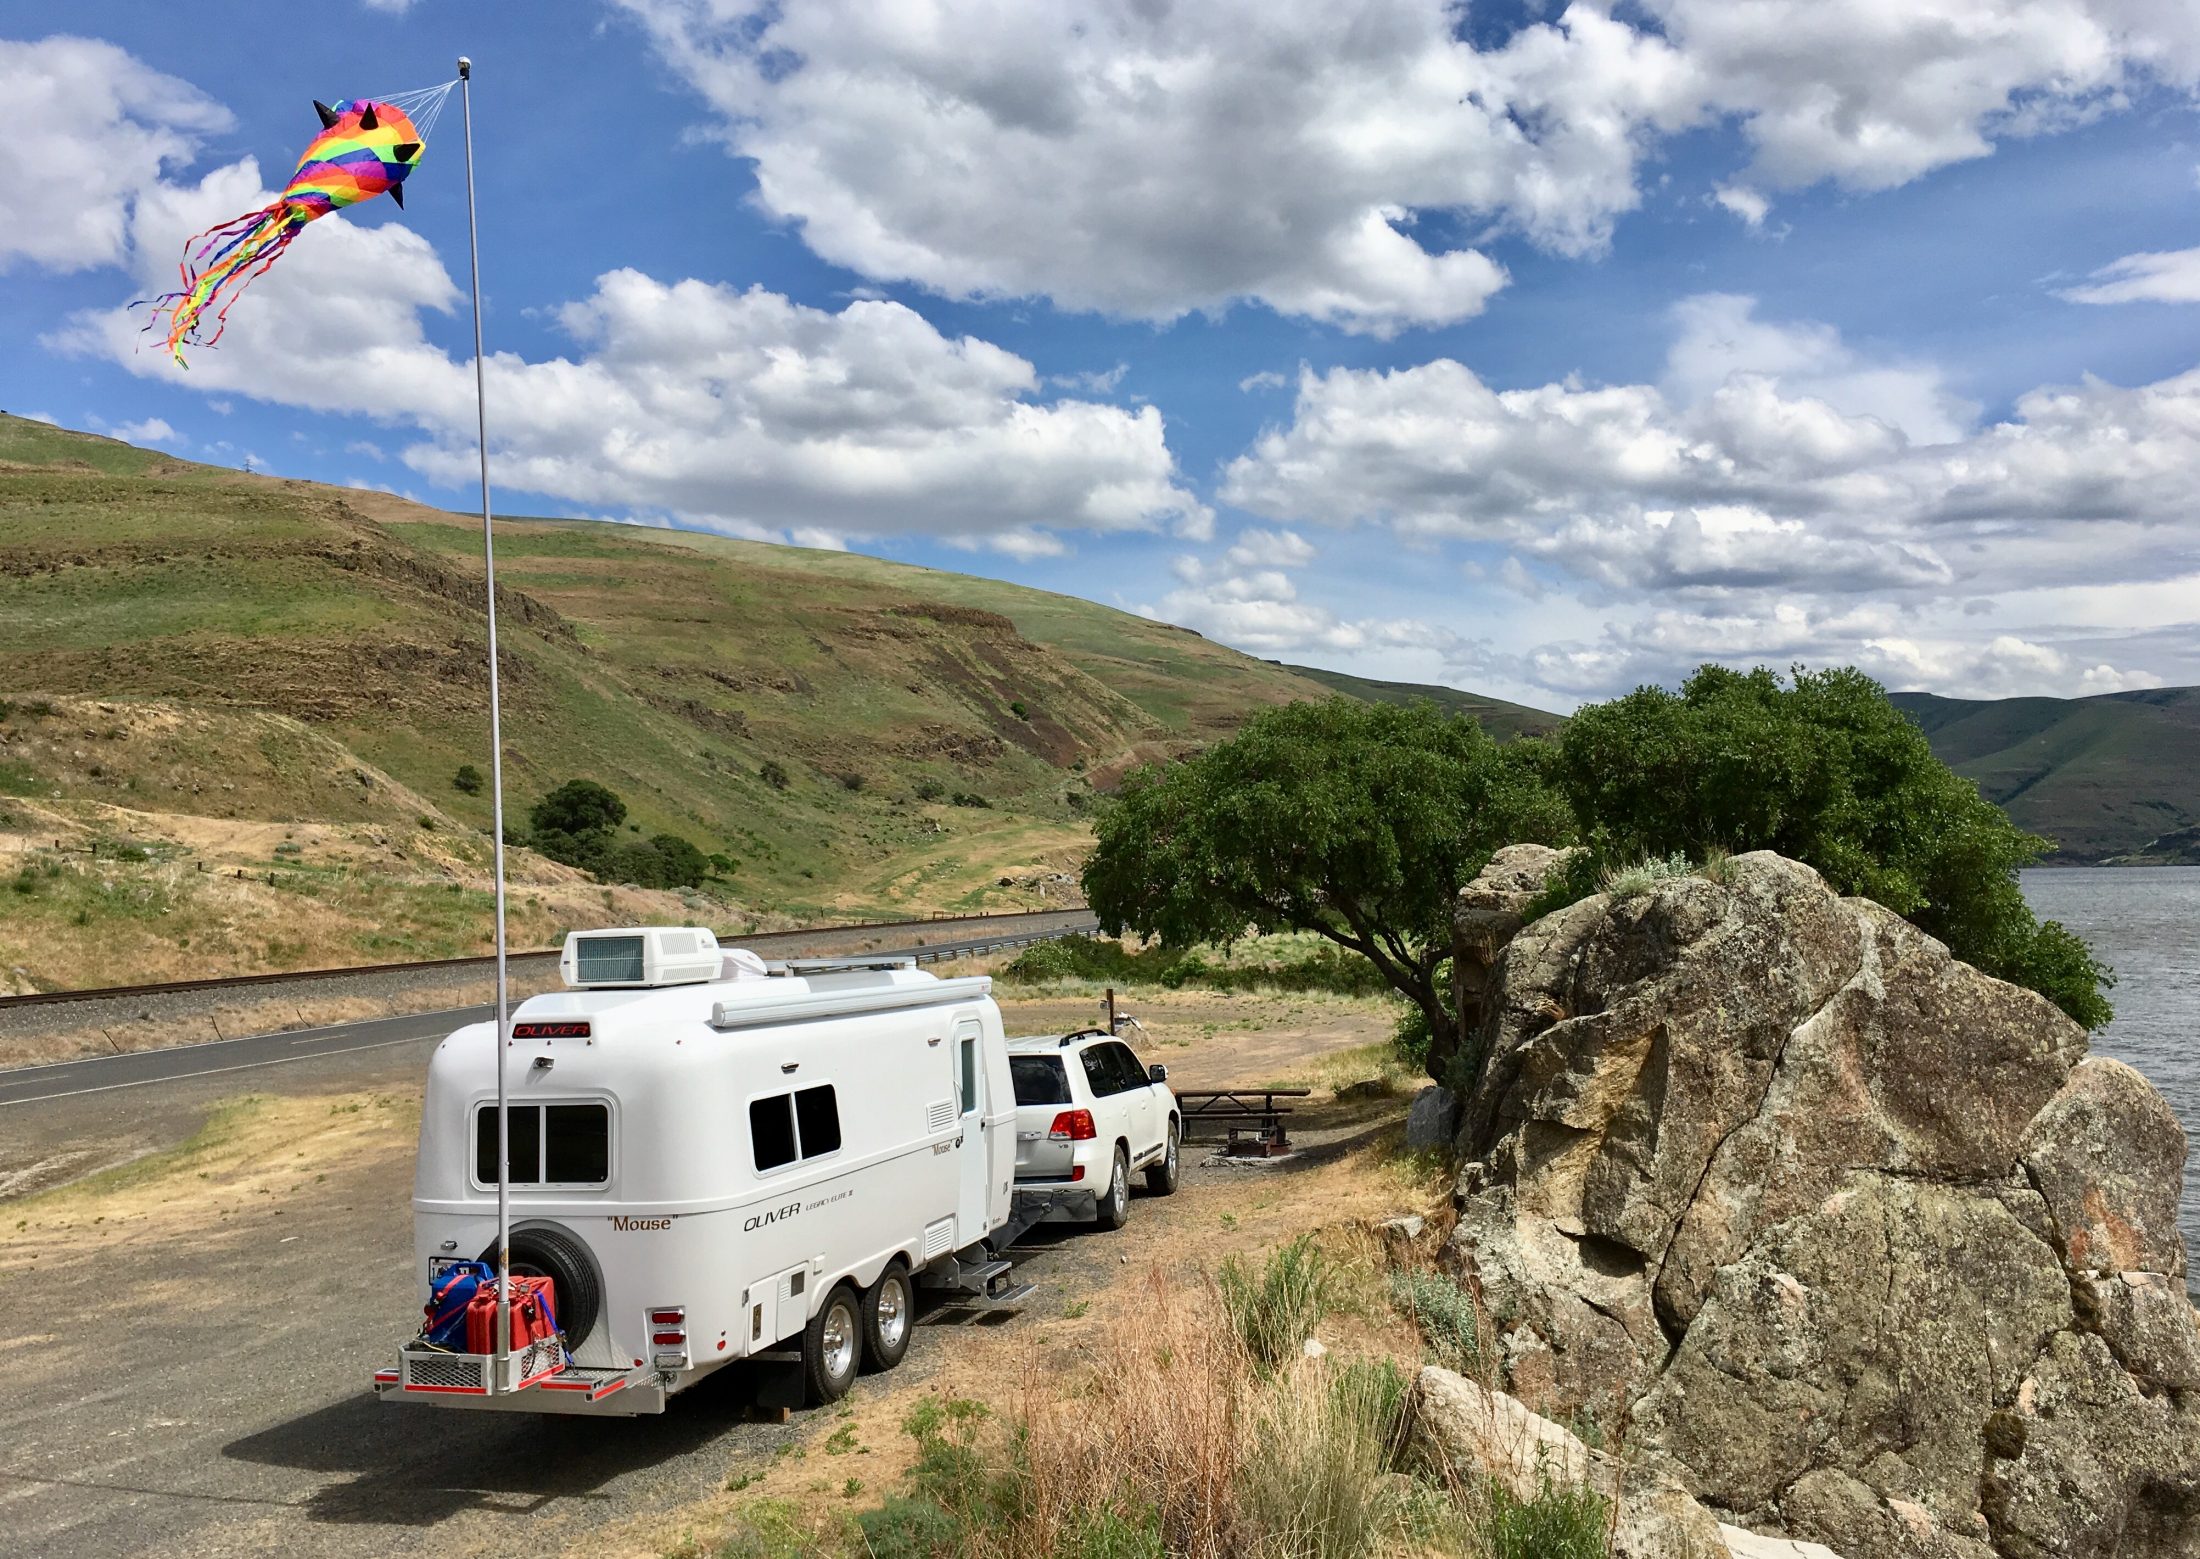
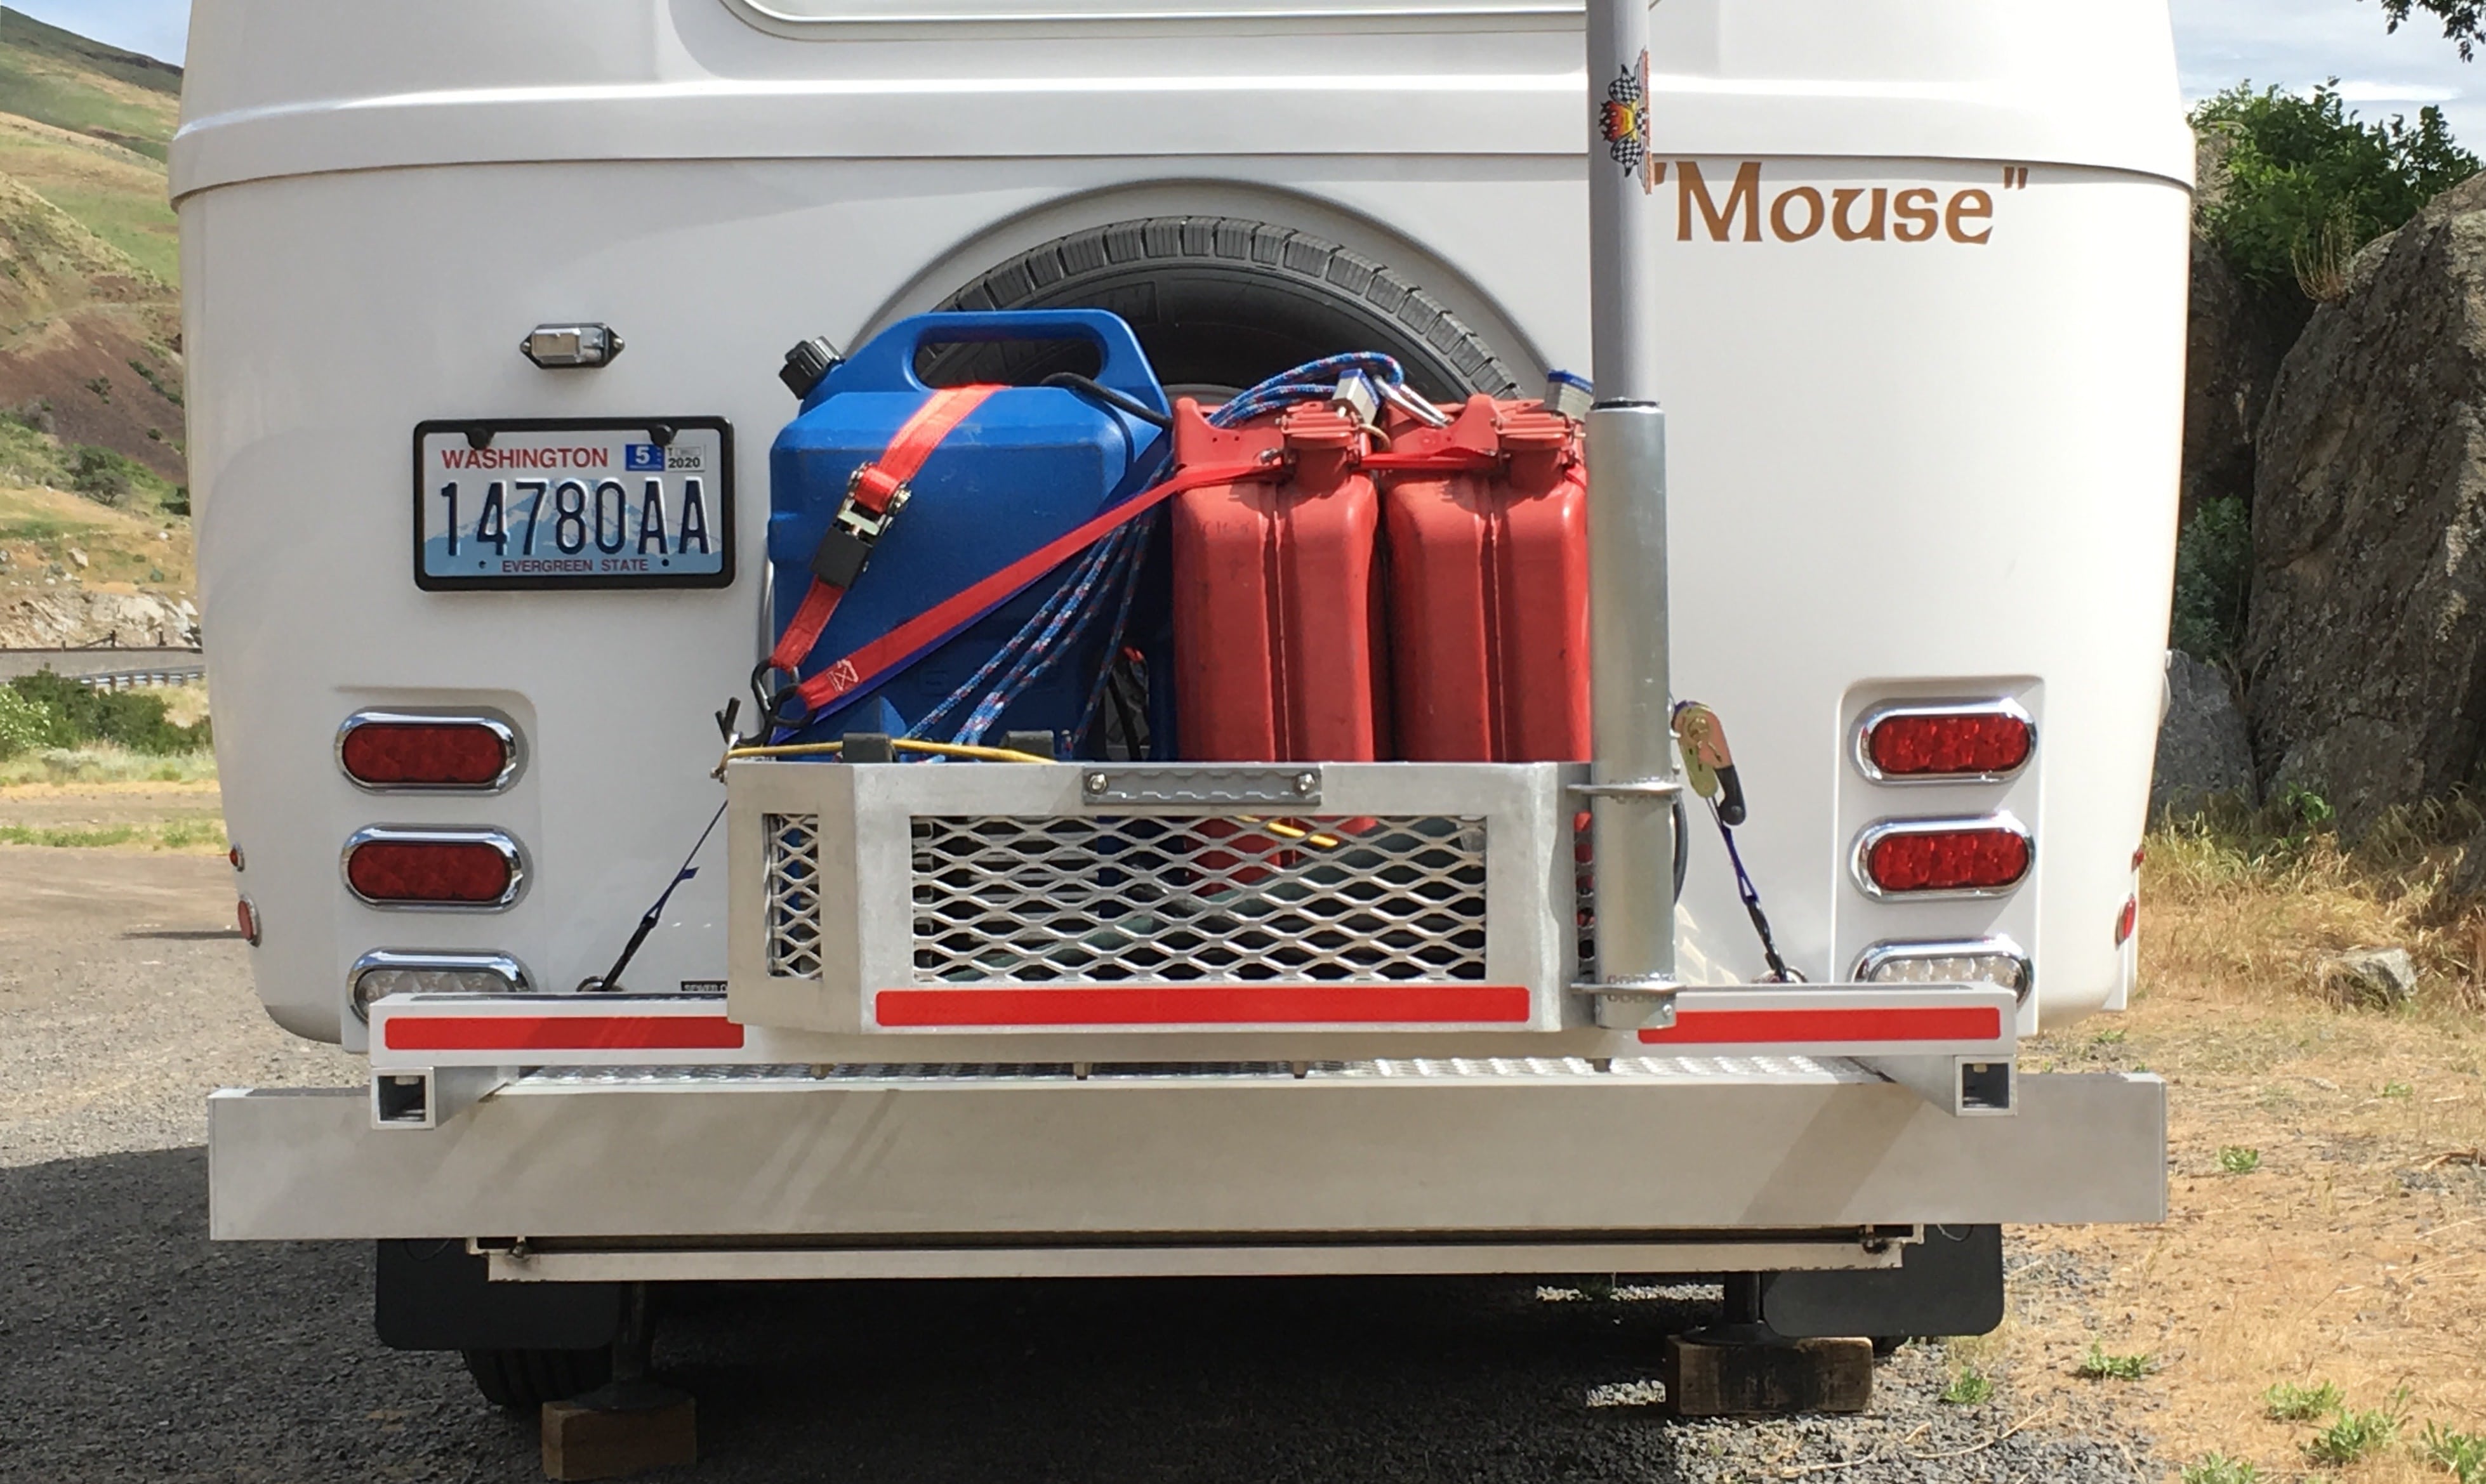
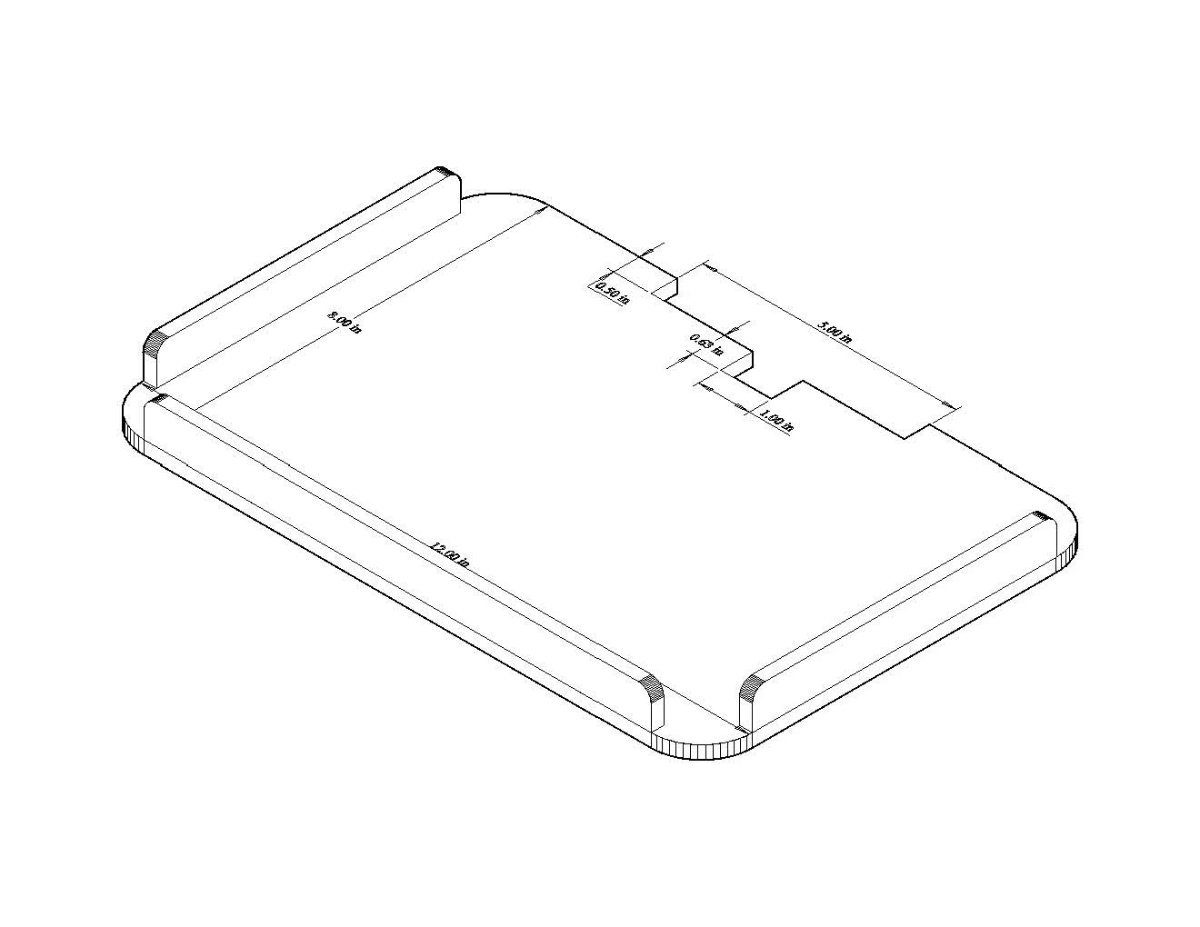
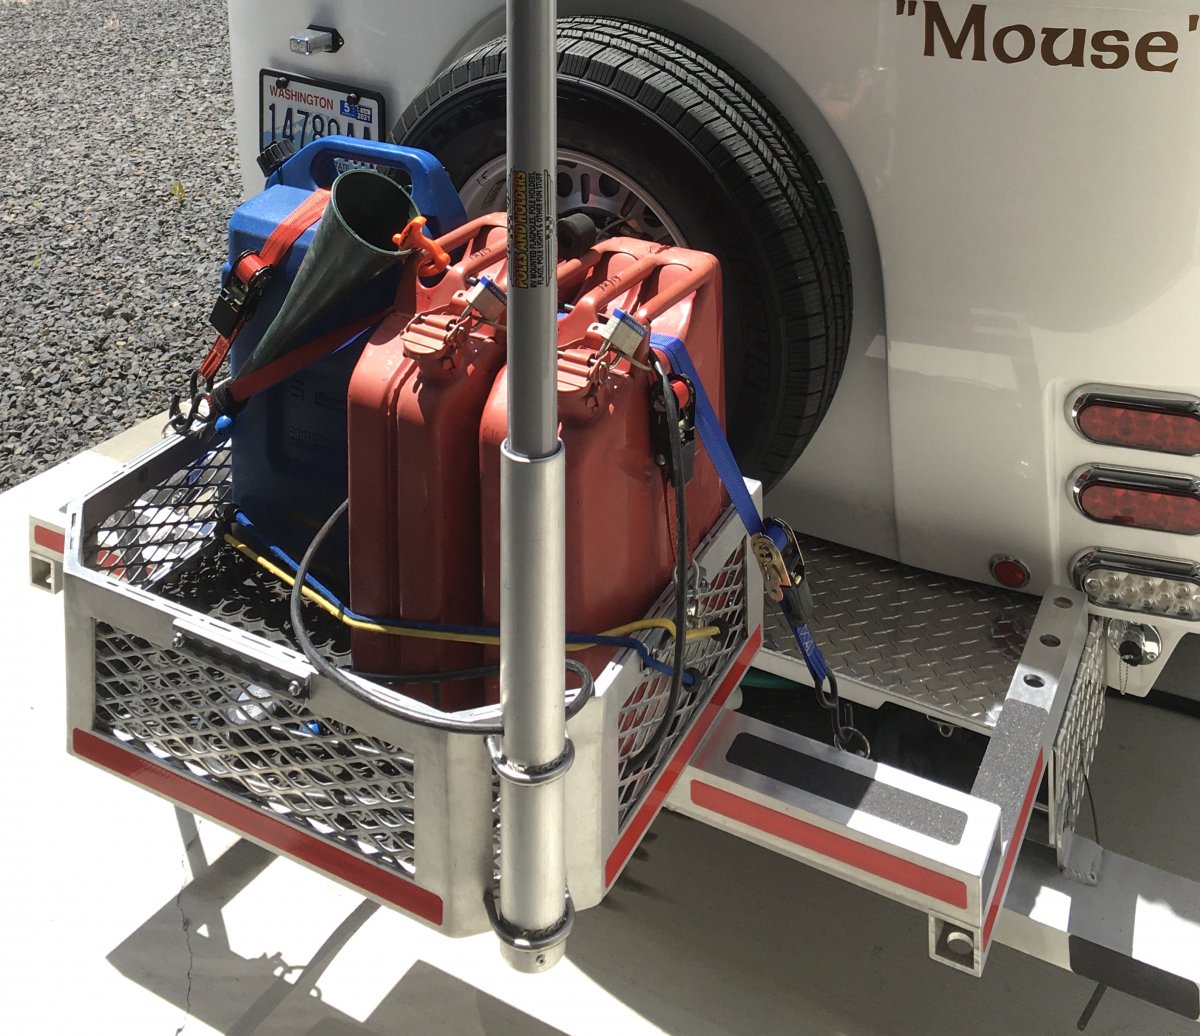
In honor of Flag Day.... Bought this HD telescoping adjustable 22 ft flagpole, which comes with a 3x5 US flag: ... https://polesandholders.com/PNH-22-Deluxe-**NEW**-and-MOST-Popular-Flag-Pole-p206298627 And built a holder for my cargo tray, which is now mounted in back. The ID of the tube is larger than the pole OD, so I wrapped the pole in vinyl tape (0.015" thick) The pole can be lowered to around rooftop height if you don't want the flag or art to be in the upper atmosphere. Stored in its carry bag the package is around 4 ft long and fits in the closet. EDIT 12/19/19: Tube ID: 2.065” Pole OD: 1.855” Clearance 0.210” The spinner shown is 6 ft long with a 3 ft harness, from here: https://www.gkites.com/store/ I haven't actually flown the flag yet, but I can attach it at the top and hang wind art below it. I plan to put a socket in the ground in my front yard, so I can fly stuff from this pole and not have a permanent installation, which my HOA does not like, for some reason... John Davies Spokane WA
1 point
-
I didn't have a choice, I live too far away from the factory, and my fiberglass skills aren't good enough to make a seamless repair. Thankfully, when my solar panels got hit, the weak point was the mounts, which is what bent, thus preserving the fiberglass, but all 4 mounts were too far gone to be easily straightened. Once I figured how to fix everything, it wasn't that hard, and didn't require that much patience. The tough part was coming up with the idea for the hollow bolt, and the decision to just tap and thread the plates themselves. If I had to do it over again, I could probably knock it out in about 4 hours maximum. Once you see the video, it'll all make sense.1 point
-
It would seem to me if the battery is capable of being charged 100% by solar which I believe they are then they should eligible for the tax credit. If I boon dock for a year and never connect to shore power seems to me Im running 100% on solar. Just because you can charge them by plugging them in doesn't mean I ever will. What if I plug them into an external solar array it seems to be a gray area1 point
-
A couple of folks have posted threads detailing solar panel mounts utilizing awning brackets: https://olivertraveltrailers.com/forums/topic/3379-zamp-solar-panel-add-ons/ https://olivertraveltrailers.com/topic/added-2-90-watt-panels-to-the-solar-array-for-520-watts-total/ We did something similar on our 2018 LE... adding an extra 90 watt panel parallel to the curb-side awning, attaching the "outboard" side of the new panel to the awning mounts and the "inboard" side to a long (approx 3ft) piece of aluminum strut channel that was VHB-taped to the roof. As a belt 'n suspenders safety feature, the front end of this strut channel was bolted to one of the existing solar panel brackets, and the rear end was stainless steel cabled around one of the air conditioner frame vents. Lots of custom angles and tapered spacers to match up with the roof contours, but it turned out quite solid. We get up there and check the attachments a couple of times each year just to be sure. Might be possible to make a cross-frame between both awnings to support solar panel(s). We only had the one awning however.1 point
-
I read that provision differently. It is arguable that qualifying batteries installed during 2022 are not excluded from the credit. See: https://www.solar.com/learn/how-getting-a-home-battery-affects-your-federal-solar-incentive-tax-credit/ UPDATE: SEE POST BELOW SUGGESTING THAT 2022 LEGISLATION MAY HAVE MADE THE INFORMATION BELOW MOOT. But, of greater concern is the apparent requirement that, for battery costs to be eligible for the credit, 100% of the energy used to recharge the batteries must come from solar. See: https://www.taxequitytimes.com/2018/03/residential-solar-storage-eligible-tax-credit-subject-100-cliff/ It seems to me that our Oliver trailers can't meet the 100% requirement because the inverters can, and do, charge the batteries from either shore power or solar. So, it appears to me that regardless of the installation date, batteries installed as part of a solar upgrade in an Oliver do not qualify for the federal tax credit. I welcome contrary views. And, this is not tax advice! You must consult with your own counsel or tax advisor for reliable advice before filing your tax return.1 point
-
You are not crazy. As an alternative to pink XPS foam, you could consider 2" foil-faced polyisocyanurate foam board. It has a higher R value than XPS, and the foil facing should blend in better cosmetically with the aluminum-and-white Oliver under belly. If you do add foam to the underbelly, please report your results, including how you installed it.1 point
-
Then I found this: https://www.solar.com/learn/how-getting-a-home-battery-affects-your-federal-solar-incentive-tax-credit/ which says the 2023 cutoff is only for the minimum size, and all batteries in 2022 are included. Very confusing.1 point
-
Found this: https://www.energy.gov/eere/solar/homeowners-guide-federal-tax-credit-solar-photovoltaics Says the inverter does count. They changed the battery rule recently, too: https://www.energy.gov/eere/solar/articles/solar-investment-tax-credit-what-changed "[batteries] that have a capacity rating of 3 kilowatt-hours (kWh) or greater (for systems installed after December 31, 2022)." So, from what I can tell, I can't claim my batteries because they were installed in 2022, but anyone with a 2023-built trailer will be able to. Somebody tell me if I'm reading this wrong...1 point
-
My suggestion is to have mounted brackets made, thru bolted to the roof hull and encapsulated with fiberglass cloth, resin and white gelcoat to match. The fiberglass work could be done by any marina or marine repair facility. If Oliver service was able to do that, then you could also have them install the brackets, panels, the wiring and the control devices. You could possible do that all yourself or have a RV tech do it if you are not near OTT.1 point
-
Now the countdown really starts. Deciding what to buy to outfit the Ollie and then the planning for where to go first, second ....... Watch the weather in March when you pickup, but it looks like you do not have far to travel. It is always a good idea to spend a couple days at the Oliver campsite or nearby camping area where you can operate everything which will likely give way to more questions and maybe even require Oliver to make a few adjustments. Happy Travels and send us some pictures of your new baby.1 point
-
Great thanks Bill!1 point
-
I'm sure that there was no water in the sink before departure. After looking at the auto drain drawing, simply a typical gate valve with a motor and rack gear, I suspect that the gate was either not completely closed or there was some small amount of debris preventing it from sealing. What I should have done was to not open the valve immediately after finding the water in the shower pan and see if the water would seep back into the tank on it's own over time. I can certainly do that test but I won't be able to do a "slosh test" as the rig is now winterized ( and it's going to be -4 degrees soon ☹️).1 point
-
I put a REMOVE BEFORE FLIGHT keychain on the bathroom faucet handle when I close the valve before travel. Too many wet socks... 1x Remove Before Flight Red Key Chain by Apex Imports(1 Pack) https://a.co/d/2OxwnZE1 point
-
The previous owner of my Ollie showed me the following storage procedure after he had a problem with the Ollie lights being on: Costs nothing. If you look at where the Oliver fiberglass hull is near the trailer's tongue, you will see there is a gap between the fiberglass and the trailer frame. This gap is big enough for the trailer plugs to fit up into and out of the weather. I have never had a problem with moisture or rain water storing it this way.1 point
-
For those of us who have to wait for camping season, this is so true!
1 point
-
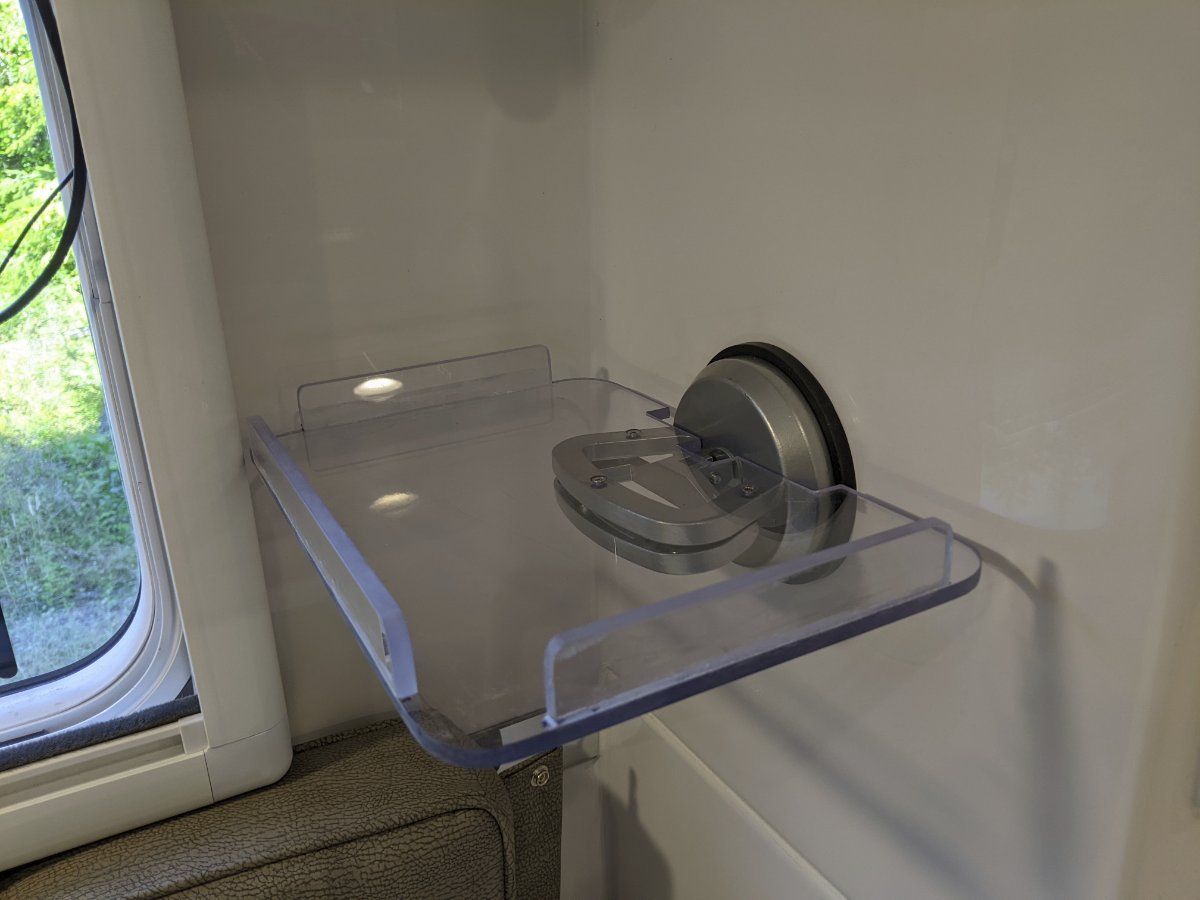
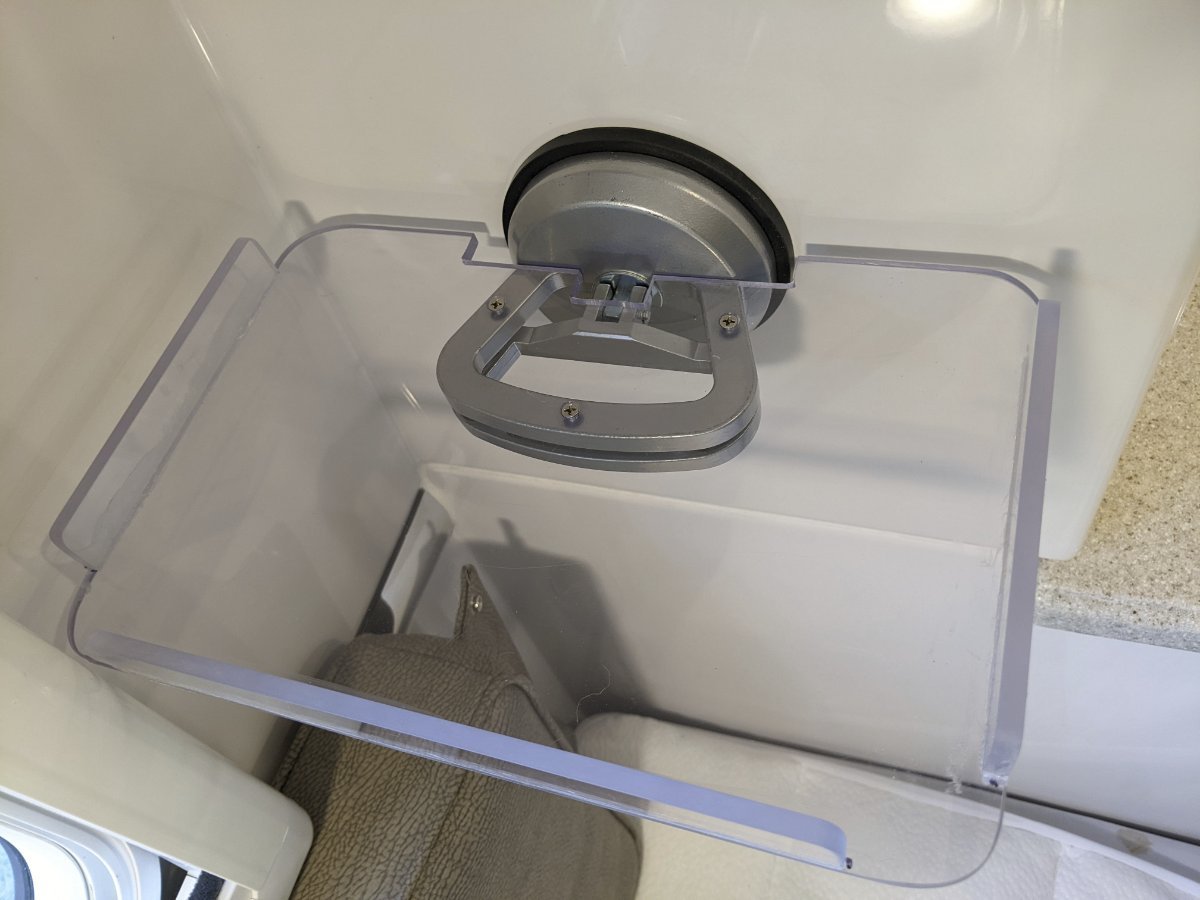
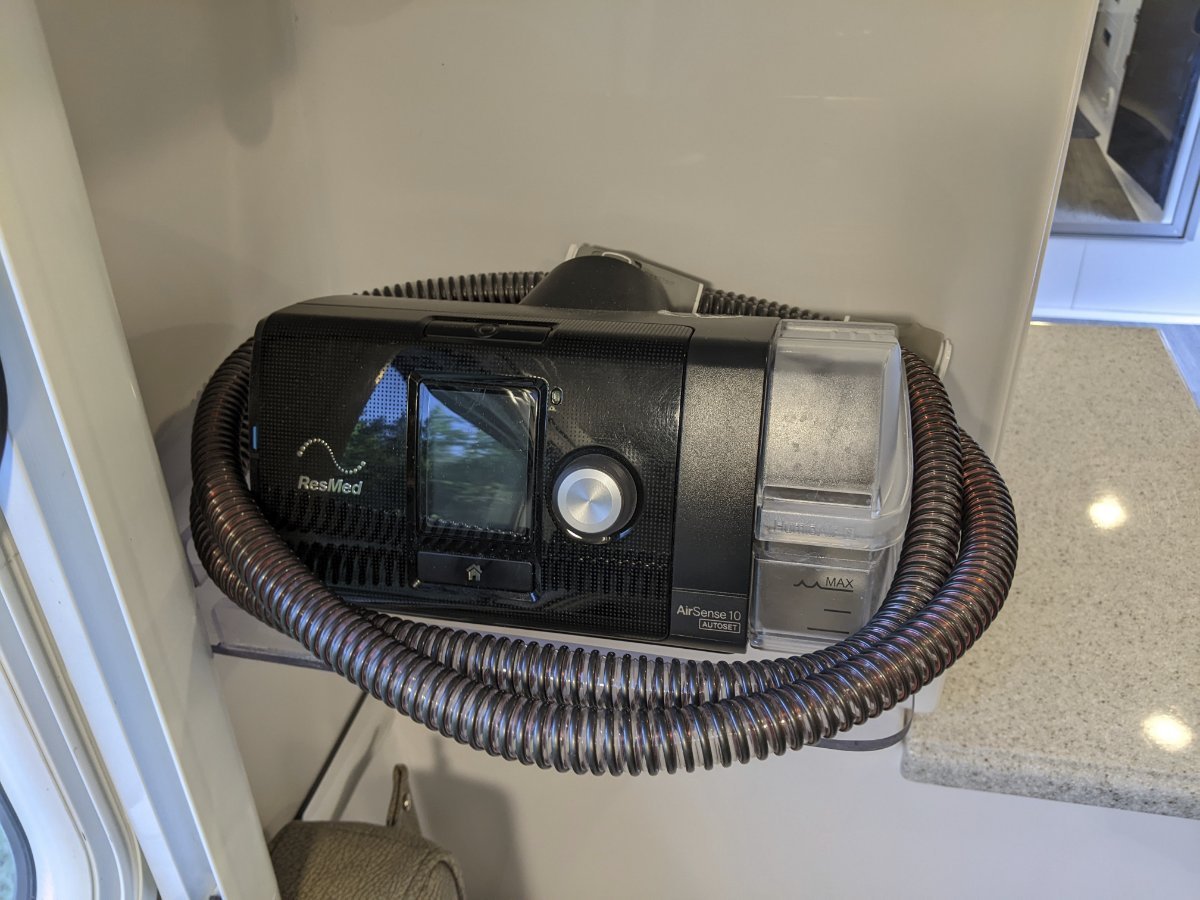
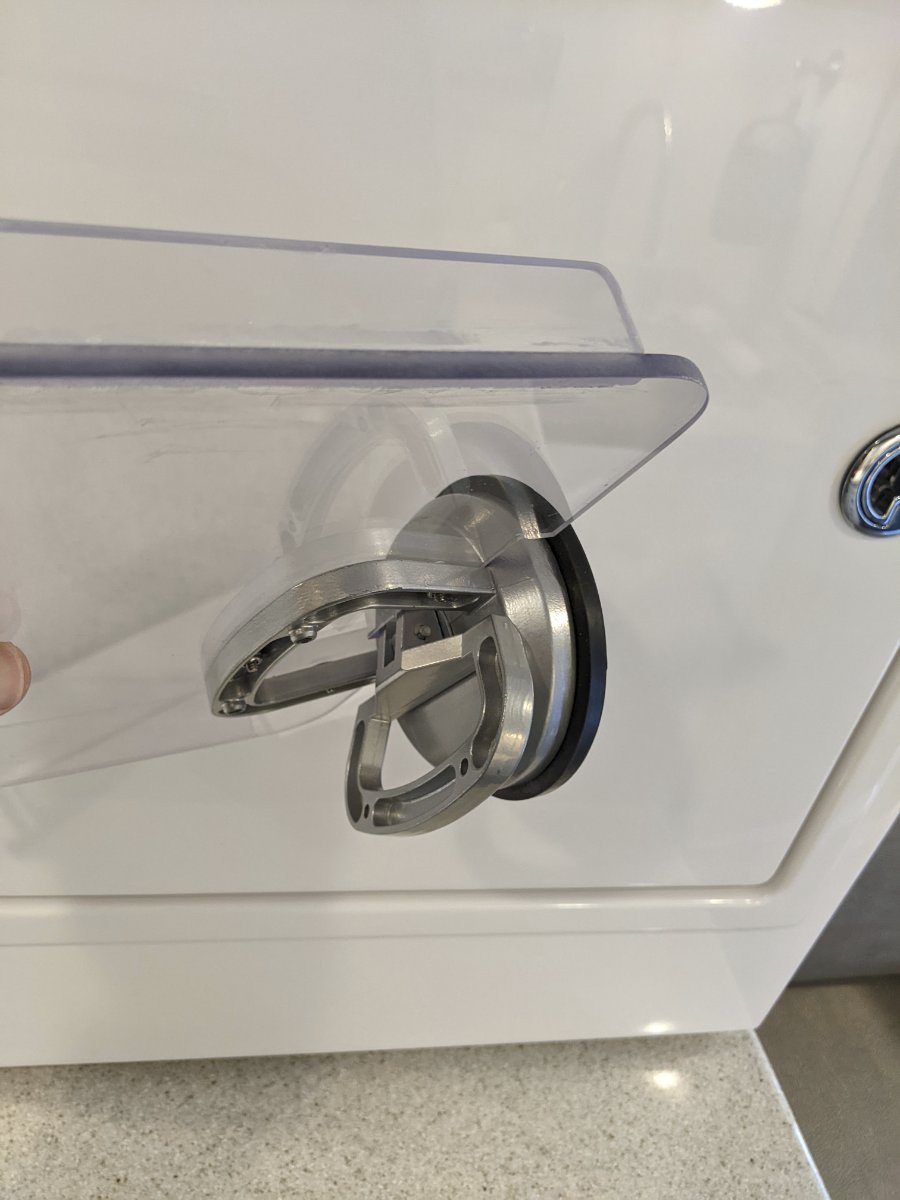
Inspired by dhaig's use of a Harbor Freight suction cup to make an external towel rack, I decided to use another Harbor Freight suction cup, https://www.harborfreight.com/4-58-in-aluminum-suction-cup-lifter-110-lb-57500.html, to make an interior shelf. I fabricated the shelf out of a 1/4" sheet of polycarbonate. I'm using the shelf to hold a CPAP machine on the back side of the pantry cabinet of our standard bed Elite 2 but the suction cup shelf could be adapted to a number of different applications depending on a person's need. The suction cup is rated for 110 Lbs. Of course this is a straight line pull and not side loaded like it is in this shelf application, but that said, the shelf is quite secure and can support quite a bit of weight.
1 point
-
Brian and Sondra, congratulations on your upcoming Oliver purchase!! It will open up a new world of exciting road trips and wanderings ahead. An Elite will provide years and years of enjoyment across this beautiful land. The last two years have really slowed down my traveling . . . only 139,000 miles on The Wonder Egg so far. So far, I've camped in 48 states, (missing Delaware), 10 provinces, one territory, have seen unbelievable giant Redwoods and Sequoias, monuments, canyons, ancient ruins, pueblos, Viking settlements, and camped with an iceberg grounded in a cove right behind the campsite. The Wonder Egg still looks like it just rolled off the factory floor and is ready for 15 more years of 4 to 7 month wanderings each year . . . roll on!!1 point
-
Hello and welcome to the forum! I agree with the others to see a Elite II before your final decision. We previously had an Airstream Nest but found it was way too small for any extended trips and the climb over bed situation got old real fast! We love the twin beds and so much more storage in the E2. Towing with the dual axle is so nice and what a difference from our Nest in backing it up (smaller definitely wasn’t easier)! We too fell in love with fiberglass campers and considered an Escape but the Oliver quality and customer service just can’t be beat! Whichever you decide you will love your Oliver!❤️1 point
-
Congrats NC neighbors!! Your delivery day will be here before you know it! Patriot 🇺🇸1 point
-
Bryan: When I was in the market for a RV, I looked first at the Elite. I thought that would be what I would buy until I saw the Elite II. I would suggest that you look at a Elite II prior to Oliver starting production. You may change your mind. Even though you have your order into Oliver, that is just a place holder in production. You could change to the Elite II if you decide to. The Elite II is obviously a little longer, but has a lot more inside storage space for both food (with the pantry) but also for your belongings. I find it better fit for extended camping trips. You could use John's idea of a front trailer hitch to move the Elite II into you yard. I also find that the Elite II with the double axle is easier to back up then my single axle trailers. Either way, you have an order into one of the best RV's manufactured and the best customer service company.1 point
-
Congratulations on your order and welcome to the forum. It’s all about owners helping owners here. We’ve been to plenty of campgrounds that were tight and we’ve been able to get into them every time, especially some National Parks campgrounds. Let us know how we can help! Mike1 point
-
For those less industrious, "GO-STIK" products makes a single (4') aluminum towel bar that attaches with suction cups. Major difference is that the GO-STIK only has a single bar vice triple. The GO-STIK product is obviously more expensive. I have the GO-STIK myself and it suits my needs but I do like the OPs design. Another note: Make sure you avoid putting the suction cups on any graphics.1 point
-
Borrowed this ingenious concept from @mossemi
1 point
-
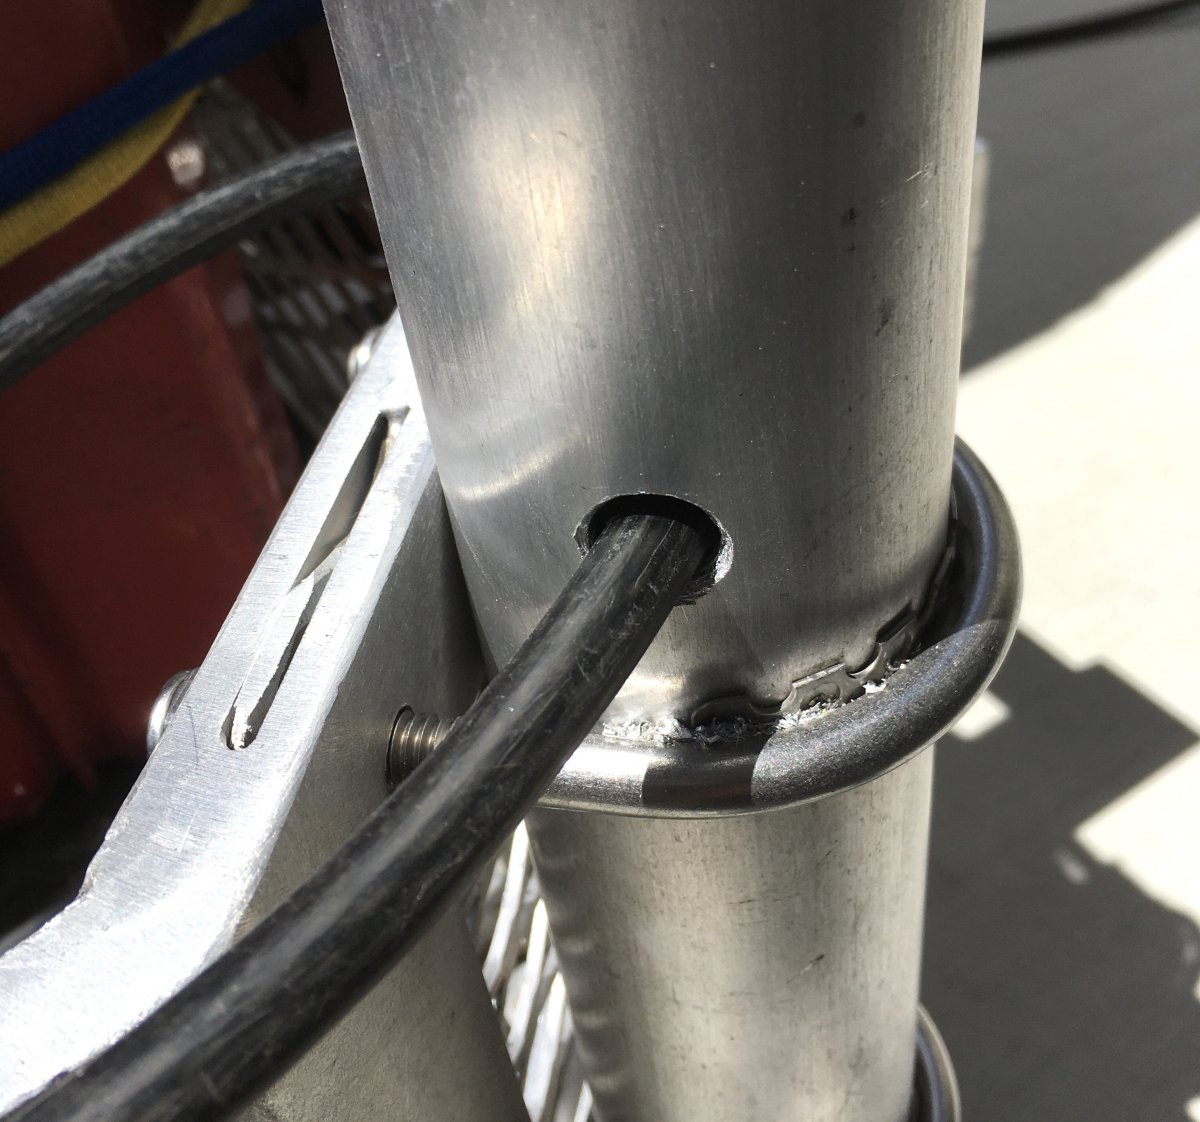
I was pretty worried about leaving the pole set up while unattended. It would be a matter of a few seconds for a nasty person to lift it up and carry it away. I normally keep my jerry cans secured with a Master Python cable lock, so I just drilled a pair of 1/2” holes through the tube and the lowest section of pole. Now the pole can be left in place for longer periods of time, either fully extended, part-way extended or retracted, as in the second picture. John Davies Spokane WA
1 point
-
Just keep in mind, the more stuff you hang up top, the harder it is to get up there to clean and wax the roof and service stuff like the air conditioner. With a single big factory installed panel, you can unbolt the curb side, install a set of extension bars, and tilt it WAY up so you can easily crawl all over the roof on a foam pad. The awning keeps you from sliding off... if you have two awnings this won’t work since there isn’t enough clearance to get the panel high enough. I personally think on this compact trailer that a big remote solar panel makes more sense, one you can move with the sun and use when the trailer is shaded. John Davies Spokane WA
1 point


-
Recent Achievements
-


")


")


")
