Leaderboard


Popular Content
Showing content with the highest reputation on 06/02/2023 in all areas
-
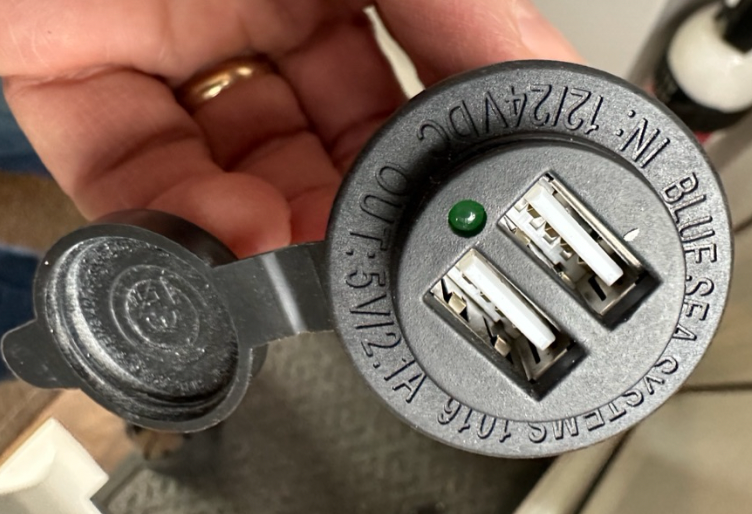
This is definitely a big clue. 5 volts is the nominal charging voltage of a USB port to charge connected devices. If you are seeing approximately 5 volts at the adjacent cigarette lighter instead of 12 volts, I would check the wiring between the USB socket and the cigarette lighter to make sure they aren’t incorrectly wired. They may be incorrectly wired in series, or reversed polarity, or the USB charger port may be defective. They should be wired in parallel to the trailer DC power circuit and ground.5 points
-
This was our first travel trailer, had only tent camped many years ago with the kids. Being new to all this and alittle nervous when we actually picked it up and then out on our own I figured it might be a good idea to video the delivery. As they went over all the options and how things worked on the trailer I had my wife video all of it. We stayed at the Oliver campground Friday and Saturday checking things out then went to spend a night at Davey Crockett with eventually ending up at a COE campground in Mississippi. During our initial trip(s) we would look at each other and ask, "what did he say about that" and would just go look at the video. Don't be afraid to ask all the questions you have. The delivery folks at Oliver were very understanding. Good Luck and Safe Travels !!5 points
-
AAA batteries (some of our remotes were weak / dead upon delivery) flashlights including a strap-on headlamp charging cords to be dedicated to the Oliver outdoor entry mat multiporpose cleaning spray and microfiber cloths for cleaning / wiping (and a roll or two of paper towels) spritz bottle and vinegar (if you use the compost toilet If you purchase the Anderson hitch from the factory, they will install / set it up, (you'll not need the big wrenches) tire pressure gauge and pump capable of 60 psi or more torque wrench, 1/2 inch drive capable of 120 ft-lbs 13 or 18 gallon kitchen trash bags small level such as a torpedo level (used to gauge level (until you install levelmate or similar) spare breakaway cable (you ain't going anywhere if this breaks, is lost or damaged) spare hitch pin hot pad / insulators as the epoxy granite cannot tolerate high heat4 points
-
So far I've only tried the dark film in the driveway, but it seems there is plenty of functional light. From a distance, the "bright-in-your-face" light from a distance (i.e., neighboring campsite) is substantially diminished. The awning light on more recent trailers is available for more street-side light if needed. Finally, the film can be removed if you feel it's too dark. I did try film on only half of the light next to the door (see photo), thinking this would leave more light around the door but diminish the distance brightness. However, the light still seemed to bright at a distance, so I removed the film and replaced it with a full-coverage piece. I found the best way to apply the film was to place a piece of masking tape over the light, carefully trim with a precision hobby knife the portion of the masking tape covering the chrome housing. The remaining portion of masking tape covering the lens can then be removed and used as a template for cutting the film.
 4 points
 -
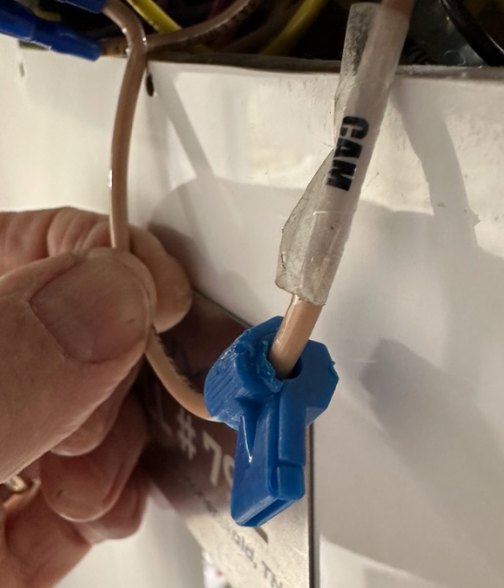
This is an excerpt from our post on upgrading to Lithionics on hull 505. Origin was from a discussion with Jason Essary in Oliver Service. https://4-ever-hitched.com/ggs-blog/f/lithium-battery-upgrade Step 7; Disable the 7 Pin Charge Line: We will be installing a new DC/DC charger into our Oliver EII. But before we do that install we need to disable the current charging wire that runs from the 7 pin cable on the tongue of the Oliver. That 7 pin connector is the one that plugs into the back of the truck for lights, brake lights, emergency brake power. Inside the 7 pin cable there is a BLACK wire that provides 12V (B+ ) from the truck battery/alternator B+ all the way back through the trailer, through a 20A breaker and back to the batteries via the 12V Bus bar in the trailer. We will not be using that (Black) charge line for the trailer an longer. We disabled that line on the 7 pin connector by putting heat shrink coating over the screw terminal on the black B+ wire conductor and also taping up the screw lead the body. We reassembled the conductor and tested that no 12V was present on the wires inside the trailer. Wiring Digram for Oliver EII 7 Pin To disable the Charge Wire (BLACK) from the 7 pin, remove the cover and disconnect the wire from the connector by taping up the wire and putting it back inside the cover. Don't cut the wire in case you need to use it in the future. 7 Pin Connector from Trailer Craig Short Hull 5054 points
-
School is out forever! Today was my last day of teaching, and I’m beginning my retirement tomorrow. My husband and I purchased an Elite II, and will be picking it up on June 26. What advice do you have for us on delivery day? What items are must-haves for pick up day? I should mention we are new to camping so even basic advice is appreciated! Thanks!3 points
-
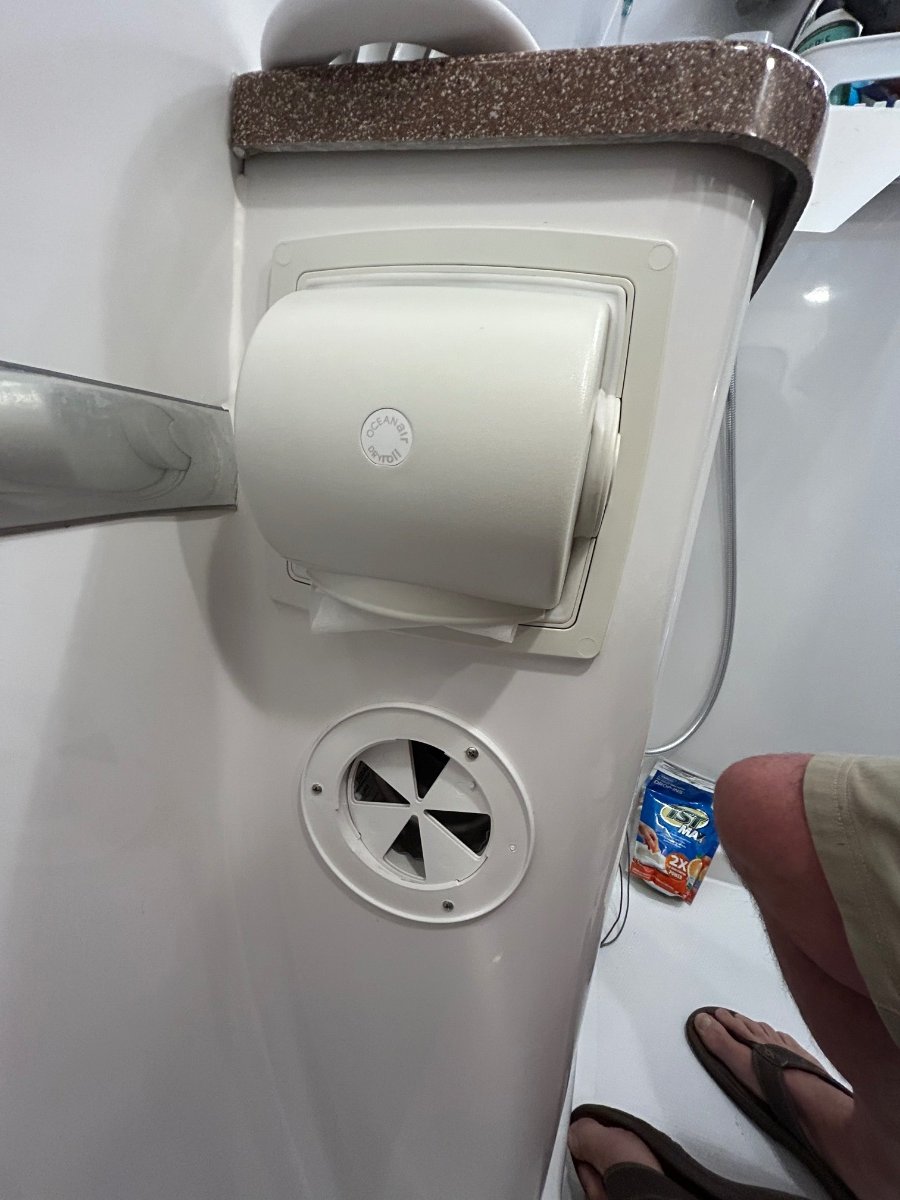
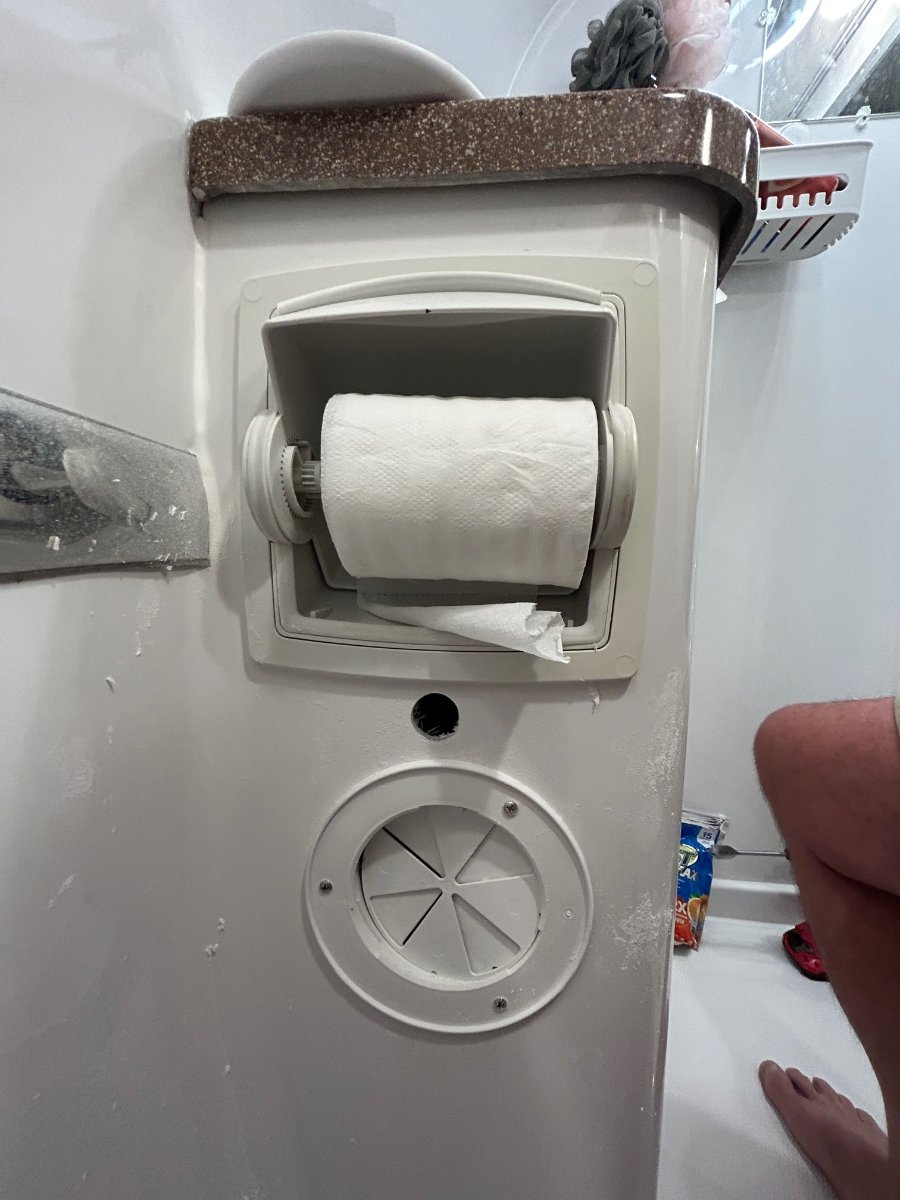
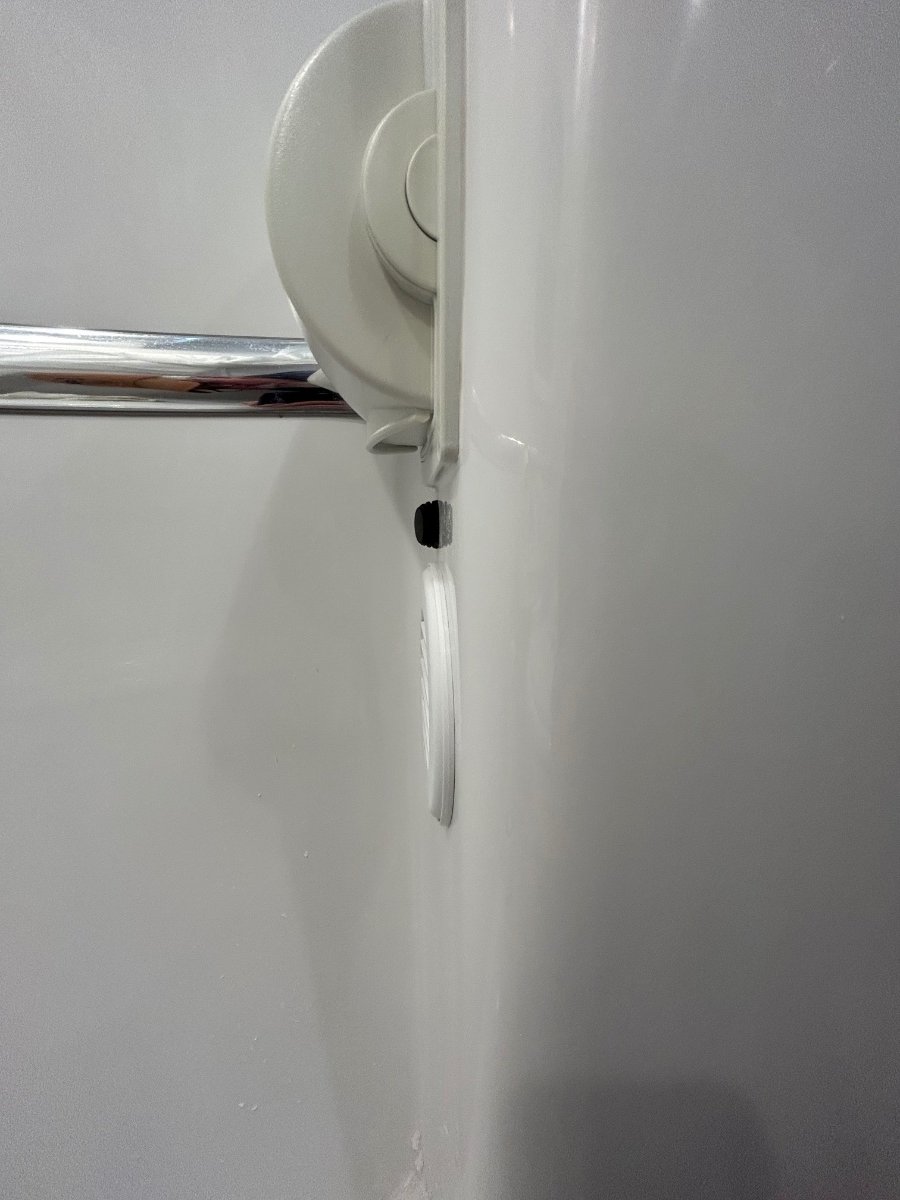
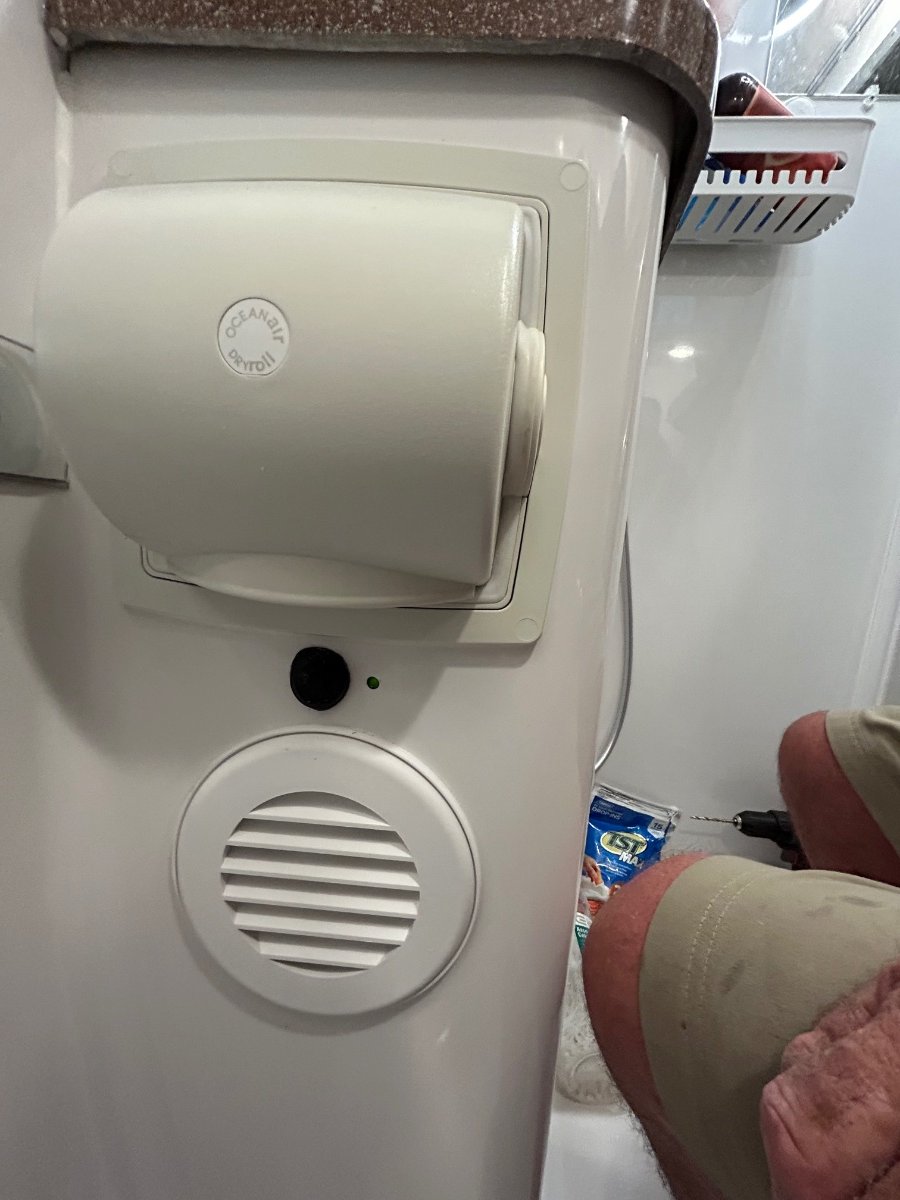
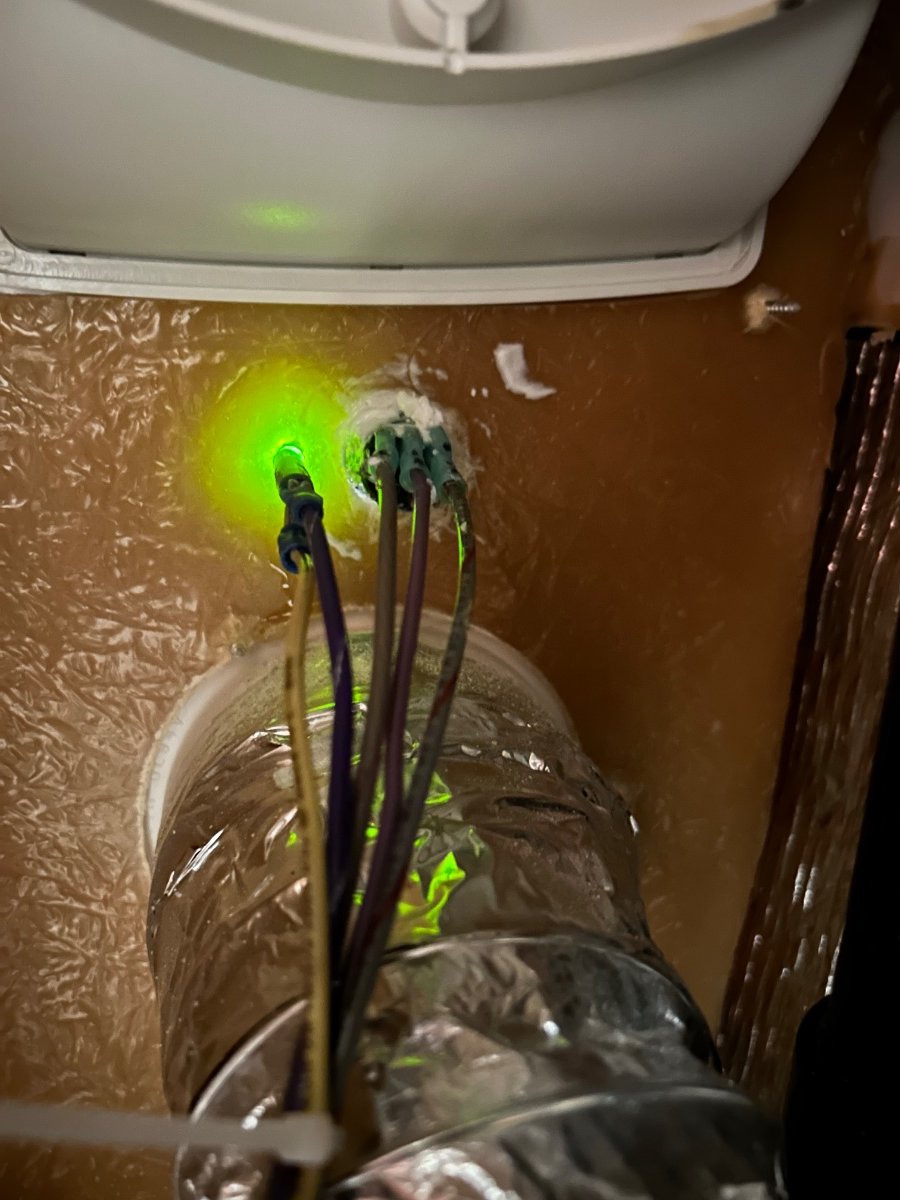
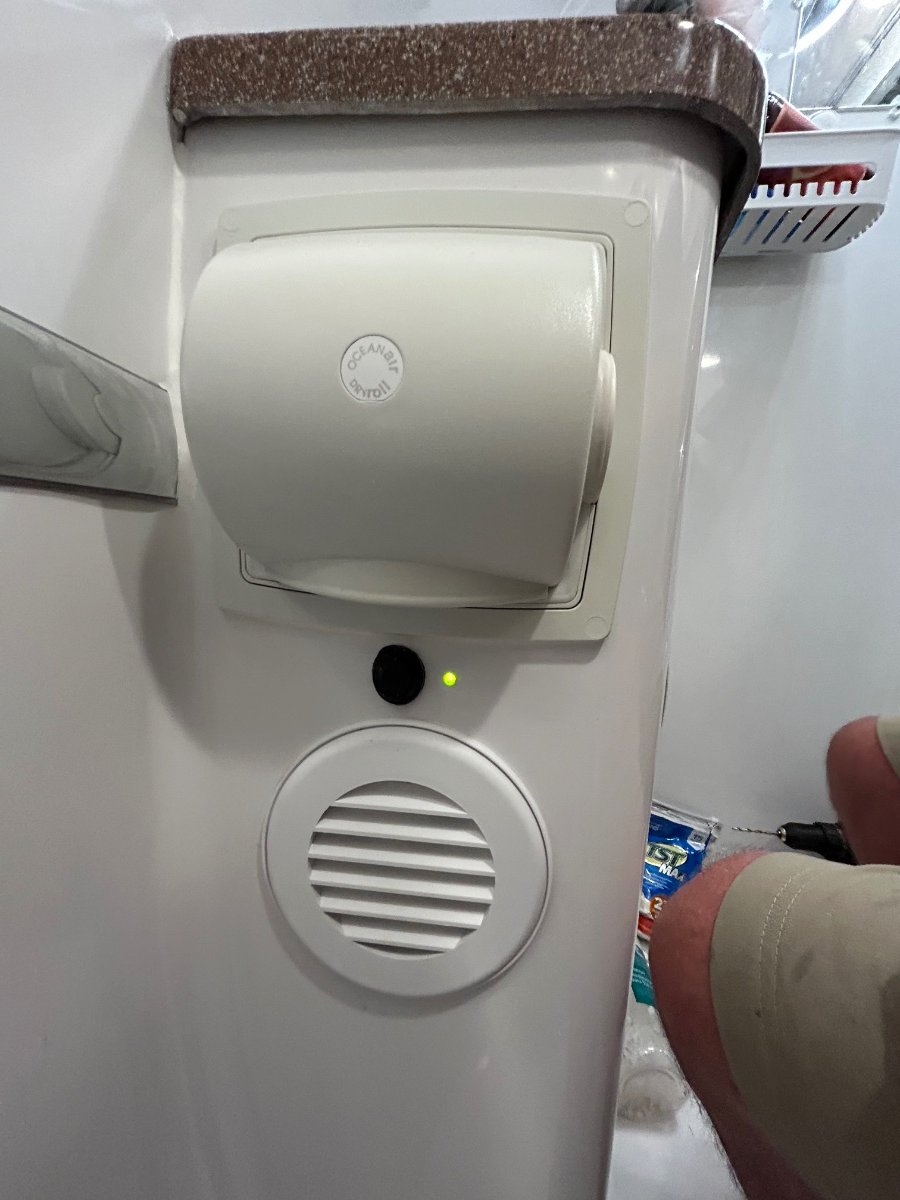
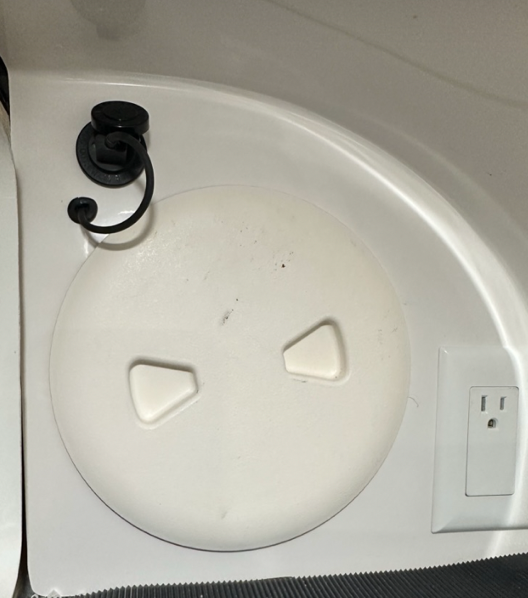
Problem: We've had our OTT for several months now, and still getting used to the "in's and out's" of the rig. One item that's been bugging us is that there wasn't a way to energize the water pump when occupying the head. WHAT? Background: So, the PO decided to remove the "cubby" shelf under the bathroom sink which housed the factory WP switch and LED and replaced it with a 2-dog marine-grade hatch to access space in the forward area under the sink for additional storage. I get that, 100%. However, they didn't (for unknown reasons) reposition the switch/LED before completing their mod. This was either an oversight, or running out of time, or outside their wheelhouse, or... whatever, it doesn't really matter. There's a modification project that's hatching here. After rooting around (with my vintage 6-foot frame) on the shower pan looking into the forward-most storage void, lo and behold, the WP switch AND LED wires were found wrapped-up and tucked away. The 5 wire-bundle of switch/LED circuits were fully intact and operational. Whew! Right? Fix: Ok! Let's figure out a logical placement of this, what we consider, a non-trivial feature to have working correctly in a proper RV head. I decided to reach out to a couple members for their thoughts (many thanks to JD and Geronimo John) - another huge benefit of the OTT Forum. Several ideas surfaced to include repositioning the switch/LED on the upper bath cabinet near the existing light switch or on the port side of the sink cabinet. We opted for the side of the sink cabinet. Below are some pix of the repositioning modification we knocked-out yesterday: 1. Carefully measured, marked, pilot-drilled, and drilled switch hole: 2. We chose the area below the TP Compartment because it would seem to give more "anti-water intrusion protection" than the space above the TP holder. 3. Measured, marked and drilled LED hole: 4. Used a couple drops of Gorilla Instant Glue for the LED mounting placement. After glue cured, applied clear silicone to provide additional water resistance: 5. Let there be light... The rubber-booted "marine-grade" switch should be fine in this environment and away from a direct shot from the shower head much like its original factory position in the upper area of the cubby shelf. We debated actually posting this to the Ollie-World because it would seem to us that it's a "one-of-a-kind" modification. However, if anyone else out there has a similar situation, hopefully this may be of help. At least for now, we'll no longer be stranded in the head during one of those middle of the night "needs" without being able to flush... Cheers!
3 points
-
They found that a piece of foam had come loose and was partially blocking the air flow and causing the noise I reported. This happened during installation and was not noticed on pre-delivery check. I spoke to Dave, the Truma rep that was at the rally, and he said it is not uncommon for those foam blocks to get dislodged during installation but there is a step to check them prior to installing the interior face plate/panel. It's all good now, have not had any issues since. I just look forward to the day Truma decides to update the CP Plus to include the de-humidification mode. Not very "user friendly" to have to use the remote AND the CP Plus to get it to work. Brian3 points
-
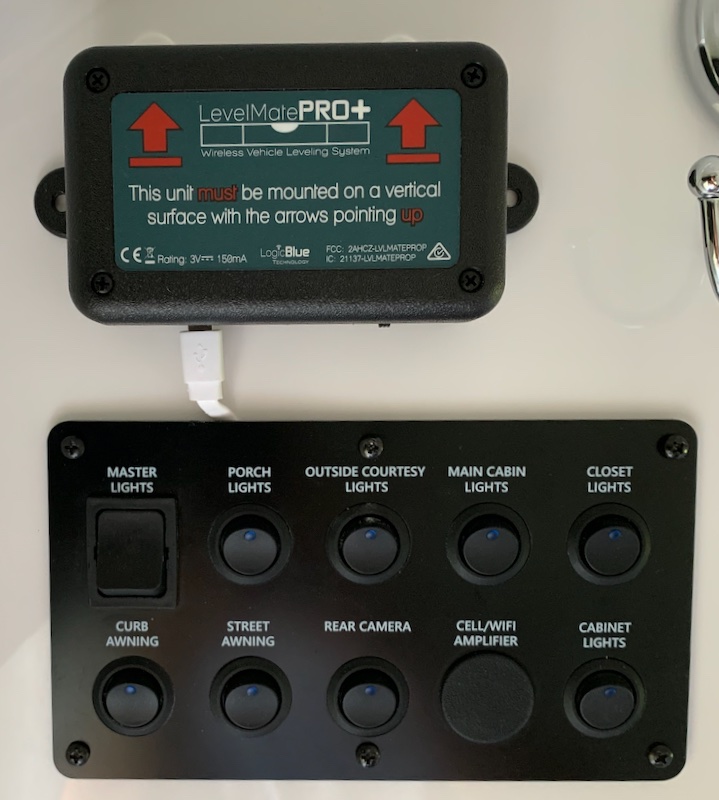
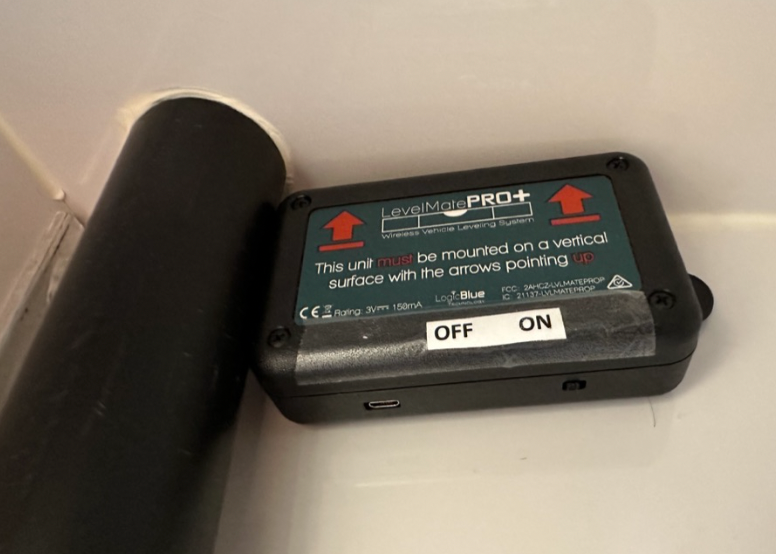
I mounted my LevelMate Pro+ in the corner, above the main switch panel. I piggybacked off of the street-side awning switch. The top (negative) and bottom (positive) wires are always hot. I tried following the manual as to how to use wire it permanently, using the white and black wires in a USB cord. But after a few hours fiddling, and cutting up two different USB cords, I could *not* get 12V DC to the unit. I did find a pair of wires that deliver 12V, but they were not the two that connect with the micro USB plug on the printed circuit board. Frustrating! I ended up gutting a USB plug that fits in a lighter socket, soldering the positive and negative wires onto the appropriate terminals, then used heat-shrink tubing to encapsulate the assembly, including the USB-A plug. I connected the two wires to the awning switch, plugged the other end of the USB cord into the LevelMate, and good to go! (The LevelMate is level. The perspective of the photo throws it off) Plenty of room for more wires... 🤪
3 points
-
Never disconnect the trailer from your tow vehicle unless the trailer wheels are well chocked first. We use rubber chocks on the downhill side of the trailer tires, as well as X-chocks, before removing the trailer coupler from the hitch ball. Don't ask me why this became such an important rule for us...3 points
-
Welcome to the forum. My wife and I retired a couple years back (she was a teacher too) and bought an Oliver. We created a blog to help our family see various campgrounds, trip logs and provide tips for them and other Oliver owners. Here’s the link to Galway Girls (Hull 505) Blog: https://4-ever-hitched.com At the top and bottom of the blog are links an Amazon "Oliver Outfitters Guide". That guide is a list that’s been made for great Oliver gear along with comments from Oliver owners that describe how it fits or works in and Oliver. Oliver Outfitters Guide on Amazon Craig & Rose Hull 505 - Galway Girl3 points
-
Are you looking to secure the hitch while traveling or while parked? The collar style works for both situations. The big heavy Proven Industries lock only works when parked. I have both 🙂. The Proven lock can double as a boat anchor. https://www.provenlocks.com/products/model-2178-b3 points
-
Having an OBD reader opens up a lot of different settings that the MFG knows about but may not make available on your trim level. Many of those options are actually available for the owner with such a scanner. For my 2019 F-150 they include: Bambi Mode Transmission Temp Display in degrees F above the idiot light Disable Auto Start/Stop Turn off double honk when leaving the truck with keys in it... like hooking up Ollie Toyota likely has many such options that may improve your truck suites your preferences. Recommend you search the Toyota Forum for your truck's generation. For sure will not improve the engine braking vs a big block V-8, but some of those minor irritations can for sure be fixed easily. GJ3 points
-
Congratulations on retirement!! and welcome to the Oliver Family!! Going through the videos and literature in the Oliver University is a great place to start. A good set of rubber wheel chocks are a must and a set of X-chocks are helpful, nice pair of work gloves, a set of OX Blox, will all come in handy. Also getting some "dog bones" for the electrical hookup can come in handy so you can plug your power cord into sockets with different plug configurations. If you're getting the composting toilet then you'll need some coconut coir to get started Otherwise, mostly less is better, you can always pick stuff up as you see the need for it, also there's a Walmart and Tractor Supply within a couple of miles of the OTT hatchery so most of the stuff you NEED can be picked up once you arrive. here's some links. Happy camping, hope to see you on the road!! OX BLOX: https://myoxblox.com/products/ox-blox-trailer-jack-block?variant=40142725349582 X-Chock: https://www.amazon.com/X-Chock-Wheel-Stabilizer-Handle-28012/dp/B002XLHUQG Chock blocks: https://www.amazon.com/dp/B07KBDXV5N/ref=redir_mobile_desktop?_encoding=UTF8&aaxitk=07fc3ca7ec09edf448ec676e284045a3&content-id=amzn1.sym.cd95889f-432f-43a7-8ec8-833616493f4a%3Aamzn1.sym.cd95889f-432f-43a7-8ec8-833616493f4a&hsa_cr_id=9916698050301&pd_rd_plhdr=t&pd_rd_r=1effbf6a-4da1-4856-86db-8988933de586&pd_rd_w=HBLd0&pd_rd_wg=CozHp&qid=1685674425&ref_=sbx_be_s_sparkle_mcd_asin_0_img&sr=1-1-9e67e56a-6f64-441f-a281-df67fc737124 Dog Bone addapters: (just an example, make sure to get the correct ends) https://www.amazon.com/Camco-Dogbone-Electrical-Innovative-PowerGrip/dp/B000BUU5YA?th=1 coconut coir: https://www.amazon.com/Harris-Coconut-Coir-Pith-Bricks/dp/B08ML1STTH/ref=sr_1_2?hvadid=580651732311&hvdev=c&hvlocphy=9029069&hvnetw=g&hvqmt=e&hvrand=7016637740682253726&hvtargid=kwd-438033878099&hydadcr=27824_14517113&keywords=coir+plants&qid=1685674704&sr=8-23 points
-
Congrats on your retirement! I am closing in on that myself! This was a great question to ask, I'm picking up my LE2 on June 20th, picking up some good tips here. I already have the Harbor Freight wheel chocks and some leveling blocks. Got some plastic dishes, sheets, pillows. I got a Froli system for under the bed. The excitement grows!!!2 points
-
The most important thing I had was my trusty notepad. As I thought of things I needed I'd jot them down. I stopped at Wal-Mart once (or even twice) a day as I was on the road. It was a constant for the first couple weeks. You'll also get great ideas from the forums. For other than daily use type things I would add them to my Amazon basket on a continuing basis, then make a purchase every month or so. After two years I feel that I'm finally getting things set up how I want, but I still have things in my Amazon basket that I need to order. Enjoy!2 points
-
Push every button on your Oliver on delivery day. Take a few days to test the systems prior to departing the Hohenwald area. There are places to camp. Ask all the questions you can possibly think of and then ask more. Most importantly enjoy your delivery day, Oliver goes to great lengths to make it a really special day! Congrats! Patriot🇺🇸2 points
-
All good advice here. One thing I can add would be to video tape your walk thru at delivery. I found myself watching it a year or two later and found info I missed. Ask a lot of questions and enjoy the experience. Cheers!2 points
-
The reason this happens is that Oliver has one 12v hot lead going to all the lights on that panel. If you install a dimmer you will dim all the lights. I need to get in there to determine if there is a better way or even if it is possible to dim individual circuits. Brian2 points
-
Congratulations on your retirement! My wife and I will be right behind you, leaving the profession at the end of the first semester of 2023-24. Make sure you bring the correct ball hitch and some wheel chocks. (Chocking before unhitching is critical, as @Rivernerd said.) Some levelers. We use Lynx "Lego" blocks but you can usually buy Anderson levelers at Oliver (although they might be cheaper elsewhere). Bed linens and pillows. Utensils. Toiletries. Some basic tools (Harbor Freight has a decent little toolkit for $34: https://www.harborfreight.com/hand-tools/tool-sets/tool-set-with-case-130-piece-64263.html). You can leave the whiteboard markers and gradebook at home!2 points
-
We use a Fort Knox hitch lock. Not as pretty as a Proven Industries but just as tough and a little less expensive. Bulldog Sliding Collar Coupler Lock Includes Cobra-Sidewinder puck lock- BOLT CUTTER PROOF!!! https://a.co/d/gkBIplM I also loop a large padlock through the two safety chains and attach them to the front basket so the trailer can't be dragged by the chains.2 points
-
Tested the new MPPT solar controller with two 100W Renogy Suitcase solar panels. Charged at 12.6 Amps, the 100AH BattleBorn Lithium 12V battery charged quickly this afternoon. 🙂2 points
-
You as well. Always fun talking to people who like to modify stuff and figure it out. 😎 The plant travels in the truck with us. The plants rank slightly below the dog which ranks above me. Not sure if I’m ahead of the plants.😂😂2 points
-
This is still a puzzle. Oliver sent me a new cigarette lighter socket to replace the existing one over the cook top. I replaced it and its not the problem. With a little more investigation this is what discovered. There is 5.4 volts at the socket but if I disconnect the adjacent usb plug the voltage will jump to 12 volts. The cigarette lighter socket under the dinette and the socket above the bed and to the right of the TV bother register 13.5 volts. I have a call into Oliver and am waiting to see what they say. I’m thinking a bad ground someplace or a loose connection. I haven’t had the time to start ripping things apart and I’m waiting to see if someone might have an idea where to begin looking. bill2 points
-
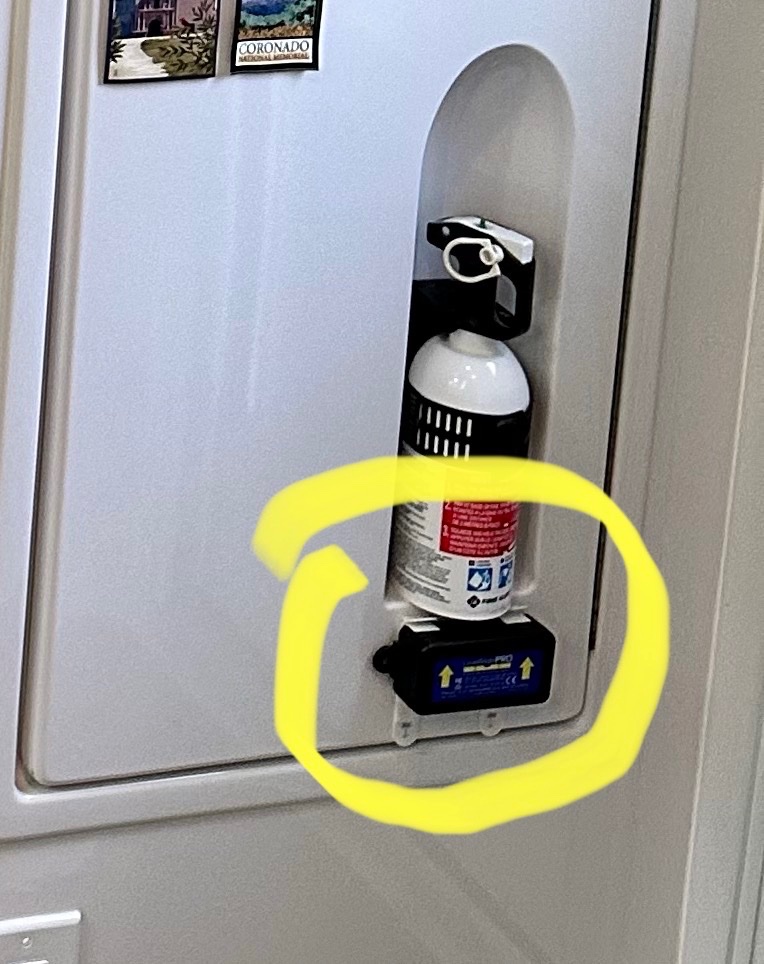
Originally I mounted in back of closet and it was hard to reach. I moved it to the outside of the closet door just below fire extinguisher mounted with double stick Velcro. I can reach it while standing outside with the door open to turn on/off when setting up camp. I can pull off easily to change batteries.
2 points
-
For the first year of ownership, we never used the patio lights at all because we didn't want to blind ourselves on the curbside, much less the neighbors on the streetside. Like other Oliver owners have, we ended up adding amber film over all the patio lights and the light is now warm and subdued. I agree that Oliver should provide separate switches for street and curbside lights, but we found that adding the amber film to the lights is an easy, low cost way to mitigate those annoyingly bright lights for everyone affected.
2 points
-
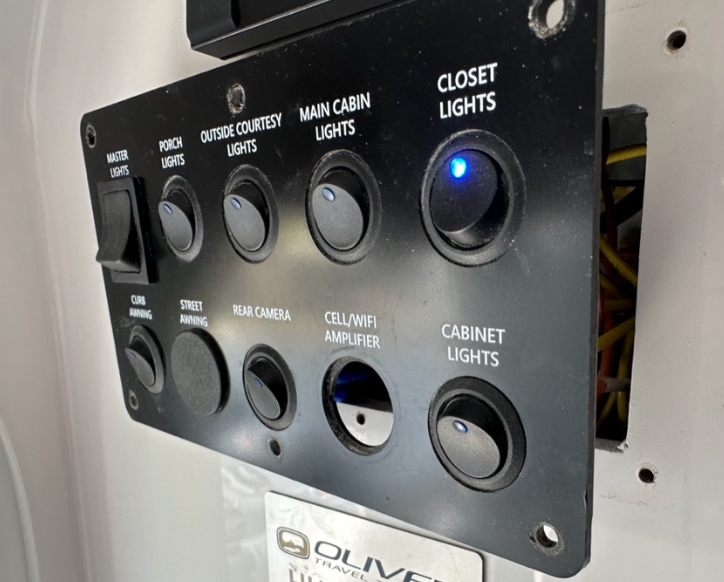
2 OTT design decisions strike me as odd: Why aren't there separate switches for left/right flood and outside courtesy lights? Sometimes I want to light my patio area without blinding my neighbors on the street side. Why isn't there an indoor switch for the 120v water heater element? Sometimes the campground voltage goes low and I want to switch to gas hot water instead. Both of these are pretty common in other brands, so I wonder why OTT opted against them.1 point
-
We've used a bulldog collar, towing or not, plus a ball type lock while camped, for 16 seasons. More locks to defeat, more time needed for the jerk... Some people also deploy locks or chains on wheels. We don't.1 point
-
Good idea.1 point
-
Keep your carry list as short as possible, as @AlbertNTerri suggested, imo. Whatever you being, make sure you know how to use it. There's so much to learn about your new Oliver, you don't need another "learning curve" thrown into the mix. We camped one night near new owners. Their suv was so chockablock full, they couldn't find breakfast supplies, coffee maker, or paper plates. Way too much. Label bins with contents. Pack the bins so stuff you'll need the first night is easily accessible. (Bedding, clothes for a few days,towels, meds, entry mat, rugs, bulldog collar lock, pot and pan, dishes/paper plates, silverware, bottle of champagne, etc.) If your TV is a pickup, as many of us use, carry a foldable two step footstool and a boathook or similar to pull stuff forward. Saves some aggravation. As @Patriotsaid, try EVERY button and system before you leave Oliver, or a close-by park . Even if it's 95, make sure you run the heater, and know how. If it's 32 degrees, don't skip the step of testing ac. You may want to just treat yourself to dinner out the first night. Most of the restaurants in Hohenwald are surprisingly good, for a little town. And Hohenwald people have been very friendly and nice to us, over the years.1 point
-
We are so excited for your upcoming delivery. We just picked up hull 1390 and are delighted with our trailer. The folks at oliver are extremely kind and very helpful. I would strongly recommend spending a night or two at Oliver. We did and found it to be very enjoyable. If you do be sure to bring some camp chairs and especially bring some latex or nitrile disposable gloves if you will be emptying your tanks at Oliver bf you leave. We found these series of videos on storage options by Katjo on this forum or Kathy Adams to be extremely helpful for storage bins, baskets etc, but those things can be done at your leisure. Happy Trails.1 point
-
That would be way COOL. Get on it, brother! HA!1 point
-
The good news and the bad news - When I dim the lights, ALL lights (interior and exterior) dim. There are times when I would prefer to only dim either the interior or the exterior. However, this has never bothered me enough to rewire it. No - I do not know the answer to this. If I had to guess, I'd think that the touch lights are the "problem", but, the guys that would probably know are located in Oliver Service. Bill1 point
-
I have a dimmer on my Ollie lights - like THIS one. Bill1 point
-
Welcome to the OTT Family! Be sure to refer to the forums for virtually anything Oliver-related - its simply a wealth of information, experience, and friendship. Working with the folks at the factory and supplemented with support from the forum forms a base of knowledge for you to handle just about any conceivable issue. Enjoy the ride... it will be a life-changer as you're entering into retirement! 😎1 point
-
This is so helpful! Thank you!1 point
-
We see this all the time. Empty sites. Ghosted. Stiffer cancellation penalties might fix it. The thing is, we rarely camp in our home state (Florida) because it's so difficult to get a site, in season. As in most states, our state taxes support the parks. Along with camping fees. I'd say better plan is charge extra for out of state users. Especially at prime sites . I've met Canadian campers who have told me they sit up and wait for reservations to open at midnight, months ahead. Not my deal. Not gonna do it. Too many things can happen in 10 or 11 months. But, our put of state visitor folks will make those plans, a year ahead.1 point
-
The pictures did not come on my post above (ugh!). Here is another try. You'll just have to imagine that the photos are appropriately placed with relevant text.
1 point
-
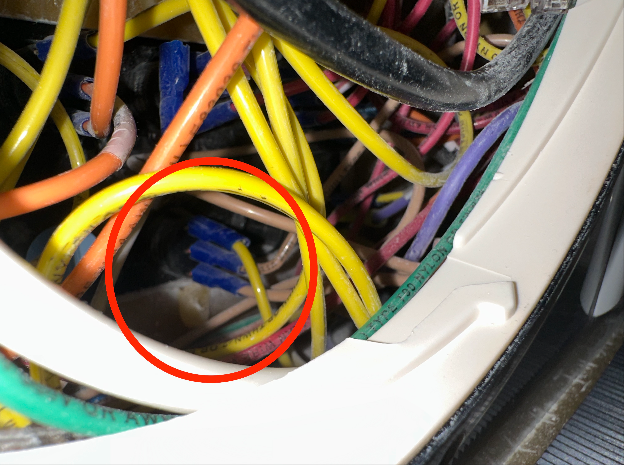
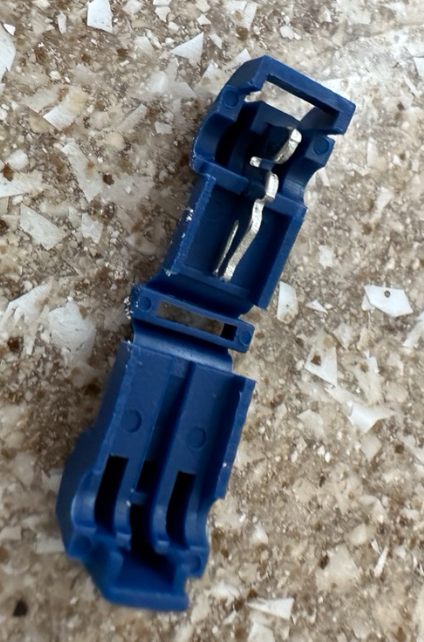
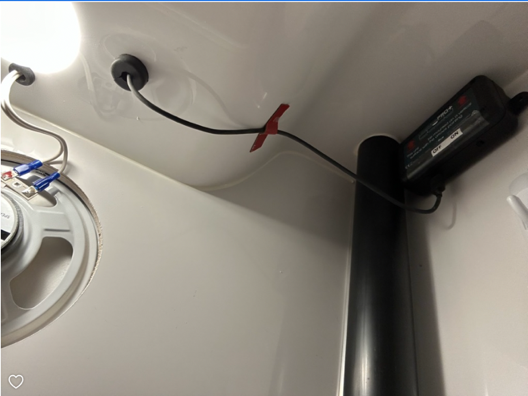
I, like others, mounted the Levelmate in the closet, because it is about halfway between the driver’s seat in the tow vehicle and the stabilizer switches in the rear of the trailer (I've found that signal strength is generally fine with this location). The Levelmate is installed with 3M Command velcro strips. Secure, no screw holes, removable. It’s easy enough to reach into the closet and turn the Levelmate on. But the batteries are rather short-lived, so I would run back to the trailer and turn it on prior to parking (and leveling). Problem is, it is too easy (at least for me) to forget to turn off the Levelmate. Result: dead battery, yet again. So I decided to hard-wire the unit. Theoretically the unit could be wired directly to the trailer’s 12V system, but I used the USB cable that came with the Levelmate instead. This requires an accessible USB charger; the closest existing USB charger was too far away. Thus, wiring the Levelmate consisted of installing a USB charger within a cable-length of the Levemate unit. As there was no really good location in the closet (criteria being a wall with accessible space behind), I installed it in the galley cabinet (referred to hereafter simply as “cabinet”) above the microwave cabinet. I also wanted the Levelmate on easily for driving (so that it is ready to use when I want to park), but off when not driving or parking. So I connected the Levelmate to the same circuit as the rear camera. On when driving, off when parked. The Levelmate draws very little current (or the 2032 or 2050 batteries in the Levelmate, depending on model, would be insufficient), so I was not very concerned about overloading the camera circuit. There are many (and probably some better) ways of wiring the Levelmate, but here’s what I did: 1. I began by removing the screws securing the main Oliver switch panel to the wall (giving access to the wires behind it) and the port cover in the cabinet. 2. The rear camera switch has 3 wires attached: 2 tan wires and one yellow wire. In my trailer (2021 LE2), the bottom tan wire is continuous 12V, the middle tan wire is 12V only when the camera switch is on, and the yellow wire is ground. I verified this with a circuit tester, using metal in the exterior lower refrigerator vent as a ground. (It would be SO GOOD to have an electrical diagram for the trailer!) 3. I removed the closet light, and used a 36” zip tie (3/8” width) to fish between the closet-light hole and the cabinet port. I tried fishing with 2 different wires (which were either too stiff and it would get stuck, or to thin and would bend); the zip tie was sufficiently stiff yet flexible, and I could work it though without getting caught on reflectix insulation. 4. Once I confirmed my ability to fish, I drilled a 1 1/8” hole in a part of the cabinet that did not have wires behind it, and another hole for the USB cable (3/8”, I think). Similarly, I drilled a hole in the closet (1/2”, I think) for the other end of the USB cable. The hole sizes for the cable are different because the cable ends are different sizes. 5. I taped the small end of the USB cable to the zip tie, and pulled it from the closet to the cabinet. I placed a rubber grommet in the smaller hole, and a rubber bushing in the larger fiberglass hole, to protect the cable from chafing in the fiberglass holes. In both cases, I cut the grommet and bushing on a bandsaw to slip them over the cable. 6. I then spliced the tan middle tan wire on the camera switch with a quick-splice snap-wire connector, to which I connected a shrouded spade connector attached to about 10” of 16 ga wire, which in turn got connected with a shrouded connector to the positive terminal of a Blue Sea 2.1A USB charger (https://www.amazon.com/Blue-Sea-Systems-Charger-Socket/dp/B0082CXEI8/ref=sr_1_1?crid=3QD4BPGGKK7GE&keywords=blue%2Bsea%2B2.1%2Busb&qid=1685469544&sprefix=blue%2Bsea%2B2.1%2Busb%2Caps%2C196&sr=8-1&th=1). There are cheaper charging ports available, but the others in the trailer are this brand, and Blue Sea previously responded quickly when a charging port in the trailer failed. The negative charger terminal was similarly spliced to the yellow wire on the switch. In conclusion, I’m happy with this solution to a first-world problem—it lets me use the Levelmate app when pulling (or backing) into a site without having to first run back and turn the Levelmate unit on.1 point
-
Oh yeah. Already did the larger table top out of walnut.
1 point
-
@SeaDawgGreat question and TBD..😊 a work in progress. Where do put your fuel container when running your gen? Hopefully sooner than later I am actually planning to install the www.hutchmountain.com new 3200i LP conversion kit. That will take gas out of the picture. I am on the waiting list we’ll see. If not I may attach this mount lock onto the non exhaust side of the cargo basket to at least lock the roto pax down when running the gen. I guess if someone wants the gas bad enough they will just siphon it. here- https://www.amazon.com/RotopaX-RX-LOX-PM-Pack-Mount-Lock/dp/B008S9QRH0/ref=sr_1_4?hvadid=636053578030&hvdev=c&hvlocphy=9009915&hvnetw=g&hvqmt=e&hvrand=12750849366801851103&hvtargid=kwd-59998714017&hydadcr=7467_13278794&keywords=rotopax+mounts&qid=1685500874&sr=8-4&ufe=app_do%3Aamzn1.fos.006c50ae-5d4c-4777-9bc0-4513d670b6bc1 point
-
We have a 2019 Ram 1500 and it came with air suspension. It has 2 off settings, normal, Aero, and Exit. It automatically adjusts to the weight of the tongue. We also use the off road setting when we are at a dump station to tip the Ollie so we can drain the grey tank faster. We also find that when we stay at HH or campsites where we stay hooked, we can level the trailer front to back very quickly. The newer Ram have eliminated the 5 settings in favor of just 3, but still auto levels the TV.1 point
-
The inverter shouldn't have any effect on the 12v outlets. They run directly off the batteries. Sounds like an issue with the outlet itself, or the wiring connection to it. First, look up inside the 12v socket/outlet. There should be metal around the perimeter of the side wall and a separate piece of metal in the center of the bottom of the socket. Those are your 2 connections to the plug (- on the side and + on the bottom). Is all that metal shiny? Not corroded in any way?1 point
-
@Brian and Brandelyne As promised, I did check the air flow and the air flow is equal on both sides. Patriot🇺🇸1 point
-
Interesting - on my 2016 I have separate switches for the curbside and street side for the "patio/flood" lights. However, I have only one switch for the "puddle/courtesy " lights. I have heard of a couple of owners moving this switch to an inside location. It shouldn't really be all that difficult. However, I'm not sure why Oliver has never done this. Bill1 point
-
Are you expecting an attack from the bathroom? 😬 My wife and I both like to lounge on the beds during the day, head forward. Very often there is a good view out the back window. From there you can look out three sides of the trailer. Since I sleep in a bag, position doesn’t matter, but she sleeps under regular linens, so switching around doesn’t work. It’s all a matter of preference and whether or not you whack your head on the night table. That is actually a pretty nasty occurrence, the corner is sharp!. John Davies Spokane WA1 point
-
When I first got my Ollie I slept with my head at the nightstand (I'm 6', 165 pounds). But after a couple of night of my elbows hitting either the nightstand or the curved wall, I did a 180 and now sleep with feet at the nightstand. Much more room for the elbows. If you are not convinced by the posts above or feel you need more information then you might want to PM (private message) Patriot since he is reasonably tall. At 6' I can stand up straight in the shower - barely. Shortly after buying my Ollie I spend hours building a shower mat - similar to Foy's mat but not as nice as his. Unfortunately, I never thought about the reduction of vertical room and sure enough the day I finished and proudly took it out to the Ollie I realized that either I would now have to shower while bending over or give it away. Needless to say - it belongs to someone else now.😥 Bill1 point
-
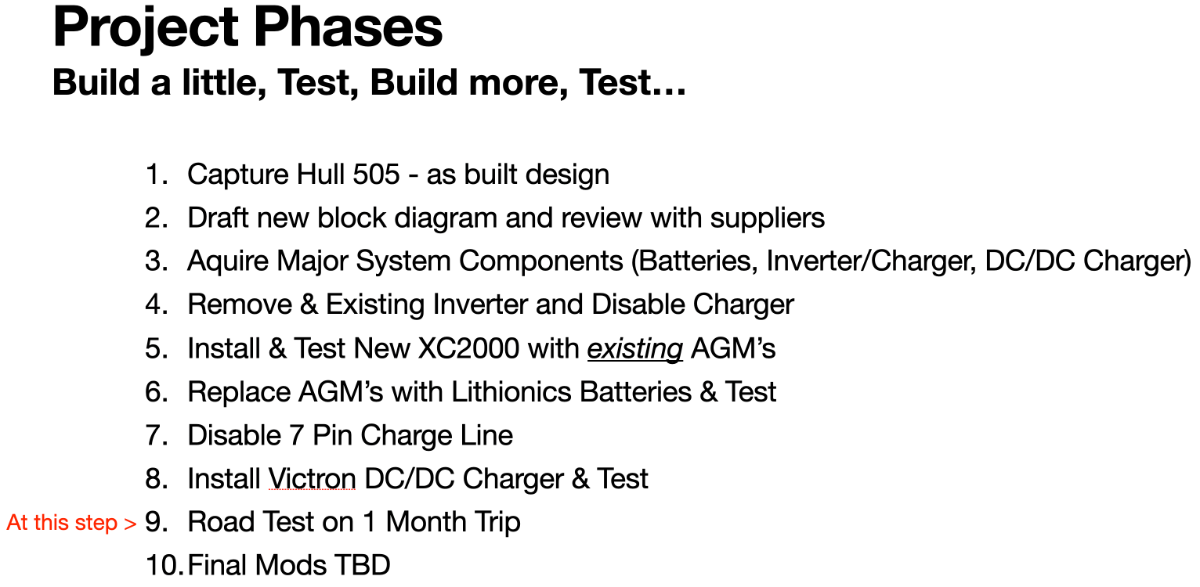
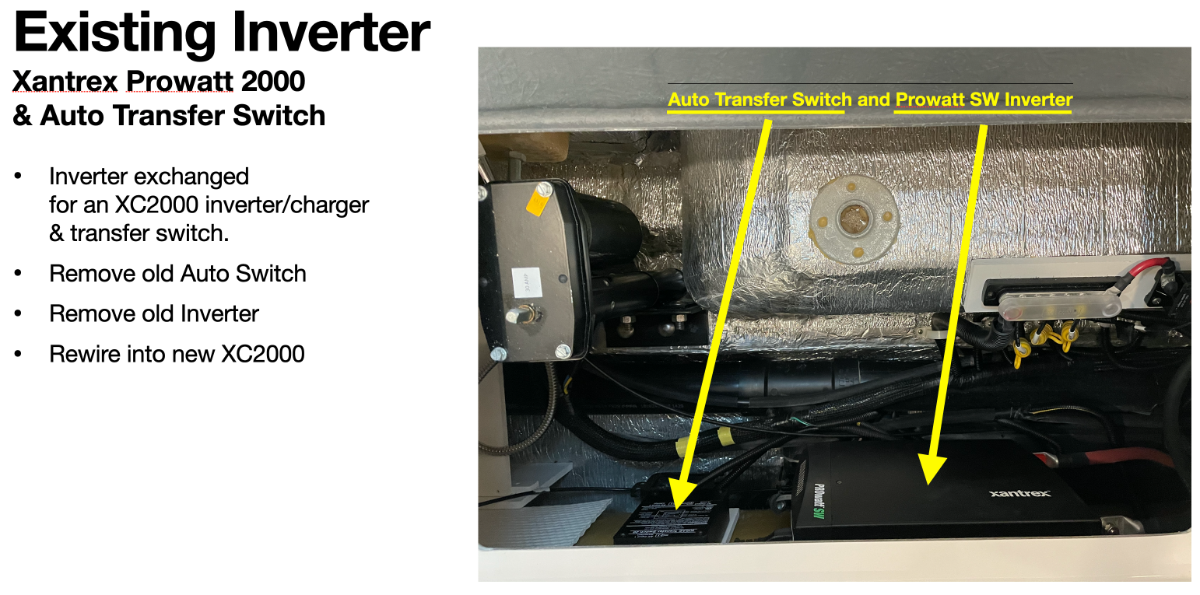
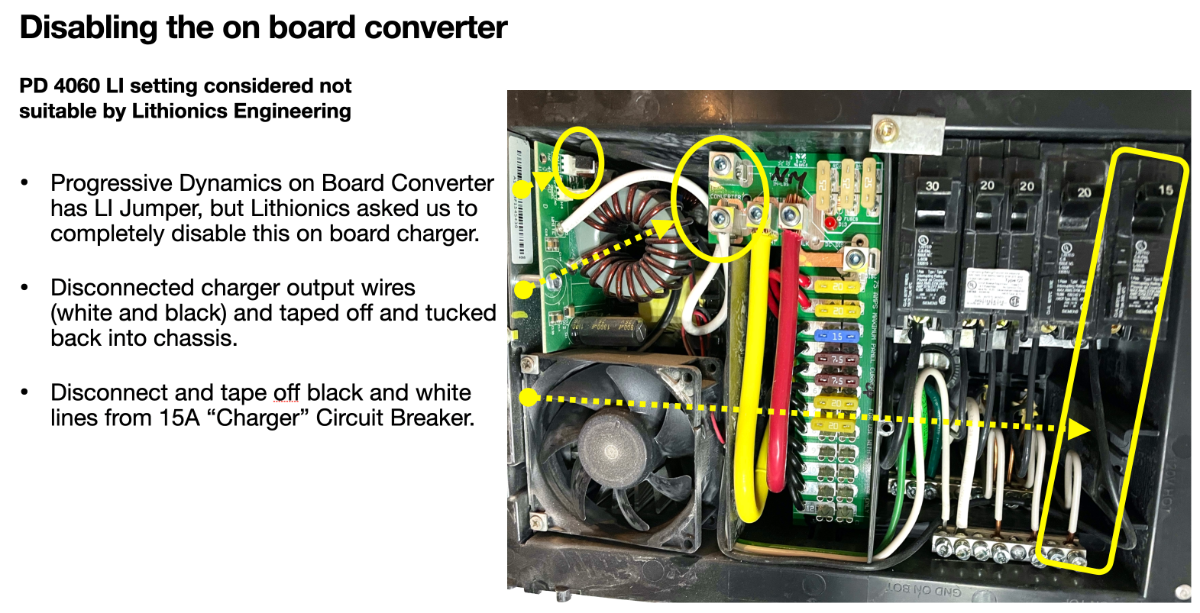
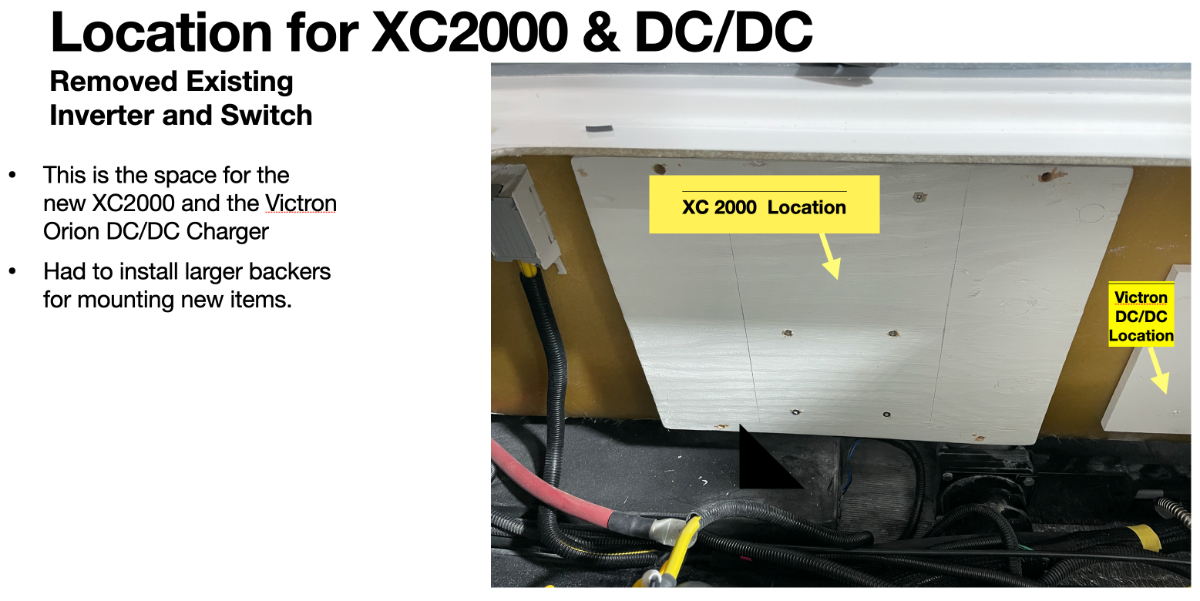
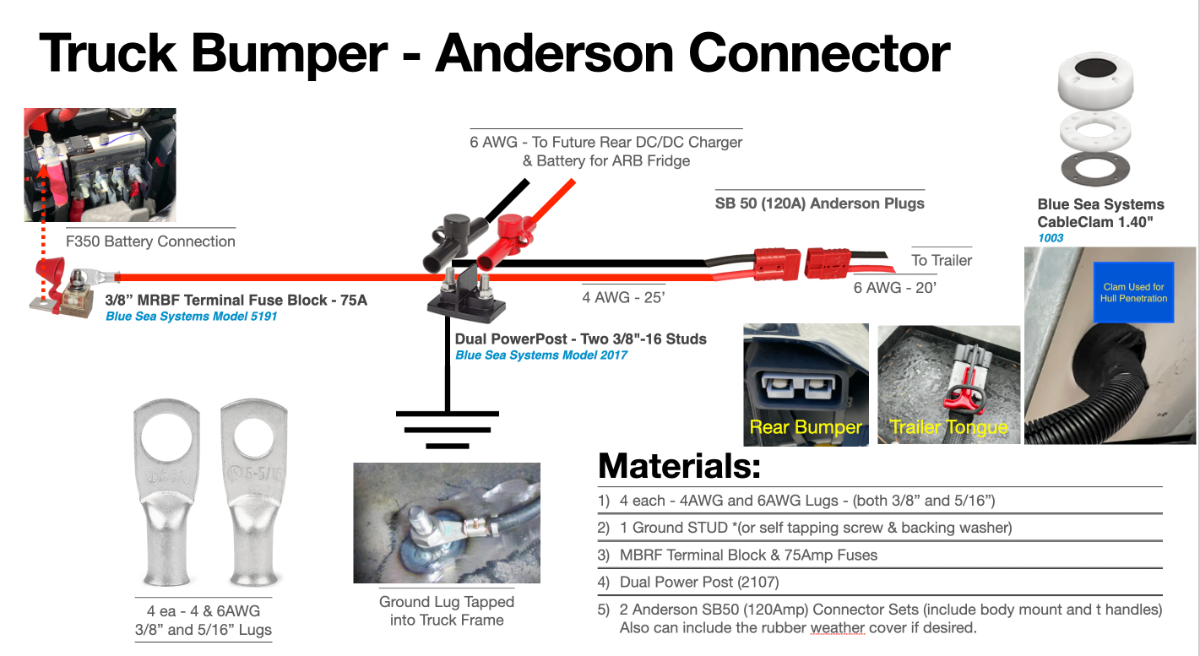
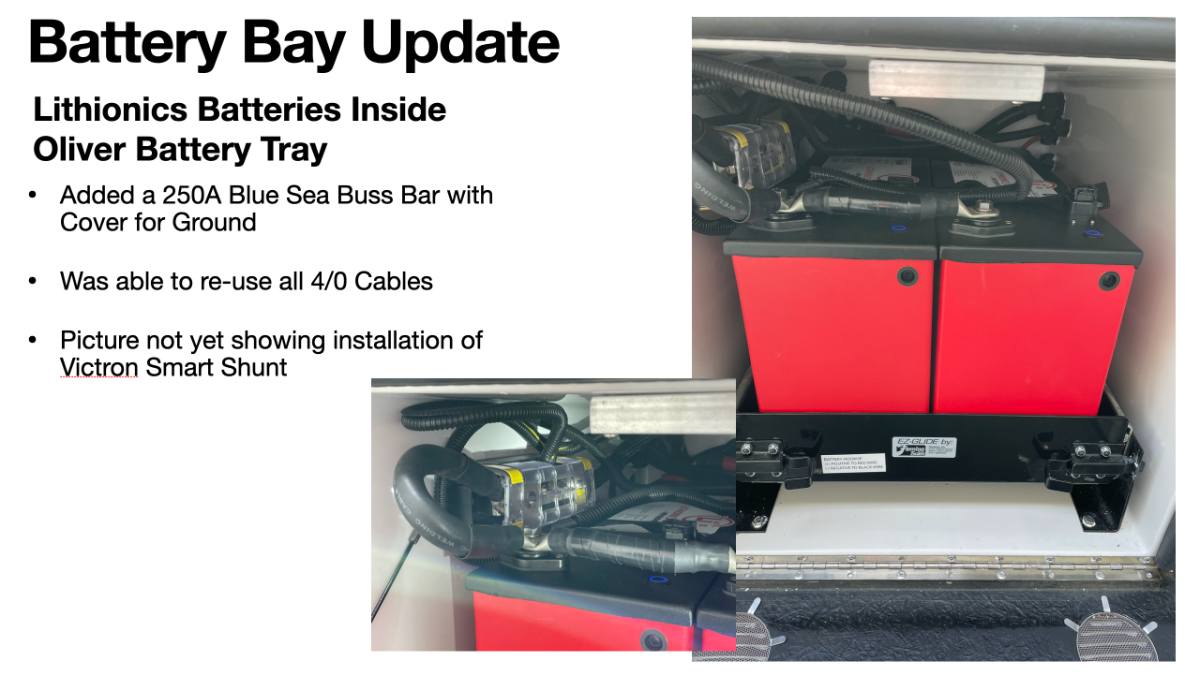
An update for the forum on my project to upgrade to 2 new Lithionics GTX315 Batteries for Hull 505 - Galway Girl. Some slide ware below is self explanatory...but if you have questions, please ask. We'll be doing a month long road test in June. Craig Short Hull 505 ________________________________ What are we adding? ________________________________ Project plan: _________________________________________________ New System Level Block Diagram: ___________________________________________________ What we are removing from Hull 505: _____________________________________________________________________________________________________ How to disable the existing onboard Progressive 4060 converter / charger: _______________________________________ New Components Installed: _________________________________________________________________________________ The finished installation: ______________________________________________________________________ Battery Bay with (2) Lithionics GTX 315's Installed: _____________________________________________________________________________________________________ Victron DC/DC Charger Modification - new wiring run and hull penetration: In this case we used a Blue Sea CableClam for the hull penetration to maintain a sealed exterior. 1242127529_Hull505Upgrade.pdf
1 point
-
We bought our 2020 Elite II with LifeBlue Lithiums, so I can't comment on an upgrade, but I can comment on things I've learned that you may want to consider in your "design". 1. Temperature control: the Lithiums like to be at room temperature (+/- 20F). OTT installs a heating mat custom made for super-cold conditions. I know a lot of owners with Lithium, including myself, have sealed off the battery box vents and insulated the door. Conditioned air is also something to consider. @John E Davieshas vented and installed a computer fan to help with temperatures in his battery box. I took a different approach and decided to keep the battery box air tight and tie it in directly with the cabin conditioned air using a dedicated 4" smart fan and ducts. 2. A charger that has either software control or an easy to access cutoff between the charger and the batteries. Lithiums don't like to be topped off and kept at 100%, so I have found that I do a lot of shorter charge cycles like from 50% to 85% or so. Turning the charger off / on may be something you find you would like to do more often than you have in the past, so easy access is very nice to have. Good luck - I'm sure you will get lots of great advice and help from other members that have just done the actual upgrade! John1 point
-
A broken toilet mechanism? If I was younger I would get into the RV components business and put Dometic and the rest the yahoos out of business.1 point


-
Recent Achievements
-


")


