Leaderboard


Popular Content
Showing content with the highest reputation on 06/20/2023 in all areas
-
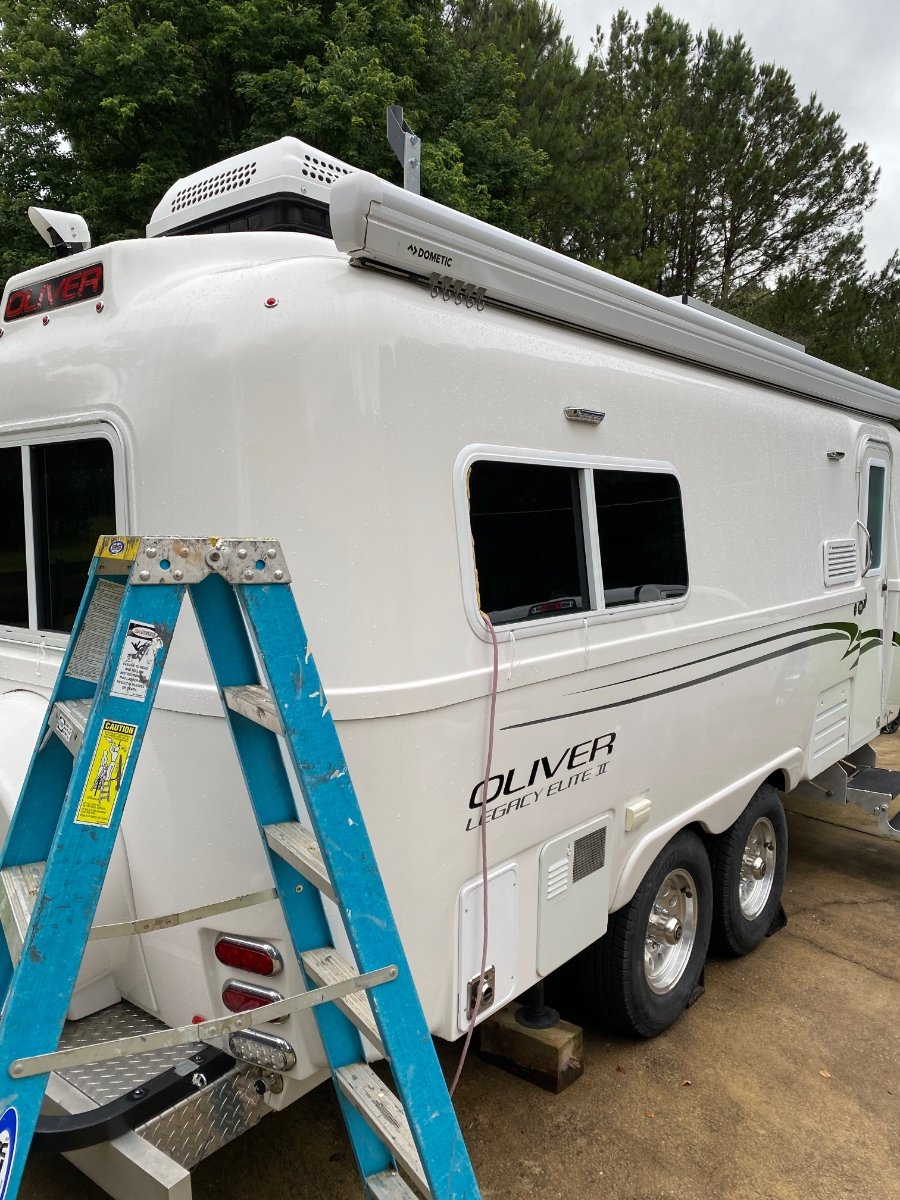
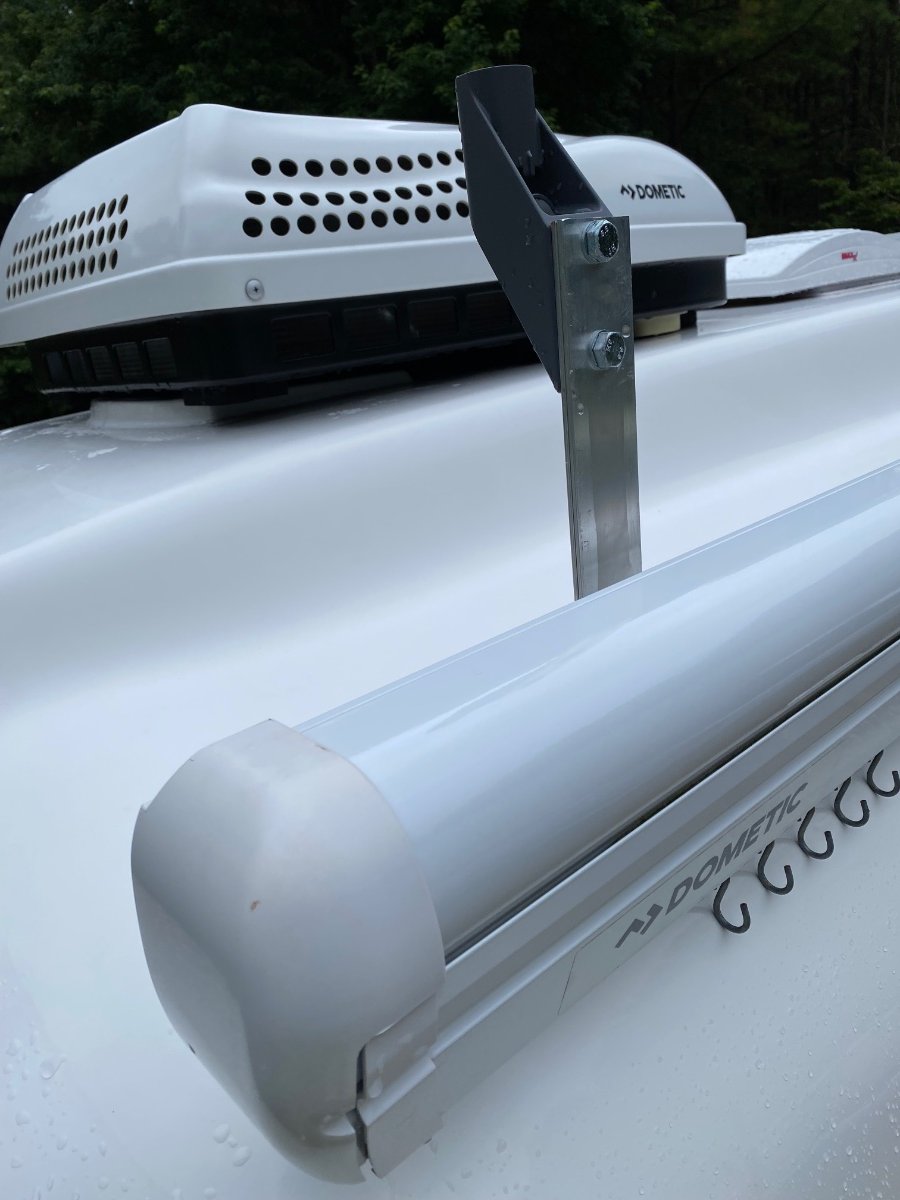
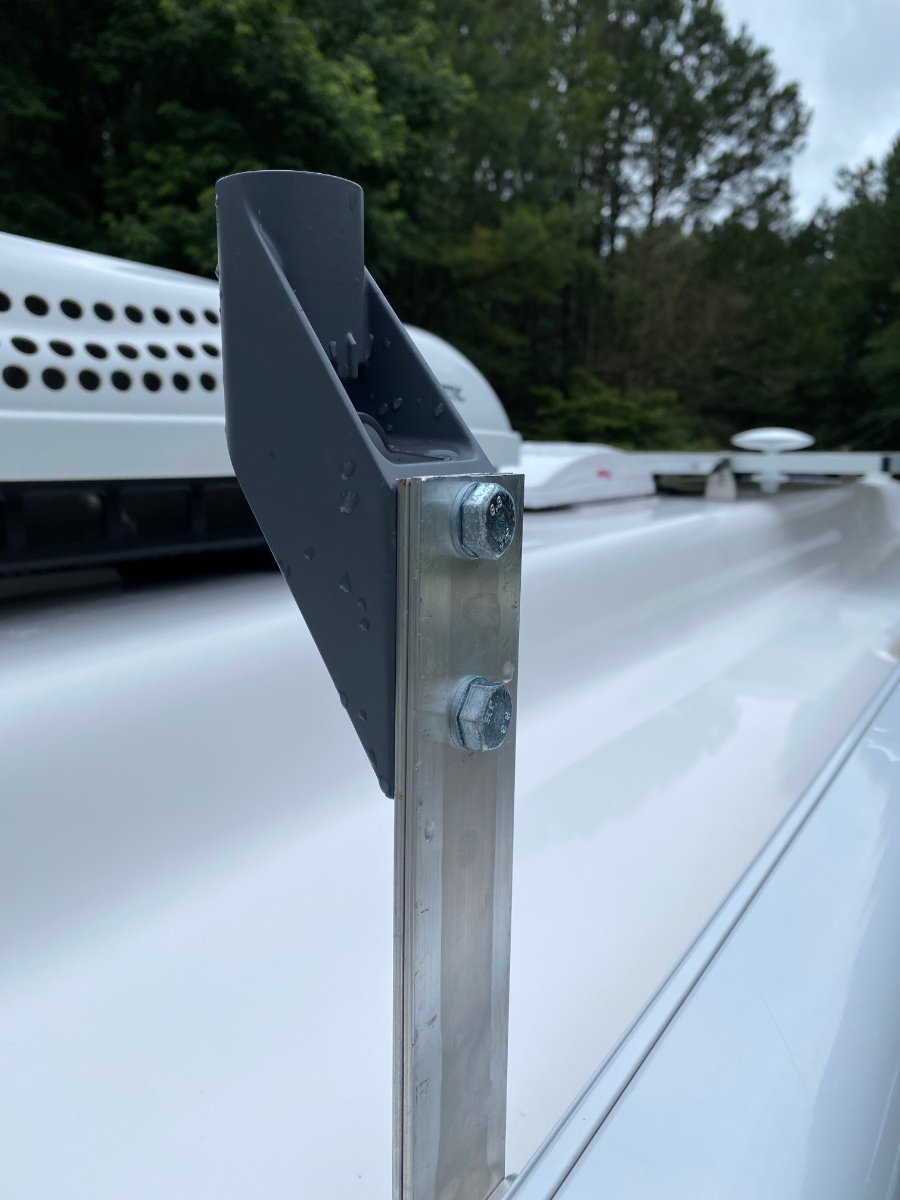
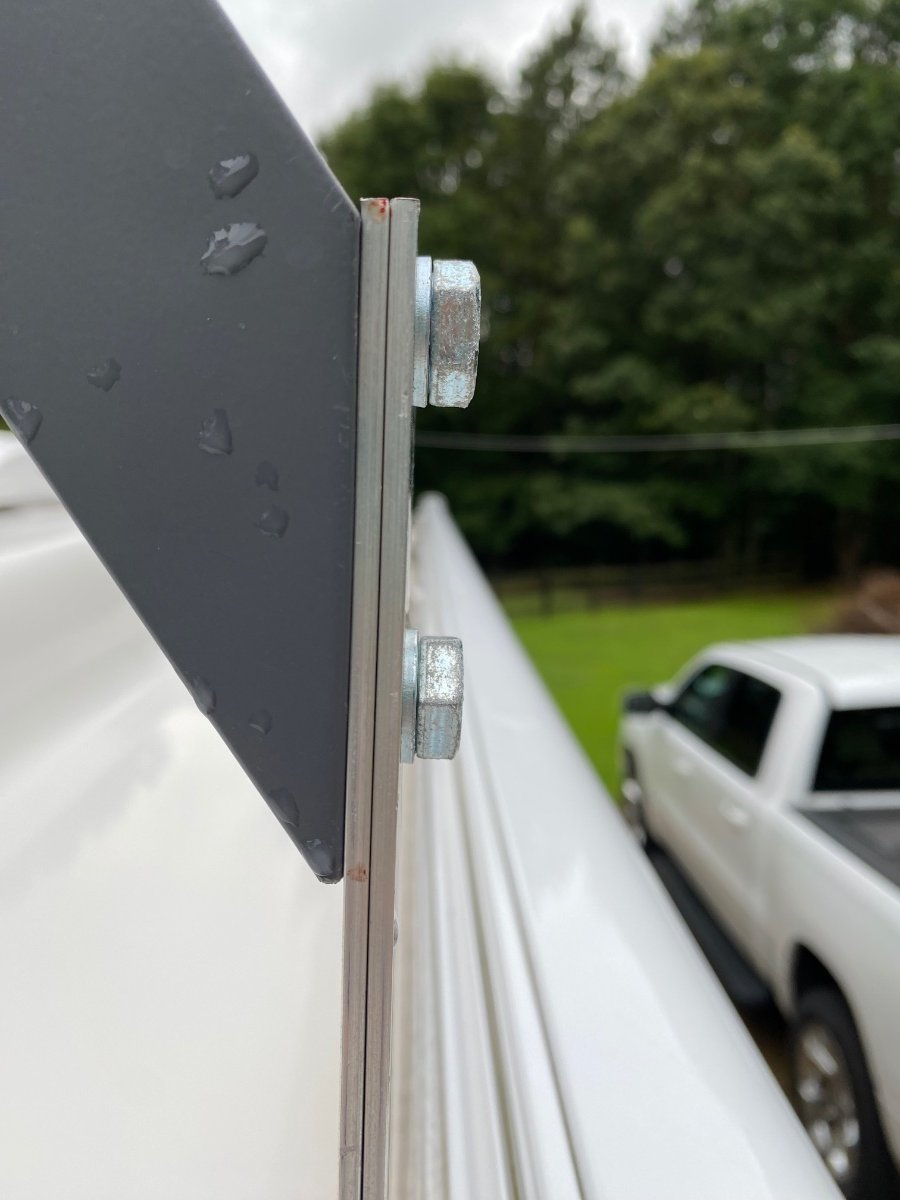
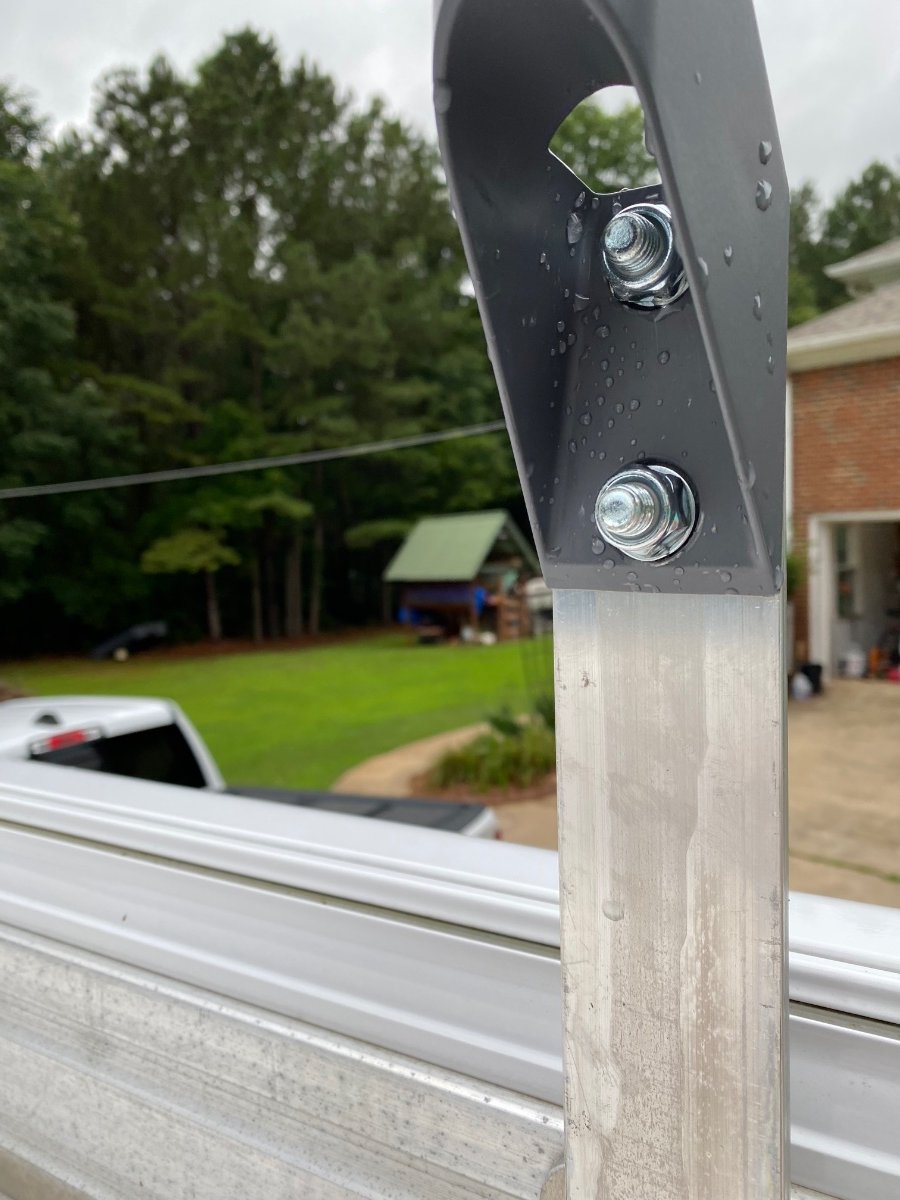
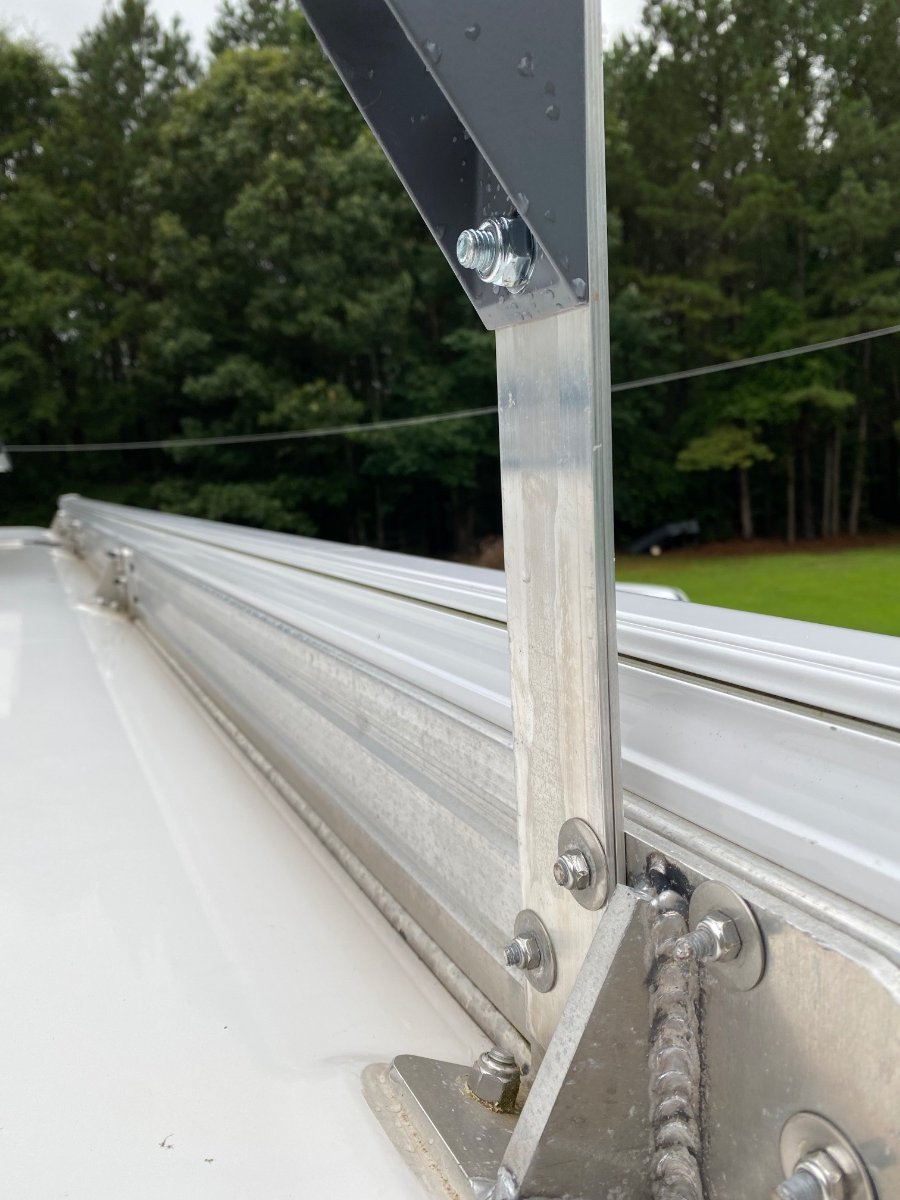
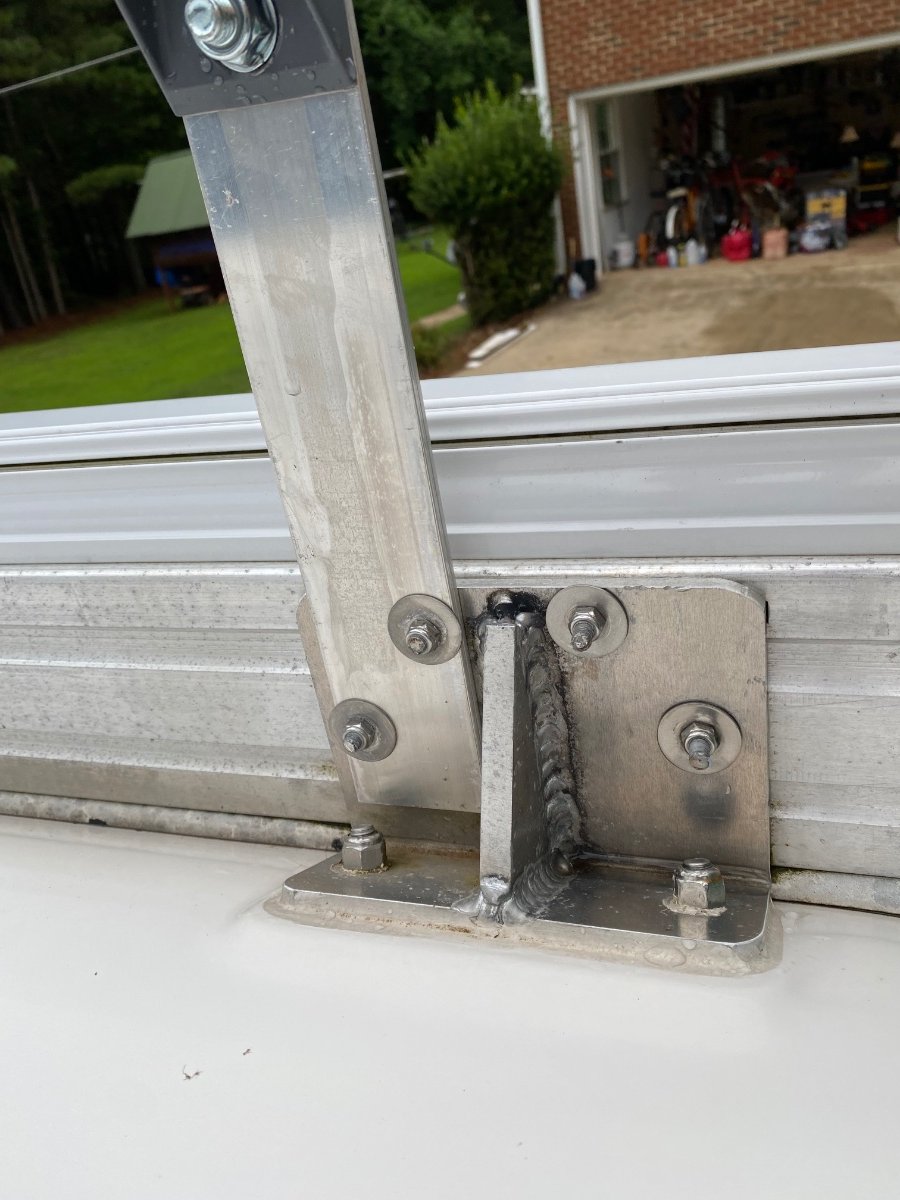
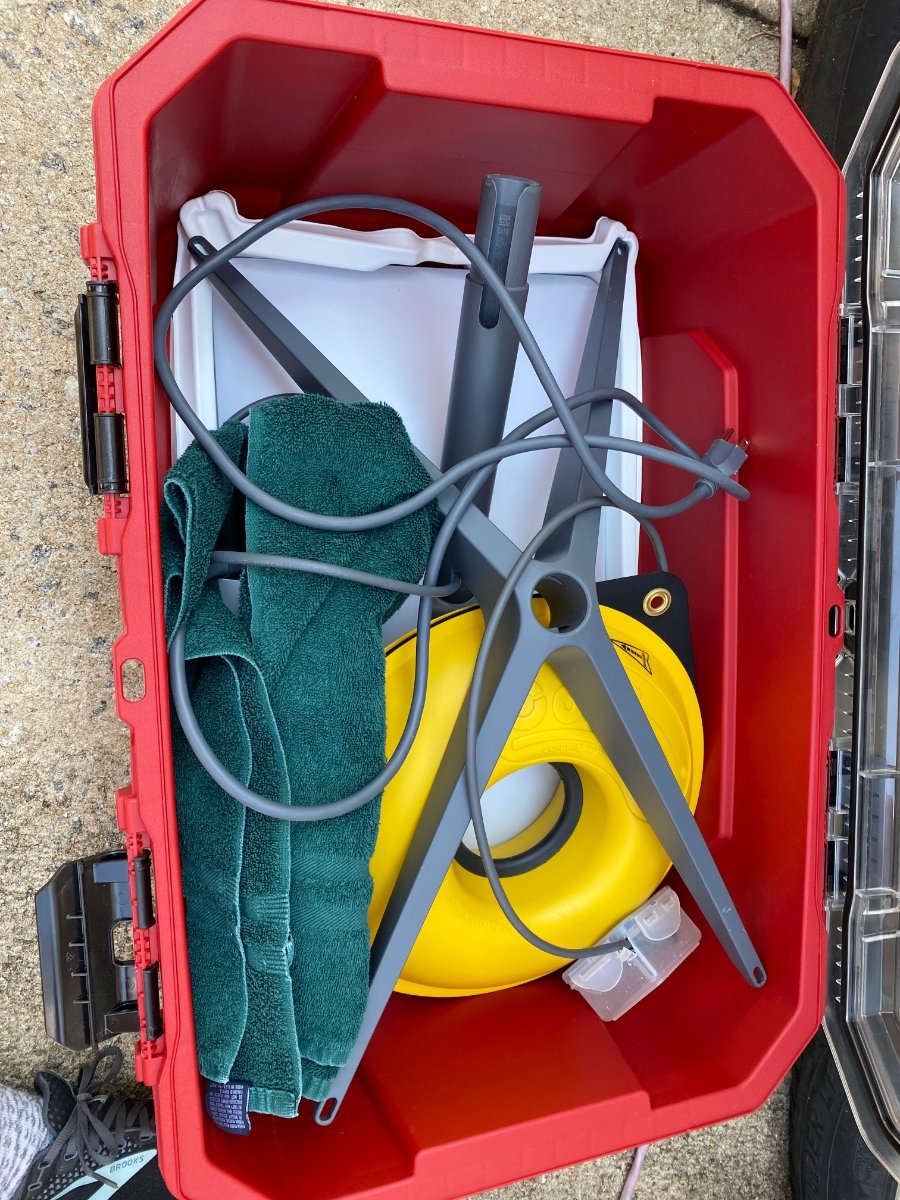
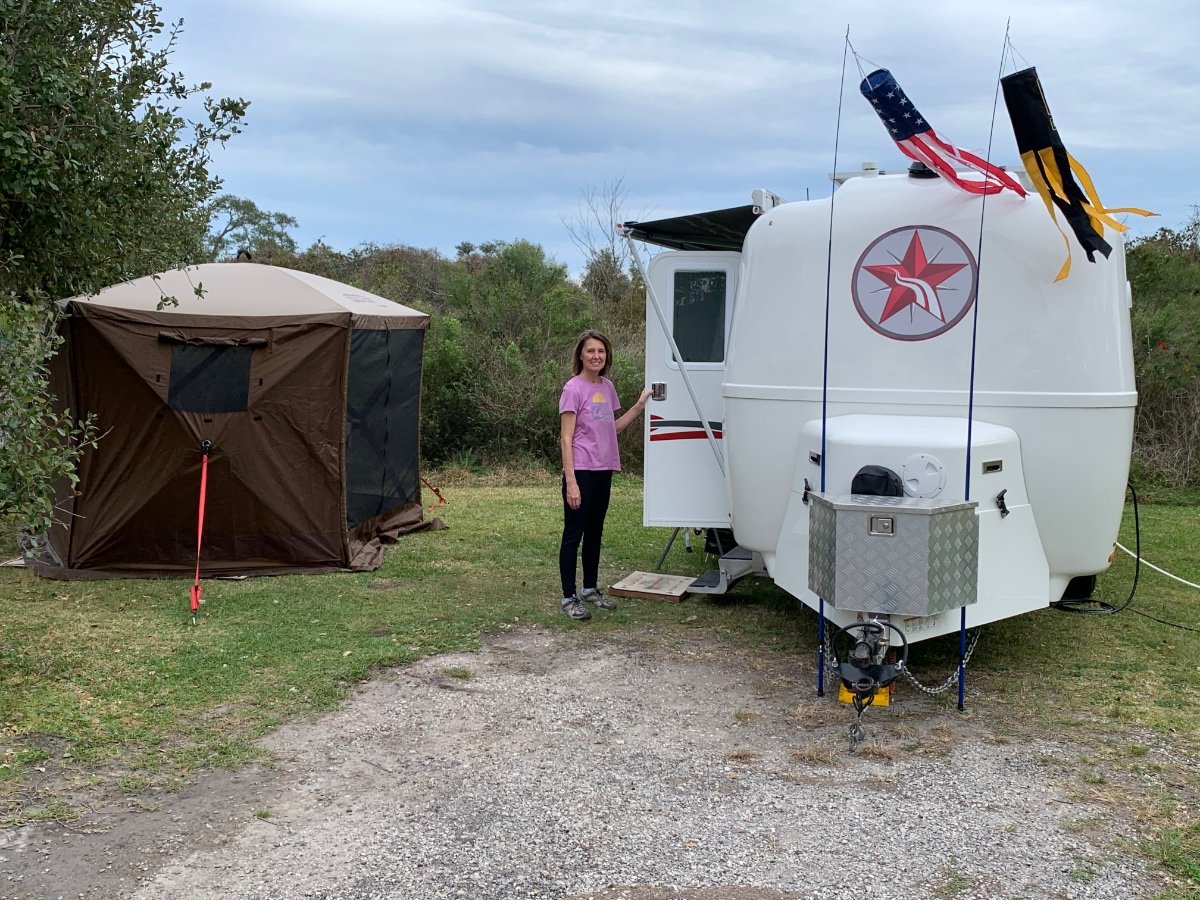
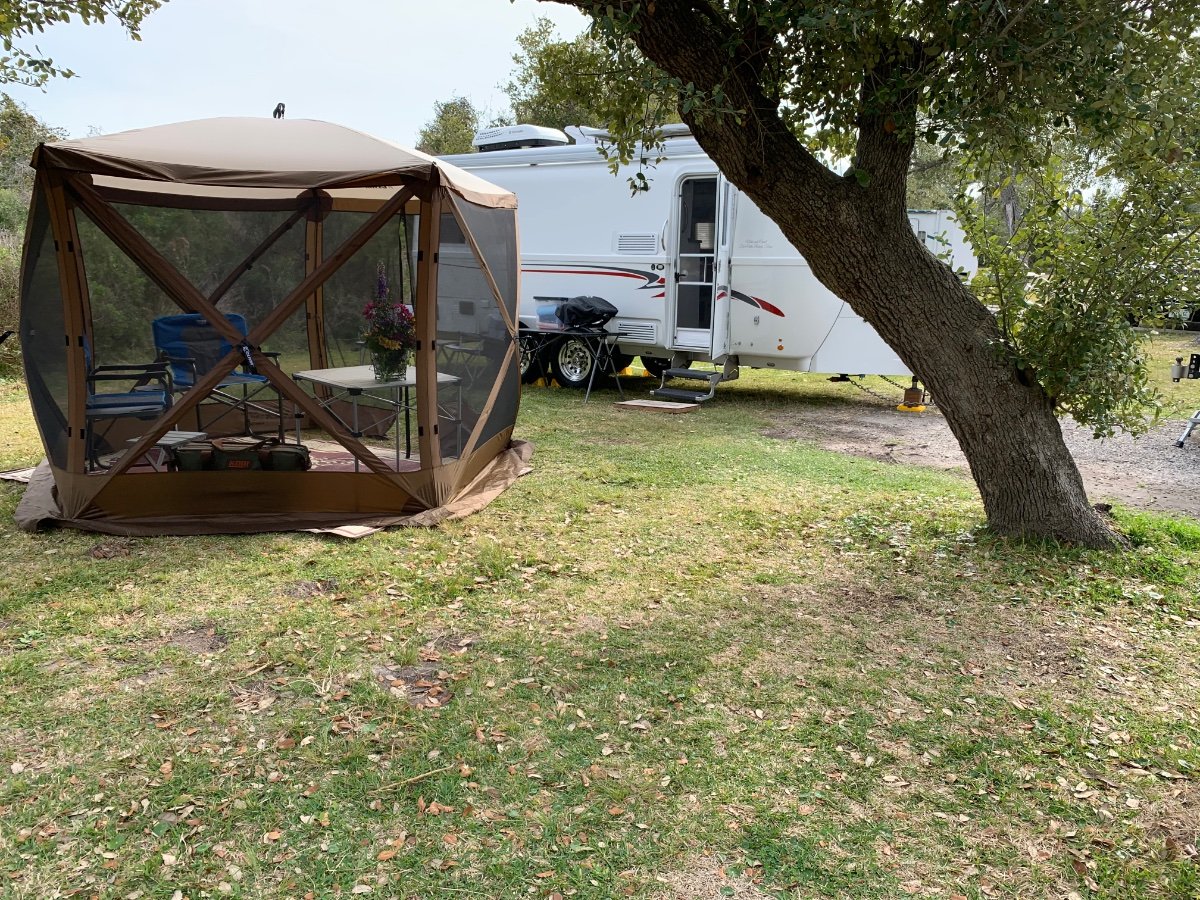
We liked the idea of mounting the Starlink bracket to the roof as we already owned the short mount from when we mounted it to the fascia board of our house. Mounting to the awning where easy and quick access to install the dish at each campground was our priority. But our 2019 Oliver has a Dometic awning whose bolt pattern is diagonal and the Starlink mounts bolt pattern is vertical. Our solution was to select a 2” wide piece of 4’ stock aluminum at Lowe’s, cut 2 pieces for strength, and drill holes on one end to match Starlink mount and the other end to match the Dometic awning. 1. We began by measuring the clearance needed for the dish to clear the awning when the dish is in stow mode, and length for the drilling of holes on both end. For our application, that length was ? We also ensured the trailer was level before starting. 2. Next we used cardboard to make a template to cut and drill the hole patterns. I am sure others may find a better way to do this, but we put dark powder on the bolts and then pressed the cardboard to them using a level on the cardboard to ensure it was straight. (We also visually assessed that it appeared perpendicular to the awning). We then pre drilled the holes in the cardboard and did a test run. NOTE: it took us at least 3 cardboard attempts before we got it right! 3. Now we transferred the template to the metal pieces. We actually drilled the awning pattern on one end of the 4’ aluminum piece before we cut the short lengths. This was in case we messed up, we would only lose a short 2” piece rather than our planned 8” lengths. We mounted the long piece to the awning, but the upper hole was slightly off, so we had to wallow that hole slightly larger, but that did not impact securing it. We cut our length and drilled the Starlink holes. We repeated this process for the second piece. 4. We purchased stainless steel bolts, washers and lock nuts for the Starlink end. So we stacked the 2 aluminum plates and installed. The direction we chose for the Starlink mount was to make it easier to see and plug in the router cable to the dish when we put it up there. NOTE: the awning bolts had been cutoff and threads were damaged so the nuts wouldn’t come off easily on the rear awning bolt set. Thus we had to use the set forward of those. 5. We have traveled at 65mph and it doesn’t seem to move and remains secure. 6. Like others, we bring the 4 legged dish mount/anchor and use it if we are under trees and need to move the dish 50’ away from the camper. We aren’t concerned about theft of the dish as it cannot be used by anyone else. Each dish is specific to the owner’s account. For interest, I am including a picture of our Husky storage box and how we pack it. We use a Cord-Pro to wrangle the 75’ router cord to prevent tangling. I also notched a Tupperware to protect the cord plug end that goes in the dish. It can be delicate and damaged easily. 7. We current put the cord thru the basement door and plug into the router via the trap door at the bottom of the bedside table (we have twins. The basement door has a notch in the rubber seal where the cord fits and allows us to close and lock the door without pinching the cord. Eventually we plan to convert the satellite port. Please ask questions, we would be happy to answer.
 4 points
 -
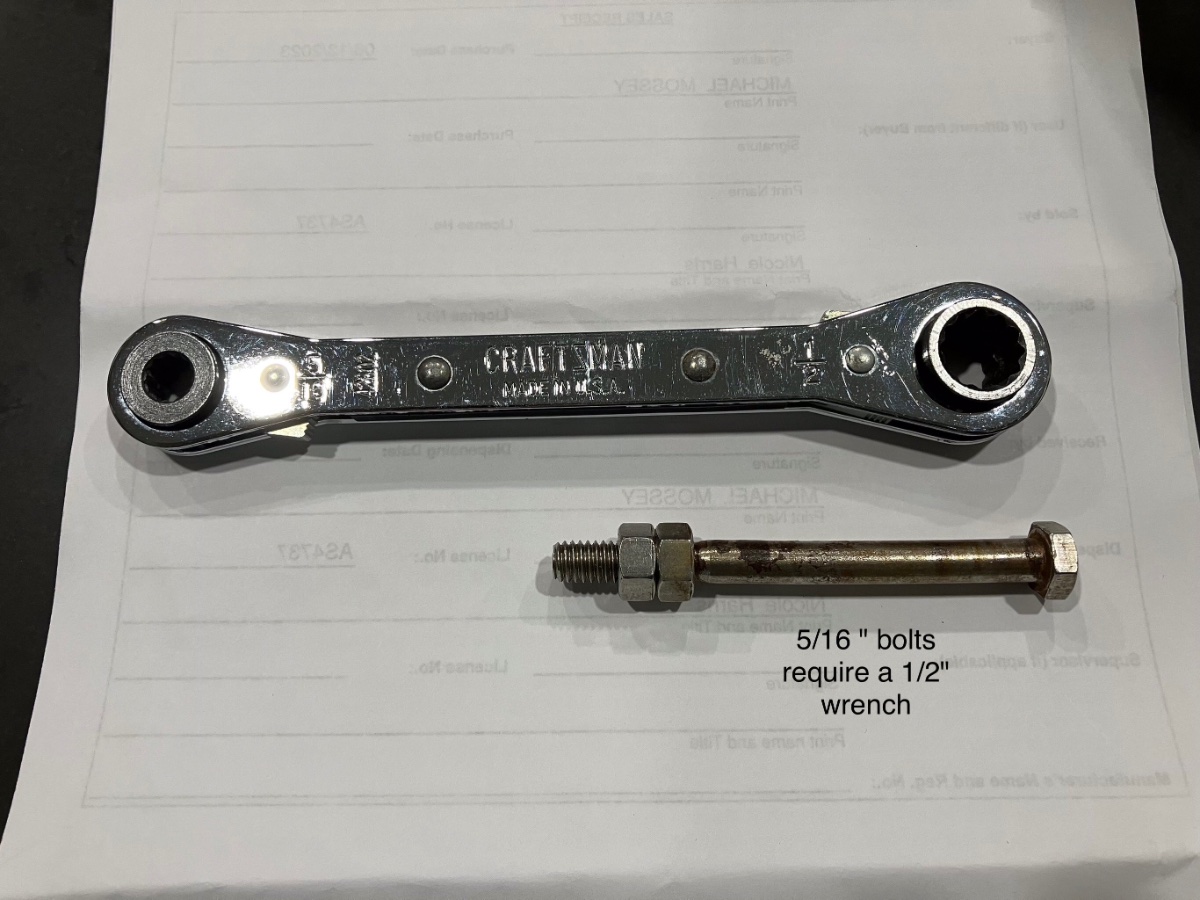
This is what I use, since I don’t own a 1/2" Allen wrench! Mossey
4 points
-
What fun. Take it all in as you can but enjoy yourself. It will become second nature before you know it.3 points
-
Unless it's changed since September 2022, I was advised there are anchor points in the hull for solar panels even if you don't get solar during production.3 points
-
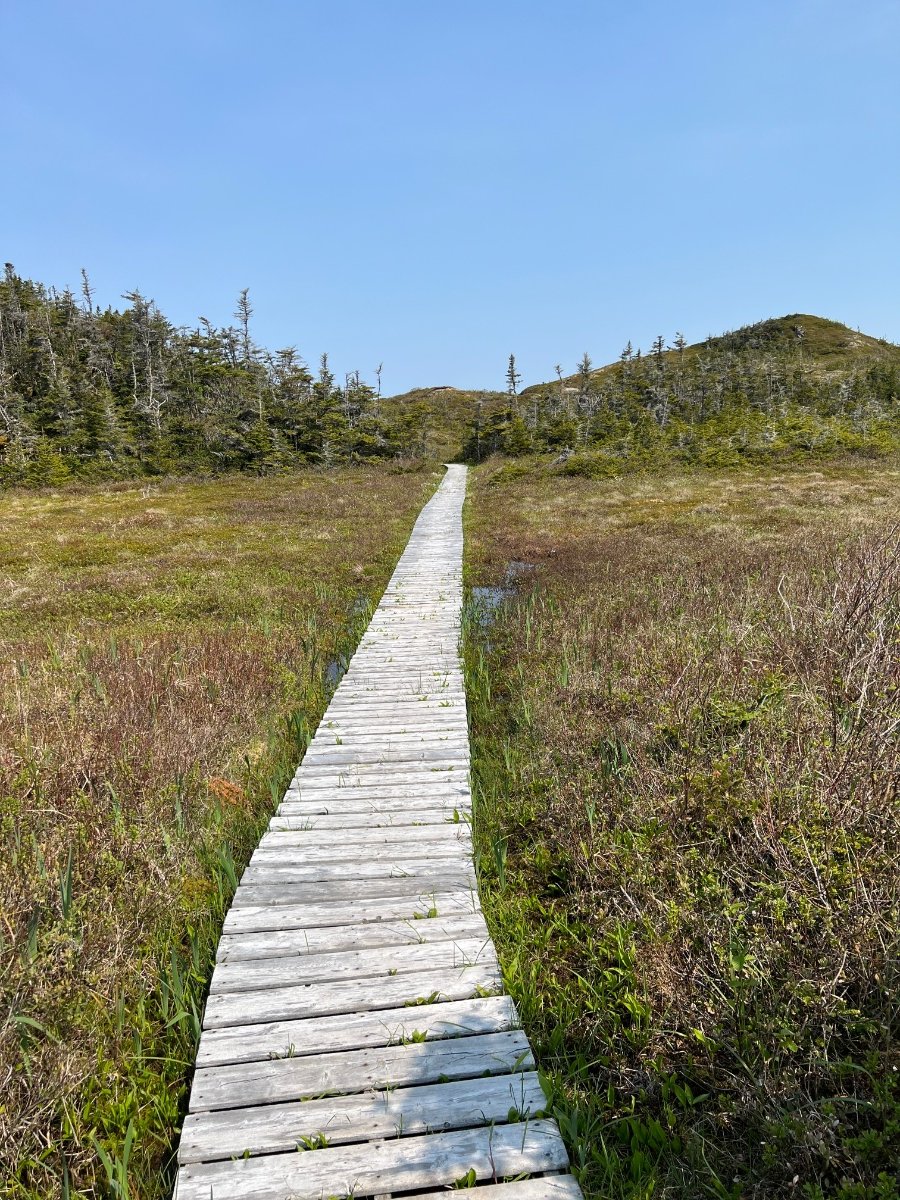
I made reservations for each stay, but so far the campgrounds have been maybe 10 to 30 percent full. It’s early in the season here, I suspect they will be a lot fuller in July. Most of the Provincial Parks have no water/electricity at each site but have water and dump sites in the park. A few have electricity at the camp sites. All have been really nice and beautiful camping sites. The private and National Parks have more facilities at each campground site. Our current camp site at Gros Morne National Park, has water and electricity.3 points
-
I’m hunkered down in scattered showers at Camp Oliver right now. Ryan did a great job with the delivery and I’m completely overwhelmed! The big stuff I’ve got covered but the little details are just going to take time.
2 points
-
While you've got the washer and screen out I'd take out that 1/2 inch Allen wrench and make sure the fitting is snug. The wrench fits into the hose opening behind the washer/screen combo. Should be snug. Don't need to torque it.2 points
-
The solar panel mounting points would be more important to me than the pre-wiring. I wonder if that is still being installed during a non solar build. Mossey2 points
-
Very creative idea. I also ran into the issue of mounting bolts that were offset. in our Domestic awning rail (below), I drilled and tapped 2 new holes that I installed 2 bolts with thread locker. The front side of the bracket is flush with the aluminum mounting bracket.
2 points
-
Current labor rate is $150/hr. Might be able to back into it. That said, they may price it so they don't have do it.2 points
-
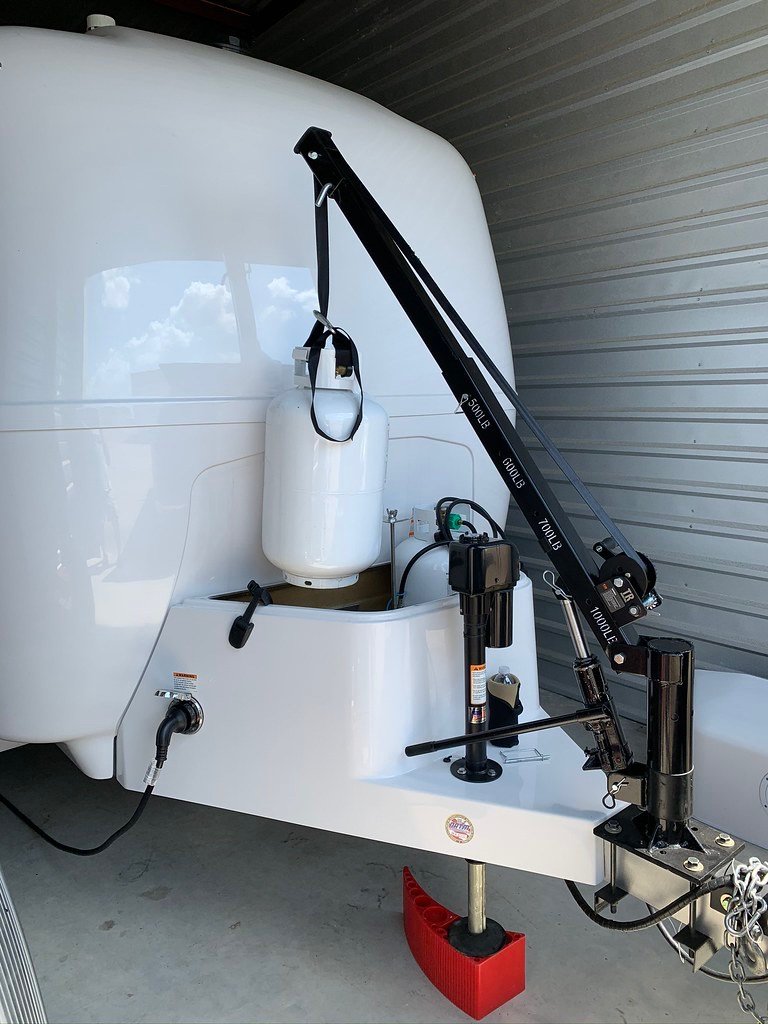
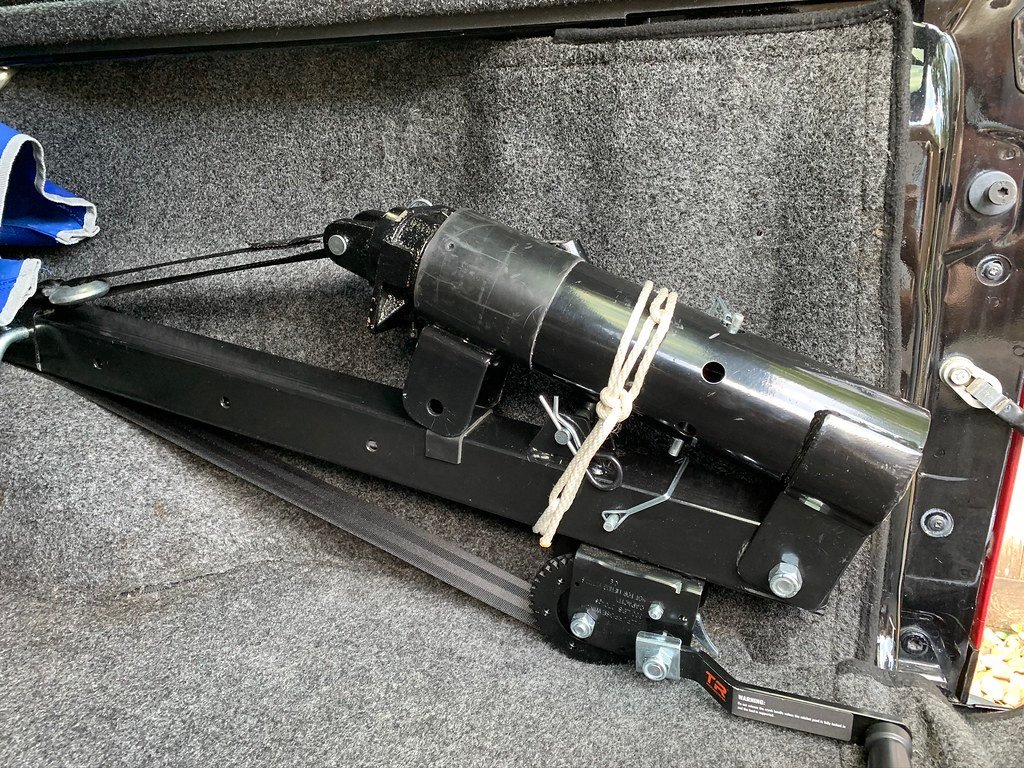
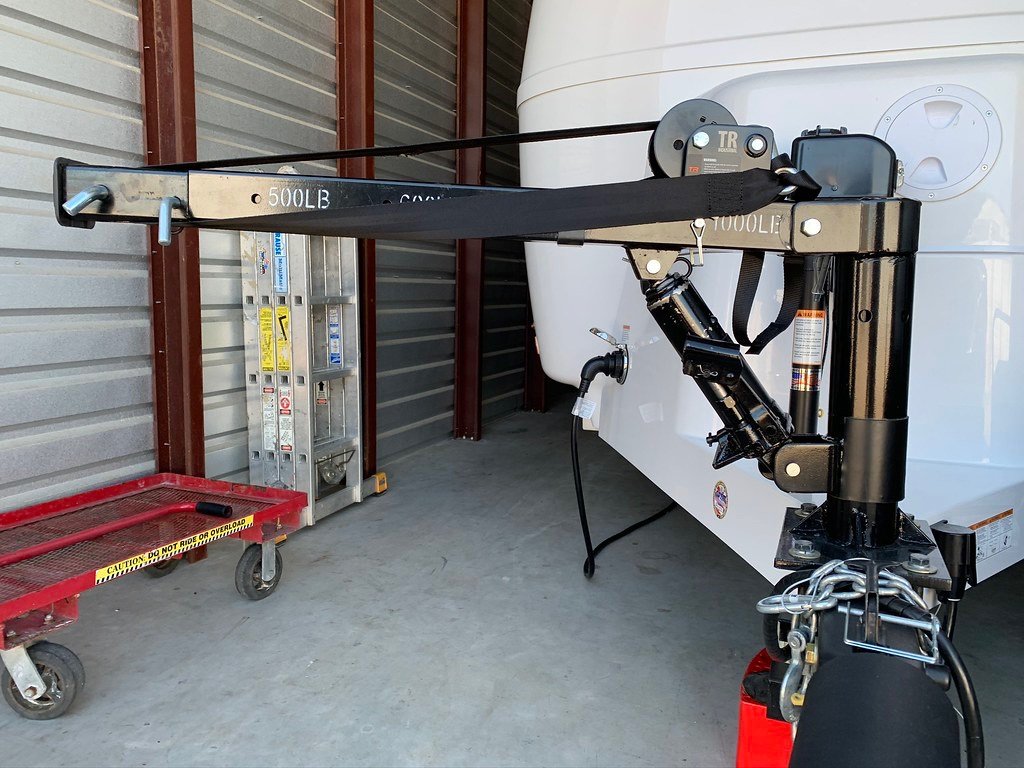
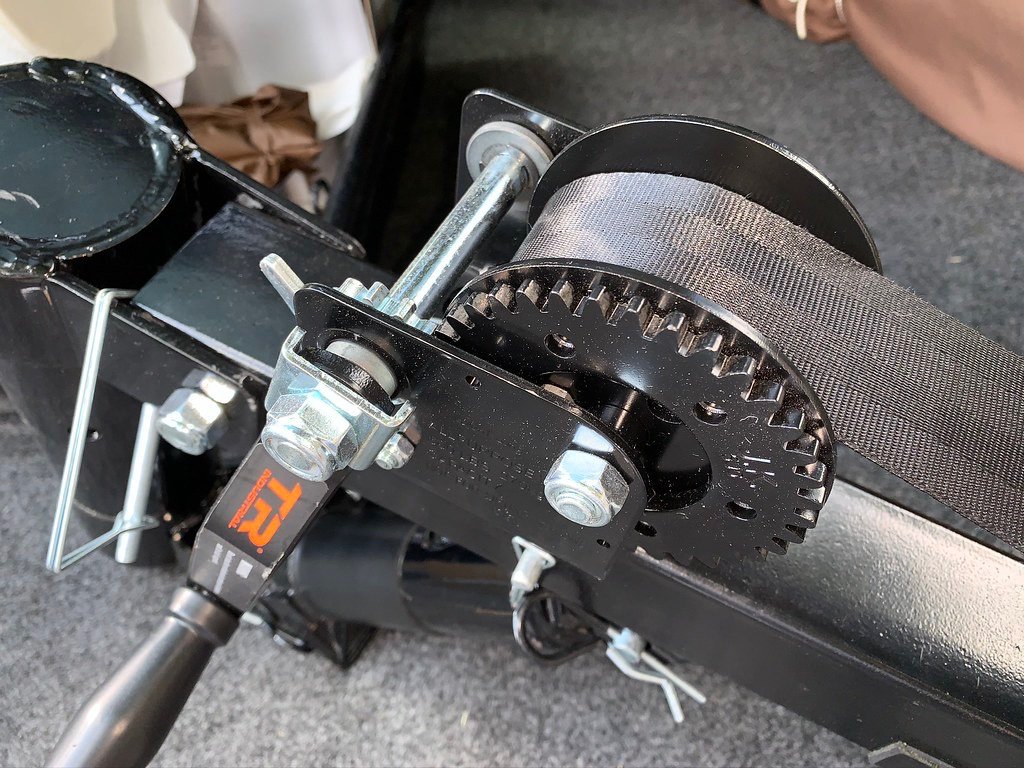
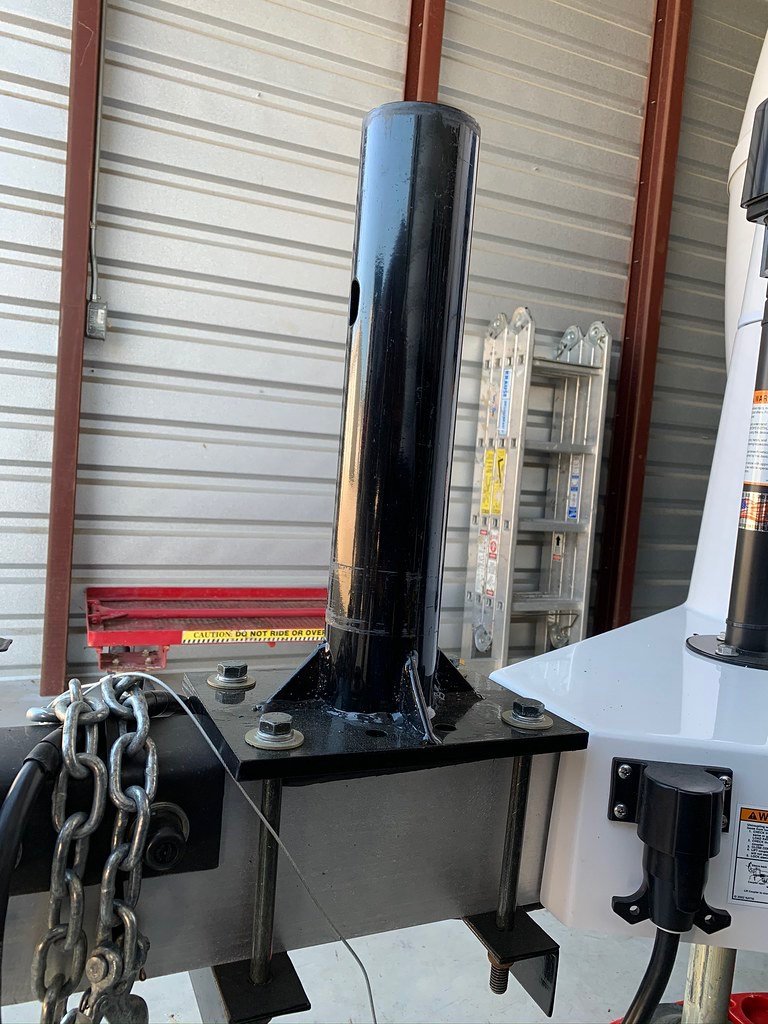
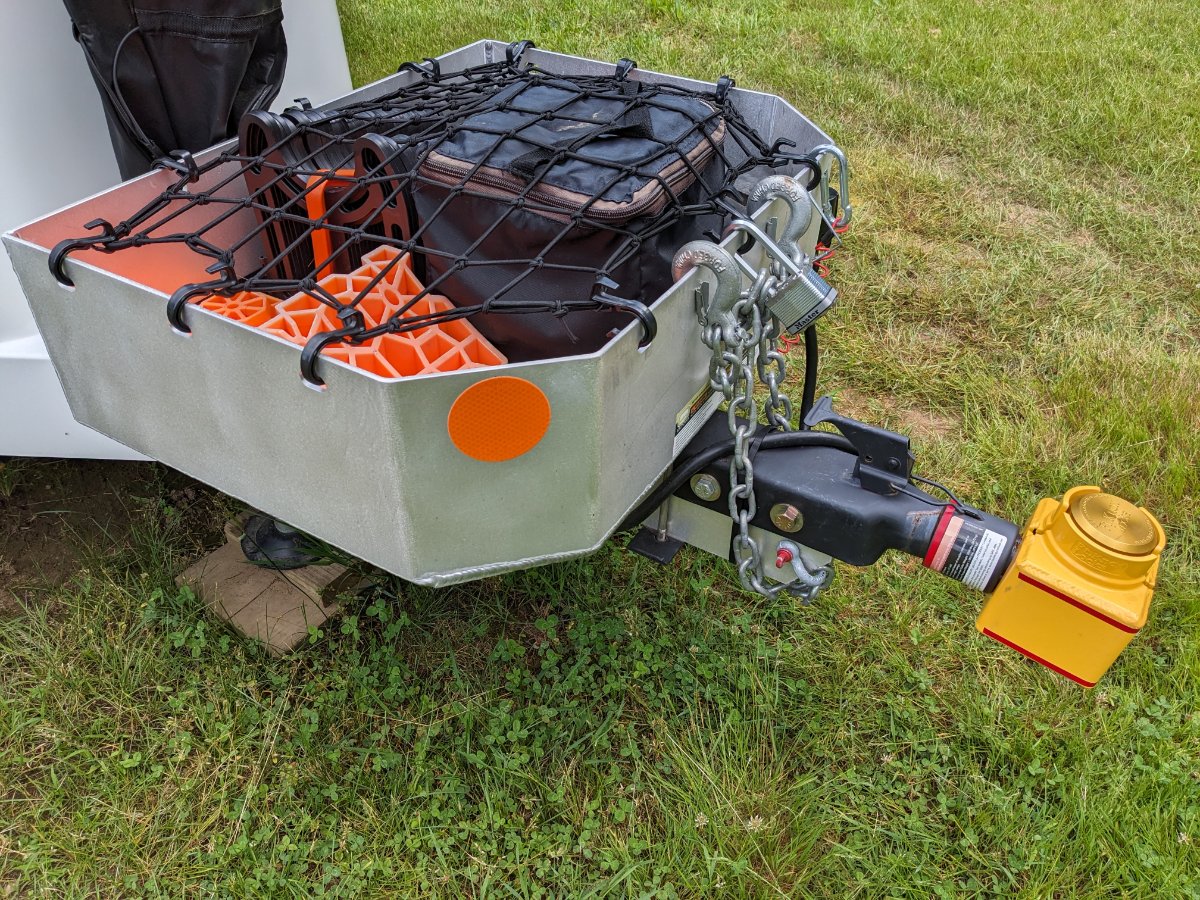
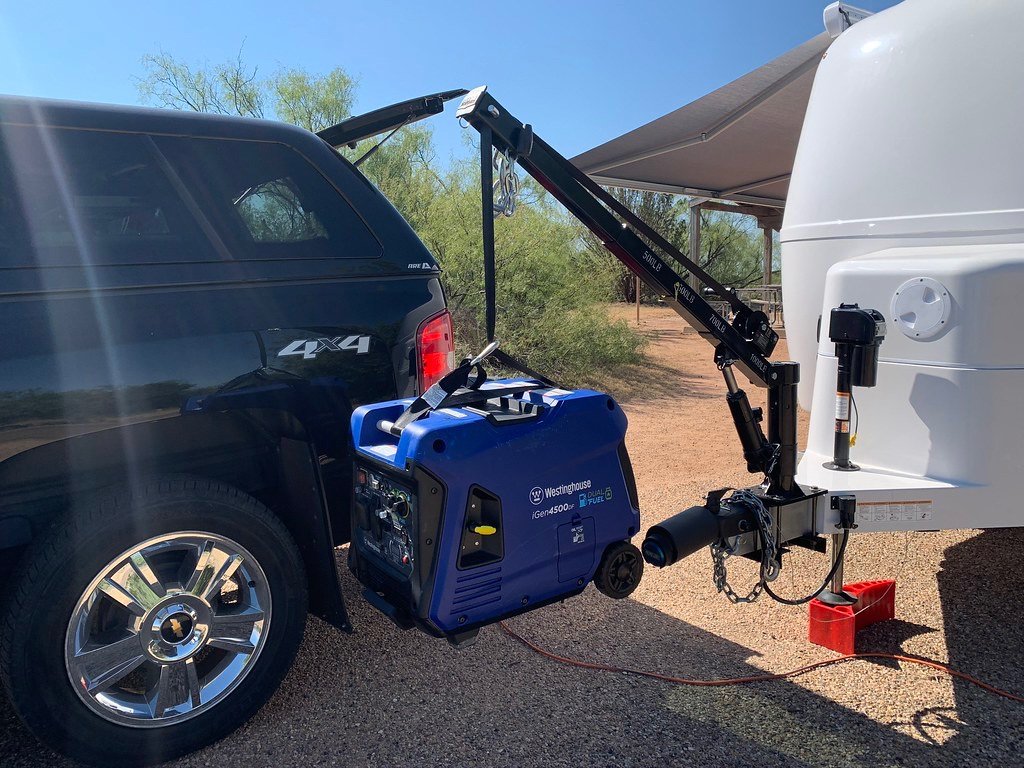
The hoist is a real back saver, use it to load the generator, as well as the Dometic completely loaded and full 30# propane tanks. The ‘truck crane’ is marketed for a truck bed installation, but I modified it to mount on the tongue of the Oliver. I also added a strap winch for enhanced performance which involved some fabrication. The Anderson under the front stabilizer is a Rapid Jack put to good use!
2 points
-
Another interesting use for those Andersen Levelers too. You keep adding more "stuff" and ScubaRx will have to start thinking about a bigger truck. 😇 Bill2 points
-
Must be why I always eat 3 donuts. 😋 And remember, ”you don’t have to be hungry to eat a donut"!2 points
-
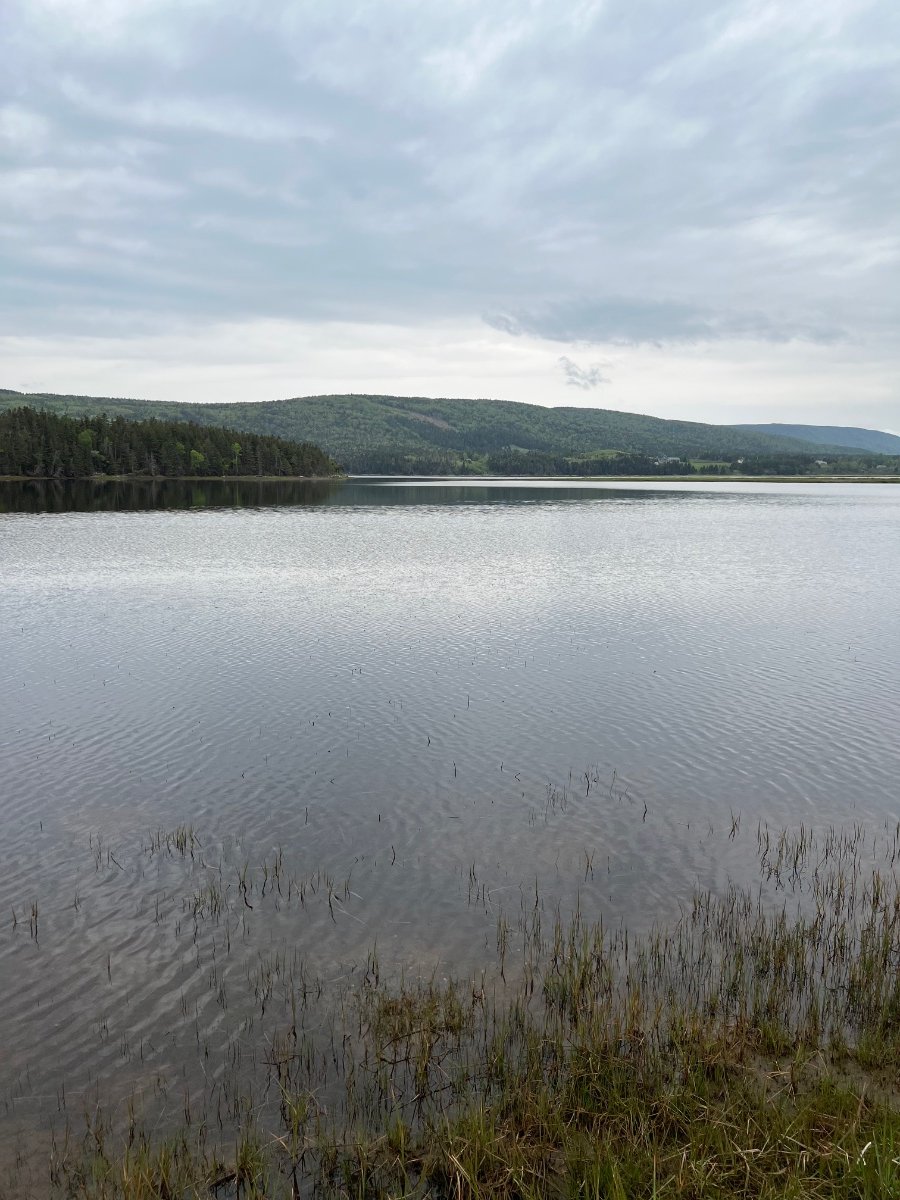
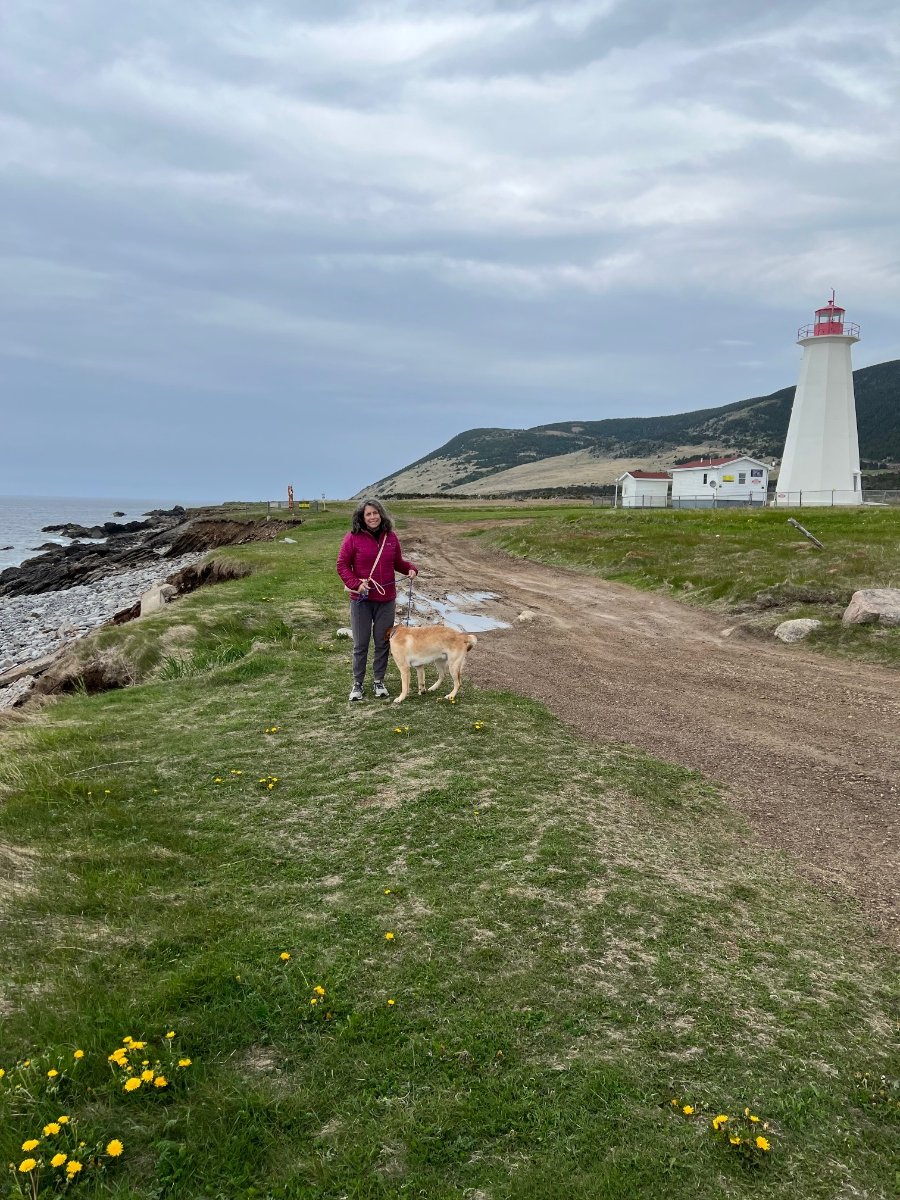
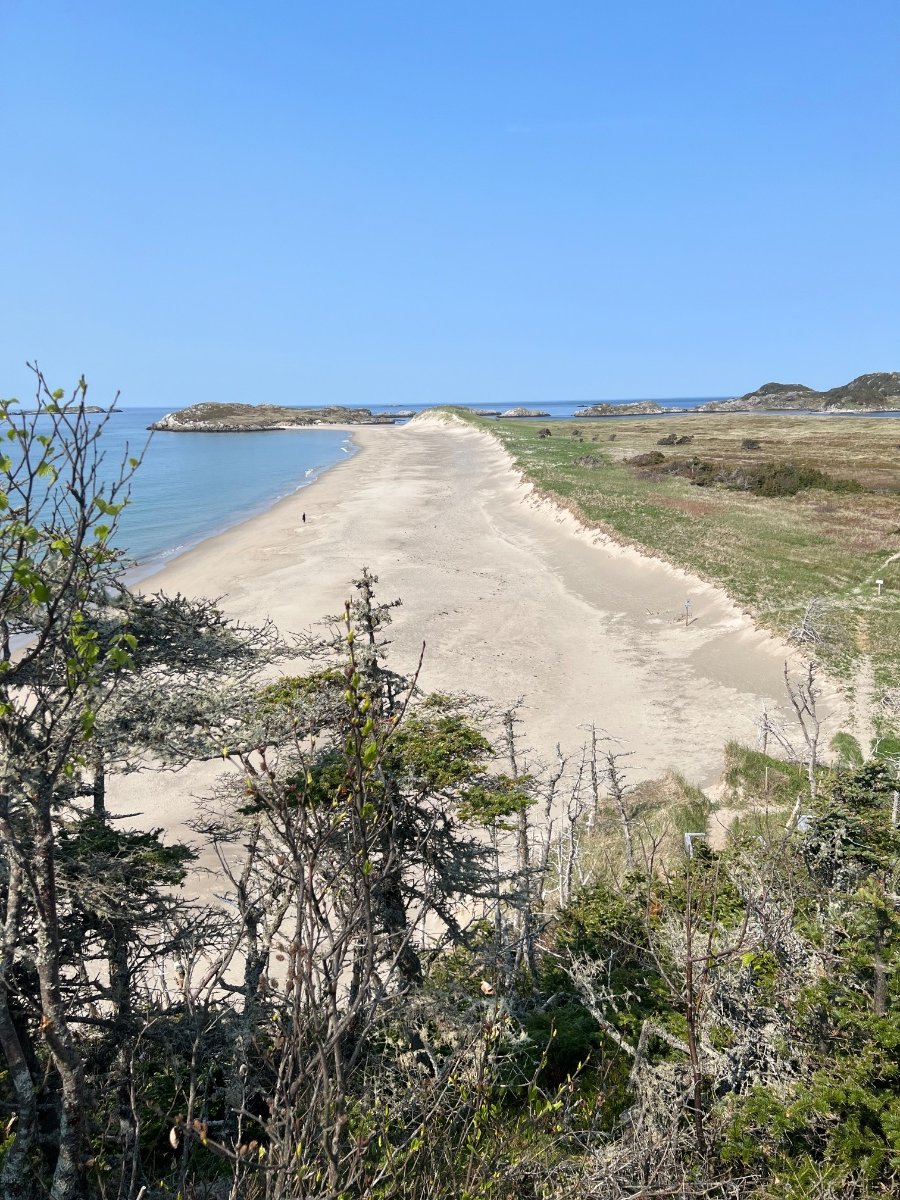
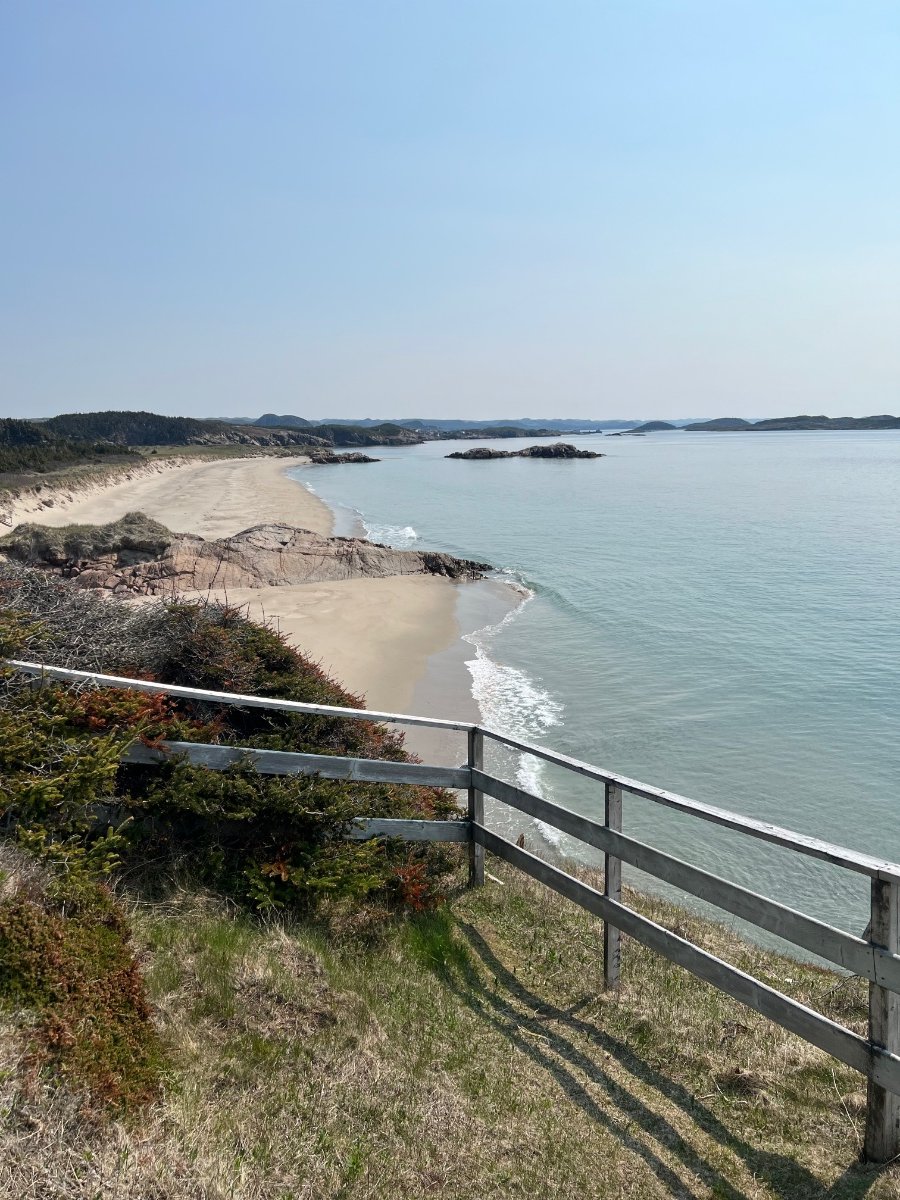
Our first 3 nights were at Grand Codroy campground, 30 minutes north of the Channel-Port aux Basques ferry terminal. The campground overlooks a large meandering river. We found it to be very peaceful and well maintained. A short drive from the campground is the most westerly point on the island. The next 3 nights we are at Sandbanks Provincial Park on the southern shore of Newfoundland. It’s a four hour drive from our previous campsite, where you perfect your pothole avoidance techniques. There are beautiful sandy beaches a fairly short walk from the campground. We are heading north from here, to Blow Me Down Provincial Park.
1 point
-
Our progressive auto insurance shot up 40 per cent this year. No accidents or tickets for decades. Needless to say, we are shopping.1 point
-
I hope that is so.1 point
-
I was told the factory or service department will not prewire the trailer, due to having to drill holes in the external fiberglass and then having to possibly repair the fiberglass. The only option I was offered, was that they could add a solar port on the side of the trailer for a suitcase solar panel if I was not getting any other solar package.1 point
-
I'd strongly suggest that you look for site 18 - it is a pull through site that is just a short distance from the restroom. I usually pull through the campground, past the restroom, around the "circle", back past the restroom and then into site 18. That way, your door opens to the street side and the next morning you simply pull straight out of the campground. Note that there is water available at the restroom if you need any via a spigot on the water fountain located in front of the restroom. The camp host is a nice lady located in the camper between site 18 and the restroom. Garbage can be dropped off at either your site or outside the restroom. If you have the time - the cabin and the monument to Meriwether are worth the half hour and there is room to park the Oliver over in that area. Enjoy your new baby. Bill1 point
-
@RoadKingsofGA Very nice and creative! And your documentation of the project should be very helpful to others. But I’m more interested in what may be a bike rack mounted on top of the sewer hose storage area. Can you elaborate on that project if it is indeed a bike rack mount. Mossey1 point
-
Nuff said.1 point
-
Tonight’s Yard Art
1 point
-
There is a basic flaw in your reasoning, would a casual thief know that? 😉 A cable lock around a fixed object would make me sleep a little easier. FYI your awning mounts should have holes drilled as indicated by the arrow, later versions have a great big opening there. Otherwise it will trap water and debris and corrode them. Especially if you have not removed that pesky rubber seal… John Davies Spokane WA
1 point
-
Will the 5 sided Clam go over a picnic table?1 point
-
I do have the solar/lithium package. Still a few things I'm looking forward to getting cleared up, but otherwise I've ton a fair amount of reading... Which I'm sure I'll forget until I have to actually do it, that's the way that usually goes. Frankly, I'm most worried about the towing and backing! After a night at Oliver, I'm going to the Meriwether Lewis campground to boondock for one night, then on to Tim's Ford State Park where I'll spend a couple of nights before heading home.1 point
-
Snow Foxes
1 point
-
For resale value alone. At this price point, add-ons are not overly significant in the price increase and makes it easier to sell.1 point
-
Another safety addition. There are limited reflectors on the front of the Ollie, just the two amber reflectors on the front corners of the lower body. These don't really delineate the length of the trailer since they're 6 feet back from the end of the hitch. And there are no reflectors on the front of the trailer. Occasionally, we end up putting the nose of our trailer at the front of a site, with the truck behind. We also once had a mechanical failure with a previous trailer that forced us to park it on the side of the road. In those circumstances, I prefer to have reflectors visible from the front and sides closer to the hitch. For $4 I added DOT-approved reflectors on the angles of our front basket. Since their viewing angle is greater than 45 degrees, these provide effective front and side markers much closer to the hitch. 3M 989-74-3 Circle-2 989-74-3 Reflectors, 3" Diameter in Circles, 3" Wide, 3" Length (Pack of 2) https://a.co/d/7EtKpYr
1 point
-
Sully, Have a wonderful time in Newfoundland! I went several years ago and it was a month of exploration I'll never forget. Don't miss the UNESCO Viking settlement, L'Anse aux Meadows National Historic Site on the northwest tip (looks like you're heading that way). At Twillingate, you can catch a boat tour amongst the icebergs and if you take a ferry on the north shore, to Fogo Island, you may even have an iceberg run aground right behind your campsite! As a group of people, I found those in Newfoundland to be some of the most friendly I've ever met. How long do you plan on remaining on the Rock?1 point
-
FYI, Just got my camping world flyer, Dometic Fresh jet 3 $1099. For club members and free shipping. That’s for the 13,500 BTU..they say that’s a $200.00 savings.. I,m not in market right now.. Happy& Safe Travels..Manny1 point
-
Really nice work on the glass organizer. We opt to roll with the space saver solo disposable red cups mainly with cabinet space being a premium. They stack easy, less dishwashing, light weight and no glass breakage. Our last night at LGSP Oliver Rally we grilled and had a fun meal with 9 or 10 friends. The solo cups worked great for our guests. Just another option. 😊 Patriot🇺🇸
1 point
-
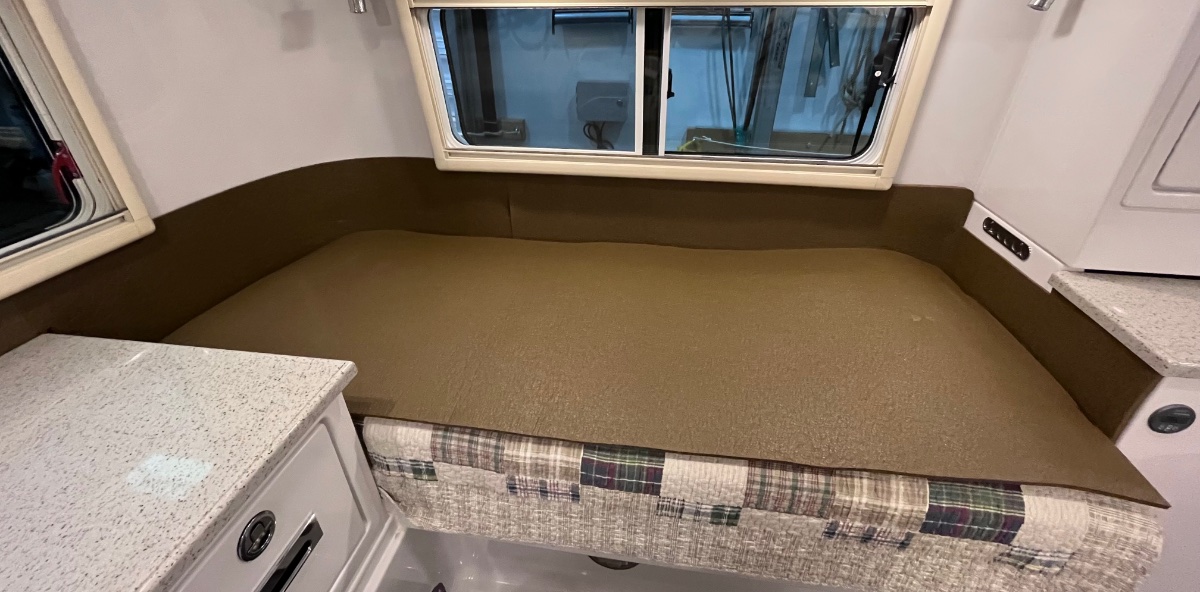
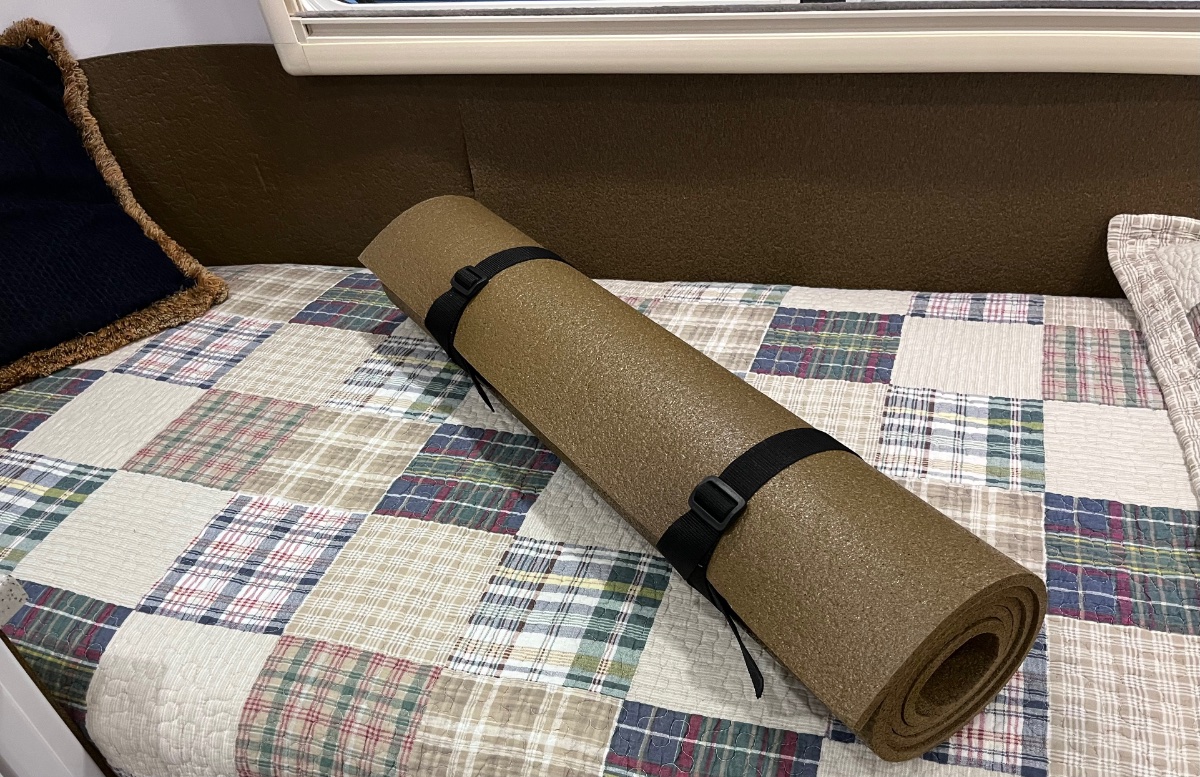
I mentioned that I was happy that these are 30” wide. That is the exact width of the mis-labeled “Twin” mattresses, which are really Bunk sized. That third pad was *exactly* the right size, all you have to do is cut a curve to match the wall. When traveling solo, I can put gear on top of that mattress without worrying about hurting the fabric, or scarring the gelcoat, or the hassle of removing completely and storing the mattress. A zero gravity lounger works, or a full sized CLAM shelter, or a cased rifle, or plastic bins with paper products or linens. But there are no tie downs straps, I would NOT recommend putting a fridge or anything really heavy there. It would become a nasty missile in a collision. Wedging the item(s) against the front bulkhead will minimize that hazard. I highly recommend this mod, once you sleep with the added thermal insulation you will thank me. John Davies Spokane WA
1 point
-
We have had Amica since we purchased our LEII in 2019. After the first year, Amica was using the list price less depreciation that didn't include the extensive options or take into consideration of their actual replacement cost. We had them do a special underwriting using a number we felt represented the actual replacement cost in year 2 and 3. We will no doubt need to discuss this at our next renewal.1 point
-
I use a cutoff piece from a pool noodle, or pipe insulation, works great and does keep pressure on the vent to keep it closed when traveling. trainman1 point
-
I guess that is called "Yankee Ingenuity" in Connecticut.😄 Mossey1 point
-
And the 4 sided Clam will NOT fit over virtually any picnic table. Bill1 point
-
It depends on the size of the clam and size of the picnic table. Our 6 sided clam will easily go over a 6ft table.1 point
-
I am interested in a enclosue to put over a picnic table. will all the Clam models fit over most CG picnic tables.1 point
-
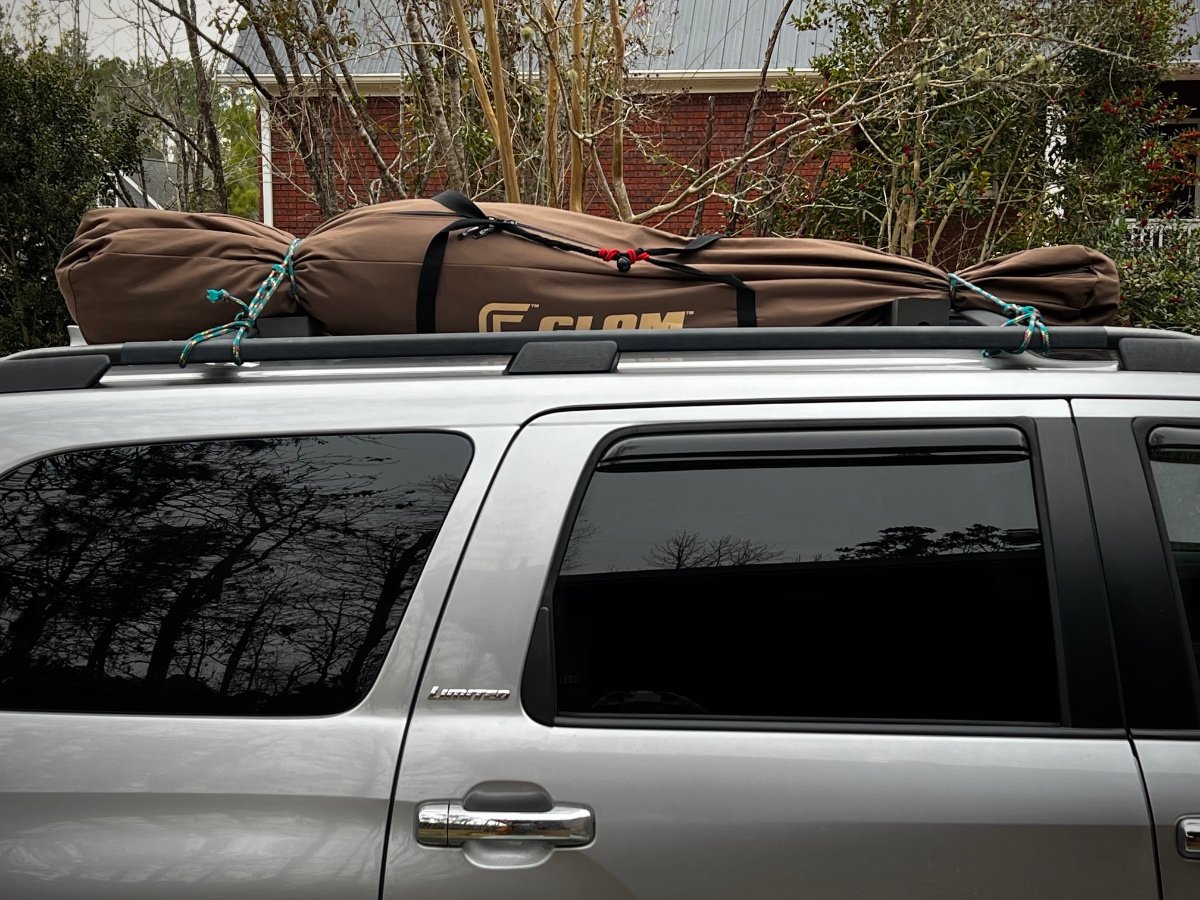
Our Clam traveled on top of our Sequoia from our home in South Carolina to Hohenwald & back. I really think it looks like a body is tied up in a brown bag, but maybe my dark sense of humor has colored my perception. From a low point of view you can’t see “Clam” on the bag, so maybe I’m lucky I wasn’t pulled by law enforcement during my trip(lol).
1 point
-
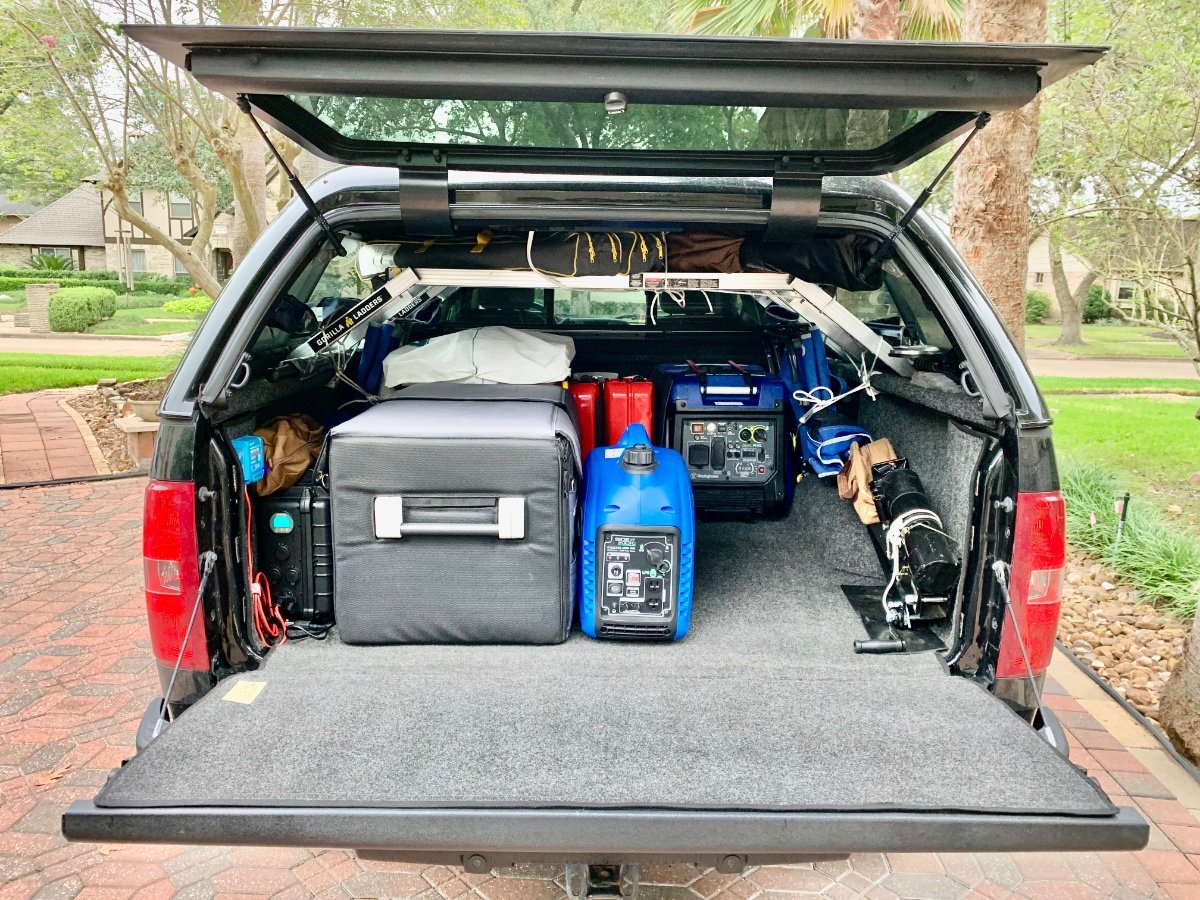
Yep, two generators both dual fuel. The Oliver is my hurricane escape pod and the larger one has served me well for those 3-4 day mandatory evacuations. It will run 16 hours on a tank of gas, non-ethanol, and continuously during those times. I have also used it in roadside and parking lot overnight stays when the wife demands all of the comforts of home! I then got the smaller one primarily as a convenience for A/C on stops for meals or breaks when traveling; but have used it, on propane, for brief overnight stays, as well. I have solar panels atop my TV cap to run the Dometic dual zone and a DC-DC charger to keep the trailer batteries topped off.
1 point
-
Very cleaver use of a pair of Gorilla Ladder Work Platforms. I will try to remember this mod. Mossey1 point
-
I was able to resolve the cumbersome stowage of my Sky Escape by installing an upper shelf under cap. The Clam is positioned diagonally along with the separate panel bag and assorted camp tables. This mod really freed up a lot of bed space for all of my other necessities!
1 point
-
We have the Clam Sky Escape Shelter which is one of the larger ones. It's 6 sided, measures 12x12. It is fully netted on all sides and top so you can see out to the night sky. It comes with the wind/rain walls, a rain fly top and a floor. You can use it in any combination. We have the shortbed F250 with the 6.5' bed and it fit straight in. We camped over Thanksgiving weekend with our grown kids & grandkids. 11 of us in all. On Saturday it rained from noon until 1am for 13 hours straight without stopping. It was great to have the shelter. We were able to fit everyone inside in chairs for dinner and during the day we had a smaller table set up for the kids to play games. It can be used over a picnic table easily without the floor installed. When the weather is nice we don't put any of the sides or top on and just use the netting to keep the bugs out.1 point
-
We have the 5 sided Clam, brown with the tan top. We also have removable side panels which work great in cold weather. We put our Outlander fire pit in the middle and the Clam stays warm even in cold weather. We can easily fit 6, 8 if we get real friendly. It is not too big for me to handle alone and fits in our truck bed end to end.
1 point
-
The 4 sided Clam is great for 1 or 2. Three is a crowd and 4 can fit but you are going to be knee to knee. Yes, wind/rain panels can be had for the 4 sided model. Another benefit to the 4 sided model is that it will fit in the Oliver closet - the larger models will not fit in there. Of course, the larger model can not only fit more people but in many instances it can be placed over a picnic table if need be. These days there are Clam models that have floors in them too. Good luck! Bill p.s. Clam is a company that is very much like Oliver - if you have a problem, they will fix it.1 point
-
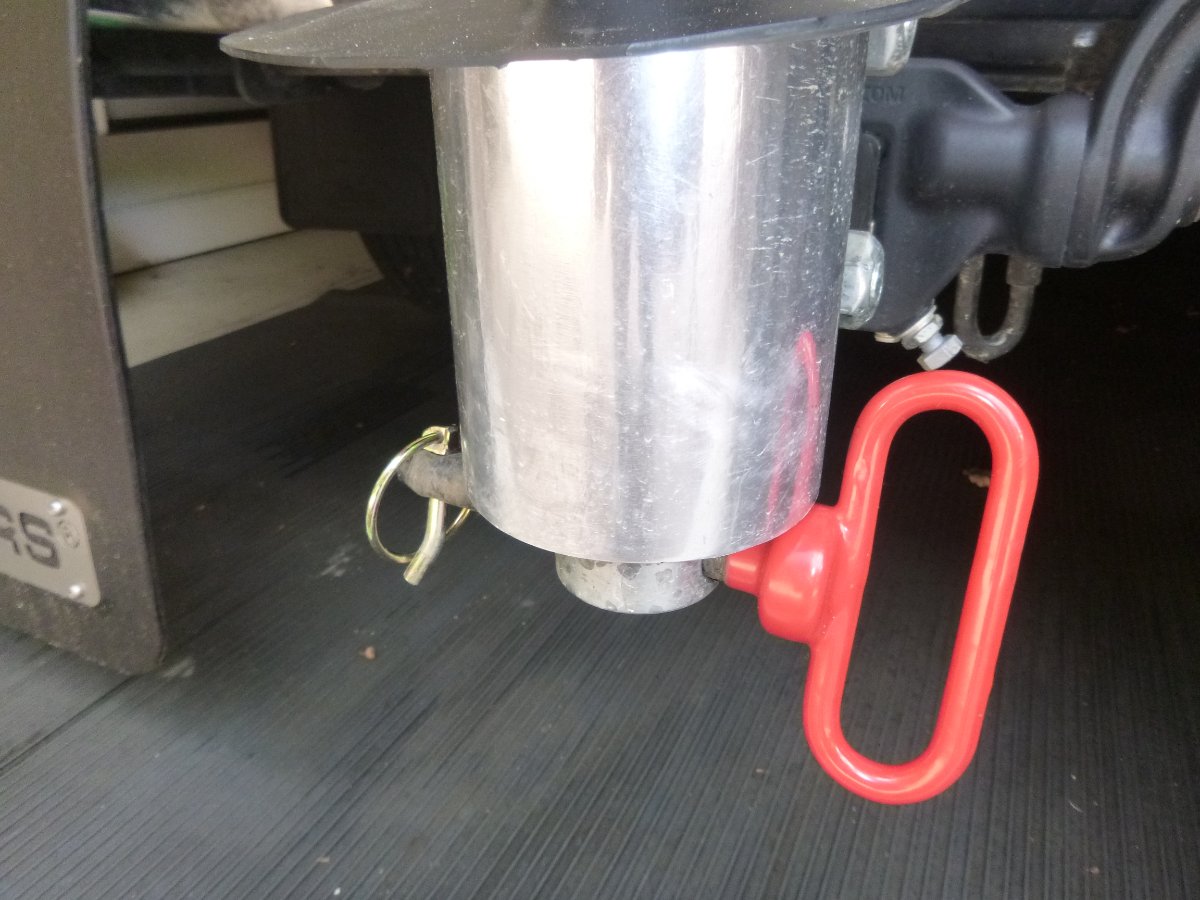
Nice Ollie - nice truck. Did you stop into Tractor Supply to get one of these hitch pins? They make pulling and inserting that pin a bunch easier.
0 points
-
ShallowGal - I know that you can obtain new CLAM covers (and other replacement parts) directly from CLAM - try THIS. Bill p.s. shortly after purchasing my CLAM I lost my storage bag in a wind storm. I sent an email to CLAM's customer support telling them what happened and they promptly sent me a replacement bag that was even better than the original - FREE!0 points


-
Recent Achievements
-


")


")


")


