Leaderboard


Popular Content
Showing content with the highest reputation on 08/31/2023 in all areas
-
We ended up painting a white stripe on the Bulldog which is visible by the backup camera on the tailgate. We roll down the back aft window of the Tundra and D calls me on her mobile whilst attempting to line-up the hitch ball with the Bulldog (the mobile phone keeps the active "discussion" a bit more private especially when D's commands are accentuated with something like, "...I said turn to your other *&^%ing left!")7 points
-
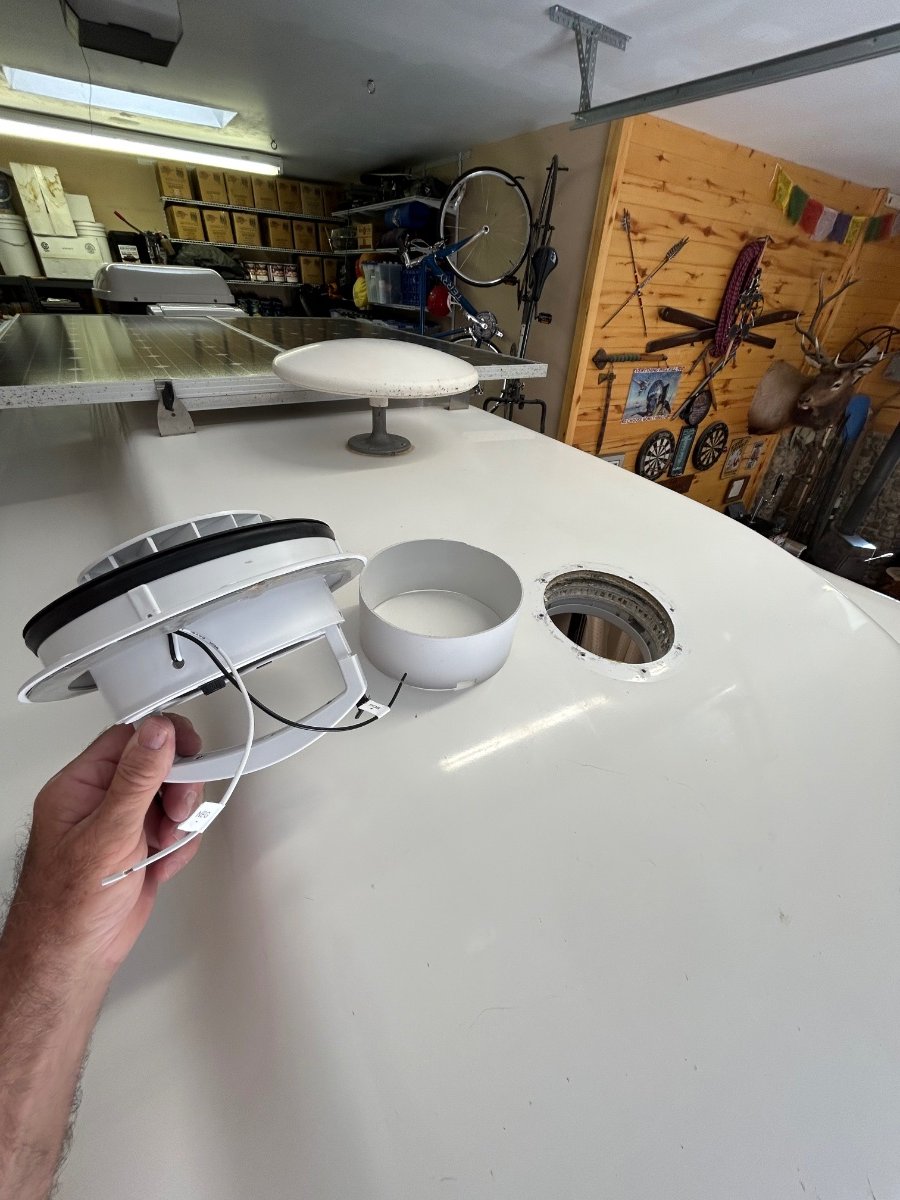
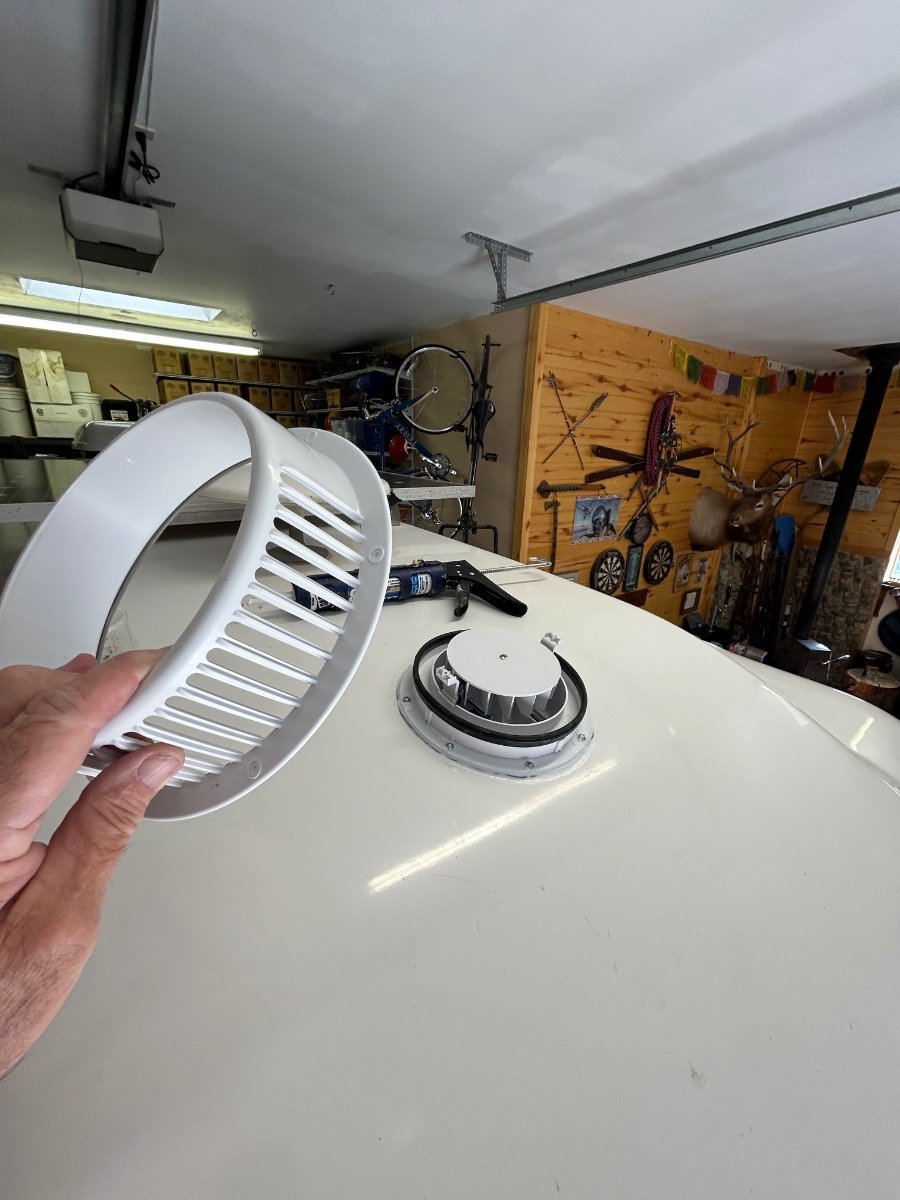
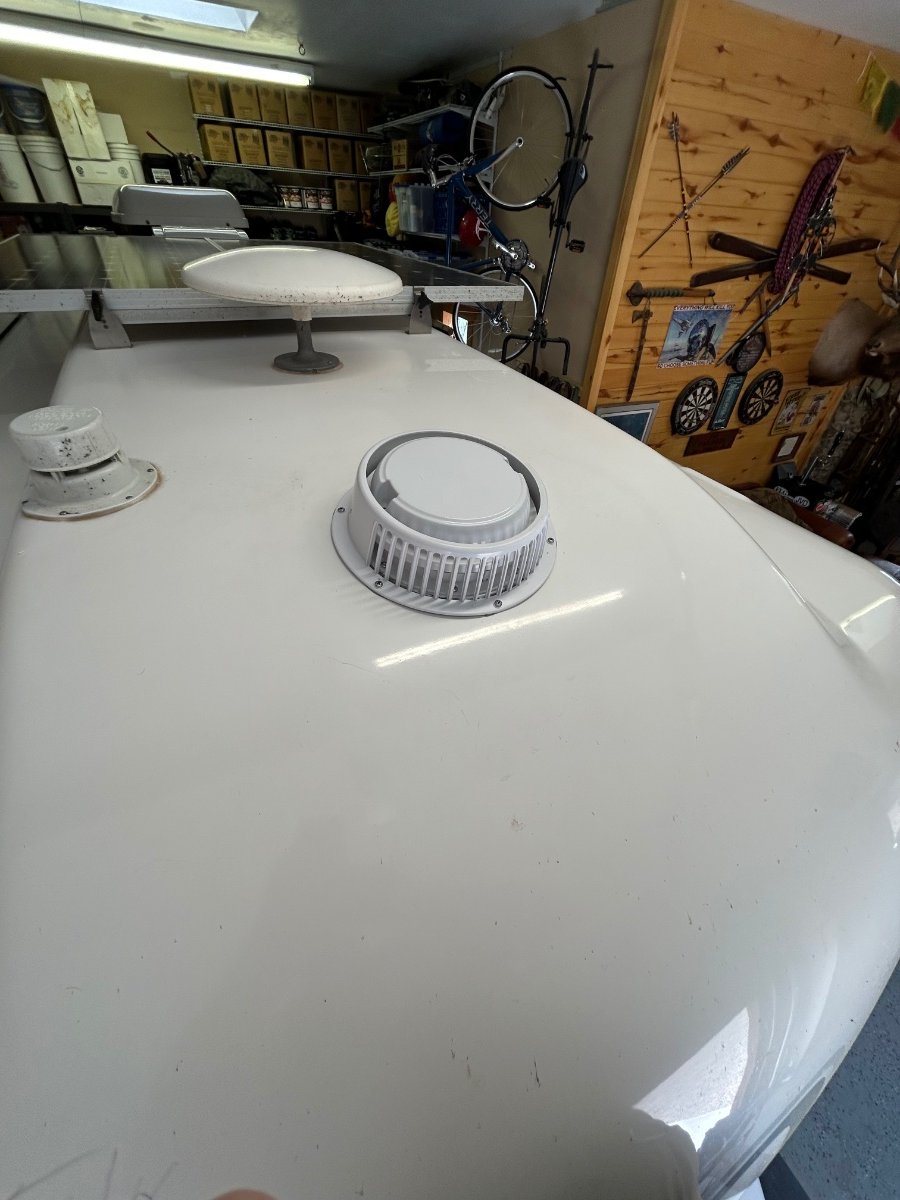
This "story" is a bit embarrassing but ....🥵 At the end of last year my original exterior fridge fan bit the dust. It had been making noises for some time, but, finally, mercifully, it made no more noise. Certainly these poor things do live in a rather harsh environment and get little "love". So, over the winter I decided to get a replacement (I ordered THESE). While TWIST was in storage I looked at how the old fan was installed and decided to replace the rubber isolation bushings too which I got at Lowes. I also noted how the existing fan was wired and did all that I could in my home workshop (i.e. I installed spade connectors on the fan wires) so that when it came time to install the fan in the Ollie the process would not take very much time. Fast forward to a day before leaving for the Owner's Rally and I installed the fan with my plan proceeding very smoothly. Except for one "small" detail - when I hit the switch just inside the Ollie's door, the fan didn't come on! Of course I rechecked all my work - to no avail. I got out the multi-meter and started checking my wiring and found out that I was only getting a little over 8 volts in the fan wiring. THAT would tend to indicate a bad ground or loose connection but with the time I had before leaving I could not find any problem. Due to lack of time - fast forward to a month ago when I stopped at the Mothership for annual wheel bearing service. I mentioned my fridge fan problem to Jason and asked that if the Service guys had time would they take a look to see if they could identify the issue. That afternoon when I picked up Twist I asked if they had enough time to look at the fan . With a grin and a wink I was told that the issue was with a faulty crimp in one of the spade connectors! Yes - I did the "tug test", yes I've done hundreds of crimp connections over the years without any issues, I even double crimp each connection. Due to the environment that these things live in I also took the extra step of putting heat shrink over these connections! Just shows what being in a hurry will do. Now that things are back to normal - I can report that the fan I installed actually works better than the original and it is quieter too. Bill7 points
-
Mike, every time I've seen this problem, it's been due to the white (ground) wire coming into the trailer from the 7-pin wiring bundle not being securely connected to the grounding buss bar located under the aft dinette seat. All the rest of the wiring on that bar is yellow. All this was going on between the time our trailer was built and about Hull #200. The factory actually sent out a bulletin about this and a standing order to check for this problem on every trailer that passed thru the shop for any reason. Your trailer was probably checked at some time in the past and it either passed inspection or was fixed. Some of those back roads Carol makes you drive on could very easily have loosened that wire. Now would be a good time to check tightness on all the wires attached to that bar.5 points
-
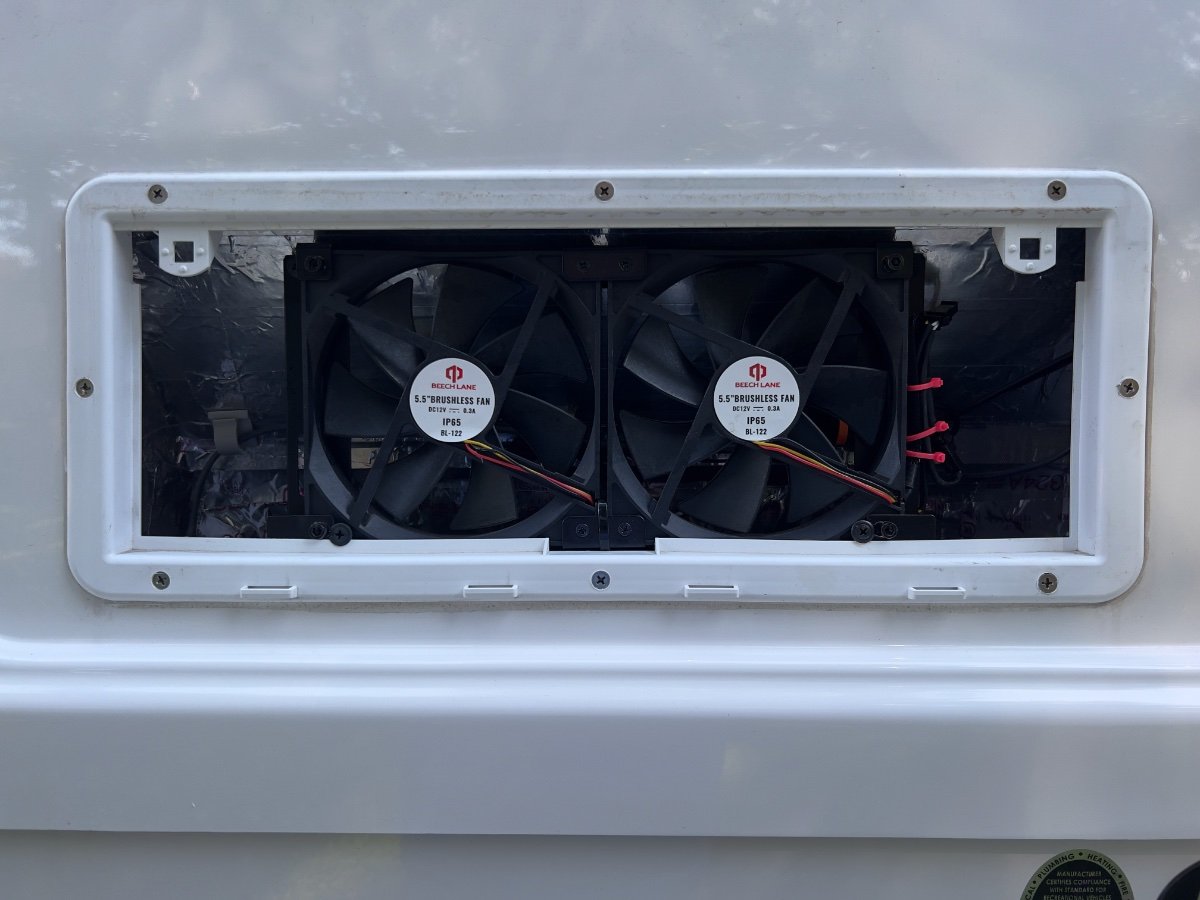
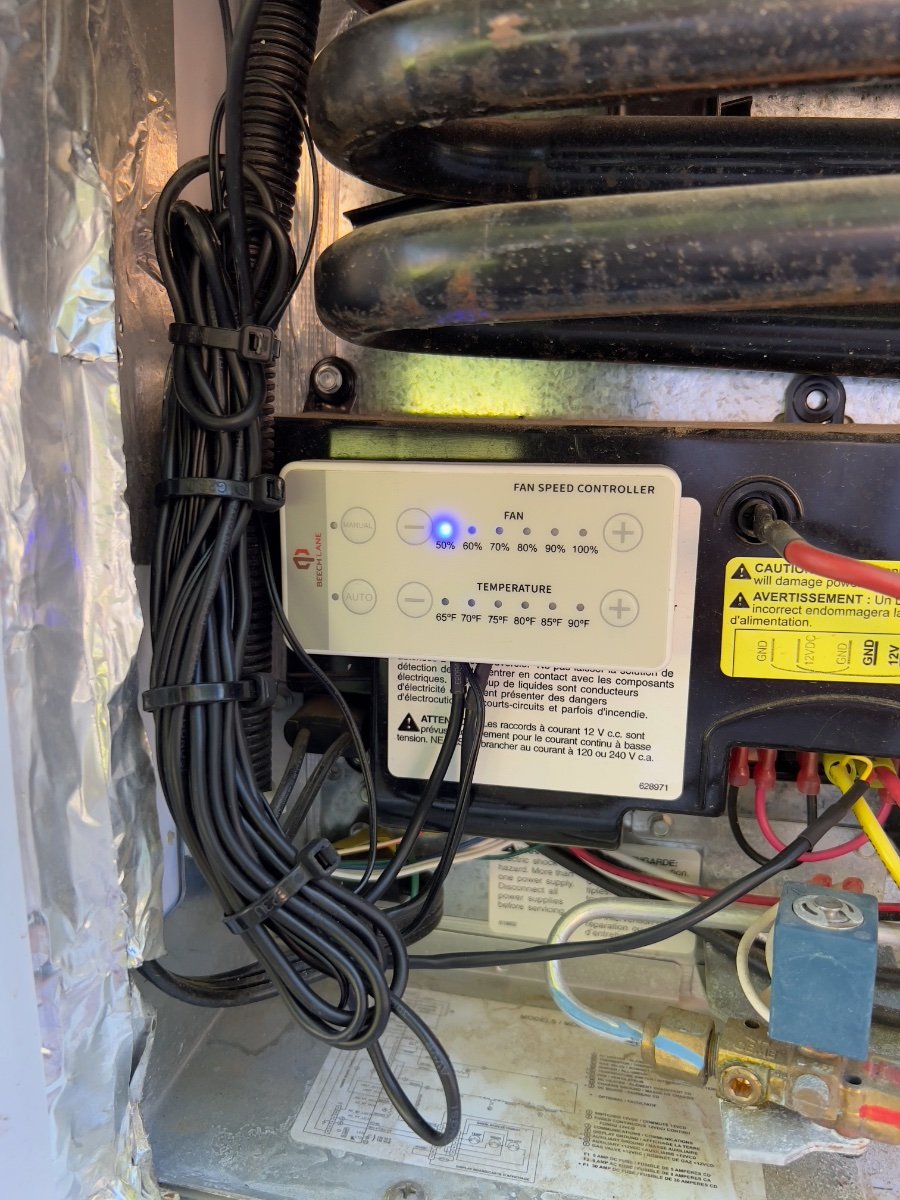
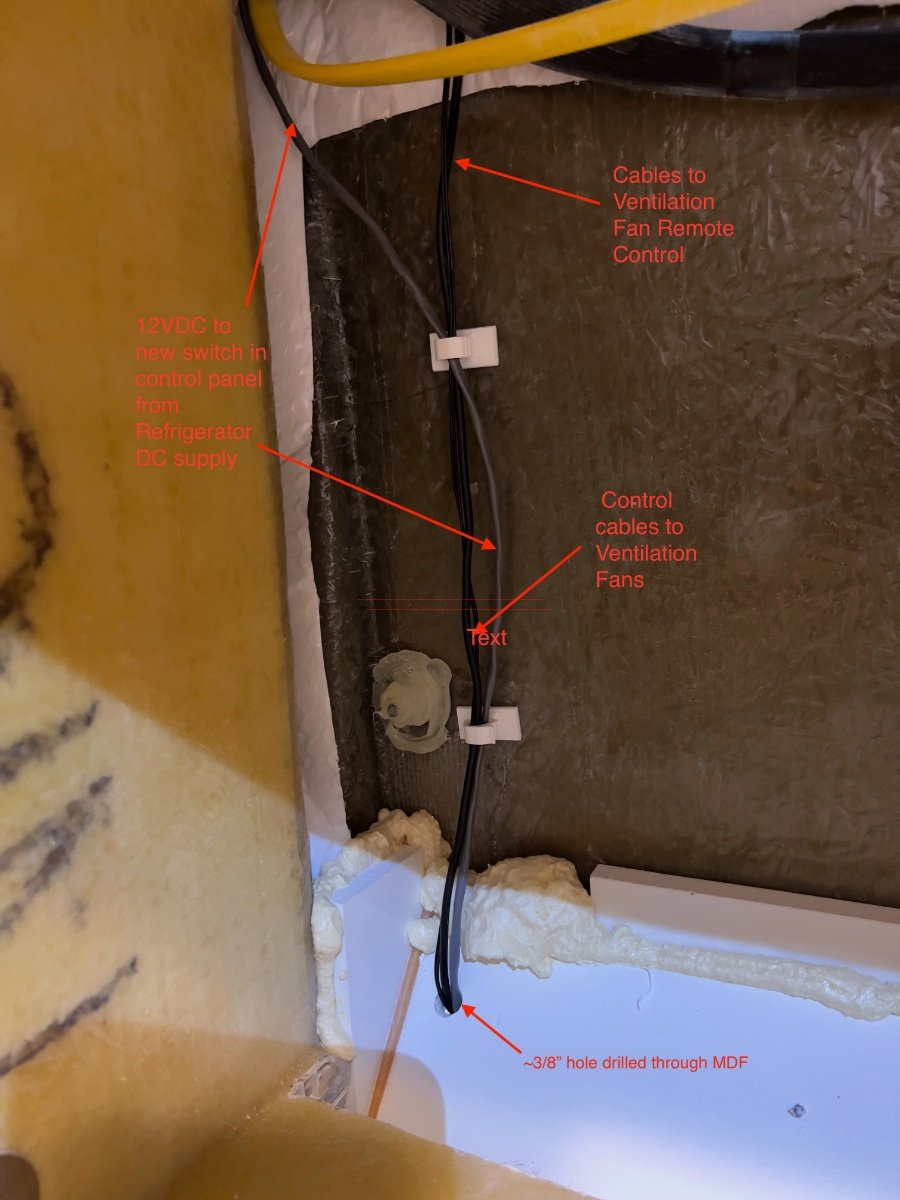
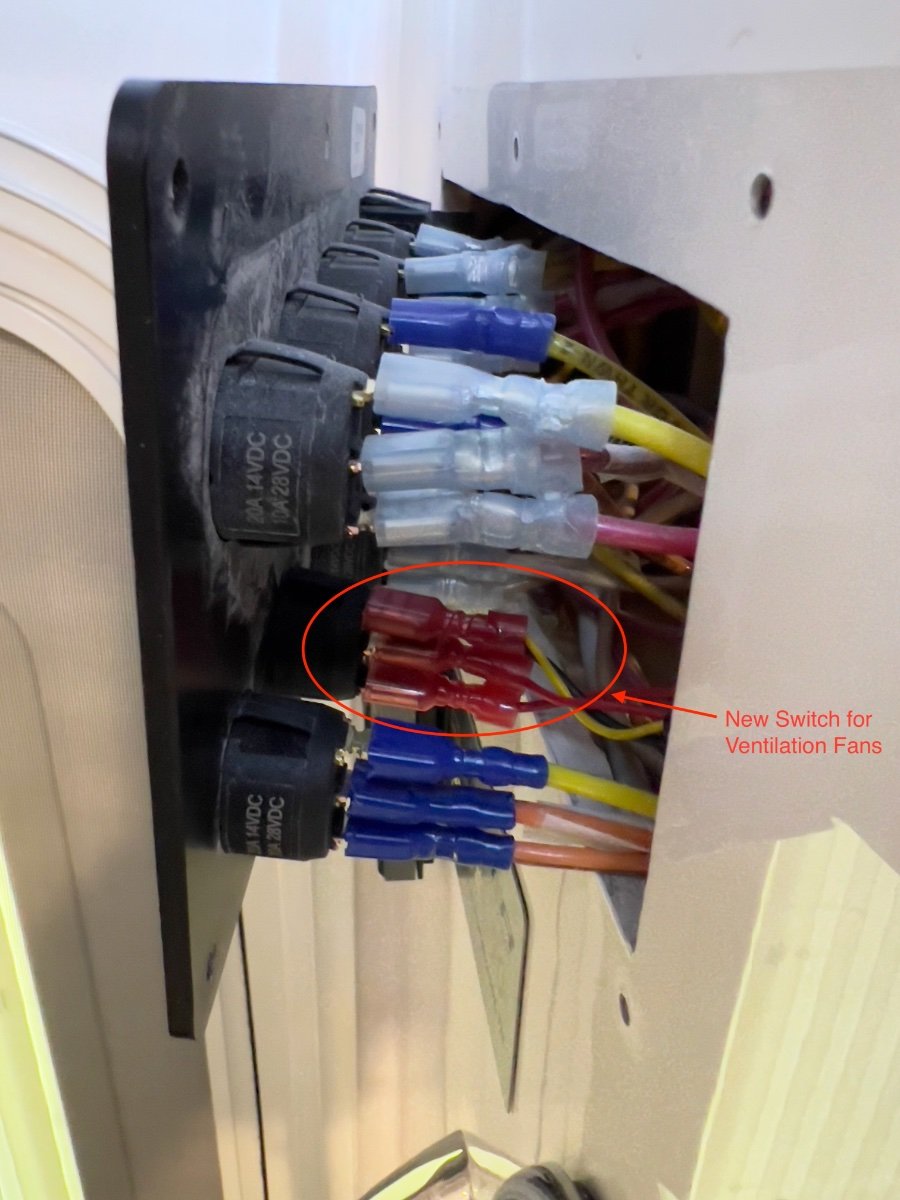
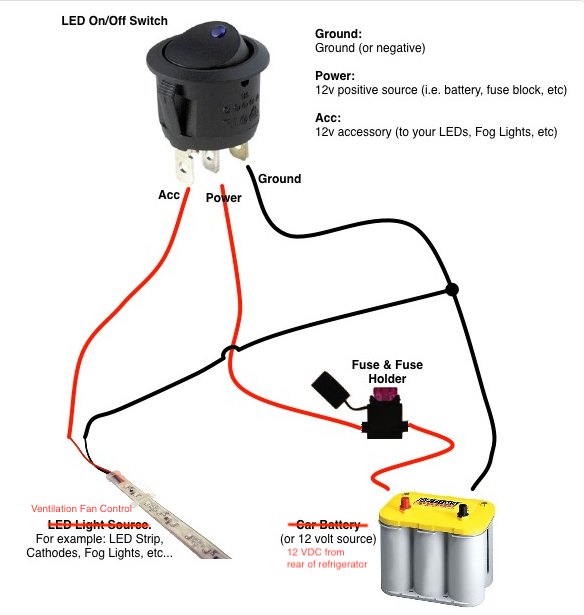
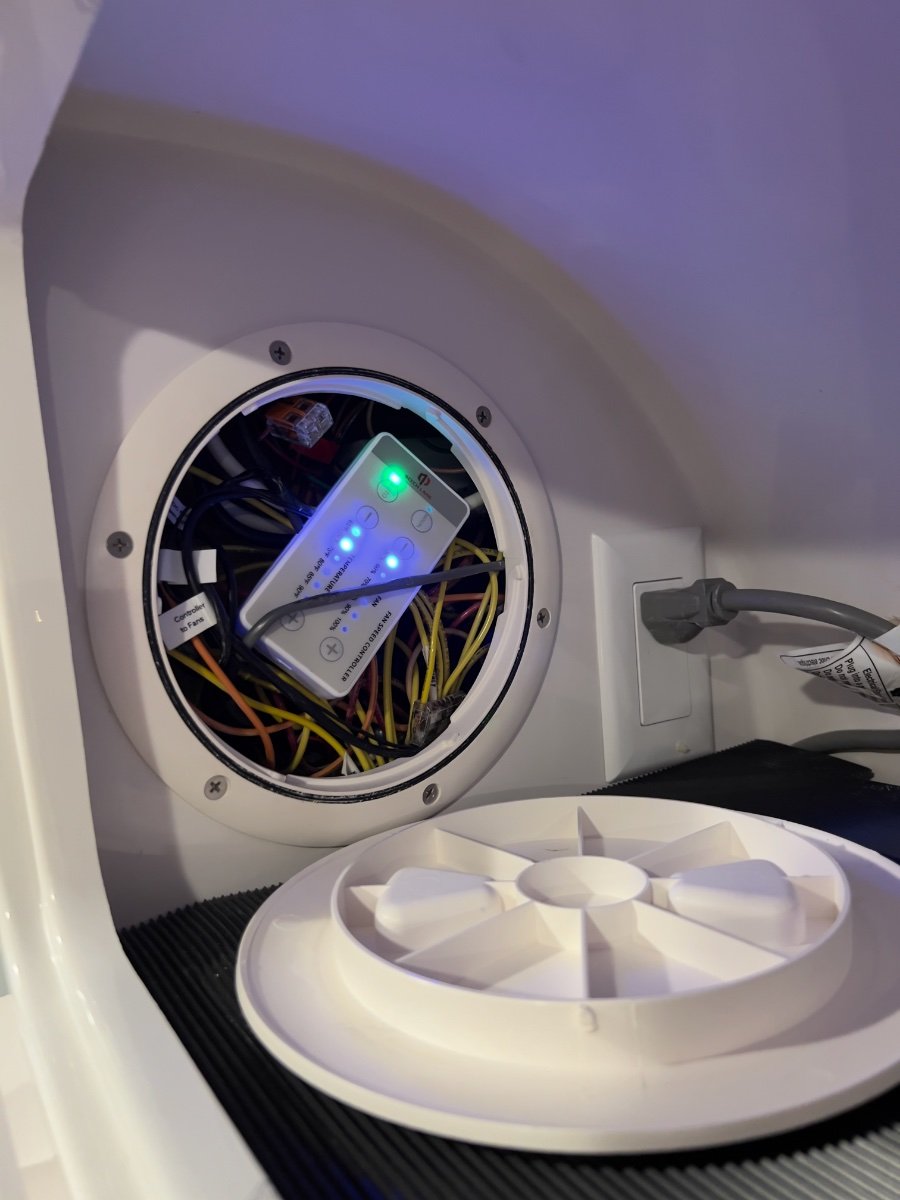
From late May to mid-June my wife and I took a loop trip from our home in Dallas, TX to: Greenville, SC; Asheville, NC; Asheboro & Seagrove, NC and back to Dallas. The trip covered approximately 1900 miles, with significant temperature variation. During the trip we experienced erratic performance by the Norcold Model 412 refrigerator, standard equipment in our 2022 Oliver Legacy Elite II trailer. The refrigerator would not maintain food safe temperatures in either compartment, except when operating on AC current. This problem occurred mostly on the second half of the trip, as daytime temperatures exceeded 90 degrees (F). Especially when in transit, operating on propane or DC current, the refrigerator temperature would climb to approximately 60 degrees and the freezer into the mid 20s. We contacted Oliver Service and made an appointment to have the refrigerator problem assessed in Hohenwald. We later decided not to divert from our trip plans and to deal with the problem when we returned home. Upon our return home to Dallas, TX, on June 20, I began a series of tests with the trailer parked in our driveway. To monitor the temperatures in the refrigerator and freezer, I used an AcuRite Digital Wireless Fridge and Freezer Thermometer, which we had purchased to monitor the Norcold refrigerator and had been using since September, 2022. I also used an Etekcity Infrared Thermometer 1080 to compare readings with the Acurite thermometer. The AcuRite and Etekcity thermometer readings agreed closely. With the refrigerator empty, I recorded the time required to go from ambient temperature to food safe temperatures using AC, DC or propane. Using AC, the refrigerator/freezer would reach food safe temperatures in 6-7 hours (low 40s F for the refrigerator; 0 degrees F for the freezer) with ambient temperatures ranging from 87 to 99 degrees F. Once achieved, when on AC, the temperatures on both compartments would hold in a food safe range. Conducting the same test on propane, the refrigerator and freezer would reach only 62 degrees and 19 degrees F, respectively after more than 12 hours of operation. This test also was done while ambient temperatures ranged from 87 to 99 degrees F. Similar results were observed while operating the refrigerator on DC. I again contacted Oliver Service and was recommended to take the trailer to an authorized Norcold service provider. Blue Moon Mobile RV (Blue Moon) was determined to be the closest available Norcold service provider. I arranged an appointment to bring the trailer to Blue Moon for troubleshooting of the refrigerator. Technicians at Blue Moon confirmed my observations of the behavior of the refrigerator. They also confirmed the cooling function was working properly, since proper temperatures were achieved when operating on AC. They also confirmed the single, small fan located at the rear of the refrigerator was operational, but providing insufficient air flow for the refrigerator to operate properly when ambient temperatures were high. Blue Moon conferred with Norcold technical support on their findings. Blue Moon and Norcold recommended additional fans be installed to dissipate warm air behind the refrigerator. Having anticipated installing additional fans, I had done online research and chose a dual fan assembly from Beech Lane 12V RV Fridge Ventilation Cooling Fan 5.5" (140mm). These fans come with a remote control with which fan speeds and threshold temperature may be set manually or automatically. These fans were installed by Blue Moon in the upper vent opening of our LEII. The 12VDC power supply to the refrigerator was also used to power the fans. The remote control was mounted to the cover over the refrigerator circuit board using double sided tape. The excess length cables provided with the fans were bundled with zip ties and secured nearby, as shown below. Blue Moon tested the operation of the refrigerator following the installation of the Beech Lane fans and reported food safe temperatures were being achieved and held, with high ambient temperatures. On July 19 I picked up our trailer from Blue Moon and returned home to repeat my prior tests to compare results running the refrigerator on propane and on DC. The trailer was parked in the same location in our driveway as previously. After installation of the ventilation fans, using propane, the refrigerator and freezer compartments achieved safe food temperatures in approximately 8 hours, with the refrigerator control set to 7, despite ambient temperatures ranging from 93 to 105 degrees Fahrenheit. Once safe food temperatures were achieved the refrigerator control setting was reduced from 7 to 6 and allowed to run overnight. The following morning both the refrigerator and freezer had slightly warmer temperatures, but still satisfactory for safe food storage. We have not yet had an opportunity to utilize the Norcold refrigerator on a trip to observe how effectively safe food temperatures are maintained when full of food and under changing environmental conditions using the three power sources. Based on the test results using the ventilation fans, I expect the performance of the refrigerator to be significantly improved. We should now be able to use DC to power the Norcold refrigerator when in transit, and avoid the use of propane. Performance running on DC appears to be similar to running on propane. While I was pleased with the significant improvement in the operating temperatures achieved by the Norcold refrigerator, there were three aspects of the installation I chose to change, all related to access to the remote control: The remote control for the Beech Lane fans has very bright blue LEDs which are ON whenever 12VDC power is ON. At night, we noticed a bright blue glow emanating from the lower refrigerator external vent cover. Accessing the remote control to change settings required removing the refrigerator external vent cover. When we store the trailer we typically turn OFF all DC power by turning OFF our lithium batteries. Upon the next use of the trailer, when DC power is restored, the refrigerator ventilation fans must also be turned ON manually. There was no switch to turn OFF DC power to the remote control. To address these issues, I relocated the Beech Lans fan remote control to the interior of the trailer and installed a switch on the control panel located at the entry to the trailer. I chose to have the remote control inside the access hatch in the storage cabinet located over the microwave oven, directly above the Norcold refrigerator. To re-route the cables to the ventilation fans, I had to remove the microwave oven. To install a new switch in the control paneI I had to loosen the panel from the wall. I had to add approximately 10 feet of 20 AWG twisted pair cable (gray) to reach from the new switch on the control panel to the 12VDC power supply at the bottom rear of the refrigerator. The photo below shows the routing of the remote control wires (black) and 12VDC power supply behind the microwave cabinet. I had to drill a ~3/8" hole in the angled MDF panel behind the microwave cabinet, directly above the refrigerator. I caulked around the cables after routing them through the hole and behind the refrigerator. Fishing the wires into the area behind the control panel was not difficult. The yellow Romex appearing at the top of the photo below supplies the AC outlet for the microwave oven. I contacted Oliver Service and ordered a single pole switch (with blue light) to match the others in the trailer control panel. The cost was slightly over $7, including shipping by first class mail. The new switch was installed in an unused location on the control panel which previously had a blank cover. I added crimp on spade type connectors to the twisted pair cable to connect to the terminals on the new switch. Although the new switch is single pole, there are three terminals on the rear with the wiring connections listed below: Ground (dissimilar color) DC Power IN (center) Switched DC Power Out I found the wiring diagram below which shows an analogous circuit. The switch and the ventilation fan remote control both require a ground connection. The Switched DC power terminal is connected to the DC+ power connection for the ventilation fan remote control. The new switch needs a ground connection in order for the blue light to operate indicating the switch is ON. In the diagram a car battery is shown as the 12VDC source. On the trailer, the 12VDC source is located at the bottom rear of the refrigerator. This DC circuit is already fused at the DC power panel located below the rear dinette seat. I chose to locate the Beech Lane fan remote control behind the access panel in the storage cabinet above the microwave oven. I made this choice to avoid having the bright blue LED lights on the remote control illuminating the interior of the trailer. The access panel is easily removed when there is a need to access the remote control, to turn ON the ventilation fans, or to change the fan speed or threshold temperature. The Beech Lane ventilation fans are very quiet. With the auxiliary fans running, the volume of air exiting the top exterior vent is noticeably greater than with the small, single OEM fan mounted to the rear of the refrigerator. We have not yet tried sleeping in the trailer with these fans running. There is no chance of hearing the fans inside the trailer with the Dometic A/C running. They are not noticeable when they are running unless you are standing close to the upper exterior vent. I recommend these fans to anyone having similar difficulty maintaining food safe temperatures in the refrigerator when ambient temperatures are high. Regards, Don
 4 points
 -
Here is the “How to” video of how we added two shelves inside the closet.3 points
-
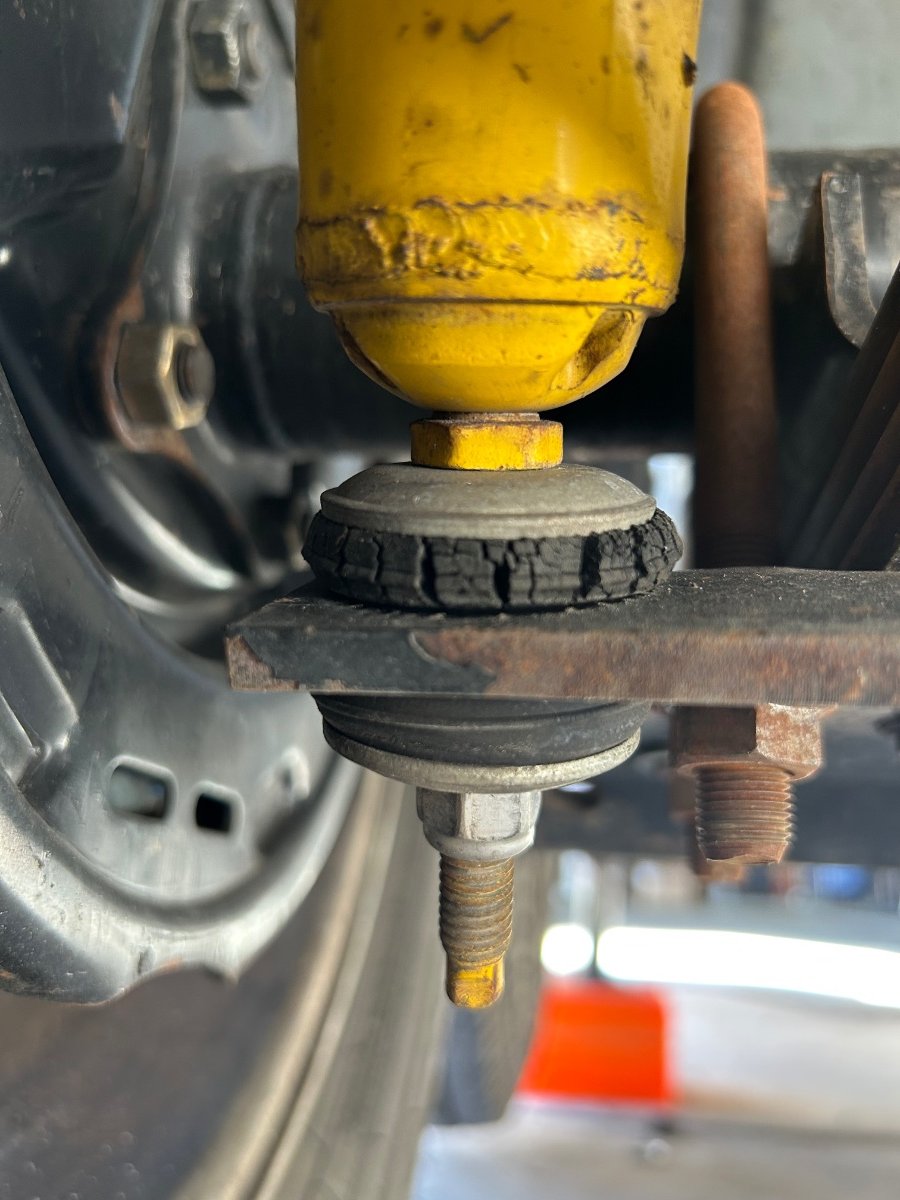
We replaced (what is believed to be the original factory yellow Monroe 555001's) our shocks with new "black" 555001's last April - if originals; that would make them 6+ years old (we bought ours from the original owner - who didn't keep track of the mileage). As it turned out, 3 of the 4 shocks were bad... It's easy to test them - pick a side, and jack it up. Place a safety jack stand in place. Remove the lower nut, compress the shock and remove from the keeper. Release compression, a healthy shock will fully extend after releasing. 3 of ours would not extend after compressing. My sense is these shocks are good for only 3 or 4 years, obviously depending on mileage. It would be nice to learn if another manufacturer (Bilstein, perhaps?) has an upgrade replacement.... Cheers and "Ravel-On!"
3 points
-
I have not received my F-150, built but not shipped. I am of the understanding the vehicle has a camera with a Cross Hair that assists in aligning the hitch to the ball. Does not your F-150 have that accessory? I am not patiently awaiting to go and Hook-up to Mouse..3 points
-
We got a little rain and no wind here in Western NC, our friends at who live on Marco Island said it was a gorgeous day there today. Appears all is calm, more hype than ever from the news weather heads. Onward! Patriot🇺🇸3 points
-
I just got around to doing my annual bearing maintenance and switched out all lug nuts to the ones recommended above by ScubaRx. They are super high quality and fit perfect. As a side note, I did not find any cracked sheathing on my old lug nuts. Likely had to do with spending most of the year out West and use of a 6 point socket. Thanks Steve!2 points
-
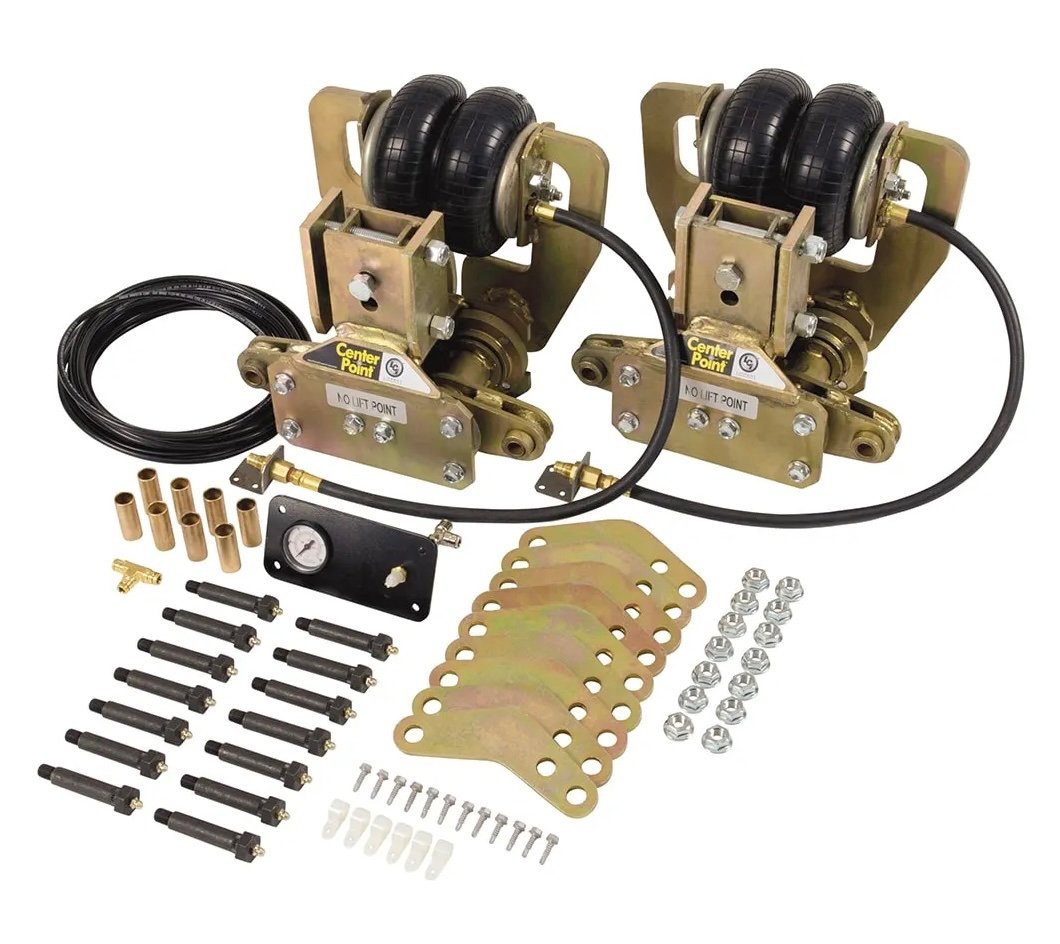
Yikes: I call that sophisticated monkey motion: far FAR too complicated for the end result. (Like drum brakes vs disc brakes.) This is the complete opposite of low maintenance. You still have all those grease fittings to worry about, plus the complexity of the airbag equalizers, and the possibility of leaks or stone damage from debris spit out by the tow vehicle’s rear tires. John Davies Spokane WA
2 points
-
We painted ours gloss white after trying silver duct tape... The white paint needs touching up occasionally, but no biggie... The white stripe really gets your line-up dead-nuts on using the back up camera!
2 points
-
Mike: Good catch. For sure Dielectric Grease. GJ2 points
-
Awesome post! We have a friend who did the same on their LE2 with great success. Not sure which fans he used but it's definitely a mod I need to do on my 2021. Appreciate the detail!2 points
-
You look good to go to me. The only argument for more grease coming out is that it "helps" flush out any old stale dirty grease that may be in there.2 points
-
Seqaucker suction cups are really secure and have a strong hold. I have the suction rooftop rack for my car. Ended up using it on the dent in the fender of my Tundra to successfully perform paintless dent removal, the suction is that strong. I will look for the waste band as it ould be great to be able to move it outside/inside as needed.2 points
-
Same thing happened with our first trailer. The wires were actually folded inside the axle tube and chafed until they shorted. Dumb design. Same repair. Never had another problem.2 points
-
Bryan, I haven’t checked that wire - will do so in the morning when the weather is a bit cooler. Thanks - Mike2 points
-
Don, thanks for the suggestions. I replaced the 7pin connector, my RV guy checked it when I took it in. Dielectric grease applied. The 7pin fits and is secured by the cover. The Ram dealer checked the controller. The brakes don’t work when the message is on. I haven’t had the message come up when stationary, so I can’t tell if lights are affected. Wiggling the 7pin does nothing. I’m going to crawl under the trailer in the morning (when it’s not 100+ degrees) to “explore”. Mike2 points
-
M & C, Are you getting the notice via your Dash Messages? We did, and here is what it was. (I am working on a Post about this). JD had a similar post about Brake wire issues, which I found informative. https://olivertraveltrailers.com/forums/topic/2685-how-to-brake-wiring-is-undersized-some-answers-and-partial-solution/#comment-25131 There is a 2-wire pair (mine looked like old brown table lamp cord) which travels through the front and rear axles that bring the current for electric brakes from the Drivers side to the Pass side. It is a common way RV manufactures do it. That wire has slack and sits inside and rubs inside those tubes. Ours rubbed/abraded to bare wires on a couple of surfaces, causing an intermittent short that soon became a constant short. I basically just cut the old wires off and ran a larger insulated 2-wire pair 12awg across the outside of the back of the axles at the rear so to prevent rock strikes, once I had it all connected. WE HAD BRAKES AGAIN… I found that removing the wheels made it easier to get in and work at each hub, where green brake wires go into back of the plate to get to the brakes. Before you cut your wires, maybe test the green wire going into brakes with a meter to make sure. If you pull the "Brake break-away" cable and then measure the current where the brake wires come in (inside driver side wheel well) you might get a reading, but I am not sure what an electrical short might do to that reading. I was told 80% of the time it is the 7-pin (which it was not), so I naively replaced it, before I found out what the real issue is; now I have a “bugly” 7pin, which is not sealed to the weather like the OTT factory one... Best of luck. B~Out
2 points
-
@dhaig: We totally second @Katjo's comment - thanks for posting your findings about the Beech Lanes!2 points
-
When the brake pads on my 2008 Tundra got thin, the "Brake" warning light on the dash started to light up intermittently. Like you, I knew the pads were near the end of their useful life because I check them when rotating tires. But, I thought the pads still had some life left, so I didn't immediately replace them. The brakes continued to feel solid, so the light made me wonder if there was another issue with the braking system. When I finally got around to replacing the pads on the 2008 Tundra, the "Brake" warning light went out. Lesson learned: when the light comes on, even intermittently, replace the pads (or in case of Oliver brakes, the shoes) sooner rather than later. I concluded the Tundra must have a sensor that activates the warning light when any of the pads get too thin. Please post what you learn after your Oliver brake shoes are renewed.2 points
-
Yup, what others have said. Hasko! Paula2 points
-
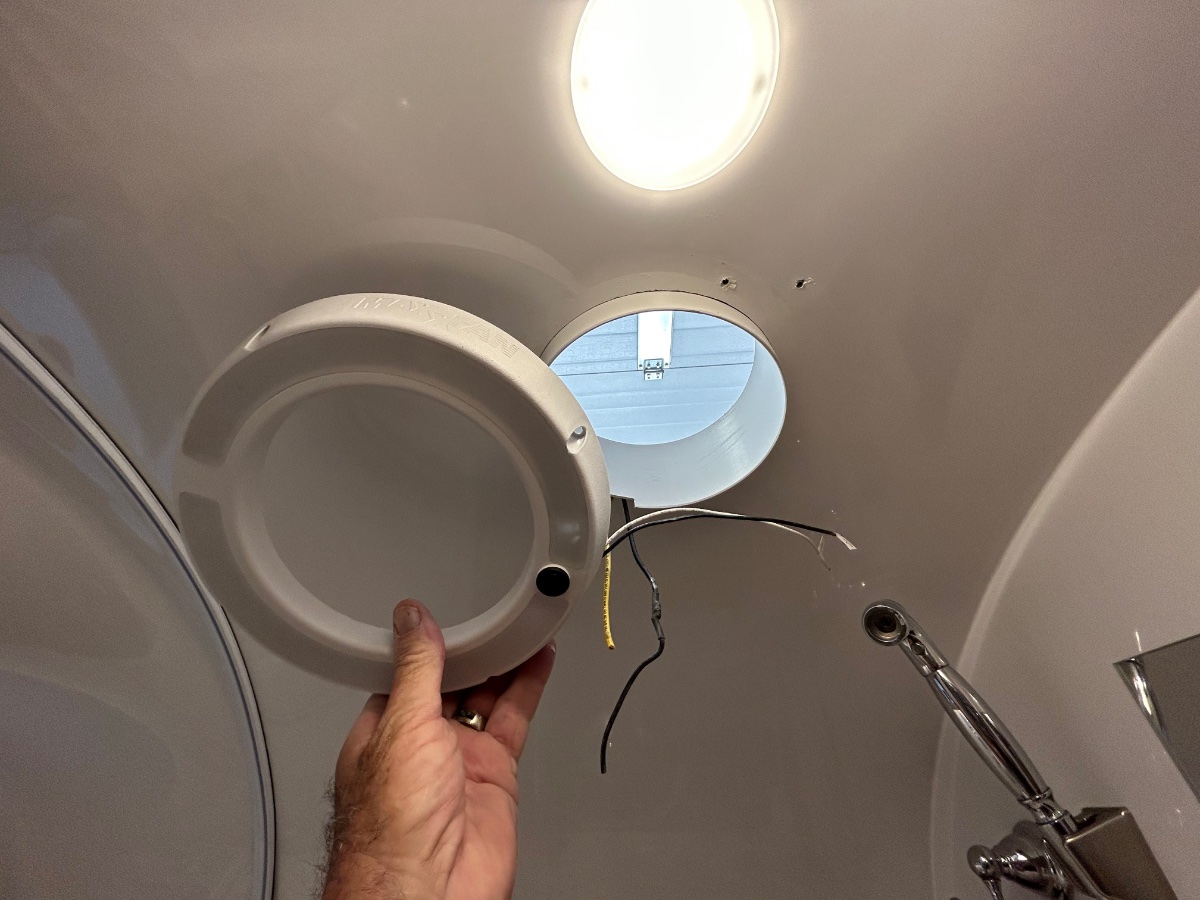
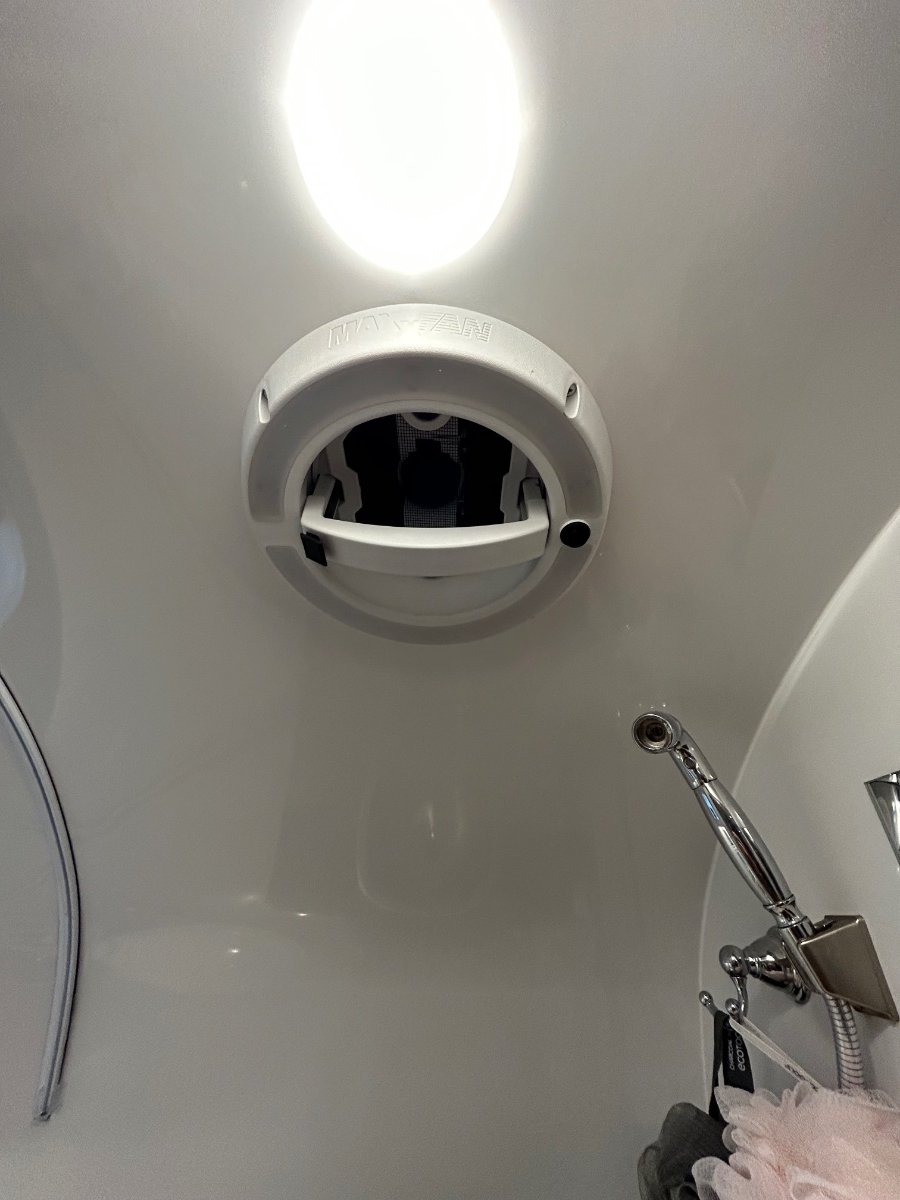
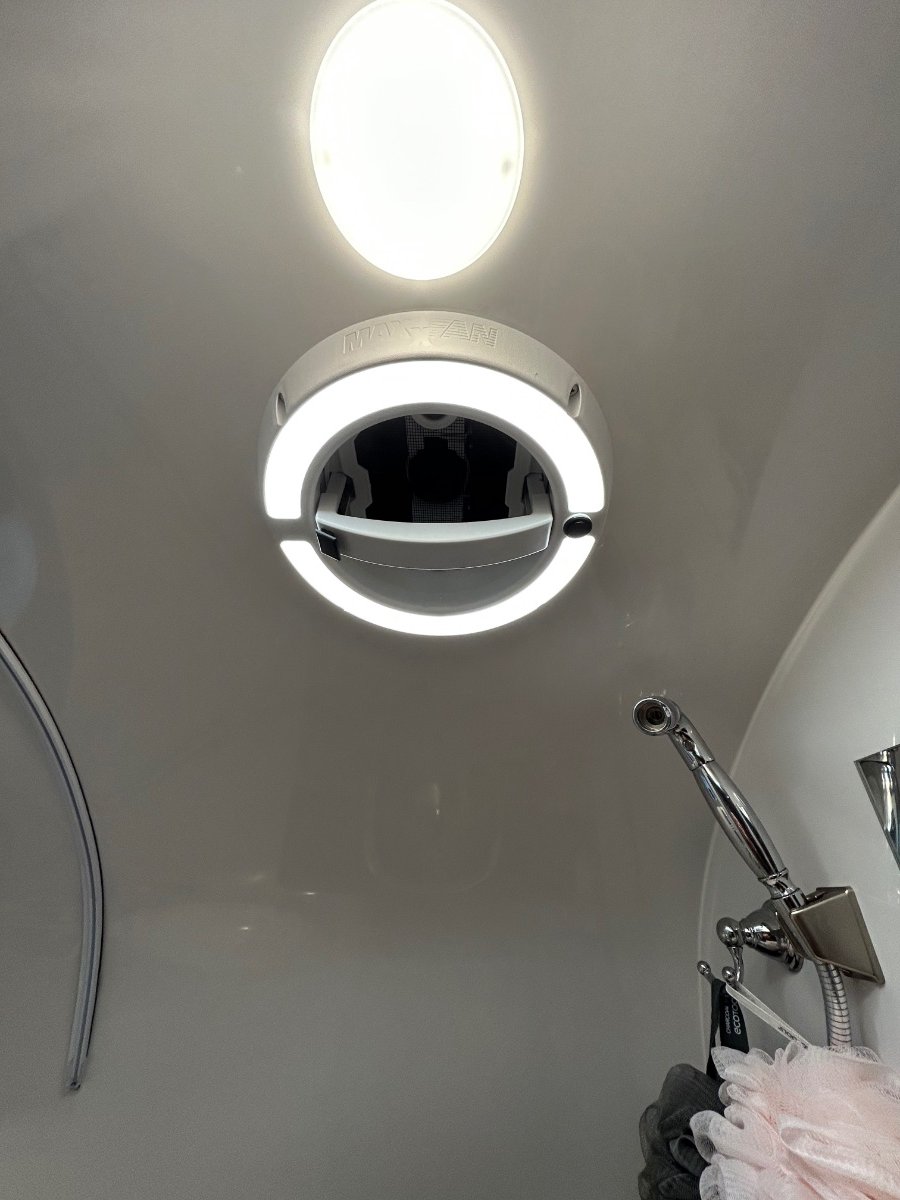
Ok... I love these forums! Nothing like great ideas shared by a group of common minded OTT owners. I'm thinking I stole this one from a comment that @SeaDawg mentioned a while back regarding his "LED-lit" Shower Fan. Well, Diane read his post and thought it would be a good upgrade - so, the new MAXXAIR w/LED unit arrived yesterday via Amazon (Happy Wife - Happy Life category). This would be the short story of its installation... First off, the original VANAIR Ventline fan assembly operated perfectly - no leaks, no bearing wobble, smooth actuation, but alas, no LED. It's the exact unit we had in our previous SOBs. BTW: Its up for grabs - a "freebee", I'll cover any CONUS shipping costs for anyone needing a Ventline. There was major brain cramping involved to plot-out a list of instructions for the R&R drill, especially the Removal phase. The first "R" was straight forward - using a plastic "razor" scrapper to remove the butyl tape from the gelcoat. Cleaned gelcoat with a fresh microfiber cloth doused with an ounce of rubbing alcohol. 2. Filled original mounting holes with clear silicone, they will be further sealed with the butyl tape attached to the new fan housing. 3. Cut-to-fit the included plastic sleeve that fits between the top flange and bottom (shower side) trim piece. Applied clear silicone around circumference of plastic sleeve and upper gelcoat. BTW - the OTT factory fan hole was exactly the correct diameter - no additional cutting was needed (WHEW!). 4. Mounted new assembly up top, carefully pre-drilled/chamfered 8 new holes in exterior gelcoat. Lightly torqued-in stainless screws enough to "push" butyl tape out from flange. Trimmed tape and applied clear silicone around perimeter of flange. 5. Rain guard: The new unit included a "rain-guard" which may be helpful if operating the fan in a heavy downpour. Applied butyl tape on the RG flange and carefully pre-drilled/chamfered 6 new holes for the RG. Trimmed tape after torquing screws in and then applied clear silicone around perimeter of RG. Attached fan cap with the provided 2 white screws. 6. Applied clear silicone to the trim piece groove where plastic sleeve seats. Carefully pre-drilled/chamfered 4 new holes for the trim. Connected 12vDC power to fan motor and LED - used solder and heat-shrink for connections. Tucked wires inside trim piece and mounted it with 4 screws. 7. Unlike the Ventline unit, the MAXXAIR has a locking mechanism when depressed allows the fan lid to open/raise. Its raises/lowers smoothly. Fan and LED each have separate switches. And as, I believe, @Patriot has recently said, "Let there be light!" One and done... Happy Wife.
1 point
-
Other than making sure that the area to be painted in degreased and the rusty areas/chips are lightly sanded (a Dremel tool is great for this), I don't bother with an undercoat. Primarily this is due to the fact that I re-spray this once a year and I don't want too much paint build-up. I started using THIS (Rustoleum) but I do prefer THIS (Krylon) instead since it tends to not run/drip as much as the Rustoleum. I understand that "caliper paint" might offer a bit more durability, but, since I respray once a year anyway due to chips and light rust the additional durability versus the additional cost just doesn't compute. Bill p.s. I only spray the "nose" (up to the sliding collar) silver. I leave the collar and the rest of the Bulldog "satin" black and separate the two areas via some blue painter's tape like THIS stuff.1 point
-
On my 2023 F-150 there are no "cross hairs" but there are guidance lines and the ability to "zoom" in once you get close enough to the hitch. The biggest "problem" is that with the bulldog hitch painted black (from the factory) it can be difficult to see. This is particularly so if the pavement is asphalt and/or the lightening is not that great. This is the reason that MB (above) painted a white stripe in his bulldog. I chose to simply paint the entire front end of the hitch. However, my first attempt painting it was with fluoresrsent orange paint. This didn't work too well in that the paint faded in the sun. Therefore, I switched to "hammered silver" and the results are great as it is easy to see in virtually all lighting conditions. Bill1 point
-
We bought a white plastic paper towel holder 15 years ago. I, too, was hesitant about drilling, first year. I used industrial velcro first season to make sure I was happy with the location. Permanently installed with stainless steel bolts, washers and nuts after we decided we were indeed happy. We mounted it over the bed. I didn't care for the idea of paper towels over the cooktop.
1 point
-
We mounted a ratcheting towel holder above the kitchen sink - but it required drilling 2 holes. We also use a portable vertical towel holder that we can take outside when cooking or whatever... The vertical one keeps the towels handy and from blowing away.1 point
-
This is what I’m thinking as well. I’ll be getting them replaced next month and will let everyone know the result.1 point
-
Well, that's another "potential " problem, not one anyone is likely to face with quality lifepo4 batteries, but it could happen. Fighting a lifepo4 fire is different from a traditional fire, from what I have read. Not unique to Olivers. Many manufacturers now offer a lithium upgrade. And, many owners have done their own upgrade, hopefully to a reliable source. Someday, near in the future, we'll likely see a requirement for a lithium hazard symbol. Everywhere. For now, my home is powered by solar and lithium, and one car. Tesla markings on the outside of our home, at the transfer switch, should help firefighters, hopefully, if ever needed.1 point
-
I respect your opinion on this. If the fire is in the Battery Box, inside is logical. So long as every occupant of the trailer knows where it is. On the other hand some believe that if there is a fire situtation, get all occupants out NOW and away from the trailer. Then once the family and pets are safe, kill the power source at the batteries or some other outside accessible location. Looking for a master switch hidden under the beds or in a closet somewhere is not time efficient. However fire fighters will go to the battery box and either cut the 4/0 cable or use the red master switch. That likely will be their first action once finding the buring trailer. Regardless, your comment begs having clearly visable signage that "Emergency Battery Switch Here" would be advisable for all locations where the switch is located. Personally I show my guests our 350 amp rated Blue Seas master switch as part of our trailer tour. GJ1 point
-
This should be considered a "work-around" rather than a "fix" and Oliver should come up with a permanent solution, which I'm sure they will. In my particular case, running a 1.5kW load, the voltage indicated by the Xantrex display was .5V lower than what was measured at that battery. This doesn't seem like much but it does cause a premature and unnecessary shutdown of the Xantrex, as many have experienced, since the Xantrex interprets the battery voltage being much lower than it actually is. Changing the LBCO to a lower value to compensate works however it doesn't change the fact that there is still a .5V drop across the wiring and associated circuit breaker. That doesn't sound like a big deal but what it equates to, in my case, is that running a 1.5kW load results in 60W ( conservatively ) being dissipated by the wiring on the DC input side of the Xantrex. That's power that's not being applied to the load and results in unnecessary heating of the wiring (although small). Ideally there would be no voltage drop between the battery and the Xantrex, in reality there will be some, nothings perfect, but .5V is excessive. Having said all that the "work-around" will work, as I've been using that method for a while with good results, and my heavy electrical loads are usually temporary.1 point
-
It is ironic that this unit is labeled “Freedom” … freedom from what? The Lithionic batteries seem to be solid products, but the fact that each has its own on/ off switch adds a lot of unnecessary complexity to the electrical system, and the potential to wreck one of them if an owner makes a very simple mistake: “Oliver Travel Trailers was alerted that under certain conditions the Lithionics internal BMS could be damaged if the full load for inrush amperage to the inverter is loaded on a single battery.” https://olivertraveltrailers.com/forums/topic/6619-tsb-proper-lithionic-reboot-sequence/ I think the entire electrical system has some VERY major design flaws that should be corrected. An owner should not have to worry about cr@p like this due to shoddy design! Ollies need a central battery master on/ off switch inside the trailer, not at the batteries... (No - the picture is not upside down.) All the cables should be run to two central internal positive and negative buses. EACH battery positive terminal needs a limiting fuse of an adequate rating to operate normally, but it would blow in the event of a current overload. There should be no unfused wires anywhere, ever!!!! And …… every owner should have full access to up-to-date wiring diagrams. Does Oliver consult with professional electrical engineers? I seriously doubt it … As a side note, “old school” electronics and appliances with separate functions, such as a charger and an inverter, or a water heater and furnace, do perfectly fine in an RV environment, they are very simple to troubleshoot or cheap to repair, and they don’t cause major system headaches when one fails. If one goes out in the field, you usually can continue camping without very much trouble. Properly designed systems should make life easier and more trouble free for owners. Not make things complicated. OK, I am done ranting 😉 John Davies Spokane WA
1 point
-
I made them myself. They are all aluminum but the top one is painted white.1 point
-
Now that is a flag pole! Well done.1 point
-
Wow Eric, nice install! The only reason we accepted this install, even temporarily, is that the batteries are AGM. My plan eventually is to eventually find a tray that is deeper and wider so that I can put 3 batteries along the back of the tray, have the faucet mounted in front of the batteries and beside the faucet, have room for our toolbag. At that point I would engineer a solution to separate the battery box from the main compartment.1 point
-
Having seen Andrew's solar installation and electrical upgrade work at Burning Man, I have to say that I am blown away. We used to have the coolest and most geeked-out Oliver in existence, but he has taken things to a new extreme. He has a bigger and better inverter, larger solar panels, and more battery capacity too. If you haven't checked out his work yet, you will be impressed. He rocks. - Chris1 point
-
Hi Steve ! You betcha' ! The tubes first since we are on the storage tube thread: The plug is localy called an expansion plug. The tubing can be the tubing of your choice. Example: the white tube is a 6" sewer drain pipe, non preforated. The corrugated pipe is a 6" driveway culvert pipe, smooth on the inside so the plug can seal watertight.. Decide what size pipe you want to use, then see if there is an expansion plug available in that size localy. There is a point where the cost versus the size will come into play. For us the the 6" size pipe seemed to look "right" on the expedition rack. About the sunroom or sunshades, here is a series of photos by the lady that makes them and the tiedown setup. There are 39 photos and they pretty well give a good look at everything. Our Olivers sit higher off of the ground than a Casita and that needs to be considered when ordering. http://good-times.webshots.com/album/404604710WIdfzS1 point
-
Here's a look from the back:1 point
-
Since Pete has appointed (annointed?) me the queen of suction cups.... the outside suction hooks are awesome.... For holding: brooms, chair covers, outside shower towels... even my eyeglasses, folded over and perched on the hook. Occasionally, I've forgotten to remove them, and have been so surprised to see them still attached to the Oliver when we stop hundreds of miles later. (Can't say I recommend it... Just happened) As I have said, so very many times before, we love our little Oliver. We hope that both of you will feel the same way we do, a year--and 17,000 miles---- later... as we do now. We're soooo looking forward to summer trips in our Oliver. We have had great adventures, traveling and camping, and meeting wonderful people from this forum and others. It has been a blast. Sherry also known as... the queen of suction cups????1 point
-
Brilliant! My quick and simple solution has been turning the lock to the locked position when shutting the door, which keeps it cracked open and still out of the way. It at least gives the bathroom some warmth overnight to make it a little less torturous. And it's also helping us train the kitten to open & close the bathroom door (as we eventually want to keep the litterbox in there).1 point
-
During the birth of the Wonder Egg, I did some web searching and found a good signal amplifier supplier at http://www.powerfulsignal.com / I selected the Command Post option and had it installed on the Wonder Egg. Since then, Wilson Antenna "decertified" the dome antenna I had on the inside from being dual band to being "single band only" because it did not boost the 1900 MHz frequency as much as they wanted. Since then, installations have included either a stronger dome antenna, or stronger flat panel antenna. I had the flat panel installed in retrofit. Here's the problem that I ran into . . . if you have a cell phone signal, say of one or two bars and you activate this flat panel antenna, it interferes with the front, receiving antenna and the system shuts down. It was only usable in EXTREMELY week signal areas. Here's my fix: I reinstalled the previous dome antenna which works in a small way on 1900 MHz and put an A/B switch which I now use to go between the old dome and the flat panel. Here are the pics of my current system . . . Wilson 301133RV - spring mounted, dual band cellular antenna on the outside Power supply - 12V plug mounted inside front storage bin SOHO Amplifier hooked to a DIAWA CS-201 A/B RF switch in middle bin. (You need a switch capable of 2 Gigahertz to do the job) Take it to your local Ham Radio shop and they can make you the connector cables. I have a 8 inch cable with a type-2 connection to the amplifier and a Type N connection to the switch. Two six foot cables with N-connectors to go from the switch to the antennas. Two pics of the original dome antenna, model number WE 301123 (even though they say it only does the low band, it works well enough for this application on the high band) It can be identified by the three mounting screws and the "Wilson" logo on the bottom Finally, the Dual Band Wall Mount Antenna mounted near the front dinette seat. The bracket to its left is so I can reposition it to radiate out the side of the trailer to use the laptop & cell phone outside, under the awning This should provide me with 5 bars just about everywhere I go. If I'm in a deep crater, I'll crank up the Ham radio.1 point
-
After living full time in our Oliver for a few months now, I've come up with solutions to some of our everyday practical problems. This evening, I completed the last one - finding a suction cup paper towel holder! Suction cup Paper Towel Holder So.. I'll start there. It's by Chefmate, and can be found at Target for just $9.99. It has a suction cup grip base, that is ordinarily meant for securing to countertops. However, with the fiberglass interior, it sticks just about anywhere! You just twist the top to engage the suction cup, and untwist to disengage to move it around. There's even a magnetic paddle that keeps the papertowels under control, so this allows you to mount the towels even upside down! It fits in a variety of places in the Oliver: Of course, if you have the default entertainment system, some of these positions won't be available for you.. but you get the idea! Suction Cup Area Divider There are often nights that Chris stays up later than I do, and I'm a bit light sensitive when I'm trying to sleep. So, one restless evening I had a thought - I had left over fabric from our cushion's being made, and I had just bought some small suction cups for hanging exterior Christmas lights with AND I had a box full of binder clips left over from running an Obama Campaign Office just a couple weeks ago out of the trailer ... and voila.. I had an instant curtain to help block the light and give us a bit of room separation - and no permanent installation on the trailer: Now that I know it works, in time I'll probably add rivets to the fabric and have it finished off. But for now, it's a very workable solution. Suction Cup Coat Hangers Now that colder weather is here, we were getting a cluttered feeling having our jackets out all of the time, usually tossed on the seats or bed (our closet is pretty full with clothing, so it's not an ideal storage spot for us). So, I got some extra large suction cup hooks out - and instant coat & hat hangers: One goes over the closet door, so obviously the coat has to be moved when getting clothing out. But so far, it's working great - keeping our coats out of the way but easily accessible as we leave. The jumbo suction cups seems to strong enough to handle our coats. Velcro Door Curtain Since it's in the picture above, I thought I'd use this opportunity to introduce my solution to the door window not having privacy. This was probably one of the most glaring oversights on the trailer, in my opinion. All of the other windows are so awesome at privacy - but the one that is *right* in front of the bathroom and closet door doesn't have a privacy option?!? So this was actually one of my very first modifications - I took extra fabric from our cushions (getting extra fabric if you do custom cushions turns out to be a very smart idea - I also made seat covers out of extra fabric for when we're in dirty environments, such as the dusty desert.) and some double stick velcro to create a quick curtain: The double sided sticky actually didn't stick for many nights to our fabric, so I have since sewn that in. When the curtain is not in use, it velcros right up in the corner, nice and out of the way. And of course, this solution could also be done with ... you guessed it.. Suction Cups! Much suction cup happiness here! What other uses for suction cups have you encountered? - Cherie1 point
-
Nearly all of our favorite campsites are covered with large old growth oak trees. Those locally, that is. September, October and November are some of our favorite months to camp and enjoy the outdoors. We usually enjoy the start of the television new program season that is also about that time of the year. Maybe it's the fact that it is getting dark outside earlier in the day ? Anyhow we find ourselves turning on the TV so we can view the new offerings. But we usually plan the next days activities around the weather and getting a live radar view is often very important. We set a portable dish in a opening so we can access a satellite. However, that dish/tripod setup is a pain to carry with us. Though not very heavy, it does take up more space than we like. We often leave it behind for that very reason. So, my question is this. Anybody ever taken a hacksaw to that infernal contraption ? You know, to make it smaller. Maybe put hinges and snaps on it somehow so it would fold up smaller for transport, then unfold, for use at the campsite ? We have all laughed at some of the Redneck solutions to technology photos that circulate on the internet. Betty says that she is worried that I may be the star of one of those photos involving a satellite dish !1 point
-
Just to follow up on this topic, it appears that the factory is already working on a solution for a receiver. They would rather not install a custom bumper-mounted receiver with limited capacity, as this would allow a potential future owner to use the receiver in way that was never intended (is tandem trailering even allowed anywhere?). Therefore, I'm going to wait and see what they come up as their standard receiver option. If that doesn't pan out, I might also reconsider the tongue basket.1 point
-
Based on my limited understanding of the Oliver frame, I believe that the bumper covers the entire depth of the frame rails, making the attachment of receiver tubes on either side of the rails fruitless. I think that's why Steve had them welded to the underside of the frame rails, so that the custom carrier he is fabricating will slide in directly underneath the bumper. Either way, I really don't want to do a custom carrier if I can avoid it...that would likely get costly, since this is not something I could do myself. FYI, I found a rather nice aluminum carrier at Northern Tool today. It has a rather stout 2" square tube for the mount (and nearly 1/4" wall thickness!), but the standard installation requires bolting on 2 additional sections of steel tubing which also allows for a swing-up position when not in use. I would rather try to make it work without those steel pieces and have a direct connection to the bumper-mounted receiver...assuming I'll still be able to angle the bumper down far enough to access the waste hose. Being aluminum the carrier only weighs 42 lbs. and the dimensions are approx. 4' wide and 2' deep. We'll see how far this idea goes...1 point
-
Personally, I prefer a toaster oven to a microwave any day! If I am on extended trips, I usually just bring mine along. It's big enough to make casseroles, bake a pan of corn bread or biscuits, bake a meat loaf or a chicken & I love the fact that it makes great toast and it's not big enough to heat up the whole camper. I stow it under the bed of my Casita. I have actually seriously considered replacing the microwave with the toaster oven many times. I guess I just haven't camped for extended periods often enough lately to get that done. I think a microwave is a big drain on power and seldom use it while camping. Geri1 point
-
RvBella, There is an a/c outlet above the stove-top in the galley that could be used for a toaster oven or any other small appliance you might bring along. As long as you're hooked up to shore power or you've got a generator going and don't exceed its wattage you should be able to do just about anything. The Fantastic Vent will whisk away the odors and smoke if you need it to.1 point
-
Hi Robert! We picked up the in the sink dispenser for the kitchen area at Lowe's. The product in the package is here: http://oliver.hewus.com/Mods/Under_Coun ... 6.JPG.html The dispensers for the bathroom area were purchased through http://www.dispenser.com and are nice because they can be removed and used in the house as well with only an additional mounting bracket needed.1 point
-
Hi, Those awesome little suction hooks are now available in the big box stores. I think we bought the ones for our daughter's dorm room in Wally World last fall... or maybe Target. They work the same way... open it up, pull the hook down, and the suction cup attaches like glue... but no glue. The one that mystifies me is the variety of hooks at the home depot that claims to hang with no mark. From small picture frames to big, towel size, you positions them, slide a little piece of paper out, and they stick with no suction cup or no hole or mark. And, they're supposedly reuseable/repositionable. Haven't tried one yet. Any experience with those? I'm thinking they might be good for pix and pot holders, etc. in the Oliver. Sherry1 point
-
I have to agree with MountainBorn... The Oliver is just a really easy tow. One of the reasons we started looking at Olivers and similar trailers is that we travel a lot to North Carolina, and we spend a lot of time on little narrow mountain roads. My husband liked the idea of a trailer that was not a lot wider than the tow vehicle... there's not a lot of shoulder or forgiveness in some of those little mountain roads. The added bonuses of light weight, low center of gravity, plus the narrower body just make for a really nice tow. We drove our new Oliver home from TN via Destin to Tampa Bay, about half small two lane roads and half interstate, in Florida tourist season traffic, and never had a problem with the Volvo's standard side mirrors. But, you may want to check out the tow mirrors just for added security if you're not used to towing at all. Especially, because the Oliver trails along so lightly behind, it's easy to forget that it's there! Sherry1 point


-
Recent Achievements
-


")


")


")
