Leaderboard


Popular Content
Showing content with the highest reputation on 10/09/2023 in all areas
-
If you are really going down this additional "rabbit hole" then I'd suggest getting some 1/2 inch foam pipe insulation and putting it on both the cold and hot water pipes. Even without removing the kitchen drawers you can shove that pipe insulation almost all the way to the entry door. Also relative to the above post - don't forget about putting some around the inside of the outside shower. With a pair of scissors and a little of that tape you can get a good layer around and over that plastic box. The same can be said of where your shore power comes through the outside wall. Another place is around the turn signals (from the inside of course) and that wall in the basement that separates the basement from the area under the street side bed. And - how about another layer around the Styrofoam that covers your water heater (assuming of course that you have the standard water heater). Get creative! But, be a bit careful around electric areas. Bill p.s. not only does that pipe insulation help with regards to freezing issues, but, it also helps keep your hot water a bit hotter such that you will lose less heat during the water's travels from the water heater to the shower in both warm and cold weather. And, it helps keep your water usage quieter - yes, some sound does travel from the water pump through the water its pipes. p.p.s. just remembered another place - the underside of those "hatches" that allow you to access the area under the dinette seats and under each bed. Actually instead of using Reflectix in these areas I used an insulation/sound proofing material like THIS STUFF. It not only insulates part of the bedding area but it also cuts noise from the water pump on the curb side.4 points
-
We've never owned a truck or a trailer. My wife and I are retiring in 6 months and diving in with all 4 feet. Tell me what we don't know please. We looked at lots of trailers and are finally pulling the trigger on the LEII. I've read a bunch of threads on here over the last year. Very helpful. But if you can point me to some that have already discussed this sort of thing, I'd appreciate that, too. We prefer simple: Everything we need, but nothing we don't. So.... LEII - starting the ordering process today 🙂. Scheduling factory tour soon. Standard except as follows: Twin Bed Floor Plan Two Upgraded Foam Mattresses Hypervent for Twin Bed Floor Plan Front & Rear Propane Quick Connects Backup Camera with 4.3” display Aluminum Storage Basket Inside Basement Access Door Auto Drain (push button drain valve) - What is this? Door lock (do I need the electric one?) TV - bought yesterday 🙂 Ram 1500 Laramie, 5.7L 8 cyl hemi, 4wd, max tow, air shocks, class iv hitch, 9 pin connector, rear video Approx 1,700 load capacity Locking hard tonneau cover, bed liner Miscellaneous side purchases (yet to be made) Generator that runs on propane - to be carried in Ollie's storage basket Surge protector (no idea what sort of electrical equipment I need for generator or shore power) TPMS for trailer Screen house carpet for under awning hoses, leveling blocks, antitheft? tools? Storage - We intend to use these toys a lot. Maybe even 6 months a year. But, inevitably, they will get placed in storage when not in use. We live in a FL subdivision, with no garage space for this size stuff. So, I thinking I buy a cover for both.3 points
-
Good choice on the truck. I towed with two different Ram 1500s, both with the 5.7 V8. It would be helpful if you told us what kind of camping/traveling you think you’ll be doing, if you know. We had never camped when we ordered our trailer. I didn’t think we’d do much boondocking but went ahead and ordered solar. Lithium wasn’t an option then. As it turns out many National Parks have campgrounds with no hookups. Many other desirable camping locations are also no hookups. We’ve utilized Harvest Host locations and they are mostly no hookups. So, I would recommend thinking about where you will go and how you’ll camp before going without solar. Mike3 points
-
Indeed - putting your Ollie inside a building when you're not using it is the best storage solution. However, I've been storing my Oliver for almost the past eight years at a storage yard that is totally open (except for the fences and cameras, etc.). For each of those years it has been stored under a CalMark cover. I make sure that it is clean before storage and that the cover is always snugged down with the rear bumper and the solar panels padded so as to not tear the cover. There have been no signs of abrasion due to this cover. It should be noted though that the cover is not waterproof . Therefore, when taking the Ollie out of storage it still needs a bath before hitting the open road. But, this bath is much easier than cleaning the grime off of it that would have accumulated without the cover. Bill p.s. Once a year I also give the cover a bath.2 points
-
Count us as another saying that solar is worth it. Our previous trailers were lead-acid batteries and generator. The solar package is so much better in every way.2 points
-
Well, certainly it is almost not possible to fill the Oliver water tank to 100% full if you are not reasonably level. But, my Ollie isn't perfectly level (nor do I spend the time to make it so) when I have it in my driveway preparing for travel. Interestingly, while in my driveway my Ollie is slightly high at the front and slightly tilted to the street side. Being slightly high in the front means that the overflow tube in higher than it would be if things were level and with the tilt being low on the street side it also makes the over flow tube higher than it would be at level. All this results in a fresh water tank that basically gets "overfilled". No problem for me except for that first time I pulled out of the driveway and my wife started yell that I had a leak - due to the "excess" water now coming out of the overflow tube. Having said all this - I normally don't fill my fresh water tank with any more water than necessary. If my plan is to simply be driving for the day and I know that I'll be stopping at a campground that night, I just might not fill that tank at all - why tow around the weight of the water. Note here that I always have a couple of milk jugs with water in them stored by the toilet in order to have water to flush my standard toilet when necessary. Don't forget - one of the main benefits of the tank design in the Oliver is that the weights of the liquids in these tanks is distributed low down and relatively evenly from side to side. This is a major contributing factor in the towing stability of Olivers. Bill p.s. both the fridge and the fresh water do not require that the Oliver be perfectly level in order to fill and/or use them. Specific degrees of "off level" can probably be found in any particular manufacturers owner's manual. I simply use my senses in order to determine what is OK for level - if I can sleep relatively comfortably and if my adult beverage doesn't roll off the dinette then I'm good to go.2 points
-
I realize that "having never owned a tow vehicle or a trailer" the question of "what kind of camping are you going to do" becomes a bit of a problem - you don't know what you don't know. But, try answering questions such as: we are interested in traveling to visit family, we want to see national parks, we want to see America, we want to go to Alaska, etc. And/or: we have experience camping in tents or backpacking and prefer getting out away from people; or, we enjoy a good meal and visiting museums. Do you have to have air conditioning? Living in Florida the answer is probably - yes. I have found that living in western North Carolina I only actually use my air conditioner less than 6 times a year. During those times I can stop at a campground that has full hookups and this saves me from having to have a generator. The standard air conditioner is noisy. Can you sleep with ear plugs or even the noise just may not bother you The standard battery setup on Oliver is fine if your intent is to virtually always use campgrounds that have electric hookups. However, if you really want to travel, the Oliver solar setup can't be beat. It allows you to camp virtually anywhere without having to sacrifice (much) in the way of electric usage. I've lived with the standard toilet for 8 years. But, normally I travel alone and I use rest areas and campground restrooms whenever possible. There are many ways around the issue of disposing of human waste. Lean on your Oliver sales agent "hard". Search this Forum for help on just about any topic that enters your mind regarding Olivers and camping. But, enjoy the process! It is a great learning experience that we all continue to have. Bill p.s. Welcome to our world!2 points
-
We will be visiting plenty of places with no hookups, but for relatively short periods. Our demands for electricity in those cases should be relatively small (mostly just the fridge to be honest). I feel like the generator will be enough. (If I'm wrong, I'll be shelling out another $10K or so next year in Hohenwald.) In no case am I worrying about running the AC or TV (or ???) when off-grid. I'm still in the mindset that this is a very comfy, hard-sided tent. 😀2 points
-
I am very familiar with the feeling. We took delivery in August. Welcome aboard!2 points
-
Do you want to bring bicycles? If so, you may want to consider getting the bumper hitch option.2 points
-
In your list I saw a half ton pickup but no Andersen hitch. This TV/RV combination requires weight distribution. From what I have read, Andersen is really your only option because of the aluminum chassis. Best to let Oliver install it. Perhaps you already thought of this and left it out of your description. Be safe! You didn't mention your intended camping style. Will you always (or almost always) be at a campground with hookups? If you intend to boondocks, you should consider one of the higher capacity battery solutions, either the 4 6-volt AGMs or a lithium option. You should add solar charging. If your intent is to boondock more than 2 consecutive days you should also consider the composting toilet. The standard power and toilet options are fine if you will always camp with full hookups. I don't have the compressor fridge. I know it consumes less power (in DC mode) than the Norcold 3-way. Keep in mind how long you might want to operate your fridge without hookups. This might also affect your choice of power option. The push button drain valve and the electronic lock are both conveniences. Neither is necessary. A manual valve is used instead. In either case, you have to open and close the valve manually when appropriate. I think the electronic lock also comes with a remote so you don't need a key or to enter the code each time. The Domestic Penguin is VERY loud. If you're going to camp in hot weather, you should consider the Truma Aventa option, or plan to replace it yourself with a Houghton Recpro or Dometic FreshJet. There are a number of postings on all three options. Get a tongue lock to prevent anyone from hooking up and towing it away. There are a number of options. I use The Collar and an A-Bus disc lock. This can be left in place while hooked up.2 points
-
EDIT 11/02/21. Oliver will do the spin weld mod free if you visit the factory. IMHO they should issue a Technical Bulletin and just fix all the ones in the field, at no charge to the owners. Instead they just changed the technical specs from “32 gallons” to “32 gallons design capacity”. LOL…. How lame is that? Matt Duncan posted this on Page 2 here in this thread: "I have talked to the service department and management. We will take care of the tank modification for free if you can bring it to our service center in Tennessee. You will need to call 1-888-526-3978 to schedule the tank modification. Let me know if you have any questions!" I am not sure what Hull number is the cutoff for the new design. Does anybody know? JD —————- This has been a hot topic lately, and a few people are getting parts, sort of, but no instructions and definitely no expensive spin-weld tool to install the new 3/4 inch FPT fitting on the top surface of the tank. The factory method is great if you are willing to take your trailer to TN, but for those of us further away it has been frustrating. I finally decided to do this mod using the two existing holes in the side of the tank, and no welding is required. It is a little time consuming but the cost is negligible. It is late, I will write this up tomorrow. Here are a couple of teaser shots: I added just a few gallons of water to the tank and tried the pump. It ran great all the way down to 16% indicated. It used to cavitate and quit at 38%, leaving about 12 gallons unusable. I raised the tongue two inches and was able to get out 3 more gallons. Another two inches raised, and only half a gallon came out. I am pretty sure the tank is getting almost fully emptied. I can live with a three gallon "reserve" - that is enough for me to finish a shower if I run dry, by just raising the tongue a little to get out that last little bit of water. Lots more info later. John Davies Spokane WA
 1 point
 -
We took a four day, three park trip through northern Arkansas this week. Our Oliver is still very new to us, and we love it. I think this is our third trip since getting it in August. Every single time we have been out we have at least one person ask us if our Oliver is an Airstream. One was kind of funny, he said, "I did not know Airstream made a plastic camper." Do you get that question, or Airstream comment?1 point
-
jd1923, Do not discount the fire risk of your old Dometic fridge! Just because you never heard of this issue with other makes doesn’t mean it isn’t a serious problem. With a used trailer you have no idea how the previous owners used the appliances. RV Fire – 3 Things You MUST Do Today! There is a lot of useful info here, https://www.arprv.com/products.php but be aware that you cannot install one of their kits into your older hull without removing the refrigerator fully into the cabin to gain access to the working section. Remove your fridge and inspect it, it will most likely be in a dangerous condition. John Davies Spokane WA
1 point
-
Welcome Dennis & Melissa! I’m another advocate for solar, it’s so much nicer than listening to a generator one or two times per day. Your camping neighbors will appreciate it as well. Sun is the enemy of every RV, and UV rays degrade sealant and components, and is hard on gel coat. If possible, find a covered storage site to protect your investment.1 point
-
Good point, I took video clips of our walk through, have come in handy a few times already. Yes can’t stress that enough, test everything at the Oliver campground fully hooked up, AND like you would when boondocking, and if you’re getting solar, test it there.1 point
-
Hopefully you have view the videos in the Oliver University. Be sure to get very familiar with the one that covers "what to expect on delivery day". Most of us were basically overwhelmed on that day - the excitement and all the information and the people you meet are all a bunch of "stuff" to take in during the relatively few hours that you are there. Take a camera (and use it), take a note book (and use it), don't be afraid to ask that question - yes, stop the person who is playing tape number 36 from memory and ask, ask, ask. Make sure that you actually understand the answer to that question and don't be afraid to ask it again if necessary. If something doesn't "look right" to you - ask about it. Be sure to actually test every thing and all systems on your new Ollie. If it doesn't work (or if you can't get it to work) don't be afraid to walk back over to the Service Department and ask for help. They (and the rest of Oliver people) are really nice and are actually glad to help you. Give yourself a break! You will forget things - there are simply way too many to remember. But - most of all - HAVE FUN!!!!! Bill p.s. We need pictures of your new rig! Most likely you will be in site #1 in the Oliver camping area. All of these sites have water and electric but the sewer dump is located up by the entrance road. If you can't find it then ask someone to point it out to you. Finally - if you are too tired to cook or simply want an easy dinner out then the Mexican place that is located right across the street (in the small strip mall) from Tractor Supply is fairly good. Also, WalMart is right there too in the event you think of anything you forgot to bring.1 point
-
I'm realizing that in my haste I've replied to some of you without saying thanks. How rude of me. Please know, ALL of your comments are so very much appreciated. TY!1 point
-
There's a couple on YouTube that just took their new Ollie to Alaska: https://youtube.com/@HardAleeAdventures?si=x3xpbvrJ5jftzF4J1 point
-
Since we are "bumping an old thread" on this old subject for the benefit of the owners of older Ollies then we should also bump THIS THREAD which gives more background, frustrations/compliments by owners and explanations by Oliver staff along with what should be done if you are the owner of any Oliver with this problem that has not been previously fixed. Bill1 point
-
I recommend going to the Glacier/ Banff/ Jasper areas on the return trip. The scenery is so stunning that it will make Alaska look dreary in comparison. The west route Cassiar Hwy up BC is pretty stunning too, way better than the Alaska Highway. But it is a lot twistier and slower and can be extremely dirty if it is wet weather. John Davies Spokane WA1 point
-
With the long and low tanks, the see level is definitely an approximation, especially if you're not "perfectly " level, front to back, side to side . Even so, they are more "accurate " than most, since the sensors are exterior, and properly calibrated, they do a reasonable job, so we opted for see level when we installed new grey and black tanks to increase holding capacity in our sailboat, seven years ago. If you think it's fun getting actual readings in a trailer, think about a sailboat on a heel. 😁 I'd recheck the valves, and look at dewdev's suggestions.1 point
-
When I originally started down the molded fiberglass trail I didn't know Oliver existed (like most of us). So, I arranged to take a tour of a Casita. My initial "problem" was that I could not stand straight up in the shower. But, as we sat at her dinette I looked around and saw that the "oak" cabinets were actually particle board with an "oak" decal. The floor simply looked "cheap" and the fit and finish was not good - and this was a trailer that was only one year old. A week later - I found Oliver!😃 Bill1 point
-
Make sure that your valve configuration is proper and that those valves are fully set into the position you desire.1 point
-
The Avions were kind of cool.1 point
-
The Oliver is an attention getter. One guy came up that was in his second Casita. He is seriously considering going to an Oliver. We talked about our trailer and gave him the tour. I expect he is going to join our forum, and stop by the factory on his way home to NC. He was struck by the component quality of the Oliver compared to the Casita. We talked to a young man that was interested in our Oliver. He and his family are big long time campers. He was in a refurbed 1966 Avion. He fell in and out of love with our Oliver as we discussed the cost of an Oliver. I suggested he join our forum and look at an older used model. Oliver's sell themselves.1 point
-
Met many nice folks showing Ollie. Sometimes we have questions, “What is it” or “It’s like an Airstream”, or “Is it new”. We had a note on Ollie one time in PA from a couple with their campsite number wanting to see inside Ollie. We were the same way when we first saw an Ollie during 2010, after being shown the interior and exterior by a very nice couple from FL, we hoped we would be able to buy one.1 point
-
You'll get used to it. Its those guys that "surprise" me at the gas pumps that I still don't like.😒 Bill1 point
-
On our way over to Cortez CO we detoured into the town of Telluride aka “ski meca” with our Ollie in tow and actually scored a spot to park right on Main Street. The Aspens are just popping in peak color in many areas. We enjoyed a great lunch in town and took the free gondola ride up the mountain. It was short sleeve weather and really a great day. We will do a little exploring in Mesa Verde NP today. Onward!🇺🇸 Telluride from the mountain side State route 145 is a really beautiful drive especially this time of year.
1 point
-
Note that I said that "the good fishing". While I've never actually fished at that access you mention, I've been told that it does not have the best fishing there. So glad that you two are having a good time and that the weather has been about as good as you could have wished for. Hopefully this weather continues for you! Bill p.s. Note that during the two times I did the hike down and back into the canyon, I too never actually saw a snake (of any kind). However, in two different fly shops I was warned - both about the hike and the snakes.1 point
-
Thank you Bill for your encouraging words! 😊 Cortez CO weather looks like it’s going to be amazing. Mid 70’s full sun for a daily high. Nice cool nights in the upper 30’s to 40. We are looking forward touring Mesa Verde NP and the Great Sand Dunes NP. This will round out our NP goal here in CO with our Park PP stamped. 😊 Rocky Mountain NP CO National Monument - (a National Park Service) Black Canyon of the Gunnison NP, Mesa Verde NP - soon. Great Sand Dunes NP - soon.1 point
-
I use the EEZTIRE TPMS. But most of these are very similar. The "recommended interval" for changing the batteries is one year. But, I simply leave mine until I start to get a loss of signal notification. Since I always carry spare batteries with me while on the road it is simple to change them. Note that I also remove the wheel sensors and batteries when I am not planning on using my Ollie for a month or so. Even though the sensors should not be transmitting a signal when there isn't movement in the wheel, I feel better knowing that the contacts are not being subjected to humidity, heat, cold, etc. On another note - I have never needed a booster for the EEZTIRE transmitter. However, these signals that are being sent from these small transmitters can experience some loss of signal during very wet weather, snow, and heavy traffic. In addition, depending on the types of things that are being carried in both the tow vehicle an/or the Oliver, signals can be weakened. Bill1 point
-
One advantage of rubber stem mounted sensors: first thing in the morning before departing, make sure your monitor is awake, then walk around and do your tire and wheel inspection, and rap each sensor a couple of times with your finger. This will trigger a new signal to the monitor. As you leave you can see TODAY’S pressures, not yesterday’s!!! If a tire picked up a nail yesterday it could have been slowly deflating all night. Read and learn: https://olivertraveltrailers.com/forums/topic/6043-article-on-how-tpms-sensors-operate/ Turn in your junk wheel without the rubber, and you should get about $14 or $15 for it.. or hang it on your garage wall as a keepsake. I hope you turned in a Service Request about this, maybe a bad batch of tires? Oliver needs to know when these events happen. I am glad the Ollie survived. The rubber scuffs will buff out. John Davies Spokane WA1 point
-
In order to clarify this statement - Most (if not all) TPMS systems will alert you to "issues" with a tire - such as sudden loss of pressure, or pressures or temperatures that are outside of a predetermined range that you set. And, the TPMS system that integrates with the Ford system and screen will do this too as I assume that the other truck makers do. However, I've found an unexpected plus to having the stand alone monitor is that I'll watch it keeping an eye on the relative differences between tire temp and tire pressure under varying road and climate conditions. All things being equal - tires running on a concrete road will have a lower temperature and pressure than those running on a black asphalt road on a sunny day. smooth road. Generally, the same statement is true for a rough surfaced road versus a smooth road. So, how does one decide on what tire pressure is correct for their particular trailer? In the pages of this Forum there have been many posts that flat out state that one should NEVER have tire pressures under "X" or above "Y". These statements may or may not be correct for the particular trailer the poster is referring to under the conditions that they normally drive - or even those conditions that may be encountered from time to time. Trailer weight, the roads that are normally driven or even specifically driven, the speeds at which they drive, the weather, etc., etc. all influence the decision as what tire pressures are appropriate for any given situation. Indeed, many of these posters will "admit" to "airing down" for those times when they travel on rough (dirt) roads. This is done for basically two reasons: 1 - for better traction; 2 - softer ride. Interestingly, this is one of the same problems that we are all trying to solve when deciding what our "normal" or "regular" tire pressure will be. We don't want to have such a high pressure in the tires such that they are like (to borrow an oft used statement) rocks. Nor do we want a tire with such low tire pressure as to cause it to heat up too much in "normal" driving. By keeping an eye on my tire pressures while also seeing the tire's temperature I can make a rough judgement as to when or why a tire is reacting to any particular situation. For instance (for my Ollie loaded for a "normal" camping trip), I will set my tire pressures at 60psi. But, the weather changes and/or one of the main roads I'm traveling has been repaved from concrete to fresh black asphalt and I note that my tires are increasing more than about 1 psi for every 10 degrees increase in air temp. Depending on how long or how severe this situation might continue, I might decide to add 3 or 4 psi. This is a bit counter intuitive but note that a harder tire (more psi) will have less rolling resistance and therefore run cooler than a softer tire. Another way of thinking about this is that a softer tire (less psi) will have more surface of the tire on the road and will "squirm" or "flex" more thus causing more friction and thus more heat. Over time I have been able to predict (generally speaking) what tire pressures are about right for me and my Ollie. But, just because I chose to run my tires at a certain pressure does not mean that this is the correct pressure for your Ollie in any given situation. We all want as soft a ride as possible while at the same time we want good traction, high tire mileage and most of all safety. By having the information provided by a TPMS we not only increase our immediate safety but we also obtain information from which we can make informed decisions as to satisfying some of the other conditions present when operating in a constantly changing environment. Bill1 point
-
@johnwen, glad to hear your experience ended without injury or serious damage. We also installed a standalone TPMS for our LEII (Hull 990), the TireMinder i10, with 6 transmitters (TPMS), four for the trailer and the other two for our spares. See: https://technorv.com/products/tireminder-i10-rv-tpms-with-4-to-10-sensors?_pos=1&_sid=585f6a851&_ss=r I installed the signal booster under the dinette rear seat. I have tested the range by walking over 300 feet from the trailer with the monitor, without loss of signal. Our TV does not have the option for adding trailer sensors. Don1 point
-
I assume from your post that other than the wheel rim there was no damage to the Oliver - wheel well, tire fairing, brake lines, brake wires, etc.? If that be the case then consider yourself to be very fortunate. Certainly there is a margin of safety in having two axles versus only one. And, a big thanks to that driver who alerted you to the problem. When purchasing my 2023 F-150 I too considered getting Ford's trailer TPMS. But even though it would be nice not to have yet another of these screens in the cockpit of the truck, the price was much higher than simply getting a stand alone TPMS. Also, I've found that having the stand alone TPMS I tend to monitor it more often. There are numerous brands on the market that do a great job of monitoring both pressure and temperature for the trailer and the spare tires on the truck and Oliver. I simply went to YouTube and Amazon, looked at features, size, reviews and price to get the one I liked best. Glad that you are OK. Bill1 point
-
@Alberta and Randy, Oliver will perform the update for you at no charge if you take the trailer to Hohenwald. Open a service ticket, with hull and vin #. They will know if the update has been done, or not, at their facility.1 point
-
I can confirm that our Elite 2 has the “new” configuration of pump suction. We have hull no. 372 with a pickup date of August 2018. There is a fitting on the top of the tank about 1 foot from the aft end with apparently a suction tube extending into the tank. This is in addition to the 2 tubes on the side at aft end for fill and drain functions. The line at the top routes to the suction side of the pump so is obviously the suction tube. On a recent dry camping trip, we experienced cavitation at about 10% indicated on the level meter. I think 13% was the last good reading and at at about 8% could not draw anything (from memory and don’t exactly remember resolution increments of level meter). When draining (and raising front end) it seemed like a substantial amount of water drained, but I did not measure. Probably no more than 5 gallons.1 point
-
I have talked to the service department and management. We will take care of the tank modification for free if you can bring it to our service center in Tennessee. You will need to call 1-888-526-3978 to schedule the tank modification. Let me know if you have any questions!1 point
-
They started doing the freshwater pickup tube mod as standard equipment some time in mid to late 2017, I think, by having their tanks delivered to the factory with the correct large fitting in the top. They were made aware of the serious design flaw before that, by angry owners, and were offering to fix older trailers gratis, if you drove to Tennessee. The factory fix for the old trailers involves adding a new “spin welded” fitting on top to allow the installation of a suction “dip” tube, and they will also change some of the connected plumbing. This should be a free in the field repair IMHO, I am sure many owners who live 2500 miles away never have plans to return there….. like me. It does require a substantial 20,000 rpm router and the very special spin weld “fixture” to do the job. Four years ago that fixture was about $140, IF you could even find one. And the job is not for the timid or faint of heart. https://www.dukane.com/plastic-welding-process/what-is-spin-welding/ My hull number 218, delivered in 05/2017, was certainly one of the affected ones, but I do not know the cutoff date or hull number. I would guess anything made after 2017 would be fine. If somebody can supply me with the information, I will add it to the top of this thread. Thanks. FYI it is super easy to see if your tank has the current design top pickup (suction) tube, it comes out of the top right (street side) corner. Older tanks have no fitting or tube on top anywhere, other that the big vent line way to the front of the tank. If somebody could send me a picture, I can add it here. Maybe it is shown in a factory tour picture of the tanks and plumbing…. John Davies Spokane WA1 point
-
I've been learning a lot here. Lots of great ideas and techniques posted and many thanks to all who have contributed. Having looked hard at my Elite and considering all that has been presented here, I can say for certain that the only way forward for me is to spin weld a fitting on top of the tank. There is just no room at all to work with the existing fittings, even using John's technique. The water heater tank mostly centers on the back of the FWT, completely covering its fittings, there is no room. Even if I was to remove the hot water tank, which would be a huge project for me, there still would be minimal room with high chance of failure. You can just make out the back of the FWT in this pic: There is a clear area on top to spin weld a fitting but it is about 12" forward from the rear of the tank. I guess this means I would have to use a longer siphon tube that would reach to the back of the tank, which is where I believe it should be located. Tape is hooked on back of FWT above fittings. I sure wish Oliver was a little more supportive about this issue. At least identifying shops that could do this work for us folks who live very far away from Hohenwald. I told them about this issue 04/15 when we kept loosing prime on our trip home. It didn't take long to discover the problem. I still am in disbelief that, as well conceived as the Olivers are, that this PITA water system ever got off the drawing board. Sure glad we all have each other to help make our Olivers what they should be- the very best! Dave
1 point
-
I don't think that the copper would split in the tank because there is no pressure on that line, if someone did let the tank get cold enough to freeze, it would freeze in place and maybe expand a touch, as could the pex and the tank would probably split... Either way, letting the tank freeze with water in it at the rear is a bad idea, by lowering the tongue either back to level or forward a bit after draining the tank as low as possible, the remaining water would be out of the area of the dip tube anyway leaving no way for any accidents.1 point
-
I just remembered another reason I decided against copper.... the risk of splitting when the tank contents freeze. It might only affect an inch or two of material right at the bottom, but that would prevent it from drawing from as far down next season. PEX is much more tolerant of freezing. I’ve had a couple of residential copper lines freeze in really severe cold and I don’t care for that, no way....! In regards to restrictions or using smaller tubing, that might work but it is not the best solution. For a suction line, there needs to be minimal restrictions (narrowing or sharp bends) and ideally the suction line should be the next size larger diameter all the way to the pump. With the small pressure and flow rates that RV pumps are capable of, it isn’t a big deal, but you should be aware of this when you start thinking about changing stuff.... John Davies Spokane WA1 point
-
Summary: It remains to be seen how well the dip tube connection endures the rigors of trailering with 32 gallons of water sloshing around. If it seeps, I will tighten the nut. If it continues to be a problem, then maybe the official spin-welded fitting will be needed. I will not know for quite a few miles, but I think it will be fine. I can imagine a situation where the suction dip tube has air in it from trailering, and you can't get water to flow out the tank drain. Simply turning on the pump should clear the line of air and start the siphon going. Attached are the original water capacity placard I made up shortly after I got Mouse home, and the new one I just made. There is quite a difference in usable water, I think this mod is definitely worth doing, unless you are forever connected to city water at your campsites. Note that while I did measure capacities while filling and emptying using 5 gallon buckets, there is some error and the numbers are not 100% accurate. I plan to print the new placard,laminate it and place it above the Tank Monitor in the trailer for easy reference. I checked the water filter after a few minutes of operation and it was FULL of white shavings, but I have never cleaned it before, so that may be a present from its birth in Howenwald. I plan to check and clean the filter every few hours until I see no more plastic shavings. Comments, questions and possible improvements are welcome. Oh yes, I never planned to run naked outside the trailer to raise the tongue if my shower ran the tank dry. I would most likely scream at my wife to do that.... with clothes on. John Davies Spokane WA Fresh-Water-Capacity-Placards.docx1 point
-
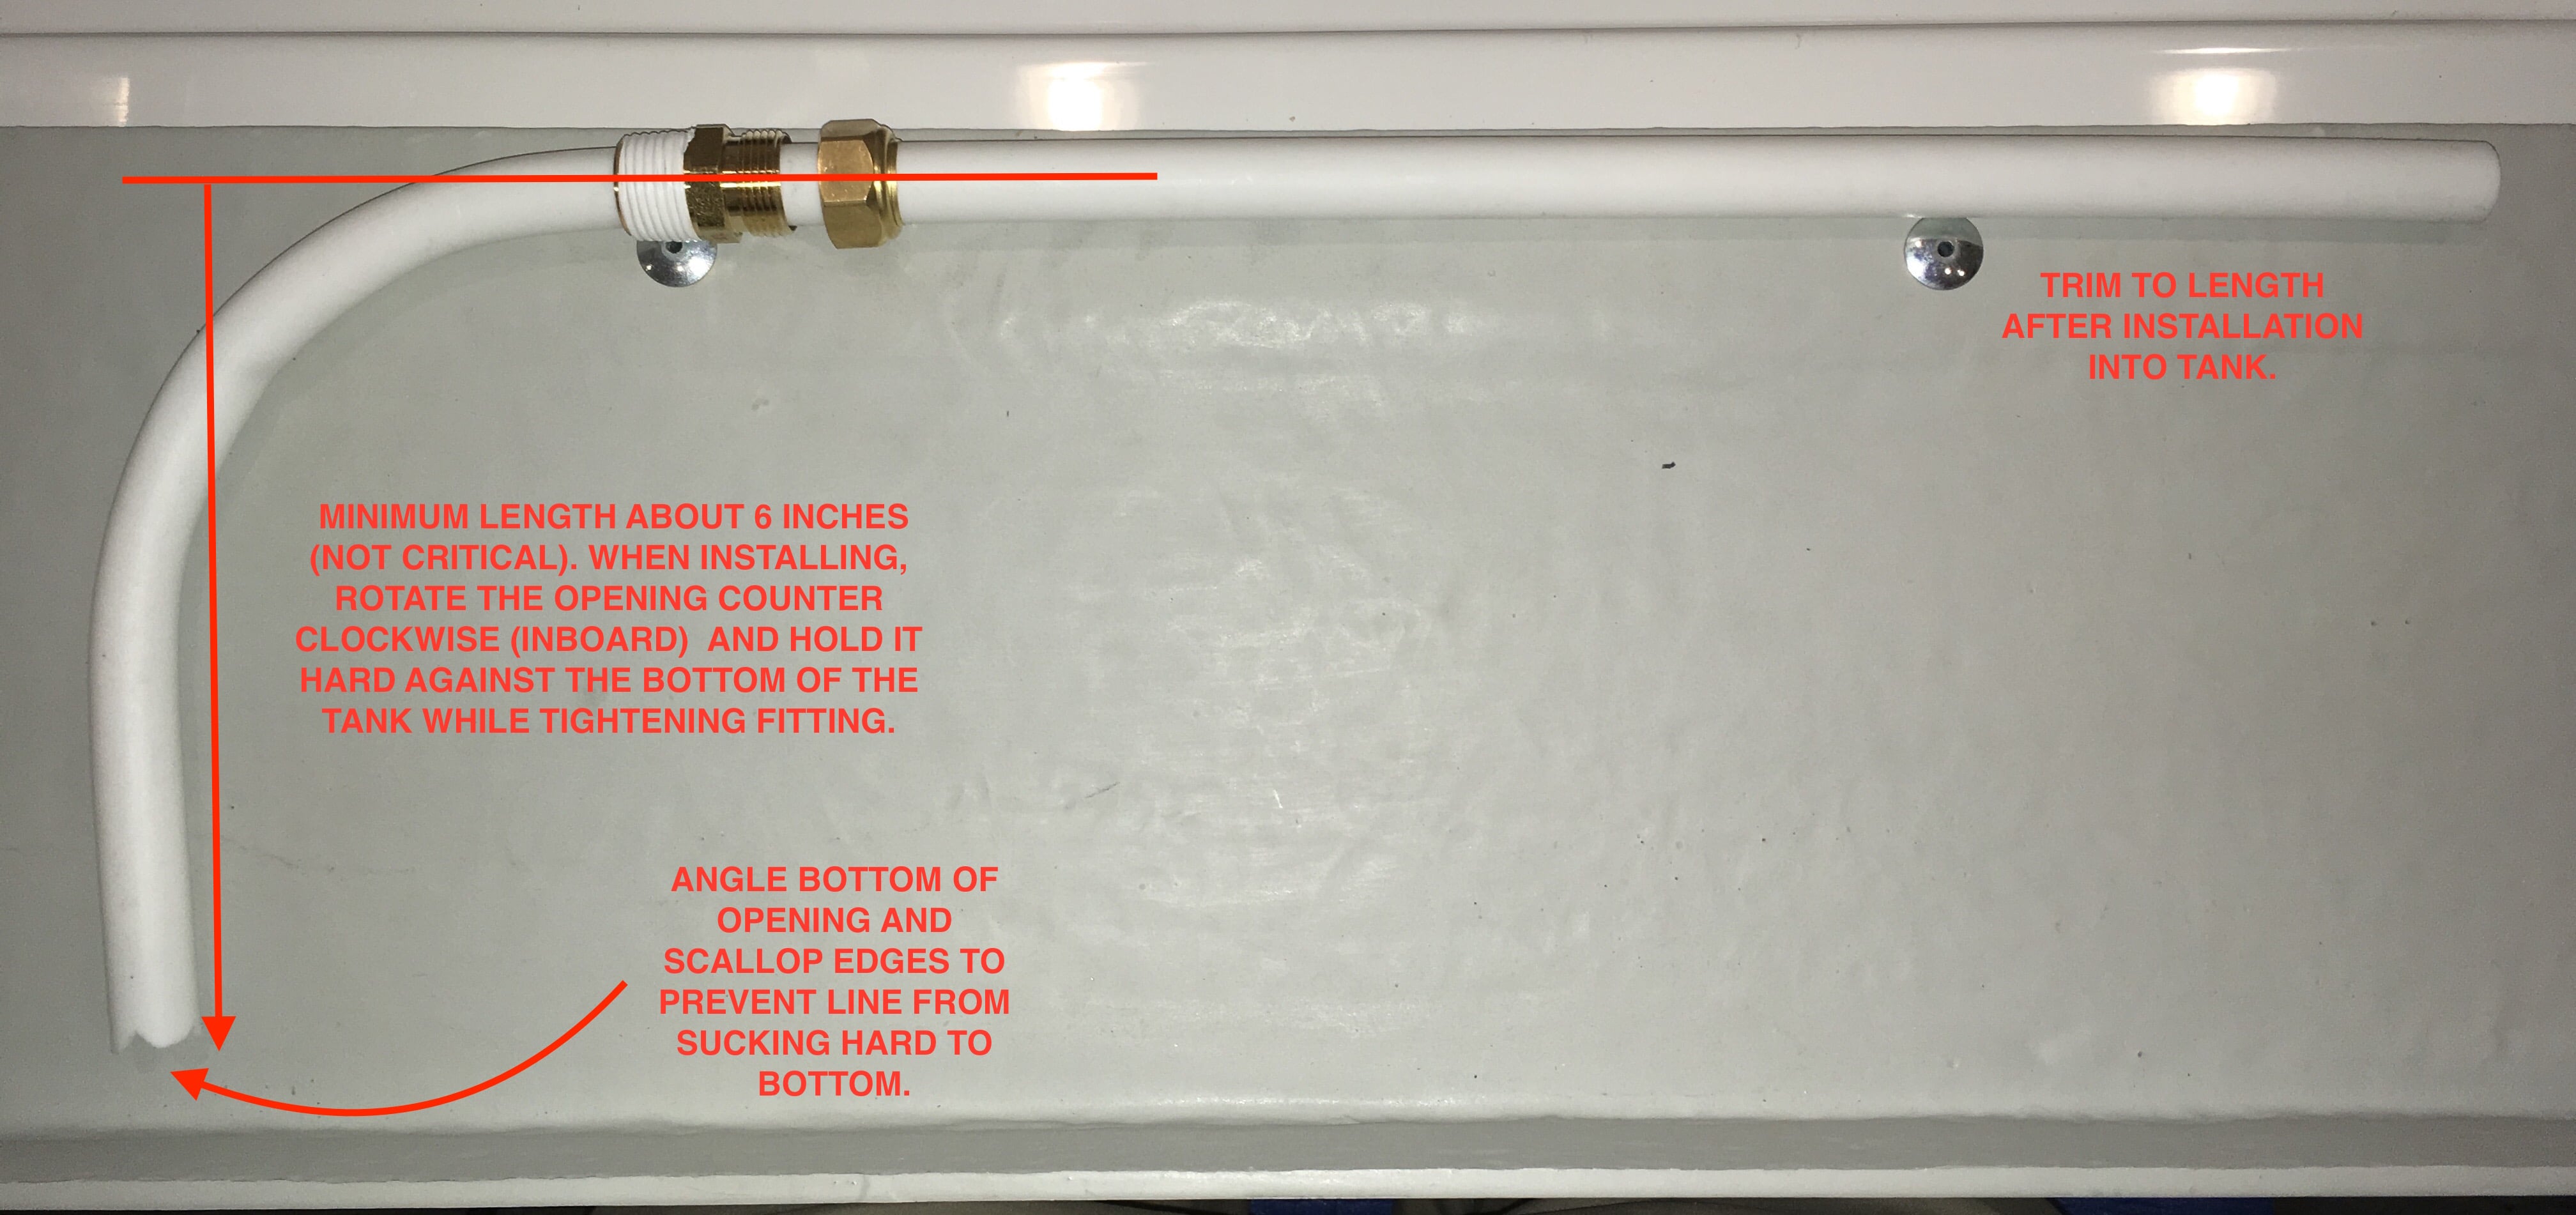
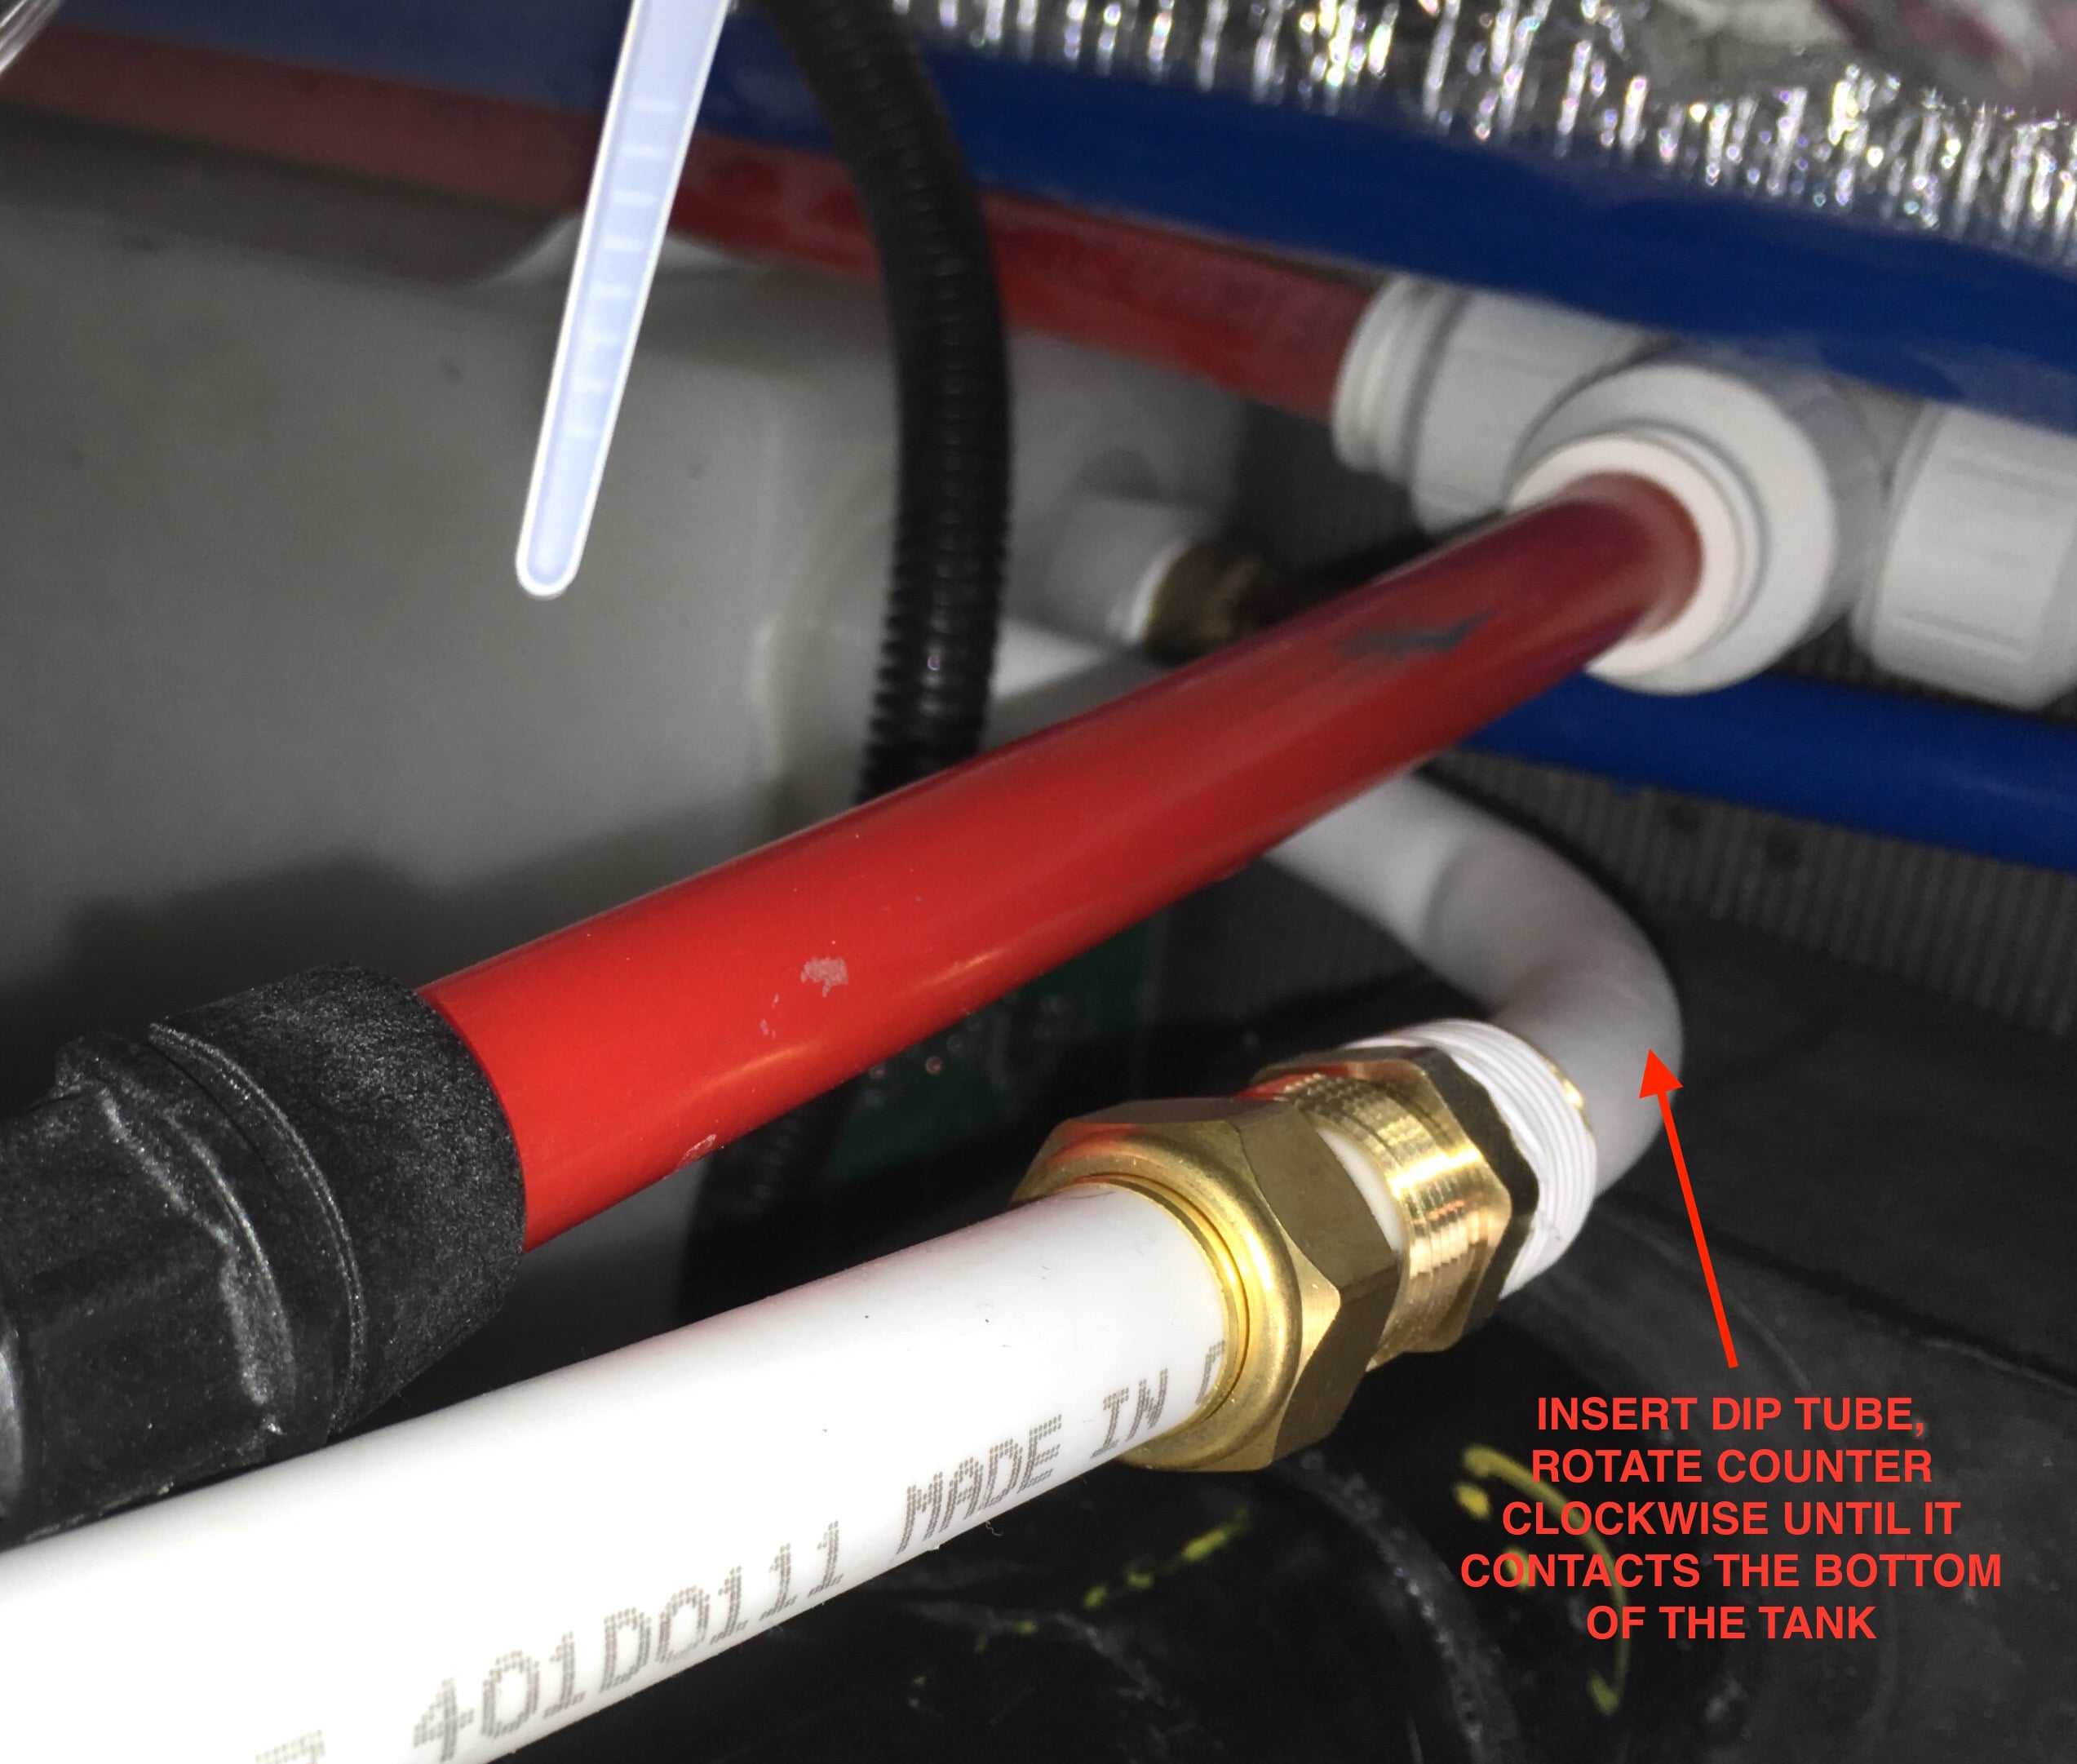
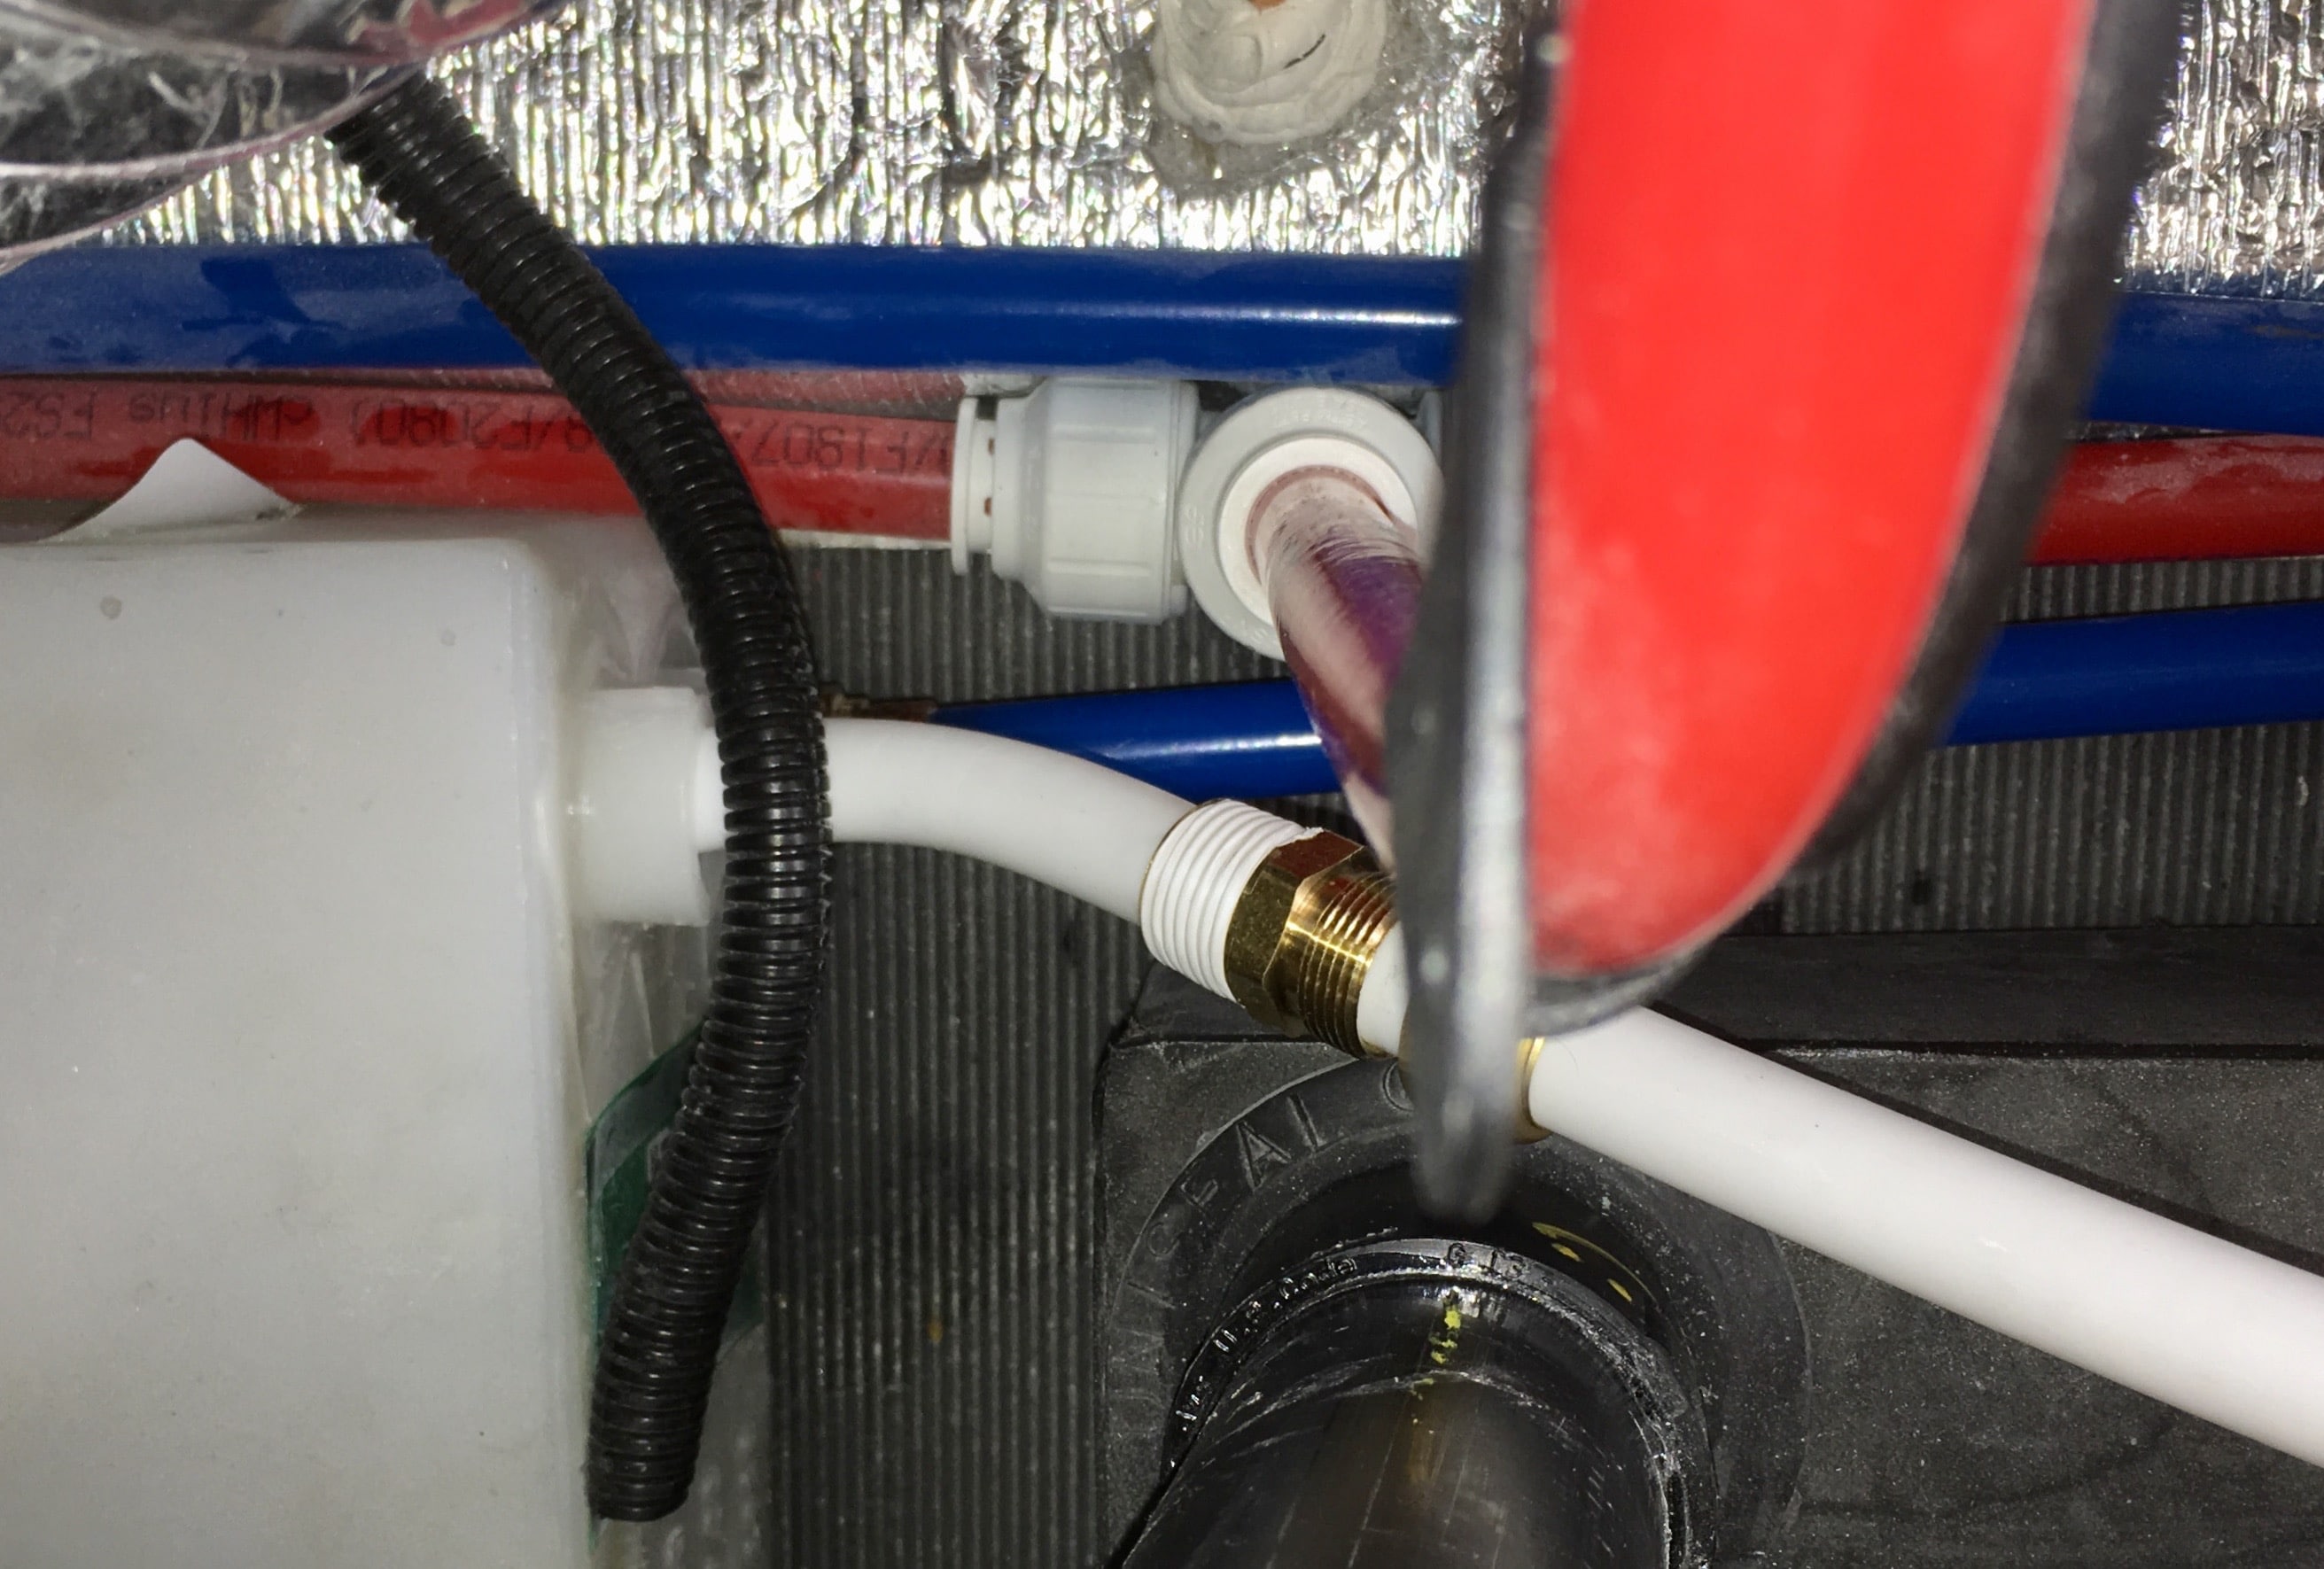
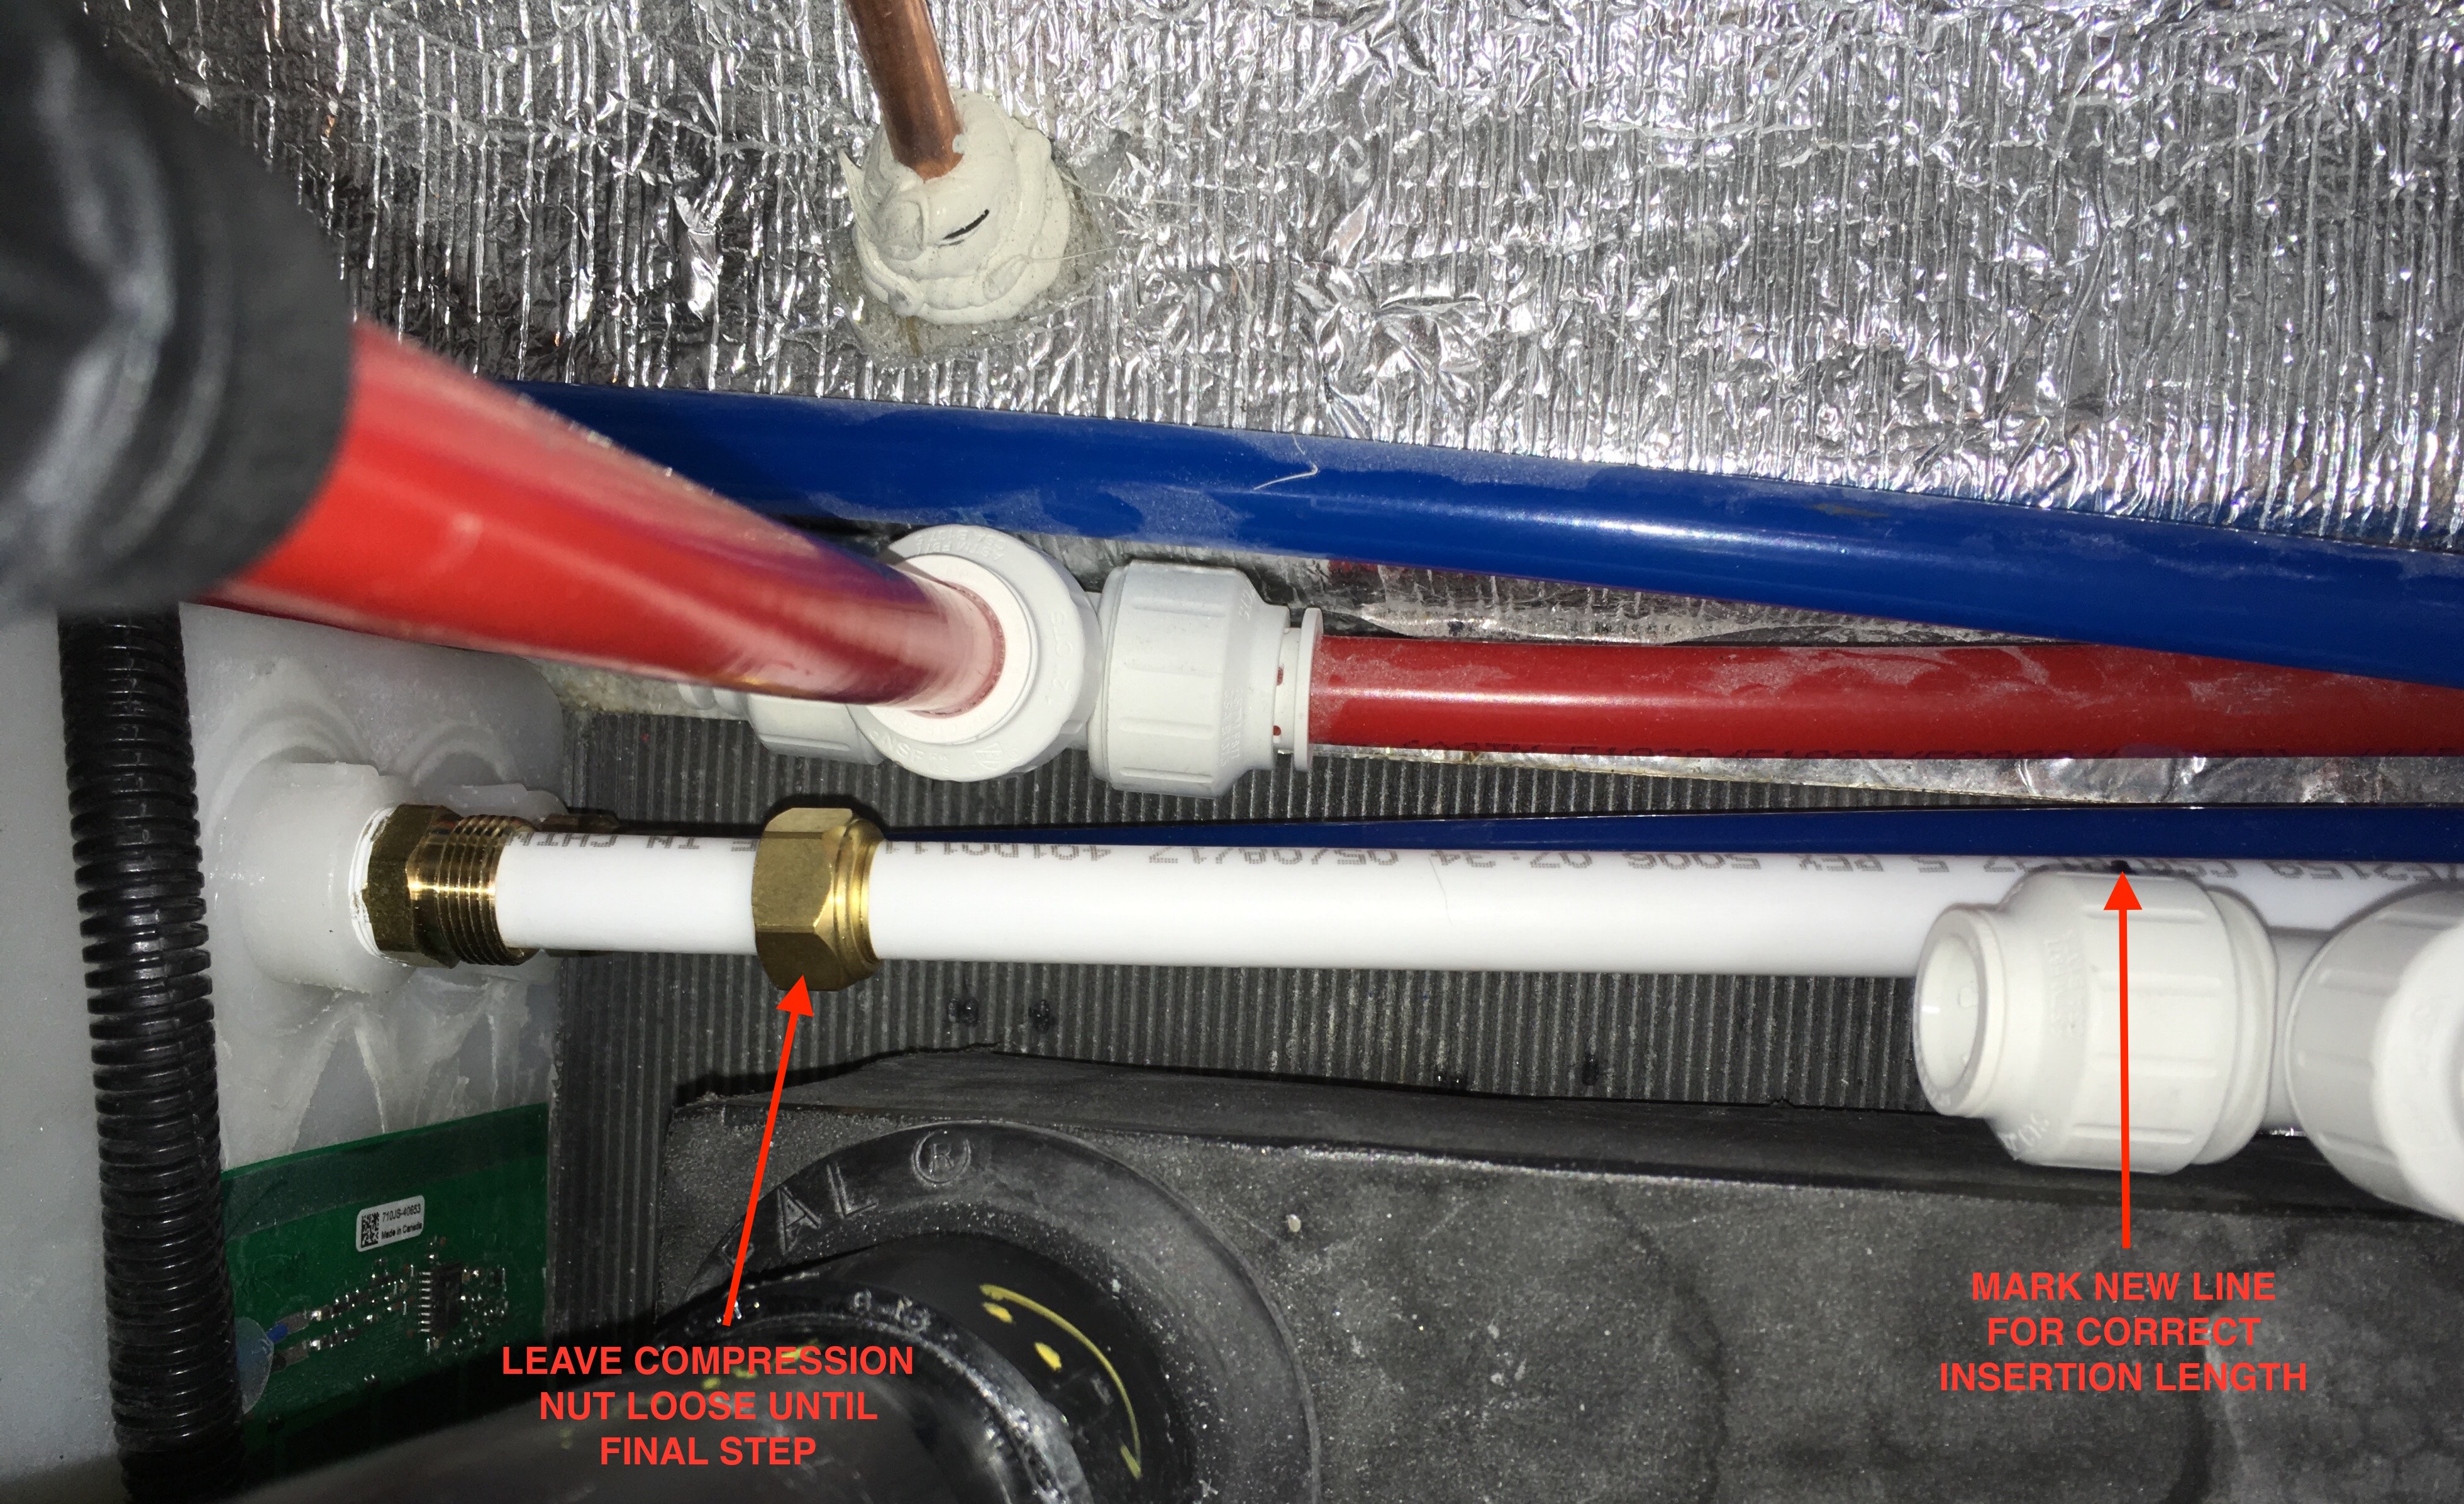
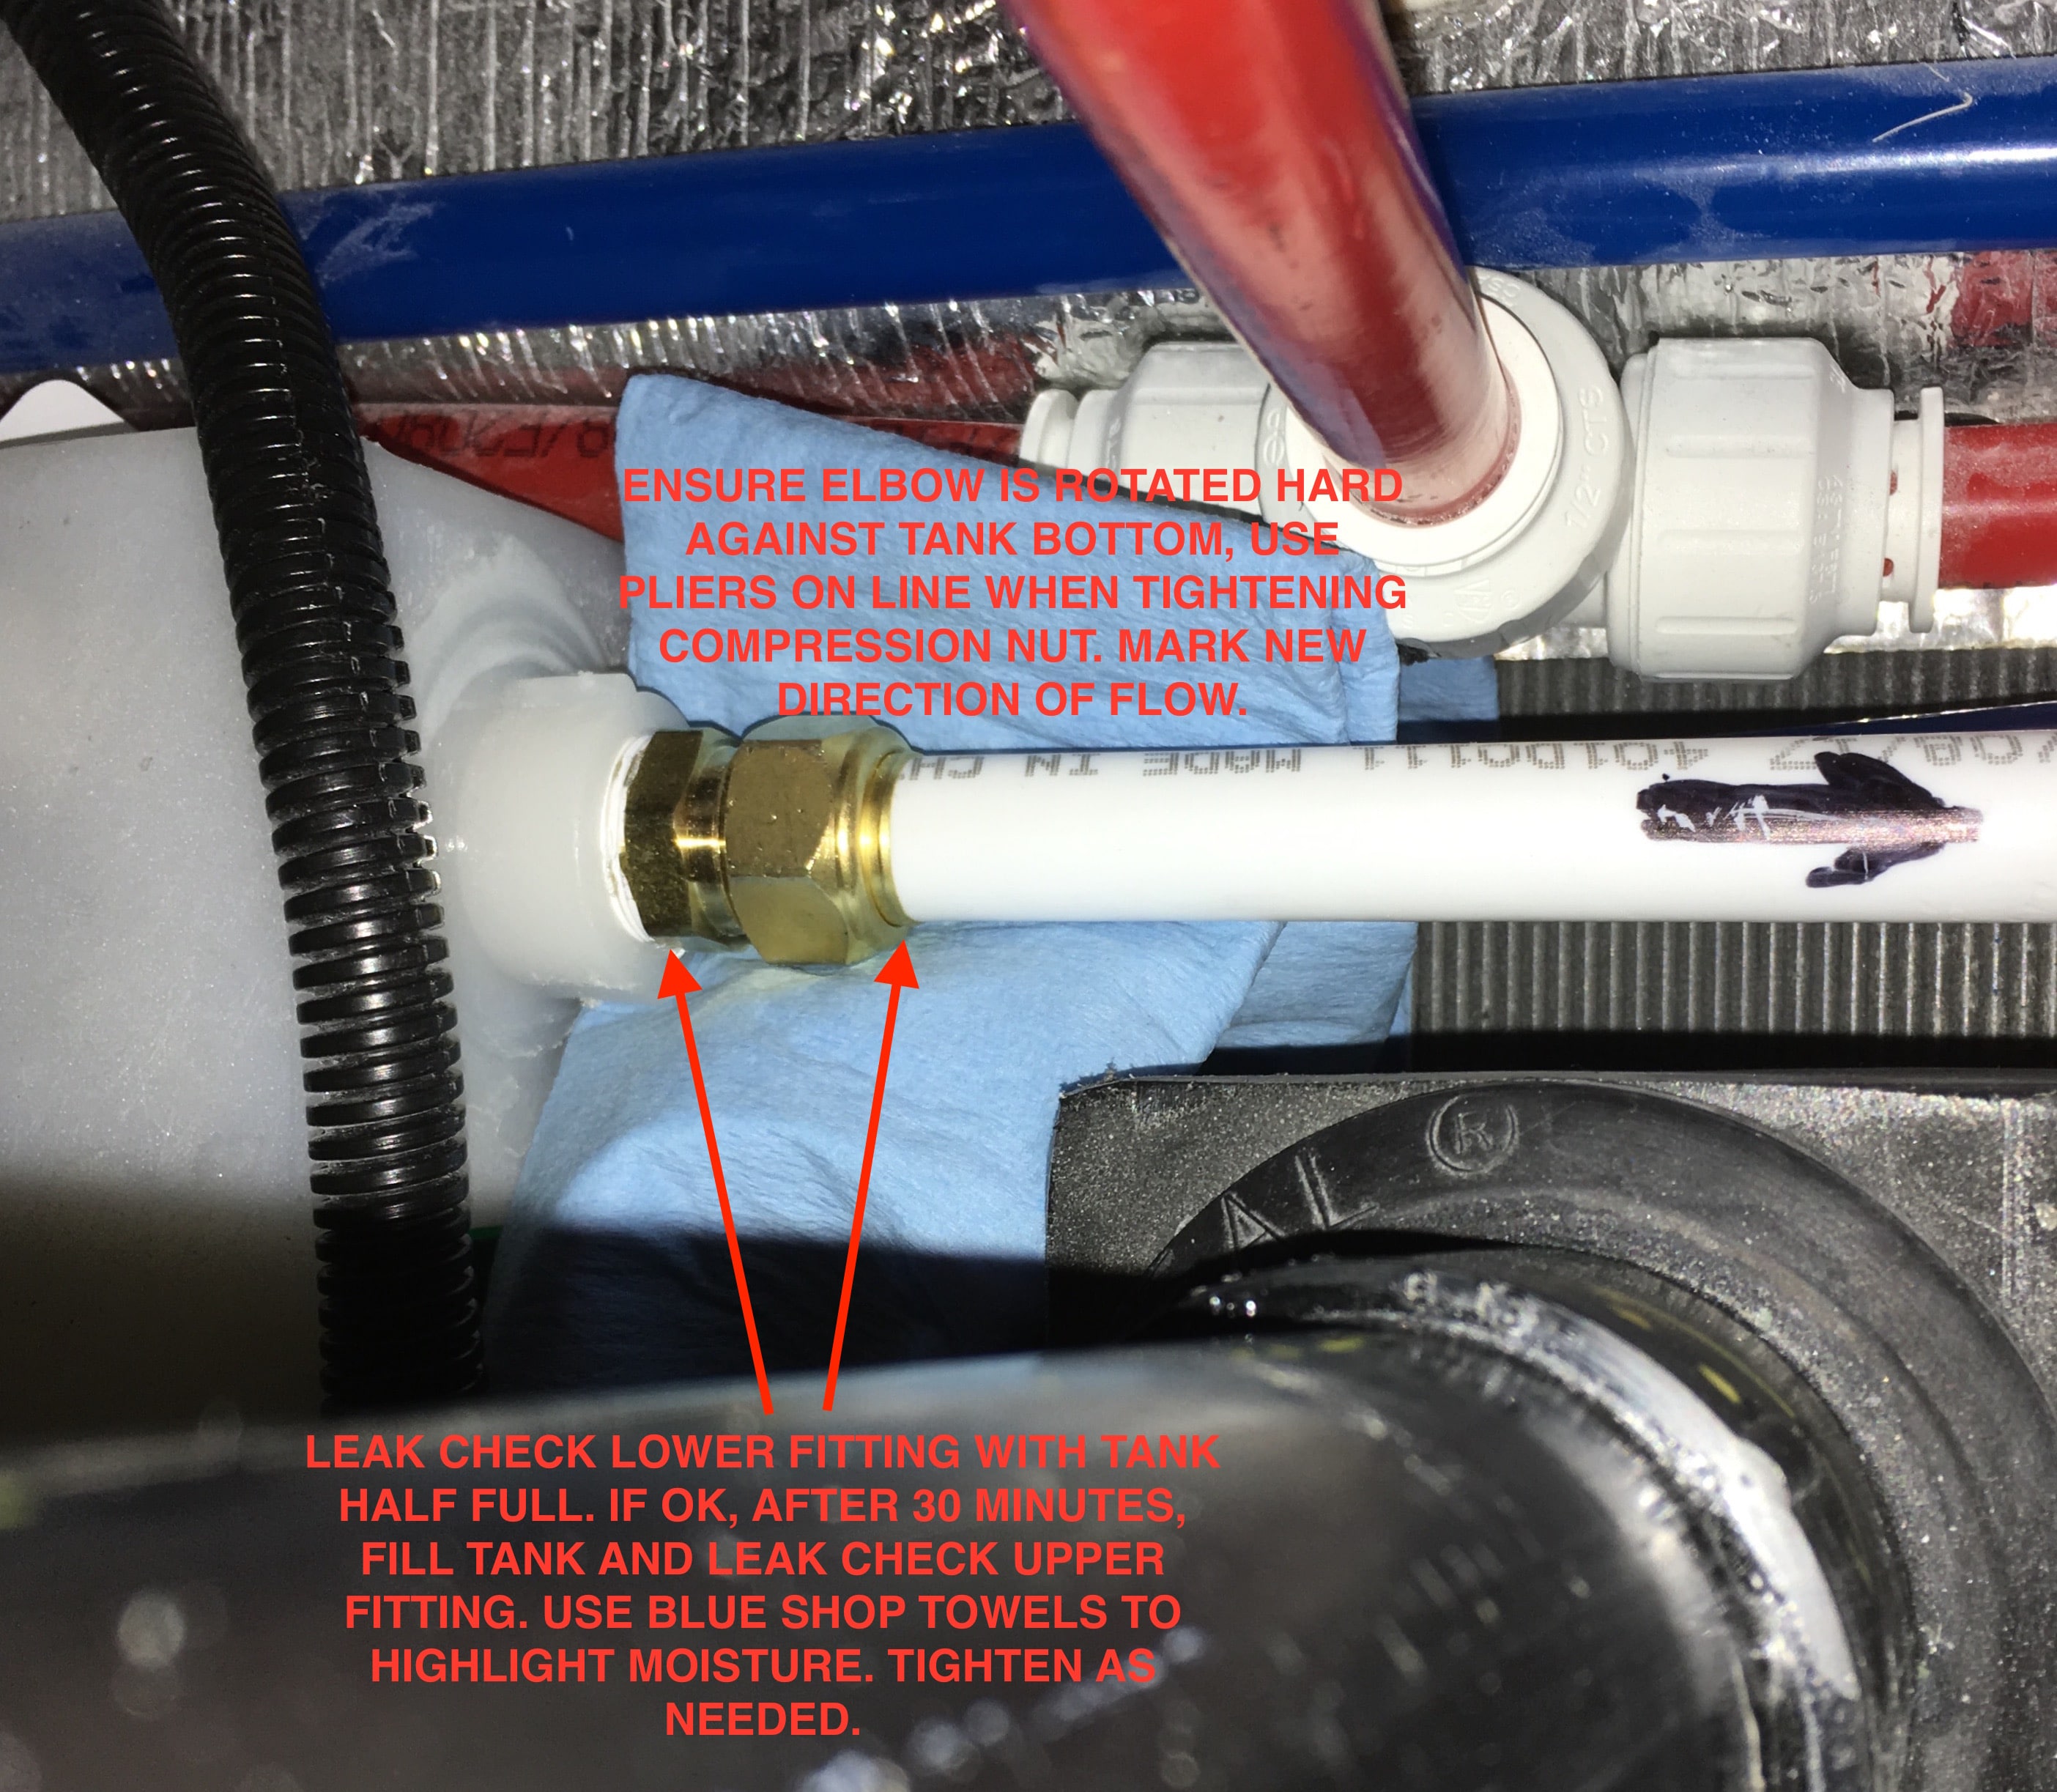
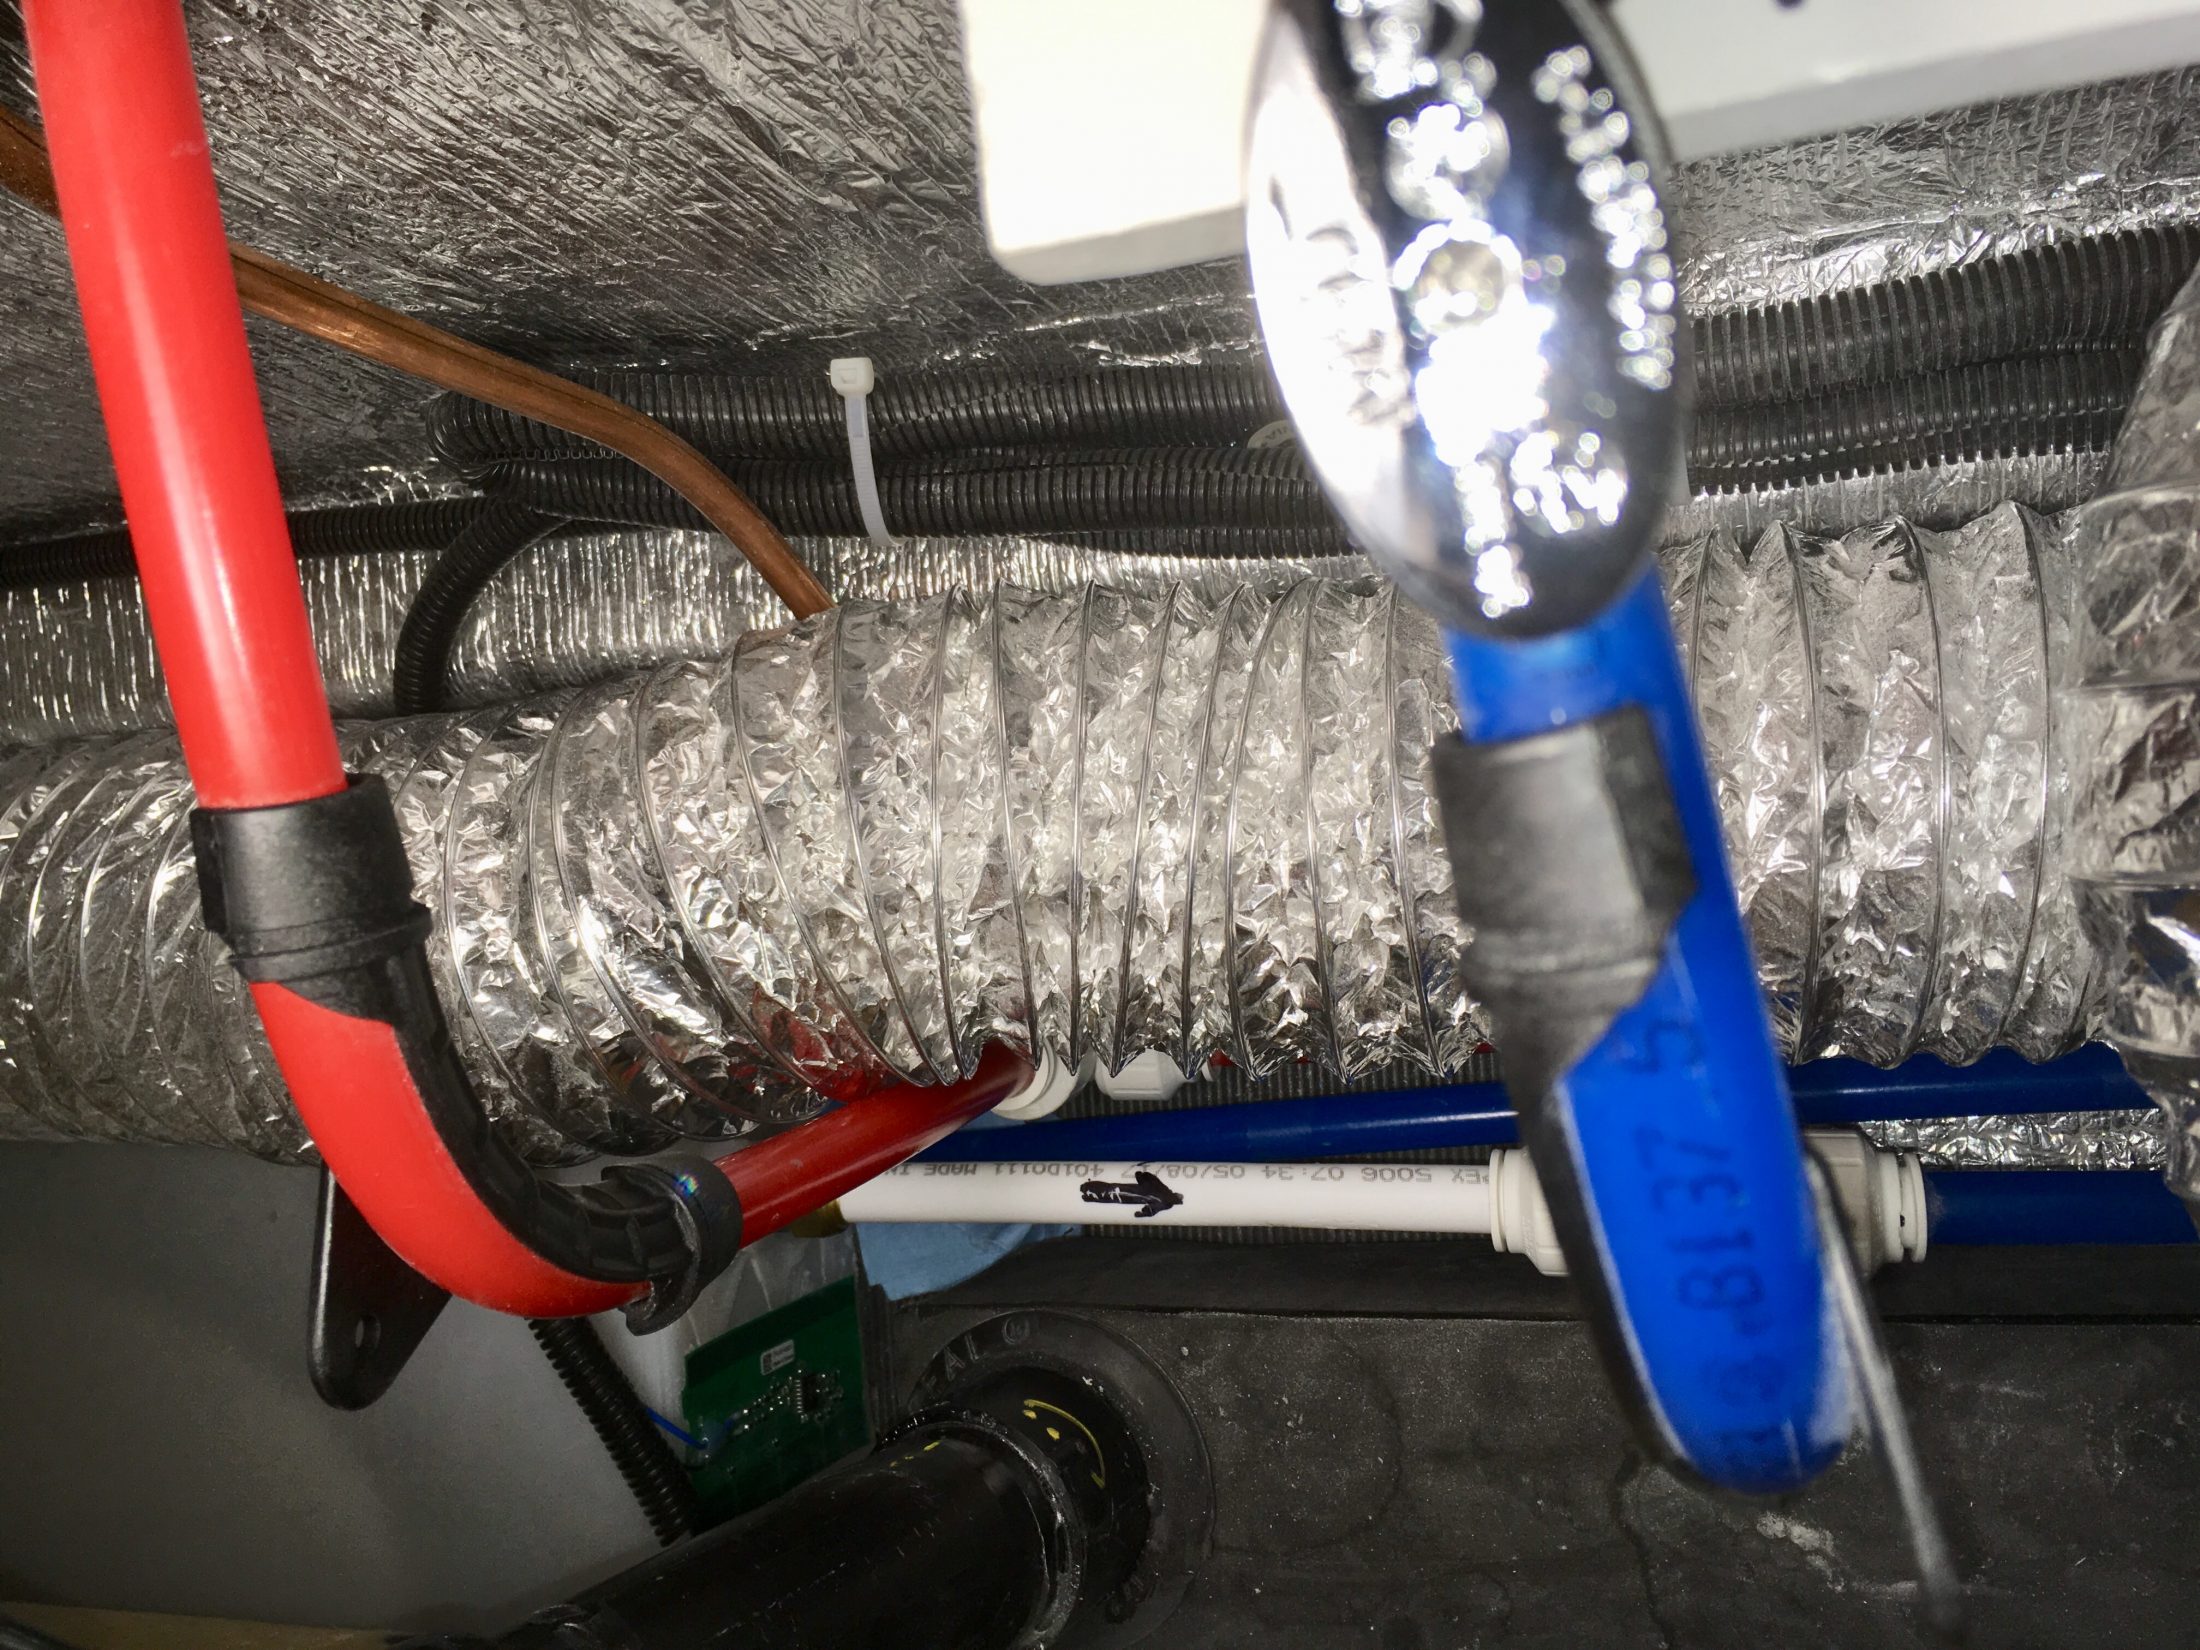
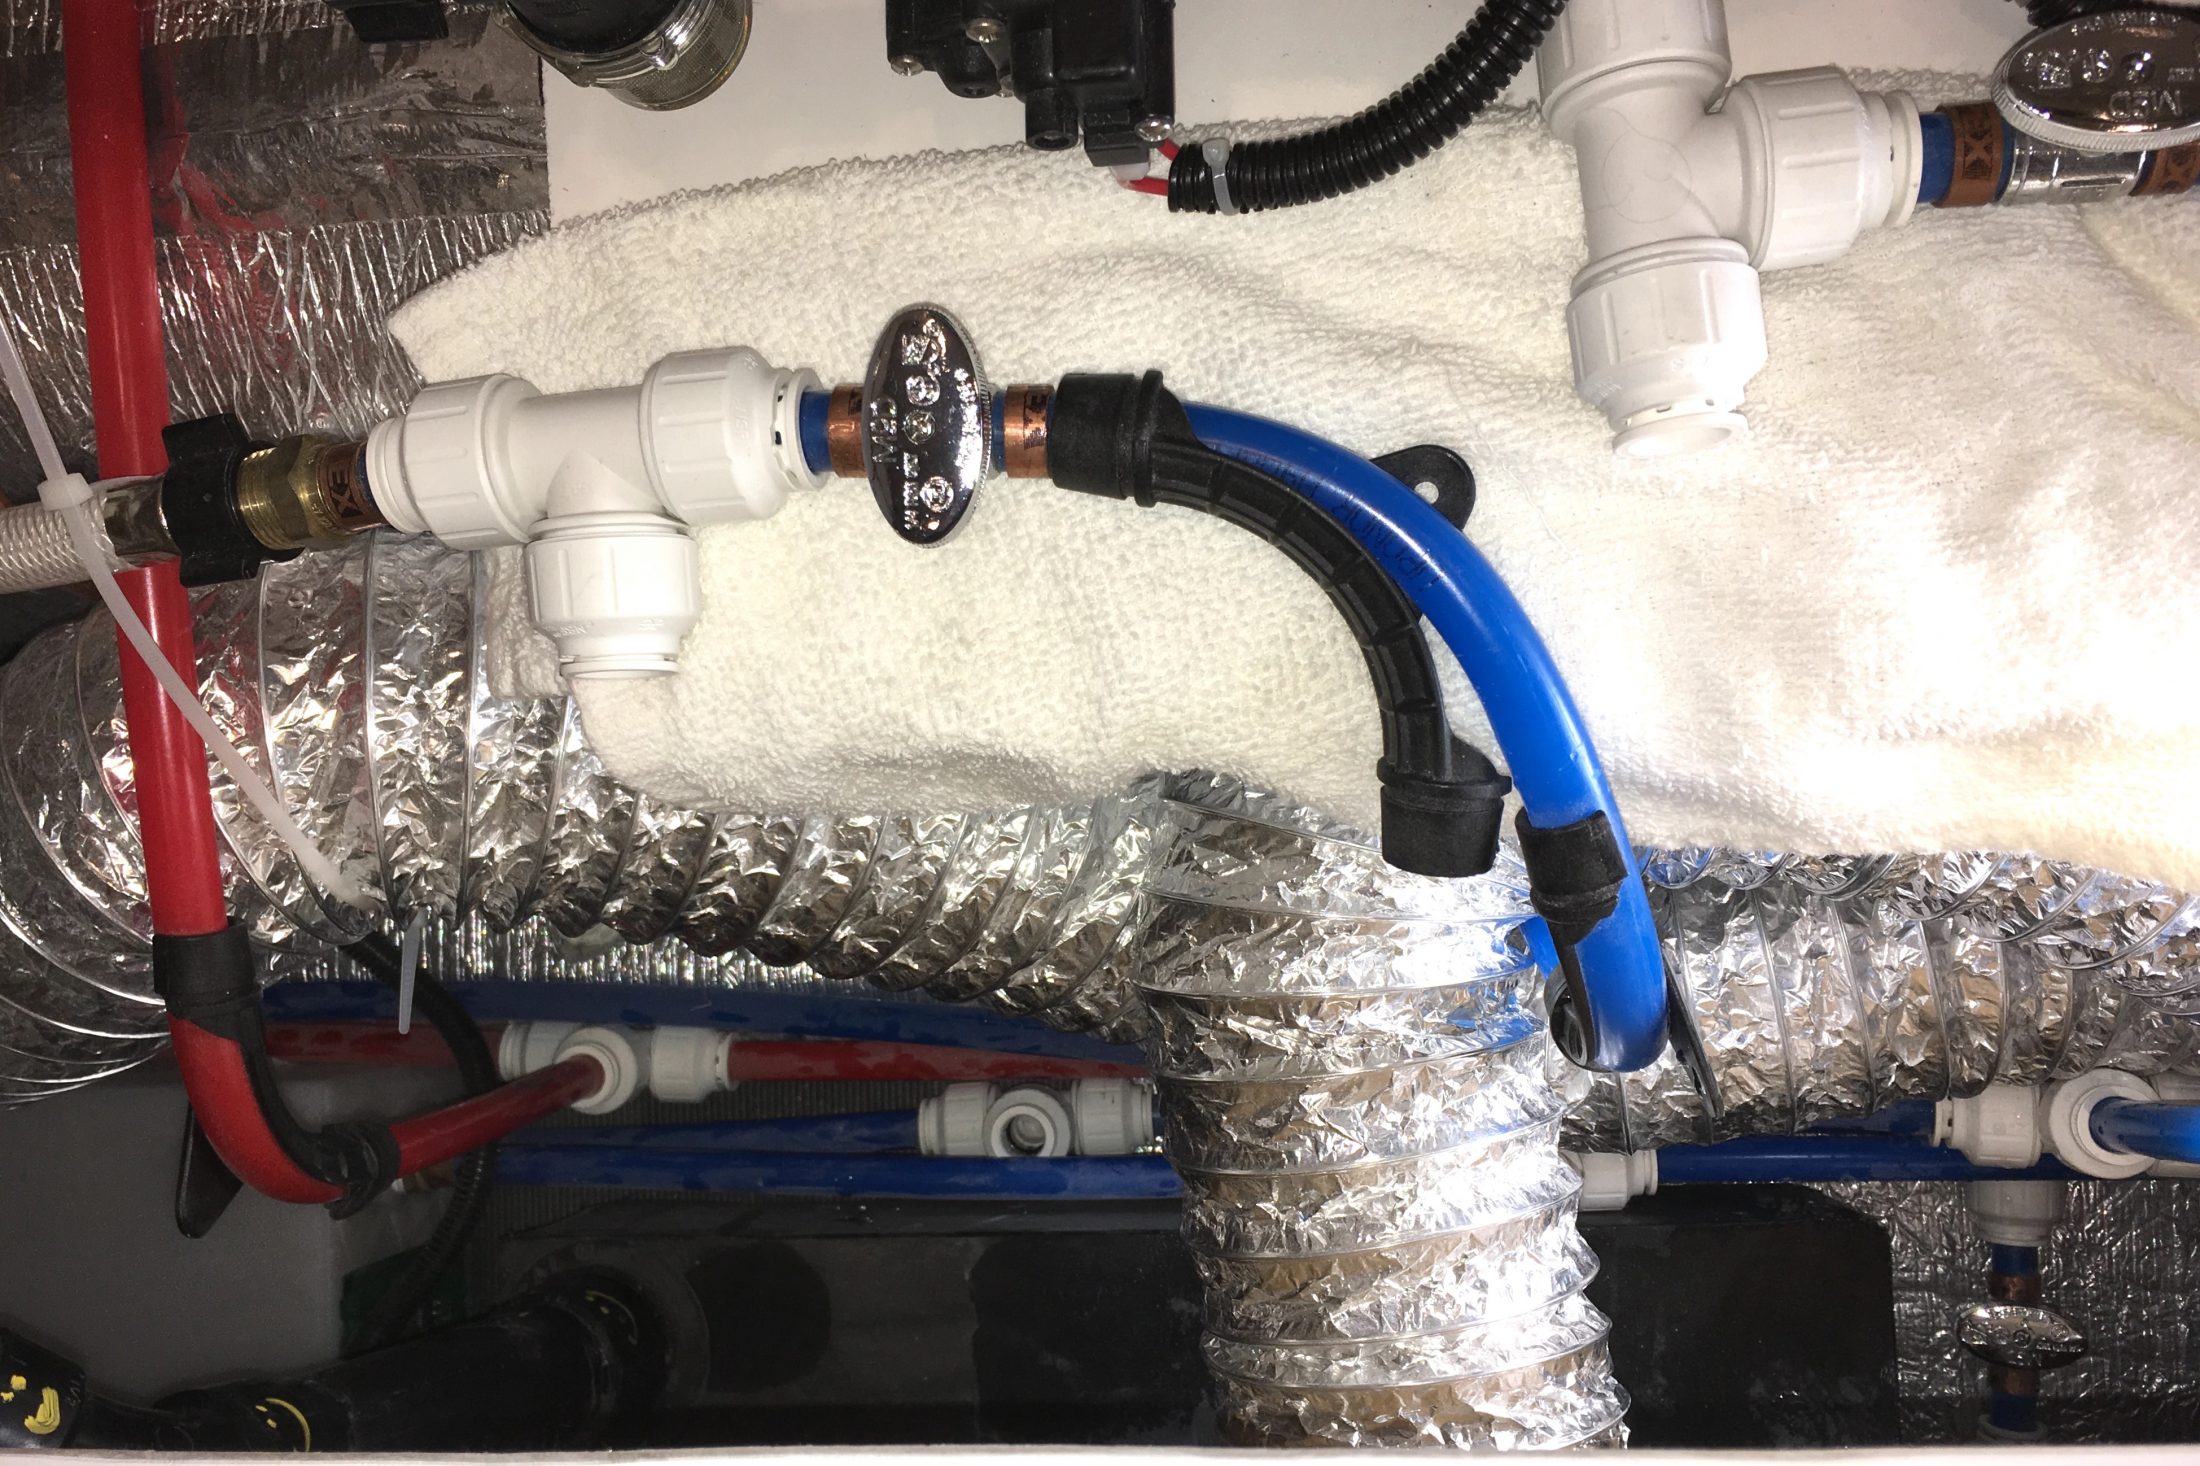
Installing the curved dip tube. Insert the short end into the top opening and push it inward while rotating counter clockwise. This rotation will keep it from colliding with the top of the tank. Screw in and tighten the pipe fitting. Do not over torque, light pressure is all that is required. Do not connect the compression nut yet. Pull outwards (to the back) on the dip tube to position the other end as far back as possible in the tank, and mark the location of the cut. Make sure the length is correct so that the end is well past the o-ring. about an inch from the opening of the fitting. Push the tube forward into the tank and cut the line. Insert the cut end into the tee fitting. Do not tighten collar. Pull back as hard as needed and rotate the dip tube toward you so that it is hard on the bottom. Make sure the newly-cut is past the 0-ring! Tighten the 1 inch compression nut while holding the line with large pliers to keep it from turning. Also use a 7/8 inch wrench on the tank fitting so that it doesn't turn. It really needs three hands, but you can position the wrenches so that you squeeze with one hand while holding the line with the other ... or you can borrow a helper. It's hard to tell how tight to adjust the compression nut. I did it moderately, checked to see if the tube would turn, tightened a little more, until the tube was tight and could not be turned easily with pliers. With the dip tube secured into the tank, insert the short elbow line into the tee and appropriate fitting on the manifold. Secure the collars. Draw an arrow on top of the new tube showing flow. Before securing all the clamps on the manifold, it is necessary to leak check the system. Fill the tank with a few gallons of water using the outside fill port and turn on the pump. WOOHOO, it works! Check for leaks in all the pressure connections - it should be easy to see them. For the suction and fill lines it is harder. I like to use a blue paper shop towel folded up and placed underneath a fitting. If there is a leak, even a small seep, it will show up as an easily visible dark spot. I filled the tank half way and checked the bottom fitting for leaks. None were present after 30 minutes. I then filled it to the top and checked the top fitting. There was an immediate leak at the compression nut. I turned it about 1/3 turn until the leak quit. I left the towels in place overnight and they were dry in the morning. A leaking tee may be fixed by repositioning the line slightly, but you may have to try a new tee or line. I was pleased that the repositioned lines did not leak. I expected at least one leaker.... Clean up the area, secure the manifold tees with their clamps, check for left-over tools, reposition the heater duct. I left a blue shop towel in the bottom as a tell-tale in case of future seepage. More to come. John Davies Spokane WA
1 point
-
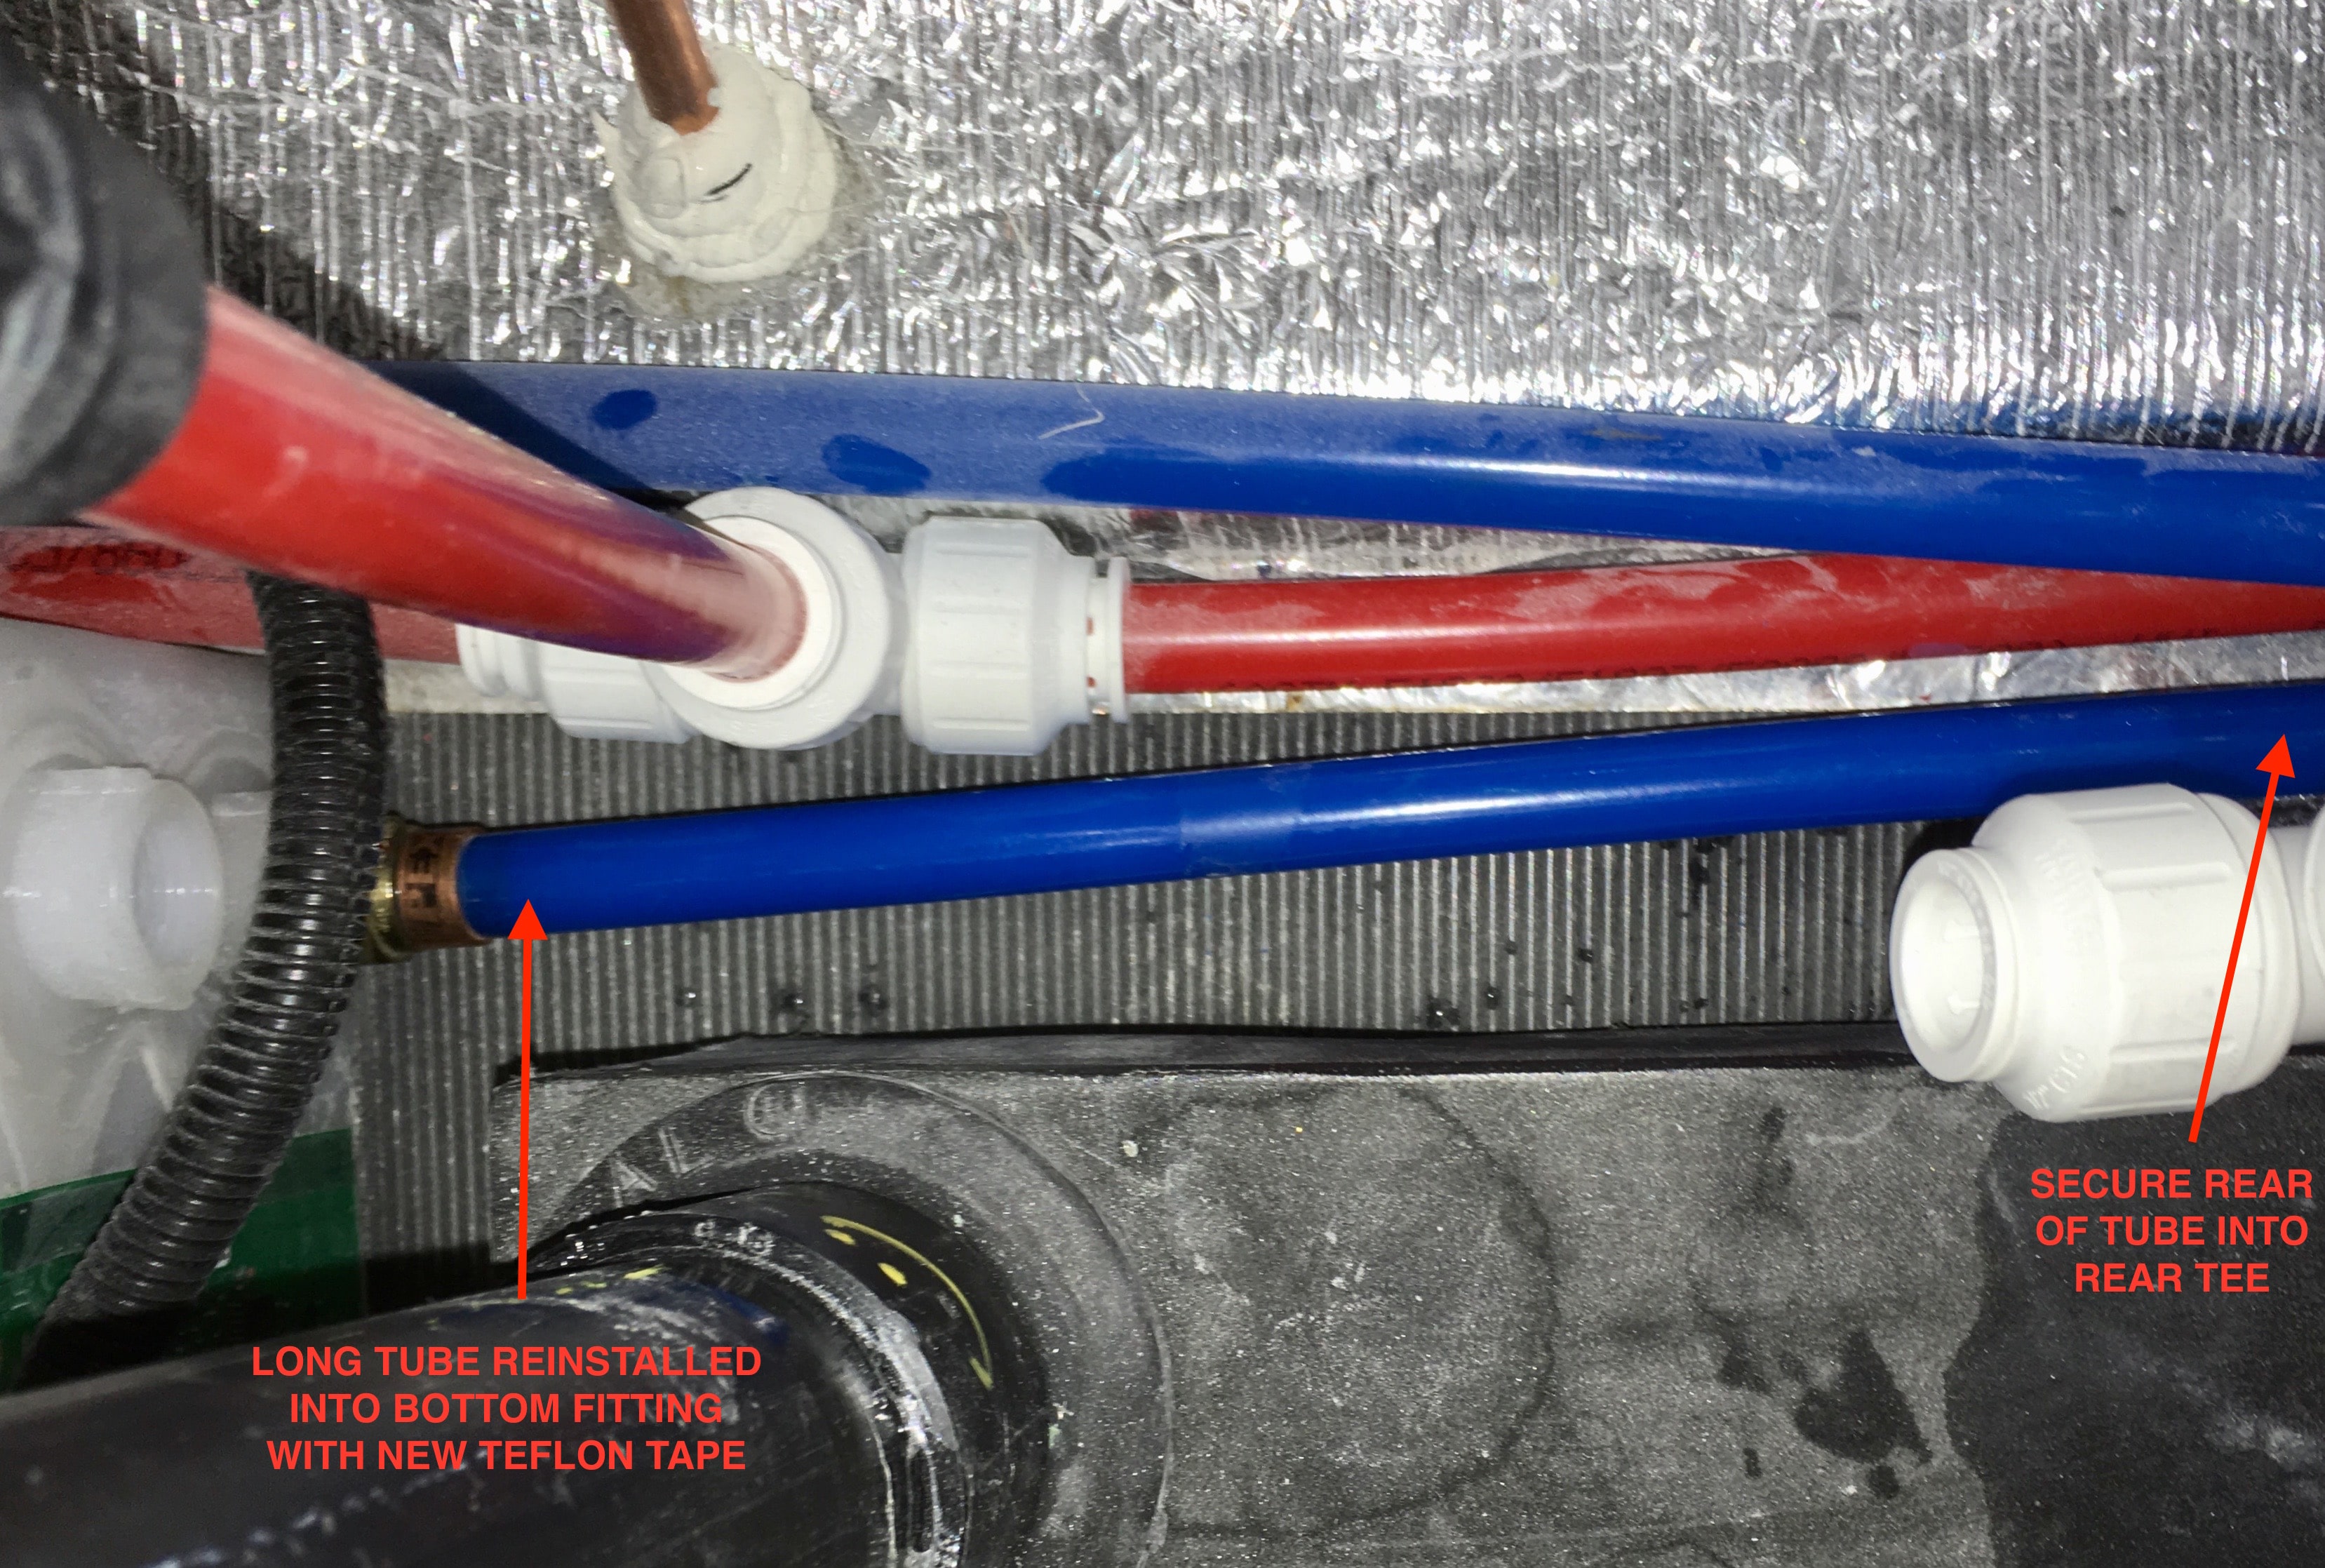
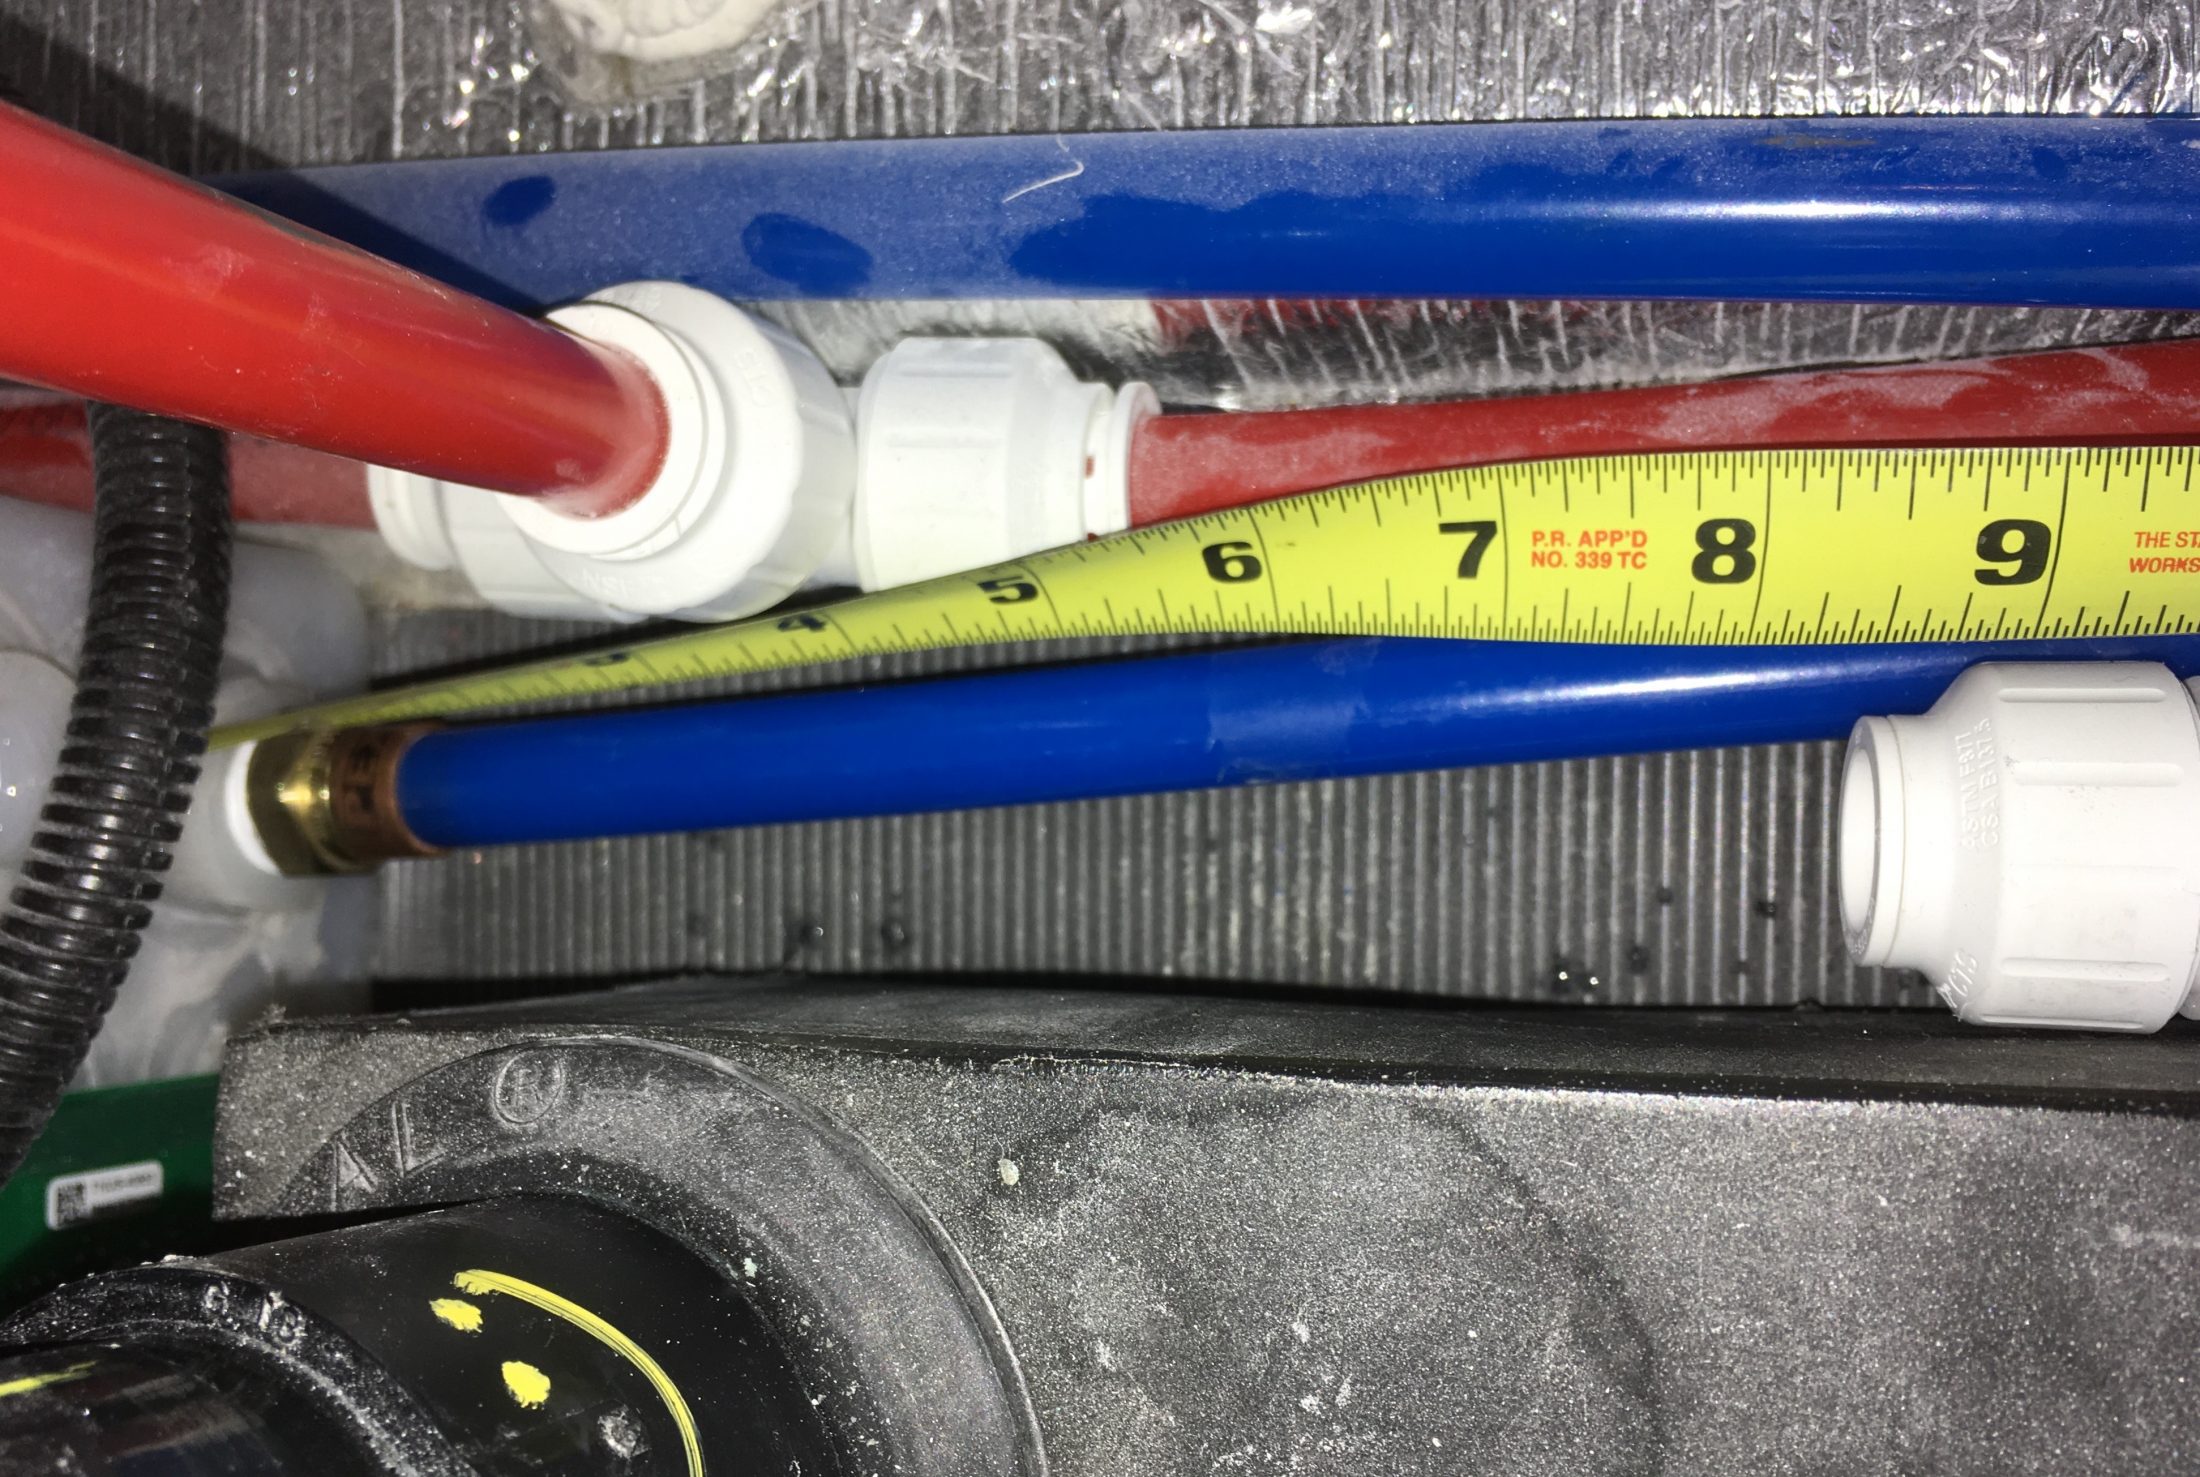
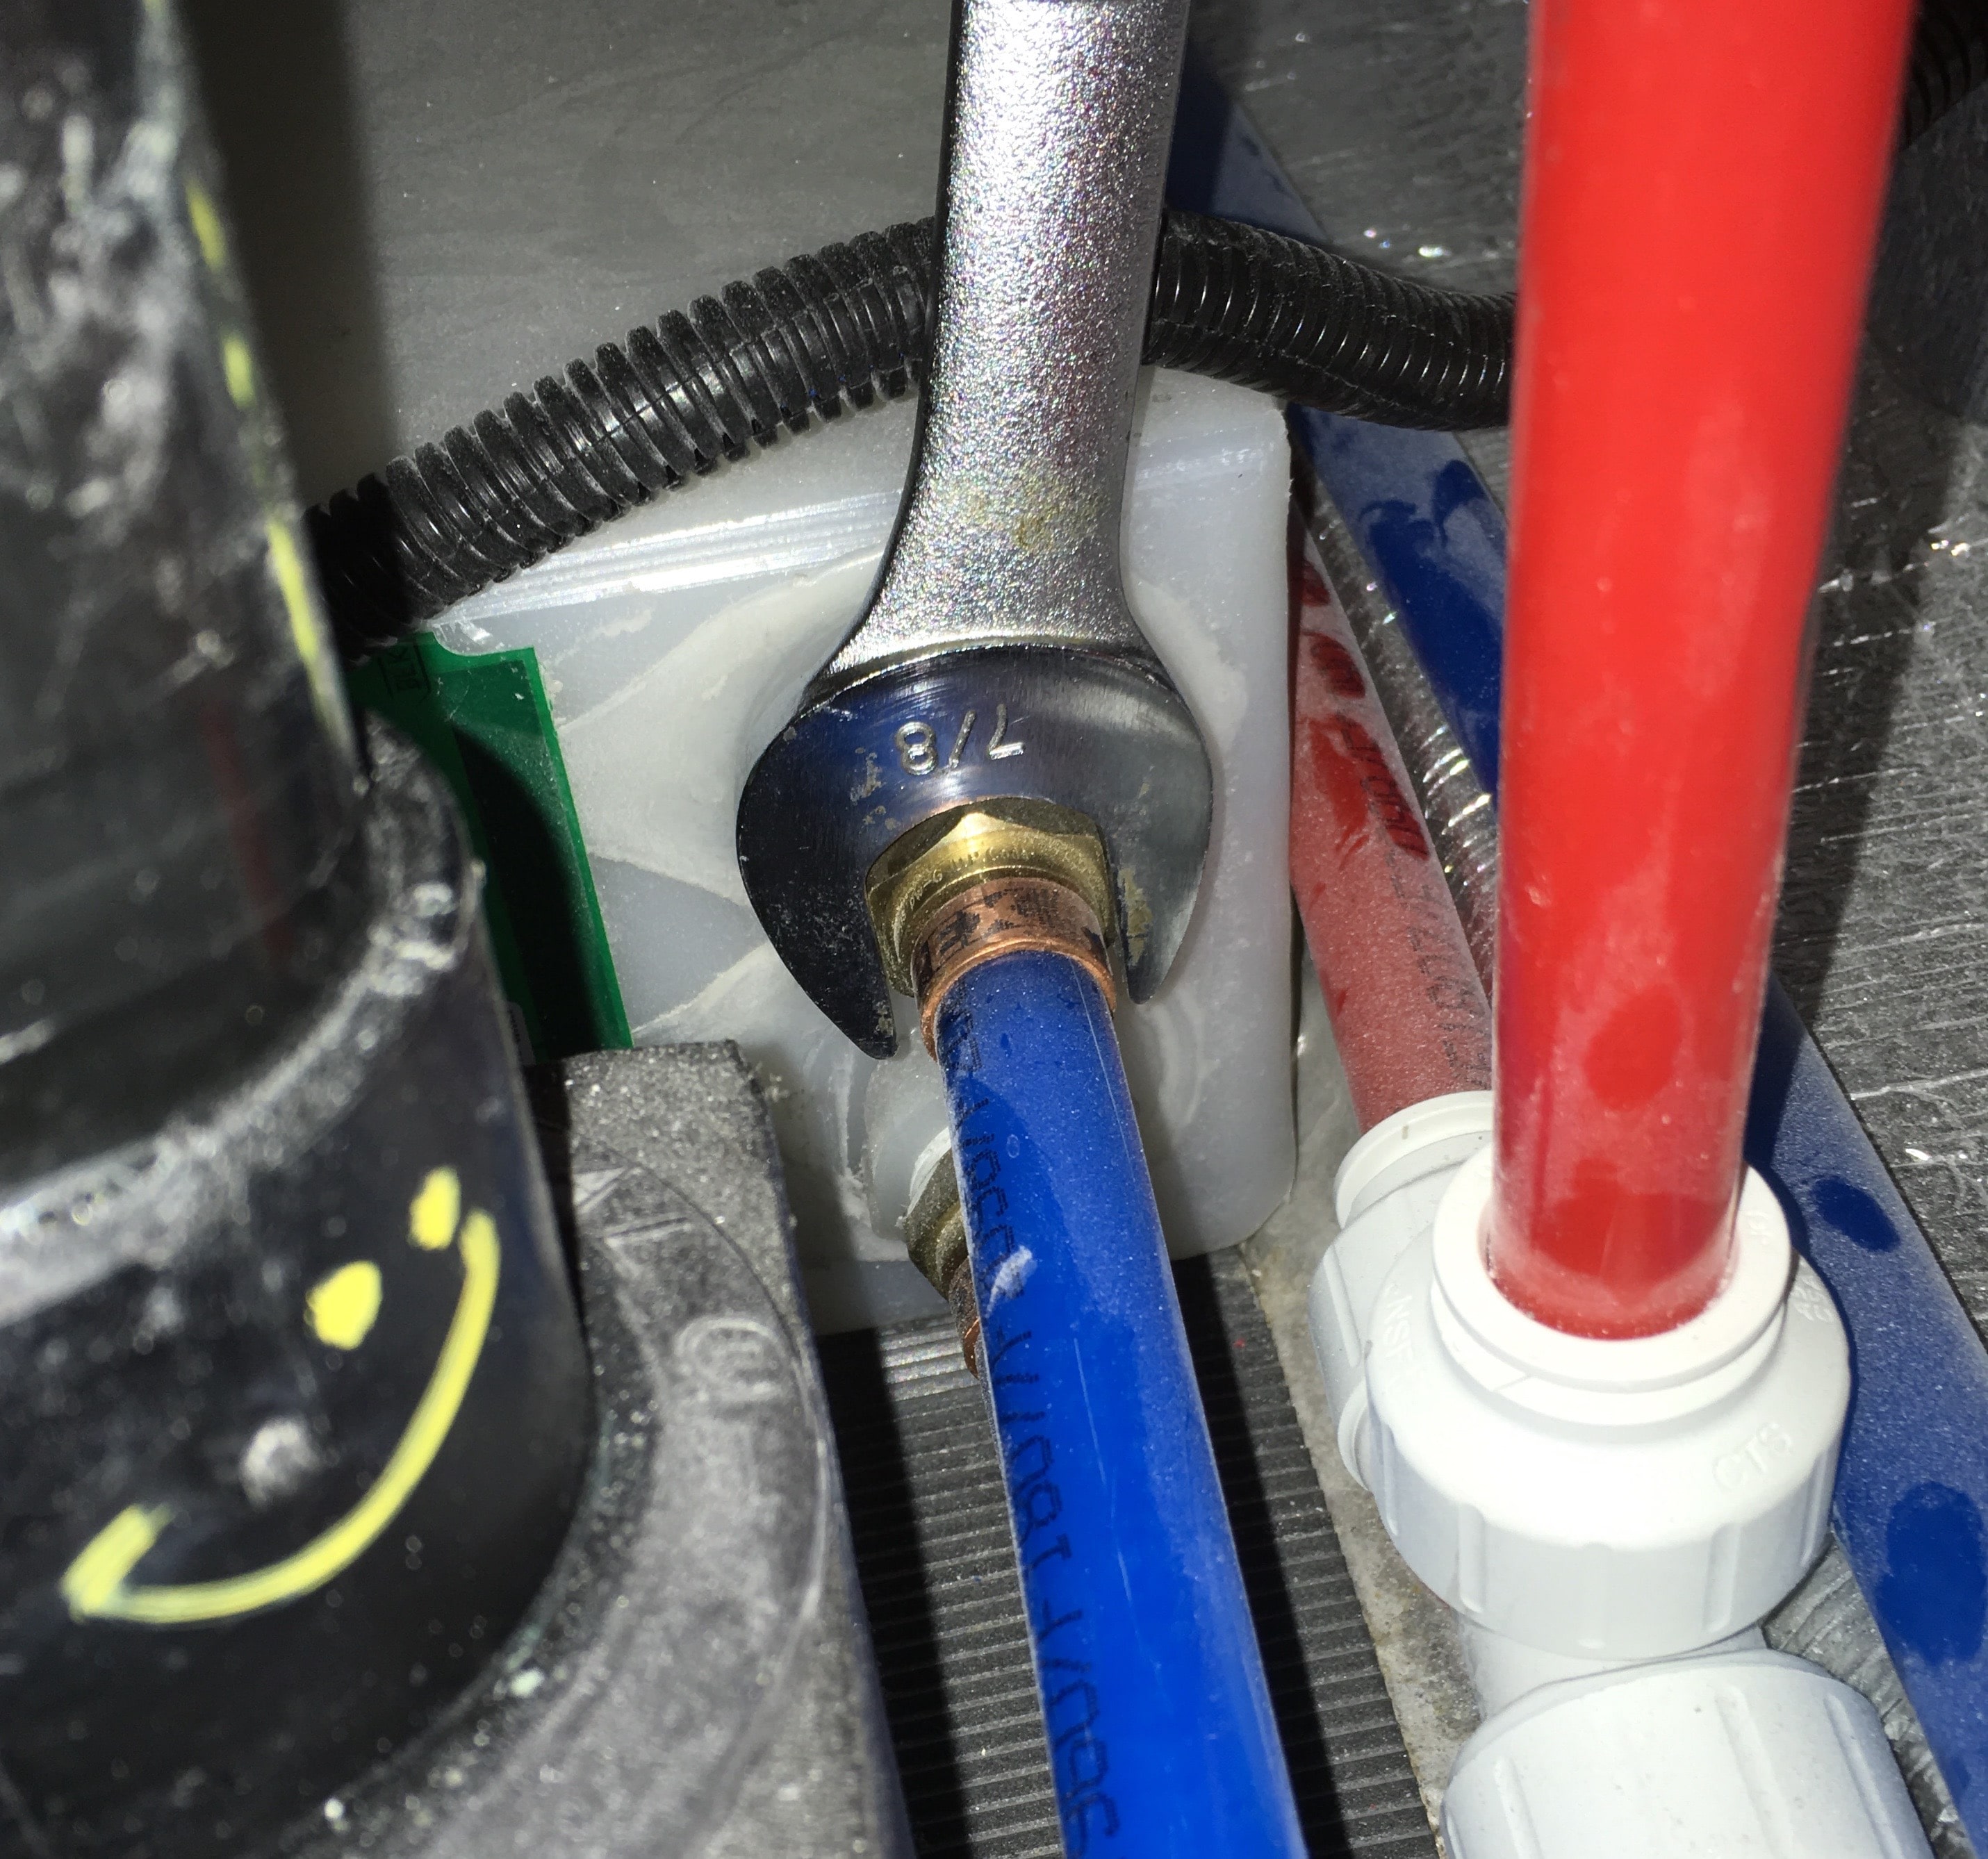
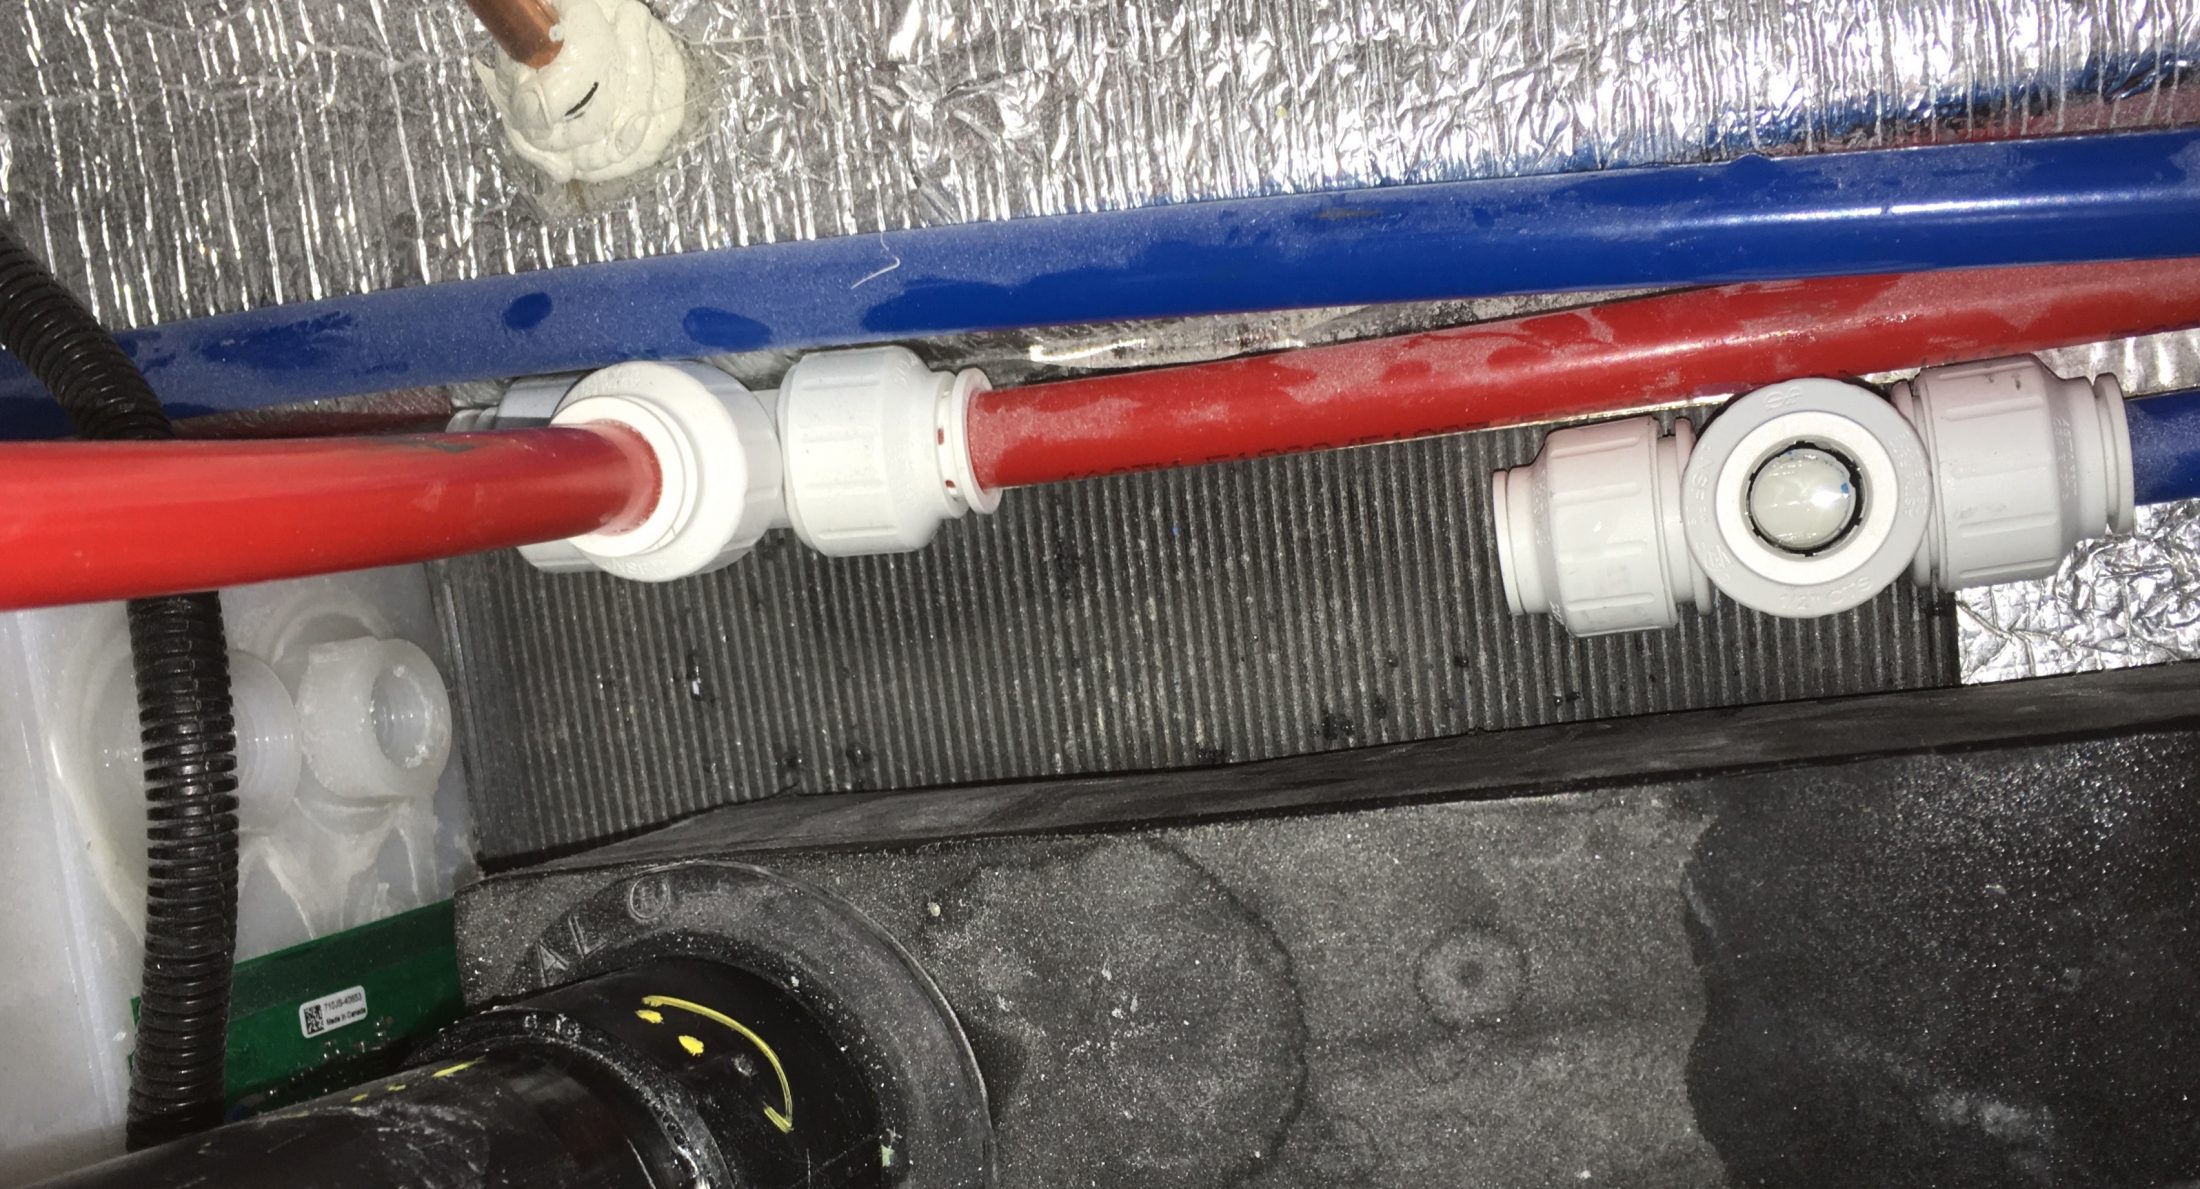
Reinstalling the factory plumbing. Install thread sealer on the CLEAN pipe fitting of the long line and install into the bottom port and also the rear tee. This line will lie nicely on the floor. Raspy recommends in the second post to use Rectorseal #5 for a better seal. The factory uses tape, and I had no leaks using tape. Insert the long elbow line into the rear tee and the appropriate Tank Fill fitting on the manifold, as shown. Secure the tee collars down below since they will be harder to access afterwards. View of the lower hose installed, showing that you will need about 9.5 inches of extension to properly seat the new tube into its tee fitting, past the o-ring; make sure you have MORE than this length left when you make the tube. You will trim to length after installing it. Test fit the new tube into the upper port. I was expecting it to slip right in, but the hole in the side of the tank was drilled undersized (1/2 inch). This is poor practice since the barrier will trap water and possibly cause freeze damage. There should be a small weep hole drilled at the very bottom of any vertical opening to keep it water free in winter storage. The guy who welded these fittings on could have done that in about a minute. Note, this is pretty hard to see without a good mirror, I just stuck my cell phone down low and looked at the pics. I had to open up the hole to allow the 5/8 inch OD tube to go through. I used a coarse, large rat-tail file (with HANDLE so I could not lose it inside the tank!) while sucking up shavings with a shop vac. Any residual shavings will collect in the filter for removal. Be very careful if you have to file, to prevent damage to the pipe threads or it will leak. It's not pretty, I guess you could use a straight soldering iron to melt the edges.... but the fraying doesn't really matter. I marked the approximate location of the old Water Line, where the pump will suck air and cavitate, and also the location of the new line. This difference represents a lot of extra usable water. Make SURE this is very clean before installing the new tube. I used a blast of compressed air. More to come. John Davies Spokane WA
1 point
-
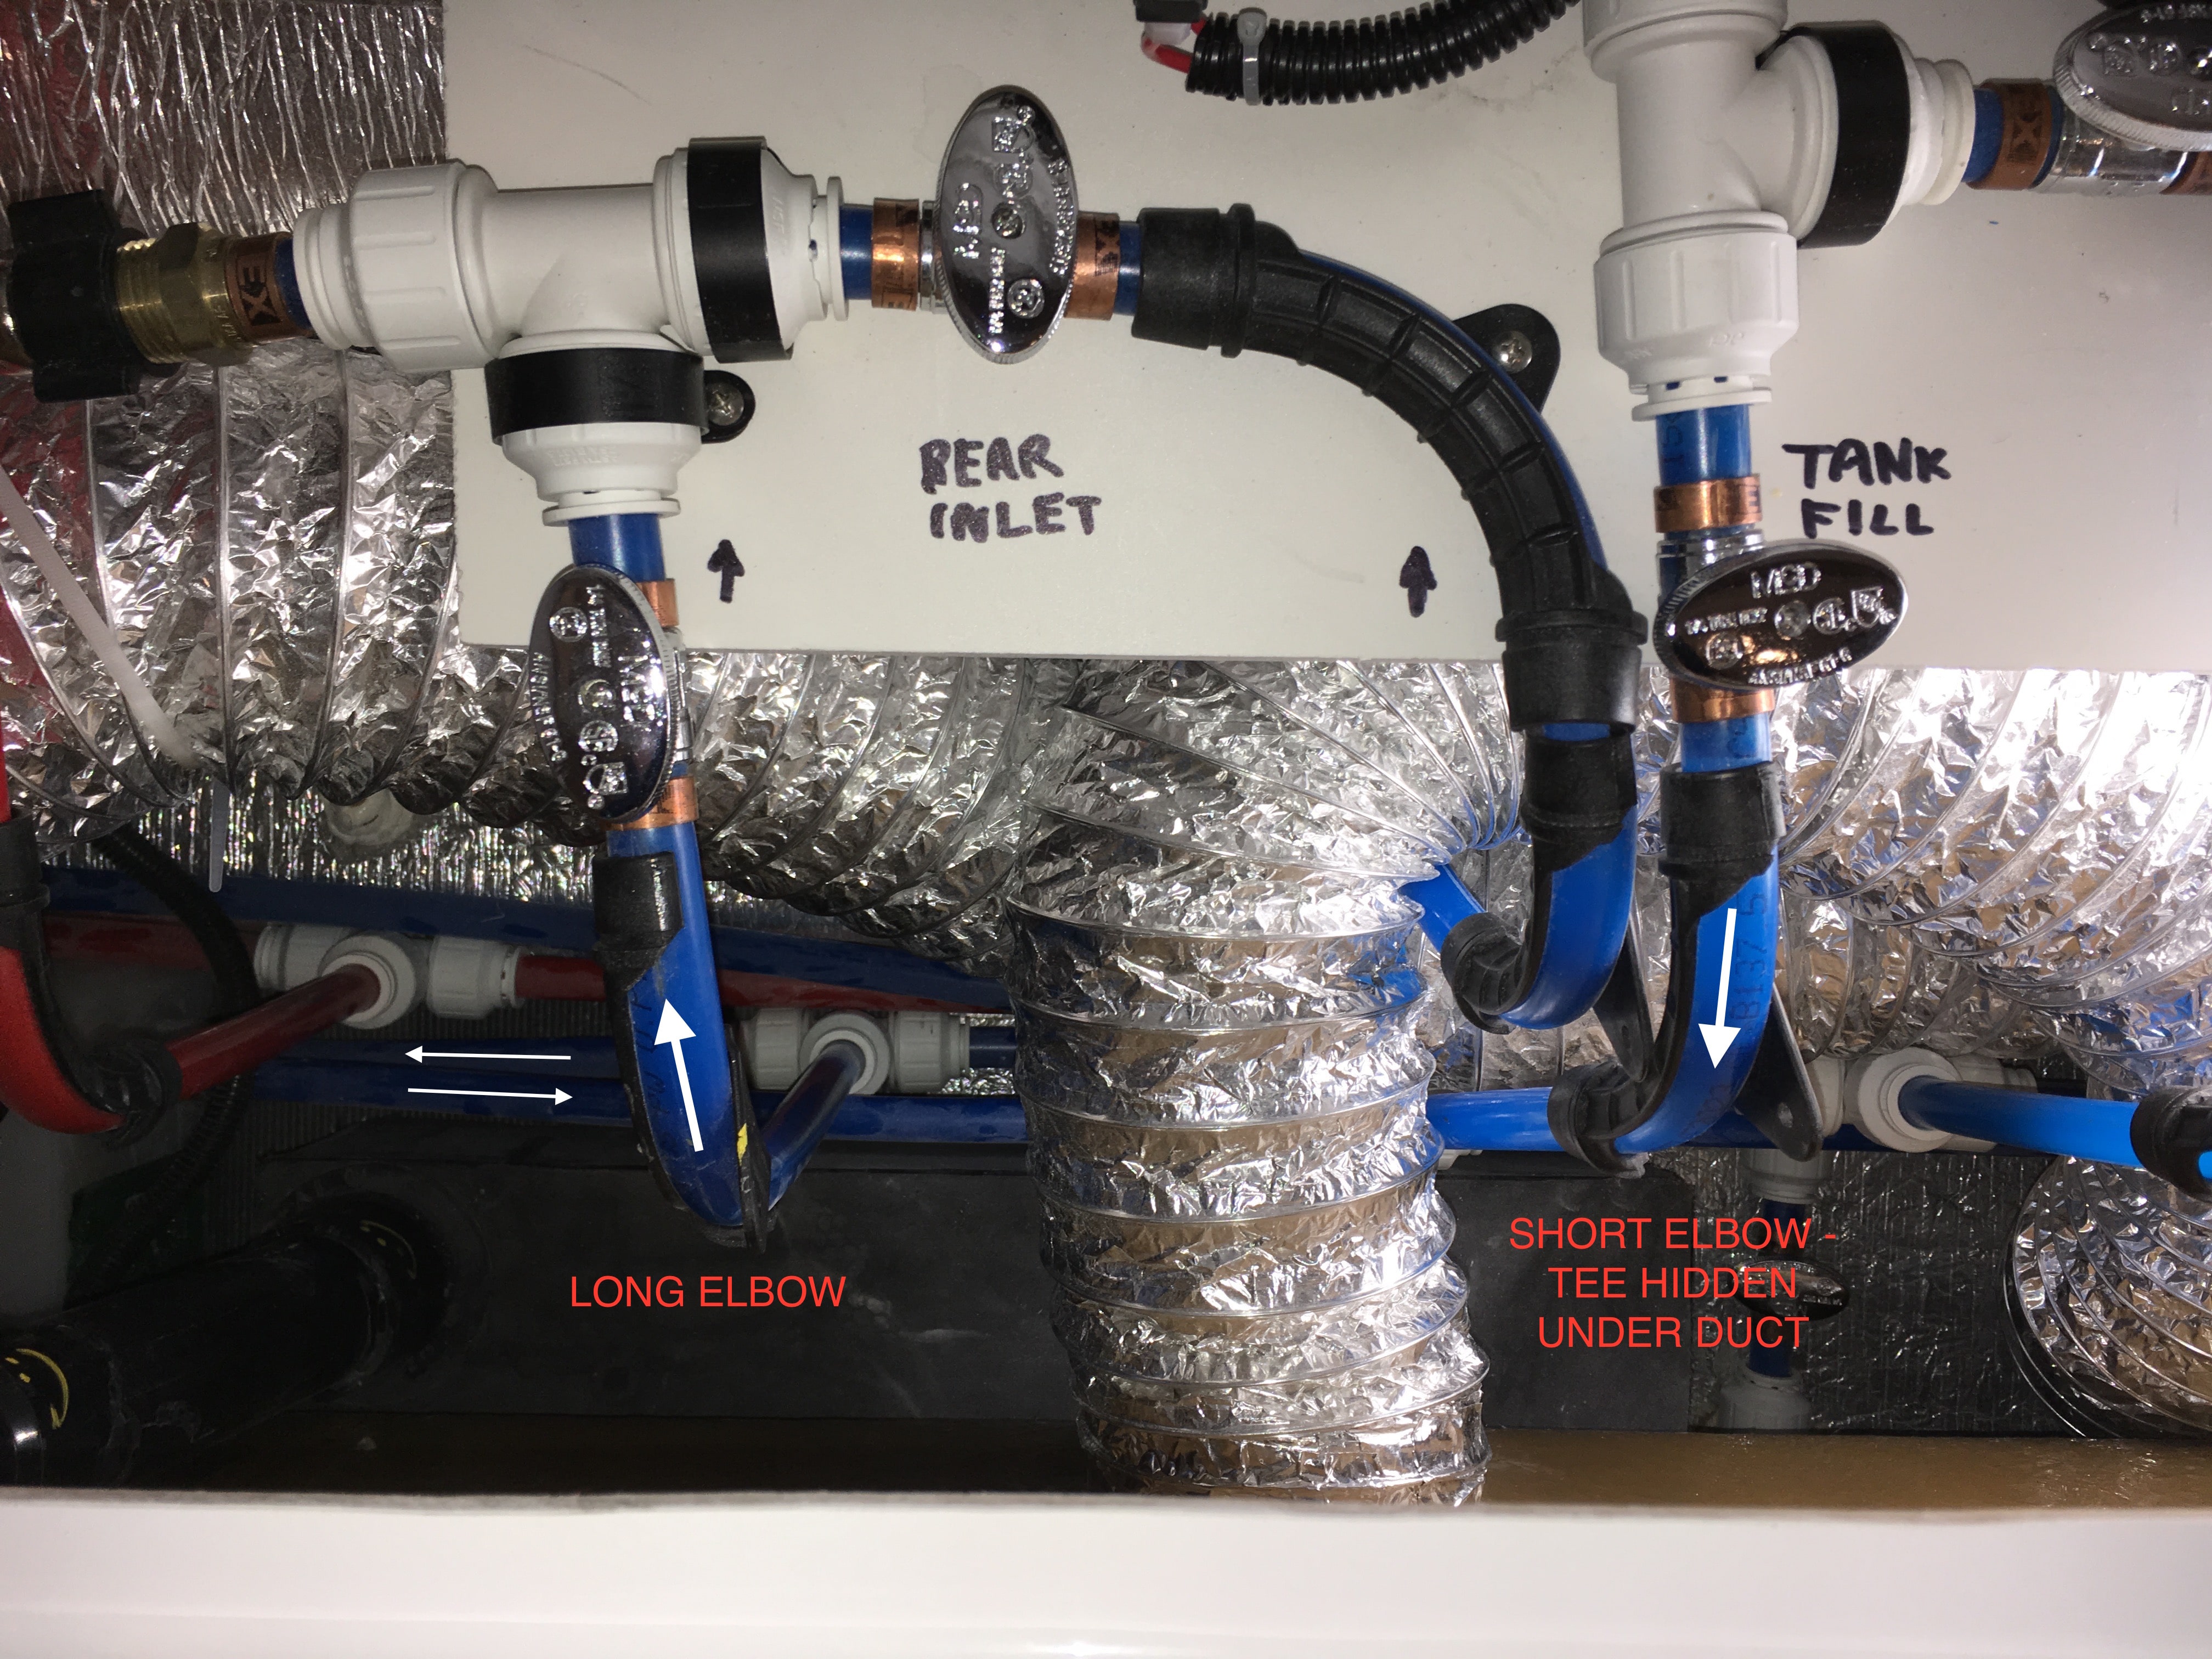
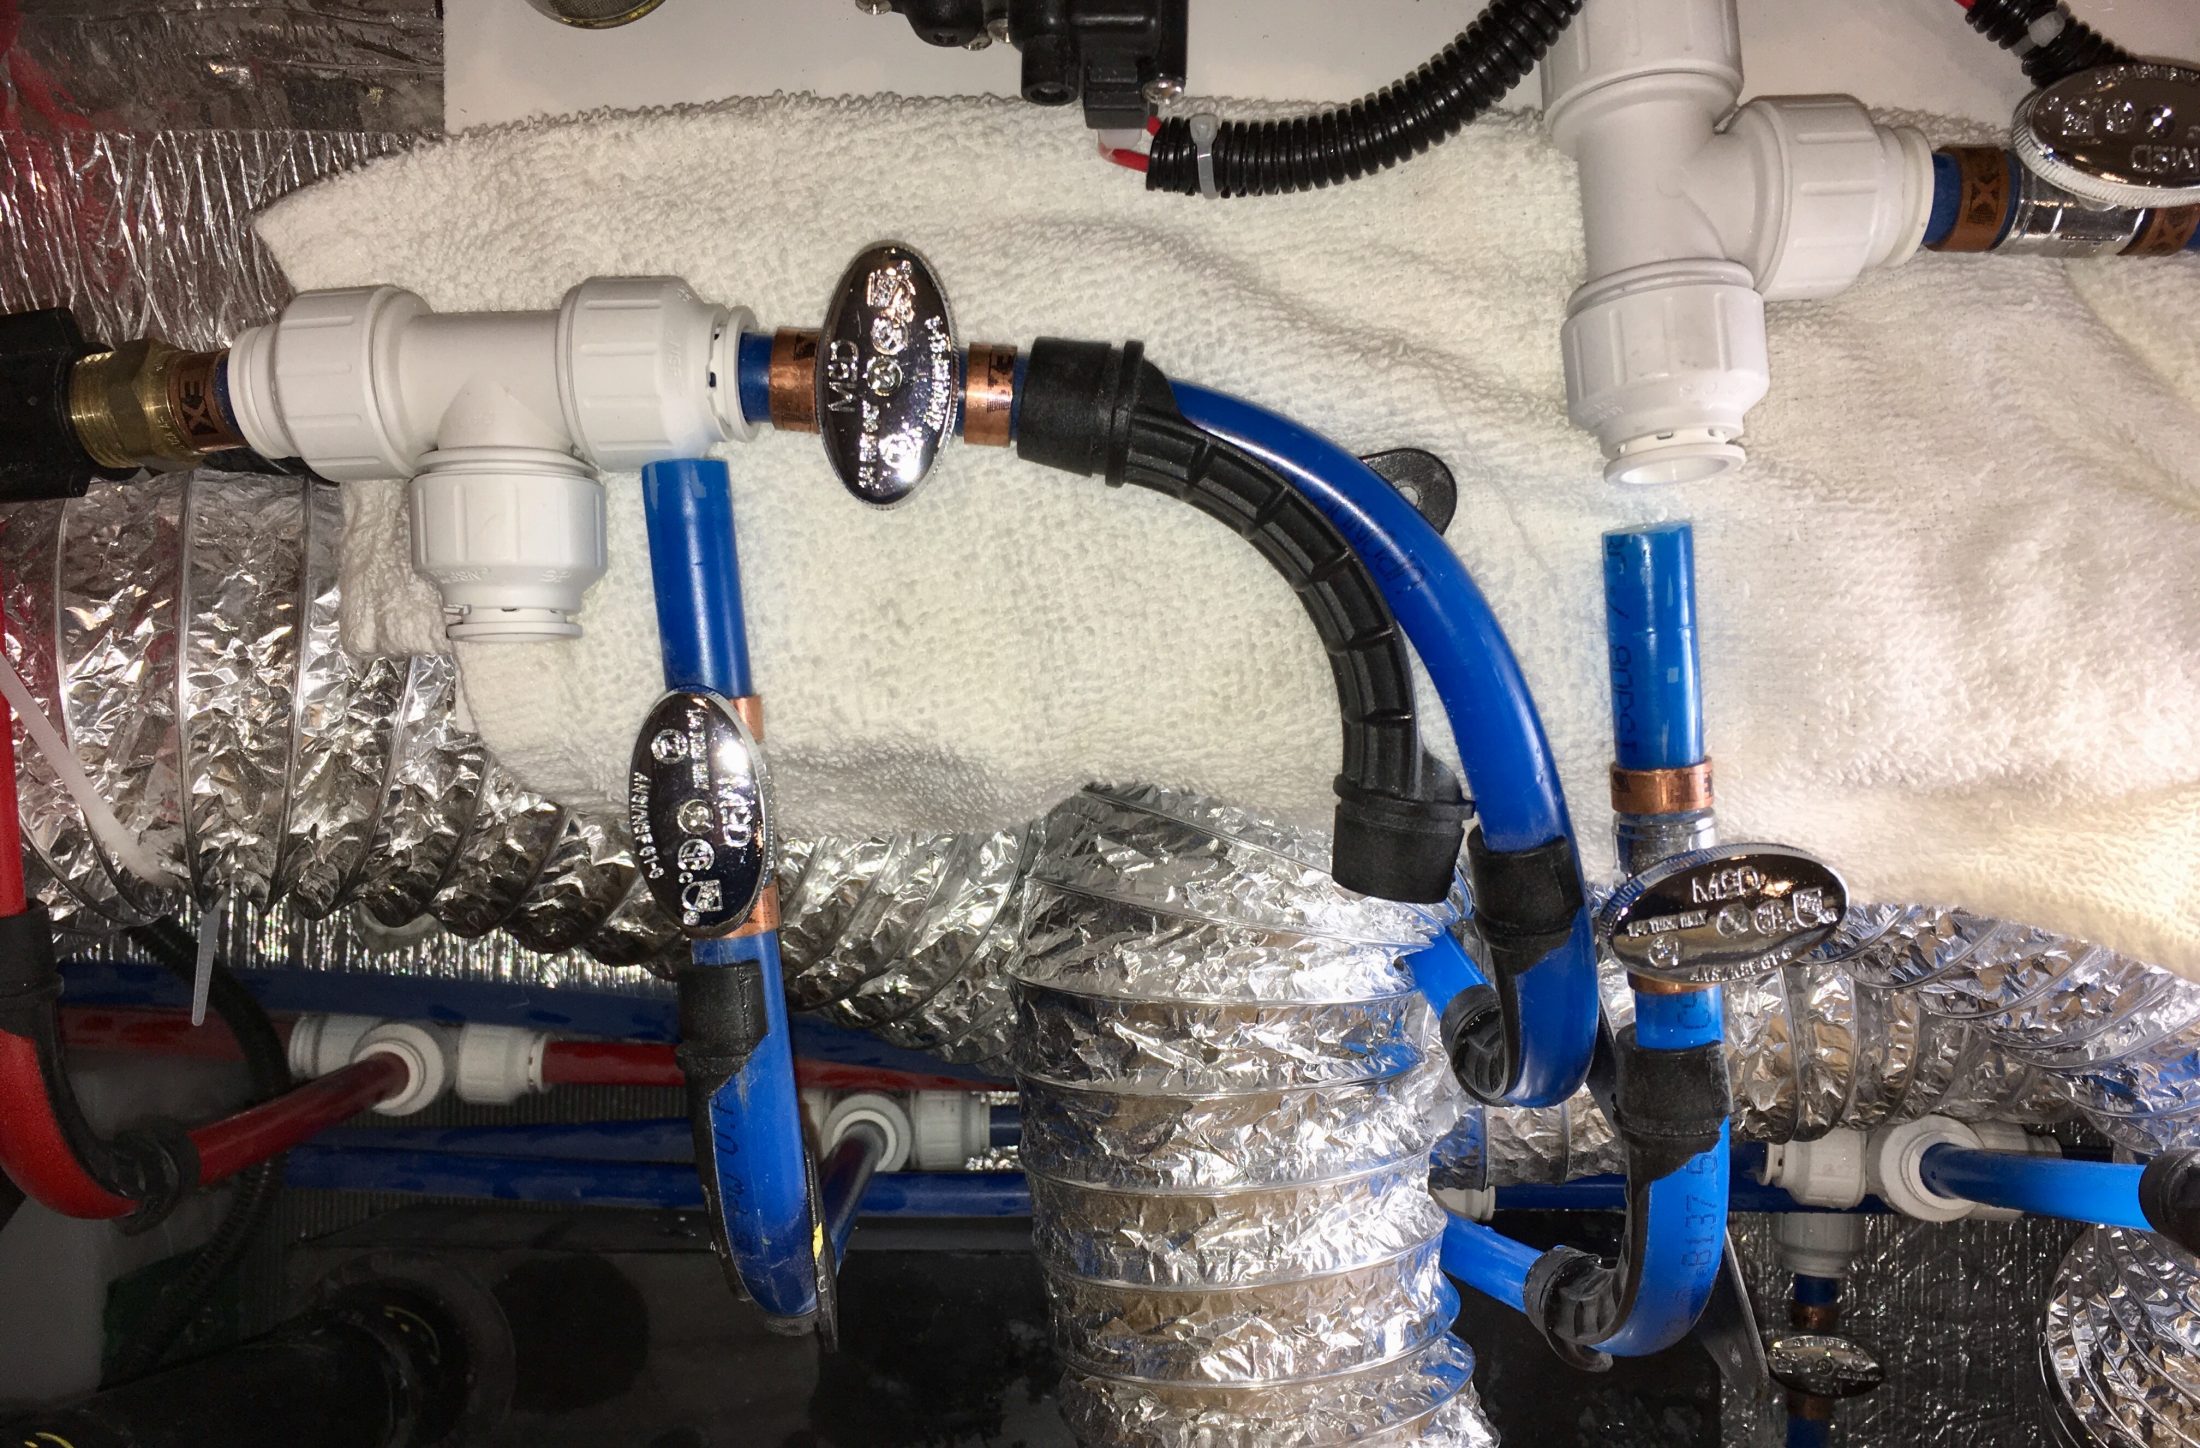
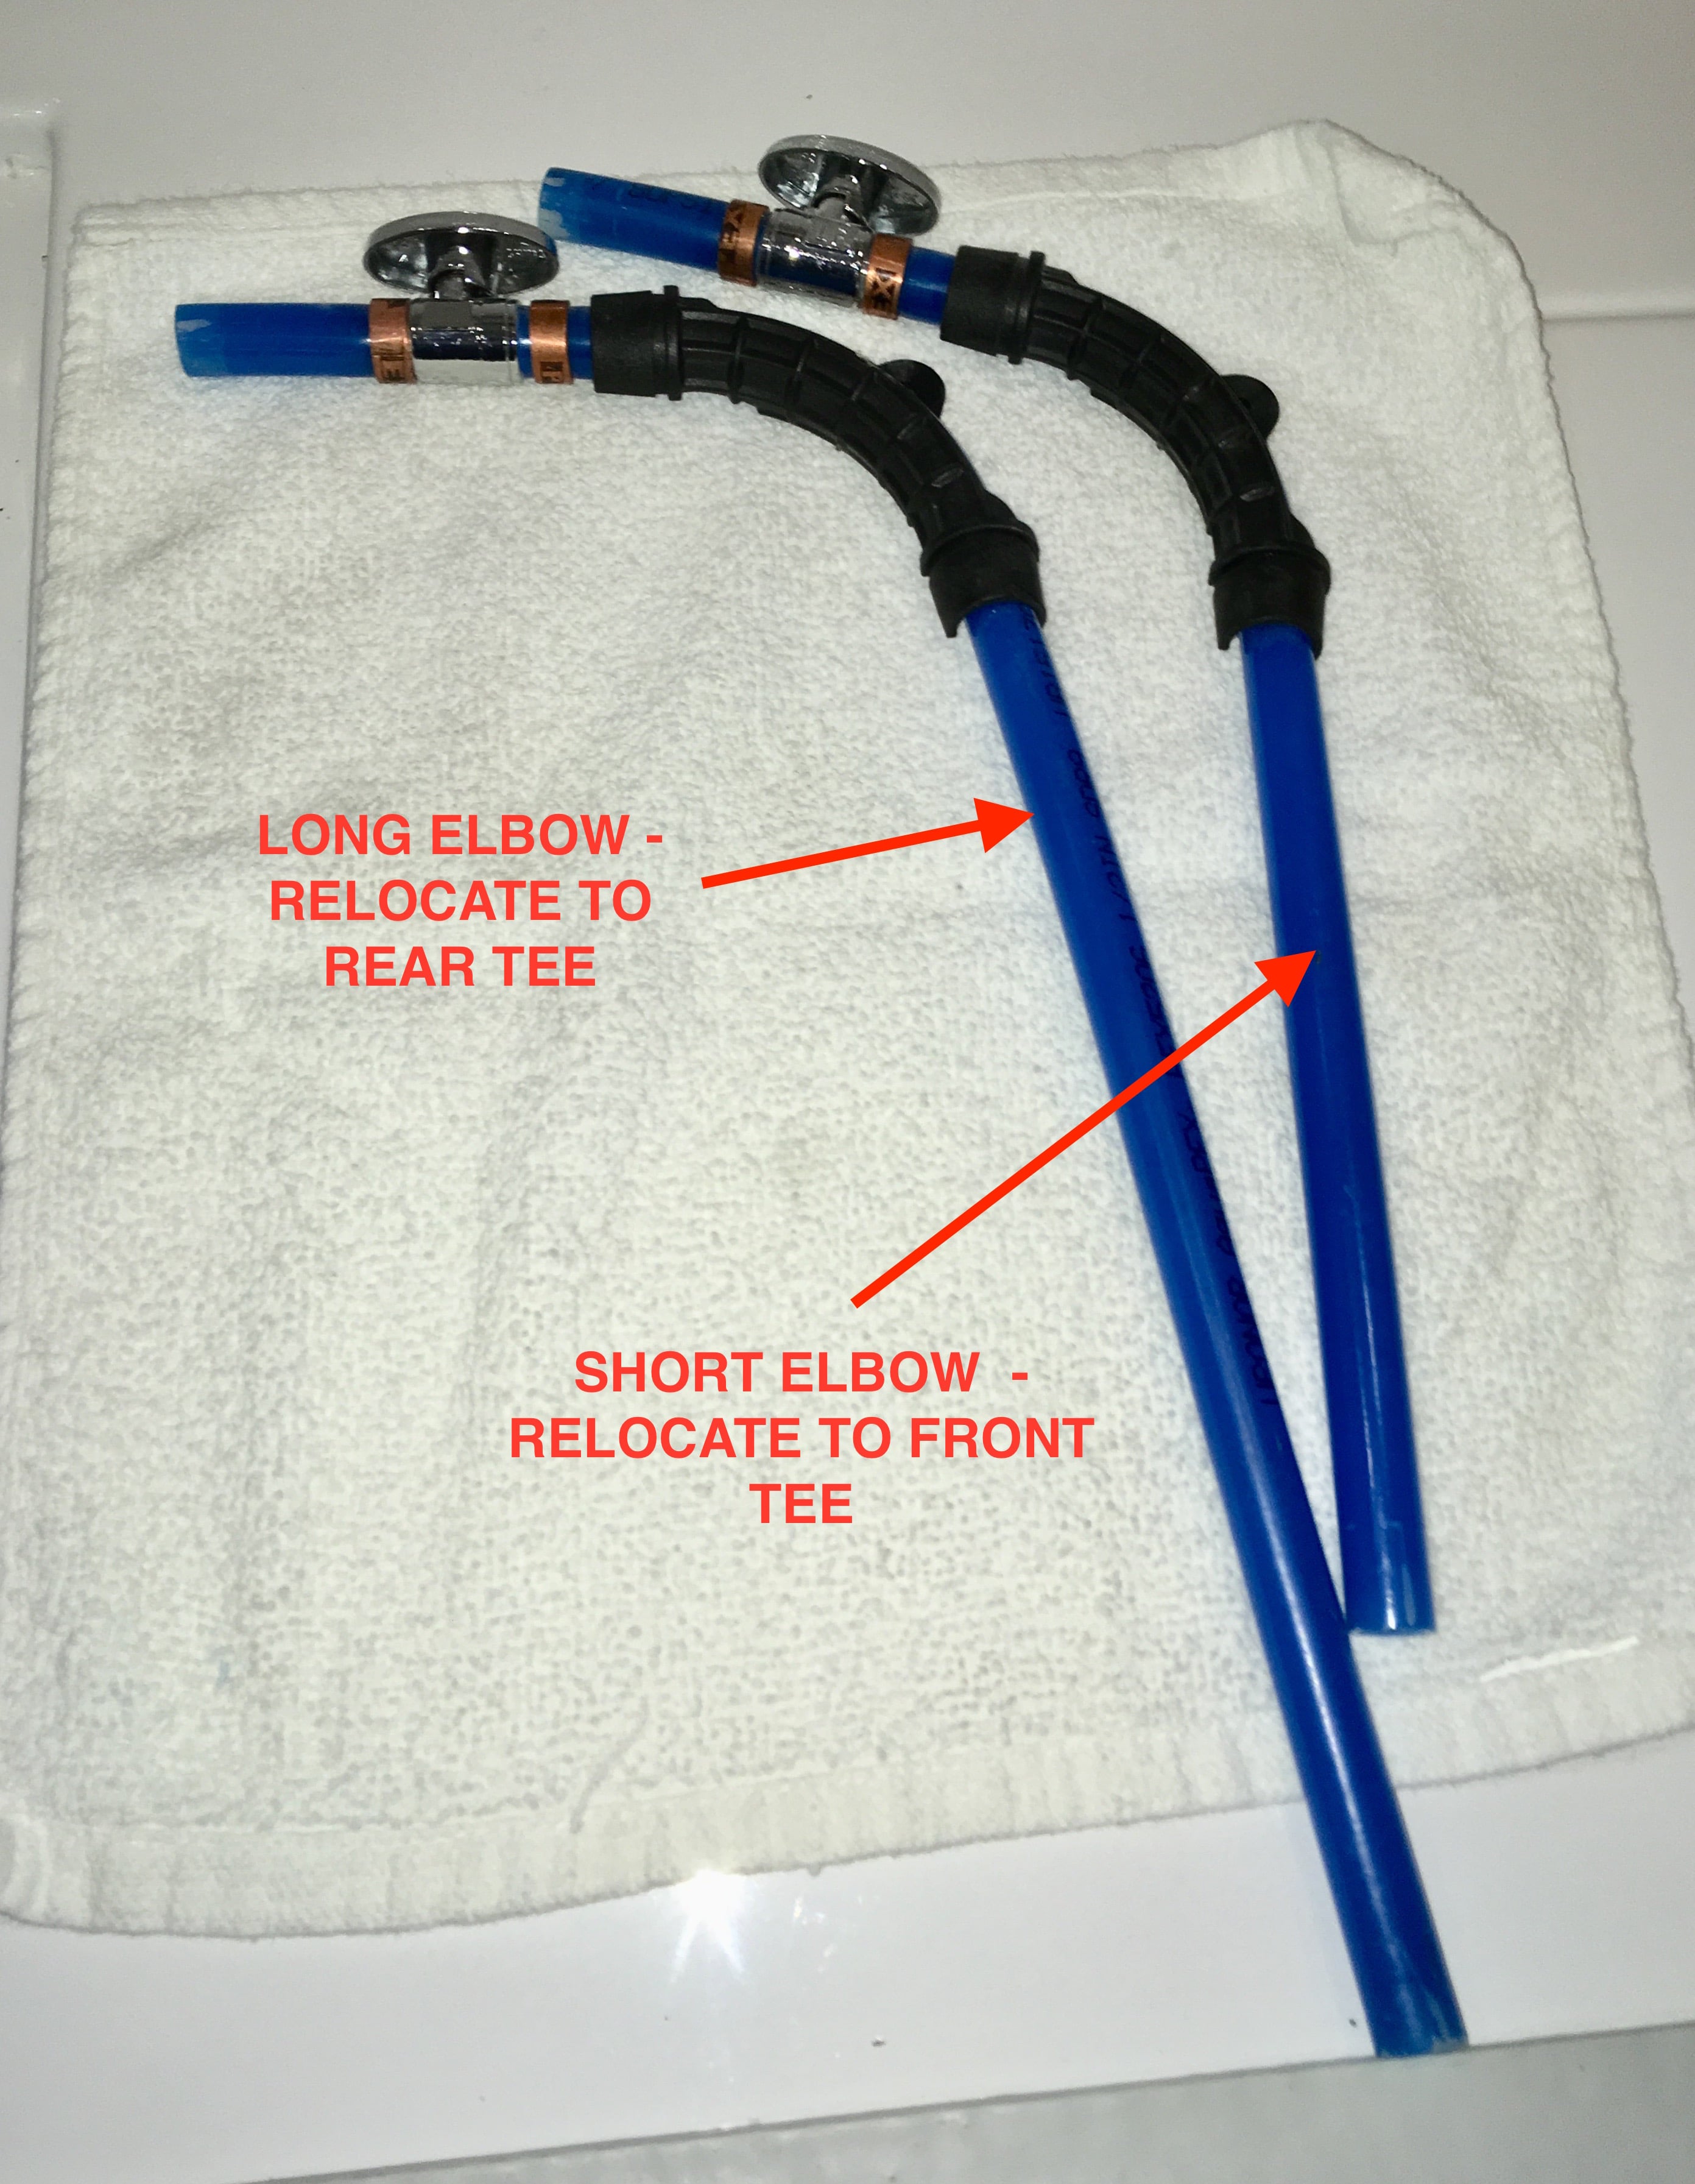
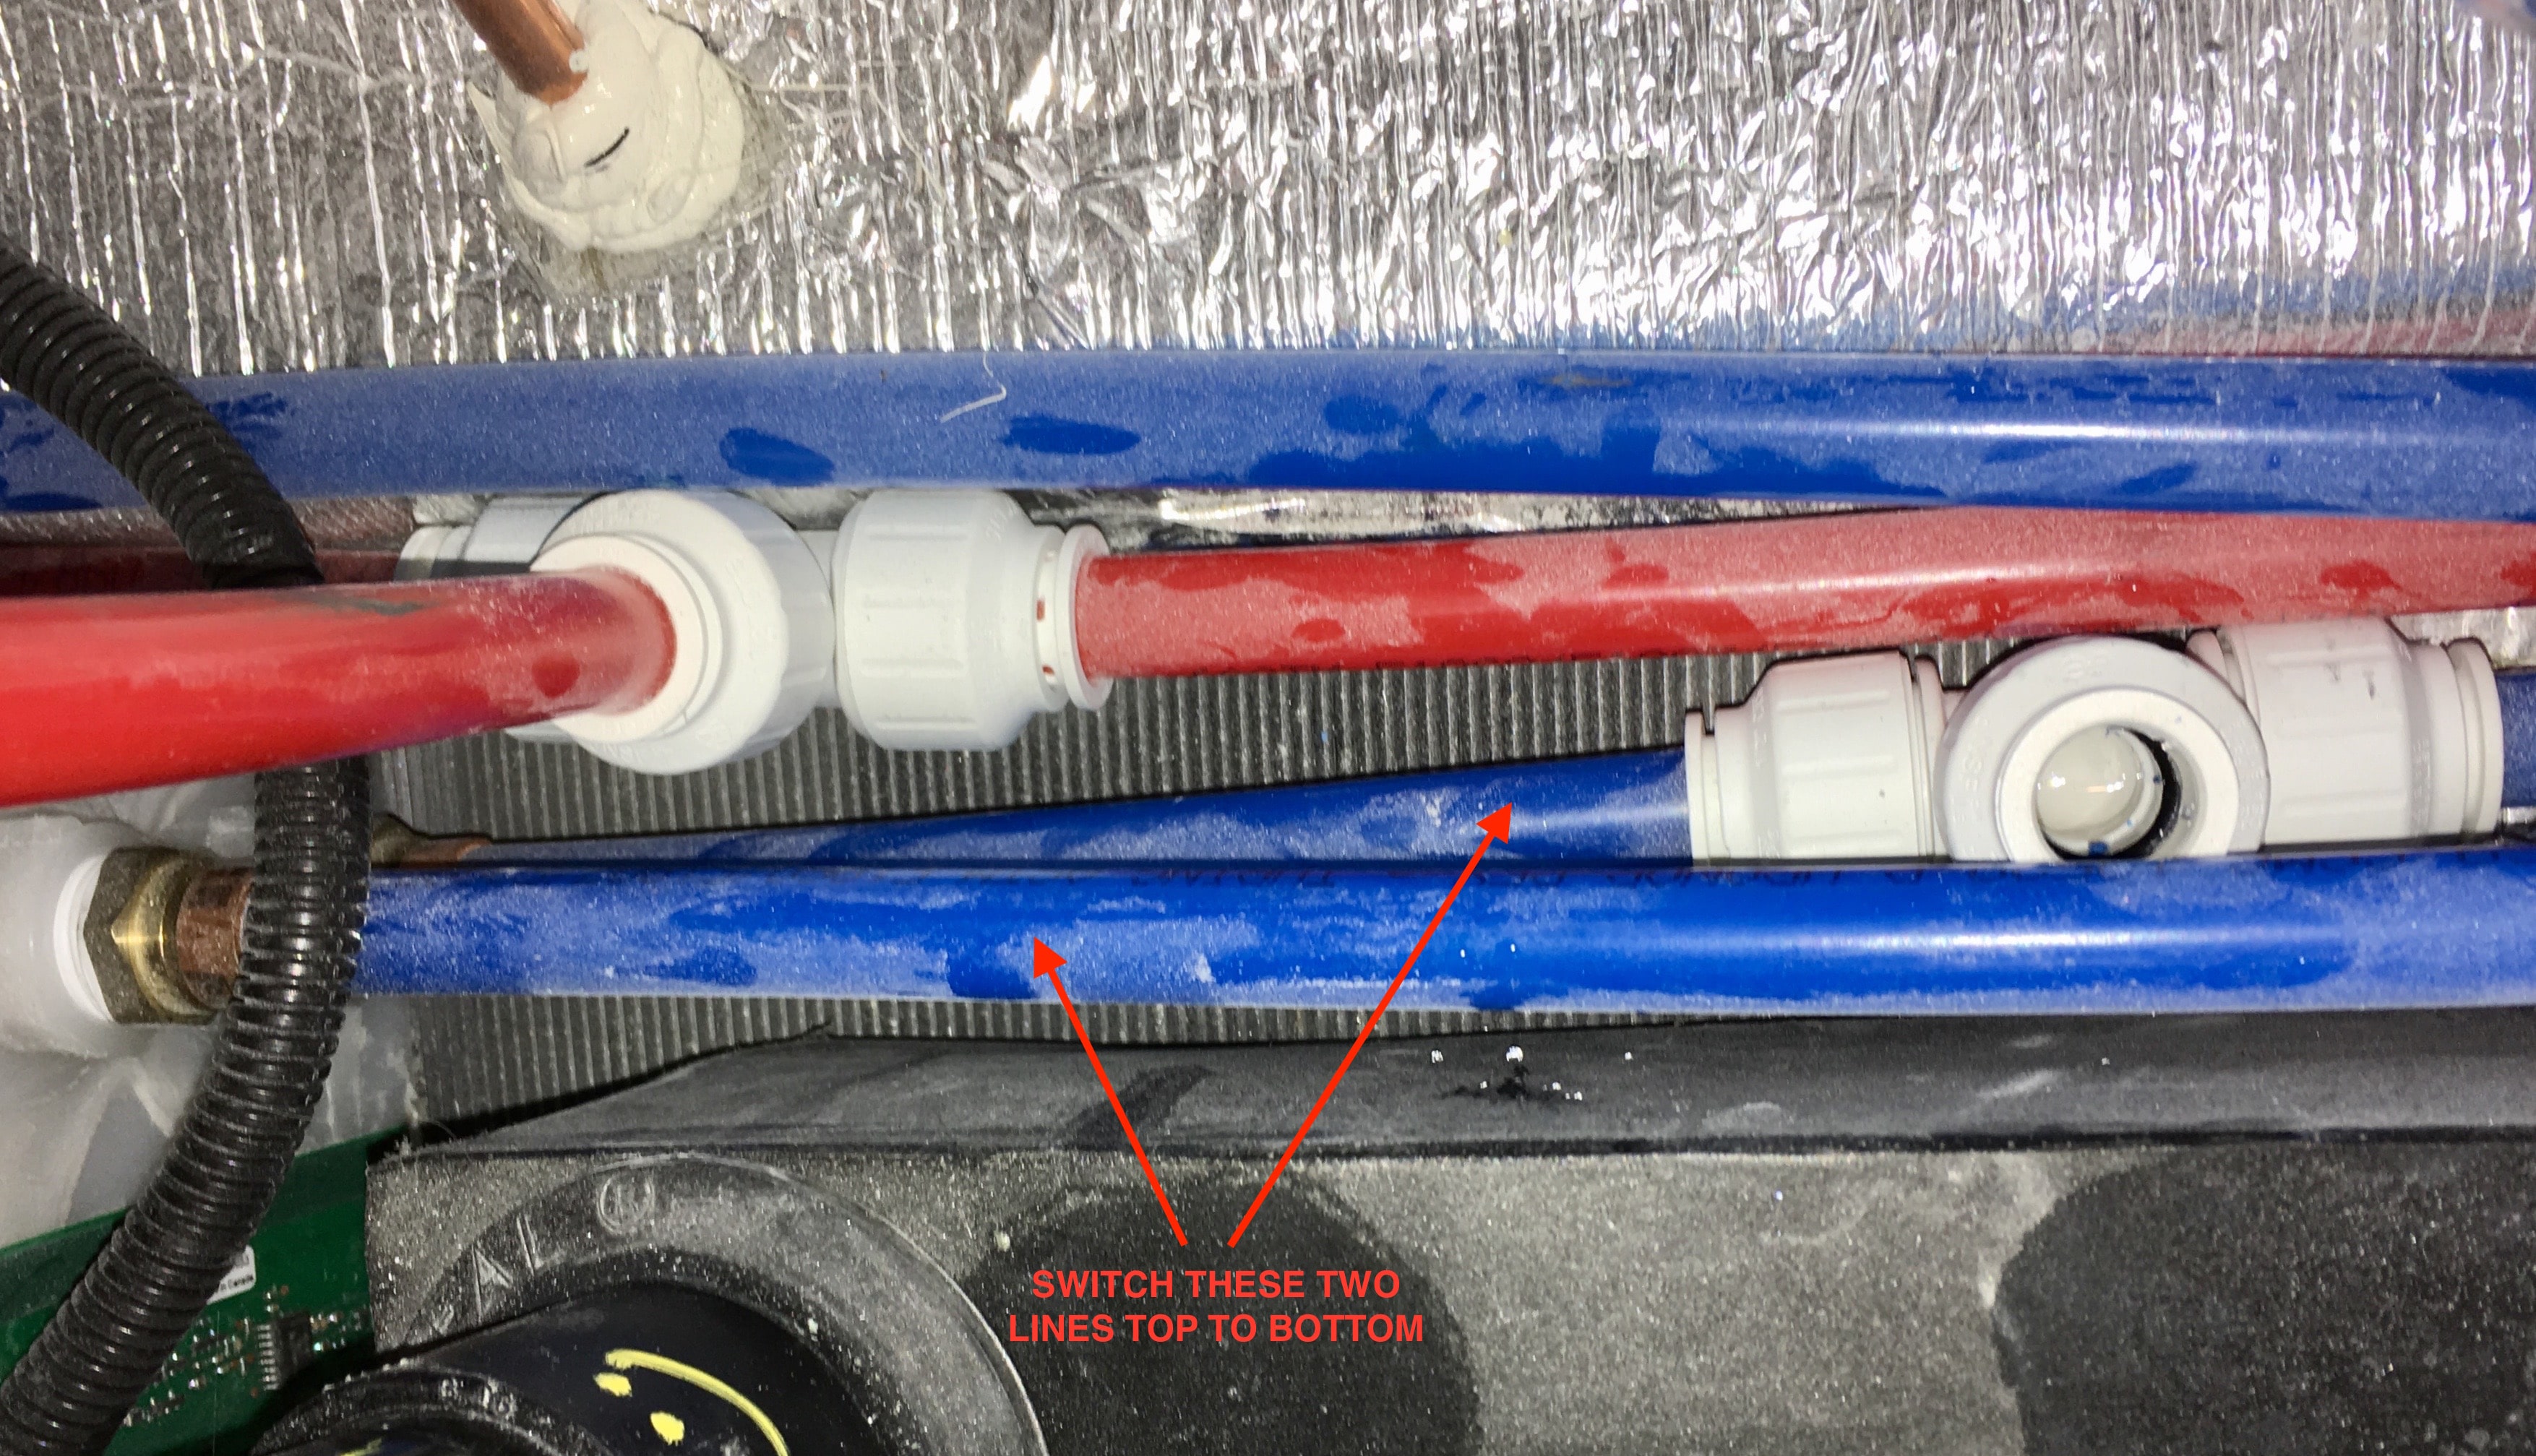
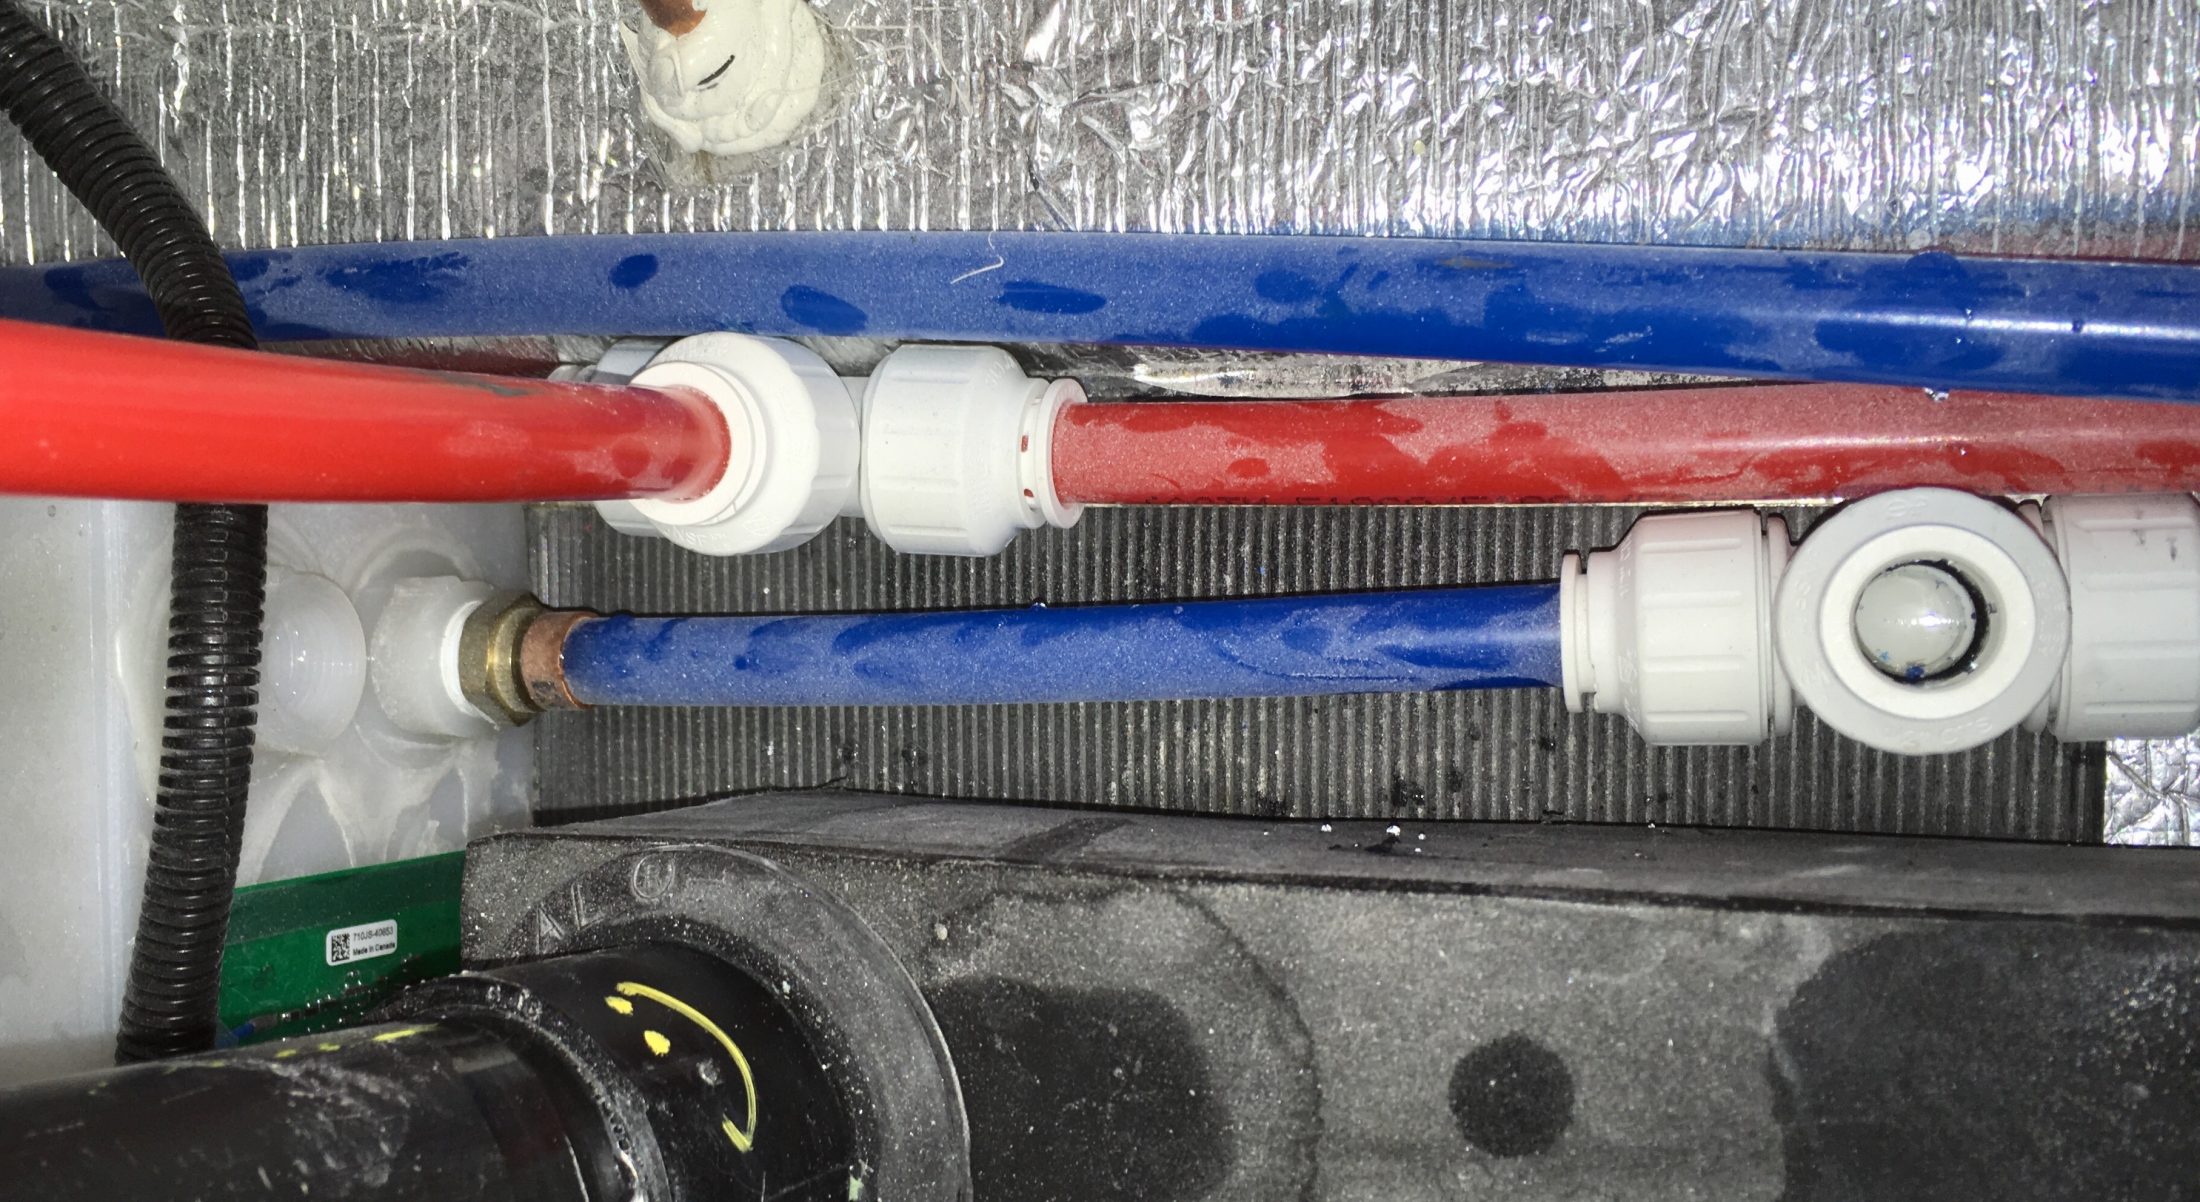
Disassembling the factory plumbing. A word on the quick connect fittings. To remove a line, rotate the collar counter clockwise 90 degrees. The inner sleeve will push out. Press the sleeve inwards with a finger or tool and that will release the pressure from the o-ring.Pull the line out of the fitting. Assembly is opposite, just be sure all parts are clean. View of the system, white arrows show water flow. The flow in these locations is NOT changed. The two elbow sections (with white arrows) will be swapped since the lines they connect to down low will have different heights. One will drop 3 inches, one will rise 3 inches. There is a tee visible to the left in the shadow, and another hidden under the duct at the lower part of the pic. Remove any black clamps as needed to gain working room. Do not drop any of the stainless clamp screws down into the hull - they are non-magnetic and may be very hard to retrieve! Disconnect the two upper elbow lines. Use a towel to catch any water. It isn't necessary to label any parts. Working at the lower tees, disconnect and remove both elbow lines. Here is a closeup of the two lines we need to swap to different ports. The shorter section will be discarded and replaced with the new curved dip tube. Remove the lines from the tank using a 7/8 inch wrench. There is adequate room. Be aware of the circuit breaker board for the water level sensor, do not short it out! You could cover it with duct tape if you feel klutzy... Here are the bits that have been removed. All will be reused except for the short straight section which can be tossed or placed in a junk drawer. I worried a little that reusing old pipes in new locations would result in leaks, but I had none. Your mileage may vary. You could always install new line and fittings if you are a worrier. More to come. John Davies Spokane WA
1 point
-
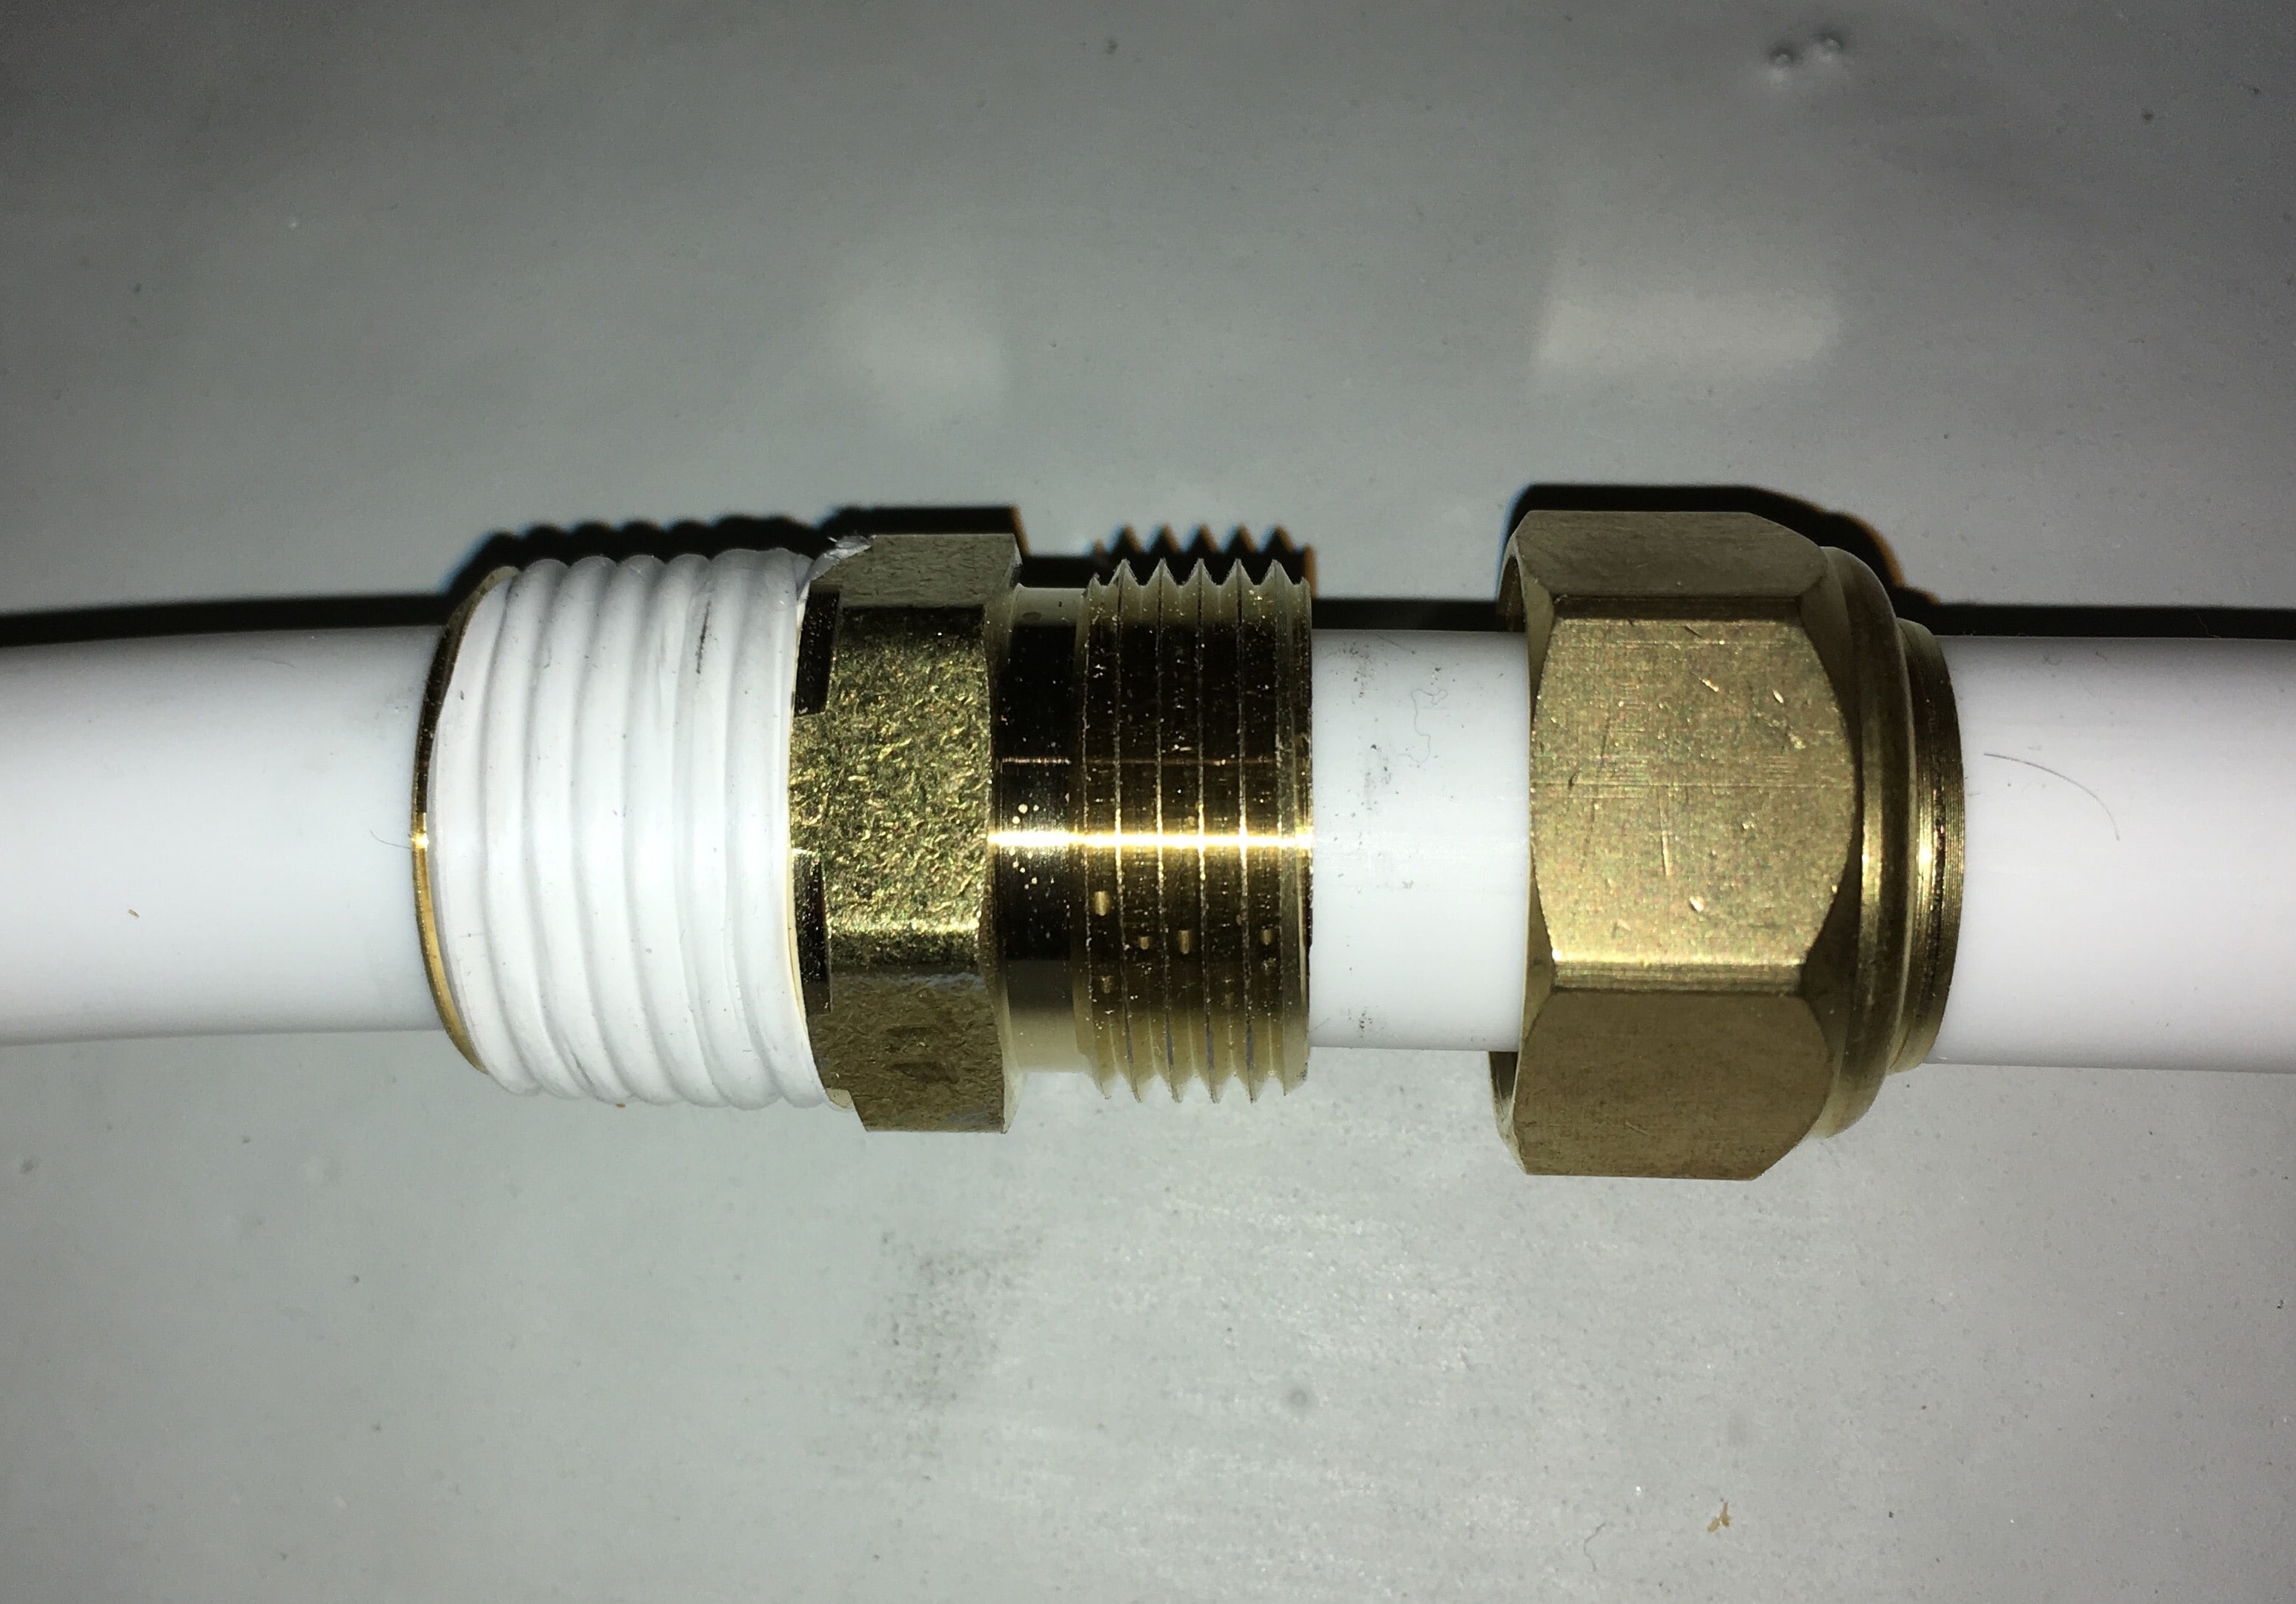
Compression fitting. There is a "pass through" version available, but it is not commonly found in box stores. I used a regular version with internal stop, and I removed that section. The threaded port is 1/2 inch FMP, so we need a fitting with a MPT and also a 5/8 inch opening (the PEX hose is 5/8", as is a copper pipe). I drilled out the passage way using a regular 5/8 inch bit, followed by a 5/8 inch Forstner wood bit to clean up any rough gouges. You can do this with a file but be careful not to damage the cone seat on the left side, or it will leak. Ideally a PEX tube should have a metal insert inside to help support it when you tighten the nut. This is not possible in this case. More to come. John Davies Spokane WA
1 point
-
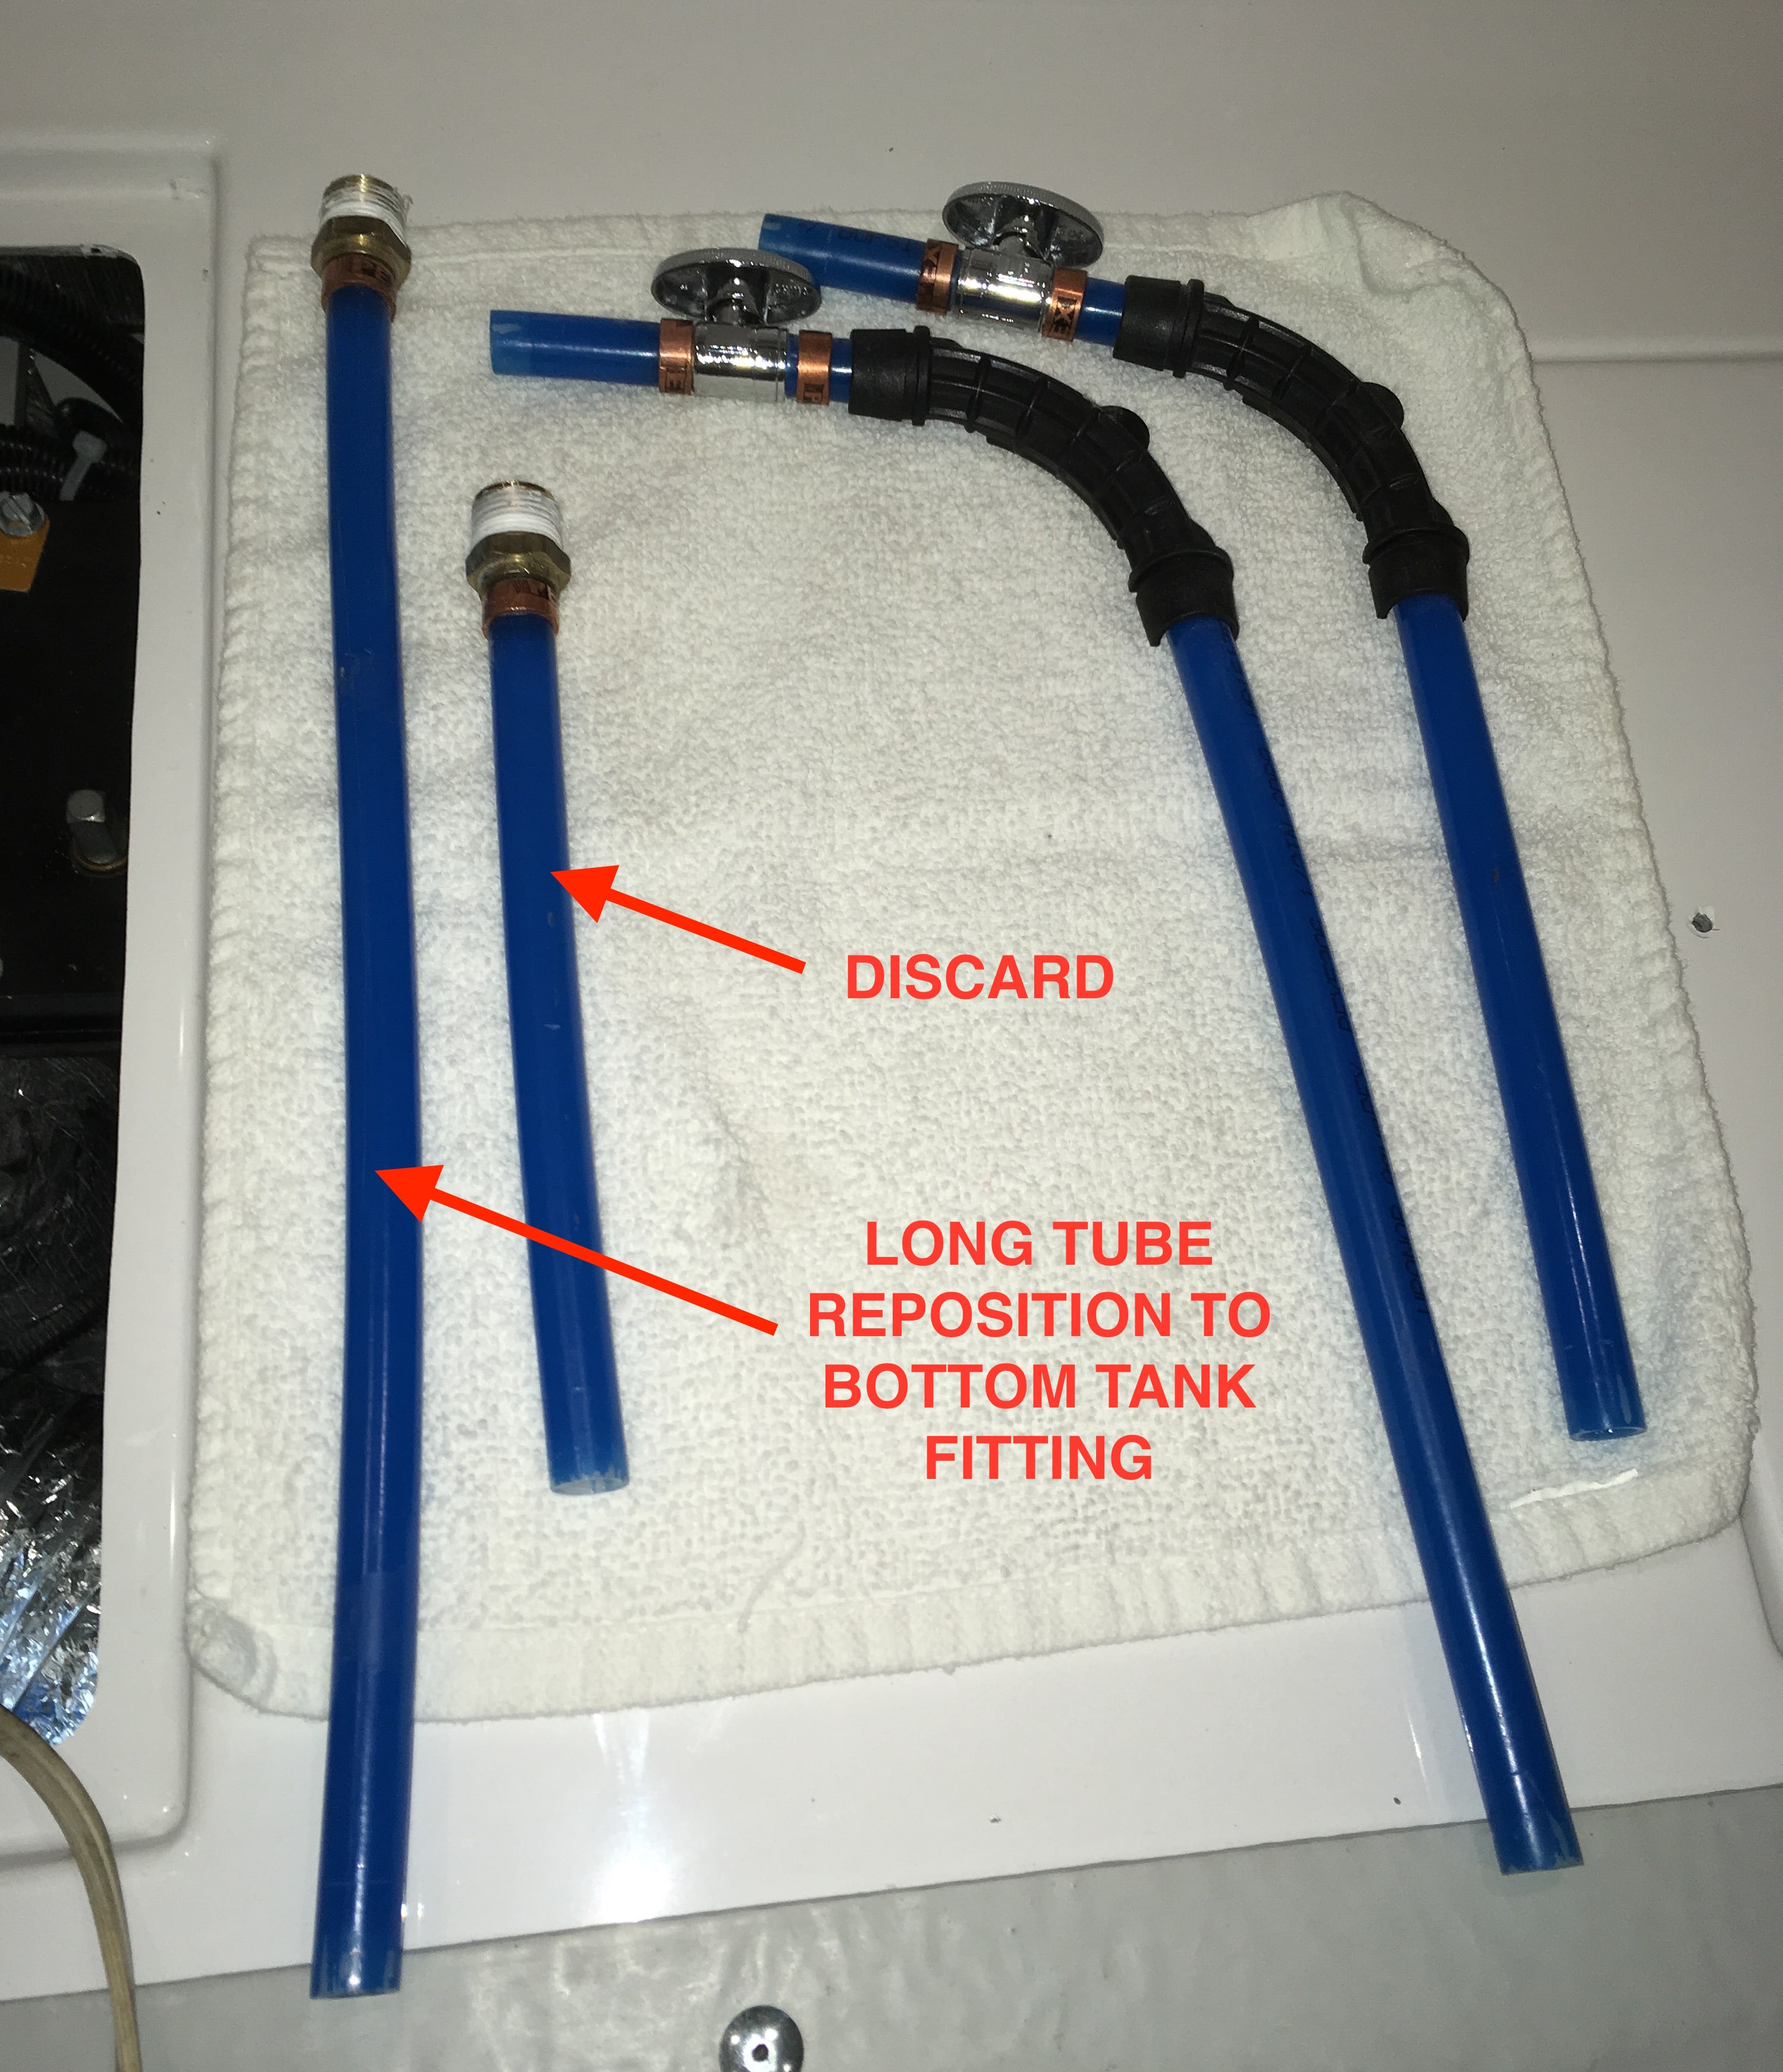
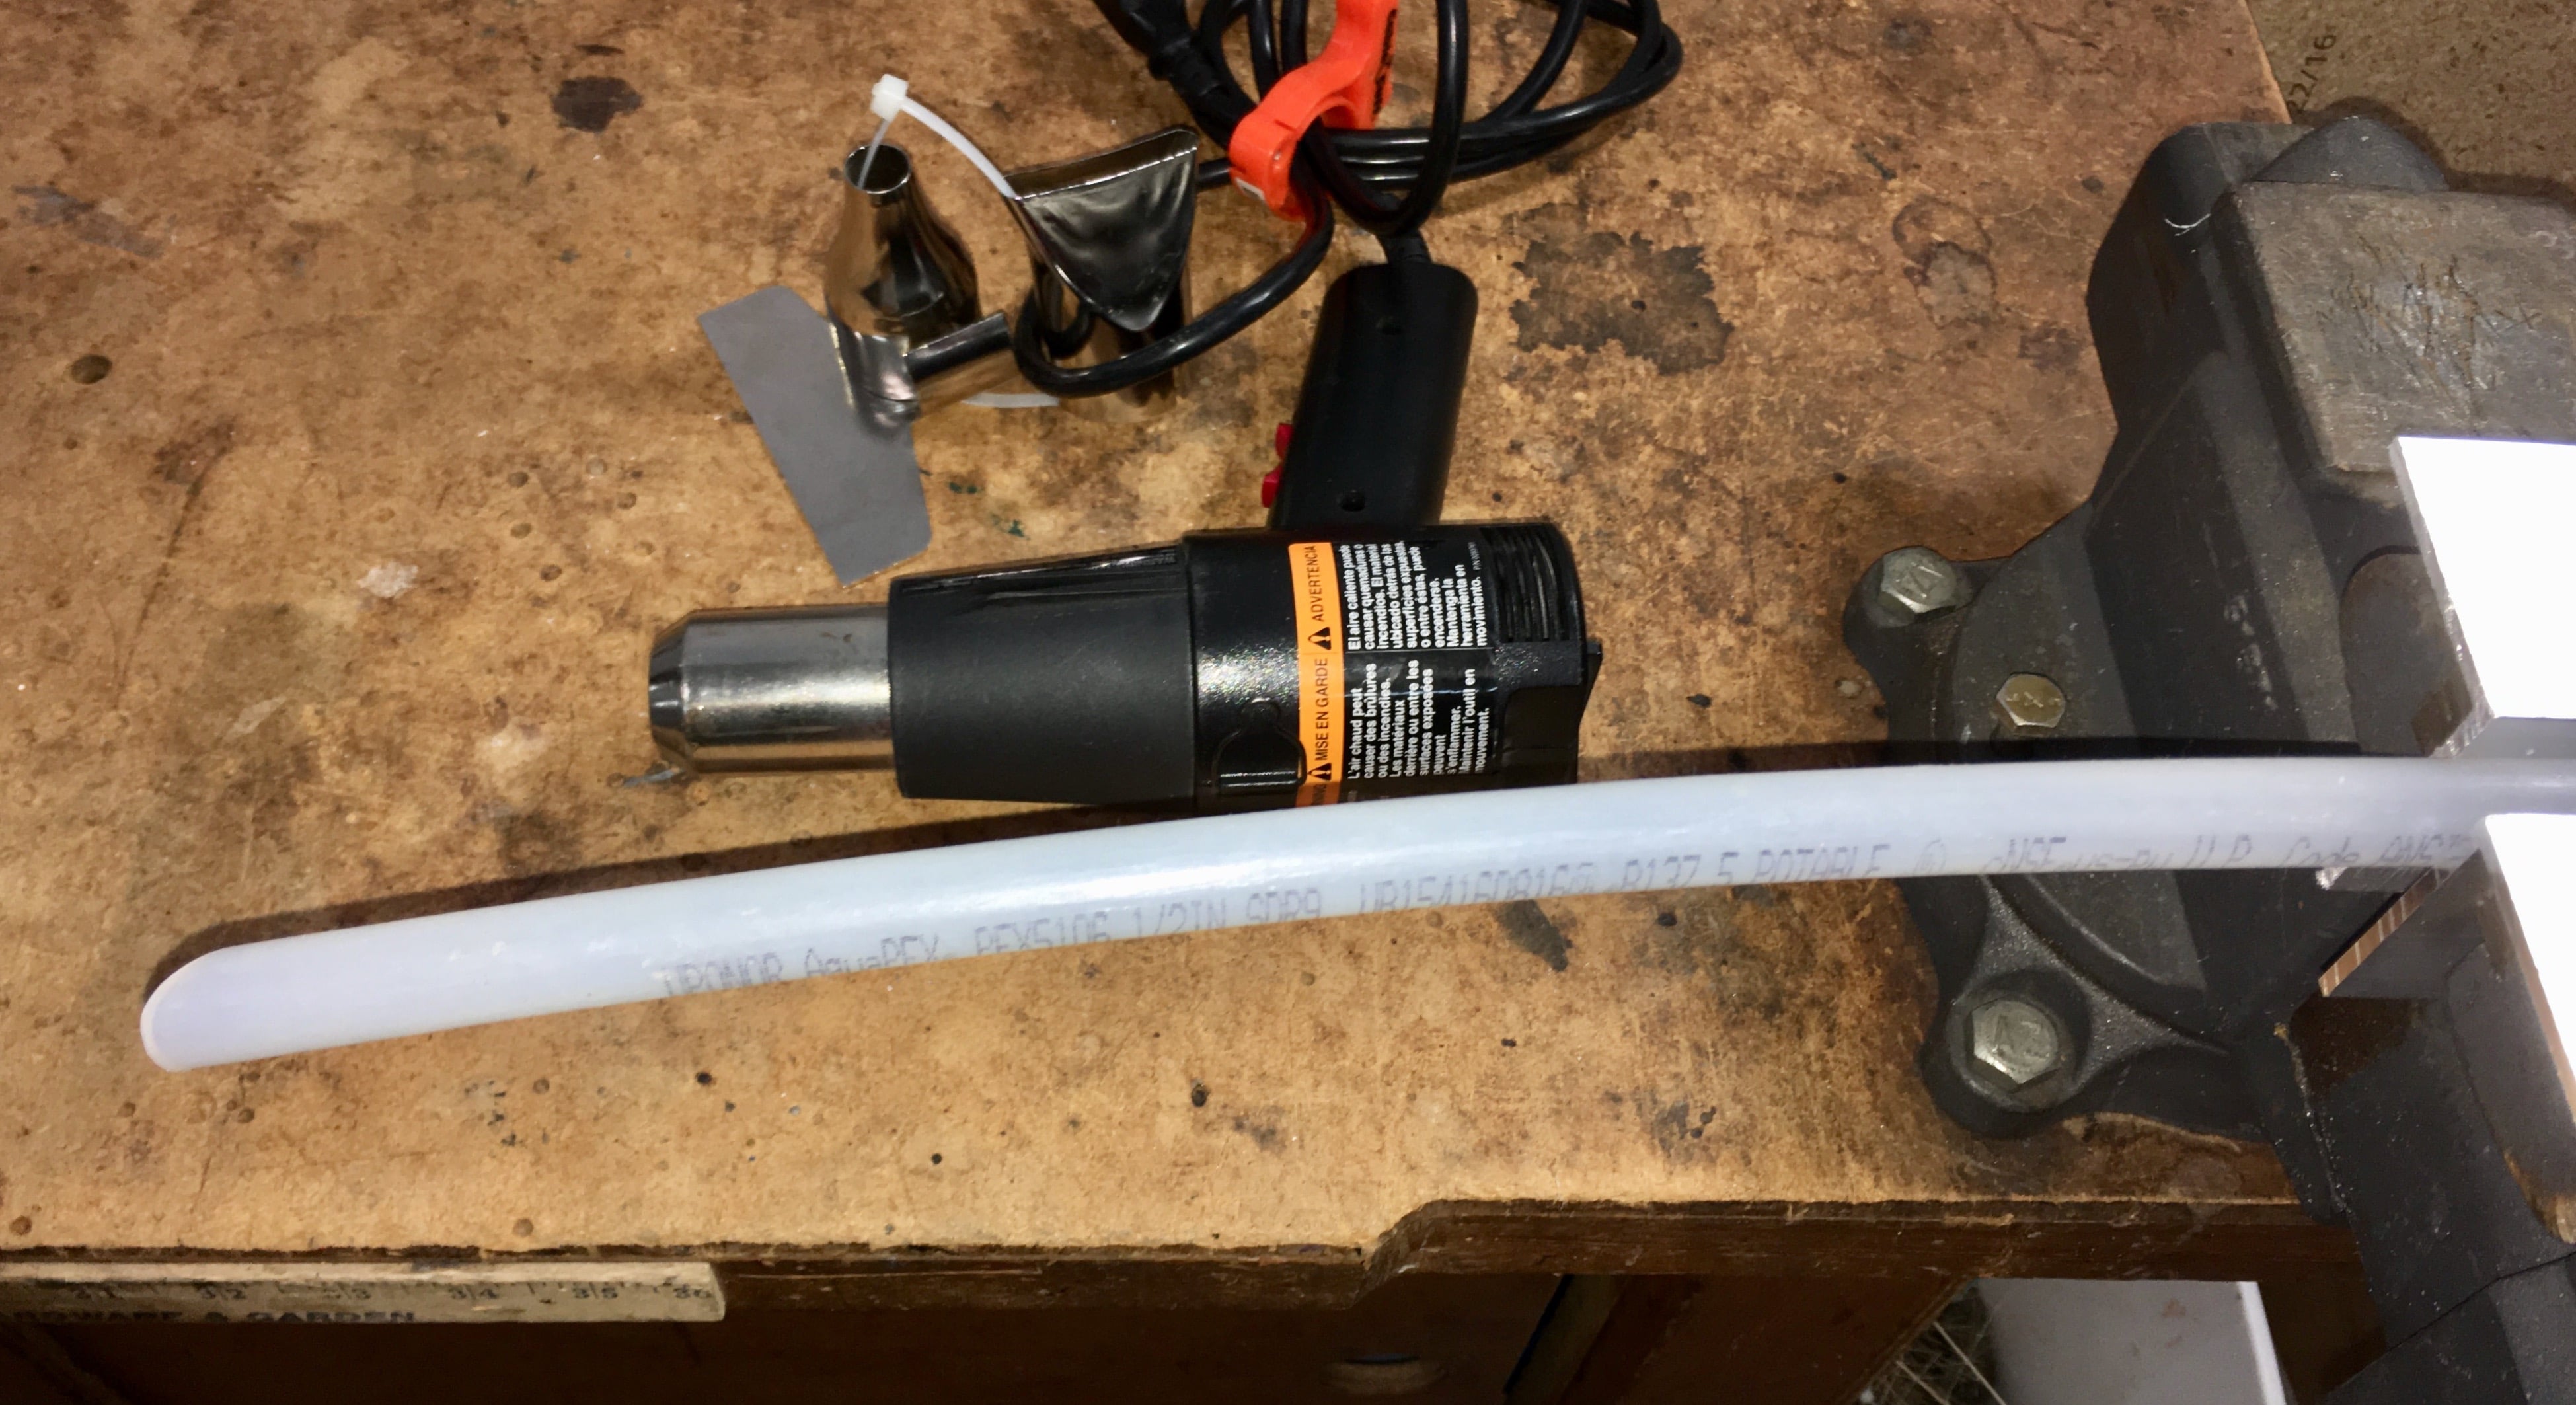
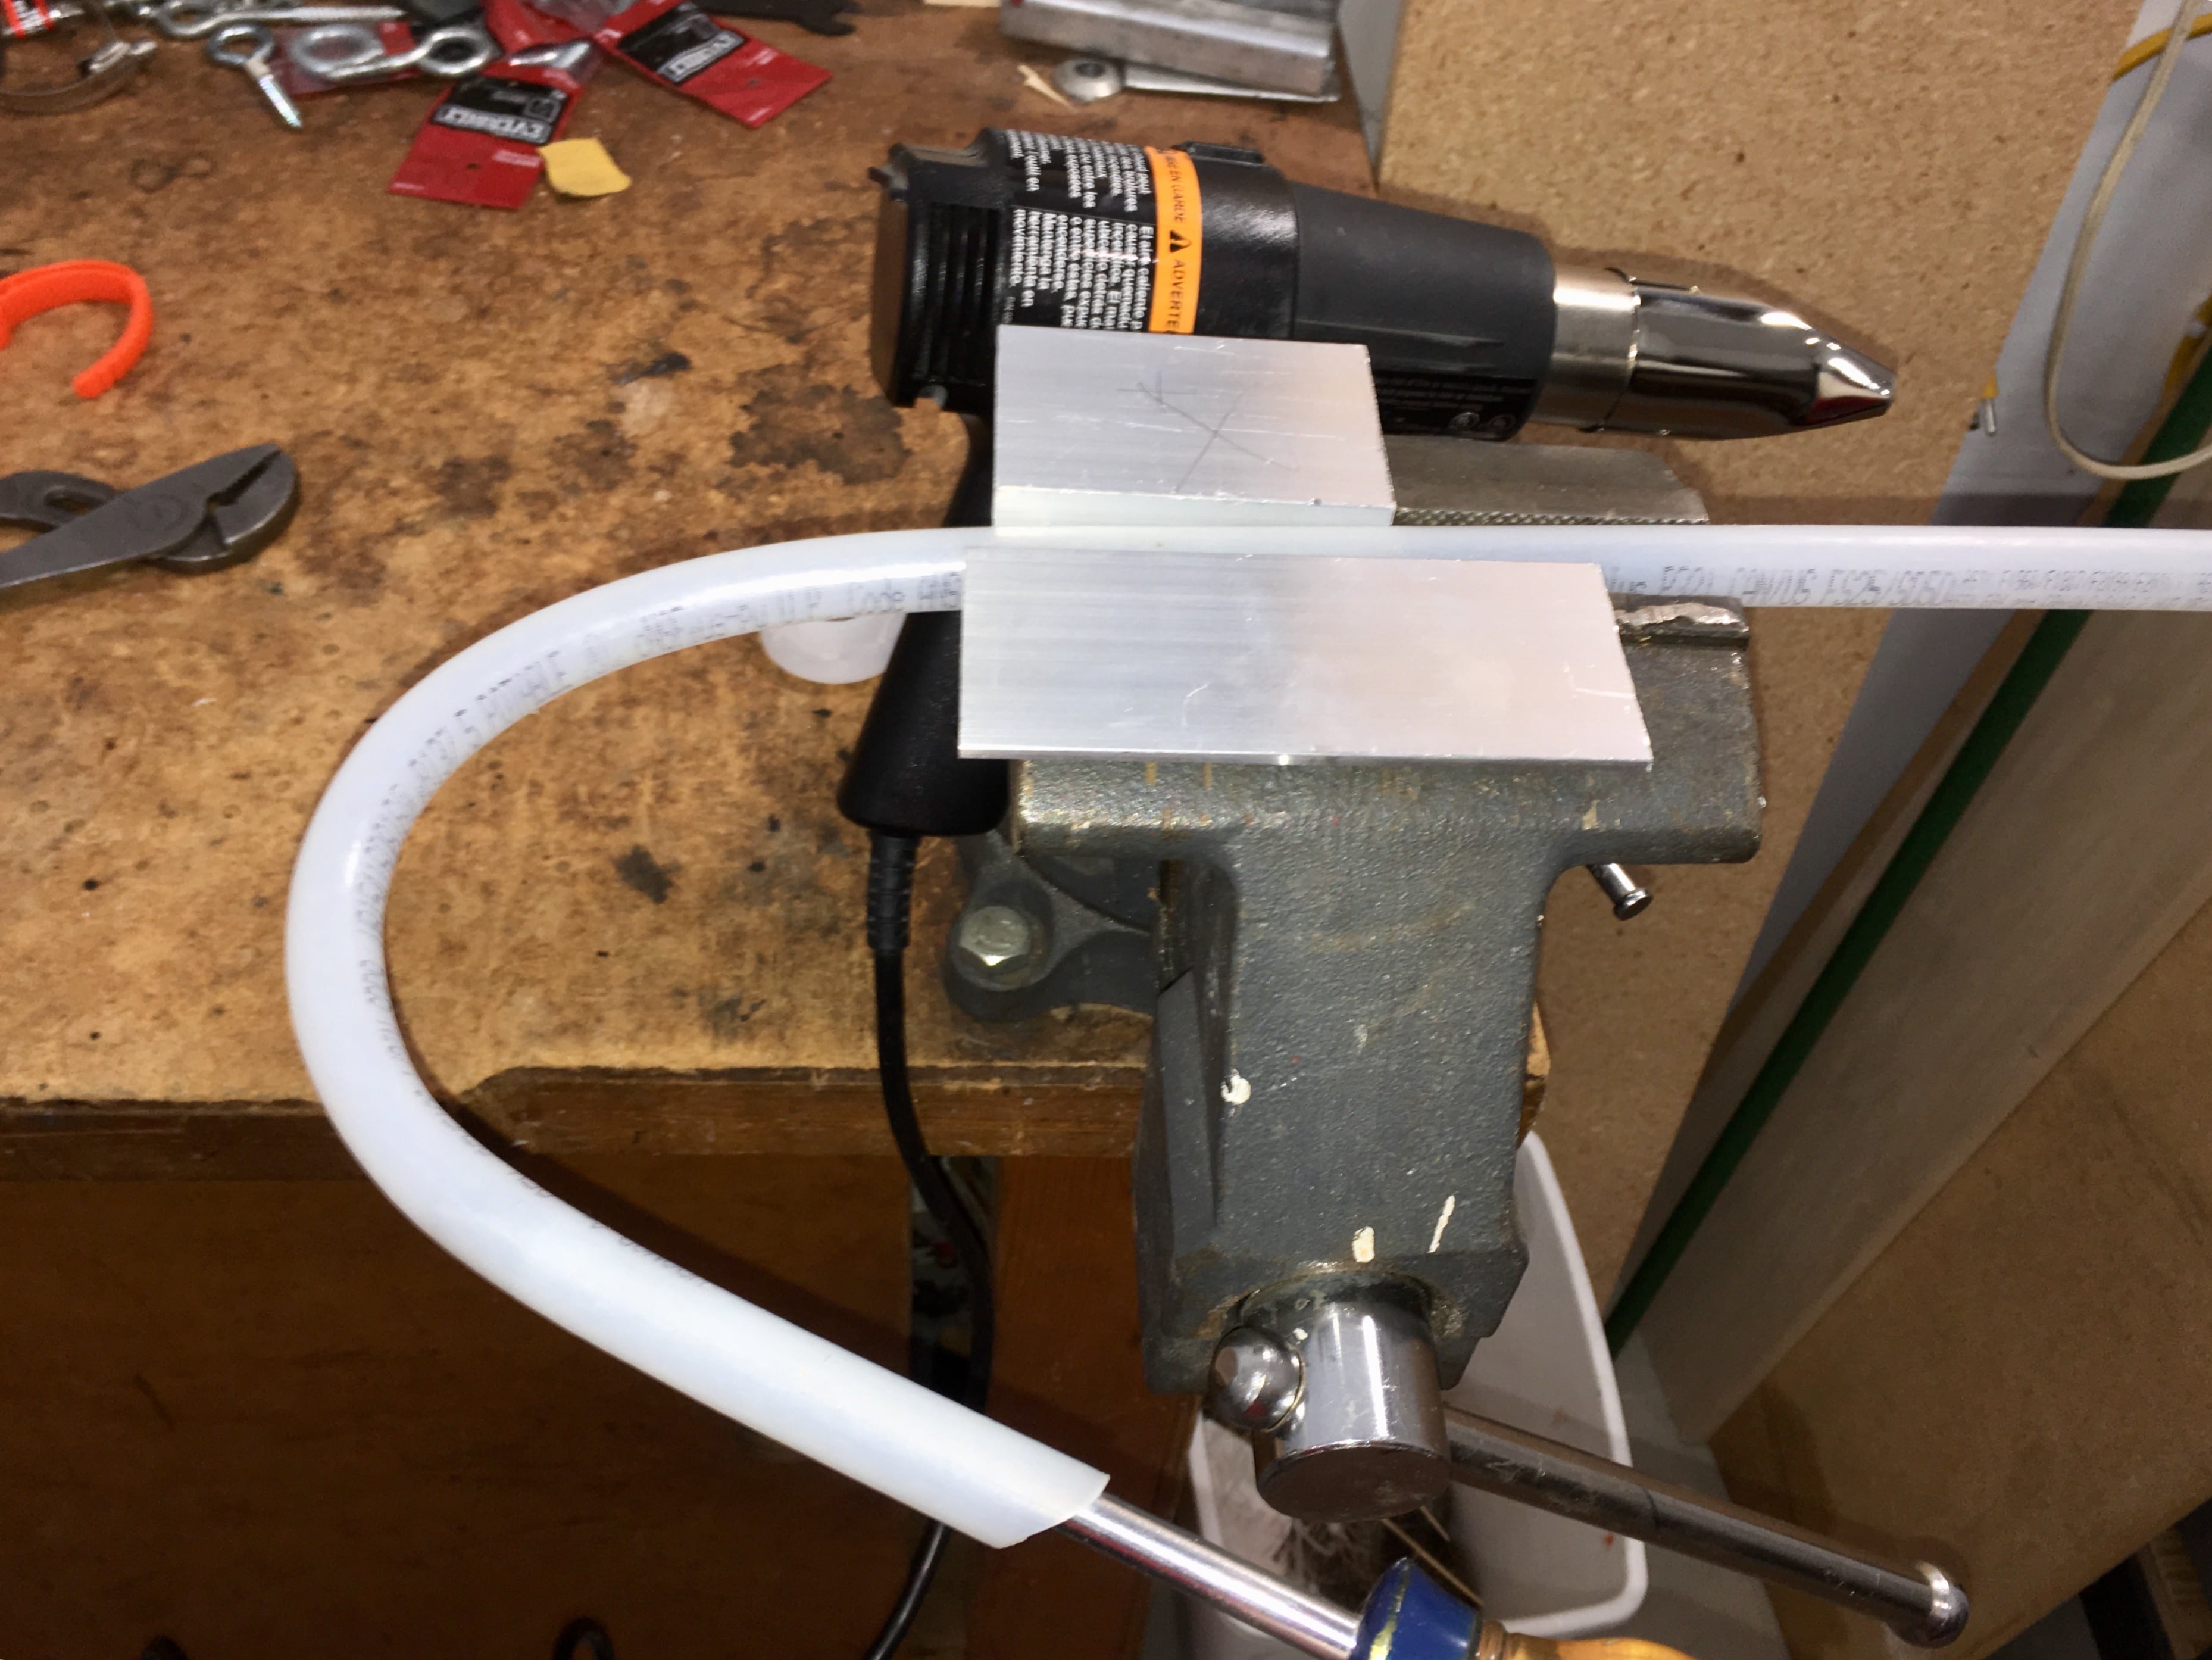
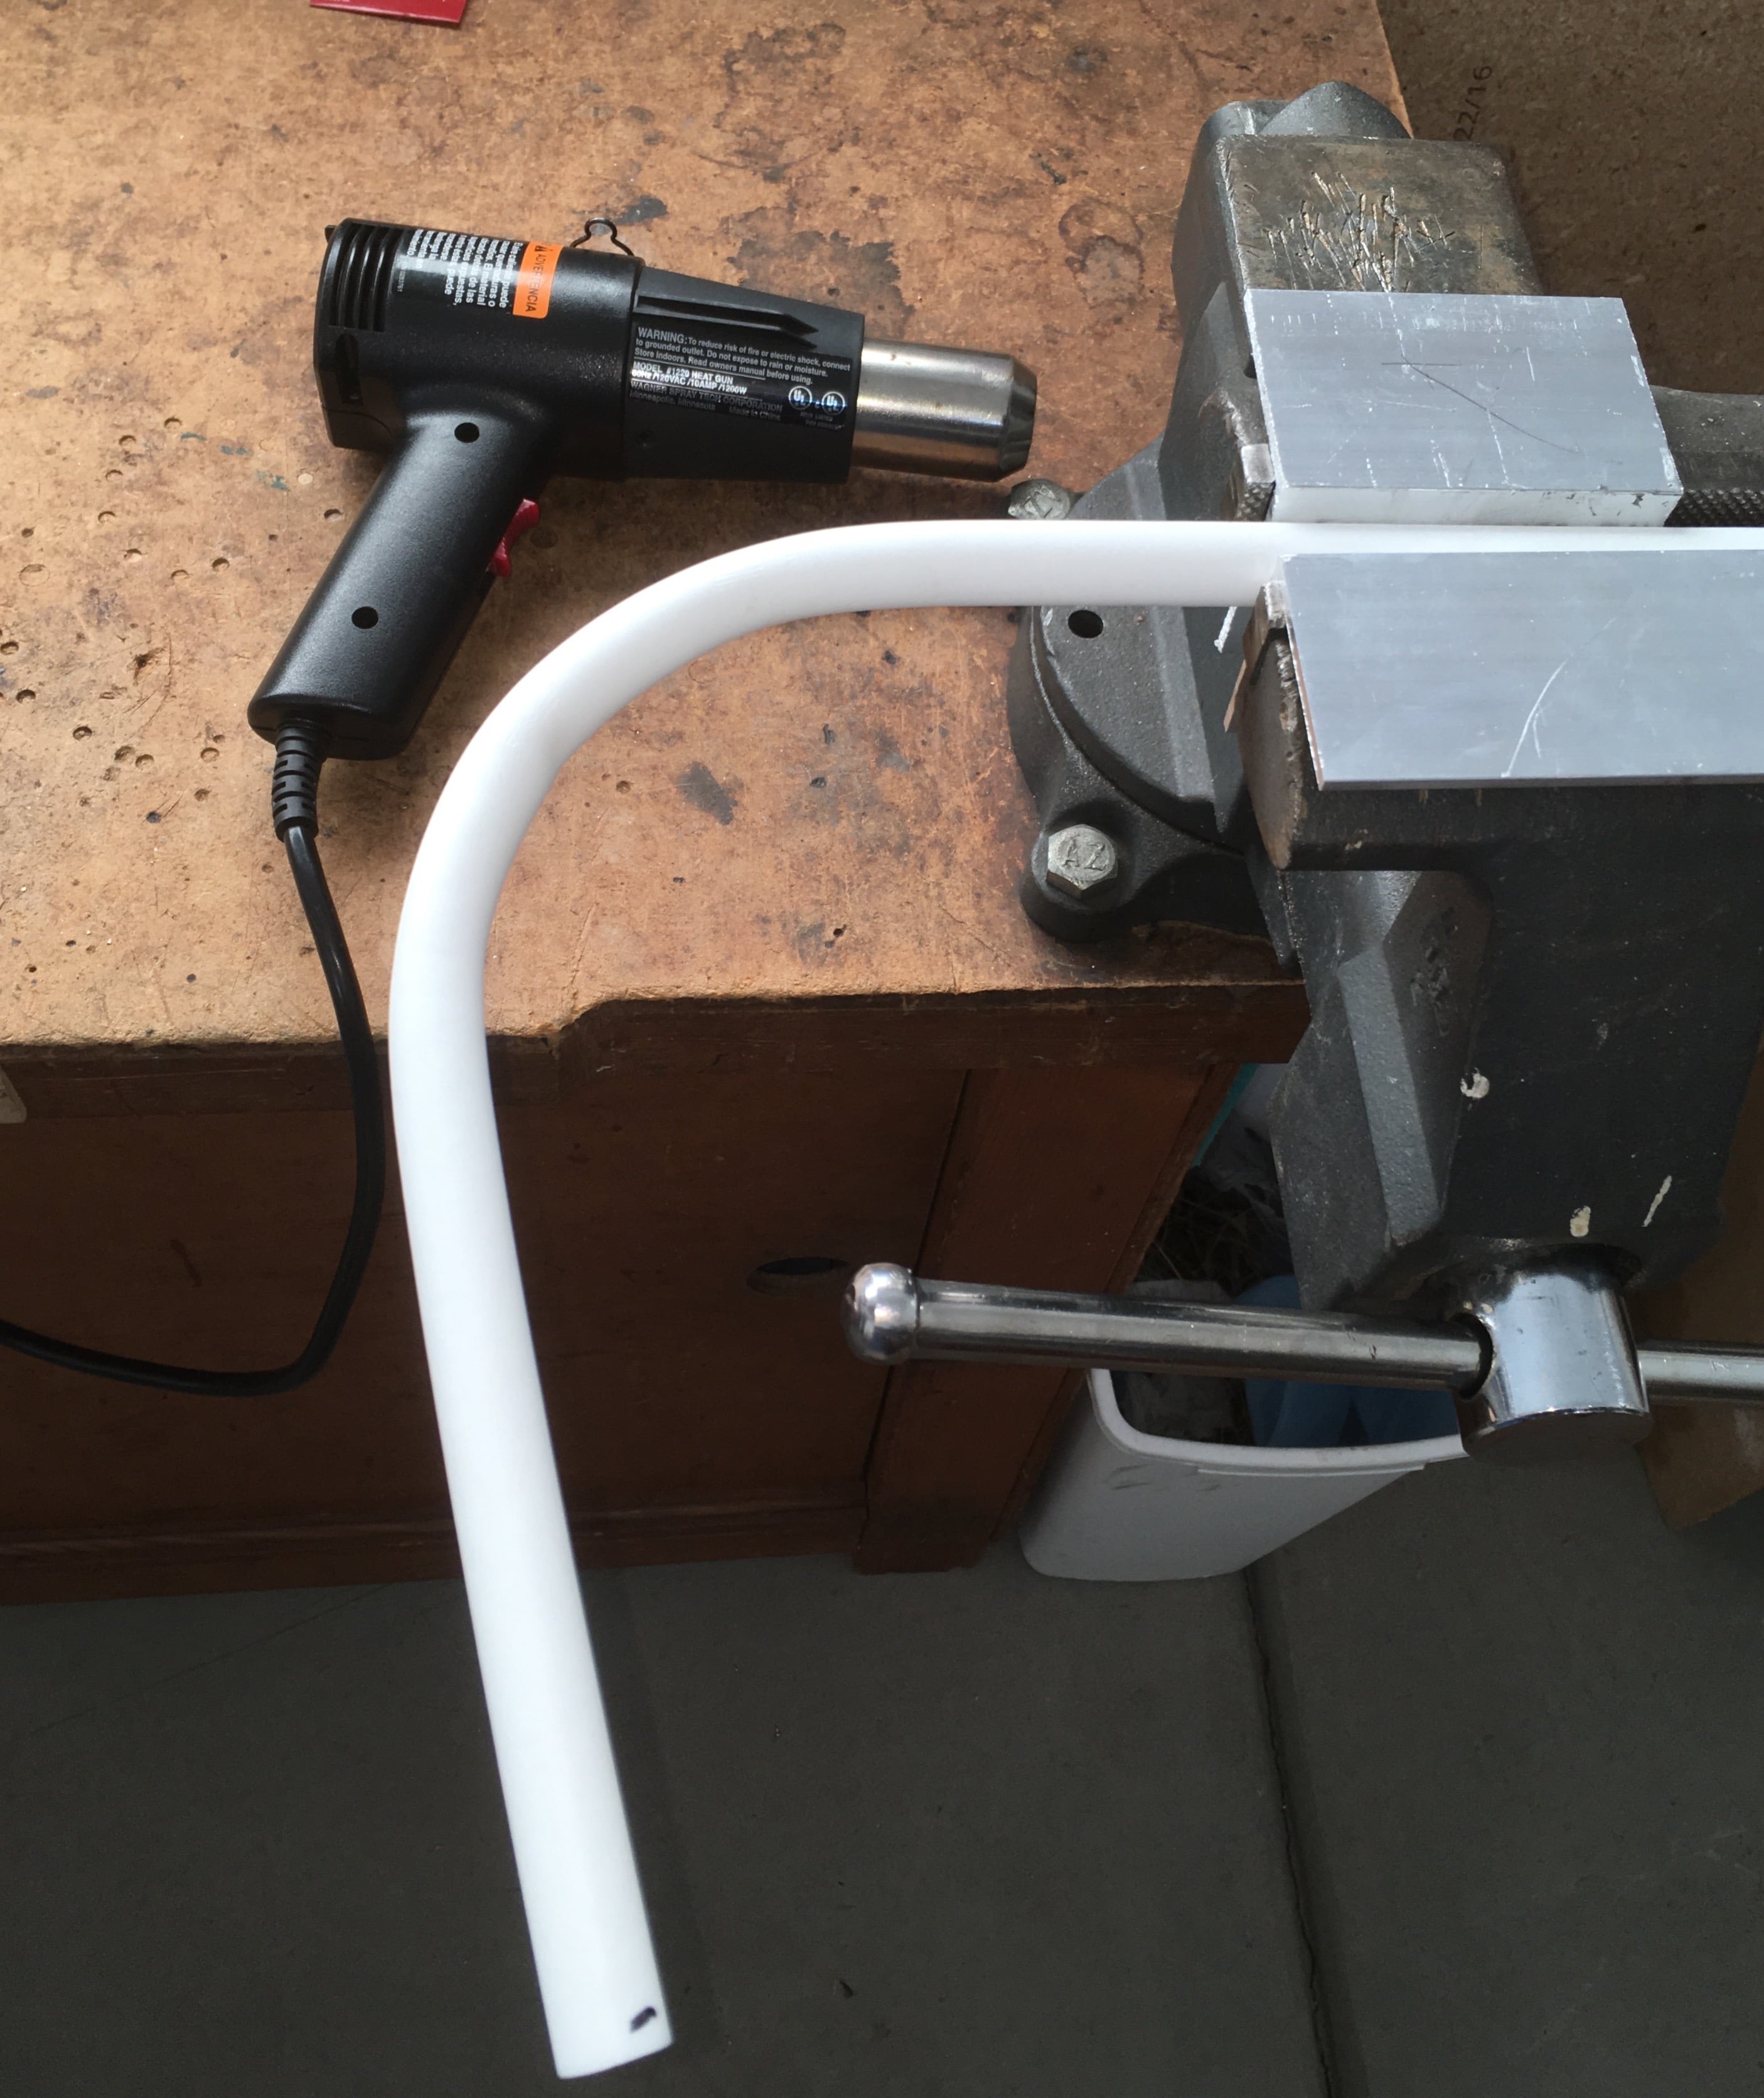
!!! NOTE: THIS MOD WORKS WELL ON MY ELITE II, HULL NUMBER 218. EARLIER HULLS THAT DO NOT USE QUICK RELEASE PLUMBING FITTINGS WILL BE MORE DIFFICULT. Even if your trailer has these newer fittings, your configuration may be slightly different which will require some re-design. As always, do this at your own risk. It will not void your factory warranty, but Oliver certainly will not help you with stuff that your altered from the factory configuration, without charging you for their labor. _____________________________________________ Here's the full installation, with pics. I will answer specific questions after I have finished, to avoid repetition and confusion.... I noticed that the two lines attached to the water tank are parallel and about three inches apart, the same spacing as the holes in the tank. After a lot of pondering, I decided to swap the lines so that: The lower Pump Suction/ Gravity Drain port becomes the Tank Fill port. The upper Tank Fill port becomes the Pump Suction/ Siphon Drain port. I think that this is an elegant solution since you can easily reposition the lines top to bottom, and also easily swap the two existing elbow sections that go vertically to the pump manifold. So the only fabrication involves making a new curved dip tube to go into the top hole, and a few unexpected but easily fixed problems associated with doing that. The system is not really changed except that the water now flows into the tank at the bottom, and the water is sucked off the bottom of the tank through the top port, and can also gravity siphon to drain it through the same line. And it is all easily (but not quickly) reversible to put the system back to "factory configuration". I would really rather have a new spin welded fitting on top, but I can always do that later if I decide it is necessary. I never understood why there are fittings on the side of the tank anyway. They are not needed and they just develop leaks. ALL functions of a fresh water tank system can be done through the top of the tank, where leakage risk is very minor. View of the original system, with the heat duct lying in the way. The heat duct is pulled up and to the outside and secured with long nylon cable ties. Access is pretty easy with it held there. The white arrows show direction of water flow. We will be REVERSING those. First and most important, manufacture the curved dip tube. Once that is made correctly, you can start disassembling lines and fittings. Clamp the 1/2 inch PEX hose in a vise, leave lots of its length extended to work with. You need a good hot heat gun, not a hair dryer, to get the plastic warmed up enough to soften and reform. Once cooled it will maintain its shape. Stick a big screwdriver in the end and carefully heat the curve over a span of about 6 inches, moving the heat gun back and forth and around so that you do not melt the plastic. If it starts to turn gray you are over heating. Apply pressure to force the bend, you will feel it start to move. Do this SLOWLY and always keep pressure on the screwdriver. The inside will try to kink as the outside stretches. That is OK unless it is major collapse, in which case you need to try on a new section of tubing. You will have to drastically over-bend the curve since it will spring back about 45 degrees when your are done. The hose will try to flatten. A little is OK, but you can squeeze it with pliers to force it back to a round shape. Keep heating the plastic! When you are happy with the curve, remove the heat and hold the screwdriver in place for at least a minute for the plastic to cool. release tension on the tool and the pipe will spring back to about 90 degrees, a little more is better than less. It took me two tries to get this right. I wanted about a 100 degree bend. Anything more and it will be hard to get into the tank opening. Less will move the pickup opening away from the rear wall of the tank, which is the most desirable spot. This is the finished shape. Elbow length is not critical, it needs to be at least five or six inches from the unmolested section. I cut the area that will lie near the bottom of the tank at a steep angle, to lower the top of the hole (which is the first place that will suck air). It is important to keep the angle steep, say no less than 60 degrees, since you do not want the cut to be perfectly parallel with the bottom of the tank, or it will suck down and block the opening when you turn on the pump. You want to scavenge as much water from down low as possible. I added scallops - vee shaped cuts - at a few places on the end to increase the opening size and also make it impossible for the tube to suck down hard against the bottom. They are probably not needed, but they will not hurt. The length of the straight section is not critical, leave it long since it will be trimmed after installation into the tank. More to come. John Davies Spokane WA
1 point
-
That looks like a viable fix John. While looking at mine it seemed really hard to get to the side fittings as you've done. What tubing is that? PEX? If PEX, how did you get the permanent "90" in it. Just a suggestion about the teflon tape: It might be better to use something like Rectorseal #5 as I showed in my photos because teflon relies on a permanent clamping force to not leak and the plastic tank fittings can relax. Also, the fittings can crack with not much force and you'll have a leak that will be very hard to fix. The rectorseal sets to a stiff but sticky glue that is compatible with drinking water and plastic, but doesn't require a lot of constant pressure on the fitting to seal. Looking for your update on the process.1 point


-
Recent Achievements
-


")


")


